
Пользователи Windows 10 и Windows 11 могут заметить высокую нагрузку на диск, а в редких случаях — процессор со стороны процесса CompatTelRunner.exe или Microsoft Compatibility Telemetry в диспетчере задач, что не всегда приятно сказывается на работе системы.
В этой короткой инструкции о том, что за процесс CompatTelRunner.exe и как его отключить при необходимости.
Назначение CompatTelRunner.exe
Процесс CompatTelRunner.exe — один из процессов, относящихся к функциям телеметрии Windows 10/11, периодически включающийся для отправки данных об использовании системы, связанные, судя по названию Microsoft Compatibility Telemetry, с теми или иными аспектами совместимости ПО (официальной информации на этот счёт мне найти не удалось).

Исполняемый файл процесса располагается в системной папке C:\Windows\System32, если расположение иное (можно нажать по процессу правой кнопкой мыши и выбрать пункт «Открыть расположение файла»), это должно вас насторожить: имеет смысл проверить файл, например, на VirusTotal.
При штатной работе вы можете наблюдать более одного процесса CompatTelRunner.exe в диспетчере задач, а нагрузка на диск и процессор обычно незначительна и кратковременна: после выполнения задачи процесс закрывается сам. Но при необходимости процесс можно и отключить.
Как отключить CompatTelRunner.exe (Microsoft Compatibility Telemetry)
В Интернете можно встретить множество советов на тему отключения службы «Функциональные возможности для подключенных пользователей и телеметрия», отключения функций телеметрии в Параметрах Windows и реестре или использования сторонних программ для отключения телеметрии, таких как ShutUp10. Вы можете это сделать, но процесс CompatTelRunner.exe, в свою очередь, может продолжить запускаться.
Чтобы действительно отключить его запуск, используйте один из следующих способов.
Планировщик заданий
Основное действие, чтобы отключить запуск CompatTelRunner.exe — использовать планировщик заданий:
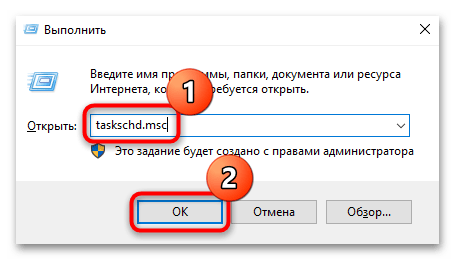
- Нажмите клавиши Win+R на клавиатуре или нажмите правой кнопкой мыши по кнопке «Пуск» и выберите пункт «Выполнить».
- Введите taskschd.msc в диалоговое окно «Выполнить» и нажмите Enter.
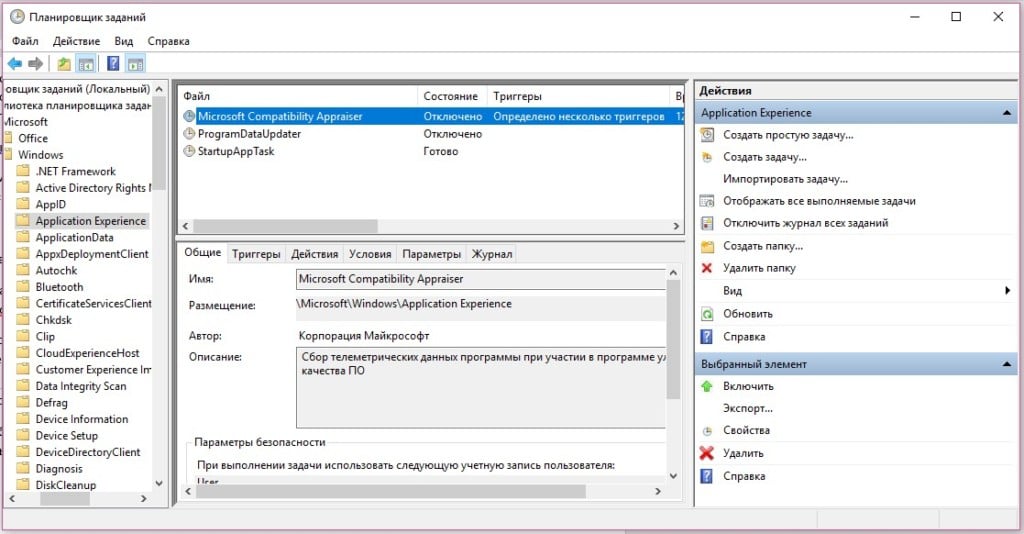
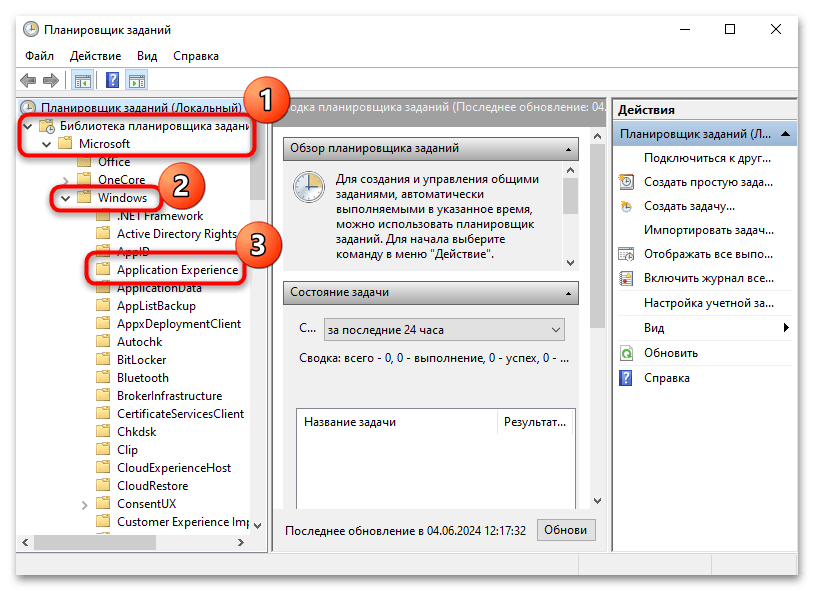
- В открывшемся планировщике заданий перейдите к разделу Библиотека планировщика заданий — Microsoft — Application Experience.
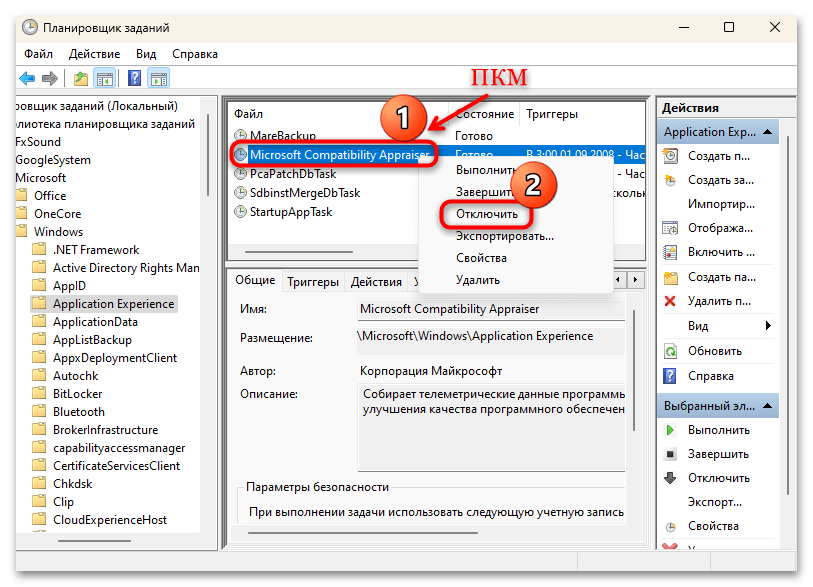
- Отключите три задания: Microsoft Compatibility Appraiser, ProgramDataUpdater и StartupAppTask, для этого можно нажать по ним правой кнопкой мыши и выбрать пункт «Отключить».


После этого CompatTelRunner.exe должен перестать запускаться. А если процесс уже запущен, можно снять задание в диспетчере задач.
Редактор реестра
Я не могу прямо рекомендовать этот метод, но он работает. Суть: не дать Windows найти параметры для запуска CompatTelRunner.exe, что предотвратит его запуск даже при запуске соответствующего задания. Необходимые шаги:
- Запустите редактор реестра: Win+R и ввести regedit в окно «Выполнить».
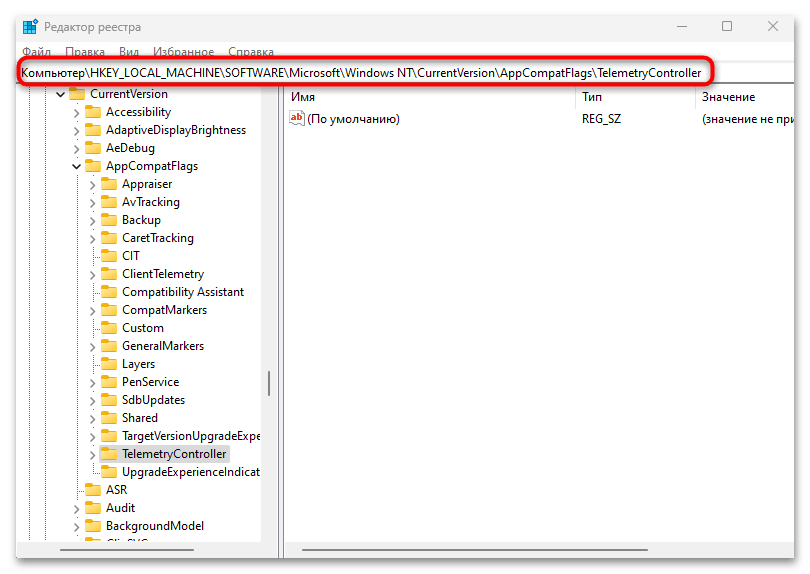
- Перейдите к разделу реестра
HKEY_LOCAL_MACHINE\SOFTWARE\Microsoft\Windows NT\CurrentVersion\AppCompatFlags\TelemetryController
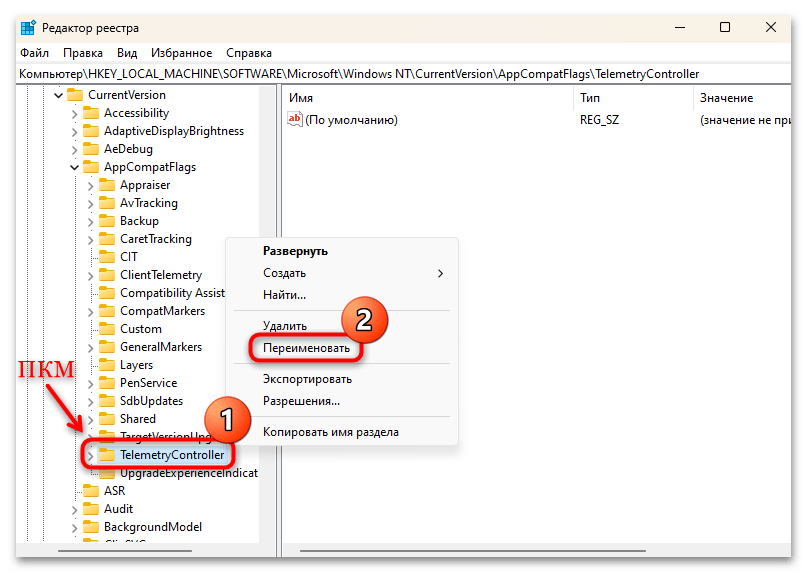
- Нажмите правой кнопкой мыши по разделу «TelemetryController» и переименуйте, например, добавив какую-то букву к концу названия раздела.

- Для отключения других функций телеметрии зайдите в раздел реестра
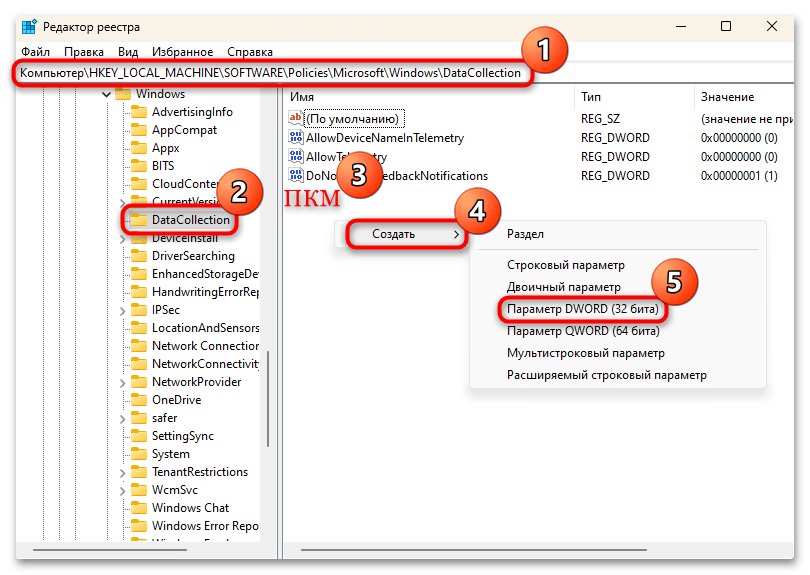
HKEY_LOCAL_MACHINE\SOFTWARE\Policies\Microsoft\Windows\DataCollection
нажмите правой кнопкой мыши в правой панели редактора и создайте новый параметр DWORD с именем AllowTelemetry и значением 0.
- Закройте редактор реестра и перезагрузите компьютер.

В результате несмотря на то, что будет создан новый раздел TelemetryController, он будет пустым, а запуск Microsoft Compatibility Telemetry выполняться не будет.
Rick Akura
This article will cover why the CompatTelRunner.exe process is running high CPU usage and how to stop it.
If you’re using Windows 10 and CompatTelRunner.exe is taking up a lot of your CPU, it may be time to figure out what’s going on. CompatTelRunner.exe is used when you’re updating Windows. It’s also the process that handles diagnostics for compatibility when Windows 10 runs programs written for previous versions of Windows.

If this process has high CPU usage, then there can be some serious problems with your computer. For example, it might slow down your device and make it sluggish to use. In rare cases, it may even run you dry of resources and cause a system crash. This could result in losing your work or important files.
In this article, we will detail how to fix CompatTelRunner high CPU usage in Windows 10 so you don’t have any more headaches!
Table of Contents
- What causes CompatTelRunner.exe to have high CPU usage?
- Solved: CompatTelRunner high CPU usage
- Method 1. Fix corrupted system files
- Method 2. Remove CompatTelRunner.exe from your computer
- Method 3. Disable CompatTelRunner.exe in the Task Scheduler
- Method 4. Make an edit in the Registry
- Method 5. Disable Microsoft Compatibility Telemetry in Group Policy
- Method 6. Change your Feedback & diagnostics setting
- Method 7. Disable relevant services
- Final thoughts
What causes CompatTelRunner.exe to have high CPU usage?
There are a few different reasons why CompatTelRunner.exe may have high CPU usage on your Windows computer. Usually, it’s an error with the Windows Telemetry service itself. Some other issues may include:
- Corrupt system files
- Badly configured services
- A recent Windows 10 update bug
- Outdated operating system
- Microsoft Compatibility Appraiser is enabled
- Malware infection
Luckily, whatever caused the high CPU usage, you can easily fix it by applying one of our troubleshooting methods below! You’ll get your device back to functioning properly in no time.
Solved: CompatTelRunner high CPU usage
Here are the solutions to CompatTelRunner.exe high CPU usage you can try in order to restore your computer and performance!
Method 1. Fix corrupted system files
Corrupt system files are the most common cause for this error. You can easily restore all damaged files with a utility found in Windows 10 itself, called the System File Checker; SFC scan for short. This tool checks for all of your system files, takes note of any missing or corrupted ones, and replaces them with the default unaltered files.
By running the SFC scan, you’ll restore all possibly corrupt or missing system files on your device, which may lead to fixing the high CPU usage of the CompatTelRunner process.
- Open the search bar in your taskbar by clicking on the magnifying glass icon. You can also bring it up with the Windows + S keyboard shortcut.
-
Type Command Prompt in the search box. When you see it in the results, right-click on it and choose Run as Administrator. If you’re using a local account that doesn’t have administrator permissions, click here first.

- When prompted by the User Account Control (UAC), click Yes to allow the app to launch with administrative permissions.
-
Type in the following command and press Enter to execute it: sfc /scannow
- Wait for the System File Checker to finish scanning your computer. In the case of a discrepancy, the utility will restore system files and fix all errors related to them.


Method 2. Remove CompatTelRunner.exe from your computer
Since this issue is directly related to the CompatTelRunner.exe file, you can fix it by taking ownership of the file and then deleting it.
- Press the Windows + R keys on your keyboard. This is going to bring up the Run utility. Type in C:\Windows\System32 and click on the OK button. This will open up a File Explorer window in the correct location.
- When you find the CompatTelRunner.exe file, right-click on it to bring up a context menu and select Properties from that list of options.
- A new window will appear. Here, switch to the Security tab, and then click on the Advanced button to access special permission and settings.
- Click on the Change link next to the current owner of the CompatTelRunner.exe file, which should be TrustedInstaller. You’ll need administrative permissions to be able to do this.
- Type Administrators in the Enter the object name to select field, then click on the Check Names button. The system should automatically input the full name. When done, click the OK button.
- Afterwards, select the administrator group, and click on the Edit button. A new window should open up.
- Click on Select a principal and choose the Administrators group like you did in Step 5. Place a checkmark next to the Full Control option to grant administrator accounts full permissions to the folder and its files.
- Click the OK button twice to save your changes and exit the advanced properties window. Now, you should be able to right-click on the CompatTelRunner.exe and pick Delete from the context menu.
- Restart your computer and see if there are any improvements to your CPU usage and performance.
Method 3. Disable CompatTelRunner.exe in the Task Scheduler
Another way of fixing this problem is by disabling the Microsoft Compatibility Appraiser in your Task Scheduler. By doing so, you’re telling Windows 10 that you don’t want this service running, which will stop it from consuming any resources on your computer.
- Press the Windows + R keys on your keyboard. This is going to bring up the Run utility. Type in “taskschd.msc” without the quotation marks and press the Enter key on your keyboard.
- Using the left-side pane, navigate to the Library > Microsoft > Windows > Application Experience location.
- In the middle area, right-click on any of the tasks labeled Microsoft Compatibility Appraiser, and then choose the Disable option from the context menu.
- Reboot your computer and see if this helped your issue with the CompatTelRunner.exe process using too much CPU.
Method 4. Make an edit in the Registry
The Registry is your one-stop-shop for system customization on the deepest level. You can use it to customize Windows down to each and every app and service, — you can even create new rules for your computer to follow! This is what we’ll be doing in this guide.
By taking advantage of the Registry Editor, you can create a new key which disables the Telemetry service directly related to the CompatTelRunner process.
- Press the Windows + R keys on your keyboard. This is going to bring up the Run utility. Type in “regedit” without the quotation marks and press the Enter key on your keyboard. This will launch the Registry Editor application.
- Use the Navigation pane to reach the following Registry key, or use the address bar and copy-paste the file’s location:
HKEY_LOCAL_MACHINE\SOFTWARE\Policies\Microsoft\Windows\DataCollection
3. Right-click on any empty space in the right pane, and then select New > DWORD (32-bit) Value from the context menu that appears.
4. Name the new value “Allow Telemetry” and press the Enter key to create it. You may need to have an administrator account to be able to perform this step!
5. Double-click on the value you just made, and then set its value to 0. Click OK and reboot your computer.
Method 5. Disable Microsoft Compatibility Telemetry in Group Policy
Another way of turning off the frustrating Telemetry service is by using the Group Policy. Here’s what you need to do in order to fix the high CPU usage of the CompatTelRunner.exe process in Windows when using the Group Policy interface.
- Search for Group Policy in your search box, and click on Edit group policy from the search results.
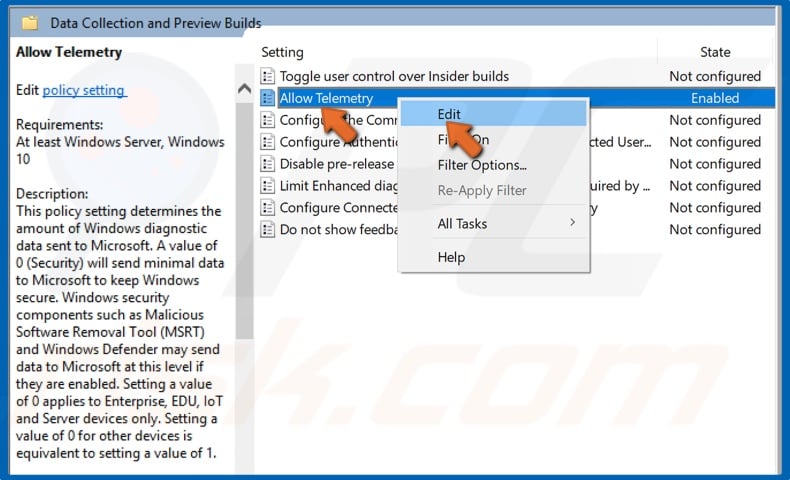
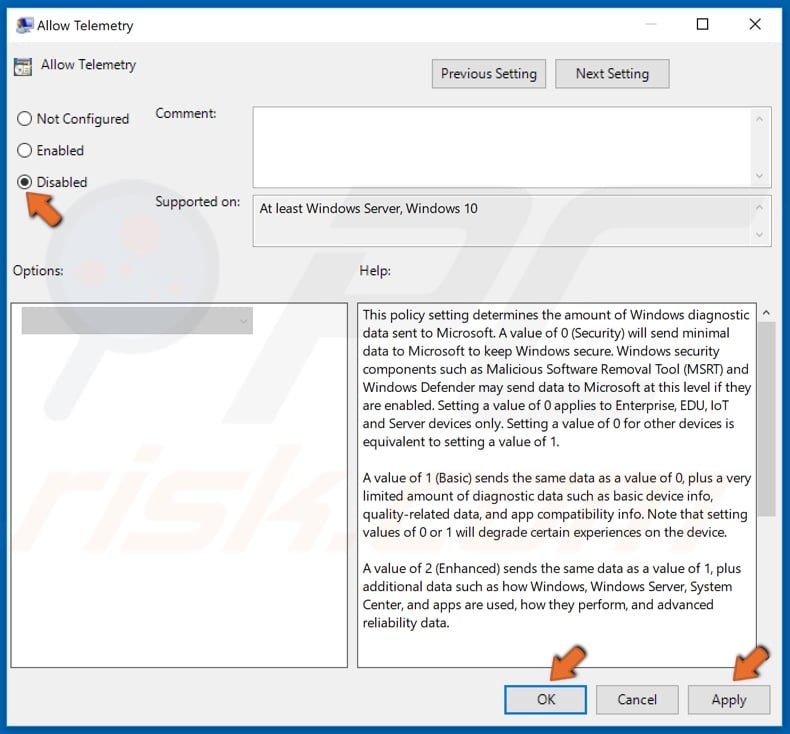
- Navigate to the following location within the Group Policy window: Computer Configuration > Administrative Templates > Windows Components > Data Collection and Preview Builds.
- Double-click on the Allow Telemetry entry.
- Select the Disable option, and then click OK. Make sure to reboot your computer to make the change final, and then monitor your CPU usage.
Method 6. Change your Feedback & diagnostics setting
Oftentimes, problems like this require complex troubleshooting steps that could be confusing for some, especially beginners. If you’ve never done troubleshooting before, definitely give this method a try — a simple setting change may do the trick in restoring your device’s performance.
- Open the search bar in your taskbar by clicking on the magnifying glass icon. You can also bring it up with the Windows + S keyboard shortcut. Type in Feedback and Diagnostics and launch the system settings from the matching results.
- Make sure that you have “Basic: Send only info about your device, its settings and capabilities, and whether it is performing properly.” instead of any other option in the Diagnostic data section.
- Restart your computer and check if your situation with the high CPU usage has been resolved after making this change.
Method 7. Disable relevant services
If none of the methods above seem to work, there’s one more thing you can try. You could try to disable any services relevant to CompatTelRunner and this might fix problems with high CPU usage when those particular processes are running on your system.
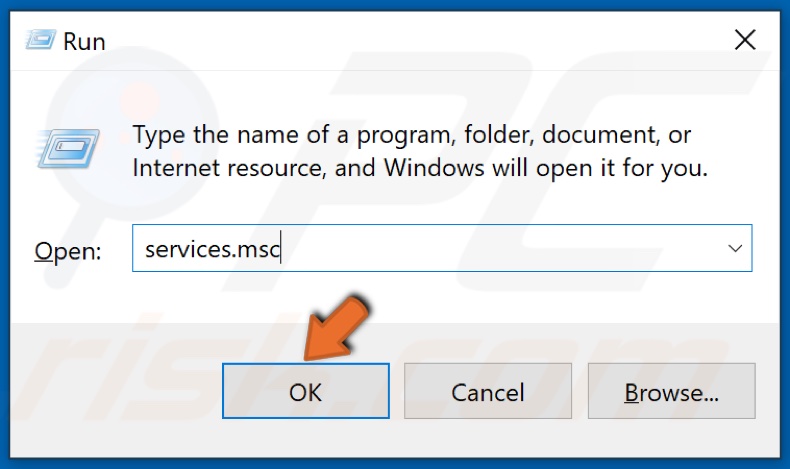
- Press the Windows + R keys on your keyboard. This is going to bring up the Run utility. Type in “services.msc” without the quotation marks and press the Enter key on your keyboard. This will launch the Services application.
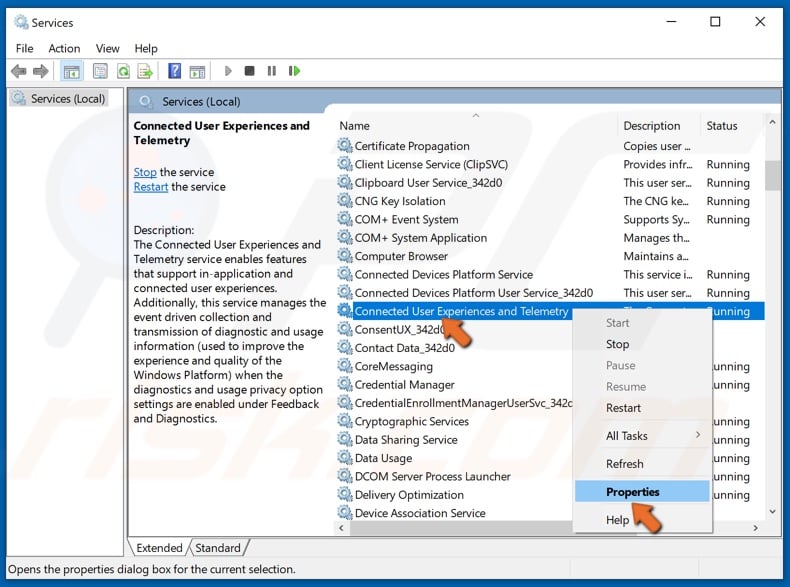
- Right-click on the Connected User Experiences and Telemetry service, and then select Properties from the context menu. A new window should open.
- In the General tab, make sure that you set the Startup type to Disabled. This is going to completely block this service from starting the next time you boot your computer.
- Click OK and restart your system. The next time you boot, monitor your CPU usage and see if the CompatTelRunner.exe file still uses high resources.
Final thoughts
Our team of experts are always available to answer any questions or concerns! Contact us by email, live chat, and phone every day of the week.
Get early access to our blog posts, promotions, and discount codes when you subscribe to our newsletter! You’ll get the best price on all products we offer at SoftwareKeep. Want more articles from us? Check out our blog page for more tech articles updated regularly!
Recommended articles
» How to Fix Windows Modules Installer Worker High CPU on Windows 10
» How To Fix Windows Driver Foundation High CPU on Windows
» How To Fix Antimalware Service Executable (MsMpEng) High CPU Usage
For more articles, check out our Blog and Help Center!
How to Fix Microsoft Compatibility Telemetry (CompatTelRunner.exe) High CPU and Disk Usage
Microsoft Compatibility Telemetry is a Windows system service responsible for collecting and sending usage and performance data to Microsoft. The problem is that some Windows 10 users have noticed that CompatTelRunner.exe causes high CPU and Disk usage. This article is dedicated to helping you fix this issue.
Even today, CompatTelRunner.exe is found in Windows 7 (with the latest updates), Windows 8.1, and Windows 10. It’s been known to cause high resource consumption in all three operating systems.
CompatTelRunner.exe is generally not CPU resource-intensive, but it may spike CPU and/or Disk usage to 100% for up to 20 minutes at startup. Also, some users have even reported encountering performance issues and application crashes.
The good news is that you can stop and disable Microsoft Compatibility Telemetry’s process at any time. You can disable the service from Scheduled Tasks, which is responsible for launching CompatTelRunner.exe on system startup.
Alternatively, you can disable the process using the Group Policy Editor or the Windows Registry Editor. All three methods achieve the same result.
Video Guide on How to Fix Microsoft Compatibility Telemetry High CPU and Disk Usage
Table of Contents:
- Introduction
- Solution 1. Switch Feedback and Diagnostics to Basic
- Solution 2. Disable Microsoft Compatibility Telemetry Using Task Scheduler
- Solution 3. Disable Microsoft Compatibility Telemetry Using Group Policy Editor
- Solution 4. Disable Telemetry Using Windows Registry Editor
- Solution 5. Disable Connected User Experiences and Telemetry Service
- Video Guide on How to Fix Microsoft Compatibility Telemetry High CPU and Disk Usage
Download Computer Malware Repair Tool
It is recommended to run a free scan with Combo Cleaner — a tool to detect viruses and malware on your device. You will need to purchase the full version to remove infections. Free trial available. Combo Cleaner is owned and operated by Rcs Lt, the parent company of PCRisk.com read more.
Solution 1. Switch Feedback and Diagnostics to Basic
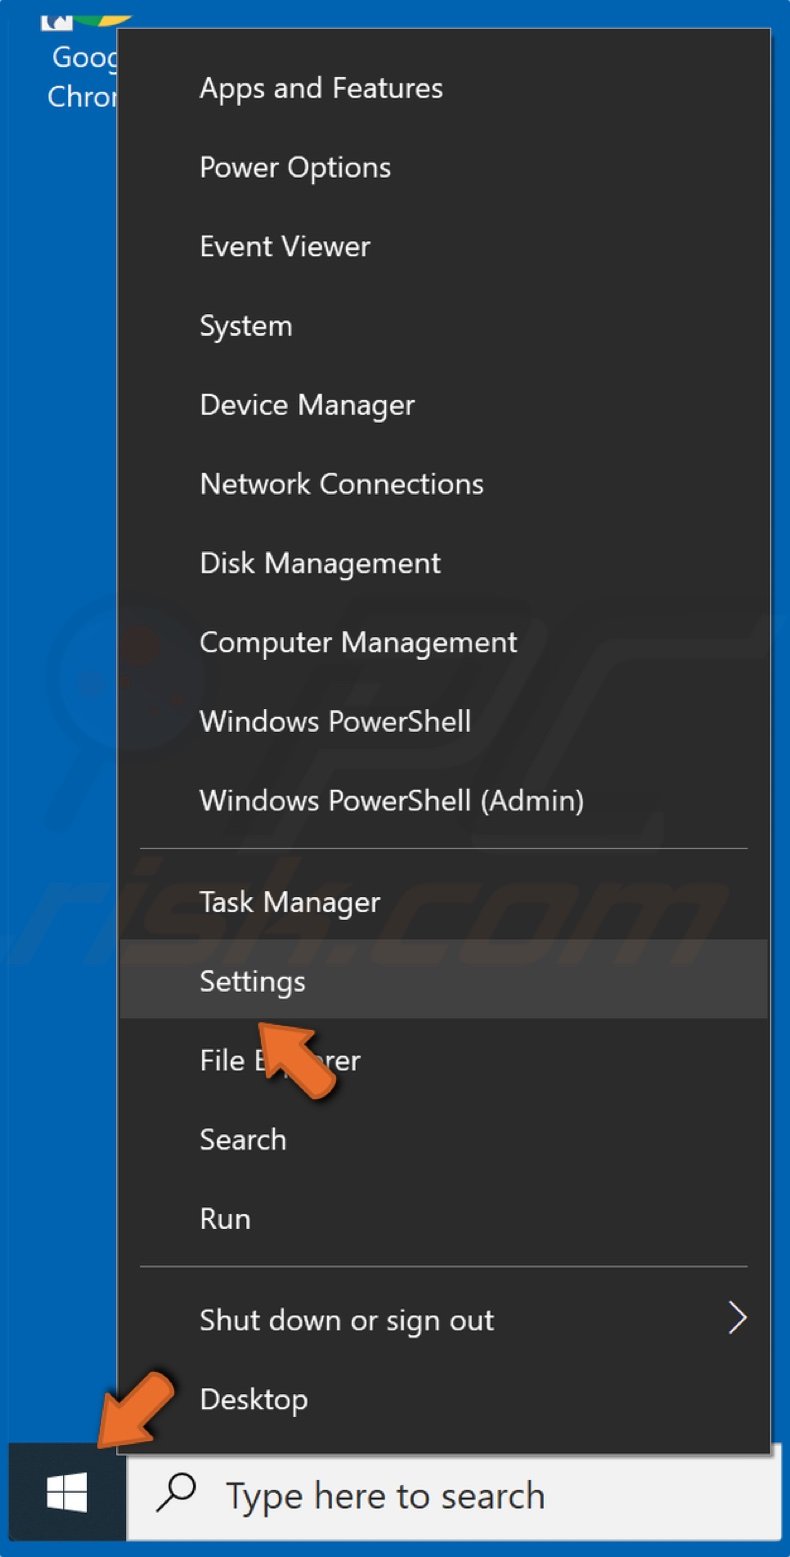
1. Right-click the Start Menu button and click Settings.

2. then, select Privacy.
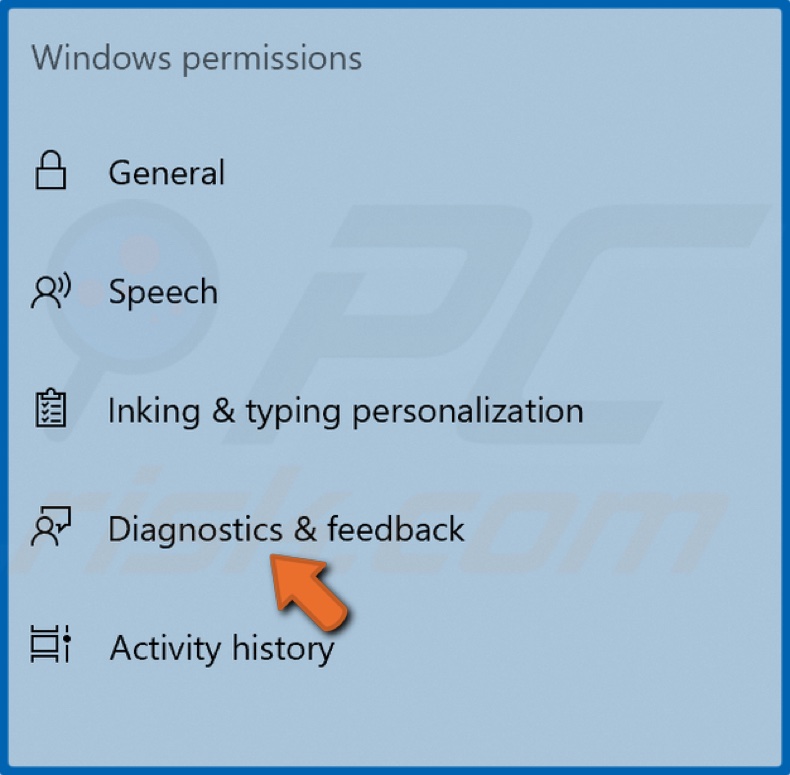
3. In the left pane, select Diagnostics & feedback.
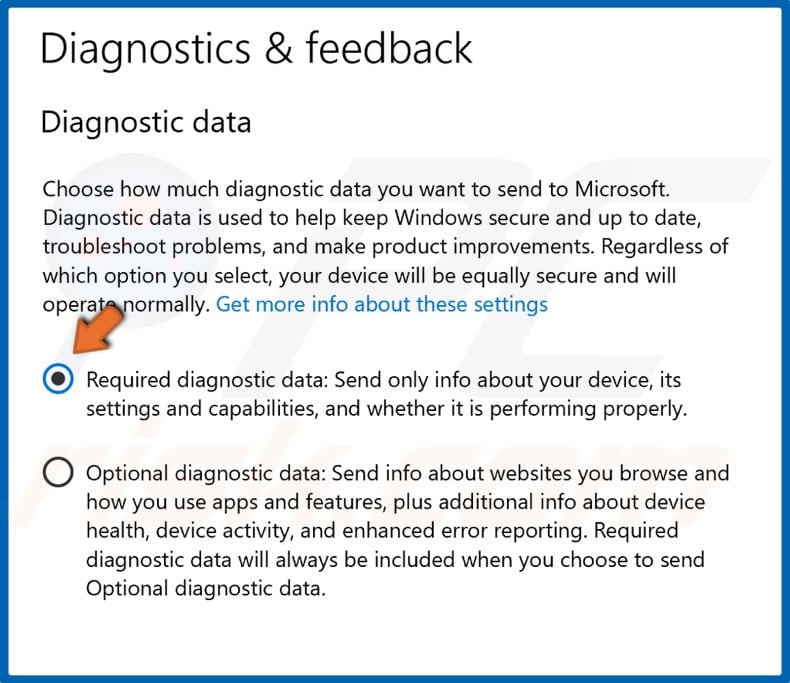
4. If the Optional diagnostic data is selected, select Required diagnostic data.
5. Close the Settings window.
[Back to Table of Contents]
Solution 2. Disable Microsoft Compatibility Telemetry Using Task Scheduler
Instead of removing CompatTelTunner.exe, the easier thing to do is disable it from the Task Scheduler responsible for launching CompatTelTunner.exe on system startup.
1. Hold down Windows+R keys to open Run.
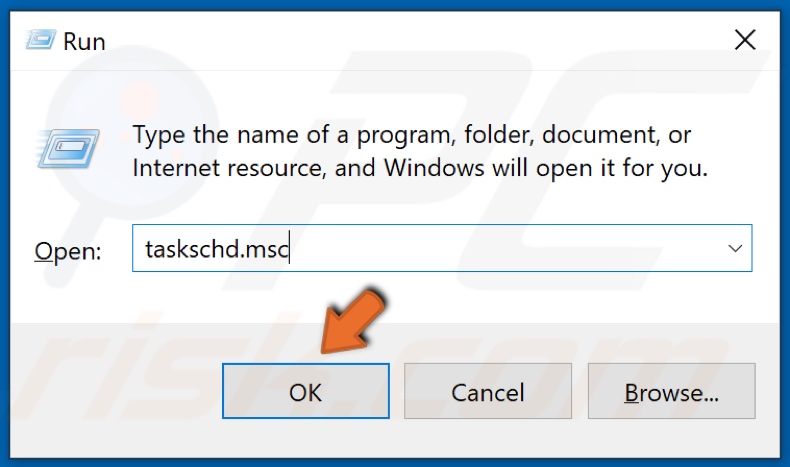
2. In the Run dialog box, type in taskschd.msc and click OK.

3. Then, navigate to Library/Microsoft/Windows/Application Experience.
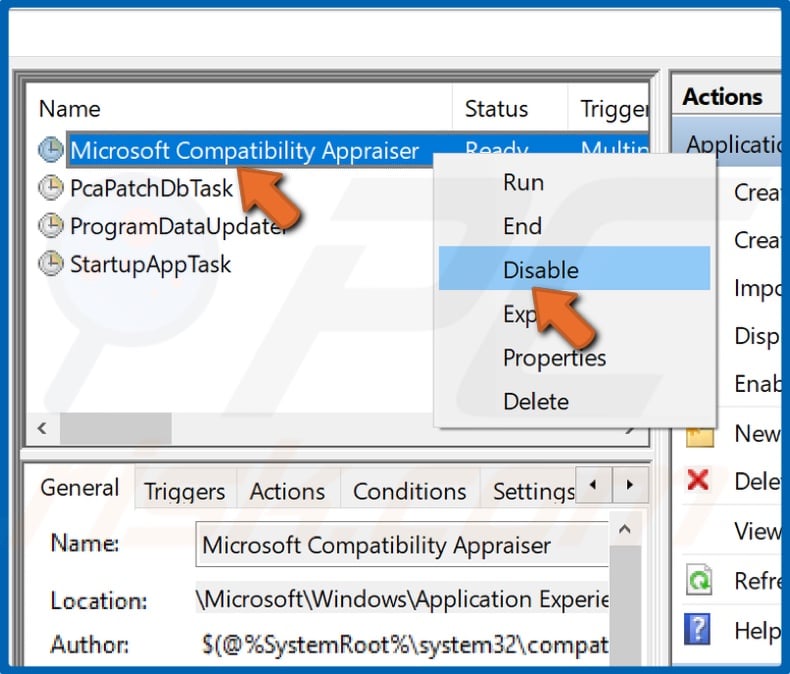
4. In the right pane, find a task called Microsoft Compatibility Appraiser.
5. Right-click Microsoft Compatibility Appraiser and select Disable.
6. Close the Task Scheduler and restart your PC.
[Back to Table of Contents]
Solution 3. Disable Microsoft Compatibility Telemetry Using Group Policy Editor
1. Hold down Windows+R keys to open Run.
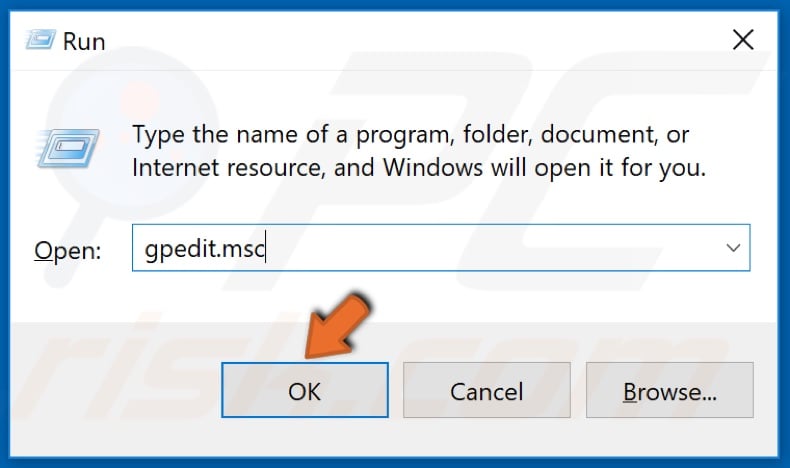
2. In the Run dialog box, type in gpedit.msc and click OK.
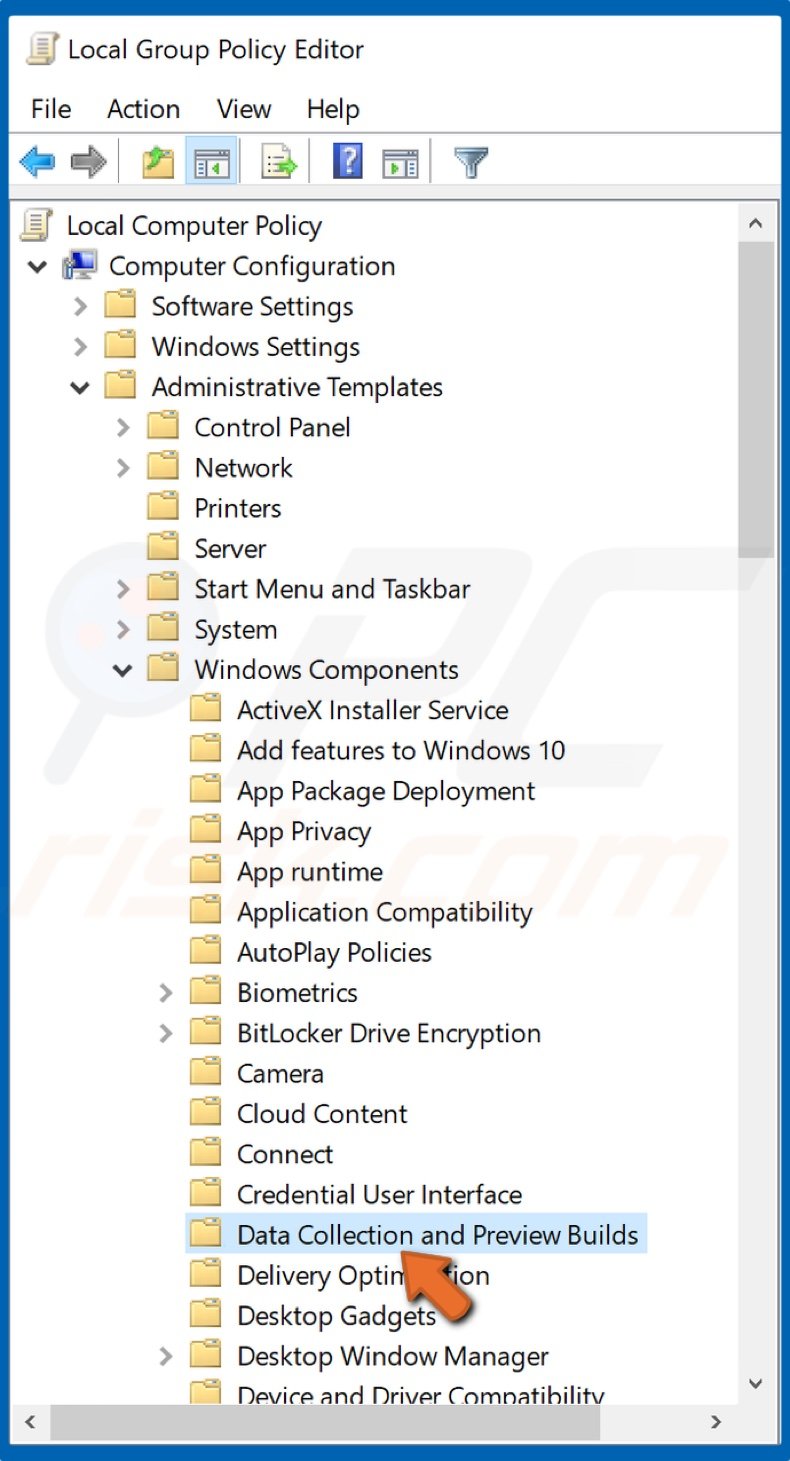
3. Then, navigate to Computer Configuration/Administrative Templates/Windows Components/Data Collection and Preview Builds.
4. Right-click Allow Telemetry and select Edit.
5. Select Disabled. Then, click Apply and click OK.
6. Close the Group Policy Editor and restart your PC.
[Back to Table of Contents]
Solution 4. Disable Telemetry Using Windows Registry Editor
1. Hold down Windows+R keys to open Run.
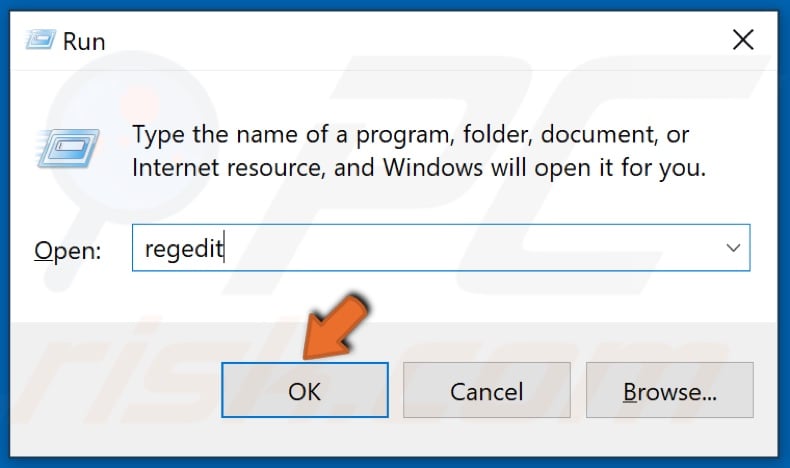
2. In the Run dialog box, type in regedit and click OK.
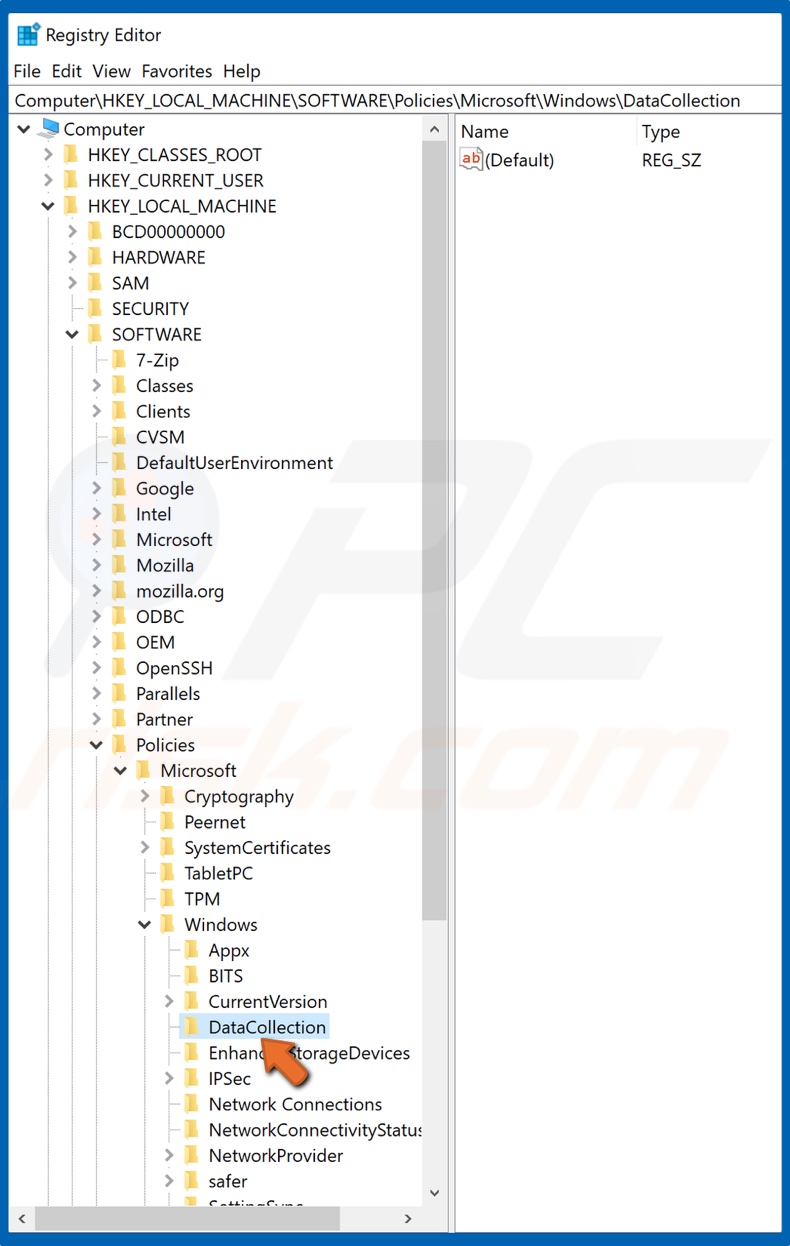
3. Then, navigate to HKEY_LOCAL_MACHINE/SOFTWARE/Policies/Microsoft/Windows/DataCollection.
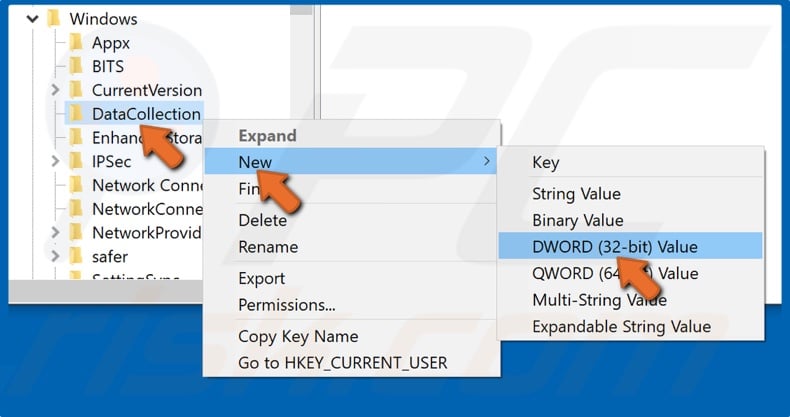
4. Right-click DataCollection and select New, and then select DWORD (32-bit value).
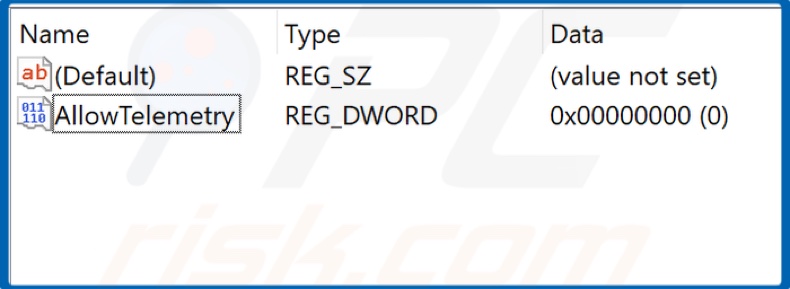
5. Name the new value AllowTelemetry.
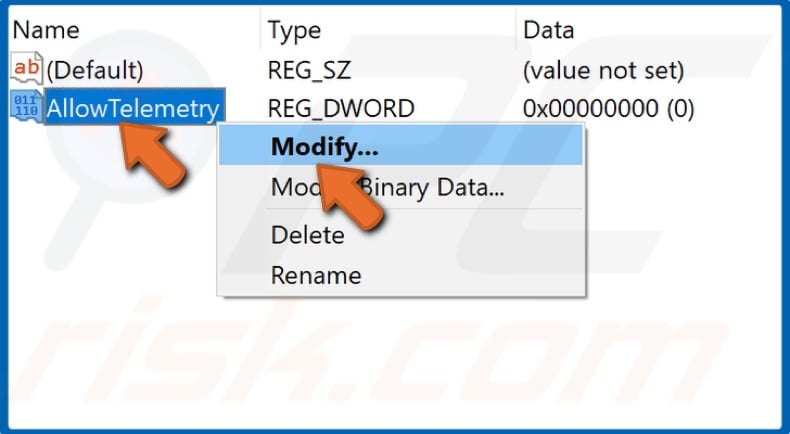
6. Then, right-click AllowTelemetry and click Modify.
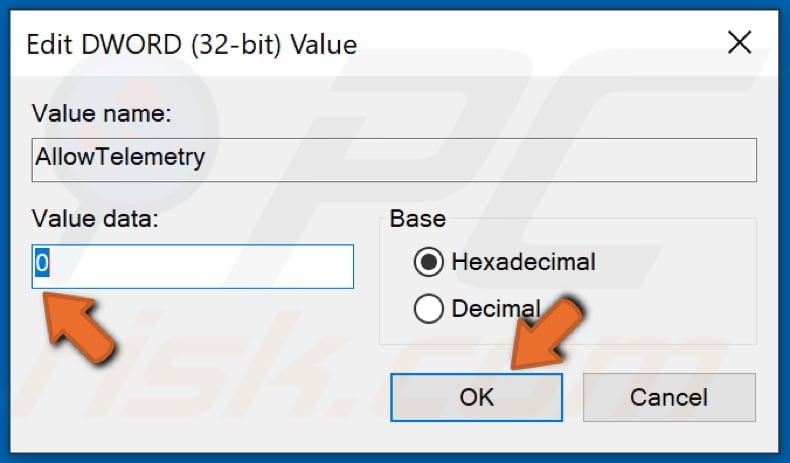
7. Change the Value data from 1 to 0 and click OK.
8. Close the Windows Registry Editor and restart your PC.
[Back to Table of Contents]
Solution 5. Disable Connected User Experiences and Telemetry Service
Connected User Experiences and Telemetry is a background Windows service that automatically sends data to Microsoft. Specifically, this service sends diagnostic and usage information to Microsoft servers. Therefore, disabling it may fix high CPU or Disk usage by CompatTelRunner.exe.
1. Hold down Windows+R keys to open Run.
2. In the Run dialog box, type in services.msc and click OK.
3. Scroll through the services list and locate the Connected User Experiences and Telemetry service.
4. Right-click Connected User Experiences and Telemetry and click Properties.
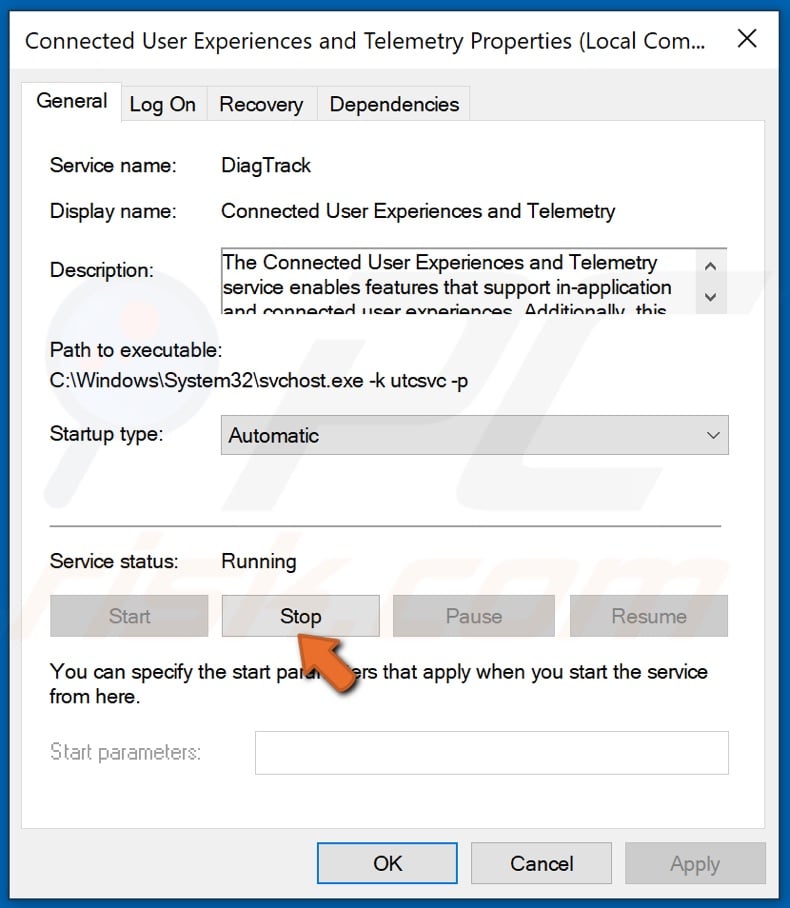
5. Under the Service status section, click the Stop button.
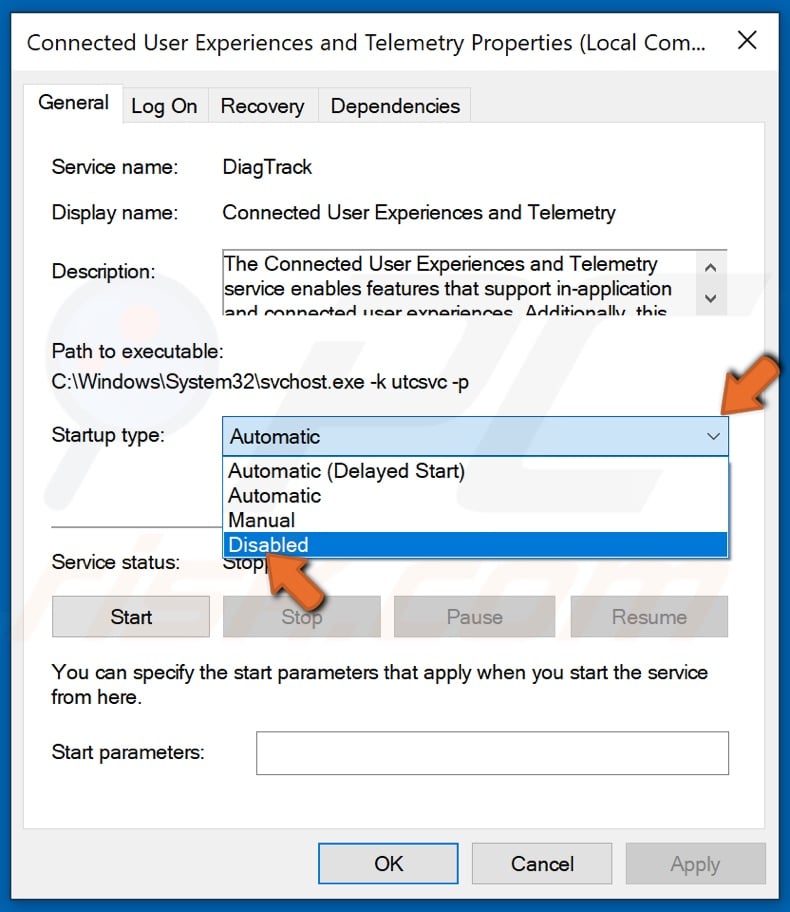
6. Then, Under Startup type, open the drop-down menu and select Disabled.
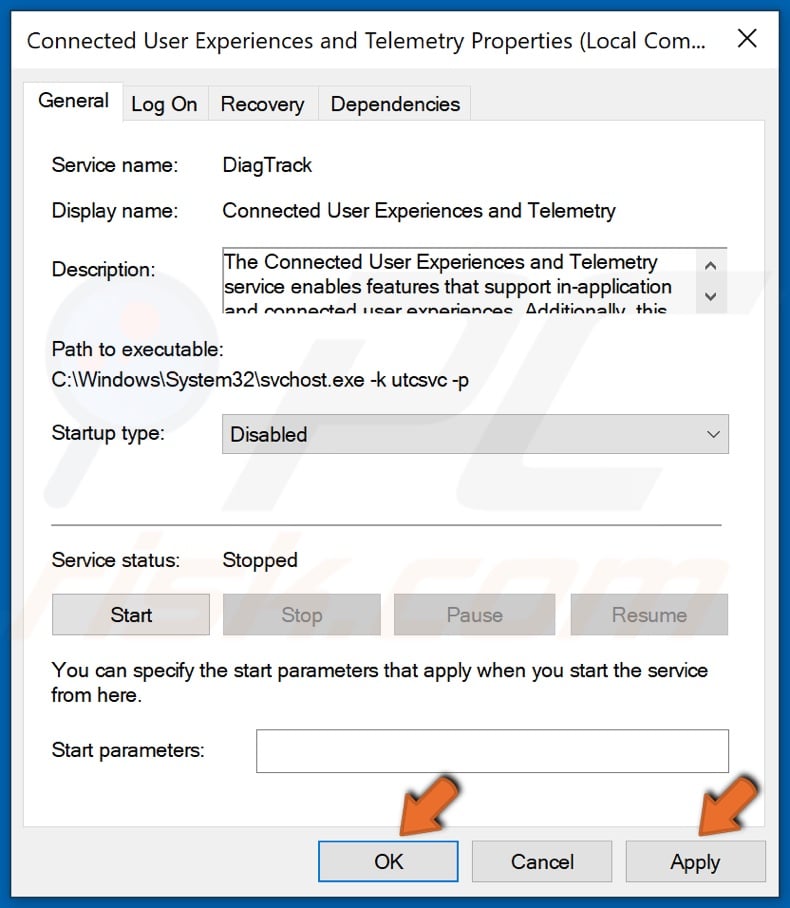
7. Click Apply and click OK.
8. Close the Services window.
[Back to Top]
Столкнуться с файлом CompatTelRunner.exe большинство пользователей может в диспетчере задач, когда видят там высокую нагрузку на процессор и диск от этого процесса. При чем также узнать о нем можно в ракурсе отношения к телеметрии Microsoft в Windows 10. Чаще бывает, что после обновления к новой версии операционной системы в диспетчере задач CompatTelRunner.exe забирает до 95% ресурсов ПК. Может появляться как в Windows 10, так и 11. Легко подумать, что речь идет о вредоносном ПО, но в данном случае это будет ошибка, по крайней мере в большинстве случаев. Речь идет о фирменном сервисе от Microsoft.
Что это за файл Compattelrunner.exe?
Compattelrunner.exe – исполняемый файл, который в своем названии носит сокращение от Microsoft Compatibility Telemetry. Он появился еще в Windows 7 и перекочевал во все следующие версии операционной системы. Отвечает за телеметрию от Microsoft, которая собирает данные о системе, ее использовании, производительности и отправляется на сервера Microsoft. Как говорят разработчики, подобные данные пригождаются им для усиления защиты Windows и для улучшения комфорта использования операционной системы.
Файл Compattelrunner.exe располагается в папке C:/Windows/System32/ и должен иметь размер приблизительно 140-150 Кб. Если его расположение отличается или вес намного превышает указанный размер, скорее всего это вирус, который маскируется под сервис Microsoft.
Стоит ли выключать CompatTelRunner.exe?
Здесь есть 2 стороны вопроса: теоретическая и практическая. С точки зрения теории, данный сервис глубоко интегрирован в ОС и важен для ее различных функций. Отключение может привести к сбоям, которые даже сложно спрогнозировать. Также процедура приведет к снижению степени безопасности. С практической стороны, обычно отключение не влияет на быстродействие или стабильность Windows. Однако он участвует в некоторых важных процессах, в том числе в процедуре обновления операционной системы и некоторых встроенных приложений. Еще его система использует в период диагностики Windows.
Как отключить запуск Compattelrunner.exe?
Так как Compattelrunner.exe часто участвует в обновлениях Windows, повышенная нагрузка с его стороны может быть следствием апдейта. То есть немного подождав, он перестанет грузить процессор и диск, а значит и в самом отключении особого смысла не будет. Те же, кто не желает передавать свои данные Microsoft, или долгое время наблюдают за загрузкой ресурсов системы без улучшения ситуации, имеют право заблокировать процесс. Можно поступить несколькими способами: завершить процесс и установить блокировку на его запуск или просто удалить файл. Лучше все-таки следовать по первому пути, так как в будущем, если будут проблемы, можно легко разблокировать процесс.
Через планировщик заданий
В данном системном меню мы можем установить блокировку запуска файла при любой попытке его вызвать со стороны операционной системы.
Инструкция:
- Нажимаем клавишу Windows и через поиск находим «Планировщик заданий».
- Раскрываем список «Библиотека планировщика заданий», затем – Microsoft, Windows и последний пункт Application Experience.
- В меню справа находим параметр Microsoft Compatibility Appraiser, нажимаем на него правой кнопкой мыши и выбираем «Отключить».
- Перезагружаем компьютер и проверяем результат.
Совет! Если проблема останется, дополнительно выключите параметр ProgramDataUpdater в том же разделе по аналогии с инструкцией выше.
Удалить файл
К сожалению, это не совсем простое удаление. Если выделить файл и нажать кнопку Del, мы увидим запрет на удаление. Нужно выполнить несколько дополнительных действий прежде.
Пошаговое руководство:
- Переходим по пути C:\Windows\System32 в обычном проводнике и ищем файл CompatTelRunner.exe.
- Нажимаем по нему правой кнопкой мыши и переходим в «Свойства».
- На вкладке «Безопасность» жмем на кнопку «Дополнительно».
- В строке «Владелец» должно быть указано TrustedInstaller, жмем рядом с ним на кнопку «Изменить».
- В новом окне нажимаем на кнопку «Дополнительно», а затем – «Поиск».
- Когда высветится список всех пользователей, находим текущего и кликаем по «Ок».
- Выделяем выбранного юзера и нажимаем «Ок».
- На вкладке «Безопасность» выбираем текущего пользователя и нажимаем «Изменить».
- Активируем «Полный контроль» и применяем изменения.
- Удаляем файл.

Важно! Из пользовательских отчетов известно, что обновление Windows с кодом KB2952664 чаще всего приводит к повышенной нагрузки на процессор и диск от Compattelrunner.exe. Его удаление может помочь. Для этого в командную строку вводим dism /online /get-packages | findstr KB2952664, затем — dism /online /remove-package /PackageName:Package_for_KB2952664~31bf3856ad364e35~amd64~~6.1.1.3 и последняя Get-HotFix -id KB2952664.
Если файл Compattelrunner.exe грузит процессор или диск на 50 или 100%, вы можете его заблокировать или даже удалить. Но порой срабатывает и простое удаление обновления, которое нередко становится источником проблемы.
Все способы:
- Для чего нужен процесс
- Отключение CompatTelRunner.exe
- Способ 1: «Планировщик заданий»
- Способ 2: Редактирование системного реестра
- Вопросы и ответы: 1
Для чего нужен процесс
Некоторые пользователи сталкиваются с проблемой, когда процесс под названием CompatTelRunner.exe сильно нагружает ресурсы системы, что видно в «Диспетчере задач». Этот процесс является частью функциональных возможностей телеметрии Windows 10. Нагрузка на компоненты начинается, когда он отправляет различные данные об использовании операционки.
Прежде чем отключать процесс, стоит проверить его расположение. Если он находится в системной папке (по адресу
C:\Windows\System32), значит, работает системная функция, которую можно отключить, о чем мы написали ниже. Если же расположение исполняемого файла иное, тогда есть смысл проверить компьютер на наличие вредоносных утилит – вполне вероятно, что работает вовсе не функция телеметрии, а вирусный софт.Читайте также: Как проверить Windows 10 на вирусы и другие угрозы
Чтобы посмотреть расположение исполняемого файла, достаточно отыскать процесс среди работающих программ и служб в «Диспетчере задач», кликнуть по нему правой кнопкой мыши и выбрать пункт «Открыть расположение файла». Далее отобразится системный «Проводник», где и будет находиться файл процесса.
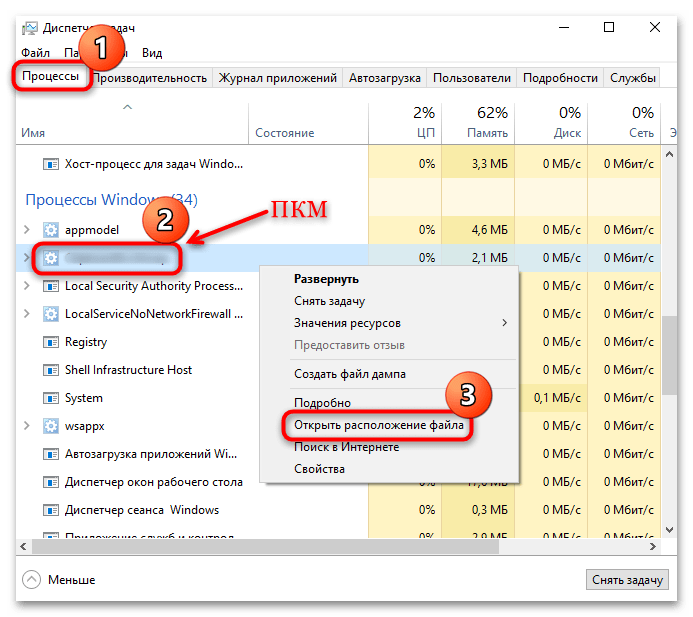
Отключение CompatTelRunner.exe
Как правило, работа процесса носит непродолжительный характер: он включается и отключается автоматически буквально через небольшой промежуток времени. Если требуется, деактивируйте его самостоятельно одним из доступных способов.
Следует отметить, что отключение телеметрии с помощью встроенных средств или стороннего софта не принесет нужного результата. Хоть и функция будет отключена, процесс CompatTelRunner.exe будет продолжать периодически запускаться.
Способ 1: «Планировщик заданий»
Одним из эффективных способов отключения процесса является ручное изменение нужного параметра во встроенном «Планировщике заданий» Windows 10:
- Одновременно нажмите на клавиши «Win + R», чтобы открыть окно «Выполнить», где нужно ввести запрос
taskschd.mscи выполнить его, нажав на кнопку «ОК» или клавишу «Enter». - На панели слева разверните меню «Библиотека планировщика заданий», затем «Microsoft», «Windows» и «Application Experience».
- В центральной части окна найдите параметр «Microsoft Compatibility Appraiser», кликните по нему правой кнопкой мыши и выберите пункт «Отключить». То же самое проделайте с пунктами «ProgramDataUpdater» и «StartupAppTask».
После выполненных действий процесс CompatTelRunner.exe запускаться не должен. Если же возникают проблемы с остановкой пунктов в «Планировщике заданий», вероятно, процесс в данный момент работает. В этом случае следует самостоятельно снять задачу в «Диспетчере задач».
Способ 2: Редактирование системного реестра
Этот способ подразумевает запрет поиска параметров для запуска процесса в «Редакторе реестра». Он может работать, даже если запланированное задание активно:
- Через окно «Выполнить» («Win + R») запустите штатный «Редактор реестра» при помощи команды
regedit. - Разверните ветку
HKEY_LOCAL_MACHINE\SOFTWARE\Microsoft\Windows NT\CurrentVersion\AppCompatFlags\TelemetryControllerили вставьте путь в адресную строку вверху, после чего нажмите на клавишу «Enter» для перехода к нужному разделу. - На панели слева щелкните по подразделу «TelemetryController» правой кнопкой мыши и выберите пункт «Переименовать». Немного измените имя, например допишите какой-то символ в конце – его удаление в последующем позволит быстро включить возможность запуска процесса, если это снова потребуется.
- Далее перейдите к следующему разделу —
HKEY_LOCAL_MACHINE\SOFTWARE\Policies\Microsoft\Windows\DataCollection. В основной части окна щелкните по свободной области правой кнопкой мыши, наведите курсор на пункт «Создать» и выберите «Параметр DWORD (32 бита)». - Задайте имя для нового параметра как «AllowTelemetry».
- Менять для него «Значение» не нужно — оно и должно быть «0».

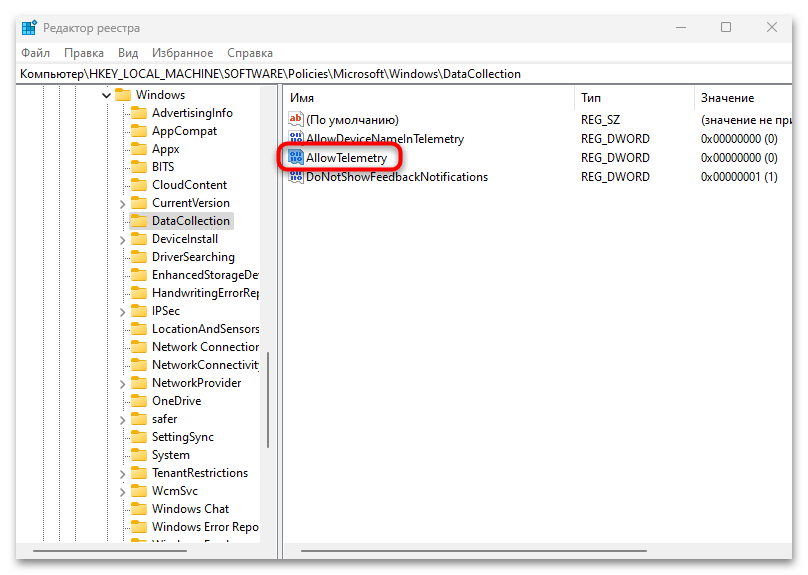
Таким образом, вы создали параметр, который препятствует запуску функций телеметрии, в том числе процесса CompatTelRunner.exe. Закройте «Редактор реестра» и перезагрузите компьютер, чтобы новые настройки вступили в силу.
Наша группа в TelegramПолезные советы и помощь