
Раз вы видите эту статью, значит вы попытались установить Windows 10 на свой компьютер. Скорее всего он весьма устаревший, ведь в тексте сообщения говорится об отсутствии поддержки важного компонента со стороны процессора. Хотя это не всегда правда. Не всегда нужно лишь менять ЦП, порой проблема носит программный характер. Все, что удалось узнать об ошибке, читайте дальше.
Процессор компьютера не поддерживает важный компонент compareexchange128
Причины
Есть довольно очевидная причина ошибки, но также речь может идти и о не совсем банальных проблемах.
В чем проблема:
- Процессор не поддерживает инструкции CMPXCHG16b. Такие инструкции как CMPXCHG16b, PrefetchW и LAHF/SAHF необходимы для работы с Windows 10 х64. Роль указанного компонента — атомарное сравнение и обмен 16-байтовыми значениями. Если простыми словами, процессор не умеет сравнивать содержимое областей памяти с указанным значением.
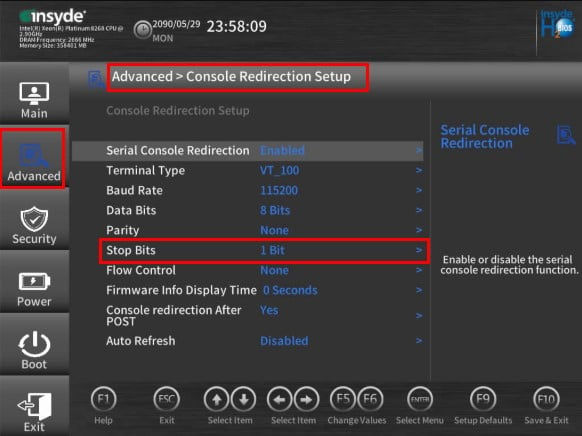
- Настройки BIOS. Некоторые параметры в BIOS, если их активировать, могут вызывать подобные ошибки compareexchange128.
- Несовместимость Xeon-процессоров с Windows x64. Серверные процессоры старых поколений плохо адаптированы к пользовательской системе. В BIOS просто нет необходимых микрокодов для данного процессора.
Как исправить ошибку compareexchange128?
Первое, что вам нужно сделать – проверить поддержку необходимых инструкций. Нужно изучить технические характеристики процессора на предмет наличия поддержки compareexchange128 или CMPXCHG16b. На старых ЦП данная инструкция отсутствует. Хотя напрашивается вывод, что нужно покупать новый процессор, мы бы рекомендовали другой путь – просто установите Windows 7 или 8. Простое обновление процессора не приведет к сильному улучшению работы ПК в целом, так как у вас старый тип ОЗУ, устаревшая видеокарта и материнская плата. Уже лучше в будущем приобрести новый компьютер. Хотя если удастся найти дешевый б/у ЦП с поддержкой соответствующих инструкций, может иметь смысл и замена процессора.
Какие есть решения ошибки compareexchange128:
- Настройка BIOS. Следует перейти в BIOS и проверить, что параметр Executable Disable Bits обладает значением Disable. Если он включен, отключите настройку. После этого установка Windows 10 должна пройти успешно.
- Установка BIOS. Что касается процессоров Xeon, вам нужно прошить BIOS под него соответствующим образом. Подходящие версии можно найти по запросу xeon modded bios. Хотя не все материнские платы поддерживают перепрошивку. К примеру, материнские платы Intel не позволяют это делать. Еще подходящую версию BIOS можно найти по запросу: «[MOD] LGA775 Support For LGA771 Xeon CPUs».
Попробуйте перечисленные выше решения, возможно, вам повезет и удастся обойтись без затрат. Если же проблема в процессоре, тогда остается только устанавливать старую версию Windows или обновляться. Здесь уже на ваше усмотрение.
During Windows 10 installation, you will see all the beautiful user interfaces, however, what’s more, important are the drivers, your processor, and free storage disk in order for the installation to be successfully completed. So if you are getting the CompareExchange128 error during the installation of Windows 10, this means that the CPU lacks a very important instruction known as “CMPXCHG16B”. Thus, if you don’t have CMPXCHG16B, then it will result in the CompareExchange128 error when you install Windows 10. In fact, CMPXCHG16B, PrefetchW as well as LAHF/SAHF is a criterion for you to be able to use Windows 10 64-bit version when upgrading from an earlier version of Windows.
So what exactly is the CMPXCHG16B instruction? The CMPXCHG16B instruction is the one that performs an atomic compare-and-exchange on 16-byte values. This instruction can also be referred to as “CompareExchange128”. The atomic compare-and-exchange means that the CPU compares the contents of a memory location with a given value. So if the values are the same, it modifies the contents of that memory location to a new given value. Note that this kind of issue only happens to the 64-bit Windows 10 version and the only way to resolve it is by getting an update on the hardware level from the OEM. On the other hand, if nothing really works, it’s maybe time for you to get a new CPU but before you resort to that, in the meantime, you can try following the options given below to fix the CompareExchange128 error during the installation of Windows 10.
Option 1 – Try to update the BIOS and Chipset Drivers
One of the best things you can do to fix the CompareExchange128 error is by updating the BIOS and chipset drivers which is why you need to check if your OEM has an update available for your computer’s BIOS as well as the related chipset drivers. But before that, you need to first check the BIOS version. To do so, follow these steps:
- Type “msinfo32” in the search bar and hit Enter to open the System Information Tools.
- After opening the System Information Tools, check the BIOS version.
- Then take note of that BIOS version. You also need to use the BIOS utility that came with your computer and use it for the upgrade. Note that it is different for every computer and if you don’t have it, you can just go to the OEM website and see if there is an option to download it there.
Option 2 – Try to downgrade to the 32-bit Windows 10 version
If option 1 didn’t work as the BIOS update is not available, you can also try downgrading to the 32-bit version of Windows 10. Keep in mind that this will bring restrictions on the amount of RAM installed and other places but that won’t be a problem as you can still switch.
Option 3 – Try buying a new hardware
If none of the first two options didn’t work for some reason then maybe it’s time for you to purchase new hardware especially if your computer is way too old. In such cases, it’s better to buy new hardware or better yet, a new computer that can keep up for the next couple of years.
Do You Need Help with Your Device?
Our Team of Experts May Help
Troubleshoot.Tech Experts are There for You!
GET HELP
Troubleshoot.Tech experts work with all versions of Microsoft Windows including Windows 11, with Android, Mac, and more.
Share this article:
You might also like
Outlook PST Errors
Problems occur when your PST file becomes corrupted or hits the size limit. Outlook will start to display error messages. These errors include like 0x80040119, 0x80040600, and 0x8004060c.
Error Causes
You might think Outlook problems are just a minor inconvenience. You can’t access your emails and contact information, but that doesn’t actually affect computer security, right? Wrong! Outlook problems can indicate serious corruption issues within your system.
In many cases, your PST file can even be targeted specifically by a virus.
Today, many viruses are specially designed to steal personal information and then sell that information on the online black market. Since so much personal data is stored within Outlook’s PST file, this is often the first place that viruses look.
If you don’t want some hacker in a foreign country to read your emails, steal your contact information, or do all sorts of other dangerous tasks, then we advise you to fix your PST problem as soon as possible.
Other causes include hitting the 2GB memory limit on older versions of Outlook, erroneous SMTP settings, etc,.
Further Information and Manual Repair
PST errors are an incredibly annoying problem. However, thanks to powerful software like Stellar Phoenix Outlook PST Repair, it has never been easier to fix Outlook and recover all of the data inside your PST file. That means that you won’t lose contact information, calendar entries, emails, or any other information stored in Outlook.
ScanPST.exe rarely fixes problems with the PST file. Since the application is only a few megabytes in size, its effectiveness is very limited. Although Microsoft designed ScanPST.exe to be an effective solution to any PST files, it fails miserably.
Better Alternatives to Microsoft’s ScanPST.Exe
Ultimately, after downloading ScanPST.exe and running it, your Microsoft Outlook will still be unable to send or receive emails. And, to make matters worse, you might also be unable to access contact data or read your old emails.
Unlike other PST repair solutions, ScanPST.exe will not recover deleted emails or other lost Outlook data. In fact, using ScanPST.exe can sometimes cause your personal data to become even more difficult to recover.
If you do want to try out ScanPST.exe, then go ahead. While it probably won’t make your PST errors worse, it won’t even come close to fixing them. If you’re ready for a more serious solution to PST problems, then keep reading.
Why are Outlook problems dangerous?
You might think Outlook problems are just a minor inconvenience. You can’t access your emails and contact information, but that doesn’t actually affect computer security, right? Wrong!
Outlook problems can indicate serious corruption issues within your system. In many cases, your PST file can even be targeted specifically by a virus.
Today, many viruses are specially designed to steal personal information and then sell that information on the online black market. Since so much personal data is stored within Outlook’s PST file, this is often the first place that viruses look.
If you don’t want some hacker in a foreign country to read your emails, steal your contact information, or do all sorts of other dangerous tasks, then we advise you to fix your PST problem as soon as possible.
How do I actually fix Microsoft Outlook PST errors?
Microsoft’s ScanPST.exe application clearly doesn’t work. So what’s the next best option? Well, a program called Stellar Phoenix Outlook PST Repair has been helping PC users solve Outlook problems for several years. As the world’s leading Outlook solution, Stellar Phoenix Outlook PST Repair will quickly and effectively repair any PST problems you encounter.
So how does Stellar Phoenix Outlook Repair work? Well, it starts by finding your PST file. Once the PST file has been found, Stellar Phoenix Outlook PST Repair determines if the file is corrupt or full. It will then repair your PST file either by removing the size limit or by fixing the corrupt files.
How Does Stellar Phoenix Outlook Repair Work?
Once Stellar Phoenix Outlook PST Repair determines that your calendar appointments, contact data, and emails have all been successfully recovered, it permanently restores access to your PST file.
In fact, Stellar Phoenix Outlook PST Repair can even restore Outlook data that you deleted a long time ago. So, instead of just being a PST error recovery tool, Stellar Phoenix Outlook PST Repair is also a powerful data recovery program.
After letting Stellar Phoenix Outlook PST Repair go to work, open up Outlook and try it out. You’ll have full access to all of your Outlook files and folders, and all of those ScanPST.exe problems will be a thing of the past.
Advantages of Stellar Phoenix Outlook PST Repair Software
Stellar Phoenix Outlook PST Repair comes with many advantages. Here are just a few reasons why it’s such a popular program:
- Easy-to-use: Don’t worry if you’re not a computer genius. Stellar Phoenix Outlook Repair is incredibly easy to use. Even if you barely know how to send an email over your computer, the program has a straightforward interface that anybody can understand. If you can click the left mouse button, then Stellar Phoenix will be easy to use.
- Goes to work instantly: It takes only seconds to download and install Stellar Phoenix Outlook PST Repair. Once you’re ready to perform a scan, the program goes to work instantly. It identifies your PST file in an incredibly short amount of time, and before long, you’ll be able to access Outlook once more.
- Effective: Unlike the infamously useless ScanPST.exe application, Stellar Phoenix Outlook PST Repair actually works like it’s supposed to. It allows users to safely recover all of their most important data. While ScanPST.exe can actually damage your PST file, Stellar Phoenix Outlook PST Repair simply goes to work quickly and effectively.
- Multiple support packages: Stellar Phoenix Outlook Repair comes with three different pricing plans. One is designed for people who only need to install the program on a single computer. Another is designed for businesses or households that want to install the program on multiple PCs.And with the third option, the technician package, users can install Stellar Phoenix Outlook PST Repair on an unlimited number of computers. One of the biggest advantages of these packages is that you can spread out the cost of the program among multiple users. If several different people at your workplace are having PST error problems, for example, then you can buy a multiple-license package and share the cost.
- Data recovery: Along with fixing corrupt PST files and removing the size limits from the PST file, Stellar Phoenix Outlook PST Repair can actually recover any Outlook data on your computer. This is useful if you uninstalled Outlook a few months ago but still need to recover that data. In fact, Stellar Phoenix can recover Outlook data even if Outlook is not currently installed on your computer. In that sense, Stellar Phoenix Repair is more than just an Outlook repair program; it’s also a full-service data recovery solution.
Stellar Phoenix PST Repair is superior to ScanPST.exe in every way. But Stellar Phoenix’s most important advantage is that it actually works. If you’re ready to quickly fix your Outlook PST errors, then Stellar Phoenix Outlook PST Repair can help. Download it here today to experience the magic of PST repair for yourself.
Read More
It is common to run multiple programs and applications at the same time and it’s important to be able to switch between them using their Taskbar icons or using the usual Alt + Tab shortcut. However, there are times when you might suddenly find that neither of the aforementioned methods worked and you will no longer be able to switch between programs in the Windows Taskbar. To fix this issue, refer to the options given in this post.
For instance, when you have multiple instances of Microsoft Edge running and every time you press the Alt + Tab combo nothing happens so you are left with no choice but to minimize everything and then hover your mouse on the icon and switch between the instances of Edge. You will also notice that the right-click on the taskbar won’t respond back and will only keep on showing the loading circle icon.
Here are a few tips you can follow to fix the issue with the Windows 10 Taskbar.
Option 1 – Try to restart the Windows Explorer
This is one of the basic things you can try as restarting Windows Explorer helps in refreshing the user interface and makes most of the things work in relation to the user interface.
- To get started, tap the Alt + Ctrl + Del keys to pull up the Windows Task Manager.
- After opening Task Manager, look for “explorer.exe” under the list of programs.
- Once you find the explorer.exe, right-click on it and click Restart.
Option 2 – Try changing the Foreground Lock Time
Aside from restarting Windows Explorer, you could also try changing the Foreground Lock Time to fix the issue with the Taskbar.
- Tap the Win + R keys to open the Run dialog box.
- Then type in regedit in the field and tap Enter to open the Registry Editor.
- Next, go to this registry key – HKEY_CURRENT_USERControl PanelDesktop
- Next, change the ForegroundLockTimeout value from200000 to 0. After that, it will make sure that no other application will take away the focus from your current program or application. It could be that some other application has taken away the focus and even when you try to actually switch, the focus gets back to the old one. Anyhow, since you already changed the value of ForegroundLockTimeout, it will ensure that the focus is not switched.
Note: If you are running some Full-Screen applications there are some devices especially the gaming ones, disable the Windows key to make sure that you won’t be able to switch. If this is the case, you need to make some modifications to the Full-Screen games.
Read More
SmartScreen is a cloud-based anti-phishing and anti-malware component that’s come packed in all Windows 8 (8.1) and Windows 10 versions. This security component is also used in several browsers and programs like Internet Explorer, Microsoft Edge and Outlook.com. Although this program is quite useful, there’ve been reports that SmartScreen is apparently blocking Microsoft’s own apps from opening. According to some users, they only get the “Windows SmartScreen can’t be reached right now” error message every time they try to open apps from the built-in Windows suite like Photos, Mail, Alarms, Maps, etc.
Whenever Windows SmartScreen is either down or unreachable on an end-user PC, your computer won’t be able to download anything in both official and unofficial channels. This error might be due to a corrupted Windows account, or it could be that SmartScreen is disabled from the Windows Defender Security Center or it might be down due to an MS issue. In addition, the error might also be caused by a proxy entry.
Option 1 – Make sure that SmartScreen is enabled
Before anything else, the first thing you must do is to check if SmartScreen is even enabled as it might be the reason why you’re getting the error. You can verify this by simply going to the Windows Defender Security Center. To do so, follow the steps below.
- Tap the Win + R keys to open the Run dialog box.
- Next, type “ms-settings:windowsdefender” in the field and hit Enter to open the Windows Defender Security Center.
- After that, click on the Open Windows Defender Security Center button located under Windows Security.
- Then click on App & browser control.
- From there, make sure that the Check apps and files toggle is set to Warn and then check the same thing for Microsoft Edge and SmartScreen for Microsoft Store apps.
- If it turns out that SmartScreen is indeed disabled, you have to restart your computer after making some changes and then check if the issue is fixed upon the next startup.
Option 2 – Check if SmartScreen is down for maintenance
Another possible reason why SmartScreen is not working is that it might be scheduled for maintenance. When SmartScreen is scheduled for maintenance, it will become unreachable for a lot of users at the same time and so before you go over unnecessary troubleshooting steps, you need to verify if SmartScreen is down for maintenance or not.
Option 3 – Try to disable the proxy server
If applicable, you can try to disable the proxy server to fix SmartScreen. There are some users who reported that they’ve fixed the problem after they’ve disabled the use of a proxy server using the built-in way. In some instances, certain proxy servers can interfere with the SmartScreen component and cause it to become unusable. However, if you are not using a proxy server, just skip this option and proceed to the next one, otherwise, follow the steps below to disable the proxy server.
- Tap the Win + R keys to open the Run dialog box.
- Next, type “ms-settings:network-proxy” in the field and hit Enter to open the Proxy tab under Settings.
- After that, scroll down to the Manual proxy setup and make sure that the toggle button of the “Use a proxy server” option is turned off.
- Now restart your PC and check if the problem is fixed upon the next startup.
Option 4 – Try to create a new Windows user account
There are some users who were able to fix the problem by simply creating a new Windows user account. Although this solution will make you lose a couple of settings enforced through your user account, it’s actually effective in circumventing the “Windows SmartScreen can’t be reached right now” error. To create a new Windows user account, here’s what you have to do:
- Tap the Win + R keys to open the Run dialog box.
- And then type “ms-settings:otherusers” in the field and hit Enter to open the Family & other people tab under the Accounts menu.
- After that, click on the “Add someone else to this PC” option and then click on “I don’t have this person’s sign-in information.
- Next, insert the user credentials like emails, password, birth date, etc., and then click Next. Take note that if you want to create a new local user account, just click on Add a user without a Microsoft account.
- After you’re done creating the new Windows user account, click the start icon and then click the account icon and choose to Sign out.
- After you’re logged in, check if SmartScreen now works properly or not.
Read More
Microsoft has started to use group along with every open window in the Taskbar ever since the release of Windows 10. Early on, they used to show an individual entry for each one of the windows after grouping them which makes the taskbar look cleaner and organized. However, the main issue lies in the fact that you have to hover on your desired window to get on to them. At the time of writing, you need to tap the Ctrl key and click on the taskbar icon to open the last active window but you have to only click on the program’s taskbar icon after you apply the tweak given in this post for the last active window to open. Take note that the “Last Active” windows feature will only work if the taskbar buttons are combined.
Before you get started doing the instructions given below, you need to create a System Restore Point first since you will be dealing with registry files and modifying some of the critical settings in Windows 10. Once you’ve done this, proceed to the given steps below.
Step 1: Tap the Win + R keys to open the Run dialog box and then type “Regedit” in the field and hit Enter to open the Registry Editor.
Step 2: If a User Account Control or UAC prompt appears, just click on Yes to proceed to open the Registry Editor.
Step 3: Next, navigate to the following registry path:
HKEY_CURRENT_USERSoftwareMicrosoftWindowsCurrentVersionExplorerAdvanced
Step 4: From there, right-click on the right side of the panel and select New > DWORD (32-bit) and then name it “LastActiveClick”.
Step 5: After that, double click on the newly created DWORd to modify its value. Put “1” as its value data.
Step 6: Then click OK and close the Registry Editor.
Step 7: Now restart your computer to successfully apply the changes made.
Note: In case you want to revert back to the default configuration, all you have to do is set the value data of LastActiveClick to “0” or simply delete that DWORD and restart your computer to successfully apply the changes made.
Read More
Flash.ocx Error — What is it?
To understand this error, first, it is important to understand what Flash.ocx actually is. Flash.ocx is basically a flash plug-in or ActiveX file that is responsible for the adobe flash player to work on the system.
The Flash.ocx error triggers due to issues in the Adobe flash player.
Solution
Error Causes
The error Flash.ocx may occur due to many reasons. These include:
- Flash player corruption
- Corrupted and broken Active X components
To this error code is not fatal but nonetheless it is still advisable to fix it right away to avoid inconvenience when using Flash player.
The inability to run the Flash Player smoothly will hinder you from watching videos on your PC and playing exciting web-based games.
Further Information and Manual Repair
To resolve this error on your system, you don’t have to hire a professional and spend hundreds of dollars. This error code is quite easy to fix. You don’t need to be technically sound to resolve this error code.
Simply follow the methods give below to fix the Flash.ocx error code in a few minutes.
Method 1: Reinstall the Flash Player
If the error occurs due to the corruption of the Flash Player, then it is advisable to reinstall the player on your PC. However, before you do that first remove the previous versions of Adobe Flash Player on your system.
If the previous corrupted version is not removed properly, then you will be unable to re-install it properly on your PC again.
Go to the Add/Remove Programs and find the Flash Player and uninstall it. Make sure the files are also removed from the registry.
Once you have successfully uninstalled the corrupted version, now go to the official website of Adobe Flash Player and download the utility from the website. Install it and run it on your system.
If it works, then this means the error is resolved. However, if the error still persists, then try method 2.
Method 2: Download Restoro to Fix Active X components
Another reason for Flash.ocx error code can be broken or corrupted Active X components.
If this is the issue, then the best way to resolve it is to download Restoro. This is a multi Reimagefunctional and advanced PC Fixer deployed with multiple high-performance scanners including Active X and Class scanner.
The Active X and Class scanner perform an entire PC scans for corrupt and broken Active X entries along with missing software paths and invalid combinations. After the scanning process is complete, it repairs and restores the components back to normal.
Thereby resolving the Flash.ocx error right away and ensuring smooth video browsing over the web.
Restoro is an efficient and a safe program. It has a user-friendly interface and easy navigations. It can be used by all level of users.
Besides the Active X scanner, it includes 5 more value-added utilities like a registry scanner and an antivirus to name a few. It is compatible with all Windows versions
Click here to download Restoro on your PC and resolve Flash.ocx error code now!
Read More
Libcurl.dll — What is it?
Libcurl.dll is a Dynamic Link Library file; a component of Google Earth. Google Earth is a 3D software tool.
Libcurl.dll file is visible within a 3D application with the help of which software users can see satellite images, maps, and other geography-related information from their computers.
The Libcurl.dll file enables users to map the earth using superimposing images received via satellite imagery and also aerial photography. However, Libcurl.dll error messages may occur while using or installing this program.
The libcurl.dll error message is displayed in either of the following formats:
- «Cannot find [PATH]libcurl.dll»
- «The file libcurl.dll is missing.»
- «Libcurl.dll Not Found»
- «This application failed to start because libcurl.dll was not found. Re-installing the application may fix this problem.»
Solution
Error Causes
Libcurl.dll may occur due to several reasons. These include:
- Bugged program
- Viral infection may add malicious codes to Libcurl.dll file and generate error messages
- Registry issues
- Missing libcurl.dll file
- Hard disk failure
- Misconfigured system files
If you experience difficulty in using Google Earth and come across libcurl.dll error message, it is advisable to resolve the error immediately typically because this error has severe consequences.
If not fixed timely, it can lead to the blue screen of death errors, system hang-ups and freezes, sluggish PC performance, PC crashes and browser crashes, slow internet speed, and other system errors.
Further Information and Manual Repair
This error is crucial but the good news is that it is easy to fix. To resolve it, you don’t have to hire a technical expert and pay hundreds of dollars.
You can repair the issue with ease by yourself regardless of whether or not you are technically sound. Continue reading to find out the best solutions to fix libcurl.dll error code on your system without any hassle.
Here are some of the easiest and the best methods to resolve libcurl.dll error:
1. Check your recycle bin
Since .dll files are shared by multiple programs, there is a possibility that you might have accidentally deleted libcurl.dll file when uninstalling a certain program on your system which was also sharing this file.
And because of this, you may experience the missing libcurl.dll error message. To resolve it, all you have to do is to check your recycle bin. If you find the file here, restore it. Once restored, try running the program again! If the error code does not appear, then this means it is resolved.
However, if it continues to persist, then try other solutions given below.
2. Scan for Malicious Software on your System
While downloading files and checking unknown emails malicious software like viruses, malware and spyware can also enter your PC.
Such software can damage and corrupt dll files. This could be the underlying cause of libcurl.dll error on your PC too. So, to resolve the issue, scan and remove malicious viruses and spyware from your system by using a powerful anti-virus.
However, please note, anti-viruses are notorious for slowing PC performance and also sometimes you may also have to stop all other activities on your PC.
3. Clean the Cluttered Disk, Repair dll files and Restore the Registry
Libcurl.dll file error may also occur due to hard disk failure. This triggers registry issues. If you don’t clean the registry every now and then, it overloads the hard disk with files.
These include both important and unnecessary files like internet history, temporary files, cookies, junk files, invalid registry entries, and bad keys. These clutter the disk, damaged dll files, and the registry.
Therefore first you need to clean the cluttered disk, repair libcurl.dll files and restore the registry. Executing it manually can take a lot of time as you may find it complex if you are not a computer programmer. However, the best, easiest, and quickest way to clean, repair, and restore the registry is to download Restoro
Why Restoro?
Restoro is an innovative, advanced, and multi-functional PC repair tool loaded with powerful and PC performance boosting utilities including an intuitive registry cleaner, an antivirus, Active X controls, and class module, and a system optimizer.
So, whether the libcurl.dll error message is triggered by a viral infection, hard disk failure, or registry issues, this tool takes care of all!
The registry cleaning feature scans all registry issues, cleans the hard disk by removing unnecessary and obsolete files, repairs damaged and corrupt dll files, and restores the registry thereby resolving libcurl.dll error in seconds.
Simultaneously, the antivirus utility removes viruses and malware if found. And the system optimizer feature ensures optimum PC performance.
Restoro is easy to navigate and operate. It is user-friendly, safe, bug-free, and efficient. Furthermore, it is compatible with all Windows versions.
Click here to download Restoro and repair your PC and resolve libcurl.dll error today!
Read More
If your Windows 10 computer is downloading or installing updates but suddenly an error pops up saying, “GWXUX has stopped working”, read on as this post will show you what you can do to resolve the problem. GWXUX is a process responsible for downloading and installing Windows updates and is installed on your computer via Windows Updates. That particular update is known as “KB3035583”. Through this process, the “Get Windows 10” pop-ups are installed and initiated by Microsoft. This process is also capable of checking the compatibility of your PC to run Windows 10 as well as preparing it for installation. However, this process might also result in excessive usage of Disk and sometimes, CPU. So in this post, you will be guided on how you can fix the issue with the GWXUX. Follow the instructions given below carefully.
Option 1 – Disable GWXUX in the Task Scheduler
You will have to disable the gwxux.exe process to run from the Task Scheduler. Thus, you need to follow the steps below to do so.
- Open the Cortana Search box and then type “task scheduler” in the field.
- Then click on Task Scheduler from the related search results that appear to open it.
- After opening the Task Scheduler, navigate to Microsoft > Windows > Setup > gwx on the left panel from the Task Scheduler Library.
- Once you select the GWX folder, you will see two tasks that are listed under that folder. Select both of these tasks and permanently disable them.
- Restart your computer to apply the changes made and check if the issue is now fixed or not.
Option 2 – Uninstall the KB3035583 Windows Update
- To uninstall the KB3035583 Windows Update, you need to go to Control Panel, and for you to do that, type “control panel” in the Cortana Search box.
- After that, click on Control Panel from the related search results given.
- Once Control Panel is pulled up, search for “View Installed Updates” in the search field from the top right part of the window.
- Next, click on a link labeled, “View Installed Updates” under the Programs and Features menu.
- After clicking the link, you will see the list of all the installed updates in your computer from the Windows Updates.
- Now look for an update named “KB3035583” and select it.
- You should notice the Uninstall button located at the top portion of the sub-menu ribbon as you can see on the snippet below. Click on that button to uninstall the KB3035583 Windows Update.
- After uninstalling the update, make sure to restart your computer to apply the changes made.
Option 3 – Try using the System File Checker
System File Checker or SFC is a built-in command utility that helps in restoring corrupted files as well as missing files. It replaces bad and corrupted system files with good system files that might be causing the error 0x80200056. To run the SFC command, follow the steps given below.
- Tap Win + R to launch Run.
- Type in cmd in the field and tap Enter.
- After opening Command Prompt, type in sfc /scannow
The command will start a system scan which will take a few whiles before it finishes. Once it’s done, you could get the following results:
- Windows Resource Protection did not find any integrity violations.
- Windows Resource Protection found corrupt files and successfully repaired them.
- Windows Resource Protection found corrupt files but was unable to fix some of them.
After running the System File Checker, restart your computer and check if the error with the GWXUX.exe file is now fixed or not.
Read More
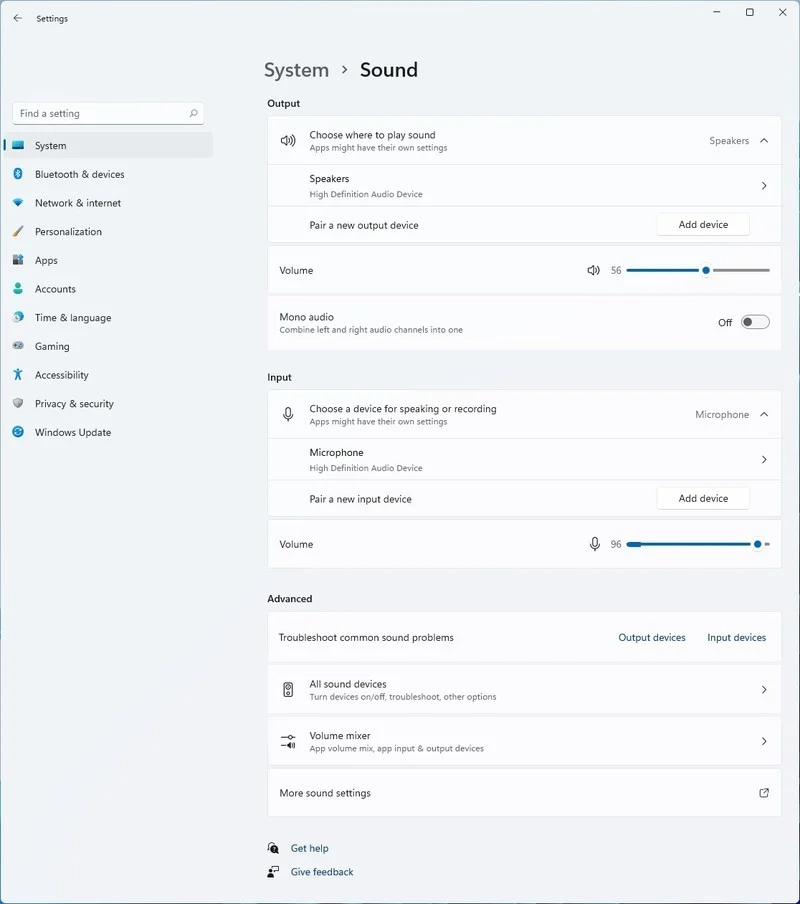
Windows 11 has brought some new features and changed some of the existing ones. One of these changes includes quick switching of audio devices which will play audio.
Audio switching can still be done under the taskbar, it is just a little different and one could say even hidden. Follow this quick guide and you will be switching from your headphones to speakers as an example in a matter of seconds.
- Click on the speaker icon located in the far-right part of the taskbar.
- After the quick settings menu appears click on the right arrow located right of the volume slider. If the arrow is not present, instead of click on the pencil icon, then on add, and finally select Volume from the list.
- After clicking on the arrow icon, a list of all enabled audio devices on the system will replace the volume slider. Click on the desired audio device in order to make it active.
- Click anywhere outside the quick setting menu to save changes and close it.
Note: in the Quick settings menu if you choose More Volume Settings it will bring you to System > Sound where you can access more sound input and output options.
Read More
A lot of users lately reported getting an error that says, “The application has failed to start because its side-by-side configuration is incorrect”. This kind of error can pop up when you try to open a number of programs, regardless of their origin, the developer, and compatibility.
Here’s the full context of the error message:
“<PATH OF THE EXECUTABLE FILE>, This application has failed to start because its side-by0side configuration is incorrect. Please see the application event log or use the command-line sxstrace.exe tool for more detail”.
This kind of problem has something to do with the C++ runtime package in the background. It could also be related to an error for a registry value. Whatever the cause is, you can fix this error with the help of some suggestions provided in this post. You can try to reinstall the application or check the registry setting or reinstall the suitable Visual C++ Runtimes or re-enable the Microsoft .NET Framework. For more details, refer to the instructions given below.
Option 1 – Try to reinstall the application
There are times when some supporting module for your application under the hood could have messed up the application. And so to fix that, you need to uninstall the concerned application and then try reinstalling it again. Once you’re done, check if it fixed the problem or not.
Option 2 – Try to change the Registry setting
- Tap the Win + R key combination to open the Run dialog box.
- Then type “Regedit” in the fields and tap Enter to open the Registry Editor.
- Next, navigate to this registry key: Computer HKEY_LOCAL_MACHINE SOFTWARE Microsoft Windows NT CurrentVersion SideBySide Winners x86_policy.9.0.microsoft.vc90.crt_1fc8b3b9a1e18e3b_none_02d0010672fd8219 9.0
- From there, look for a String value named “default” and double click on it.
- After that, change its Value data to match the one as the third value in BINARY.
- Now restart your computer to successfully apply the changes made.
Option 3 – Try reinstalling the appropriate Visual C++ Runtime
- You need to open the Event Viewer first by searching for it in the Windows Search box.
- After opening Event Viewer, look for the error events that are sourced by SideBySide.
- Next, look for the actual Visual C++ Runtime module that’s causing the error.
- Now download the module from the official website of Microsoft Support and then install it and see if it fixed the problem.
Option 4 – Re-enable the Microsoft .NET Framework
You could also try to disable the Microsoft .NET Framework then enable the latest version of the .NET Framework on your PC and check if the error is fixed.
Read More
Windows 10 and Windows 11 have automatic dynamic screen brightness depending on the surrounding light inside the room. Please take note that this option is available only on devices with build-in screens like laptops, tablets, and all in one desktop PC. If you are connected with your PC via an external monitor you will not have these settings available and probably feature is not even working.

Some computers will also allow automatic brightness changes also on what is displayed on the screen. This option is meant to save battery life on devices. Microsoft calls this automatic brightness feature Content adaptive brightness control. In order to change this setting, we will go to settings inside Windows.
Disabling automatic brightness inside Windows
Open Settings inside Windows, in Windows 11 press WINDOWS + I to open settings, then click on the system in the sidebar and then go to Display. Click on the small arrow beside the Brightness slider in order to expand a small menu and then uncheck Help improve battery by optimizing the content show and brightness. If you see Change brightness automatically when lighting changes, uncheck that as well. Close the settings and you are good to go, now brightness will always be as set in settings.
Inside Windows 10, go to Settings and then go to System and then in Display under the Brightness and Color section look below and locate the box that says Automatically adjust contrast based on the displayed content to help improve battery and uncheck it, if the box below with text Change brightness automatically when lighting changes exists, uncheck it as well. Close settings and you are done.
Read More
Copyright © 2023, ErrorTools. All Rights Reserved
Trademark: Microsoft Windows logos are registered trademarks of Microsoft. Disclaimer: ErrorTools.com is not affiliated with Microsoft, nor claims direct affiliation.
The information on this page is provided for information purposes only.
CompareExchange128 Error during Windows Installation
The installation of a new operating system can be an exciting yet challenging process for many users. As technology continues to advance, operating systems like Microsoft Windows become more sophisticated with enhanced features. However, along with these enhancements, users may encounter various error messages that can obstruct the installation process. One such error that has puzzled many is the CompareExchange128 error during Windows installation. In this article, we will dive deep into this error, exploring its causes, troubleshooting steps, and preventive measures.
Understanding CompareExchange128
Before delving into the specifics of the CompareExchange128 error, it is essential to understand what CompareExchange128 refers to. The term «CompareExchange128» is associated with an atomic operation in programming, specifically in the context of concurrent programming and memory operations in a multi-threaded environment. This operation is used as a primitive to ensure that updates to a memory location are safe from data corruption due to conflicting operations from other threads. In simple terms, it helps to synchronize access to shared data.
When this error occurs during Windows installation, it usually indicates a failure in the process that relies on this atomic operation to manage resources or memory correctly. This error can emerge due to several underlying issues, which we will explore in the subsequent sections.
Common Causes of CompareExchange128 Error
-
Incompatible Hardware: Incompatibilities between the user’s hardware and the Windows operating system can result in various errors during installation. For instance, the CPU must support certain features that some Windows versions require. If the hardware is outdated or lacks the necessary configurations, it could trigger a CompareExchange128 error.
-
Corrupted Installation Media: One of the primary causes of installation errors, including CompareExchange128, is corrupted installation media. This can be a DVD or USB drive that has been damaged or improperly prepared. If the installation files are incomplete or corrupted, the installation may fail with various error messages.
-
Faulty RAM: Random Access Memory (RAM) plays a pivotal role in the installation process. If the RAM is faulty or not functioning correctly, it may lead to data corruption and hence trigger the CompareExchange128 error. Issues with memory can manifest through various symptoms including unexpected system crashes and errors during critical operations.
-
BIOS Settings: The settings in the Basic Input/Output System (BIOS) can impact the installation of Windows. If certain features such as Secure Boot or virtualization options are not configured correctly, it may contribute to installation errors, including CompareExchange128.
-
Hard Drive Issues: The health of the hard drive where Windows is being installed can influence the installation process. Bad sectors, incorrect formatting, or other issues with the hard drive can impede the writing of installation files, leading to errors.
-
Outdated or Incompatible Drivers: Device drivers facilitate communication between the operating system and hardware components. If there are outdated or incompatible drivers present, they can interfere with the installation process and lead to various errors.
-
Setting Changes: Any recent changes made to system settings or configurations—such as file format changes, partition adjustments, or changes in the network configuration—can lead to conflicts during installation.
Troubleshooting CompareExchange128 Error
Now that we understand the common causes, let’s look into some methodical solutions to troubleshoot and potentially resolve the CompareExchange128 error during Windows installation.
-
Check Hardware Compatibility:
- To ensure that your hardware meets the requirements for the Windows version you are attempting to install, check the official Microsoft website for system requirements. Consider using tools like the PC Health Check app to identify compatibility issues.
-
Test the Installation Media:
- Create a new installation media using the Windows Media Creation Tool or verify the integrity of existing media. If using a USB drive, ensure it is formatted correctly (preferably FAT32) and configured properly. Also, try a different USB port if possible.
-
Run Memory Diagnostics:
- Use Windows Memory Diagnostic tool or third-party tools like MemTest86 to check your RAM. These tools scan for any faults in memory modules that could be causing the error. If any errors are detected, consider replacing the faulty RAM.
-
Update BIOS:
- Check the manufacturer’s website for available updates to your BIOS. Ensure all relevant settings like virtualization, Secure Boot, and legacy modes are configured as per the requirements of the OS you are trying to install.
-
Examine the Hard Drive:
- Use tools like CHKDSK to check for and repair errors on the hard drive. Run “chkdsk c: /f /r” in the Command Prompt, and consider reformatting the drive using the NTFS file system before installation.
-
Remove or Update Drivers:
- If possible, remove any unnecessary hardware components during installation. This could include additional graphics cards, USB devices, or any hardware that is not essential. If installing Windows over an existing version, consider uninstalling outdated drivers.
-
Reset BIOS to Default Settings:
- If you are uncertain about the configuration changes made to the BIOS, reverting to the factory default settings may help eliminate any potential conflicts.
-
Check Security Settings:
- If your system is configured with secure boot or other advanced security features, consider disabling these settings temporarily to evaluate if they are causing issues with the installation.
-
Use an Alternate Installation Method:
- If you continue experiencing issues, try an alternate installation approach. For example, perform an installation through DVD media if USB is failing, or vice versa.
-
Consult Forums and Community Support:
- Engage with the larger user community online. Forums like Microsoft Community, Reddit, or tech support sites can be instrumental in identifying solutions based on user experiences.
Preventive Measures
Once the CompareExchange128 error has been resolved, taking proactive measures can help prevent similar issues in the future. Here are several recommendations:
-
Routine Hardware Checkups: Regularly inspect internal components such as RAM, hard drives, and connection cables. Address any potential issues before they escalate.
-
Keep Software Updated: Ensure that both the operating system and drivers are regularly updated. This ensures optimal performance and reduces vulnerability to bugs and compatibility issues.
-
Use Trusted Installation Media: Always download Windows operating systems from official sources. This ensures the integrity of installation files and helps avoid corruption.
-
Backup Data Regularly: Maintain regular backups of essential data to minimize potential losses during system installation or recovery processes.
-
Educate Yourself: Stay informed about system requirements and common installation problems by reading documentation and user guides provided by Microsoft and other reputable sources.
-
Create Restore Points: If upgrading Windows or making significant changes, create a restore point, which allows you to revert to an earlier state if something goes wrong.
Conclusion
Experiencing a CompareExchange128 error during Windows installation can be a daunting challenge that many users face. Understanding the underlying causes and systematically troubleshooting the issue can often lead to a resolution, enabling a successful installation. Through proactive measures and ongoing maintenance, users can not only prevent similar errors from arising but also ensure a smoother computing experience moving forward. The world of technology is continually evolving, and navigating these challenges with knowledge and preparedness will make the journey a lot smoother.
For further assistance, don’t hesitate to contact Microsoft Support or learn from trusted online communities. By taking the necessary precautions and learning from experiences, user interactions with technology can become less of a struggle and more of an exploration into the vast features and aspects of their systems.
If you have an older processor and motherboard, and you are thinking of upgrading to Windows 10 64-bit Operating System then you might face CompareExchange128 error, and you will not be able to install the Windows 10 64-bit OS on your PC or laptop. This problem also occurs with the users who are upgrading to Windows 8.1 from Windows 8.
The Error will read as “You can’t install Windows 10 because your processor doesn’t support CompareExchange128”.
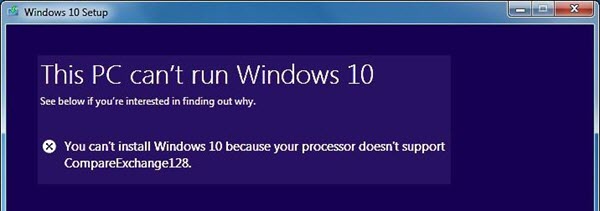
What causes CompareExchange128 error in Windows 10?
The main cause of CompareExchange128 error depends on the various two conditions:
CPU lacks CMPXCHG16b Instruction – This is the foremost reason for CompareExchange128 error which occurs because your CPU or Processor lacks CMPXCHG16b Instruction which is needed for Windows 10 64-bit Installation.
Old & Outdated BIOS – The CompareExchange128 error can also occur even if your 64-bit CPU / Processor supports CMPXCHG16b Instruction. This is due to older version of BIOS on your motherboard which fails to detect some of the instructions in your CPU or Processor which in this case is CMPXCHG16b.
Must Read: When to change Motherboard BIOS Battery?
How to find out whether your CPU supports CMPXCHG16b Instruction?
Here are the various methods by which you can find out if your processor supports CMPXCHG16b Instruction or not.
Using CPU Info Tools
CPU-Z – CPU-Z is a widely popular and well known CPU info tool that can tell you the complete details of your current CPU / Processor, Motherboard details and memory details. It is a very tiny utility and you can download and install it from the link given below.
Download CPU-Z
Coreinfo – Coreinfo is small command line utility that can tell you about the various in-depth technical details about your CPU or Processor. It can tell you about the mapping between logical processors and the physical processor, NUMA node, and socket on which they reside, as well as the cache’s assigned to each logical processor. It really gives you the very technical details about your processor which can be very hard to understand for most of the users but here you have to focus on only one thing which is CMPXCHG16b Instruction.
Click here to Download Coreinfo & Learn How to use it?
Search on Internet
If you do not physically own the processor but want to know that whether the other processor supports CMPXCHG16b Instruction or not, then you can find this by searching online on the internet. You can type the following search query in the Google for this:
<CPU Model> CMPXCHG16b
Fix & Solutions for CompareExchange128 / CMPXCHG16b Error in Windows 10
Here are the various fix and top solutions for resolving CompareExchange128 / CMPXCHG16b error on your computer when installing 64-bit version of Windows 10.
Update BIOS
The first thing to do when you encounter this CompareExchange128 / CMPXCHG16b Error is to update or flash your BIOS to the latest one. For this download the latest copy of BIOS (.ROM file) from your motherboard’s manufacturer website and then follow the instructions given in your motherboard manual to update/flash the BIOS. In most of the cases updating the BIOS can fix this annoying error.
Install 32-bit version of Windows 10
If updating the BIOS doesn’t solve your problem then forget about installing 64-bit version of Windows 10 and install the 32-bit version of Windows 10 until you decide to upgrade your processor and motherboard.
Workaround Fix [credit:windowsreport.com]
This is a workaround and not a proper fix but some users have pretty good success with it.
1. Backup all your important data and files.
2. Download all the updates and upgrade to 32-bit version of Windows 10.
3. Your Windows 10 32-bit version copy will be activated on Microsoft servers.
4. Now Download 64-bit version of Windows 10.
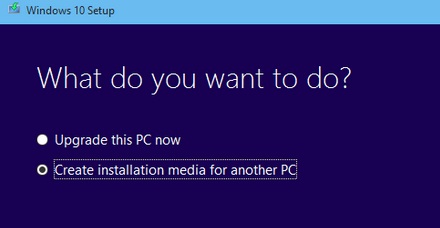
5. Use Windows 10 Creation Media Program and choose Create installation media for another PC. You will need an empty DVD or USB Flash Drive for this.
6. After this perform a clean install of Windows 10 and skip the step where it asks you to enter the serial number.
7. After the Installation is complete you will have Windows 10 64-bit running on your PC which is fully activated.
Get a New Processor & Motherboard
If all of the above solutions fail then the last resort is to upgrade your PC and get yourself latest generation of Processor and Motherboard which is fully compatible with Windows 10 64-bit OS.
If you have some queries regarding this then you can ask me by leaving a comment below.
See Also:
- Solution to USB Device Not Recognized Error in Windows
- How to Fix DNS_PROBE_FINISHED_NXDOMAIN Error in Chrome
Процессор не поддерживает CompareExchange128, не могу установить Windows
Похоже, что это проблема совместимости, тесно связанная с виртуализацией, поскольку Windows работает на том же ПК. Однако параметры VirtualBox должны быть удовлетворены, когда вы решите установить любую операционную систему, в дополнение к обычным требованиям, указанным для нее. VirtualBox имеет решение для этого.
Если вы получаете сообщение об ошибке. Вы не можете установить Windows, поскольку ваш процессор не поддерживает CompareExchange128 при установке Windows 10/8.1 с использованием виртуализации на VirtualBox, читайте дальше.
Исправление упоминается ниже, но убедитесь, что вы выполняете его, когда VirtualBox не работает в вашей системе.
Не удается установить Windows, потому что процессор не поддерживает CompareExchange128
1. Откройте командную строку с правами администратора.
2. Введите эти команды одну за другой и нажмите клавишу Enter :
Если при выполнении последней команды вы получили ошибку недопустимой пакетной команды, попробуйте выполнить ее с текущим пользователем (без прав администратора Командная строка ). Теперь перезагрузите компьютер и попробуйте установить Windows 8.1 с помощью виртуализации, и в этот раз вы не получите сообщение об ошибке.
Надеюсь, вы найдете исправление полезным!
Проверьте это сообщение, если вы получили сообщение об ошибке «Не удалось завершить установку Windows».
Источник
Ошибка CompareExchange128 во время установки Windows 10
Несмотря на то, что во время установки Windows 10 мы видим весь красивый пользовательский интерфейс, знайте, что драйверы важны и для установки требуется свободный диск для хранения, ваш процессор не менее важен. Если вы получаете CompareExchange128 ошибка во время установки Windows 10, CPU не имеет важной инструкции, называемой CMPXCHG16B. Это приводит к ошибке CompareExchange128 во время установки Windows 10. На самом деле CMPXCHG16b, PrefetchW и LAHF / SAHF являются критерием использования 64-разрядной версии Windows 10 при обновлении с более ранней версии Windows.
Что такое инструкция CMPXCHG16B
Инструкция CMPXCHG16B выполняет атомный сопоставление и обмен по 16-байтовым значениям. Эта инструкция также может называться CompareExchange128. Атомное сравнение и обмен означает, что CPU сравнивает содержимое ячейки памяти с заданным значением. Если они совпадают, это изменяет содержимое этой ячейки памяти на новое заданное значение. Я знаю его технические, но это дает вам немного идеи.
Ошибка CompareExchange128 во время установки Windows 10
1] Обновление драйверов BIOS и чипсетов
Лучше всего, если вы сможете выяснить, есть ли у вашего OEM-обновления обновление для вашего компьютера BIOS и соответствующих драйверов чипсета. Сначала вы должны проверить версию BIOS. В строке поиска введите msinfo32 в поиск и нажмите Enter. После того, как откроется инструмент System Information Tool, вы можете проверить версию BIOS.
Затем вам нужно использовать утилиту BIOS, поставляемую вместе с ноутбуком или ПК, а затем использовать ее для обновления. Это различно для каждого ПК. Если у вас его нет, посмотрите на веб-сайте OEM и посмотрите, есть ли возможность скачать.
2] Переход к 32-разрядной версии Windows 10:
Если обновление BIOS недоступно, вы можете переключиться на 32-битный версии Windows. Это приведет к ограничению объема установленной ОЗУ и других мест, но если это не проблема, вы можете переключиться. Многие используют 64-бит для улучшения аппаратных возможностей, ОЗУ и других вещей.
3] Купить новое оборудование
Если ваш компьютер слишком стар, лучше купить новое оборудование или совершенно новый ПК, который может идти в ногу в течение следующих нескольких лет. Мне пришлось заменить 10-летнего ноутбука Dell, хотя он смог обновиться до Windows 10, но не смог продолжить работу. Обязательно проверьте все функции и совместимость с Windows 10.
См. Этот пост, если вы не можете установить Windows, процессор не поддерживает CompareExchange128.
Источник
Ошибка CompareExchange128 при установке Windows 10
Что такое инструкция CMPXCHG16B
Инструкция CMPXCHG16B выполняет атомарное сравнение и обмен 16-байтовыми значениями. Эта инструкция также может называться CompareExchange128. Атомное сравнение и обмен означает, что ЦП сравнивает содержимое области памяти с заданным значением. Если они одинаковые, содержимое этой ячейки памяти изменяется на новое заданное значение. Я знаю его технический, но он дает вам немного идеи.
Ошибка CompareExchange128 при установке Windows 10
1] Обновление драйверов BIOS и наборов микросхем
Лучше всего выяснить, есть ли у вашего OEM-изготовителя обновление для BIOS вашего компьютера и связанных драйверов чипсета. Сначала вы должны проверить версию BIOS. В строке поиска введите msinfo32 в поле поиска и нажмите Enter. Как только откроется System Information Tool, вы можете проверить версию BIOS.
Затем вам нужно использовать утилиту BIOS, которая поставляется с вашим ноутбуком или ПК, а затем использовать ее для обновления. Это отличается для каждого ПК. Если у вас его нет, посмотрите на сайте OEM и посмотрите, есть ли возможность скачать.
2] Переходите на 32-разрядную версию Windows 10:
Если обновление BIOS недоступно, вы можете вместо этого перейти на 32-разрядную версию Windows. Это приведет к ограничению объема установленной оперативной памяти и других мест, но если это не проблема, вы можете переключиться. Многие используют 64-битные для улучшения аппаратных функций, оперативной памяти и других вещей.
3] Купите новое оборудование
Если ваш компьютер слишком старый, лучше купить новое оборудование или совершенно новый компьютер, который будет работать в течение следующих нескольких лет. Мне пришлось заменить свой 10-летний ноутбук Dell, хотя он мог обновиться до Windows 10, но не смог идти в ногу. Обязательно проверьте все функции и совместимость с Windows 10.
Посмотрите этот пост, если вы не можете установить Windows, процессор не поддерживает CompareExchange128.
Источник
Compareexchange128 Windows 10 как исправить?
»Как исправить ошибку Windows 10 Update Exchange128
Некоторые пользователи Windows 7 и Windows 8.1 сообщили об ошибке CompareExchange128 при попытке перейти на Windows 10, Ошибка гласит: «Вы не можете установить Windows 10, потому что ваш процессор не поддерживает CompareExchange128». Для обновления до Windows 10 (64-разрядная версия) должна присутствовать инструкция CMPXCHG16B. Если вы получаете эту ошибку, это в основном означает, что ваш процессор не имеет инструкции CMPXCHG16B.
Загрузка доступна для полного восстановления Сравнить Exchange128 Ошибка
Рекомендуется: Загрузите утилиту автоматического восстановления, чтобы исправить эту и другие проблемы с производительностью ПК.
Сертифицированный безопасный, без вирусов скачать. Выбор редактора инструментов ошибок.
Причины ошибок
Ошибка CompareExchange128 обычно возникает по двум возможным причинам:
Дополнительная информация и ручной ремонт
Одно из основных требований для обновления до Windows 10 для вашего процессора иметь инструкцию CMPXCHG16b. Вам также нужна правильная версия BIOS, чтобы гарантировать бесперебойную установку. Ниже описано, как вручную решить эту проблему.
ПРИМЕЧАНИЕ. Если вы не уверены в себе, используя ручные методы, перечисленные ниже, настоятельно рекомендуется обратиться за помощью к опытному специалисту. Если вы не знаете кого-то, вы также можете использовать автоматизированный инструмент, чтобы это исправить.
Прежде чем выполнять какие-либо исправления, попробуйте сначала определить, является ли причина ошибки причиной того, что на вашем процессоре отсутствует инструкция CMPXCHG16b. Вы можете использовать инструмент Информация о процессоре, который предоставляет полную информацию о вашем процессоре, памяти и материнской плате. Если вы ищете более подробную информацию, вы также можете попробовать утилиты командной строки. Но самый безопасный и простой способ проверить это — просто выполнить поиск в Интернете. Попробуйте использовать поисковый запрос: CMPXCHG16b
Способ 1 — обновить BIOS
Этот метод загрузит последнюю версию BIOS от производителя вашей материнской платы. Это гарантирует, что ваш процессор имеет инструкцию CMPXCHG16b, необходимую для завершения 10-разрядной установки Windows 64. Чтобы обновить BIOS вашего компьютера, выполните следующие действия:
Способ 2 — установить 10-разрядную версию Windows 32
Если обновление BIOS не работает, вы можете установить 32-разрядную версию Windows 10 вместо 64-разрядной. Вот как это сделать:
Способ 3 — Купить новый процессор / материнскую плату
Если вышеупомянутые два метода не работают, есть большая вероятность, что эта ошибка происходит из-за устаревшего процессора / материнской платы. Следующее возможное решение — купить обновленную модель, полностью совместимую с 64-битной Windows 10.
Метод 4 — Загрузите автоматизированный инструмент
Если ничего не помогает, вы можете рассмотреть возможность использования этого мощный автоматизированный инструмент чтобы быстро решить проблему и любые другие проблемы, связанные с компьютером.
Процессор не поддерживает данную версию Windows. Что это значит?
Microsoft продолжает усиленно радовать, удивлять и шокировать своих пользователей. Буквально на днях ко мне обратился коллега с такой проблемой: он приобрел и собрал новый ПК на базе нового процессора Intel Core i3 7100. На собранный компьютер был успешно установлен образ Windows 7. Но через некоторое время, после того, как Windows 7 закачала и установила все обновления через Windows Update, система перестала получать новые обновления со следующей ошибкой:
Unsupported hardware
Your PC uses a processor that is designed for the latest version of Windows. Because the processor is not supported together with the Windows version that you are currently using, your system will miss important security updates.
Не поддерживаемое оборудование
Ваш процессор не поддерживает данную версию Windows, вы не сможете получать обновления.
Несовместимое оборудование
Ваш компьютер оборудован процессоров, предназначенным для последней версии Windows, вы пропустите важные обновления системы безопасности.
При попытке выполнить поиск обновления через Windows Update появляется ошибка:
Code 80240037 Windows Update encountered an unknown error.
Неподдерживаемые процессоры для Windows 7 и Windows 8.1
Дело в том, Microsoft еще в прошлом году анонсировала, что все обладатели новейших процессоров должны использовать только последнюю версию клиентской платформы — Windows 10. Для более старых версий Windows будет созданы ограничения для использования данных моделей процессоров.
Ограничения распространяется на следующие поколения процессоров:
В апреле 2017 года MSFT выпустило специальные патчи для предыдущих версий ОС
В описании патчей заявляется о появление функционала определения поколения процессора и поддерживаемого оборудования при поиске обновлений через Windows Update.
Enabled detection of processor generation and hardware support when PC tries to scan or download updates through Windows Update.
Соответственно, после установки данных обновлений, система начинает блокировать загрузку новых обновлений (в т.ч для MS Office) и драйверов на старых версиях ОС с ошибкой 80240037, тем самым вынуждая пользователей переходить на Windows 10 /Windows Server 2016. Таким образом, все старые системы с новым оборудованием перестают получать обновления безопасности и переходят в разряд уязвимых. Похоже на шантаж…
Конечно, временно поможет удаление этих обновлений (wusa.exe /quiet /uninstall /kb:4012218 /promptrestart или wusa.exe /quiet /uninstall /kb:4012219 /promptrestart ) и блокировка их установки, но с высокой долей вероятности они прилетят в следующем месяце в обновлении Monthly Rollup (в рамках новой концепции накопительной модели кумулятивных обновлений).
Кроме того, блокируется установка драйверов для видеоадаптеров на базе графических процессоров Intel седьмого поколения (Intel HD Graphics 610 — 650). В Windows 7 SP1 он определяется как стандартный VGA графический адаптер.
При попытке установить скачанный с драйвера производителя подписанный видео драйвер, появляется ошибка «Эта система не удовлетворяет минимальным требованиям для установки программного обеспечения».
Как вы видите, непосредственно в установщике драйвера указано, что на оборудовании с седьмым поколением процессоров Intel, драйвер может быть установлен только в Windows 10 x64.
Wufuc – патч для восстановления Windows Update
Существует неофициальный обходной метод, позволяющий убрать сообщение «Оборудование не поддерживается» и восстановить возможность получения и установки обновлений безопасности на компьютерах с Windows 7 и 8.1 с процессорами Intel Kaby Lake, AMD Ryzen, и другими не поддерживаемыми CPU.
Пользователь GitHub под ником Zeffy выпустил небольшой патч Wufuc (windows update …. ну вы поняли), который позволяет избавиться от проблемы «несовместимого оборудования». Патч отключает сообщение Центра обновлений о несовместимости оборудовании и разрешает компьютеру получать обновления с Windows Update. Последнюю стабильную версию патча Wufuc можно скачать тут: https://github.com/zeffy/wufuc/releases/latest.
Есть версия Wufuc как для x86, так и для x64 систем.
Согласно информации от Zeffy функция обнаружения типа процессора и запрета получения обновлений находится в библиотеке wuaueng.dll. Первоначально патч Wufuc заменял данный файл, но т.к. данное решение неустойчиво против обновления файла очередным обновлением Windows Update, в последующих релизах Wufuc логика работы патча была изменена.
Теперь фактическая замена файла wuaueng.dll не производится. Установщик wufuc_setup_x64.msi регистрирует новое задание планировщика, которое запускает wufuc при загрузке компьютера. Затем wufuc внедряет себя в процесс service host или службу wuauserv и перехватывает вызов функций IsDeviceServiceable и IsCPUSupported, модифицируя возвращаемый ответ.
Таким образом патч wufuc отключает сообщение «Оборудование не поддерживается» в Windows Update, и позволяет продолжать устанавливать обновления на системах Windows 7 и 8.1.
Compareexchange128 Windows 10 как исправить?
Не для кого не секрет, что новая операционная система Windows 8 компании Microsoft с момента ее выхода подверглась серьезной критике. Наибольшее недовольство пользователей вызвал новый плиточный интерфейс Metro с отсутствующей в нем привычной кнопкой “Пуск”. Критику в Microsoft восприняли как руководство к действию.
На конец августа 2013 года запланировано выпустить новую версию операционной системы, которая уже получила официальное название Windows 8.1 (Windows Blue). Она будет бесплатно распространяться через магазин Windows Store как обновление Windows 8.
В настоящий момент времени уже выпущена и доступна для загрузки с сайта Microsoft ознакомительная версия Windows 8.1 Preview.
В силу того, что это Preview, наверное не многие захотят ставить ее сразу на рабочий компьютер или планшет. Первое, что приходит в голову по поводу того, как познакомиться с новой редакцией ОС, это система виртуализации Oracle VirtualBox. Windows 8, как 32-х, так и 64-разрядная, в Virtual Box работают исправно.
Однако, попытка установить в виртуальную машину Virtual Box (в данный момент речь идет о VirtualBox 4.2.14 для Windows) 64-разрядную Windows 8.1 Preview закончится неудачей. Процесс инсталляции сразу же остановится и вы получите вот такое сообщение:
Понять, что пошло не так не специалисту из этого сообщения достаточно сложно.
Хорошо, если 8.1 Preview х64 не хочет устанавливаться на чистый диск, то можно попытаться установить ее как обновление Windows 8.
Для этого “вставляем” в виртуальный оптический привод гостевой ВМ с Windows 8 x64 ISO файл с образом дистрибутива 8.1 Preview х64 и запускаем с него “setup.exe”.
Очень быстро установка снова останавливается, но информации уже значительно больше –
Невозможно установить Windows 8.1 Preview, так как процессор не поддерживает CompareExchange128
Стало быть дело в процессоре. Но не в физическом, – компьютер, на котором делались попытки инсталляции 8.1 Preview х64 в VirtualBox, достаточно современный с процессором I7, а в виртуальном процессоре, который предоставляет система виртуализации.
Наверняка эту недоработку Oracle исправит в самое ближайшее время в очередном обновлении VirtualBox. Однако, для тех, кто не согласен ждать новой исправленной версии VirtualBox, можно предложить очень простое решение этой проблемы. Его удалось найти здесь.
Настройка необходимых характеристик процессора виртуальной машины
Дело в том, что, как объясняется в Windows 8.1 Preview FAQ, для инсталляции 64-разрядных версий процессор должен поддерживать: CMPXCHG16b, PrefetchW and LAHF/SAHF.
Включить поддержку этих опций процессора в Oracle VirtualBox можно следующим образом:
1. Запустить командную строку операционной системы хостового компьютера (привилегии администратора при этом не требуются) и перейти в корневую папку VirtualBox. Если система виртуализации устанавливалась с параметрами по умолчанию, то для этого надо выполнить:
cd C:\Program Files\Oracle\VirtualBox 2. Не выходя из командной строки выполнить команду:
VBoxManage setextradata [имя ВМ для Windows 8.1] VBoxInternal/CPUM/CMPXCHG16B 1
После этого можно беспрепятственно инсталлировать любым способом Windows 8.1 Preview x64 в выбранную виртуальную машину и получить вполне ожидаемый результат:
К сожалению, в гостевой машине Windows 8.1 Preview пока не будут работать “Дополнения гостевой ОС” – имеющиеся в версии VirtualBox 4.2.14 попросту не устанавливаются. Это относится как к 64-х, так и к 32-разрядной версиям. В результате этого такие возможности, как автоматическое масштабирование окна гостевой ОС, общий буфер обмена, общие папки и другие будут недоступны.
Решение проблемы отсутствующих дополнений гостевой ОС путем использования удаленного подключения к виртуальной машине
Временным выходом из этого положения может оказаться использование удаленного рабочего стола. Реализовать эту идею можно двумя способами:
1. Разрешить удаленные подключения непосредственно в гостевой машине Windows 8.1 Preview
Для доступа к свойствам системы нажимаем Win+X, в появившемся списке выбираем “Система” –> “Дополнительные параметры системы” –> “Удаленный доступ”:
2. Включить в VirtualBox в настройках виртуальной машины “Удаленный дисплей”:
В общем, кому как больше нравится. И то и другое это классический RDP. Лично мне как-то привычнее первый, но при этом придется разобраться с сетью и IP-адресом гостевой машины.
При подключении удаленного дисплея в VirtualBox нужно будет обратить внимание на номер порта – их можно менять для удаленного подключения к нескольким ВМ с IP-адресом хоста.
Для того, чтобы получить адекватное представление о Windows 8.1 Preview, в настройках RDP соединения имеет смысл выбрать максимальную скорость соединение и включить все эффекты рабочего стола:
Здесь же можно подключить локальные ресурсы компьютера для обмена файлами с гостевой ОС.
Желаю всем успешного и приятного знакомства с Windows 8.1 Preview.
Как я и предполагал, после выхода следующей версии Oracle VirtualBox — 4.2.16 большинство положений, описанных в данной статье, потеряли свою актуальность.
Теперь для установки 64-разрядной версии Windows 8.1 Preview достаточно правильно выбрать в настройках тип операционной системы:
“Дополнения гостевой ОС” теперь устанавливаются без проблем и позволяют настраивать варианты обмена данными с главным компьютером.
А вот с масштабированием экрана гостевой машины у меня пока что-то не получилось (возможно, это только у меня) – разрешение экрана гостевой Windows 8.1 при переходе в полноэкранный режим или в режим масштабирования не изменяется. Так что вариант удаленного подключения к гостевой машине остается пока актуальным.
В следующей статье описана установка Windows 8.1 непосредственно на виртуальный диск.
— 4 июля, 2013 в рубрике — Microsoft Windows Microsoft, VirtualBox, Windows 8, Процессор
» How to Fix Windows 10 Upgrade Compare Exchange128 Error Message — Error Support for Windows PCs
Some Windows 7 and Windows 8.1 users reported experiencing a CompareExchange128 error when trying to upgrade to Windows 10. The error reads, “You can’t install Windows 10 because your processor doesn’t support CompareExchange128”. In order to upgrade to Windows 10 (64-bit), the CMPXCHG16B instruction must be present. If you receive this error, this mostly means that your CPU doesn’t have the CMPXCHG16B instruction.
Recommended: Download the Automatic Repair Utility to correct this and other PC performance issues.
Установка в материнскую плату на 775 сокете
Для начала, нужно узнать, что за процессор вам достался.
Установленный процессор с пропилами
После успешной установки биос должен правильно определить новый процессор. Не лишним будет зайти в настройки и проверить их корректность. После загрузки windows заходим в диспетчер задач и проверяем количество ядер. Иногда, при переходе на зион с двухъядерного процессора, количество ядер может остаться равным двум. Поэтому если вы видите 2 ядра вместо 4, то нужно проделать следующее:
Теперь система будет видеть все 4 ядра
Вот и всё, установка прошла успешно и можно переходить к тестированию.
При загрузке появляется сообщение о необходимости обновить биос, либо сообщение о неподдерживаемом процессоре (unsupported cpu detected)
Как правило, если нажать F1, то система успешно загружается. Проблема, вероятнее всего, в том, что не прошит модифицированный биос. Если ошибка появляется даже после успешной прошивки, но при этом все остальное работает нормально, то избавиться от неё можно отключив функцию Halt boot on error в bios.
Не устанавливается Windows 8.1 или Windows 10
Windows может жаловаться на какую-либо отсутствующую функциональность процессора ( например CompareExchange128 ). Ошибка появляется когда:
Для исправления — прошить последнюю актуальную версию bios с микрокодами Xeon.
Система не загружается, выдает ошибку вида «unrecognized CPU error»
Windows крашится при загрузке
Выполните сброс всех настроек биоса, либо установите их в дефолтное значение. Убедитесь, что установлен корректный режим работы SATA (IDE или AHCI). В редких случаях, может потребоваться переустановка Windows.
Кулер постоянно крутится на максимальных оборотах
Такое может быть по нескольким причинам:
После установки Xeon, при включении компьютера черный экран и ничего не происходит
Во первых, убедитесь, что используете совместимую материнскую плату и для неё прошит модифицированный биос.
Во вторых, проверьте, правильно ли установлен процессор в сокет. Возможно не до конца срезаны пластиковые ключи и это мешает контакту. По возможности, проверьте работоспособность на другой плате.
И наконец, убедитесь, что все остальные комплектующие подключены корректно. Проверьте работоспособность со старым процессором, чтобы исключить другие неполадки.
Fix CompareExchange128 Windows 10 Error [Solved]
If you have an older processor and motherboard, and you are thinking of upgrading to Windows 10 64-bit Operating System then you might face CompareExchange128 error, and you will not be able to install the Windows 10 64-bit OS on your PC or laptop. This problem also occurs with the users who are upgrading to Windows 8.1 from Windows 8.
What causes CompareExchange128 error in Windows 10?
The main cause of CompareExchange128 error depends on the various two conditions:
CPU lacks CMPXCHG16b Instruction – This is the foremost reason for CompareExchange128 error which occurs because your CPU or Processor lacks CMPXCHG16b Instruction which is needed for Windows 10 64-bit Installation.
Old & Outdated BIOS – The CompareExchange128 error can also occur even if your 64-bit CPU / Processor supports CMPXCHG16b Instruction. This is due to older version of BIOS on your motherboard which fails to detect some of the instructions in your CPU or Processor which in this case is CMPXCHG16b.
Must Read: When to change Motherboard BIOS Battery?
How to find out whether your CPU supports CMPXCHG16b Instruction?
Here are the various methods by which you can find out if your processor supports CMPXCHG16b Instruction or not.
CPU-Z – CPU-Z is a widely popular and well known CPU info tool that can tell you the complete details of your current CPU / Processor, Motherboard details and memory details. It is a very tiny utility and you can download and install it from the link given below.
Coreinfo – Coreinfo is small command line utility that can tell you about the various in-depth technical details about your CPU or Processor. It can tell you about the mapping between logical processors and the physical processor, NUMA node, and socket on which they reside, as well as the cache’s assigned to each logical processor. It really gives you the very technical details about your processor which can be very hard to understand for most of the users but here you have to focus on only one thing which is CMPXCHG16b Instruction.
Click here to Download Coreinfo & Learn How to use it?
Search on Internet
If you do not physically own the processor but want to know that whether the other processor supports CMPXCHG16b Instruction or not, then you can find this by searching online on the internet. You can type the following search query in the Google for this:
CMPXCHG16b
Fix & Solutions for CompareExchange128 / CMPXCHG16b Error in Windows 10
Here are the various fix and top solutions for resolving CompareExchange128 / CMPXCHG16b error on your computer when installing 64-bit version of Windows 10.
Update BIOS
The first thing to do when you encounter this CompareExchange128 / CMPXCHG16b Error is to update or flash your BIOS to the latest one. For this download the latest copy of BIOS (.ROM file) from your motherboard’s manufacturer website and then follow the instructions given in your motherboard manual to update/flash the BIOS. In most of the cases updating the BIOS can fix this annoying error.
Install 32-bit version of Windows 10
If updating the BIOS doesn’t solve your problem then forget about installing 64-bit version of Windows 10 and install the 32-bit version of Windows 10 until you decide to upgrade your processor and motherboard.
Workaround Fix [credit:windowsreport.com]
This is a workaround and not a proper fix but some users have pretty good success with it.
1. Backup all your important data and files.
2. Download all the updates and upgrade to 32-bit version of Windows 10.
3. Your Windows 10 32-bit version copy will be activated on Microsoft servers.
4. Now Download 64-bit version of Windows 10.
5. Use Windows 10 Creation Media Program and choose Create installation media for another PC. You will need an empty DVD or USB Flash Drive for this.
6. After this perform a clean install of Windows 10 and skip the step where it asks you to enter the serial number.
7. After the Installation is complete you will have Windows 10 64-bit running on your PC which is fully activated.
Get a New Processor & Motherboard
If all of the above solutions fail then the last resort is to upgrade your PC and get yourself latest generation of Processor and Motherboard which is fully compatible with Windows 10 64-bit OS.
If you have some queries regarding this then you can ask me by leaving a comment below.
See Also:
»Как исправить ошибку Windows 10 Update Exchange128
Некоторые пользователи Windows 7 и Windows 8.1 сообщили об ошибке CompareExchange128 при попытке перейти на Windows 10, Ошибка гласит: «Вы не можете установить Windows 10, потому что ваш процессор не поддерживает CompareExchange128». Для обновления до Windows 10 (64-разрядная версия) должна присутствовать инструкция CMPXCHG16B. Если вы получаете эту ошибку, это в основном означает, что ваш процессор не имеет инструкции CMPXCHG16B.
Fix CompareExchange128 Windows 10 Error [Solved]
If you have an older processor and motherboard, and you are thinking of upgrading to Windows 10 64-bit Operating System then you might face CompareExchange128 error, and you will not be able to install the Windows 10 64-bit OS on your PC or laptop. This problem also occurs with the users who are upgrading to Windows 8.1 from Windows 8.
The Error will read as “You can’t install Windows 10 because your processor doesn’t support CompareExchange128”.
Источник