
Раз вы видите эту статью, значит вы попытались установить Windows 10 на свой компьютер. Скорее всего он весьма устаревший, ведь в тексте сообщения говорится об отсутствии поддержки важного компонента со стороны процессора. Хотя это не всегда правда. Не всегда нужно лишь менять ЦП, порой проблема носит программный характер. Все, что удалось узнать об ошибке, читайте дальше.
Процессор компьютера не поддерживает важный компонент compareexchange128
Причины
Есть довольно очевидная причина ошибки, но также речь может идти и о не совсем банальных проблемах.
В чем проблема:
- Процессор не поддерживает инструкции CMPXCHG16b. Такие инструкции как CMPXCHG16b, PrefetchW и LAHF/SAHF необходимы для работы с Windows 10 х64. Роль указанного компонента — атомарное сравнение и обмен 16-байтовыми значениями. Если простыми словами, процессор не умеет сравнивать содержимое областей памяти с указанным значением.
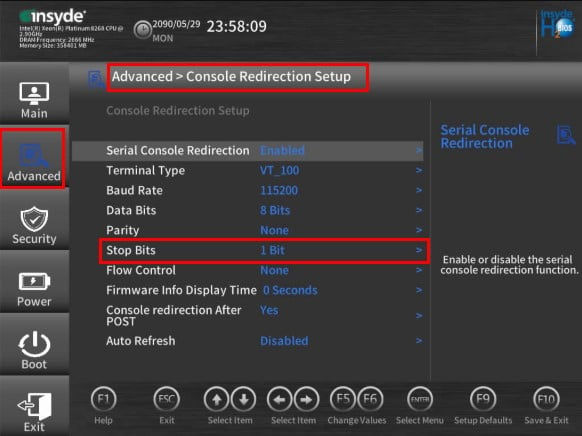
- Настройки BIOS. Некоторые параметры в BIOS, если их активировать, могут вызывать подобные ошибки compareexchange128.
- Несовместимость Xeon-процессоров с Windows x64. Серверные процессоры старых поколений плохо адаптированы к пользовательской системе. В BIOS просто нет необходимых микрокодов для данного процессора.
Как исправить ошибку compareexchange128?
Первое, что вам нужно сделать – проверить поддержку необходимых инструкций. Нужно изучить технические характеристики процессора на предмет наличия поддержки compareexchange128 или CMPXCHG16b. На старых ЦП данная инструкция отсутствует. Хотя напрашивается вывод, что нужно покупать новый процессор, мы бы рекомендовали другой путь – просто установите Windows 7 или 8. Простое обновление процессора не приведет к сильному улучшению работы ПК в целом, так как у вас старый тип ОЗУ, устаревшая видеокарта и материнская плата. Уже лучше в будущем приобрести новый компьютер. Хотя если удастся найти дешевый б/у ЦП с поддержкой соответствующих инструкций, может иметь смысл и замена процессора.
Какие есть решения ошибки compareexchange128:
- Настройка BIOS. Следует перейти в BIOS и проверить, что параметр Executable Disable Bits обладает значением Disable. Если он включен, отключите настройку. После этого установка Windows 10 должна пройти успешно.
- Установка BIOS. Что касается процессоров Xeon, вам нужно прошить BIOS под него соответствующим образом. Подходящие версии можно найти по запросу xeon modded bios. Хотя не все материнские платы поддерживают перепрошивку. К примеру, материнские платы Intel не позволяют это делать. Еще подходящую версию BIOS можно найти по запросу: «[MOD] LGA775 Support For LGA771 Xeon CPUs».
Попробуйте перечисленные выше решения, возможно, вам повезет и удастся обойтись без затрат. Если же проблема в процессоре, тогда остается только устанавливать старую версию Windows или обновляться. Здесь уже на ваше усмотрение.
During Windows 10 installation, you will see all the beautiful user interfaces, however, what’s more, important are the drivers, your processor, and free storage disk in order for the installation to be successfully completed. So if you are getting the CompareExchange128 error during the installation of Windows 10, this means that the CPU lacks a very important instruction known as “CMPXCHG16B”. Thus, if you don’t have CMPXCHG16B, then it will result in the CompareExchange128 error when you install Windows 10. In fact, CMPXCHG16B, PrefetchW as well as LAHF/SAHF is a criterion for you to be able to use Windows 10 64-bit version when upgrading from an earlier version of Windows.
So what exactly is the CMPXCHG16B instruction? The CMPXCHG16B instruction is the one that performs an atomic compare-and-exchange on 16-byte values. This instruction can also be referred to as “CompareExchange128”. The atomic compare-and-exchange means that the CPU compares the contents of a memory location with a given value. So if the values are the same, it modifies the contents of that memory location to a new given value. Note that this kind of issue only happens to the 64-bit Windows 10 version and the only way to resolve it is by getting an update on the hardware level from the OEM. On the other hand, if nothing really works, it’s maybe time for you to get a new CPU but before you resort to that, in the meantime, you can try following the options given below to fix the CompareExchange128 error during the installation of Windows 10.
Option 1 – Try to update the BIOS and Chipset Drivers
One of the best things you can do to fix the CompareExchange128 error is by updating the BIOS and chipset drivers which is why you need to check if your OEM has an update available for your computer’s BIOS as well as the related chipset drivers. But before that, you need to first check the BIOS version. To do so, follow these steps:
- Type “msinfo32” in the search bar and hit Enter to open the System Information Tools.
- After opening the System Information Tools, check the BIOS version.
- Then take note of that BIOS version. You also need to use the BIOS utility that came with your computer and use it for the upgrade. Note that it is different for every computer and if you don’t have it, you can just go to the OEM website and see if there is an option to download it there.
Option 2 – Try to downgrade to the 32-bit Windows 10 version
If option 1 didn’t work as the BIOS update is not available, you can also try downgrading to the 32-bit version of Windows 10. Keep in mind that this will bring restrictions on the amount of RAM installed and other places but that won’t be a problem as you can still switch.
Option 3 – Try buying a new hardware
If none of the first two options didn’t work for some reason then maybe it’s time for you to purchase new hardware especially if your computer is way too old. In such cases, it’s better to buy new hardware or better yet, a new computer that can keep up for the next couple of years.
Do You Need Help with Your Device?
Our Team of Experts May Help
Troubleshoot.Tech Experts are There for You!
GET HELP
Troubleshoot.Tech experts work with all versions of Microsoft Windows including Windows 11, with Android, Mac, and more.
Share this article:
You might also like
Each time you execute a command on your computer, it takes into account a number of files and space for the code in the background for the command to be executed. Thus, executing the command is not that easy which is why you could encounter some errors along the way due to various limitations or poor allocation of memory, and so on. One of the errors you might encounter when executing a command on Windows 10 and Windows Server is the “Not enough storage is available to process this command”.
There are several potential fixes you can check out to fix this error. To fix this error, you can try to delete the temporary files in your computer, run the DISM tool or apply some registry tweaks. For more details, refer to each one of the given options below.
Option 1 – Try to delete the temporary files
The error could be caused by some temporary or junk files in your computer and so you need to clear them up to fix the problem. You can achieve that using the Storage Sense feature.
- Open Setting > System > Storage from the WinX Menu.
- From there, you will see a list of all the local and connected storage devices along with the details on the free space. Make sure that Storage Sense is on.
- Next, find a link that says “Free Up Space” and click it to open.
- After that, a screen which is the built-in program in Windows 10 will appear and will scan your computer for the following junk files so you can free up disk space:
- Windows Upgrade Log Files
- System created Windows Error Reporting Files
- Thumbnails
- Temporary Internet Files
- Previous Windows Installation Files
- Delivery Optimisation Files
- DirectX Shader Cache
- Choose the files you want to get rid of and then click on the remove files option. Note that you’ll have an idea of the total size as you select any of the junk files listed above.
- Now go to the “Free Up Space Now” section and click the Clean now button. This will get rid of all the temporary or junk files in your computer and should hopefully fix Error 1310.
Option 2 – Run the DISM tool
You can also run the DISM Tool as it could also help in fixing the “Not enough storage is available to process this command” error in Windows 10. Using this built-in tool, you have various options such as the “/ScanHealth”, “/CheckHealth”, and “/RestoreHealth” that could help in fixing error 0x80246019.
- You can run the DISM tool via Advanced Startup Options or you could boot your computer into a Clean Boot State and then select Command Prompt.
- Open the Command Prompt with admin privileges.
- Then type in the following commands and make sure to hit Enter right after you type each one of them:
- Dism /Online /Cleanup-Image /CheckHealth
- Dism /Online /Cleanup-Image /ScanHealth
- exe /Online /Cleanup-image /Restorehealth
- Do not close the window if the process takes a while as it will probably take a few minutes to finish. Once it’s done, restart your computer and try again. If it didn’t work, you can try to use the “/StartComponentCleanup” parameter: Dism /Online /Cleanup-Image /StartComponentCleanup
Option 3 – Try to use the Registry Editor
The memory range allocated for the tasks and commands to be executed is associated with the IRPStackSize DWORD. Thus, to fix the error, you need to extend the range by applying some registry tweak. Before you proceed, make sure that you create a System Restore point first. Once you’re done, follow these steps:
- Tap the Win + R keys to open the Run dialog box and type “Regedit” in the field and tap Enter to open the Registry Editor.
- Next, navigate to this registry key: ComputerHKEY_LOCAL_MACHINESYSTEMCurrentControlSetServicesLanmanServerParameters
- From there, look for the DWORD named “IRPStackSize” and right-click on it. If you can’t find this DWORD, just right-click on any empty space and select New > DWORD (32-bit) Value.
- Input “IRPStackSize” as the DWORD name and double click on it and set its Value data to be greater than its default value. Note that the maximum value allowed is “0xc” and the range starts from “0x1”.
- Now click on OK and exit the Registry Editor and then restart your computer and see if the error is fixed.
Read More
A lot of users rely on keyboard shortcuts to carry out tasks on their PCs. One of the most common keyboard shortcuts used is the Ctrl + Shift + Esc which opens the Task Manager. As you can see, the Shift key is not just used to capitalize a text as it can also be used for other functions and plays an essential role in operating a computer. However, if you suddenly find it not working, read on as this post will help you fix the problem.
If your Shift key is not working, there are several potential fixes you can check out to fix it.
These are the different ways to get rid of the Shift key not working issue on Windows 10:
- Physically clean the key and keyboard
- Disable Sticky Keys.
- Update, Reinstall, or Rollback Keyboard driver.
- Test the keyboard on another system.
- Check your connections
- Run the Hardware troubleshooter
- Troubleshoot in Clean Boot State.
Option 1 – Clean the keyboard keys physically
Your keyboard might not be working properly due to some dirt or other corrosion. Thus, you need to clean your keyboard, especially the Shift key. First, you need to shut down your computer and then unplug the keyboard if you are using a desktop computer and then prepare it for cleaning. After that, use a small cotton ear cleaning tool to get between the creases and clean them. You can dip it slightly in alcohol to make it more efficient in cleaning dust and dirt. And if you can, you have the option to pull apart the keyboard completely and then wipe away all the corrosion from the inside. Once you’re done, put the keyboard back together and then plug it back into your PC. Now turn your PC on and check if the Shift key is now working.
Option 2 – Try to disable the Sticky keys
Another thing you can try is to disable the Stick keys. How? Refer to these steps:
- Tap the Win + I keys to open the Settings app.
- After that, navigate to the Ease of Access section, and here, select Keyboard.
- Next, make sure that the option for Press one key at a time under the Sticky Keys is toggled off.
Option 3 – Reinstall, update or rollback your keyboard driver
Once you’ve determined that the problem is in the software part of the keyboard, it is now time to try to reinstall, update or roll back your keyboard drivers. To reinstall the driver for your keyboard, refer to these steps:
- From the WinX Menu, open the Device Manager.
- In the Device Manager, you should find your laptop’s keyboard under the “Keyboards” option. Right-click on it and select the “Uninstall” option.
Note: If you’re not quite certain about your laptop’s keyboard, you can uninstall all the keyboards if there’s more than one.
- After that, restart your PC and see if the keyboard driver is installing automatically. If not, open the Device Manager again and right-click on Keyboards, and select the option “Scan for hardware changes” to install it.
Once the keyboard driver is installed again, check if your keyboard is now working properly or not.
Option 4 – Try connecting the keyboard to a different USB port or another computer
The problem might have something to do with the USB port that’s currently in use by your keyboard. It could be that it’s not working so it makes sense to unplug it and attach it to another USB port. You can also clean the USB port on both ends to ensure that they are not affected by corrosion. In addition, you can also try connecting the keyboard to a different computer and see if the Shift key works there or not.
Option 5 – Try to check your connections
You can also try checking if the connection mode you are using for your keyboard is functioning properly. For instance, if you are using a Surface 2-in-device, you can clean the connection pins and see if it resolves the problem.
Option 6 – Run the Hardware and Devices Troubleshooters
- The first thing you need to do is click on Start and then on the gear-like icon to pull up the window for Settings.
- After opening Settings, look for the Update and Security option and select it.
- From there, go to the Troubleshoot option located on the left-hand side of the list.
- Next, select Hardware and Devices from the list and open the Troubleshooter and run it. Once it is doing its job, wait for it to complete the process and then restart the system.
- After the system restarts, check if the problem’s now fixed. If not, refer to the next option given below.
Option 7 – Put your PC in a Clean Boot State
You might also want to put your computer in a Clean Boot State to fix the problem with the Shift key. It could be that there is a third-party program that’s preventing the Shift key from functioning. To isolate this possibility, you need to put your computer in a Clean Boot State.
- Log onto your PC as an administrator.
- Type in MSConfig in the Start Search to open the System Configuration utility.
- From there, go to the General tab and click “Selective startup”.
- Clear the “Load Startup items” check box and make sure that the “Load System Services” and “Use Original boot configuration” options are checked.
- Next, click the Services tab and select the “Hide All Microsoft Services” check box.
- Click Disable all.
- Click on Apply/OK and restart your PC. (This will put your PC into a Clean Boot State. And configure Windows to use the usual startup, just simply undo the changes.)
- Now try to connect the external devices and check if the error is now gone.
Read More
Getting errors while trying to update your Windows 10 computer is not an uncommon occurrence. Although some of them are easy to fix, there are others that need a lot of time and research in order to resolve. One of these tough Windows Update errors is Error 0x80244007. This kind of Windows Update error halts the process of Windows Update and a simple system restart won’t help much to fix it.
When you encounter this Windows Update error, you will see a description that says, “SOAP client failed because there was a SOAP fault for reasons of WU_E_PT_SOAP_* error codes”. One of the main causes of such an error is that Windows was not able to renew the cookies for Windows Update. To fix this error, here are some suggestions that might be useful.
Option 1 – Clear up temporary or junk files
The error could be caused by some temporary or junk files in your computer and so you need to clear them up to fix the problem. You can achieve that using the Storage Sense feature.
- Open Setting > System > Storage from the WinX Menu.
- From there, you will see a list of all the local and connected storage devices along with the details on the free space. Make sure that Storage Sense is on.
- Next, find a link that says “Free Up Space” and click it to open.
- After that, a screen which is the built-in program in Windows 10 will appear and will scan your computer for the following junk files so you can free up disk space:
- Windows Upgrade Log Files
- The system created Windows Error Reporting Files
- Thumbnails
- Temporary Internet Files
- Previous Windows Installation Files
- Delivery Optimisation Files
- DirectX Shader Cache
- Choose the files you want to get rid of and then click on the remove files option. Note that you’ll have an idea of the total size as you select any of the junk files listed above.
- Now go to the “Free Up Space Now” section and click the Clear Now button. This will get rid of all the temporary or junk files in your computer and should hopefully fix the Windows Update error 0x80244007.
Option 2 – Try running the Windows Update troubleshooter
Windows 10 have various troubleshooters that can help you resolve many system issues. So if you’re dealing with Windows Update errors like Error 0x80244007, you can run the Windows Update troubleshooter to resolve it.
To run it, go to Settings and then select Troubleshoot from the options. From there, click on Windows Update and then click the “Run the troubleshooter” button. After that, follow the next on-screen instructions and you should be good to go.
Option 3 – Try to reset the Windows Update components
If by any chance that the second option didn’t work, resetting the Windows Update components could also help you resolve the problem. How? Refer to the following steps:
- Open Command Prompt with admin privileges.
- After that, type each one of the following commands and hit Enter after you key in one after the other.
- net stop wuauserv
- net stop cryptsvc
- net stop bits
- net stop msiserver
Note: The commands you entered will stop the Windows Update components such as Windows Update service, Cryptographic services, BITS and MSI Installer.
- After disabling WU components, you need to rename both the SoftwareDistribution and Catroot2 folders. To do that, type each one of the following commands below and don’t forget to hit Enter after you type one command after the other.
- ren C:WindowsSoftwareDistribution SoftwareDistribution.old
- ren C:WindowsSystem32catroot2 Catroot2.old
- Next, restart the services you’ve stopped by entering another series of commands. Don’t forget to hit Enter after you key in one command after the other.
- net start wuauserv
- net start cryptsvc
- net start bits
- net start msiserver
- Close Command Prompt and reboot your PC.
Read More

Microsoft office has two major packages, an online one, and an offline version. The online version of the course is Office 365 that requires a monthly subscription and it is always regularly updated and maintained. Another version is more of a typical old school application, install it and use it, no constant internet connection is required and no monthly subscription is required, buy once and use it.
The last version of buying it once and use it was Office 2019 and after two years we are going to receive a new version soon. Microsoft has set its release date for October 5th of this year and as always it will feature the current latest version of office applications and one-time purchase.
The new office will support dark mode and other improvements tied to the new Windows 11 and some specific features tied to Office itself.
Read More
The Motitags toolbar browser add-on was created by Mindspark Inc. and is compatible with Internet Explorer and Mozilla Firefox. It claims to enhance users’ Internet browsing experience by enabling smileys within popular email clients such as Gmail, Yahoo!, AOL, and Outlook Live. While such added functionality may seem useful, Internet users should be aware that this browser plugin is categorized as a Browser Hijacker due to its behavior.
When installed this extension changes your default search engine, the home page, and new tab to MyWay.com, and while installed it gathers user browsing data and sends it back to Mindspark servers. This data is later used to inject additional unwanted ads into the user’s browser search results.
About Browser Hijackers
Browser hijacking is actually a type of unwanted software program, often a web browser add-on or extension, which then causes modifications in the web browser’s settings. Browser hijacker malware is developed for a number of reasons. These are generally used to force hits to a specific website, manipulating web traffic to generate ad revenue. It could seem harmless, but the majority of these websites aren’t legitimate and could pose a serious threat to your online safety. In a much worst case, your internet browser could be hi-jacked to open up your computer to a host of additional computer infections.
How one can identify a browser hijack
There are several signs of browser hijacking. Here are a few of them: the home page of your browser is changed unexpectedly; you get re-directed to websites you never intended to visit; the essential web browser settings are altered and unwanted or unsafe resources are added to the trusted websites list; discover new toolbars that you didn’t add; endless pop-up adverts show up and/or your web browser popup blocker is disabled; your browser gets sluggish, buggy, crashes frequently; you can’t navigate to certain internet pages, for example, security software related websites.
So how does a browser hijacker infect a computer?
Browser hijackers infect computers via malicious email attachments, downloaded infected files, or by going to infected sites. Many internet browser hijackings come from add-on software, i.e., toolbars, browser helper objects (BHO), or plug-ins added to browsers to provide them extra capabilities. Browser hijackers sneak into your pc in addition to free software application downloads that you unwittingly install along with the original. An example of some infamous browser hijacker includes Babylon, Anyprotect, Conduit, SweetPage, DefaultTab, RocketTab, and Delta Search, but the names are often changing.
Browser hijacking can bring about severe privacy problems and also identity theft, affect your browsing experience by taking control over outgoing traffic, drastically slows down your PC by consuming lots of resources, and result in system instability also.
Getting rid of browser hijackers
Some browser hijacking could be easily stopped by discovering and eliminating the corresponding malware program through your control panel. But, most browser hijackers are difficult to eliminate manually. No matter how much you try to eliminate it, it can return over and over. Rookie PC users should not try for the manual form of removal, since it needs thorough computer knowledge to perform fixes on the system registry and HOSTS file.
Professionals always recommend users to remove any malware including browser hijacker with an automatic removal tool, which is easier, safer, and quicker than the manual removal technique. Safebytes Anti-Malware has a state-of-the-art anti-malware engine that will help you stop browser hijacking in the first place, and clean up any existing issues.
What To Do If You Cannot Download Safebytes Anti-Malware?
Malware could potentially cause all sorts of damage once they invade your computer, starting from stealing your private details to erasing data files on your computer system. Some malware sits in between your computer and your internet connection and blocks some or all sites that you would like to visit. It might also prevent you from installing anything on your PC, particularly anti-virus programs. If you’re reading this, you probably have infected by malware that prevents you from downloading a computer security program such as Safebytes Antimalware on your PC. There are a few options you could try to get around with this particular obstacle.
Install in Safe Mode
If the malware is set to load automatically when Windows starts, entering Safe Mode could block this attempt. Only minimal required programs and services are loaded whenever you start your personal computer in Safe Mode. To start your Windows XP, Vista, or 7 computers in Safe Mode with Networking, please do as instructed below.
1) At power on/start-up, press the F8 key in 1-second intervals. This would conjure up the Advanced Boot Options menu.
2) Choose Safe Mode with Networking with arrow keys and press Enter.
3) When you are into this mode, you will have online access again. Now, get the virus removal application you want by using the web browser. To install the program, follow the directions within the setup wizard.
4) Right after the software is installed, allow the scan run to eliminate viruses and other threats automatically.
Use an alternate web browser to download security software
Malicious code could exploit vulnerabilities on a particular internet browser and block access to all anti-virus software sites. The most effective way to avoid this issue is to choose a web browser that is renowned for its security features. Firefox contains built-in Malware and Phishing Protection to keep you safe online.
Install security software on a USB drive
To effectively eliminate the malware, you need to approach the problem of installing an anti-virus software program on the infected PC from a different angle. Follow these steps to run the antivirus on the affected computer.
1) Download Safebytes Anti-Malware or Microsoft Windows Defender Offline onto a virus-free computer system.
2) Plug the pen drive into the uninfected computer.
3) Double click on the downloaded file to open the installation wizard.
4) Choose the USB stick as the destination for saving the software file. Follow the instructions on the screen to finish up the installation process.
5) Disconnect the flash drive. You may now use this portable anti-malware on the infected computer.
6) Double-click the anti-malware program EXE file on the USB flash drive.
7) Run Full System Scan to detect and get rid of all sorts of malware.
Benefits and Features of SafeBytes Security Suite
To protect your laptop or computer from many different internet-based threats, it is very important to install an anti-malware program on your PC. However, with so many anti-malware companies in the marketplace, nowadays it’s difficult to decide which one you should obtain for your laptop. A few are very good ones, some are ok types, and some are simply just fake anti-malware applications that could damage your computer themselves! When looking for an anti-malware program, pick one which gives reliable, efficient, and total protection against all known viruses and malware. One of the highly recommended software by industry analysts is SafeBytes Anti-Malware, a popular security application for Microsoft Windows.
Safebytes is one of the well-established computer solutions companies, which provide this complete anti-malware software. Using its cutting-edge technology, this application can assist you to eliminate multiples types of malware such as viruses, PUPs, trojans, worms, ransomware, adware, and browser hijackers.
SafeBytes possesses a variety of wonderful features that can help you protect your laptop or computer from malware attack and damage. Below are some typical features found in this application:
World-class AntiMalware Protection: Built upon a greatly acclaimed anti-virus engine, this malware removal application can find and remove numerous stubborn malware threats like browser hijackers, PUPs, and ransomware that other typical anti-virus applications will miss.
Real-time Threat Response: SafeBytes gives complete and real-time security for your computer. They’re extremely effective in screening and getting rid of numerous threats since they’re regularly improved with the latest updates and alerts.
“Fast Scan” Features: Safebytes Anti-Malware, using its enhanced scanning engine, provides ultra-fast scanning which can quickly target any active online threat.
Website Filtering: Through its unique safety ranking, SafeBytes notifies you whether a site is safe or not to visit it. This will ensure that you’re always certain of your online safety when browsing the internet.
Light-weight: The program is lightweight and can run silently in the background, and will not have an effect on your PC efficiency.
24/7 Premium Support: SafeBytes provides you with 24/7 technical support, automatic maintenance, and software upgrades for the best user experience.
Simply put, SafeBytes has developed a meaningful anti-malware solution that is aimed to protect you against various malware. Malware issues can become a thing of the past when you put this tool to use. So if you’re seeking the very best malware removal application out there, and when you don’t mind shelling out a few bucks for it, go for SafeBytes Anti-Malware.
Technical Details and Manual Removal (Advanced Users)
If you wish to manually remove Motitags without using an automated tool, it may be possible to do so by removing the application from the Windows Add/Remove Programs menu, or in cases of browser extensions, going to the browsers AddOn/Extension manager and removing it. Additionally, it is advised to factory reset your web browser to its default state to fix corrupt settings.
Finally, check your hard drive for all of the following and clean your computer registry manually to get rid of leftover application entries after uninstalls. Please remember that only advanced users should try to manually edit the system files simply because removing any single vital registry entry leads to a serious issue or even a PC crash. Moreover, certain malicious programs have the capability to defend against its removal. Carrying out this in Safe Mode is recommended.
Folders:
C:\Program Files\Motitags_94
C:\Program Files\Motitags_94EI
C:\Users\(username)\AppData\Local\Motitags_94
C:\Users\(username)\AppData\LocalLow\Motitags_94
C:\Users\(username)\AppData\LocalLow\Motitags_94EI
C:\Users\(username)\AppData\Roaming\Mozilla\Firefox\Profiles\g75s8p2u.default\extensionsffxtbr-bs@Motitags_94.com
C:\Users\(username)\AppData\Roaming\Mozilla\Firefox\Profiles\g75s8p2u.default\extensionsffxtbr@Motitags_94.com
C:\Users\(username)\AppData\Roaming\Mozilla\Firefox\Profiles\g75s8p2u.default\Motitags_94
Files:
Search and Delete:
94auxstb.dll
94auxstb64.dll
94bar.dll
94barsvc.exe
94bprtct.dll
94brmon.exe
94brmon64.exe
94brstub.dll
94brstub64.dll
94datact.dll
94dlghk.dll
94dlghk64.dll
94feedmg.dll
94highin.exe
94hkstub.dll
94htmlmu.dll
94httpct.dll
94idle.dll
94ieovr.dll
94medint.exe
94mlbtn.dll
94Plugin.dll
94radio.dll
94regfft.dll
94reghk.dll
94regiet.dll
94script.dll
94skin.dll
94skplay.exe
94SrcAs.dll
94SrchMn.exe
94srchmr.dll
94tpinst.dll
AppIntegrator64.exe
AppIntegratorStub64.dll
BOOTSTRAP.JS
chromeffxtbr.jar
CHROME.MANIFEST
CREXT.DLL
CrExtP94.exe
DPNMNGR.DLL
EXEMANAGER.DLL
FF-NativeMessagingDispatcher.dll
Hpg64.dll
INSTALL.RDF
installKeys.js
LOGO.BMP
NP94Stub.dll
T8EPMSUP.DLL
T8EXTEX.DLL
T8EXTPEX.DLL
T8HTML.DLL
T8RES.DLL
T8TICKER.DLL
UNIFIEDLOGGING.DLL
VERIFY.DLL
94EIPlug.dll
94EZSETP.dll
NP94EISb.dll
Registry:
Key HKLM\SOFTWARE\Microsoft\Windows\CurrentVersion\Run Value: Motitags_94 Browser Plugin Loader Data: 94brmon.exe
Key HKLM\SOFTWARE\Microsoft\Windows\CurrentVersion\Run Value: Motitags Search Scope Monitor Data: C:\PROGRA~1\MOTITA~2\bar.binsrchmn.exe” /m=2 /w /h
Key HKLM\SOFTWARE\Microsoft\Windows\CurrentVersion\Run Value: Motitags Home Page Guard 32 bit Data: C:\PROGRA~1\MOTITA~2\bar.bin\AppIntegrator.exe
Key HKLM\SOFTWARE\Microsoft\Windows\CurrentVersion\Run Value: Motitags EPM Support Data: C:\PROGRA~1\MOTITA~2\bar.binmedint.exe” T8EPMSUP.DLL,S
Key HKCU\Software\AppDataLow\Software\Motitags_94
Key HKLM\SOFTWARE\Motitags_94
Key HKLM\SOFTWARE\MozillaPlugins\@Motitags_94.com/Plugin
Key HKLM\SOFTWARE\Microsoft\Windows\CurrentVersion\Uninstall\Motitags_94bar Uninstall Firefox
Key HKLM\SOFTWARE\Microsoft\Windows\CurrentVersion\Explorer\Browser Helper Objects\6df8a038-1b03-41eb-a92b-0e82de08ee4a
Key HKLM\SOFTWARE\Microsoft\Windows\CurrentVersion\Explorer\Browser Helper Objects\598f4e85-2ee6-43a8-bf43-c75c82b925fe
Key HKLM\SOFTWARE\Classes\Motitags_94.ToolbarProtector.1
Key HKLM\SOFTWARE\Classes\Motitags_94.ToolbarProtector
Key HKLM\SOFTWARE\Classes\Motitags_94.ThirdPartyInstaller.1
Key HKLM\SOFTWARE\Classes\Motitags_94.ThirdPartyInstaller
Key HKLM\SOFTWARE\Classes\Motitags_94.SettingsPlugin.1
Key HKLM\SOFTWARE\Classes\Motitags_94.SettingsPlugin
Key HKLM\SOFTWARE\Classes\Motitags_94.ScriptButton.1
Key HKLM\SOFTWARE\Classes\Motitags_94.ScriptButton
Key HKLM\SOFTWARE\Classes\Motitags_94.RadioSettings.1
Key HKLM\SOFTWARE\Classes\Motitags_94.RadioSettings
Key HKLM\SOFTWARE\Classes\Motitags_94.Radio.1
Key HKLM\SOFTWARE\Classes\Motitags_94.Radio
Key HKLM\SOFTWARE\Classes\Motitags_94.PseudoTransparentPlugin.1
Key HKLM\SOFTWARE\Classes\Motitags_94.PseudoTransparentPlugin
Key HKLM\SOFTWARE\Classes\Motitags_94.MultipleButton.1
Key HKLM\SOFTWARE\Classes\Motitags_94.MultipleButton
Key HKLM\SOFTWARE\Classes\Motitags_94.HTMLPanel.1
Key HKLM\SOFTWARE\Classes\Motitags_94.HTMLPanel
Key HKLM\SOFTWARE\Classes\Motitags_94.HTMLMenu.1
Key HKLM\SOFTWARE\Classes\Motitags_94.HTMLMenu
Key HKLM\SOFTWARE\Classes\Motitags_94.FeedManager.1
Key HKLM\SOFTWARE\Classes\Motitags_94.FeedManager
Read More
On September 18th, 2017, Cisco’s Talos announced that CCleaner, a popular utility with billions of worldwide users, had been compromised by hackers, and was used to unwittingly distribute hidden malware in its installer. Later in the day, Piriform, the publisher of CCleaner, confirmed the problem.
Undetected by all but 1 major antivirus including CCleaner’s own parent company, this occurred for over a month and impacted over 2.7 million users. Users of CCleaner v5.33.6162 and CCleaner Cloud v1.07.3191 for 32-bit Windows are affected. These downloads were live on CCleaner’s official site from August 15th to September 12th, 2017. Anyone who downloaded the program during this time could be affected.
The company claims that while the hackers set up the backdoor and many users were impacted, that the perpetrators have been arrested and that the malware never successfully performed its full task and compromised user’s PCs or sent out their data; in the wake of recent security breaches such as Equifax, users are understandably worried. Given the severity of the threat of hacking and data theft, users should take action immediately if they have CCleaner.
Technical Details of CCleaner Malware Injection
First reported by Talos, the malware, which was hidden in the CCleaner installer without the publisher noticing (despite them being owned by Avast, a massive Anti-virus company), modified a core program DLL file to evade detection, and creates several registry keys. Not only were these files not flagged by any major Anti-Virus, but they were also even digitally signed by Piriform via their Symantec certificate, meaning your PC and security program would likely whitelist and trust the malicious installer. The malware gathers personal information on a user’s PC, including IP address and running programs, and sends it to a remote server. In our testing, the program sent data to IP 216.126.225.148.
Restore Your PC (If Possible)
As of the publication of this article, there have been no assurances given that updating or even uninstalling CCleaner will remove the malware is installed. The only action thus far has been shutting down the remote server where user data was being sent has been shut down by authorities. For this reason, it is best to remove the underlying malware separately, as its presence represents a serious security threat. Unfortunately, as this could have been installed as far back as August 15th, 2017, your System Restore points may not go back that far, or even if they do, restoring to such an outdated point may cause unintended problems with other programs you use and potentially lost files and data. Manually backing up files and doing a full format or clean Windows installation would likely be successful in fully removing the malware, but is extremely time-consuming and can be difficult for many PC users. Unfortunately, this makes a PC Restore or format an unattainable option for many.
Update CCleaner to the Latest Version
While CCleaner has told users to update to the latest version of the program. Prior to doing so, we recommend fully uninstall CCleaner, ensuring you check its program files folders and registry keys, manually deleting any remnants, and then re-downloading the latest version from the official site and reinstalling clean.
Read More
The Get Coupons Fast Toolbar is a Browser Extension for Google Chrome developed by Mindspark Inc. This extension allows quick access to the most popular coupon websites available. While this might look like a good useful idea, keep in mind that it has been classified as a Browser Hijacker by Several anti-virus applications.
When installed this extension will hijack your new tab page, changing it to a customized version of Search.MyWay.com. While active It records user browser activity, this data is later used to better target ads.
While browsing the internet with this extension installed you will see additional pop-up ads, sponsored content, and injected ads into your browser search results and pages. GetCouponsFast usually comes bundled with other PUP-s or Browser Hijackers that may harm your computer and it is recommended you remove it from your PC.
About Browser Hijackers
Browser hijacking means that a malicious code has taken control over and altered the settings of your internet browser, without your permission. They are created to disrupt browser functions for various reasons. It redirects you to the sponsored sites and inserts ads on your internet browser that assists its developer to generate revenue. While it might seem harmless, these tools were created by malicious people who always look to take advantage of you, so that they could make money from your naivety and distraction. They did not just ruin your browsers, but browser hijackers can also modify the system registry, making your computer or laptop susceptible to various other types of attacks.
Signs of browser hijacker infection
There are plenty of signs that indicate the web browser has been highjacked:
1. you notice unauthorized modifications to your web browser’s home-page
2. you find re-directed to internet sites you never intended to visit
3. the default browser configurations have been modified and/or your default web engine is altered
4. you’ll see many toolbars on your browser
5. you might see never-ending pop-up adverts on your computer screen
6. your browser has become unstable or starts running slowly
7. you are blocked to access the websites of antivirus solution providers.
How does a computer get infected with a browser hijacker?
Browser hijackers might use drive-by downloads or file-sharing networks or an email attachment in order to reach a targeted computer system. They could also come from add-on applications, also known as browser helper objects (BHO), web browser extensions, or toolbars. Some internet browser hijackers spread in user’s computers using a deceptive software distribution method called “bundling” (often through freeware and shareware).
Browser hijackers will affect the user’s web browsing experience severely, monitor the websites visited by users and steal sensitive information, cause difficulty in connecting to the web, and eventually create stability problems, making programs and systems freeze.
Removal
Some hijackers can be simply removed by deleting the free software they were included with or by deleting any add-ons you have recently added to your browser. Unluckily, the majority of the software applications utilized to hijack an internet browser are deliberately designed to be difficult to detect or get rid of. And there is no denying the very fact that manual repairs and removal can certainly be a difficult task for a novice PC user. Moreover, there are various risks connected with tinkering around with the system registry files.
Installing and running anti-malware software on the affected computer will automatically erase browser hijackers as well as other unwanted programs. In order to get rid of persistent browser hijackers effectively, install the award-winning Anti-Malware tool Safebytes Anti-Malware. Employ a pc optimizer (such as Total System Care) along with your anti-malware to repair various computer registry problems, remove computer vulnerabilities, and improve your computer performance.
How To Get Eliminate Virus That Is Blocking Antivirus Downloads?
Malware could cause all sorts of damage once they invade your computer, starting from stealing your private details to erasing data files on your computer system. Some malware is created to hinder or block things that you wish to do on your PC. It may not permit you to download anything from the net or it will prevent you from accessing a few or all of the websites, in particular the anti-virus sites. If you are reading this article right now, you may have perhaps realized that a malware infection is a reason for your blocked internet connectivity. So what to do if you want to download and install an anti-virus application like Safebytes? There are some steps you can take to circumvent this problem.
Boot Windows in Safe Mode
Safe Mode is actually a unique, simplified version of Windows in which just bare minimum services are loaded to prevent malware and also other troublesome programs from loading. If the malicious software is set to load automatically when the PC starts, shifting into this mode may prevent it from doing so. In order to enter into Safe Mode or Safe Mode with Networking, press the F8 key while the system is booting up or run MSCONFIG and find the “Safe Boot” options under the “Boot” tab. Once you are in safe mode, you can attempt to install your anti-malware program without the hindrance of the malicious software. Right after installation, run the malware scanner to remove standard infections.
Use an alternate web browser to download security software
Web-based malware can be environment-specific, aiming for a particular browser or attacking particular versions of the browser. The best solution to avoid this issue is to choose an internet browser that is known for its security features. Firefox contains built-in Malware and Phishing Protection to keep you secure online.
Run anti-virus from a pen drive
Another option would be to make a portable anti-malware program onto your USB flash drive. To run anti-virus using a pen drive, follow these simple measures:
1) Download Safebytes Anti-Malware or Windows Defender Offline onto a virus-free PC.
2) Plug the USB drive into the clean computer.
3) Double-click the Setup icon of the anti-malware program to run the Installation Wizard.
4) Select thumb drive as the place when the wizard asks you where you wish to install the application. Follow the directions to complete the installation process.
5) Unplug the flash drive. Now you can utilize this portable anti-virus on the infected computer.
6) Double click the Safebytes Anti-malware icon on the pen drive to run the application.
7) Click the “Scan Now” button to start the virus scan.
SafeBytes Anti-Malware Overview
Want to download the best anti-malware application for your desktop? There are many applications on the market that comes in free and paid versions for Windows systems. Some are very good ones, some are ok types, while some are just fake anti-malware programs that will damage your personal computer themselves! While looking for an antimalware program, pick one that offers reliable, efficient, and total protection against all known viruses and malware. On the list of recommended software is SafeBytes AntiMalware. SafeBytes has a good history of quality service, and customers appear to be happy with it.
Safebytes is among the well-established PC solutions companies, which provide this all-inclusive anti-malware application. With its outstanding protection system, this tool will automatically detect and remove most of the security threats, which include adware, viruses, browser hijackers, PUPs, trojans, worms, and ransomware.
SafeBytes possesses a variety of wonderful features that can help you protect your computer from malware attacks and damage. Listed below are a few of the great ones:
Real-time Protection: SafeBytes provides round-the-clock protection for your computer restricting malware intrusions in real-time. They are very efficient in screening and getting rid of numerous threats because they’re regularly improved with new updates and alerts.
Robust Anti-malware Protection: Built on a highly acclaimed antivirus engine, this malware removal tool has the capacity to find and remove various stubborn malware threats such as browser hijackers, PUPs, and ransomware that other common antivirus programs will miss.
Web protection: SafeBytes checks the hyperlinks present on a webpage for possible threats and tells you if the website is safe to explore or not, through its unique safety rating system.
Minimal CPU and Memory Usage: SafeBytes is a lightweight and simple to use antivirus and anti-malware solution. As it utilizes very low computer resources, this software leaves the computer power exactly where it belongs: with you.
24/7 Customer Service: Support service is available 24 x 7 x 365 days via chat and email to answer your queries.
Overall, SafeBytes Anti-Malware is a solid program since it has lots of features and could identify and remove any potential threats. Now you may realize that this tool does more than just scan and delete threats on your computer. So when you need advanced forms of protection features and threat detections, purchasing SafeBytes Anti-Malware could be well worth the dollars!
Technical Details and Manual Removal (Advanced Users)
If you don’t want to use malware removal software and prefer to eliminate GetCouponsFast manually, you could do so by going to the Windows Add/Remove Programs menu in the control panel and deleting the offending program; in cases of browser extensions, you can remove it by visiting the browser’s Add-on/Extension manager. Additionally, it is advised to reset your web browser settings to their default state.
Lastly, check your hard disk for all of the following and clean your registry manually to remove leftover application entries after uninstallation. Please keep in mind that only advanced users should attempt to manually edit the system files since deleting any single vital registry entry results in a serious problem or even a PC crash. Moreover, certain malicious programs are capable to defend against its removal. It is recommended that you do the removal process in Windows Safe Mode.
Files:
%LOCALAPPDATA%\Google\Chrome\User Data\Default\Extensions\iadmakoacmnjmcacmhlcjcameijgcopj
%UserProfile%\Local Settings\Application Data\Google\Chrome\User Data\Default\Extensions\iadmakoacmnjmcacmhlcjcameijgcopj
%UserProfile%\Local Settings\Application Data\GetCouponsFastTooltab
%LOCALAPPDATA%\GetCouponsFastTooltab
Registry:
HKEY_LOCAL_MACHINE\Software\[APPLICATION]\Microsoft\Windows\CurrentVersion\Uninstall..Uninstaller
Read More
If you are trying to copy or move files to and from your external storage device but you suddenly encounter the error 0x800703EE, then you’ve come to the right place as this post will guide you on how you can fix this error in your Windows 10 computer.
This kind of error when copying files may be accompanied by an error message that says, “The volume for a file has been externally altered so that the opened file is no longer valid”. This error prevents you from copying or moving the files to and from the external storage device.
This kind of issue might be caused by a service that belongs to a backup program that could be blocking the operation or a conflict with your third-party antivirus program. In addition, the error could also be due to corrupted or outdated USB drivers or it could be caused by a disabled Windows Backup and Volume Shadow copy service. It is also possible that some system files are corrupted or that the drivers for the external device are also corrupted. Whatever the cause is, here are some options you need to check out to fix the error.
Before you troubleshoot the error, you might want to try moving the files to another location on your local drive and remove the USB drive and insert it back again. After that, try to move or copy the file to the USB drive and see if it still throws an error. If it does, then you need to troubleshoot the problem further by following each one of the suggestions given below.
Option 1 – Update or reinstall the Universal Serial Bus Controller driver
Since it could be a driver issue, you can try to update or reinstall the Universal Serial Bus Controller drivers using the Device Manager. Refer to the following steps:
- First, click the Start button and type “device manager”.
- Then click on the “Device Manager” from the search results to open it.
- From there, look for the “Universal Serial Bus controllers” option and then right-click on each one of the USB drivers and select the Update Driver from the menu.
Note: If it is a regular USB drive, then it will be listed as a USB Mass Storage Device but if you have a USB 3.0 device, then look for a USB 3.0 Extensible Host Controller.
- Restart your PC and then click the “Search automatically for updated driver software” option.
Note: If updating the USB Controller drivers didn’t work, you can try to reinstall them instead.
Option 2 – Try checking the Volume Shadow Copy and Windows Backup services
The next thing you can do to fix error 0x800703EE is to check the Volume Shadow Copy and Windows Backup service.
- First, tap the Win + R keys to open the Run dialog box and type “services.msc” in the field, and hit Enter to open the Services Manager.
- From there, look for the Volume Shadow Copy service and right-click on it, and then select Properties.
- After that, make sure that its Startup type is set to Manual and that its status is “Started” so if it isn’t, you need to click on the Start button and then on the Apply and OK buttons to save the changes made.
- Once done, look for the Windows Backup Service and repeat the same process you did with the Volume Shadow Copy service.
- After you complete the steps, restart your computer and see if the error is now fixed.
Option 3 – Restart your computer in a Clean Boot State
If a third party program like antivirus is the one that’s causing the problem, you can try to put your computer in a Clean Boot State to isolate the issue by following these steps:
- Log onto your PC as an administrator.
- Type in MSConfig in the Start Search to open the System Configuration utility.
- From there, go to the General tab and click “Selective startup”.
- Clear the “Load Startup items” check box and make sure that the “Load System Services” and “Use Original boot configuration” options are checked.
- Next, click the Services tab and select the “Hide All Microsoft Services” check box.
- Click Disable all.
- Click on Apply/OK and restart your PC. (This will put your PC into a Clean Boot State. And configure Windows to use the usual startup, just simply undo the changes.)
- Now try to copy the files to your external storage device again and check if the error is now gone.
Option 4 – Try to run System File Checker or SFC scan
- Tap Win + R to launch Run.
- Type in cmd in the field and tap Enter.
- After opening Command Prompt, type in sfc /scannow and hit Enter.
- Once done, restart your computer.
Option 5 – Try to delete the Filter drivers
Note that this option is only applicable if you see the error 0x800703EE accompanied with the “The volume for a file has been externally altered so that the opened file is no longer valid” error message. Before you start, create a System Restore Point first.
- Open the Registry Editor and navigate to this registry path: HKEY_LOCAL_MACHINESYSTEMCurrentControlSetControlClass{4D36E965-E325-11CE-BFC1-08002BE10318}
- After that, select the “{4D36E965-E325-11CE-BFC1-08002BE10318}” key and check if you can find the “Upperfilters” and “Lowerfilters” value in the right pane. If you can find them, right-click on them and select Delete.
- Once done, exit the Registry Editor and restart your computer.
Read More
It is no secret that a few days ago Facebook has been breach and tons of user accounts have been compromised. These kinds of things are very unpleasant experiences for both users and the company itself. User trust lowers significantly in the company and it can greatly increase the chances of users migrating to another platform.
This just shows how much a hacker or security breach can produce damage to the business.
Sadly we can not offer you guidance or assistance in recovering your stolen data nor can we provide you with removing your data from the hands of the attacker. What we can do is to provide you with information has your data been stolen.
Threat actor released the personal information for 533,313,128 Facebook users on a hacking forum, including mobile numbers, name, gender, location, relationship status, occupation, date of birth, and email addresses. This data was originally sold in private sales after being collected in 2019 using a bug in the ‘Add Friend’ feature on Facebook.
Facebook had closed this vulnerability soon after it was discovered, but threat actors continued to circulate the data until it was finally released practically for free. Since then, Troy Hunt has added the leaked data to his Have I Been Pwned data breach notification service to help users determine if a Facebook member’s data was exposed in the leak.
Go to the site and enter your email address to check and see if your data has been compromised.
Read More
There are times when you see a message in Windows Defender saying, “The Threat Services has stopped, Restart it now” when you try to use it. This kind of error is usually fixed by simply clicking on the Restart now button. However, if the error still appears even after you restart your computer and you see another message that says, “Unexpected error, Sorry, we ran into a problem”, then continue reading as this post will guide you in resolving this issue in Windows Defender.
Before you proceed with the given fixes below, you have to create a System Restore point first. This way, you can always undo any changes you’ve made in case something goes wrong.
Option 1 – Make sure that the Windows Defender Services are started
The Windows Defender Advanced Threat Protection service is the one that protects your computer from advanced threats by monitoring and reporting security events that happen on your computer. This is why you have to make sure that this, as well as other required services in Windows Defender, are set to their default values and are started. To do so, follow these steps:
- In the Cortana search box, type “services” and click on the Services icon to open the Services Manager. Alternatively, you can also tap the Win + R keys to launch the Run prompt and then type “services.msc” in the field and hit Enter to open the Services Manager
- After opening the Services Manager, look for the following services and make sure that their Startup type is set to their default values:
- Windows Defender Advanced Threat Protection Service – Manual
- Windows Defender Antivirus Network Inspection Service – Manual
- Windows Defender Antivirus Service – Manual
- Windows Defender Firewall Service – Automatic
- You can right-click on each one of the listed services and then select Start to start them.
- And if some of the services don’t have their default values, just double-click on the Services to change the Startup types and select the correct option from the drop-down menu of the Startup type under the Properties box.
- Next, set up the Startup type of these services to Automatic and then click on the Start button if the services are not running yet.
- Now click on the Apply and OK buttons to save the changes made and then see if it fixed the problem or not.
Option 2 – Try modifying some entries in the Windows Registry
If the first option didn’t work in fixing the problem, you can try to alter some entries in the Windows Registry using the Registry Editor.
- First, tap Win + R keys to open the Run dialog box.
- Then type “Regedit” in the field and hit Enter to open the Registry Editor.
- Next, navigate to this registry path: HKLMSoftwarePoliciesMicrosoftWindows Defender
- From there, look for the “DisabledAntivirus” and “DisableAntiSpyware” DWORDS from the right pane and change each one of their values to “0”. On the other hand, if you don’t see any of these DWORDS, you can create them instead and give each one of them a 0 value.
- To create a DWORD, simply right-click on any empty space and select New > DWORD. Then name them both as “DisabledAntivirus” and “DisableAntiSpyware”.
- Afterward, set the value of the newly-created DWORDS to 0.
- Now exit the Registry Editor and reboot your PC to apply the changes made and then check if it has fixed the error in Windows Defender or not.
Read More
Copyright © 2023, ErrorTools. All Rights Reserved
Trademark: Microsoft Windows logos are registered trademarks of Microsoft. Disclaimer: ErrorTools.com is not affiliated with Microsoft, nor claims direct affiliation.
The information on this page is provided for information purposes only.
Процессор не поддерживает CompareExchange128, не могу установить Windows
Похоже, что это проблема совместимости, тесно связанная с виртуализацией, поскольку Windows работает на том же ПК. Однако параметры VirtualBox должны быть удовлетворены, когда вы решите установить любую операционную систему, в дополнение к обычным требованиям, указанным для нее. VirtualBox имеет решение для этого.
Если вы получаете сообщение об ошибке. Вы не можете установить Windows, поскольку ваш процессор не поддерживает CompareExchange128 при установке Windows 10/8.1 с использованием виртуализации на VirtualBox, читайте дальше.
Исправление упоминается ниже, но убедитесь, что вы выполняете его, когда VirtualBox не работает в вашей системе.
Не удается установить Windows, потому что процессор не поддерживает CompareExchange128
1. Откройте командную строку с правами администратора.
2. Введите эти команды одну за другой и нажмите клавишу Enter :
Если при выполнении последней команды вы получили ошибку недопустимой пакетной команды, попробуйте выполнить ее с текущим пользователем (без прав администратора Командная строка ). Теперь перезагрузите компьютер и попробуйте установить Windows 8.1 с помощью виртуализации, и в этот раз вы не получите сообщение об ошибке.
Надеюсь, вы найдете исправление полезным!
Проверьте это сообщение, если вы получили сообщение об ошибке «Не удалось завершить установку Windows».
Источник
Ошибка CompareExchange128 во время установки Windows 10
Несмотря на то, что во время установки Windows 10 мы видим весь красивый пользовательский интерфейс, знайте, что драйверы важны и для установки требуется свободный диск для хранения, ваш процессор не менее важен. Если вы получаете CompareExchange128 ошибка во время установки Windows 10, CPU не имеет важной инструкции, называемой CMPXCHG16B. Это приводит к ошибке CompareExchange128 во время установки Windows 10. На самом деле CMPXCHG16b, PrefetchW и LAHF / SAHF являются критерием использования 64-разрядной версии Windows 10 при обновлении с более ранней версии Windows.
Что такое инструкция CMPXCHG16B
Инструкция CMPXCHG16B выполняет атомный сопоставление и обмен по 16-байтовым значениям. Эта инструкция также может называться CompareExchange128. Атомное сравнение и обмен означает, что CPU сравнивает содержимое ячейки памяти с заданным значением. Если они совпадают, это изменяет содержимое этой ячейки памяти на новое заданное значение. Я знаю его технические, но это дает вам немного идеи.
Ошибка CompareExchange128 во время установки Windows 10
1] Обновление драйверов BIOS и чипсетов
Лучше всего, если вы сможете выяснить, есть ли у вашего OEM-обновления обновление для вашего компьютера BIOS и соответствующих драйверов чипсета. Сначала вы должны проверить версию BIOS. В строке поиска введите msinfo32 в поиск и нажмите Enter. После того, как откроется инструмент System Information Tool, вы можете проверить версию BIOS.
Затем вам нужно использовать утилиту BIOS, поставляемую вместе с ноутбуком или ПК, а затем использовать ее для обновления. Это различно для каждого ПК. Если у вас его нет, посмотрите на веб-сайте OEM и посмотрите, есть ли возможность скачать.
2] Переход к 32-разрядной версии Windows 10:
Если обновление BIOS недоступно, вы можете переключиться на 32-битный версии Windows. Это приведет к ограничению объема установленной ОЗУ и других мест, но если это не проблема, вы можете переключиться. Многие используют 64-бит для улучшения аппаратных возможностей, ОЗУ и других вещей.
3] Купить новое оборудование
Если ваш компьютер слишком стар, лучше купить новое оборудование или совершенно новый ПК, который может идти в ногу в течение следующих нескольких лет. Мне пришлось заменить 10-летнего ноутбука Dell, хотя он смог обновиться до Windows 10, но не смог продолжить работу. Обязательно проверьте все функции и совместимость с Windows 10.
См. Этот пост, если вы не можете установить Windows, процессор не поддерживает CompareExchange128.
Источник
Ошибка CompareExchange128 при установке Windows 10
Что такое инструкция CMPXCHG16B
Инструкция CMPXCHG16B выполняет атомарное сравнение и обмен 16-байтовыми значениями. Эта инструкция также может называться CompareExchange128. Атомное сравнение и обмен означает, что ЦП сравнивает содержимое области памяти с заданным значением. Если они одинаковые, содержимое этой ячейки памяти изменяется на новое заданное значение. Я знаю его технический, но он дает вам немного идеи.
Ошибка CompareExchange128 при установке Windows 10
1] Обновление драйверов BIOS и наборов микросхем
Лучше всего выяснить, есть ли у вашего OEM-изготовителя обновление для BIOS вашего компьютера и связанных драйверов чипсета. Сначала вы должны проверить версию BIOS. В строке поиска введите msinfo32 в поле поиска и нажмите Enter. Как только откроется System Information Tool, вы можете проверить версию BIOS.
Затем вам нужно использовать утилиту BIOS, которая поставляется с вашим ноутбуком или ПК, а затем использовать ее для обновления. Это отличается для каждого ПК. Если у вас его нет, посмотрите на сайте OEM и посмотрите, есть ли возможность скачать.
2] Переходите на 32-разрядную версию Windows 10:
Если обновление BIOS недоступно, вы можете вместо этого перейти на 32-разрядную версию Windows. Это приведет к ограничению объема установленной оперативной памяти и других мест, но если это не проблема, вы можете переключиться. Многие используют 64-битные для улучшения аппаратных функций, оперативной памяти и других вещей.
3] Купите новое оборудование
Если ваш компьютер слишком старый, лучше купить новое оборудование или совершенно новый компьютер, который будет работать в течение следующих нескольких лет. Мне пришлось заменить свой 10-летний ноутбук Dell, хотя он мог обновиться до Windows 10, но не смог идти в ногу. Обязательно проверьте все функции и совместимость с Windows 10.
Посмотрите этот пост, если вы не можете установить Windows, процессор не поддерживает CompareExchange128.
Источник
Compareexchange128 Windows 10 как исправить?
»Как исправить ошибку Windows 10 Update Exchange128
Некоторые пользователи Windows 7 и Windows 8.1 сообщили об ошибке CompareExchange128 при попытке перейти на Windows 10, Ошибка гласит: «Вы не можете установить Windows 10, потому что ваш процессор не поддерживает CompareExchange128». Для обновления до Windows 10 (64-разрядная версия) должна присутствовать инструкция CMPXCHG16B. Если вы получаете эту ошибку, это в основном означает, что ваш процессор не имеет инструкции CMPXCHG16B.
Загрузка доступна для полного восстановления Сравнить Exchange128 Ошибка
Рекомендуется: Загрузите утилиту автоматического восстановления, чтобы исправить эту и другие проблемы с производительностью ПК.
Сертифицированный безопасный, без вирусов скачать. Выбор редактора инструментов ошибок.
Причины ошибок
Ошибка CompareExchange128 обычно возникает по двум возможным причинам:
Дополнительная информация и ручной ремонт
Одно из основных требований для обновления до Windows 10 для вашего процессора иметь инструкцию CMPXCHG16b. Вам также нужна правильная версия BIOS, чтобы гарантировать бесперебойную установку. Ниже описано, как вручную решить эту проблему.
ПРИМЕЧАНИЕ. Если вы не уверены в себе, используя ручные методы, перечисленные ниже, настоятельно рекомендуется обратиться за помощью к опытному специалисту. Если вы не знаете кого-то, вы также можете использовать автоматизированный инструмент, чтобы это исправить.
Прежде чем выполнять какие-либо исправления, попробуйте сначала определить, является ли причина ошибки причиной того, что на вашем процессоре отсутствует инструкция CMPXCHG16b. Вы можете использовать инструмент Информация о процессоре, который предоставляет полную информацию о вашем процессоре, памяти и материнской плате. Если вы ищете более подробную информацию, вы также можете попробовать утилиты командной строки. Но самый безопасный и простой способ проверить это — просто выполнить поиск в Интернете. Попробуйте использовать поисковый запрос: CMPXCHG16b
Способ 1 — обновить BIOS
Этот метод загрузит последнюю версию BIOS от производителя вашей материнской платы. Это гарантирует, что ваш процессор имеет инструкцию CMPXCHG16b, необходимую для завершения 10-разрядной установки Windows 64. Чтобы обновить BIOS вашего компьютера, выполните следующие действия:
Способ 2 — установить 10-разрядную версию Windows 32
Если обновление BIOS не работает, вы можете установить 32-разрядную версию Windows 10 вместо 64-разрядной. Вот как это сделать:
Способ 3 — Купить новый процессор / материнскую плату
Если вышеупомянутые два метода не работают, есть большая вероятность, что эта ошибка происходит из-за устаревшего процессора / материнской платы. Следующее возможное решение — купить обновленную модель, полностью совместимую с 64-битной Windows 10.
Метод 4 — Загрузите автоматизированный инструмент
Если ничего не помогает, вы можете рассмотреть возможность использования этого мощный автоматизированный инструмент чтобы быстро решить проблему и любые другие проблемы, связанные с компьютером.
Процессор не поддерживает данную версию Windows. Что это значит?
Microsoft продолжает усиленно радовать, удивлять и шокировать своих пользователей. Буквально на днях ко мне обратился коллега с такой проблемой: он приобрел и собрал новый ПК на базе нового процессора Intel Core i3 7100. На собранный компьютер был успешно установлен образ Windows 7. Но через некоторое время, после того, как Windows 7 закачала и установила все обновления через Windows Update, система перестала получать новые обновления со следующей ошибкой:
Unsupported hardware
Your PC uses a processor that is designed for the latest version of Windows. Because the processor is not supported together with the Windows version that you are currently using, your system will miss important security updates.
Не поддерживаемое оборудование
Ваш процессор не поддерживает данную версию Windows, вы не сможете получать обновления.
Несовместимое оборудование
Ваш компьютер оборудован процессоров, предназначенным для последней версии Windows, вы пропустите важные обновления системы безопасности.
При попытке выполнить поиск обновления через Windows Update появляется ошибка:
Code 80240037 Windows Update encountered an unknown error.
Неподдерживаемые процессоры для Windows 7 и Windows 8.1
Дело в том, Microsoft еще в прошлом году анонсировала, что все обладатели новейших процессоров должны использовать только последнюю версию клиентской платформы — Windows 10. Для более старых версий Windows будет созданы ограничения для использования данных моделей процессоров.
Ограничения распространяется на следующие поколения процессоров:
В апреле 2017 года MSFT выпустило специальные патчи для предыдущих версий ОС
В описании патчей заявляется о появление функционала определения поколения процессора и поддерживаемого оборудования при поиске обновлений через Windows Update.
Enabled detection of processor generation and hardware support when PC tries to scan or download updates through Windows Update.
Соответственно, после установки данных обновлений, система начинает блокировать загрузку новых обновлений (в т.ч для MS Office) и драйверов на старых версиях ОС с ошибкой 80240037, тем самым вынуждая пользователей переходить на Windows 10 /Windows Server 2016. Таким образом, все старые системы с новым оборудованием перестают получать обновления безопасности и переходят в разряд уязвимых. Похоже на шантаж…
Конечно, временно поможет удаление этих обновлений (wusa.exe /quiet /uninstall /kb:4012218 /promptrestart или wusa.exe /quiet /uninstall /kb:4012219 /promptrestart ) и блокировка их установки, но с высокой долей вероятности они прилетят в следующем месяце в обновлении Monthly Rollup (в рамках новой концепции накопительной модели кумулятивных обновлений).
Кроме того, блокируется установка драйверов для видеоадаптеров на базе графических процессоров Intel седьмого поколения (Intel HD Graphics 610 — 650). В Windows 7 SP1 он определяется как стандартный VGA графический адаптер.
При попытке установить скачанный с драйвера производителя подписанный видео драйвер, появляется ошибка «Эта система не удовлетворяет минимальным требованиям для установки программного обеспечения».
Как вы видите, непосредственно в установщике драйвера указано, что на оборудовании с седьмым поколением процессоров Intel, драйвер может быть установлен только в Windows 10 x64.
Wufuc – патч для восстановления Windows Update
Существует неофициальный обходной метод, позволяющий убрать сообщение «Оборудование не поддерживается» и восстановить возможность получения и установки обновлений безопасности на компьютерах с Windows 7 и 8.1 с процессорами Intel Kaby Lake, AMD Ryzen, и другими не поддерживаемыми CPU.
Пользователь GitHub под ником Zeffy выпустил небольшой патч Wufuc (windows update …. ну вы поняли), который позволяет избавиться от проблемы «несовместимого оборудования». Патч отключает сообщение Центра обновлений о несовместимости оборудовании и разрешает компьютеру получать обновления с Windows Update. Последнюю стабильную версию патча Wufuc можно скачать тут: https://github.com/zeffy/wufuc/releases/latest.
Есть версия Wufuc как для x86, так и для x64 систем.
Согласно информации от Zeffy функция обнаружения типа процессора и запрета получения обновлений находится в библиотеке wuaueng.dll. Первоначально патч Wufuc заменял данный файл, но т.к. данное решение неустойчиво против обновления файла очередным обновлением Windows Update, в последующих релизах Wufuc логика работы патча была изменена.
Теперь фактическая замена файла wuaueng.dll не производится. Установщик wufuc_setup_x64.msi регистрирует новое задание планировщика, которое запускает wufuc при загрузке компьютера. Затем wufuc внедряет себя в процесс service host или службу wuauserv и перехватывает вызов функций IsDeviceServiceable и IsCPUSupported, модифицируя возвращаемый ответ.
Таким образом патч wufuc отключает сообщение «Оборудование не поддерживается» в Windows Update, и позволяет продолжать устанавливать обновления на системах Windows 7 и 8.1.
Compareexchange128 Windows 10 как исправить?
Не для кого не секрет, что новая операционная система Windows 8 компании Microsoft с момента ее выхода подверглась серьезной критике. Наибольшее недовольство пользователей вызвал новый плиточный интерфейс Metro с отсутствующей в нем привычной кнопкой “Пуск”. Критику в Microsoft восприняли как руководство к действию.
На конец августа 2013 года запланировано выпустить новую версию операционной системы, которая уже получила официальное название Windows 8.1 (Windows Blue). Она будет бесплатно распространяться через магазин Windows Store как обновление Windows 8.
В настоящий момент времени уже выпущена и доступна для загрузки с сайта Microsoft ознакомительная версия Windows 8.1 Preview.
В силу того, что это Preview, наверное не многие захотят ставить ее сразу на рабочий компьютер или планшет. Первое, что приходит в голову по поводу того, как познакомиться с новой редакцией ОС, это система виртуализации Oracle VirtualBox. Windows 8, как 32-х, так и 64-разрядная, в Virtual Box работают исправно.
Однако, попытка установить в виртуальную машину Virtual Box (в данный момент речь идет о VirtualBox 4.2.14 для Windows) 64-разрядную Windows 8.1 Preview закончится неудачей. Процесс инсталляции сразу же остановится и вы получите вот такое сообщение:
Понять, что пошло не так не специалисту из этого сообщения достаточно сложно.
Хорошо, если 8.1 Preview х64 не хочет устанавливаться на чистый диск, то можно попытаться установить ее как обновление Windows 8.
Для этого “вставляем” в виртуальный оптический привод гостевой ВМ с Windows 8 x64 ISO файл с образом дистрибутива 8.1 Preview х64 и запускаем с него “setup.exe”.
Очень быстро установка снова останавливается, но информации уже значительно больше –
Невозможно установить Windows 8.1 Preview, так как процессор не поддерживает CompareExchange128
Стало быть дело в процессоре. Но не в физическом, – компьютер, на котором делались попытки инсталляции 8.1 Preview х64 в VirtualBox, достаточно современный с процессором I7, а в виртуальном процессоре, который предоставляет система виртуализации.
Наверняка эту недоработку Oracle исправит в самое ближайшее время в очередном обновлении VirtualBox. Однако, для тех, кто не согласен ждать новой исправленной версии VirtualBox, можно предложить очень простое решение этой проблемы. Его удалось найти здесь.
Настройка необходимых характеристик процессора виртуальной машины
Дело в том, что, как объясняется в Windows 8.1 Preview FAQ, для инсталляции 64-разрядных версий процессор должен поддерживать: CMPXCHG16b, PrefetchW and LAHF/SAHF.
Включить поддержку этих опций процессора в Oracle VirtualBox можно следующим образом:
1. Запустить командную строку операционной системы хостового компьютера (привилегии администратора при этом не требуются) и перейти в корневую папку VirtualBox. Если система виртуализации устанавливалась с параметрами по умолчанию, то для этого надо выполнить:
cd C:\Program Files\Oracle\VirtualBox 2. Не выходя из командной строки выполнить команду:
VBoxManage setextradata [имя ВМ для Windows 8.1] VBoxInternal/CPUM/CMPXCHG16B 1
После этого можно беспрепятственно инсталлировать любым способом Windows 8.1 Preview x64 в выбранную виртуальную машину и получить вполне ожидаемый результат:
К сожалению, в гостевой машине Windows 8.1 Preview пока не будут работать “Дополнения гостевой ОС” – имеющиеся в версии VirtualBox 4.2.14 попросту не устанавливаются. Это относится как к 64-х, так и к 32-разрядной версиям. В результате этого такие возможности, как автоматическое масштабирование окна гостевой ОС, общий буфер обмена, общие папки и другие будут недоступны.
Решение проблемы отсутствующих дополнений гостевой ОС путем использования удаленного подключения к виртуальной машине
Временным выходом из этого положения может оказаться использование удаленного рабочего стола. Реализовать эту идею можно двумя способами:
1. Разрешить удаленные подключения непосредственно в гостевой машине Windows 8.1 Preview
Для доступа к свойствам системы нажимаем Win+X, в появившемся списке выбираем “Система” –> “Дополнительные параметры системы” –> “Удаленный доступ”:
2. Включить в VirtualBox в настройках виртуальной машины “Удаленный дисплей”:
В общем, кому как больше нравится. И то и другое это классический RDP. Лично мне как-то привычнее первый, но при этом придется разобраться с сетью и IP-адресом гостевой машины.
При подключении удаленного дисплея в VirtualBox нужно будет обратить внимание на номер порта – их можно менять для удаленного подключения к нескольким ВМ с IP-адресом хоста.
Для того, чтобы получить адекватное представление о Windows 8.1 Preview, в настройках RDP соединения имеет смысл выбрать максимальную скорость соединение и включить все эффекты рабочего стола:
Здесь же можно подключить локальные ресурсы компьютера для обмена файлами с гостевой ОС.
Желаю всем успешного и приятного знакомства с Windows 8.1 Preview.
Как я и предполагал, после выхода следующей версии Oracle VirtualBox — 4.2.16 большинство положений, описанных в данной статье, потеряли свою актуальность.
Теперь для установки 64-разрядной версии Windows 8.1 Preview достаточно правильно выбрать в настройках тип операционной системы:
“Дополнения гостевой ОС” теперь устанавливаются без проблем и позволяют настраивать варианты обмена данными с главным компьютером.
А вот с масштабированием экрана гостевой машины у меня пока что-то не получилось (возможно, это только у меня) – разрешение экрана гостевой Windows 8.1 при переходе в полноэкранный режим или в режим масштабирования не изменяется. Так что вариант удаленного подключения к гостевой машине остается пока актуальным.
В следующей статье описана установка Windows 8.1 непосредственно на виртуальный диск.
— 4 июля, 2013 в рубрике — Microsoft Windows Microsoft, VirtualBox, Windows 8, Процессор
» How to Fix Windows 10 Upgrade Compare Exchange128 Error Message — Error Support for Windows PCs
Some Windows 7 and Windows 8.1 users reported experiencing a CompareExchange128 error when trying to upgrade to Windows 10. The error reads, “You can’t install Windows 10 because your processor doesn’t support CompareExchange128”. In order to upgrade to Windows 10 (64-bit), the CMPXCHG16B instruction must be present. If you receive this error, this mostly means that your CPU doesn’t have the CMPXCHG16B instruction.
Recommended: Download the Automatic Repair Utility to correct this and other PC performance issues.
Установка в материнскую плату на 775 сокете
Для начала, нужно узнать, что за процессор вам достался.
Установленный процессор с пропилами
После успешной установки биос должен правильно определить новый процессор. Не лишним будет зайти в настройки и проверить их корректность. После загрузки windows заходим в диспетчер задач и проверяем количество ядер. Иногда, при переходе на зион с двухъядерного процессора, количество ядер может остаться равным двум. Поэтому если вы видите 2 ядра вместо 4, то нужно проделать следующее:
Теперь система будет видеть все 4 ядра
Вот и всё, установка прошла успешно и можно переходить к тестированию.
При загрузке появляется сообщение о необходимости обновить биос, либо сообщение о неподдерживаемом процессоре (unsupported cpu detected)
Как правило, если нажать F1, то система успешно загружается. Проблема, вероятнее всего, в том, что не прошит модифицированный биос. Если ошибка появляется даже после успешной прошивки, но при этом все остальное работает нормально, то избавиться от неё можно отключив функцию Halt boot on error в bios.
Не устанавливается Windows 8.1 или Windows 10
Windows может жаловаться на какую-либо отсутствующую функциональность процессора ( например CompareExchange128 ). Ошибка появляется когда:
Для исправления — прошить последнюю актуальную версию bios с микрокодами Xeon.
Система не загружается, выдает ошибку вида «unrecognized CPU error»
Windows крашится при загрузке
Выполните сброс всех настроек биоса, либо установите их в дефолтное значение. Убедитесь, что установлен корректный режим работы SATA (IDE или AHCI). В редких случаях, может потребоваться переустановка Windows.
Кулер постоянно крутится на максимальных оборотах
Такое может быть по нескольким причинам:
После установки Xeon, при включении компьютера черный экран и ничего не происходит
Во первых, убедитесь, что используете совместимую материнскую плату и для неё прошит модифицированный биос.
Во вторых, проверьте, правильно ли установлен процессор в сокет. Возможно не до конца срезаны пластиковые ключи и это мешает контакту. По возможности, проверьте работоспособность на другой плате.
И наконец, убедитесь, что все остальные комплектующие подключены корректно. Проверьте работоспособность со старым процессором, чтобы исключить другие неполадки.
Fix CompareExchange128 Windows 10 Error [Solved]
If you have an older processor and motherboard, and you are thinking of upgrading to Windows 10 64-bit Operating System then you might face CompareExchange128 error, and you will not be able to install the Windows 10 64-bit OS on your PC or laptop. This problem also occurs with the users who are upgrading to Windows 8.1 from Windows 8.
What causes CompareExchange128 error in Windows 10?
The main cause of CompareExchange128 error depends on the various two conditions:
CPU lacks CMPXCHG16b Instruction – This is the foremost reason for CompareExchange128 error which occurs because your CPU or Processor lacks CMPXCHG16b Instruction which is needed for Windows 10 64-bit Installation.
Old & Outdated BIOS – The CompareExchange128 error can also occur even if your 64-bit CPU / Processor supports CMPXCHG16b Instruction. This is due to older version of BIOS on your motherboard which fails to detect some of the instructions in your CPU or Processor which in this case is CMPXCHG16b.
Must Read: When to change Motherboard BIOS Battery?
How to find out whether your CPU supports CMPXCHG16b Instruction?
Here are the various methods by which you can find out if your processor supports CMPXCHG16b Instruction or not.
CPU-Z – CPU-Z is a widely popular and well known CPU info tool that can tell you the complete details of your current CPU / Processor, Motherboard details and memory details. It is a very tiny utility and you can download and install it from the link given below.
Coreinfo – Coreinfo is small command line utility that can tell you about the various in-depth technical details about your CPU or Processor. It can tell you about the mapping between logical processors and the physical processor, NUMA node, and socket on which they reside, as well as the cache’s assigned to each logical processor. It really gives you the very technical details about your processor which can be very hard to understand for most of the users but here you have to focus on only one thing which is CMPXCHG16b Instruction.
Click here to Download Coreinfo & Learn How to use it?
Search on Internet
If you do not physically own the processor but want to know that whether the other processor supports CMPXCHG16b Instruction or not, then you can find this by searching online on the internet. You can type the following search query in the Google for this:
CMPXCHG16b
Fix & Solutions for CompareExchange128 / CMPXCHG16b Error in Windows 10
Here are the various fix and top solutions for resolving CompareExchange128 / CMPXCHG16b error on your computer when installing 64-bit version of Windows 10.
Update BIOS
The first thing to do when you encounter this CompareExchange128 / CMPXCHG16b Error is to update or flash your BIOS to the latest one. For this download the latest copy of BIOS (.ROM file) from your motherboard’s manufacturer website and then follow the instructions given in your motherboard manual to update/flash the BIOS. In most of the cases updating the BIOS can fix this annoying error.
Install 32-bit version of Windows 10
If updating the BIOS doesn’t solve your problem then forget about installing 64-bit version of Windows 10 and install the 32-bit version of Windows 10 until you decide to upgrade your processor and motherboard.
Workaround Fix [credit:windowsreport.com]
This is a workaround and not a proper fix but some users have pretty good success with it.
1. Backup all your important data and files.
2. Download all the updates and upgrade to 32-bit version of Windows 10.
3. Your Windows 10 32-bit version copy will be activated on Microsoft servers.
4. Now Download 64-bit version of Windows 10.
5. Use Windows 10 Creation Media Program and choose Create installation media for another PC. You will need an empty DVD or USB Flash Drive for this.
6. After this perform a clean install of Windows 10 and skip the step where it asks you to enter the serial number.
7. After the Installation is complete you will have Windows 10 64-bit running on your PC which is fully activated.
Get a New Processor & Motherboard
If all of the above solutions fail then the last resort is to upgrade your PC and get yourself latest generation of Processor and Motherboard which is fully compatible with Windows 10 64-bit OS.
If you have some queries regarding this then you can ask me by leaving a comment below.
See Also:
»Как исправить ошибку Windows 10 Update Exchange128
Некоторые пользователи Windows 7 и Windows 8.1 сообщили об ошибке CompareExchange128 при попытке перейти на Windows 10, Ошибка гласит: «Вы не можете установить Windows 10, потому что ваш процессор не поддерживает CompareExchange128». Для обновления до Windows 10 (64-разрядная версия) должна присутствовать инструкция CMPXCHG16B. Если вы получаете эту ошибку, это в основном означает, что ваш процессор не имеет инструкции CMPXCHG16B.
Fix CompareExchange128 Windows 10 Error [Solved]
If you have an older processor and motherboard, and you are thinking of upgrading to Windows 10 64-bit Operating System then you might face CompareExchange128 error, and you will not be able to install the Windows 10 64-bit OS on your PC or laptop. This problem also occurs with the users who are upgrading to Windows 8.1 from Windows 8.
The Error will read as “You can’t install Windows 10 because your processor doesn’t support CompareExchange128”.
Источник
If you have an older processor and motherboard, and you are thinking of upgrading to Windows 10 64-bit Operating System then you might face CompareExchange128 error, and you will not be able to install the Windows 10 64-bit OS on your PC or laptop. This problem also occurs with the users who are upgrading to Windows 8.1 from Windows 8.
The Error will read as “You can’t install Windows 10 because your processor doesn’t support CompareExchange128”.
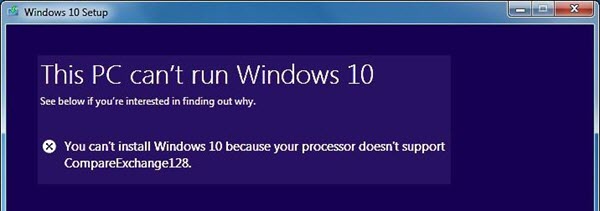
What causes CompareExchange128 error in Windows 10?
The main cause of CompareExchange128 error depends on the various two conditions:
CPU lacks CMPXCHG16b Instruction – This is the foremost reason for CompareExchange128 error which occurs because your CPU or Processor lacks CMPXCHG16b Instruction which is needed for Windows 10 64-bit Installation.
Old & Outdated BIOS – The CompareExchange128 error can also occur even if your 64-bit CPU / Processor supports CMPXCHG16b Instruction. This is due to older version of BIOS on your motherboard which fails to detect some of the instructions in your CPU or Processor which in this case is CMPXCHG16b.
Must Read: When to change Motherboard BIOS Battery?
How to find out whether your CPU supports CMPXCHG16b Instruction?
Here are the various methods by which you can find out if your processor supports CMPXCHG16b Instruction or not.
Using CPU Info Tools
CPU-Z – CPU-Z is a widely popular and well known CPU info tool that can tell you the complete details of your current CPU / Processor, Motherboard details and memory details. It is a very tiny utility and you can download and install it from the link given below.
Download CPU-Z
Coreinfo – Coreinfo is small command line utility that can tell you about the various in-depth technical details about your CPU or Processor. It can tell you about the mapping between logical processors and the physical processor, NUMA node, and socket on which they reside, as well as the cache’s assigned to each logical processor. It really gives you the very technical details about your processor which can be very hard to understand for most of the users but here you have to focus on only one thing which is CMPXCHG16b Instruction.
Click here to Download Coreinfo & Learn How to use it?
Search on Internet
If you do not physically own the processor but want to know that whether the other processor supports CMPXCHG16b Instruction or not, then you can find this by searching online on the internet. You can type the following search query in the Google for this:
<CPU Model> CMPXCHG16b
Fix & Solutions for CompareExchange128 / CMPXCHG16b Error in Windows 10
Here are the various fix and top solutions for resolving CompareExchange128 / CMPXCHG16b error on your computer when installing 64-bit version of Windows 10.
Update BIOS
The first thing to do when you encounter this CompareExchange128 / CMPXCHG16b Error is to update or flash your BIOS to the latest one. For this download the latest copy of BIOS (.ROM file) from your motherboard’s manufacturer website and then follow the instructions given in your motherboard manual to update/flash the BIOS. In most of the cases updating the BIOS can fix this annoying error.
Install 32-bit version of Windows 10
If updating the BIOS doesn’t solve your problem then forget about installing 64-bit version of Windows 10 and install the 32-bit version of Windows 10 until you decide to upgrade your processor and motherboard.
Workaround Fix [credit:windowsreport.com]
This is a workaround and not a proper fix but some users have pretty good success with it.
1. Backup all your important data and files.
2. Download all the updates and upgrade to 32-bit version of Windows 10.
3. Your Windows 10 32-bit version copy will be activated on Microsoft servers.
4. Now Download 64-bit version of Windows 10.
5. Use Windows 10 Creation Media Program and choose Create installation media for another PC. You will need an empty DVD or USB Flash Drive for this.
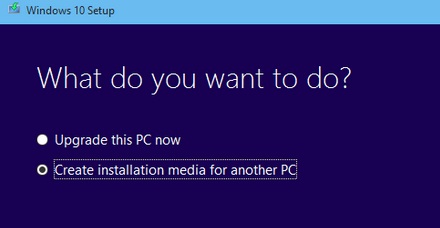
6. After this perform a clean install of Windows 10 and skip the step where it asks you to enter the serial number.
7. After the Installation is complete you will have Windows 10 64-bit running on your PC which is fully activated.
Get a New Processor & Motherboard
If all of the above solutions fail then the last resort is to upgrade your PC and get yourself latest generation of Processor and Motherboard which is fully compatible with Windows 10 64-bit OS.
If you have some queries regarding this then you can ask me by leaving a comment below.
See Also:
- Solution to USB Device Not Recognized Error in Windows
- How to Fix DNS_PROBE_FINISHED_NXDOMAIN Error in Chrome
-
Сегодня решил поставить на еще один свой компьютер Windows 10 x64 bit. Вроде по началу все было не плохо, винда быстро залилась на флэшку и я решил начать установку. Если загружаться с флэшки, то происходит следующая вещь, Файлы на хард загружаются, потом на 10-15 секунд появляется логотип Windows 10, и компьютер сразу перезагружается начиная грузится с Харда. Так происходило очень много раз, при том что другие операционки спокойно позволяли себя поставить, и 64 битные и 32 битные. После я решил попробовать поставить Windows через проводник, и выяснилась следующая вещь, мой процессор не поддерживает Compare Exchange 128, хотя у меня Core 2 Quad 9400, который в теории всё это имеет.
Есть ли какой то способ это исправить? -
Ну вообщем вопрос решился методом перебора вариантов решения проблемы. Вообщем проблема была в устаревшем Биосе, и решилась его обновлением. Десятка встала как влитая, моментально и без проблем.