
Knowing how to run Microsoft Defender (formerly Windows Defender) from the command line can be very useful. Perhaps you’ve been locked out of its UI due to malware, are trying to run a scan from recovery media, or are using a GUI-less Windows Server install. In any of these situations, knowing a scan command or two can save you a lot of trouble.
Though Microsoft Defender is easier to control from the Windows Security app, command-line antivirus is also quite simple and presents many of the same options. Importantly, it also allows you to automate your anti-malware tasks if you wish. You could create a script to automatically perform a quick scan at a certain time, for example, or to perform the same scans across multiple PCs.
In this tutorial, we’ll be showing how to update Microsoft Defender with CMD, as well as how to perform a quick, full, or custom scan. By the end of it, you should have a good idea of how command-line antivirus works.
⚠️ Please note: The process described below is the same in Windows 11 as it is in Windows 10. However, bear in mind that we’ll be using screenshots from Windows 10, so your UI may look a little different. We’ll point out any changes you need to be aware of as they come up.
How to Check for Updates for Microsoft Defender in the Command Line
One task that admins are particularly eager to automate is updates. Knowing how to update Microsoft Defender from the command line will allow you to build it into an automatic update script so you never forget.
- Open Command Prompt
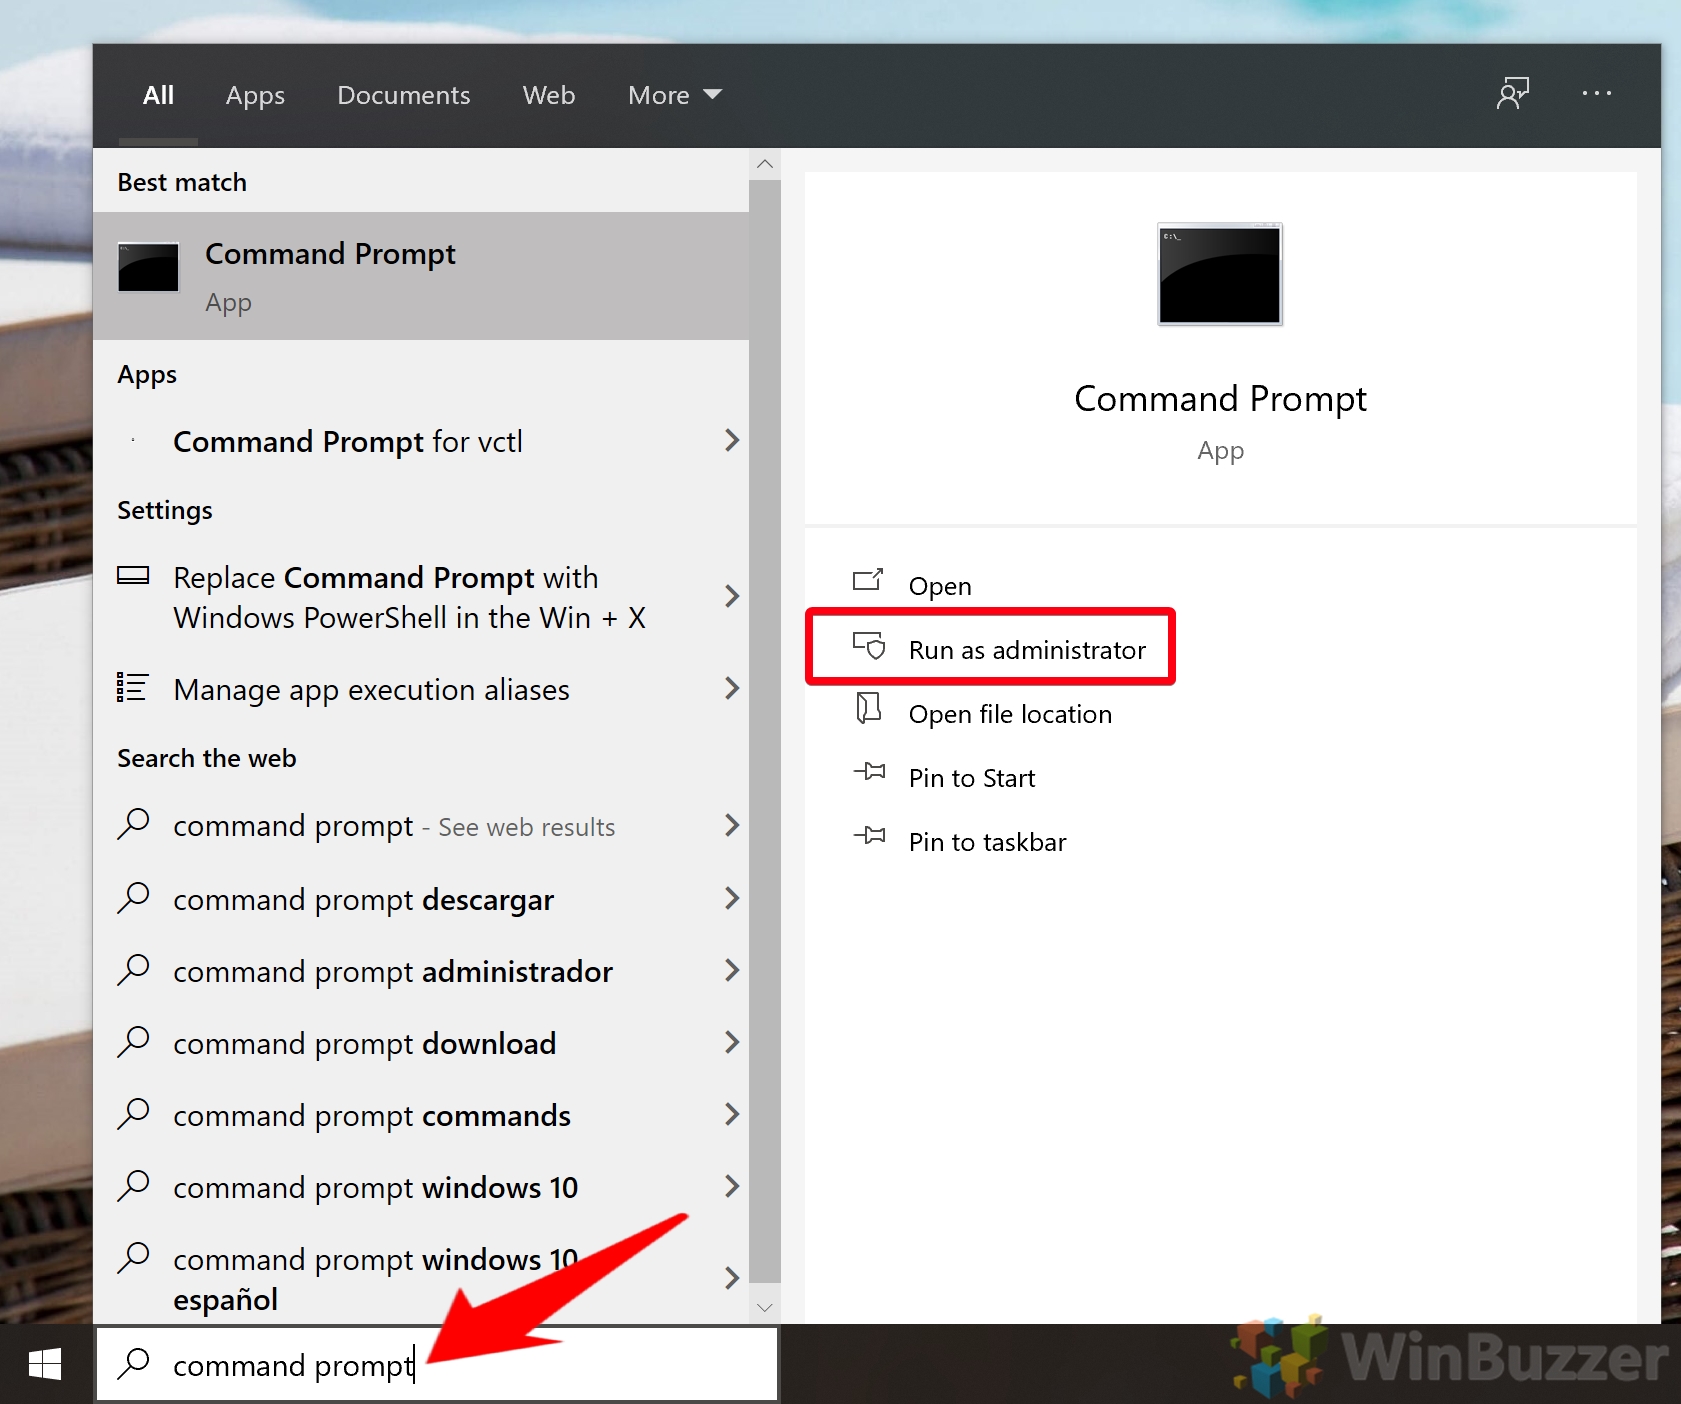
Press Start and then type “Command Prompt”. With the application selected, click “Run as administrator” in the sidebar.

- Open and update the command line antivirus
To open the location of the command line anti-virus in CMD, paste the following:
cd C:\ProgramData\Microsoft\Windows Defender\Platform\4.18*Now you can run a Windows Defender command-line update by typing:
MpCmdRun -SignatureUpdateThe tool will check for the most recent update and download and install it automatically if one is available.

- How to remove previously installed Microsoft Defender updates
So you know how to install updates, but what if you downloaded a faulty one? You can uninstall the most recent definitions with CMD.
First, open CMD by typing “Command Prompt” in your Start menu and then clicking “Run as administrator” on the right-hand side.
- Navigate to the Windows Defender folder and run the remove command
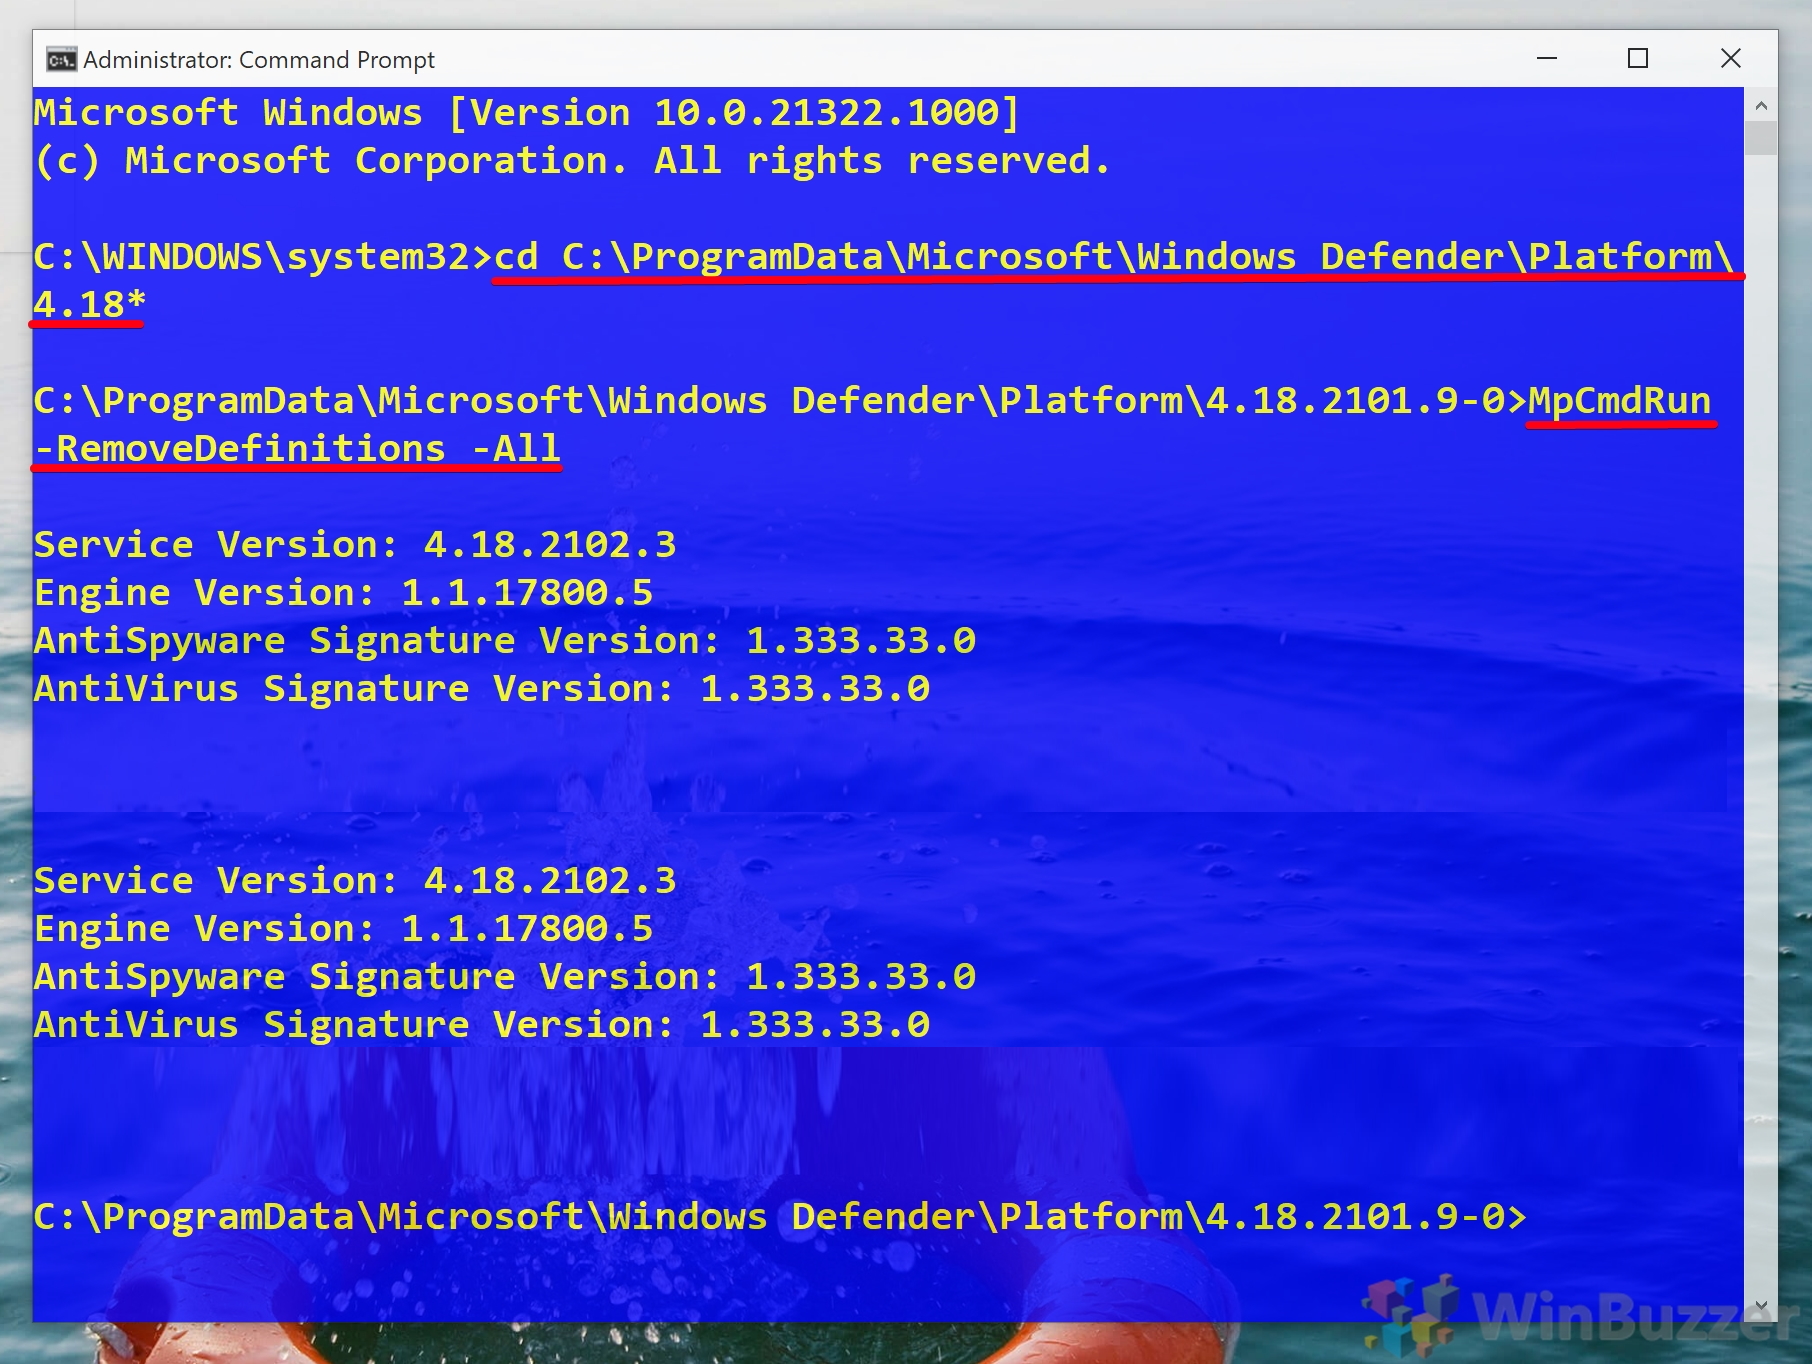
In your CMD window, type the following to navigate to your Windows Defender folder.
cd C:\ProgramData\Microsoft\Windows Defender\Platform\4.18*Then, run the following command to uninstall the most recent definitions:
MpCmdRun -RemoveDefinitions -AllThe
-Alloption restores previous definitions from the default set of signatures.
- Rollback the engine version
To roll back the engine version, type the following and press Enter:
MpCmdRun -RemoveDefinitions -Engine
- Remove dynamic signature updates
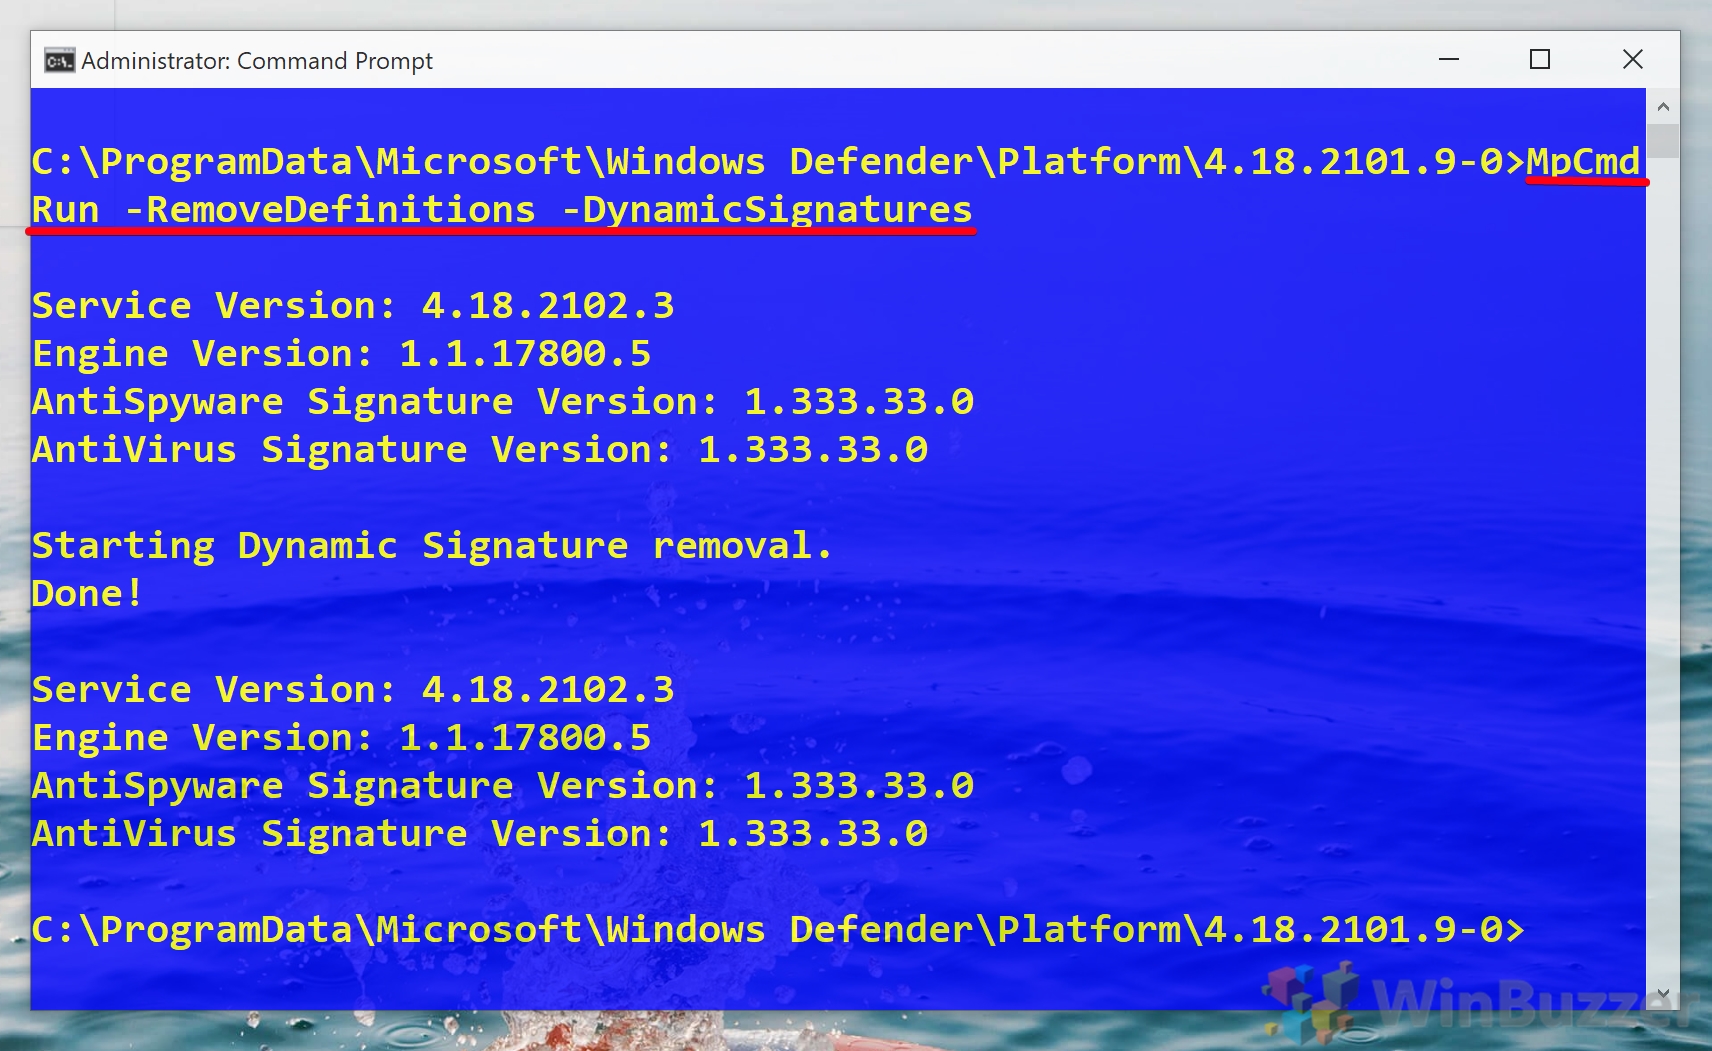
You can uninstall only dynamic signatures by typing the following command and pressing Enter:
MpCmdRun -RemoveDefinitions -DynamicSignatures


How to Perform a Quick Virus Scan with the CMD Scan Command
In most cases, you should run a quick scan before any other type. This will cause Windows Defender to scan the most commonly infected files so you can quickly take action. You can use Windows Defender in the Command line to start one in less than a minute.
- Open Command Prompt
Press the Start button and type “Command Prompt”, then click “Run as administrator” on the right-hand side.
- Navigate to the Windows Defender folder and run the quick scan command
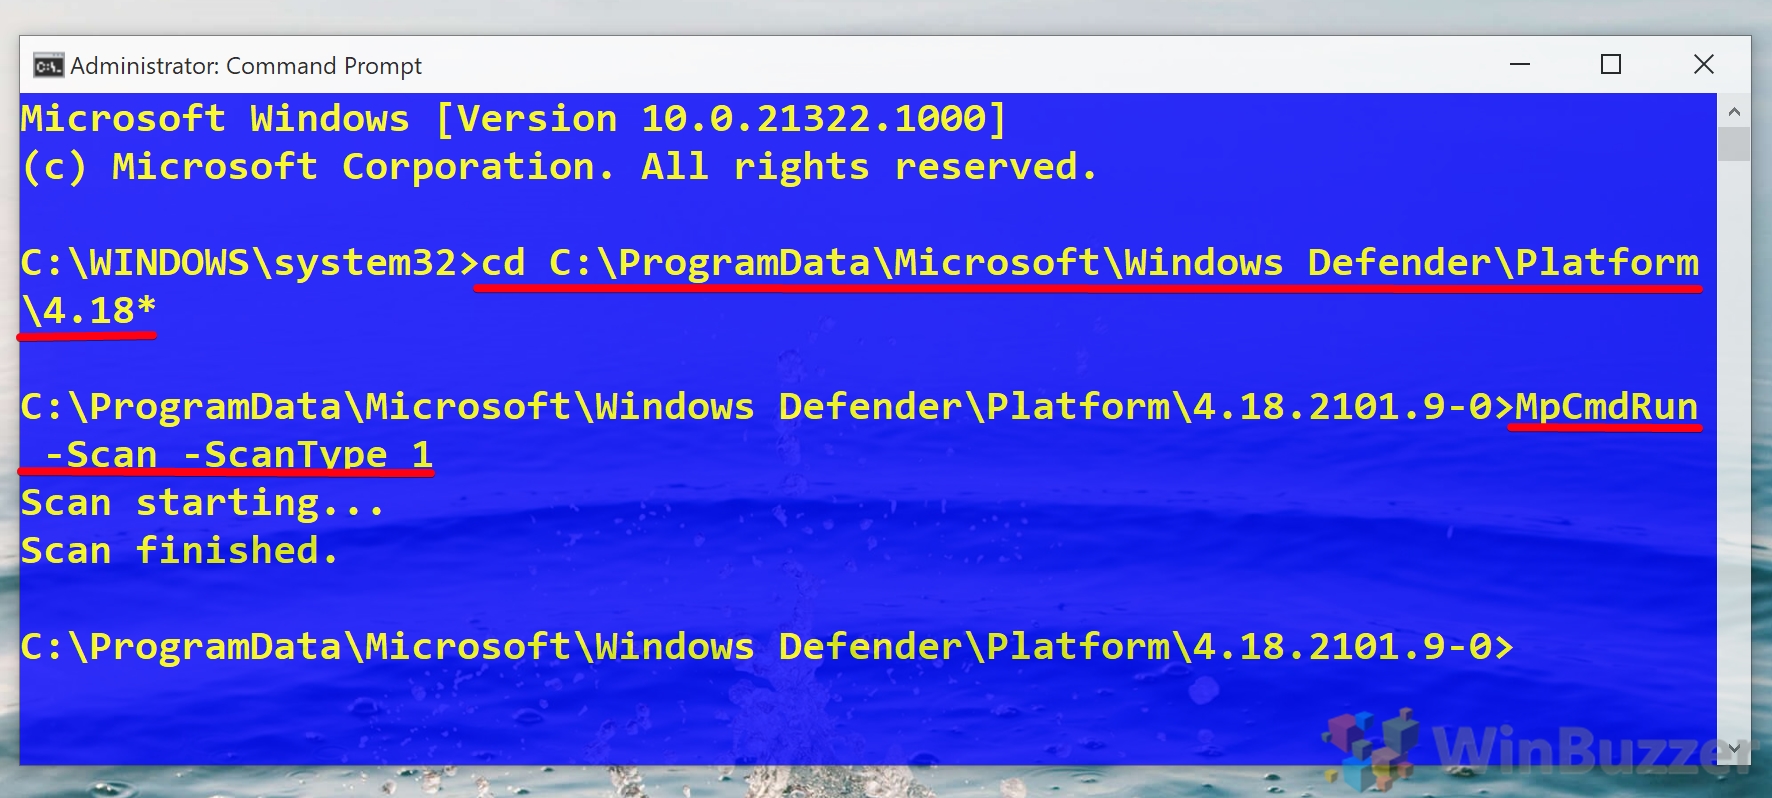
First, we need to navigate to the folder where Windows Defender is installed.
cd C:\ProgramData\Microsoft\Windows Defender\Platform\4.18*
Now we’re ready to run the CMD quick scan command:
MpCmdRun -Scan -ScanType 1The scan will begin, stopping itself automatically if it takes longer than a day.


How to Perform a Full Virus Scan via a Microsoft Defender CMD Command
So, your quick scan found some issues or found no issues, but you’re still seeing virus symptoms. The full scan will check every file on your PC for malware. Here’s how you can run it with a CMD scan command:
- Open Command Prompt
Press Start and then type “Command Prompt”. With the application selected, click “Run as administrator” in the sidebar.
- Open the Windows Defender folder and run the full CMD scan command
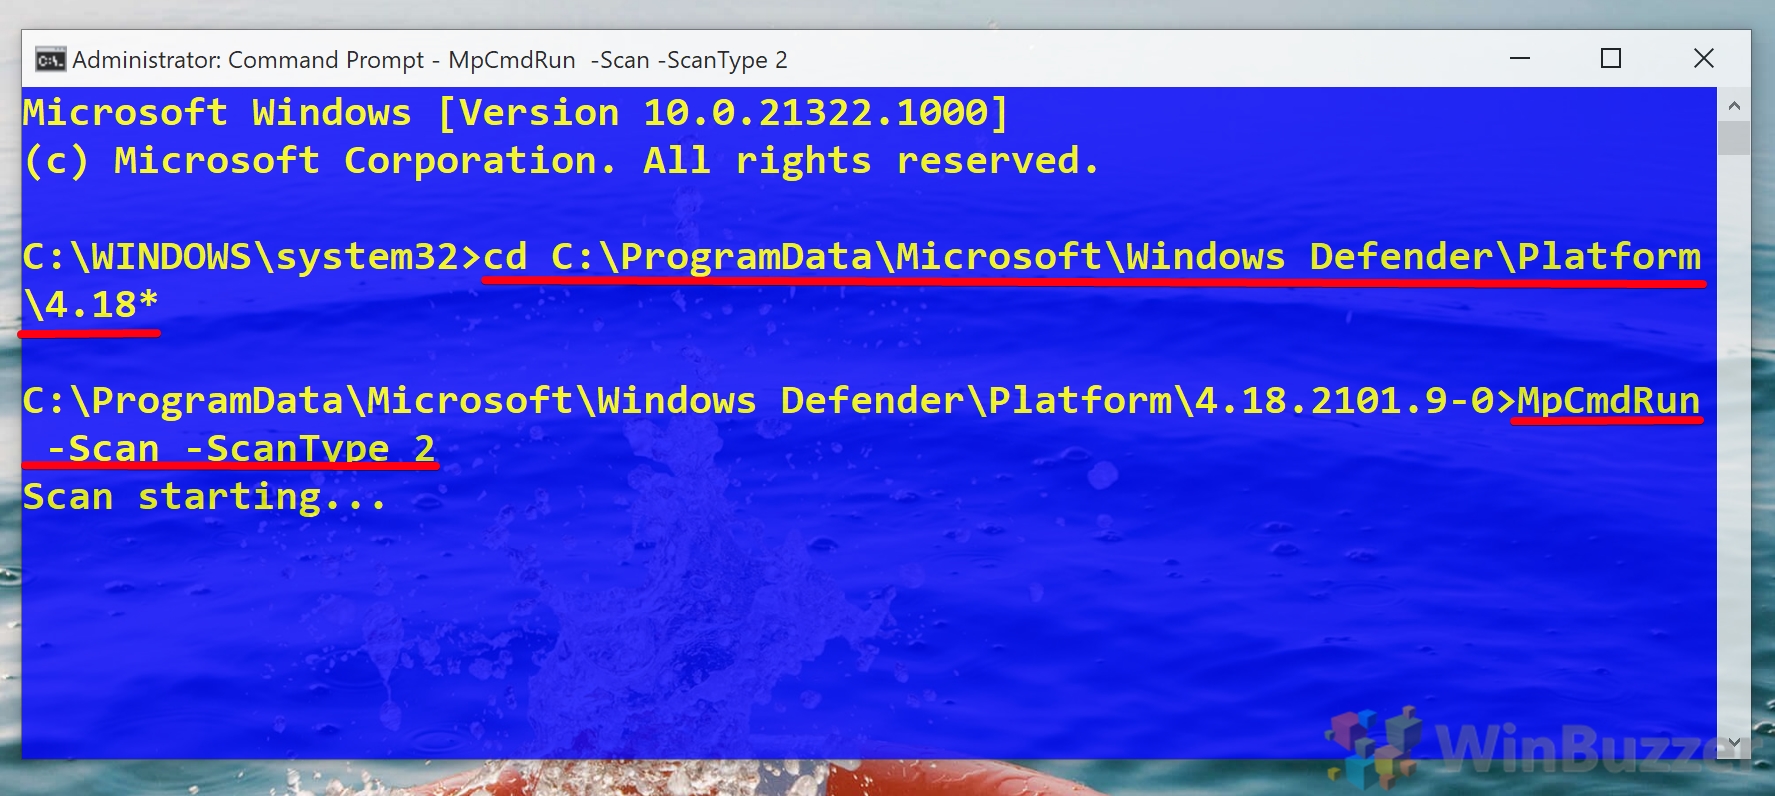
Before we can run our CMD scan, we need to navigate to the folder our anti-virus tool lives in:
cd C:\ProgramData\Microsoft\Windows Defender\Platform\4.18*Now we can run our full command-line anti-virus scan:
MpCmdRun -Scan -ScanType 2If you followed the quick scan section, you’ll notice that this command is identical, except the scan type has been changed from
1to2.The scan will start and will take a very long time. The more files you have on your PC, the longer it will take.


How to Perform a Custom Command Line AntiVirus Scan
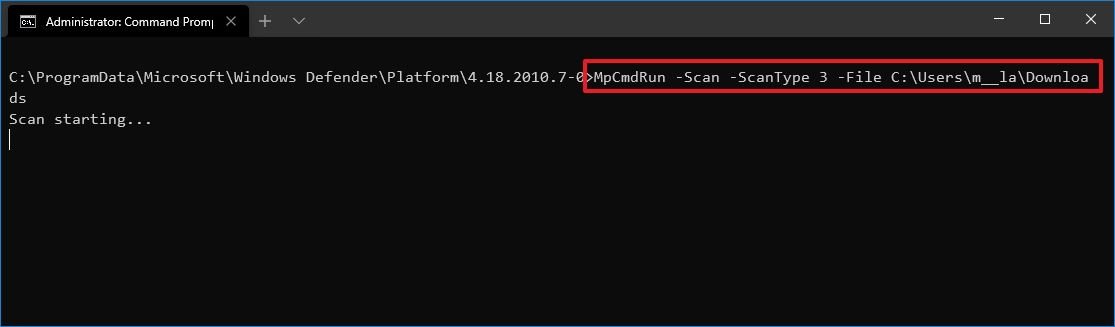
If you just want to tell if a file you just downloaded is safe, you can perform a custom CMD scan by pointing it to a specific folder or file.
- Open Command Prompt
Press the Start button, type Command Prompt, then click “Run as administrator” on the right-hand side with it selected.
- Run the custom malware scan
In your CMD window, type the following to navigate to your Windows Defender folder.
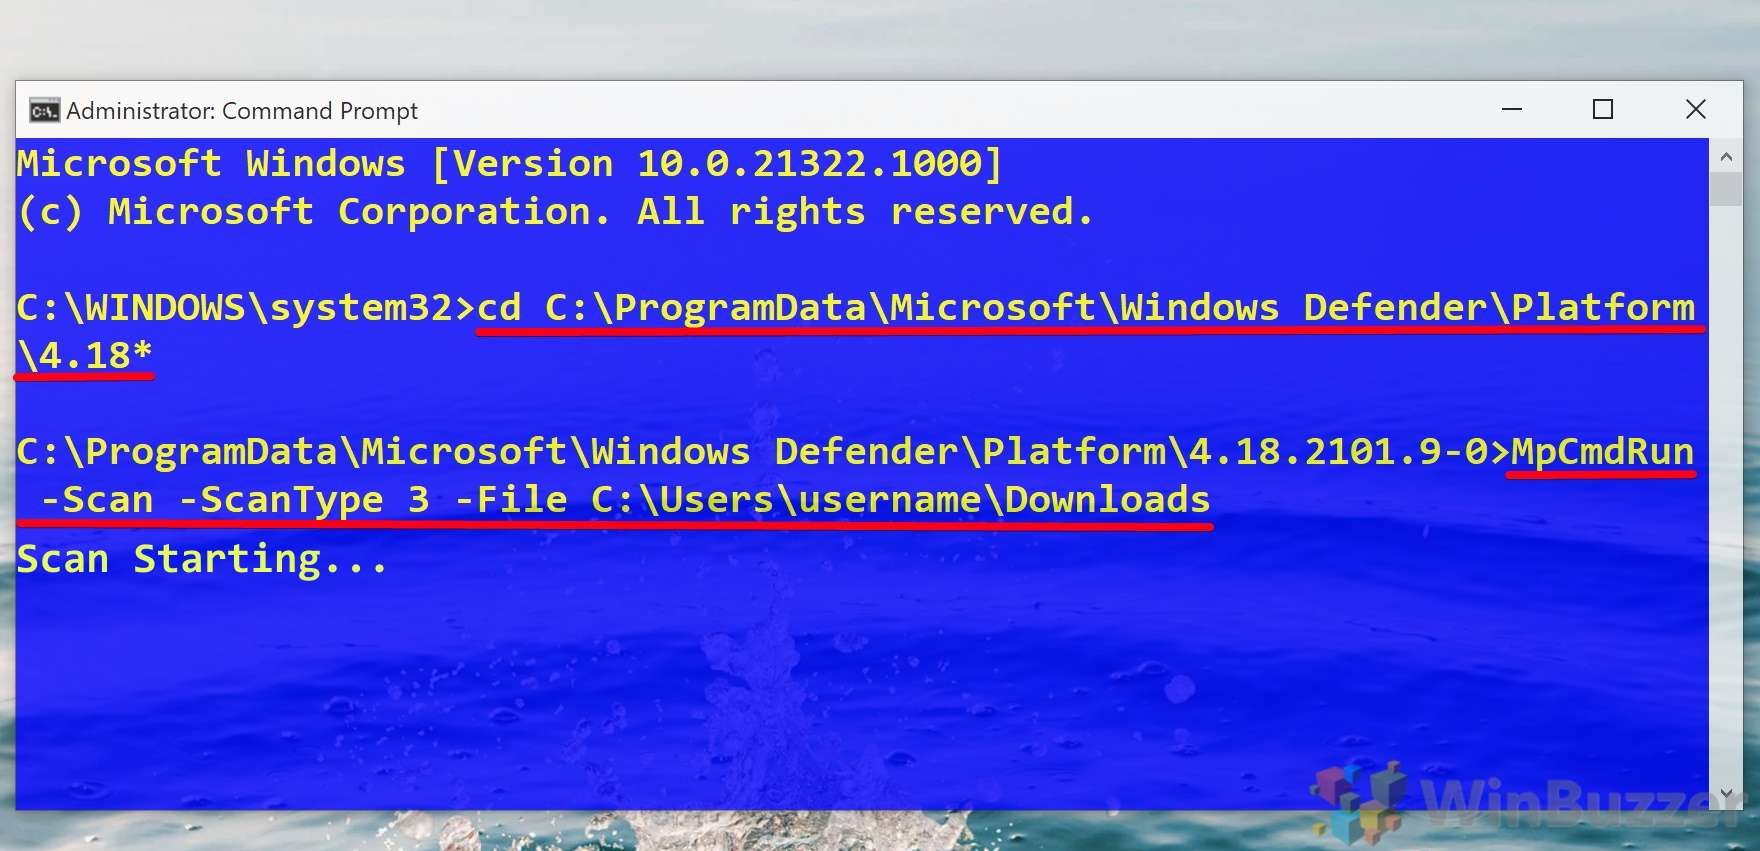
cd C:\ProgramData\Microsoft\Windows Defender\Platform\4.18*Now run the following command, switching C:/file/or/folder/path with the path to your file or folder.
MpCmdRun -Scan -ScanType 3 -File C:\file\or\folder\pathThe scan will start, and shouldn’t take too long if there are only a few files.

- Optional: Run the custom scan command with a timeout option
You can also define a timeout period for your scan in case it takes too long. Simply navigate to your Defender folder with
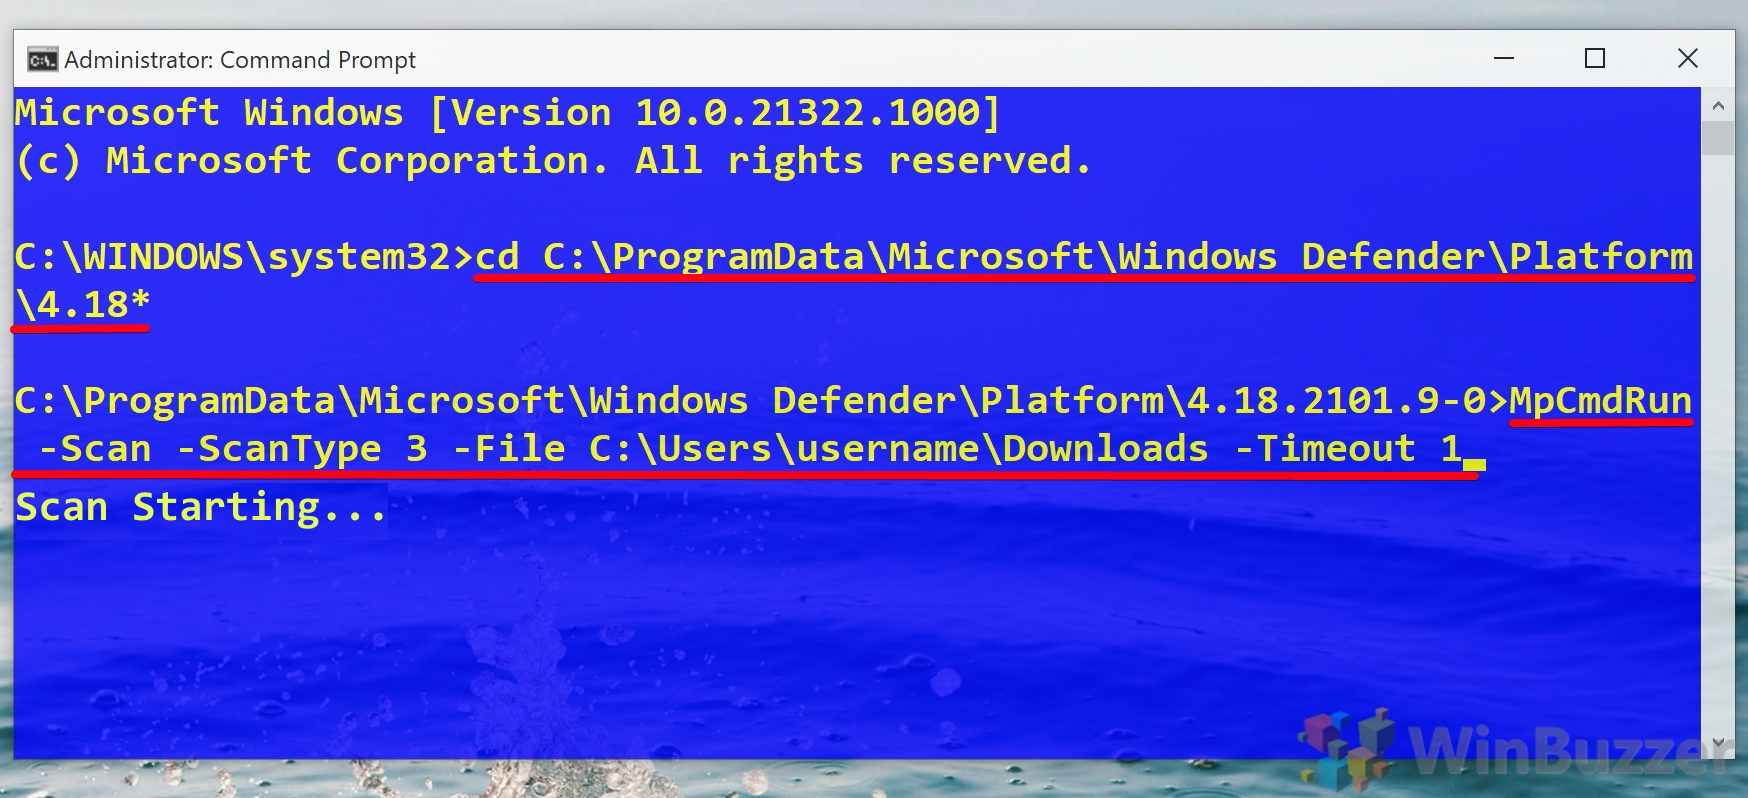
cd C:\ProgramData\Microsoft\Windows Defender\Platform\4.18*and run the following command:MpCmdRun -Scan -ScanType 3 -File C:\your\folder\or\file\path -Timeout 1Remember to switch the file path for the folder of your choice and that the timeout number represents days, not hours.


How to Perform a Boot Sector Malware Scan with the Microsoft Defender Command Line Tool
If you have a particularly nasty virus, it may have attacked your boot sector – the part of your PC that stores instructions that inform the startup process. Because such modifications can make it difficult to boot into your OS and cause other unwanted behavior, this can be hard to fix.
Thankfully, Windows Defender has a specific tool to find and resolve these issues – the boot sector scan. Even better, you can run it from the command line if you can’t access your normal OS. Here’s how:
- Open Command Prompt
Press Start and type “Command Prompt”, then click “Run as administrator” in the right-hand panel of the Start menu.
- Run a boot sector CMD scan
First, navigate to the Windows Defender folder with:
cd C:\ProgramData\Microsoft\Windows Defender\Platform\4.18*Then, run the following command:
MpCmdRun -Scan -ScanType -BootSectorScanThe command line anti-virus tool will then scan your boot sector for any malicious code and remove it if it can.


How to Restore Quarantined Items via a Microsoft Defender CMD Command
Last but not least, the Windows Defender Command-line tool lets you list and restore items that have been automatically quarantined. This can be useful if you’re sure a safe item has been removed.
- Open Command Prompt
Press Start, then type Command Prompt. With the tool selected, press “Run as administrator” on the right-hand side.
- Restore quarantined items
Navigate to the Microsoft Defender folder with the following command:
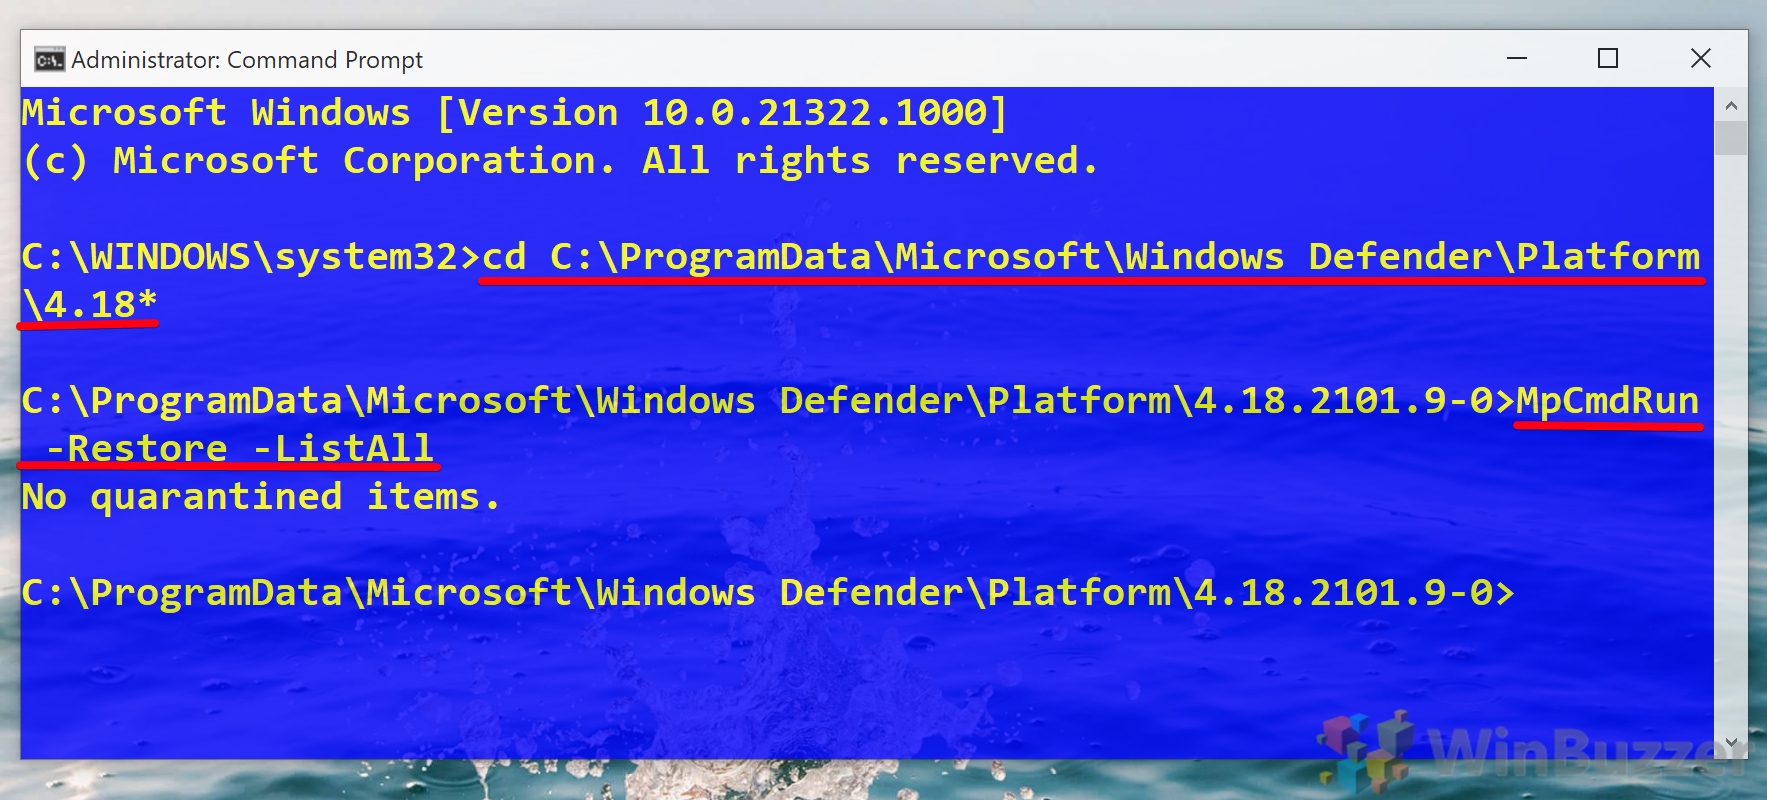
cd C:\ProgramData\Microsoft\Windows Defender\Platform\4.18*Now you can run the following command to view your quarantined items:
MpCmdRun -Restore -ListAllReference the list and type the following to restore a specific quarantined item:
MpCmdRun -Restore -Name ITEM-NAMEAlternatively, restore a file to a specific path with:
MpCmdRun -Restore -Name ITEM-NAME -FilePath PATH\TO\RESTOREYour items will be returned to their original or specified location.

With that, you should have all the tools you need to perform command line antivirus activities. However, to get the most out of Windows Defender, you may want to learn how to perform a scheduled scan or turn on the hidden adware scanner.

FAQ – Frequently Asked Questions about Microsoft Defender CMD Usage
How can I schedule regular Microsoft Defender scans using CMD?
Use Windows Task Scheduler to create a task that runs the appropriate MpCmdRun command at your desired frequency. This isn’t covered in the tutorial but leverages the commands shown.
What are the differences between dynamic signatures and regular updates?
Dynamic signatures are frequently updated definitions to respond to emerging threats, while regular updates are more comprehensive but less frequent updates to Defender’s threat database.
Can I use CMD to configure Microsoft Defender’s real-time protection settings?
CMD doesn’t directly allow you to change real-time protection settings. These settings are typically adjusted through the Windows Security app or Group Policy Editor.
How do I check the health and status of Microsoft Defender via CMD?
Run “MpCmdRun -GetFiles” in CMD. This generates a report with information about Defender’s health and status, including recent activity and detection statistics.
Is it possible to update Microsoft Defender offline using CMD?
Yes, you can download the latest update package on another computer, transfer it to the offline machine, and use CMD to apply the update manually.
How do I disable Microsoft Defender using CMD?
Disabling Defender via CMD is not recommended and typically requires Group Policy changes. However, it can be temporarily turned off via the Windows Security app.
Can CMD commands be used to manage Microsoft Defender on remote computers?
Directly managing Defender on remote computers via CMD isn’t straightforward. It usually involves remote desktop or network management tools.
How do I interpret the scan results provided by CMD?
The CMD output will list detected threats and actions taken. For detailed analysis, refer to the Defender security logs in the Windows Event Viewer.
Can I use CMD to add or remove exclusions in Microsoft Defender?
Adding or removing exclusions via CMD isn’t directly supported. Use the Windows Security app for managing exclusions.
How do I restore Microsoft Defender to its default settings using CMD?
There’s no direct CMD command to reset Defender to default settings. This typically requires manual adjustments in the Windows Security app.
Is it possible to use CMD to view the update history of Microsoft Defender?
CMD doesn’t provide a direct way to view update history. This information can be found in the Windows Security app under the virus & threat protection updates section.
Can I use CMD to check which version of Microsoft Defender I am running?
Yes, navigate to the Defender folder in CMD and run “MpCmdRun -GetFiles”; this generates a report that includes version information.
How do I troubleshoot Microsoft Defender issues using CMD?
Use “MpCmdRun -GetFiles” to generate a detailed report for troubleshooting. For more complex issues, Windows Event Viewer or the Security app may provide additional insights.
Can CMD be used to manage Microsoft Defender’s cloud-based protection?
Managing cloud-based protection settings is not directly possible through CMD. These settings are typically configured in the Windows Security app.
Is there a way to use CMD to view all currently active Defender settings?
CMD doesn’t provide a comprehensive view of all active Defender settings. For a complete overview, use the Windows Security app or Group Policy Editor.
Related: How to Exclude a File or Folder from Microsoft Defender Scans
Microsoft Defender, formerly known as Windows Defender is incredibly useful for a free tool, providing Windows 10 users with competitive anti-virus technology and protecting against rootkits, ransomware, unwanted programs, and more. However, occasionally the program will keep flagging a file or folder that you know is safe. In these cases, it’s useful to know how to exclude a folder from Microsoft Defender scans.

Last Updated on November 7, 2024 11:13 pm CET
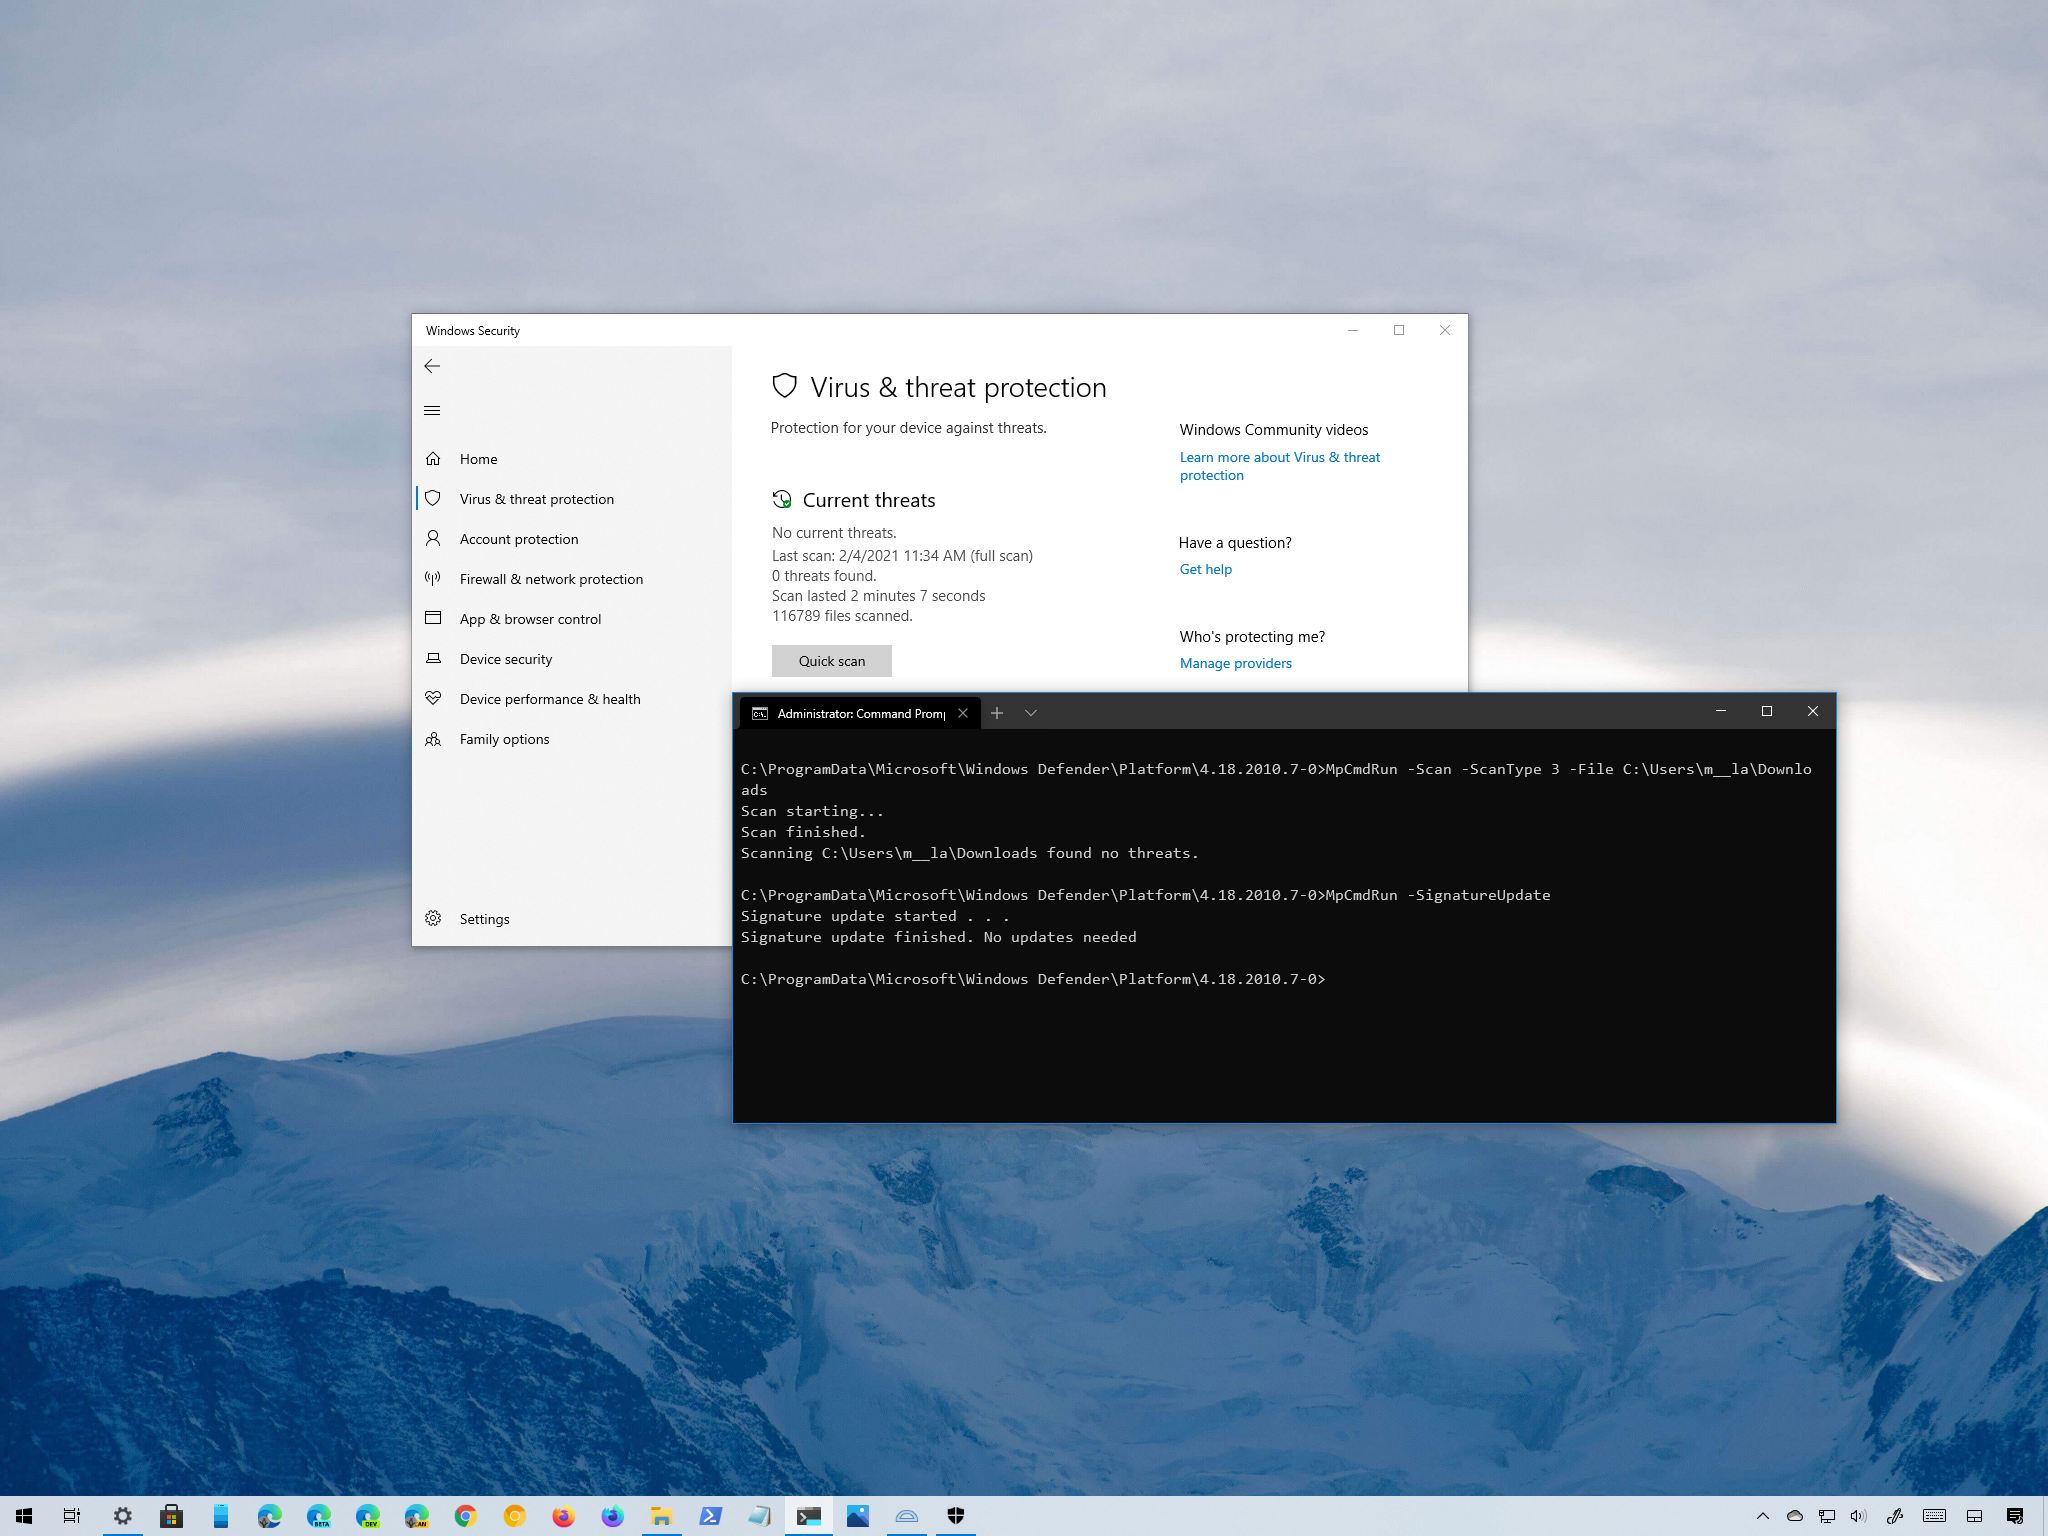
(Image credit: Windows Central)
On Windows 10, Microsoft Defender Antivirus provides advanced real-time protection to protect your device and files against viruses, ransomware, spyware, rootkits, and other forms of malware, including hackers.
Although you can easily control the feature using the Windows Security app, you can also handle various aspects of the antivirus (updates, scans, and quarantined items) through Command Prompt. Usually, managing the experience with commands can be useful in many situations. For instance, when you need to use a script to automate some of the anti-malware tasks. You want to set a specific schedule to download updates or perform a quick, full, or custom scan. Or when you need to complete particular tasks on multiple computers.
In this Windows 10 guide, we will walk you through the steps to manage Microsoft Defender Antivirus with Command Prompt.
- How to check for updates on Microsoft Defender
- How to perform quick virus scan with Microsoft Defender
- How to perform full virus scan with Microsoft Defender
- How to perform custom virus scan with Microsoft Defender
- How to perform boot sector malware scan on Microsoft Defender
- How to restore quarantined items on Microsoft Defender
How to check for updates on Microsoft Defender
To check and download updates for Microsoft Defender, use these steps:
- Open Start.
- Search for Command Prompt, right-click the top result, and select the Run as administrator option.
- Type the following command to open the antivirus tool location and press Enter:
cd C:\ProgramData\Microsoft\Windows Defender\Platform\4.18* - Type the following command to check and update Microsoft Defender Antivirus and press Enter:
MpCmdRun -SignatureUpdate
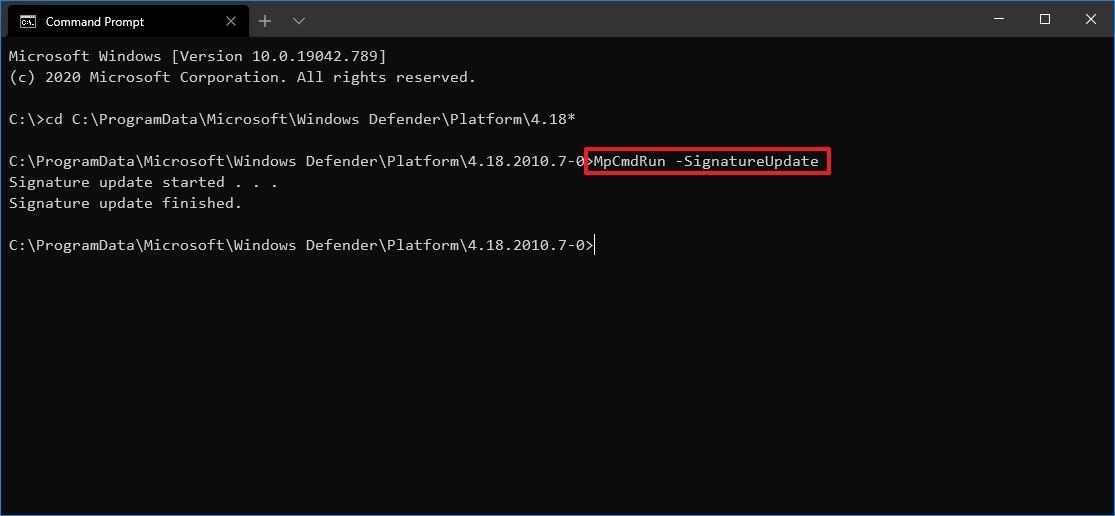
Once you complete the steps, the tool will check and download any update available for the built-in antivirus.
Uninstall definitions updates
You can also remove previously installed updates with these steps:
- Open Start.
- Search for Command Prompt, right-click the top result, and select the Run as administrator option.
- Type the following command to open the antivirus tool location and press Enter:
cd C:\ProgramData\Microsoft\Windows Defender\Platform\4.18* - Type the following command to remove the most recent definitions and press Enter:
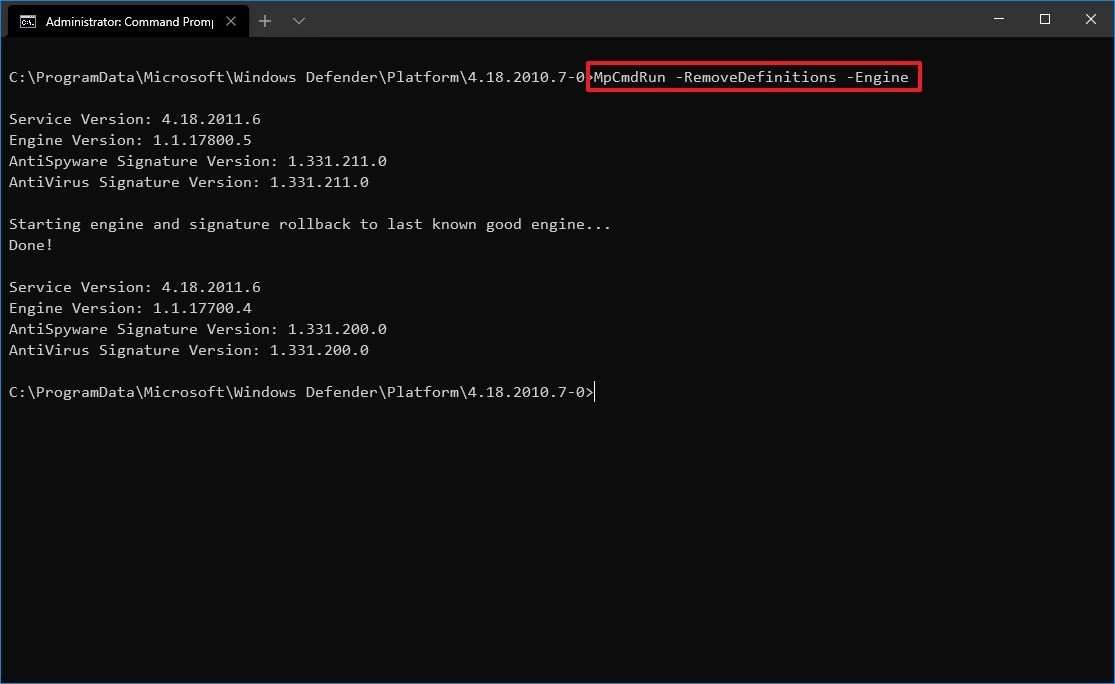
MpCmdRun -RemoveDefinitions -AllThe -All option restores the previous definitions from the backup or original default set of signatures. - Type the following command to rollback the engine version and press Enter:
MpCmdRun -RemoveDefinitions -EngineThe -Engine option rolls back to the previous version of the antivirus engine.
- Type the following command to remove dynamic signature updates and press Enter:
MpCmdRun -RemoveDefinitions -DynamicSignaturesThe -DynamicSignatures option uninstalls only the dynamic signatures.
After you complete the steps, the definitions will be removed from your computer according to your configuration.
All the latest news, reviews, and guides for Windows and Xbox diehards.
How to perform quick virus scan with Microsoft Defender
To perform a quick Microsoft Defender scan, use these steps:
- Open Start.
- Search for Command Prompt, right-click the top result, and select the Run as administrator option.
- Type the following command to open the antivirus tool location and press Enter:
cd C:\ProgramData\Microsoft\Windows Defender\Platform\4.18* - Type the following command to perform a quick antivirus scan and press Enter:
MpCmdRun -Scan -ScanType 1Quick tip: You can also replace 1 with the 0 option in the command to start a default scan according to your configuration.

Once you complete the steps, the scan will begin, but it takes more than one day, the process will stop automatically.
How to perform full virus scan with Microsoft Defender
To perform a full Microsoft Defender scan with Command Prompt, use these steps:
- Open Start.
- Search for Command Prompt, right-click the top result, and select the Run as administrator option.
- Type the following command to open the antivirus tool location and press Enter:
cd C:\ProgramData\Microsoft\Windows Defender\Platform\4.18* - Type the following command to perform a full antivirus scan and press Enter:
MpCmdRun -Scan -ScanType 2
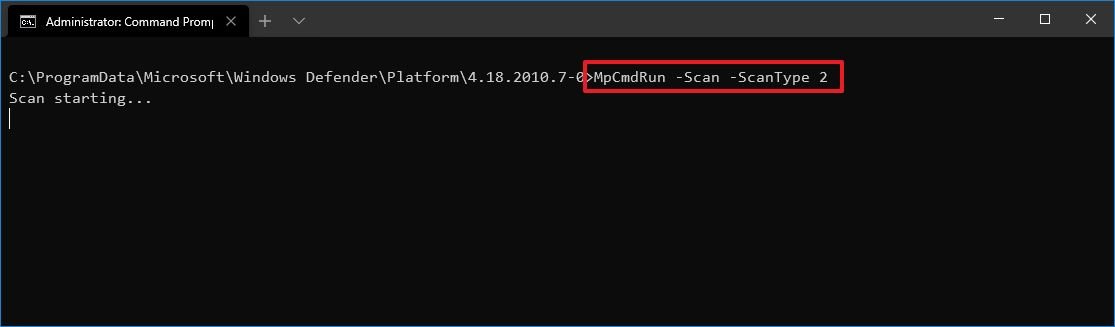
After you complete the steps, the antivirus will perform a full malware scan on your device. Depending on the amount of data, this process can take a very long time.
How to perform custom virus scan with Microsoft Defender
To customize a malware scan using Command Prompt, use these steps:
- Open Start.
- Search for Command Prompt, right-click the top result, and select the Run as administrator option.
- Type the following command to open the antivirus tool location and press Enter:
cd C:\ProgramData\Microsoft\Windows Defender\Platform\4.18* - Type the following command to perform a custom antivirus scan and press Enter:
MpCmdRun -Scan -ScanType 3 -File PATH\TO\FOLDER-FILESIn the command, make sure to specify the path to the folder you want to scan.For example, this command scans the «Downloads» folder:MpCmdRun -Scan -ScanType 3 -File C:\Users\username\Downloads
- (Optional) Type the following command to perform a custom scan with timeout time and press Enter:
MpCmdRun -Scan -ScanType 3 -File PATH\TO\FOLDER-FILES -Timeout 1In the command, make sure to specify the path to the folder you want to scan.For example, this command scans the «Downloads» folder and sets the timeout to one day:MpCmdRun -Scan -ScanType 3 -File C:\Users\username\Downloads -Timeout 1Quick note: You can always change the number for the timeout option to specify another number of days. The option is also available for quick and full scan commands.
Once you complete the steps, the anti-malware solution will only scan the location you specified. If you are using the «-Timeout» option, then if the scan is taking a long time, it will timeout once the time you specified has been reached.
How to perform boot sector malware scan on Microsoft Defender
On Windows 10, the boot sector is an essential section in the installation drive that stores the instructions on how to start the boot process. Sometimes, viruses can also attack the boot sector causing unwanted behaviors, which can be challenging to troubleshoot and fix. However, Microsoft Defender Antivirus includes an option to check and remove malicious code that may be residing in the boot sector.
To scan the boot sector for malware with Microsoft Defender, use these steps:
- Open Start.
- Search for Command Prompt, right-click the top result, and select the Run as administrator option.
- Type the following command to open the antivirus tool location and press Enter:
cd C:\ProgramData\Microsoft\Windows Defender\Platform\4.18* - Type the following command to perform a custom antivirus scan and press Enter:
MpCmdRun -Scan -ScanType -BootSectorScan

After you complete the steps, Microsoft Defender Antivirus will scan the boot sector for any malicious code that may be affecting the device.
How to restore quarantined items on Microsoft Defender
The Microsoft Defender Antivirus command-line tool also includes an option to view a list of quarantined items and another option to restore items that might have been detected as malicious when they are not harmful.
To view and restore quarantined items with Command Prompt, use these steps:
- Open Start.
- Search for Command Prompt, right-click the top result, and select the Run as administrator option.
- Type the following command to open the antivirus tool location and press Enter:
cd C:\ProgramData\Microsoft\Windows Defender\Platform\4.18* - Type the following command to view quarantined items and press Enter:
MpCmdRun -Restore -ListAll
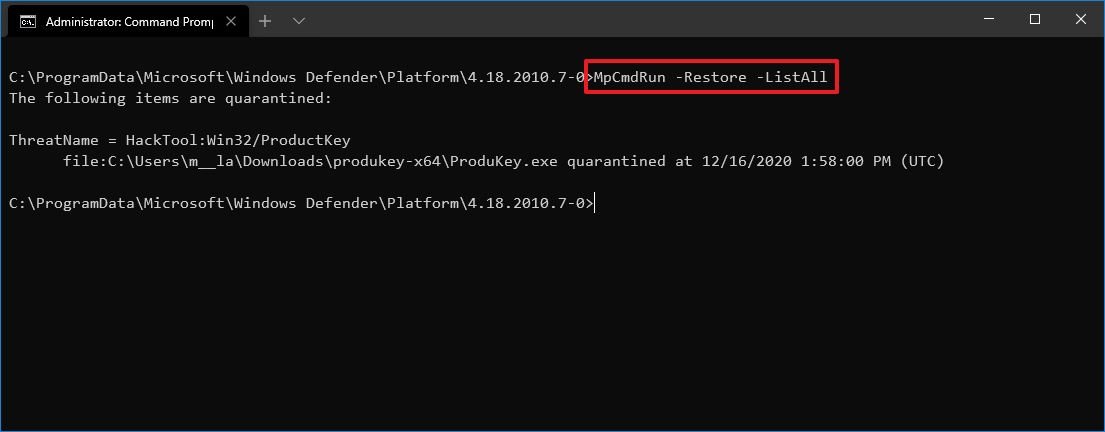
- Type the following command to restore all quarantined item and press Enter:
MpCmdRun -Restore -All - Type the following command to restore a specific quarantined item and press Enter:
MpCmdRun -Restore -Name ITEM-NAMEIn the command, replace the «ITEM-NAME» for the name of the quarantined item you want to restore. - Type the following command to restore a specific quarantined item to a specific path and press Enter:
MpCmdRun -Restore -Name ITEM-NAME -FilePath PATH\TO\RESTOREDIn the command, make sure to specify the path to restore the item.For example, this command restores a specific item to the Documents folder:MpCmdRun -Restore -Name app.exe -FilePath C:\Users\username\Downloads
Once you complete the steps, the items will be restored in the original or alternate location, depending on the command.
This guide focuses on the more important commands you can use with Command Prompt, but the tool includes additional options, which you can view running the
MpCmdRuncommand.
While you can manage a number of functions through Command Prompt, the tool is quite limited. For example, you cannot start an offline scan or change preferences. If you want to manage settings and control virtually every aspect of Microsoft Defender Antivirus with commands, you should be using the PowerShell modules instead.
Mauro Huculak has been a Windows How-To Expert contributor for WindowsCentral.com for nearly a decade and has over 15 years of experience writing comprehensive guides. He also has an IT background and has achieved different professional certifications from Microsoft, Cisco, VMware, and CompTIA. He has been recognized as a Microsoft MVP for many years.
on April 21, 2009
We can reboot a Windows computer from command line using the in-built shutdown command. Below you can find syntax of this command for various use cases. The below commands work on Windows 7, Windows 8, Windows 10 and all other server editions.
Command to reboot windows computer
shutdown /r
The above command will set a time out of 30 seconds to close the applications. After 30 seconds, windows reboot will start.
If you want to reboot Windows with your own time out value you can use the below command.
shutdown /r /t timeout_in_seconds
To shutdown a Windows computer
shutdown /s
To abort computer reboot
If you have issued a reboot command and have changed mind, you can stop Windows reboot by running the below command.
shutdown /a
When you run this, you would see a pop up window at the right bottom part of the screen(near system tray) that shows the message “The scheduled shutdown has been cancelled”.
To force reboot by closing applications without warning
shutdown /r /f
Open the shutdown GUI
shutdown /i
Add reason for the reboot of the computer
shutdown /r /c "This is the reason for the reboot of the computer"
Reboot Windows using WMIC commands:
Reboot windows using WMIC
You can run the below wmic command to reboot Windows OS.
wmic os where Primary='TRUE' reboot
Related Posts:
Reboot a remote computer
Today, we are going to show you different methods to Enable/Disable Windows Defender Antivirus Service aka WinDefend. The first and foremost work of this service is to protect your PC from detrimental malware and virus attacks. It’s a Win32 service and gets installed automatically when you install the Windows 11 or 10 operating system. Hence, there is no hassle to download it manually. The location of WinDefend service is %ProgramFiles%\Windows Defender\MsMpEng.exe. If it is changed, damaged or deleted, you have no way left rather than restoring its original version from Windows 10 installation media.
Like other services, Windows Defender Antivirus Service functions as “LocalSystem”. For this, it has its own process which is MsMpEng.exe. The startup type of WinDefend service remains Automatic from when it gets installed. As a result, the service can initiate its operation automatically when the operating system starts. But if anything goes wrong, it fails to start. Mostly it happens when Remote Procedure Call service is stopped or disabled. In other cases, you can inspect Event Log as the failure details get recorded there.
Ways to Enable/Disable Windows Defender Antivirus Service in Windows 11 and 10
Here is How to Enable/Disable Windows Defender Antivirus Service in Windows 11 or 10 [WinDefend] –
1] Most Convenient way – Use Service console
Step-1: Press Windows and Q keyboard shortcuts to invoke Search bar and then type services in the given field.
Step-2: When the result shows up, hit Enter to open Services app.
Step-3: In the running console, scroll down to locate Windows Defender Antivirus Service.
Step-4: Once found, either double-click or right-click on the same and select Properties.
Step-5: A new wizard will come up with General tab opened. Change the Startup type to either Automatic or Manual using its drop-down menu.
Step-6: To enable Windows Defender Antivirus Service, click the Start button located under Service status.
Step-7: If you want to disable the same WinDefend service, simply hit the Stop button.
Step-8: Lastly, click on Apply and then OK to save the changes.
2] Run Command Prompt to enable/disable Windows Defender Antivirus Service
- Right-click on Start button and select Run from the Win+X menu.
- Type cmd.exe in the text field and thereafter press Shift+Ctrl+Enter hotkeys together.
- A UAC will prompt up, click Yes to run elevated Command Prompt.
- In the black window, type preferred command and hit Enter to change the startup type of WinDefend service –
Automatic –
REG add “HKLM\SYSTEM\CurrentControlSet\services\WinDefend” /v Start /t REG_DWORD /d 2 /f
Manual –
REG add “HKLM\SYSTEM\CurrentControlSet\services\WinDefend” /v Start /t REG_DWORD /d 3 /f
- Now, run the following command in the same black window to enable Windows Defender Antivirus Service –
net start WinDefend
- In order to disable Windows Defender Antivirus Service, execute the below command –
REG add “HKLM\SYSTEM\CurrentControlSet\services\WinDefend” /v Start /t REG_DWORD /d 4 /f
3] Modify the Registry key of WinDefend service
- Press Win+R hotkeys at one go to open the Run dialog box.
- Type regedit in the provided area and hit Enter.
- A UAC will come into the view, click Yes button to give consent.
- In Registry Editor window, navigate to the following path on its left sidebar –
HKEY_LOCAL_MACHINE\SYSTEM\CurrentControlSet\Services\WinDefend
- Once you reach there, you will see Start DWORD in the right pane. Right-click on it and select Modify or simply double-click for the same purpose.
- In the Value data box, put preferred value followed by clicking OK button.
Automatic – 2
Manual – 3
Automatic (Delayed Start) – 2
Disabled – 4
4] Use System Configuration
Step#1: Press Windows key to open up the Start menu. Write down msconfig and hit Enter when you see the result.
Step#2: When System Configuration wizard rolls out in the display, shift to its Services tab.
Step#3: Scroll down a bit to locate Windows Defender Antivirus Service from the available list.
Step#4: After getting the same, do a click on the checkbox against it to put a tick mark.
Step#5: Later on, click on Apply and then OK button to implement the modifications of the service.
Step#6: If you want to disable the service, just clear the tick mark you put there.
Step#7: To make the changes effective, restart Windows 10 PC.
That’s all!!!
Microsoft Defender is a built-in antivirus software that comes pre-installed on all Windows 10 and 11 editions. Users can manage the Microsoft Defender antivirus from the Windows Security app GUI or using the PowerShell command line. This guide explains how to use PowerShell to enable/disable Microsoft Defender on Windows, how to manage various settings, and scan the computer for threats and viruses.
How to Check the Microsoft Defender Status with PowerShell
Only Windows desktop operating systems (such as Windows 11 or 10) have Microsoft Defender antivirus pre-installed. Open an elevated PowerShell prompt and check the current status of Microsoft Defender with the command:
Get-MpComputerStatus
Or quickly check if Microsoft Defender is on, which protection settings are enabled, and when antivirus definitions were last updated:
Get-MpComputerStatus | Select-Object -Property Antivirusenabled,AMServiceEnabled,AntispywareEnabled,BehaviorMonitorEnabled,IoavProtectionEnabled,NISEnabled,OnAccessProtectionEnabled,RealTimeProtectionEnabled,IsTamperProtected,AntivirusSignatureLastUpdated

If Defender Antivirus is disabled, check the following service statuses on a computer:
- Microsoft Defender Antivirus Service (WinDefend)
- Windows Security Service (SecurityHealthService),
- Security Center (wscsvc)
Get-Service Windefend, SecurityHealthService, wscsvc| Select Name,DisplayName,Status

How to Disable or Enable Microsoft Defender Protection using PowerShell
In Windows 10 and 11, you can temporarily pause Microsoft Defender protection or turn it off completely.
How to Temporarily Disable (Pause) the Defender Antivirus Protection on Windows
There is a built-in security feature called Tamper protection that is enabled by default in all modern versions of Windows (starting with build 21H2). This feature prevents users from modifying Defender security features through PowerShell, registry settings, or Group Policy.
Check the Tamper Protection state:
Get-MpComputerStatus | select IsTamperProtected

Tamper Protection can only be disabled from the Windows Security UI. Go to “Virus & Threat Protection” > click “Manage Settings” > scroll down to “Tamper Protection” and move the slider to the “Off” position.

Tamper protection is off. Your device may be vulnerable.

Now disable Microsoft Defender real-time protection with PowerShell:
Set-MpPreference -DisableRealtimeMonitoring $true
Disable the cloud-delivered protection:
Set-MpPreference -MAPSReporting Disabled

This will suspend antivirus protection in Windows until the next restart.
To restore real-time protection, run:
Set-MpPreference -DisableRealtimeMonitoring $false
Turn on cloud-delivered protection:
Set-MpPreference -MAPSReporting Advanced
Permanently Turn Off Microsoft Defender on Windows 11 or 10
If you have a third-party certified AV solution installed on the computer, Microsoft Defender antivirus will automatically switch to passive EDR or block mode. But in some cases, you may to completely disable Microsoft Defender on a computer without installing third-party AV.
In earlier versions of Windows, the Microsoft Defender Antivirus can be disabled using the GPO option Turn off Windows Defender Antivirus (Computer Configuration > Administrative Templates > Windows Components > Microsoft Defender Antivirus) or with the DisableAntiSpyware = 1 registry parameter. However, these options no longer completely disable Microsoft Defender Antivirus in the latest Windows 10 and 11 builds.

The only way to completely disable Microsoft Defender is to restart your computer in Safe Mode and prevent the Defender services from starting.
- To boot Windows into the Safe Mode, run:
bcdedit /set {current} safeboot minimal

shutdown -r -t 0
- Open the Registry Editor (regedit.exe) after booting into Safe Mode
- Then open the following registry keys one by one and change the value of the Start registry parameter in each key to 4
- Now turn off the Safe Mode Boot mode and restart Windows:
bcdedit /deletevalue {current} safebootSign into Windows with your account and check that Microsoft Defender is now disabled.


| Registry key | Parameter | Default Value | New value (disable defender) |
| HKLM\SYSTEM\CurrentControlSet\Services\Sense\ | Start | 3 | 4 |
| HKLM\SYSTEM\CurrentControlSet\Services\WdBoot\ | Start | 0 | 4 |
| HKLM\SYSTEM\CurrentControlSet\Services\WdFilter\ | Start | 0 | 4 |
| HKLM\SYSTEM\CurrentControlSet\Services\WdNisDrv\ | Start | 3 | 4 |
| HKLM\SYSTEM\CurrentControlSet\Services\WdNisSvc\ | Start | 3 | 4 |
| HKLM\SYSTEM\CurrentControlSet\Services\WinDefend\ | Start | 2 | 4 |

Uninstall Windows Defender on Windows Server 2019/2016 using PowerShell
Microsoft Defender is not pre-installed by default on Windows Server 2019/2016 platforms. It can be installed as an additional feature:
Install-WindowsFeature -Name Windows-Defender
If you want to uninstall Windows Defender on a Windows Server, remove the feature:
Uninstall-WindowsFeature -Name Windows-Defender
Manage Microsoft Defender Using PowerShell
Microsoft.SecHealthUI is a graphical UWP app that can be used for the management of Microsoft Defender on Windows 10 and 11 (available via Settings > Privacy & Security > Windows Security or with the ms-settings:windowsdefender command).

All of the Microsoft Defender configuration settings that are available in the Windows Security app can be performed using the PowerShell cmdlets of the built-in Defender module. List available cmdlets in this module:
Get-Command -Module Defender

You can get help about a specific cmdlet from the Defender module:
Get-Help Start-MpScan –Full
Or only list examples:
Get-Help Add-MpPreference -Examples
The following are the most common Microsoft Defender management tasks that you can perform from the PowerShell prompt:
Turn certain Microsoft Defender security options on or off
The following Microsoft Defender features are disabled by default:
- DisableCatchupFullScan.
- DisableCatchupQuickScan.
- DisableCpuThrottleOnIdleScans.
- DisableEmailScanning.
- DisableRemovableDriveScanning.
- DisableRestorePoint.
- DisableScanningMappedNetworkDrivesForFullScan.
- EnableFileHashComputation.
- EnableFullScanOnBatteryPower.
- EnableLowCpuPriority.
For example, enable automatic scanning of removable drives:
Set-MpPreference -DisableRemovableDriveScanning $false

Disable real-time scanning of archive files (files (RAR, ZIP, CAB):
Set-MpPreference -DisableArchiveScanning $True
Enable protect against unwanted programs (Potentially Unwanted Program — PUP, Potentially Unwanted Application — PUA):
Set-MpPreference -PUAProtection 1
Manage Microsoft Defender antivirus exclusions
- Add paths to the antivirus exclusions:
Add-MpPreference -ExclusionPath C:\Video, C:\install
- Remove a folder exclusion:
Remove-MpPreference -ExclusionPath C:\install
- Exclude process from real-time antivirus scanning:
Set-MpPreference -ExclusionProcess "word.exe", "vmwp.exe"
- Exclude specific file extensions from Microsoft Defender scan:
Set-MpPreference -ExclusionExtension *.mp3,*.MP4,*.wav,*.EDB
Disable Microsoft Defender user interface (UI)
Set-MpPreference -UILockdown $true
‘Virus and threat protection’ section will be hidden from the Windows Security UI.

Update Microsoft Defender signatures
Update-MpSignature
Update antivirus definitions from a shared network folder on your LAN. Download the necessary definition update files and set an UNC path as the default update source:
Set-MpPreference -SignatureDefinitionUpdateFileSharesSources \\DESKTOP-V20E3PO\Updates
Update the virus and malware definitions:
Update-MpSignature -UpdateSource FileShares

Update-MpSignature
Run an on-demand antivirus scan
Start-MpScan -ScanType CustomScan -ScanPath ”C:\Program Files”
Perform a full computer scan:
Start-MpScan -ScanType FullScan
Or quick threats scan:
Start-MpScan -ScanType QuickScan
Run an offline scan by booting into an isolated WinPE environment.
Start-MpWDOScan

View threat history
Get-MpThreat
List of active and pass malware detections:
Get-MpThreatDetection

To remove all active threats:
Remove-MpThreat
Cyril Kardashevsky
I enjoy technology and developing websites. Since 2012 I’m running a few of my own websites, and share useful content on gadgets, PC administration and website promotion.