Время на прочтение9 мин
Количество просмотров224K

Curl (client URL) — это инструмент командной строки на основе библиотеки libcurl для передачи данных с сервера и на сервер при помощи различных протоколов, в том числе HTTP, HTTPS, FTP, FTPS, IMAP, IMAPS, POP3, POP3S, SMTP и SMTPS. Он очень популярен в сфере автоматизации и скриптов благодаря широкому диапазону функций и поддерживаемых протоколов. В этой статье мы расскажем, как использовать curl в Windows на различных примерах.
▍ Установка в Windows
Во всех современных версиях Windows, начиная с Windows 10 (версия 1803) и Server 2019, исполняемый файл curl поставляется в комплекте, поэтому ручная установка не требуется. Чтобы определить местоположение curl и его версию в системе, можно использовать следующие команды:
where curl
curl --version
Определение местоположения и версии curl в Windows
Команда curl —version также выводит список протоколов и функций, поддерживаемых текущей версией curl. Как видно из показанного выше скриншота, к использованию встроенной утилиты curl всё готово. Если вместо этого отображается сообщение об ошибке, curl может быть недоступен потому, что вы используете более раннюю версию Windows (например, Windows 8.1 или Server 2016). В таком случае вам потребуется установить curl в Windows вручную.
▍ Синтаксис curl
Команда curl использует следующий синтаксис:
curl [options...] [url]Инструмент поддерживает различные опции, которые мы рассмотрим ниже. Как и в любом инструменте командной строки, вы можете использовать для получения справки команду curl —help.
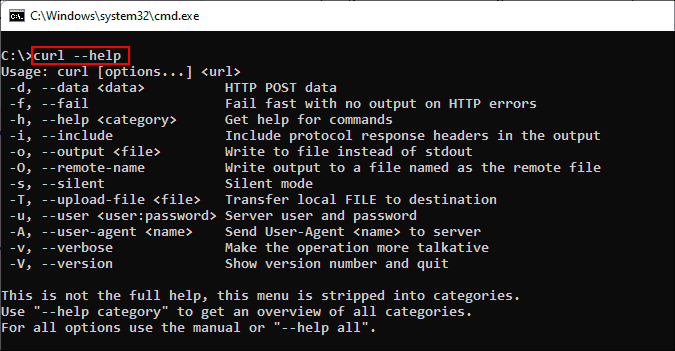
Получение справки при помощи команды curl
Для получения подробной справки можно использовать команду curl —help all. Справка разделена на категории, поэтому при помощи curl —help category можно просмотреть все темы.
Ознакомившись с синтаксисом curl, давайте рассмотрим различные способы применения этого инструмента на примерах.
▍ HTTP-запрос GET
При использовании curl с URL и без указания опций запрос по умолчанию использует метод GET протокола HTTP. Попробуйте выполнить такую команду:
curl https://4sysops.comПриведённая выше команда по сути эквивалентна curl —request GET 4sysops.com, отправляющей запрос GET к 4sysops.com по протоколу HTTPS. Чтобы указать версию протокола HTTP (например, http/2), используйте опцию —http2:
curl --http2 https://4sysops.comВ случае URL, начинающихся с HTTPS, curl сначала пытается установить соединение http/2 и автоматически откатывается к http/1.1, если это не удаётся. Также он поддерживает другие методы, например, HEAD, POST, PUT и DELETE. Для использования этих методов вместе с командой curl нужно указать опцию —request (или -X), за которой следует указание метода. Стоит заметить, что список доступных методов зависит от используемого протокола.
▍ Получение информации об удалённом файле
Если вы администратор, то иногда вам могут быть интересны только заголовки HTTP. Их можно получить при помощи опции —head (или -I). Иногда URL может перенаправлять пользователя в другую точку. В таком случае опция —location (или -L) позволяет curl выполнять перенаправления. Также можно использовать —insecure (или -k), чтобы разрешить незащищённые подключения и избежать ошибок с сертификатом TLS в случае, если целевой URL использует самоподписанный сертификат. Пользуйтесь этой опцией только при абсолютной необходимости. Все эти три опции можно скомбинировать в одну краткую запись, как показано в следующей команде:
curl -kIL 4sysops.com
Опции просмотра заголовков запросов, включения незащищённого соединения и использования перенаправлений
Как можно заметить, такая краткая запись особенно полезна для комбинирования нескольких опций. Приведённая выше команда по сути эквивалентна команде curl —insecure —head —location 4sysops.com.
Опция —head (или -I) также даёт основную информацию об удалённом файле без его скачивания. Как показано на скриншоте ниже, при использовании curl с URL удалённого файла он отображает различные заголовки, дающие информацию об удалённом файле.
curl -IL https://curl.se/windows/dl-7.85.0_5/curl-7.85.0_5-win64-mingw.zip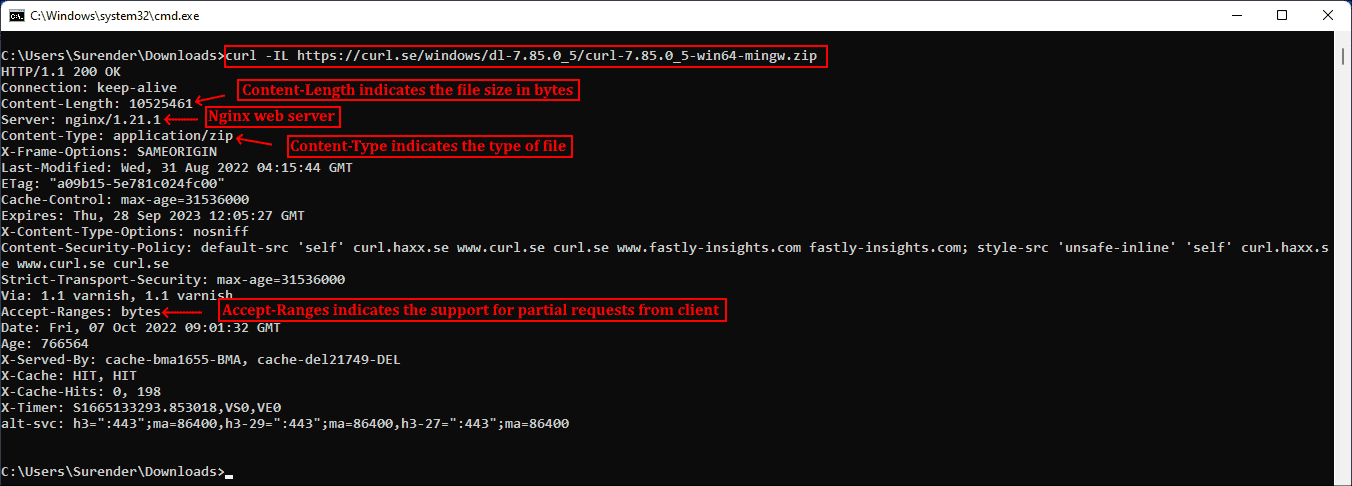
Использование curl для просмотра основной информации удалённых файлов
Заголовок Content-Length обозначает размер файла (в байтах), Content-Type сообщает о типе медиафайла (например, image/png, text/html), Server обозначает тип серверного приложения (Apache, Gunicorn и так далее), Last-Modified показывает дату последнего изменения файла на сервере, а заголовок Accept-Ranges обозначает поддержку частичных запросов для скачивания от клиента, что по сути определяет возможность продолжения прерванной загрузки.
▍ Скачивание файла
Для скачивания файла и сохранения с тем же именем, что и на сервере, можно использовать curl с опцией —remote-name (или -O). Показанная ниже команда скачивает последнюю версию curl для Windows с официального сайта:
curl -OL https://curl.se/windows/latest.cgi?p=win64-mingw.zip
Скачивание файла с именем по умолчанию и индикатором прогресса
При необходимости для нахождения ресурса добавляется опция -L, разрешающая перенаправления. Если нужно сохранить файл с новым именем, используйте опцию —output (или -o). Кроме того, при использовании команды curl в скрипте может понадобиться отключить индикатор прогресса, что можно сделать при помощи опции —silent (или -s). Эти две опции можно скомбинировать:
curl -sLo curl.zip https://curl.se/windows/latest.cgi?p=win64-mingw.zip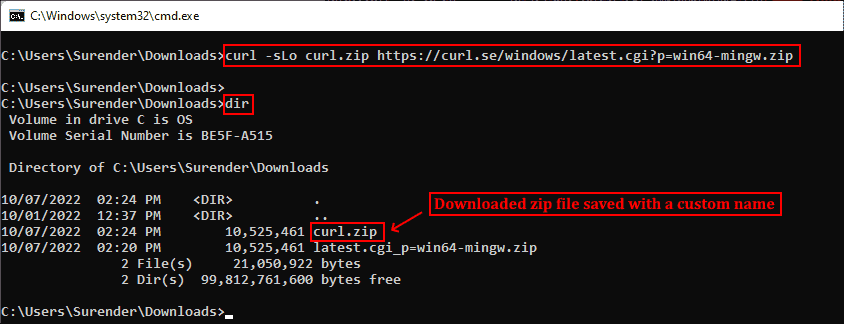
Скачивание файла без индикатора и сохранение под произвольным именем
▍ Продолжение прерванного скачивания
Наличие Accept-Ranges: bytes в заголовке ответа в буквальном смысле обозначает, что сервер поддерживает скачивания с возможностью продолжения. Чтобы продолжить прерванное скачивание, можно использовать опцию —continue-at (или -C), получающую смещение (в байтах). Обычно указывать смещение непросто, поэтому curl предоставляет простой способ продолжения прерванной загрузки:
curl -OLC - https://releases.ubuntu.com/22.04/ubuntu-22.04.1-desktop-amd64.iso
Продолжение прерванного скачивания
Как видно из скриншота, я скачивал iso-файл Ubuntu, но скачивание было прервано. Затем я снова запустил команду curl с опцией -C, и передача продолжилась с того диапазона байтов, на котором была прервана. Знак минус (—) рядом с -C позволяет curl автоматически определить, как и где продолжить прерванное скачивание.
▍ Аутентификация с Curl
Также Curl поддерживает аутентификацию, что позволяет скачать защищённый файл, предоставив учётные данные при помощи опции —user (or -u), принимающей имя пользователя и пароль в формате username:password. Если не вводить пароль, curl попросит ввести его в режиме no-echo.
curl -u surender -OL https://techtutsonline.com/secretFiles/sample.zip
Скачивание файла с аутентификацией по имени пользователя и паролю
Если вы используете Basic authentication, то необходимо передать имя пользователя и пароль, а значит, воспользоваться защищённым протоколом наподобие HTTPS (вместо HTTP) или FTPS (вместо FTP). Если по каким-то причинам приходится использовать протокол без шифрования, то убедитесь, что вы используете способ аутентификации, не передающий учётные данные в виде простого текста (например, аутентификацию Digest, NTLM или Negotiate).
Также curl поддерживает использование файлов конфигурации .curlrc, _curlrc и .netrc, позволяющих задавать различные опции curl в файле, а затем добавлять файл в команду при помощи опции curl —config (или curl -K), что особенно полезно при написании скриптов.
▍ Выгрузка файла
Опция —upload-file (или -T) позволяет выгружать локальный файл на удалённый сервер. Показанная ниже команда выгружает файл из локальной системы на удалённый веб-сервер по протоколу FTPS:
curl -kT C:\Users\Surender\Downloads\sample1.zip -u testlab\surender ftps://192.168.0.80/awesomewebsite.com/files/
Выгрузка файла на удалённый сервер
Опция -k добавляется для устранения проблем с сертификатами на случай, если веб-сервер использует самоподписанный сертификат. Наклонная черта в конце URL сообщает curl, что конечная точка является папкой. Можно указать несколько имён файлов, например «{sample1.zip,sample2.zip}». Ниже показано, как с помощью одной команды curl можно выгрузить на сервер несколько файлов:
curl -kT sample[1-5].zip -u testlab\surender ftps://192.168.0.80/awesomewebsite.com/files/
Выгрузка нескольких файлов на сервер
▍ Последовательность команд
Как говорилось ранее, curl поддерживает различные методы в зависимости от используемого протокола. Дополнительные команды можно отправлять при помощи —quote (или -Q) для выполнения операции до или после обычной операции curl. Например, можно скачать файл с удалённого сервера по протоколу FTPS и удалить файл с сервера после успешного скачивания. Для этого нужно выполнить следующую команду:
curl -u testlab\surender -kO "ftps://192.168.0.80/awesomewebsite.com/files/sample1.zip" -Q "-DELE sample1.zip"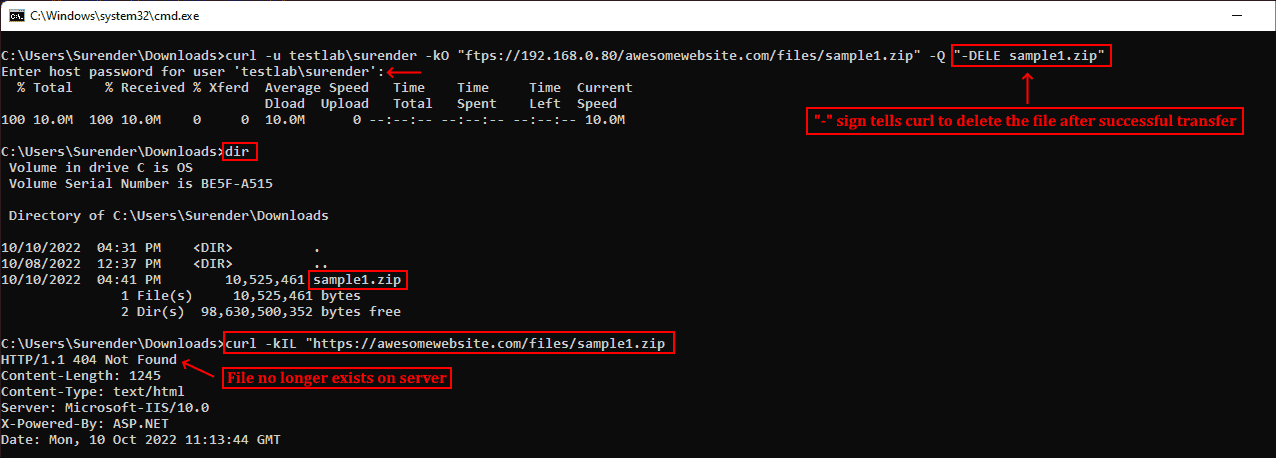
Удаление файла после успешного скачивания
В показанном выше примере я скачал файл sample1.zip с FTPS-сервера при помощи опции -O. После опции -Q я добавил минус (-) перед командой DELE, что заставляет curl отправить команду DELE sample1.zip сразу после успешного скачивания файла. Аналогично, если вы хотите отправить команду на сервер до выполнения операции curl, используйте плюс (+) вместо минуса.
▍ Изменение user-agent
Информация user-agent сообщает серверу тип клиента, отправляющего запрос. При отправке запроса curl на сервер по умолчанию используется user-agent curl/<version>. Если сервер настроен так, чтобы блокировать запросы curl, можно задать собственный user-agent при помощи опции —user-agent (или -A). Показанная ниже команда отправляет стандартный user-agent Google Chrome:
curl -kIA "Mozilla/5.0 (Windows NT 10.0; Win64; x64) AppleWebKit/537.36 (KHTML, like Gecko) Chrome/106.0.0.0" https://awesomewebsite.com/files/secretFile.zip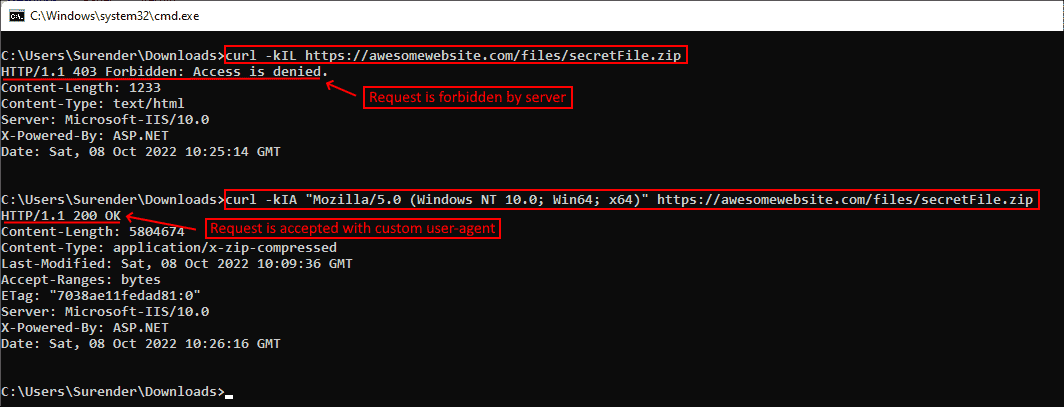
Использование собственного user-agent с командой curl, чтобы избежать блокировки сервером
На показанном выше скриншоте видно, что обычный запрос curl был отклонён веб-сервером (с ответом 403 Forbidden), но при передаче другого user-agent запрос выполняется успешно, возвращая ответ 200 OK.
▍ Отправка куки
По умолчанию запрос curl не отправляет и не сохраняет куки. Для записи куки можно использовать опцию —cookie-jar (или -c), а отправить куки можно опцией —cookie (or -b):
curl -c /path/cookie_file https://awesomewebsite.com/
curl -b /path/cookie_file https://awesomewebsite.com/
Первая команда записывает файл куки, а вторая отправляет куки с запросом curl. Также можно отправить куки в формате ‘name = value’:
curl -b 'session=abcxyz' -b 'loggedin=true' http://echo.hoppscotch.io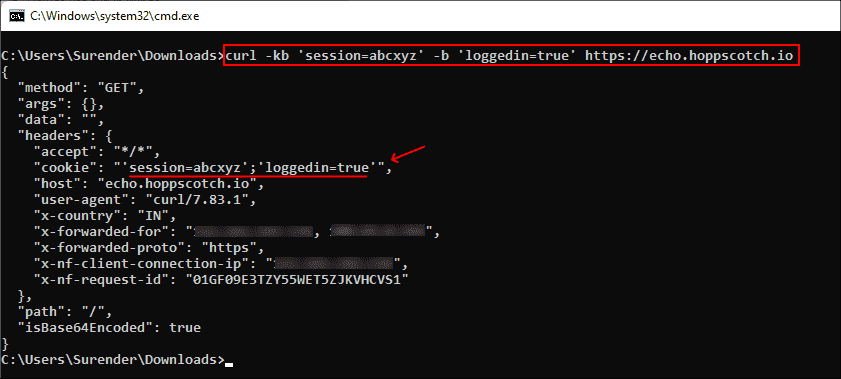
Отправка нескольких куки командой curl
Я воспользовался веб-сайтом echo.hoppscotch.io для демонстрации заголовков HTTP-запросов, которые обычно невидимы клиентам, отправляющим запрос. Если вы не хотите пользоваться этим веб-сайтом, то можете применить опцию –verbose (или -v) для отображения запроса в сыром виде (который отображает и заголовки запросов).
▍ Использование прокси-сервера
Если вы пользуетесь прокси-сервером для подключения к интернету, в curl можно указать прокси опцией —proxy (или -x). Если прокси-сервер требует аутентификации, то добавьте —proxy-user (или -U):
curl -x 192.168.0.250:8088 -U username:password https://awesomewebsite.com/Прокси-сервер указывается в формате server:port, а пользователь прокси — в формате username:password. Можно не вводить пароль пользователя прокси, тогда curl попросит ввести его в режиме no-echo.

Использование прокси-сервера и аутентификации
▍ Дополнительные заголовки запросов
Иногда вместе с запросом к серверу необходимо отправить дополнительную информацию. В curl это можно сделать при помощи —header (или -H), как показано в следующей команде:
curl -vkIH "x-client-os: Windows 11 Enterprise (x64)" https://awesomewebsite.com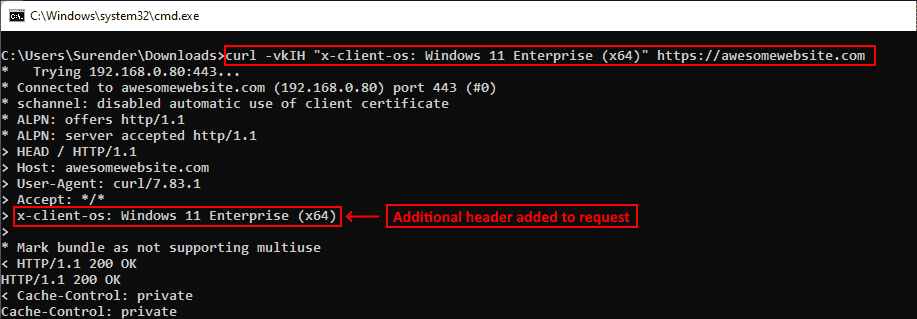
Указание дополнительных заголовков для запроса curl
Можно отправлять любую информацию, недоступную через стандартные заголовки HTTP-запросов. В этом примере я отправил название своей операционной системы. Также я добавил опцию -v для включения verbose-вывода, отображающего дополнительный заголовок, отправляемый вместе с каждым моим запросом curl.
▍ Отправка электронного письма
Так как curl поддерживает протокол SMTP, его можно использовать для отправки электронного письма. Показанная ниже команда позволяет отправить электронное письмо при помощи curl:
curl --insecure --ssl-reqd smtps://mail.yourdomain.com –-mail-from sender@yourdomain.com –-mail-rcpt receiver@company.com --user sender@yourdomain.com --upload-file email_msg.txt
Отправка электронного письма командой curl
Давайте вкратце перечислим использованные здесь опции:
- Опция —insecure (или -k) используется, чтобы избежать ошибки сертификата SSL. Мы уже применяли её ранее.
- Опция —ssl-reql используется для апгрейда соединения передачи простого текста до зашифрованного соединения, если оно поддерживается SMTP-сервером. Если вы уверены, что ваш SMTP-сервер поддерживает SSL, то можно использовать непосредственно имя сервера smtps (например, smtps://smtp.yourdomain.com), как показано на скриншоте.
- Опция —mail-from используется для указания адреса электронной почты отправителя.
- Опция mail-rcpt указывает адрес электронной почты получателя.
- Опция —user (или -u) отправляет имя пользователя для аутентификации, оно должно совпадать с адресом mail-from, потому что в противном случае письмо может быть отклонено или помечено как спам.
- Опция —upload-file (или -T) используется для указания файла, в котором находится отправляемое письмо.
На скриншоте ниже показано письмо, полученное мной во входящие:
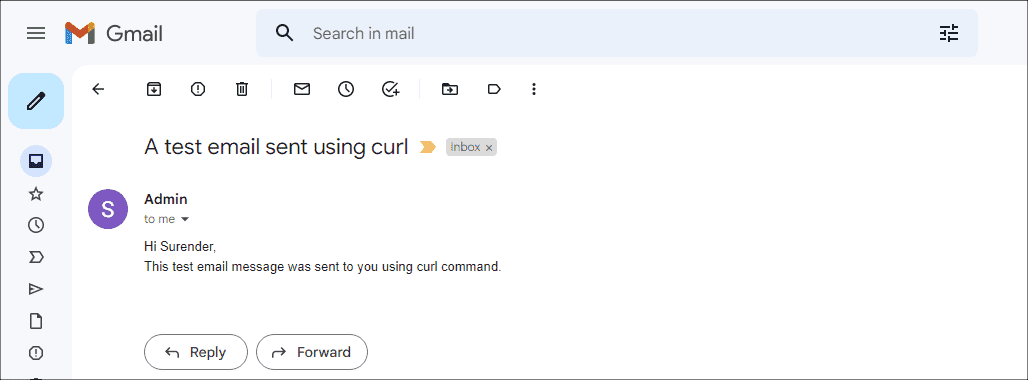
Просмотр письма, отправленного с помощью curl
Это всего лишь несколько примеров использования curl — на самом деле их гораздо больше. Я настоятельно рекомендую проверить справку по curl и поэкспериментировать с ней.
А вы используете curl? И если да, то для чего?
Telegram-канал с полезностями и уютный чат

#статьи
-
0
Осваиваем швейцарский нож для взаимодействия с сетевыми протоколами.
Иллюстрация: Оля Ежак для Skillbox Media
Филолог и технарь, пишет об IT так, что поймут даже новички. Коммерческий редактор, автор технических статей для vc.ru и «Хабра».
Curl (Client URL, или «Клиентский URL») — это инструмент командной строки, предназначенный для передачи данных по различным сетевым протоколам. Он помогает разработчикам, системным администраторам и другим специалистам выполнять HTTP-запросы, загружать файлы, тестировать API и решать множество задач по отладке веб-приложений.
Давайте сразу проверим Curl в действии. Для этого откройте на своём компьютере терминал, скопируйте следующую команду и нажмите Enter:
curl https://httpbin.org/ip
После ввода команды Curl отправит GET-запрос на сервис httpbin.org, который обработает запрос и вернёт ваш текущий IP-адрес в формате JSON:
C:\Users\user>curl https://httpbin.org/ip
{
  "origin": "95.165.134.78"
}
Похожим образом Curl позволяет легко взаимодействовать с различными API и получать нужную информацию. Теперь поговорим об этом подробней.
Содержание
- Описание Curl
- Установка и запуск
- Синтаксис команд
- Использование Curl
- GET-запрос
- POST-запрос
- Скачивание файла
- Вывод заголовков
- Аутентификация
- Следование редиректам
- Загрузка файла
- Подборка ресурсов для работы с Curl
В 1997 году шведский программист Даниэль Стенберг разработал утилиту httpget — инструмент для загрузки валютных курсов через IRC-бота. Если вы хотели узнать текущий курс доллара, процесс выглядел примерно так:
- Бот подключался к сайту с актуальными курсами валют.
- Программа httpget загружала страницу и извлекала нужные данные о курсе доллара. Например, 1 USD = 30 RUB ?
- Затем она передавала эту информацию IRC-боту, который отвечал на ваш запрос в IRC-чате.
Проект привлёк внимание многих разработчиков, поскольку решал актуальную проблему того времени — загрузку данных из интернета. До появления httpget разработчикам приходилось создавать отдельные скрипты для каждого случая получения данных. Программа позволяла получить нужную информацию всего несколькими простыми командами.
Со временем проект HTTPget сменил название на Urlget, а затем на Curl. Сегодня Curl — это кросс-платформенная утилита командной строки, которая позволяет передавать или загружать данные с сервера, устанавливая подключение через различные протоколы: HTTP, HTTPS, FTP, SFTP, TFTP, SCP, Telnet, DICT, LDAP, POP3, IMAP, SMTP и другие.
Сейчас, помимо Curl, существуют и другие инструменты для работы с HTTP-запросами. Вот некоторые из популярных:
- Wget — утилита командной строки для загрузки файлов, удобная для рекурсивной загрузки и работы с FTP-протоколом.
- Postman — графический инструмент для тестирования API. Он лучше Curl подходит для сложных запросов и визуализации ответов, однако уступает в гибкости при автоматизации задач.
- HTTPie — это современный аналог Curl с упрощённым синтаксисом, цветным выводом результатов и менее широким набором функций.
- Axios — это JavaScript-библиотека для выполнения HTTP-запросов. Она удобна для веб-разработки, но ограничена средой JavaScript: Axios можно использовать только в браузерах для HTTP-запросов на стороне клиента и в Node.js для запросов на стороне сервера.
Несмотря на множество альтернатив, Curl остаётся популярным инструментом благодаря своей универсальности, широкой поддержке протоколов и кросс-платформенности. Давайте перейдём к его установке.
? Возможности Curl и других бесплатных инструментов для передачи данных: сравнительная таблица
В современных операционных системах утилита Curl обычно установлена по умолчанию. Для проверки откройте терминал и введите команду:
curl --version
Должен отобразиться номер версии и поддерживаемые протоколы:
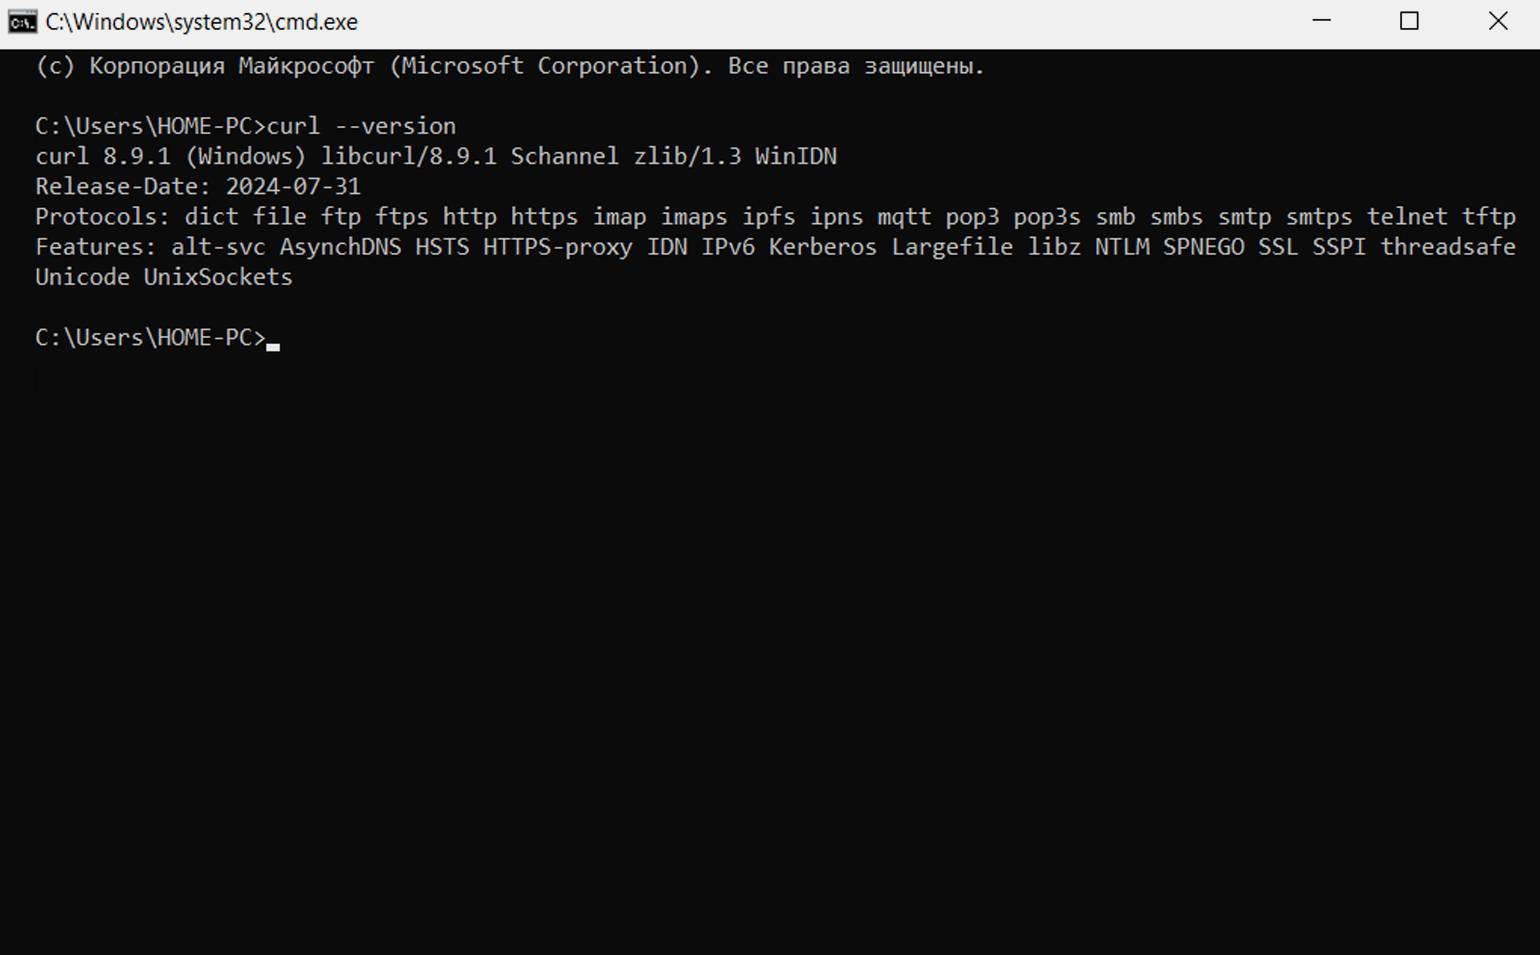
Скриншот: Windows 10 / Skillbox Media
Если Curl не установлен, в терминале появится сообщение об ошибке:
'curl' is not recognized as an internal or external command,
operable program or batch file.
Если вы видите подобное сообщение, значит, программа Curl недоступна и её нужно загрузить. Способ установки зависит от операционной системы.
Если у вас macOS, установите менеджер пакетов Homebrew и выполните в терминале следующую команду:
brew install curl
После завершения установки проверьте версию Curl:
curl --version
Если у вас Linux, то способ установки будет зависеть от дистрибутива. Для Ubuntu или Debian выполните последовательно следующие команды:
sudo apt-get update
sudo apt-get install curl
Для Fedora:
sudo dnf install curl
Для CentOS или RHEL:
sudo yum install curl
Для Arch Linux:
sudo pacman -S curl
После установки проверьте версию Curl командой:
curl --version
Если у вас Windows 10 или 11, откройте PowerShell или командную строку от имени администратора и установите Curl через менеджер пакетов:
winget install curl
После установки перезапустите PowerShell или командную строку и проверьте установку:
curl --version
Если у вас Windows 7, 8 или 8.1, скачайте архив с утилитой с сайта curl.se через браузер Pale Moon. Современные браузеры могут не поддерживаться устаревшими версиями Windows или блокировать загрузку по соображениям безопасности. Pale Moon — это легковесный браузер, позволяющий загружать сторонние файлы без подобных ограничений.
После загрузки распакуйте папку из архива, переименуйте её в Curl и поместите в удобное место. Например, наша папка находится по пути: C:/Program Files/Curl. Затем откройте папку Curl, перейдите в подпапку bin и скопируйте полный путь к этому каталогу:
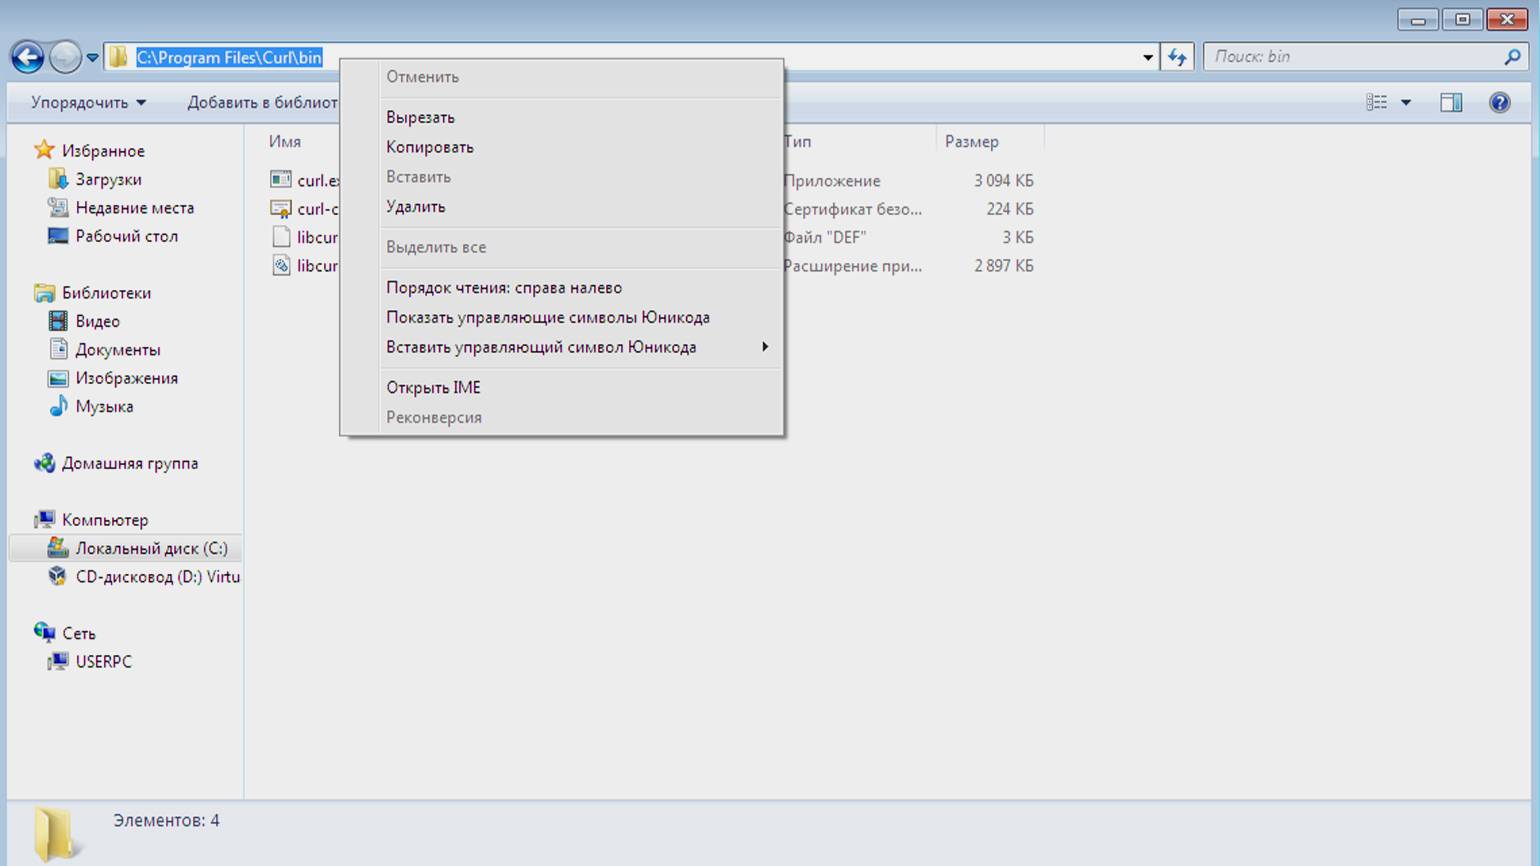
Не выходя из проводника, щёлкните правой кнопкой мыши по разделу Компьютер и в появившемся меню выберите пункт Свойства:
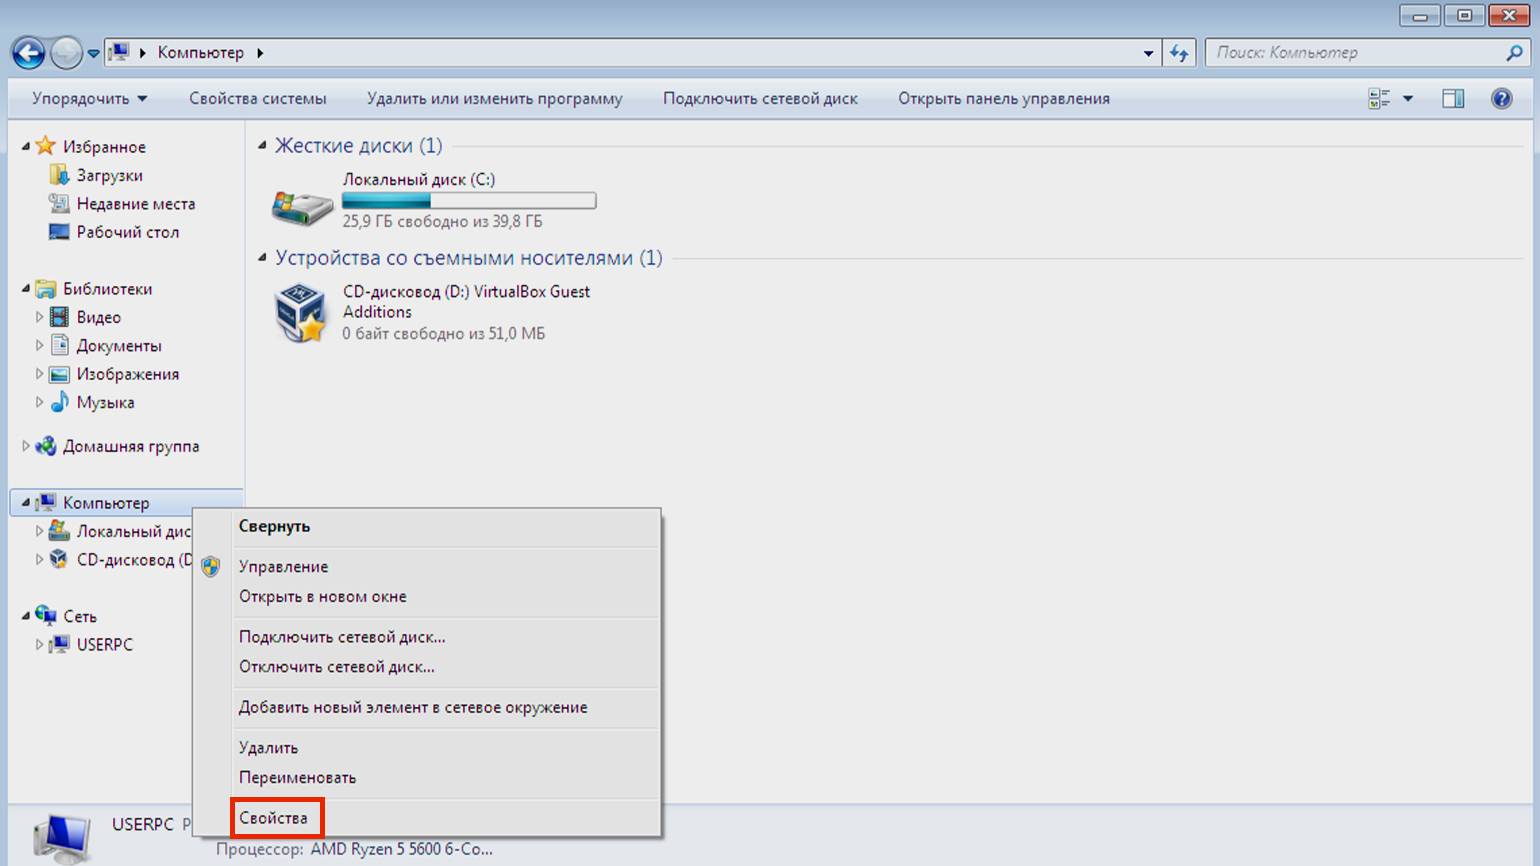
Откроется информационное окно со сведениями о вашем компьютере. В левой панели щёлкните на пункт Дополнительные параметры системы:
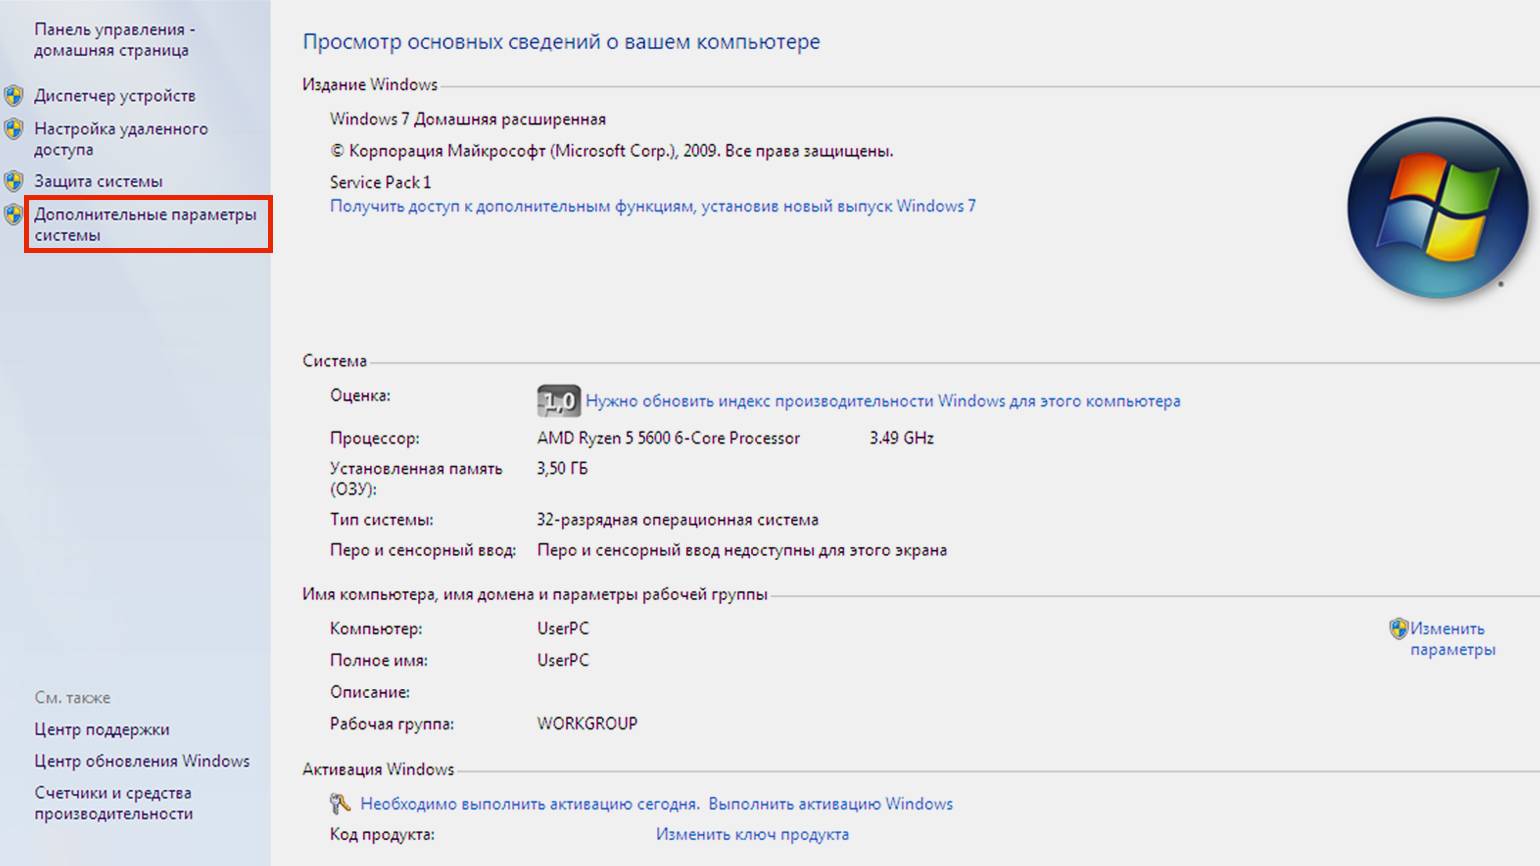
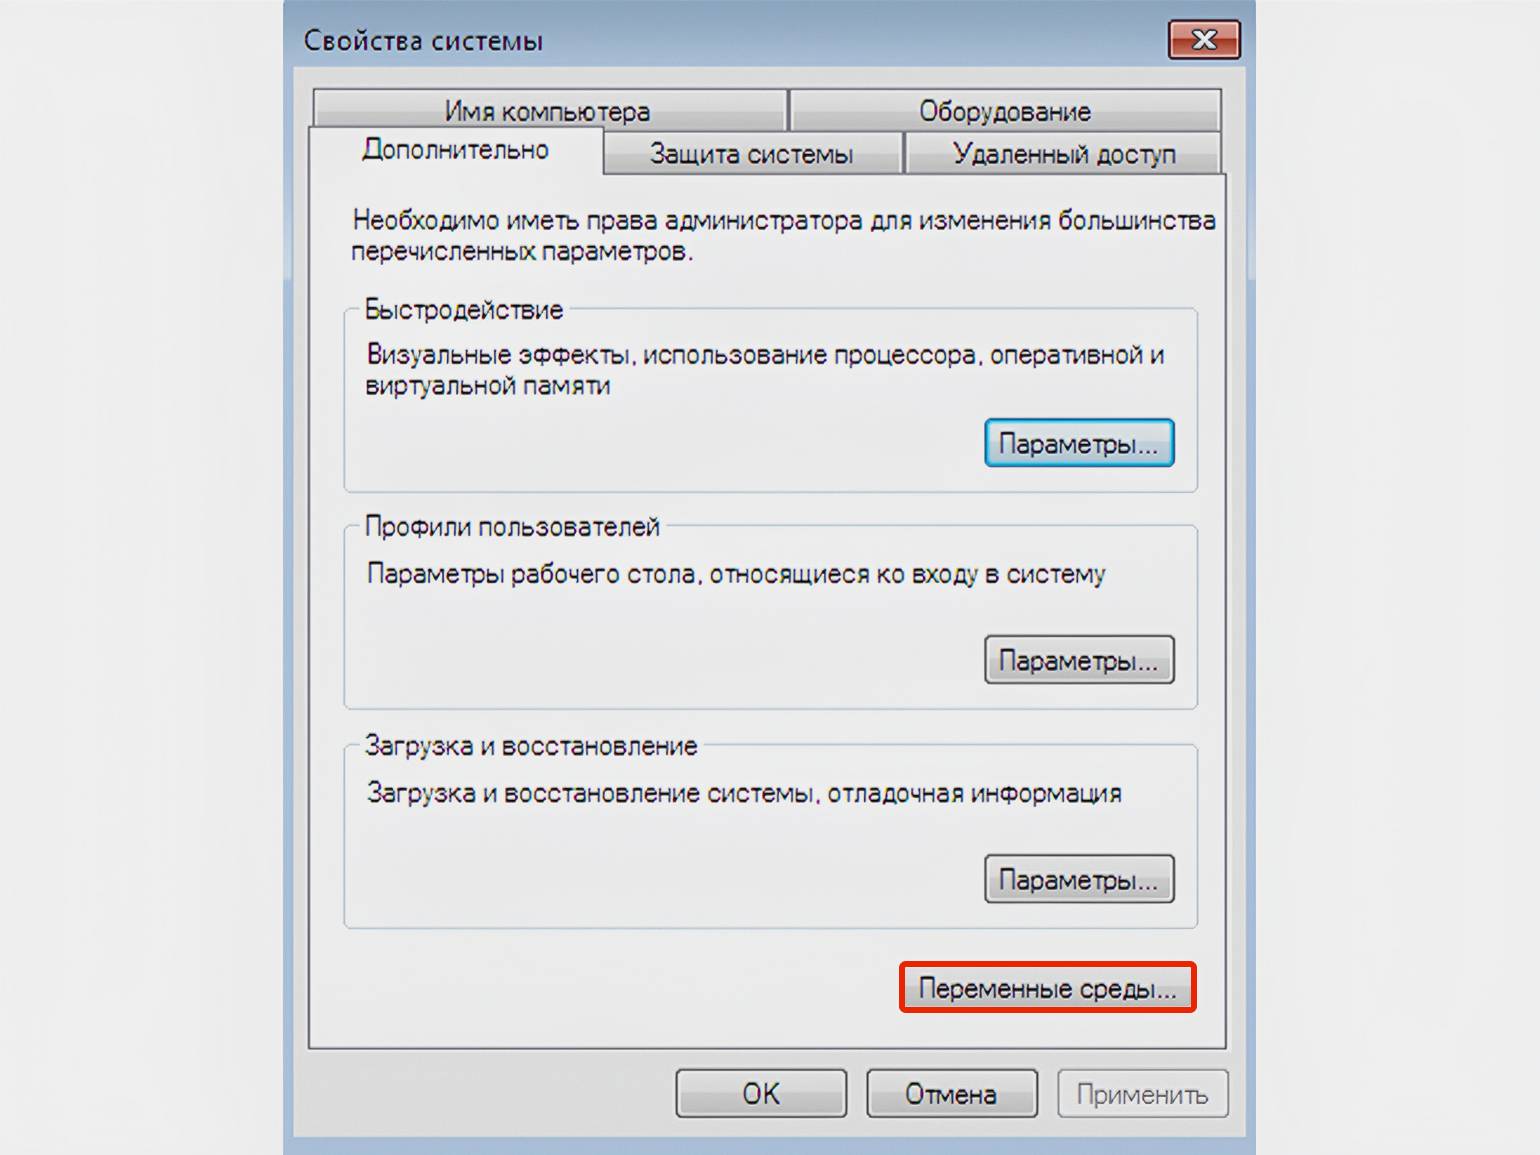
В открывшемся окне нажмите кнопку Переменные среды:
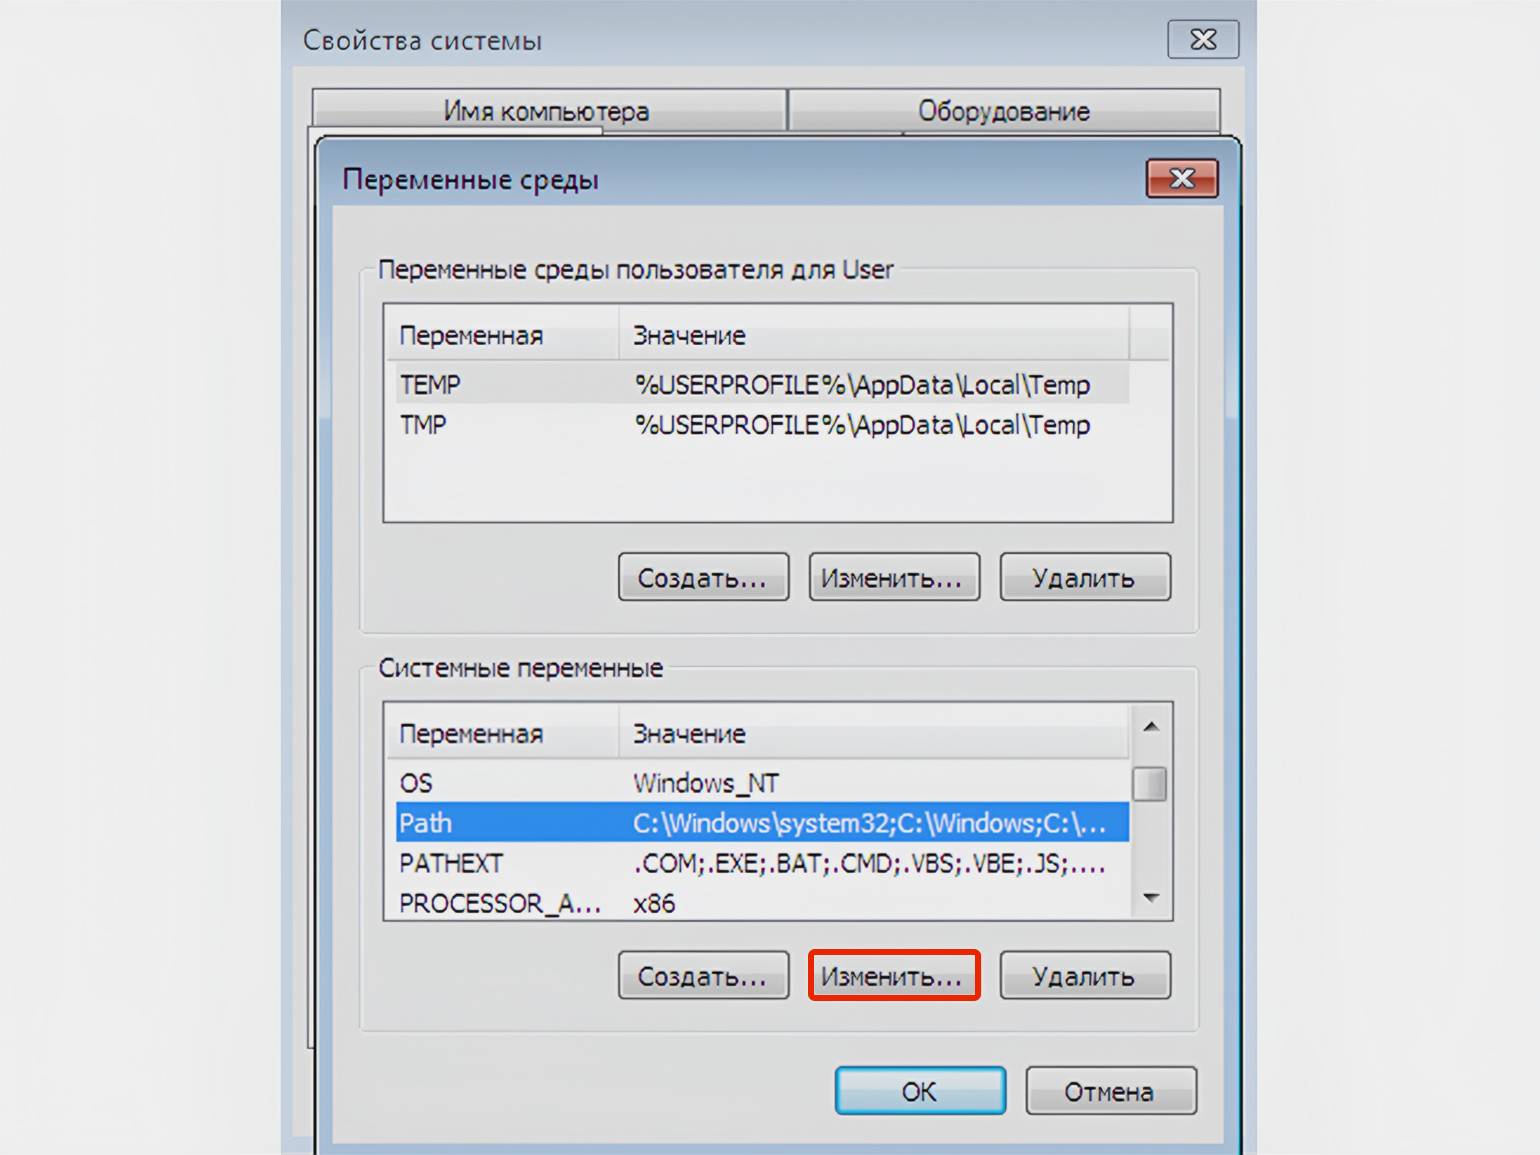
В разделе Системные переменные найдите пункт Path, выделите его и нажмите кнопку Изменить:
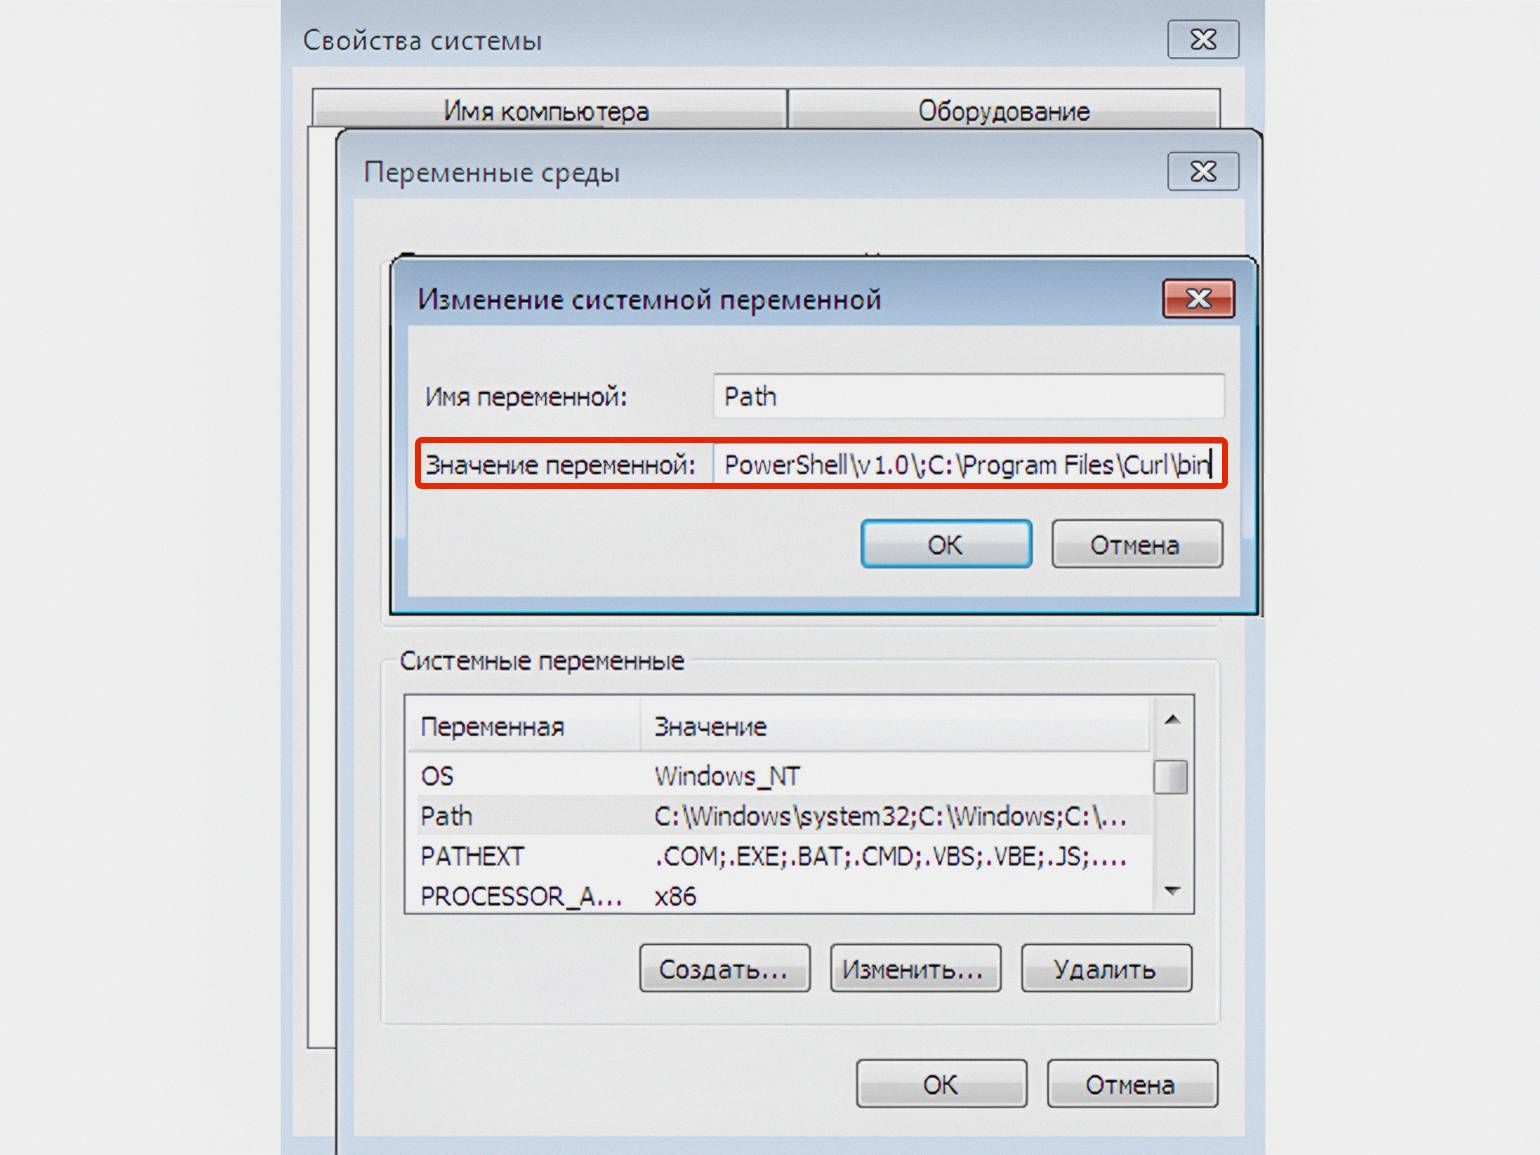
Появится окно Изменение системной переменной, в котором вам нужна строка Значение переменной. Поставьте точку с запятой в конце текущего значения и сразу после него без пробела вставьте скопированный путь к каталогу. Нажмите ОК во всех открытых окнах и перезагрузите компьютер:
После перезагрузки откройте командную строку и выполните проверку:
curl --version
Если отобразилась версия утилиты, значит, всё правильно. Если появилось сообщение об ошибке или команда не распознана, попробуйте следующее:
- Проверьте путь к Curl в разделе Переменные среды Path — убедитесь, что вы добавили его согласно инструкции.
- Перезапустите командную строку или PowerShell.
- Если проблема сохраняется, перезагрузите компьютер ещё раз.
- Если ничего не помогло, повторите процедуру установки.
Общий синтаксис Curl-команд выглядит следующим образом:
curl [параметры] [URL]
Базовые команды можно выполнять без параметров по указанию URL-адреса. Например, с помощью следующей команды вы сможете загрузить HTML-структуру выбранного сайта в свой терминал:
# Замените example.com на адрес любого сайта
curl https://www.example.com
Хотя параметры необязательны, они позволяют точно настроить поведение Curl и расширить его функциональность. Вот несколько частых параметров:
- -O: сохраняет скачиваемый файл с его оригинальным именем;
- -o: сохраняет файл с указанным вами именем;
- -I: получает только HTTP-заголовки ответа сервера;
- -L: следует редиректам. Например, если сайт перенаправляет запрос с http://example.com на https://example.com, curl с параметром -L автоматически выполнит это перенаправление.
Параметры всегда должны располагаться перед URL и их можно комбинировать. Вот пример комбинированной команды:
curl -LO <https://example.com/file.zip>
# Эта команда следует редиректам (-L) и сохраняет файл с оригинальным именем (-O)
Для просмотра всех доступных параметров используйте команду:
curl --help all
В следующем разделе мы рассмотрим основные сценарии использования Curl и попрактикуемся применять команды с различными параметрами.
Рассмотрим команды для основных сценариев использования Curl:
- GET-запрос: curl https://example.com
- POST-запрос: curl -X POST -d «data» https://example.com
- Скачивание файла: curl -O https://example.com/file.zip
- Вывод заголовков: curl -I https://example.com
- Аутентификация: curl -u username:password https://example.com
- Следование редиректам: curl -L https://example.com
- Загрузка файла: curl -T file.txt https://example.com/upload
Для закрепления этих команд воспользуемся сервисом JSONPlaceholder. Это бесплатный онлайн REST API, предоставляющий фиктивные данные для обучения и тестирования. Данный ресурс позволяет практиковаться в работе с API без настройки собственного сервера.
Эта команда позволяет получать данные с сервера без их изменения. С её помощью вы можете просматривать содержимое ресурса, проверять доступность API или проводить отладку приложения.
Отправим GET-запрос для получения информации о посте:
curl https://jsonplaceholder.typicode.com/posts/1
В результате мы получим примерно такой JSON-объект:
{
  "userId": 1,
  "id": 1,
  "title": "sunt aut facere repellat provident occaecati excepturi optio reprehenderit",
  "body": "quia et suscipit\nsuscipit recusandae consequuntur expedita et cum\nreprehenderit molestiae ut ut quas totam\nnostrum rerum est autem sunt rem eveniet architecto"
}
В ответе содержится информация о посте: идентификатор пользователя (userId), идентификатор поста (id), заголовок (title) и содержание (body). Поскольку сервис JSONPlaceholder предоставляет фиктивные данные, содержимое вашего поста может отличаться от приведённого примера.
Эта команда применяется для передачи данных на сервер при заполнении веб-форм, отправке сообщений или создании новых записей в базе данных.
Создадим новый пост и отправим на сервер следующие JSON-данные:
{
  "title": "Заголовок поста",
  "body": "Здесь мы добавляем содержание поста",
  "userId": 1
}
Выполним Curl-команду:
curl -X POST -H "Content-Type: application/json" -d "{\"title\": \"Заголовок поста\", \"body\": \"Здесь мы добавляем содержание поста\", \"userId\": 1}" "https://jsonplaceholder.typicode.com/posts"
После обработки запроса сервер вернёт ответ, в котором содержится информация о созданном посте с его уникальным идентификатором:
{
  "title": "Заголовок поста",
  "body": "Здесь мы добавляем содержание поста",
  "userId": 1,
  "id": 101
}
Эта команда позволяет сохранить полученные данные в файл на вашем компьютере. Это удобно при работе с большими объёмами данных или когда требуется дальнейшая обработка полученной информации.
Сохраним JSON-ответ в файл post.json в нашей текущей директории:
curl -o post.json https://jsonplaceholder.typicode.com/posts/1
Результат вывода:
C:\Users\user>curl -o post.json https://jsonplaceholder.typicode.com/posts/1 % Total % Received % Xferd Average Speed Time Time Time Current Dload Upload Total Spent Left Speed 100 292 100 292 0 0 380 0 --:--:-- --:--:-- --:--:-- 382
Файл post.json сохранён в директории C:\Users\user. Вывод также содержит статистику загрузки данных:
- Общий размер файла: 292 байта.
- Процент загрузки: 100%.
- Скорость загрузки: 380 байт/с.
- Время выполнения: мгновенно (—:—:—).
Эта команда позволяет получить заголовки HTTP-ответов без тела сообщения. Это полезно для проверки статуса ответа, типа содержимого, заголовков кэширования и других метаданных с запрашиваемого ресурса.
Отправим запрос для получения HTTP-заголовков из нашего сервиса:
curl -I https://jsonplaceholder.typicode.com/posts/1
Пример ответа:
HTTP/1.1 200 OK
Date: Wed, 23 Oct 2024 07:34:44 GMT
Content-Type: application/json; charset=utf-8
Content-Length: 292
Connection: keep-alive
Report-To: {"group":"heroku-nel","max_age":3600,"endpoints":[{"url":"https://nel.heroku.com/reports?ts=1729551695&sid=e11707d5-02a7-43ef-b45e-2cf4d2036f7d&s=T06zv%2Bip6vp%2FcW6OahKqDwFYY1PQhd6eXYmDv1DMf3g%3D"}]}
Reporting-Endpoints: heroku-nel=https://nel.heroku.com/reports?ts=1729551695&sid=e11707d5-02a7-43ef-b45e-2cf4d2036f7d&s=T06zv%2Bip6vp%2FcW6OahKqDwFYY1PQhd6eXYmDv1DMf3g%3D
Nel: {"report_to":"heroku-nel","max_age":3600,"success_fraction":0.005,"failure_fraction":0.05,"response_headers":["Via"]}
X-Powered-By: Express
X-Ratelimit-Limit: 1000
X-Ratelimit-Remaining: 999
X-Ratelimit-Reset: 1729551747
Vary: Origin, Accept-Encoding
Access-Control-Allow-Credentials: true
Cache-Control: max-age=43200
Pragma: no-cache
Expires: -1
X-Content-Type-Options: nosniff
Etag: W/"124-yiKdLzqO5gfBrJFrcdJ8Yq0LGnU"
Via: 1.1 vegur
CF-Cache-Status: HIT
Age: 1983
Accept-Ranges: bytes
Server: cloudflare
CF-RAY: 8d700bdd4a385b4f-VIE
alt-svc: h3=":443"; ma=86400
server-timing: cfL4;desc="?proto=TCP&rtt=25362&sent=5&recv=6&lost=0&retrans=0&sent_bytes=3130&recv_bytes=510&delivery_rate=144240&cwnd=252&unsent_bytes=0&cid=748ae82f39ab1e32&ts=71&x=0"
Этот вывод содержит важную информацию для анализа ответов API и отладки запросов. В нём есть статус ответа (200 OK), тип содержимого (например, application/json), длина контента, а также заголовки кэширования, безопасности и ограничения скорости. Такие сведения помогают разработчикам лучше понять взаимодействие с сервером и выявить потенциальные проблемы.
Аутентификация обеспечивает доступ к частным или защищённым ресурсам. Сервис JSONPlaceholder не требует аутентификации, однако вы можете выполнить команду, демонстрирующую передачу данных при работе с защищёнными API. В нашем примере сервер вернёт список постов, а в реальном сценарии такой запрос открыл бы доступ к закрытому ресурсу:
curl -u username:password https://jsonplaceholder.typicode.com/posts
Редиректы полезны при работе с URL-адресами, которые могут перенаправлять на другие ресурсы. JSONPlaceholder не использует редиректы, поэтому команда ниже эмулирует этот процесс, позволяя Curl автоматически следовать по цепочке переадресаций сайтов. При реальном запросе вы получите конечный ресурс после различных перенаправлений:
curl -L https://jsonplaceholder.typicode.com/posts/1
Вы можете отправлять POST-запросы для передачи больших объёмов данных или заранее подготовленной информации. Создадим файл newpost.json и сразу отправим его содержимое на JSONPlaceholder.
Добавим кодировку UTF-8, чтобы избежать ошибок при отображении данных на русском языке:
chcp 65001
Создадим файл newpost.json:
echo {"title": "Загруженный пост", "body": "Содержимое поста", "userId": 1} > newpost.json
curl -X POST -H "Content-Type: application/json" -d @newpost.json https://jsonplaceholder.typicode.com/posts
Получаем ответ от сервера, подтверждающий выполнение запроса:
C:\Users\user>curl -X POST -H "Content-Type: application/json" -d @newpost.json https://jsonplaceholder.typicode.com/posts
{
  "title": "Загруженный пост",
  "body": "Содержимое поста",
  "userId": 1,
  "id": 101
}
Вы познакомились с возможностями Curl, и, если считаете, что этот инструмент может пригодиться в работе, рекомендуем следующие ресурсы:
- Everything curl — бесплатная онлайн-версия книги от создателя Curl, в которой он подробно рассказывает об устройстве технологии.
- Официальная документация с описанием всех опций и команд Curl.
- Блог Даниэля Стенберга, где он часто пишет о Curl и смежных технологиях.
- GitHub-репозиторий Curl — позволяет отслеживать разработку проекта, сообщать о проблемах и вносить свой вклад в развитие Curl.
- Curl Сookbook — сборник практических примеров использования Curl для решения различных задач.

Научитесь: Старт в DevOps: системное администрирование для начинающих
Узнать больше
The cURL command, or “Client for URLs“, is a useful tool you can use to move data around on the internet, working with lots of different ways of communicating online like HTTP, HTTPS, FTP, and more. It’s very useful for users who work with networks and computers a lot.
If you’re using Windows 10 or Windows 11, you can use cURL directly in the Command Prompt; you don’t need to install anything else. This guide will show you how to use cURL on Windows 11 to do all sorts of things like downloading and uploading files, sending emails, dealing with cookies and HTTP headers, and handling SSL certificates.

Checking if cURL is ready on Windows 11
First, we will make sure whether cURL already exists on your computer. Just open Command Prompt and type this:
curl --version
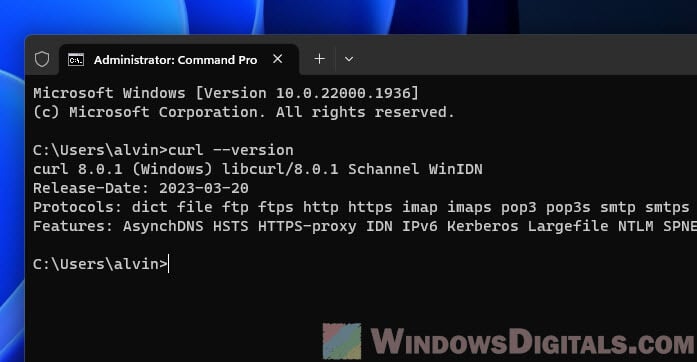
This command will tell you which version of cURL you have. If the command doesn’t show anything but returns an error, it means your PC does not have cURL installed yet.
Also see: How to use FTP via Command Line (CMD) on Windows 11
How to download files with cURL
One of the first things people use cURL for is to download files from the internet. It’s pretty straightforward. To download a file, you just use the -O (or --remote-name) option with the file’s URL:
curl -O https://example.com/myfile.txt
This command pulls the file myfile.txt from example.com and puts it where you are right now on your computer.
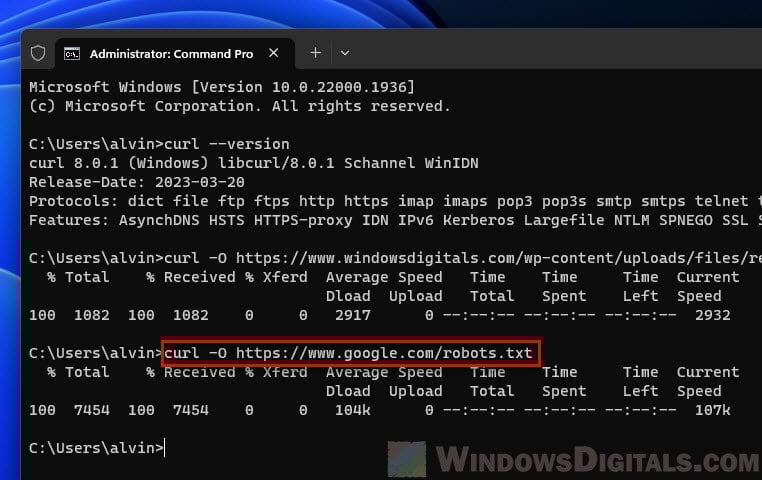
If you want to save the file under a different name, just use the -o (or --output) option like this:
curl -o renamedfile.txt https://example.com/myfile.txt
With the -o option and a new filename, you can choose what the downloaded file is called.
Related resource: How to Download an FTP File Using CMD in Windows 11/10
Uploading files with cURL
cURL also lets you send (upload) files to a server using different methods like FTP. The following steps will show you how to do it with FTP:
curl -T localfile.txt ftp://example.com/ --user username:password
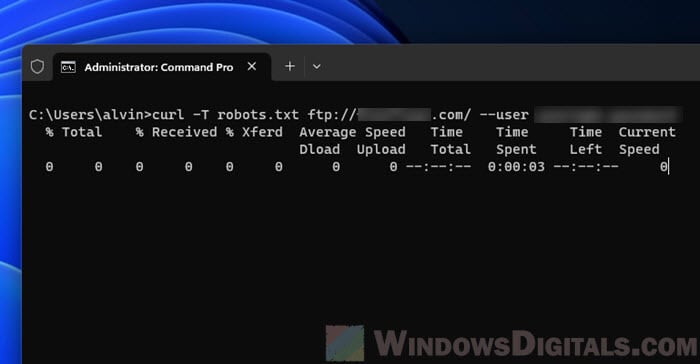
This command line will upload localfile.txt from your computer to example.com. Just replace username:password with your login info for the FTP server.
Sending emails with cURL
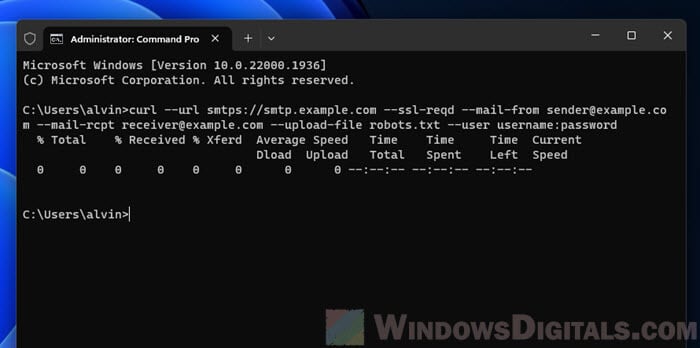
You can also use cURL to send emails using the SMTP protocol, which is very good for automated emails. Below a quick example:
curl --url smtps://smtp.example.com --ssl-reqd --mail-from [email protected] --mail-rcpt [email protected] --upload-file email.txt --user username:password
In this case, email.txt is a file that has your email’s subject, headers, and body. Just swap in your details for the SMTP server and the email addresses.
Handling cookies with cURL
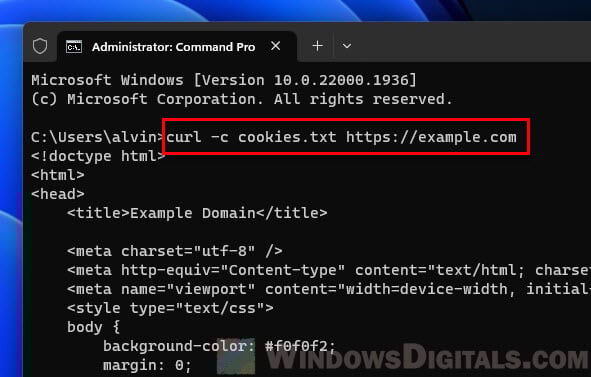
When you need to work with cookies, cURL can also do that. You can send cookies with the -b (or --cookie) option, and save them with the -c (or --cookie-jar) option. Here’s how to send a cookie:
curl -b "name=value" https://example.com
And to save cookies from a server into a file, do this:
curl -c cookies.txt https://example.com
Setting up HTTP headers with cURL
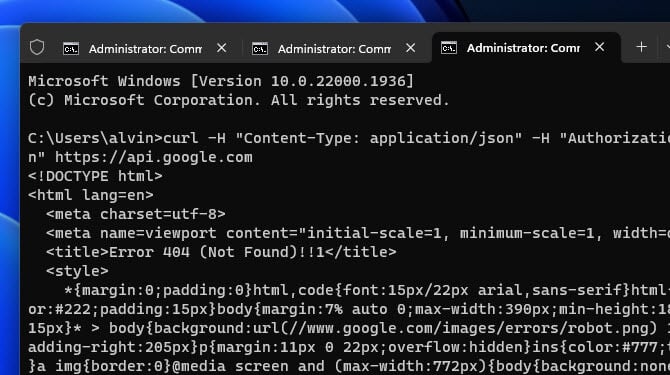
Sometimes you need to tell the server more about what you’re sending, and that’s where HTTP headers come in. With cURL, you can add these headers to your request like so:
curl -H "Content-Type: application/json" -H "Authorization: Bearer your_token" https://api.example.com
Checking SSL certificates
cURL can help you make sure SSL certificates are valid, which is important for secure web browsing. To check a certificate, you can use this:
curl -vI https://example.com 2>&1 | findstr "expire date"
This command gets the SSL certificate details from the server and looks for the expiration date, helping you ensure everything’s up to date and secure.
Linked issue: Fixing Website’s Security Certificate Error on Windows 11/10
Making POST requests with cURL
When you need to send data to a server, you might use a POST request. Doing this with cURL is easy. For example, if you want to send JSON data to an API, you could do it like this:
curl -d "{'key1':'value1', 'key2':'value2'}" -H "Content-Type: application/json" -X POST https://api.example.com
The -d option lets you specify the data you’re sending, and the -H option tells the server it’s in JSON format. The -X tells cURL this is a POST request.
cURL and REST APIs
cURL is also very useful for working with REST APIs, which use standard web methods like GET, POST, PUT, and DELETE. We’ve looked at GET (for downloading files) and POST (for sending data). Now for updating things, you’d use a PUT request like this:
curl -d "{'key1':'value1', 'key2':'value2'}" -H "Content-Type: application/json" -X PUT https://api.example.com/resource/1
And if you need to remove something, a DELETE request does the job:
curl -X DELETE https://api.example.com/resource/1
Some final thoughts
Using cURL from the Command Prompt in Windows 11 is not just easy; it’s a powerful way to talk directly with web services from your computer. Whether you’re automating tasks, testing servers, or doing a whole bunch of other web-related activities, cURL is a very useful tool that’s available across different platforms, making your work portable and widely usable.
If you ever get stuck with a cURL command or need a quick reminder on how to use it, just pop open the command line and type curl --help. Think of it as a mini-guide that’s always there when you need it, showing you all the commands and parameters you can use with curl.
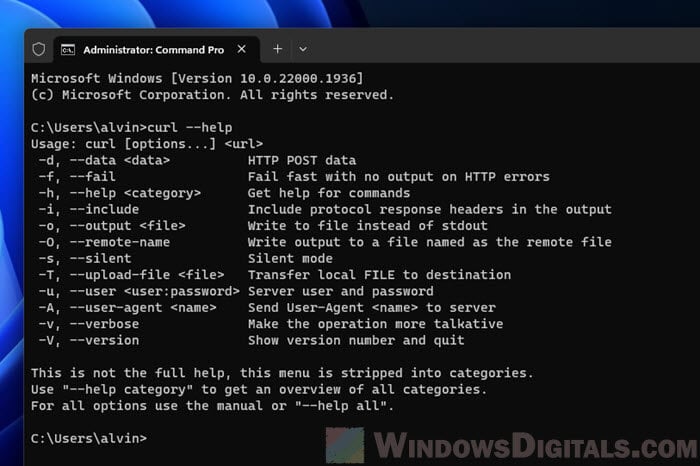
Running cURL commands on Windows 10 is simpler than you might think. First, open the Command Prompt or PowerShell, then type the cURL command you wish to execute. That’s it! With these tools, you can transfer data using various network protocols with just a few keystrokes. In this article, we’ll go over how to set up and run a cURL command step-by-step, making it easy to perform tasks like downloading files or interacting with web APIs on your Windows 10 machine.
By following these steps, you’ll learn how to use cURL commands in Windows 10 to communicate with web servers and transfer data effortlessly.
Step 1: Open Command Prompt or PowerShell
To begin, open the Command Prompt or PowerShell on your Windows 10 computer.
You can find Command Prompt by typing “cmd” in the Windows search bar and selecting the application. For PowerShell, type “powershell” in the search bar, and you’ll see the option. Both of these tools allow you to execute cURL commands, so choose the one you’re more comfortable with.
Step 2: Check if cURL is Installed
Next, check if cURL is already installed by typing curl --version and pressing Enter.
Most Windows 10 versions have cURL pre-installed. If you see a version number, you’re good to go. However, if you receive an error or no response, you may need to install cURL manually.
Step 3: Install cURL (If Necessary)
If cURL isn’t installed, download it from the official cURL website and extract the files to a folder of your choice.
Visit the cURL website and download the correct version for Windows. Extract the downloaded ZIP file and remember the folder path, as you’ll need to add it to your environment variables later.
Step 4: Set Environment Variables
To make cURL accessible from anywhere, add its folder path to your system’s environment variables.
Go to System Properties > Environment Variables, then under “System variables,” select “Path” and click “Edit.” Add the folder path where you extracted cURL. This step ensures that cURL commands work in any Command Prompt or PowerShell window.
Step 5: Run Your cURL Command
Finally, execute your cURL command by typing it into the Command Prompt or PowerShell window and pressing Enter.
Whether you’re downloading a file with curl -O http://example.com/file.txt or making an API request, your command will be processed. cURL will return the output directly in your terminal window.
After setting up and running your cURL command, you can interact with web servers using various protocols like HTTP, FTP, and more. You’ll see results directly in your terminal, allowing you to download content, upload data, or fetch metadata seamlessly.
Tips for Running cURL Command in Windows 10
- Make sure you have administrative privileges to install software or modify system settings.
- Familiarize yourself with basic cURL syntax and options, like
-Ofor downloading files or-X POSTfor sending POST requests. - Use double quotes around URLs or file paths with spaces to avoid errors.
- Keep your cURL version up to date to benefit from new features and security patches.
- Experiment with different cURL options to find the best configuration for your specific needs.
Frequently Asked Questions
What is cURL?
cURL is a command-line tool used to transfer data using URL syntax, supporting multiple protocols such as HTTP, HTTPS, FTP, and more.
Is cURL safe to use on Windows 10?
Yes, cURL is safe to use, provided you download it from the official site and only execute commands from trusted sources.
Why do I get an error when trying to run a cURL command?
Ensure that cURL is installed correctly and the environment variables are set. Also, double-check your command for typos.
Can I use cURL in scripts?
Absolutely! cURL is perfect for automating data transfers in batch files or PowerShell scripts.
What can I do if cURL is not recognized in Command Prompt?
This usually indicates a problem with the environment variables. Verify the cURL path is added correctly to the system variables.
Summary of Steps
- Open Command Prompt or PowerShell.
- Check if cURL is installed.
- Install cURL if necessary.
- Set environment variables.
- Run your cURL command.
Conclusion
Learning how to run a cURL command in Windows 10 is a valuable skill that opens up a world of possibilities for data transfer and interaction with web services. Whether you’re fetching data from a server or sending information to an API, cURL offers a straightforward and robust way to handle these tasks. Once it’s set up, you’ll find that cURL quickly becomes an indispensable tool in your tech arsenal.
For those looking to delve deeper, consider exploring additional cURL options and commands available online. There are countless resources and tutorials that can guide you through more complex scenarios. If you’re regularly working with web services or APIs, you’ll find that cURL is a time-saver worthy of mastering.
Dive into cURL and explore its capabilities—it’s an investment in your skills that pays off in efficiency and flexibility. Happy cURL-ing!
Matt Jacobs has been working as an IT consultant for small businesses since receiving his Master’s degree in 2003. While he still does some consulting work, his primary focus now is on creating technology support content for SupportYourTech.com.
His work can be found on many websites and focuses on topics such as Microsoft Office, Apple devices, Android devices, Photoshop, and more.

cURL is a command line tool and a library which can be used to receive and send data between a client and a server or any two machines connected over the internet. It supports a wide range of protocols like HTTP, FTP, IMAP, LDAP, POP3, SMTP and many more.
Due to its versatile nature, cURL is used in many applications and for many use cases. For example, the command line tool can be used to download files, testing APIs and debugging network problems. In this article, we shall look at how you can use the cURL command line tool to perform various tasks.
Install cURL
Linux
Most Linux distributions have cURL installed by default. To check whether it is installed on your system or not, type curl in your terminal window and press enter. If it isn’t installed, it will show a “command not found” error. Use the commands below to install it on your system.
For Ubuntu/Debian based systems use:
sudo apt update
sudo apt install curl
For CentOS/RHEL systems, use:
sudo yum install curl
On the other hand, for Fedora systems, you can use the command:
sudo dnf install curl
MacOS
MacOS comes with cURL preinstalled, and it receives updates whenever Apple releases updates for the OS. However, in case you want to install the most recent version of cURL, you can install the curl Homebrew package. Once you install Homebrew, you can install it with:
brew install curl
Windows
For Windows 10 version 1803 and above, cURL now ships by default in the Command Prompt, so you can use it directly from there. For older versions of Windows, the cURL project has Windows binaries. Once you download the ZIP file and extract it, you will find a folder named curl-<version number>-mingw. Move this folder into a directory of your choice. In this article, we will assume our folder is named curl-7.62.0-win64-mingw, and we have moved it under C:\.
Next, you should add cURL’s bin directory to the Windows PATH environment variable, so that Windows can find it when you type curl in the command prompt. For this to work, you need to follow these steps:
- Open the “Advanced System Properties” dialog by running
systempropertiesadvancedfrom the Windows Run dialog (Windows key + R). - Click on the “Environment Variables” button.
- Double-click on “Path” from the “System variables” section, and add the path
C:\curl-7.62.0-win64-mingw\bin. For Windows 10, you can do this with the “New” button on the right. On older versions of Windows, you can type in;C:\curl-7.62.0-win64-mingw\bin(notice the semicolon at the beginning) at the end of the “Value” text box.
Once you complete the above steps, you can type curl to check if this is working. If everything went well, you should see the following output:
C:\Users\Administrator>curl
curl: try 'curl --help' or 'curl --manual' for more information
cURL basic usage
The basic syntax of using cURL is simply:
curl <url>
This fetches the content available at the given URL, and prints it onto the terminal. For example, if you run curl example.com, you should be able to see the HTML page printed, as shown below:
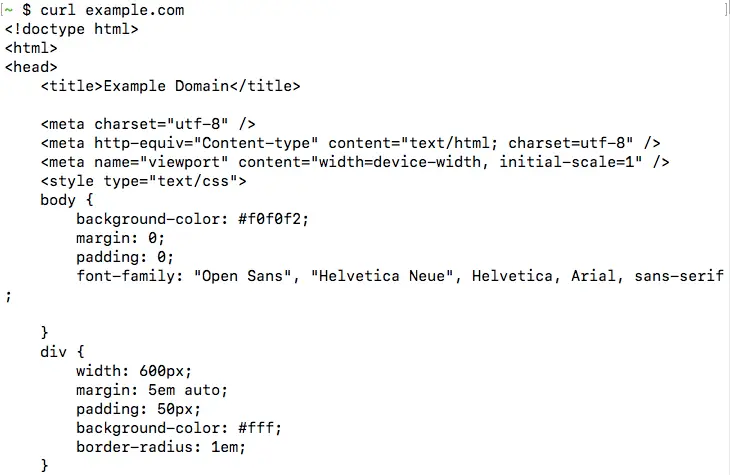
This is the most basic operation cURL can perform. In the next few sections, we will look into the various command line options accepted by cURL.
Downloading Files with cURL
As we saw, cURL directly downloads the URL content and prints it to the terminal. However, if you want to save the output as a file, you can specify a filename with the -o option, like so:
curl -o vlc.dmg http://ftp.belnet.be/mirror/videolan/vlc/3.0.4/macosx/vlc-3.0.4.dmg
In addition to saving the contents, cURL switches to displaying a nice progress bar with download statistics, such as the speed and the time taken:

Instead of providing a file name manually, you can let cURL figure out the filename with the -O option. So, if you want to save the above URL to the file vlc-3.0.4.dmg, you can simply use:
curl -O http://ftp.belnet.be/mirror/videolan/vlc/3.0.4/macosx/vlc-3.0.4.dmg
Bear in mind that when you use the -o or the -O options and a file of the same name exists, cURL will overwrite it.
If you have a partially downloaded file, you can resume the file download with the -C - option, as shown below:
curl -O -C - http://ftp.belnet.be/mirror/videolan/vlc/3.0.4/macosx/vlc-3.0.4.dmg

Like most other command line tools, you can combine different options together. For example, in the above command, you could combine -O -C - and write it as -OC - .
Anatomy of a HTTP request/response
Before we dig deeper into the features supported by cURL, we will discuss a little bit about HTTP requests and responses. If you are familiar with these concepts, you directly skip to the other sections.
To request a resource such as a webpage, or to submit some data to a server, a HTTP client (such as a browser or cURL) makes a HTTP request to the server The server responds back with a HTTP response, which contains the “contents” of that page.
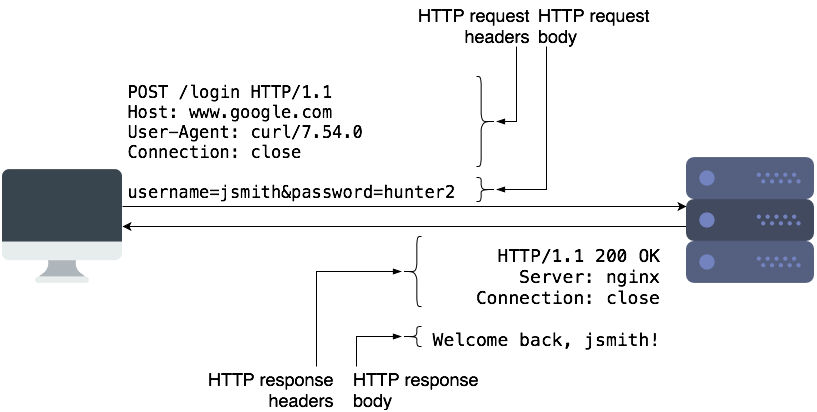
HTTP requests contain the request method, URL, some headers, and some optional data as part of the “request body”. The request method controls how a certain request should be processed. The most common types of request methods are “GET” and “POST”. Typically, we use “GET” requests to retrieve a resource from the server, and “POST” to submit data to the server for processing. “POST” requests typically contain some data in the request body, which the server can use.
HTTP responses are similar and contain the status code, some headers, and a body. The body contains the actual data that clients can display or save to a file. The status code is a 3-digit code which tells the client if the request succeeded or failed, and how it should proceed further. Common status codes are 2xx (success), 3xx (redirect to another page), and 4xx/5xx (for errors).
HTTP is an “application layer protocol”, and it runs over another protocol called TCP. It takes care of retransmitting any lost data, and ensures that the client and server transmit data at an optimal rate. When you use HTTPS, another protocol called SSL/TLS runs between TCP and HTTP to secure the data.
Most often, we use domain names such as google.com to access websites. Mapping the domain name to an IP address occurs through another protocol called DNS.
You should now have enough background to understand the rest of this article.
Following redirects with cURL
By default, when cURL receives a redirect after making a request, it doesn’t automatically make a request to the new URL. As an example of this, consider the URL http://www.facebook.com. When you make a request using to this URL, the server sends a HTTP 3XX redirect to https://www.facebook.com/. However, the response body is otherwise empty. So, if you try this out, you will get an empty output:
If you want cURL to follow these redirects, you should use the -L option. If you repeat make a request for http://www.facebook.com/ with the -L flag, like so:
curl -L http://www.facebook.com/
Now, you will be able to see the HTML content of the page, similar to the screenshot below. In the next section, we will see how we can verify that there is a HTTP 3XX redirect.
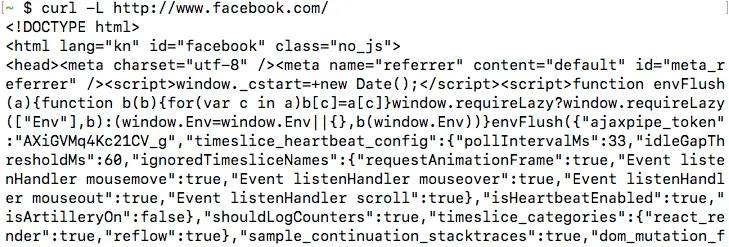
Please bear in mind that cURL can only follow redirects if the server replied with a “HTTP redirect”, which means that the server used a 3XX status code, and it used the “Location” header to indicate the new URL. cURL cannot process Javascript or HTML-based redirection methods, or the “Refresh header“.
If there is a chain of redirects, the -L option will only follow the redirects up to 500 times. You can control the number of maximum redirects that it will follow with the --max-redirs flag.
curl -L --max-redirs 700 example.com
If you set this flag to -1, it will follow the redirects endlessly.
curl -L --max-redirs -1 example.com
When debugging issues with a website, you may want to view the HTTP response headers sent by the server. To enable this feature, you can use the -i option.
Let us continue with our previous example, and confirm that there is indeed a HTTP 3XX redirect when you make a HTTP request to http://www.facebook.com/, by running:
curl -L -i http://www.facebook.com/
Notice that we have also used -L so that cURL can follow redirects. It is also possible to combine these two options and write them as -iL or -Li instead of -L -i.
Once you run the command, you will be able to see the HTTP 3XX redirect, as well as the page HTTP 200 OK response after following the redirect:
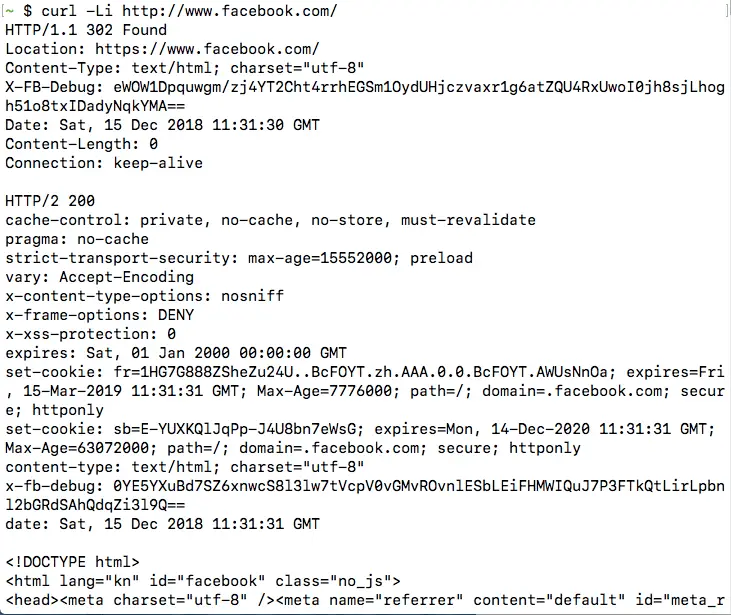
If you use the -o/-O option in combination with -i, the response headers and body will be saved into a single file.
Viewing request headers and connection details
In the previous section, we have seen how you can view HTTP response headers using cURL. However, sometimes you may want to view more details about a request, such as the request headers sent and the connection process. cURL offers the -v flag (called “verbose mode”) for this purpose, and it can be used as follows:
curl -v https://www.booleanworld.com/
The output contains request data (marked with >), response headers (marked with <) and other details about the request, such as the IP used and the SSL handshake process (marked with *). The response body is also available below this information. (However, this is not visible in the screenshot below).
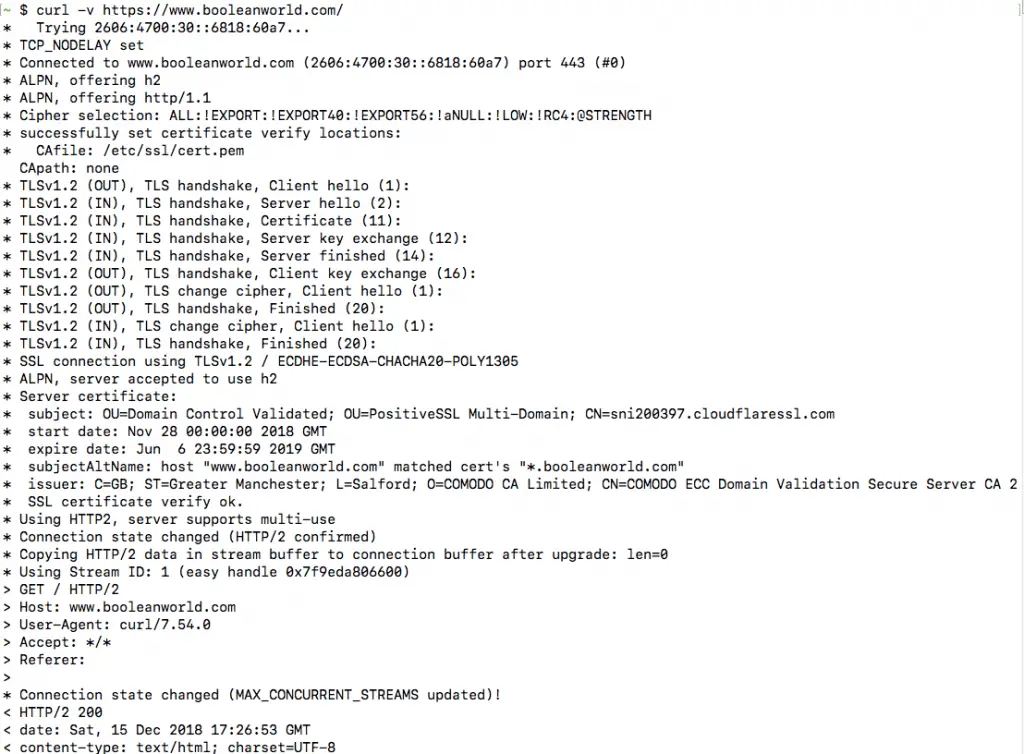
Most often, we aren’t interested in the response body. You can simply hide it by “saving” the output to the null device, which is /dev/null on Linux and MacOS and NUL on Windows:
curl -vo /dev/null https://www.booleanworld.com/ # Linux/MacOS
curl -vo NUL https://www.booleanworld.com/ # Windows
Silencing errors
Previously, we have seen that cURL displays a progress bar when you save the output to a file. Unfortunately, the progress bar might not be useful in all circumstances. As an example, if you hide the output with -vo /dev/null, a progress bar appears which is not at all useful.
You can hide all these extra outputs by using the -s header. If we continue with our previous example but hide the progress bar, then the commands would be:
curl -svo /dev/null https://www.booleanworld.com/ # Linux/MacOS
curl -svo NUL https://www.booleanworld.com/ # Windows
The -s option is a bit aggressive, though, since it even hides error messages. For your use case, if you want to hide the progress bar, but still view any errors, you can combine the -S option.
So, if you are trying to save cURL output to a file but simply want to hide the progress bar, you can use:
curl -sSvo file.html https://www.booleanworld.com/
When testing APIs, you may need to set custom headers on the HTTP request. cURL has the -H option which you can use for this purpose. If you want to send the custom header X-My-Custom-Header with the value of 123 to https://httpbin.org/get, you should run:
curl -H 'X-My-Custom-Header: 123' https://httpbin.org/get
(httpbin.org is a very useful website that allows you to view details of the HTTP request that you sent to it.)
The data returned by the URL shows that this header was indeed set:
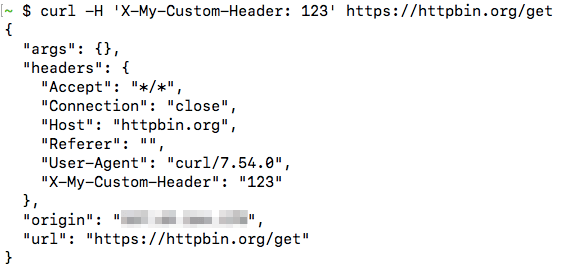
You can also override any default headers sent by cURL such as the “User-Agent” or “Host” headers. The HTTP client (in our case, cURL) sends the “User-Agent” header to tell the server about the type and version of the client used. Also, the client uses the “Host” header to tell the server about the site it should serve. This header is needed because a web server can host multiple websites at a single IP address.
Also, if you want to set multiple headers, you can simply repeat the -H option as required.
curl -H 'User-Agent: Mozilla/5.0' -H 'Host: www.google.com' ...
However, cURL does have certain shortcuts for frequently used flags. You can set the “User-Agent” header with the -A option:
curl -A Mozilla/5.0 http://httpbin.org/get
The “Referer” header is used to tell the server the location from which they were referred to by the previous site. It is typically sent by browsers when requesting Javascript or images linked to a page, or when following redirects. If you want to set a “Referer” header, you can use the -e flag:
curl -e http://www.google.com/ http://httpbin.org/get
Otherwise, if you are following a set of redirects, you can simply use -e ';auto' and cURL will take care of setting the redirects by itself.
Making POST requests with cURL
By default, cURL sends GET requests, but you can also use it to send POST requests with the -d or --data option. All the fields must be given as key=value pairs separated by the ampersand (&) character. As an example, you can make a POST request to httpbin.org with some parameters:
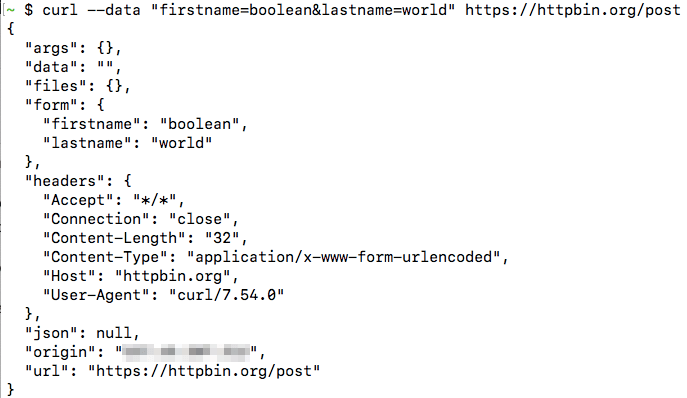
curl --data "firstname=boolean&lastname=world" https://httpbin.org/post
From the output, you can easily tell that we posted two parameters (this appears under the “form” key):
Any special characters such as @, %, = or spaces in the value should be URL-encoded manually. So, if you wanted to submit a parameter “email” with the value “[email protected]”, you would use:
curl --data "email=test%40example.com" https://httpbin.org/post
Alternatively, you can just use --data-urlencode to handle this for you. If you wanted to submit two parameters, email and name, this is how you should use the option:
curl --data-urlencode "[email protected]" --data-urlencode "name=Boolean World" https://httpbin.org/post
If the --data parameter is too big to type on the terminal, you can save it to a file and then submit it using @, like so:
curl --data @params.txt example.com
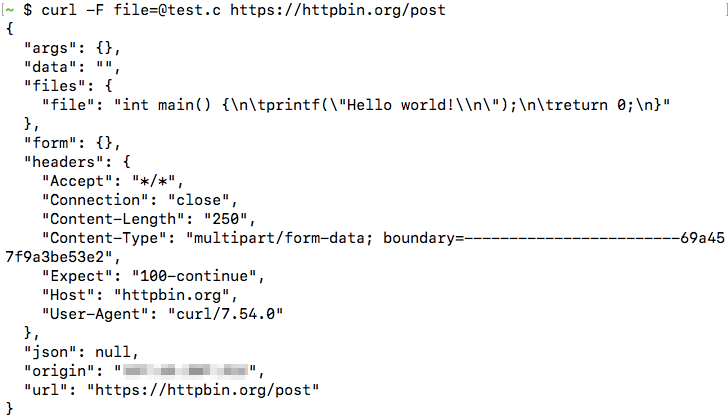
So far, we have seen how you can make POST requests using cURL. If you want to upload files using a POST request, you can use the -F (“form”) option. Here, we will submit the file test.c, under the parameter name file:
curl -F [email protected] https://httpbin.org/post
This shows the content of the file, showing that it was submitted successfully:
Submitting JSON data with cURL
In the previous section, we have seen how can submit POST requests using cURL. You can also submit JSON data using the --data option. However, most servers expect to receive a POST request with key-value pairs, similar to the ones we have discussed previously. So, you need to add an additional header called ‘Content-Type: application/json’ so that the server understands it’s dealing with JSON data and handles it appropriately. Also, you don’t need to URL-encode data when submitting JSON.
So if you had the following JSON data and want to make a POST request to https://httpbin.org/post:
{
  "email": "[email protected]",
  "name": ["Boolean", "World"]
}
Then, you can submit the data with:
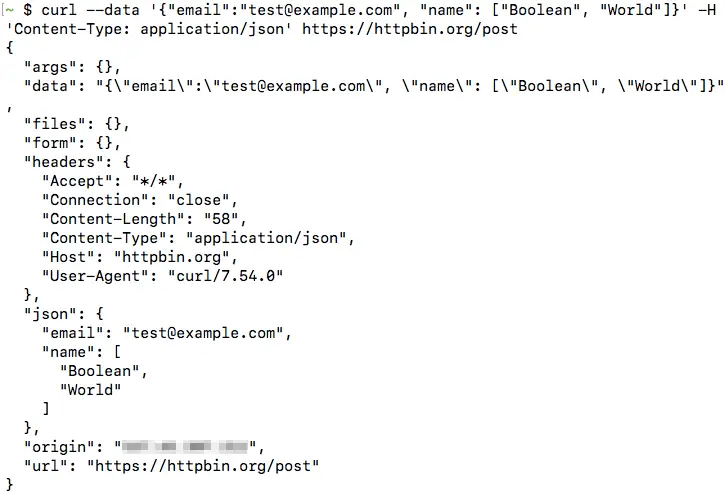
curl --data '{"email":"[email protected]", "name": ["Boolean", "World"]}' -H 'Content-Type: application/json' https://httpbin.org/post
In this case, you can see the data appear under the json value in the httpbin.org output:
You can also save the JSON file, and submit it in the same way as we did previously:
curl --data @data.json https://httpbin.org/post
Changing the request method
Previously, we have seen how you can send POST requests with cURL. Sometimes, you may need to send a POST request with no data at all. In that case, you can simply change the request method to POST with the -X option, like so:
curl -X POST https://httpbin.org/post
You can also change the request method to anything else, such as PUT, DELETE or PATCH. One notable exception is the HEAD method, which cannot be set with the -X option. The HEAD method is used to check if a document is present on the server, but without downloading the document. To use the HEAD method, use the -I option:
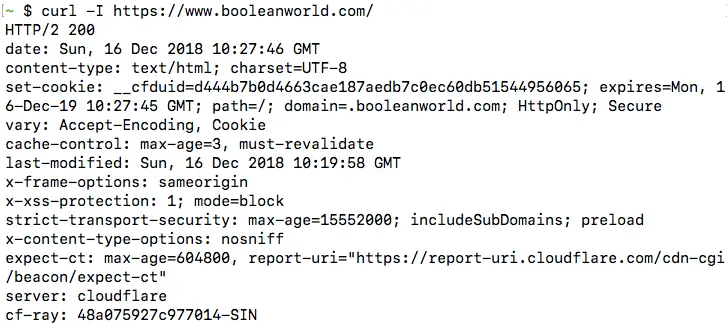
curl -I https://www.booleanworld.com/
When you make a HEAD request, cURL displays all the request headers by default. Servers do not send any content when they receive a HEAD request, so there is nothing after the headers:
Replicating browser requests with cURL
If you want to replicate a request made through your browser through cURL, you can use the Chrome, Firefox and Safari developer tools to get a cURL command to do so.
The steps involved are the same for all platforms and browsers:
- Open developer tools in Firefox/Chrome (typically F12 on Windows/Linux and Cmd+Shift+I on a Mac)
- Go to the network tab
- Select the request from the list, right click it and select “Copy as cURL”
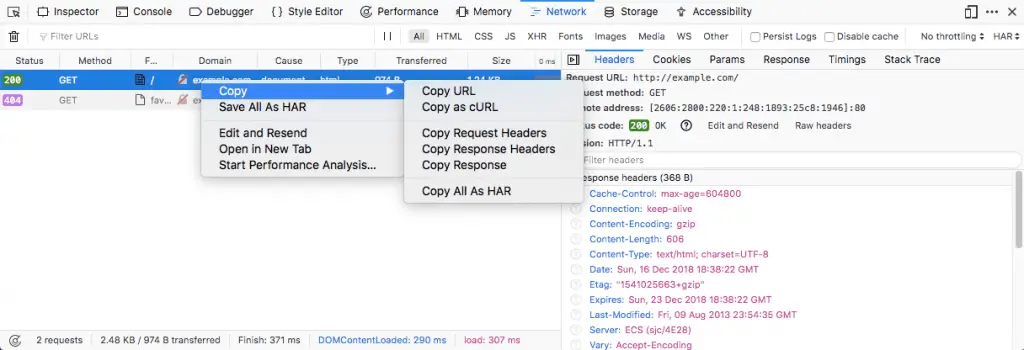
The copied command contains all the headers, request methods, cookies etc. needed to replicate the exact same request. You can paste the command in your terminal to run it.
Making cURL fail on HTTP errors
Interestingly, cURL doesn’t differentiate between a successful HTTP request (2xx) and a failed HTTP request (4xx/5xx). So, it always returns an exit status of 0 as long as there was no problem connecting to the site. This makes it difficult to write shell scripts because there is no way to check if the file could be downloaded successfully.
You can check this by making a request manually:
curl https://www.booleanworld.com/404 -sSo file.txt
You can see that curl doesn’t print any errors, and the exit status is also zero:

If you want to consider these HTTP errors as well, you can use the -f option, like so:
curl https://www.booleanworld.com/404 -fsSo file.txt
Now, you can see that cURL prints an error and also sets the status code to 22 to inform that an error occured:

Making authenticated requests with cURL
Some webpages and APIs require authentication with an username and password. There are two ways to do this. You can mention the username and password with the -u option:
curl -u boolean:world https://example.com/
Alternatively, you can simply add it to the URL itself, with the <username>:<password>@<host> syntax, as shown:
curl https://boolean:[email protected]/
In both of these methods, curl makes a “Basic” authentication with the server.
Testing protocol support with cURL
Due to the wide range of protocols supported by cURL, you can even use it to test protocol support. If you want to check if a site supports a certain version of SSL, you can use the --sslv<version> or --tlsv<version> flags. For example, if you want to check if a site supports TLS v1.2, you can use:
curl -v --tlsv1.2 https://www.booleanworld.com/
The request takes place normally, which means that the site supports TLSv1.2. Now, let us check if the site supports SSL v3:
curl -v --sslv3 https://www.booleanworld.com/
This command throws a handshake_failed error, because the server doesn’t support this version of SSL.

Please note that, depending on your system and the library version/configuration, some of these version options may not work. The above output was taken from Ubuntu 16.04’s cURL. However, if you try this with cURL in MacOS 10.14, it gives an error:

You can also test for HTTP protocol versions in the same way, by using the flags --http1.0, --http1.1 or --http2.
Setting the Host header and cURL’s --resolve option
Previously, we have discussed about how a web server chooses to serve different websites to visitors depending upon the “Host” header. This can be very useful to check if your website has virtual hosting configured correctly, by changing the “Host” header. As an example, say you have a local server at 192.168.0.1 with two websites configured, namely example1.com and example2.com. Now, you can test if everything is configured correctly by setting the Host header and checking if the correct contents are served:
curl -H 'Host: example1.com' http://192.168.0.1/
curl -H 'Host: example1.com' http://192.168.0.1/
Unfortunately, this doesn’t work so well for websites using HTTPS. A single website may be configured to serve multiple websites, with each website using its own SSL/TLS certificate. Since SSL/TLS takes place at a lower level than HTTP, this means clients such as cURL have to tell the server which website we’re trying to access at the SSL/TLS level, so that the server can pick the right certificate. By default, cURL always tells this to the server.
However, if you want to send a request to a specific IP like the above example, the server may pick a wrong certificate and that will cause the SSL/TLS verification to fail. The Host header only works at the HTTP level and not the SSL/TLS level.
To avoid the problem described above, you can use the --resolve flag. The resolve flag will send the request to the port and IP of your choice but will send the website name at both SSL/TLS and HTTP levels correctly.
Let us consider the previous example. If you were using HTTPS and wanted to send it to the local server 192.168.0.1, you can use:
curl https://example1.com/ --resolve example1.com:192.168.0.1:443
It also works well for HTTP. Suppose, if your HTTP server was serving on port 8080, you can use either the --resolve flag or set the Host header and the port manually, like so:
curl http://192.168.0.1:8080/ -H 'Host: example1.com:8080'
curl http://example.com/ --resolve example1.com:192.168.0.1:8080
The two commands mentioned above are equivalent.
Resolve domains to IPv4 and IPv6 addresses
Sometimes, you may want to check if a site is reachable over both IPv4 or IPv6. You can force cURL to connect to either the IPv4 or over IPv6 version of your site by using the -4 or -6 flags.
Please bear in mind that a website can be reached over IPv4 and IPv6 only if:
- There are appropriate DNS records for the website that links it to IPv4 and IPv6 addresses.
- You have IPv4 and IPv6 connectivity on your system.
For example, if you want to check if you can reach the website icanhazip.com over IPv6, you can use:
curl -6 https://icanhazip.com/
If the site is reachable over HTTPS, you should get your own IPv6 address in the output. This website returns the public IP address of any client that connects to it. So, depending on the protocol used, it displays an IPv4 or IPv6 address.
You can also use the -v option along with -4 and -6 to get more details.
Disabling cURL’s certificate checks
By default, cURL checks certificates when it connects over HTTPS. However, it is often useful to disable the certificate checking, when you are trying to make requests to sites using self-signed certificates, or if you need to test a site that has a misconfigured certificate.
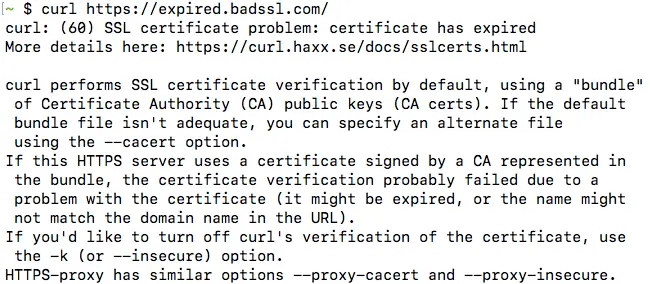
To disable certificate checks, use the -k certificate. We will test this by making a request to expired.badssl.com, which is a website using an expired SSL certificate.
curl -k https://expired.badssl.com/
With the -k option, the certificate checks are ignored. So, cURL downloads the page and displays the request body successfully. On the other hand, if you didn’t use the -k option, you will get an error, similar to the one below:
Troubleshooting website issues with “cURL timing breakdown”
You may run into situations where a website is very slow for you, and you would like to dig deeper into the issue. You can make cURL display details of the request, such as the time taken for DNS resolution, establishing a connection etc. with the -w option. This is often called as a cURL “timing breakdown”.
As an example, if you want to see these details for connecting to https://www.booleanworld.com/, run:
curl https://www.booleanworld.com/ -sSo /dev/null -w 'namelookup:\t%{time_namelookup}\nconnect:\t%{time_connect}\nappconnect:\t%{time_appconnect}\npretransfer:\t%{time_pretransfer}\nredirect:\t%{time_redirect}\nstarttransfer:\t%{time_starttransfer}\ntotal:\t\t%{time_total}\n'
(If you are running this from a Windows system, change the /dev/null to NUL).
You will get some output similar to this:

Each of these values is in seconds, and here is what each value represents:
- namelookup — The time required for DNS resolution.
- connect — The time required to establish the TCP connection.
- appconnect — This is the time taken to establish connections for any layers between TCP and the application layer, such as SSL/TLS. In our case, the application layer is HTTP. Also, if there is no such intermediate layer (such as when there is a direct HTTP request), this time will always be 0.
- pretransfer — This is the time taken from the start to when the transfer of the file is just about to begin.
- redirect — This is the total time taken to process any redirects.
- starttransfer — Time it took from the start to when the first byte is about to be transferred.
- total — The total time taken for cURL to complete the entire process.
As an example, say, you are facing delays connecting to a website and you notice the “namelookup” value was too high. As this indicates a problem with your ISP’s DNS server, you may start looking into why the DNS lookup is so slow, and switch to another DNS server if needed.
cURL configuration files
Sometimes, you may want to make all cURL requests use the same options. Passing these options by hand isn’t a feasible solution, so cURL allows you to specify options in a configuration file.
The default configuration file is located in ~/.curlrc in Linux/MacOS and %appdata%\_curlrc in Windows. Inside this file, you can specify any options that you need, such as:
# Always use IPv4
-4
# Always show verbose output
-v
# When following a redirect, automatically set the previous URL as referer.
referer = ";auto"
# Wait 60 seconds before timing out.
connect-timeout = 60
After creating the above file, try making a request with curl example.com. You will find that these options have taken effect.
If you want to use a custom configuration file instead of the default one, then you can use -K option to point curl to your configuration file. As an example, if you have a configuration file called config.txt, then you can use it with:
curl -K config.txt example.com
Conclusion
In this article, we have covered the most common uses of the cURL command. Of course, this article only scratches the surface and cURL can do a whole lot of other things. You can type man curl in your terminal or just visit this page to see the man page which lists all the options.
