
Did you try to use Veeam Agent for Windows feature to backup physical machines? Have you been noticed the exiting backups with a warning “Collecting recovery media files Details: Windows recovery image file not found”? Today, I am going to show you how to fix the issues.

Veeam Agent for Windows runs the Recovery Media collection process at the end of the backup job. The process enables Veeam Agent for Windows to generate the Veeam Recovery Media for the machine.
The Recovery Media collection process is based on the Windows RE/PE components that may be missing. For example:
- Starting from Windows 10 version 1809, the WinPE component is an add-on to the Windows Assessment and Deployment Kit (ADK).
- Veeam Agent machine has a hardware recovery partition instead of the system partition.
As a result, the backup job fails to process the WinRE image and displays the warning.
Check the status of the Windows RE components with the following command:
1.Start the command prompt.
2.Run the command: reagentc /info.
- If the command returns Enabled, there is a possibility that system might be corrupted. It is worth checking system integrity. Use the dism.log command that may point to a possible cause.
- If the command returns Disabled, it is most likely that the Windows RE/PE components are not installed or configured on the Veeam Agent machine.

If Windows RE/PE components are not installed or configured on the Veeam Agent machine, fix the Recovery Media collection process as shown here:
Veeam Recovery Environment is built off the Windows Recovery Environment, and the Recovery Environment is made from the Windows Preinstallation Environment.
If a system is missing the Windows PE/RE components, Veeam Recovery Media will fail to create.
The missing Windows Recovery Environment files will need to be copied from the Windows Installation media to the running system to resolve this issue.
Solution 1:
You should perform the following steps on the machine which is having the issue.
1.Mount the Windows Installation ISO, or insert the installation media
2.Using Windows Explorer, check the “sources” folder on the Windows install media:
- If install.wim is present, skip to step 4
- if install.esd is present, proceed to step 3
3.Using the DISM Export-Image function, extract the install.wim from the install.esd file in the install media:
*How to export install.wim from install.esd file
First, using the DISM Get-ImageInfo function, determine which Index ID inside the install.esd matches the installed version of Windows.
Modify file paths as needed for your environment.
dism /get-imageinfo /imagefile:D:\sources\install.esd
In this example, the machine had Windows 10 Pro installed, and using the previous command, Index #6 matched that version.
The /Compress switch must be included, if not the resulting wim file will fail to mount using DISM.
Dism /Export-image /SourceImageFile:D:\sources\install.esd /SourceIndex:6 /DestinationImageFile:C:\tempsources\install.wim /Compress:fast /CheckIntegrity
4.Using the DISM Mount-Image function, mount the install.wim:
Correct file paths as needed depending on the location of the install.wim.
- Create dism folder at C drive.
- DISM /Mount-image /imagefile:F:\sources\install.wim /Index:1 /MountDir:C:\dism /readonly /optimize

5.Copy WinRe.wim and ReAgent.xml files from the mounted image to the system’s C:\Windows\System32\Recovery folder:
Note: The example command will overwrite all data in the C:\Windows\System32\Recovery folder with content from the mounted image.
(WinRe.wim is a system file and is hidden by default, as such, you won’t be able to see the file once it’s copied to the target location.)
robocopy /MIR C:\dism\Windows\System32\Recovery\ C:\Windows\System32\Recovery

6.Enable Recovery image using REAgentC
reagentc /setreimage /path C:\Windows\System32\Recovery

7.Using the DISM Unmount-Image function, unmount the image mounted in Step 4.
Note: If the install.wim was extracted from an install.esd file, you can manually delete it during this step.
Dism /Unmount-image /MountDir:C:\dism /discard

Solution 2:
If it’s still not working, download and install ADK and Windows PE add-on with default settings as following link.
https://docs.microsoft.com/en-us/windows-hardware/get-started/adk-install
1.Run following command to verify WIN RE Image status.
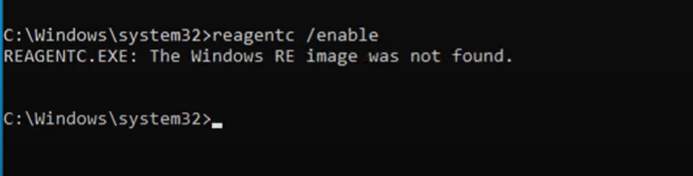
reagentc / enable
dir /a /s c:\winre.wim

2.Run adkwinpesetup,exe to install ADK.

3.On the Specify location page, click Next.

4.On the Windows Key Privacy page, click Next.

5.On the License Agreement page, click Accept.

6.On the Select the features you want to install page, select Windows Preinstallation Environment (Windows PE), click Install.

7.On the User Account Control page, click Yes.

8.On the Welcome page, click Close.


9.Open Regedit.
10.Browse to “HKEY_LOCAL_MACHINE\SOFTWARE\Veeam\Veeam Endpoint Backup”
11.Right-click Veeam Endpoint Backup, select New, click DWORD (32-bit) Value.

12.Edit DWORD (32-bit Value key with these details, click OK.
Name: ForceUseAdkForRecoveryMedia
Base: Hexadecimal
Value data: 1

13.Restart the “Veeam Agent for Microsoft Windows” service.

Solution 3:
If you want to eliminate the warning, exclude the Veeam Agent machine from the Recovery Media collection process. Add the following registry key:
1.Run regedit.exe.
2.Locate the HKEY_LOCAL_MACHINE\SOFTWARE\Veeam\Veeam EndPoint Backup key.
3.Add the following value under the key:
Name: DisableRECollection
Type: REG_DWORD
Value: 1
4.Go to Control Panel > System and Security > Administrative Tools > Services.
5.Restart the Veeam Agent for Microsoft Windows service.
After the registry key is created, Veeam Agent for Windows does not start the Recovery Media collection process at the end of the backup job.
Hope you enjoy this post.
Cary Sun
Twitter: @SifuSun
Web Site: carysun.com
Blog Site: checkyourlogs.net
Blog Site: gooddealmart.com
If we face an issue with Veeam Backup where the Windows recovery image file is not found, we can follow the steps explained in this article. Bobcares, as a part of our Windows Hosting Support offers solutions to every query that comes our way.
Overview
- Fixing Veeam Backup Issue “Windows Recovery Image File is not Found”
- Error Causes
- Error Fixes
- Troubleshooting Tips
- Conclusion
Fixing Veeam Backup Issue “Windows Recovery Image File is not Found”
Veeam Backup is a complete data protection and disaster recovery solution for backing up, replicating, and restoring virtual machines (VMs), physical servers, and cloud workloads. It is often used in enterprises of all kinds to assure data availability and reduce downtime.
Veeam Backup Features
Some of the features of the Veeam Backup are as follows:
1. Full, Incremental, and Differential Backups: Veeam can perform different types of backups, including full backups (entire data set), incremental (only changes since the last backup), and differential (changes since the last full backup).
2. Fast Recovery: Veeam allows quick restoration of entire VMs, individual files, applications, and even specific data from backups.
3. VM Replication: Veeam replicates VMs from a production site to a backup site, enabling fast recovery of services in case of disaster.
4. Failover & Failback: It also supports failover to a backup site and failback to the original site when the primary system is restored.
5. Instant VM Recovery: Veeam enables the immediate recovery of a failed VM by running it directly from a backup file, reducing downtime significantly.
6. Backup to Cloud: Veeam supports backing up data to cloud storage (e.g., AWS, Azure, Google Cloud).
7. Disaster Recovery in the Cloud: It facilitates disaster recovery plans involving cloud environments.
8. Application-Aware Processing: I also ensures consistent backups of applications like Microsoft Exchange, SQL Server, Active Directory, and Oracle by understanding the internal structure of the applications.
9. Granular File and Item Recovery: The Backup allows recovery of individual files or items (like emails) from a backup without having to restore the entire VM or system.
10. Data Encryption: Veeam protects backups with encryption both at rest (on disk) and in transit (over the network) to ensure data security.
11. Monitoring & Reporting: Veeam provides detailed monitoring, alerting, and reporting capabilities to help manage backup operations and ensure compliance with SLAs (Service Level Agreements).

What does the Error means?
The “Windows recovery image file not found” error means that Veeam Backup can’t find the necessary recovery image during the restoration process. This can occur when using Veeam Backup in a variety of settings. This usually occurs during the backup, restore, or recovery operations when Veeam interacts with a Windows-based system.
Error Causes
1. Missing or Corrupted Recovery Partition: When the recovery partition was not backed up properly or was excluded from the backup job configuration.
2. Veeam backup job is set to back up only specific partitions and excludes the recovery partition, this error may occur during recovery.
3. The recovery image may have been destroyed, damaged, or transferred after the backup was produced, causing this error on restore.
4. Veeam may fail to locate the recovery image if the destination disk does not match the layout associated with the recovery image.
5. Incompatibility between Veeam Agent and Windows versions, or a Veeam Agent problem.
6. Backup data may have become damaged as a result of backup difficulties, storage problems, or transmission faults.
7. Users may mistakenly remove or edit the recovery partition, resulting in the loss of the recovery image during backup or recovery.
8. Veeam relies on the Windows Recovery Environment (WinRE), which itself is based on the Windows Preinstallation Environment (WinPE).
9. If the system is missing the necessary Windows PE/RE files, the creation of Veeam Recovery Media will fail.
Error Fixes
1. Prepare the Image File
1. Mount the Windows Installation ISO or insert the installation media.
2. Look inside the “sources” folder on the media.
3. If we see install.wim, skip to next part. If we see install.esd, extract install.wim using the DISM tool.
2. Check for Recovery Partition
1. Open Command Prompt: Run it as an administrator.
2. Use Diskpart to Check:
List disks: list disk
Select the OS disk (usually Disk 0): select disk 0
List partitions: list part
3. Recovery Image Handling
Based on whether the Recovery Partition is present:
1. If the Recovery Partition exists, update it with the new recovery image.
2. If there’s no Recovery Partition, create a new one and store the recovery image there.
3. If we don’t want a Recovery Partition, place the recovery image on the OS volume.
Troubleshooting Tips
1. Check that the recovery partition is present in the backup and not corrupted. Ensure that the partition is appropriately recognized by the operating system.
2. Check the backup job parameters to make sure that all relevant partitions, including the recovery partition, are chosen for backup.
3. Check the backup files’ integrity and whether the recovery image is available. If the picture is missing, consider generating a backup.
4. Check that the target disk’s partition structure corresponds to the source disk from the original backup. Change the disk setup if necessary.
5. Update Veeam Agent to the most recent version and verify compatibility with the Windows OS version. Reconfigure the agent if needed.
6. Verify the integrity of backup files using Veeam’s built-in tools, or try to restore from a different source.
7. Educate users on the value of the recovery partition and make sure it is safe from mistaken revisions.
[Want to learn more? Click here to reach us.]
Conclusion
In summary, the “Veeam Backup Windows Recovery Image File Not Found” error occurs when Veeam cannot locate the required recovery image during restoration due to missing or inaccessible Windows Recovery Environment files. By preparing the necessary files and checking the system’s disk configuration, we can resolve the issue and successfully create or update the Veeam Recovery Media.
Here, our Experts went over the troubleshooting tips for the issue in detail.
The Windows Preinstallation Environment has a WinRE, which helps repair issues with the unrebooting operating system. If you try to reboot your Windows and receive an error Windows Recovery Environment not found then, this article is for you.
There are many possible causes of such an error, making you struggle. You may receive such an error because of the winre.wim file is corrupted, the disk installation is broken, your Windows RE status is disabled, or your firmware or hardware has issues. This post will explain five methods for solving the Windows RE image was not found error.
Method 1. Recover WinRE Image File With Data Recovery Software
The first step in recovering Winre image files is using data recovery software. I recommend the EaseUS Data Recovery Wizard as the most secure and reliable software.
It is compatible with most Windows, be it seven or eleven. Besides using this EaseUS Data Recovery Wizard to recover your WinRE image file, it can also recover any lost files on your PC. This tool can help you recover permanently deleted files and can perform Recycle Bin recovery.
To save yourself big time, download this highly-rated EaseUS Data Recovery Wizard on your PC and follow the steps below to get your lost WinRE image files back:
Step 1. Choose the exact file location and then click the «Search for Lost Data» button to continue.
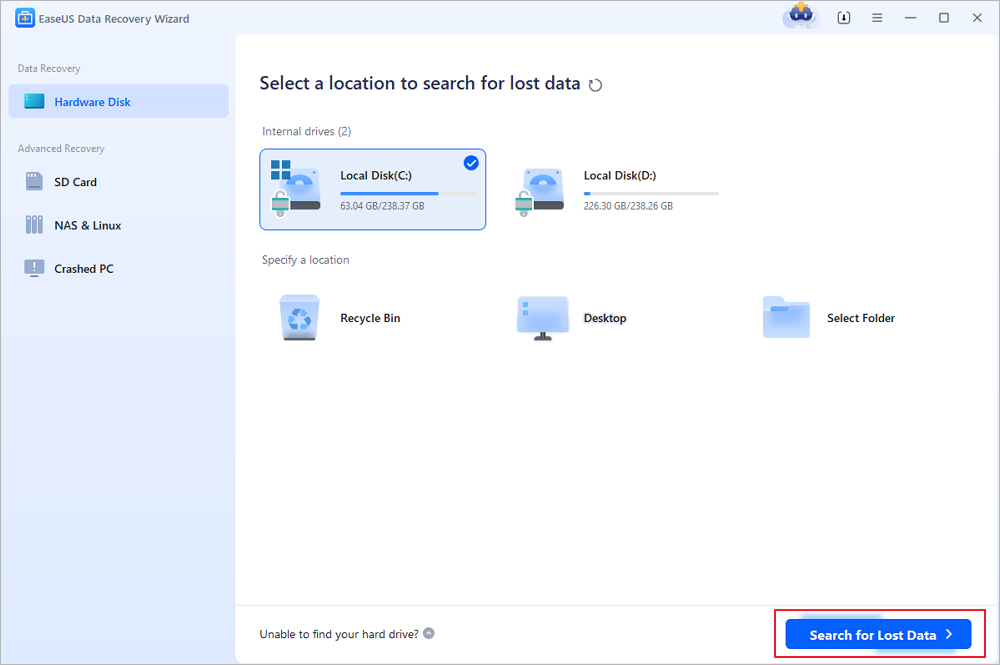
Step 2. After the process, locate the deleted or lost files in the left panel using the «Path» or «Type» feature. Or, you can apply the «Filter» feature to find the deleted files.

Step 3. Click the «Recover» button and save the restored files – ideally, it should be different from the original one. You can choose a cloud storage, such as OneDrive, Google Drive, etc., and click «Save» to save your recovered files.

You can share this post on forums like Reddit or social media like Twitter to help more users in need:
Method 2. Fix Windows RE Image Was Not Found by Enabling Recovery Environment
Enabling a recovery environment can fix the reagent.exe Windows RE image that was not found. Check out how to do it!
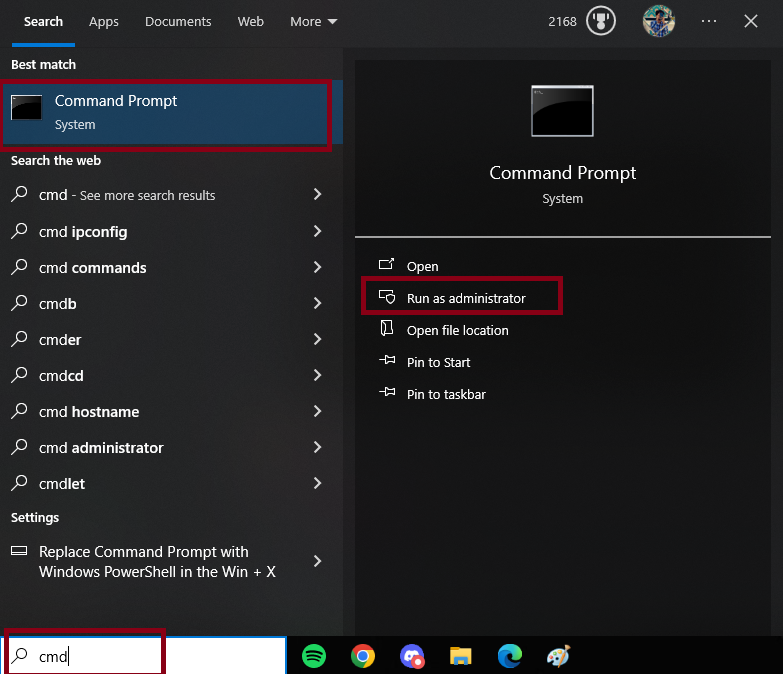
Step 1. In your search box, type «CMD.»
Step 2. Press «Enter.»
Step 3. Right-click on the «Command Prompt» that will appear.
Step 4. Click «Run as administrator.»
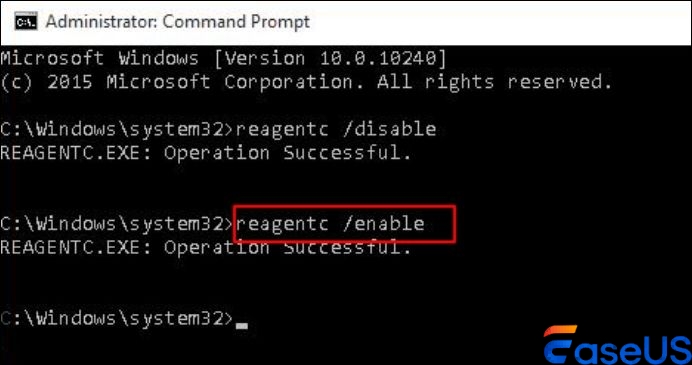
Step 5. Type «reagentc /info.»
Step 6. Press «Enter.»
Step 7. If disabled, type reagentc /enable.
After re-enabling the Windows recovery environment, you should be able to find the recovery environment. But if not, you should check whether the Windows recovery environment location is valid.
Method 3. Check and Set Path for winre. wim File to Solve Windows RE Image Missing
Checking the set path for wire. wim can help fix the error Windows RE image not found on your computer. You will need to see if the BCD contains entries to restart in recovery mode.
Step 1. With a priority permission, run «cmd.»
Step 2. Type bcdedit /enum all.
Step 3. You will access a current «BCD (Boot Configuration Data)» store.
Step 4. Scroll down to see a «Windows boot loader area» and locate the «identifier={current}.»
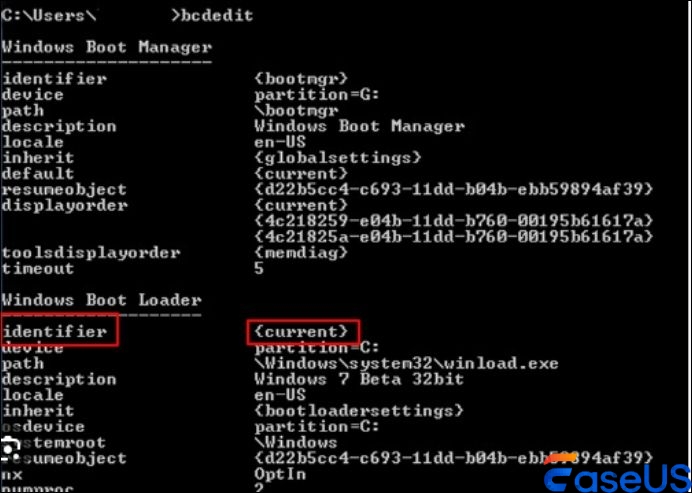
Step 5. Again, locate the «recovery sequence» with the GUID recovery sequence attribute value.
Step 6. Identify the Windows boot loader with «identifier value and the GUID recovery sequence attribute value» and ensure the Windows RE description on the device and the OS device are the same.
Step 7. If not the same, then set the path by typing bcdedit/set {current} recovery sequence {FoundGUID}. Next, click «Enter» to execute.
It would be great if you share this post with your friends and colleagues:
Method 4. Copy winre.wim File Manually to Fix Windows RE Image Not Found
Another possible method of fixing the Windows RE image not found is by copying the winre.wim file manually.
The following steps will guide you on how to set it manually.
Step 1. Go to your PC and locate the «winre.wim» file.
Step 2. Run «cmd» with the administrator priority.
Step 3. Type «dir /a /s c:\winre.wim.»
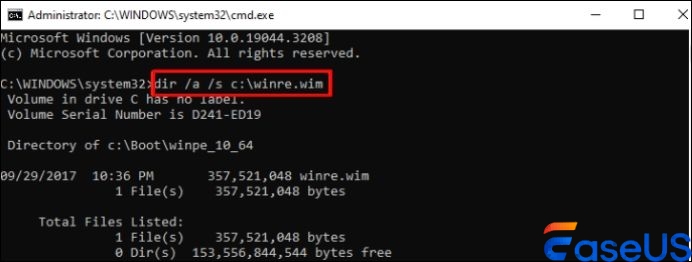
Step 4. Press «Enter.»
Step 5. If not in the system partition, then assign a drive letter to try again
Step 6. If in C: drive, enter the command to access the file and the copy:
xcopy /h c:\Recovery\3b09be7c-2b1f-11e0-b06a-be7a471d71d6\winre.wim c:\Windows\System32\Recovery» or «attrib -h -s c:\Recovery\3b09be7c-2b1f-11e0-b06a-be7a471d71d6\winre.wim
Step 7. Copy and paste reagentc /setreimage /path C:\windows\system32\recovery to replace the winre.wim file path in the recovery agent configuration.
Step 8. Type the command line reagentc /info or reagentc /enable to enable the recovery environment.
Method 5. Restore winre.wim File Using Installation Disc to Fix Windows RE Image Not Found
Another method is using an installation disc. Here is how to do it!
Step 1. Go to your PC and open «View.»
Step 2. Open «Folder Options» to enable hidden system files.
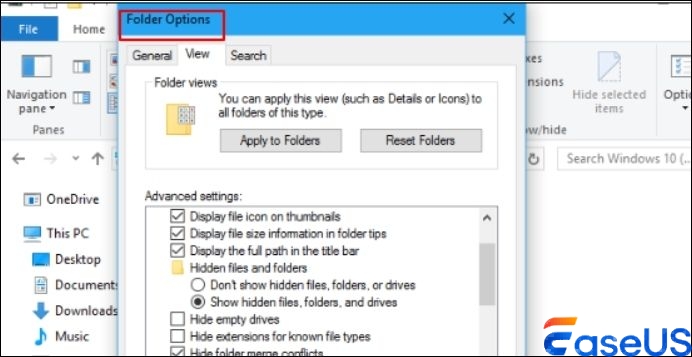
Step 3. Go to «installation disc-» and open the «Source folder.» Copy and paste the «winre.wim file.»
Step 4. Run «cmd» as administrator. In the command prompt, type md c:\test\. Click «Enter.»
Step 5. Mount your image to the created folder» dism /mount-image /imagefile:»D:\sources\install.wim» /index:1 /mountdir:C:\test\ /readonly in your PC.
Step 6. Copy the file from the folder to C:\Windows\System32\Recovery folder.
Step 7. Type reagentc /setreimage /path C:\windows\system32\recovery in the command prompt and run.
Step 8. Enter dism /unmount-image /mountdir:C:\test\ /discard to unmount your install.wim image file. Enable recovery environment.
Conclusion
You can reboot your computer without trouble using the various methods of resolving the Winre image. When such an error occurs, try checking the set path for Winre. wim, copying Winre. wim manually, enabling the recovery environment, and using the installation disc to restore Winre. wim to solve the problem. But before trying all the possible methods, you can use the safest and most highly rated software, like the EaseUS Data Recovery Wizard.
1. Where is the Windows RE image?
A WinRE (Windows Recovery Environment) is found in the Windows Preinstallation Environment. That is in the \Windows\System32\Recovery folder hence, you cannot see it directly. It helps repair issues with the unrebooting operating system.
2. How do I enable WinRE in Windows 10?
Do you need help enabling Winre on your Windows 10? Check out these easy steps!
- Step 1. Click on «Start.»
- Step 2. Find «Command Prompt.»
- Step 3. Right-click on the «top results.»
- Step 4. Select «Run as administrator.»
- Step 5. Type reagentc /info.
- Step 6. Click «Enter.»
- Step 7. Type reagentc /enable and press «Enter.»
3. How do you install a Windows recovery image?
Check out how to install a Windows recovery image on your PC.
- Step 1. Go to the search box and type create a recovery drive.
- Step 2. Open the «backup system files to the recovery drive.»
- Step 3. Click «Next.»
- Step 4. Select the «hard drive» on the PC to save the images.
- Step 5. Click «Next.»
- Step 6. Choose «Create» to create a recovery drive.
Launching soon: The world’s first vendor agnostic bug scrubLearn more & join waitlist

OPERATIONAL DEFECT DATABASE
…
The Windows Recovery Environment (WinRE) is a tool designed to help reset or recover Windows. However, during the resetting process, you may encounter the error “Could not find the Recovery Environment.” This indicates that the RE image is corrupted or deleted from your system. If you try to enable the recovery environment using the reagentc.exe command in the command prompt, you might see the error message: “The Windows RE Image was not found.”
This error usually occurs when the winre.wim file is missing from the Windows recovery folder. The winre.wim file is essential for resetting, upgrading, or repairing your system.
In this article, we will explore how to retrieve this file and continue the reset process.
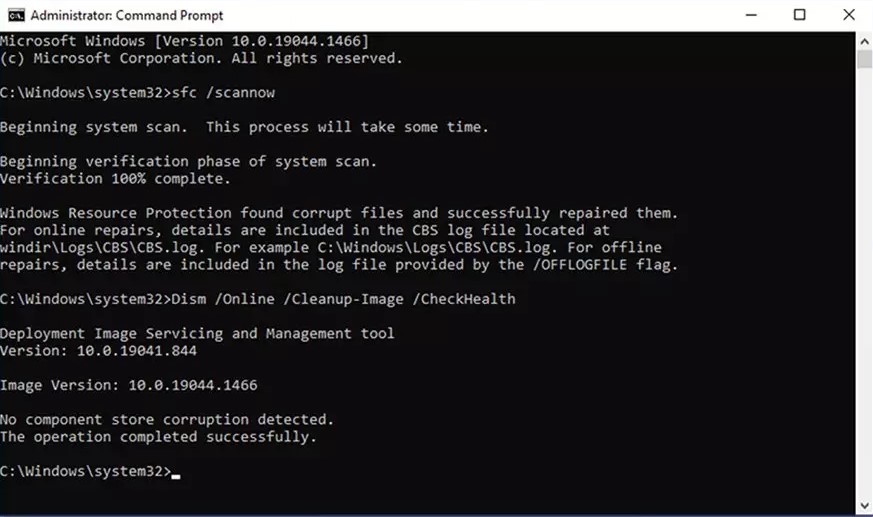
1. Run SFC and DISM
Since winre.wim is a critical system file, it is advisable to run the System File Checker (SFC) and Deployment Image Servicing and Management (DISM) utilities first. These tools will scan for, repair, and restore corrupted files. SFC focuses on restoring corrupted system files, while DISM addresses system-wide issues.
- Open the Search menu, type in cmd, and start the Command Prompt as an Administrator.

- Execute the following commands in the Command Prompt:
sfc /scannow
Dism /Online /Cleanup-Image /RestoreHealth

- After completion, close the Command Prompt and restart your PC.
2. Download the winre.wim File Manually
The error is triggered by the absence of the winre.wim file in the Windows recovery folder. To retrieve the file, you need to download the Windows ISO file and extract the winre.wim file using 7-zip. Follow the steps below:
Step 1. Download the Windows ISO file
To retrieve the Winre.wim file, first, download the Windows ISO file which contains the winre.wim file needed for the recovery folder. Detailed instructions on how to download the Windows 10 ISO and Windows 11 ISO can be found in our articles: how to download Windows 10 ISO and how to download Windows 11 ISO.
Step 2. Download 7-Zip
Unfortunately, you cannot extract files from a WIM or ESD file using WinRAR. Instead, download and install 7-Zip on your computer. You can download 7-Zip from their official website.
Step 3. Copy the winre.wim file
After downloading the ISO file and 7-Zip, proceed with the following steps:
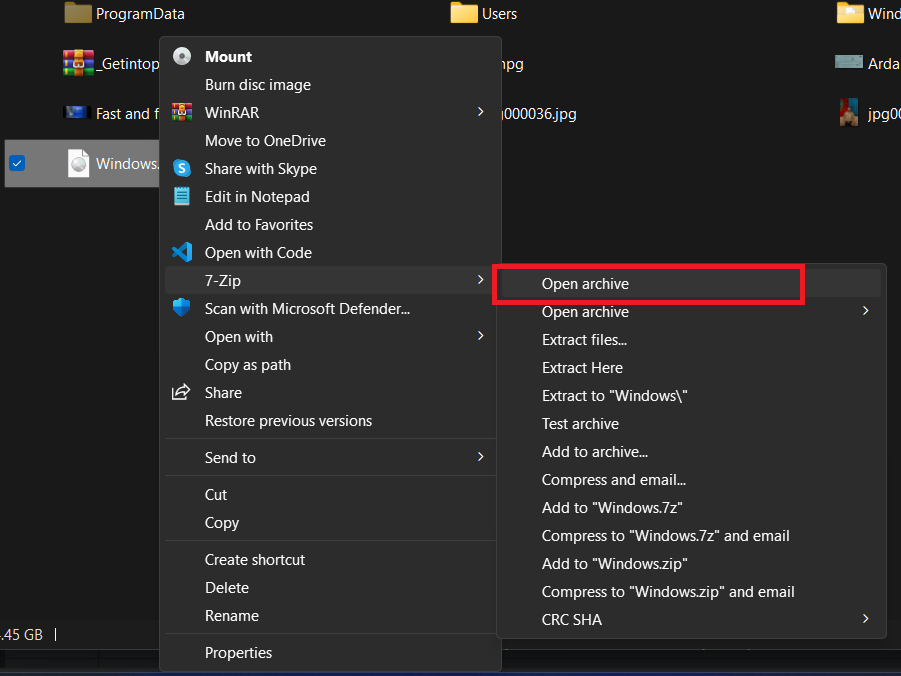
- Right-click on the downloaded ISO file and select Open Archive using 7-Zip.

Opening ISO in 7-Zip - Navigate to the sources folder within the Windows ISO and locate the install.esd file.

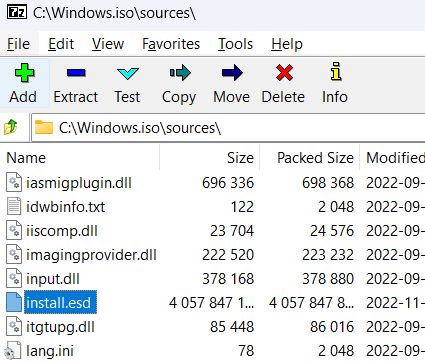
- Double-click install.esd to view its contents. You will find folders designated for each version of Windows, such as Windows 10 Home, Windows 10 Pro, etc.
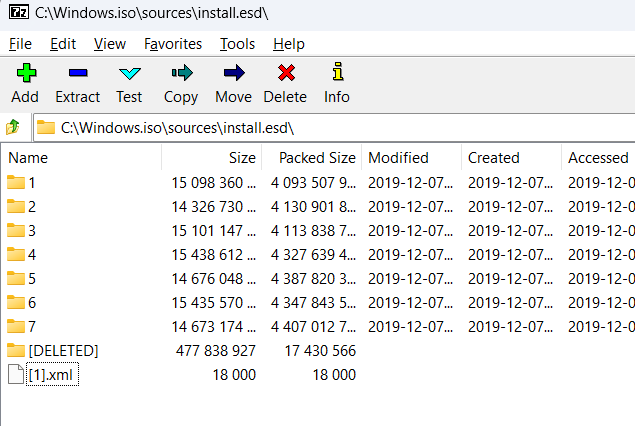
1 - Windows 10 Home 2 - Windows 10 Home N 3 - Windows 10 Home Single Language 4 - Windows 10 Education 5 - Windows 10 Education N 6 - Windows 10 Pro 7 - Windows 10 Pro N

- Select the folder that corresponds to your Windows version.
- Navigate to Windows > System32 > Recovery.

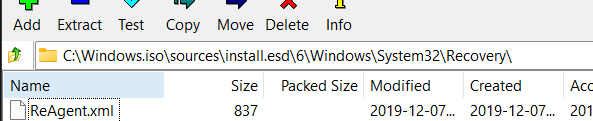
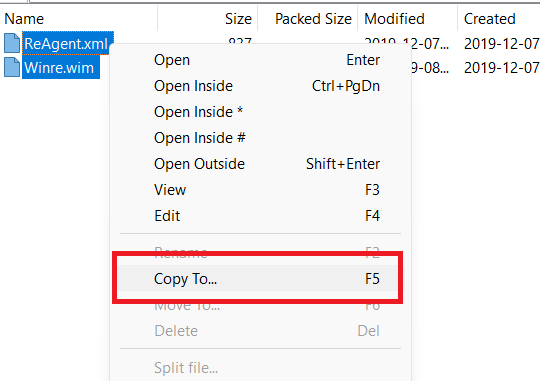
Opening the Recovery Folder in Install.esd - In the Recovery folder, locate the ‘ReAgent.xml‘ and ‘Winre.wim‘ files.
- Select both files, right-click, and choose Copy to, or press the F5 key.

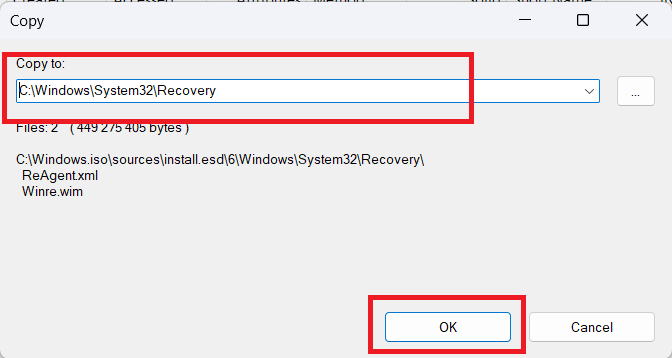
- In the copy window, enter the following address and press OK.
C:\Windows\System32\Recovery

- If you encounter permission issues, change the destination to Desktop.
C:\Users\[Your-PC-Name]\Desktop
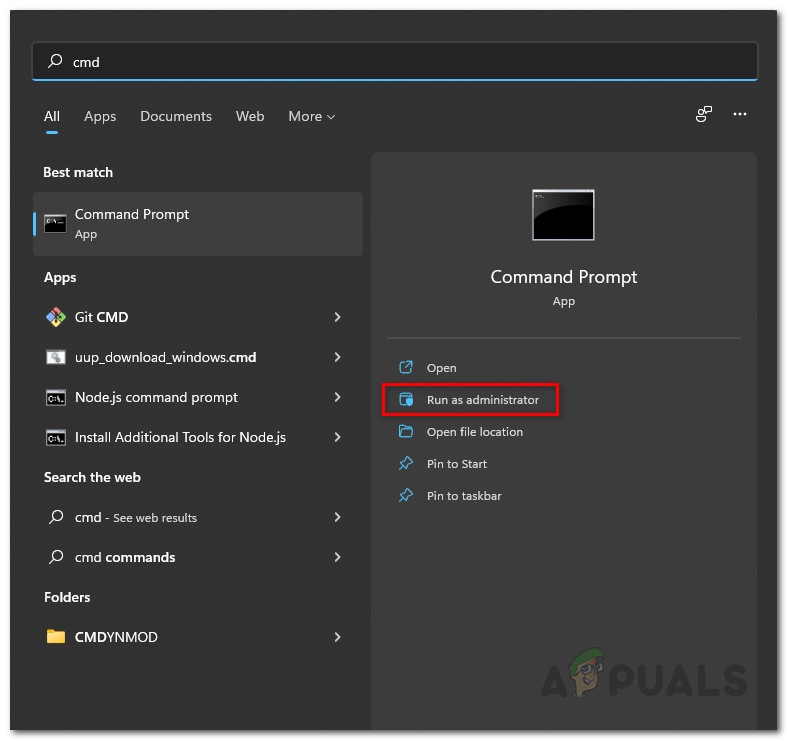
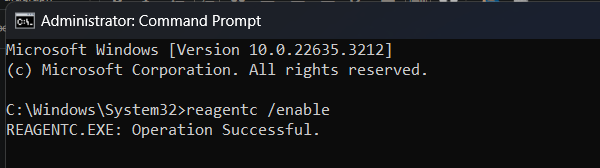
- If step 9 fails, open Command Prompt as Administrator and execute the following command to copy the Winre.wim file to the recovery folder.
copy C:\Users\[Your-PC-Name]\Desktop\Winre.wim C:\Windows\System32\Recovery
- Finally, press Windows + R, type cmd, and run Command Prompt as Administrator.

- Enter the following command:
reagentc /enable

Once complete, restart your PC, and the issue should be resolved.
3. Reinstall Windows
If the issue persists and your aim is merely to reset Windows, you can perform a repair installation which will eliminate all third-party apps. For detailed instructions, refer to our article on how to repair install Windows.
Should that method fail, consider reinstalling Windows using a USB. Instructions for this can be found in our article on how to install windows.
Kevin Arrows
Kevin Arrows is a highly experienced and knowledgeable technology specialist with over a decade of industry experience. He holds a Microsoft Certified Technology Specialist (MCTS) certification and has a deep passion for staying up-to-date on the latest tech developments. Kevin has written extensively on a wide range of tech-related topics, showcasing his expertise and knowledge in areas such as software development, cybersecurity, and cloud computing. His contributions to the tech field have been widely recognized and respected by his peers, and he is highly regarded for his ability to explain complex technical concepts in a clear and concise manner.