
CNAME or Canonical Name record is one of the types of DNS records. It is used to create an alias name for an existing Host A record or another CNAME record. Alias name usually required to hide the original hostname, or if the host itself runs multiple services then one alias name can be assigned for each service. It’s very easy to Add CNAME Record in Windows DNS Server. Also, you can add as many CNAME records as you want, all pointing to the same hostname.
Like the other DNS record types, you can create CNAME record as a static or dynamic record. You can also create CNAME record in either Forward Lookup Zones or Reverse Lookup Zones, however, the CNAME record must point to a Host A record or another CNAME record in Forward Lookup Zones.
To simulate the steps to add CNAME record in Windows DNS server, we’re going to use the scenario below:
AS-DCO001 is the Domain Controller and DNS Server of the mustbegeek.com domain environment. The network administrator adds a new server, AS-SVC001, which runs several services at the same time including FTP and print server. The A record for AS-SVC001 is already existing, however the administrator wants to use a more user-friendly name instead of the original server name to serve end-users. You are required to help the administrator to create alias name for each of the services.
As usual, we can add CNAME record in Windows DNS server either by using DNS Manager or PowerShell.
Add CNAME Record using DNS Manager
The steps to add CNAME record using DNS Manager is similar with adding another record. You can start by selecting the zone that you want to use. In this example, the zone name is mustbegeek.com under Forward Lookup Zones.
Right click on the zone name, then select New Alias (CNAME)…
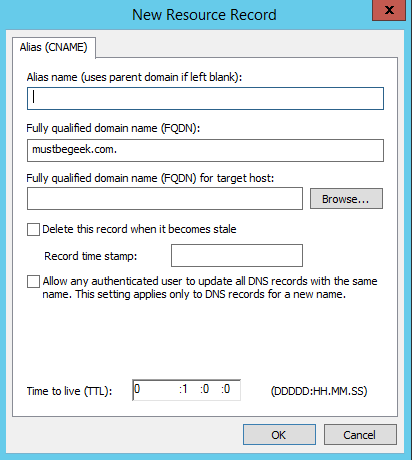
The window below will then show up

You need to fill in the details required on the above window
- Fill the Alias name field with the alias name you want to use. Notice the Fully Qualified Domain Name (FQDN) field will be automatically updated as you type the alias name.
- Fill the FQDN for target host field with the FQDN of the target host or you can click on Browse to select the from the available records.
- You can choose to tick Delete this record when it becomes stale option. When enabled, this option will convert your CNAME record into a dynamic record. Otherwise it is static by default.
- You can also tick the Allow any authenticated user to update all DNS records with the same name to allow automatic update of this CNAME record if the information on the target host record is changing overtime, such as when the server is using DHCP.
- Optionally, you can modify the TTL value if you want to use anything other than the default value which is 1 hour.
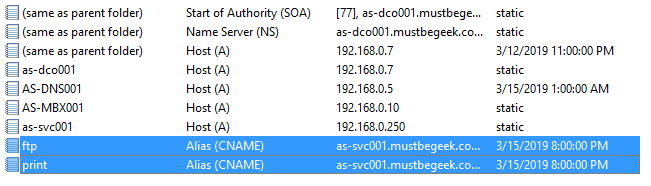
In this example, we created two CNAME records and all pointing to the same target host AS-SVC001.mustbegeek.com with details as shown in the pictures below:


Click OK to finish adding the CNAME record.

Add CNAME Record using PowerShell
When you’re using PowerShell to add CNAME record in Windows DNS server, you have to run PowerShell as administrator. After that you can enter the command below:
Add-DnsServerResourceRecordCName -Name "ALIAS_NAME" -HostNameAlias "HOST_NAME_FQDN" -ZoneName "ZONE_NAME" [-AllowUpdateAny] [-AgeRecord] [-TimeToLive TTL_VALUE]
Replace the values below with the information you want to create:
- ALIAS_NAME = Replace with the alias name in FQDN format
- HOST_NAME_FQDN = Replace with the target hostname also in FQDN format
- ZONE_NAME = Replace with the zone name where you create the CNAME record
- [-AllowUpdateAny] = Optional keyword that serve the same function as “Allow any authenticated user to update all DNS record…”
- [-AgeRecord] = Optional keyword that serve the same function as “Delete this record when it becomes stale”
- [-TimeToLive] = Optional keyword that serve the same function as the TTL field, replace the TTL_VALUE with the value you want in HH:MM:SS format
And below are two lines of PowerShell cmdlets that we use in this scenario, which results in the same as the previous example:

Working with CNAME Record in Windows DNS Server
It’s fairly easy to understand about CNAME record compared to the other types of DNS record. CNAME record doesn’t have many requirements except a valid Host A record for the target host name. Also, the same alias name cannot be used multiple times by different target host.
That makes less considerations needed to add CNAME record in Windows DNS server.
The following two tabs change content below.
- Bio
- Latest Posts
I am IT practitioner in real life with specialization in network and server infrastructure. I have years of experience in design, analysis, operation, and optimization of infrastructure solutions for enterprise-scaled network. You can send me a message on LinkedIn or email to arranda.saputra@outlook.com for further inquiry regarding stuffs that I wrote or opportunity to collaborate in a project.
This Windows Server 2022 Tutorial covers how to Create DNS CNAME Record on Windows Server 2022. Domain Name System is a name resolution service that provides a naming system for computers, services, and other resources in the network. The DNS Server resolves computer names or other hostnames to IP addresses and IP addresses to computer names or other hostnames. A DNS zone is the specific portion of a DNS namespace hosted on a DNS server and it contains resource records. Alias (CNAME) record used to resolve a name to another name and it exists in the forward lookup zone. A Canonical Name or CNAME record is a type of DNS record that maps an alias name to a true or canonical name. Using a CNAME record points more than one name to a single host.
Note: In this Tutorial Active Directory-Integrated DNS is used, DNS servers running on domain controllers can store their zones in Active Directory Domain Services.
Demo environment
- Computer Name: server1.test.com
- Operating System: Windows Server 2022 Datacenter
- IP Address: 192.168.0.2
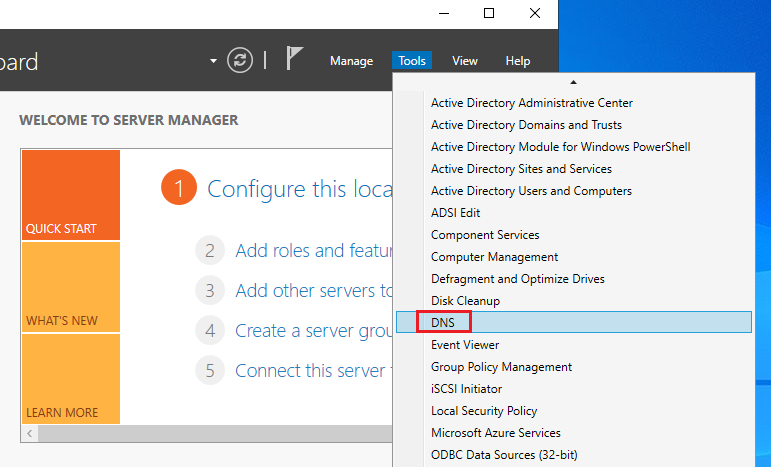
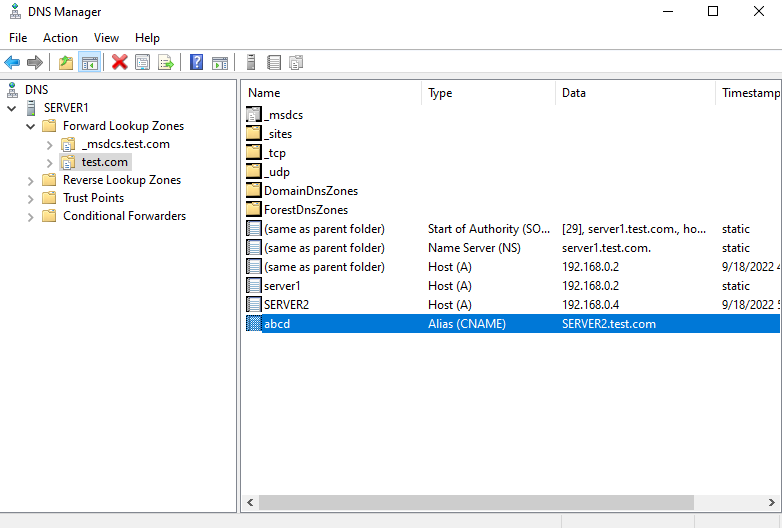
1. Open the Server Manager dashboard click Tools and select DNS.
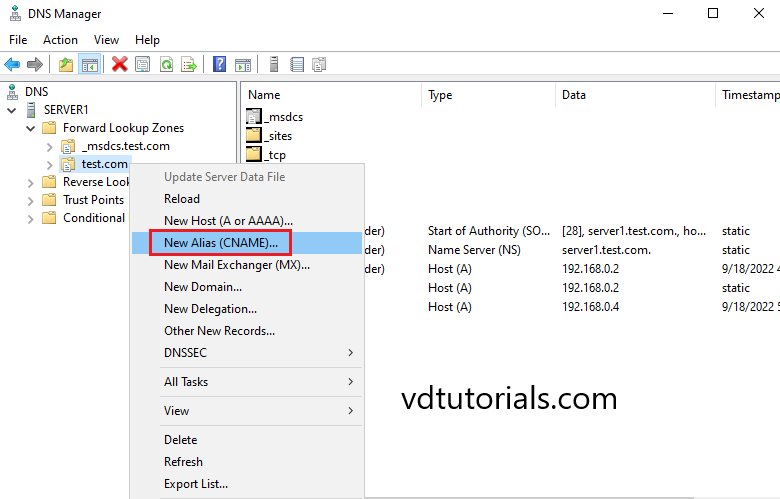
2. Right Click on Forward lookup zone name and New Alias (CNAME).
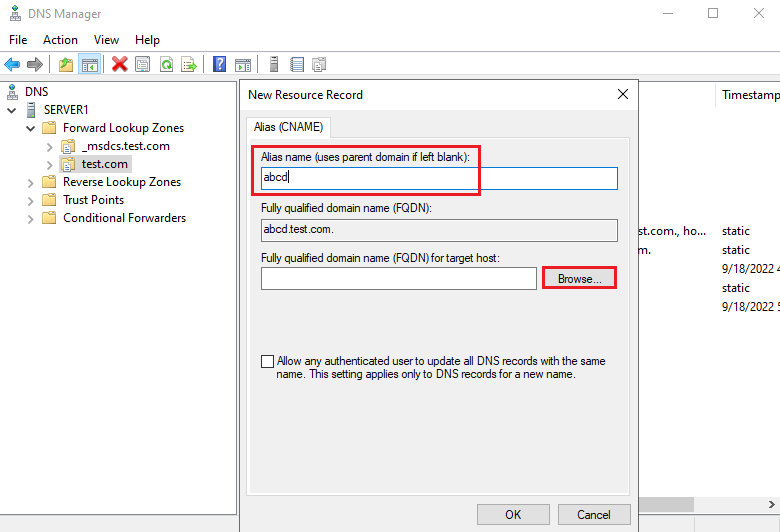
3. Enter the Alias name and click Browse.
Alias Name: abcd
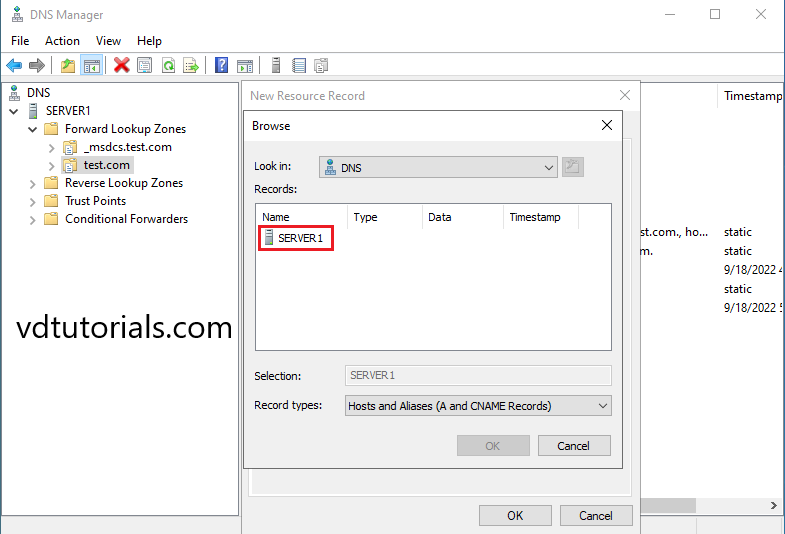
4. Select DNS Server (SERVER1).
5. Select Forward Lookup Zone.
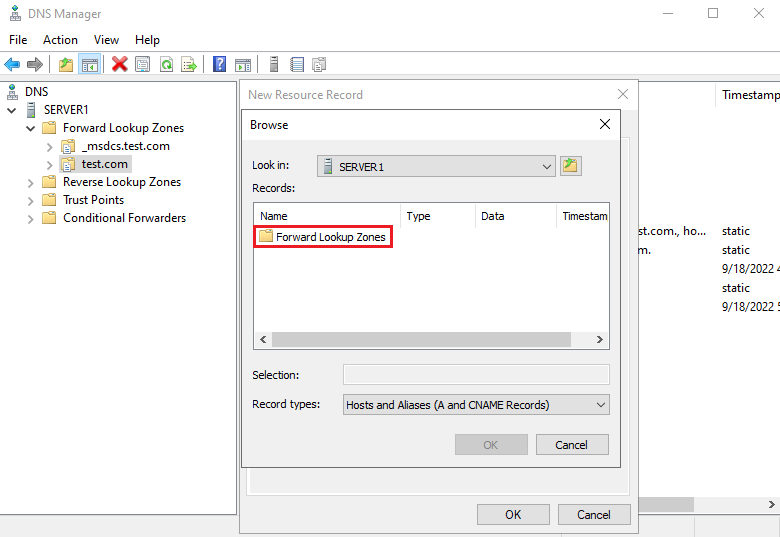
6. Select Forward Lookup Zone Name (test.com).
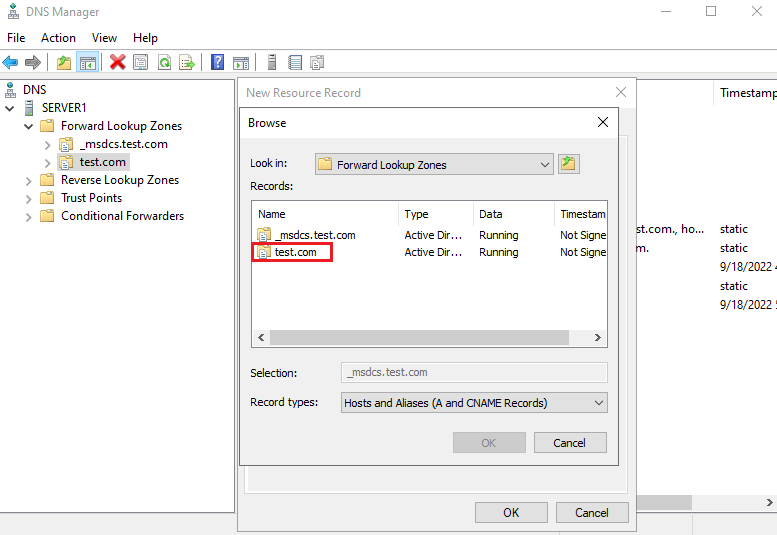
7. Select A Record.
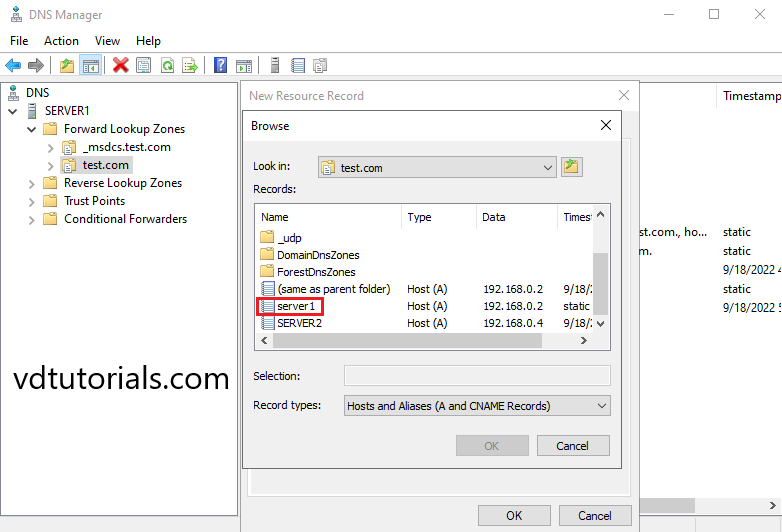
8. Click OK.
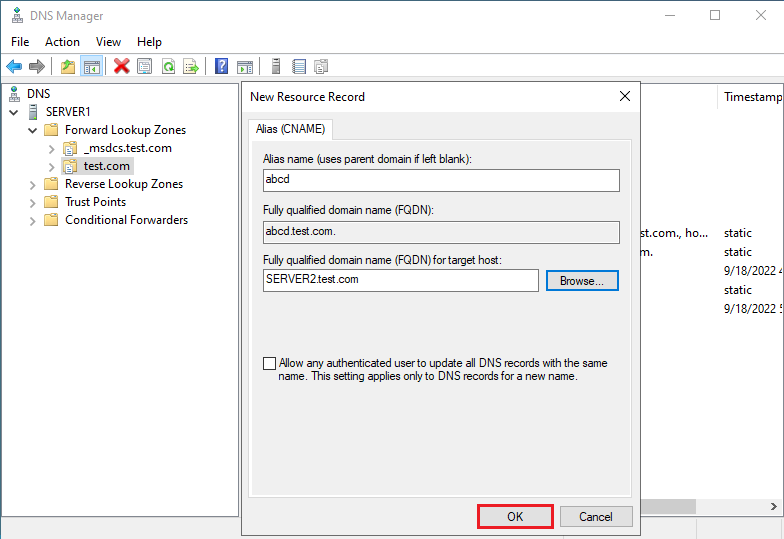
9. DNS CNAME Record has been created, Verify the CNAME Record.
Well, CNAME or Canonical name is one of the types of DNS records. With the help of CNAME one can use more than one name to point to a single host thus making it very easy to do things as host both a File Transfer Protocol server and a Web server on the same computer. It is only because of CNAME that the user can use a Web server to host certificate revocation list for certification authority as well as performing additional services. In fact, it is very easy and simple to add CNAME record in Windows DNS Server. Also the user can add as many CNAME as they want. It mainly depends upon the discretion of the user.
How to Add CNAME Record in Windows DNS Server

Steps to add CNAME record in Windows DNS Server:
Like the other DNS Server, the user can also create CNAME record as a static or dynamic record. The user can also create CNAME record either in forwarding Lookup Zones or on the Reverse Lookup Zones. But it should be remembered that CNAME record must always point to a host record or another CNAME record in forwarding lookup zones.
- Take for example AS-DCO001 is the main Domain Controller and also the DNS Server of the mustbegreek.com. The network administrator will add a new server AS SVC001 that will run several services at the same time by including FTP and print server. Keep it in mind that the A record for AS SVC001 is already in existence. Now if the administrator tries to use a more user-friendly one, then they can opt for other ones. CNAME can be added to the Windows DNS Server either by using DNS Manager or by using Power shell.
- The steps that are followed in adding record is somehow similar to add CNAME record. The user can start by selecting the zone that they want to use. In this case, you can use mustbegeek.com under the forward lookup zones. Please have a look at the below image and you will get a clear conception.
- Now right click on the zone name and then select new alias(CNAME)
- The user will see that the window will show a message and by going through it the user should fill up the following things. First fill-up the alias name field with the help of the alias name. Note that the fully qualified domain name field will be automatically updated as the user will type the alias name. Next, fill up the FQDN target host field with the FQDN of the target host and click on the browse to select the form that is available on the records.
- The user can also choose to delete the record when it becomes a stale option. Once enabled, the option will convert the CNAME record into a dynamic record or else it will be static by default.
- Even the user can also tick and allow any unauthenticated user to update all DNS records with the same name in order to allow automatic update of the CNAME record if the information on the target record host is changing over time.
- On the other side, the user can also opt for modifying the TTL value if they want to use anything other than the default value that is for 1 hour. Below there are two images that may clear the whole thing in a systematic manner.

- In the next step, the user should click OK to finish adding the CNAME record.
Check here: How to Configure Stub Zone in Windows DNS Server
Add CNAME by using Power Shell:
When anyone is using power shell to add CNAME record in Windows DNS Server then they have to run the Power Shell as administrator. Soon after this, they can add comments below just like this.
Add-DnsServerResourceRecordCName -Name “ALIAS_NAME” -HostNameAlias “HOST_NAME_FQDN” -ZoneName “ZONE_NAME” [-AllowUpdateAny] [-AgeRecord] [-TimeToLive TTL_VALUE]
The user can replace the below with the information as the user want:
ALIAS_NAME: The user can replace it with the alias name in FQDN format.
HOST_NAME_FQDN: The user, in this case, should replace it with a target hostname also in the FQDN format.
ZONE_NAME: The user can replace with the zone name where the user can create the CNAME record.
(Allow update any): There is an optional keyword that serves the same function as allow any unauthenticated user to update all the DNS record
Age Record: There is an optional keyword that serves the same function as delete this record when it becomes stale.
Time to live: The optional keyword will serve the same function as the TTL field. It will simply replace TTL_ value with the value that the user desires. It should be in HH:MM: SS format. Just have a look at the below image and it will make the whole thing clear.

In short, CNAME has a very less requirement and the main thing that it demands is to have a valid Host A record for the target hostname. On the other side, the same alias name cannot be used for multiple times by different target host. CNAME is really a vital tool in the hands of modern people. The above-mentioned process adding CNAME record is quite easy and comfortable. The more people will use it the more they will get used to it. It may appear to be a tough process in the initial level but once the user enters into the process the whole thing becomes quite easier before them.
See more: Steps by Step Guide to Install VMware vSphere ESXi 6.7
Gone are the days of simple computer work. Today’s people mainly believe in fast and quality work. They can do anything to get quality and error-free work. The latest developments have reduced time to a great extent. Thus a person can concentrate on several projects at a time. It is really a very good thing. The wait is just over. Now it is the exact time when one can use the right tools and systems for getting their work done in a short duration. It should be appreciated by everyone.
Check here: Steps to Configure Aging and Scavenging in Windows DNS Server.
Table of Contents
It’s very easy to Install and configure DNS Server in Windows Server 2008. Now after installing and configuring DNS Server we will need to create various DNS resource record for the recently created forward lookup zone. Every domain hosted requires at least following DNS resource records to be created:
- SOA (Start of Authority) DNS resource record. SOA record has already been created while Creating Forward Lookup Zone. All parameters related to SOA record are updated during the Configuration of Forward Lookup Zone. SOA record for gopalthorve.com looks as below:
@          3600    IN  SOA ns1.gopalthorve.com. hostmaster.gopalthorve.com. (
                   2012032809   ; serial number
                   86400        ; refresh
                   7200         ; retry
                   604800       ; expire
                   86400      ) ; default TTL
- At least two Name Server (NS) DNS resource records. Primary NS record pointing to primary name server (ns1.gopalthorve.com) and secondary NS record pointing to secondary name server (ns2.gopalthorve.com). These records have already been created during the Configuration of Forward Lookup Zone. The name server records and name server host records looks as pasted below:
@                       NS    ns1.gopalthorve.com.
@                       NS    ns2.gopalthorve.com.
ns1                     A    192.168.0.98
ns2                     A    192.168.0.99
- Host (A or AAAA) DNS resource record for the parent domain (say gopalthorve.com >> 192.168.0.98). Host (A or AAAA) record for www sub domain (www.gopalthorve.com >> 192.168.0.98) or CNAME record for www sub domain pointing to the parent domain (www.gopalthorve.com >> gopalthorve.com).
@                       A    192.168.0.98
www                     A    192.168.0.98
- Host (A or AAAA) DNS resource record for FTP Server host for the domain e.g. ftp.gopalthorve.com >> 192.168.0.98.
ftp A 192.168.0.98
- Mail Exchanger (MX) DNS resource record for Email Server host for the domain. e.g. MX record for gopalthorve.com is mail.gopalthorve.com and mail.gopalthorve.com points to host 192.168.0.99.
mail A 192.168.0.99
@ MX 10 mail.gopalthorve.com.
Create Host (A or AAAA) DNS resource record
- Open DNS Manager by clicking Start > Administrative Tools > DNS
- Right click on the forward lookup zone and then click New Host (A or AAAA)…
- Enter name in the first text box. If you want to create a parent domain (leave it blank). To create www record type www in this text box.
- Enter IP address in the third text box to which this host record will point to.
- Click Add Host button to create host resource record.
Create Mail Exchanger (MX) DNS resource record
- As discussed in MX Record, before creating an MX record we have to create a host (A or AAAA) resource record pointing to the IP address of the host where email services for the domain is hosted. I created mail.gopalthorve.com pointing to 192.168.0.99 (mail.gopalthorve.com >> 192.168.0.99).
mail A 192.168.0.99
- Host or child domain: If you want to create Mail Exchanger record for parent domain say gopalthorve.com then leave this field blank otherwise type the name of sub domain for which you want to create mail exchanger (MX) record for.
- Fully Qualified domain name (FQDN) of mail server: Enter FQDN of the host where email services for the domain is hosted. Enter mail.gopalthorve.com i.e. the host resource record we recently created pointing towards email server.
- Mail server priority: Enter the priority (preference) value for this Mail Server, the lower the value the higher the preference. We have discussed this in detail at MX Record.
@ MX 10 mail.gopalthorve.com.
 DNS resource record")
Create SPF (TXT) DNS resource record
- To know more about SPF visit SPF Record and construct your SPF record text.
- From DNS Manager right-click on the zone and then click Other New Records…
- Select Text (TXT) from the window and then click Create Record… button
- Record name: Leave blank for creating this SPF (TXT) DNS resource record for parent domain i.e. gopalthorve.com otherwise enter the name of sub domain for which you want to create this DNS resource record for.
- Text: Visit SPF Record to construct SPF DNS resource record text and enter text in this box.
- Click OK to create the record.
@ TXT ( "v=spf1 a mx ~all" )
 DNS resource record")
Create Alias (CNAME) DNS resource record
- From DNS Manager right click on the forward lookup zone and click New Alias (CNAME)…
- Alias name: Enter the alias or canonical name here e.g. I want to identify parent domain gopalthorve.com with the alias name of www2.gopalthorve.com then enter www2 in this text box.
- FQDN for target host: Enter the FQDN of target host here. In our example this will be gopalthorve.com
One more example: I want to create a Alias name for google.com as google.gopalthorve.com then in alias name text box I will enter google and in target host text box I will enter google.com.
www2 CNAME gopalthorve.com.
google CNAME google.com.
 DNS resource record")
Looking at Zone File
Entire zone file (gopalthorve.com.dns located under %systemroot%\system32\dns folder) for gopalthorve.com looks like below:
;
;  Database file gopalthorve.com.dns for gopalthorve.com zone.
;      Zone version:  2012040913
;

@          3600    IN  SOA ns1.gopalthorve.com. hostmaster.gopalthorve.com. (
           2012040913   ; serial number
           86400        ; refresh
           7200         ; retry
           604800       ; expire
           86400      ) ; default TTL

;
;  Zone NS records
;

@                       NS    ns1.gopalthorve.com.
@                       NS    ns2.gopalthorve.com.

;
;  Zone records
;

@                       A    192.168.0.98
@                       MX    10    mail.gopalthorve.com.
@                       TXT    ( "v=spf1 a mx ~all" )
ftp                     A    192.168.0.98
mail                    A    192.168.0.99
ns1                     A    192.168.0.98
ns2                     A    192.168.0.99
www                     A    192.168.0.98
Администратор DNS сервера на Windows для управления сервером, DNS зонами и записями может использовать старую добрую утилиту
Dnscmd
, или воспользоваться возможностями PowerShell модуля DNSServer. В этой статье мы рассмотрим основные операцию по массовому созданию, модификации и удалению различных DNS записей и зон с помощью PowerShell.
Содержание:
- Модуль PowerShell — DNSServer
- Управление DNS зонами из PowerShell
- Управление DNS записиями с помошью модуля DNSServer
- Как добавить сразу несколько A / PTR записей в DNS зону с помощью PowerShell?
Модуль PowerShell — DNSServer
PowerShell модуль DNSServer входит в состав RSAT. В Windows 10 RSAT устаналивается отдельно, а в Windows Server вы можете установить модуль через Server Manager (Role Administration Tools -> Dns Server Tools).
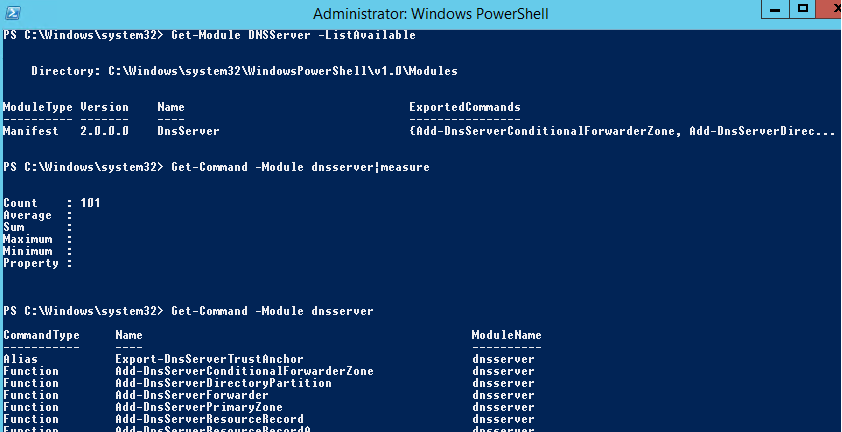
Проверим, что в системе имеется модуль PoSh DNSServer:
Get-Module DNSServer –ListAvailable
Можно вывести список команд в нем (в версии модуля на Windows Server 2012 R2 доступно более 100 команд):
Get-Module DNSServer
Управление DNS зонами из PowerShell
Выведем список зон на DNS сервере (в нашем случае это контроллер домен):
Get-DnsServerZone –ComputerName dc01
Чтобы добавить новую первичную DNS зону с именем contoso.local, выполните команду:
Add-DnsServerPrimaryZone -Name contoso.local -ReplicationScope "Forest" –PassThru
Как вы видите, была создана первичная DNS зона, интегрированная в Active Directory (isDsIntegrated=True).
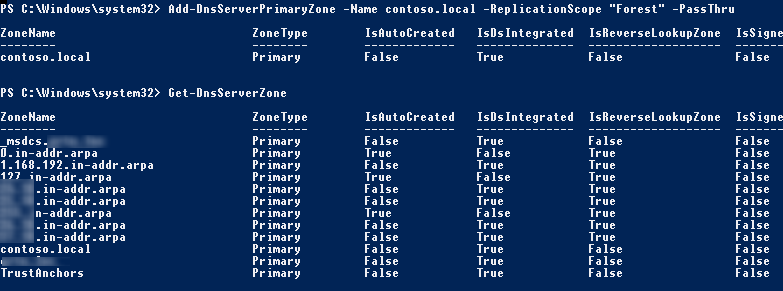
Можно создать зону обратного просмотра (Lockup Zone):
Add-DnsServerPrimaryZone -NetworkId "192.168.1.0/24" -ReplicationScope Domain
Чтобы синхронизировать новую зону с другими DC в домене, выполните команду:
Sync-DnsServerZone –passthru
Выведем список записей в новой DNS зоне (она пуста):
Get-DnsServerResourceRecord -ComputerName dc01 -ZoneName contoso.local

Для удаления зоны воспользуйтесь командой:
Remove-DnsServerZone -Name contoso.local -ComputerName dc01
Эта команда также удалит все существующие DNS записи в зоне.
Управление DNS записиями с помошью модуля DNSServer
Чтобы создать новую A запись в указнаной DNS зоне, воспользуемся командой:
Add-DnsServerResourceRecordA -Name rds1 -IPv4Address 192.168.1.30 -ZoneName contoso.local -TimeToLive 01:00:00
Чтобы добавить PTR запись в обратной зоне, в предыдущей команде можно добавить параметр –CreatePtr или создать указатель вручную командлетом Add-DNSServerResourceRecordPTR:
Add-DNSServerResourceRecordPTR -ZoneName 1.168.192.in-addr.arpa -Name 30 -PTRDomainName rds1.contoso.local
Для добавления алиаса (CNAME) для определенной A записи, воспользуйтесь командой:
Add-DnsServerResourceRecordCName -ZoneName contoso.local -Name RDSFarm -HostNameAlias rds1.contoso.local
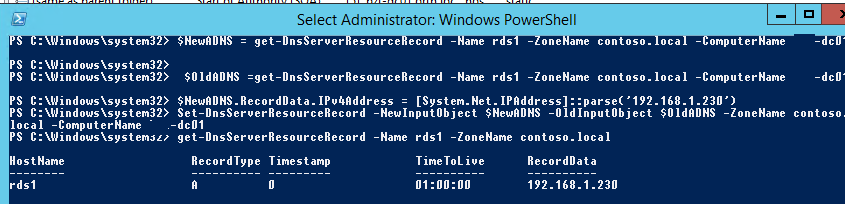
Чтобы изменить IP адрес данной A записи нужно воспользоваться довольно сложной схемой, т.к. вы не можете напрямую изменить IP адрес у DNS записи.
$NewADNS = get-DnsServerResourceRecord -Name rds1 -ZoneName contoso.local -ComputerName dc01
$OldADNS =get-DnsServerResourceRecord -Name rds1 -ZoneName contoso.local -ComputerName dc01
Теперь изменим свойство IPV4Address у объекта $NewADNS
$NewADNS.RecordData.IPv4Address = [System.Net.IPAddress]::parse('192.168.1.230')
Теперь изменим IP адрес A записи с помощью Set-DnsServerResourceRecord:
Set-DnsServerResourceRecord -NewInputObject $NewADNS -OldInputObject $OldADNS -ZoneName contoso.local -ComputerName dc01
Проверим, что IP адрес A записи изменился:
get-DnsServerResourceRecord -Name rds1 -ZoneName contoso.local
Можно вывести список DNS записей одного типа, указав тип в аргументе –RRType. Выведем список записей CNAME в зоне:
Get-DnsServerResourceRecord -ComputerName DC01 -ZoneName contoso.local -RRType CNAME

Также вы можете использовать фильтр по различным параметрам DNS записей с помощью Where-Object. Например, выведем список A записей, у которых в имени есть фраза rds.
Get-DnsServerResourceRecord -ZoneName contoso.local -RRType A | Where-Object HostName -like "*rds*"

Для удаления записей в DNS используется командлет Remove-DnsServerResourceRecord.
Например, для удаления CNAME записи, выполните:
Remove-DnsServerResourceRecord -ZoneName contoso.local -RRType CName -Name RDSFarm
Для удаления A записи:
Remove-DnsServerResourceRecord -ZoneName contoso.local -RRType A -Name rds1 –Force
Для удаления PTR записи в обратной зоне:
Remove-DnsServerResourceRecord -ZoneName “1.168.192.in-addr.arpa” -RRType “PTR” -Name “30”
Как добавить сразу несколько A / PTR записей в DNS зону с помощью PowerShell?
Допустим, вам нужно создать сразу множество A записей в определенной DNS зоне прямого просмотра. Вы можете завести их по-одной с помощью команды Add-DnsServerResourceRecordA, но гораздол проще и быстрее массово завести A записи по списку из файла.
Создайте текстовый файл NewDnsRecords.txt ч именами и IP адресами, которые вы хотите завести. Формат файла такой:
HostName, IPAddress
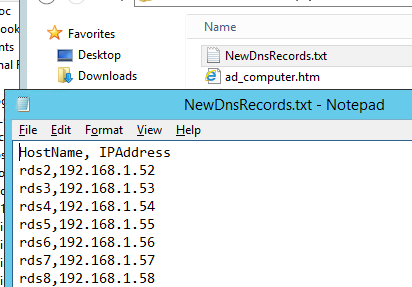
Чтобы завести A записи в зоне contoso.local по данным из TXT/CSV файла, воспользуйтесь следующим скриптом PowerShell:
Import-CSV "C:\PS\NewDnsRecords.txt" | %{
Add-DNSServerResourceRecordA -ZoneName contoso.local -Name $_."HostName" -IPv4Address $_."IPAddress"
}
Если нужно сразу завести записи в обратной зоне, добавьте в команду Add-DNSServerResourceRecordA параметр –CreatePtr.
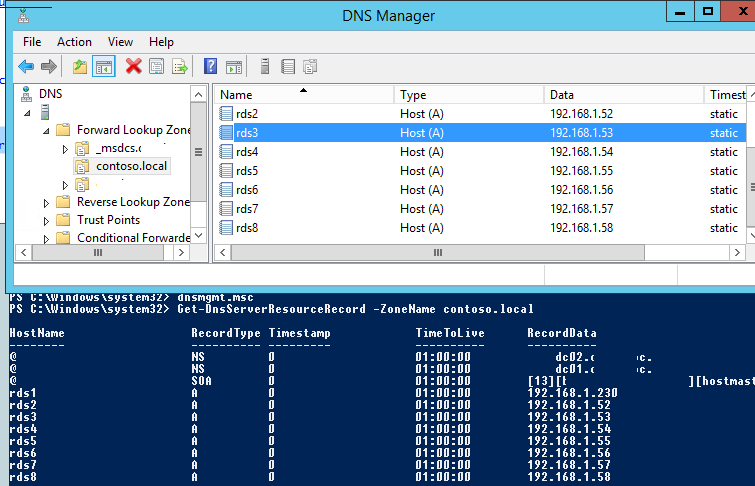
Теперь с помощью консоли DNS Manager (dnsmgmt.msc) или команнды
Get-DnsServerResourceRecord -ZoneName contoso.local
убедитесь, что все A записи успешно созданы.
Если нужно массово завести PTR записи в зоне обратного просмотра создайте текстовый/csv файл со следующей структурой
octet,hostName,zoneName
65,rds5.contoso.local,1.168.192.in-addr.arpa
66,rds6.contoso.local,1.168.192.in-addr.arpa
67,rds7.contoso.local,1.168.192.in-addr.arpa.
Затем запустите такой скрипт:
Import-CSV "C:\PS\NewDnsPTRRecords.txt" | %{
Add-DNSServerResourceRecordPTR -ZoneName $_."zoneName" -Name $_."octet" -PTRDomainName $_."hostName"
}
Убедитесь, что PTR записи появились в указанной Reverse зоне DNS.