
Table of Contents
- Registry configuration
- Disable Defender: the Microsoft way
- DisableAntiSpyware
- GPO
- Temporary solution
- Disable Defender: the hacker way
- How it works
- Scripting in PowerShell
Once again, after a Windows update, Windows Defender activated itself again. It finally bothered me enough to take an actual look at how to disable it permanently and reliably, in a fully automated way (a PowerShell script), on my Windows 10 20H2 (build 19042).
WARNING (please read me):
This script is not intended as a “stop/start” solution. It aims at disabeling permanently windows defender, even removing its files if you chose to. I made it as a malware analyst, for my usage, and decided to share it to help others. The “general public” might find another, easier to use solution that suit their need better.
I would also add that some alternative working solutions have been added in the comments of this article (many thanks to their writers !) : it’s definitly worth checking.
TL;DR : the final script can be found here : https://github.com/jeremybeaume/tools/blob/master/disable-defender.ps1
Registry configuration
First, I took some time to look at the registry configuration, where are the parameters located, and how/when the values were changed. Procmon, from SysInternals, is a very convenient tool for this kind of research.
I looked for registry access with “Defender” in the path, and this is the result:
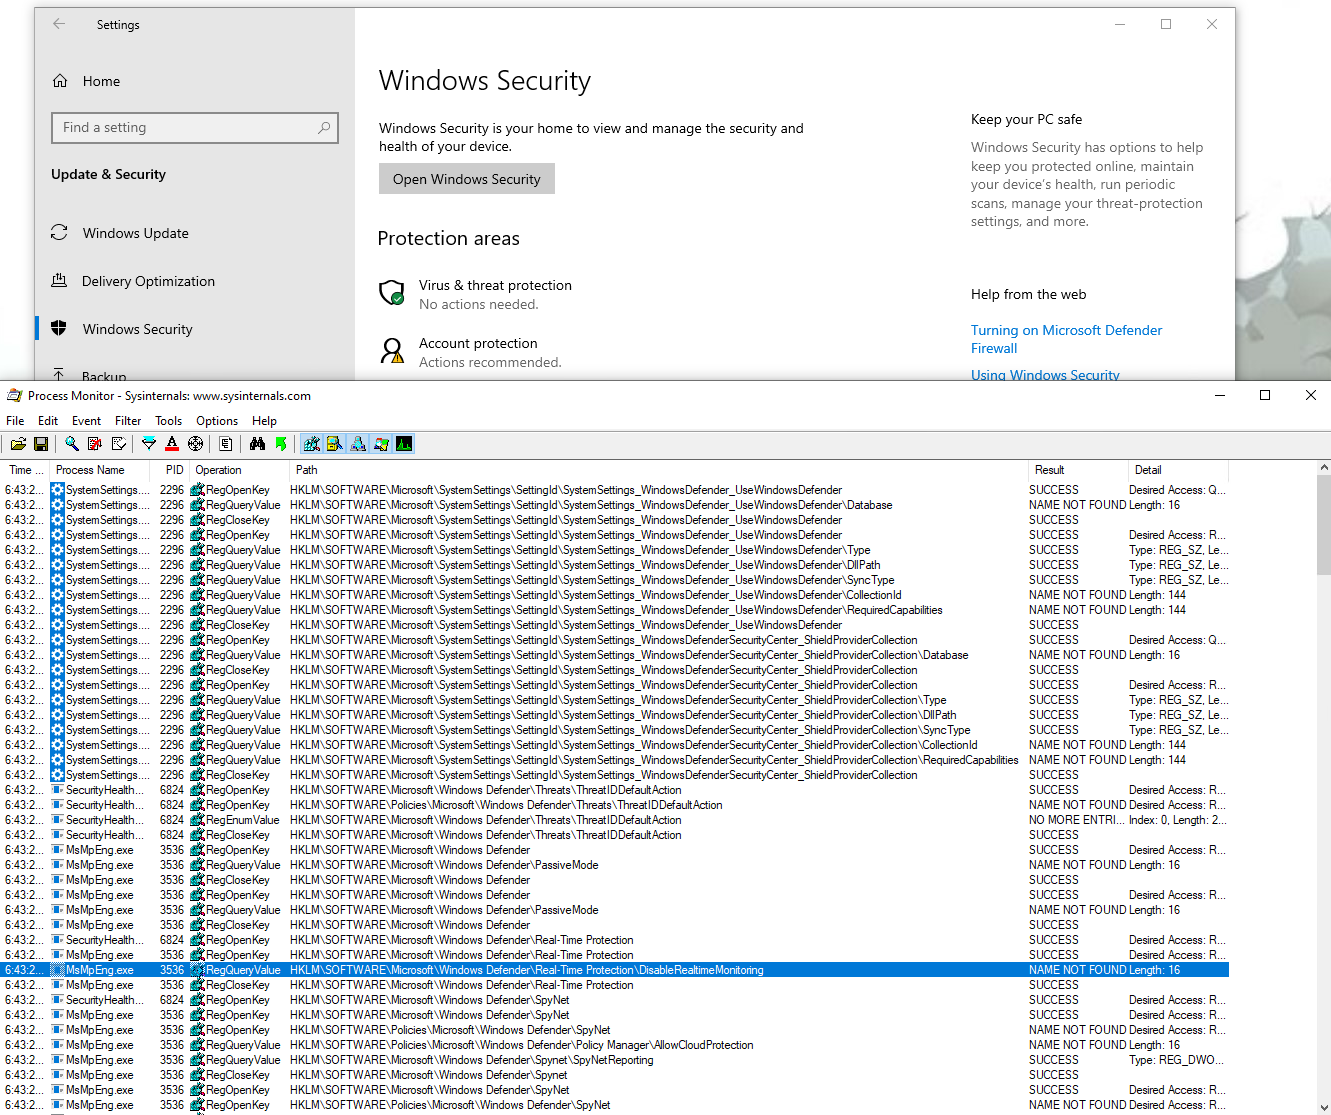
We get a first idea of the configuration location, most interesting keys seems to be under HKLM\SOFTWARE\Microsoft\Windows Defender.
Then I proceeded to check the keys for each parameter.
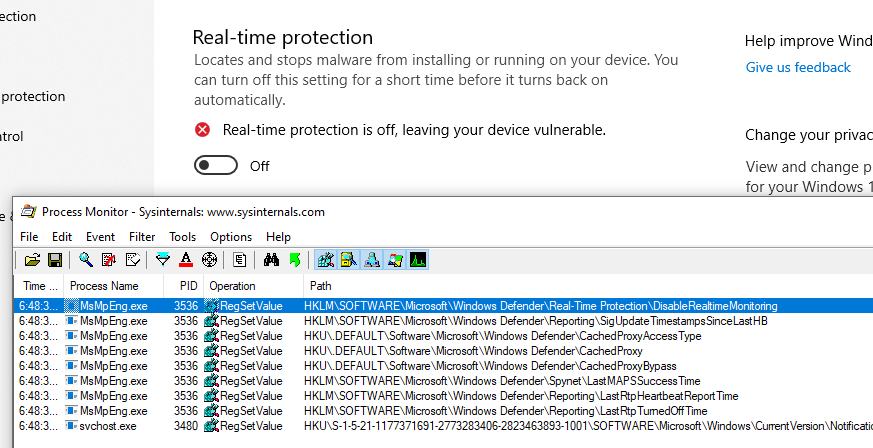
First on the list is the “Real-Time protection”, modifying the key HKLM\SOFTWARE\Microsoft\Windows Defender\Real-Time Protection\DisableRealtimeMonitoring
Then the “cloud-delivered protection”, with the key HKLM\SOFTWARE\Microsoft\Windows Defender\SpyNet\SpyNetReporting :
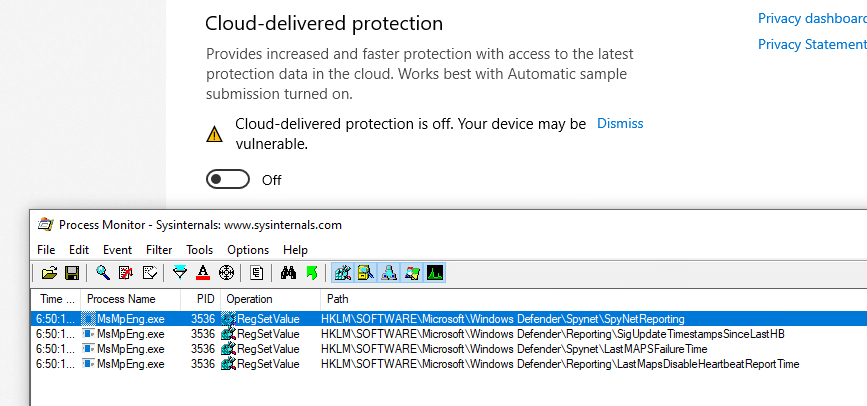
(For reference, the key for “Automatic sample submission” is HKLM\SOFTWARE\Microsoft\Windows Defender\SpyNet\SubmitSampleConsent)
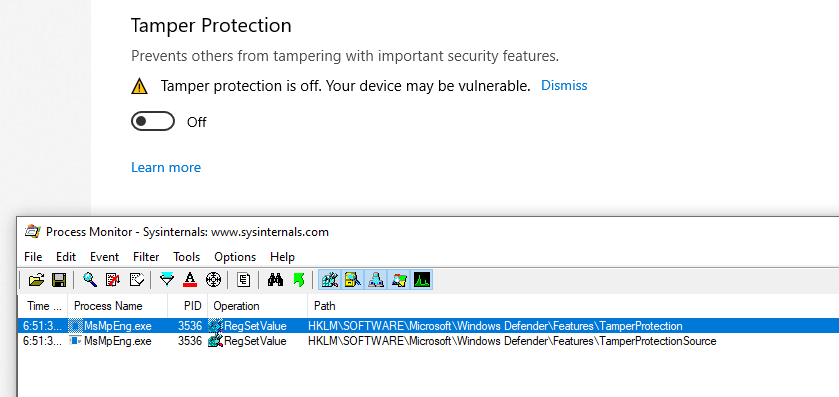
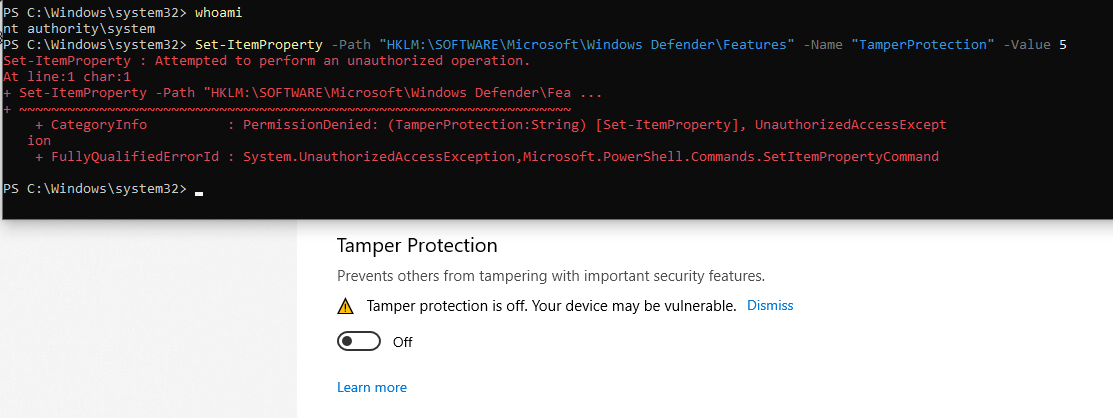
The “Tamper Protection” is next, using 2 keys: HKLM\SOFTWARE\Microsoft\Windows Defender\Features\TamperProtection (4 when disabled) and HKLM\SOFTWARE\Microsoft\Windows Defender\Features\TamperProtectionSource (2 when disabled)
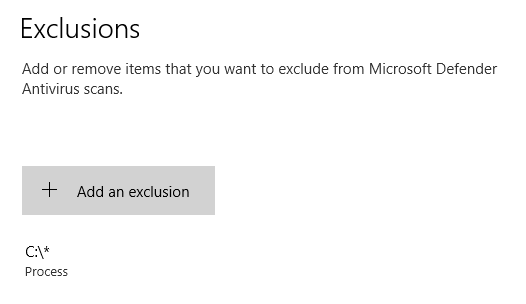
And lastly, exclusions are stored in subkeys of HKLM\SOFTWARE\Microsoft\Windows Defender\Exclusions depending on their type:
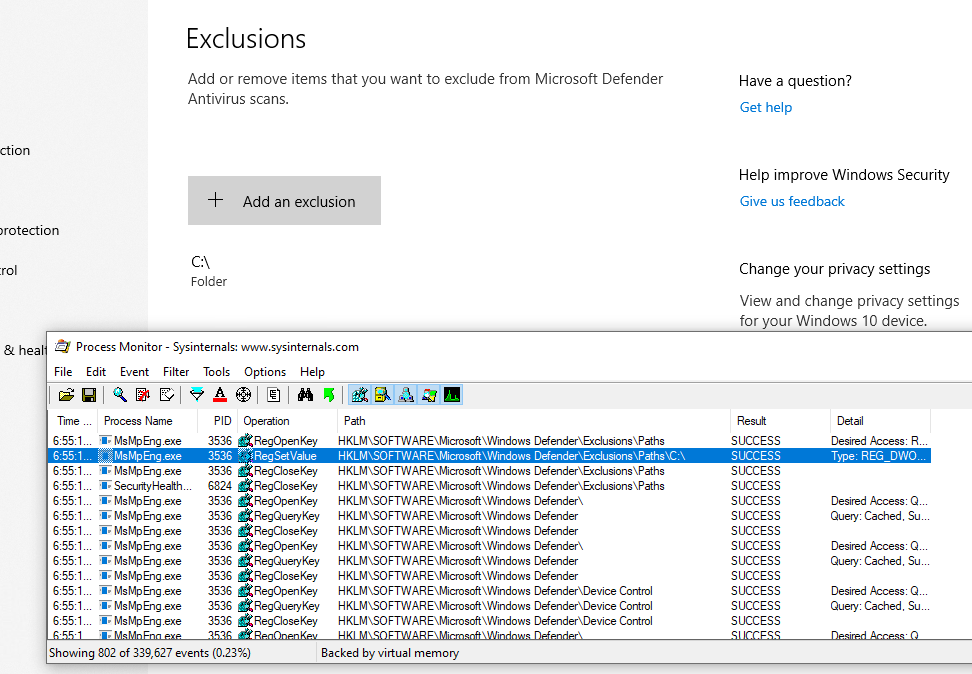
Now, one thing to note is that the Administrator (meaning members of the BUILTIN\Administrators group) cannot change those keys (only SYSTEM can):
An even as SYSTEM, with tamper protection off, writing is still not authorized:
So here we are :
- There is not option to disable “Tamper Protection” in powershel (that’s the point ….).
- We can’t edit the configuration directly in the registry, even as SYSTEM.
What I used to do was using Set-MpPreference to add whole drives as exception, but sometimes I would still get alerts : Defender is still running and analyzing my actions.
Of course, Microsoft provides ways and documentation to disable Defender, so let’s check them out.
Disable Defender: the Microsoft way
DisableAntiSpyware
Searching on the internet (like ), there seems to be a registry key for that, named DisableAntiSpyware. It is indeed read when opening the configuration:
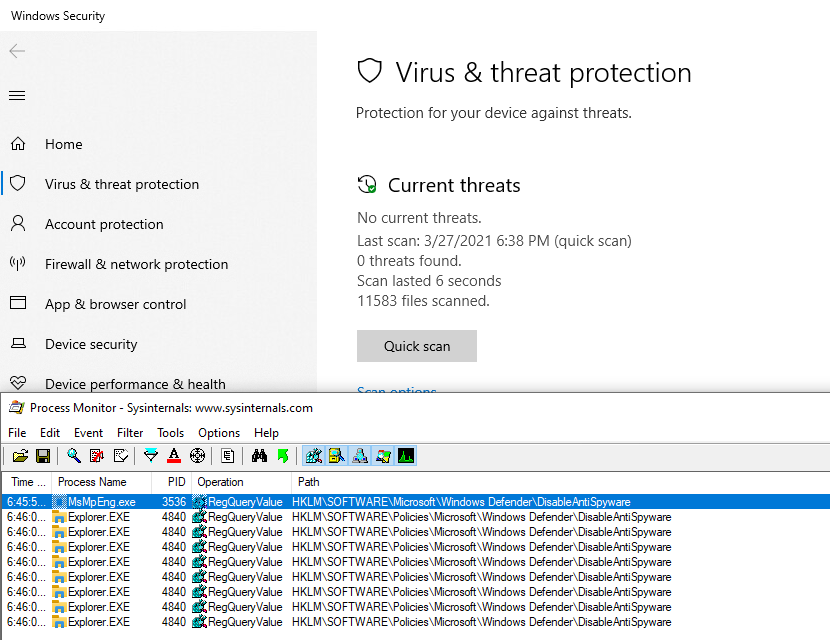
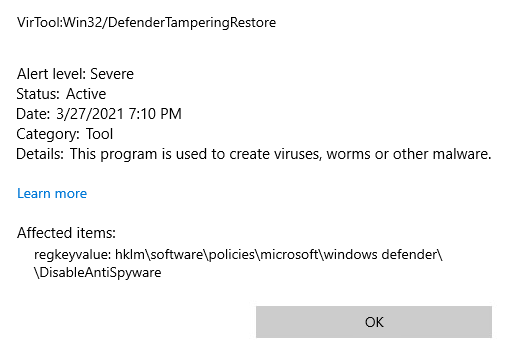
2 Keys are read, one in the “main configuration” key, and one under HKLM\SOFTWARE\Policies. This second one, we can write, to let’s go for it!
I created it, Defender was still running, without warning or anything, so it doesn’t seem to have any effect. But it gets better, it is actually considered a Severe security alert!
Maybe we need to be more subtle, and use gpedit to edit this policy, let’s try that!
GPO
Here is what we get when editing the policy with gpedit :
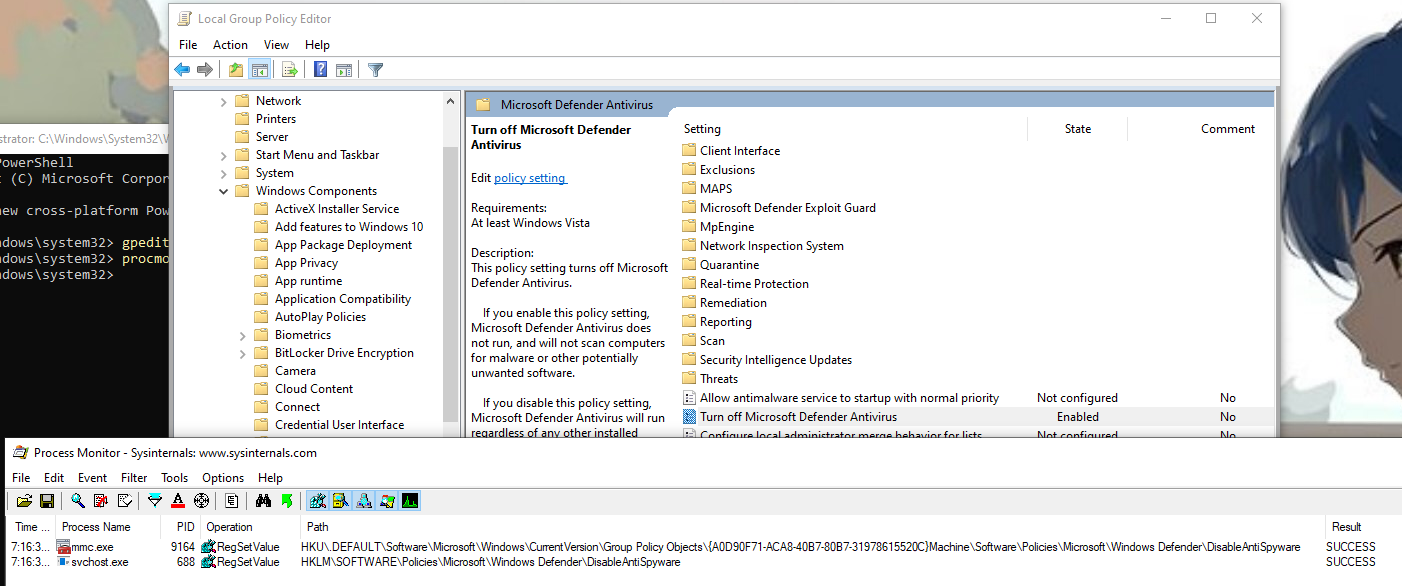
The previous key is actually written by a service (svchost.exe -k netsvcs -p -s gpsvc) and another one is written in a policy object. This time is doesn’t raise a security alert, so the second key must be necessary. I also noted that a 3rd key is written when the tamper protection is off:

This 3rd key is written by MsMpEng.exe which happens to be the binary run by the Microsoft Defender service: this is the Defender userland engine. So, we should be good to go then?
Well, nothing is disabled yet, and after reboot …. the policy is removed! So this seems to be completely ignored.
Temporary solution
I finally managed to disable it, by adding a process exclusion (including regedit.exe):
Then, with “Tamper Protection” off, and as SYSTEM, the key HKLM\SOFTWARE\Microsoft\Windows Defender\DisableAntiSpyware finally becomes writable. Setting its value to 1 immediately stops Windows Defender:
So here we are! But …. no 🙂 This is still overwritten on reboot! This a good enough temporary solution, but as we need to disable the “Tamper Protection”, it cannot be scripted in PowerShell.
Disable Defender: the hacker way
How it works
So I did not found any way to configure Defender itself to stop running. But it actually runs in a Service, so maybe there is something there. The service cannot be modified using services.msc as we would usually do:
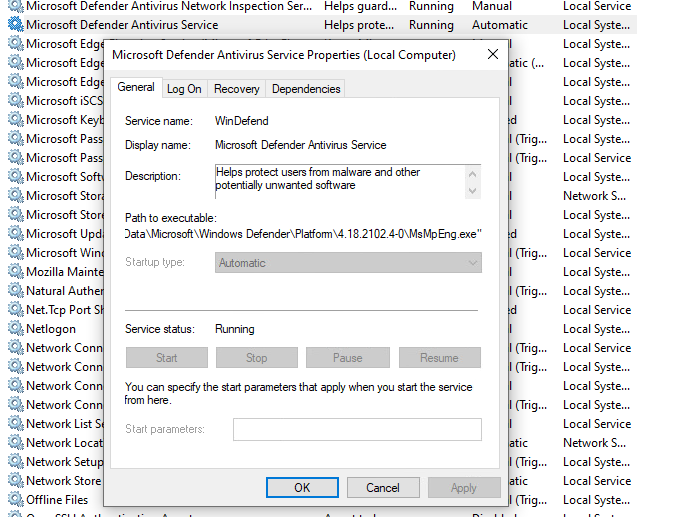
See how everything is greyed out?
We can also find the kernel drivers used by Defender, with msinfo32:

But, and that’s what we’re going to use : we can edit (at least for now) the registry keys associated to those services and drivers, in HKLM\SYSTEM\CurrentControlSet\Services\. We set they Start value to 4, meaning “Disabled”, and after next reboot, the services and driver will not be loaded / started, and so Defender will not be working anymore ! And indeed, after the reboot :

We’re good to go, finally! It’s weird that we can edit those registry keys, when services.msc doesn’t let us modify the service, but well … It works! Let’s script the whole thing.
Scripting in PowerShell
I put everything in a convenient script that disables what it can directly in defender (Set-MpPreference), then modify the registry to disable the services, and set itself up to run again after reboot, to complete the removal. I’ll break it down below.
First, I make sure to elevate to Administrator (mandatory, and actually used when the scripted is run after rebooting), and SYSTEM if psexec is available. SYSTEM is optional, but we need it to write in the registry to modify the parameters in case Defender would still re-enable itself one day (because it sure will …).
if(-Not $($(whoami) -eq "nt authority\system")) {
    $IsSystem = $false

    # Elevate to admin (needed when called after reboot)
    if (-Not ([Security.Principal.WindowsPrincipal] [Security.Principal.WindowsIdentity]::GetCurrent()).IsInRole([Security.Principal.WindowsBuiltInRole] 'Administrator')) {
        Write-Host "    [i] Elevate to Administrator"
        $CommandLine = "-ExecutionPolicy Bypass `"" + $MyInvocation.MyCommand.Path + "`" " + $MyInvocation.UnboundArguments
        Start-Process -FilePath PowerShell.exe -Verb Runas -ArgumentList $CommandLine
        Exit
    }

    # Elevate to SYSTEM if psexec is available
    $psexec_path = $(Get-Command PsExec -ErrorAction 'ignore').Source
    if($psexec_path) {
        Write-Host "    [i] Elevate to SYSTEM"
        $CommandLine = " -i -s powershell.exe -ExecutionPolicy Bypass `"" + $MyInvocation.MyCommand.Path + "`" " + $MyInvocation.UnboundArguments
        Start-Process -WindowStyle Hidden -FilePath $psexec_path -ArgumentList $CommandLine
        exit
    } else {
        Write-Host "    [i] PsExec not found, will continue as Administrator"
    }

} else {
    $IsSystem = $true
}
Then the script use the Set-MpPreference command to disable everything we can, adding exception for all drive leter, and disabling all available engines.
67..90|foreach-object{
    $drive = [char]$_
    Add-MpPreference -ExclusionPath "$($drive):\" -ErrorAction SilentlyContinue
    Add-MpPreference -ExclusionProcess "$($drive):\*" -ErrorAction SilentlyContinue
}

Write-Host "    [+] Disable scanning engines (Set-MpPreference)"

Set-MpPreference -DisableArchiveScanning 1 -ErrorAction SilentlyContinue
Set-MpPreference -DisableBehaviorMonitoring 1 -ErrorAction SilentlyContinue
Set-MpPreference -DisableIntrusionPreventionSystem 1 -ErrorAction SilentlyContinue
Set-MpPreference -DisableIOAVProtection 1 -ErrorAction SilentlyContinue
Set-MpPreference -DisableRemovableDriveScanning 1 -ErrorAction SilentlyContinue
Set-MpPreference -DisableBlockAtFirstSeen 1 -ErrorAction SilentlyContinue
Set-MpPreference -DisableScanningMappedNetworkDrivesForFullScan 1 -ErrorAction SilentlyContinue
Set-MpPreference -DisableScanningNetworkFiles 1 -ErrorAction SilentlyContinue
Set-MpPreference -DisableScriptScanning 1 -ErrorAction SilentlyContinue
Set-MpPreference -DisableRealtimeMonitoring 1 -ErrorAction SilentlyContinue

Write-Host "    [+] Set default actions to Allow (Set-MpPreference)"

Set-MpPreference -LowThreatDefaultAction Allow -ErrorAction SilentlyContinue
Set-MpPreference -ModerateThreatDefaultAction Allow -ErrorAction SilentlyContinue
Set-MpPreference -HighThreatDefaultAction Allow -ErrorAction SilentlyContinue
Then the services and drivers are disabled, and the script checks if it need to reboot :
$need_reboot = $false

# WdNisSvc Network Inspection Service
# WinDefend Antivirus Service
# Sense : Advanced Protection Service

$svc_list = @("WdNisSvc", "WinDefend", "Sense")
foreach($svc in $svc_list) {
    if($(Test-Path "HKLM:\SYSTEM\CurrentControlSet\Services\$svc")) {
        if( $(Get-ItemProperty -Path "HKLM:\SYSTEM\CurrentControlSet\Services\$svc").Start -eq 4) {
            Write-Host "        [i] Service $svc already disabled"
        } else {
            Write-Host "        [i] Disable service $svc (next reboot)"
            Set-ItemProperty -Path "HKLM:\SYSTEM\CurrentControlSet\Services\$svc" -Name Start -Value 4
            $need_reboot = $true
        }
    } else {
        Write-Host "        [i] Service $svc already deleted"
    }
}

Write-Host "    [+] Disable drivers"

# WdnisDrv : Network Inspection System Driver
# wdfilter : Mini-Filter Driver
# wdboot : Boot Driver

$drv_list = @("WdnisDrv", "wdfilter", "wdboot")
foreach($drv in $drv_list) {
    if($(Test-Path "HKLM:\SYSTEM\CurrentControlSet\Services\$drv")) {
        if( $(Get-ItemProperty -Path "HKLM:\SYSTEM\CurrentControlSet\Services\$drv").Start -eq 4) {
            Write-Host "        [i] Driver $drv already disabled"
        } else {
            Write-Host "        [i] Disable driver $drv (next reboot)"
            Set-ItemProperty -Path "HKLM:\SYSTEM\CurrentControlSet\Services\$drv" -Name Start -Value 4
            $need_reboot = $true
        }
    } else {
        Write-Host "        [i] Driver $drv already deleted"
    }
}

# Check if service running or not
if($(GET-Service -Name WinDefend).Status -eq "Running") {
    Write-Host "    [+] WinDefend Service still running (reboot required)"
    $need_reboot = $true
} else {
    Write-Host "    [+] WinDefend Service not running"
}
To execute after reboot, a shortcut is added in C:\ProgramData\Microsoft\Windows\Start Menu\Programs\StartUp\, and deleted after use.
$link_reboot = "C:\ProgramData\Microsoft\Windows\Start Menu\Programs\StartUp\disable-defender.lnk"
Remove-Item -Force "$link_reboot" -ErrorAction 'ignore' # Remove the link (only execute once after reboot)

if($need_reboot) {
    Write-Host "    [+] This script will be started again after reboot." -BackgroundColor DarkRed -ForegroundColor White

    $powershell_path = '"C:\Windows\System32\WindowsPowerShell\v1.0\powershell.exe"'
    $cmdargs = "-ExecutionPolicy Bypass `"" + $MyInvocation.MyCommand.Path + "`" " + $MyInvocation.UnboundArguments

    $res = New-Item $(Split-Path -Path $link_reboot -Parent) -ItemType Directory -Force
    $WshShell = New-Object -comObject WScript.Shell
    $shortcut = $WshShell.CreateShortcut($link_reboot)
    $shortcut.TargetPath = $powershell_path
    $shortcut.Arguments = $cmdargs
    $shortcut.WorkingDirectory = "$(Split-Path -Path $PSScriptRoot -Parent)"
    $shortcut.Save()
Finally, if we don’t need to reboot, we can finish cleaning up : configure the registry, and delete the files if we wish to :
} else {
    if($IsSystem) {

        # Configure the Defender registry to disable it (and the TamperProtection)
        # editing HKLM:\SOFTWARE\Microsoft\Windows Defender\ requires to be SYSTEM

        Write-Host "    [+] Disable all functionnalities with registry keys (SYSTEM privilege)"

        # Cloud-delivered protection:
        Set-ItemProperty -Path "HKLM:\SOFTWARE\Microsoft\Windows Defender\Real-Time Protection" -Name SpyNetReporting -Value 0
        # Automatic Sample submission
        Set-ItemProperty -Path "HKLM:\SOFTWARE\Microsoft\Windows Defender\Real-Time Protection" -Name SubmitSamplesConsent -Value 0
        # Tamper protection
        Set-ItemProperty -Path "HKLM:\SOFTWARE\Microsoft\Windows Defender\Features" -Name TamperProtection -Value 4

        # Disable in registry
        Set-ItemProperty -Path "HKLM:\SOFTWARE\Microsoft\Windows Defender" -Name DisableAntiSpyware -Value 1
        Set-ItemProperty -Path "HKLM:\SOFTWARE\Policies\Microsoft\Windows Defender" -Name DisableAntiSpyware -Value 1

    } else {
        Write-Host "    [W] (Optional) Cannot configure registry (not SYSTEM)"
    }


    if($MyInvocation.UnboundArguments -And $($MyInvocation.UnboundArguments.tolower().Contains("-delete"))) {

        # Delete Defender files

        function Delete-Show-Error {
            $path_exists = Test-Path $args[0]
            if($path_exists) {
                Remove-Item -Recurse -Force -Path $args[0]
            } else {
                Write-Host "    [i] $($args[0]) already deleted"
            }
        }

        Write-Host ""
        Write-Host "[+] Delete Windows Defender (files, services, drivers)"

        # Delete files
        Delete-Show-Error "C:\ProgramData\Windows\Windows Defender\"
        Delete-Show-Error "C:\ProgramData\Windows\Windows Defender Advanced Threat Protection\"

        # Delete drivers
        Delete-Show-Error "C:\Windows\System32\drivers\wd\"

        # Delete service registry entries
        foreach($svc in $svc_list) {
            Delete-Show-Error "HKLM:\SYSTEM\CurrentControlSet\Services\$svc"
        }

        # Delete drivers registry entries
        foreach($drv in $drv_list) {
            Delete-Show-Error "HKLM:\SYSTEM\CurrentControlSet\Services\$drv"
        }
    }
}

Write-Host ""
Read-Host -Prompt "Press any key to continue"
And we are done ! Final result can be downloaded here : https://github.com/jeremybeaume/tools/blob/master/disable-defender.ps1
It can be executed from anywhere in the file system. The parameter -Delete will delete the files linked to Defender after reboot. And it should work fine, until the Tamper Protection also protects the services ergistry key, which is bound to happen someday. I’m actually surprised it doesn’t already …
Windows Defender — встроенная антивирусная программа в операционной системе Windows, которая защищает устройство от вредоносного программного обеспечения и других угроз. Однако бывают ситуации, когда необходимо временно отключить защиту, например, для установки программного обеспечения, которое может быть заблокировано антивирусом, или для выполнения задач, требующих полного контроля над системой. В этом руководстве расскажем, как отключить антивирус Windows, обеспечив при этом максимальную безопасность вашего устройства.
Важные моменты перед отключением
Перед тем как отключить Windows Defender, необходимо учитывать несколько ключевых аспектов:
Риски безопасности
Временное отключение антивируса увеличивает вероятность заражения системы. Отключайте защиту только на короткий срок и убедитесь, что у вас есть альтернативные средства защиты.
Дополнительная защита
Если требуется отключить встроенный антивирус, нужно установить стороннее решение, например, PRO32 Total Security, которое будет обеспечивать защиту вашей системы на время отключения Windows Defender.
Отключение через параметры системы
Самый простой способ временно отключить Windows Defender — использовать встроенные системные настройки:
1. Доступ к настройкам безопасности:
- Откройте меню Пуск и выберите «Параметры».
- Перейдите в раздел «Обновление и безопасность» и выберите «Безопасность Windows».
2. Отключение защиты в реальном времени:
- В разделе «Антивирус и защита от угроз» выберите «Управление настройками».
- Отключите опцию «Защита в реальном времени», передвинув переключатель. Это временно деактивирует антивирус, однако система может автоматически включить его через некоторое время.
Полное отключение через редактор локальной групповой политики
Если вы используете Windows Pro или Enterprise, можно полностью отключить Windows Defender через редактор локальной групповой политики:
1. Запуск редактора групповой политики:
- Нажмите Win + R для открытия окна «Выполнить».
- Введите команду gpedit.msc и нажмите Enter.
2. Настройка отключения антивируса:
- Перейдите в раздел Конфигурация компьютера → Административные шаблоны → Компоненты Windows → Антивирусная программа Windows Defender.
- Найдите параметр «Отключить антивирусную программу Windows Defender» и включите его, чтобы полностью отключить встроенную защиту.
Отключение через редактор реестра
Этот метод требует осторожности, поскольку некорректное изменение реестра может вызвать проблемы в работе системы:
1. Запуск редактора реестра:
Откройте окно «Выполнить» с помощью сочетания клавиш Win + R и введите regedit, затем нажмите Enter.
2. Изменение параметров реестра:
- Перейдите по пути: HKEY_LOCAL_MACHINE\SOFTWARE\Policies\Microsoft\Windows Defender.
- Если параметр DisableAntiSpyware отсутствует, создайте его:
- Щёлкните правой кнопкой мыши в правой части окна, выберите Создать → Параметр DWORD (32 бита).
- Присвойте параметру имя DisableAntiSpyware и установите значение 1.
Временное отключение через командную строку
Если необходимо временно остановить работу Windows Defender, можно воспользоваться командной строкой:
1. Запуск командной строки с правами администратора:
В меню Пуск введите cmd, затем щёлкните правой кнопкой мыши на «Командная строка» и выберите «Запуск от имени администратора».
2. Остановка антивирусной службы:
Введите команду sc stop WinDefend и нажмите Enter. Это временно остановит работу Windows Defender.
3. Повторное включение защиты:
Чтобы снова включить антивирус, введите команду sc start WinDefend и нажмите Enter.
Отключение антивируса Windows может быть необходимо в ряде случаев, но всегда следует помнить о рисках, связанных с этим действием. Включайте защиту сразу после выполнения нужных задач. Если у вас возникают сомнения, лучше обратиться к профессионалам. Для обеспечения дополнительной безопасности во время отключения Windows Defender рекомендуется использовать проверенные антивирусные решения, такие как PRO32 Антивирус.
There are times when we want to turn off Windows Defender on Windows 10 quickly. For example, if we are installing a software which requires that the antivirus should be disabled during installation (yes there are some software which requires this).
Windows Defender is an all in one security software from Microsoft consisting of antivirus and a firewall. Windows Defender comes pre-installed with Windows 10. It gets all its updates from Windows Update.
Although you can turn Windows Defender on or off from Windows Settings, there are other quick ways to turn it on or turn off Windows Defender Windows 10 or even Windows 8/8.1. You should choose the best method according to the version of Windows you are using.
Table of Contents
Why turn off Windows Defender?
A general recommendation in terms of security is that you should always have security enabled for your PC at all times. This could be using Windows Defender, Microsoft’s own security solution built into Windows 10, or using a third-party security tool.
Sometimes you will need to disable antivirus and firewall protection in Windows. For example, when you are playing a game but the antivirus keeps on scanning the files and slows down the system. Another example can be when the antivirus detects a program as a false positive although you know that the program is completely safe to use.
Some people believe that it is safe to turn off Windows Defender and use cracking software. This includes activating Windows using illegal tools like KMSPico or the Microsoft Toolkit. These cracking tools are not safe at all. They may inject malware into the system that may not be detectable by the antivirus after installation. The malware is used for cryptomining and other hacking purposes.
There are two ways to turn off Windows Defender, either temporarily or permanently. We will discuss both ways here.
How to Turn Off Windows Defender Using Windows Settings
If you want to turn Windows Defender on or off using Windows Settings, follow the steps below:
- Open Windows Settings (Windows key + i)
- Go to Update & Security –> Windows Security
- From the right-hand pane, select Manage settings under Virus & threat protection settings.
- Toggle the switch to Off under Real-time protection.

This will turn off real-time protection while a manual scan is available at your disposal.
How To Disable Windows Defender Using Command Prompt
To turn off Windows Defender using Command Prompt, follow these steps:
-
Open command prompt with administrative privileges
-
Run the following command to disable Windows Defender:
sc stop WinDefend -
To make sure that Windows Defender is stopped, run this command:
sc query WinDefend
To enable Windows defender again, run the following command:
sc start WinDefendPlease note that this is a temporary method to stop Windows Defender. The service will return to its original state once the system is restarted.
To disable Windows Defender permanently using the command prompt, run the following command:
sc config WinDefend start= disabled
sc stop WinDefend
To enable it again on startup, run the following commands:
sc config WinDefend start= auto
sc start WinDefend
If you want to check the current state of the Windows Defender service, run the following command:
sc query WinDefendCheck the STATE variable. It should be in RUNNING state if it is enabled.

How To Permanently Disable Windows Defender Using PowerShell
One advantage of PowerShell is that you can deploy changes to Windows Defender on multiple computers across the network.
If you prefer PowerShell way, follow the steps below:
- Run PowerShell with administrative privileges (Windows key + X + A)
- To disable real-time monitoring for Windows Defender, run the following command:
Set-MpPreference -DisableRealtimeMonitoring $true - To enable real-time monitoring, run the following command:
Set-MpPreference -DisableRealtimeMonitoring $false
The above method will only turn off real-time monitoring of Windows Defender. If you want to completely remove Windows Defender from Windows 10, use the following PowerShell command:
Uninstall-WindowsFeature -Name Windows-Defender
How To Permanently Turn Off Windows Defender Using Group Policy
If you are a network admin and want to disable Windows Defender from your network, it is wise to use Group Policy. Just follow the steps below to turn off Windows Defender using the Group Policy editor:
- Open Group Policy Editor (Run –> gpedit.msc)
- Go to Computer Configuration –> Administrative Templates –> Windows Components –> Windows Defender Antivirus

- From the right-hand pane, open Turn off Windows Defender Antivirus and select Enabled


This setting can be accessed through Local Group Policy as well as Domain Group Policy. The local policy will turn off Windows Defender for all local users while the domain policy will disable it for all systems on which the policy is applied.
How To Permanently Disable Windows Defender Using Windows Registry
You can also disable Windows Defender permanently from Windows Registry just by creating or altering a few registry keys.. Follow the steps below:
- Go to Run –> regedit. This will open the Windows Registry Editor.
- Navigate to the following key:
HKEY_LOCAL_MACHINE\SOFTWARE\Policies\Microsoft\Windows Defender - In the right pane, right-click the empty area and create a new DWORD (32-bit) value.
- Rename the new item to DisableAntiSpyware
- Double-click DisableAntiSpyware and change its value to 1.
Windows Defender will not load after the next computer restart. To enable Windows Defender again, you can either delete the created registry key or simply change its value to 0.
Please note that you can’t completely uninstall the Windows Defender. Even if you manage to delete its service or files, it will most likely be restored on the next major Windows update.
There are a few scenarios where the user wants to disable a specific part of the Windows Defender system. We will discuss the scenarios below.
How to turn off Windows Firewall only
To turn off Windows Firewall only and keep using other Windows Defender functionality, follow the steps below:
- Open Windows Settings (Windows key + i)
- Click on Update & Security and then Windows Security
- In the right-hand pane, click on Open Windows Security
- From the left-hand pane, select Firewall & network protection
- In the right-hand pane, you will see three protection types. Domain network, Private network, Public network.
- Click on each network type and toggle it to disabled.
This will only turn off the firewall. The antivirus and other functionality of Windows Defender will keep on working.
How to turn off Windows Defender real-time antivirus only
If you want to turn off the antivirus real-time functionality only, you can follow the steps below:
- Open Windows Settings (Windows key + i)
- Click on Update & Security and then Windows Security
- From the left-hand pane, click on Virus & threat protection
- In the right-hand pane, toggle real-time protection to off.
Verdict
If you have not installed any third-party antivirus, then you should keep Windows Defender running as it will protect you from the most common virus/hacking threats while you are connected to the Internet. There should always be an anti-malware solution running on your computer at all times. These methods should be used to disable the security software temporarily.
I hope this has been informative for you. If there are any other easier ways to enable or disable Windows Defender, please let us know in the comments below!
Microsoft Defender also Known as Windows Defender is an anti-malware component of Microsoft Windows. It is an official Protection Program provided by Microsoft to Protect computers running windows from Spyware and malware. Many users think that it’s a new program Which is introduced in Windows 10, but actually, it has a very long story, At first, the concept of Microsoft Defender is based on GIANT AntiSpyWare from the GIANT Company software. Then this company was acquired by Microsoft on December 16, 2004. It was first released to the public as a downloadable free antispyware program for Windows XP, then later shipped with Windows Vista and Windows 7. After it has evolved into a full antivirus program, replacing Microsoft Security Essentials as part of Windows 8. Finally, in windows 10 it is known as Windows Defender before Windows 10 November 2019 Update or Windows Defender Antivirus in Windows 10 Creators Update and later.
Windows Defender Protect Your PC by these Seven security areas mentioned below:
- Virus & threat protection – This feature runs scans, detects threats, and downloads updates to help identify new viruses and malware. On version 1709, this section also offers configuration settings for controlled folder access.
- Account Protection – When you sign in to Windows, the new Account Protection pillar protects your identity. You will be encouraged to set up Windows Fingerprint, Hello Face, or PIN sign-in. If applicable, Account Protection will also notify you if Dynamic Lock has stopped working because your PC’s Bluetooth is inactive.
- Firewall & network protection – In this area, you will be able to manage the Windows Defender Firewall settings. You can also monitor what’s happening with your Internet connections and networks.
- App & browser control – This feature allows you to use Windows Defender Smart Screen, which can protect your computer against potentially dangerous files, sites, apps, and downloads. Moreover, it provides a customization exploit protection feature.
- Device Security – You can get a better insight into the security features integrated with your Windows computer. You can access this area to manage your PC’s built-in security features. Moreover, you can use it to generate security status reports.
- Device performance & health – Access this page to get reports on your computer’s performance and health. This feature can also help you keep your PC clean and up-to-date with the latest version of your operating system.
- Family options – If you’re a parent, you can use this feature to manage your children’s online experience.
Even though Windows Defender has very good protection at some point of time if you are decided to Disable Windows Defender using command line, then this article will guide you to Disable Windows Defender using command line and PowerShell.
In this method we use windows Settings, Using windows settings we can easily Disable Windows Defender.
- Open Windows Settings by pressing Windows + I, click on Update and Security, From the Right-hand pane Click on Windows Security.
- Once you clicked, from the left-hand pane you can see open Windows security. Now you will get the Windows Security Program page.
Or
- You can directly search in the Cortana search bar for Windows defender and click on it.
- Once the windows defender program open Click on Virus and thread protection from the left-hand pane.
- Under Virus and thread protection settings, click on manage settings.
- Toggle the switch to off under Real-time protection.

- Once you turn off the Real-time Protection it Locates and stops malware from installing or running on your device automatically, But Manual scan will be available at your disposal.
Disable Windows Defender using command Prompt:
- Press Windows + X and Open Command Prompt in administrator mode.
- Now type the following command to disable Windows Defender.
sc stop WinDefend
- This command will stop the Windows Defender service, if the service is unstoppable you will receive the [SC] OpenService FAILED 5: Access is denied. Error.
To enable it back run the following command.
sc start WinDefend
- This command will enable the windows defender back, if the service is already running then you will receive the instance of the service is already running. Error.
To enable it again on startup run the following commands:
sc config WinDefend start= auto sc start WinDefend
To check the Current status of windows defender service, run the following command:
sc query Windefend

This command will check the STATE variable. If the service is already running it should show Running STATE.
Using PowerShell
PowerShell is the most advanced that Command prompt, Using Powershell we can turn off windows defender on Multiple Computers over the network. And also using PowerShell we can particularly turn off the real-time monitoring of windows defender.
Open PowerShell with administrative privileges.
Disable Using PowerShell:
Run the following command to disable windows defender
Set-MpPreference -DisableRealtimeMonitoring $true

This command will turn off the real-time monitoring of windows defender.
Enable Using PowerShell:
Run the following command to disable windows defender
Set-MpPreference -DisableRealtimeMonitoring $false
This command will turn on the real-time monitoring of windows defender. The above-mentioned command will only turn off/on real-time monitoring, if you want to disable windows defender completely, run the following command in the PowerShell admin mode.
Uninstall-WindowsFeature -Name Windows-Defender
Disable Using Group Policy
This method is for network administrators, If you are a network administrator and if you want to disable Windows defender for many systems using Group policy then this method will guide you to Disable windows defender using group policy editor.
Open run command by pressing Windows + R and type gpedit.msc and hit enter, this command will open Group Policy Editor.
Navigate to the following path
Computer Configuration –> Administrative Templates –> Windows Components –> Windows Defender Antivirus
From the right-hand pane, Search for Turn Off Windows Defender Antivirus and open and Enable the Group Policy editor.

Click apply and give OK.
Disable using Windows Registry
Registry editor is one of the best options in windows 10 to disable or enable any windows settings. In this method, we are going to use the registry editor to disable windows editor. Follow the steps below.
Open run command by pressing Windows + R and type Regedit and hit enter, this command will open the windows registry editor.
Now navigate to the following location.
HKEY_LOCAL_MACHINE\SOFTWARE\Policies\Microsoft\Windows Defender
From the right-hand pane right-click on any empty area and New> DWORD 32 bit value Name the DWORD as DisableAntiSpyware.
Right-click on the new DWORD and choose modify. Modify the value to 1. And give OK, Restart the machine to make it effective.

From the next restart the Windows Defender will not load, If you want to enable it back, follow the above-mentioned steps and delete the registry key, or Modify the value to 0.
Note: Windows Defender is a security feature you can’t uninstall or remove it completely. These methods will allow you to disable it for temporarily. It will restore automatically in the next windows update.
Read Also:
How to Disable Non-critical notifications from Windows Security?
How to scan individual Files and Folders using Microsoft Defender?
How to Enable Microsoft Defender Application Guard for Office?
How to Update Windows Defender Virus signature using Command Prompt?
What is mpcache.exe? How to Delete mpcache files in Windows 11?
Post Views: 3,212
Learn how to permanently disable Windows Defender on Windows 10 & 11 using Registry, Group Policy, or PowerShell, with step-by-step instructions.
Disabling Windows Defender permanently can be necessary when you need to install certain software, run customized security setups, or rely on a third‑party antivirus. In this guide, we’ll walk through every step on how to turn off Windows Defender permanently on both Windows 10 and Windows 11.

We will also cover troubleshooting if Defender re‑enables after restart, and discuss risks of disabling Defender as well as alternatives & complementary security measures.
What is Windows Defender Role in Windows Security
Windows Defender is Microsoft’s built‑in antivirus and anti‑malware solution integrated into the Windows Security Center. It provides real‑time protection, automatic scans, and firewall capabilities. While its default configuration serves most users well, there are scenarios—such as testing software in a sandbox, gaming performance optimization, or deploying a corporate security suite—where you may wish to disable Windows Defender permanently. Before proceeding, it’s crucial to understand:
- Defender’s core functions: file scanning, cloud‑based threat detection, firewall management.
- How Defender integrates with Windows Security settings, including Windows Defender exclusions and real‑time protection toggle.
- The distinction between temporarily disabling Windows Defender (via the Windows Security app) and permanent disable (via policy, registry, or command‑line).
Knowing what you’re turning off—and why—will help you make informed choices and avoid unexpected gaps in your security posture.
Before making any system‑level changes, back up your system and registry to safeguard against misconfigurations:
Backup Your Registry and Create a System Restore Point
Editing the Windows Registry or Group Policy can have unintended effects. To disable Defender via Registry Editor, you will create and modify keys under HKLM\SOFTWARE\Policies\Microsoft\Windows Defender. Always export the current branch and set a restore point:
- Open System Properties ➔ System Protection ➔ Create.
- Name your restore point (e.g., “Pre‑Disable Defender”).
- In Registry Editor (
regedit.exe), right‑click theWindows Defenderkey, choose Export, and save the.regfile.
These precautions let you revert if the system behaves unexpectedly.
How to Disable Windows Defender Permanently
Method 1: Disable Windows Defender via Windows Security Settings
Windows Security provides a simple interface to toggle off real‑time protection, but this method is temporary and Defender re‑enables after restart.
Turn Off Real‑Time Protection in Windows Security
Navigate to Start ➔ Settings ➔ Privacy & Security ➔ Windows Security ➔ Virus & Threat Protection ➔ Manage Settings. Here, switch off Real‑time Protection and Cloud‑delivered Protection.
You may see a prompt confirming you want to turn off Windows Defender via Windows Security; accept to proceed.
Limitations of the Windows Security Method
Because Microsoft designed Defender to re‑activate at each boot for baseline protection, this approach only temporarily disables Windows Defender. If you need a permanent disable, proceed to the Group Policy or Registry methods below. Use this method only when you need a quick, one‑off suspension of antivirus scans (for instance, when installing certain development tools that Defender might flag).
Method 2: Permanently Disable Windows Defender Using Group Policy Editor
For Windows 10/11 Pro, Enterprise, and Education editions, Group Policy Editor (gpedit.msc) offers a reliable way to permanently disable Defender Windows 10/11.
Opening the Group Policy Editor
Press Win + R, type gpedit.msc, and press Enter. In the Local Group Policy Editor window, expand Computer Configuration ➔ Administrative Templates ➔ Windows Components ➔ Microsoft Defender Antivirus.
Configuring Defender Settings via gpedit.msc
Locate the policy named “Turn off Microsoft Defender Antivirus”. Double‑click it and select Enabled, then click Apply and OK. This configuration tells Windows to disable Microsoft Defender permanently and prevents Defender from initializing on startup.
Applying and Verifying the Group Policy
After enabling the policy, open an elevated Command Prompt and run gpupdate /force. Then, check Services (services.msc) for the WinDefend service; it should be set to Disabled and not running. You can also revisit Windows Security to see that Real‑time Protection options are grayed out, confirming a successful Windows Defender group policy permanent disable.
Method 3: Permanently Disable Windows Defender via Registry Editor
When Group Policy Editor isn’t available (e.g., Windows 10/11 Home), you can disable Defender via Registry Editor to achieve a permanent disable.
Editing the HKLM Registry to Turn Off Windows Defender
Open Registry Editor (regedit.exe) and navigate to:
HKEY_LOCAL_MACHINE\SOFTWARE\Policies\Microsoft\Windows Defender
If the Windows Defender key doesn’t exist, create it.
Creating and Editing the DisableAntiSpyware Key
Inside the Windows Defender key, right‑click on the right pane, choose New ➔ DWORD (32‑bit) Value, name it DisableAntiSpyware, and set its value to 1. This registry edit not only disables Windows Defender but also prevents future automatic re‑enabling, achieving a permanent disable.
Restarting and Verifying Registry Changes
Restart your PC. After reboot, open Windows Security or Services to confirm that Defender is inactive. If Defender still shows active components, double‑check the registry path and value, and ensure there are no conflicting policies under Windows Defender\Real-Time Protection keys.
Method 4: Disabling Windows Defender via Command‑Line & PowerShell
For script‑based automation or deployment scenarios, you can disable Windows Defender command line or use PowerShell to disable Windows Defender.
Using Command Prompt to Stop WinDefend Service
Launch an elevated Command Prompt and run:
sc config WinDefend start= disabled
sc stop WinDefend
This sequence stops the Defender service (WinDefend) and prevents it from starting at boot, effectively turning off Windows Defender via command line.
Using PowerShell to Disable Windows Defender
Open an elevated PowerShell window and execute:
Set-MpPreference -DisableRealtimeMonitoring $true
Set-MpPreference -DisableBehaviorMonitoring $true
Stop-Service -Name WinDefend -Force
The Set‑MpPreference cmdlets disable real‑time protection toggle and behavior monitoring, while Stop-Service halts the Defender service.
Automating the Disable Process with Scripts
Combine the above commands into a .ps1 script to distribute across multiple machines. Ensure the execution policy allows running your script (Set‑ExecutionPolicy RemoteSigned) and include error handling to detect if Defender won’t disable or re‑enables after restart.
Troubleshooting Common Issues When Disabling Defender
Even after following these methods, Windows Defender may resist being turned off or keep re‑enabling after restart. Here’s how to tackle these problems.
Windows Defender Won’t Disable or Re‑Enables After Restart
If Defender returns after reboot despite Group Policy or Registry tweaks, check for:
- Conflicting keys under
HKLM\SOFTWARE\Policies\Microsoft\Windows Defender\Real-Time Protection(e.g.,DisableBehaviorMonitoringset to0). - Third‑party AV installations that automatically re‑enable Defender to maintain a baseline shield.
Remove or correct conflicting registry entries, then re‑apply your disable method.
Fixing “Can’t Turn Off Windows Defender” Errors
Errors like “This setting is managed by your administrator” indicate an active Group Policy or MDM policy. Run rsop.msc (Resultant Set of Policy) to identify the controlling policy, then adjust accordingly. On domain‑joined machines, coordinate with IT to update domain‑level policies.
Dealing with Conflicts and Exclusions
Sometimes Windows re‑enables Defender to protect critical system files. Use Windows Defender exclusions (via Registry or PowerShell Add-MpPreference -ExclusionPath) to exempt specific folders, then disable real‑time scans. This hybrid approach lets you maintain Defender in a minimal state without fully turning it on.
Alternatives & Related Concerns After Disabling Defender
Disabling Defender exposes you to threats if no other protections are in place. Consider these Windows Defender alternatives and safety precautions.
Installing Third‑Party Antivirus Software to Disable Defender
Windows automatically disables Defender when a compliant third‑party AV is installed. Popular choices include Bitdefender, Kaspersky, and Norton. During installation, these tools set the appropriate registry and Group Policy flags to turn off Windows Defender permanently and manage AV responsibilities.
Risks and Precautions When You Permanently Disable Microsoft Defender
Completely turning off your built‑in antivirus invites malware, ransomware, and phishing attacks. To mitigate risks:
- Ensure regular backups and offline restore points.
- Use a firewall appliance or software firewall alternative.
- Schedule frequent manual scans with your chosen AV.
- Keep Windows and all applications patched.
Configuring Defender Exclusions and Complementary Security Measures
If full disablement feels too risky, you can apply a partial approach: disable real‑time protection but retain on‑demand scans, or set up Defender exclusions for development folders and high‑performance applications. Complement this with network monitoring, intrusion detection, and sandboxing tools to maintain a robust security stance.
Conclusion
Disabling Windows Defender permanently on Windows 10 and Windows 11 can be achieved through multiple avenues: the built‑in Windows Security app (temporary), Group Policy Editor (permanent on Pro/Enterprise/Education), Registry Editor (permanent on Home), and command‑line or PowerShell scripts for automation.
Each method has its place depending on your edition of Windows and security requirements.
Always back up your system before making changes, and consider installing a reputable third‑party antivirus or using a hybrid disable‑exclusion strategy to keep your PC protected. By following the detailed steps above, you’ll be able to turn off Windows Defender permanently while managing the associated risks effectively.
Visit Our Post Page: Blog Page