
Clr20r3 Error is an error that arises when Windows is not able to read the settings and files in the same way in which they read them while uploading corresponding applications. Many users have a complaint that they are getting Clr20r3 error message while working with Visual Studio or .Net or Microsoft Exchange software.
Quick Overivew
Why this Clr20r3 error occurs?
The error Clr20r3 may occur, for instance, when Windows Media Edition is unable to record videos or when you are trying to sync the computer with any mobile device.
What causes the Clr20r3 error?
Corrupt executable or application files and bugs in the programs are primary factors that cause this error. Some of the reasons for such file corruptions may be:
- The system is corrupted by a malware
- The system is unable to access registry keys or files corresponding to a given program or function
- The system itself has certain other problems and errors
- The information needed to carry out a particular task cannot be processed.
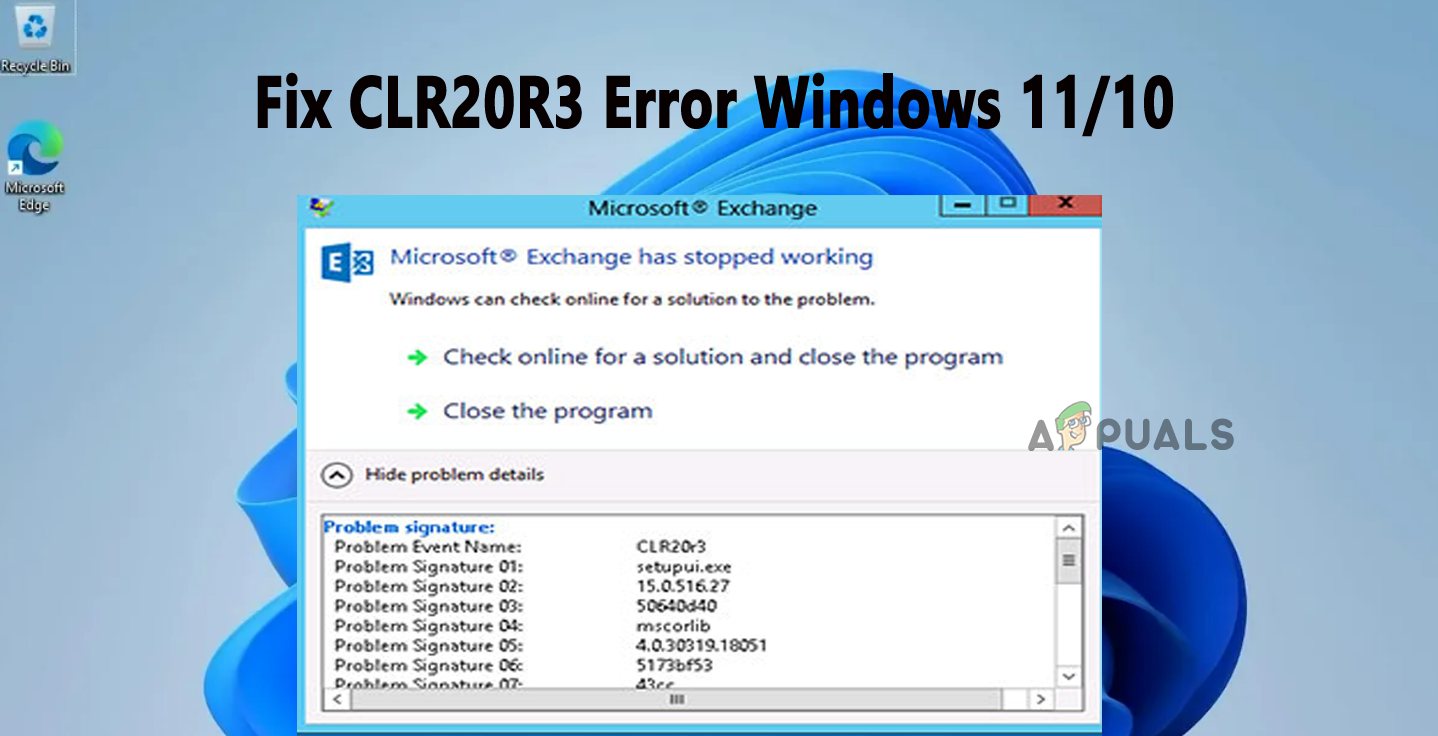
This error may look like this:
Problem Event Name: CLR20r3
Problem Signature 01: article submitter.exe
Problem Signature 02: 2.8.3.0
Problem Signature 06: 4a275e83
Problem Signature 04: System.Drawing
Clr20r3 Error Screen-shot

There are three methods that can be used to fix the Clr20r3 errors that arise when a certain program abruptly stops working:
Method 1: Re-registering Windows Media Center components
This is the most efficient fix which involves rewriting the components that may have been corrupted or damaged with respect to the Windows Media Center. The steps to be followed to do the same are:
- Click on the Start button and type cmd in the search box
- Right-click on the Command Prompt app and select Run as administrator
- Click on Yes if prompted by User Account Control dialogue box
- Type the following commands in succession in the command prompt and press the enter key after each command:
- regsvr32 atl.dll
- cd C:\WINDOWS\eHome
- ehSched /unregServer
- ehSched /service
- ehRecvr /unregServer
- ehRecvr /service
- exe /unregServer
- exe /regserver
- exe /unregServer
- exe /regserver
- Exit command prompt and reboot the system
- After the system restarts, open the corresponding application to check if the error is resolved.
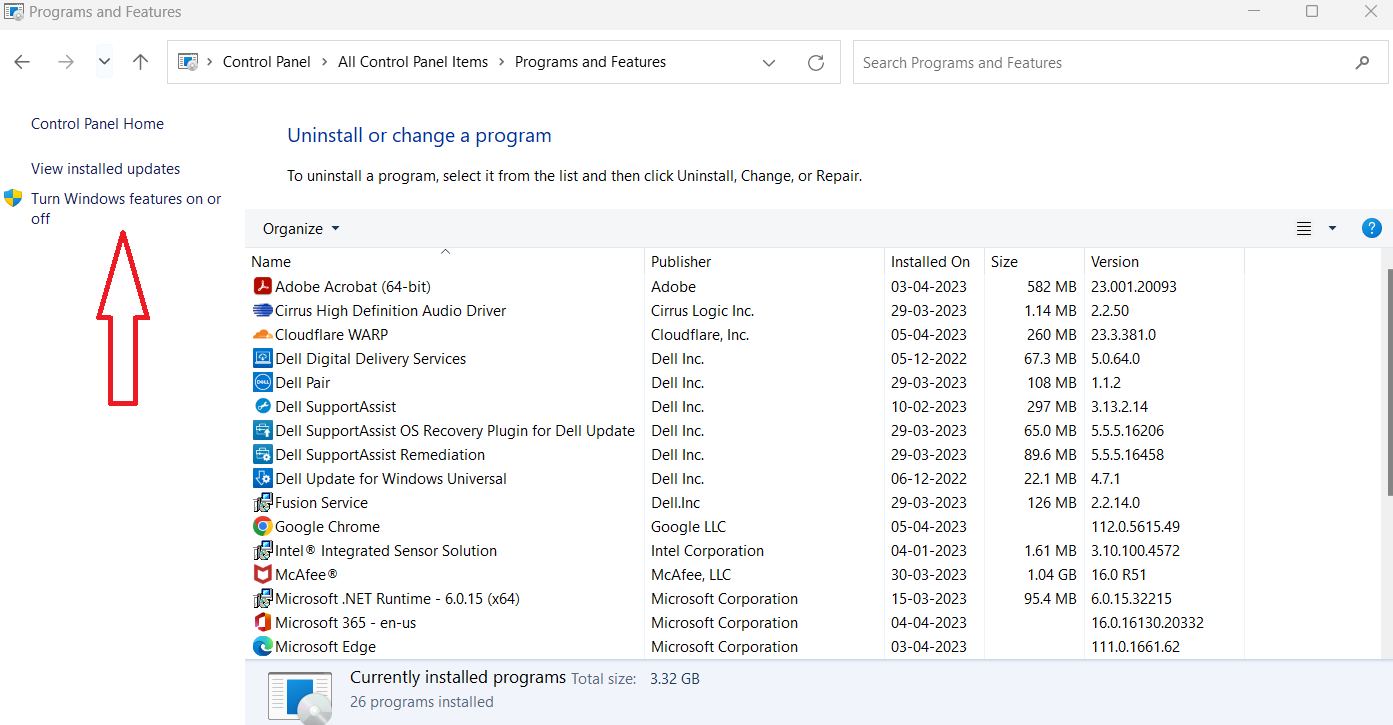
Method 2: Re-install Windows Media Center
- Open Control Panel and go to Programs -> Programs and Features
- On the left panel, click on Turn Windows features on or off option
- In the Windows Features window, expand Media Features section it by clicking on the ‘+’ symbol next to it
- Uncheck the Windows Media Player option
- Click on OK and then close the window
- Now, reboot the system and open Windows Features again using Control Panel.
- Check the Windows Media Player option to reinstall it
- Once again, reboot the system and after the system restarts, open the corresponding app and verify if the error is resolved.
Method 3: Scan and Clean Windows Registry
The most important files, options, and settings are kept in the Windows Registry which is needed by the Windows operating system in order to operate in a smooth manner. Using a reliable registry cleaner to scan and clean the Windows Registry enables fixing of errors arising due to problems with the system’s registry. Make sure to take the registry backup before you clean it.
Method 4: Clean Windows DRM Cache
Sometimes what happens that the Windows DRM Cache store a lot of temp data on your system and consume a lot of space. This may store some short of congenital data like browsing history. Therefore it’s recommended to clean such files in order to avoid any error.
Follow the below steps to clean remove Windows DRM Cache from your Windows OS:
1) Press Windows+R button
2) Type CMD and hit Enter button
3) Type below command one-by-one and hit Enter
dir /s %ALLUSERSPROFILE%\Microsoft\Windows\DRM\Cache\*
dir /s %LOCALAPPDATA%\VirtualStore\ProgramData\Microsoft\Windows\DRM\Cache\*
If you have Windows XP or Vista, then use below command prompt:
dir /s %ALLUSERSPROFILE%\Application Data\Microsoft\Windows\DRM\Cache\*
dir /s %USERPROFILE%\Local Settings\Application Data\VirtualStore\ProgramData\Microsoft\Windows\DRM\Cache\*
Let the system scan and remove the temp files then you are done.
Another common Clr20r3 Error is the Event Type error that arises while a program is being installed. One method to fix such error types is:
Method 5: Repair / Update the .Net Framework
Clr20r3 Event Type Error generally occurs when the .NET Framework has expired or it has become corrupt. The following steps facilitate repairing of the .NET Framework:
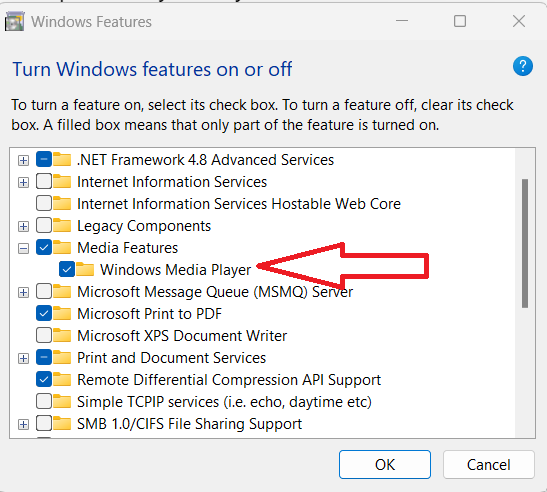
- Open Control Panel and go to Programs -> Programs and Features
- On the left panel, click on Turn Windows features on or off option
- In the Windows Features window that opens, find .NET Framework 3.5 and .Net Framework 4.8 Advanced Services options and uncheck both of them individually by using the square box symbol next to each one of them, in order to disable them
- Click on OK and then close the window
- Reboot the system and again open Windows Features using Control Panel.
- Now, check the square box symbol next to .NET Framework 3.5 and .Net Framework 4.8 Advanced Services options
- Reboot the system again and install the corresponding app again to verify if the error is resolved.
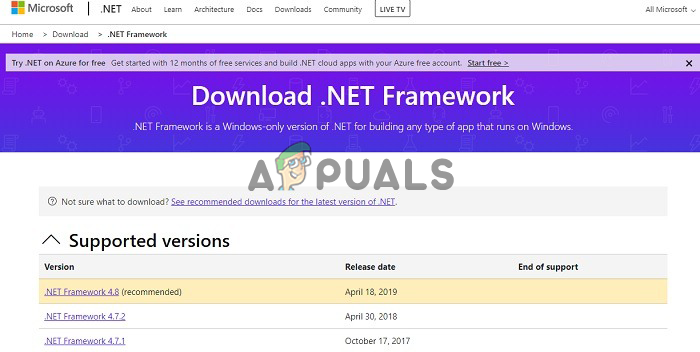
In case the error still needs to be resolved or if the .NET Framework has expired, its latest version can be downloaded from Microsoft’s website and installed to rectify the issue.
You may also download the latest version of .Net Framework from Microsoft:
https://www.microsoft.com/en-us/download/details.aspx?id=30653
Method 6: Quick Fix for DotNet Framework
In case if you identify that the error is related to Microsoft .net framework then follow below steps to fix it:
1) Press Windows+R button
2) Type CMD and hit Enter key
3) Paste below the comment and hit Enter button
%windir%\Microsoft.Net\Framework\v2.0.50727\ngen.exe update
Method 7: Reinstall the MSSQL Server
You may encounter the above issue while trying to install the MSSQL Server on Windows PC. In that case, you just need to reboot the system and then reinstall the MSSQL Server, it should work.
Method 8: Reset this PC
This method can be used if all of the above methods did not work to fix Clr20r3 Error.
1) Type Reset this PC on Windows search bar and click on it
2) Click on Get Started button located on right-hand-side

3) A Pop-up window open, choose first option that says Keep my files
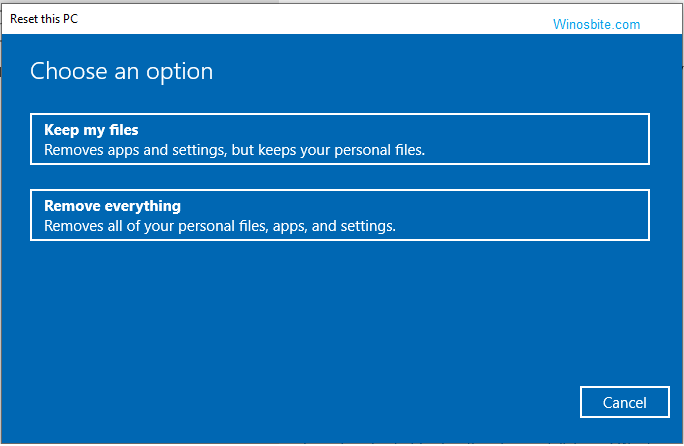
4) Now, wait for some time so that system can Reset your PC
Now, restart your system and start using your Windows PC without an error Clr20r3. You don’t need any software to get rid of this problem!
Conclusion
There are simple and easy ways to fix Clr20r3 error, all you have to do is to follow the above-mentioned steps!
Last updated on 21st February 2021.
You may encounter the Windows error CLR20R3 while launching an application like Media Player. While most instances of the error are when you try to launch a new application you installed, CLR20R3 can hint at corrupted application or system files.
So, when the files are corrupted, bugs can make access to registry files for these applications and programs really difficult, thereby damaging the registry files. Missing system files can also be the underlying reason for the CLR20R3 error in Windows 10/11.
What’s the Cause Behind CLR20R3 Error in Windows 10/11
Other than the two main causes we just discussed, here are a few other causes why the CLR20R3 can happen in Windows 10/11:
Hardware Problems
Though rare, hardware problems have also been one of the causes that can jumpstart CLR20R3 error. When your device’s main memory is corrupted, Windows will not be in a position to access the configuration files needed to launch the application.
Missing or Expired DLL Files
Full form for Dynamic Link Library, DLL files contain data that can be used by multiple applications simultaneously. Sometimes, you might have accidentally deleted DLL files. In this case, they’ll go missing and trigger the CLR20R3 error in Windows 10/11.
Another instance might be when your DLL files are outdated and haven’t been updated in a long time. But don’t try to download new DLL files from unauthorized sites to solve this problem.
How to Identify CLR20R3 Error in Windows 10/11?
Like every other Windows error, the CLR20R3 error will be shown with an error message. For CLR20R3 error, users have noted two recurring error messages:
- The program has stopped working
- The application service reported an error
Both will be accompanied by the event name: CLR20R3. Now, while it might be difficult to pinpoint what triggered the error CLR20R3 in the first place, you can begin to troubleshoot the error to go into the underlying cause.
Let’s take you through the top 10 methods you can try to fix the CLR20R3 error in Windows 10/11:
Run the Application in Compatibility Mode
For the application or program that refuses to run due to the CLR20R3 error, you can try using the compatibility mode to fix it. Here’s how:
- Right-click on the program and select Properties
- Go to the Compatibility tab
- Check the box that says Run this program in Compatibility mode
- Choose the Windows version you want to run this program in
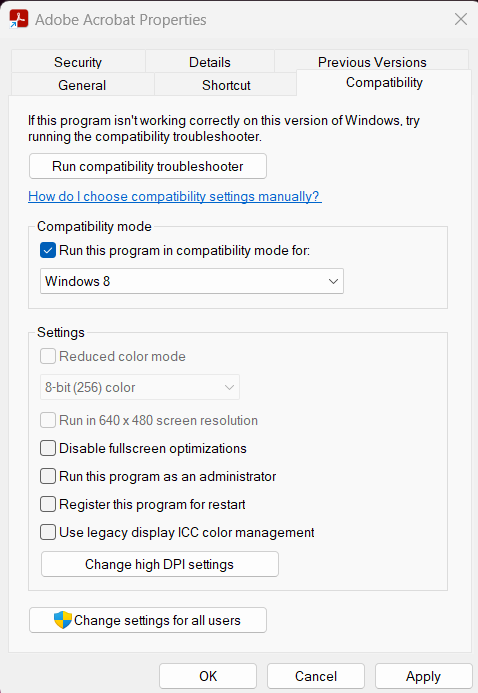
Once done, you can right-click on the program and click on Open file location. Finish saving your changes, and try to launch the program again. If it launches correctly, your problem has been resolved. And if not, try one of the following methods.
If you’re wondering what’s the compatibility mode or how it works, you should know that it turns off the latest features that might be causing errors. It takes an application back to its earlier version when it was normally functioning without throwing any errors.
If you’re having trouble launching Windows Media Player, you can try reinstalling it to fix the CLR20R3 error. We recommend you try this option only after you’ve tried to reset Windows Media Components and it hasn’t resolved your issue. Anyway, let’s jump onto the steps:
Go to Start and launch the Control Panel. On the top right of the screen, you’ll find View. Select View by Large Icons for convenience
Click on Programs and Features. Turn on Windows feature on or off capability.
Uncheck Windows Media Player and click OK to uninstall the Media Player.
Once done, restart your PC to bring the changes into effect
Post restart, go back to Programs and Features and expand on Media Features
Check Windows Media Player to install it again
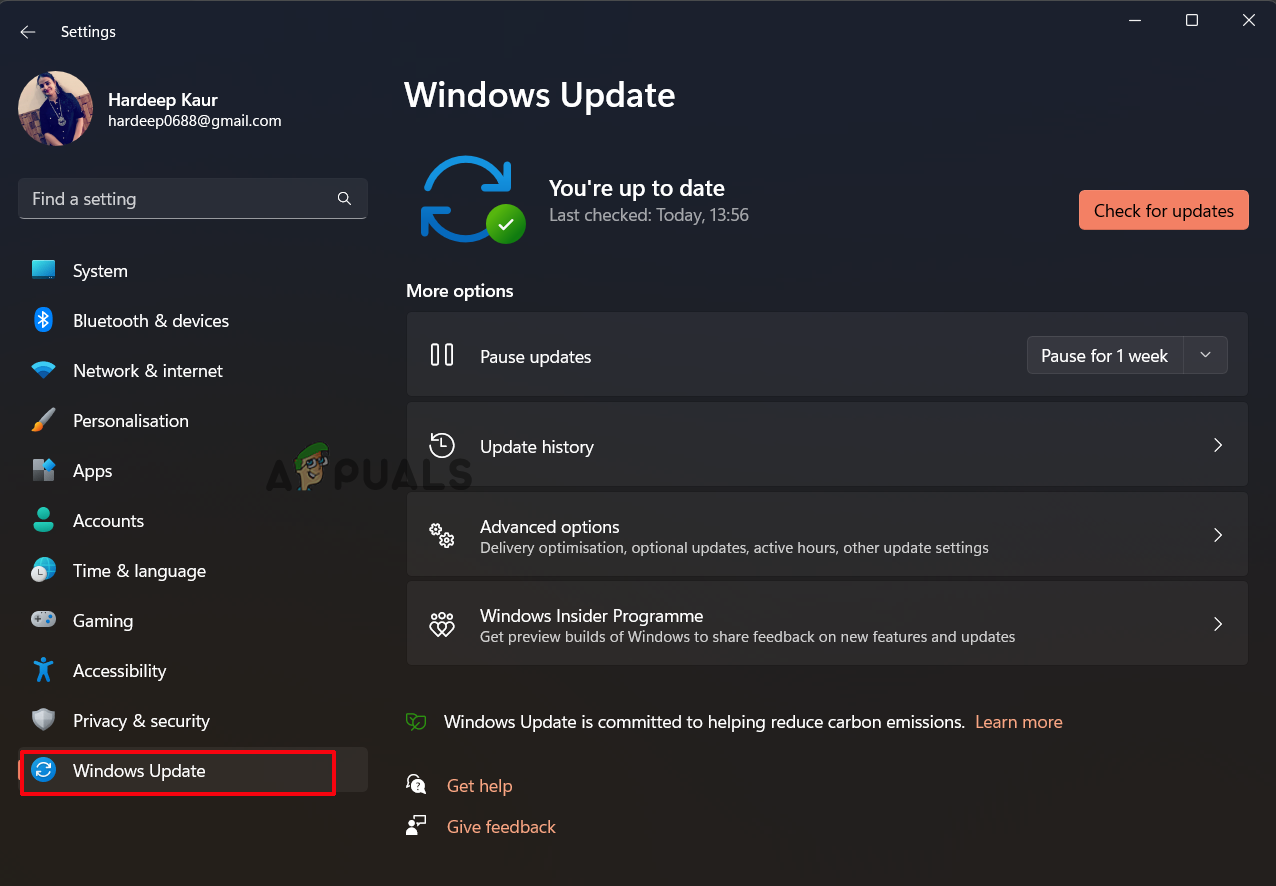
Check for Pending Updates
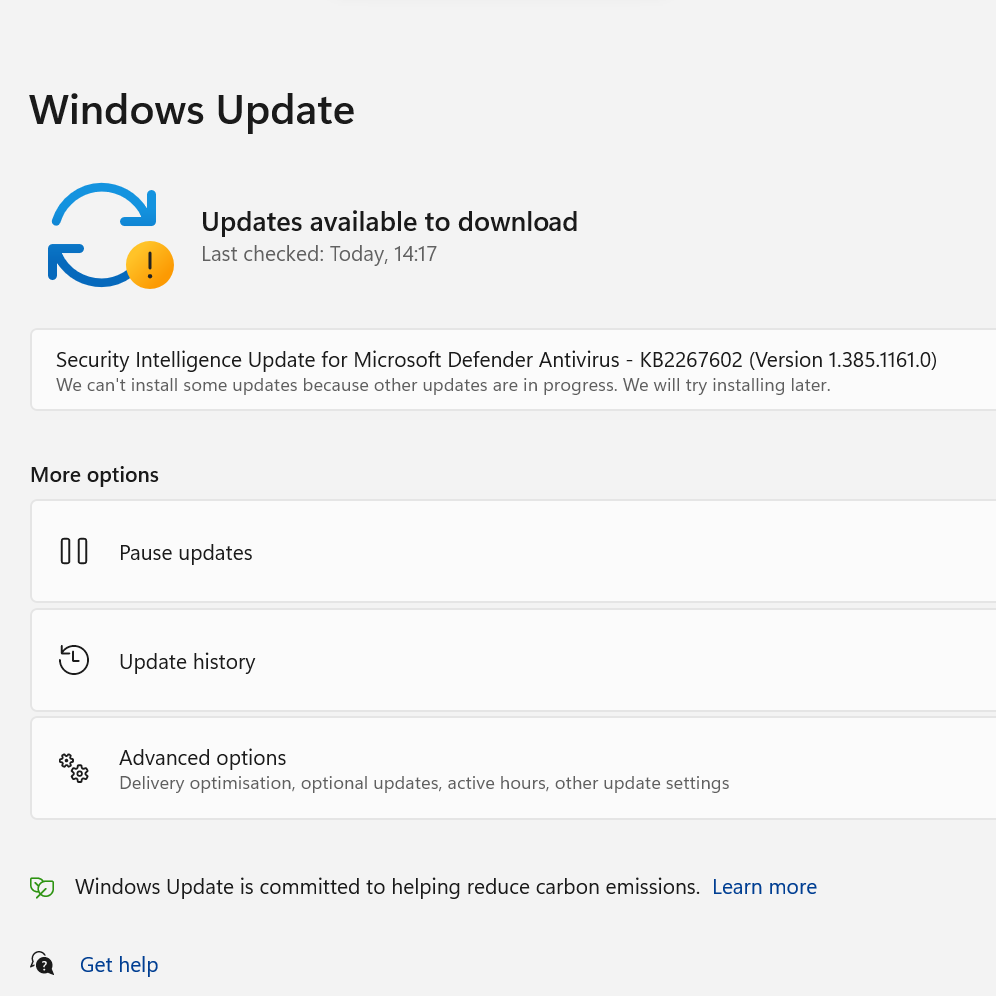
Sometimes, the error CLR20R3 can get triggered if you have pending Windows updates.
- To get started, Search for Updates in the Windows search bar
- Click on Check for Updates in the top-right corner
- Once you install the updates, restart your PC to finalize your changes
You can also download the System Update Readiness Tool to see what’s the problem and how to fix it if your updates aren’t running due to some reason.
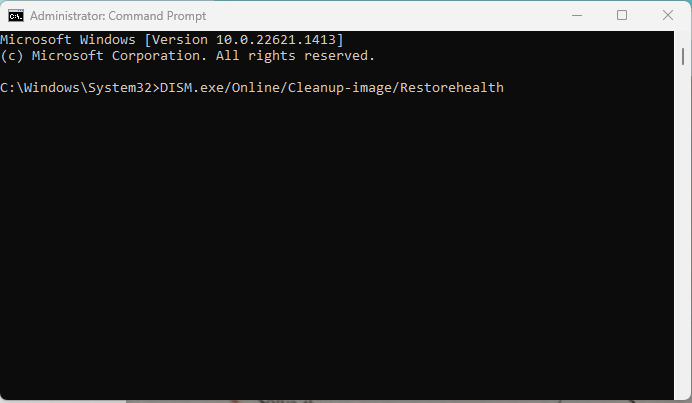
If nothing resolves CLR20R3, it might be due to corrupted system files, and you can run the DISM (Deployment Image Servicing and Management) tool to fix that. It is worth noting that you can use this tool, only if you’re using Windows 10, and this might not work for Windows 11.
- Search Command Prompt on Windows Search Bar
- Run Open Command Prompt as an administrator
- Run these commands and type enter after each
DISM /Online /Cleanup-Image /CheckHealth
C:\Windows>DISM /Online /Cleanup-Image /CheckHealth

Deployment Image Servicing and Management tool
Version: 10.0.22621.1

Image Version: 10.0.22621.1413

No component store corruption detected.

The operation completed successfully
DISM /Online /Cleanup-Image /ScanHealth
C:\Windows>DISM /Online /Cleanup-Image /ScanHealth

Deployment Image Servicing and Management tool
Version: 10.0.22621.1

Image Version: 10.0.22621.1413

[==========================100.0%==========================] The component store is repairable.
The operation completed successfully.
DISM /Online /Cleanup-Image /RestoreHealth
C:\Windows>DISM /Online /Cleanup-Image /RestoreHealth

Deployment Image Servicing and Management tool
Version: 10.0.22621.1

Image Version: 10.0.22621.1413

[==========================100.0%==========================] The restore operation completed successfully.
The operation completed successfully.
Reboot or restart your device after you run these prompts.
Run Windows System File Checker to Fix Corrupted Files
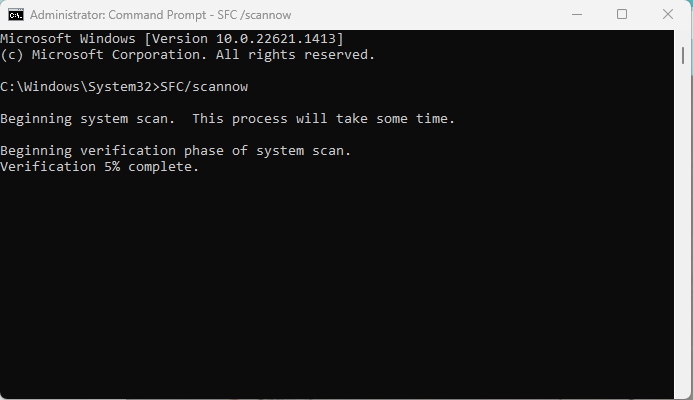
There’s another alternative to running DISM tool to fix corrupted application files as well as system files. You can use the Windows System file checker that’s in-built into your device to diagnose the cause of the error CLR20R3 and fix it.
- Press the Windows key and search for Command Prompt in the Search bar
- Right-click on the Command prompt and select the option: Open Command Prompt and run as Administrator
- Write the following command: SFC /scannow
- Click on Enter and restart your device soon after
Also check these Run Commands in Windows you should memorize.
Clean Windows DRM Cache
The error CLR20R3 can get triggered in Windows 10 if there are corrupted temp files in your system. For that, you have to clean the Windows DRM cache and remove broken or corrupted files.
- Click on Start or press Win + S to launch the Start button
- Open Command Prompt by typing CMD or Command Prompt in the Search tab
- Right-click on the Command Prompt and select Run as Administrator
Type the following commands, and press enter after each
dir /s %ALLUSERSPROFILE%\Microsoft\Windows\DRM\Cache\*

dir /s %LOCALAPPDATA%\VirtualStore\ProgramData\Microsoft\Windows\DRM\Cache\*
If you’ve to delete or clear a selection at any point, you can type CLS and press Enter
Once you run these two commands, you’ll be able to get rid of all of your DRM cache and temp files.
If the above method isn’t working for you, follow this to locate your DRM cache folder, which will help you remove temp files:
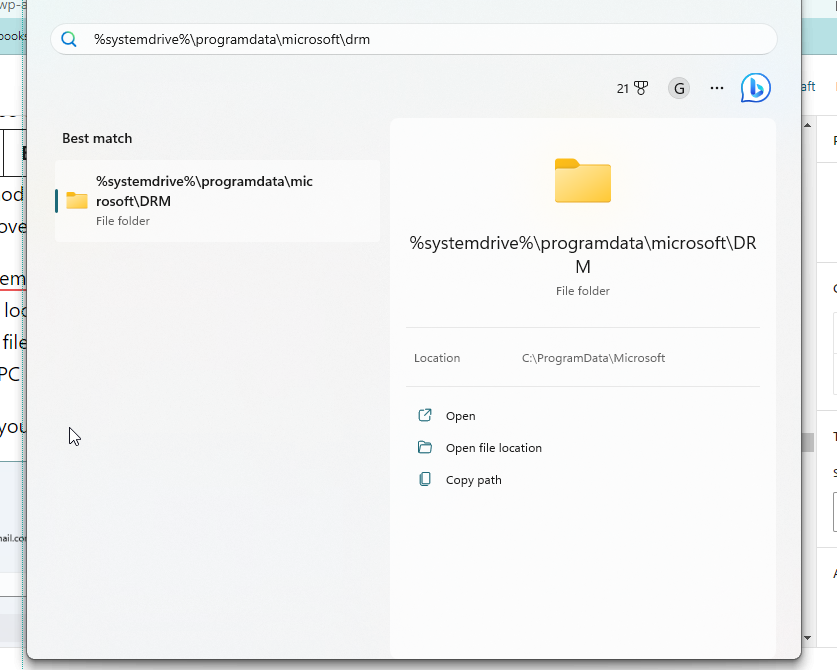
- Search
%systemdrive%\programdata\microsoft\drmin Windows search bar - This will help locate the folder, click on Open
- Select all the files in the folder and click Delete
- Restart your PC once done
For Windows 11, you can clear the cache by following these steps:
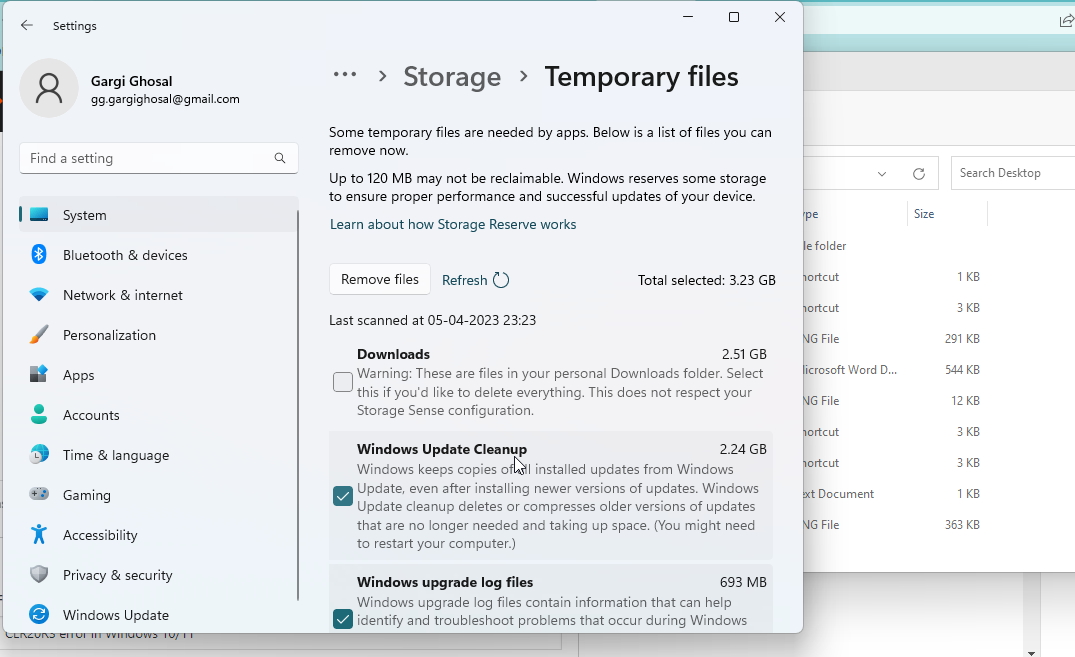
- Go to Settings > System > Storage > Temporary Files
- You can also search Delete Temporary Files in the search bar on the left
- Check the Temporary files boxes you can delete
The system will show you a warning that some temp files are required to perform functions. Hence, it’ll give you a list of temp files you’re allowed to delete at the moment. Check all and click on Remove files.
You’ll be shown another warning that some important files might be deleted. If you’re sure of your selection, click OK.
Install the Latest .NET Framework
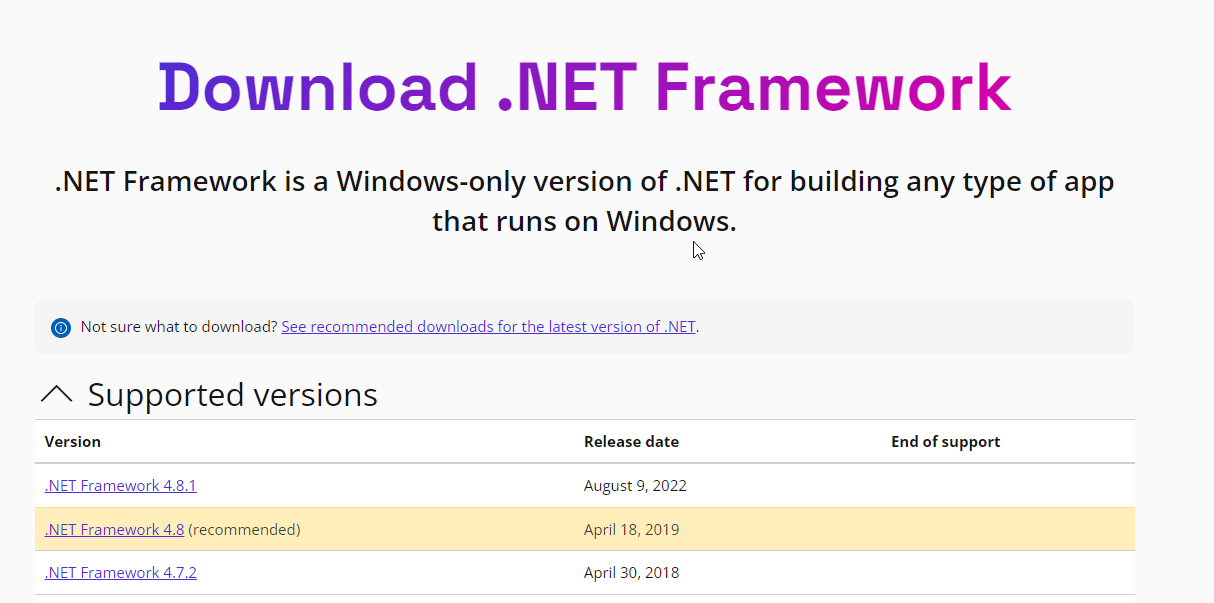
If your CLR20R3 is still not resolved, you can try to install the latest .NET framework from the official Microsoft website. Please be mindful to not download frameworks from third-party services, programs, and apps for this purpose.
- Go to www.dotnet.microsoft.com/en-us/download/dotnet-framework
- Click on the latest .NET framework, check the date of its release
- Select Download
The website will automatically show you all the supported versions of the .NET framework in this website. If you’re confused about which version to get, you can check out the recommendations from the official website as well. Now, if you’re wondering what’s the use of .NET framework, it basically helps you run and create software applications.
While used by programmers typically, .NET framework has class libraries and a gamut of tools to help you build and support high-quality apps. Installing it might resolve the CLR20R3 error in Windows 10/11. No harm trying!
Reinstall the Difficult Application
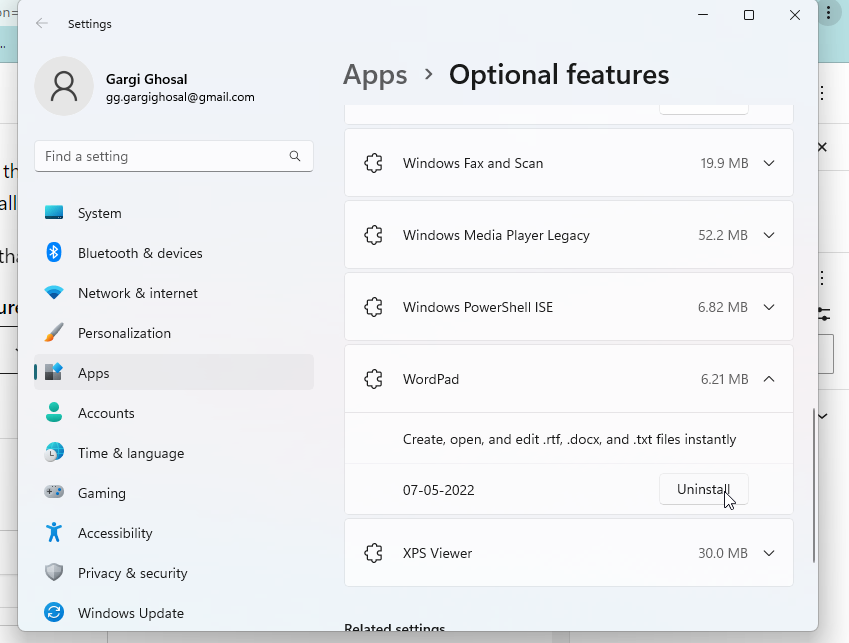
If you’re trying to launch an app, and it keeps throwing the error code CLR20R3 error, you might want to put your foot down and uninstall the app.
Yes, we understand it’s an app you need – so that’s why you can try reinstalling it.
- Go to Windows > Apps > Optional Features
- Look for the app and click on the downward-facing error beside it
- Select Uninstall from the list of options
Now you can try installing it from the official sources by following the steps that are relevant to the particular application. This might be similar to the steps mentioned below:
- Go to your browser and go to the program’s source
- Click on Save or Save As to download the program
- Your Windows Firewall should scan the program and alert you if it’s safe to download. We recommend not proceeding with the download in case the security certificate is expired and your safety is compromised
- You should find the saved file in your Downloads folder or the folder you’ve selected for Download
You can also get applications from the Microsoft Store by going to it directly.
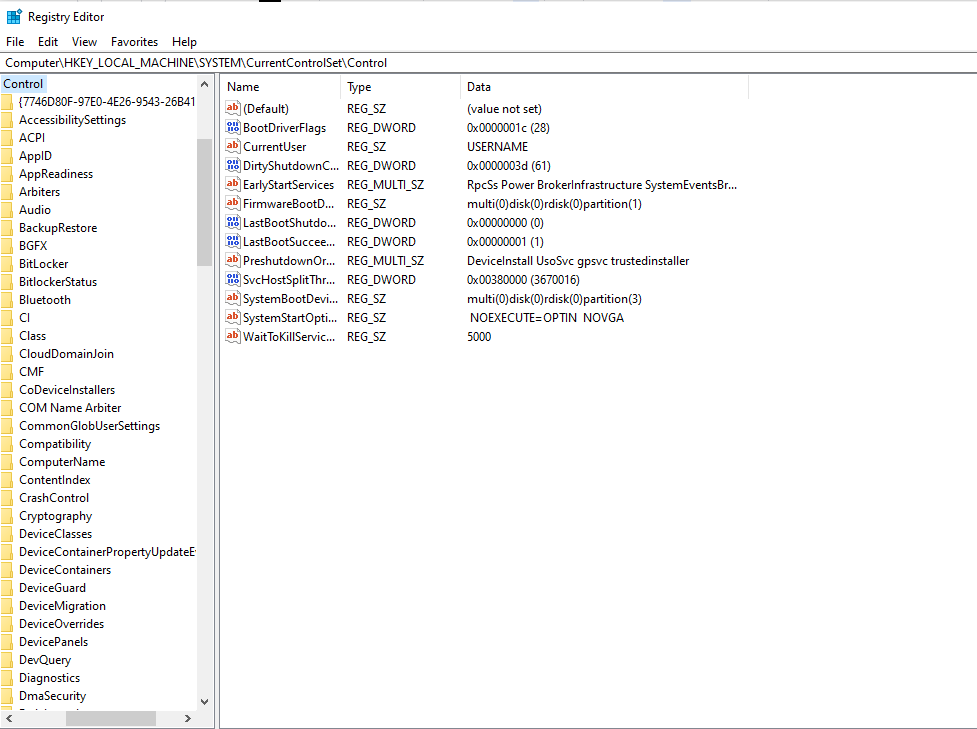
Run the Registry Editor
If the error code CLR20R3 is happening due to a registry issue and none of the above steps have helped so far, try running the registry editor. We have kept this resolution method at the last, only because it’s best if this is done by a service professional or a programmer. Exercise caution while following the steps:
Search regedit on the Windows Search Bar, it’ll open the Registry Editor.
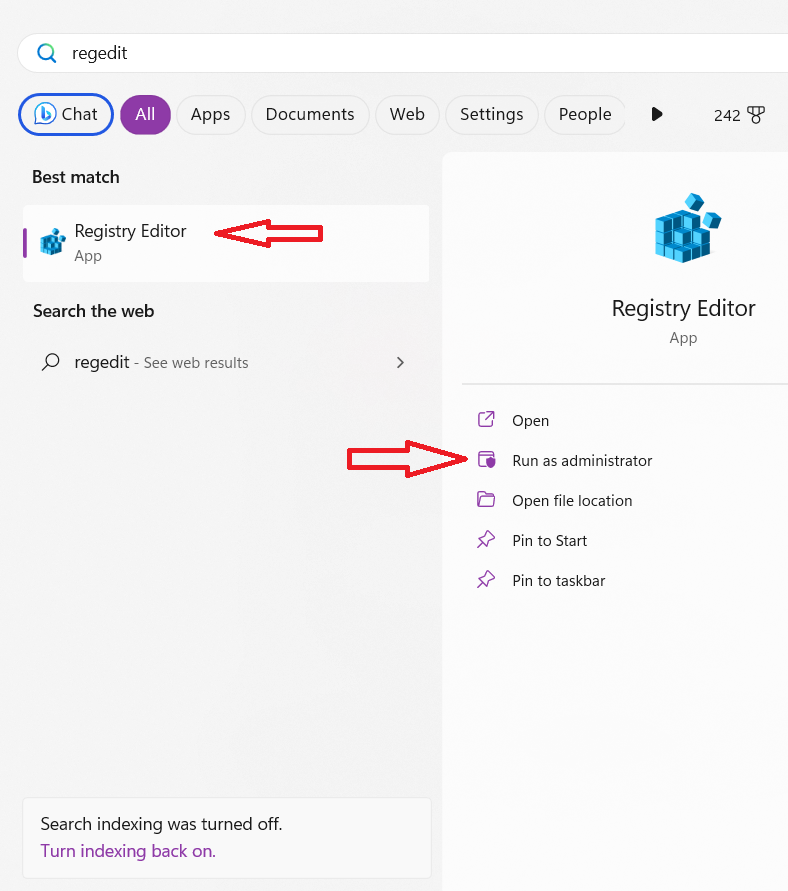
Give necessary permissions to it to make changes to your device.
Click CTRL + F and type HKEY_LOCAL_MACHINE\SYSTEM\CurrentControlSet\Control to search for it in the Registry Editor.
Once you right-click, you’ll get an Export option.
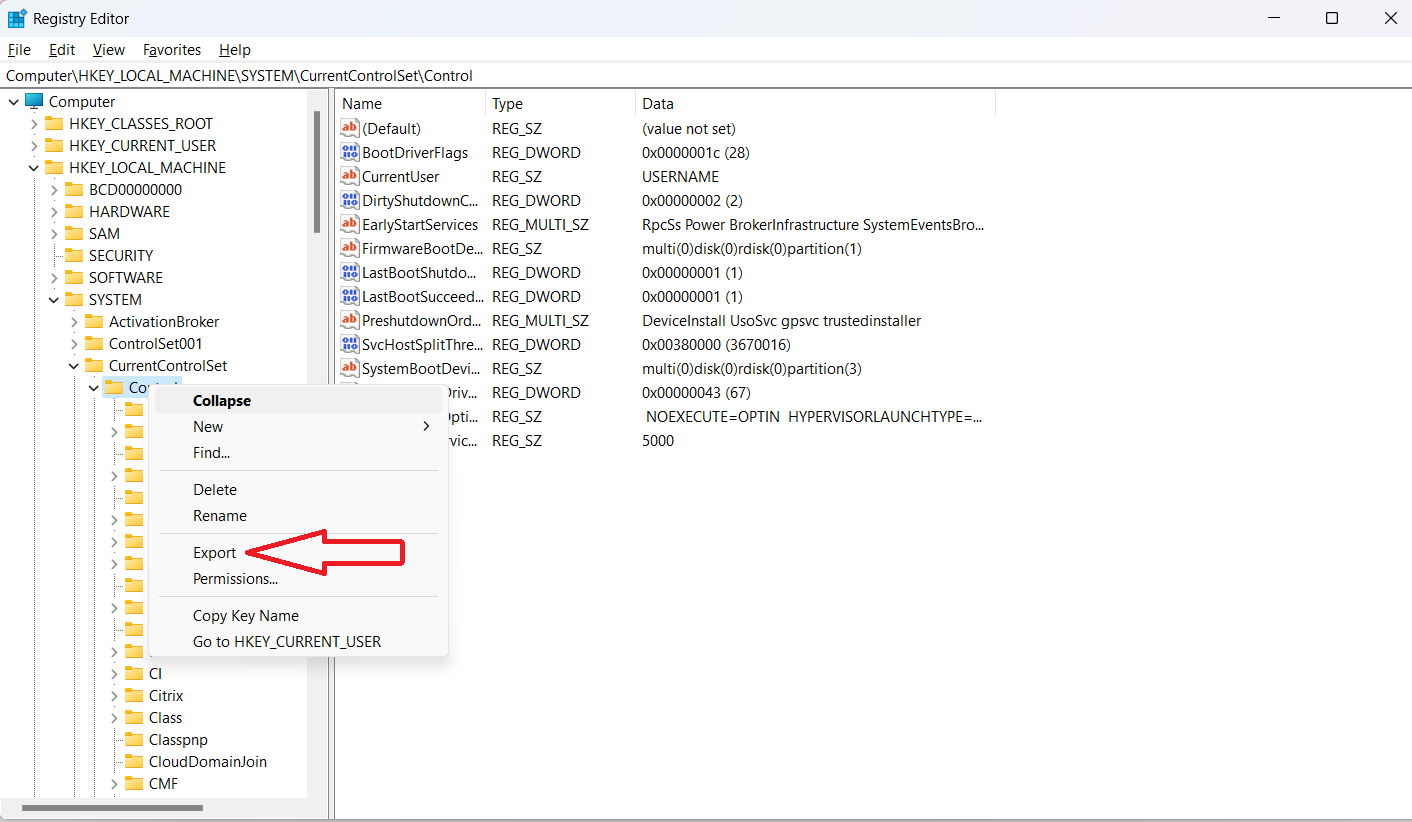
Save the file and open it with WordPad.
Search for any CLR issues with CTRL + F.
If you find any, please go ahead and delete them.
Import back the saved registry file.
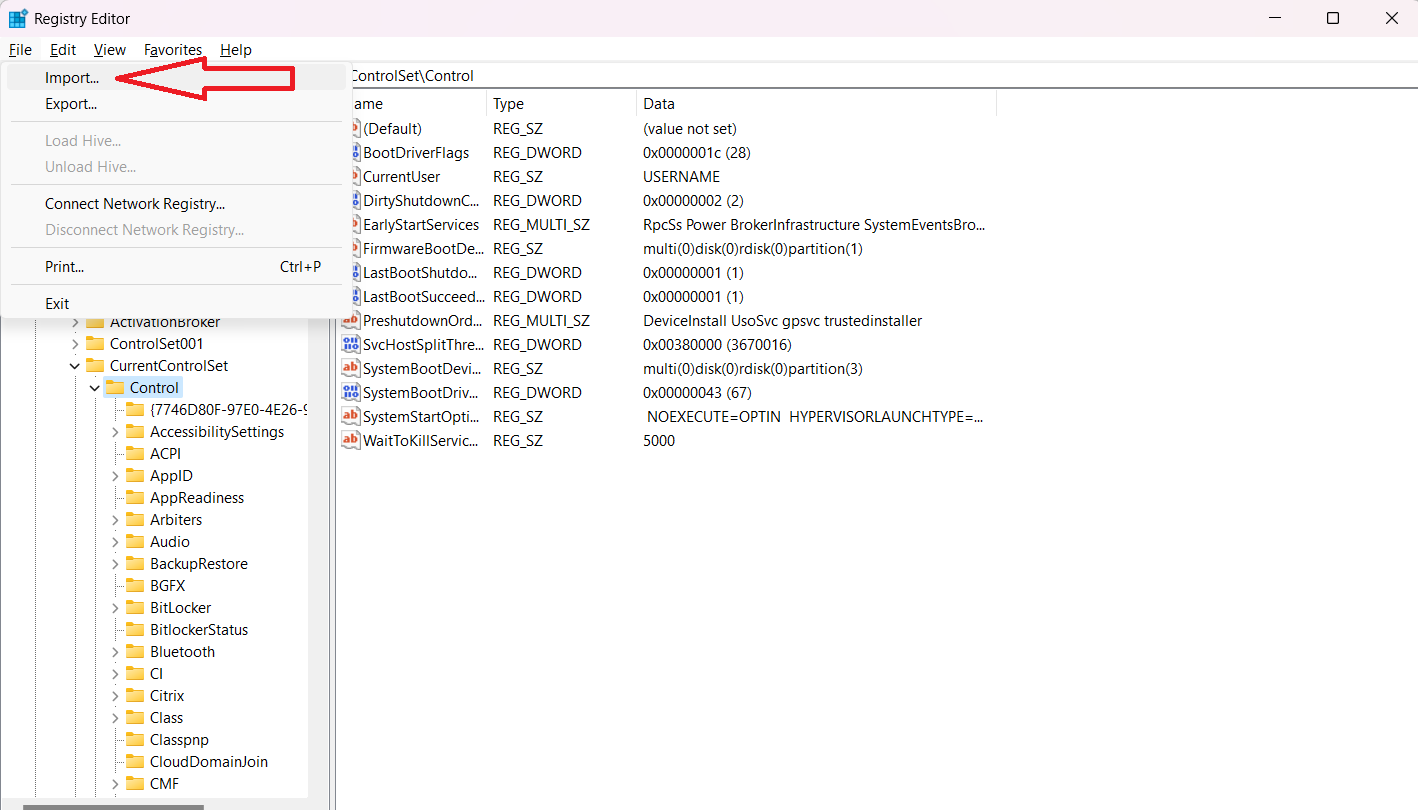
Close the Registry Editor and restart your device to finalize changes
How to Prevent CLR20R3 Error From Recurring
CLR20R3 can become a recurring error in Windows 10/11 if the issue isn’t resolved at the root. To prevent it from showing up again and again, try these methods below for regular maintenance of your Windows PC or laptop:
Run Disk Management Tool to Clear Temp Files
It’s a good practice to run the disk management tool every once in a few months to clear temp files that might trigger the issue. Don’t overuse it, however, disk cleanup is a good practice that maintains the overall health of your PC or laptop.
Run Windows Updates Without Missing
Don’t let too many Windows updates pile up. Run them frequently, as and when required. Keep checking for new updates so that you’re not working with outdated versions and bugs in your system.
Check your Antivirus
Sometimes, Windows error code CLR20R3 can be prompted by third-party antivirus software. Disable them and see if the issue persists. If it doesn’t, you can remove the software.
Download Applications From Official Sources
If you’re someone who downloads applications from unofficial sources, you’re sure to be plagued by CLR20R3 error in Windows 10/11 frequently. There’s only one fix: ditch the unofficial, APK files and rely solely on official downloads.
Pirated versions can infect your device and ruin its stability, so always be cautious before downloading unofficial or illegitimate applications.
Updating the .NET Framework
Be mindful to update the .NET framework occasionally if you happen to use it, by going to the official website and downloading the recent and latest versions. As mentioned before, in case of doubts, you can rely on the official recommendations from Microsoft.
In Conclusion
We hope the methods discussed above will help you resolve the Windows error CLR20R3. While you might run into issues while running command prompts if you’re not familiar with it, follow the steps we’ve mentioned and one of them is sure to work and help fix the CLR20R3 error in Windows 10/11.
If you want to ensure that the Windows error code CLR20R3 doesn’t plague you in the future, it is important you do regular maintenance of your Windows device. Rebooting your system occasionally, keeping your firewalls updated, and keeping your system files updated can reduce the chances of Windows errors popping up.
The CLR20R3 error appears while launching a program on Windows. It is generally caused due to program file corruption or missing components. It prevents you from opening the application installed on the PC.
Follow the solutions below to fix the CLR20R3 error.
1. Download the Program from the Official Site
The following error commonly occurs when downloading an app from an unofficial website or any third-party source. If that’s the case, it is recommended to download the program from the official website and then install it on your Windows system.
Moreover, you can also uninstall the particular problem causing the error and then reinstall it completely from the official website.
2. Run Program in Compatibility Mode
In Windows, the compatibility mode allows old or incompatible programs to run on the latest Windows system without any problems. Doing this will make older programs run on a newer operating system using a compatibility mode. Therefore it is advised to run the program in compatibility mode and make it perform well without showing any errors. Follow these steps to provide program compatibility rights:
- Right-click the program, choose Properties from the menu, select the Compatibility tab, select Run this program in compatibility mode and select the Windows version.
Select Run this program as administrator. - Right-click on the program and choose the Open file location option.
- Save your changes, launch the program causing the error and check if the error is fixed.
3. Install .NET Framework Version.
Some programs might not function properly on your PC if an older version of the .NET Framework due to incompatibility issues. In this situation, you will need to download and install your computer’s most recent version of the .Net Framework.
- Visit the Microsoft official page on the browser and download the latest .Net framework.

Download Microsoft .net framework - Run the installation setup to install the framework.
- After the framework has been updated, restart your computer. Check to see if the program is opening.
4. Update Windows
If you are using an early build or beta version of the Windows 11 operating system, problems like these may frequently occur because early builds and betas have a lot of faults and flaws. Therefore, updating the most recent Windows OS build is advised. Follow the instructions below to update Windows to the most recent build:
- Press the Win + I keys together to open the settings app.
- Now select the Windows Update option from the list on the left.
- Select the Check for Update option, and Windows will look for and download any available updates.

Click on Check for updates - Wait for the procedure to complete and restart your computer.
So, these solutions work for you to fix the clr20r3 error in Windows 10/11.
Hardeep Kaur
Hardeep is a passionate technical writer with more than 7 years of experience. She has a keen interest in PC games, Windows OS and everything surrounding it. She is a technology enthusiast and fascinated with technology since her childhood days.
CLR20R3 Error is a common error in Windows 10 and 11 that can be caused by a variety of issues. Fortunately, there are several methods that can help you quickly get rid of this error and get your computer running smoothly again. To fix the error quickly, the first step is to make sure the operating system is up to date.
This can be done by opening the Windows Update Settings and checking for any available updates. If any updates are available, they should be installed to ensure the system is running the latest version of Windows. It is also important to scan the system for any viruses or malware using a trusted antivirus program.
If any malicious software is found, it should be removed to prevent further damage. Additionally, the user should check the application which is causing the error to ensure it is up to date. If the application is out of date, the user should update it to the latest version.
The first thing you should do is update all the drivers on your system. Outdated or corrupted driver files can cause a wide range of issues, including CLR20R3 errors. To update the drivers manually, go to Device Manager in Control Panel and look for any devices with yellow exclamation marks next to them – these need updating immediately!
You may also want to use an automatic driver updater tool like Driver Booster which will scan your system for outdated drivers automatically and install any updates that it finds without needing manual intervention from you.
Finally, if none of these solutions work then try uninstalling/reinstalling Microsoft .NET Framework as this could potentially solve the issue too – just make sure that when reinstalling it’s done correctly so as not to create further problems down the line!
If all else fails then contact Microsoft Support directly who may be able provide additional assistance in resolving this issue for good – either way though hopefully one (or more) of these tips have helped resolve CLR20R3 Errors on Windows 10/11 quickly!
To fix the CLR20R3 error on Windows 10/11, you can try the following methods:
- Run the application in compatibility mode: Right-click on the program and select Properties. Go to the Compatibility tab and check the box that says Run this program in Compatibility mode. Choose the Windows version you want to run this program in. Once done, you can right-click on the program and click on Open file location. Finish saving your changes, and try to launch the program again. If it launches correctly, your problem has been resolved
- Run Windows System File Checker to Fix Corrupted Files: Open Command Prompt as an administrator and type
sfc /scannowand press Enter. Wait for the process to complete. If any corrupted files are found, they will be automatically replaced with the correct ones - Install the Latest .NET Framework: If your CLR20R3 error is still not resolved, you can try to install the latest .NET Framework. This will ensure that all the necessary files are up-to-date and compatible with your system
- Reinstall the Application: If none of the above methods work, you can try reinstalling the application. This will ensure that all the files are installed correctly and there are no missing or corrupted files
Please note that the CLR20R3 error can also be caused by hardware problems, missing or expired DLL files, or outdated system files. If none of the above methods work, you may need to consult a professional technician to diagnose and fix the issue.
Discover more from TechResider Submit AI Tool
Subscribe to get the latest posts sent to your email.
Windows 10, a widely used operating system, is known for its features and versatility. However, it is not immune to errors, including the problem event name: clr20r3.
Like many Windows errors and issues, clr20r3 error is quite common. And to make it worse, it is very frustrating to deal with as it can lead to more serious issues.
In this article, we’ll cover how to fix the clr20r3 error on Windows 10/11 and how to prevent this error from happening again in the future. Read on to find out what you can do to resolve this error without any additional software or programs!
What Is Problem Signature Clr20r3?
The clr20r3 error on Windows can appear at any time during your computer’s boot sequence, and it can cause issues with installing and running programs on your PC. It can be caused by corrupted application or system files. When system files become corrupted, it can affect how applications launch and damage the registry files. This explains why you might be seeing the error clr20r3 on Outlook or Windows Media Center.
Sometimes, this error can also be triggered by malicious files. And in this case, scanning your PC for any signs of threats will resolve the problem.
Below are other causes of the clr20r3 error:
- Corrupted Application Registry Keys – If you are quite familiar with how operating systems work, then you probably know what registry keys These keys store records for application settings and configurations. Once they are corrupted, the application’s settings can also get corrupted, resulting in the error.
- Hardware Problems – Although it rarely happens, hardware issues may also trigger the error clr20r3. If the main memory of your device is corrupted, Windows may not be able to access an application’s configuration files. Hence, the error code will be displayed.
- Missing DLL Files – This error may appear when there are missing dll files.
- Outdated DLL File Versions – The problem could also occur because of corrupted or outdated versions of dll files.
Regardless of what’s causing it, there is no reason to panic because there are plenty of fixes available. We’ll go through these fixes below.
What Is the Most Effective Clr20r3 Fix for Windows 10/11 Devices?
Here are the different clr20r3 fixes that have worked for many affected users. Go through them one at a time and see if they work.
Fix #1: Fix the Windows Media Center
Are you getting the Windows 10/11 Media Center clr20r3 error? If yes, then you may need to repair Windows Media Center first. Here are the steps to follow to fix the Windows Media Center:
- Click on the Cortana search field and type optional features. Then select the top-most result.
- In the window that appears, find Media Features and click the + sign to expand the options.
- Untick the boxes next to Windows Media Center and hit OK.
- Restart your computer and wait for your system to reboot.
- Now, launch the Turn Windows Features on or off window and check the Windows Media Center option once again. Hit OK and restart your computer.
- After your computer successfully reboots, relaunch the application. Hopefully, the error Windows 10/11 Media Center clr20r3 is gone.
Fix #2: Register the Windows Media Components
If the clr20r3 error still shows, you can try re-registering the Windows Media Components. To do this, carry out these steps:
- Press the Windows + S keys and type cmd into the pop-up window.
- Right-click Command Prompt and choose Run as Administrator.
- Next, input these commands and hit Enter after each one:
- regsvr32 atl.dll
- cd
- C:WINDOWSeHome
- ehSched /unregServer
- ehSched /service
- ehRecvr /unregServer
- ehRecvr /service
- exe /unregServer
- exe /regserver
- exe /unregServer
- exe /regserver
- After running these commands, exit Command Prompt and restart your device.
- Relaunch the problematic app where the error clr20r3 appears.
Fix #3: Run an SFC Scan
Do you suspect that corrupted system files are causing the error? Then the first step in fixing corrupted system files is using a tool called SFC. This stands for System File Checker and it does exactly what its name implies: It helps you check and fix system files.
To use SFC, you’ll need an administrator login. Follow these steps:
- Press Windows Key + X then choose Command Prompt (Admin) from the list of available options.
- Type sfc /scannow and hit Enter. Let SFC run uninterrupted; don’t close Command Prompt until it completes.
- If problems are found, repair them automatically.
Fix #4: Perform a DISM Scan
If you receive an error 0x800f081f during DISM /Online /Cleanup-Image /RestoreHealth or after performing a Reset your PC, run DISM and check your Windows Image using CMD. To do that, here’s what to do:
- Launch cmd with administrative privileges and type in DISM.exe /Online /Cleanup-Image /CheckHealth.
- It will prompt if you want to do a full scan. Press Y and it will take a while but at end state whether there are errors or not. Press Y if you are getting only one error – making sure you get no more than that.
- Otherwise, simply restart your computer if more than one error is displayed.
Fix #5: Reinstall the .NET Framework
The .NET Framework is a runtime environment that helps load and execute the different kinds of software that you install on your computer. It’s not something you can uninstall, but it is something you can reinstall if it’s corrupted or missing from your system.
To get rid of these errors, there are two ways to go about it: the Manual method or the Automatic method. The manual way involves locating and downloading the framework yourself before reinstalling it on your PC and restarting.
The automatic fix, on the other hand, involves using Microsoft’s own troubleshooter tool. We recommend giving both methods a try so you can choose which one works best for you! To reinstall the .NET Framework manually, do this:
- Download and Install .NET FrameWork 4 first. You can do so by going through Settings > Update & Security > Recovery.
- Next, click Go back to an earlier build and select Get Started.
- Wait for the process to complete.
- Restart your computer.
Fix #6: Disable the DEP Process
One of the causes of the error is a process called DEP. However, it’s important to keep in mind that DEP is just a catch-all term for Data Execution Prevention and is essentially designed to protect Windows by preventing code-based attacks.
When DEP detects an attempt to execute a piece of code (like when you boot up your PC), it stops the request until certain steps have been completed and confirms that it’s safe to continue. While DEP has proven itself effective at preventing malware attacks, unfortunately, sometimes certain processes in Windows don’t play nice with DEP and cause problems—such as the clr20r3 error.
So, how do you disable it? In order to disable DEP on Windows, do this:
- Navigate to the Control Panel, then select the Administrative Tools tab.
- In the administrative tools window that appears, select the services tab and look for a service called Data Execution Prevention.
- Right-click on it and choose properties.
- Uncheck its startup type, which should be set as Automatic.
- Click OK to save changes.
- Next, you need to restart your PC.
- When done go back into Services and check again if DEP is enabled or not.
Fix #7: Uninstall Any Virtualization Software
Virtualization software is software that allows you to run multiple operating systems simultaneously. It does so by creating a virtual computer, either from scratch or using an existing computer, and running your operating system within it.
In order to achieve compatibility with all your other programs, virtualization software uses a feature called binary translation. Sometimes called binary emulation, binary translation effectively translates a program’s binary code into something else before executing it—in our case, x86 code. This causes compatibility issues.
At first glance it might not seem like you need virtualization software to run another operating system; however, unless you’re running legacy games or applications, virtualization is still a very valuable tool for gaming and productivity alike.
Depending on what virtualization software you’re using, uninstallation might not be quite as simple as uninstalling a normal application. Read on for our guide:
- First, open Programs and Features from the Control Panel. There you will see a list of applications installed on your PC.
- Now, find and uninstall VMWare Workstation or VMWare Player, VirtualBox, or Oracle VM VirtualBox virtualization software.
- If you’re not sure which one to uninstall go to Control Panel > System and Security > Program & Features > View Installed Updates section on your PC and look up corresponding virtualization software version number in Installed Updates windows.
- Uninstall it as described above.
- Finally, go to Control Panel again.
- Click Uninstall a program.
- Select the virtualization software in question again and click on Uninstall button.
- Restart your computer after uninstallation process is complete.
Fix #8: Disable or Uninstall Any Antivirus
Anti-virus software plays an important role in keeping your computer safe from viruses and other unwanted programs. If you’re constantly getting error messages that prevent you from using a program, it may be time to uninstall or disable your antivirus software.
When you uninstall an antivirus program, it no longer can block any applications. The antivirus will still be there if you decide you want to install it again later. You can temporarily disable your anti-virus software through its interface, but remember that re-enabling it might not help with issue if it was interfering with other programs.
Fix #9: Use a PC Repair Tool
A PC Repair is a powerful tool which allows you to easily and safely repair your system by fixing registry errors, the clr20r3 error, dll errors and all kinds of possible issues that prevent your PC from working as it should. Just download and install it in a few minutes, then use its intuitive interface to fix your problems.
What’s more, PC repair tools are 100% safe. And they don’t contain viruses or malware.
Fix #10: Clean the Windows DRM Cache
The clr20r3 error may be caused by Windows DRM cache corruptions or deletions. So, clear out all unnecessary DRM files and fix the errors with ease.
Here’s how:
- Press Win+R then type regedit in the Run dialog box
- Navigate to HKEY_LOCAL_MACHINE\SYSTEM\CurrentControlSet\Control
- Right-click FileSystems then select Export option in the pop-up menu.
- Click Save As, enter FileName and click Save button, then open it with Notepad or WordPad to check out what’s inside. If you find any clr20r3 entries, delete them all.
- Close Registry Editor and restart your computer.
- See if you can access your files now.
Wrapping Up: The Best Fix for Error Clr20r3
Update your PC with relevant updates and fixes. Your device may have any of a number of specific issues that can cause the clr20r3 error, which makes it difficult to troubleshoot it. The best way you can ensure a good fix for this is to update your computer or device as much as possible. This means installing all available driver updates, new operating system updates and security patches.
If you have an Internet connection, make sure that you’re connected and staying up-to-date with your software automatically via Windows Update. Also, even if you choose not to install them immediately, be sure that you know about all critical updates for your computer or device in case one does arise.
Give us some love and rate our post!