
Clonezilla —полностью бесплатный инструмент для клонирования дисков, позволяющий в том числе перенести установленную Windows 11 или Windows 10 с жесткого диска на SSD или другой HDD.
Далее в инструкции описан базовый способ переноса установленной системы на примере Windows 11 на другой диск с помощью Clonezilla, а также некоторые нюансы и проблемы, с которыми можно столкнуться в процессе.
Перенос Windows на другой диск в Clonezilla
Прежде чем приступить, несколько предупреждений, касающихся использования Clonezilla:
- По моему опыту, Clonezilla преподносит больше «сюрпризов» после клонирования дисков, чем другие популярные инструменты, о которых вы можете прочитать в статье Как перенести Windows на SSD или другой HDD. Обычно, ничего непоправимого, но иногда после переноса приходиться добиваться исправной загрузки, могут пригодиться навыки использования команд diskpart.
- Если загрузчик ОС у вас находится на одном диске (условно, Диск 1), а сама система — на другом (Диск 2), что не редкость, перенося систему с диска 2 на диск 1 мы потеряем загрузчик. Если вы не уверены в расположении загрузчика и в том, что сможете в дальнейшем исправить ситуацию, возможно, это не тот метод, который вам следует использовать.
- Всегда есть риск что что-то пойдёт не так. Позаботьтесь о сохранности важных данных.
Приступая, ещё раз: все действия, описанные далее, только под вашу ответственность.
Загрузка образа ISO Clonezilla и создание загрузочной флешки
Прежде всего нам потребуется скачать Clonezilla и создать загрузочную флешку:
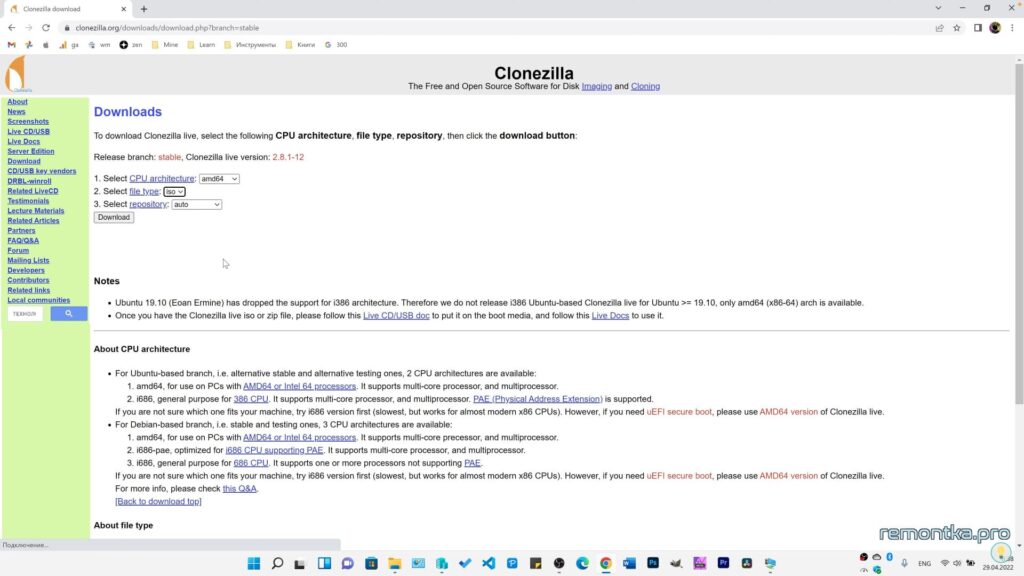
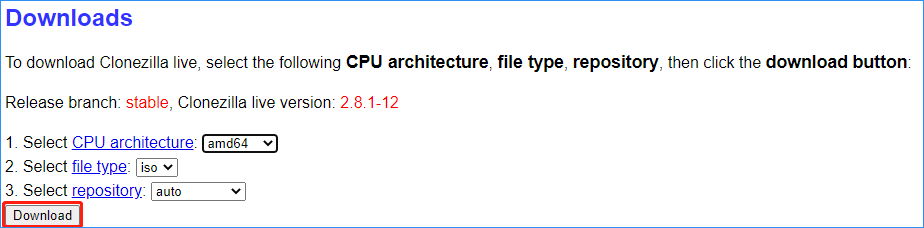
- Зайдите на официальную страницу загрузки https://clonezilla.org/downloads/download.php?branch=stable
- В поле CPU architecture оставьте AMD64 (даже если у вас Intel), в пункте «File type» выберите ISO.
- Нажмите кнопку Download и дождитесь завершения загрузки образа ISO Clonezilla.
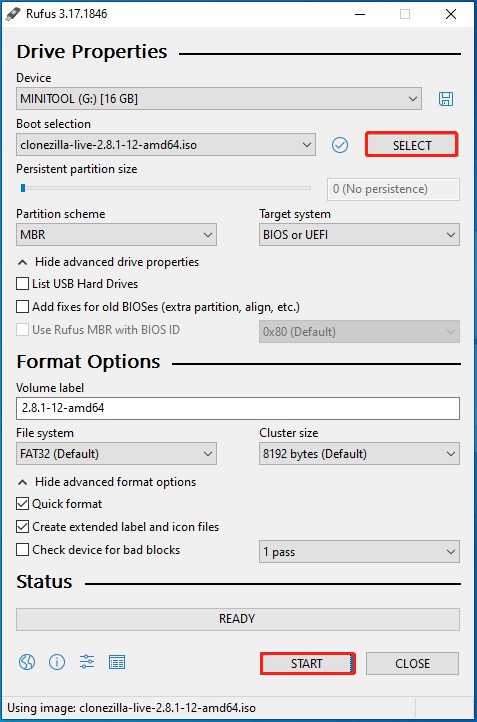
- Используя этот образ, запишите загрузочную флешку, можно использовать популярную программу Rufus. Используйте тот тип загрузки (UEFI/Legacy), который используется для загрузки вашей ОС.
- После записи накопителя перезагрузите компьютер и поставьте загрузку с флешки в БИОС/UEFI. Потребуется выключить Secure Boot, если опция включена.
Процесс переноса системы на другой диск
После загрузки с использованием созданного накопителя Clonezilla, можем приступать к клонированию. В тестовой системе подключено два накопителя, пробуем перенести ОС с одного диска на другой:
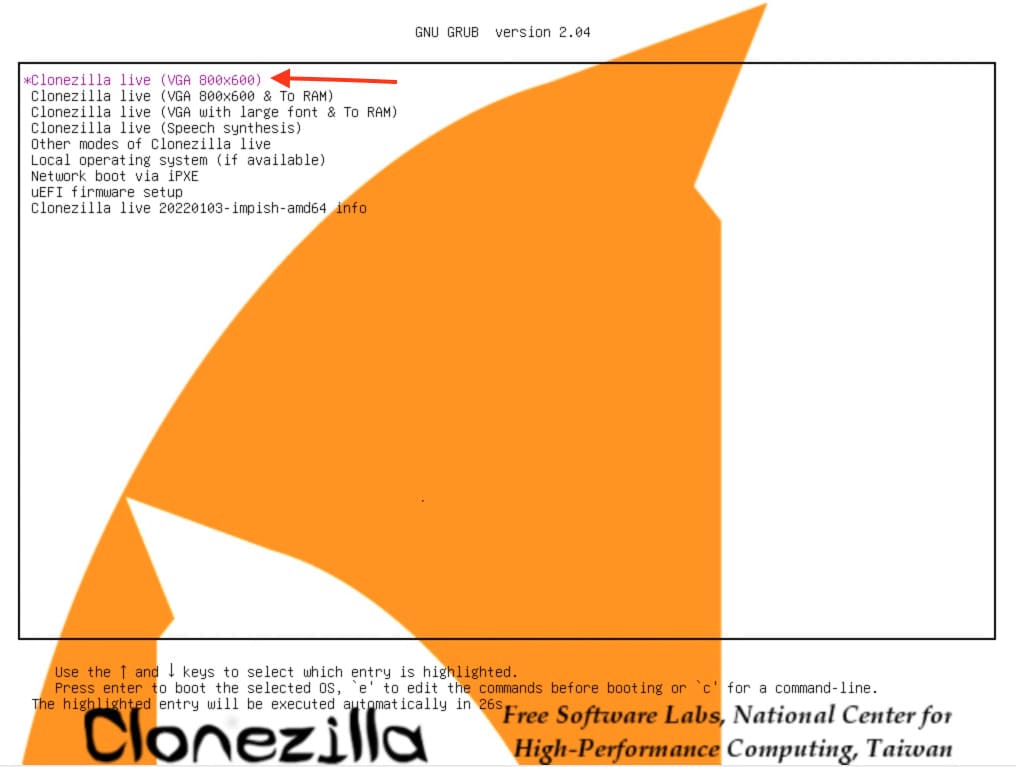
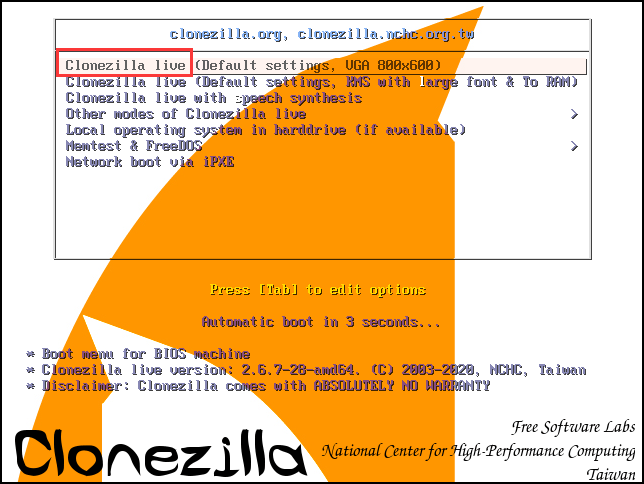
- На первом экране выберите первый вариант: Clonezilla live и нажмите Enter.

- В окне выбора языка присутствует русский, выберите его.

- В следующем окне с предложением сменить раскладку просто нажмите Enter, изменять не требуется.
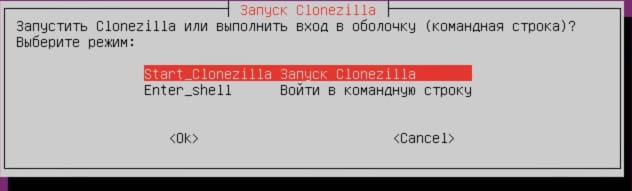
- Оставьте выбранным пункт «Запуск Clonezilla» и нажмите Enter.

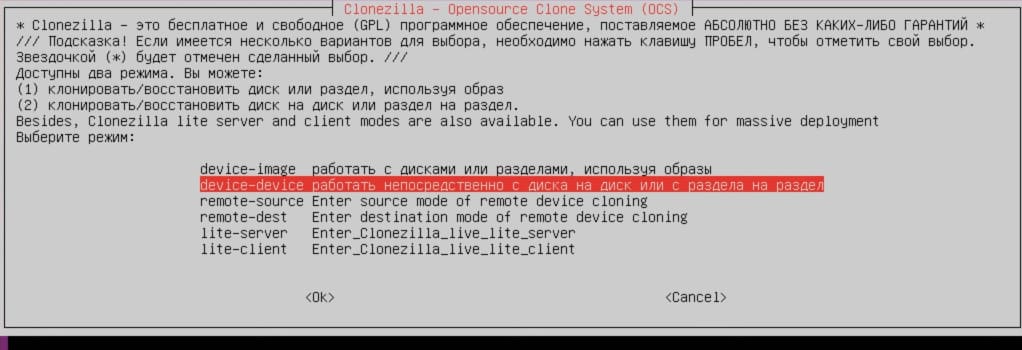
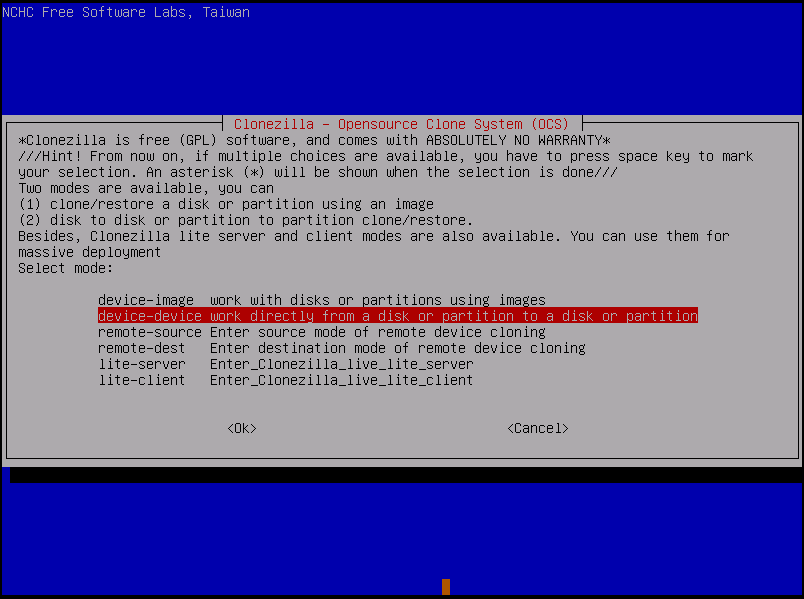
- Выберите 2-й пункт: «Работать непосредственно с диска на диск или с раздела на раздел» и нажмите Enter.

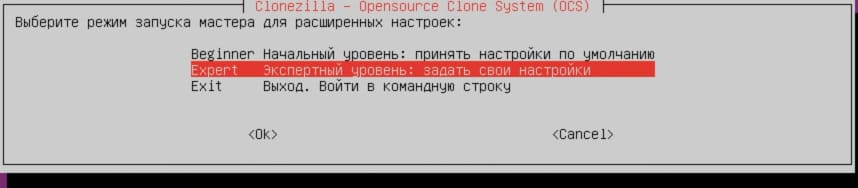
- На следующем экране лучше выбрать Expert — «Экспертный уровень», это позволит отключить одну из опций, включённых по умолчанию, которая может приводить к проблемам при переносе систем Windows.

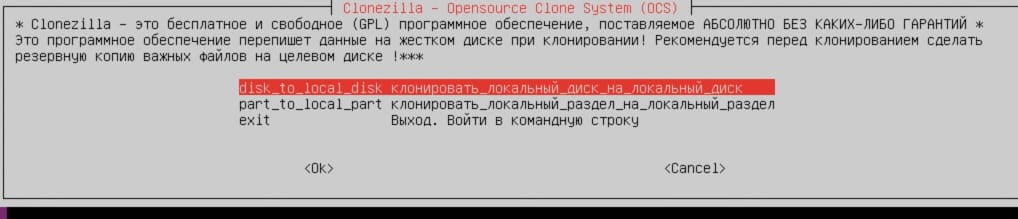
- Выберите пункт «Клонировать локальный диск на локальный диск».

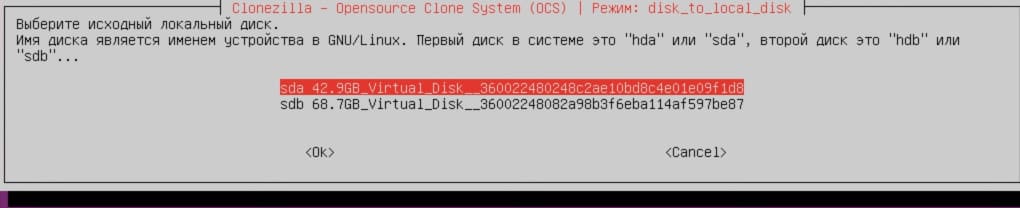
- Выберите исходный диск, то есть тот, информация с которого, включая все разделы будет клонироваться на другой диск. Внимание: общий размер разделов исходного диска (и занятого и свободного пространства) не должен быть больше размеров целевого диска.
- Выберите целевой диск.
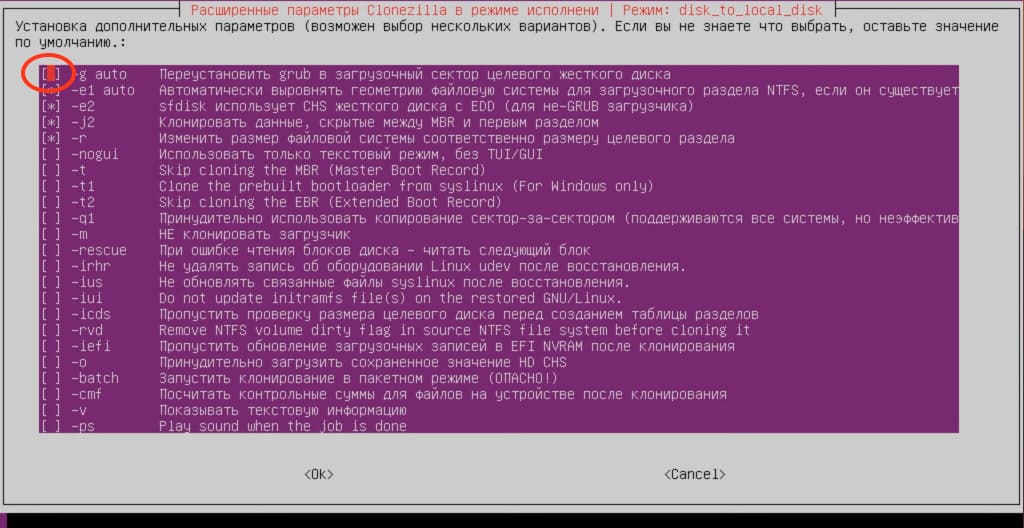
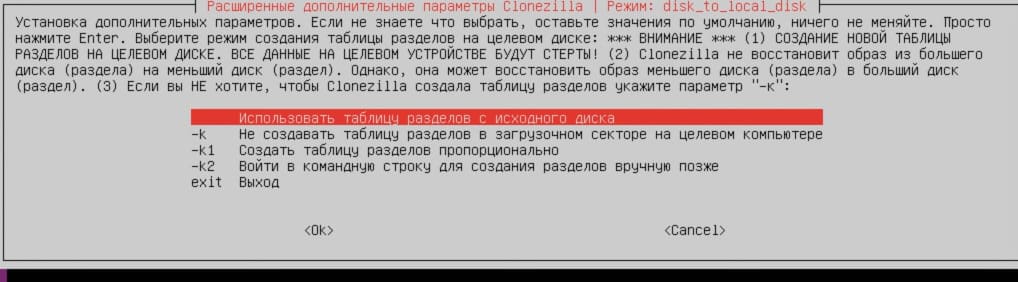
- Если вы выбрали режим «Эксперт», отключите верхний пункт в следующем окне (в режиме Beginner оно не появляется) — нам не нужен GRUB на диске с Windows. Сделать это можно с помощью клавиши «пробел» или мышью. Нажмите Enter.

- Выберите вариант проверки файловой системы. Для ускорения процесса и, если вы уверены, что с исходным диском всё в порядке, оставьте выбранным пункт «Пропустить проверку» и нажмите Enter.

- В случае использования режима «Эксперт» в окне с запросом о таблице разделов просто нажмите Enter.

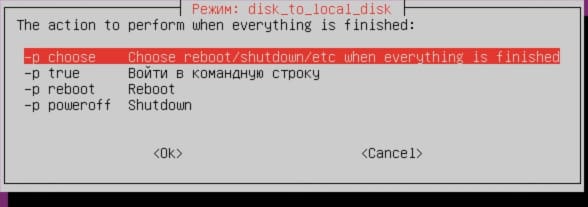
- Вам будет предложено выбрать, что сделать после завершения процесса — можно оставить выбранным первый пункт: «Спросить».

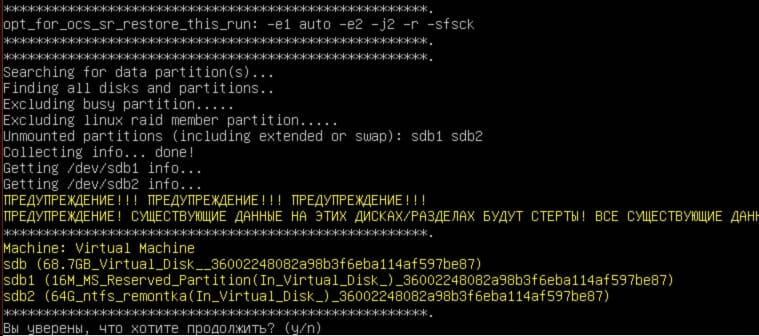
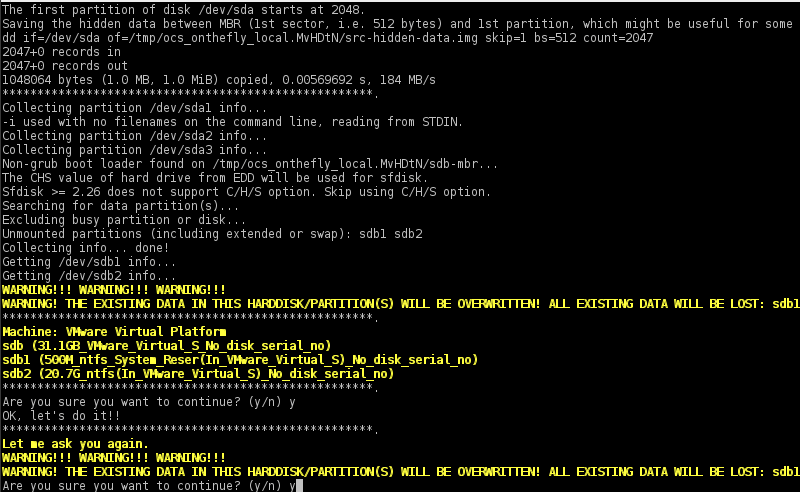
- Далее потребуется нажать Enter для продолжения, прочитать предупреждение (о том, что все данные с целевого диска на всех разделах будут удалены), ввести Y, если согласны и нажать Enter. А затем еще раз прочитать предупреждение и снова подтвердить, что вы понимаете, что делаете вводом Y.

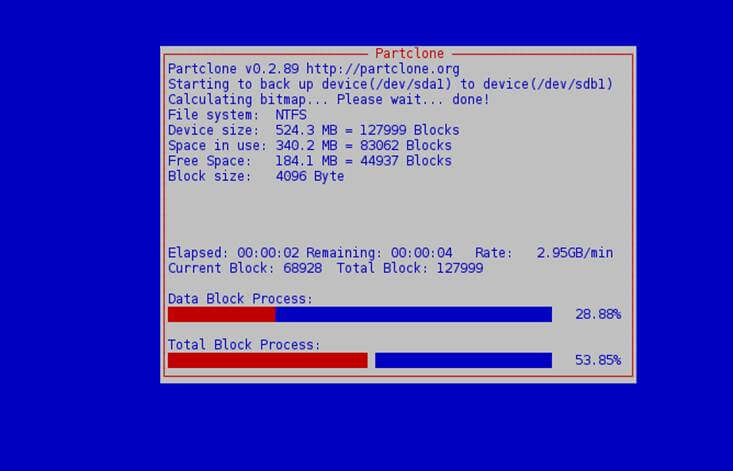
- Начнется процесс клонирования дисков, который может занять разное, обычно — продолжительное, время.

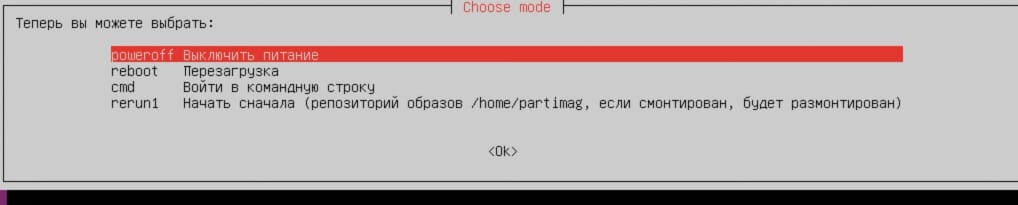
- По завершении вам будет предложено нажать Enter для продолжения, а затем выбрать вариант действий (если вы не выбрали его на 13-м шаге): выключить компьютер, выполнить перезагрузку, перейти в командную строку или начать сначала. Выберите «Выключить питание» и дождитесь завершения обратного отсчёта.
- При выключении питания вам сообщат о необходимости отключить загрузочный накопитель с Clonezilla, чтобы следующая загрузка выполнялась не с него.


После того, как все шаги были выполнены, мы можем надеяться, что при отключении исходного диска или при изменении порядка загрузки в БИОС/UEFI загрузка с диска, на который была перенесена система, пройдёт успешно. В моем случае для Windows 11 в режиме UEFI всё прошло успешно. Однако, это не всегда так, кроме этого, существуют и дополнительные нюансы.
Возможные проблемы после клонирования диска в Clonezilla
Далее — не полный список того, с чем можно столкнуться после выполнения переноса системы с помощью Clonezilla и кратко о том, как исправить ситуацию:
- После отключения исходного диска при загрузке с диска, на который была перенесена система, сообщается об ошибке загрузки на синем экране. Решение: восстановить загрузчик, как описано в инструкциях Восстановление загрузчика Windows 11 и Восстановление загрузчика Windows 10 (2-й способ, в командной строке). Учтите, что после этого при загрузке системы может появиться меню с выбором двух ОС, одна из которых не загружается — удаляем не загружающийся пункт в Win+R — msconfig на вкладке «Загрузка».
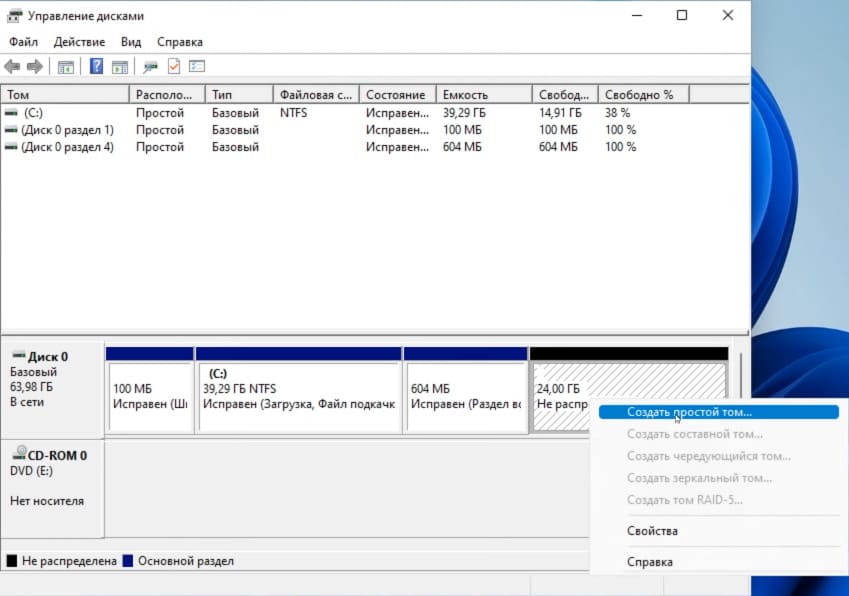
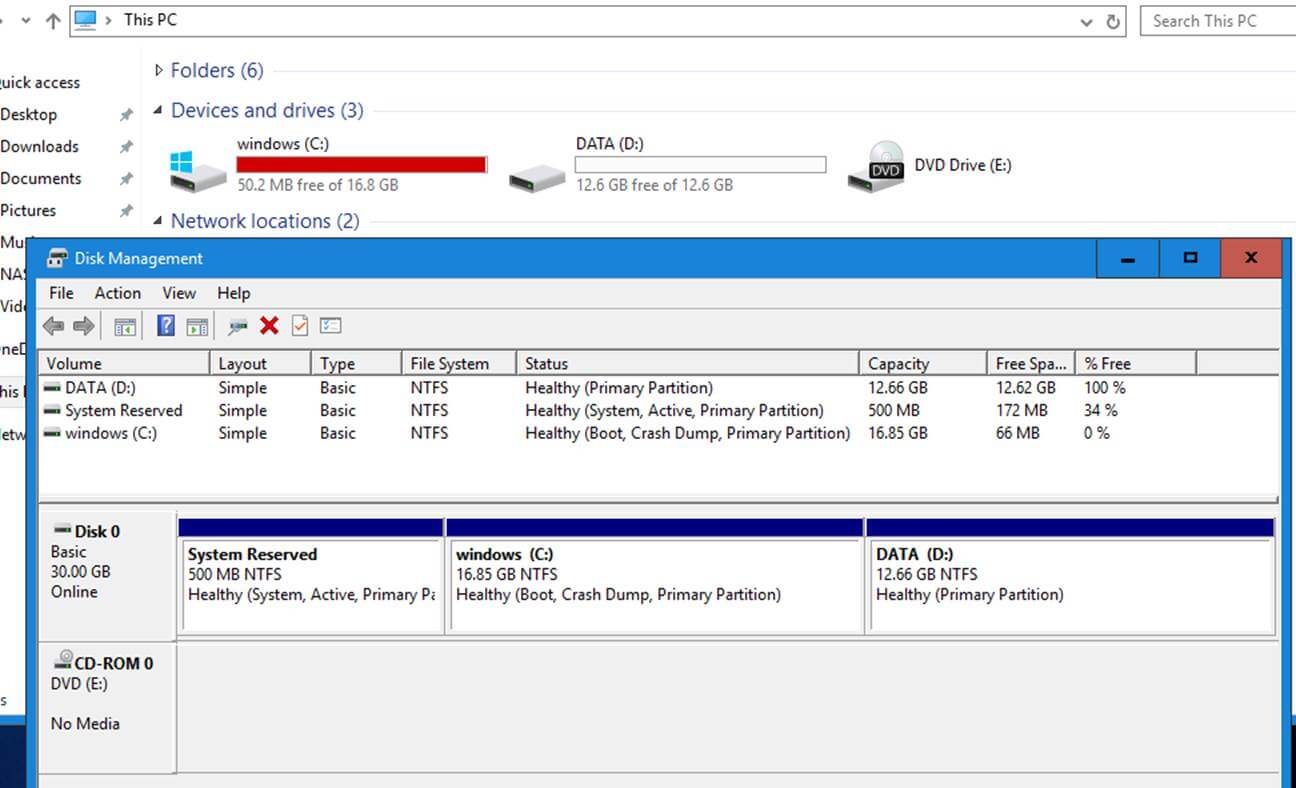
- Целевой диск оказывается не подключен и не инициализирован. Если мы можем загрузиться в систему на исходном диске: включаем диск в диспетчере устройств, инициализируем в «Управлении дисками». Если исходный диск отключен, то инициализируем диск в diskpart (list disk, select disk N, online, exit).
- Если целевой диск имел больший объём, чем исходный, на нем появится не распределенное пространство. Его можно использовать для создания нового раздела или присоединения к одному из текущих разделов (через «расширить том» в управлении дисками).

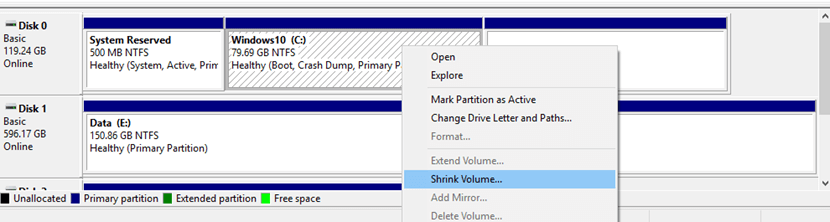
- В некоторых случаях процесс усложняется и утилитой «Управление дисками» не обойтись. Например, в ситуации на скриншоте, когда между разделом с данными и не распределенной областью есть системный раздел, придется использовать сторонний софт, чтобы увеличить системный раздел на всю область незанятого пространства, а затем — отдать пространство от увеличившегося системного раздела в пользу диска C.

Это не исчерпывающий список возможных проблем и методов решения: в зависимости от изначальной конфигурации (тип загрузки, размеры дисков, расположение раздела с загрузчиком) они могут быть другими.
В этой статье мы расскажем, как клонировать Windows с одного жесткого диска на другой SSD или HDD с помощью бесплатного приложения Clonezilla. Мы покажем, как использовать Clonezilla для полного переноса системы, сохраняя загрузочные файлы и все необходимые разделы. Этот процесс подходит для случаев, когда исходный диск меньше или равен по объему целевому диску.
Приобрести оригинальные ключи активации Windows всегда можно у нас в каталоге от 1099 ₽
Шаг 1: Скачивание Clonezilla
Сначала необходимо скачать Clonezilla с официального сайта. При выборе архитектуры выберите amd64 (даже если у вас процессор Intel). Формат файла лучше выбрать ISO для создания загрузочной флешки.
Так же вы можете скачать Clonezilla с нашего сервера.
Шаг 2: Запись Clonezilla на флешку
Запишите ISO-образ на флешку с помощью приложения Rufus. Если ваша система загружается в режиме Legacy, выберите соответствующий режим, а для UEFI необходимо отключить Secure Boot в BIOS перед загрузкой с флешки.
Как записать ISO-образ на флешку с помощью Rufus, можно прочитать в нашей другой статье.
Шаг 3: Загрузка с флешки
Подключите флешку с Clonezilla и перезагрузите компьютер. Загрузитесь с флешки, выбрав её в BOOT Menu (обычно F12 или Esc при старте компьютера). После загрузки вы увидите экран выбора. Выберите Clonezilla live и нажмите Enter.
Шаг 4: Настройка Clonezilla
1. После запуска выберите язык. В списке есть русский язык.

2. Оставьте раскладку клавиатуры по умолчанию.

3. Далее выберите “Запуск Clonezilla” и нажмите Enter.
4. В следующем меню выберите “Работать с диска на диск”, чтобы клонировать один диск на другой.
Шаг 5: Выбор уровня настроек
Clonezilla предлагает выбрать уровень настроек: начальный или экспертный. Рекомендуется выбрать экспертный уровень, чтобы избежать проблем с загрузчиком Windows. В противном случае вам может потребоваться восстанавливать загрузчик вручную.
Шаг 6: Выбор дисков для клонирования
1. Выберите диск, с которого будет производиться клонирование (например, диск 0).
2. Затем выберите целевой диск, на который будет производиться клонирование. Учтите, что все данные на целевом диске будут удалены.

Шаг 7: Настройка дополнительных параметров
1. Снимите отметку с пункта, который влияет на загрузчик Windows, используя пробел.
2. Пропустите проверку восстановления исходного файла системы, если уверены в целостности файловой системы.

3. Оставьте таблицу разделов без изменений — все разделы будут перенесены так, как есть.
Шаг 8: Завершение настроек и запуск клонирования
1. Выберите, что делать после завершения клонирования: перезагрузить систему, выключить компьютер и т.д.
2. Нажмите Enter для начала клонирования.

Clonezilla предупредит вас о том, что все данные на целевом диске будут удалены. Введите “y” для подтверждения и нажмите Enter.

Шаг 9: Ожидание завершения клонирования
Дождитесь завершения процесса клонирования. Это может занять продолжительное время в зависимости от объема данных и скорости дисков. После завершения нажмите Enter для продолжения.

Шаг 10: Перезагрузка и проверка результата
После завершения клонирования вы можете:
— Перезагрузить компьютер и войти в BIOS, чтобы выбрать новый диск в качестве основного загрузочного устройства.
— Отключить исходный диск, чтобы загрузиться только с нового диска.

Корректировка разделов после клонирования
Если целевой диск больше исходного, на нем может остаться нераспределенная область. Чтобы её использовать:
1. Нажмите клавиши Win + R, введите diskmgmt.msc, чтобы открыть управление дисками.
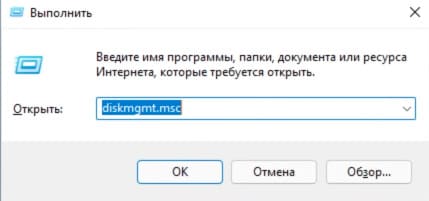
2. Найдите нераспределенное пространство на новом диске и либо создайте новый раздел, либо расширьте существующий.
Clonezilla — мощное и бесплатное решение для клонирования жестких дисков. С его помощью можно легко перенести Windows на новый SSD или HDD, сохранив все системные файлы и настройки. Несмотря на то, что приложение может показаться сложным, следуя данной инструкции, вы сможете успешно выполнить клонирование и настроить систему для работы с нового диска. Удачи!
This tutorial represents a practical excerpt on how to migrate (also known as cloning) a Windows 10 Operating System from a large HDD with multiple partitions, such as C:, D:, to a smaller SSD using a Linux distribution which includes Clonezilla utility.
Clonezilla utility can run from PartedMagic Linux distribution CD ISO image or directly from Clonezilla Linux distribution CD ISO image.
This guide assumes that both disks (old HDD and SSD) are physically plugged-in into your machine simultaneously and Windows OS is installed on a disk with MBR partition scheme table. Fdisk command line utility should display the disklabel type as DOS.
Read Also: 8 Open Source Disk Cloning and Backup Solutions for Linux
If disk in partitioned in MBR layout from UEFI, you should clone all partitions, such as Windows RE partition, EFI System partition, Microsoft Reserved partition and Microsoft basic data partition which holds the Windows OS partition, typically the C: drive. In this case Fdisk command line utility should report the disklabel type as GPT.
On the below screenshots you can review the initial Windows partitioning scheme in case of a MBR layout style and GPT partition layout performed from UEFI.
MBR Partition Layout from Disk Management
GPT Partition Layout from Disk Management

Step 1: Shrink C: Partition of Windows System
Be aware that in the case your windows C: partition from the HDD is larger than the total size of your SSD you will need reduce its size to fit on the SSD.
The calculations for this step are simple:
System Reserved + Recovery + EFI partition + Windows C: partitions must be smaller or equal than the total size of the SSD reported by a utility such as fdisk.
1. To shrink C: partition from Windows, first open a Command Prompt window and execute the diskmgmt.msc to open Windows Disk Management utility which will be used to Shrink the volume (assuming that windows is installed at the beginning of the disk on the second partition, after the System Reserved partition and has C: letter assigned) in order to reduce its size to minimal.
Feel free to use other partitioning tools for this step, such as Gparted run from a live Linux ISO, to reduce C: drive size to minimal.
2. After you’ve reduced the size of C: partition, plug the SSD drive to your machine motherboard and reboot the machine into Clonezilla utility (use Clonezilla ISO image or <arel=”nofollow” href=”https://partedmagic.com/downloads/” target=”_blank”>Parted Magic ISO), enter to Bash shell interface and check both disks partition table and size using the below commands.
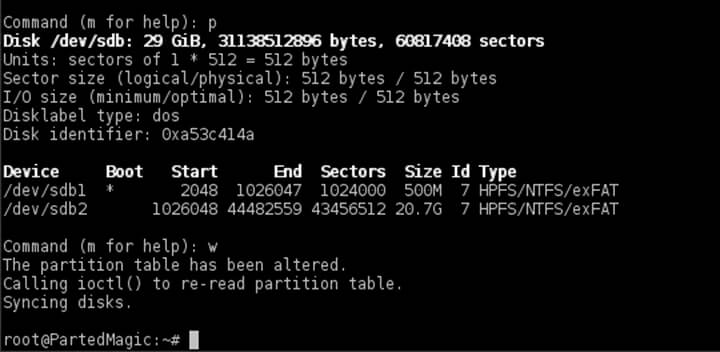
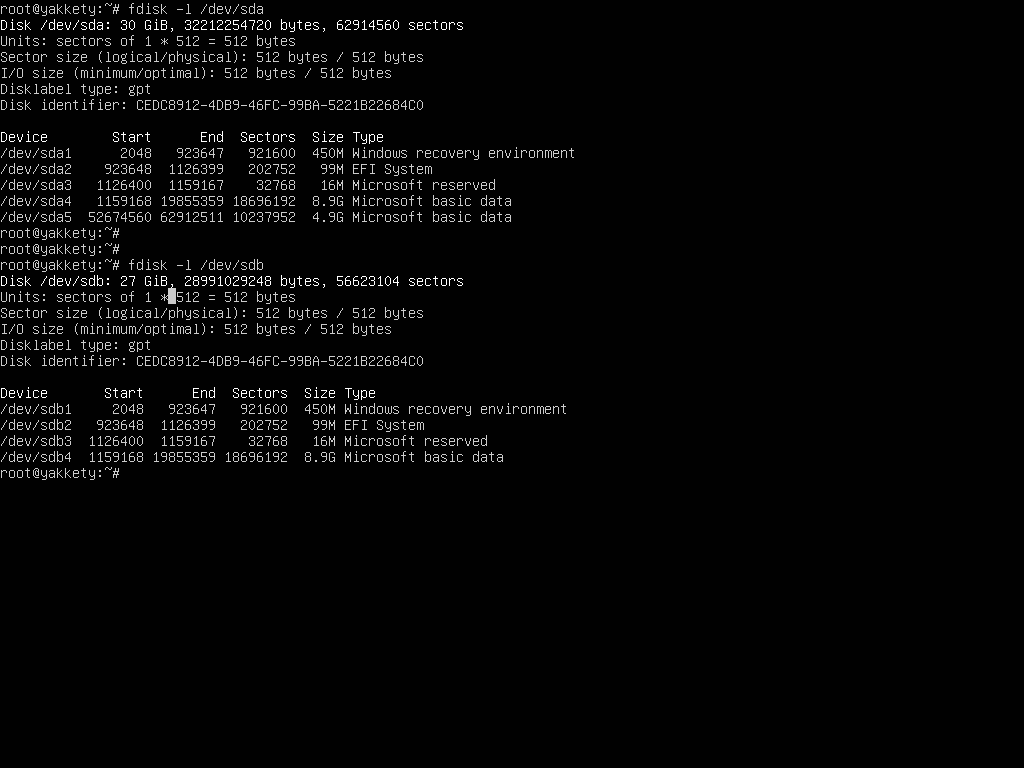
# fdisk -l /dev/sda
# fdisk -l /dev/sdb
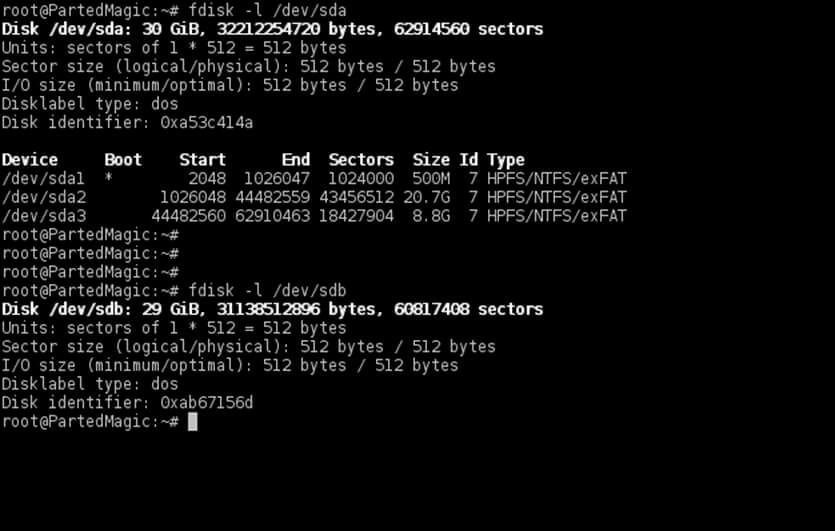
Be aware that your drives names would be sda for the first disk, sdb for the second and so on. Choose the disk with maximum attention so you won’t end-up cloning the wrong device and destroy all data.
To match the correct disk source (HDD in this case) and disk destination target (SSD) use the size and the partition table reported by fdisk command. Fdisk output will show that the SSD should be smaller in size than your HDD disk and should have no partition table created by default.
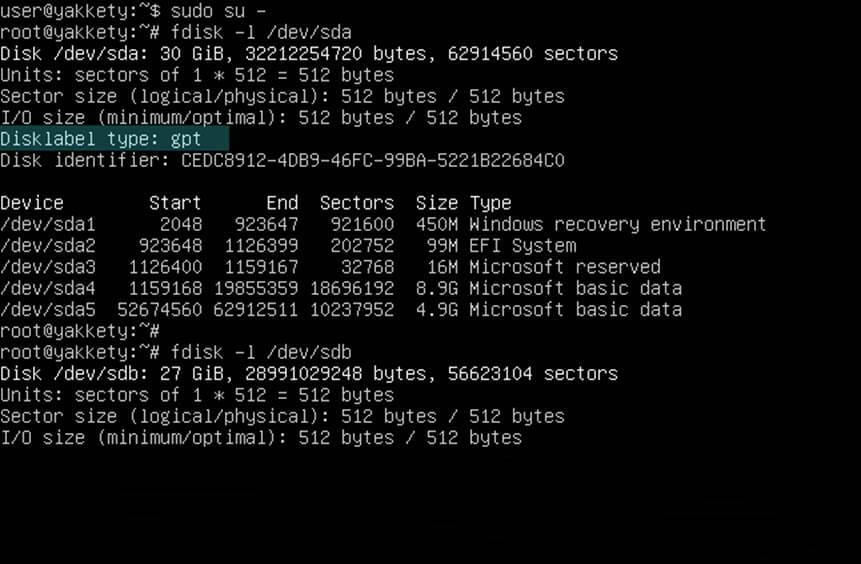
In case of a GPT disk, the HDD partition table should look as illustrated on the below screenshot.
$ su -
# fdisk -l /dev/sda
# fdisk -l /dev/sdb
Step 2: Clone Disks Using Clonezilla
3. Next , clone only the MBR (stage one bootloader + partition table) from the HDD to the SSD target disk using one of the below commands (assuming that sda represents the drive where Windows OS is installed and sdb the SSD disk).
# dd if=/dev/sda of=/dev/sdb bs=512 count=1
or
# sfdisk -d /dev/sda | sfdisk -f /dev/sdb

In case of a GPT partition style you should clone the first 2048 bytes:
# dd if=/dev/sda of=/dev/sdb bs=2048 count=1
Or use sgdisk utility. Be aware that if you copy partition table from sda to sdb you should inverse the order of disks when using sgdisk.
# sgdisk -R /dev/sdb /dev/sda
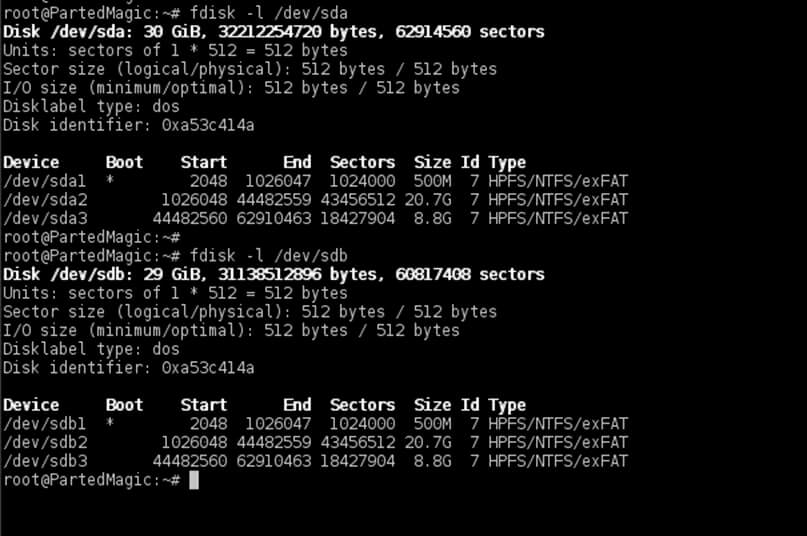
After cloning the MBR/GPT, run fdisk command again with the -l flag to verify if the partition table matches on both disks.
# fdisk -l /dev/sda
# fdisk -l /dev/sdb
4. By now both drives should have the exact partition table. On the target disk now delete all the partitions that follow after the Windows partition in order to start with a clean partition table with the entries necessaries only for system reserved and windows.
You won’t clone data from D: (or other partitions that follow Windows) from the old drive. You’re basically cloning only the first two partitions from the old HDD. Later you will use this unallocated space left behind to extend the C: partition by incorporating all the unused space from SSD.
Use fdisk utility as described below to delete partitions. First run the command against your SSD target drive (/dev/sdb this case), print partition table with p key, press d key to start delete partitions and choose the last partition number from the prompt (in this case the third partition) as illustrated in the below screenshots.
# fdisk /dev/sdb
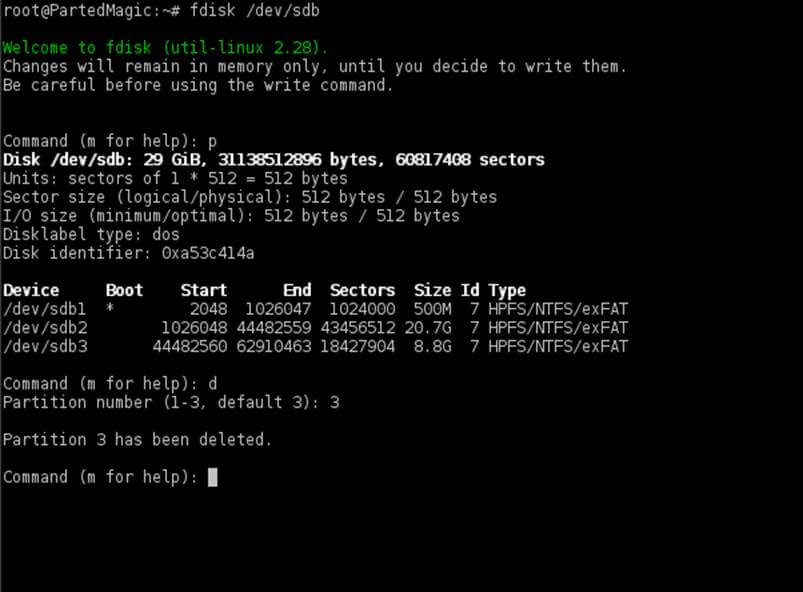
In case your drive has more than one partition following after the Windows partition, make sure you delete all of them. After you’ve finished removing all unneeded partitions, press p key again to print partition table and if, by now, only the two required Windows partitions are listed, you are safe to hit on w key in order to apply all changes.
The same procedure for deleting last partitions applies for GPT disks also, with the mention that you should use cgdisk utility which is intuitive to work with in manipulation a disk layout.
Don’t worry about destroying backed-up partition table at the end of the GPT disk, cgdisk will make the appropriate changes on both partition tables and will save the new disk layout table at the end of the disk automatically.
# cgdisk /dev/sdb
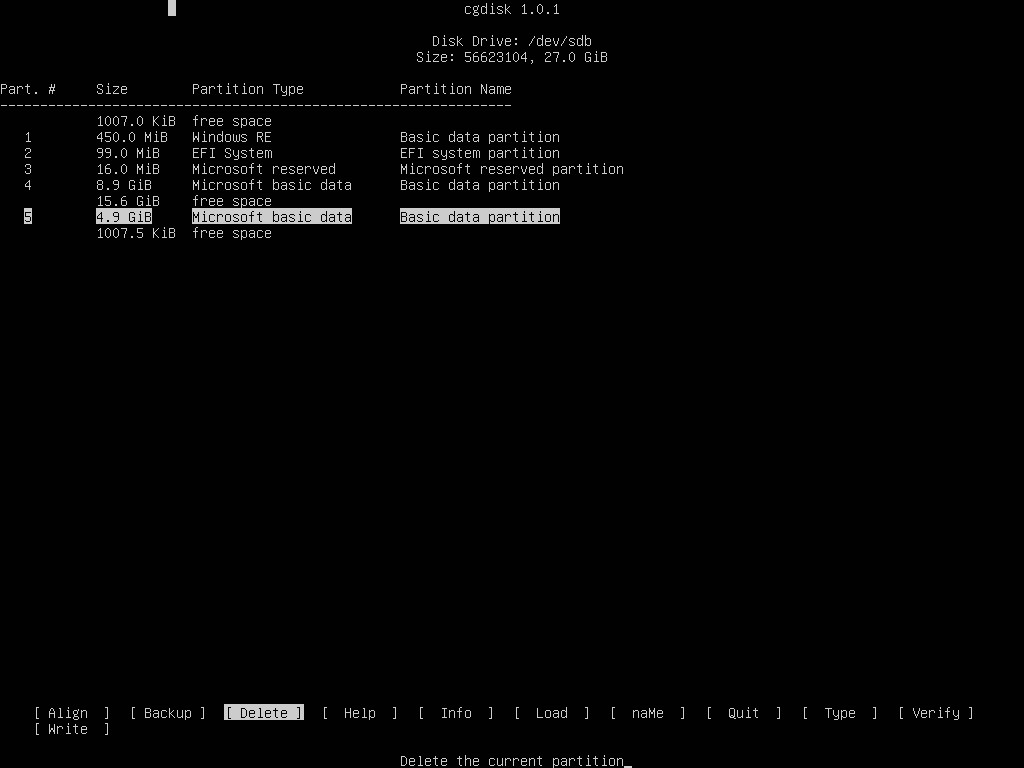
And the final GPT disk report with the last 4,9 GB partition deleted.
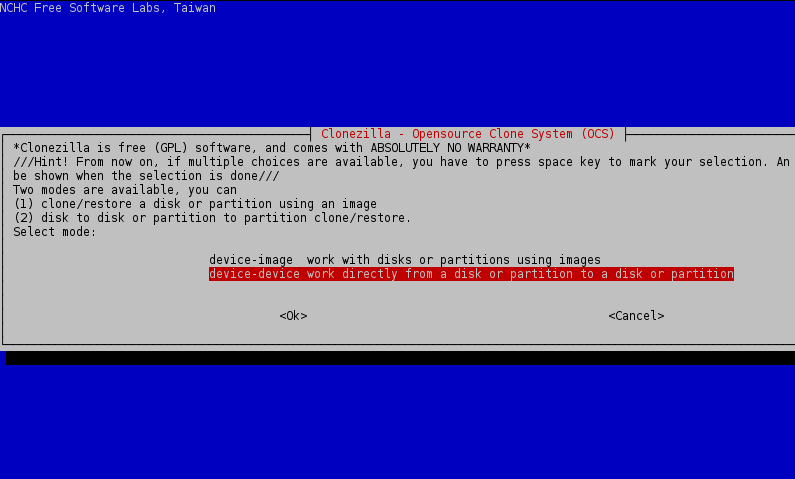
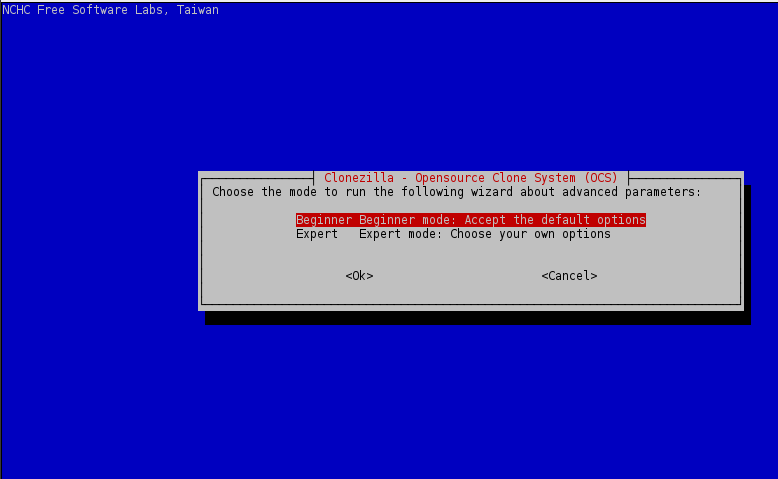
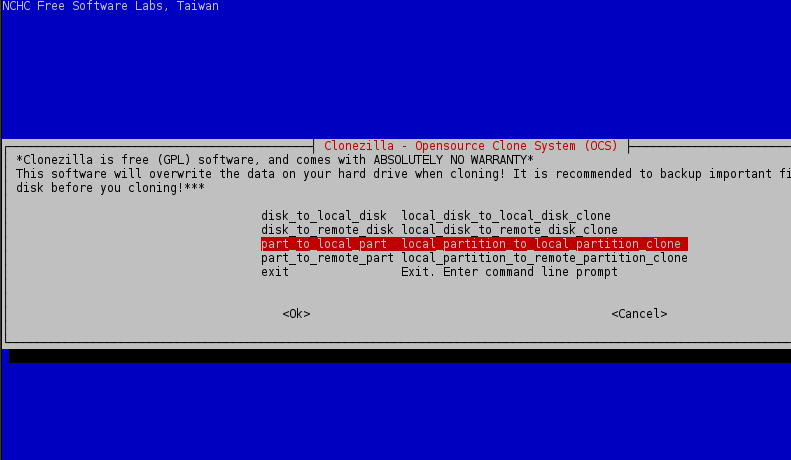
5. Now, if everything is in place, start Clonezilla utility, select device-device mode, run from beginner wizard and select part-to-local_part cloning option.
Use the below screenshots for guide.
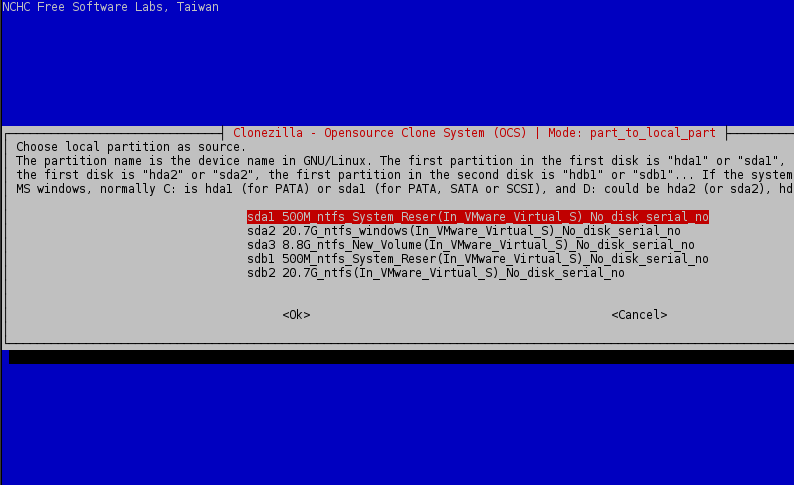
6. Choose the first local partition from the list (sda1 – System Reserved ) as source and press Enter key to continue.
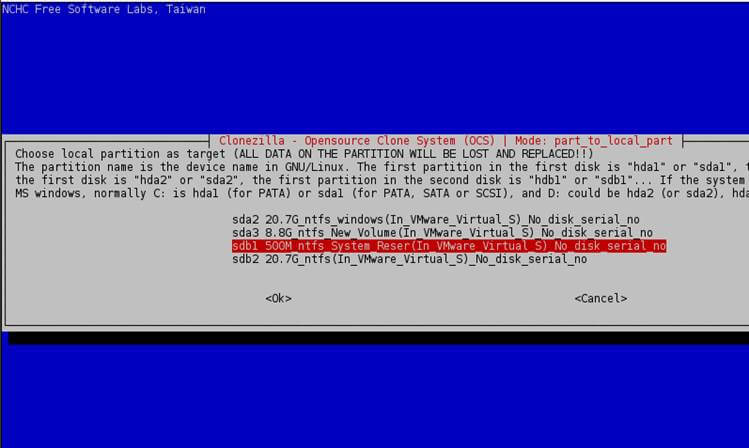
7. Next, choose the local target partition, which will be the first partition from the second disk, (/dev/sdb1) and press Enter key to continue.
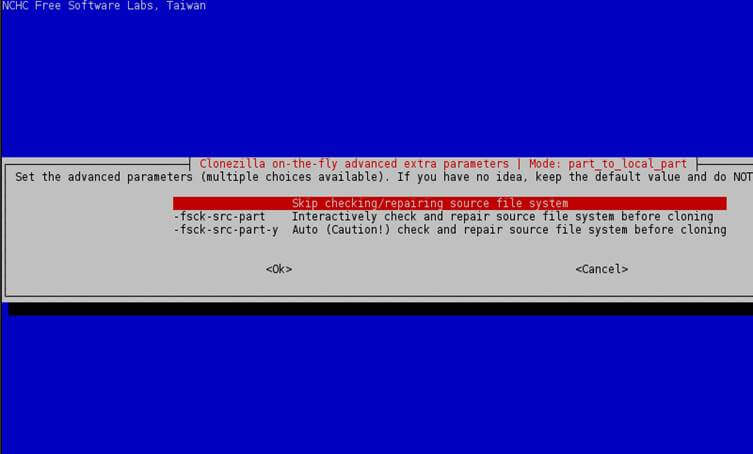
8. On the next screen choose to Skip check/repair file system and press Enter key again to continue.
9. Finally, press Enter key again to Continue and answer with yes (y) twice to accept the warnings and start the cloning process.
10. After the cloning process of the first partition finishes select to enter command line prompt, run clonezilla and repeat the same steps for next partitions (source sda2 – target sdb2, etc).

11. After all windows partitions are cloned, reboot the system and physically unplug the HDD drive or, better, tamper BIOS settings in order to set SSD as primary boot drive instead of old HDD.
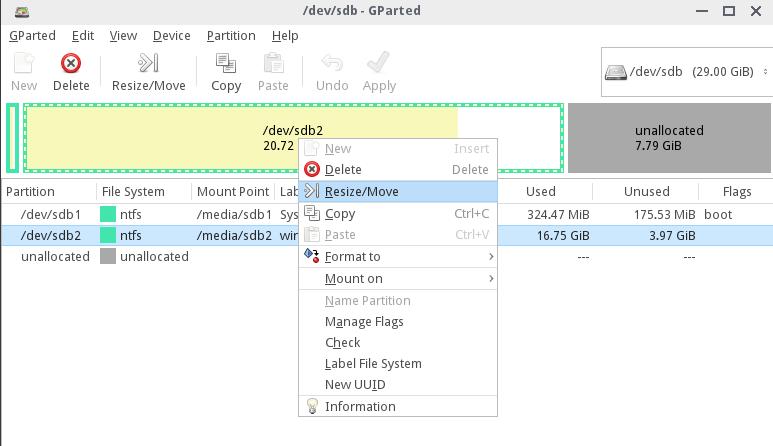
Step 3: Resize Windows Partition
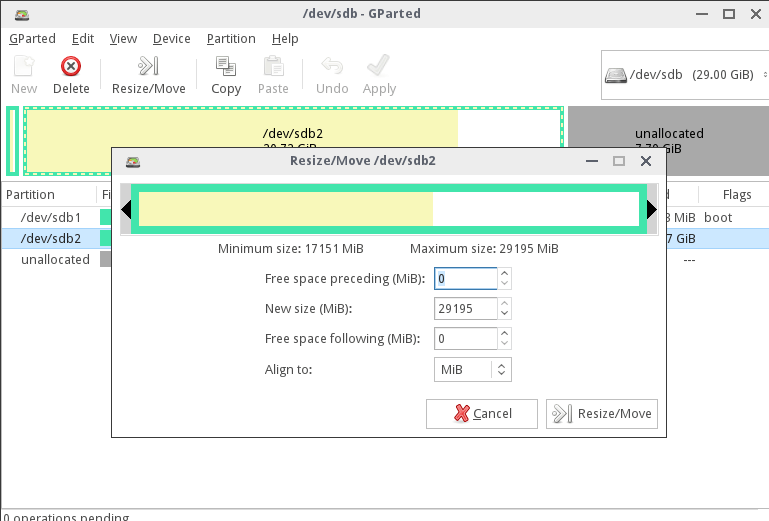
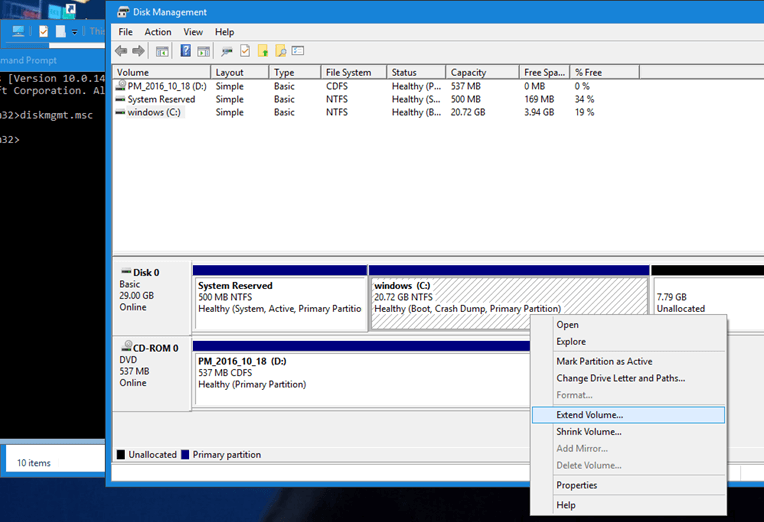
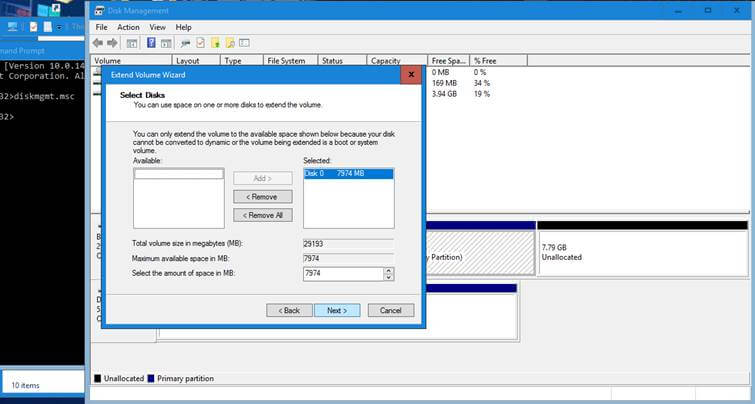
12. You can run Gparted utility to check partitions sanity and extend windows partition from Linux or you can just boot into Windows and use Disk Management utility to do this job. The below screenshots illustrate how to use both utilities.
Extend Partition using Gparted Live CD
Extend Partition using Windows Disk Management utility directly from Windows.
That’s all! The C: partition is now expanded to the maximum size of your SSD and Windows can now run at its maximum speed on a brand new SSD. The old HDD has all data intact.
Connect the hard-disk again in order to use it in case you’ve physically removed it from the motherboard. You can delete system reserved partition and windows partition from the old HDD and create a new partition instead of these two. The other old partitions (D:, E: etc) will remain intact.
Conclusion
With Clonezilla you can also choose to image the partitions and save them to an external HDD or a network location. In this case you must also backup HDD MBR/GPT with one of the following commands and save the MBR image to the same directory where your clonezilla images are kept.
MBR backup to file:
# dd if=/dev/sda of=/path/to/MBR.img bs=512 count=1
or
# sfdisk -d /dev/sda > =/path/to/sda.MBR.txt
GPT Backup to file:
# dd if=/dev/sda of=/path/to/GPT.img bs=2048 count=1
or
# sgdisk --backup=/path/to/sda.MBR.txt /dev/sda
For a future restoration of your Windows system from a network location, first restore the MBR sector from the saved imaged above using one of the below commands, then proceed with restoring each clonezilla partition image one by one.
MBR image restore from file:
# dd if=/path/to/MBR.img of=/dev/sda bs=512 count=1
or
# sfdisk /dev/sda < =/path/to/sda.MBR.txt
GPT image restore from file:
# dd if=/path/to/GPT.img of=/dev/sda bs=2048 count=1
# sgdisk - -load-backup=/path/to/sda.MBR.txt /dev/sda
Read Also: How to Clone or Backup Linux Disk Using Clonezilla
This method has been used multiple times on BIOS motherboards and on UEFI machines with Windows installed from Legacy Mode (CSM) or directly from UEFI without any error or data loss.
If you want to migrate HDD to SSD to get a fast speed, you may choose to use Clonezilla. How to use Clonezilla in Windows 11/10? If this tool is not working, is there a Clonezilla alternative? Refer to this post that focuses on Clonezilla HDD to SSD and you can get the answers given by MiniTool.
Using an HDD on your computer may be the factor that causes the machine to run slowly. The traditional hard disk can offer a large storage capacity and the best price ratio. However, in terms of performance, it works not well. To get the best performance, you can choose to install the system on an SSD.
To replace the HDD with SSD, you need to install Windows from scratch, which is time-consuming and complicates the process. If your system is going well, this is not necessary. If you want to keep all data of HDD, hard drive cloning is an option to migrate HDD to SSD.
Clonezilla HDD to SSD Migration
When it comes to HDD to SSD migration, you may take Clonezilla into consideration. As a free and open-source disk imaging/cloning program, Clonezilla is well-liked since it supports system deployment, bare metal backup and recovery, disk cloning, and more.
Clonezilla offers three available types:
Clonezilla live – it is suitable for single machine backup and recovery.
Clonezilla lite server and Clonezilla – they can be used for massive deployment; to be specific, they can help you to clone more than 40 computers at the same time.
Only used blocks in the hard disk are saved and restored, which improves the clone efficiency.
Clonezilla is compatible with multiple platforms, including Linux, macOS, Chrome OS, and Windows. If you want to clone HDD to SSD, you can run Clonezilla that can help to transfer the current installation of Windows, your apps, settings, files, and more to a new drive like SSD without reinstalling the operating system.
Step-by-Step Guide – Clonezilla HDD to SSD Cloning in Windows 11/10
How to use Clonezilla live to clone HDD to SSD? The operations are not simple and you should follow the step-by-step instructions below.
#1. Shrink Volume (Optional)
Attention:
There is a point you must pay attention to – the destination drive must be equal or larger than the source one. That is, if you want to clone a drive that is using 500GB storage, to get a complete and successful clone, the destination drive must also have at least 500GB available.
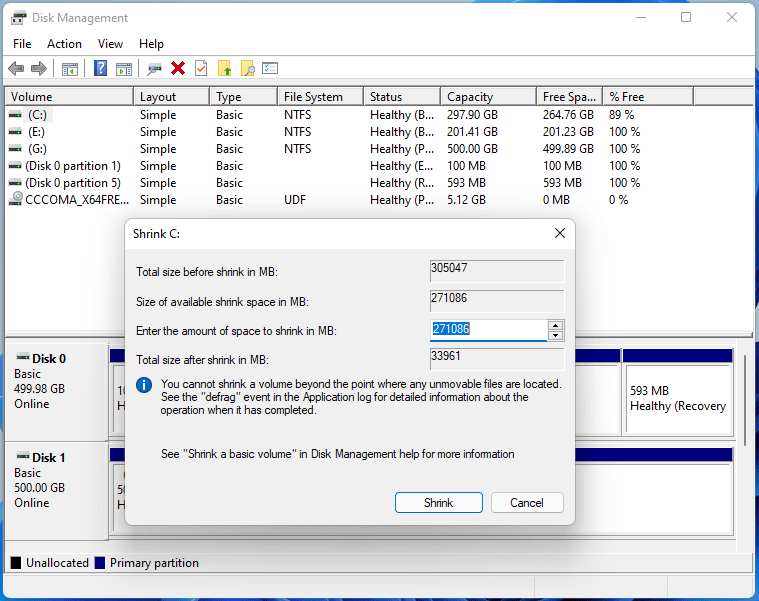
Before you do, prepare an SSD that is large enough. If you want to migrate HDD to a smaller SSD, it is realizable provided that you need to shrink the source drive to fit the destination drive. Just go to Disk Management in Windows 11/10, right-click the C partition, and choose Shrink Volume. Then, customize the size of the volume and click Shrink. After that, go on the following steps.
If your SSD is large than the source drive, skip this step and continue.
#2. Get Clonezilla Bootable USB
For Clonezilla cloning, you can run Clonezilla live that allows you to use a USB flash drive or CD/DVD to boot and run Clonezilla to migrate HDD to SSD. Here, we take a USB drive as an example.
How to install Clonezilla on USB?
1. Go to the download page of Clonezilla, choose amd64 from the CPU architecture section, set file type to iso, and then click the Download button on your PC.
2. Go to the Rufus website and download this burning tool. Currently, the latest version is Rufus 3.17.
3. Connect your USB flash drive to your computer.
4. Double-click on the exe file of Rufus to launch it.
5. Click the SELECT button, choose the iso file of Clonezilla you have downloaded, and then click START to create a bootable Clonezilla Windows 11/10 USB drive.
After these steps, the Clonezilla bootable USB drive has been created. Now, you can boot the PC from this drive to clone HDD to SSD. Just restart your computer, press a function key to enter the BIOS menu, and then change the boot sequence as the USB drive. Based on different manufacturers, the setting is different.
#3. Clonezilla Migrate HDD to SSD in Windows 11/10
The next step is to use Clonezilla live to start the disk cloning. Make sure your SSD has been connected to your computer and then follow these instructions to start Clonezilla cloning HDD to SSD.
Tip: Before cloning, make sure you have backed up important files on the target disk – SSD since Clonezilla will overwrite the data on that hard drive.
1. After booting your PC from the bootable USB drive, choose Clonezilla live when seeing the interface below and press Enter.
2. After choosing a language, press Enter.
3. Configure the keyboard layout – keep the default keyboard layout or choose another one.
4. Choose to start Clonezilla or enter login shell (command prompt). We choose the first option to continue.
5. Choose a mode to continue: to clone HDD to SSD in Windows 11/10, highlight the option of device-device work directly from a disk or partition to a disk or partition, and press Enter.
6. Select Beginner Beginner mode: Accept the default options to go on.
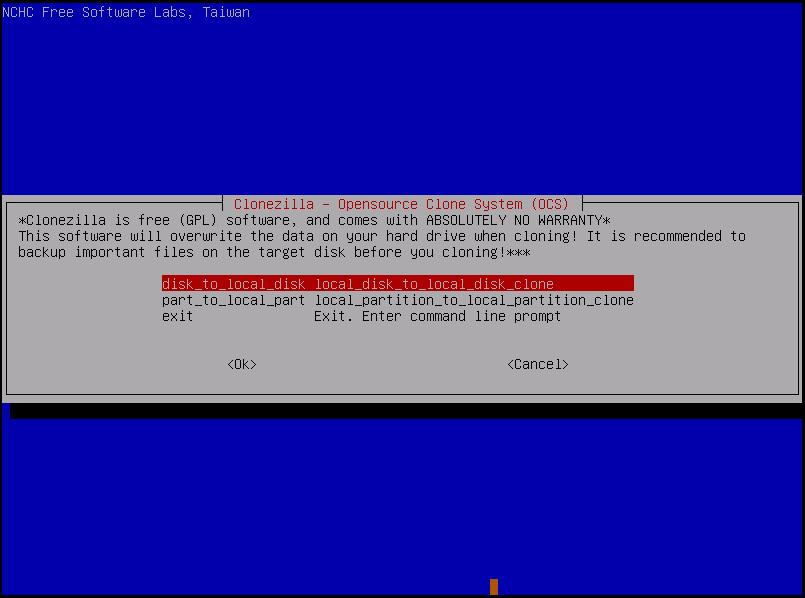
7. In the new window, you are asked to choose a cloning method. To clone the entire HDD to SSD, you need to choose the option of disk_to_local_disk local_disk_to_local_disk_clone and then continue.
8. Choose the source disk and target disk in turn. In terms of Clonezilla HDD to SSD, here choose your HDD as the source drive and SSD as the destination drive.
9. Set the advanced parameters. If you have no idea, keep the default value to continue.
10. Decide the action to perform when everything is finished – choose, reboot, or poweroff. You can select anyone.
11. Press Y and Enter three times to confirm the operations including the cloning process, data overwriting during cloning, and cloning the boot loader (this can make the Windows 10/11 drive bootable).
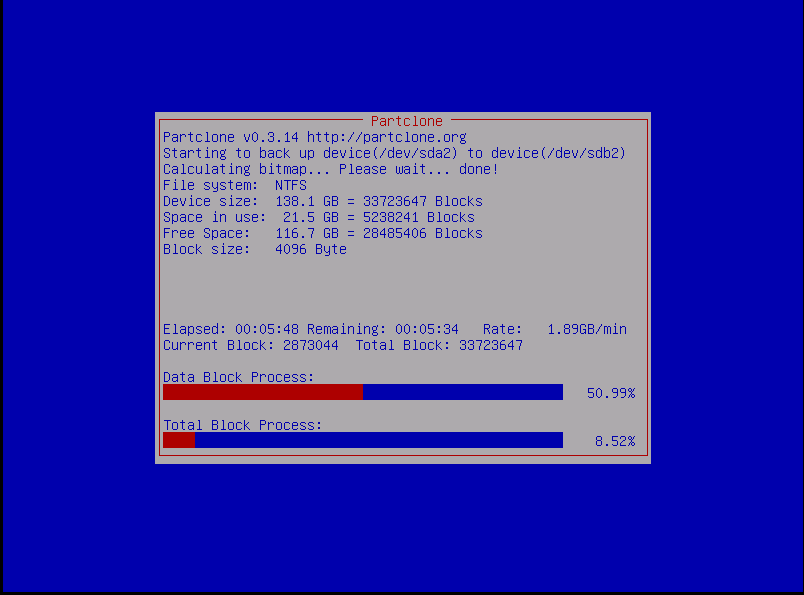
12. Now, Clonezilla is cloning your hard drive to an SSD. The cloning process may take a few minutes and wait patiently.
After cloning, you can shut down the system, open the case of your computer, remove the old hard drive and put the SSD into the original location. Then, run your PC from the SSD to enjoy the best performance.
Review of Clonezilla Disk to Disk (HDD to SSD) Cloning
After reading so much information about Clonezilla cloning, you may find it is pretty difficult to migrate HDD to SSD using Clonezilla for a newbie since there is no user interface. Besides, it is time-consuming and troublesome since you need to prepare a Clonezilla bootable USB.
Furthermore, some users have reported the issue of Clonezilla not working and here are common cases – Clonezilla failed to clone bad sectors, Clonezilla failed to clone due to disk size, etc. Sometimes, Clonezilla Windows 11/10 is not booting after clone because of some reasons, for example, BIOS or UEFI boot mode mismatch, missing EFI system partition or system reserved partition, etc.
To clone a hard drive to an SSD easily and effectively, you can try a Clonezilla alternative. In the next part, we will show you one.
Instead of cloning HDD to SSD using Clonezilla, we prefer to recommend MiniTool ShadowMaker. It is not only a free disk cloning software but also backup & recovery software for Windows 11/10/8/7 (imaging backup system, disk, partition, files, or folders). As well, it can be a good sync software to sync folders and files to another location.
In terms of cloning, MiniTool ShadowMaker allows you to clone the entire hard drive to another disk, for example, HDD to SSD. If your SSD is smaller, you can finish the cloning process successfully as long as the SSD can hold all the data on the source disk. The cloned drive is bootable. That is, you can replace the HDD with the SSD to run Windows as normal.
This software offers a clear and easy-to-use interface, making disk cloning easy. Next, let’s see how to clone your disk to disk via this Clonezilla alternative.
Step 1: Connect your SSD to your computer.
Step 2: Get MiniTool ShadowMaker Trial Edition by clicking the download button below and then install it on your PC by following the on-screen instructions.
MiniTool ShadowMaker TrialClick to Download100%Clean & Safe
Step 3: Double-click the icon of this software and click Keep Trial to enter the main interface.
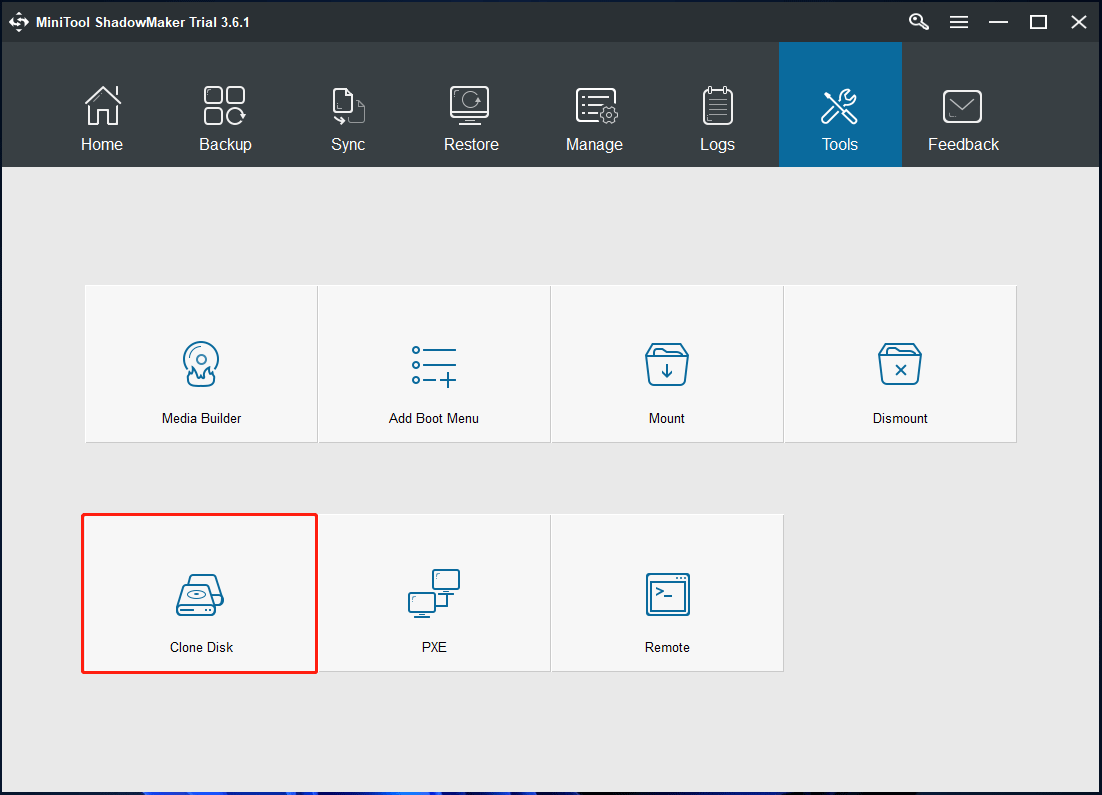
Step 4: Click Tools at the top and click Clone Disk to continue.
Step 5: In the new window, choose the source disk and destination disk by clicking the corresponding section. To migrate HDD to SSD, choose your HDD as the source disk and SSD as the target disk. Then, click OK and Yes to start the cloning process.
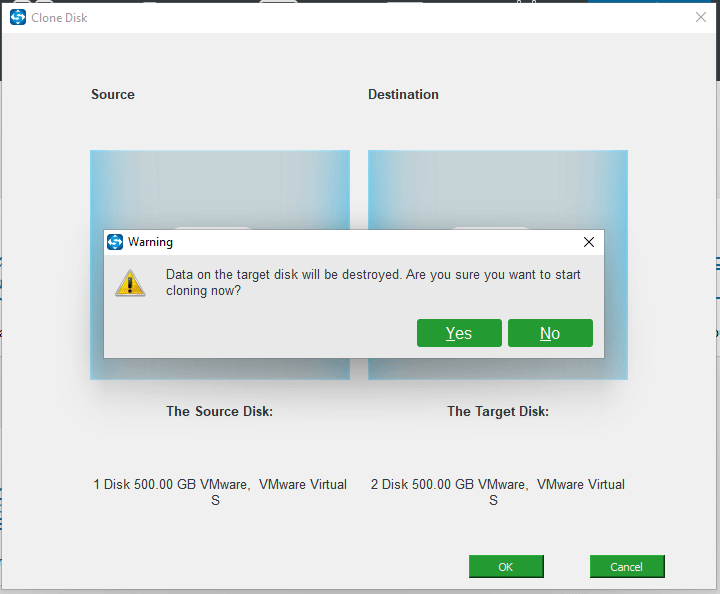
Note: You also need to note that the cloning process can erase all the data on your target disk. If there are crucial files on that disk, create a backup beforehand to avoid data loss.
Step 6: This Clonezilla alternative starts disk cloning. The cloning time depends on the data on your source disk. Wait patiently.
After finishing all the operations, shut down your PC, remove the HDD from your computer and then put the SSD in the original place. Then, boot the PC and you can enjoy a fast speed.
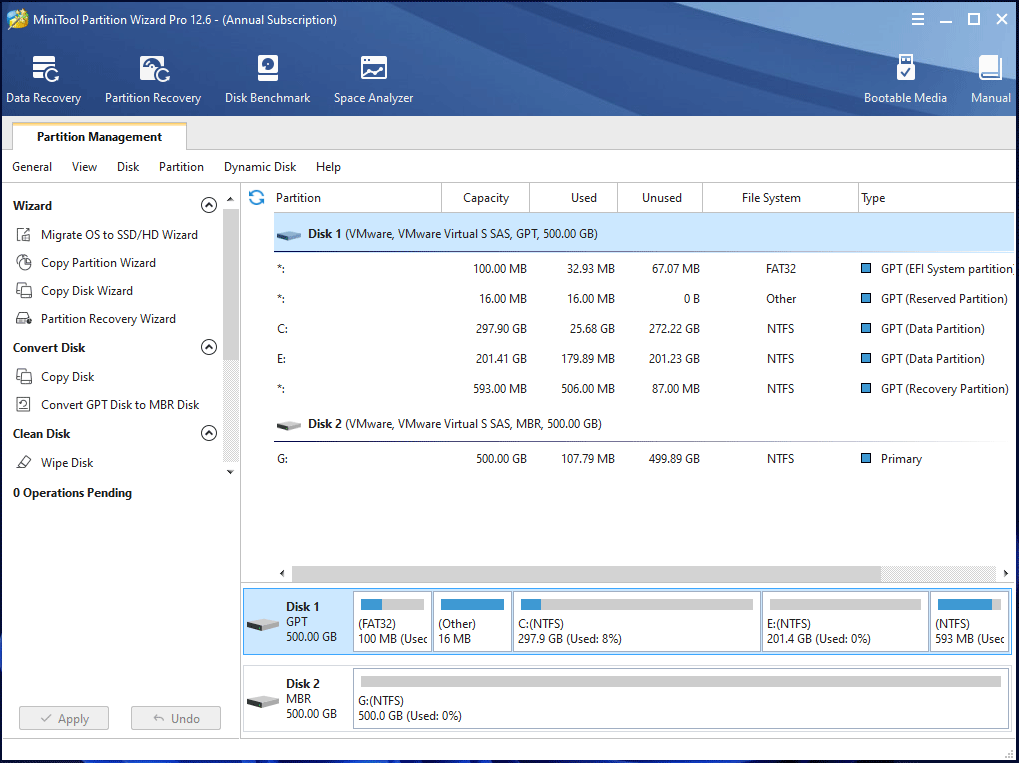
In addition, there is another alternative to Clonezilla for HDD to SSD cloning and it is MiniTool Partition Wizard. This hard drive cloning software allows you to migrate Windows to SSD/HDD, clone the entire disk and partition.
To deal with the system disk, you need to get its full edition – Pro or an advanced one via the MiniTool Store website. It also gives you a clear and visual user interface and allows you to finish cloning easily within a few steps.
In its main interface, you can find some options under the Wizard section. To clone HDD to SSD, you can use its Migrate OS to SSD/HD Wizard and Copy Disk Wizard. Then, follow the on-screen instructions to finish the cloning process.
A Simple Conclusion
MiniTool ShadowMaker and MiniTool Partition Wizard are easy to use due to their simple and clear user interface compared to Clonezilla. Besides, they allow you to clone to a smaller disk if the target drive is large enough to hold all the contents of the source disk, which breaks the limitation of Clonezilla. Within a few steps, you can easily finish disk cloning.
MiniTool software is the best hard drive cloning software. Just get one based on your needs for cloning.
Bottom Line
In this post, you know what Clonezilla is, how to use Clonezilla live for cloning HDD to SSD, and two MiniTool hard drive cloning software – Clonezilla alternatives.
If you are an advanced user, you can download Clonezilla, create a bootable USB drive to boot the PC, and then start disk cloning via Clonezilla. But if you are a novice or encounter Clonezilla not working, try to install MiniTool ShadowMaker or MiniTool Partition Wizard to transfer HDD to SSD for the best performance.
If you have any ideas, don’t hesitate and leave a comment below. We will reply to you as soon as possible. Thanks in advance.
This tutorial represents a practical excerpt on how to migrate (also known as cloning) a Windows 10 Operating System from a large HDD with multiple partitions, such as C:, D:, to a smaller SSD using a Linux distribution which includes Clonezilla utility.
Clonezilla utility can run from PartedMagic Linux distribution CD ISO image or directly from Clonezilla Linux distribution CD ISO image.
This guide assumes that both disks (old HDD and SSD) are physically plugged-in into your machine simultaneously and Windows OS is installed on a disk with MBR partition scheme table. Fdisk command line utility should display the disklabel type as DOS.
Read Also: 8 Open Source Disk Cloning and Backup Solutions for Linux
If disk in partitioned in MBR layout from UEFI, you should clone all partitions, such as Windows RE partition, EFI System partition, Microsoft Reserved partition and Microsoft basic data partition which holds the Windows OS partition, typically the C: drive. In this case Fdisk command line utility should report the disklabel type as GPT.
On the below screenshots you can review the initial Windows partitioning scheme in case of a MBR layout style and GPT partition layout performed from UEFI.
MBR Partition Layout from Disk Management
Check MBR Partition Layout
GPT Partition Layout from Disk Management
Check MBR Partition Layout
Step 1: Shrink C: Partition of Windows System
Be aware that in the case your windows C: partition from the HDD is larger than the total size of your SSD you will need reduce its size to fit on the SSD.
The calculations for this step are simple:
System Reserved + Recovery + EFI partition + Windows C: partitions must be smaller or equal than the total size of the SSD reported by a utility such as fdisk.
1. To shrink C: partition from Windows, first open a Command Prompt window and execute the diskmgmt.mscto open Windows Disk Management utility which will be used to Shrink the volume (assuming that windows is installed at the beginning of the disk on the second partition, after the System Reserved partition and has C:letter assigned) in order to reduce its size to minimal.
Shrink C Partition
Feel free to use other partitioning tools for this step, such as Gparted run from a live Linux ISO, to reduce C:drive size to minimal.
2. After you’ve reduced the size of C: partition, plug the SSD drive to your machine motherboard and reboot the machine into Clonezilla utility (use Clonezilla ISO image or <arel=”nofollow” href=”https://partedmagic.com/downloads/” target=”_blank”>Parted Magic ISO), enter to Bash shell interface and check both disks partition table and size using the below commands.
# fdisk -l /dev/sda
# fdisk -l /dev/sdb
Check Partition Table Size
Be aware that your drives names would be sda for the first disk, sdb for the second and so on. Choose the disk with maximum attention so you won’t end-up cloning the wrong device and destroy all data.
To match the correct disk source (HDD in this case) and disk destination target (SSD) use the size and the partition table reported by fdisk command. Fdisk output will show that the SSD should be smaller in size than your HDD disk and should have no partition table created by default.
In case of a GPT disk, the HDD partition table should look as illustrated on the below screenshot.
$ su -
# fdisk -l /dev/sda
# fdisk -l /dev/sdb
Check Partition Disk Label
Step 2: Clone Disks Using Clonezilla
3. Next , clone only the MBR (stage one bootloader + partition table) from the HDD to the SSD target disk using one of the below commands (assuming that sda represents the drive where Windows OS is installed and sdbthe SSD disk).
# dd if=/dev/sda of=/dev/sdb bs=512 count=1
or
# sfdisk -d /dev/sda | sfdisk -f /dev/sdb
Clone Disks Using Clonezilla
In case of a GPT partition style you should clone the first 2048 bytes:
# dd if=/dev/sda of=/dev/sdb bs=2048 count=1
Or use sgdisk utility. Be aware that if you copy partition table from sda to sdb you should inverse the order of disks when using sgdisk.
# sgdisk -R /dev/sdb /dev/sda
After cloning the MBR/GPT, run fdisk command again with the -l flag to verify if the partition table matches on both disks.
# fdisk -l /dev/sda
# fdisk -l /dev/sdb
Verify Partition Table
4. By now both drives should have the exact partition table. On the target disk now delete all the partitions that follow after the Windows partition in order to start with a clean partition table with the entries necessaries only for system reserved and windows.
You won’t clone data from D: (or other partitions that follow Windows) from the old drive. You’re basically cloning only the first two partitions from the old HDD. Later you will use this unallocated space left behind to extend the C: partition by incorporating all the unused space from SSD.
Use fdisk utility as described below to delete partitions. First run the command against your SSD target drive (/dev/sdb this case), print partition table with p key, press d key to start delete partitions and choose the last partition number from the prompt (in this case the third partition) as illustrated in the below screenshots.
# fdisk /dev/sdb
Delete Partition Table
In case your drive has more than one partition following after the Windows partition, make sure you delete all of them. After you’ve finished removing all unneeded partitions, press p key again to print partition table and if, by now, only the two required Windows partitions are listed, you are safe to hit on w key in order to apply all changes.
Confirm Partition Changes
The same procedure for deleting last partitions applies for GPT disks also, with the mention that you should use cgdisk utility which is intuitive to work with in manipulation a disk layout.
Don’t worry about destroying backed-up partition table at the end of the GPT disk, cgdisk will make the appropriate changes on both partition tables and will save the new disk layout table at the end of the disk automatically.
# cgdisk /dev/sdb
Delete GPT Partition
And the final GPT disk report with the last 4,9 GB partition deleted.
Verify GPT Partition Table
5. Now, if everything is in place, start Clonezilla utility, select device-device mode, run from beginner wizard and select part-to-local_part cloning option.
Use the below screenshots for guide.
Select Clonezilla Device Mode
Select Clonezilla Beginner Mode
Select Clonezilla Local Partition Clone
6. Choose the first local partition from the list (sda1 – System Reserved ) as source and press Enter key to continue.
Select Partition to Clone
7. Next, choose the local target partition, which will be the first partition from the second disk, (/dev/sdb1) and press Enter key to continue.
Select Local Target Partition
8. On the next screen choose to Skip check/repair file system and press Enter key again to continue.
Skip Check Repair Filesystem
9. Finally, press Enter key again to Continue and answer with yes (y) twice to accept the warnings and start the cloning process.
Confirm Partition Changes
Start Cloning Partition
10. After the cloning process of the first partition finishes select to enter command line prompt, run clonezillaand repeat the same steps for next partitions (source sda2 – target sdb2, etc).
Clone Second Partition
11. After all windows partitions are cloned, reboot the system and physically unplug the HDD drive or, better, tamper BIOS settings in order to set SSD as primary boot drive instead of old HDD.
Step 3: Resize Windows Partition
12. You can run Gparted utility to check partitions sanity and extend windows partition from Linux or you can just boot into Windows and use Disk Management utility to do this job. The below screenshots illustrate how to use both utilities.
Extend Partition using Gparted Live CD
Resize Partition Using GParted
Resize Partition Size
Extend Partition using Windows Disk Management utility directly from Windows.
Extend Windows Partition
Select Disk to Extend
That’s all! The C: partition is now expanded to the maximum size of your SSD and Windows can now run at its maximum speed on a brand new SSD. The old HDD has all data intact.
Connect the hard-disk again in order to use it in case you’ve physically removed it from the motherboard. You can delete system reserved partition and windows partition from the old HDD and create a new partition instead of these two. The other old partitions (D:, E: etc) will remain intact.
Conclusion
With Clonezilla you can also choose to image the partitions and save them to an external HDD or a network location. In this case you must also backup HDD MBR/GPT with one of the following commands and save the MBR image to the same directory where your clonezilla images are kept.
MBR backup to file:
# dd if=/dev/sda of=/path/to/MBR.img bs=512 count=1
or
# sfdisk -d /dev/sda > =/path/to/sda.MBR.txt
GPT Backup to file:
# dd if=/dev/sda of=/path/to/GPT.img bs=2048 count=1
or
# sgdisk --backup=/path/to/sda.MBR.txt /dev/sda
For a future restoration of your Windows system from a network location, first restore the MBR sector from the saved imaged above using one of the below commands, then proceed with restoring each clonezilla partition image one by one.
MBR image restore from file:
# dd if=/path/to/MBR.img of=/dev/sda bs=512 count=1
or
# sfdisk /dev/sda < =/path/to/sda.MBR.txt
GPT image restore from file:
# dd if=/path/to/GPT.img of=/dev/sda bs=2048 count=1
# sgdisk - -load-backup=/path/to/sda.MBR.txt /dev/sda