
Если компьютер работает медленно, воспользуйтесь следующими рекомендациями для повышения его производительности. Советы перечислены в определенном порядке — начните с первого, проверьте, помог ли он, и переходите к следующему.
Один из лучших способов повысить эффективность работы компьютера — убедиться, что у вас установлена последняя версия Windows 11. При проверке обновлений компьютер также выполнит поиск последних версий драйверов устройств, которые помогут улучшить производительность.
Проверка наличия обновлений
-
Выполните одно из следующих действий.
-
Если в состоянии указано «Последние обновления установлены», продолжите и проверьте, не доступны ли дополнительные обновления.
-
Если указано состояние «Доступны обновления», после их скачивания выберите Установить сейчас.
-
-
Выберите обновления, которые необходимо установить, а затем нажмите кнопку Установить.
-
Перезагрузите ПК и проверьте, стал ли он работать лучше.
Иногда может быть доступно дополнительное обновление, например новый некритичный драйвер.
Проверка наличия дополнительных обновлений
-
Нажмите кнопку Пуск и выберите Параметры > Центр обновления Windows > Дополнительные параметры > Необязательные обновления.
-
Если необязательные обновления доступны, выберите их и затем нажмите Скачать и установить.
-
Перезагрузите ПК и проверьте, стал ли он работать лучше.
Дополнительные сведения об обновлениях, в том числе о том, как установить их автоматически, см. в статье Центр обновления Windows: вопросы и ответы.
Сведения об устранении неполадок Центра обновления Windows см. в разделах Центр обновления Windows и Устранение неполадок при обновлении Windows.
Если компьютер все еще работает медленно, перейдите к следующему совету.
Чем больше приложений, программ и браузеров открыто, тем медленнее работает компьютер. Одновременное открытие большого числа вкладок браузера также может немного замедлить работу. В этом случае закройте все приложения, вкладки браузера и т. д., которые вам не нужны, и посмотрите, поможет ли это ускорить работу компьютера. Если это не помогло, перезагрузите компьютер, а затем откройте только те приложения, программы и окна браузера, которые вам нужны.
Перезагрузка компьютера
-
Нажмите кнопку Пуск и выберите Выключение > Перезагрузка .
-
После перезагрузки компьютера откройте только нужные приложения, а затем закройте их после завершения работы.
Иногда приложения, которые созданы для более ранней версии Windows, по-прежнему работают в Windows 11, но они могут замедлять компьютер. Если это происходит после открытия определенной программы, посетите веб-сайт ее поставщика, чтобы установить обновленную версию, или запустите средство устранения проблем с совместимостью программ.
Запуск средства устранения проблем с совместимостью программ
-
Выберите Поиск , введите Устранение неполадок в поле поиска, а затем выберите Параметры устранения неполадок > Другие средства устранения неполадок .
-
В разделе Другое нажмите кнопку Запуск рядом с полем Устранение проблем с совместимостью.
-
Выберите программу, с которой возникают проблемы, нажмите Далее и продолжите работу со средством устранения неполадок.
Компьютер все еще работает медленно? Перейдите к следующему совету.
ReadyBoost позволяет использовать съемный носитель, например USB-устройство флэш-памяти, чтобы повысить производительность компьютера без установки дополнительных модулей памяти (ОЗУ). Чтобы использовать ReadyBoost, вам потребуется USB-накопитель или карта памяти по крайней мере с 500 МБ свободного места и высокой скоростью передачи.
Использование ReadyBoost
-
Подключите USB-устройство флэш-памяти к USB-порту на компьютере.
-
На панели задач выберите Проводник.
-
Нажмите и удерживайте (или щелкните правой кнопкой мыши) USB-накопитель (или SD-карту), а затем выберите Свойства.
-
Откройте вкладку ReadyBoost и выберите Использовать это устройство.
Windows определит, может ли устройство использовать ReadyBoost. Если это невозможно, вы увидите сообщение. -
После того как Windows определит объем свободного места для оптимизации памяти, нажмите ОК, чтобы зарезервировать его для ReadyBoost.
Если взглянуть на содержимое USB-накопителя в проводнике, вы увидите файл ReadyBoost.sfcache. Размер файла показывает, сколько места зарезервировано для ReadyBoost.
Примечание: ReadyBoost невозможно использовать, если ОС Windows установлена на твердотельном накопителе (SSD). SSD и без того работает достаточно быстро, поэтому ReadyBoost не сможет повысить его производительность.
Файл подкачки — это область на жестком диске, которую Windows использует как оперативную память. В Windows 11 существует параметр, который автоматически управляет размером файла подкачки, что помогает повысить производительность компьютера.
Включение автоматического управления файлами подкачки
-
Выберите Поиск на панели задач, введите расширенную систему в поле поиска, а затем выберите Просмотреть дополнительные параметры системы, под которым указана панель управления .
-
В разделе Свойства системы перейдите на вкладку Дополнительно , а затем выберите Параметры в области Производительность .
-
В окне Параметры быстродействия откройте вкладку Дополнительно и нажмите Изменить в области Виртуальная память.
-
Убедитесь, что флажок Автоматически выбирать объем файла подкачки установлен. Если это так, переходите к следующему совету. Если это не так, установите его и перезагрузите компьютер, выбрав Пуск > Выключение > Перезагрузка.
Воспользуйтесь компьютером, чтобы узнать, стал ли он работать быстрее. Если это не так, попробуйте следующую подсказку.
Можно повысить производительность, освободив место на диске ПК.
Проверка места на диске
-
Ваши диски будут перечислены в области Хранилища . Обратите внимание на объем свободного места и общий размер каждого диска.
Примечание: Если на компьютере достаточно места, перейдите к следующему совету.
С помощью контроля памяти вы можете удалить с устройства ненужные или временные файлы, что также поможет освободить место.
Если включить контроль памяти, Windows будет автоматически освобождать место на диске, удаляя ненужные файлы, в том числе файлы в корзине, при нехватке дискового пространства или через заданные интервалы времени. В приведенных ниже инструкциях показано, как удалить временные файлы, а также как включить и настроить контроль памяти.
Если вам не удается найти контроль памяти на устройстве, выполнив следующие действия, см. раздел «Освобождение места с помощью очистки диска» ниже.
Примечание: Не рекомендуется удалять временные файлы для повышения производительности. Эти файлы могут не использоваться сейчас, но помогают ускорить загрузку и работу приложений.
Удаление временных файлов с помощью контроля памяти
-
Выберите Временные файлы в описании хранилища.
Примечание: Если элемент «Временные файлы» не отображается в списке, выберите Показать больше категорий.
-
Windows потребуется несколько минут, чтобы определить, какие файлы и приложения занимают больше всего места на компьютере.
-
Выберите все элементы, которые требуется удалить, а затем нажмите Удалить файлы.
Чтобы просмотреть содержимое корзины перед очисткой, откройте ее на рабочем столе. Если значок корзины не отображается на рабочем столе, в панели поиска на панели задач введите корзина, а затем в списке результатов выберите пункт Корзина.
Примечание: Windows перемещает удаляемые файлы в корзину на тот случай, если вы передумаете и эти файлы снова потребуются вам в будущем. Вы можете освободить значительное пространство, выбрав пункт Корзина, чтобы окончательно удалить файлы, которые уже удалялись ранее.
Включение и настройка контроля памяти
-
В области Управление памятью включите функцию Контроль памяти.
-
Нажмите для функции Контроль памяти, чтобы настроить ее.
-
В разделе Очистка временных файлов установите флажок Обеспечивать бесперебойную работу Windows путем автоматической очистки временных файлов системы и приложений.
-
В разделе Настройка расписания очистки выберите, как часто необходимо запускать контроль памяти.
-
Для файлов, которые вы хотите удалить с помощью Контроля памяти (вы можете выбрать файлы в корзине и в папке «Загрузки»), выберите предпочтительные временные интервалы или выберите Никогда, если вы хотите, чтобы функция контроля памяти не влияла на эти типы файлов.
-
Прокрутите страницу вниз и выберите Запустить Контроль памяти сейчас.
-
Windows попытается очистить файлы, а затем появится сообщение о том, сколько места на диске было освобождено.
Если в вашей системе нет контроля памяти, вы можете использовать средство очистки диска, чтобы удалить с устройства временные и системные файлы.
Запуск программы очистки диска
-
Выберите Поиск, введите Очистка диска, а затем выберите Очистка диска в списке результатов.
-
Установите флажок напротив типа файлов, которые требуется удалить. (Чтобы просмотреть описание того или иного типа файлов, выберите имя.) По умолчанию установлены флажки Загруженные файлы программ, Временные файлы Интернета и Эскизы. Если вы не хотите удалять эти файлы, снимите эти флажки.
-
Чтобы освободить еще больше места, выберите Очистить системные файлы. Программе очистки диска потребуется определенное время, чтобы вычислить объем дискового пространства, которое может быть освобождено.
Примечание: Если с момента перехода на Windows 11 прошло менее 10 дней, предыдущая версия Windows будет указана как системный файл, который можно удалить. Если вам нужно освободить место на диске, вы можете удалить ее, но помните, что вам нужно будет удалить папку Windows.old, содержащую файлы, которые дают возможность вернуться к предыдущей версии Windows. Если вы удалите предыдущую версию Windows, эту операцию невозможно отменить. (Вы не сможете вернуться к предыдущей версии Windows.)
-
Выберите типы файлов, которые требуется удалить, нажмите ОК, а затем щелкните Удалить файлы в окне подтверждения, чтобы начать очистку.
Если компьютер все еще работает медленно, попробуйте удалить приложения, которые больше не используются.
Удаление неиспользуемых приложений
-
Выполните поиск конкретного приложения или отсортируйте их, чтобы увидеть, какие из них занимают больше всего места.
-
Когда вы найдете приложение для удаления, нажмите значок Дополнительно рядом с ним и, если возможно, выберите Удалить.
-
Перезагрузите свой компьютер и проверьте, повысилась ли производительность.
Если компьютер все еще работает медленно, попробуйте переместить файлы на другой диск.
Если у вас есть фотографии, музыка или другие файлы, которые вам нужны, но редко используются, рекомендуем сохранить их на съемном носителе, например USB-накопителе. Вы по-прежнему сможете использовать их, подключив этот носитель, но они не будут занимать место на вашем компьютере.
Перемещение файлов на другой диск
-
Подключите съемный носитель к компьютеру.
-
Выберите Проводник на панели задач и найдите файлы, которые нужно переместить.
-
Выберите файлы, а затем на панели задач нажмите Вырезать.
-
Выберите ваш съемный носитель из списка расположений и нажмите Вставить.
-
После завершения перемещения перезагрузите свой компьютер и проверьте, повысилась ли производительность.
Дополнительные сведения об освобождении места на диске в Windows.
Если компьютер все еще работает медленно, попробуйте следующий совет.
В Windows 11 представлено множество визуальных эффектов, таких как анимации и тени. Они отлично выглядят, но также могут использовать дополнительные системные ресурсы, что может замедлить работу компьютера. Это особенно заметно при использовании компьютера с небольшим объемом памяти (ОЗУ).
Настройка визуальных эффектов в Windows
-
Нажмите Поиск, введите Производительность, а затем выберите Настройка представления и производительности системы в списке результатов.
-
На вкладке Визуальные эффекты выберите Обеспечить наилучшее быстродействие > Применить.
-
Перезапустите компьютер и посмотрите, станет ли он быстрее.
Если компьютер все еще работает медленно, перейдите к следующему совету.
В параметрах компьютера можно выбрать место сохранения файлов по умолчанию. По умолчанию файлы можно сохранять на компьютере или в OneDrive и синхронизировать файлы между двумя расположениями. Благодаря этому вы можете получить доступ к файлам с любого устройства, подключенного к Интернету, и это позволяет создать их резервную копию на случай повреждения или утери компьютера. Однако файлы на компьютере и в OneDrive необходимо синхронизировать, и синхронизация может замедлить работу компьютера. Можно временно приостановить синхронизацию OneDrive и проверить, повысится ли производительность ПК.
Приостановка синхронизации с OneDrive
-
На панели задач найдите OneDrive рядом с областью уведомлений.
-
Выберите OneDrive > Справка и параметры > Приостановить синхронизацию и укажите, на какое время приостановить синхронизацию файлов.
-
Перезапустите свой компьютер и проверьте, повысилась ли производительность после приостановки синхронизации.
-
Чтобы возобновить синхронизацию файлов, выберите OneDrive > Справка и параметры > Возобновить синхронизацию.
Кроме того, информацию о проверке проблем синхронизации можно найти в разделе Устранение проблем синхронизации OneDrive.
При включении компьютера некоторые программы запускаются автоматически и работают в фоновом режиме. Вы можете отключить их, чтобы они не запускались при загрузке компьютера.
Многие программы запускаются автоматически при загрузке Windows. Вы не знаете, что они работают, но они будут быстро открываться, когда потребуются. Это полезно для часто используемых программ, но не так эффективно для приложений, с которыми вы работаете редко, так как это замедляет время запуска Windows.
Поиск программ, которые запускаются автоматически
Иногда вы можете узнать, какие приложения запускаются автоматически, посмотрев на значки программ в области уведомлений в дальнем правом углу панели задач. Посмотрите, нет ли там программ, которые не нужно запускать автоматически. Чтобы узнать имя приложения, наведите указатель мыши на значок. Выберите Отображать скрытые значки, чтобы не пропустить какие-либо программы.
Некоторые программы, автоматически запускающиеся при загрузке, могут не отображаться в области уведомлений. Вот как можно найти все программы, которые запускаются автоматически, и остановить те, которые не вам не нужны.
Отключение автоматического запуска программы
-
В области Автозагрузка приложений найдите приложение, автоматический запуск которого необходимо отключить, и выберите для него значение Выкл.
Примечание: Если вы отключили программу, но она продолжает запускаться автоматически при загрузке Windows, вам необходимо проверить систему на наличие вирусов и вредоносных программ (см. следующий раздел для получения дополнительной информации).
Замедление работы компьютер может вызывать вирус или другое вредоносное ПО. К другим признакам относятся появление неожиданных всплывающих сообщений, самостоятельный запуск программ и звук постоянно работающего жесткого диска.
Лучший способ защититься от вирусов и вредоносных программ — использовать антивирусное программное обеспечение и постоянно его обновлять. Однако даже если вы соблюдаете меры предосторожности, ваш компьютер по-прежнему может быть заражен.
Вы можете проверить компьютер на наличие вирусов и других вредоносных программ с помощью панели «Безопасность Windows» (предыдущее название — Центр безопасности Защитника Windows), которая является одним из компонентов Windows 11. Дополнительные сведения см. в разделе Как защитить свой компьютер с Windows.
Примечания:
-
Если вы используете другие антивирусные или антивредоносные программы, изучите их документацию, чтобы узнать, как выполнять поиск вирусов. Кроме того, убедитесь, что одновременно не запущено несколько антивирусных программ. Если это так, выберите программу, которую хотите запустить, а затем отключите или удалите другие решения.
-
Если у вас установлена и включена другая антивирусная программа, панель «Безопасность Windows» будет отключена по умолчанию.
Проверка на наличие вирусов с помощью панели «Безопасность Windows»
-
Выберите Защита от вирусов и угроз и нажмите Обновления системы защиты в разделе Обновления защиты от вирусов и угроз.
-
На экране Обновления системы защиты выберите Проверить наличие обновлений, чтобы обеспечить наличие самых последних обновлений.
-
Выберите Защита от вирусов и угроз, а затем — Быстрая проверка.
Подождите, пока функция «Безопасность Windows» завершит проверку на наличие вирусов и вредоносных программ.
-
Выполните одно из следующих действий в зависимости от результатов проверки.
-
Запустите рекомендуемое расширенное сканирование. Эта проверка занимает больше времени, но более тщательно ищет угрозы на компьютере.
-
Если функция «Безопасность Windows» нашла вирус или вредоносную программу и не может удалить их или добавить в карантин, обратитесь в службу поддержки Майкрософт.
-
Если вирусы не найдены, перезапустите компьютер и попробуйте воспроизвести проблему.
-
Примечание: Если Безопасность Windows не открывается, не может обновить файл определений или завершить проверку на наличие вирусов, попробуйте запустить антивирусную программу в Microsoft Defender (автономное сканирование), как описано ниже.
Проверка на наличие вредоносных программ и вирусов с помощью антивирусной программы в Microsoft Defender (автономное сканирование)
-
Сохраните все документы или другие файлы, которые могут быть открыты на компьютере.
-
Нажмите Защита от вирусов и угроз, а затем в разделе Текущие угрозы выберите Параметры сканирования > Антивирусная программа в Microsoft Defender (автономная проверка) > Выполнить сканирование сейчас.
Компьютер перезапустится, после чего антивирусная программа в Microsoft Defender (автономная проверка) выполнит проверку на наличие вирусов и вредоносных программ. Проверка может занять около 15 минут, а после ее окончания компьютер снова перезапустится.
-
Попробуйте воспроизвести проблему.
Если компьютер все еще работает медленно, перейдите к следующему совету.
Восстановление компьютера — это операция, которая позволяет отменить недавние системные изменения, могущие вызывать проблемы. Если вы считаете, что недавно установленное приложение, драйвер или обновление Windows могут быть причиной проблем, вы можете восстановить состояние компьютера в определенный момент времени — точку восстановления.
Примечания:
-
Восстановление не затронет личные файлы, но приложения, драйверы и обновления, установленные после создания последней точки восстановления, будут удалены.
-
Восстановление системы подходит для изменений, примененных за последние 7–14 дней.
Восстановление компьютера из точки восстановления
-
На панели задач выберите Поиск, введите расширенные системы и выберите Просмотр расширенных параметров системы в списке результатов.
-
На вкладке Защита системы выберите Восстановление системы.
-
Выберите Рекомендуемое восстановление, чтобы использовать самую последнюю точку восстановления, созданную Windows автоматически, или нажмите Выбрать другую точку восстановления, чтобы выбрать ее самостоятельно, а затем щелкните Далее.
-
Если вы выбрали другую точку восстановления, выберите ее и нажмите Далее. В любом случае выберите Готово, чтобы начать восстановление.
-
После завершения восстановления перезагрузите свой компьютер и проверьте, повысилась ли производительность.
Если вы не видите точек восстановления, это может означать, что защита системы не включена.
Включение защиты системы
-
В поле поиска на панели задач введите Создание точки восстановления, а затем выберите Создание точки восстановления в списке результатов.
-
На вкладке Защита системы выберите Настроить.
-
Выберите Включить защиту системы > ОК.
If you are facing performance-related issues like Non-responding programs, freezing, system crashes, sluggishness, etc., on your Windows PC quite often, then you can try a few of these suggested tips. They may help you resolve such issues by tuning-up Windows.
Here are a few steps you can take to troubleshoot Windows 11/10 Performance issues:
- Run Selective Startup
- Update Drivers
- System Maintenance
- Windows Update
- Cleaning Junk Files
- Virus Scanning
- System Integrity Check
- Hardware Diagnostic
- Windows Boot Performance Diagnostics
- Disk usage issues.
1] Selective Startup
Most of the time, a Startup service may cause issues that affect the performance of the System. A Clean Boot can resolve and pinpoint which Service is causing the problem. To identify this, we can use the System Configuration Utility to find it.
Go to Start, and under search, type in MSCONFIG and hit Enter.
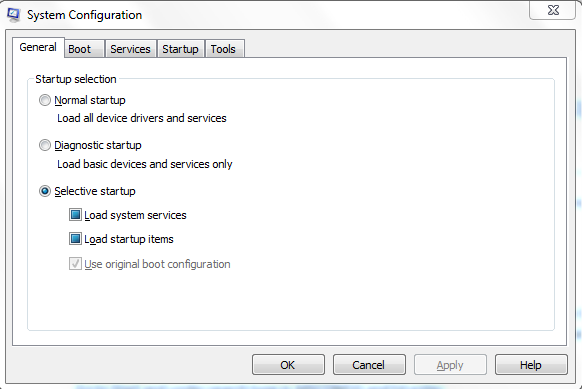
First, in the General Tab uncheck “Load Startup Items” then go to Services Tab.
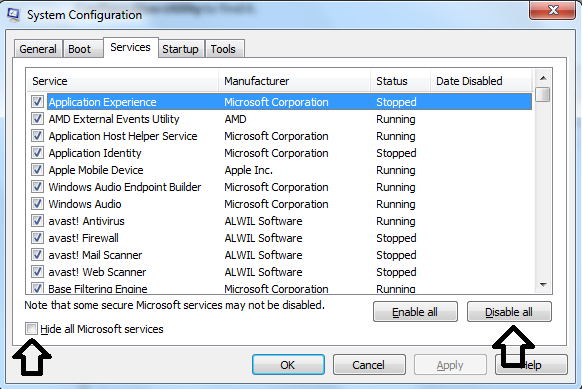
Then check on “Hide all Microsoft services” and click on “Disable all”. Click Apply and Restart the Computer.
Once the computer restarts, see if you have your issue resolved. If so, go back to MSCONFIG and first go to the Startup Tab and enable the first Startup item and reboot the System. You have to do the same procedure until you find which service or startup item is causing the System to crash.
I know it might take a while to find out which one it is, but it’s not advisable to run the System in Selective Startup all the time. Because Selective Startup is not a fix; it’s a troubleshooting step, to find the culprit that’s causing System inconsistency.
Trust me, most of the performance-related issues can be resolved by this step!
2] Update Drivers
An outdated driver can cause the System to crash and go to non-responding at times. So, it’s a good step to keep the device drivers up to date. You find the exact model of your device drivers and check the version and driver date. You could use the MSINFO32 file.
Go to Start and under search type in MSINFO32 and Hit Enter.

This is what the MSINFO32 looks like. Then select each non-Microsoft device, and on the Right side panel, you’ll find the model of your device, driver date version, etc.
Once you find the driver name, date, and version, go to the manufacturer’s website, go to the appropriate section and download the driver and install it.
Don’t use Windows Update or any lesser-known third-party application to auto-update the drivers because, in my opinion, most of the time, Windows Update or any of these third-party applications won’t find the best drivers, which may, in turn, cause the system to crash with a Blue Screen.
TIP: I have seen a lot of cases where a Display driver is a cause for lagging or performance-related issues it’s best to update or reinstall the Display related drivers.
3] System Maintenance
System Maintenance is a crucial system while troubleshooting performance-related problems.
Open an elevated Command Prompt, type the following and hit Enter to run the Performance Troubleshooter.
msdt.exe /id PerformanceDiagnostic
This troubleshooter helps the user adjust settings to improve operating system speed and performance.
Alternatively, Open ControlPanel > All Control Panel Items > Troubleshooting
Click on Run maintenance tasks to open the Performance Troubleshooter.
Run it and see if it helps.
Read: Beginners tips to optimize Windows for better performance.
4] Windows Update
It is important to update your Windows Operating System on a regular basis, as there will be some updates that could resolve performance issues and increase system security.
5] Cleaning Junk Files
It may not look like a great step to resolve such issues but trust me there are lots of situations where this step used to do the trick. There is a built-in cleanup tool in Windows that would help you in removing the Temp files etc., but I would recommend a freeware called CCleaner.
This will remove unused files from your system – allowing Windows to run faster and freeing up valuable hard disk space. It also cleans traces of your online activities such as your Internet history.
You may or may not want to use the Registry cleaner portion of it or any registry cleaners. The decision is, of course, yours to take! Check out one of our posts for more information Do Registry Cleaners & Defragmenters really help?
6] Virus Scanning
Most of the time, Malware or Trojan infection can cause unstable behavior in your operating system. Run a complete virus scan to make sure your computer is clean. There are a lot of freeware out there. I would recommend Windows Defender – it has a very low footprint and lesser false positives. Then download the free versions of Malwarebytes or Emsisoft Anti-malware and run a complete scan in Safe Mode.
7] System Integrity Check
SFC /SCANNOW command (System File Checker) scans the integrity of all protected Windows system files and replaces corrupted, changed, or damaged versions with the correct versions if possible.
- Go to Start and under search type in CMD then Right Click on it and click on Run as administrator.
- Then type in SFC /SCANNOW
- This article will help you analyze the SFC logs.
8] Hardware Diagnostic
The next step I would recommend is to run Hardware scans to see if some hardware failure is causing the system to crash. First, check your RAM, follow our thread that will explain to you the process Advanced Memory Diagnostic on Windows with Memtest86+ then run a Hard Drive Diagnostic. Each manufacturer would have its own diagnostic tools. Check this thread for the list HD Tools.
9] Windows Boot Performance Diagnostics
Use Windows Boot Performance Diagnostics to troubleshoot long boot times.
10] Disk usage issues
See this post if you frequently receive a 100% Disk Usage message. This post will help you if you see Random Disk Usage Spikes.
Last but not least, use a legitimate version of Windows. An illegal copy may look convenient, but you’re putting your data security at risk, and this may cause a lot of issues to your operating system.
How can I improve my Windows 11 performance?
You should disable the background apps that run unnecessarily as such apps and programs can affect the Windows 11 performance quite a bit. In addition to that, disable game mode if it is turned on when you aren’t playing a game. Also, use disk cleanup and storage sense to get rid of junk items, temporary files, etc., to free up disk space and improve Windows 11 performance. Uninstalling unwanted programs, disabling VBS, etc., can also be helpful.
You can Enhance your Windows performance by disabling startup programs, running disk cleanup, and updating to the latest software. Optimize your PC’s speed by upgrading your RAM, utilizing Performance troubleshooter, and adjusting for best performance in system properties. Regular maintenance and decluttering can lead to significant improvements.
Why is Windows 11 so laggy?
If you find that Windows 11 is laggy or slow, then make sure the disk space is free. Running Windows 11 on low storage can also make your system hang or freeze. Sometimes, running a program that uses a lot of system resources can also make it slow. Also, if you are using too many apps and programs together, then this could be the reason for it. You should also perform an antivirus scan as malicious programs can also slow down your computer.
Read next: Windows 11 Problems, Issues with solutions, and fixes.
Table of contents
- The Most Common Reasons for a Slow Windows Computer
- How to Improve PC Performance on Windows 10/11
- Fix 1: Use reliable third-party tools
- Fix 2: Update your drivers
- Fix 3: Update your Windows
- Fix 4: Remove unneeded software
- Fix 5: Disable unneeded startup programs
- Fix 6: Clean up your registry
- Fix 7: Remove junk files from your PC
- Fix 8: Optimize your hard drive
- Fix 9: Adjust power settings
- Fix 10: Upgrade your hardware
- Extra Tips on How to Make Your PC Run Like New
- Tip 1: Maintain your PC regularly
- Tip 2: Adjust your PC settings for gaming
- Tip 3: Shut down your computer regularly
- Tip 4: Tweak Windows through the registry
- Tip 5: Optimize your browser
- Conclusion
- FAQ
If your computer’s performance is slowing your productivity, this guide is for you. I get how frustrating a slow PC can be. It slows your work, drains your patience, and steals valuable time. That’s why it’s essential to keep in mind tips for improving your computer’s performance.In fact, studies show that people lose up to three hours weekly battling slow systems. If you’re one of them, follow the solutions covered in this article to resolve the issue permanently.
The Most Common Reasons for a Slow Windows Computer
There are many reasons why your computer is running so slow. Some possible poor PC performance causes are as follows:
1. Lack of computer maintenance
Regular computer maintenance ensures your PC runs optimally and avoids frustrating crashes and slowdowns. Otherwise, your computer’s performance, security, and longevity may suffer.
To ensure your computer is functioning properly, you should perform the following tasks regularly:
- Run regular antivirus scans.
- Remove unnecessary files to clean up disk space.
- Optimize your drives (HDD and SSD).
- Check for storage and memory issues.
When you fail to follow a regular maintenance schedule, your computer will experience issues like junk file accumulation, overheating, system crashes, data loss, and failing hardware in addition to poor performance.
2. Driver problems
If your driver software is out of date, corrupted, or not functioning properly, your operating system may not be able to communicate properly with your hardware, which can result in slow performance.
Driver issues can also cause conflicts between your system’s software components, which can lead to performance issues like freezes, crashes, and instability.
Related: How to Update Drivers on Windows 10/11 PC?
3. Software issues
Software culprits leading to poor PC performance include outdated or incompatible software, unnecessary startup apps, and resource-hungry programs.
Running too many programs at once is also a practice that often makes the PC intolerably slow. To increase PC performance, consider closing some programs or restarting.
Similarly, outdated operating systems and programs can slow down your PC. To fix that, update Windows and your apps frequently to ensure they work perfectly.
4. Registry issues
The Windows registry is a crucial yet sensitive database that stores configuration settings, options, and preferences for your computer’s programs and hardware.
Over time, registry errors and corruption develop, causing many system problems, including slow PC performance.
5. Hardware issues
When it comes to hardware problems leading to poor performance, insufficient amounts of memory, storage space, or processing power are often to blame.
For instance, if your computer does not have enough RAM, it may fail to run several apps at once. A hard drive running out of space may struggle to swap data in and out of memory.
To fix all these hardware problems and improve PC performance, consider upgrading some parts, but before that you can apply fixes we will speak about below.
Also read: Factors That May Cause Hard Drive Failure
How to Improve PC Performance on Windows 10/11
Malware can significantly slow down your Windows device by consuming huge amounts of system resources, launching unwanted and dangerous processes, and modifying critical system settings. Your OS may even become totally unresponsive or get damaged beyond repair.
Usually, the first step to fix a performance problem on Windows 10/11 is to scan for malware issues.
You can scan with Windows Security by opening it from the Start menu (Settings > Privacy & security > Windows Security), selecting Virus & threat protection, and clicking Quick scan or Full scan to check for and remove any threats.
While Windows Security offers essential protection, it doesn’t catch every potential threat. That’s where Auslogics Anti-Malware comes in. It’s designed to work alongside your main antivirus and neutralize hidden threats, suspicious activities, and vulnerabilities that may evade standard protection.
Fix 1: Use reliable third-party tools
The fastest and most effective way to boost PC performance is to use trustworthy third-party tools, like CCleaner, Advanced SystemCare, and Auslogics BoostSpeed. These programs are designed to:
- Address performance bottlenecks.
- Clean unnecessary clutter.
- Optimize your PC settings without needing technical expertise.
The main advantage of using third-party tools instead of built-in methods is their versatility. These tools are specifically designed to perform all optimization tasks with just one click. We strongly recommend using a PC optimizer regularly to ensure your PC is well-maintained and to minimize the causes of slow performance.
Auslogics BoostSpeed is quite unique because it offers comprehensive features that can supercharge your computer’s performance. It has over 30 features, from removing temporary files and defragging your system to cleaning your registry.
Here’s how it works:
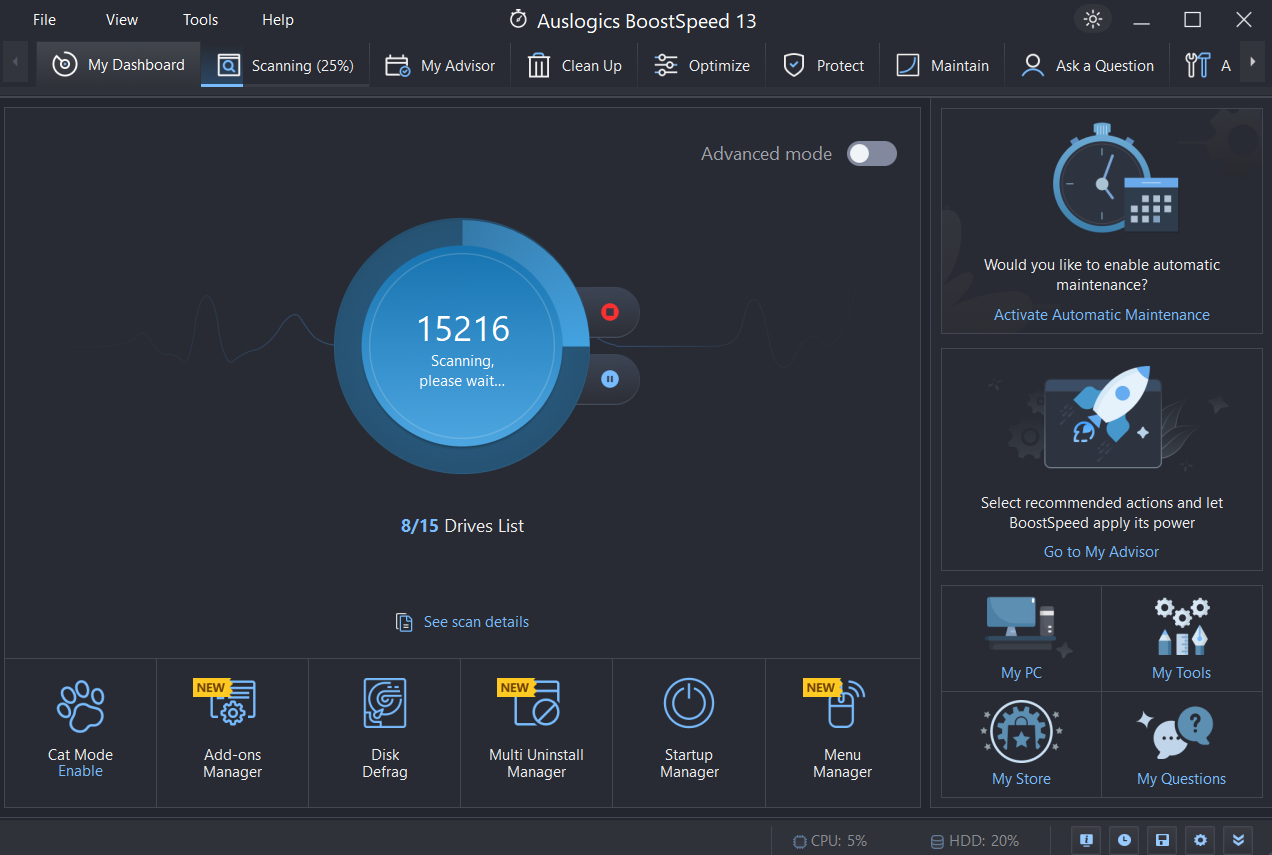
- Download the software from Auslogics official website and install it.
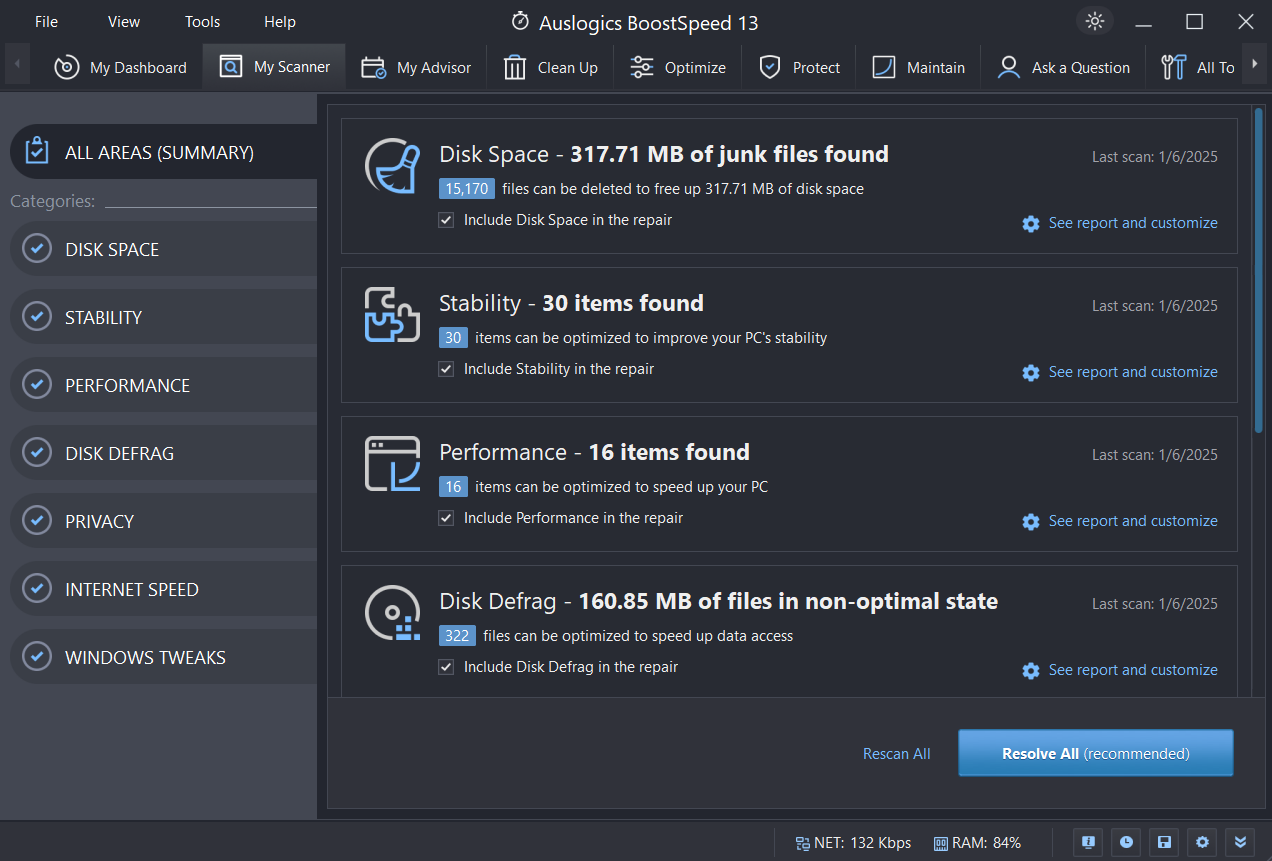
- After the installation, launch the program. You will see a big Scan button. Click on it to start the process.
This is a multi-purpose full system scan that checks your disk space, pinpoints stability and performance glitches, looks for privacy vulnerabilities, and more. If you don’t know what’s causing your PC to slow down, use this option.
- After the scan, click on Resolve All to optimize your system.
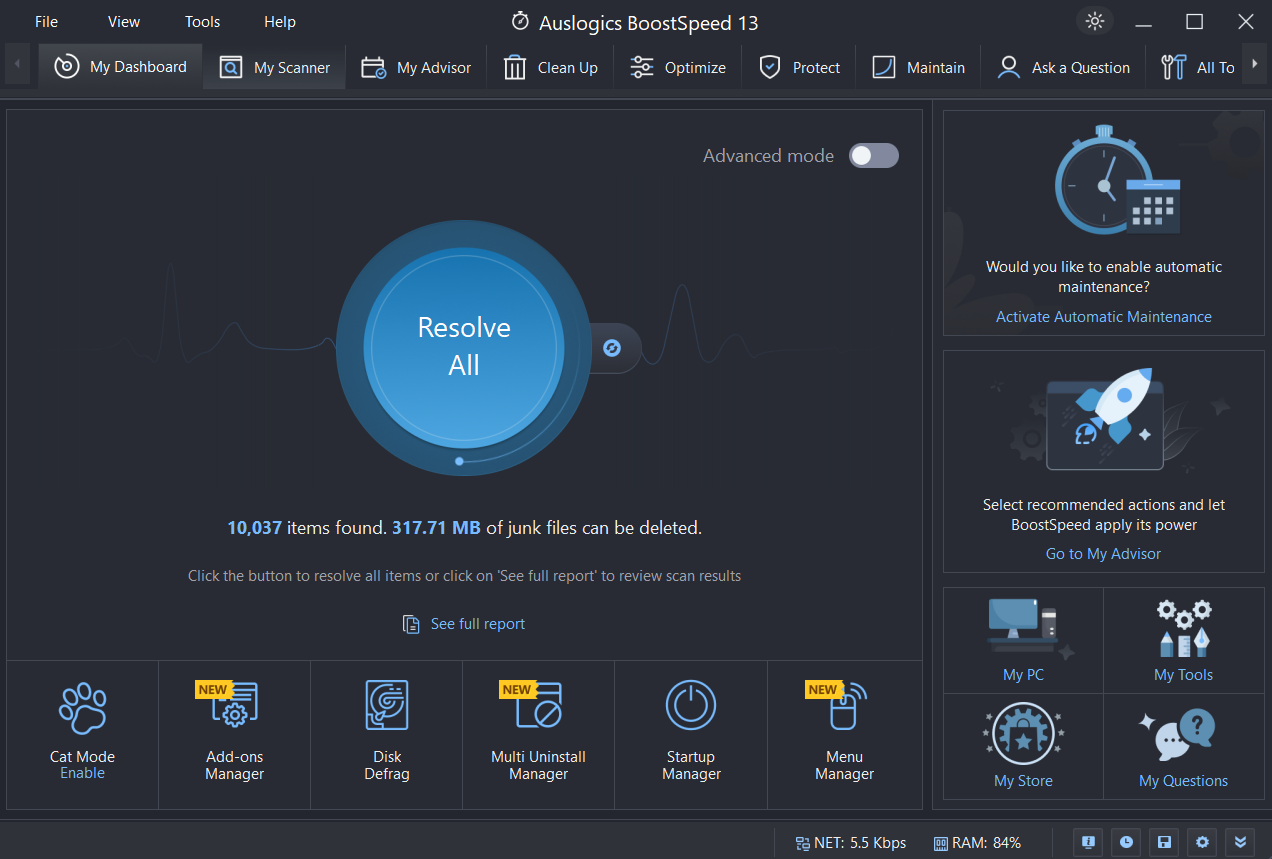
- You can also click on See scan details to find out what BoostSpeed uncovered and suggest to do. Here, you can deselect areas you don’t want to optimize and make adjustments that suit you.
That said, if you are not sure which third-party tool to use, here is a quick summary of some of the best on the Internet today. We have put together a comparison of their main features to help you make an informed decision.
| Feature | Auslogics BoostSpeed | CCleaner | Advanced SystemCare |
|---|---|---|---|
| Junk file cleanup | ✔ Comprehensive and thorough | ✔ Moderate coverage | ✔ Extensive cleanup |
| Disk defragmentation | ✔ Advanced optimization | ✘ Not available | ✔ Basic functionality |
| Startup optimization | ✔ Detailed with safety ratings | ✔ Basic functionality | ✔ Basic functionality |
| Real-time monitoring | ✔ Monitors system performance, like CPU, RAM, etc. | ✘ Not available | ✔ Monitors system performance, like CPU, RAM, etc. |
| Ease of use | ✔ User-friendly interface | ✔ Simple | ✔ Moderate learning curve |
| Free version availability | ✔ Free with limited features | ✔ Free with limited features | ✔ Free with limited features |
| Premium pricing | Pro version: $34.44 for 3 PCs/year
Holiday prices: $29.28 for 3 PCs/year |
Pro starts from $59.95 for 3 devices/year to $159.95 for 5 devices/2 years
Holiday prices: From $59.95 for 3 devices/year to $109.95 for 5 devices/2 years |
Pro version starts from $29.99/year to $179.94/2 years
Holiday prices: $16.77/year–26.99/2 years |
| Privacy protection | ✔ Tracks and removes sensitive data | ✔ Moderate coverage | ✔ Includes privacy features |
PRO TIP
There may be several factors that may be causing your computer to lose its steam. PC optimizers helps to find the areas for improvements and automatically apply necessary adjustments. Regardless, Auslogics BoostSpeed has got the tool to help you fix decrease in PC productivity.
Whether it’s Duplicate File Finder, Tweak Manager, or its Startup Manager, this tool can help you get more space and reduce unnecessary apps taking up too much resources, defragment hard drives, and tweak Windows settings for further improvements.
PC optimizers are always the easiest solution for keeping your machine running smoothly. However, if you prefer to navigate independently, let’s explore the built-in Windows methods to enhance your PC’s performance.
Fix 2: Update your drivers
Drivers are software that help your computer communicate with hardware devices like network adapters or graphics cards. When these drivers are not updated, the devices they control run inefficiently. This might be the reason you are experiencing performance issues.
Updating your drivers ensures that your hardware components, such as the graphics card, network adapter, and sound card, are running with the latest software. This helps prevent crashes, compatibility issues, or slow performance.
Below are important drivers to update for optimal performance:
- Graphics card for sharper visuals and better gaming.
- Network adapter for faster internet and stable connection.
- Sound card for enhanced audio quality.
- Chipset drivers for improved system stability.
- Storage drivers for faster data transfer speeds.
Step 1:
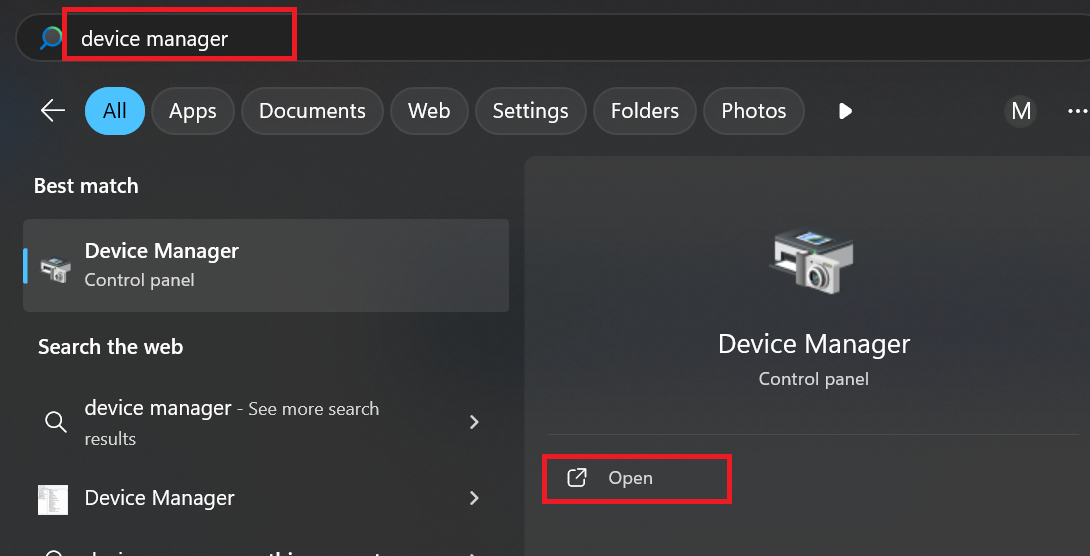
To update your drivers, you need to go to Device Manager . Type Device Manager in Windows Search and open the app.
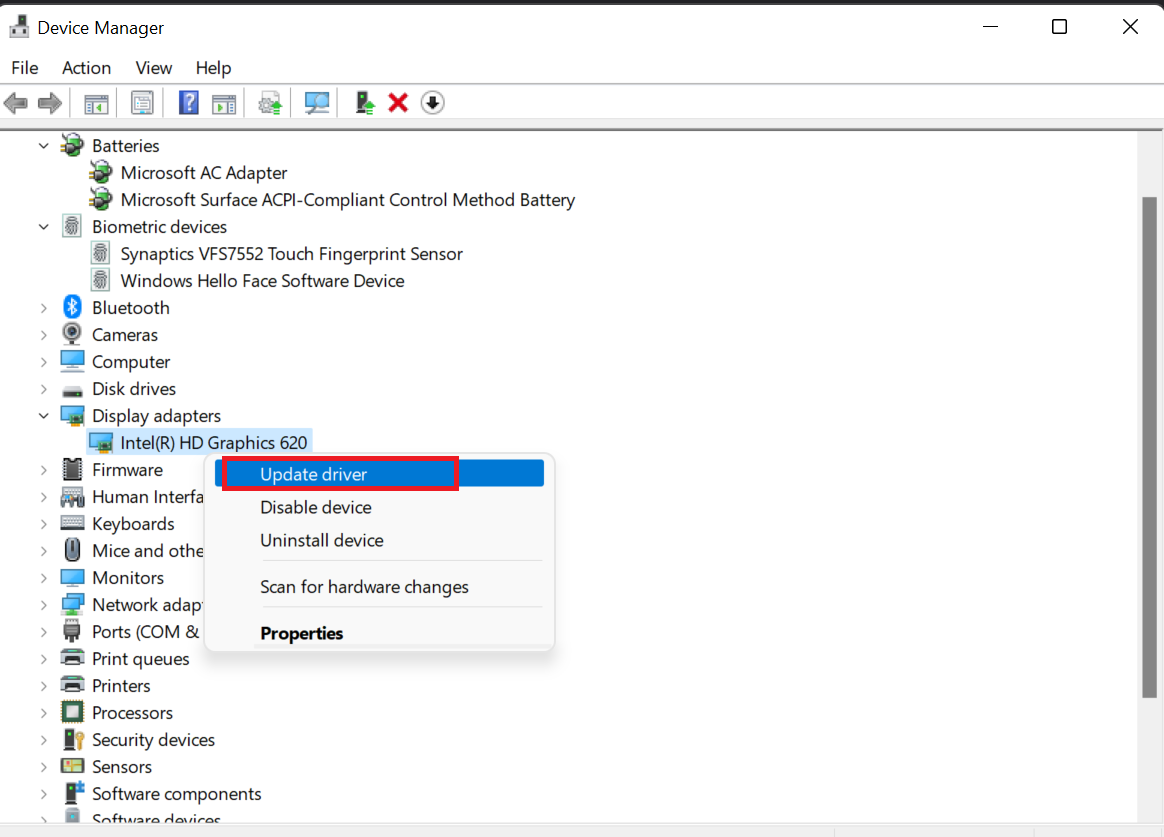
Step 2: Expand the categories to find the device whose driver you want to update (for example, expand Display adapters if you want to update a graphics card driver).
Step 3: Right-click the device and choose Update driver .
Step 4: On the next screen, select Search automatically for drivers .
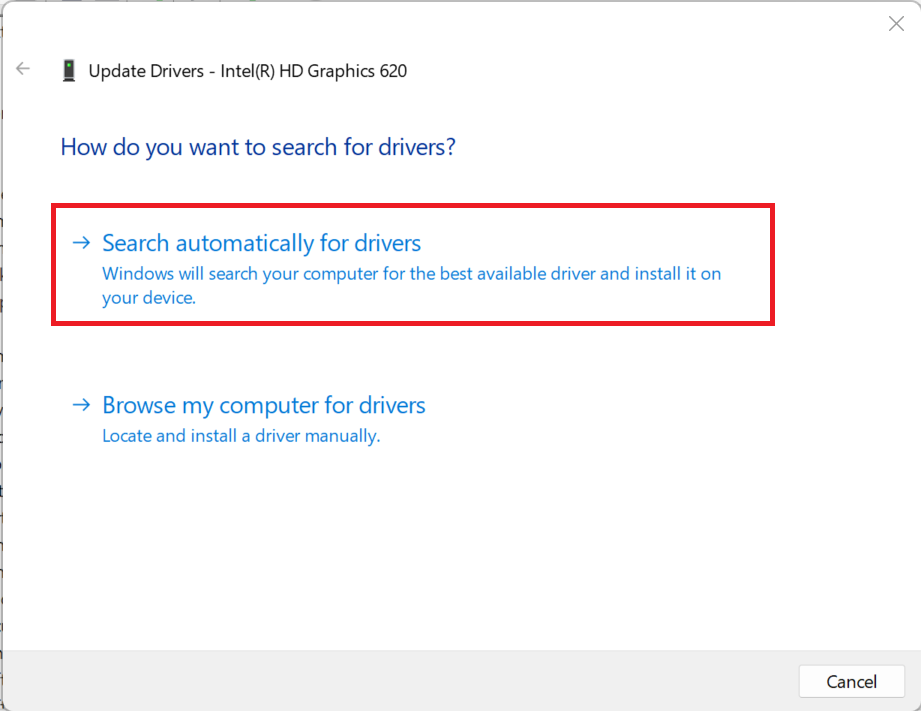
Follow the on-screen instructions to complete the update.
Manually updating drivers can be time-consuming and tricky, especially if you’re unsure which ones need updates. Auslogics Driver Updater simplifies the process by automatically scanning your system and updating all outdated or missing drivers in one go.
Fix 3: Update your Windows
Your drivers are not the only things to update. If, after completing the step above, performance does not improve significantly, try updating Windows.
Keeping Windows up to date is crucial for maintaining system stability and performance. Updates often include bug fixes and performance enhancements that protect your computer from vulnerabilities and improve its overall functionality.
Step 1: To update Windows, open Settings by pressing Win + I . Click on Windows Update .
Step 2: Click Check for updates .
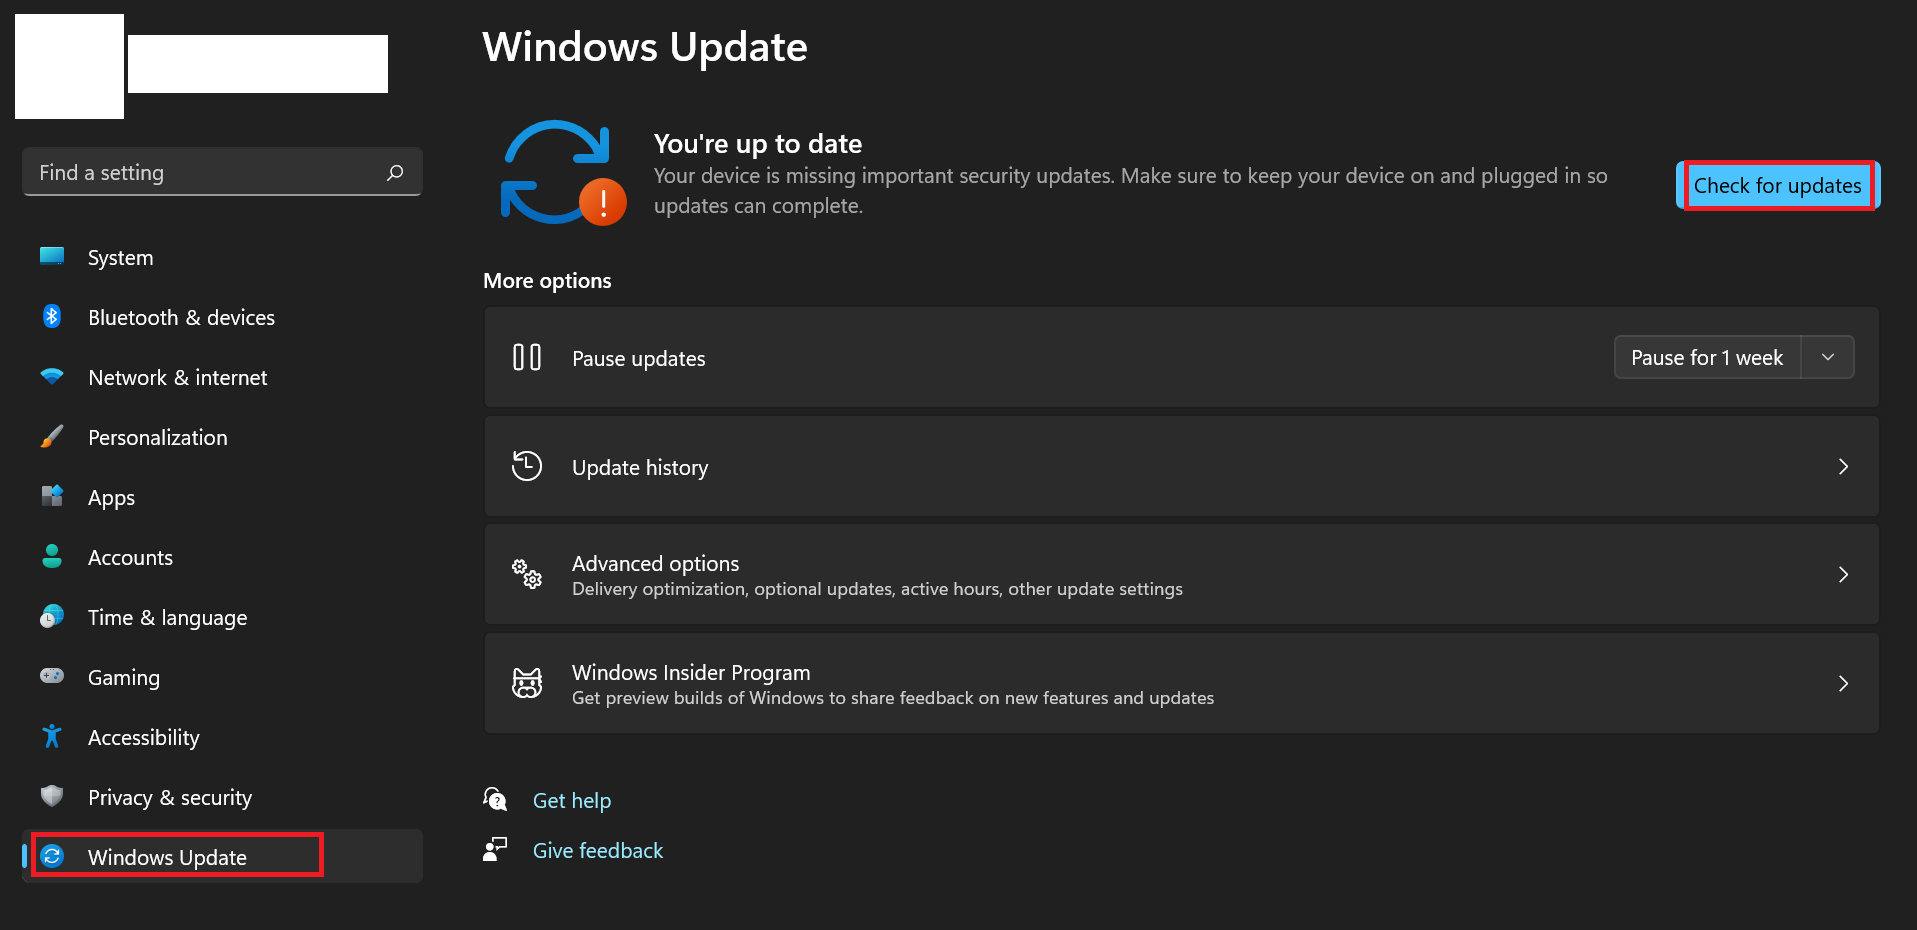
Step 3: If updates are available, click Download and install.
Restart your PC if prompted to complete the update.
Fix 4: Remove unneeded software
Now that your PC is up to date, you should remove unnecessary software. Unnecessary apps take up valuable disk space on your computer and consume plenty of system resources. All of these can slow down your device, limiting the amount of storage available for important data. So, to improve your machine productivity, remove unnecessary apps . Windows has a built-in Add or Remove Programs feature to uninstall apps:
- Open Control Panel from Windows Search.
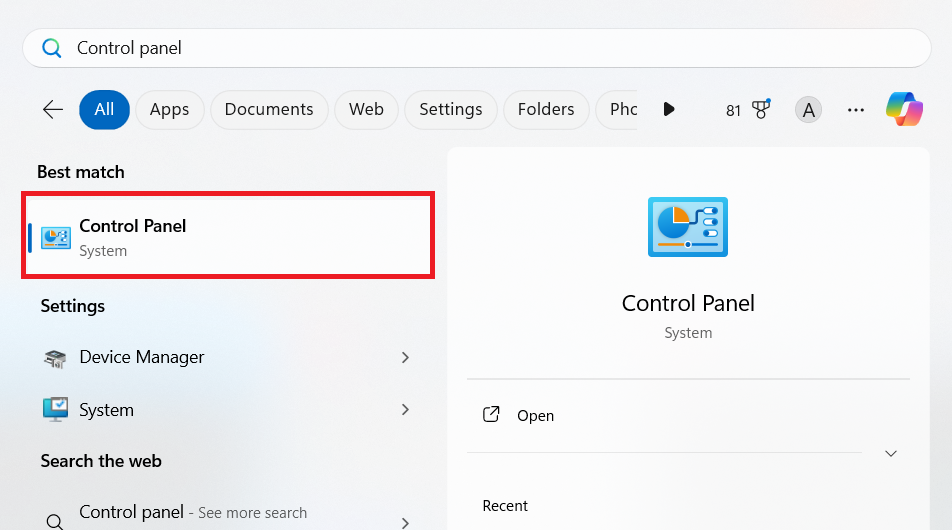
- Select Uninstall a program under Programs.
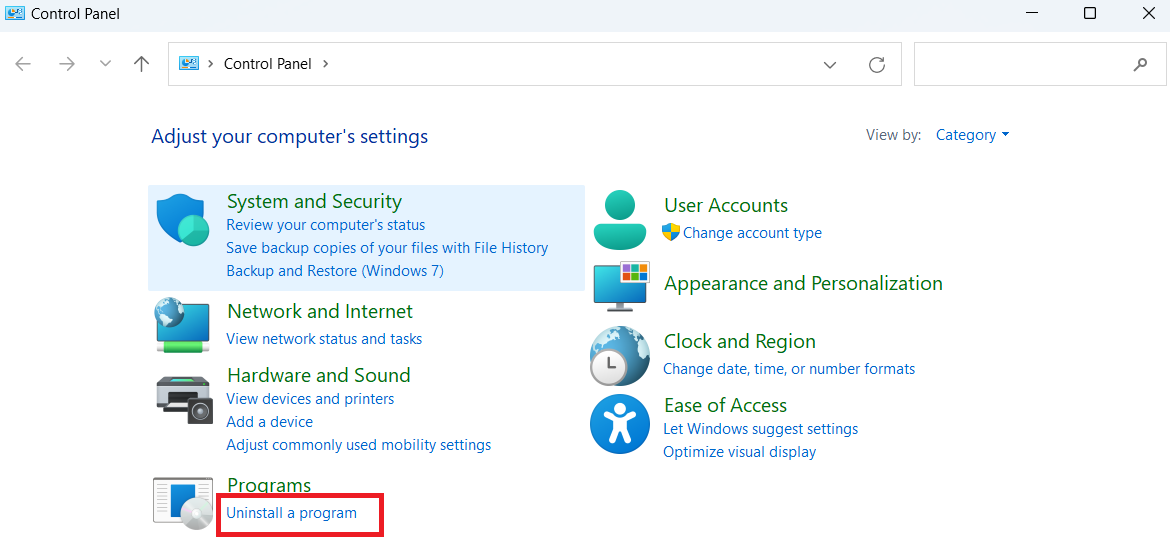
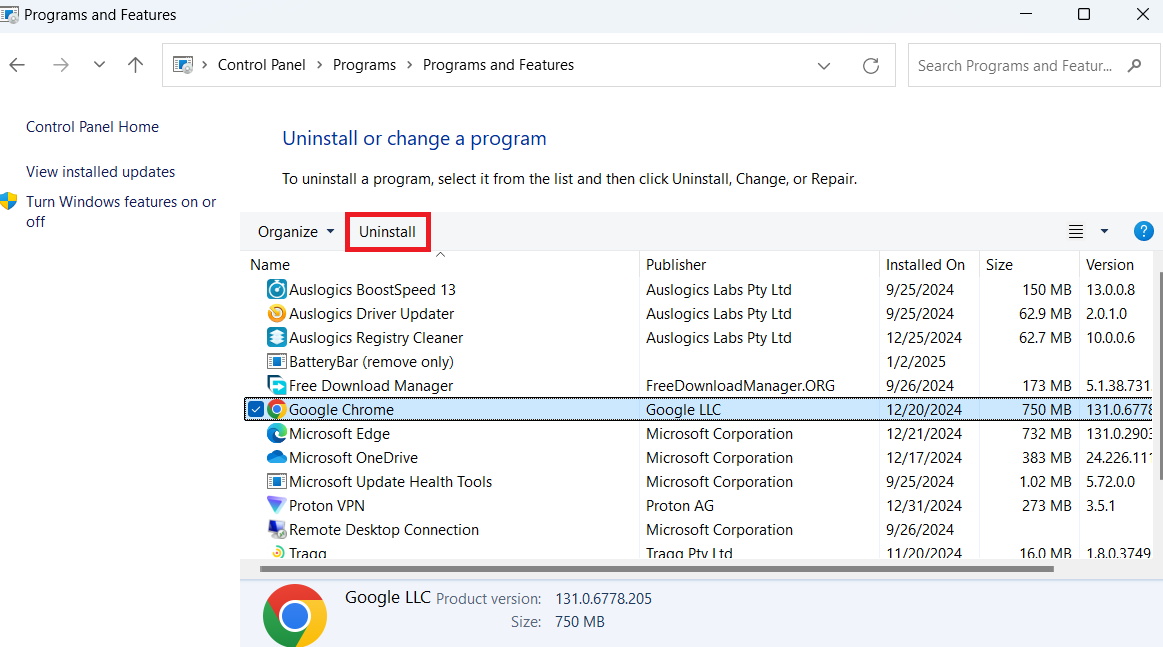
- Locate the app you would like to uninstall. Select it and click the Uninstall button.
PRO TIP
Instead of using the Control Panel, try Auslogics BoostSpeed ’s Uninstall Manager. It’s faster, easier, and much more thorough.
In addition to deleting apps, it also removes leftover files and registry entries that apps leave behind after uninstallation — something the Control Panel can’t do. This frees up even more space.
Fix 5: Disable unneeded startup programs
Disabling unnecessary startup programs in Windows can improve PC performance by reducing the number of applications competing for system resources when the system starts. Every time your system boots, startup programs consume system resources like CPU, RAM, and disk space. This can slow down your computer, especially during bootup and even minutes after booting.
By disabling startup programs you don’t need immediately, the system can focus on essential tasks, leading to faster startup times and smoother overall performance. This also frees up resources for other applications and ensures that your PC operates more efficiently throughout its use.
Here’s how to use Task Manager to disable the startup apps:
- Press
Ctrl + Shift + Escto open Task Manager and click the Startup apps tab. - Select any app you want to disable and click Disable.
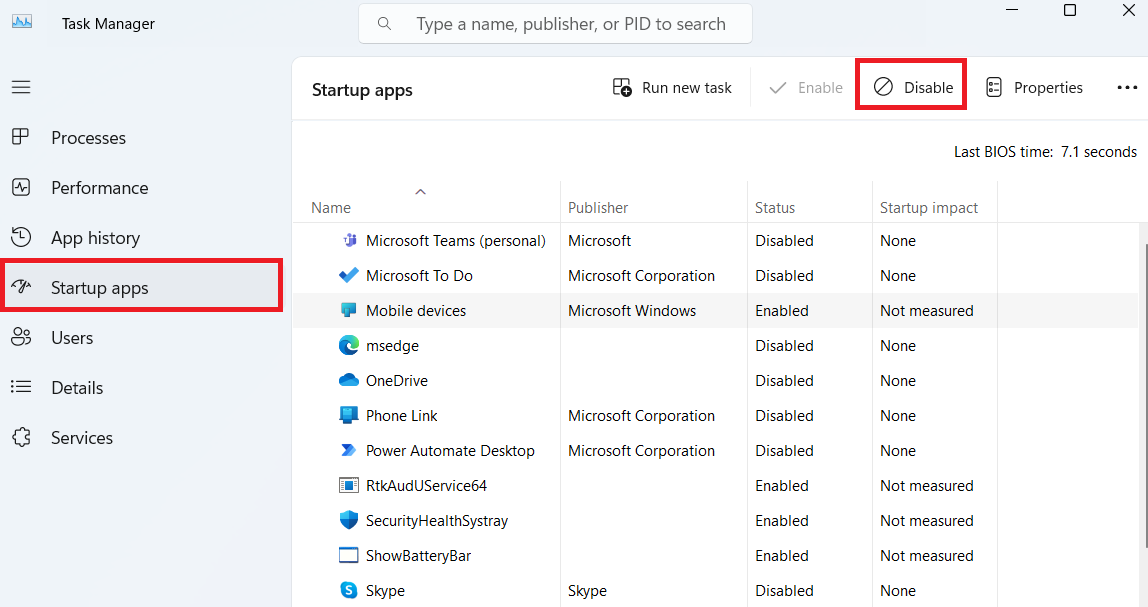
You can check the startup impact of each app in the respective column to help decide which one should go. If an app’s startup impact is rated as High and it is not needed for startup, you should consider disabling it.
If you want to know more on what’s going on in terms of resource usage, processes, and their impact on your system performance, consider using Auslogics BoostSpeed’s Task Manager.
Together with its one-click optimization tools, you can control your system resources and adjust necessary settings to easily speed up PC productivity. Make your PC perform better than it used to.
Fix 6: Clean up your registry
To boost PC performance further and make sure your OS is running smoothly, you need to keep your registry clean . This is important because when the registry gets cluttered with outdated or unnecessary entries (like leftover settings from uninstalled programs), the system may take longer to load necessary system files, which might cause a drop in performance.
The Windows registry is a database where Windows keeps important settings that are crucial for the operating system as well as settings needed for hardware, software, and user preferences.
Please note that you need to back up your Windows registry before making any changes.
Cleaning the registry involves removing these outdated, invalid, or broken registry entries that may be causing performance issues and system instability.
Here’s how to do it:
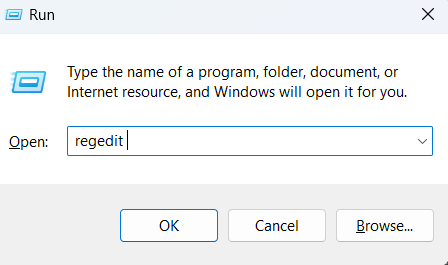
- Open the Registry Editor by pressing the
Windows key + Rto open the Run dialog. In the text box, type regedit and click OK or pressEnter.
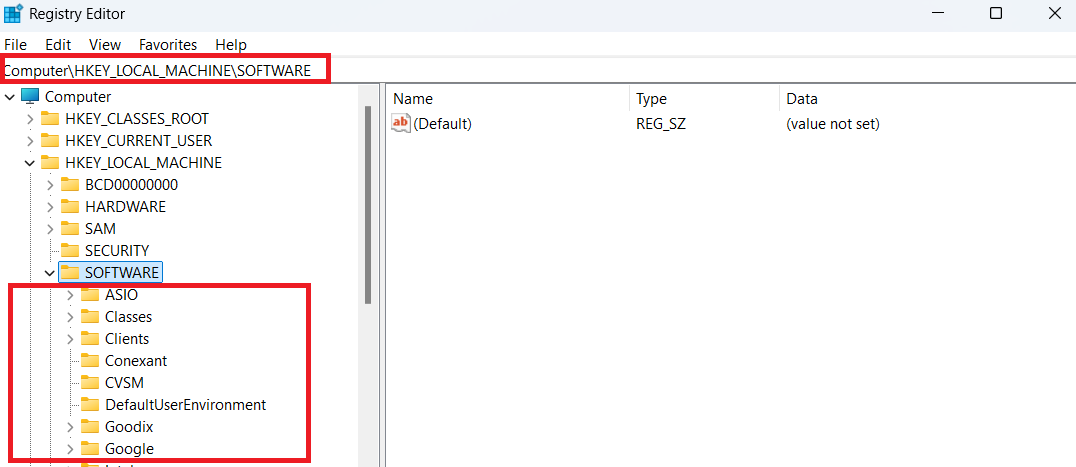
- Copy and paste HKEY_LOCAL_MACHINE\Software into the address bar and see if there are entries from programs you’ ve uninstalled or software you no longer use.
Warning!
If you are not familiar with registry files, it might be challenging to know the entry to delete. Plus sometimes, you need to find broken file associations that uninstalled programs may have left behind.
If you do not find the right entry files or mistakenly delete or modify the wrong entries, your system might have issues handling files. Using a trusted registry cleaner can help in this situation.
Fix 7: Remove junk files from your PC
Accumulating junk files can slow down your computer because this makes it harder for the system to manage files efficiently. This can lead to slower read and write speeds, longer loading times, and decreased overall performance. This is especially noticeable when running resource-intensive tasks or applications.
Junk files are temporary files that are created by applications or your operating system. These files are supposed to serve temporary functions. Examples of these junk files include:
- Temporary files: Created by applications during installation or use, such as .tmp files.
- Log files: Files generated by the system or applications to track events, often unnecessary after troubleshooting.
- Recycle Bin files: Deleted files that are still stored in the Recycle Bin and not permanently removed.
- Download folder clutter: Files downloaded from the Internet but no longer needed.
Ideally, these files become useless after their task is complete, like after a program is installed. However, they often remain on your system, taking up storage space unnecessarily and contributing to clutter. Over time, the accumulation of these files can slow down your computer and reduce its efficiency. Performing a disk cleanup is one way to remove junk files from your PC. You can use the built-in Windows Disk Cleanup tool to identify and delete unnecessary files that take up disk space on your computer.
- Type Disk cleanup into Windows Search and open the app.
- Windows will tell you how much space you can free up and the files that are safe to delete. Under Files to delete , select the files you want to remove and click OK .
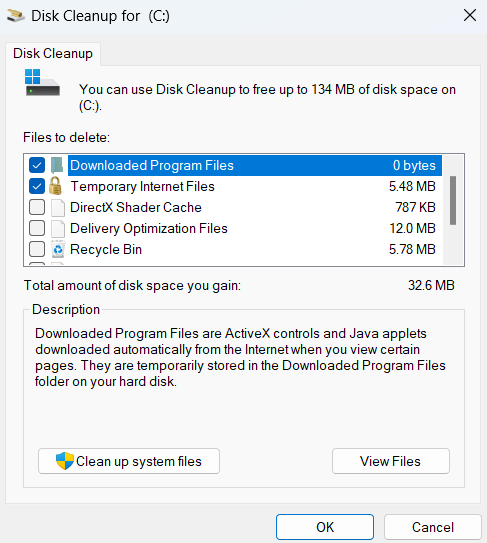
- To perform a more thorough cleanup, click the Clean up system files button. Also, select the file types you would like to remove and click OK to proceed.
What else do you need to do to clean up your PC?
Apart from these above junk files, consider these additional cleanup tasks:
- Remove duplicate files: Use the Duplicate File Finder tool to identify and delete redundant files that unnecessarily take up storage.
- Clear temporary internet files: Delete temporary internet files through your browser settings to free up space and improve browsing performance.
- Clear old system restore points: Keep only the most recent restore point and delete the older ones to save storage.
- Clean old emails: Organize your email inbox and delete unnecessary or outdated emails , especially those with large attachments. This will free up storage and improve performance.
- Clean large files: Use a third-party tool like Auslogics BoostSpeed to locate large files taking up significant storage space. You can either delete large files if they are no longer needed or move them to an external drive.
- Delete old update files: Remove outdated Windows update files by using the Disk Cleanup tool. You could also access Storage settings > Temporary files to recover storage space taken up by unnecessary update leftovers.
Performing these tasks regularly will help keep your PC running smoothly and improve its overall efficiency.
Fix 8: Optimize your hard drive
Optimizing your SSD or HDD can boost PC performance and even the lifespan of your machine. Optimization will allow your programs and files to load faster and lead to better system functioning.
An HDD (hard disk drive) is a traditional storage device that uses spinning metal disks to read and write data.
An SSD (solid-state drive) is a modern storage device that uses flash memory to store data. SSDs have no moving parts, so they are much faster and more durable than HDDs.
When used as your primary drive, SSDs will give you faster boot time, plus they load files and programs quickly.
However, SSDs are generally more expensive for the same storage capacity compared with HDDs.
During optimization, HDDs go through defragmentation , which reorganizes scattered file pieces so they are stored together, making it quicker to access programs and files. SSDs , on the other hand, go through trimming which clears unused data to keep the drive running efficiently.
Either way, optimization reduces the extra work your drive has to do, preventing unnecessary wear and tear. As a result, your system works more smoothly, loads files faster, and your drive stays in good condition for a longer time.
You can set the schedule for the maintenance. Usually, Windows 10/11 automatically performs SSD maintenance , including TRIM, during scheduled drive optimizations. There’s no need to do it manually unless you are troubleshooting a performance issue.
If you’re using an SSD, Windows default weekly optimization is just fine. Excessive manual optimizations or defragmentation can potentially reduce the drive’s lifespan.
Windows has a built-in tool that can optimize your drive. To run it:
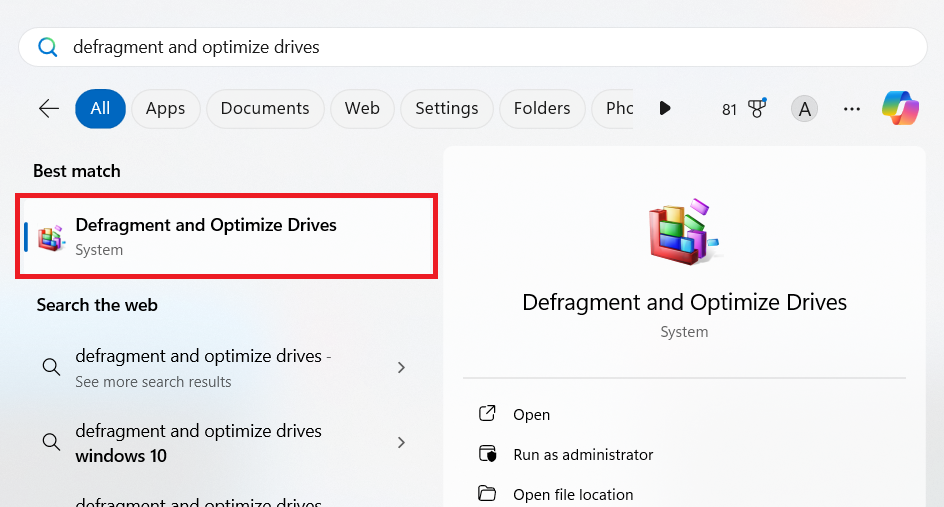
- Type defragment and optimize drives in Windows Search . Select the app from the search results.
- In the tool, a list of drives will appear. Select the drive you want to optimize. Windows will also tell you if the file has issues and when it was last fragmented or trimmed.
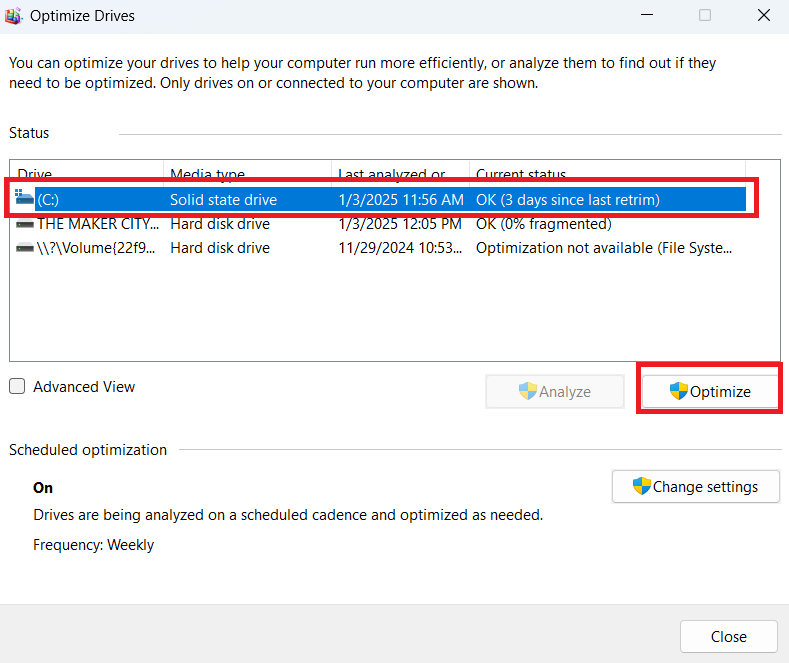
- Click Optimize to start the process. For SSDs, this will run the TRIM command; for HDDs, it will perform defragmentation.
Download Auslogics SSD Optimizer
Your safe and effective SSD performance guard, the app will optimize data placement on your solid-state drive, help clear disk space, monitor drive health, and extend its service life.
Fix 9: Adjust power settings
Power settings control how your computer uses energy. With this setting, Windows tries to strike a balance between performance and energy consumption. Windows offers three different power plans that try to trade off one for the other.
Amongst all three, the best performance plan prioritizes better performance over efficient power consumption by allowing your CPU, GPU, RAM, and storage devices to run at maximum speed, even when the system is idle. This can be especially beneficial for users who run demanding applications like gaming, video editing, programming, or data analysis.
This power-intensive mode ensures that the system doesn’t throttle performance to save power. However, keep in mind that this plan may drain the battery faster and increase power consumption.
So, if your computer is running slow and you want a noticeable boost in overall system performance, make sure to do the following:
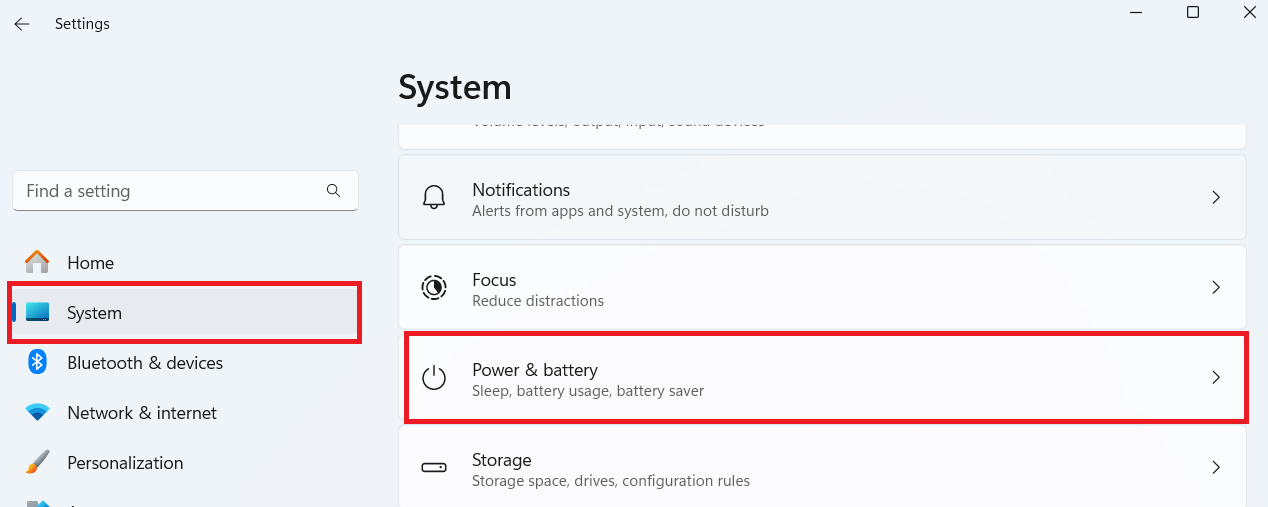
- Open the Settings app (
Windows + I) and click on System . On the left pane, navigate to Power & battery.
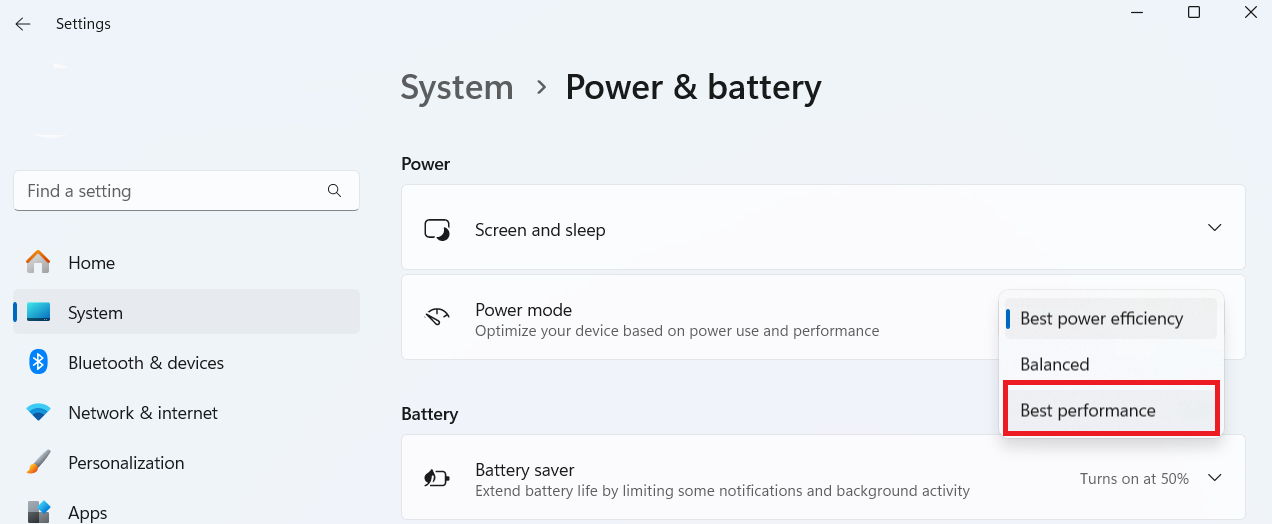
- Click on Power mode and select Best performance.
Also read: Power Options in Windows 10: Advanced Guide
Fix 10: Upgrade your hardware
Upgrading your system can improve its performance, especially if it’ s an old PC. If you’re on a tight budget, you can make specific upgrades based on what you use the computer for. Here are some things to consider:
- Add more RAM. Increasing your RAM allows your computer to handle more applications simultaneously without slowing down. This is important if you frequently run multiple programs simultaneously.
- Upgrade your HDD or SSD. SSDs offer significantly faster read/write speeds and boot times compared to traditional hard drives. Your PC will become faster and more responsive.
Read after: Best SSD for Your Gaming: Top Choices for Your Gaming Needs
- Get a new graphics card. If you’re a gamer, you should consider upgrading the GPU to enhance visual performance, increase frame rates, and get support for new technologies. Do this, and you’ll have smoother gameplay, better rendering in graphic-intensive applications, and an overall improved multimedia experience.
Warning!
It’s best to allow a technician to handle this part of the process if you’ve not done this before. Opening your computer yourself can lead to damage to sensitive parts. Also, a professional can recommend the best upgrades based on your system’s compatibility and your performance needs.
Here is a quick summary of all the best solutions on how to improve your computer performance:
| Fix | Description | Additional tips | What does it do |
|---|---|---|---|
| Use reliable third-party tools | Use tools like Auslogics BoostSpeed or CCleaner to automate cleanup tasks | Choose reputable tools to avoid malware or bloatware | Simplifies and automates cleanup, making system optimization easier |
| Update your drivers | Use Device Manager to update drivers | Update drivers for hardware components like the graphics card, network adapter, and sound card | Improves compatibility, boosts performance, and prevents system errors |
| Update Windows | Go to Settings > Windows Update and check for updates | Install the latest Windows updates, including security patches and performance enhancements | Improves system stability and enhances performance |
| Remove unneeded apps | Uninstall apps you don’t use to free up space/resources | Go to Control Panel or Settings > Apps to remove them | Frees up memory, improves speed, and saves storage space |
| Disable unneeded startup programs | Stop apps from launching at startup to improve boot time | Go to Task Manager > Startup apps to disable unnecessary apps | Reduces boot time and speeds up system startup |
| Clean up your registry | Remove obsolete registry entries to declutter your system | Use reliable tools like Auslogics Registry Cleaner; avoid manual edits | Prevents potential system errors and enhances performance |
| Remove junk files from your PC | Delete temporary, cache, and log files to clear clutter | Use Disk Cleanup or Storage Sense in Windows | Increases available storage and may improve performance |
| Optimize your drive | Defragment HDDs or optimize SSDs to improve read/write speeds | Use the built-in Windows Optimize Drives tool | Improves data access speed and extends drive lifespan |
| Adjust power settings | Set your computer to prioritize performance | Go to Control Panel or Settings > System > Power & battery to adjust your power plan settings | It sets the CPU and other components at their maximum speed to avoid throttled performance |
| Upgrade your PC | Add more RAM, change from HDD to SSD, or upgrade your graphics card | Allow a professional to handle the process for you | Boosts multitasking, speeds up load times, and enhances visual performance |
Tip 1: Maintain your PC regularly
If you want to speed up your Windows PC , you need to regularly maintain it to keep it running smoothly. If you don’t, small issues will pile up and eventually slow everything down. So, try your best to do everything I’ve already talked about in the previous section, like:
- Getting rid of junk files.
- Fixing system registry errors.
- Checking for and removing viruses and malware.
- Updating Windows.
PRO TIP
As you’ve probably noticed, this kind of thing is a chore, especially if you have other things to do. If that’s you, you can use reliable third-party tools like Auslogics BoostSpeed. It’ll automate the maintenance process, identify, and alert you if it finds issues early, and keep your PC running efficiently.
Tip 2: Adjust your PC settings for gaming
If you’re a gamer, you can elevate your gaming experiences by making a few tweaks. You can:
- Enable Game Mode to ensure your game gets priority access to your CPU and GPU resources and suspend non-essential background activities.
- Lower in-game resolution and graphical settings.
- Disable unnecessary background apps.
Here’s a detailed guide on how to get the most out of your PC for gaming: Winning Strategies: How to Optimize Your PC for High-Performance Gaming
Tip 3: Shut down your computer regularly
Many people keep their computers running for days, thinking it saves time. It doesn’t. Shutting down properly helps your PC in the long run. Here’s why:
- It clears temporary files and refreshes your system memory.
- It prevents overheating by giving hardware components a break.
- It protects your system from losing data when the power suddenly goes off.
Try to shut down your PC at least once a day to keep its performance at its peak and prolong the lifespan of your computer
Tip 4: Tweak Windows through the registry
One way to improve Windows performance is by tweaking settings through the registry. Aside from cleaning up your registry, there are lots of adjustments you can do with the registry to improve performance. For instance, using the Windows registry, you can:
- Allocate more resources for your games or other resource-intensive application.
- Reduce network latency for your games.
- Speed up your shutdowns and many more.
These adjustments can optimize system behavior, speed up processes, and reduce unnecessary resource usage.
Tip 5: Optimize your browser
Web browsers can hog resources, which can slow down your computer, but you can make some changes to get a smoother browsing experience without straining the system. Here’s what you can do:
- Close any tabs or applications you’re not using.
- Clear browsing data like cache and cookies.
- Disable or remove any browser extensions you don’t need.
- Update your browser to the latest version get recent updates.
Download Auslogics BoostSpeed
Your one-stop PC maintenance and optimization tool, this program will clean, speed up, repair and tweak your system to ensure maximum speed and efficiency.
Conclusion
Learning how to increase your PC performance does not end here. To ensure your computer works fine, it’ s essential to stay proactive. You should regularly update your system and perform routine maintenance like disk cleanup.
With these practices in place, you can extend the life of your device and enjoy a faster, more reliable computing experience.
We would love to hear from you. Did you find this helpful? If you also have some personal tricks that work for you, you can drop them in the comments.
FAQ
You can boost PC performance by using third-party optimization tools, deleting unnecessary files, managing startup programs, and ensuring your system has enough free storage space.
To increase PC performance, consider upgrading your RAM or switching to a solid-state drive (SSD). You could also consider upgrading your CPU if it’s a desktop.
You can use tools like Task Manager on Windows to identify programs that consume excessive resources. You can also run a system scan for potential malware or outdated drivers that may be affecting PC performance.
Windows 10 is more powerful, Faster and secure compared to the previous OS. And with regular updates, Microsoft adds new features, security improvements and bug fixes. But sometimes compatibility issues, bugs, malware and viruses, and even failing hardware Slow down the performance. Especially after the Windows 10 update, several users report Laptop freezes, Stuck not responding at startup. If you are also struggling with this problem, If your PC is running slow, use these tips to help speed up and increase the performance of Windows 10.
Contents
- 1 How to Optimize Windows 10 Performance
- 1.1 Disable programs that run on startup
- 1.2 Disable Unwanted Startup Services
- 1.3 Disable visual effects
- 1.4 Kill bloatware
- 1.5 Run Disk Cleanup
- 1.6 Turn on Windows 10 Fast Startup Feature
- 1.7 Disable Background Apps
- 1.8 Disable Search Indexing
- 1.9 Adjust Virtual Memory
- 1.10 Launch the Windows troubleshooter
- 1.11 Update Drivers Regularly
- 1.12 Switch to High-performance power plan
- 1.13 Repair system files
- 1.14 Upgrade to a faster drive
How to Optimize Windows 10 Performance
If you want a quick boost in Windows 10 performance, try cleaning Windows 10 junk, Tweak system settings, and stop unwanted startup services. It can create a noticeable difference in window speed.
- Install and run third-party free system optimizer like Ccleaner to clean junk, and cache and fix registry problems with one click.
- Perform a full system scan with the latest updated antivirus software.
- Also, make sure your PC has the latest updates installed, or you can check for updates from Windows settings, Update & Security.
Disable programs that run on startup
The most common reason your Windows 10 PC may feel sluggish is you’ve got too many programs running in the background – programs that you may never use, or only rarely use. Stop them from running, You will notice your Windows computer will run more smoothly.
- Open task manager using Ctrl+Shift +Esc key
- Go to the startup tab.
- There Identify the programs that you are not using regularly and don’t want to run automatically.
- Disable them in the status section.
- Make sure do not to disable your programs published by Microsoft Corporation.
Disable Unwanted Startup Services
Also After Disable Startup programs disable some unnecessary services that run on Windows startup on the background use system resources and cause Windows to run slowly.
- Press Windows + R, type msconfig and ok
- This will open the system configuration window,
- move to the services tab and select the Hide all Microsoft services check box.
- Uncheck all unnecessary services you want to disable and click Apply, Ok To make save changes.
This will ask for system restart to make save changes. Save any working data and restart Windows. This will help to speed up your Windows 10 performance while startup.
Disable visual effects
Start with Windows Vista and 7 Now Windows 10 also have some nice eye candy shadows, animations, and visual effects. Another reason for your PC to be running slow can be visual effects and animations that increase the burden on the system’s resources. On fast, newer PCs, these don’t usually affect system performance. But on slower and older PCs, they can exact a performance hit.
- Press Windows + R, type Sysdm.cpl hit the Enter key.
- This will open system properties with several tabs.
- Click on the Advanced tab, and under Performance click Settings.
- Now On the Visual Effects tab, select Adjust for best performance.
- click apply and ok to make save changes.
Kill bloatware
One of the biggest factors that slow down any Windows computer is unwanted software, aka bloatware. They take up CPU, system resources, book disk and memory space unnecessarily hindering other applications to perform at their full potential.
To remove bloatware or unused applications, follow these steps:
- Press Windows + R, type appwiz.cpl and ok
- This will open the program and Features and display all installed app lists.
- Select the unused application and click Uninstall/Change to remove it.
- Follow the instructions in the uninstall dialog boxes to uninstall the software
Run Disk Cleanup
Occasionally you may need to clean up your computer in order to get rid of old software, temporary objects, and junk files. Some software programs might not be completely uninstalled and the leftover files can cause performance issues. Try Disk CleanUp for this purpose.-
- Press Windows Key + E and select this PC
- Right-click on the C drive and select Properties.
- Click the General tab.
- Now click on Disk Cleanup.
- Select all items from the list box and then click OK.
Turn on Windows 10 Fast Startup Feature
With Windows 10 there is a new “hybrid” startup mode Called Fast Startup, which helps start your PC faster after a shutdown by cutting down on boot-up time, using caching for some necessary resources into a single file on the hard disk. At the time of startup, this master file is loaded back into the RAM speeds up the process manifolds.
- Open the Control panel,
- Search for and select power options
- Click on Choose what the power buttons do
- Then click on Change settings that are currently unavailable.
- Finally, tick the box Turn on fast startup (recommended).
- Now click the Save Changes button to enable the same
Disable Background Apps
In Windows 10, lots of background activities happen to collect information regarding your location, typing behaviour, account info, etc. These apps run unnecessarily in the background And take unnecessary system resources, heat up your PC and reduce its overall performance. That’s why it’s better to disable background apps to speed up your Windows 10.
- Press Windows + X and select Settings
- Click Privacy, then Background apps
- Switch off the toggles to turn off background apps you don’t need or use
- Also, you can turn off the toggle key Background apps ( let apps run in the background ) to turn off all running apps.
Disable Search Indexing
Windows Search indexing Feature improves the search tool’s responses and speeds up searching in Windows 10. It weakens the performance, however, as it runs in the background and utilizes a lot of system resources. Owing to this reason, if you do searches occasionally, then it’s best to disable it.
Follow the below steps to disable search indexing:
- Press Windows + R, type services.msc and ok
- In the services list, look for Windows Search and double-click it
- In the new window, for Startup type, select Manual or Disabled and then click the OK button to save your changes
Adjust Virtual Memory
Windows has two types of memory physical memory ( RAM ) and virtual memory known as (paging file). With a low RAM, it’s difficult to handle multitasking smoothly on Windows 10 computers. The recommended solution for this is to upgrade the RAM or another option is to Adjust the virtual memory (allocate more virtual memory) to optimize the Windows performance.
- Click on the start menu search type performance and select Adjust the appearance and performance of Windows.
- This will open the performance options popup.
- Next, move to the Advanced Tab and then click on the Change button under Virtual Memory.
- In the new window that appears, uncheck Automatically manage paging file size for all drives.
- Select the C: drive and then click the radio button for Custom size
Now set the Initial size (MB) to the size of your RAM and the Maximum size (MB) to double the size of your RAM (for ex., if the size of the RAM is 4GB, set the initial size to (1024 x 4 = 4096) 4096 MB and maximum size to 8192 MB). Now click the Set button and then apply, OK to make save changes. This will Ask for system restart to make save changes effective save any work and restart windows.
Launch the Windows troubleshooter
Windows 10 has a very useful, little-known tool that can sniff out performance problems and solve them. . If there are issues affecting your PC but you can’t find them yourself, then it’s easy to find and fix those using the troubleshooting tool. To launch it, open the control panel -> small icon view click on troubleshooting -> Now under system and security click on Run maintenance tasks.
A screen titled “Troubleshoot and help prevent computer problems” will appear. Click Next. The troubleshooter will find files and shortcuts you don’t use, identify any performance and other issues on your PC, report them to you and then fix them. Also, Run the other tools that fix problems with Windows updates and improve power usage to fix problems and improve Windows system performance.
Update Drivers Regularly
Incomplete driver installation and outdated drivers are serious problems that gradually slow down your computer. Device manufacturers release new updates to fix internal bugs and improve system performance. Regularly updating the drivers can improve your computer’s performance. to manually update drivers
- type device manager on the start menu search and hit the enter key. This will open the Device Manager and all installed drivers list.
- Right-click any device with an exclamation mark (You have to expand each entry to reveal yellow exclamation marks).
- Select Update Driver Software.
Switch to High-performance power plan
Windows 10 ships with three predefined power plans, including Balanced, Power saver, and High performance to optimize the power usage of your device. If you’re looking to boost performance, you should be using the “High performance” option, which allows your computer to run faster.
To change the current power plan on your device, do the following:
- Open Control Panel.
- Click on Hardware and Sound.
- Click on Power Options.
- Select the High performance power plan.
Repair system files
If you’re experiencing performance issues as a result of corrupted system files, you can use the Deployment Image Service and Management Tool (DISM) command-line tool to fix your current installation without the need to reinstall Windows 10. In the case that DISM is unable to repair system files, Windows 10 also includes the System File Checker (SFC) command-line tool, which can download and replace corrupted system files using Windows Update.
Using DISM
- Open the command prompt as administrator, then execute the following command.
- DISM /Online /Cleanup-image /Restorehealth,
- Wait for the scanning process to 100% complete,
- Now type the command sfc /scannow and hit enter key to run the system file checker utility,
- Restart Windows after completing the scanning process, you may notice the difference.
Upgrade to a faster drive
If you have an older computer, the biggest performance bottleneck you’re likely to face is the hard drive, as traditional rotating platter drives typically perform much slower than pretty much any other piece of hardware. Upgrading to an SSD is perhaps the best thing you can do to increase system performance.
Here is the difference between SSD and HDD
Do you have additional tips to make Windows 10 faster? Share in the comments below.
Also read:
- 3 effective solutions to fix 100% disk usage in Windows 10 22H2 update
- Fix unidentified network no internet access Windows 10, 8.1 and 7
- Remote desktop not working after the Windows 10 update? Try these 5 Solutions
- Solved: The proxy server is not responding in Windows 10, 8.1 and 7
- Fix Error 0xa00f4244 webcam not working Windows 10
Is your Windows 10 very slow and unresponsive, or your PC take longer to respond and get stuck while running program simultaneously? Then, this article is for you.
Here check out the complete fixes to get rid of the extremely slow and unresponsive Windows 10 computer and optimize Windows 10 to boost its performance.
Well, the Windows operating system somehow becomes slow and unresponsive as it get old. However, some users reported that it became very slow and unresponsive after updating their Windows 10 OS.
Well, the reasons vary with different users. No matter which problem is bothering your Windows 10 performance and making it slow and unresponsive. Try the below-given list of solutions to resolve Windows 10 slow to response issue.
But first, it is important to learn why is my computer so slow. Below have a look at the common culprit responsible for the problem.
To repair corrupted Windows system files & optimize your PC performance, we recommend Advanced System Repair:
This software is your one stop solution to fix Windows errors, protect you from malware, clean junks and optimize your PC for maximum performance in 3 easy steps:
- Download Advanaced System Repair rated Excellent on Trustpilot.
- Click Install & Scan Now to install & scan issues causing the PC problems.
- Next, click on Click Here to Fix All Issues Now to fix, clean, protect and optimize your PC effectively.
These are some common reasons that may help you understand what causes the problem. Well, the list won’t cover all the reasons, but it gives you a start on understanding the slow performance issues on Windows 10/8/7.
- Running too many background programs.
- Due to hardware conflicts and outdated drivers
- Virus or malware infection
- System running for a long time without a reboot
- No free hard drive space
- The corrupted or fragmented hard drive can cause Windows 10 to slow to respond.
- Due to overheating
- Outdated software or Windows version
- Too old PC/laptop
- Hardware failure can also make Windows 10 slow and unresponsive.
- High CPU usage
- The system is running out of space
Now check out the list of solutions and try them one by one to fix slow computers and optimize Windows 10 performance.
How to Fix Windows 10 Very Slow And Unresponsive Issue?

To fix a slow Windows 10 PC/laptop, carefully try out the below-given solutions one by one. But first, try some initial and basic tweaks to resolve Windows 10 slow issue on your own –
- Restart your system
- Disable TSRs (Terminate and Stay Resident program) and startup programs
- Delete temp files, and disconnect all peripherals, including USB devices like printers, hard drives, cameras, etc.
- Install the latest Windows updates.
If these tweaks and tricks didn’t help get your work done, move ahead and try the below-listed fixes.
#Fix 1 – Scan for Viruses/Malware
Like its predecessor, Windows 10 is also vulnerable to viruses and malware infection. And if the PC/laptop is infected with viruses, then this can make your computer run slowly.
So, make sure to scan your Windows 10 system with good antivirus software at regular intervals of time. If you are searching for a reliable antivirus tool, I strongly recommend using Spyhunter.
It has multiple advanced features that will help you keep your PC safe from virus/malware threats and remove the malware/virus o=infection from your computer.
Get Spyhunter to Keep Your PC Safe From Virus or Malware Threats
Or you can also try removing the virus without using the antivirus software. For this, you need to do the following:
- Type cmd in the Windows Search bar.
- Right-click on the Command Prompt and select Run as administrator.
- Enter the command attrib g:*.* /d /s -h -r–s in the Command Prompt and press the Enter key (Here, replace the letter g with your external hard drive’s drive letter)
And restart your Windows 10 computer and check if the Windows slow to respond issue is resolved or not.
#Fix 2 – Disable Heavy Performance Processes
Generally, third-party applications eat up entire system resources and cause the system to lag, freeze and respond slowly. So, check for unnecessary third-party applications running in the background and slowing down Windows 10 startup.
- Press Ctrl + Shift + Esc > open Task Manager
- As the Task Manager opens, go to the Startup tab, and sort the processes by the Startup impact rating.
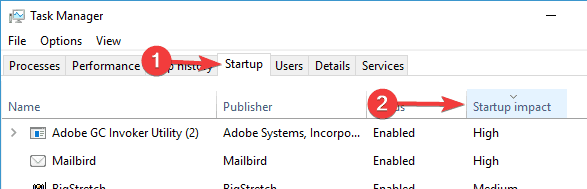
- In the high category, disable processes but avoid disabling essential programs like antivirus.
Doing these easy tweaks will help you to improve Windows 10 performance by fixing Windows 10 very slow and unresponsive issues.
#Fix 3 – Enable Fast Startup Option
Microsoft has added the latest feature named Hybrid Startup and Shutdown. This will put your PC/laptop into hibernation and improve the startup and shutdown process.
This may consume more power, but don’t turn off the machine completely. So, make sure to enable the fast startup option. Follow these steps to do the following:
- Press the Windows + S key and type the power settings.
- Choose Power & sleep settings.
- Now click on the Additional power settings option.
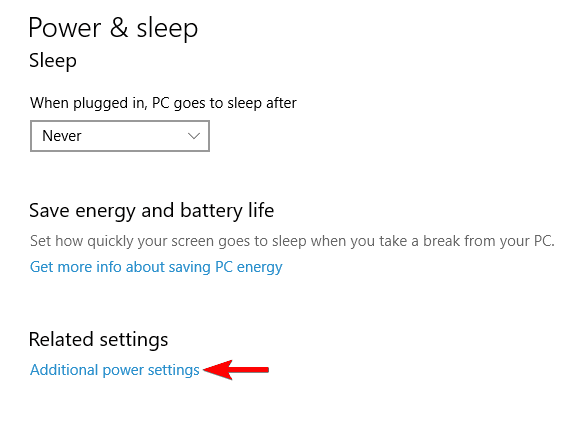
- Click on the Choose what the power button does from the left menu.
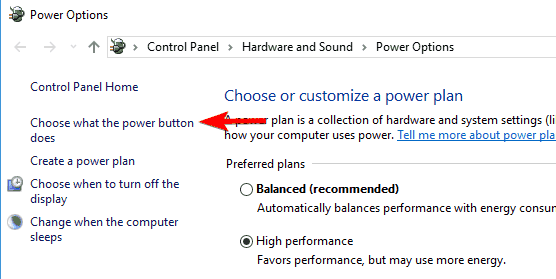
- Now, Click on the Change settings that are currently unavailable.
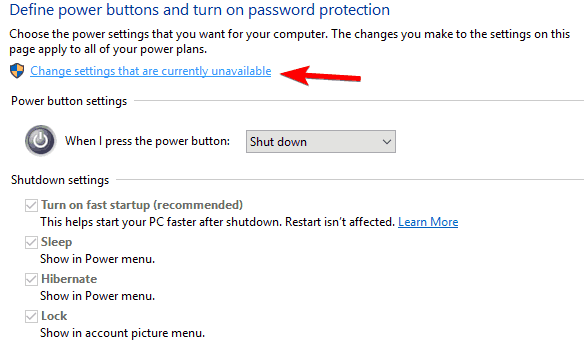
- Check the box given next to the Turn on fast startup option and save your changes
Now check if the “Windows 10 very slow and unresponsive” issue is resolved or not. If not, then try out the next solution.
#Fix 4 – Disable Unnecessary Services
Windows 10 contains plenty of Microsoft services, some of them are essential, and some are unnecessary, so make sure to turn off unnecessary Windows 10 services for better performance.
You can simply do this by following the given steps:
- Press Windows + R key together to open the Run dialog box.
- In the Run box, type services.msc and click on the OK button.
- Now you can see all the services running on Windows 10.
- Right-click on the unnecessary services and select Properties.

- Go to the Startup Type and select Disabled from the dropdown list.
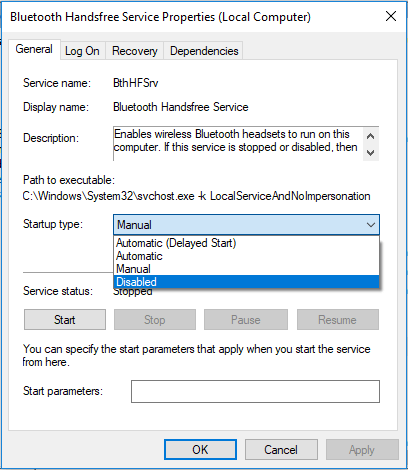
- Finally, click on the Apply and OK buttons.
#Fix 5 – Disable Visual Effects and Transparency
Windows 10 has many visual effects and other graphics that look beautiful but also slow down the Windows 10 system as they are eating up the system resources and may overheat your system..
So, disable these effects to speed up Windows 10 performance. To do so, follow the below-given steps:
- Press Windows + I key to open the Windows Settings.
- Click on Personalization.

- Then click on Colors > set Transparency effects to Off.
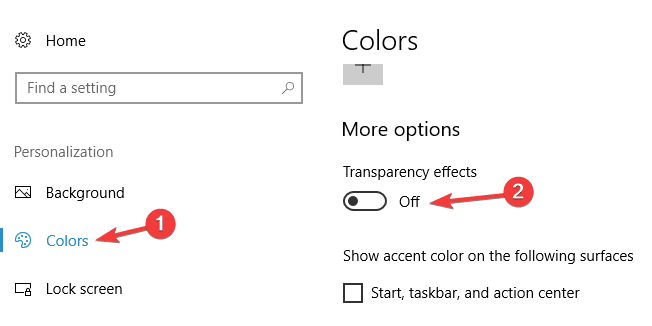
This method should work for you to fix Windows 10, which is slow, unusable, and unresponsive.
#Fix 6 – Defragment your drive
As said above, a corrupted or fragmented hard drive can cause Windows 10 slow to respond. So, here you need to defragment your drive, but if you are using the solid-state drive, skip this solution.
Windows 10 has its own fragmentation tool; you can defragment your drives by using this. For this, you need to follow the given instructions:
- Press the Windows + S key and type defrag on the Windows Search box.
- Select Defragment and Optimize Drives from the result.
- As the Optimize Drives window opens, choose the desired drive, and click on the Analyze button.
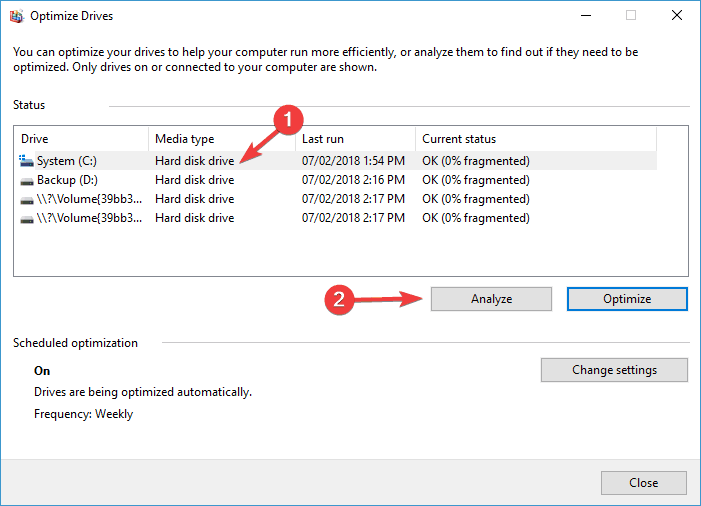
- After scanning the drives, choose the fragmented drive and click on Optimize.
- Now, wait till Windows defragments your drive.
- And after completing, repeat the process for all drives.
As the defragmentation process is finished, restart your machine and check if the Windows 10 very slow and unresponsive issue is resolved or not.
#Fix 7 – Update your Drivers and Software
The outdated drivers and applications can also make Windows 10 lagging, and freezing, and the running programs get stuck in between. So, it is very important to update them with the latest updates.
Just like the applications, it is also important to update the outdated drivers as this may cause Windows 10 to slow to perform.
To update the drivers, you can go to the Microsoft official website or to Manufacturer’s official website and search for the latest update and install them.
Despite this, you can also make the whole process easy by making use of Driver Updater, which automatically updates the drivers and fix other drivers related issues.
Get Driver Updater to Update Device Drivers Automatically
#Fix 8 – Adjust the Size of the Virtual Memory
Virtual memory is very important for Windows 10 to perform better. Windows 10 automatically manages the size of virtual memory but can also be changed manually. Follow the steps to do so:
- Press Windows + S key and type advanced.
- Choose View advanced system settings from the search result.
- Now System Properties window appears. Click on the Settings button in the Performance section.
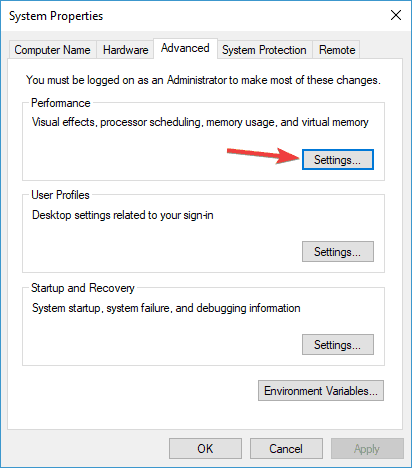
- In the Performance Options window, go to the Advanced tab and click on the Change button.
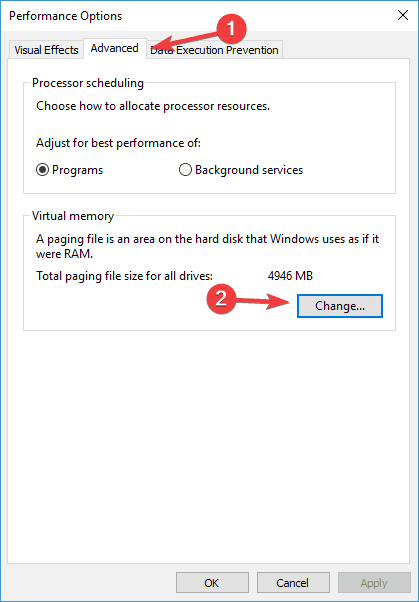
- As the Virtual Memory window opens, uncheck the automatically manage paging file size for all drives checkbox.
- Choose the Custom size, and enter Initial Size and Maximum size.
- Then click on the Set and OK button to save the changes you have made.
And after this, you need to set the virtual memory size for that drive, and to fix Windows 10very slow and unresponsive issue, you have to set the manual size for all drives.
The size of the virtual memory is related to the size of the RAM, and as a common rule, the initial size should be at least 1.5 times larger than the amount of RAM memory on the PC.
And for maximum size, it should be at least 4 times larger than your PC’s RAM.
#Fix 9 – Run SFC and DISM
Corrupted Windows system files often lead to various errors and issues on the computer. And these issues directly impact the performance of the PC.
So, if your PC is slow and not responding, then running the inbuilt Windows tool to deal with this issue. Here you have two tools, SFC and DISM.
First, we will run the SFC tool, and if it fails to fix Windows 10 performance issue, then we will go with the DISM. So, to run the SFC scan, follow these steps:
- Open the Command Prompt with the admin privileges.
- In the Command Prompt, type the given command and press the Enter key to initiate it:
sfc/scannow
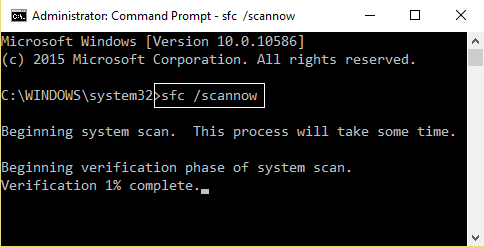
- Wait until the process is completed.
- Once the scanning is completed, restart your computer.
Now check if it helps to improve the performance issue. If not, then try the DISM. It is an advanced troubleshooting tool and can fix the issues that SFC cannot deal with.
- For this, first, open the Command Prompt as admin.
- In the Command Prompt, execute this command, and don’t forget to press the Enter key:
dism.exe /Online /Cleanup-image /Restorehealth
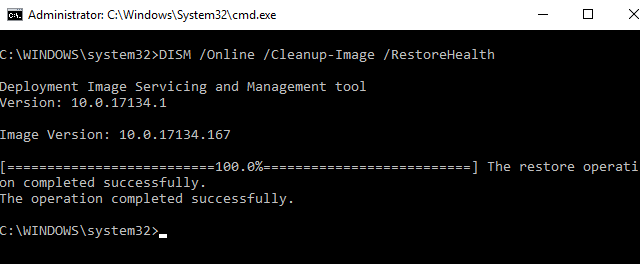
- Now, DISM will start to find the corrupt files on your system and will fix them automatically by replacing the corrupted files with healthy copies.
#Fix 10 – Clear RAM Cache
The cache memory piles up in the system, causing the computer to respond slowly. So here it is suggested to free up the RAM cache in the Windows system.
Follow the steps to do so:
- On your Desktop, right-click on empty space.
- And click on New and then on Shortcut.
- Then in the popup window, type %windir%\system32\rundll32.exe advapi32.dll,ProcessIdleTasks and click on Next
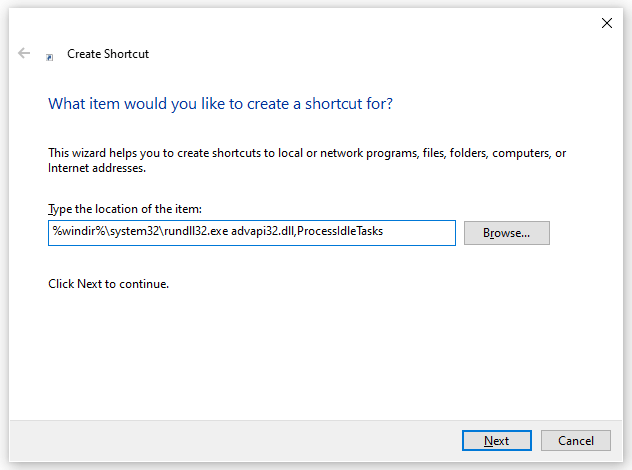
- Name the shortcut Clear Memory Cache and click on Finish.
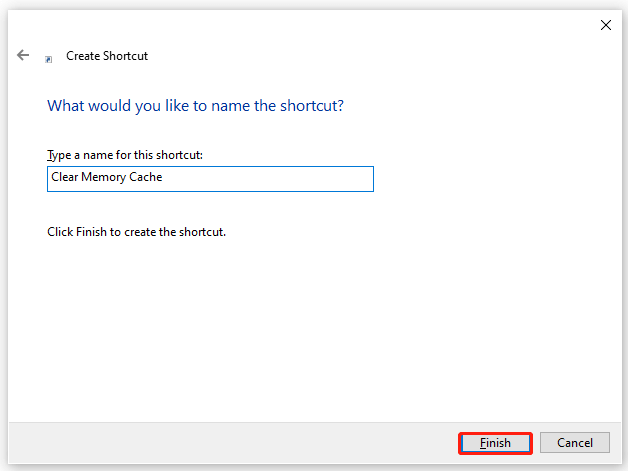
- Next double, click on the shortcut when you want to flush the memory cache.
#Fix 11 – Disable Windows Module Installer Service
The Windows Module Installer service, or TiWorker.exe is the update service that runs in the background and downloads the latest updates from Microsoft. But this causes high CPU usage for many users and makes the computer very slow and freeze.
So, here it is suggested to disable the Windows Module Installer service. Follow the steps to do so:
- Press the Windows + R key to open the Run box.
- In the Run box that appears, type services.msc and hit Enter.
- Now, in the window that opens, search the Windows Moduler Installer service and then double-click on it.
- Then modify the Startup type to Disabled and then the Service status to Stopped.
- Next, click on Apply and then on OK to save the changes.
After completing the entire process restart your system; now check whether slow and unresponsive Windows 10 and 11 problems is resolved or not.
#Fix 12 – Windows 10 Task Manager 100% Disk Usage Error
The 100% disk usage error in the task manager is another problem that may cause Windows 10 slow performance. This is a common problem faced by users due to running multiple programs and software on the PC.
To fix the Windows 10, 100% disk usage in Task Manager problem, follow the fixes given in the article – Fix 100% Disk Usage in Windows 10.
#Fix 13 – Uninstall Recently Installed Update
After updating the Windows 10 system, many users start running slow, so if you have recently installed any Windows 10 update, uninstall it and check if the Windows 10 very slow and unresponsive issue is resolved.
- Press Windows + I key to open Settings.
- Then click on Update and Security and then click on Windows updates.
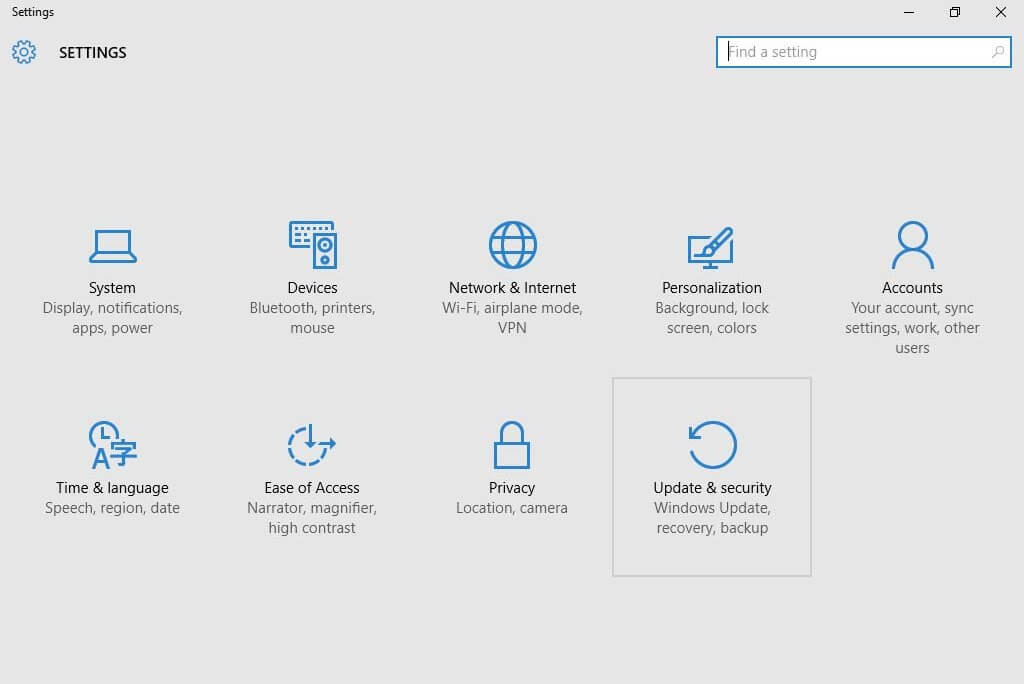
- Now click on Advanced options and then on View update History option
- Click on Uninstall updates, and the installed update page opens.
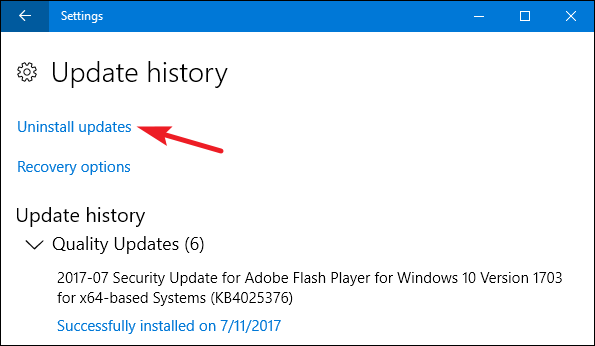
- Right-click on the recently installed update and choose Uninstall update.
Wait for the update to get uninstalled and then check Windows 10 very slow and unresponsive after update problem is resolved or not.
#Fix 14 – Upgrade to SSD Windows 10
If none of the above solutions works for you to fix Windows 10 or 11 very slow and unresponsive, then upgrading the system to a faster SSD may work for you to improve the system performance.
To upgrade from the HDD to SSD on Windows 10, follow the steps here.
#Fix 15 – Perform a Clean Windows 10 Install
I hope the given tricks help you to fix Windows 10 very slow and unresponsive issue, but if not, then it is advised to perform a clean Windows 10 install. Sometimes due to software issues, while upgrading to Windows 10 from Windows 7 or Windows 8, the computer slows down.
So, perform a clean install of Windows 10 to fix the slow and unresponsive issue, but first backup the important data.
Easy Solution to Fix Windows 10 Slow Performance
If you are looking for an easy solution to fix Windows 10 slow and unresponsive performance, then you must try the PC Repair Tool.
This tool optimizes the PC to provide maximum performance and makes it run like a new one. Along with this, it also has multiple features that fix common Windows errors just by scanning once.
It fixes corrupted registries, corrupted Windows system files, BSOD, DLL, applications, and game errors, keeps PC safe from viruses/malware, etc. So, give a try to this tool and improve the performance of your Windows PC.
Get PC Repair Tool to Boost the Performance of Your PC
Conclusion
So, here my part is done. Now it’s your turn to try the given fixes to speed up Windows 10 PC/laptop. It is estimated after performing the given fixes Windows 10 very slow and unresponsive issues should be resolved.
Make sure to follow every solution carefully to avoid any further issues. I hope this article and the listed solutions will get this issue fixed.
If you have a query or suggestions, then feel free to share them with us. You can contact us on Facebook or Twitter. You can follow us for more guides to fix Windows-related errors and issues.
Hardeep has always been a Windows lover ever since she got her hands on her first Windows XP PC. She has always been enthusiastic about technological stuff, especially Artificial Intelligence (AI) computing. Before joining PC Error Fix, she worked as a freelancer and worked on numerous technical projects.