
Кэш обновлений Windows — уже скачанные на компьютер файлы обновлений, готовые к установке. При возникновении проблем с их установкой, для освобождения места на диске или для того, чтобы после удаления обновлений они не отображались в Центре обновлений Windows с кнопкой «Установить», вы можете очистить этот кэш.
В этой пошаговой инструкции несколько простых способов очистить кэш обновлений в Windows 11 и Windows 10 встроенными средствами системы, все они безопасны и не должны привести к каким-либо проблемам в работе. Также может быть полезным: Сброс компонентов Центра обновлений (включая очистку кэша) в PowerShell.
Кэш обновлений в утилите «Очистка диска»
Самый простой способ очистки кэша обновлений — встроенная в Windows утилита «Очистка диска». Шаги будут следующими:
- Нажмите правой кнопкой мыши по кнопке «Пуск» и выберите пункт «Выполнить».
- Введите cleanmgr и нажмите Enter.

- При появлении запроса на выбор диска выберите диск C.
- Нажмите кнопку «Очистить системные файлы».
- Отметьте пункт «Очистка обновлений Windows».

- Нажмите «Ок» и дождитесь завершения очистки.


В Windows 11 и 10 вы также можете использовать функции очистки диска в «Параметрах», подробнее об этом в инструкциях Очистка диска Windows 11 встроенными утилитами, Автоматическая очистка диска Windows 10.
Очистка кэша обновлений вручную в командной строке
Кэш обновлений хранится в папке C:\Windows\SoftwareDistribution\Download и мы можем удалить её содержимое вручную с помощью командной строки. Для этого потребуется временно отключить службу Центра обновлений Windows с повторным её включением по завершении процесса.
- Запустите командную строку от имени Администратора. Для этого можно использовать поиск по «командная строка» в панели задач и пункт «Запуск от имени администратора».
- По порядку введите следующие команды
net stop wuauserv
cd C:\Windows\SoftwareDistribution
del /f /s /q Download
net start wuauserv


Удаление кэша обновлений Windows в проводнике
Этот способ, по своей сути повторяет предыдущий, но без использования командной строки:
- Нажмите клавиши Win+R на клавиатуре, введите services.msc и нажмите Enter.
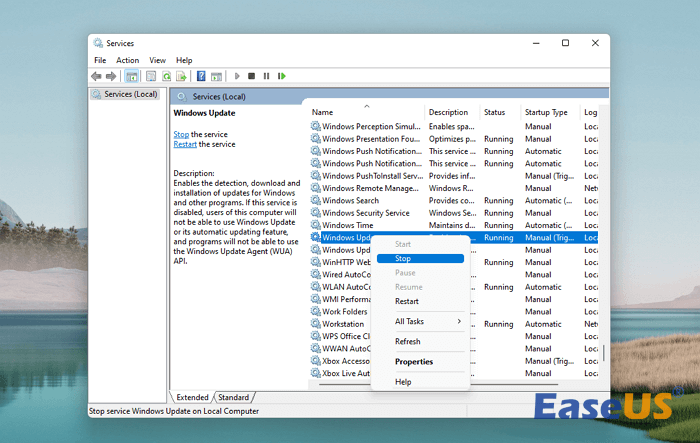
- В списке служб найдите «Центр обновления Windows», дважды нажмите по ней и нажмите кнопку «Остановить».

- В проводнике перейдите в папку
C:\Windows\SoftwareDistribution\Download
- Выделите всё содержимое папки (клавиши Ctrl+A) и удалите его.
- Снова зайдите в «Службы» и запустите Центр обновления.

Сброс кэша обновлений и его параметров без фактического удаления
Если задача — исправить ошибки центра обновлений, а не выполнить удаление кэша, можно использовать следующий набор команд в командной строке, запущенной от имени администратора:
net stop wuauserv
net stop cryptSvc
net stop bits
net stop msiserver
ren C:\Windows\System32\catroot2 catroot2.old
ren C:\Windows\SoftwareDistribution SoftwareDistribution.old
net start cryptSvc
net start bits
net start msiserver
net start wuauserv
Если ошибки были исправлены, созданные папки SoftwareDistribution.old в папке Windows и catroot2.old в папке System32 можно будет удалить.
Очистка кэша обновлений также доступна в сторонних утилитах, предназначенных для исправления ошибок при обновлениях, подробно: Как исправить ошибки Центра обновлений Windows.
Также, в контексте рассмотренной темы могут быть полезными следующие материалы:
- Как удалить обновления Windows 11
- Как удалить обновления Windows 10
- Как отключить обновления Windows 11
- Как отключить обновления Windows 10
Download Article
Get rid of corrupt cache files to fix update installation errors
Download Article
- Why clear the cache?
- Using Command Prompt
- Using File Explorer
- Using a Batch Script
- Using Windows Settings
- Using Disk Cleanup
|
|
|
|
|
Are you having trouble installing Windows Updates? If a Windows update fails mid-way or gets stuck installing, clearing the update cache forces Windows to redownload the installation files from Microsoft, which tends to fix the problem. Read on for simple steps to clear the Windows Update cache using Windows 10 or 11.
Quick Steps
- Open Command Prompt as an administrator.
- Type «net stop wuauserv» and press Enter.
- Type «net stop bits» and press Enter.
- Type «rmdir /S /Q C:\Windows\SoftwareDistribution» and press Enter.
- Type «net start wuauserv» and press Enter.
- Type «net start bits» and press Enter.
-

When Windows installs updates, it first downloads the installation files and saves them to a folder. Once the files are downloaded, Windows uses them to install the updates. If Windows Update fails, gives you an error, or gets stuck, there could be a problem with files in that cache. To fix the failed update, you can easily clear the update cache—it’s safe and will not harm your computer.
- You can also clear the update cache to free up space on your computer. However, Windows does clear the update cache automatically—the files are only saved for a certain period after an update is installed successfully, just in case you need to revert to a previous update.

Advertisement
-
An easy way to clear the Windows Update cache is from the command prompt. Don’t worry—this is simple, even if you’re uncomfortable typing commands. To open Command Prompt as an admin:
- Press the Windows key and type cmd.
- Right-click Command prompt and select Run as administrator.
- Click Yes to confirm.
-
If the services are running, you won’t be able to delete the entire update cache. At the prompt, type the following commands:
- Type net stop wuauserv and press Enter.
- Type net stop bits and press Enter.
-
This command deletes everything in the C:\Windows\SoftwareDistribution folder, which is where cached update files are stored:
- Type rmdir /S /Q C:\Windows\SoftwareDistribution and press Enter.
-
Now that the update cache is clear, you can restart the services you stopped earlier.
- Type net start wuauserv and press Enter.
- Type net start bits and press Enter.


Advertisement
-
Another way to clear the Windows Update cache is using File Explorer. Before you do this, though, you’ll want to stop the Windows Update services so the files can actually be removed. To open Windows Services:
- Press the Windows key or click the Windows menu.
- Type services.msc and press Enter.
-
To do this, scroll down to «Windows Update,» right-click it, and select Stop.
- Leave the window open for now. After clearing the update cache, you’ll need to reenable these services.
-
Scroll back up, right-click «Background Tasks Infrastructure Service,» and select Stop. This will ensure that nothing prompts Windows Update to restart until you do it manually.
-
The Windows folder is located at C:\Windows on most PCs.
- For example, if Windows is installed on your C drive, click This PC in the left panel, click the C drive, then double-click the Windows folder.
-
To fully clear the update cache, you’ll want to delete everything in this folder. Scroll down, select SoftwareDistribution, press the delete key on your keyboard, and click Continue to confirm.
-
Now that the cache is empty, return to the Windows Services window and restart the services you stopped.
- Right-click Background Tasks Infrastructure Service and select Start.
- Right-click Windows Update and select Start.


Advertisement
-
If you want to clear the update cache quickly in the future, you can use this method to write a quick batch script that clears the update cache for you. You will need to run this script as an administrator for it to work.
-
This script stops the Windows Update service, stops the Background Intelligent Transfer Service, clears the cache, and then restarts the services.
@Echo On
net stop wuauserv
net stop bits
C:
rmdir /S /Q %Windir%\SoftwareDistribution
net start wuauserv
net start bits
pause
-
If you’re using Notepad, click the File menu, select Save as, and choose a folder to save the file in. Then, select «All files» from the «Save as type» menu, name the file something like «clear_update_cache.bat», and click Save.
-
To use your script to clear the cache, right-click the file, select Run as administrator, and then click Yes to confirm. A Command Prompt window will open and run the commands from the script.
- When the script is finished running, the Windows Update cache will be cleared, and you’ll see «Press any key to continue . . .» at the bottom. When you press a key, the window will close.


Advertisement
-
Press the Windows key on your keyboard (or click the Windows menu) and select Settings.
- This method can be helpful to free up some disk space, but it usually won’t fix any Windows Update errors. The files you’ll be deleting are update files from previous updates, and they’re meant to help you in case you need to revert to the last version.
-
If you’re using Windows 11, it’ll be in the left panel. On Windows 10, click the System icon.
-
It’s in the center panel on Windows 11, and at the bottom of the left panel on Windows 10. Windows will quickly scan to determine the amount of space used on your PC.
-
This displays a list of different types of temporary files stored by Windows, including how much space each file type is consuming.[1]
-
If you don’t see this option, there aren’t any Windows Update files to delete. They’re deleted automatically after a while.
- You can, however, check «Delivery Optimization Files,» which does contain some cached files relating to Windows Update. However, these cached files are intended to improve update speeds for other computers on your network.[2]
- If you’re low on space, we recommend selecting other types of temporary files to delete as well. Just be careful not to select «Downloads» if you don’t want to delete everything in your Downloads folder.
- You can, however, check «Delivery Optimization Files,» which does contain some cached files relating to Windows Update. However, these cached files are intended to improve update speeds for other computers on your network.[2]
-
This clears the Windows Update cache and frees space from other selected temporary files.


Advertisement
-
To do this, press the Windows key on your keyboard, type disk cleanup, and click Disk Cleanup from the search results.[3]
- Like the Settings method, using Disk Cleanup to clear the Windows Update cache won’t fix problems with Windows Update. The files you’ll be deleting will free up space from existing update files that are no longer needed, but because these files are just backed-up files from your previous update, this is not the equivalent of clearing the cache, despite what some believe.
-
This quickly scans files that can be deleted and displays them in a list.
-
If you don’t see this option, there aren’t any Windows Update files to delete. They’re usually deleted automatically after a while.
- You can, however, check «Delivery Optimization Files,» which does contain some cached files relating to Windows Update. However, these cached files are intended to improve update speeds for other computers on your network.
- If you’re running low on space, select any other types of files you want to delete. You can even select «Recycle Bin» to permanently delete your deleted files.
-
This deletes the selected Windows Update files (and any other files you selected).


Advertisement
Ask a Question
200 characters left
Include your email address to get a message when this question is answered.
Submit
Advertisement
Thanks for submitting a tip for review!
References
About This Article
Thanks to all authors for creating a page that has been read 8,022 times.
Is this article up to date?
-
Home
-
News
- How to Clear Windows Update Cache (3 Ways for You)
By Daisy | Follow |
Last Updated
Clearing the Windows 10 update cache manually will solve most of the problems you may have installed the latest Windows 10 update on your computer. This post from MiniTool introduces how to clear Windows update cache.
If you have trouble running Windows Update, it is likely that there is a problem with the update file, or the file is not completely cleared for download or is damaged. Windows update cache location is C:\Windows\SoftwareDistribution\Download. All installation files for Windows updates are stored here.
Tips:
Discover MiniTool System Booster: Unlock Disk Space and Deep-Clean Your PC.
MiniTool System Booster TrialClick to Download100%Clean & Safe
How to Clear Windows Update Cache
There are 3 ways for you. You can choose one based on your needs. Here is how to do that:
Way 1: Clear Windows Update Cache via File Explorer
First, let’s see how to clear Windows update cache via File Explorer.
Step 1: Type File Explorer in the Search box to open it.
Step 2: Find and right-click Local Disk (C) to choose Properties.
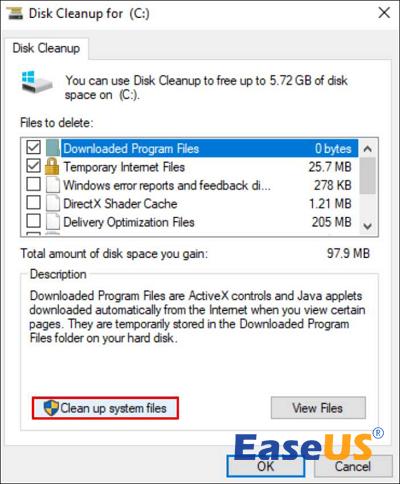
Step 3: Then, click Disk Clean-up. After that, click the Clean up system files option.
Step 4: Then, check the Windows upgrade log files and Temporary Windows Installation files boxes and click OK.
Step 5: Press the Windows and R keys at the same time to open the Run dialogue box. Type services.msc and click OK to open the Services application.
Step 6: From the list of applications, right-click Windows Update to select Stop.
Step 7: Next, open File Explorer and go to C:\ > Windows > SoftwareDistribution. Remove all the files in the folder.
Then, you have cleared the Windows update cache successfully.
Way 2: Clear Windows Update Cache via Command Prompt
The second method for you to reset Windows updates cache is via Command Prompt. The detailed steps are as follows:
Step 1: Type Command Prompt in the Search menu. Then right-click it to choose Run as administrator to open it.
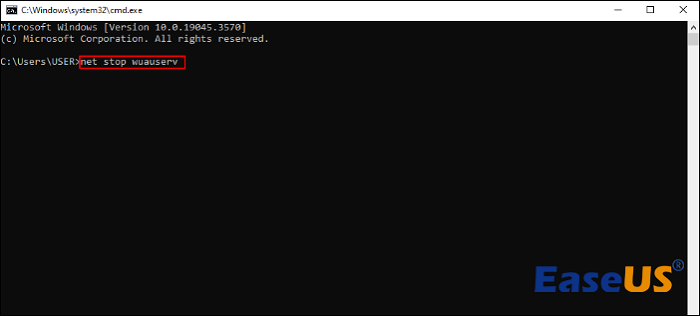
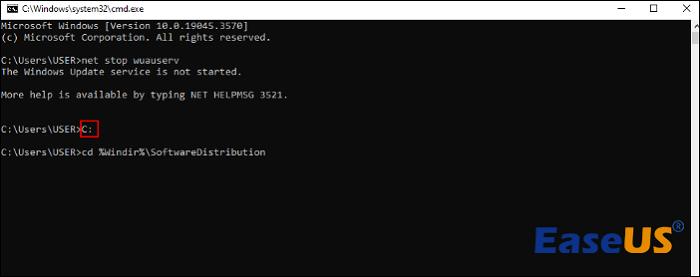
Step 2: Type net stop wuauserv and press the Enter key in the Command Prompt window.
Step 3: Type C: and press Enter. Type cd %Windir%\SoftwareDistribution and press Enter. Type del /f /s /q Download and press Enter.
Then, all of the windows 10 cache files on your machine will now be deleted.
Way 3: Clear Windows Update Cache via Script
You can also try to clear Windows Update Cache via Script. Follow the instructions below:
Step 1: Open Notepad and Insert the below code in bold
@Echo On
net stop wuauserv
C:
cd %Windir%\SoftwareDistribution
Type del /f /s /q Download
pause
Step 2: Save the file as Cleardown.cmd on your desktop.
Step 3: Right-click the Cleardown.cmd file and select run as administrator.
Step 4: When the Script has finished it will pause so you can see the output of what it has done.
How to Reset Windows Update Cache
You may also wonder how to reset Windows update cache. Here are the steps:
Step 1: Type Command Prompt in the Search menu. Then right-click it to choose Run as administrator to open it.
Step 2: Type the following command one by one:
net stop wuauserv
net stop cryptSvc
net stop bits
net stop msiserver
Step 3: Next, run the following command one by one.
ren C:\Windows\SoftwareDistribution SoftwareDistribution.old
ren C:\Windows\System32\catroot2 Catroot2.old
Final Words
This post has introduced how to clear Windows update cache and how to reset Windows update cache. I hope that this post can be helpful to you.
About The Author
Position: Columnist
Having been an editor at MiniTool since graduating college as an English major, Daisy specializes in writing about data backups, disk cloning, and file syncing as well as general computer knowledge and issues. In her free time, Daisy enjoys running and going with friends to the amusement park.
Quick Links
-
Why Should You Clear Your Windows Update Cache?
-
Clear Windows Update Cache Using File Explorer
-
Clear Windows Update Cache Using Disk Cleanup
-
Clear Windows Update Cache Using Command Prompt
Summary
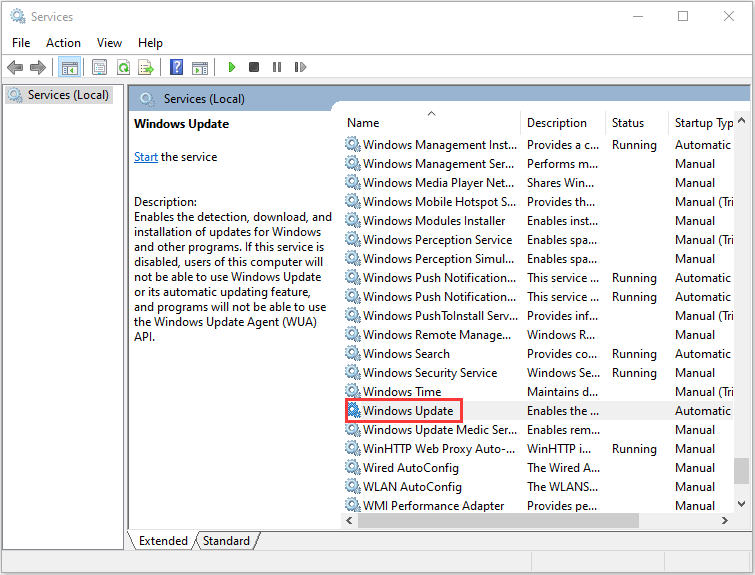
- To delete the update cache, open Run, type services.msc, right-click «Windows Update,» and choose «Stop.» Keep the window open.
- Open Run again, type C:\Windows\SoftwareDistribution\, select all files, right-click a file, and choose the trash can icon (Windows 11) or «Delete» (Windows 10).
- Come back to the «Services» window, right-click «Windows Update,» and choose «Start.»
Both Windows 11 and Windows 10 make it super easy to clear your Windows Update cache. You can use a graphical method or a command line option to delete the saved update files. We’ll show you your available options.
Why Should You Clear Your Windows Update Cache?
There are many reasons you might want to clear your Windows Update cache.
You might be facing issues finding or installing updates, and clearing the cache often fixes the problem. Clearing the cache fixes issues with Windows Updates by forcing Windows to re-download all the required files.
Another reason is to free up storage space. Update cache files often use a huge chunk of the storage, and you can reclaim that by deleting those cached files. (Windows does delete some update files after installing those updates, but not all.)
Clear Windows Update Cache Using File Explorer
An easy graphical way to delete the update cache is to use File Explorer. This method deletes all the update cache files.
To use this method, open the Run dialog box by pressing Windows+R. Type the following in the box and press Enter:
services.msc
In the Services window, find the Windows Update service. Right-click it and select «Stop.» Keep this window open as you’ll come back here later.

Launch Run again using Windows+R, type the path below in the box, and press Enter. The following is the path to the Windows Update cache folder. It assumes that Windows is installed on your C:\ drive. However, if that’s not the case, just change the drive letter in the path.
C:\Windows\SoftwareDistribution\
Press Ctrl+A to select all files in the open folder. Right-click a selected file and choose the trash can icon (Windows 11) or «Delete» (Windows 10).
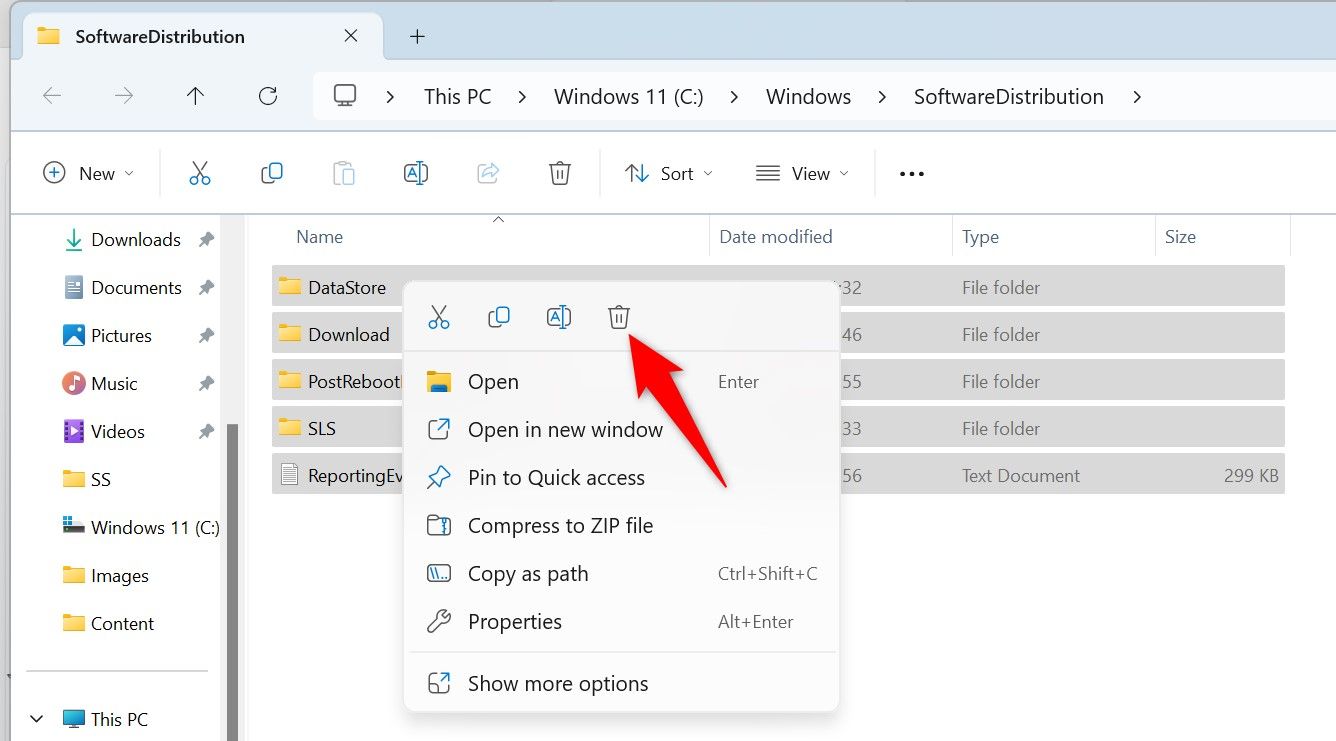
Close File Explorer and empty the Recycle Bin.
Then, return to the «Services» window, right-click «Windows Update,» and choose «Start.»
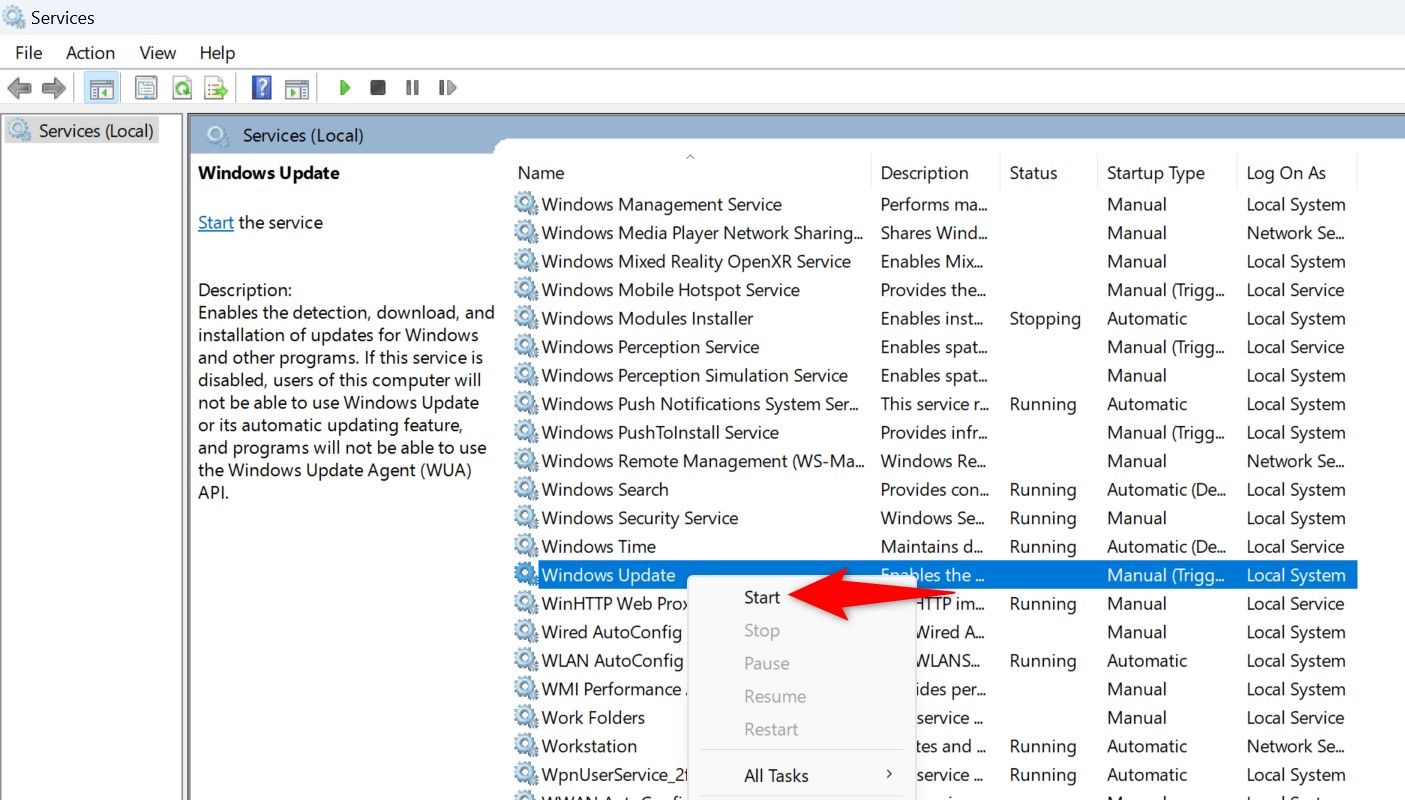
This ensures your PC can continue to look for the latest updates.
Clear Windows Update Cache Using Disk Cleanup
Windows’s built-in Disk Cleanup utility helps delete some Windows Update cache files.
To use it, open the Start Menu, search for Disk Cleanup, and launch the utility.
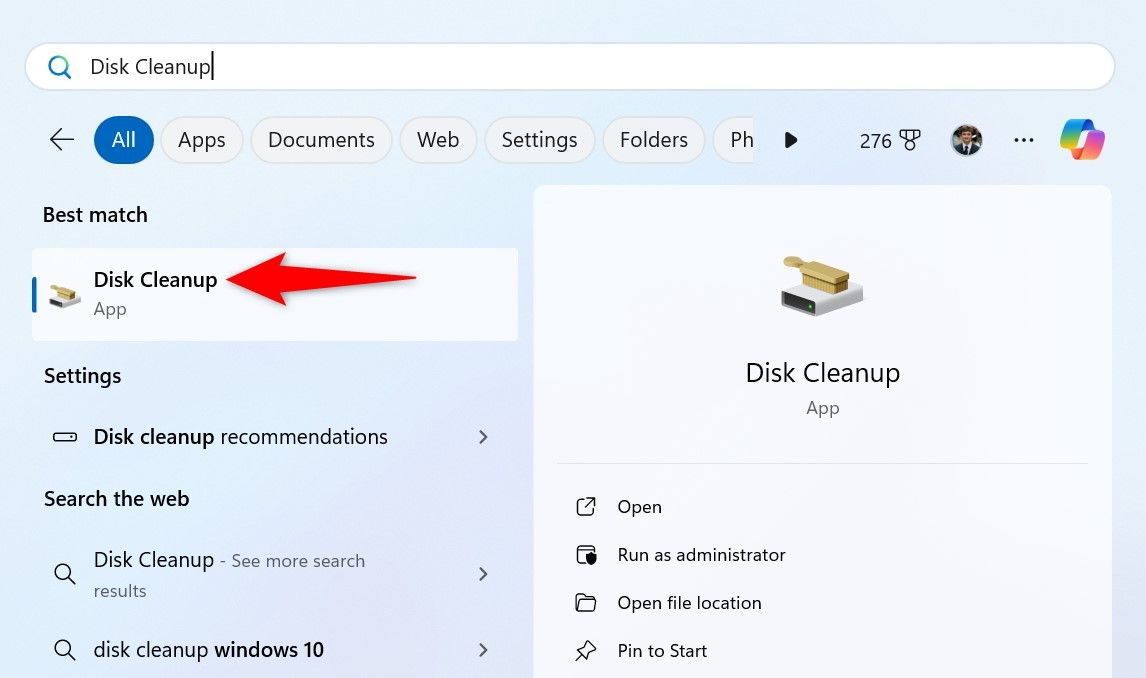
Select your Windows installation drive and choose «OK.»
Select «Clean Up System Files.»
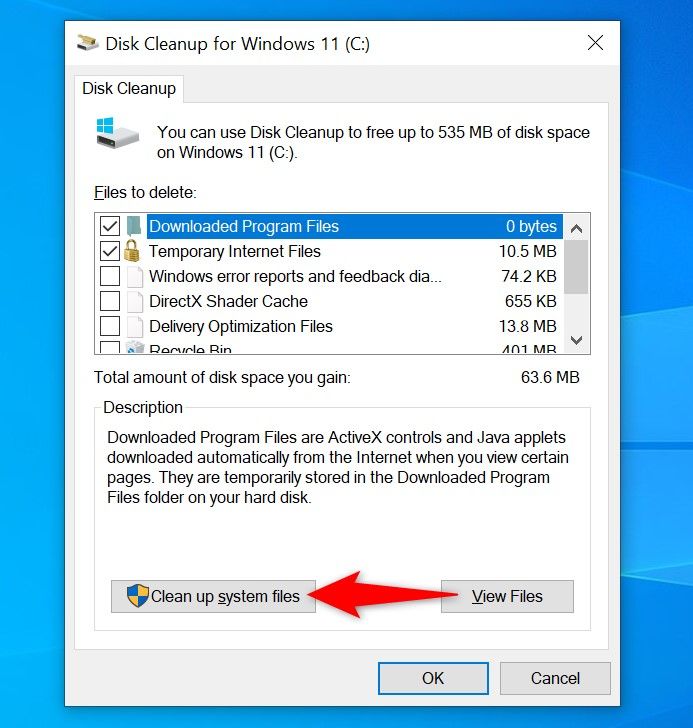
Choose your Windows installation drive again and select «OK.»
In Disk Cleanup, enable the «Windows Update Cleanup» option. Feel free to enable other options if you’d like to delete those files as well. Then, at the bottom, click «OK.»

The tool will begin cleaning up the update cache files.
Clear Windows Update Cache Using Command Prompt
If you prefer command line methods over graphical ones, use a few commands in Command Prompt (or PowerShell) to remove the update cache.
Begin by opening the Start Menu, searching for Command Prompt, and selecting «Run as Administrator.»
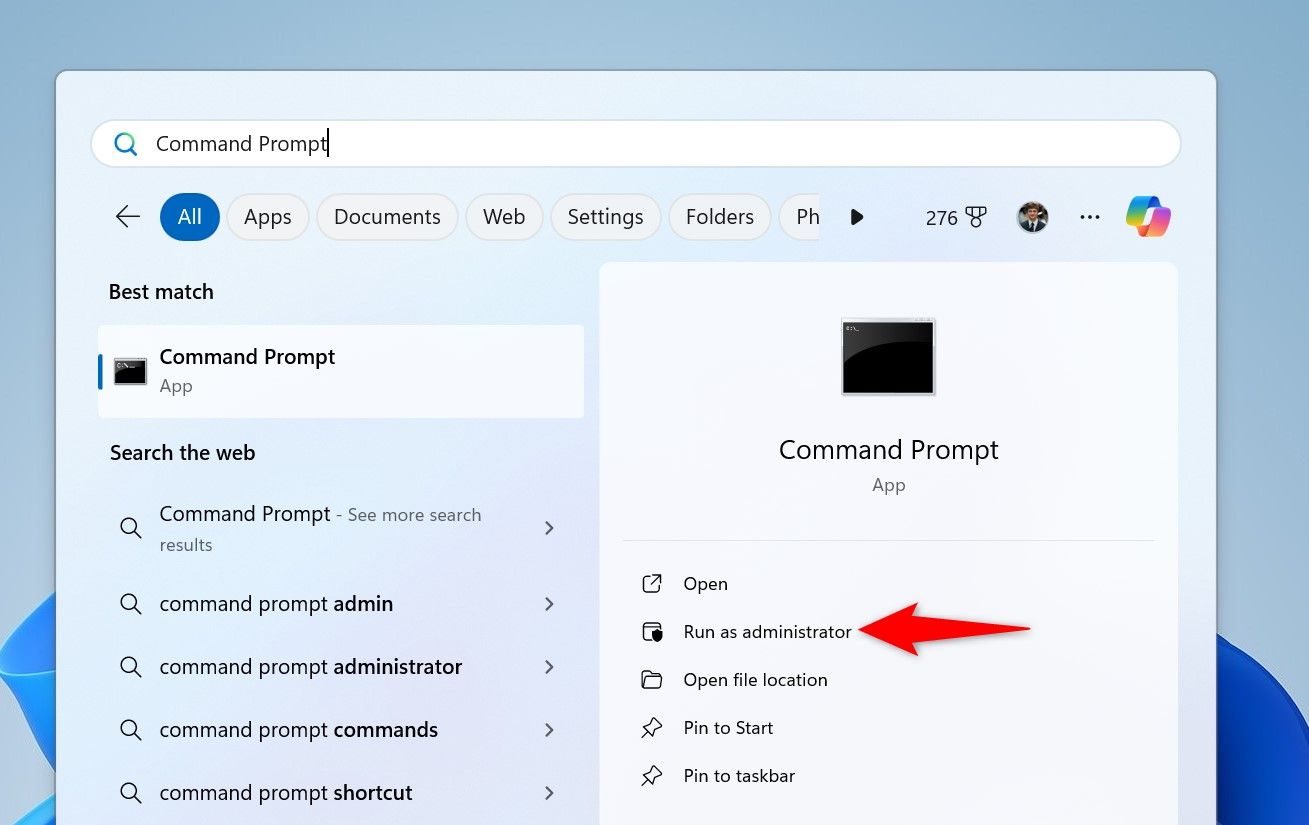
In the «User Account Control» (UAC) prompt, select «Yes.»
Type the following lines in Command Prompt, and press Enter after each line. The first command disables the Windows Update service and the second command turns off the Background Intelligent Transfer Service service.
        net stop wuauserv
net stop bits
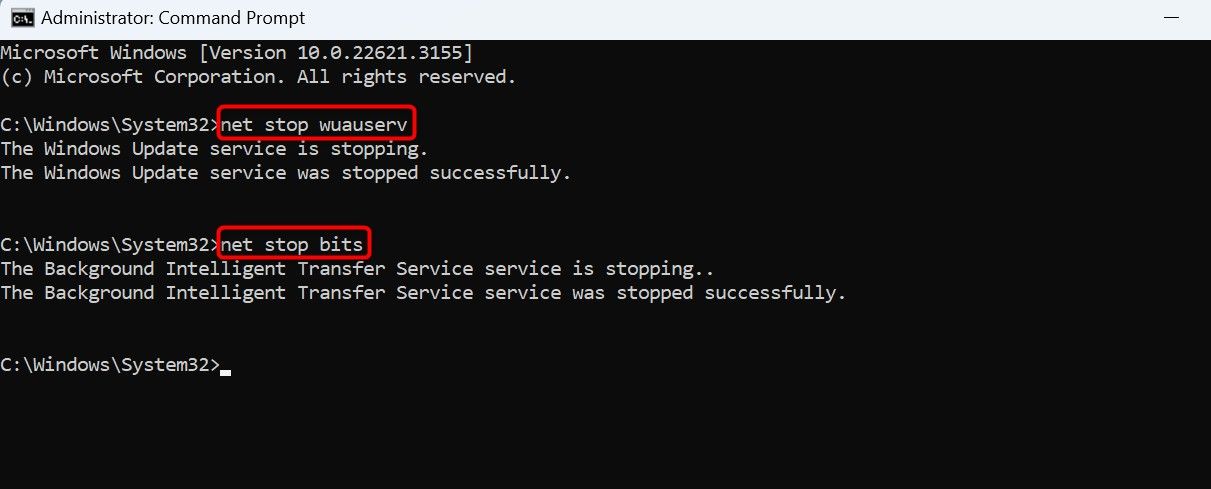
Next up, run the following command to make the Windows Update cache folder the current working directory.
cd %windir%\SoftwareDistribution
Type the following command and press Enter to delete the update cache.
del /f /s /q *.*
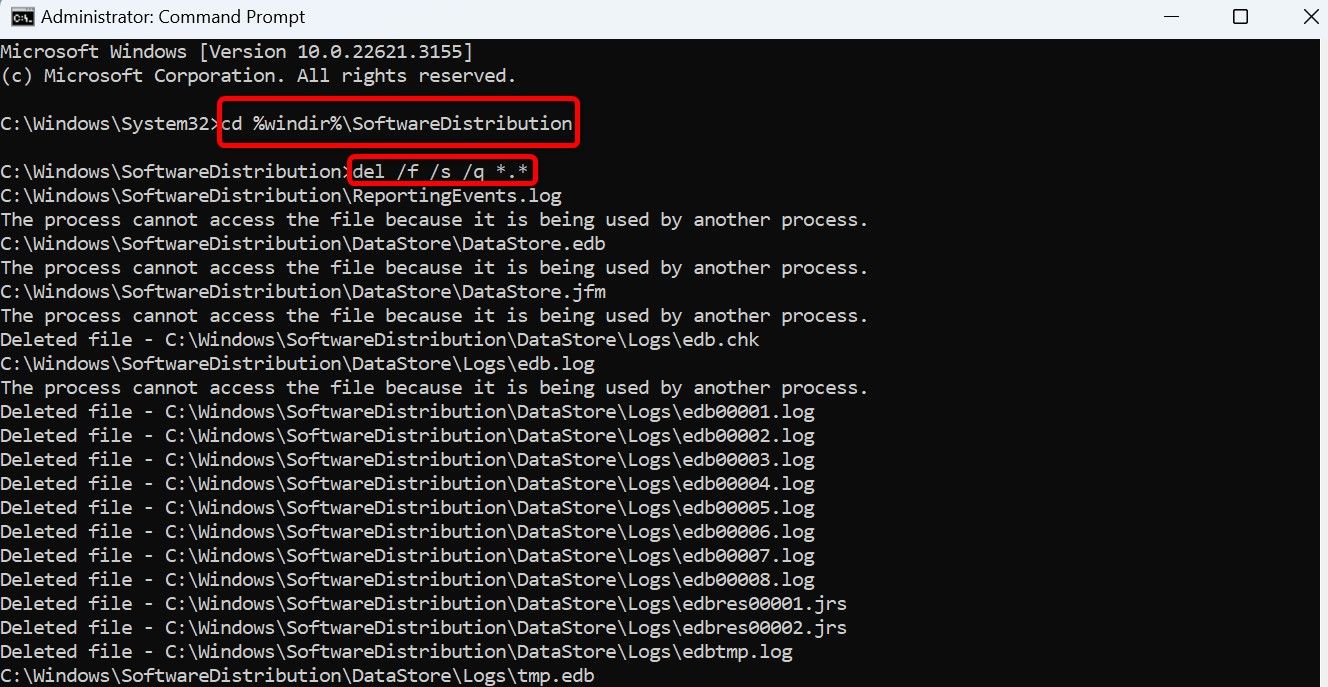
After clearing the cache, restart the services you stopped above. Do that by typing the following commands and pressing Enter after each line.
        net start wuauserv
net start bits
You’re done.
Use a Script to Clear Update Cache in a Single-Click
You can make a batch file out of the commands above to clear your Windows Update cache in just a single click. This is a convenient method if you delete your update cache files often.
To make that script, open the Start Menu, search for Notepad, and launch the app. Copy the code below and paste it in your Notepad document.
        net stop wuauserv
net stop bits
cd %windir%\SoftwareDistribution
del /f /s /q *.*
net start wuauserv
net start bits
Save the file by choosing File > Save from the menu bar.
In the «Save As» window, select the folder where you want to save the script. Click the «Save as Type» drop-down menu and choose «All Files.» Select the «File Name» field and enter a name of your choice. Then, append .bat at the end of the file name. This ensures Notepad saves the file as a batch script.
Then, click «Save.»
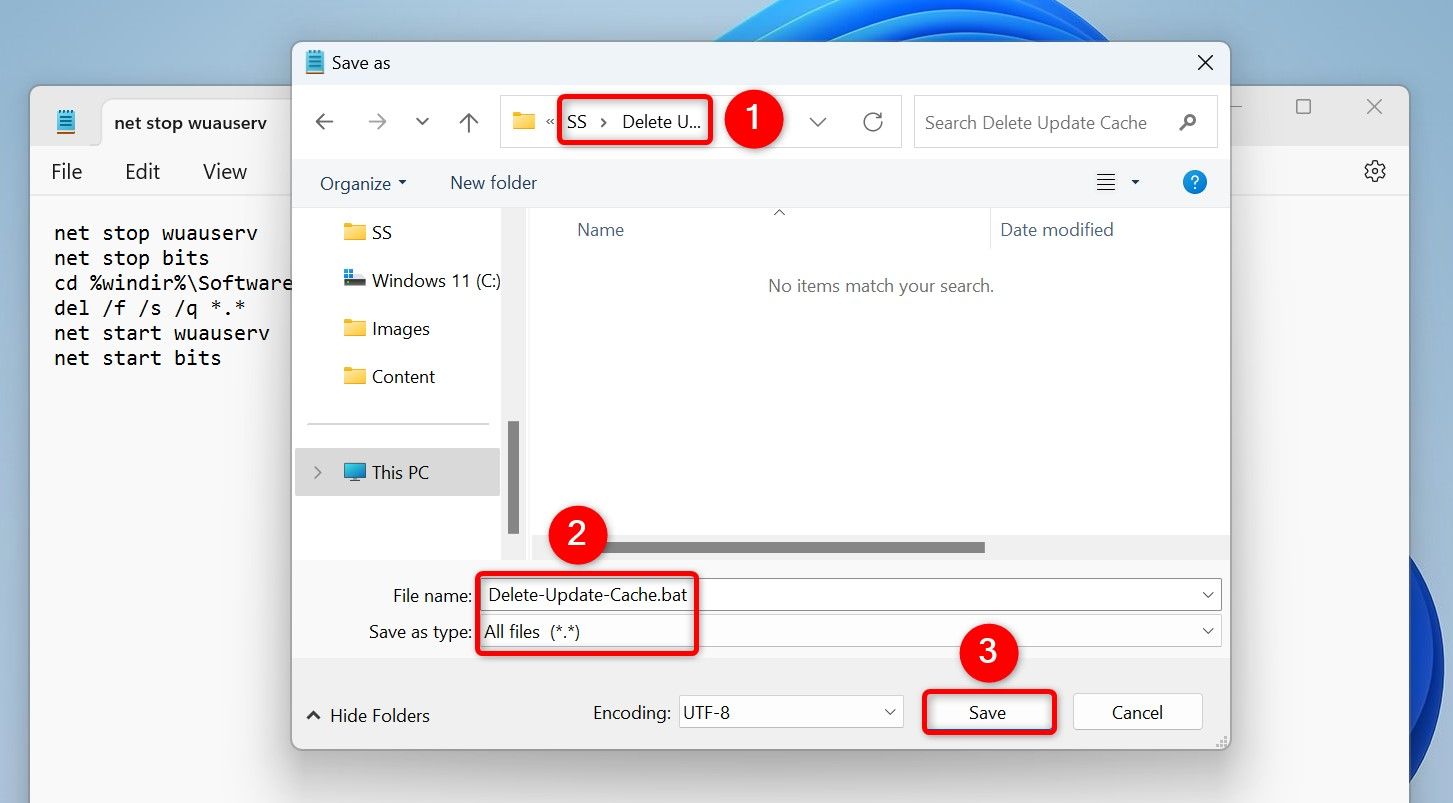
In the future, to clear your Windows Update cache using the script, right-click the script file and select «Run as Administrator.» In the User Account Control prompt, choose «Yes.» The script will stop certain services, deletes the update cache files, and restarts the stopped services.
And that’s how you get rid of the update cache files using various ways on your Windows 11 or Windows 10 computer. We hope you find the methods useful.
Keeping your Windows operating system updated is crucial for security and performance. However, when faced with update-related problems, one effective troubleshooting step is often overlooked: clearing the Windows Update cache.
In this guide, we provide the top answers and insights into the process of how to clear the Windows Update cache. By exploring this essential maintenance task, you’ll gain the knowledge needed to resolve common update issues and ensure your system’s optimal performance.
Stay with me to learn more!
Delete Windows Update Cache Is Safe or Not
Clearing the Windows Update Cache is a common troubleshooting practice for Windows users, often undertaken to address various system issues and enhance overall performance.
The need to clear the Windows Update Cache arises when users encounter update-related problems such as failed installations, slow updates, or error messages like 0x80080005.
The cache, which stores temp files associated with Windows updates, can become corrupted, leading to these issues. As a result, you may choose to delete the Windows Update Cache to resolve such issues and ensure a smoother update process.
Is it safe to delete temp files like update caches? In general, clearing the update cache is a safe procedure and is often recommended by Microsoft support as a troubleshooting step.
However, you should exercise caution and ensure you follow the correct methods to avoid unintentional data loss or system errors.
Here’s a quick overview of the methods you can use to clear the Windows Update Cache:
| Top Methods | Editor’s Review |
|
⭐Use the Run program |
This helps resolve update-related issues, ensuring a smoother and more reliable functioning of the Windows operating system. |
|
💽Use Disk Cleanup |
This method efficiently frees up storage space and optimizes system performance. |
|
📃Use Script |
Using Script offers an automated and systematic approach, simplifying the cache-clearing process. |
|
✅Try the CMD option |
If you prefer a direct and command-line-based approach, this method is your go-to. |
How to Clear Windows Update Cache
Now that we know it’s safe to clear the Windows Update Cache, let’s delve into practical steps to execute this essential maintenance task.
We have provided a video to help you clear the Windows Update Cache:
- 01:20 Open «Services» and click «Run as Administrator»
- 01:45 Find «Windows Update» and right-click on it
- 01:46 Select «Stop»
With an understanding of why you may need to clear the Windows Update Cache, let’s move on to the following steps.
Fix 1. Delete Windows Update Cache via Run Program
This section focuses on removing the Windows 11 update cache from your computer using the Run dialog box. The following guidelines offer a comprehensive overview of the procedure.
Step 1. To begin, initiate the «Run» dialog box by pressing the «Win Key + R.» After that, input services.msc and press «OK,» which will open the services window.
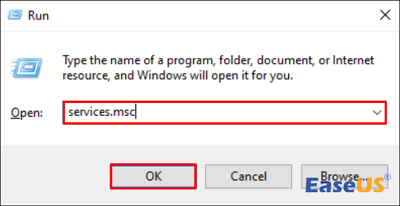
Step 2. Upon accessing the «Services (local)» window, scroll through the options to find the «Windows Update» entry.
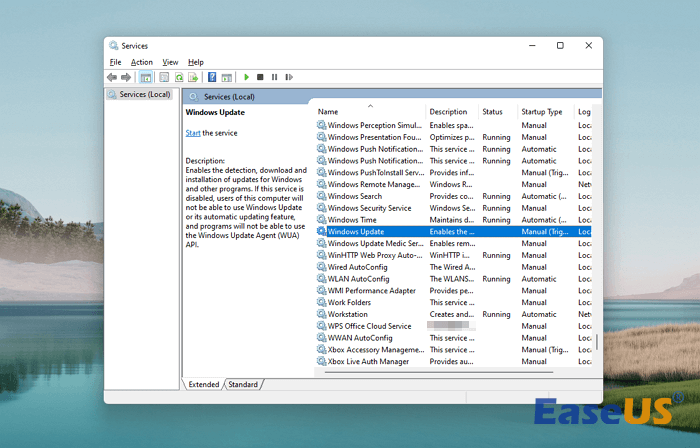
Step 3. Double-click on the «Windows Update» entry within the «Services» window to reach its properties. Scroll down and tap the «Stop» button to temporarily halt the Windows Update services.
Step 4. With the Windows Update services successfully paused, navigate to the C:\Windows\SoftwareDistribution\Download directory. Choose all files in the folder «(Ctrl + A)» and proceed to delete them.
Step 5. After successfully removing the specified files, revisit steps 1 and 2 to access the Services window again. Locate the «Windows Update» option, double-click to open its properties, and tap on the «Start» button to restart the «Windows Update» services.

Please share this useful method with more readers to help them clear Windows update caches.
Fix 2. Use Disk Cleanup to Clear Update Caches
This outlines the basic approach to eliminate the Windows cache using the disk cleanup utility. To execute this process, let’s go through the steps below:
Step 1. To initiate the disk cleanup procedure, access the search box on the taskbar and input Disk Cleanup. In the right panel, you’ll find the «Disk Cleanup» app; proceed to click on «Open» to launch it.

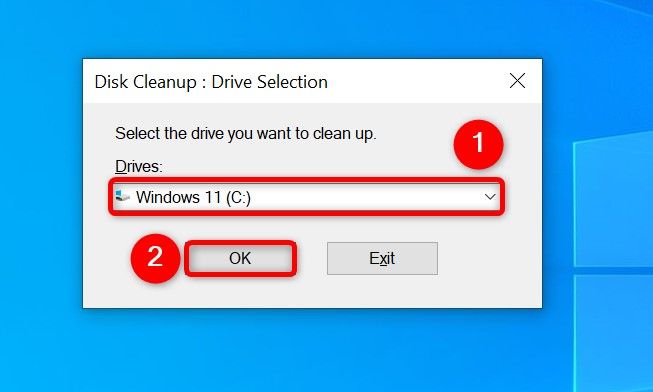
Step 2. After opening, the «Disk Cleanup: Drive Selection» window will appear. Choose the drive you intend to clean; in this case, opt for the «C:» drive, as it contains the primary file repository.
Step 3. Next, the disk cleanup interface for the selected drive will be displayed.
Step 4. Select the «C:» drive and click «OK».

Step 5. Now, navigate to the «Clean up system files» option.
The next window will present the drives available for cleanup. Choose the hard drive (usually set to C:) from which you wish to complete the Windows update cleanup.
Fix 3. Clean Windows Update Cache via Script
An alternative method to clear the Windows Update Cache involves utilizing a script. Follow the steps outlined below:
Step 1. Launch «Notepad» and input the following code:
@Echo On
net stop wuauserv
C:
cd %Windir%\SoftwareDistribution
Type del /f /s /q Downloadpause

Step 2. Save the file on your desktop as «Cleardown.cmd».
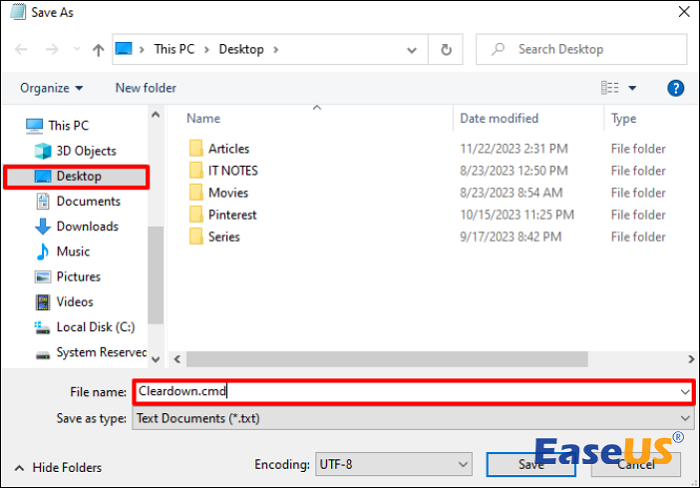
Step 3. Right-click the «Cleardown.cmd» file and choose «Run as administrator».
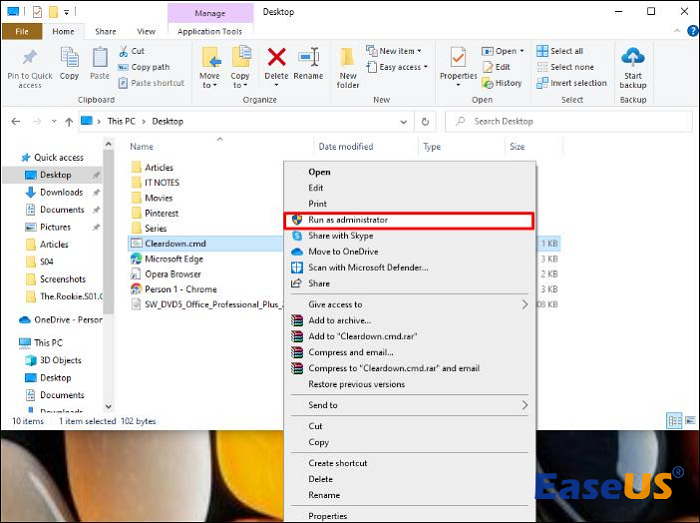
Step 4. Once the script completes its execution, it will pause, allowing you to review the output of its actions.
Fix 4. Clear Update Cache with CMD
Additionally, this is an additional alternative method to clear the Windows Update Cache, which involves using the Command Prompt. Follow these steps to finish the process:
Step 1. Press the «Win + R» keys to open the «Run» window.
Step 2. Type cmd in the bar and press «OK,» which will open a dark background «Command Prompt» window.
Step 3. Type in net stop wuauserv and click «Enter».
Step 4. Type C: and press «Enter».
Step 5. Input the command cd %Windir%\SoftwareDistribution and press «Enter».
Step 6. Finally, enter the command del /f /s /q Download and press «Enter».
🔺To reset the Windows Update Cache through an elevated Command Prompt, type in the commands below one after the other, pressing «Enter» after each:
- net stop wuauserv
- net stop cryptSvc
- net stop bits
- net stop msiserver
After stopping the services, proceed with the following commands to initiate the reset:
- ren C:\Windows\SoftwareDistribution SoftwareDistribution.old
- ren C:\Windows\System32\catroot2 Catroot2.old
Upon completing the above steps, restart the Windows Update processes by entering the following commands:
- net start wuauserv
- net start cryptSvc
- net start bits
- net start msiserver
Once these processes are finalized, reboot Windows 10 or 11. This process not only resets the Windows Update Cache but also clears any existing cache on your computer. If some of your friends encounter a Windows update that is not working, these methods may help. You can share this page with them!
Restore Accidental Deleted Files and Folders with Software
In the unfortunate event of accidental file deletion, users can rely on the robust capabilities of EaseUS Data Recovery Wizard to salvage their valuable data.
This versatile recovery tool proves invaluable in various scenarios, such as unintentional deletions, disk formatting, or even data loss due to system crashes. With its powerful and reliable features, EaseUS Data Recovery Wizard stands out as a trusted solution for users seeking to recover deleted files and folders.
The tool ensures you are equipped not only to address update cache issues but also to safeguard your data against unforeseen mistakes. You can also recover temporary files with this functional recovery tool.
Now, let’s get into the step-by-step process of utilizing the EaseUS recovery tool to recover deleted files in Windows 11 or other versions.
Step 1: Install and Launch EaseUS Data Recovery Wizard
Download and install the recovery software from the EaseUS official website, then open it on your computer or laptop.
Step 2: Scan and Select Deleted Files
Choose the hard drive or partition where the deleted files located and click «Search for Lost Data». After scanning, preview and select the deleted files you want to recover.
Step 3: Choose Location and Recover Deleted Files
Click «Recover» and choose a location to save the files (preferably on a different drive), and click «OK.» Check the recovered files in the chosen folder.You can choose a cloud storage, such as OneDrive, Google Drive, etc., and click «Save» to save your recovered files.

If you’ve found this guide on restoring deleted files helpful, don’t keep it to yourself! Share this page on your social media to help others clear the Windows Update Cache effortlessly.
Summary
In conclusion, clearing the Windows Update Cache is a vital troubleshooting step to ensure the smooth functioning of your operating system.
Throughout this article, we explored various methods, including using the Disk Cleanup utility, employing scripts, and utilizing the Command Prompt.
These approaches empower users to address common update-related issues and maintain the optimal performance of their Windows systems.
If you encounter persistent challenges or unforeseen complications during the cache-clearing process, we highly recommend considering the use of our recovery software.
EaseUS Data Recovery Wizard is designed to efficiently address a wide range of system issues, providing a comprehensive solution to enhance the overall health and performance of your Windows environment.
Windows Update Cache Clean-up FAQs
If you have more questions about how to clear the Windows Update Cache, here are some more details on the topic. Take a look:
1. Is it safe to delete cached Windows updates?
Yes, it is safe. The cache folder may occasionally contain corrupted files or bugged updates, causing disruptions in the update process and triggering various errors. If this happens, clearing the Windows Update Cache is advisable. Doing so eliminates outdated update files and helps address potential issues arising from problematic or corrupted data.
2. What is the easiest way to clear the Windows update cache?
The easiest way to clear Windows Update Cache is through File Explorer. To do this:
Step 1. Begin by entering «File Explorer» in the Search box to access it.
Step 2. Locate and right-click on «Local Disk (C),» then select «Properties.»
Step 3. Proceed to click on «Disk Clean-up,» and later, choose the «Clean up system files» option.
3. How do I clear the update cache without CMD?
If you prefer not to use CMD, you can try alternative methods such as using the built-in Disk Cleanup utility, using Script to clear update cache, and finally, using the Run Program.