
Утилита очистки диска (Disk Cleanup) позволяет администратору быстро очистить системный диск Windows Server, удалив ненужные и временные файлы, в том числе очистить каталог WinSxS от файлов устаревших компонентов, которые остались после установки обновлений. Утилита Disk Cleanup (cleanmgr.exe) по умолчанию уже установлена в графической версии Windows Server 2016/2019 (Desktop Experience), однако в предыдущих версиях Windows Server (2012 R2/ 2012/ 2008 R2) утилита cleanmgr.exe по-умолчанию отсутствует.
Содержание:
- Очистка диска с помощью Disk Cleanup в Windows Server 2016
- Очистка диска с помощью cleanmgr.exe из командной строки
- Запуск cleanmgr в Windows Server 2012 R2/ 2008 R2 без установки Desktop Experience
- Использование Disk Cleanup в Windows Server Core
Очистка диска с помощью Disk Cleanup в Windows Server 2016
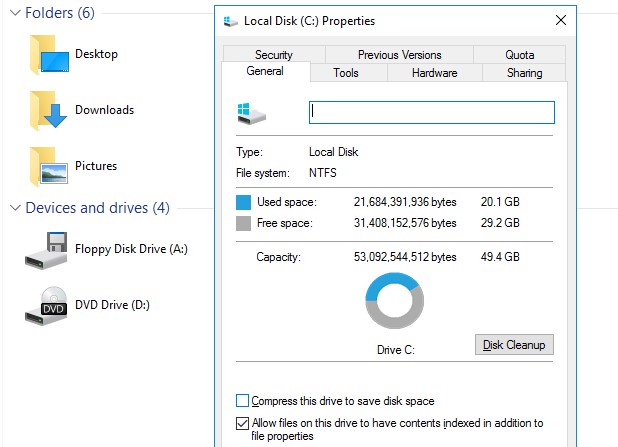
Чтобы очистить системный диск от ненужных файлов в Windows Server 2016 с помощью утилиты Disk Cleanup, нужно в File Explorer открыть свойства диска и нажать кнопку Disk Cleanup.
Также можно в поисковой строке набрать «disk cleanup» или cleanmgr.exe.
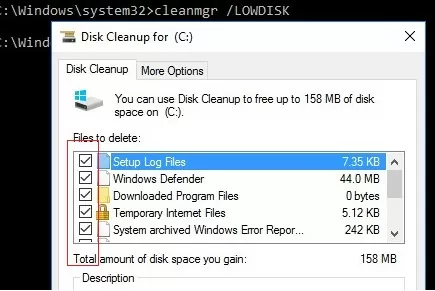
Выберите диск, который вы хотите очистить.
Дождитесь пока мастер очистки проверит ваш диск и найдет ненужные файлы, которые можно безболезненно удалить.
Вы можете выбрать компоненты, файлы которых можно удалить. Вам предлагается удалить следующие временные файлы:
- Setup Log Files
- Downloaded Program Files
- Temporary Internet Files
- Recycle Bin
- Temporary files
- Thumbnails
Чтобы удалить ненужные системные файлы нажмите на кнопку Clean up system files.
Дополнительно предлагается очистить:
- Устаревшие файлы Windows Defender
- System archived Windows Error Reporting (каталог C:\ProgramData\Microsoft\Windows\WER\ReportQueue)
- System queued Windows Error Reporting
- Device driver packages
- Windows Update Cleanup — при этом выполняется очистка хранилища компонентов в каталоге WinSxS. Удаляются старые версии компонентов, которые остались после установки обновленных версий.
Выберите нужные опции, при этом Disk Cleanup покажет количество места, которое освободится. Нажмите Ок и подтвердите удаление временных файлов.
Дождитесь, пока утилита cleanmgr.exe удалит ненужные файлы.
Очистка диска с помощью cleanmgr.exe из командной строки
Утилита
cleanmgr.exe
имеет различные параметры командной строки, которые позволяют использовать ее в различных сценариях автоматической очистки системного диска. Их можно использовать как в Windows Server, так и на рабочих станциях пользователей с Windows 10.
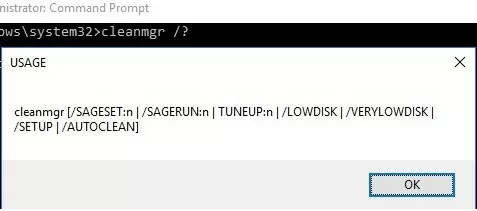
cleanmgr [/d driveletter] [/SAGESET:n | /SAGERUN:n | TUNEUP:n | /LOWDISK | /VERYLOWDISK | /SETUP | /AUTOCLEAN]
Ключ
/AUTOCLEAN
используется для очистки старых файлов, оставшихся после апгрейда билда Windows. Параметр
/SETUP
позволяет удалить файлы, оставшиеся от предыдущей версии Windows (если вы выполняли in-place upgrade).
Команда
cleanmgr /LOWDISK
– запускает графический интерфейс Disk Cleanup с уже выбранными параметрами очистки.
Команда
cleanmgr /VERYLOWDISK
выполняет автоматическую очистку, а после окончания оторажает информацией о выполненных действиях и свободном месте.
You have successfully resolved the low disk space condition. Your C:\ volume now has 10000 Mb of free space remaining.
С помощью параметров
/sageset:n
и
/sagerun:n
вы можете создать и выполнить настроенный набор параметров очистки.
Например, выполните команду
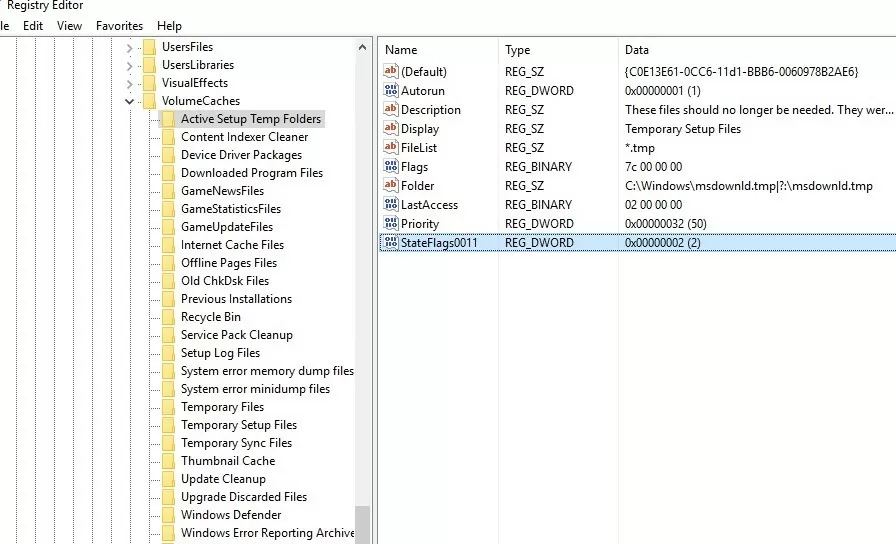
cleanmgr /sageset:11
. В открывшемся окне выберите компоненты и файлы, которые нужно автоматически очищать (я выбрал все опции).
Эти настройки сохраняются в ветке реестра HKEY_LOCAL_MACHINE\SOFTWARE\Microsoft\Windows\CurrentVersion\Explorer\VolumeCaches. В этой ветке перечислены все компоненты Windows, которые можно очистить с помощью Disk Cleanup. Для каждой опции, которую вы выбрали создается параметр типа DWORD с именем StateFlags0011 (
0011
это число, которое вы указали в параметре sageset).
Чтобы запустить процесс очистки с выбранными параметрами, выполните команду:
cleanmgr /sagerun:11
Если вам нужно настроить автоматическую очистку дисков на компьютерах (или серверах) в домене, вам достаточно экспортировать эту ветку реестра и распространить ее через GPO.
Для автоматического запуска очистки системного диска на рабочих станциях с Windows 10 можно создать задание в планировщике со следующим PowerShell скриптом:
Start-Process -FilePath CleanMgr.exe -ArgumentList '/sagerun:11' -WindowStyle Hidden -Wait
Запуск cleanmgr в Windows Server 2012 R2/ 2008 R2 без установки Desktop Experience
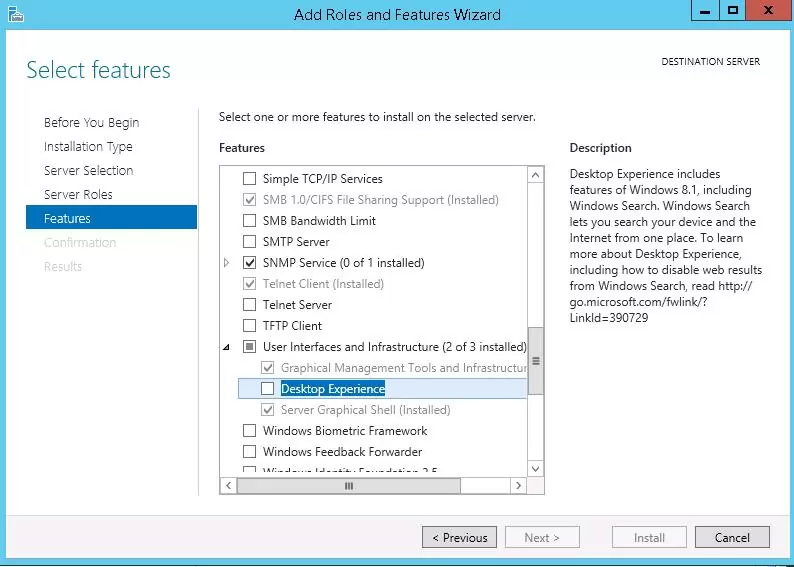
В Windows Server 2012 / R2 и 2008 /R2 по умолчанию не установлена утилита очистки диска Disk Cleanup (cleanmgr.exe). Чтобы воспользоваться утилитой cleanmgr сначала нужно установить отдельный компонент сервера Desktop Experience (Возможности рабочего стола) с помощью Server Manager или PowerShell (
Install-WindowsFeature Desktop-Experience
).
Но вместе с Desktop Experience устанавливается множество других компонентов, которые абсолютно не нужны на сервере:

- Windows Media Player
- Темы рабочего стола
- Поддержка AVI для Windows
- Windows SideShow
- Windows Defender
- Disk Cleanup
- Sync Center
- Запись звука
- Character Map
- Snipping Tool
Для запуска мастера очистки дисков в Windows Server можно воспользоваться более простым методом: достаточно скопировать в системный каталог два файла из каталога WinSxS: Cleanmgr.exe и Cleanmgr.exe.mui. Ниже представлены команды для копирования файлов cleanmgr из каталога WinSxS для разных версий Windows Server (во всех случаях используется путь для английских редакций ОC).
| ОС | Команда копирования файлов cleanmgr |
| Windows Server 2008 R2 x64 |
copy C:\Windows\winsxs\amd64_microsoft-windows-cleanmgr_31bf3856ad364e35_6.1.7600.16385_none_c9392808773cd7da\cleanmgr.exe C:\Windows\System32\
|
| Windows Server 2008 x64 |
copy C:\Windows\winsxs\amd64_microsoft-windows-cleanmgr_31bf3856ad364e35_6.0.6001.18000_none_c962d1e515e94269\cleanmgr.exe C:\Windows\System32\
|
| Windows Server 2012 x64 |
copy C:\Windows\WinSxS\amd64_microsoft-windows-cleanmgr_31bf3856ad364e35_6.2.9200.16384_none_c60dddc5e750072a\cleanmgr.exe C:\Windows\System32\
|
Windows Server 2012 R2 x64
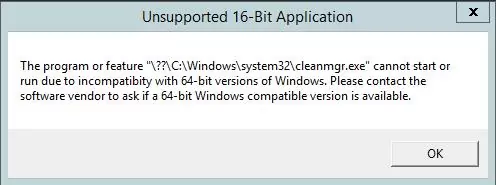
Рассмотренный выше трюк не работает в Windows Server 2012 R2 из-за изменений, внесенных обновлением KB2821895. Дело в том, что после установки данного обновления для хранения бинарных файлов компонентов стала использоваться компрессия. При попытке запустить скопированный cleanmgr.exe появляется ошибка:
The Program or feature \??\C:\Windows\system32\cleanmgr.exe cannot start or run due to incompatibility with 64-bit version of Windows
В качестве обходного решения можно воспользоваться такой методикой:
- Установить компонент Windows Desktop Experience:
Install-WindowsFeature Desktop-Experience - Перезагрузить сервер;
- Скопировать файлы %windir%\system32\cleanmgr.exe и %windir%\system32\en-US\cleanmgr.exe.mui в произвольный каталог (c:\temp)
- Удалить компонент:
Uninstall-WindowsFeature Desktop-Experience - Перезагрузка;
- Скопировать файлы cleanmgr.exe и cleanmgr.exe.mui в указанные выше каталоги
В дальнейшем эти два файла можно скопировать и на все другие сервера или интегрировать в шаблоны виртуальных машин с Windows Server 2012 R2.
Ссылка на скачивание готового комплекта файлов cleanmgr.exe.mui + cleanmgr.exe для Windows Server 2012 R2 на ЯндексДиске (thks Alex Kornev).
Для запуска утилиты очистки диска теперь достаточно выполнять с правами администратора команду
cleanmgr.exe
.

Совет. Для очистки устаревших файлов компонентов, оставшихся после установки обновлений, в Windows Server R2 можно воспользоваться командой DISM:
dism.exe /online /Cleanup-Image /StartComponentCleanup /ResetBase
В Windows Server 2008 R2, чтобы cleanmgr могла удалять устаревшие файлы обновлений нужно установить отдельный патч KB2852386.
Использование Disk Cleanup в Windows Server Core
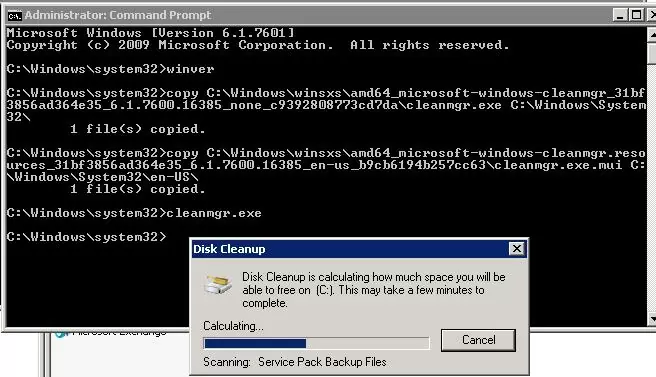
В Windows Server Core 2016, в котором отсутствует полноценный графический интерфейс, утилита Disk Cleanup также не установлена. Если вы хотите использовать cleanmgr.exe для очистки диска в Server Core, достаточно скопировать следующие файлы из каталога WinSXS:
copy C:\Windows\WinSxS\amd64_microsoft-windows-cleanmgr_31bf3856ad364e35_10.0.14393.0_none_9ab8a1dc743e759a\cleanmgr.exe C:\Windows\System32\
copy C:\Windows\WinSxS\amd64_microsoft-windows-cleanmgr.resources_31bf3856ad364e35_10.0.14393.0_en-us_8b4adb68af596a23\cleanmgr.exe.mui C:\Windows\System32\en-US\
Когда система C: диск не хватает места, вы можете очистить диск C, чтобы удалить ненужные и ненужные файлы. От Майкрософт Windows 98, уже есть собственная утилита очистки диска, которая поможет выполнить эту задачу. Но в отличие от других версий, многие люди считают, что Disk Cleanup отсутствует в Windows Server 2008 R2. Поскольку очистка диска не включена в Windows Server 2008 по умолчанию, поэтому перед запуском очистки диска в Server 2008 R2, вам следует установить или включить его самостоятельно. В этой статье рассказывается, как установить/включить Disk Cleanup в Windows Server 2008 R2 и как освободить место на диске с помощью этого встроенного инструмента.
Содержание:
- Как установить/включить очистку диска в Server 2008 R2
- Как освободить место с помощью Server 2008 Утилита очистки диска
- Дополнительные действия после очистки диска в Server 2008
1. Как установить / включить очистку диска в Windows Server 2008
Существуют два способа включить очистку диска в Windows Server 2008 R2:
- Копировать файлы из WinSxS
- Установить с возможностями рабочего стола
Первый вариант прост и быстр, но очистка диска в некоторых средах не работает. Второй вариант гарантирует, что очистка диска работает в любых условиях, но для завершения установки с компонентом Desktop Experience требуется перезагрузка. Кроме того, вместе с Desktop Experience на сервере устанавливается множество других ненужных компонентов, таких как Windows Медиаплеер, темы рабочего стола, аудио запись.
Вариант 1: Добавить/включить очистку диска в Server 2008 R2 без перезагрузки
Файлы для копирования из WinSxS отличаются на Windows Server 2008 и R2, так что сначала лучше проверить версию сервера. нажимать Windows и R вместе на клавиатуре, введите winver и нажмите Enter.
Скопируйте файлы WinSxS в Windows Server 2008 x64:
1. Нажмите Начните меню, щелкните правой кнопкой мыши Командная строка на вершине и выберите Запуск от имени администратора.
2. Вставьте команду ниже и нажмите Enter:
copy C:\Windows\winsxs\amd64_microsoft-windows-cleanmgr_31bf3856ad364e35_6.0.6001.18000_none_c962d1e515e94269\cleanmgr.exe C:\Windows\System32\
3. Вставьте команду:
copy C:\Windows\winsxs\amd64_microsoft-windows-cleanmgr.resources_31bf3856ad364e35_6.0.6001.18000_en-us_b9f50b71510436f2\cleanmgr.exe.mui C:\Windows\System32\en-US\
Скопируйте файлы WinSxS в Windows Server 2008 x64 r2:
1. Работать Командная строка как Администратор.
2. Вставьте команду:
copy C:\Windows\winsxs\amd64_microsoft-windows-cleanmgr_31bf3856ad364e35_6.1.7600.16385_none_c9392808773cd7da\cleanmgr.exe C:\Windows\System32\
3. Вставьте команду:
copy C:\Windows\winsxs\amd64_microsoft-windows-cleanmgr.resources_31bf3856ad364e35_6.1.7600.16385_en-us_b9cb6194b257cc63\cleanmgr.exe.mui C:\Windows\System32\en-US\
Вариант 2: Установите очистку диска в Windows Server 2008 R2 с другими компонентами
Шаг 1: Нажмите «Менеджер сервера» в левом нижнем углу рядом с «Начало» .
Шаг 2: Нажмите «Особенности» в левом верхнем углу, а затем «Добавить функции» справа.

Шаг 3: Установите флажок перед «Опыт работы на рабочем столе», Мастер добавления функций попросит вас установить Службы рукописного ввода и рукописного ввода, если вы еще не установили их, нажмите «Добавить необходимые функции».

Шаг 4: Снова установите флажок Desktop Experience, а затем нажмите Следующая.

Шаг 5: Нажмите Установите подтвердить и начать установку.

Как только функции будут установлены, мастеру потребуется перезагрузка, чтобы изменения вступили в силу.

2. Как очистить диск C Server 2008 R2 с очисткой диска
Существуют 3 способа запустить очистку диска в Windows Server 2008 R2:
① Press Windows и R вместе на клавиатуре, введите cleanmgr и нажмите Enter, то по умолчанию будет выбран диск C:, нажмите «ОК», чтобы продолжить.
② Нажмите Начните > Все программы > Аксессуары > Системные инструменты > Очистка диска
③ Откройте проводник, щелкните правой кнопкой мыши диск C и выберите НЕДВИЖИМОСТИ
> Очистка диска.

2-й и 3-й способ действителен только после установки Очистки диска в Windows Server 2008 с возможностями рабочего стола.
Server 2008 Инструмент очистки диска подсчитает, сколько места можно освободить на диске C (или другом выбранном вами), а затем перечислит ненужные файлы в следующем окне.
Все эти файлы можно выбирать и безопасно удалять, щелкните любой тип файла, внизу вы увидите его описание.
Нажмите OK, чтобы начать уборку. После завершения повторите Очистить системные файлы.
3. Дополнительный шаг после очистки диска в Server 2008
Windows Server 2008 Утилита очистки диска проста в использовании, быстра и способна безопасно удалять наиболее распространенные типы ненужных/мусорных файлов. Для серверов, которые никогда не освобождают диск, это может помочь вам восстановить несколько гигабайт места.
Однако свободное место будет быстро съедено новыми сгенерированными ненужными файлами, так что вам лучше добавить больше места на диске C и разверните его как можно больше. В противном случае диск C будет наполняется снова через короткое время. Этот шаг очень важен, но многие люди не знают.
Если есть свободное место в другом разделе на том же диске, следуйте инструкциям в видео, чтобы сжать этот раздел и расширить диск C:

Если ваш системный диск маленький и на нем мало свободного места, вы можете клонировать диск на больший и расширите диск C дополнительным дисковым пространством:
Помимо сжатия, перемещения, расширения и копирования раздела диска, NIUBI Partition Editor помогает объединять, преобразовывать, дефрагментировать, стирать, скрывать, сканировать разделы, оптимизировать файловую систему и многое другое.
Скачать
For some odd reason Microsoft decided to leave this feature disabled by default, and place it within a optional feature set called “Desktop Experience.“
If your hard drive is getting full, and you wish to do a disk cleanup, there are two ways to enable the Disk Cleanup tool. We recommend using Option #2 below for several reasons:
– Installing the Desktop Experience feature will not only install Disk Cleanup, but a lot of other utilities you likely don’t need on a server (sound recorder, desktop themes, etc.)
– Installing the Desktop Experience feature will require a server reboot.
How to enable the Disk Cleanup tool:
1) Go to Programs & Features, and in the Features section, enable/install “Desktop Experience”. The downside to this is that you will need to reboot your server after installing this and it installs other components you do not need on a server.
2) [RECOMMENDED] – All you really need to do is copy some files that are already located on your server into specific system folders, as described at http://technet.microsoft.com/en-us/library/ff630161(WS.10).aspx
The location of the files you need to copy depend on your version of Windows:
|
Operating System |
Architecture |
File Location |
|
Windows Server 2008 R2 |
64-bit |
C:Windowswinsxsamd64_microsoft-windows-cleanmgr_31bf3856ad364e35_6.1.7600.16385_none_c9392808773cd7dacleanmgr.exe |
|
Windows Server 2008 R2 |
64-bit |
C:Windowswinsxsamd64_microsoft-windows-cleanmgr.resources_31bf3856ad364e35_6.1.7600.16385_en-us_b9cb6194b257cc63cleanmgr.exe.mui |
|
Windows Server 2008 |
64-bit |
C:Windowswinsxsamd64_microsoft-windows-cleanmgr.resources_31bf3856ad364e35_6.0.6001.18000_en-us_b9f50b71510436f2cleanmgr.exe.mui |
|
Windows Server 2008 |
64-bit |
C:Windowswinsxsamd64_microsoft-windows-cleanmgr_31bf3856ad364e35_6.0.6001.18000_none_c962d1e515e94269cleanmgr.exe.mui |
|
Windows Server 2008 |
32-bit |
C:Windowswinsxsx86_microsoft-windows-cleanmgr.resources_31bf3856ad364e35_6.0.6001.18000_en-us_5dd66fed98a6c5bccleanmgr.exe.mui |
|
Windows Server 2008 |
32-bit |
C:Windowswinsxsx86_microsoft-windows-cleanmgr_31bf3856ad364e35_6.0.6001.18000_none_6d4436615d8bd133cleanmgr.exe |
Windows Server 2012:
C:WindowsWinSxSamd64_microsoft-windows-cleanmgr_31bf3856ad364e35_6.2.9200.16384_none_c60dddc5e750072acleanmgr.exe
C:WindowsWinSxSamd64_microsoft-windows-cleanmgr.resources_31bf3856ad364e35_6.2.9200.16384_en-us_b6a01752226afbb3cleanmgr.exe.mui
Windows Server 2012 R2: must install Desktop Experience. Use Powershell command:
Install-WindowsFeature Desktop-Experience
Once you’ve located the files move them to the following locations (Server 2012 non-R2 and earlier):
- Copy Cleanmgr.exe to %systemroot%System32.
- Copy Cleanmgr.exe.mui to %systemroot%System32en-US.
You can now launch the Disk cleanup tool by running Cleanmgr.exe from the command prompt.
The Disk Cleanup tool allows the administrator to quickly clean up the Windows Server system drive by deleting unnecessary and temporary files, including cleaning the WinSxS directory from files of outdated components that remained after installing the latest cumulative updates. The Disk Cleanup utility (cleanmgr.exe) is installed by default on the GUI editions of Windows Server 2016/2019 (Desktop Experience). However, in previous versions of Windows Server (2012 R2/2012/2008 R2), the cleanmgr.exe tool is missing.
Contents:
- Using Disk Cleanup Tool on Windows Server 2016
- Cleanmgr.exe: Disk Cleanup Command-Line Options
- How to Enable Disk Cleanup on Windows Server 2012 R2/2008 R2 without Installing Desktop Experience?
- Using Disk Cleanup on Windows Server Core Edition
Using Disk Cleanup Tool on Windows Server 2016
To clean the system disk from unneeded files on Windows Server 2016 using the Disk Cleanup utility, you need to open the disk properties in File Explorer and click the Disk Cleanup button.
You can also type the “disk cleanup” or cleanmgr.exe in the search box.
Select the drive you want to clean.
Wait until the cleaning wizard checks your disk and finds unnecessary files that can be safely deleted.
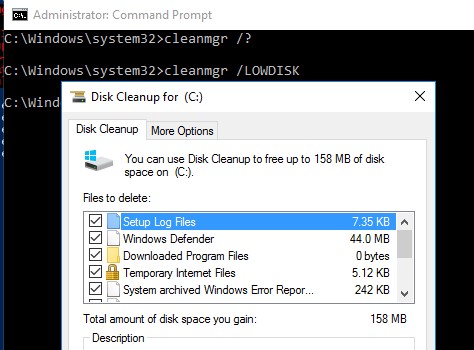
You can select components whose files can be deleted. You are prompted to delete the following temporary files:
- Setup Log Files;
- Downloaded Program Files;
- Temporary Internet Files;
- Recycle Bin;
- Temporary files;
- Thumbnails.
To remove unneeded system files, click on the Clean up system files button.
Additionally, it is proposed to clean up:
- Outdated Windows Defender files;
- System archived Windows Error Reporting files (the folder C:\ProgramData\Microsoft\Windows\WER\ReportQueue);
- System queued Windows Error Reporting;
- Device driver packages (see How to Remove Unused Drives from Driver Store);
- Windows Update Cleanup — this allows you to clean up the component store in the WinSxS directory. Old versions of components files that remain after installing updated ones are removed.
Select the options you need, and Disk Cleanup will show the amount of disk space you gave. Click OK and confirm the deletion of files.
Wait for the cleanmgr.exe tool to remove the unnecessary files.
Cleanmgr.exe: Disk Cleanup Command-Line Options
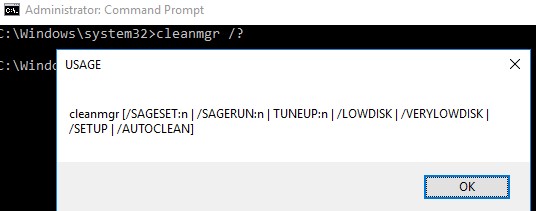
The cleanmgr.exe tool has several command-line options that allow it to be used in various automatic drive cleaning scenarios. They can be used both on Windows Server and on user desktop workstations running Windows 10.
cleanmgr.exe [/d driveletter] [/SAGESET:n | /SAGERUN:n | TUNEUP:n | /LOWDISK | /VERYLOWDISK | /SETUP | /AUTOCLEAN]
The /AUTOCLEAN parameter is used to delete old files left after upgrading a Windows build. The /SETUP option allows you to delete files left from a previous version of Windows (if you performed an in-place upgrade).
The cleanmgr /LOWDISK command runs the Disk Cleanup GUI with the already selected cleaning options.
The cleanmgr /VERYLOWDISK command performs automatic drive cleanup (without showing GUI), and after the end it displays information about the actions performed and available free space.
You have successfully resolved the low disk space condition. Your C:\ volume now has 10000 Mb of free space remaining.
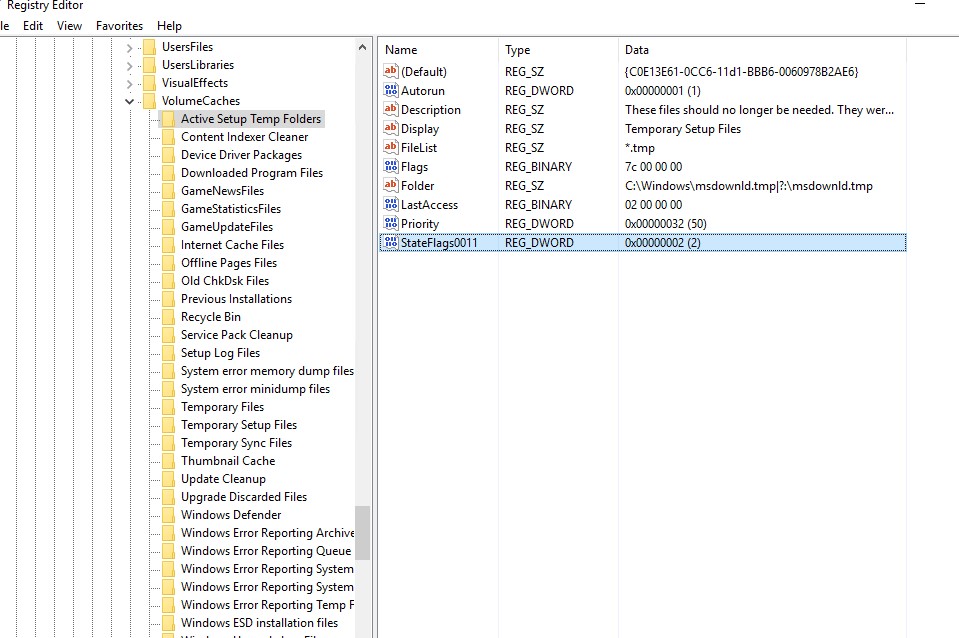
Using the /sageset:xx and /sagerun:xx options, you can create and run a customized set of cleanup options.
For example, run the command: cleanmgr /sageset: 11. In the window that opens, select the components and files that you want to automatically cleanup (I selected all the options).
These settings are saved to the registry key HKEY_LOCAL_MACHINE\SOFTWARE\Microsoft\Windows\CurrentVersion\Explorer\VolumeCaches. This registry section lists all the Windows components that can be cleaned using the Disk Cleanup tool. For each option you select, a DWORD parameter is created with the name StateFlags0011 (0011 is the number you specified in the sageset parameter).
To start the drive cleanup task with the selected parameters, run the command:
cleanmgr /sagerun:11
If you need to configure automatic disk cleanup task on computers (or servers) in an Active Directory domain, you just need to export this registry key and deploy it on computers through the GPO.
To automatically cleanup the system drive on workstations with Windows 10, you can create a simple scheduled task with the following PowerShell code:
Start-Process -FilePath CleanMgr.exe -ArgumentList '/sagerun:11' -WindowStyle Hidden -Wait
How to Enable Disk Cleanup on Windows Server 2012 R2/2008 R2 without Installing Desktop Experience?
By default, in Windows Server 2012/R2 and 2008/R2 the Disk Cleanup (cleanmgr.exe) tool is not installed by default. To use the cleanmgr utility, first you have to install a separate server Desktop Experience feature using either Server Manager or PowerShell (Install-WindowsFeature Desktop-Experience).
Together with Desktop Experience, many other unnecessary components are installed on the server:
- Windows Media Player;
- Desktop themes;
- AVI support for Windows;
- Windows SideShow;
- Windows Defender Antivirus;
- Disk Cleanup;
- Sync Center;
- Audio recording;
- Character Map;
- Snipping Tool.
To run the Disk Cleanup on Windows Server, you can use a simple method: just copy two files Cleanmgr.exe and Cleanmgr.exe.mui from WinSxS to the system32 directory. Below you can see commands to copy cleanmgr files in different Windows versions (in all cases, the path is used for Windows Server English language editions).
| OS version | Command to copy cleanmgr bin files |
| Windows Server 2008 R2 x64 | copy C:\Windows\winsxs\amd64_microsoft-windows-cleanmgr_31bf3856ad364e35_6.1.7600.16385_none_c9392808773cd7da\cleanmgr.exe C:\Windows\System32\ |
| Windows Server 2008 x64 | copy C:\Windows\winsxs\amd64_microsoft-windows-cleanmgr_31bf3856ad364e35_6.0.6001.18000_none_c962d1e515e94269\cleanmgr.exe C:\Windows\System32\ |
| Windows Server 2012 x64 | copy C:\Windows\WinSxS\amd64_microsoft-windows-cleanmgr_31bf3856ad364e35_6.2.9200.16384_none_c60dddc5e750072a\cleanmgr.exe C:\Windows\System32\ |
Windows Server 2012 R2 x64
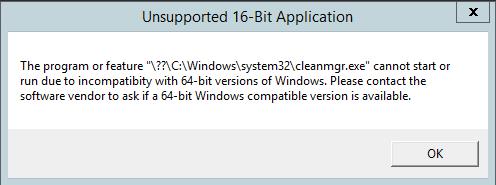
The trick described above doesn’t work on Windows Server 2012 R2 due to the changes made by KB2821895 update. The matter is that after you install this update, compression is used to store the binary component files. When you trying to run the copied cleanmgr.exe, the following error appears:
Unsupported 16-Bit Application

The Program or feature \??\C:\Windows\system32\cleanmgr.exe cannot start or run due to incompatibility with 64-bit version of Windows.
As a workaround, you can use this method:
- Install Desktop Experience feature using PowerShell:
Install-WindowsFeature Desktop-Experience - Restart your server;
- Copy the files %windir%\system32\cleanmgr.exe and %windir%\system32\en-US\cleanmgr.exe.mui to any directory (c:\temp);
- Uninstall the feature:
Uninstall-WindowsFeature Desktop-Experience - Reboot;
- Copy the files cleanmgr.exe and cleanmgr.exe.mui to the directories mentioned above.
Later both of the files can be copied to other servers or integrated into your Windows Server 2012 R2 virtual machine template.
To start the Disk Cleanup tool, run the cleanmgr.exe command with the administrator privileges.
Tip. You can use the DISM command to delete outdated component files left after installing updates on Windows Server R2:
dism.exe /online /Cleanup-Image /StartComponentCleanup /ResetBase
To use cleanmgr.exe to delete old update files on Windows 2008 R2 / Windows 7 SP1, you need to install a separate patch KB2852386.
Using Disk Cleanup on Windows Server Core Edition
In Windows Server Core 2016, which lacks full-fledged GUI capabilities, Disk Cleanup tool is also not installed. If you want to use cleanmgr.exe to clean up the disk on Server Core, just copy the following files from the WinSXS directory:
copy C:\Windows\WinSxS\amd64_microsoft-windows-cleanmgr_31bf3856ad364e35_10.0.14393.0_none_9ab8a1dc743e759a\cleanmgr.exe C:\Windows\System32\copy C:\Windows\WinSxS\amd64_microsoft-windows-cleanmgr.resources_31bf3856ad364e35_10.0.14393.0_en-us_8b4adb68af596a23\cleanmgr.exe.mui C:\Windows\System32\en-US\
Installing Disk Cleanup In Windows 2008 Without Rebooting The Server
Posted on Updated on
The Disk Cleanup executable file cleanmgr.exe and the associated Disk Cleanup button are not present in Windows Server® 2008 or in Windows Server® 2008 R2 by default. This is by design, as the Disk Cleanup button is part of the Desktop Experience feature. In order to have Disk Cleanup button appear on a disk’s Properties dialog, you will need to install the Desktop Experience feature.
So in order to use cleanmgr.exe you’ll need to copy two files that are already present on the server, cleanmgr.exe and cleanmgr.exe.mui. Use the following table to locate the files for your operating system.
Windows Server 2008 R2 64 bit
C:\Windows\winsxs\amd64_microsoft-windows-cleanmgr_31bf3856ad364e35_6.1.7600.16385_none_c9392808773cd7da\cleanmgr.exe
Windows Server 2008 R2 64-bit
C:\Windows\winsxs\amd64_microsoft-windows-cleanmgr.resources_31bf3856ad364e35_6.1.7600.16385_en-us_b9cb6194b257cc63\cleanmgr.exe.mui
Windows Server 2008 64-bit
C:\Windows\winsxs\amd64_microsoft-windows-cleanmgr.resources_31bf3856ad364e35_6.0.6001.18000_en-us_b9f50b71510436f2\cleanmgr.exe.mui
Windows Server 2008 64-bit
C:\Windows\winsxs\amd64_microsoft-windows-cleanmgr_31bf3856ad364e35_6.0.6001.18000_none_c962d1e515e94269\cleanmgr.exe.mui
Windows Server 2008 32-bit
C:\Windows\winsxs\x86_microsoft-windows-cleanmgr.resources_31bf3856ad364e35_6.0.6001.18000_en-us_5dd66fed98a6c5bc\cleanmgr.exe.mui
Windows Server 2008 32-bit
C:\Windows\winsxs\x86_microsoft-windows-cleanmgr_31bf3856ad364e35_6.0.6001.18000_none_6d4436615d8bd133\cleanmgr.exe
Once you’ve located the files move them to the following locations:
1. Cleanmgr.exe should go in %systemroot%\System32
2. Cleanmgr.exe.mui should go in %systemroot%\System32\en-US
You can now launch the Disk cleanup tool by running Cleanmgr.exe from the command prompt or by clicking Start and typing Cleanmgr into the Search bar.