
Выберите вариант загрузки:
- скачать с сервера SoftPortal (zip-файл)
- скачать с официального сайта (zip-файл)
Бесплатная портативная утилита, основанная на встроенном инструменте Microsoft Disk Clean-up Tool (Cleanmgr.exe), и которая по сравнению со стандартной очисткой диска предлагает дополнительные функции и позволяет удалять большее количество мусорных файлов (полное описание…)

Рекомендуем популярное
CCleaner 6.35.11488
CCleaner — популярное приложение для оптимизации ПК, чистки реестра и удаления различного…
CCleaner Portable 6.35.11488
CCleaner Portable — портативная (переносная, не требующая инсталляции на компьютер) версия утилиты CCleaner для чистки системного мусора…
WizTree 4.20
WizTree — небольшая и полезная утилита для определения файлов и папок, которые занимают много пространства на жестком диске…
Многие пользователи знают о встроенной утилите Windows 7, 8 и Windows 10 — Очистка диска (cleanmgr), позволяющей удалить разного рода временные файлы системы, а также некоторые системные файлы, которые не требуются для штатной работы ОС. Преимущества этой утилиты по сравнению с самыми разными программами для очистки компьютера — в том, что при ее использовании любой, даже начинающий пользователь, скорее всего, ничего не повредит в системе.
Однако, мало кто знает о возможности запуска этой утилиты в расширенном режиме, позволяющем очистить компьютер от еще большего количества различных файлов и компонентов системы. Именно о таком варианте использования утилиты очистки диска и пойдет речь в статье.
Некоторые материалы, которые могут быть полезны в данном контексте:
- Как очистить диск от ненужных файлов
- Как очистить папку WinSxS в Windows 7, Windows 10 и 8
- Как удалить временные файлы Windows
- Как очистить папку DriverStore/FileRepository (обычно очень большую)
Запуск утилиты очистки диска с дополнительными опциями
Стандартный способ запуска утилиты очистки диска Windows — нажать клавиши Win+R на клавиатуре и ввести cleanmgr, затем — нажать Ок или Enter. Также ее можно запустить в разделе Панели управления «Администрирование».
В зависимости от количества разделов на диске, появится либо выбор одного из них, либо сразу откроется список временных файлов и других элементов, которые можно очистить. По нажатию кнопки «Очистить системные файлы», можно будет также удалить некоторые дополнительные вещи с диска.
Однако, с помощью расширенного режима, можно выполнить еще более «глубокую очистку» и задействовать анализ и удаление еще большего количество не совсем нужных файлов с компьютера или ноутбука.
Процесс запуска очистки диска Windows с возможностью использования дополнительных опций начинается с запуска командной строки от имени администратора. Сделать это в Windows 10 и 8 можно через меню правого клика по кнопке «Пуск», а в Windows 7 — просто выбрав командную строку в списке программ, кликнув по ней правой кнопкой мыши и выбрав пункт «Запуск от имени администратора». (Подробнее: Как запустить командную строку).
После запуска командной строки, введите следующую команду:
%systemroot%\system32\cmd.exe /c cleanmgr /sageset:65535 & cleanmgr /sagerun:65535
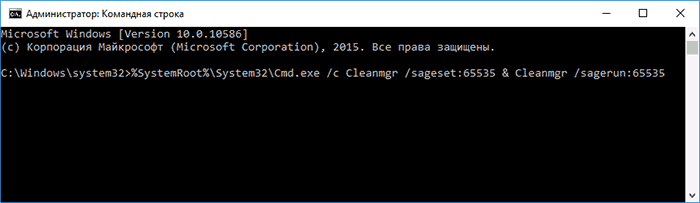
И нажмите Enter (после этого, пока не завершите действия по очистке, не закрывайте командную строку). Откроется окно очистки диска Windows с большим, чем обычно количеством пунктов для удаления ненужных файлов с HDD или SSD.
Список будет включать в себя следующие пункты (те, что появляются в данном случае, но отсутствуют в обычном режиме, выделены курсивом):
- Temporary Setup Files
- Старые файлы программы Chkdsk
- Файлы журнала установки
- Очистка обновлений Windows
- Защитник Windows
- Файлы журнала обновления Windows
- Загруженные файлы программ
- Временные файлы Интернета
- Файлы дампа памяти для системных ошибок
- Файлы мини-дампа для системных ошибок
- Файлы, оставшиеся после обновления Windows
- Пользовательские архивы отчетов об ошибках
- Пользовательские очереди отчетов об ошибках
- Системные архивы отчетов об ошибках
- Системные очереди отчетов об ошибках
- Временные файлы отчетов об ошибках
- Файлы установки Windows ESD
- BranchCache
- Предыдущие установки Windows (см. как удалить папку Windows.old)
- Корзина
- RetailDemo Offline Content
- Файлы резервной копии пакета обновления
- Временные файлы
- Временные файлы установки Windows
- Эскизы
- История файлов пользователя
Однако, к сожалению, в данном режиме не отображается, какое количество места на диске занимает каждый из пунктов. Также при таком запуске из пунктов очистки исчезают «Пакеты драйверов устройств» и «Файлы оптимизации доставки».
Так или иначе, думаю, такая возможность в утилите Cleanmgr может оказаться полезной и интересной.
Many users are confused about the cleanmgr exe feature. In this post, MiniTool will explain the definition and use guide of cleanmgr.exe. We also show you how to check its safety and provide a better alternative to clean up disk space.
With times going by, the hard disk drive may run out of hard drive space due to piled up temp files, download files, or any other files. So, a lot of people want to clean up their disk space. Although Microsoft provides Windows built-in tools like Cleanmgr.exe, many of them don’t know how to use it, like the user from the answer.microsoft.com forum. And some users even suspect it is a virus or malware.
I want to run the cleanmgr.exe and used it to automatically clean one drive the root drive «C:». I’ve tried but failed. How to use clean mgr.exe to clean up disk space?
https://answers.microsoft.com/en-us/windows/forum/all/cleanmgrexe-d-and-sageset-sagerun/20043179-0a19-42f4-af45-6d3d5e5a626c
What Is Cleanmgr Exe
What is cleanmgr exe? It is a Windows disk cleanup tool developed by Microsoft. With this utility, you can free up your hard drive space by searching and analyzing the drive for files that are no longer needed, and then it automatically removes these files from your PC.
The clean mgr.exe file is often located in the “C:\Windows\System32” or the “C:\Windows\SysWOW64” location depending on your PC’s 32-bit or 64-bit version. It was first introduced in Windows 98 and now applies to Windows 10/8/7/XP (with about 212.48 KB or 209.920 KB size) and Windows Server 2022/2019/2016/2012/2008 R2.
Is Cleanmgr Exe Safe to Use
As mentioned above, the clean mgr.exe is a Windows system file developed by Microsoft. It is the technical security rating is 0% dangerous. Sometimes, however, if the cleanmgr exe file is located in a subfolder of the user’s profile folder, then it may be malware.
In addition, you can try the following 2 ways to identify if the cleanmgr.exe disk space cleanup manager for Windows is safe.
# 1. Check the Size and Publisher of the Cleanmgr Exe File
The file size is known as 212,480 bytes or 209,920 bytes on Windows 10/8/7/XP. However, if the file is not located in the C:\Windows\System32 folder nor the file size, it might be a threat. Besides, you can check the publisher of the file.
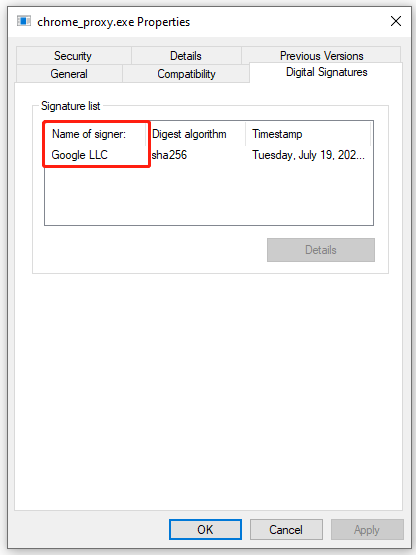
Step 1. Right-click the file and select Properties.
Step 2. In the pop-up window, navigate to the Digital Signatures tab. See if the Name of signer is Microsoft. If not, the file may be dangerous.
# 2. Scan the File with Windows Security
You can scan the clean mgr.exe file using Windows security. If you don’t know how to do that, follow the steps below to perform a virus scan.
Step 1. Type virus in the search box and double click the Virus & threat protection result.
Step 2. Inside the Windows Defender Security Centre, click on Run a new advanced scan or Scan options on the right panel.
Step 3. Select Custom scan from the list of scan options and click on Scan now.
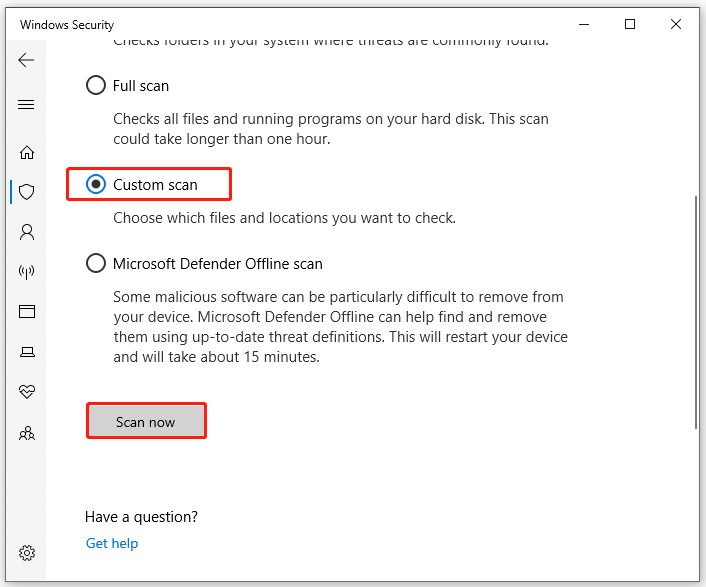
Step 4. In the pop-up File Explorer window, select the cleanmgr.exe file and click on Select Folder. Then Windows Security will automatically scan the file for the virus.
Step 5. If no virus is found, it will show you the No current threats message.
Of course, you can also scan for the file using your third-party antivirus software.
How to Use the Cleanmgr Exe to Clean up Disk Space
This part will introduce the command lines related to the cleanmgr.exe tool and show you how to use them.
About the Parameters of the Cleanmgr.exe Command Line
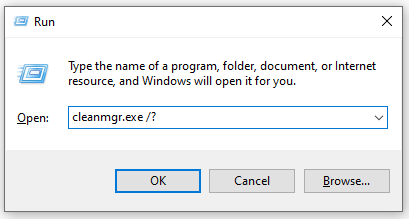
You can clean up different types of unneeded files automatically, including Temp files, Internet files, downloaded files, and Recycle Bin files using different cleanmger command lines. To learn detailed command lines related to the clean mgr.exe, you can run the following command in the Run box.
Press the Win + R keys to open the Run box, and then type cleanmgr.exe /? in it and hit Enter. It will show you the following screenshot:
Here are several parameters of the cleanmgr.exe and its detailed meaning.
- /d <driveletter>: It specifies the drive that you want to clean up. Bear in mind that it cannot be utilized with “/sageset:n”.
- /sageset:n: It shows the Disk Cleanup Settings window and generates a registry key to store the settings that you select. The “n” is the value stored in the registry, ranging from 0 to 9999, and allows you to specify tasks for Disk Cleanup.
- /sagerun:n: It allows you to run the specified tasks assigned to the “n” value that you use the “/sageset” option. All drives on your PC are enumerated and the selected profile runs against each drive.
- /tuneup:n: It is similar to the functionality of the “/sageset” and “/sagerun”, writing the presets to the registry.
- /lowdisk: It is used when Windows notifies you the hard disk is running out of space. After running the “cleanmgr.exe /lowdisk” command, Disk Cleanup will open with all checkboxes ticked by default when you click the notification.
- /verylowdisk: It functions the same as the “/lowdisk”, but it will clean up all unneeded files automatically without confirmation. But it will show you a dialog to display how much free space your disk has now.
- /setup: It will analyze the system files left from your previous Windows version. For instance, if you upgrade from Windows 8.1 to Windows 10, this command is useful.
How to Clean Up Disk via the Cleanmgr.exe Command Line
Now, you should have an overall understanding of the cleanmgr.exe command lines. There are 2 common ways to run the commands. The first way is to use the Run dialog box and the other is to use Windows Command Prompt.
Here we will show you how to free up your disk space using the cleanmgr.exe commands.
# 1. Clean up a Specific Drive
If you want to execute a disk cleanup for a specific drive such as C drive, you can follow the guide below:
1. Type cmd in the Search box, and then right-click the Command Prompt window and select Run as administrator.
2. In the elevated Command Prompt window, type the following command and hit Enter.
cleanmgr.exe /D C
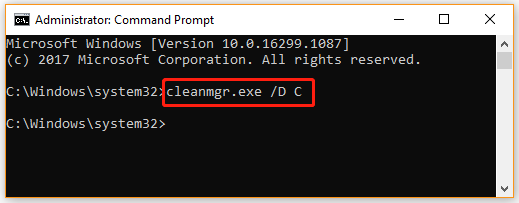
3. Then you can tick the checkboxes next to files that you want to clean up and click on OK.
Also, you can open the Run dialog box by pressing Win + R keys, and then type cleanmgr.exe /D C in it and hit Enter to clean up the C drive space. You can run all the following commands in the Run box as well.
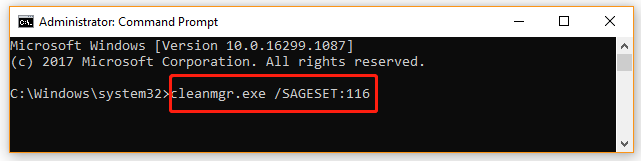
# 2. Run Cleanmgr.exe /SAGESET
If you want to create a preset of selected checkboxes in the Disk Cleanup window, you can run the /SAGERUN command. To do so, open the elevated command prompt window, and then type cleanmgr.exe /SAGESET: number (here we take the number 116 for example) and hit Enter. Then tick the checkboxes that you want to be enabled for the preset and click on OK.
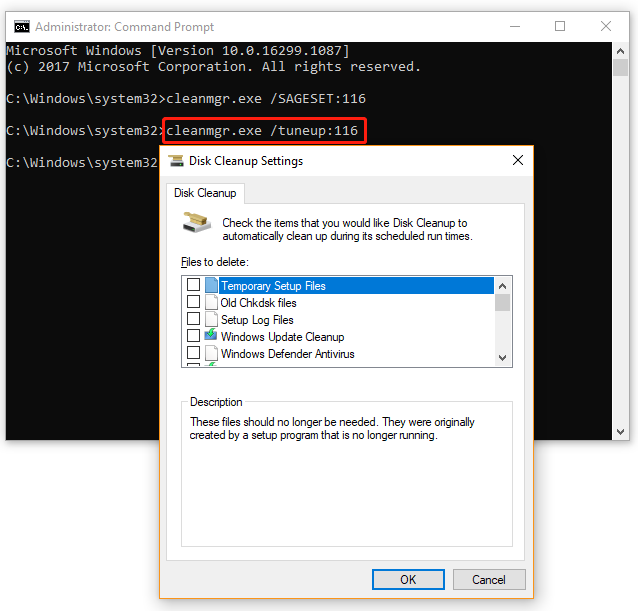
# 3. Run Cleanmgr.exe /tuneup
This command is similar to the SAGESET functionality and writes presets to the registry. The cleanmgr.exe /tuneup command needs to be run in the elevated Command Prompt window. For that:
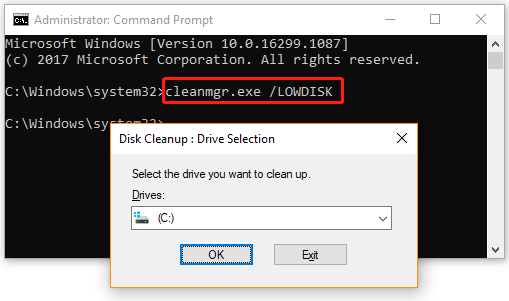
# 4. Cleanmgr.exe /LOWDISK
If you want to let Windows notify you that the disk space is running out on a drive, you can run the cleanmgr.exe /LOWDISK command. This command will select all checkboxes by default in the Disk Cleanup window. Click on OK and it will analyze and clean up the drive space automatically.
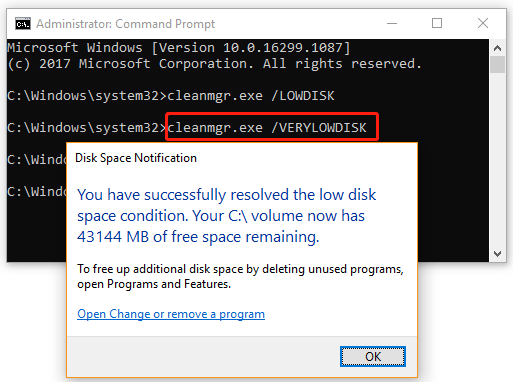
# 5. Cleanmgr.exe /VERYLOWDISK
This command is the same as the /LOWDISK command, but it will cleanup all files selected in the Disk Cleanup window automatically without confirmation. Once cleaned up, it will tell you how much free space you have now in the pop-up window.
Well, you can run other cleanmgr exe commands in the Run box or elevated Command Prompt window.
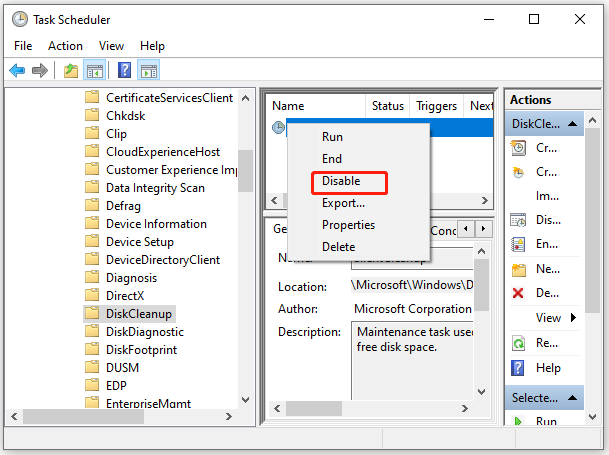
How to Stop the Cleanmgr.exe Tool from Delete Files
Some users reported that the Disk Cleanup tool removed temp files automatically, causing the app to crash. In this case, you can disable the cleanmgr.exe task from running automatically. Here’s how to do that:
Step 1. Press Win + R keys to open the Run prompt. Then type taskschd.msc in it and hit Enter.
Step 2. Inside the Task Scheduler window, expand the Task Scheduler Library category in the left pane and go to Microsoft > Windows > DiskCleanup.
Step 3. Right-click the cleanup tool in the middle panel and select Disable.
Bonus Tip: Best Alternative to Free up Your Disk Space
Although the cleanmgr.exe disk space cleanup manager for Windows can help you clean up some unnecessary files/folders, this tool can’t show what detailed files or apps eat up your disk space. Sometimes it may run into various issues such as Disk Cleanup stuck on Windows update cleanup, Disk Cleanup not working, etc.
Under these situations, a professional disk cleanup tool is a good choice. MiniTool Partition Wizard is such a tool that can analyze what is occupying your disk space and remove them permanently. Moreover, it can free up disk space effectively with some powerful features such as Extend Partition, Space Analyzer, and Migrate OS to SSD/HD.
MiniTool Partition Wizard FreeClick to Download100%Clean & Safe
Here we will show you how to free up disk space via the space analyzer feature.
Step 1. Launch the MiniTool software to get its main interface and click on the Space Analyzer from the top toolbar.
Step 2. In the new window, select the drive that contains the corrupted files from the drop-down menu and click on Scan.
Step 3. Wait for the scan to complete, and then right-click the unneeded file/folder that takes much disk space and select Delete (Permanently).

What is cleanmgr exe? How to clean up disk space using the tool? If you are also trying to figure these questions out, this post is what you need.Click to Tweet
What’s Your Opinion
This post mainly focuses on the cleanmgr exe tool and provides an alternative utility to free up disk space effectively. If you have any other opinions about this subject, please leave them down in the comment area. Of course, you can contact us via [email protected] if you have difficulty using MiniTool Partition Wizard.
The built-in Windows tool, Disk Cleanup, which can be launched as cleanmgr.exe from the Run dialog, supports a number of interesting command line arguments which can be useful in various situations. Let’s review them and see how you can use them.
You can learn the switches available for Disk Cleanup by entering the following command in the Run dialog:
cleanmgr.exe /?
See the following screenshot:
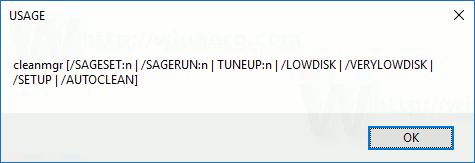
The list is as follows:
- /D DRIVELETTER
- /SAGESET:n
- /SAGERUN:n
- /TUNEUP:n
- /LOWDISK
- /VERYLOWDISK
- /SETUP
- /AUTOCLEAN
Here’s what those switches mean.
cleanmgr.exe /D DRIVELETTER
Executes disk cleanup for a specific drive. The user should specify the drive letter without «:» as shown below:
cleanmgr.exe /D C
The command above will launch disk cleanup for drive C:.
You can combine the /D argument with other switches of cleanmgr.exe.
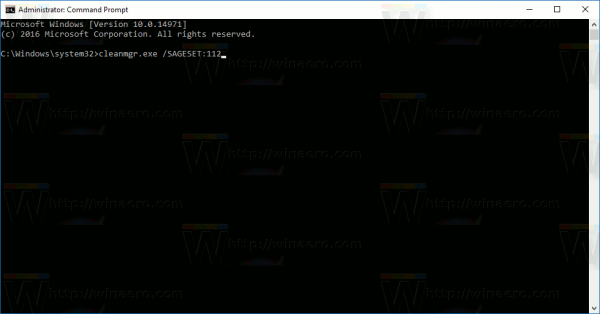
cleanmgr.exe /SAGESET
The SAGESET key allows you to create a preset of selected checkboxes in cleanmgr.exe. Once this is done, you can launch the preset using the /SAGERUN option. The syntax is as follows:
cleanmgr.exe /SAGESET:number
The command needs to be executed elevated (as administrator).
Where «number» can be any value from 0 to 65535. The options you select during the SAGESET session will be written to the Registry and stored there for further use. The command needs to be executed elevated.
Use it as follows:
- Open an elevated command prompt.
- Type the following command
cleanmgr.exe /SAGESET:number
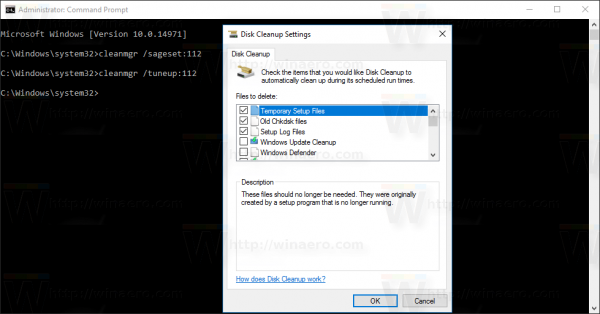
Suppose you use the number 112, for example:

- Tick the options you want to be enabled for this preset as shown below:
- Click OK to save the preset under the number you entered in the Run dialog.
Since you started cleanmgr.exe /SAGESET:n elevated, it will be opened directly in the «Clean up system files» mode. See the following article: How to run Disk Cleanup directly in the system files mode and speed it up.
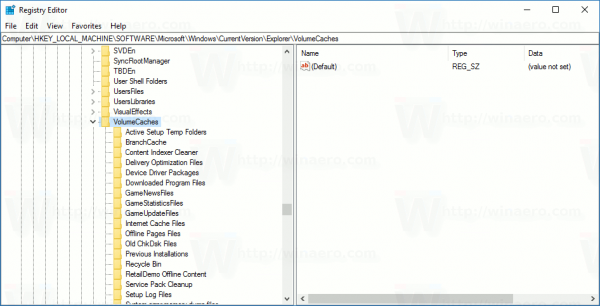
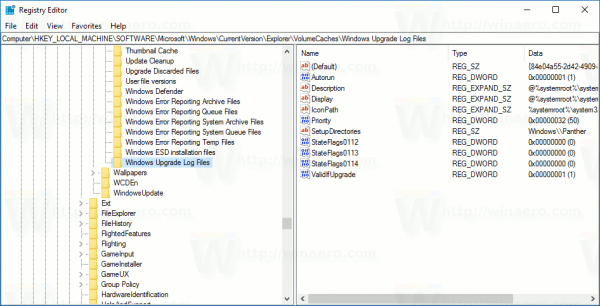
Technically, every checkbox shown in Disk Cleanup reflects the appropriate registry subkey under the following Registry branch:
HKEY_LOCAL_MACHINE\SOFTWARE\Microsoft\Windows\CurrentVersion\Explorer\VolumeCaches
For example, the Windows Upgrade Log Files subkey reflects the same option in the user interface of the app.
For every value you check, it will be marked under the StateFlagsNNNN DWORD value, where NNNN is a number you passed to the SAGESET argument. I have the value StateFlags0112 there for my /SAGESET:112 command:
cleanmgr.exe /SAGERUN
The argument /SAGERUN allows the user to launch the preset configured earlier with the /SAGESET:n command. The syntax is as follows:
cleanmgr.exe /SAGERUN:number
Use the same number that you used for the previous /SAGESET:number command.
Combining with the previous example, you should do the following.
- Open an elevated command prompt.
- Type the following command
cleanmgr.exe /SAGESET:number
Suppose you use the number 112, for example:
- Tick the options you want to be run for this preset as shown below:
- Click OK to save the preset under number 112.
- Now, type cleanmgr.exe /SAGERUN:112 in the Run dialog. It will start clean up using the preselected options automatically.
The cleanup process will be started immediately, without any confirmation prompt. Disk Cleanup will also be closed automatically.
If the /D argument is not specified for this command, it will be applied to all drives.
You can see the article How to run Disk Cleanup directly in the system files mode and speed it up.
The following commands are not documented. To discover them, I used Sysinternals Process Monitor and logs of the cleanmgr utility. If they don’t behave as described, please correct me in the comments.
cleanmgr.exe /TUNEUP
The command is similar to the described SAGESET functionality. In Windows 10, it does exactly the same thing. Like the SAGESET switch, it writes presets to the Registry. It can be used instead of SAGESET. The syntax is as follows:
cleanmgr.exe /tuneup:112
The command needs to be executed elevated.
If you previously configured the number specified with the TUNEUP switch with SAGESET, it will reflect the changes you made:
This switch is not documented, so Microsoft can remove or change its behavior at any moment. I recommend you to use SAGESET instead.
cleanmgr.exe /LOWDISK
This switch is used when Windows notifies the user that he is running out of disk space on a drive. When you click the notification, Disk Cleanup opens with all checkboxes checked by default. You can execute it from the Run dialog as follows:
cleanmgr.exe /LOWDISK
See the following screenshot:
Once you press the Enter key, it will analyze the drive and show the familiar user interface, but with all checkboxes checked by default:
You can run the command from an elevated command prompt to make it switch to the system files mode.
cleanmgr.exe /VERYLOWDISK
It is the same as the /LOWDISK disk switch, but it will cleanup all files automatically. It won’t show you a confirmation, but will show you a dialog to indicate how much free disk space you have now.
Syntax:
cleanmgr.exe /VERYLOWDISK
Run the command from the elevated command prompt to make it switch to the system files mode.
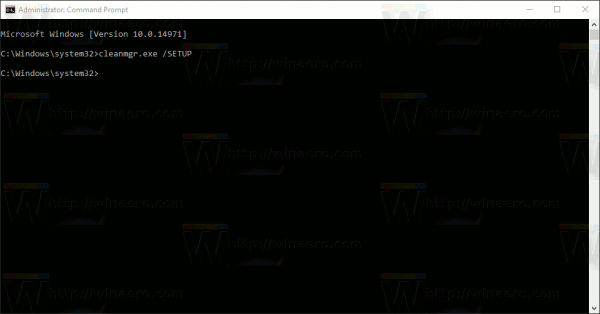
cleanmgr.exe /SETUP
The setup switch analyzes the system files left from a previous Windows version. For example, if you upgraded from Windows 7 to Windows 10, running this switch is useful. It also needs to be executed from an elevated command prompt:
cleanmgr.exe /SETUP
The application will calculate the space used by files from the previous Windows installation. It is similar to the cleaning Previous Windows Installation files using the user interface of Disk Cleanup in regular mode. The application will analyze the following locations:
C:\$Windows.~BT\*
C:\$Windows.~LS\*
C:\$Windows.~WS\*
C:\ESD\Download\*
C:\ESD\Windows\*
C:\$WINDOWS.~Q\*
C:\$INPLACE.~TR\*
C:\Windows.old\*
C:\Windows\Panther
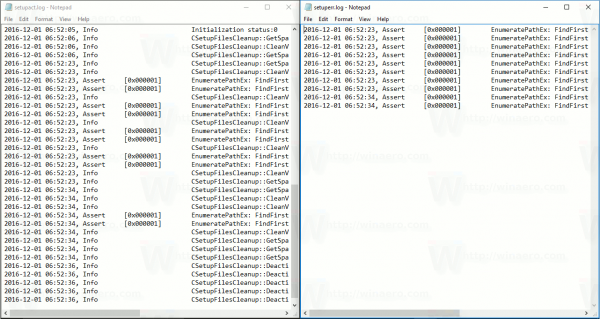
The application will not clean them up automatically. It won’t show a user interface either. Instead it will write two log files which you can inspect:
C:\Windows\System32\LogFiles\setupcln\setupact.log
C:\Windows\System32\LogFiles\setupcln\setuperr.log
cleanmgr.exe /AUTOCLEAN
It’s the same as above, but the application will remove files from the previous Windows installation or the previous in-place upgrade automatically.
The following folders will be removed:
C:\$Windows.~BT\*
C:\$Windows.~LS\*
C:\$Windows.~WS\*
C:\ESD\Download\*
C:\ESD\Windows\*
C:\$WINDOWS.~Q\*
C:\$INPLACE.~TR\*
C:\Windows.old\*
C:\Windows\Panther
The application will write the results to the following log files:
C:\Windows\System32\LogFiles\setupcln\setupact.log
C:\Windows\System32\LogFiles\setupcln\setuperr.log
No user interface will be shown.
The syntax is as follows:
cleanmgr.exe /AUTOCLEAN
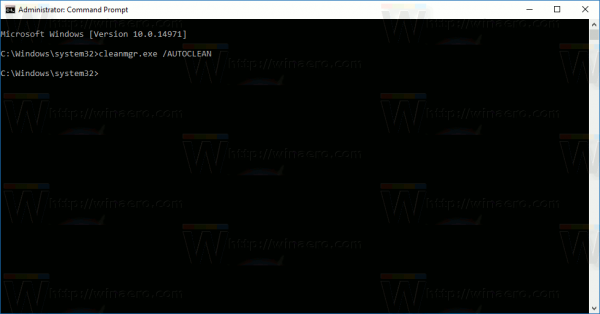
The command needs to be executed elevated, e.g. you need to launch it from an elevated command prompt instance.
That’s it.
Don’t forget to tell us if some commands don’t behave as described for you. Feel free to leave a comment if you have a question or a suggestion.
Support us
Winaero greatly relies on your support. You can help the site keep bringing you interesting and useful content and software by using these options:
If you like this article, please share it using the buttons below. It won’t take a lot from you, but it will help us grow. Thanks for your support!
cleanmgr.exe: The Windows Disk Cleanup Tool
cleanmgr.exe is the executable file for the Disk Cleanup utility in Microsoft Windows. This built-in tool helps users free up hard drive space by identifying and removing temporary files, system files, and other data that are no longer needed. It’s a crucial component for maintaining system performance and preventing your hard drive from becoming cluttered.
Origin and Purpose
cleanmgr.exe was first introduced with Windows 98 and has been a standard part of the Windows operating system ever since. Its primary purpose is to:
- Free Up Disk Space: The most obvious benefit is reclaiming storage space. This can be particularly important on drives with limited capacity (like smaller SSDs).
- Improve System Performance: While the performance impact isn’t always dramatic, reducing the number of unnecessary files can slightly improve system responsiveness, especially on older or slower systems. This is because the operating system has fewer files to index and manage.
- Remove Potentially Sensitive Data: Disk Cleanup can remove temporary internet files, which might contain traces of your browsing history.
- Prepare for Upgrades/Troubleshooting: Clearing out old files can sometimes help resolve issues during Windows upgrades or when troubleshooting system problems. It reduces the number of variables involved.
Is it a Virus? Could it Become a Virus?
cleanmgr.exe is a legitimate Microsoft Windows system file. It is NOT a virus. It is digitally signed by Microsoft, which helps verify its authenticity.
However, like any executable file, it is theoretically possible (though extremely unlikely) for a virus to:
- Replace
cleanmgr.exe: A very sophisticated virus could potentially replace the legitimatecleanmgr.exewith a malicious copy. This is rare due to Windows File Protection (WFP), also known as System File Checker (SFC), which guards critical system files. - Impersonate
cleanmgr.exe: A virus could name itselfcleanmgr.exeand be placed in a different directory. The operating system prioritizes files in the current directory and specific system directories. A malicious file in a user’s Downloads folder, for instance, would not be executed by the system when you use the Disk Cleanup shortcut or run it from the command prompt without specifying the full path.
Key indicators of a potential problem:
- Incorrect File Location: The legitimate
cleanmgr.exeis located in%SystemRoot%\System32(usuallyC:\Windows\System32) and%SystemRoot%\SysWOW64(usuallyC:\Windows\SysWOW64) on 64-bit systems. If you find acleanmgr.exeelsewhere (and you didn’t intentionally put it there), it could be suspicious. - Unexpected Behavior: If
cleanmgr.exestarts behaving strangely (e.g., popping up randomly, consuming excessive resources, or displaying unusual messages), it might indicate a problem. - Antivirus Alerts: Your antivirus software should flag any malicious file attempting to masquerade as a system file.
If you suspect a problem, run a full system scan with a reputable antivirus and anti-malware program. You can also use the System File Checker (sfc /scannow in an elevated command prompt) to verify the integrity of system files, including cleanmgr.exe.
How to Use cleanmgr.exe (Disk Cleanup)
There are several ways to use the Disk Cleanup tool:
1. GUI Method (Graphical User Interface)
- Open File Explorer: (Windows key + E).
- Right-click on the drive you want to clean (e.g., C:).
- Select Properties.
- In the «General» tab, click the Disk Cleanup button.
- Disk Cleanup will scan your drive and present a list of file categories.
- Check the boxes next to the file types you want to delete. Be careful! Read the descriptions before deleting.
- Click OK.
- Confirm the deletion by clicking Delete Files.
2. Command Line Method
The command line offers more advanced options and allows for automation.
-
Open Command Prompt (as administrator): Search for «cmd», right-click on «Command Prompt», and select «Run as administrator».
-
Basic Usage: To launch Disk Cleanup with the default settings for the C: drive, type:
cleanmgr /d c(Replace
cwith the drive letter you want to clean.) -
Advanced Options (cleanmgr /sageset:n and cleanmgr /sagerun:n):
This is the most powerful way to use Disk Cleanup. It allows you to create custom cleaning profiles.
-
cleanmgr /sageset:n: This command creates a Disk Cleanup settings profile.nis a number between 0 and 65535 (inclusive) that you choose to identify the profile. It does not delete files yet. It opens a window similar to the GUI, but your selections are saved.cleanmgr /sageset:1 // Creates a profile named '1' -
cleanmgr /sagerun:n: This command runs a previously created Disk Cleanup profile (using thenvalue you specified with/sageset). This does delete files, silently, without user interaction.cleanmgr /sagerun:1 // Runs the profile named '1'
Example: Creating and Running a Custom Profile
- Open an elevated command prompt.
- Run
cleanmgr /sageset:10. - Select the file types you want to clean (e.g., Temporary Files, Recycle Bin). Click OK.
- Now, whenever you want to clean those specific files, run
cleanmgr /sagerun:10.
-
-
/lowdisk: This switch is used when your disk is critically low on space. It runs Disk Cleanup with a predefined set of options designed to free up space quickly. It’s generally equivalent to runningcleanmgr /verylowdiskwithout prompting.cleanmgr /lowdisk /d c
*/verylowdisk: Similar to/lowdisk, but it cleans up all possible files, even those that might not normally be recommended (e.g., Windows Update Cleanup). This is usually done without prompting the user for confirmation on each category. Use with caution!
cleanmgr /verylowdisk /d c
* /setup: No longer relevant to most modern windows system, used to clean files after an upgrade from a previous major version of Windows (e.g., upgrading from Windows 7 to Windows 10).
* /autoclean: clean previous os files automatically.
*/d driveletter: Specifies the drive to clean. Essential when using command-line options.
3. Scheduled Task
You can schedule Disk Cleanup to run automatically using the Task Scheduler. This is ideal for regular maintenance.
- Open Task Scheduler: Search for «Task Scheduler» in the Start Menu.
- Create Basic Task: Click «Create Basic Task…» in the right-hand Actions pane.
- Follow the wizard:
- Give the task a name (e.g., «Disk Cleanup»).
- Choose a trigger (e.g., Weekly, Monthly).
- Set the time and day.
- Choose «Start a program» as the action.
- In the «Program/script» box, enter
cleanmgr.exe. - In the «Add arguments (optional)» box, enter
/sagerun:n(replacenwith the profile number you created earlier). For example:/sagerun:1. - Click «Finish».
File Categories Explained
Here’s a breakdown of the common file categories you’ll see in Disk Cleanup:
- Downloaded Program Files: ActiveX controls and Java applets downloaded from the internet. Generally safe to remove.
- Temporary Internet Files: Cached copies of web pages, images, and other media. Deleting these frees up space and can improve browser performance.
- Offline Webpages: Web pages saved for offline viewing.
- Recycle Bin: Files you’ve deleted. Emptying the Recycle Bin permanently removes these files.
- Temporary Files: Files created by applications for temporary storage. Usually safe to remove.
- Thumbnails: Preview images of pictures, videos, and documents. Deleting these will free up space, but Windows will recreate them as needed.
- Delivery Optimization Files: Files used for peer-to-peer Windows Update sharing. Generally safe to remove.
- Windows Update Cleanup: Old versions of Windows Update files. Removing these can free up a significant amount of space, but it prevents you from uninstalling specific Windows updates. Be cautious with this option.
- Windows upgrade log files: log file.
- System error memory dump files: Files created after a system crash («blue screen»). Useful for debugging, but can be safely deleted if you’re not troubleshooting a problem.
- System queued Windows Error Reporting: Error reports waiting to be sent to Microsoft.
- Windows Defender Antivirus: Non-critical files used by Windows Defender.
- Previous Windows installation(s): Files from a previous Windows installation (if you upgraded). Deleting these prevents you from rolling back to the previous version of Windows. Only delete this if you’re sure you don’t need to revert.
Conclusion
cleanmgr.exe (Disk Cleanup) is a valuable, safe, and essential tool for maintaining your Windows system. Understanding its options, especially the command-line switches, allows you to customize and automate disk cleanup to keep your system running smoothly and efficiently. Always exercise caution when deleting files, especially those related to Windows Update or previous installations. Regular use of Disk Cleanup, either manually or through scheduled tasks, is a recommended practice for all Windows users.