
You are here: Home / How to / [Fix] CLASSPNP.SYS BSOD Error in Windows 10 | Quickly
Microsoft Operating System comes with SCSI Class System Files and one such is the CLASSPNP.SYS which enables the users to access the OS smoothly. However, if the driver gets corrupted or failed to respond, then SYS file error arises which makes your computer stuck on the boot screen and it is usually known as CLASSPNP.SYS error.

As stated earlier, CLASSPNP.SYS is a Window SCSI Class System File which comes with the Windows Operating System. Whenever the system detects the faulty hardware or corrupt drivers, then CLASSPNP.SYS error arises in which the display of the computer turns blue and hence, it comes under the category of Blue Screen of Death errors. Some of the BSOD errors are very easy to fix but this is a little bit tough to fix this error because it doesn’t allow the users to boot into the system.
Most of the time Blue Screen of Death error occurs when Windows 10 loads, so you have to troubleshoot the issue in Safe Mode with networking. Here is the detailed step by step procedure to boot your system in Safe Mode.
Why classpnp.sys BSOD Error occurs?
This is one of the Blue Screen of Death errors encountered by many users in Windows 10. Though there can be various reasons behind this error. However, I have listed some common reasons responsible for this error. Here are the reasons:
- The hardware failure.
- Corrupted system file.
- BIOS configuration.
- Outdated or Incompatible Device Drivers.
Fix classpnp.sys Blue Screen of Death Error in Windows 10

So, if you are facing CLASSPNP.SYS Blue Screen of Death error then need not worry as there are ample solutions that will help you to fix the error. Now, go through the below-mentioned solutions to resolve the issue.
Update Device Drivers
No doubt the drivers enable the OS to run smoothly but sometimes, they failed to respond or stopped working due to multiple reasons. So, you will have to look at the drivers and make sure they are updated and for your solace, the detailed steps are listed below.
- If you are using Windows 10, then hover your mouse cursor to the Start menu and then right-click on it. Soon, you will get a list of applications, select ‘Device Manager’.

- Thereafter, a new window will appear on the screen which will feature a list of drivers.

- Now, select the disk drive, click on the arrow button to get the featured driver.

- Now select the driver, right-click on it and then choose an option ‘Update Driver’.

Run System File Checker
SFC is an inbuilt feature that scans and repairs the corrupted or missing files. The task is quite simple and following the same will help you to get rid of classpnp.sys BSOD error. Now, go through the steps listed beneath.
- First and foremost, right-click on the Start icon.
- From the list, click on Command Prompt (Admin) to run the cmd as an administrator. If the confirmation box appears, then click on the ‘Yes’ button.

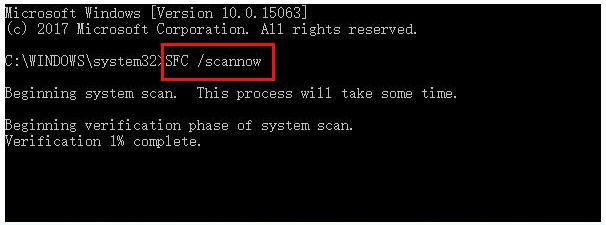
- Thereafter, you will get a command box and here you will have to type “sfc/scannow” without quotation mark and then press the Enter key.

- The system will take some time to scan the corrupted or missing files. So have patience and give time to your PC to fix the issue.
Remove Faulty Hardware
The prime reason for an error classpnp.sys BLUE SCREEN is the faulty hardware. So, you must remove the recently added video card, RAM stick and others to fix the issue. However, if you have not inserted any such hardware recently, then remove the wireless card and restart your computer. If the issue is resolved, then insert the respective cards.

If your PC has multiple slots and you are using a single slot RAM, then change the slot and restart your computer.
Update the BIOS
While booting process in under progress in your computer, BIOS (Basic Input and Output System) prompts the hardware initialization. So, CLASSPNP.SYS error can be fixed by updating your BIOS. To do so follow these steps:
- Press Windows+R keys to open the Run dialog box, and type msinfo32 and press Enter.

- In the next window, check your current BIOS Version/Date and go to its official website.

- Check the Support or Download section on the official website and search for the latest BIOS update if any.

- Download the desired file and install it and then Restart your computer and check for the error.
Get access to your PC via Safe Mode
If the error won’t allow you to access the Login Panel then you can use the Safe Mode feature to fix the issue.
- Make sure your PC is turned off.
- Now turn ON your PC and when you will find the login panel on your screen, then press the Power button to turn off the PC completely.

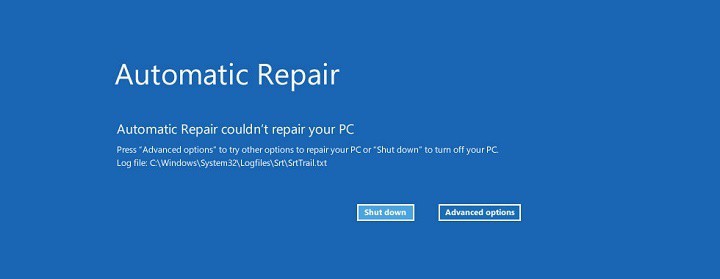
- Soon, you will get the “Preparing Automatic Repair” logo on your screen. However, if you didn’t find such a logo, then repeat the above-mentioned steps.

- Thereafter, you will get two tabs, i.e. ‘Advanced Options’ and ‘Restart’, click on ‘Advanced Options’.

- After that, the Windows will offer you an additional three options, select ‘Troubleshoot’.

- Now, move in the ‘Advanced Options’ listed in the ‘Troubleshoot’ section.

- In the ‘Advanced Options,’ you will get a list of options, select ‘Startup Settings’

- And then click on ‘Restart’.

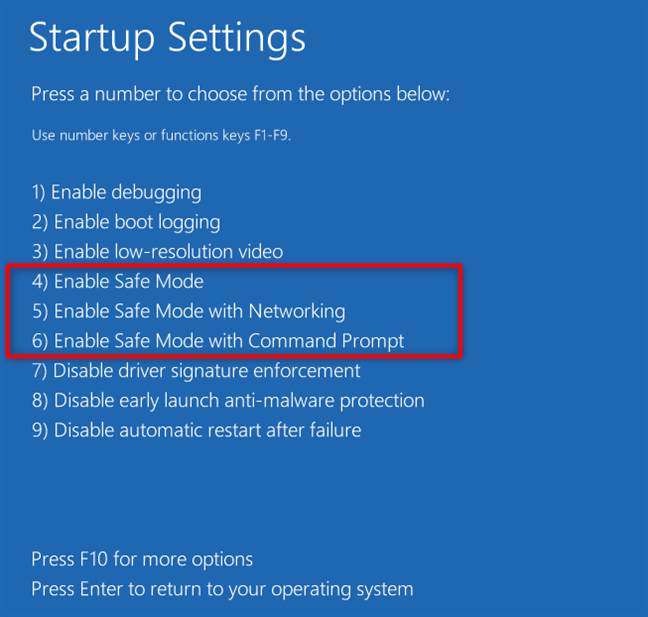
- After restarting the Windows, you will get a series of options; press key 5 to enter the Safe Mode with Networking.

- Once you get access in the Safe Mode, run SFC and update the driver.
Uninstall recently added software or applications
Sometimes, the apps or the software become the prime reason behind an issue ‘CLASSPNP.SYS’ and due to the same, the OS failed to respond properly. So, to resolve an issue you will have to uninstall such applications or software. The process is simple and the steps for the same are mentioned below.
- Open Control Panel by pressing Win+X+P keys together. Thereafter, a new window will appear which will show the list of applications and computer features.

- Move to the ‘Programs’ section and click on ‘Uninstall a Program‘.

- Soon, you will get the bunch of applications, select the one which you have recently installed and then right-click and choose to ‘’Uninstall’ the software from your system.

- If it will ask for a confirmation message, click on ‘Yes’ button to uninstall the program.
System Restore
- This is a unique feature provided by the Windows OS which reverts back the PC to the working condition. So, if you can log in to your computer and want to restore the system, then click on the ‘Start’ menu, type ‘System Restore’ in the search bar and hit ‘Enter’ key.

- Thereafter, you will be asked to ‘Create a System Restore Point’. Perform the task and click on the ‘OK’ button.

However, if you failed to login to your PC, then you can restore your PC through the boot process.
- Turn off your PC and then turn it ON.
- If you get the Login panel in the display, then press the Power button to turn off the PC completely.

- Now, turn ON the PC and then the display will show ‘Preparing Automatic Repair’.

- Beneath the same, it will show ‘Advanced Options’, click on it.

- Thereafter, click on ‘Troubleshoot’.

- In the Troubleshoot section, you will get an ‘Advanced options’ feature, click on it.

- Now click on ‘System Restore’.

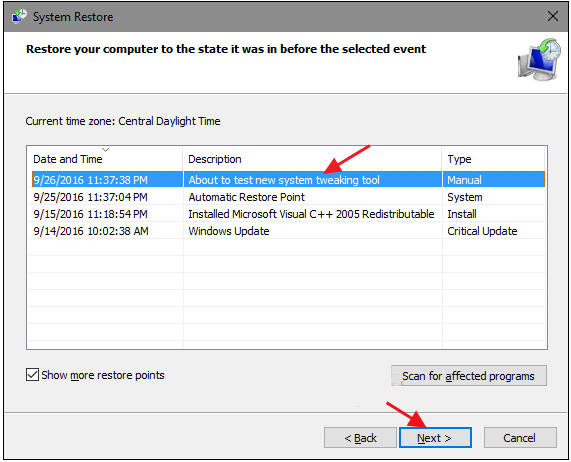
- And then the Windows will show the restore points, select the one and click on the ‘Next’ button.

- Confirm the restore point you have selected and then click on the Finish button.

- That’s it, after completing the above task, soon you will get the PC in the working condition.
Clean Install Windows
This is the last but least recommended solution to fix the classpnp.sys Blue Screen of Death error in Windows. However, if the problem has started on the new computer or after installing the updates then this error can be fixed by clean installing Windows with the latest available version.

Before performing the clean install please take a backup of available data
Conclusion
Hence, these were effective solutions to fix classpnp.sys BSOD issue. However, if you stuck amid the process or need any assistance, then post in the comment box and thereafter the techies will effectively assist you.
If you feel this article helpful please like, share and follow our Facebook page and keep visiting our website for such tutorials and guides.
Синий экран смерти (BSoD), где указывается некий Classpnp.sys, может сделать ПК юзера абсолютно непригодным для дальнейшего использования. Данная критическая ошибка возникает по нескольким причинам, включая сбой оборудования и повреждение системных компонентов.
В этом подробном руководстве мы покажем вам, как решить эту проблему, независимо от причины.
Что вызывает BSoD Classpnp.sys?
Существует ряд факторов, которые могут вызвать ошибку BSOD Classpnp.sys. Ниже приведены некоторые из наиболее примечательных:
- Неисправное оборудование. Наиболее распространенной причиной, по которой ошибка Classpnp.sys приводит к зависанию или сбою компьютера, – это неисправное оборудование. Вам необходимо отключить поврежденные компоненты и перезагрузить ПК.
- Неисправное ПО. Иногда проблема может быть вызвана неисправной или несовместимой программой. Решение этой проблемы — удалить приложение.
Что делает Classpnp Sys?
Classpnp.sys — это системный драйвер; библиотека класса устройств (SCSI) и его функции вызываются из других драйверов. Один из важнейших «винтиков» в операционной системе, без которого она не сможет нормально функционировать.
Этот драйвер по умолчанию поставляется с Windows, и его никогда не следует загружать со сторонних веб-сайтов!
Как исправить ошибку Classpnp.sys?
Прежде чем углубляться в решения, описанные в этом разделе, ниже приведены некоторые предварительные шаги по устранению неполадки, которые следует попробовать:
- удалите неисправное внутреннее оборудование (ОЗУ, видеокарту или жесткий диск);
- отключите все внешнее оборудование;
- измените режим SATA в BIOS (с AHCI на IDE, и наоборот).
Деинсталляция недавно установленных программ
- Нажмите клавиши WIN+R, введите appwiz.cpl и нажмите «ОК».
- Щелкните ПКМ на проблемное ПО и выберите «Удалить».
- Наконец, следуйте инструкциям на экране, чтобы завершить процесс, и перезагрузите ПК.
Некоторые пользователи Windows сообщают, что ошибка Classpnp.sys появилась после установки видеоигры или какой-то другой «тяжелой» программы.
Запуск проверки системных файлов
- Нажмите клавишу WIN, введите CMD и нажмите «Запуск от имени администратора» в командной строке.
- Введите команду ниже и нажмите ENTER , чтобы запустить ее:
- sfc /scannow
- Дождитесь завершения выполнения команды и перезагрузите компьютер.
Иногда ошибка Classpnp.sys может быть связана с повреждением системных файлов. Если вы можете нормально загрузить компьютер, описанные выше шаги должны помочь вам решить проблему.
Если вы не можете нормально загрузить компьютер, выполните следующие действия:
- Включите компьютер и нажмите кнопку питания, чтобы выключить его, когда логотип производителя принудительно отобразится. Повторяйте это, пока не появится расширенное меню загрузки.
- Теперь выберите «Устранение неполадок» → «Дополнительные параметры» → «Командная строка».
- Теперь введите команду ниже и нажмите ENTER:
- sfc /scannow
- Если это не помогло, выполните команду ниже:
- sfc /scannow /OFFBOOTDIR=C: /OFFWINDIR=C:Windows
- Наконец, дождитесь завершения выполнения команды и перезагрузите компьютер.
При этом ошибка Classpnp.sys должна быть исправлена, если ее причиной являются поврежденные системные файлы.
Восстановление Windows до более ранней точки
- Нажмите клавиши WIN+R, введите rstrui.exe и нажмите «ОК».
- Нажмите кнопку «Далее».
- Теперь выберите точку восстановления и нажмите кнопку «Далее».
- Наконец, нажмите кнопку «Готово» и следуйте инструкциям на экране, чтобы завершить процесс.
Иногда ошибка с файлом Classpnp.sys может быть вызвана изменениями, внесенными вами в ваш компьютер. Чтобы это исправить, вам необходимо восстановить ПК до более раннего состояния, когда все работало правильно.
Если вы не можете нормально загрузить компьютер, выполните следующие действия:
- Вызовите расширенное меню загрузки, как это было показано выше.
- Теперь выберите «Устранение неполадок» → «Дополнительные параметры».
- Наконец, выберите «Восстановление системы» и следуйте инструкциям на экране, чтобы завершить процесс.
После восстановления компьютера проверьте, устранена ли ошибка.
Чистая установка Windows
Это наименее рекомендуемое решение для исправления ошибки Classpnp.sys. Однако, если проблема возникла на новом компьютере или после установки обновлений, чистая установка Windows последней доступной версии может решить проблему.
Перед выполнением чистой установки обязательно сделайте резервную копию всех доступных данных.
10 November 2023 Senior Program Developer
Summary
Learn how to fix the CLASSPNP.SYS blue screen error on Windows 10. Our expert-recommended methods make it easy to solve this tricky issue. Discover the solutions now.

I. What is CLASSPNP.SYS, why does CLASSPNP.SYS error occur?
CLASSPNP.SYS is a Window SCSI class system file attached to the Windows operating system. Its function is to allow users to access the operating system smoothly. That is to say, when the CLASSPNP.SYS file error occurs, it will cause your computer to blue screen and cannot enter the system normally.
Under normal circumstances, the reasons for CLASSPNP.SYS errors may be as follows:
●BIOS configuration mode error
● CLASSPNP.SYS file is damaged
After understanding the possible reasons for CLASSPNP.SYS errors, in order to better protect your computer files, it is recommended that you transfer important data in advance before fixing the errors. If your computer hard disk saves very important files, but at this time you cannot transfer the files because Windows cannot be started, you can try to use Renee PassNow to transfer or restore important files in the computer without entering the Windows system. document. The following are the detailed operation steps.
II. Use Renee PassNow to transfer or recover important data
1. What is Renee PassNow?
Renee PassNow is a professional system rescue software, which can help Windows users clear Windows account passwords, create new administrator accounts; restore disk/memory card data, recover data after hard disk formatting; transfer disk files; erase or scan Disk files, etc. In addition, this software also supports repairing Windows system problems, such as: repairing MBR boot records, DBR error parameters, 0xc00000e, Windows system startup failure, and some problems that cause black screen or blue screen, etc. As a system rescue tool with various functions, it is perfectly compatible with multiple systems including Windows 10/8.1/8/7/XP/Vista, and can meet the system rescue needs of different users.
Hot Topic — ADsRenee PassNow – 3 Steps to transfer data from the crashed system
Easy to use 3 steps to transfer the files.
Transfer the files Transfer the important files of the computer without system.
Preview the files Preview the files while transferring the data.
Multifuctional Data recovery, Windows password reset, bootable problem recovery can be run without system.
Highly compatible Windows 10/8.1/8/7/XP/Vista. Also supports UEFI boot mode.
Easy to use 3 steps to transfer the files.
Transfer the files Transfer the important files of the computer without system.
Preview the files Preview the files while transferring the data.
Free TrialFree TrialNow 2000 people have downloaded!
2. How to use Renee Passnow to transfer or restore data?
When your computer cannot enter the system normally due to a blue screen failure, you can create a startup disk through Renee Passnow, then start the computer through the startup disk, and then use the functions provided by the software to transfer or restore data. Specific steps are as follows:
Step 1: Download and install Renee PassNow on other computers that can log in and run normally, then connect the U disk to the PC, run Renee PassNow, and then check in “Step 1: Select creation method” (Create a Live USB) option. (Note: Before performing this operation, please make sure that the important files in the U disk have been saved in other locations, because the operation process will delete all the data in the U disk.)
Step 2: Next, select (x64) or (x86) according to the system type, click the (Download Now) button to download the ISO file, click the (Create a Live USB) button after the file is downloaded, and click the (Eject USB) button.

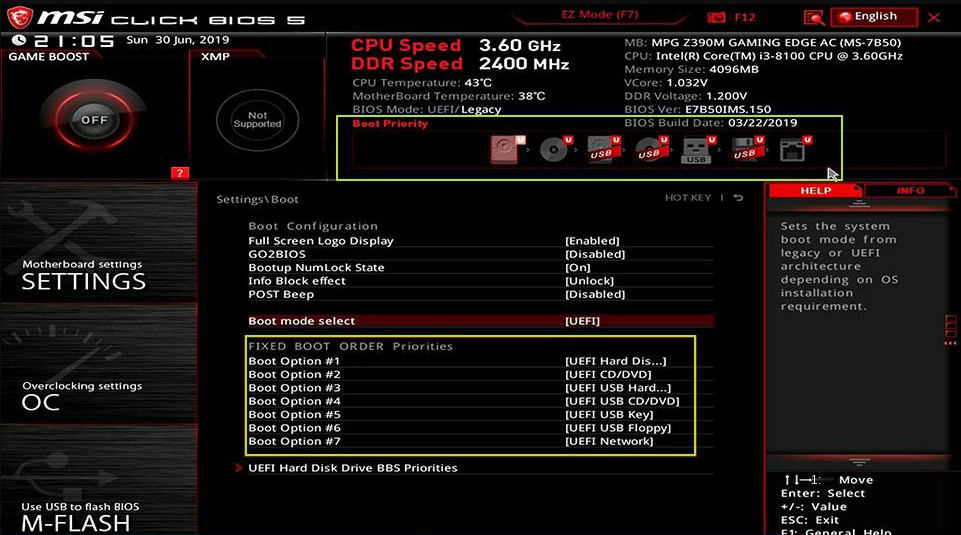
Step 3: Connect the created boot device to the computer that needs to transfer data, turn on the computer, and then the shortcut key to enter the BIOS will be displayed on the computer screen (the display time of this interface is very short, maybe only one or two seconds), click continuously BIOS shortcut key to enter the BIOS setting interface, and then set the boot U disk as the first in the boot sequence in Boot Priority, then save the settings and restart the computer.
Step 4: Wait for a while, after Renee PassNow is loaded, select (Data Transfer). If you need to transfer the data of the entire hard disk, you can select the (Data Backup) option.

Step 5: You can click on each disk drive letter (C/D/E/F, etc.) to check whether important files are lost. If not, it is recommended that you transfer them to an external disk. The operation of transferring data is very simple. For example, if you want to transfer the data in the C drive to the G drive, you can first select the C drive on the upper left, select the G drive on the upper right, and then select the files in the C drive, and click the Copy function button in the middle. Disk data can be easily transferred. If there is a file you want to delete, you can also click the (Delete) button in the middle after selecting the file, but the deletion operation cannot be undone, please operate with caution.

Step 6: If you find that there is data loss, please select the (Undeleter) option on the main interface of the function, and click the (Run) button.

Step 7: Select (Fast Partition Scan) to scan the target hard disk.
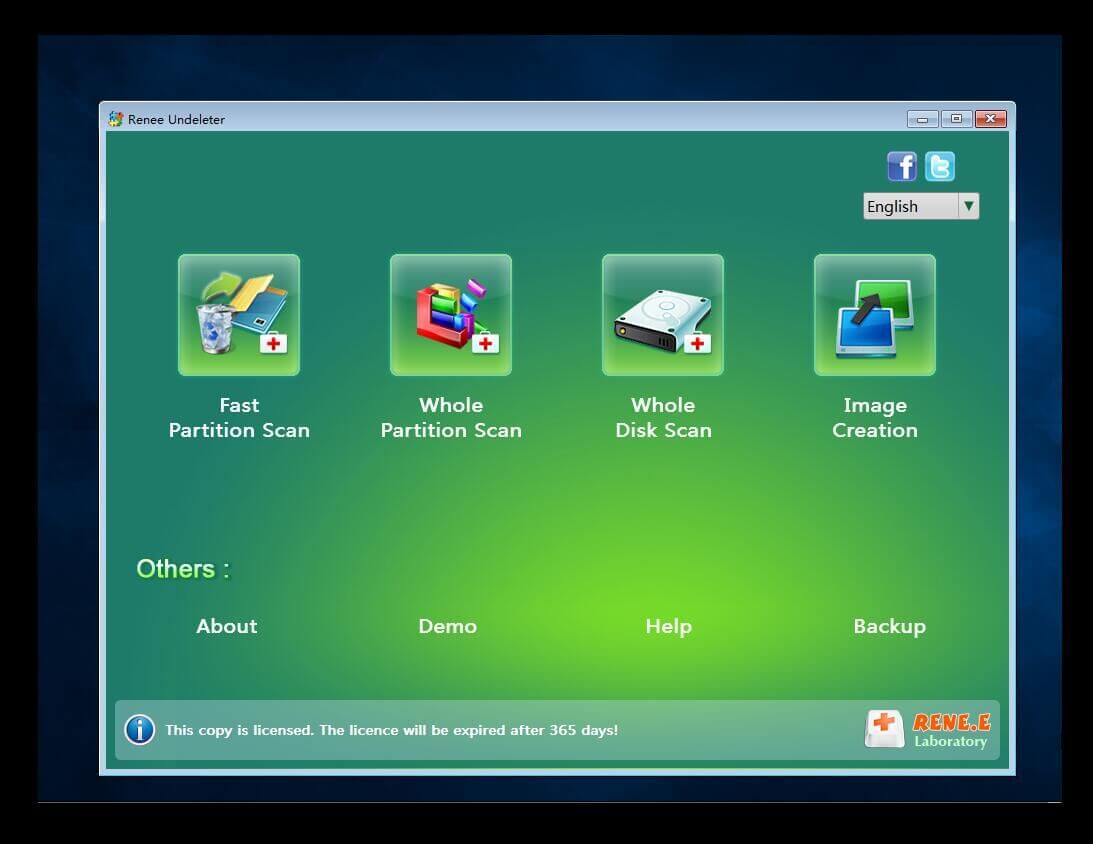
Step 8: After the scan is complete, select the file to be recovered, click the (Recover) button to execute the data recovery command, please save the file in another external disk, eject the U disk after the recovery is complete, and then perform other operations on the computer, such as maintenance , replace the hard disk or reinstall the system, etc.
The above are the detailed steps to restore and transfer data when you cannot enter the system. Let’s learn how to fix CLASSPNP.SYS errors.
III. How to Fix CLASSPNP.SYS Error in Windows 10?
1. Disconnect external hard disk/peripherals
Sometimes, the connection of peripheral devices can cause CLASSPNP.SYS errors to appear. At this time, you can try to disconnect all external hard disks and peripheral devices (USB mouse, external hard disk, Bluetooth wireless mouse adapter or radiator, etc.) to try to solve the current problem.
2. Enable safe mode to repair system files
Because CLASSPNP.SYS errors may prevent users from entering the system normally, you need to restart the computer in safe mode before executing the system file repair command. Safe mode is a special startup mode in Windows system, it can only start the basic files and drivers needed to run Windows, in this mode, we can easily repair some system errors. The specific steps to enter safe mode are as follows:
Step 1: Press and hold the Power key button for 10 seconds to shut down the computer. Next, press the power key again to start the computer.
Step 2: When you see that Windows has started and the brand logo appears, press and hold the power key for 10 seconds again to turn off the device.
Step 3: Press the power button to start the computer, when the computer starts press and hold the power button for 10 seconds to turn off the device. Then start the computer again, this time allowing the computer to fully start. Select (Advanced Options) in the “Automatic Repair” interface. You will then enter the Windows recovery environment.
Step 4: Then the computer will ask you to choose an option, please select (Troubleshoot), and then select (Advanced Options>Startup Settings>Restart). When the computer restarts, select 5 or F5 to start Safe Mode with Networking.
Step 5: After entering Safe Mode, search for (cmd) in the search box in the lower left corner, right-click (Command Prompt) and select the (Run as Administrator) option.
Step 6: In the opened command prompt window, enter the command (SFC /scannow) and press the (Enter) key. sfc /scannow is a commonly used command among all SFC commands. It can immediately scan all protected system files and repair the problems found. Next, SFC (System File Checker) performs a system scan and repairs problematic system files. After the repair is complete, restart the computer and check to see if the current problem is resolved.
3. Restore the computer to the latest restore point before the error occurred
Usually, when your computer has a CLASSPNP.SYS error, you can also try to restore the computer to the restore point before the failure to solve the current problem. The specific steps are as follows:
Step 1: Turn on the computer, when the computer brand logo appears, press and hold the power button to force shutdown, repeat more than 3 times, then allow the computer to fully start, select (advanced options) in the “Automatic Repair” interface, the computer will enter the Windows recovery environment middle.
Step 2: When the screen displays to select an option, please click (Troubleshoot) – (Advanced Options) – (System Restore) in sequence.
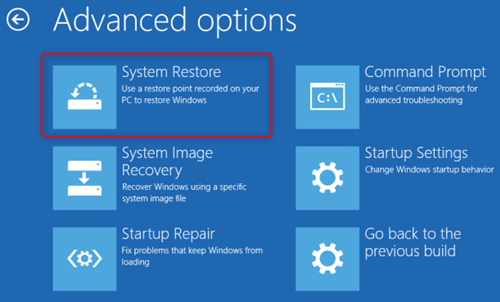
Step 3: Then, select a recent restore point before the error occurred to restore, click (Next) and wait for the restore process to complete.
4. Change the BIOS configuration mode
When the BIOS configuration mode is wrong, it will also lead to the CLASSPNP.SYS error. At this time, you need to manually change the BIOS configuration mode. The specific operation steps are as follows:
Step 1: Restart the computer, press F1 or F2 or DEL or Esc key continuously and quickly (it varies with the brand of the computer and motherboard, you can check the prompt that appears when starting up) to enter the BIOS interface.
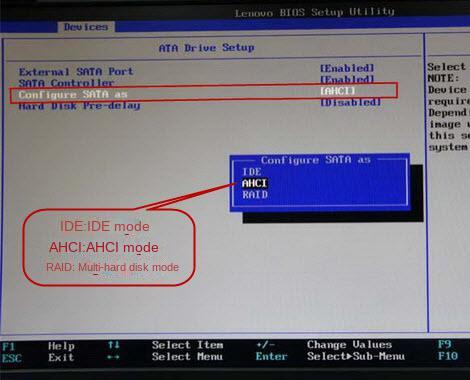
Step 2: Take the following figure as an example, select (Devices>ATA Drives Setup>Configure SATA as), and then change (ACHI) to (IDE) compatibility mode. Press (F10) to save setting changes. Finally, restart the computer to see if the current problem is resolved.
If none of the above methods can solve the problem, it is recommended that you update Windows or perform an update through the (Upgrade this PC now) option of the Windows Media Creation Tool.
The Blue Screen of Death (BSoD) is a dreaded sight for any Windows user. It signifies a critical system error that forces your computer to shut down abruptly, leaving you frustrated and potentially losing unsaved work. One common cause of BSoD is the classpnp.sys error. In this article, we will explore what classpnp.sys is, why it causes BSoD, and how you can fix it.

Understanding classpnp.sys
Classpnp.sys is a system file associated with the Windows operating system. It is responsible for managing Plug and Play devices, such as USB drives, printers, and keyboards. When you connect a new device to your computer, classpnp.sys helps in detecting and installing the necessary drivers for it to function properly.
However, if there is an issue with the classpnp.sys file or its associated drivers, it can lead to a BSoD. The error message typically appears as “classpnp.sys” followed by a STOP code, indicating the specific problem that caused the crash.
Common Causes of classpnp.sys BSoD
Several factors can contribute to the classpnp.sys BSoD error. Here are some of the most common causes:
- Corrupted or outdated device drivers: If the drivers associated with classpnp.sys are outdated or corrupted, it can lead to system instability and BSoD.
- Hardware conflicts: Conflicts between different hardware components can trigger the classpnp.sys BSoD error. This can occur when incompatible devices are connected to your computer.
- Malware or virus infections: Malicious software can corrupt system files, including classpnp.sys, leading to BSoD errors.
- Disk errors: Issues with your hard drive, such as bad sectors or file system errors, can also cause the classpnp.sys BSoD error.
How to Fix classpnp.sys BSoD
Now that we understand the causes of the classpnp.sys BSoD error, let’s explore some effective solutions to fix it:
1. Run the DISM and SFC scans
DISM (Deployment Image Servicing and Management) and SFC (System File Checker) are built-in Windows tools that can repair corrupted or missing system files and restore the health of your computer. Both DISM and SFC scans can be run from an elevated command prompt (with administrative privileges). Here are the steps to do so:
- To open the Command Prompt as an administrator in Windows, type “cmd” in the search bar and then right-click on the Command Prompt result and select “Run as administrator” as shown in the image below.

- To run a DISM scan, type the following command and press Enter:
dism /online /cleanup-image /restorehealth
This will check your Windows component store for corruption and automatically fix any problems it finds. This process may take several minutes or longer depending on your system
- To run an SFC scan, type in the Command Prompt the following command and press Enter:
sfc /scannow
This will scan all protected system files and replace any corrupted or missing ones with a cached copy. Wait for the scan to complete. It may take some time depending on your system configuration.
- After both scans are completed, you should restart your computer to apply any changes. Check to see if the issue is solved.


2. Check for faulty software.
If there is a specific program that is causing this issue, try uninstalling and then reinstalling it (eg. Microsoft DirectX, Microsoft Visual C++ Redistributable, NET Framework) to check if it will solve the problem.
Windows 11Windows 10Windows 8Windows 7
-
First, open Windows Settings by pressing Windows+I on your keyboard. You can also right-click your Start button and select “Settings” from the list.

-
When Settings opens, click “Apps” in the sidebar, then select “Apps & Features”.

-
In Apps & Features settings, scroll down to the app list and search for the program you want to uninstall. When you find the program, click the three dots button beside it and select “Uninstall” in the menu that appears.

-
In the next message box, confirm the uninstall process by clicking on Uninstall, then follow the prompts to uninstall the program.


- Press the Windows key + I on your keyboard to open the Settings app. You can also ope the Settings app by clicking the Start button on the taskbar, then select “Settings” (gear icon).

-
When the “Windows Settings” window opens, click on “Apps“. By default, it should open “Apps and Features” but if it doesn’t, select it from the list on the left.

-
In Apps & Features settings, scroll down to the app list and search for the program you want to uninstall. When you find the program, click on it and select “Uninstall” in the menu that appears.

-
In the next message box, confirm the uninstall process by clicking on Uninstall, then follow the prompts to uninstall the program.


-
Right-click on the Start button in the taskbar, then select “Programs and Features”. This will take you directly to your list of installed programs.

-
The “Programs and Features” screen will be displayed with a list of all the programs installed on your computer. Scroll through the list until you find the program, then click to highlight it, then click the “Uninstall” button.

- In the next message box, confirm the uninstall process by clicking on Yes, then follow the prompts to uninstall program.


3. Scan for your computer for malware
Malware can damage your system files and registry entries and cause various errors. We will now, download and run a scan with Malwarebytes to check if you’re device is clean.
Malwarebytes is one of the most popular and most used anti-malware software for Windows, and for good reasons. It is able to destroy many types of malware that other software tends to miss, without costing you absolutely nothing. When it comes to cleaning up an infected device, Malwarebytes has always been free and we recommend it as an essential tool in the fight against malware.
-
You can download Malwarebytes by clicking the link below.
-
When Malwarebytes has finished downloading, double-click on the MBSetup file to install Malwarebytes on your computer. In most cases, downloaded files are saved to the Downloads folder.

You may be presented with a User Account Control pop-up asking if you want to allow Malwarebytes to make changes to your device. If this happens, you should click “Yes” to continue with the Malwarebytes installation.

-
When the Malwarebytes installation begins, you will see the Malwarebytes setup wizard which will guide you through the installation process. The Malwarebytes installer will first ask you what type of computer are you installing this program on, click either Personal Computer or Work Computer.

On the next screen, click “Install” to install Malwarebytes on your computer.

When your Malwarebytes installation completes, the program opens the Welcome to Malwarebytes screen.
-
Malwarebytes is now installed on your computer, to start a scan click on the “Scan” button. Malwarebytes will automatically update the antivirus database and start scanning your computer for malicious programs.

-
Malwarebytes will now scan your computer for browser hijackers and other malicious programs. This process can take a few minutes, so we suggest you do something else and periodically check on the status of the scan to see when it is finished.

-
When the Malwarebytes scan is finished scanning it will show a screen that displays any malware, adware, or potentially unwanted programs that it has detected. To remove the malicious programs that Malwarebytes has found, click on the “Quarantine” button.

-
Malwarebytes will now remove all the malicious files and registry keys that it has found. To complete the malware removal process, Malwarebytes may ask you to restart your computer.


4. Check for updates
Make sure your operating system, drivers, and other software are up to date. If the errors started happening after an update, you can uninstall that specific update patch.
To check for Windows updates, follow the below steps:
- Press the Windows key + I to open the Settings menu. Click the “Windows Update” tab on the left side of the screen.
For Windows 10 users, the Windows Update menu can be found in Settings > Update & Security > Windows Update. - Click the “Check for updates” button. This will initiate a scan for updates. If any updates are available, they will be downloaded and installed automatically.

- If you want to check for updates for other software, you can do so by opening the software and looking for a “Check for updates” option in the menu. You can also check the software’s website for updates.

5. Disable any unnecessary startup programs
Startup programs are applications that automatically launch when you start your computer. While some of these programs may be necessary for your system to function properly, others may be unnecessary and can cause errors.
- Open the Task Manager by pressing the Ctrl + Shift + Esc keys on your keyboard simultaneously.

- In the Task Manager, go to the “Startup” tab and disable any programs that you do not need to start automatically when you turn on your computer.
Keep in mind that some startup programs may be essential to the functioning of your system, so be careful not to disable any important programs.


6. Run a memory test
A faulty RAM module can cause random crashes. Run a memory test to check for any issues with your RAM. To run a memory test, follow these steps:
- Press the Windows key + R to open the Run dialog.
- Type “mdsched.exe” into the Run dialog and press Enter. This will launch the Windows Memory Diagnostic tool.

- You will be asked whether you want to restart your PC and run the test immediately or schedule the test to run the next time you start your PC. Choose the option you prefer and click “OK”.

If you choose to run the test immediately, your PC will restart and the test will begin. The test will run automatically and may take several minutes to complete.
- If the test finds any errors, it will display a message indicating the type and location of the error. You may need to replace your RAM if the test finds any errors.
- If the test completes without finding any errors, it will display a message indicating that the test has completed successfully.


7.Check your hardware
Start by inspecting your computer’s hardware components for any signs of damage or failure. Ensure that all connections are secure and that there are no loose cables. If you suspect a faulty component, consider consulting a professional or replacing it if necessary.
Next, check your RAM, hard drive, graphics card, and any other hardware components using the Windows Device Manager.
-
To access the Device Manager, type “devmgmt.msc” into the search bar on the Start menu and select “Device Manager” from the list of results.

-
In the Device Manager, you can view a list of all the hardware devices connected to your computer and check for any errors or issues. If you see a yellow exclamation point next to a device, it may indicate a problem with that device. You can right-click on the device and select “Update driver” or “Troubleshoot” to try and fix any issues.


8. Try a system restore.
If you have a restore point saved, you can try using it to revert your system to a previous state. This may fix the issue if it was caused by a recent change. To do a system restore follow these steps:
- Press the Windows key + S to open the Search menu.
- Type “system restore” into the search bar and click the “Create a restore point” result.

- Click the “System Restore” button.

- In the System Restore window, click “Next.”

- Select a restore point from the list and click “Next.” A restore point is a saved state of your system that you can use to revert your system to a previous state. Make sure to select a restore point that was created before you started experiencing problems.
- Click “Finish” to begin the restore process. Your PC will restart and the restore process will begin. This may take several minutes to complete.

- When the restore is complete, your PC will restart again. You may need to adjust your settings and reinstall any software that was installed after the restore point was created.


9. Reset your PC
One of the most drastic solutions is to reset your PC to its default configuration. This can be considered the nuclear option for fixing errors because it will wipe out all the third-party software you installed on your computer. However, this option can also be effective if none of the other methods work for you.
Before you reset your PC, make sure you back up your important data and files. You can also choose to keep your personal files in the Reset this PC tool, but it is better to have a separate backup just in case something goes wrong.
To reset your PC, follow these steps:
- Open Settings by pressing Windows + I keys.
- Click on System and then on Recovery.

- Under Reset this PC section, click on Reset PC button.
- Choose whether you want to keep your files or remove everything.
- Follow the on-screen instructions to complete the process.


After resetting your PC, you should be able to run your applications without getting any errors. However, keep in mind that this solution will also remove any custom settings and preferences you had on your computer. You will need to reinstall and configure your programs again after resetting.
Summary
The classpnp.sys BSoD error can be frustrating and disruptive, but with the right troubleshooting steps, it can be resolved. In this article, we explored what classpnp.sys is, the common causes of the BSoD error, and effective solutions to fix it. Remember to keep your device drivers updated, scan for malware regularly using Malwarebytes Free, check for hardware conflicts, and perform disk checks to ensure the stability of your system. By following these steps, you can overcome the classpnp.sys BSoD error and enjoy a smoother computing experience.
Here are 10 basic security tips to help you avoid malware and protect your device:
To avoid potential dangers on the internet, it’s important to follow these 10 basic safety rules. By doing so, you can protect yourself from many of the unpleasant surprises that can arise when using the web.
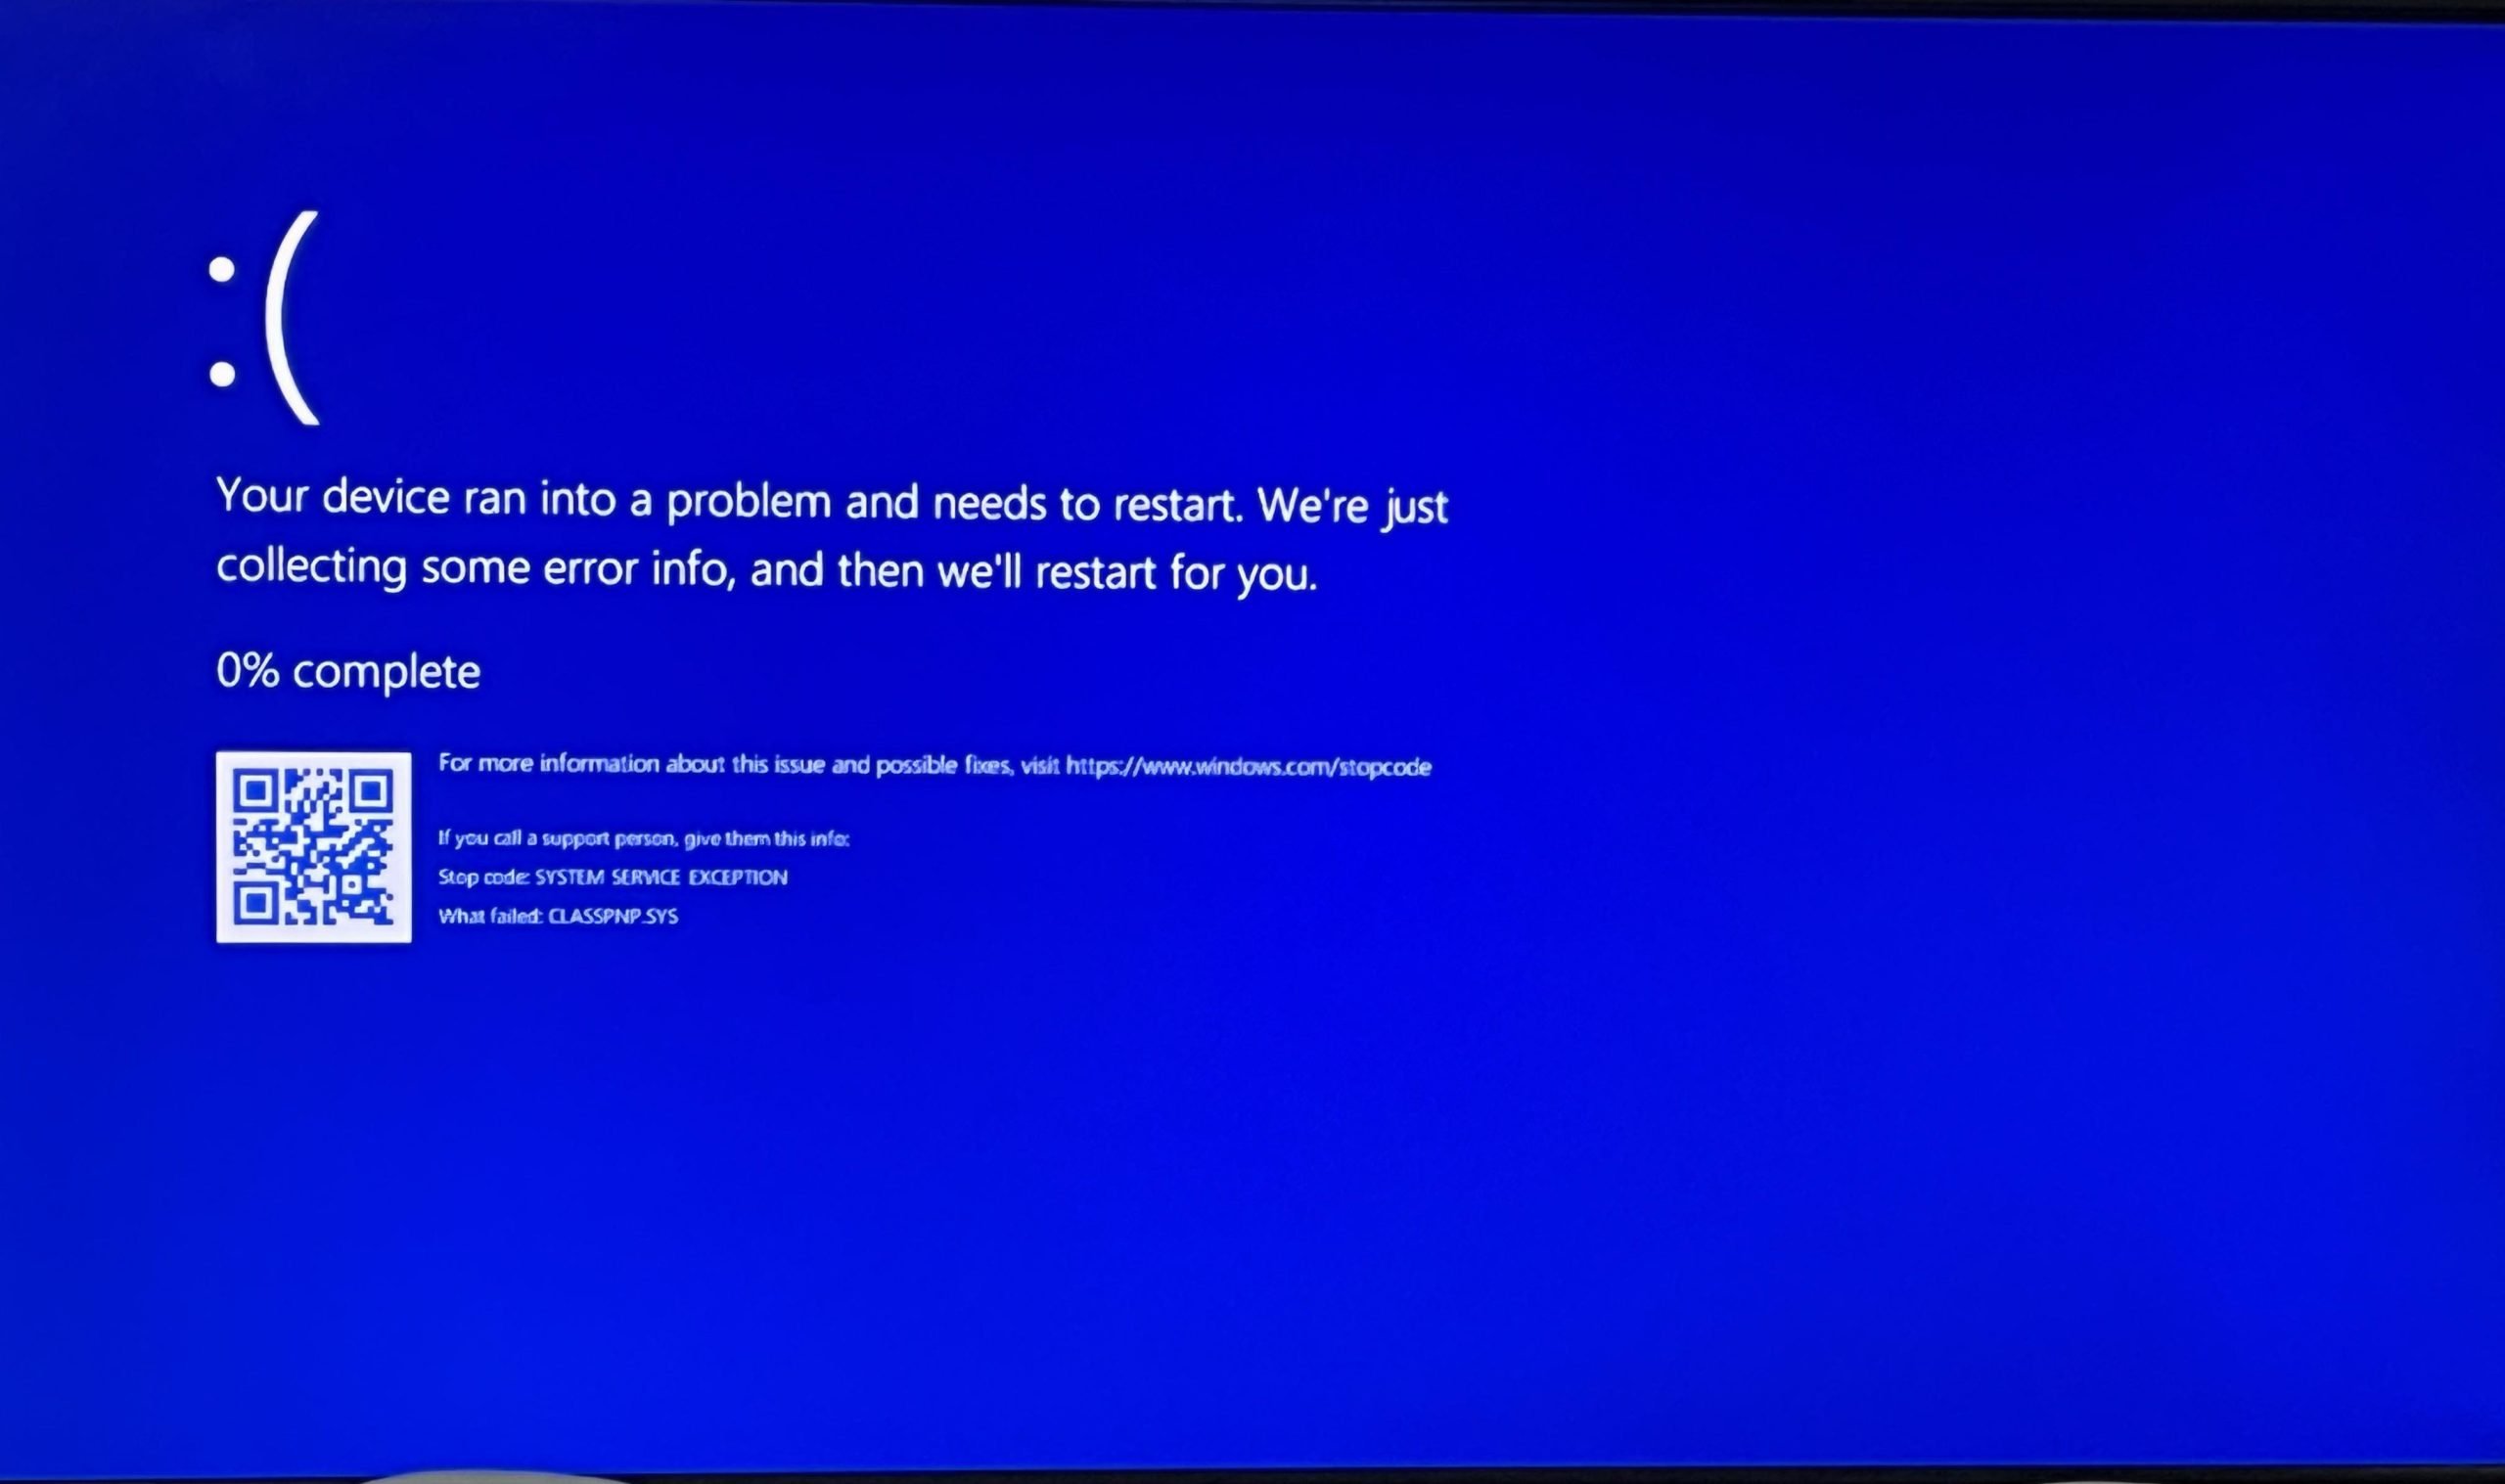
When using a computer (specifically when plugging in a peripheral), users may encounter the Blue Screen of Death (BSOD) with the error code ‘SYSTEM SERVICE EXCEPTION‘. This happens when the ‘classpnp.sys‘ file fails. The classpnp.sys file is an essential system file, managing plug-and-play hardware devices connected to the computer.

This error is caused when an unsupported device is connected to the computer, resulting in problems with the classpnp.sys file and, consequently, BSOD.
Other reasons could involve corrupted drivers, problems with system files, or hardware incompatibilities.
This article covers how to resolve this issue.
Before doing anything, you need to boot into Safe Boot, as Windows crashes as soon as you boot into Windows, triggering the classpnp.sys and resulting in BSOD.
Restarting the computer a few (3-5) times will load it into Advance Startup, from where you can safe boot Windows, Once you are loaded into Advanced startup, follow these steps:
- Click on Troubleshoot.

- Select Advanced options.

- Click on Startup settings.

- Press F4 key to boot into Safe Mode.


Once safe mode is loaded in, follow the methods shown below:
1. Run SFC and DISM
SFC (System File Checker) scans and repairs corrupted system files, while DISM (Deployment Image Servicing and Management) checks that the Windows image is correct.
- Open the Search menu, type cmd, and then launch the Command Prompt as an Administrator.

- Enter the following commands:
sfc /scannow
Dism /Online /Cleanup-Image /RestoreHealth

- Once the scans are done, restart your computer.


2. Update Drivers
Updating drivers to their latest version ensures your device runs with up-to-date drivers, potentially solving the issue.
- Click on the Search bar, type Device Manager and open it.

- Right-click on every piece of hardware, and select Update Driver.


Third-party tools can also be used to update drivers. For more details, see Best Driver Updater.
3. Remove 3rd Party Antivirus
Third-party antivirus software can create conflicts with the drivers, resulting in this error. It’s advisable to uninstall any third-party antivirus and use Windows Defender instead.
4. Check for Faulty Hardware
Faulty hardware is the main trigger of this error. So, disconnecting any recently plugged-in devices that might be causing the issue is recommended. This will stop the file from triggering, which can fix this problem.
5. Rename the classpnp.sys File
When a system file, such as classpnp.sys, acts faulty, one troubleshooting step can be to rename it. This action forces Windows to replace the problematic file with a new, error-free version.
Restart the computer a few (3-5) times to load Advanced Startup as you cannot access Windows, Advanced Startup will allow you to access Command Prompt.
- Choose Troubleshoot in the Advanced Startup page.

- Select Advanced options.

- Choose Command Prompt and follow any instructions that appear.

- Issue this command:
rename c:\windows\system32\drivers\classpnp.sys classpnp.old

- Start Windows as normal.


6. Reinstall Windows
If none of the above resolutions work, resetting Windows might be the best option. This action deletes all files that may be causing issues, and installs a fresh, clean version of Windows without any third-party software.
For more detailed steps, see our guide on How to Reset Windows.
Muhammad Zubyan
Muhammad Zubyan is a certified Google IT Support Professional with over 7 years of extensive experience. He has worked on more than 1500 computers, gaining valuable insights that enable him to detect and troubleshoot any complicated root cause of Windows-related issues and errors. In addition to managing Appuals as a Senior Editor, he is currently developing his own Game Optimization program that caters to both gamers and casual users alike.