
Document information
| Document ID: | 5447 |
|---|---|
| Subject: | ClamAV Integration Windows |
| Creation date: | 3/15/21 12:20 PM |
| Last modified on: | 9/11/23 11:07 AM |
ClamAV Windows Integration with Xeams
To use ClamAV on Windows machines, follow the instructions below.
Step 1: Download & Extract ClamAV Daemon for Windows
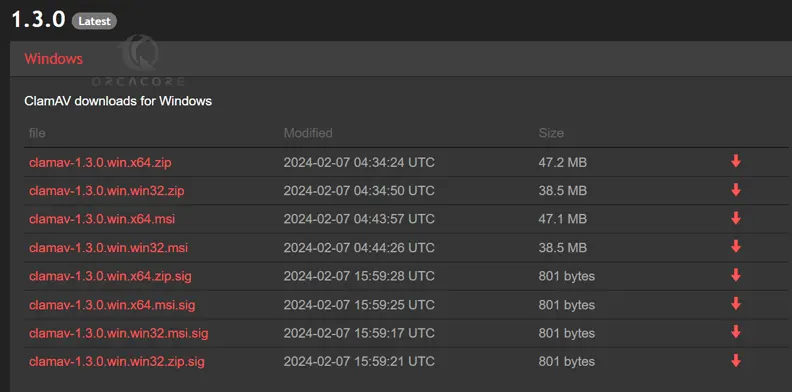
You can find the latest ClamAV installer for Windows in the «Windows» section here.
Step 2: Installing and Configuration Files
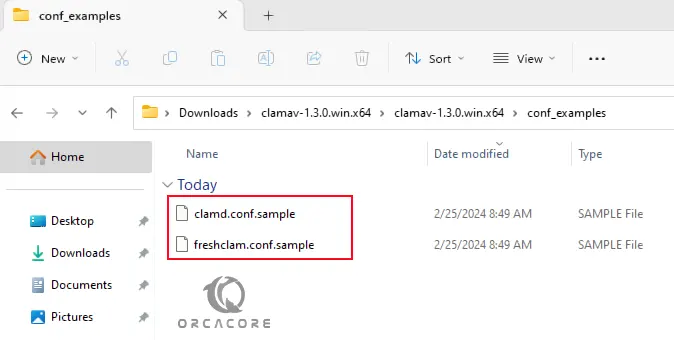
After you download and extract (or install) ClamAV, navigate to the install directory and look for the conf_examples folder. In here, there are two files; clamd.conf.sample and freshclam.conf.sample. Copy these files to the installation directory.
Step 3: Modifying Conf Files
Once you copied the files, you will need to modify the two conf files; clamd.conf.sample and freshclam.conf.sample:
Modifying clamd.conf.sample:
- Open clamd.conf.sample with a text editor, such as notepad.
- In Line number 8, you should see the word Example. Comment it so that it looks like:
#Exampleor remove this line. - To enable logging, remove the # in #LogFile «C:\Program Files\ClamAV\clamd.log»
- Search for
"TCPSocket"and confirm the port is 3310 and it is NOT commented out. - Additionally, confirm
"TCPAddr"is NOT commented out. You can either leave it at localhost or specify the ip addresses where ClamAV is installed at. - Save the file and exit. Rename the clamd.conf.sample to
clamd.conf
Modifying freshclam.conf.sample
- Open freshclam.conf.sample with a text editor, such as notepad.
- Similar to clamd.conf, in Line number 8, you should see the word Example. Comment it so that it looks like:
#Exampleor remove this line. - To enable logging, remove the # in the line #UpdateLogFile «C:\Program Files\ClamAV\freshclam.log»
- Save the file and exit. Rename freshclam.conf.sample to
freshclam.conf
Step 4: Install Service and update Antivirus Library
Open an elevated Windows DOS (Command Prompt in Administrator Mode) and navigate to the install directory.
Run the following command:
clamd.exe --install
This will install the clamd service. Next, run the following code:
freshclam.exe
This will update the current library. You can schedule this process via Windows Task Scheduler if you want to frequently update the library.
Step 5: Running the Service
Open your Windows Services window and start the service: ClamAV ClamD
If you wish, you can also edit the service to launch at startup now.
Step 6: Connecting Xeams to ClamAV
Open your Xeams Admin console and navigate to Server Configuration -> Clam-AV Integration
In the hostname/IP field put the address to the machine where you installed ClamAV. If you installed it on the same machine Xeams is running on, put: localhost
For the port, set it to 3310
Click save and run the test to confirm it is successfully integrated.
Related Pages
Tips on Improving ClamAV
Add a comment to this document
Do you have a helpful tip related to this document that you’d like to share
with other users?
Important: This area is reserved for useful tips. Therefore, do not post questions here. Instead, use our public forums to post questions.
WINDOWS
Introduction
ClamAV (Clam Antivirus) is a robust open-source antivirus engine designed for detecting a wide range of malware, viruses, and other malicious threats. It is particularly popular among system administrators and security professionals due to its versatility and flexibility. ClamAV can be seamlessly installed on multiple platforms, including Windows, Linux, and macOS. This article will provide a step-by-step guide on how to install and configure ClamAV on a Windows system, ensuring optimal performance and security.
Key Features of ClamAV
-
Open-source: ClamAV is free to use and modify, allowing for community improvements and enhancements.
-
Regular Updates: The database of virus signatures is routinely updated to keep pace with emerging threats.
-
Multi-platform Support: Compatible with Windows, Linux, and macOS, making it suitable for various environments.
-
Command line interface: Provides robust command-line utilities for flexible and comprehensive scanning options.
-
Integration capabilities: Can be integrated with mail servers and proxy servers for enhanced security.
System Requirements
Before proceeding with the installation, ensure your Windows system meets the following requirements:
-
Operating System: Windows 7 or later
-
Memory: At least 512 MB RAM
-
Disk Space: A minimum of 200 MB free disk space
-
An internet connection for downloading updates and the software package.
Step-by-Step Guide to Install ClamAV on Windows
Step 1: Download ClamAV for Windows
-
Go to the official ClamAV website: ClamAV Download Page
-
Choose the appropriate Windows version (32-bit or 64-bit) based on your operating system.
-
Click on the download link, and the ClamAV installer will begin downloading.
Step 2: Install ClamAV
-
Run the Installer: Locate the
clamav-*.exefile in your Downloads folder and double-click to run it. -
Windows Security Alert: If prompted by Windows Defender Firewall, allow the installer to make changes to your device by clicking “Yes.”
-
Installation Wizard: Follow the on-screen instructions in the installation wizard:
-
Accept the license agreement.
-
Choose the destination folder (default is typically
C:\Program Files\ClamAV). -
Select additional components as required (e.g., command-line tools).
-
-
Complete Installation: Click on “Install” and wait for the process to complete. Once finished, click “Finish” to exit the installer.
Step 3: Update ClamAV Database
-
Open the Command Prompt (cmd) as an administrator.
-
Navigate to ClamAV installation directory by entering the following command:
cd "C:\Program Files\ClamAV" -
Run the update command:
This command downloads the latest definitions from the ClamAV database for effective virus detection.
Step 4: Configure ClamAV
To ensure ClamAV runs effectively, you may need to configure it properly.
Configuration File Setup
-
Open
clamd.conffile in a text editor (located atC:\Program Files\ClamAV\etc\clamd.conf). -
Modify the following settings as per your requirements:
-
LogFile: Set the path for log files.
LogFile = C:\ProgramData\.clamav\clamav.log -
DatabaseDirectory: Specify the location where the database files will be stored.
DatabaseDirectory = C:\ProgramData\.clamav\db -
LocalSocket: Set this option only if required; for Windows, it is usually commented out.
-
-
Save the changes and close the file.
Install ClamWin (Optional)
If you prefer a graphical user interface (GUI) for ClamAV, you can use ClamWin, a Windows version of ClamAV.
-
Download ClamWin from the official website: ClamWin Download Page
-
Follow the installation prompts after downloading.
-
Open ClamWin and schedule scans or manually start a scan to check for malware.
Basic Commands to Operate ClamAV on Windows
After successful installation, you can use ClamAV’s command-line tools:
-
Scan a specific file or directory:
clamscan "C:\path\to\file_or_directory" -
Scan the entire system:
-
Remove infected files automatically:
Useful ClamAV Command-Line Options
-
-r: Recursive scanning. -
--remove: Delete infected files. -
--log: Save the scan results to a specified file.
Conclusion
Installing and configuring ClamAV on Windows provides an effective solution for protecting your system against various forms of malware. By following the aforementioned steps, you can ensure that ClamAV is installed correctly and is functioning optimally.
Make sure to regularly update ClamAV to keep your virus definitions current and consider scheduling automated scans for continuous protection. For additional information and troubleshooting guidance, refer to the ClamAV Documentation.
Additional Resources
-
ClamAV GitHub Repository
-
Official ClamAV Windows support
-
Virus Database Updates
By continuously improving your understanding of ClamAV and leveraging its capabilities, you can maintain a secure computing environment free from malware threats.
Suggested Articles
WINDOWS
WINDOWS
WINDOWS
WINDOWS
WINDOWS
WINDOWS
ClamAV is a versatile, open-source antivirus engine designed primarily for detecting malware, viruses, trojans, and other malicious software. It has become a popular choice among system administrators, developers, and anyone who wants to safeguard their systems without incurring substantial costs. This article will guide you step-by-step on how to set up and use ClamAV on your Windows PC effectively.
Understanding ClamAV
Before diving into the setup process, it’s crucial to understand what ClamAV is and how it works. ClamAV (Clam AntiVirus) is designed for scanning files, emails, and other data for viruses and malware. It uses a database of known virus signatures to identify threats and has a command-line interface for comprehensive user control.
ClamAV runs on multiple platforms such as Linux, macOS, and Windows, making it a highly adaptable antivirus solution. The project is continuously updated by a large community of developers contributing to its virus database and other enhancements.
Pre-Installation Considerations
-
System Requirements: Ensure that your Windows version is compatible with ClamAV. ClamAV works on Windows 7, 8, 10, and later versions. Having at least 2GB of RAM and a dual-core processor is advisable for better performance.
-
Administrator Rights: You must have administrator rights to install ClamAV on your Windows PC. Ensure you log in with an account that has these privileges.
-
Backup Important Files: Although ClamAV is reliable, always back up any critical data before installing or running new antivirus software.
Downloading ClamAV for Windows
-
Visit the Official Website: Go to the ClamAV official website.
-
Navigate to Downloads: Click on the “Download” section to find the latest version of ClamAV for your platform.
-
Choose the Windows Installer: Look for the Windows installer specifically designed for your needs. ClamAV typically provides binary packages tailored for Windows.
-
Download the Installer: Click on the link and download the setup file to your computer.
Installing ClamAV on Windows
-
Locate the Downloaded Installer: Open File Explorer and navigate to the location where you downloaded the ClamAV installer.
-
Run the Installer: Double-click on the installer file. You may be prompted by User Account Control (UAC) asking you to allow the program to make changes. Click “Yes” to proceed.
-
Follow Installation Prompts: The installer will guide you through the setup process. You may be asked to agree to the license agreement, choose an installation directory, and select components to install, such as the command-line scanner or the ClamAV Daemon.
-
Complete Installation: Once you enter your settings, click “Install” and allow the installer to finish. Click “Finish” when prompted.
Initial Configuration
-
Updating the Virus Database: Once installed, you need to update the virus definition database to ensure ClamAV can identify the latest threats.
- Open Command Prompt (Admin) by searching for «cmd» in the start menu, right-clicking it and selecting «Run as administrator.»
- In the Command Prompt, navigate to the ClamAV installation directory. This is usually located at
C:Program FilesClamAVor the folder you designated during installation. - Run the following command to update the database:
freshclam
-
Configuring ClamAV: The configuration file for ClamAV is located in the installation folder. You may want to edit this file according to your needs.
- Open the
clamd.conffile using a text editor such as Notepad. - Customize settings such as the log file location, user permissions, and scanning settings based on your requirements.
- Open the
Using ClamAV to Scan Your PC
ClamAV primarily operates through the Command Prompt for scanning, but you can also use graphical front-ends (GUI) for ease of use. Here’s how to conduct scans:
Command-Line Scanning
-
Open Command Prompt: Open a new Command Prompt window as Administrator.
-
Basic Scan: To scan a specific file or directory, use the following command:
clamscan [options] [file or directory]For example, to scan the
C:Downloadsfolder:clamscan C:Downloads -
Options: ClamAV has various options to tailor your scans:
--recursive: Scans directories recursively.--move=: Moves infected files to a specified path.--remove: Deletes infected files automatically.--log=: Logs scan results to a specified file.
An example command that scans a folder recursively and removes infected files may look like this:
clamscan --recursive --remove C:Downloads -
Review the Scan Result: After the scan is complete, ClamAV will display the results in the Command Prompt. It will indicate any infections found and whether files were deleted or moved.
Using a GUI with ClamAV
If you are uncomfortable with the command line, several graphical user interfaces can work with ClamAV, making it easier for less technical users.
-
ClamWin: ClamWin is an open-source antivirus program based on ClamAV that provides a user-friendly GUI. It allows you to perform on-demand scans and schedule automatic scans.
- Download ClamWin from its official website.
- Install it just like you installed ClamAV.
- Ensure to configure it to use the ClamAV virus database for updated defenses.
-
Additional GUIs: Other GUIs may allow you to interact more dynamically with ClamAV, offering easier navigation through files, more flexible scheduling of scans, and straightforward access to logs.
Scheduling Regular Scans
To maintain your PC’s security, it’s vital to schedule regular scans. Although ClamAV does not come with a built-in scheduler, you can use the Windows Task Scheduler to automate scans.
-
Open Windows Task Scheduler: Type “Task Scheduler” into the Windows search bar and open it.
-
Create a New Task:
- Click on “Create Task” on the right sidebar.
- Under the «General» tab, give your task a name (e.g., “ClamAV Daily Scan”).
-
Trigger Setup:
- Navigate to the “Triggers” tab and click “New.”
- Set how often you want to scan (e.g., daily, weekly) and the time of day.
-
Action Setup:
- Go to the “Actions” tab and click “New.”
- Choose “Start a program” in Action.
- In the “Program/script” field, enter the path to
clamscan.exe, which is usually located inC:Program FilesClamAV. - In the “Add arguments (optional)” field, enter your desired scan parameters. For example, to scan the C drive, you could enter:
C:
-
Conditions and Settings: Set any additional conditions or settings according to your preferences. Click «OK» to schedule your task.
Keeping ClamAV Updated
Maintaining up-to-date virus definitions is crucial for effective malware detection. ClamAV includes a built-in updater, freshclam, which downloads the latest malware signatures. You can manually run this command as needed or configure Windows Task Scheduler to automate it.
-
Using freshclam: Execute
freshclamregularly as part of your scanning routine or add it in the Task Scheduler to run once every day. -
Scheduling Updates:
- In Task Scheduler, create a new task (similar to the previous steps).
- Set it to run the
freshclamcommand at your chosen frequency (daily recommended).
Advanced Features of ClamAV
-
Quarantine Infected Files: ClamAV allows you to quarantine detected malware, isolating it from your general files to prevent accidental execution. Use the
--move=pathoption during scanning to specify where to move infected files. -
E-mail Scanning: ClamAV can also scan email servers for viruses and malware. For businesses and individuals handling large volumes of email, integrating ClamAV with your email server can add an extra layer of security.
-
Custom Script Integration: Advanced users can integrate ClamAV with custom scripts. Using batch scripts, you can create automated workflows that respond to detected threats, update definitions, and manage files systemically.
Troubleshooting Common Issues
-
Database Update Issues: If
freshclamfails to update the database, check your internet connection and ensure ClamAV isn’t blocked by a firewall or antivirus software. -
Permission Errors: Always run Command Prompt as an administrator when executing ClamAV commands to minimize permission issues.
-
Scan Errors: If scans report errors related to specific files, ensure those files aren’t in use or protected (such as system files).
-
Frequent False Positives: Occasionally, ClamAV may flag legitimate files as threats. Review the ClamAV website for instructions on how to whitelist these files or directories.
Conclusion
Setting up and using ClamAV on a Windows PC is a straightforward process that can significantly enhance your system’s protection against malware and viruses. By following this guide, you can install ClamAV, configure it to suit your needs, conduct regular scans, and automate your routine to maintain a secure environment.
Remember, while ClamAV is a powerful tool, it’s essential to practice safe browsing habits, such as avoiding suspicious downloads and email attachments, alongside using antivirus software. Staying proactive will help ensure your computer remains safeguarded against the ever-evolving threats in today’s digital landscape.
This tutorial intends to teach you to Install ClamAV on Windows and Use this Powerful Antivirus. ClamAV is an open-source antivirus engine designed to detect and remove malicious software (malware) from files and email messages. It is known for its effectiveness in identifying various types of malware, including viruses, trojans, worms, and other malicious software threats.
In this guide from the Orcacore website, we want to show you how to set up ClamAV in Windows and start using it.
Table of Contents
A Comprehensive Guide To Install ClamAV on Windows
Before you Install ClamAV on Windows, you must log in to your Windows Client like Windows 10 or Windows 11, and follow the steps below. In this guide, we use Windows 11 to show you the guide steps.
Step 1 – Download and Install ClamAV on Windows
First, you must visit the official downloads page and get the latest package of ClamAV for Windows.
Once your download is completed, open the file and extract the ClamAV package to your desired folder.
Step 2 – ClamAV Config Files Setup on Windows
At this point, you must navigate to your ClamAV installation directory and look for the file named conf_examples.

In this file, you should see two files named clamd.conf.sample and freshclam.conf.sample.
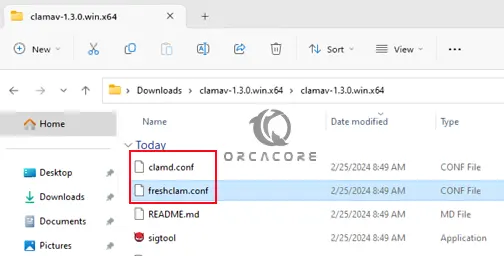
Next, you need to copy these files to the installation directory. In this example, the files will be copied to C:\Users\Administrator\Downloads\clamav-1.3.0.win.x64\clamav-1.3.0.win.x64.
Step 3 – Configure ClamAV on Windows
At this point, you need to rename clamd.conf.sample to clamd.conf and freshclam.conf.sample to freshclam.conf.
Once you are done, open these files in your desired text editor like Notepad.
In the files, find line 8 with the word Example. You must comment or remove this line on both files.
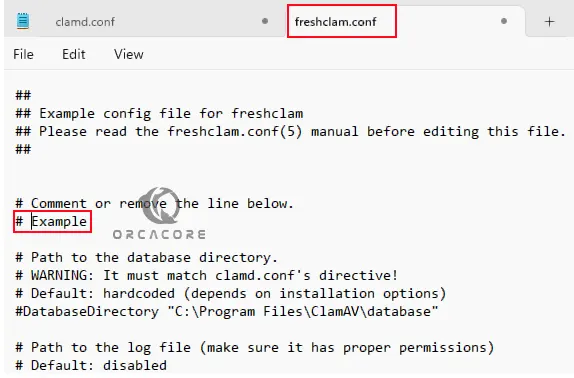
Then, save and close the files.
Step 4 – Access ClamAV From CMD
At this point, you need to open your command prompt and navigate to your ClamAV installation path on Windows. In this example, it looks like this:
cd C:\Users\Administrator\Downloads\clamav-1.3.0.win.x64\clamav-1.3.0.win.x64Once you navigated, run the freshclam command to update the antivirus library:
freshclam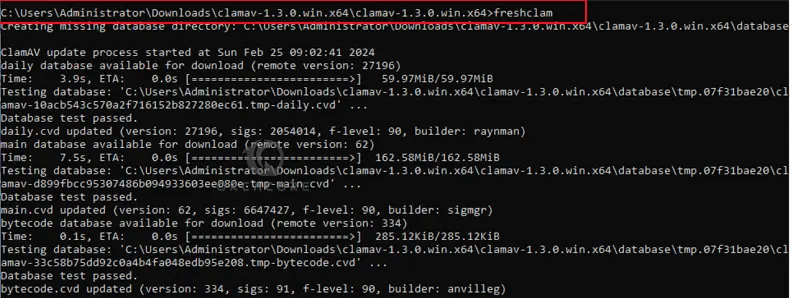
At this point, your ClamAV setup is completed and you can start using it.
Step 5 – Start Using ClamAV From CMD
From your current directory, you can scan all the files by using the command below:
clamscan -r /You can scan the files but only show the infected files. To do this, you can use the following ClamAV command on Windows CMD:
clamscan -r -i /[path-to-folder]Also, you can scan infected files in a specific directory recursively and then remove them by using the command below:
clamscan --infected --remove --recursive /path-to-folderThe options used in the commands mean:
- –infected: prints only infected files
- –remove: removes infected files
- –recursive: all directories and subdirectories in that path will be scanned
To move or copy infected files into a particular directory, you can execute the following commands.
clamscan --move=directory [file/directory]

clamscan --copy=directory [file/directory]
To get more help about ClamAV, you can use the command below:
clamscan -h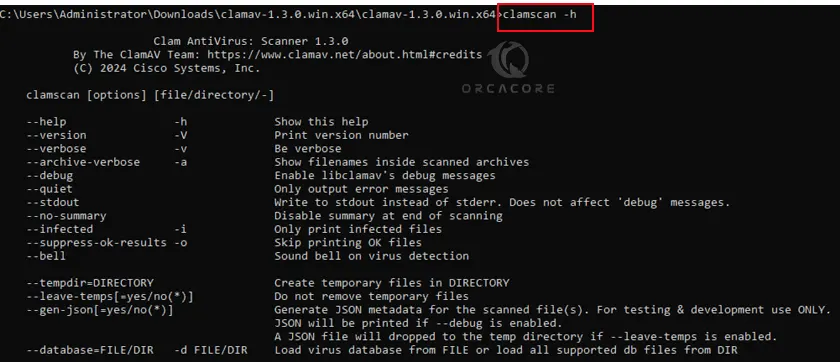
Conclusion
At this point, you have learned to Install ClamAV on Windows. It provides users with a powerful and effective solution for protecting their systems against malware threats. Hope you enjoy using it. Also, you may like to read the following articles:
Disable Real-time Protection on Windows 11
Malwarebytes Free Edition Setup on Windows
Configure BitLocker Encryption on Windows 11 Pro
Encrypt a File with Gpg4win on Windows
Note: If you are a Linux user, you can check the following guide to learn about ClamAV setup on Linux:
Install and Configure ClamAV in Linux
How To Install ClamAV on DirectAdmin
ClamAV is a popular open-source antivirus solution that helps protect your computer from malware and viruses. Installing ClamAV on your Windows system is straightforward and ensures an additional layer of security for your files and data.
Step-by-Step Installation Guide:
- Visit the Official ClamAV Website: Start by going to ClamAV’s official website.
- Download the Installer:
- Navigate to the “Download” section.
- Choose the “Windows” option under the “Latest” version.
- Select the Correct Installer:
- Click on the file named
clamav-?.?.?.win.x64.msito download the latest version suitable for your system.
- Click on the file named
- Run the Installer:
- Double-click the downloaded installer file (
clamav-1.1.0.win.x64.msi).
- Double-click the downloaded installer file (
- Follow the On-Screen Instructions:
- Go through the installation prompts. Typically, you’ll click “Next” several times, accept the license agreement, and confirm the installation location.
- Complete the Installation:
- Once the installation process is complete, click “Finish.”
Why Use ClamAV?
ClamAV is ideal for users looking for a lightweight antivirus solution that provides real-time protection and regular updates. It’s especially beneficial for those who prefer open-source software with a strong community of developers.
By following these simple steps, you can enhance your computer’s security and safeguard your data from potential threats. For more information and detailed setup options, visit the ClamAV website.
Stay safe and keep your system protected!