
Организация резервного копирования, одна из первых по важности задач, стоящих перед системным администратором. Однако многие вспоминают о нем только тогда, когда эти резервные копии внезапно понадобятся. В данной статье мы рассмотрим организацию резервного копирования для популярной серверной платформы Windows Server 2003.
Онлайн-курс по устройству компьютерных сетей
На углубленном курсе «Архитектура современных компьютерных сетей» вы с нуля научитесь работать с Wireshark и «под микроскопом» изучите работу сетевых протоколов. На протяжении курса надо будет выполнить более пятидесяти лабораторных работ в Wireshark.
Перед тем, как приступить к практической части нашей статьи, необходимо усвоить немного теории. А именно базовые принципы, которые должны лежать в основе вашей политики резервного копирования. Многие начинающие админы путают резервное копирование с обеспечением отказоустойчивости, думая что наличие «зеркала» или RAID5 избавляет их от необходимости делать резервные копии. Но это не так. Отказоустойчивость предупреждает потерю данных в случае аппаратных сбоев, никак при этом не защищая от программных и человеческого фактора. Сбой в программе способен разрушить БД сразу на всех дисках RAID, то же самое произойдет и с ошибочно удаленными данными.
Как видим, резервное копирование никоим образом не заменяет и не дополняет необходимость обеспечения отказоустойчивости, а является независимой операцией, преследующей совершенно иные цели. А именно обеспечить сохранность данных от логических ошибок и человеческого фактора.
Ответом на следующий вопрос должен быть перечень данных подлежащих резервному копированию, частота создания резервных копий и период в течении которого они должны хранится. Для одних данных будет достаточно еженедельного копирования, для других потребуется ежедневное. Для оперативно меняющихся и активно используемых данных вполне хватает одной резервной копии, для других, когда ошибка может быть замечена по прошествии более длительного периода времени желательно иметь резервные копии за период превышающий время обнаружения ошибки. При этом следует соблюдать «золотую середину», помня что резервные копии «продукт скоропортящийся» и устанавливать разумные сроки. Например, для активно использующейся базы 1С резервная копия месячной давности уже не представляет особой практической ценности, а только занимает место на диске.
Ну и последний вопрос, где хранить резервные копии. На наш взгляд наиболее оптимально использовать внешний жесткий диск подключенный через USB или eSATA. И безусловно не стоит хранить резервные копии на одном логическом диске с основными данными, хотя ниже, в практическом примере мы поступим именно так. Но одно дело пример, для ознакомления с технологией, а совсем другое ее применение в производственных целях. Будьте благоразумны, не подвергайте себя неоправданным рискам.
На этом закончим с теорией и перейдем к практике. Для решения поставленной задачи мы будем использовать штатные инструменты предоставляемые нам операционной системой. Это позволит избежать необоснованных расходов на дополнительное ПО и повысит надежность системы в целом (мы считаем что каждое лишнее приложение на сервере вносит дополнительный риск сбоев). Да и зачем изобретать велосипед, когда все уже придумано до нас.
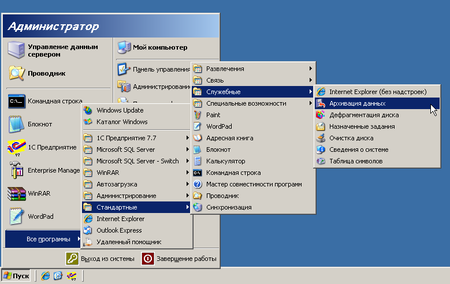
Пуск — Стандартные — Служебные — Архивация данных. В открывшемся в режиме мастера приложении последовательно выбираем: Архивация файлов и параметров, затем Предоставить возможность выбора объектов для архивации.
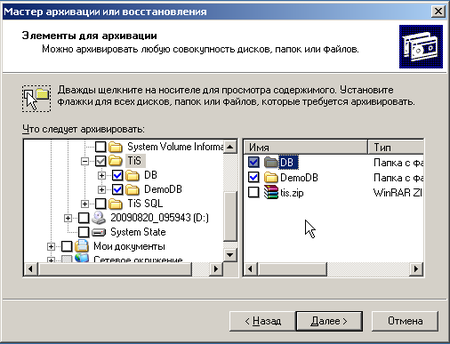
В следующем окне выбираем файлы и папки для которых мы хотим создать резервные копии. Не стоит пытаться объять необъятное и одним махом архивировать все данные. Более разумно создать отдельные задания для каждого типа данных, это позволит более гибко управлять как параметрами архивации, так и восстановления, а также избежать таких ситуаций, когда вместе с нужными документами случайно «восстановили» ненужные, уничтожив результат труда за последний день / несколько дней / неделю. Далее предстоит указать месторасположение и наименование архива, после чего с основными настройками будет закончено.
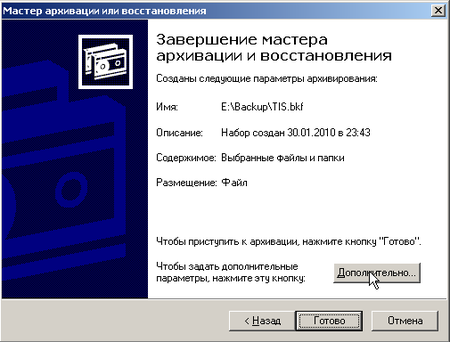
Но не спешите жать кнопку Готово. Самое время перейти к настройке дополнительных параметров.
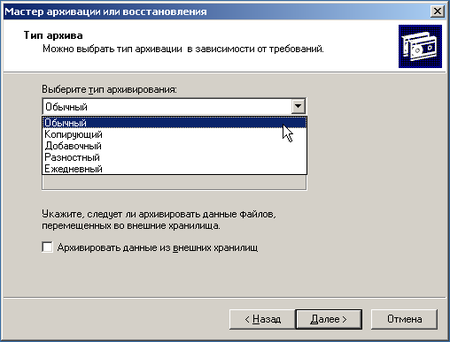
На этом этапе мы можем выбрать тип архивации в зависимости от типа данных и наших требований. Так как в нашем примере архивируются базы 1С, то мы выбрали Обычный способ, так как при активной работе затрагиваются практически все файлы БД. Для папки с офисными документами более подойдет Добавочный способ, позволяющий архивировать только вновь измененные или созданные файлы. Следующим шагом следует указать: добавить ли данный архив к существующим или перезаписать его. В нашем случае была выбрана опция перезаписать, в активно используемой 1С базе ошибки как правило выявляются сразу и необходимости иметь множество резервных копий как правило нет.
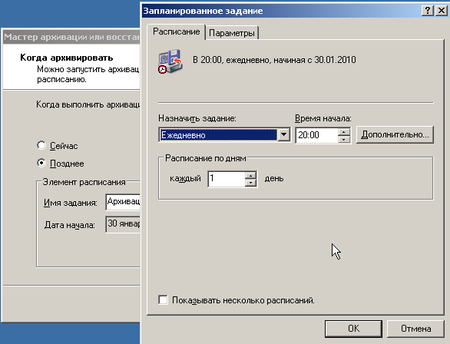
Наконец мы добрались до логического завершения, настройки расписания для резервного копирования. Мастер архивации предложит нам выполнить архивацию немедленно или создать задание для планировщика. Естественно, что нас интересует последний вариант. Мы настроили ежедневное выполнение задания в 20:00, когда в офисе гарантированно никого не будет. Затем следует перейти в Панель управления — Назначенные задания и щелкнув правой кнопкой мыши выбрать Выполнить.

Если все сделано правильно мы увидим окно как на рисунке выше и в папке для резервных копий должен появится файл архива.
Восстановление данных можно выполнить двойным щелчком по файлу архива, либо запустив Архивацию данных и выбрав вручную необходимый файл. Мастер последовательно предложит нам выбрать файлы для восстановления (не обязательно восстанавливать весь архив целиком), место для восстановления (есть возможность восстановить файлы по их изначальному расположению либо в отдельную папку) и, в дополнительных опциях, настройки перезаписи уже существующих файлов. Для баз 1С, во избежание коллизий и разрушения БД, следует выбирать полную перезапись, для архива документов, в случае удаления отдельных файлов можно восстановить только их, не затрагивая существующие.
Мы рассмотрели самый простой способ, организацию ежедневного копирования с перезаписью архива, попробуем усложнить условия. Допустим нам требуется ежедневное копирование с сохранением архивов за неделю. Ничего сложного в этом нет, все решается на уровне планировщика. Для начала откроем и изменим существующее задание.
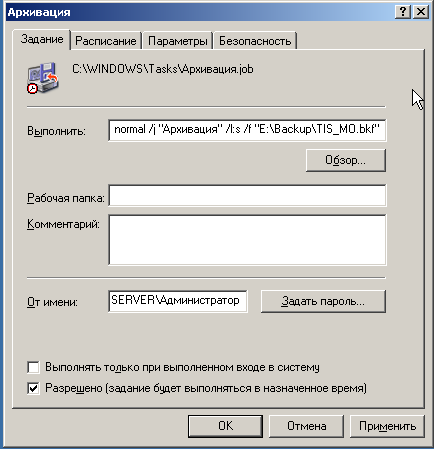
В строке Выполнить изменим имя создаваемого файла архива, добавив сокращенное наименование дня недели (МО — Monday — Понедельник и т.д.).
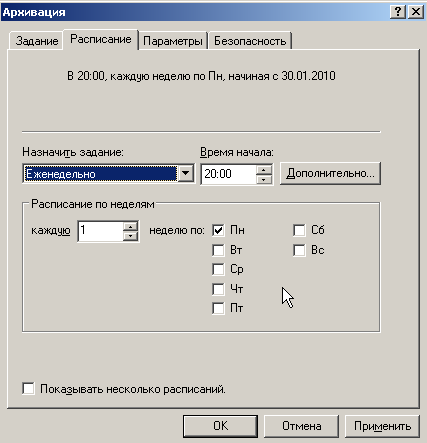
На закладке Расписание назначим заданию еженедельное исполнение по Понедельникам в 20:00 с перезаписью существующего архива. Теперь скопируем это задание (перетянуть на свободное место ПКМ) и изменим его для Вторника, аналогично поступим для Среды и т.д. В итоге получим пять заданий, выполняющихся каждое в свой день недели с понедельника по пятницу. Последовательно запустим их и убедимся в корректности работы.
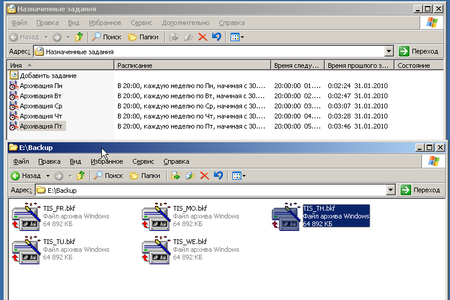
В результате мы должны получить пять архивов на каждый день недели. Таким же способом можно задать любое расписание для архивации данных, либо скомбинировать любые варианты. Например в добавок к ежедневному архиву создавать еженедельный по пятницам и т.п.
В любом случае не забывайте, что грамотно настроенное резервное копирование залог сохранности и бесперебойного доступа к вашим данным.
Онлайн-курс по устройству компьютерных сетей
На углубленном курсе «Архитектура современных компьютерных сетей» вы с нуля научитесь работать с Wireshark и «под микроскопом» изучите работу сетевых протоколов. На протяжении курса надо будет выполнить более пятидесяти лабораторных работ в Wireshark.
In this article, you will find an overview of Windows Server 2003 backup and recovery options using either the built-in NTBackup tool (backup app for Windows 2000, Windows XP and Windows Server 2003.
Since NTBackup does not support image-based backups, we will also take a brief look at the differences between a file-level system data copy and an image-based backup.
What Is System Image Backup?
System image backup is a byte-to-byte copy of selected drive partitions with all corresponding file systems and boot metadata. You can even use this copy for exact recovery of the entire drive. This backup type helps in most disaster recovery scenarios, or it can be used as a part of a server maintenance procedure.
For more information on System Image Backup please refer to our guide:
Further reading System Image Backup and Recovery Guide
Why You Need to Back Up Windows Server and How MSP360 Helps
Discover the ins and outs of a server backup strategy using MSP360 Backup.
Windows Server 2003 Image Backup with Built-In NTBackup
The built-in tool NTBackup does not support image-based backups — it only allows you to create a file-level backup covering all necessary data to restore from scratch. This copy combines full data backup with a few configuration files that you can use when booting from a Windows installation CD. This technology is called Automated System Recovery (ASR) and it is built into Windows Server 2003 as a part of the NTBackup tool that allows performing bare-metal restores in the event any local system disaster strikes.
Here is a quick guide on how to perform an ASR backup:
1Run NTBackup by typing ntbackup in the Run menu. Click Backup Wizard (Advanced) on the start screen.

2Click the Automated Recovery Wizard button and proceed. You will need to select the target backup file — we suggest using the separate (or even external) drive for such a backup.

3Now click Next and then Finish to start the backup.
4On the next step, you will be asked to insert a floppy disk. As in 2018, that is an extremely outdated technology, here is a workaround. If you do not have a floppy disk at the moment of the ASR wizard run, you can copy these files later under the path: %windir%\repair.
5After the wizard is completed, ensure that you copied the contents of the %windir%\repair folder somewhere outside the system. This folder contains a few small files (asr.sif and asrpnp.sif) that are necessary for ASR recovery.
Limitations of NTBackup for Windows 2003
Built-in Windows backup software is a powerful tool for a daily routine, but it has a few drawbacks you should remember:
- You need to use a floppy drive during the restore process since Windows uses it to save pre-restore info such as disk configuration information and system signature. Though there is a workaround, you can use Remote Installation Server instead of a recovery floppy.
- ASR does not have scheduling out of the box. You need to manually configure such backups using scripting including separately created .SIF files.
- ASR is not intended to be used for server migration purposes, so any attempt to recover the system on another hardware can require additional efforts such as a hard drive’s controller drivers installation.
Summary
Windows 2003 does not have a built-in tool supporting image-based backups, but you can still use the ASR feature that creates a file-level data copy and allows you to use it for bare-metal recovery. This feature has a few peculiarities, such as the necessity to use a floppy drive. So we suggest choosing modern third-party backup tools with the support of an image-based backup.
MSP360 Managed Backup.
Simple. Reliable.
Powerful cross-platform backup and disaster recovery that leverages the public cloud to enable a comprehensive data protection strategy.
Windows NT Backup Restore Utility for Windows 10, 11 & Latest Version
Published On
March 4th, 2025
Reading Time
5 Minutes Reading
If you are looking for a Windows NT backup restore utility to restore data from BKF files on Windows 10 and 11 versions then you have come to the right blog. In this blog, we will show you how you can restore your BKF file in any Windows system using nt5backup.cab.
This blog will be very useful for those users who have some technical knowledge. If you do not have technical knowledge at all, then we have also told another method for that in this blog, with the help of which you can restore the data stored in the BKF file without any loss. Let us first understand what is NT Backup Utility and after that, we will know why we need to use it.
Know What is ntbackup.exe Restore Utility
Windows NT backup restore utility was invented by Microsoft, that was also done because if a user has 50 folders in his system and that user wants to back them up, then he can take the backup with the help of that utility. But on Windows systems, this utility was built-in only in Windows 2000, Windows XP, and Windows 2003 versions.
After that stop this utility in Microsoft, if you have the latest system of Windows have to create a BKF file or if you already have BKF and you want to restore it then you have to first nt5backup.cab must download. After that, you can restore or create any new BKF file with the help of this Windows NT backup restore utility.
Note: How to Fix this “Backup File Contains Unrecognized Data and Cannot be Used” Error?
Why Does User Need to Use nt5backup.exe Utility?
- Some users already had the BKF file, but now they are unable to restore it due to the latest version of Windows 10 or 11.
- Or someone sent you a BKF file and you want to restore it to see what data is inside it.
- If you have any BKF files and you want to view or check them.
Here are some reasons why you might need to download the Windows NT backup restore utility. Apart from this, there can be many reasons for every user. To restore the data of the BKF file, first, you have to download nt5backup.cab utility, after that we have described the steps for how to use this utility below.
How to Use Windows NT Backup Restore Utility on Windows 10 & 11?
- On Windows 10 and other latest versions download ntbackup.exe, then double click on the ntbackup.exe setup file option.

- After this, the “Backup and Restore Wizard Screen” will open automatically, and click the Next button to continue the process

- Thereafter, choose the Restore files and Settings open and then click on the Next button
- To upload the BKF file to this software, click on the browse button and then a new popup screen will open, from there select your file and click on the OK button.

- After that you will come back to the previous screen, on that screen you will be showing your files on the right side, if you want to deselect any file from that, you can do that too, then click on the next button.
- Finally, click on the Finish button, now your restore process will be running, please wait for a few minutes
- Restore is complete, if you can see the report click on the Report button

- Eventually, Now you can see the Report


Some Limitations of NTBackup Restore Utility
Microsoft has officially removed the link for the Windows NT backup restore utility from Windows 7, 8, 10 and 11, so you will need to download this utility externally. Because of this, even Microsoft does not recommend reinstalling the BKF file on Windows. Because many times there is a risk of losing your important data while restoring the data.
You cannot use the Windows NT backup restore utility if the BKF file has some problems like your files are corrupted or virus affected. Because it does not have any scanning feature so that your corrupted file can be repaired and restored. If you have such files then you have to go through the second method we have mentioned below.
Alternative Solution of Windows NT Backup Restore Utility for Windows 7, 8, 10, 11 & Latest Version
Looking at the limitation of the Windows NT backup restore utility, we have also come up with another solution, with the help of which you will be able to restore the data of your BKF file very easily, the name of this software is 4n6 BKF Repair Tool. This software is the best software to repair all types of files and restore data, whether your file is corrupted or affected by the virus.
Free Download

Conclusion
In response to customer demand, we have outlined the whole, step-by-step procedure to get the Windows NT backup restore utility program for Windows 10/11/Server 2022/2019/2016/2012. However, it is advised to substitute the indicated professional solution for this antiquated NTBackup. To recover Windows backup data, you may use the free nt5backup.cab Windows 10 program.
Next Read: Download Office 365 Mailbox to PST
Looking for a Windows NT backup restore utility for Windows 10 and the latest Windows 11 OS? Don’t worry, you can download the nt5backup.cab windows 10 utility from here. Using Windows NTBackup Tool, you can easily restore the crucial data available in BKF files.
Let’s Know Windows NT Backup Restore Utility
Microsoft introduced the NTBackup utility to backup Windows files in Windows NT OS. This is an inbuilt backup application that came with the old Windows Operating System, i.e., Windows NT, XP, Vista, and Server 2003 / 2008. Windows NT Backup Restore Utility allows to create BKF files to store windows backup data.
However, it has been replaced in Windows 11 / 10 / 8 / Windows Server 2022 / 2019 / 2016 / 2012 by the Windows Backup and Restores program, which creates VHD disc image files. If you simply try to use the Windows NT Backup utility on the latest Windows operating systems, then it shows an error message, i.e., The procedure entry point SetCatalogState could not be located NTBackup.
Why Do Users Want to Download NTBackup.exe for Windows 10?
- Some users still have BKF files but they are using the latest Windows 11 or 10.
- Many users have archived their crucial data for future use in BKF files.
- Sometimes, users received their required data in the BKF format.
- Several users want to do some R&D on BKF files for multiple purposes.
These are some possible situations where users may want to download nt5backup.cab windows 10 / 11. Users also wish to restore their critical data after obtaining Windows NT Backup Restore Utility for Windows 10.
Steps to Use Windows NT Backup Restore Utility for Windows 11, 10, 8, 7
-
- Download ntbackup.exe for Windows 10 and other operating systems. Double click the ntbackup.exe setup file.

- After that, the welcome screen of the backup and restore wizard will open. Click Next to proceed.
- Now, choose the Restore files and settings option and select Next.
- Select the required BKF file from GUI or hit on the Browse button to choose a specific file.
- After selecting the backup file from your pc, press the OK button.
- Choose the BKF file and press the Next button to continue.
- Thereafter, completing the backup or restore wizard screenshot will open. Click the Finish button.
- Download ntbackup.exe for Windows 10 and other operating systems. Double click the ntbackup.exe setup file.


The process of restoring data is running. Please wait for a while.

- The restoration process is complete. Click on the Close button.
- You can also click on the Report button to see the restore status report.


Limitations of NTBackup
Microsoft officially eliminated the official download link of the Windows NT backup restore utility for Windows 10 and other editions. So, this is not a recommended method to restore data from Windows backup BKF files as it may lead to data loss.
Sometimes, your BKF files may have some issues, i.e., they are affected by viruses or missing some items. In such cases, you cannot recover your data by using the NTBackup utility as there is no scanning option available for corrupt files.
Alternative for Windows NT Backup Restore Utility for Windows 7 / 8 / 10 / 11
Windows BKF Restore Utility is available for extracting data from BKF files in actual formatting. The tool comes with multiple advanced features that make it the most recommended utility. Let’s look at its features.
Download Now Purchase Now
- Dual scanning modes are available to successfully deal with virus-infected BKF files.
- Supports data recovery from corrupted, damaged, missing internal items, and all types of BKF Zip files.
- Windows file explorer view is available for selecting specific files and folders for restoring.
- Users can specify where they want the extracted files and directories to be saved.
Conclusion
As per the demand of users, we have explained the complete step-by-step process to get Windows NT backup restore utility for Windows 10 / 11 / Server 2022 / 2019 / 2016 / 2012. However, it is advisable to use the suggested third-party solution instead of this out-of-date NTBackup. You can download the nt5backup.cab windows 10 tool to restore Windows backup files free of cost.
Next Read: Fix Backup File Contains Unrecognized Data and Cannot be Used Error
NTBackup
NTBackup is an effective data protection solution that is included with Windows NT and Windows 2000 operating systems. It allows users to easily back up their data and restore it in the event of system failure or data loss. The software is designed to be intuitive and user-friendly, making it an ideal solution for both novice and experienced computer users.
NTBackup provides a reliable and easy-to-use method of backing up critical system data.
Features:
• Automated Backups: NTBackup allows users to set up an automated backup schedule, so that their data is backed up regularly without having to manually initiate the process.
• File Compression: NTBackup can compress files for storage, allowing users to save space on their hard drive.
• Data Restoration: NTBackup can restore data from backups created with the software, allowing users to easily recover lost or corrupted data.
• Incremental Backups: NTBackup supports incremental backups, which only back up files that have been changed since the last backup was performed. This helps to reduce the amount of time spent on backups.
• Security: NTBackup supports password protection, allowing users to secure their backups from unauthorized access.
• Scheduling: NTBackup allows users to schedule backups at specific times or on a regular basis.
• Logging: NTBackup can log all backup activities, allowing users to easily track the progress of their backups.
• Backup Media: NTBackup supports a variety of backup media, including tapes, CD-ROMs, and external hard drives.
• Flexibility: NTBackup allows users to customize their backups, so they can select specific files or folders to back up.
• Operating System Support: NTBackup is compatible with Windows NT and Windows 2000 operating systems.
• Batch File Support: NTBackup can be used to create batch files, which can be used to automate the backup process.
• Remote Access: NTBackup can be used to back up data across a network, allowing users to back up data from multiple computers.
• Command Line Support: NTBackup can be used with the command line for advanced users who want to customize their backups.
• Volume Shadow Copy: NTBackup supports Volume Shadow Copy, which allows users to back up data on a computer that is running.
• Backup Verification: NTBackup can verify that backups have been successful, ensuring that the data is backed up properly.
1. Operating System: Microsoft Windows XP, Vista, 7, 8, 8.1, 10, Windows Server 2003, 2008, 2012, and 2016.
2. Processor: Intel Pentium 4 or higher.
3. RAM: Minimum 512 MB.
4. Hard Disk Space: Minimum 500 MB of free space.
5. Microsoft .NET Framework 3.5 or later.
6. Microsoft Data Access Components (MDAC) 2.8 or later.
7. Microsoft Management Console (MMC) 2.0 or later.
8. Microsoft Visual Studio Tools for Applications 2.0 or later.