
If you’re looking to tweak your mouse sensitivity in Windows to achieve smoother navigation and better control, you’ve come to the right place. Adjusting the mouse sensitivity can significantly enhance your computing experience, whether you’re gaming, working on graphic design, or simply navigating through your daily tasks. Thankfully, it’s a straightforward process that allows you to fine-tune your settings to suit your preferences. In this article, we’ll walk you through the steps to change your mouse sensitivity in Windows 6 to 11, ensuring you get the most out of your device. So, let’s dive right in and empower you with the knowledge to make those adjustments in no time!
Adjusting your mouse sensitivity settings can significantly improve your computer experience. It can make navigating through applications and games smoother and more precise. This guide will help you understand how to change Windows mouse sensitivity specifically to 6 11 settings, which is often recommended for better performance in various applications. We’ll break down the steps in simple terms so that anyone can follow along.
Understanding Mouse Sensitivity
Mouse sensitivity refers to how far the cursor moves on your screen in relation to the movement of the mouse. A higher sensitivity means the cursor will move further with less physical mouse movement. Conversely, lower sensitivity means you need to move the mouse more for the cursor to cover the same distance.
Why Adjust Mouse Sensitivity?
Adjusting your mouse sensitivity can help you:
- Enhance accuracy in gaming
- Improve productivity while working
- Reduce strain on your wrist
Finding the right sensitivity setting depends on personal preference and the tasks you do most.
Accessing Mouse Settings in Windows
Before you can adjust the sensitivity settings, you need to access the mouse settings. Here’s how you can do that:
1. Click on the **Start Menu**.
2. Select **Settings** (the gear icon).
3. Choose **Devices**.
4. Click on **Mouse** from the left-hand menu.
This section allows you to tweak various mouse settings, including sensitivity.
Adjusting the Mouse Sensitivity
Within the Mouse settings page, you can find options to adjust your mouse sensitivity. Windows typically offers a slider to help you find the best fit.
To change to the 6 11 setting:
1. Look for the **Pointer speed** section.
2. Move the slider to achieve the desired sensitivity level.
3. Click **Apply** to save your changes.
Fine-tuning Your Sensitivity Settings
If the standard settings don’t feel right, you can adjust them further. Fine-tuning allows you to customize your mouse experience even more.
Using the Control Panel
For more advanced settings, utilize the Control Panel. Here’s how:
1. Type **Control Panel** in the Start Menu search bar.
2. Click on **Hardware and Sound**, then select **Mouse**.
3. In the Mouse Properties dialog box, navigate to the **Pointer Options** tab.
Here, you can adjust the pointer speed for more precision.
Using the Registry Editor
For those who feel comfortable with advanced options, the Windows Registry Editor allows for specific customizations. Remember, be cautious when using the Registry Editor as it can affect your system.
1. Type **regedit** in the Start Menu search bar to open the Registry Editor.
2. Navigate to `HKEY_USERS\.DEFAULT\Control Panel\Mouse`.
3. Change the **MouseSensitivity** value to **6** to switch to a 6 11 setting.
Ensure you back up your registry before making changes.
Testing Your New Settings
After adjusting your mouse sensitivity, it’s crucial to test it out. Open a program or game that you frequently use and see how the new settings feel. It may take a bit of time to get used to the changes.
Tips for Testing
When testing your new mouse sensitivity, consider the following:
- Try out different applications
- Play a game that requires precision
- Take breaks to avoid fatigue
This will help you find the perfect sensitivity level for your needs.
Common Issues and Solutions
Sometimes adjusting mouse sensitivity can lead to some common problems. Let’s address a few of them.
Cursor Movement Issues
If your cursor feels jumpy or unresponsive, you may need to recalibrate your mouse settings or clean your mouse’s sensor. Dust and debris can impact its performance.
Returning to Default Settings
If you’re unhappy with your changes, it’s easy to revert back to default settings. Simply return to the mouse settings and reset the sensitivity to its original value.
Advanced Mouse Features
For users interested in more than just basic settings, many modern mice come with advanced features. These can improve your experience even further.
Using Mouse Software
Companies like Logitech and Razer offer software that allows you to customize mouse settings even more. With these applications, you can:
- Adjust DPI settings
- Program buttons for specific functions
- Create profiles for different games or applications
This can provide a tailored experience that aligns with your needs.
Consider Health and Ergonomics
While adjusting settings, remember to consider your posture and ergonomics. Proper alignment of your monitor and chair can prevent discomfort during long use.
Changing your Windows mouse sensitivity to 6 11 settings can significantly improve your computing experience. Whether you’re gaming or working, these adjustments allow for a customized and comfortable setup. With careful testing and adjustments, you can find the perfect sensitivity that meets your personal needs, making your time on the computer more enjoyable and efficient.
Make sure to revisit your settings periodically or when you change your usage patterns to ensure you maintain optimal performance. Happy adjusting!
How to Change Mouse Sensitivity – Windows 11
Frequently Asked Questions
How can I adjust mouse sensitivity in Windows settings?
To adjust mouse sensitivity in Windows, go to the Control Panel. Click on “Mouse,” then select the “Pointer Options” tab. Here, you can move the slider to change the pointer speed. Adjust it according to your preference, and click “Apply” to save the changes.
What is the impact of increasing mouse sensitivity?
Increasing mouse sensitivity allows the pointer to move faster across the screen. This can benefit gamers and users who require quick navigation. However, it may also reduce precision, making it challenging to perform detailed tasks like graphic design or fine editing.
Can I set different sensitivity levels for different applications?
Windows does not offer a built-in option to set different sensitivity levels for individual applications. However, some third-party mouse software allows you to customize sensitivity settings for different applications, providing the flexibility needed for various tasks.
Is it better to have a high or low mouse sensitivity?
The best mouse sensitivity depends on personal preference and the tasks you perform. High sensitivity can benefit fast-paced gaming, while lower sensitivity may be better for tasks requiring precision. Experiment with both settings to find what works best for you.
How do I reset mouse sensitivity to default settings?
To reset mouse sensitivity to default settings, navigate to the “Mouse” settings in the Control Panel. In the “Pointer Options” tab, you can usually find a “Reset” button or revert the slider back to the center. Click “Apply” to confirm the changes.
Final Thoughts
Adjusting mouse sensitivity can greatly enhance your computing experience. To change Windows mouse sensitivity 6 11, navigate to the Settings menu and locate the Mouse options.
From there, you can easily adjust the pointer speed to suit your preferences. Fine-tuning these settings will help you achieve the control and precision you need for various tasks.
Disclosure: Some of the links below are affiliate links. This means that, at zero cost to you, I will earn an affiliate commission if you click through the link and finalize a purchase.
It might seem weird, but your Windows sensitivity matters. In some cases, choosing the wrong value can make your cursor less precise. Weird, isn’t it? After researching the topic, I’ve found that many people are unaware of this which can harm their consistency overall. Let’s fix it together, shall we?
The Best Windows Sensitivity
Windows sensitivity should be set to the 6th notch, which is commonly referred to as 6/11. The reason is that choosing any other value can cause pixel skipping or inconsistencies in your cursor. But, more and more games are using raw input, which overrides this setting making this setting useless.
The problem with choosing anything other than 6/11 is that you won’t get 1-to-1 Windows mouse movement. For instance, let’s say you are using a lower value than 6/11. 3/11, for example. That means that your Windows sensitivity multiplier is 0.25. So if you move your mouse for 3 pixels, you will get 0.25*3=0.75, which basically means that you didn’t move at all.
Now, move again for another pixel, and it will move 1 pixel. Because 1*0.25+0.75=1. Do you see the problem? Inconsistency alert!
Now, let’s say you choose something higher than 6/11. For example, 11/11. Now, you move 3.5 pixels for every mouse count. That means you are skipping 2 pixels every time. This is not the best practice, to say the least. Imagine skipping an entire head in CS:GO. Just kidding, heads are a bit bigger than a pixel, but again, it is easy to see the problem here.
The problem with anything other than 6/11 for Windows sensitivity is inconsistency. Skipping pixels and cursor movement inconsistencies are all things we should avoid when playing in a competitive environment.
Is This Still A Problem Today?
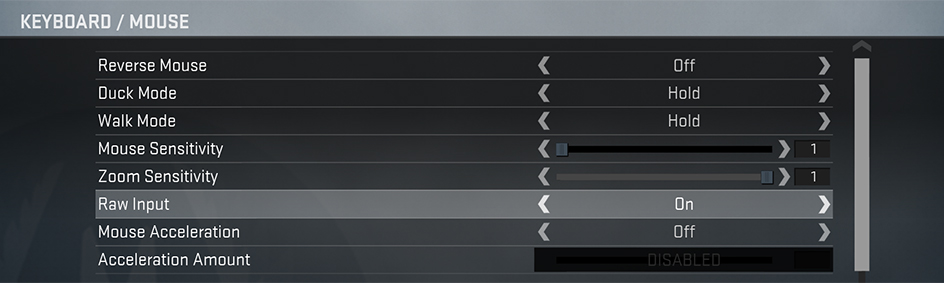
But there’s a catch. There is a thing called Raw input.
Raw input means that your game engine gathers mouse input straight from your mouse’s driver and not from Windows. It reads the data before it reaches Windows, reducing input latency and giving you 1:1 consistent input without any Windows interpretation.
Most of today’s games are actually using Raw input. This basically means that Windows sensitivity doesn’t matter. Now, many old games are still not utilizing the power of raw input, so that’s why I still recommend using 6/11 for consistency across every game.
That’s why I wouldn’t stress too much about it. As most games are using raw input, you are basically safe with every setting you set. But there’s no harm to put it on 6/11, right?
What The Pros Are Using?
I’ve found the data on on-winning.com, the prosettings.net official blog. They’ve gathered 172 players’ information, including windows sensitivity in CS:GO.
After analyzing the data, I concluded that more than 90% of pro players analyzed use 6/11 windows sensitivity.
Not even one player is above 6/11. Again, not surprising as we’ve learned that more than that causes pixel skipping.
Another interesting finding is that I’ve found this information only about pro CS:GO players. I couldn’t find any data regarding Windows sensitivity in other esports games. And there’s a reason why.
As I’ve said, most of today’s games use raw input as default. Therefore, Windows sensitivity settings do not matter. But, CS:GO does not use raw input as default. That’s why mentioning pro players’ Windows sensitivity when talking about general sensitivity settings is a good idea.
You can find the data here.
How To Change Your Windows Sensitivity?
- Type “mouse settings” in the windows search bar and click on the first option.
- Click “Additional mouse options” in the right section.
- Click on the “pointer options” tab.
- Set your Windows sensitivity to the desired one and press OK.
6/11 or 10/20?
6/11 or 10/20 Windows sensitivity is the same thing on different interfaces. 10/20 is on the newer mouse settings panel while 6/11 is on the older one. You can get to 10/20 when you type “mouse settings” in the search bar and click on the first option.
As you can see, the cursor speed is set to 10/20 in this specific interface, but 6/11 on the other interface. But these are the same thing.
The default Windows sensitivity is 6/11 or 10/20 depending on which interface you are looking at.
So generally speaking, you don’t need to adjust anything if you didn’t touch the setting. But I would take a second glance and make sure it is set right.
Thank you for reading and I will see you next time!
There has been a lot of talk about Microsoft’s operating system, Windows 11, and gaming ever since the OS wasn’t even released.
Windows 11 has been constantly improved since it came out, and we can now call it a much more stable and reliable experience, even if we are talking about gaming.
Even Mac users can install Windows 11 on their devices and play a game of their choice after the Windows 11 gaming improvements coming with Parallels Desktop 18.
Also, if you are interested in playing Android Games on Windows 11, we can show you everything you need to know about it.
Whether you spent a bag on gaming peripherals for your PC, such as mechanical keyboards or sensitive gaming mice, tweaking the device’s settings can improve your overall experience.
And, since we’re talking about gaming, you will surely be interested in a good gaming browser, so check out the best choices.
Do Windows mouse settings affect games?
We’re going to say that yes, they do. Sensitivity or other mouse settings can thoughtfully contribute to your overall gaming experience.
Mouse acceleration, for example, was implemented to help people feel more in control over their cursor; however, it can seriously throw you off while gaming.
For FPS players, experts recommend playing these games using a sensitivity between 400 and 800 DPI.
Yes, optimizing your mouse for gaming can significantly enhance the experience, so keep that in mind next time you want to tweak your game.
Of course, if you purchased a professional gaming mouse, you can personalize it directly from the product interface.
Where are the mouse settings in Windows 11?
If you want to access your mouse’s Windows 11 system settings, all you have to do is press Win + I, select the Bluetooth & devices tab, and then select Mouse.

Also, under this section, you will find the Additional or Advanced Mouse Settings for Windows 11.
What are the best mouse settings for gaming?
1. Personalised DPI settings
If you are into gaming or spend time around gamers, one of the first things you observe is that everyone plays with different DPI settings,
Depending on how sensitive you want your mouse to be, adjusting the DPI setting to a value you are comfortable with is essential.
If you have a gaming mouse, you can change the DPI settings from the extra button on it.
How do I change mouse DPI in Settings on Windows 11?
- Press Win + I to access Settings.
- Select the Bluetooth & devices tab, then click on Mouse.

- Adjust Mouse pointer speed to your preference.


2. Disable mouse acceleration
- Press Win + I to access Settings.
- Select the Bluetooth & devices tab, then click on Mouse.
- Select Advanced mouse settings.
- Select the Pointer Options tab and disable the Enhance pointer precision option. Also, for maximum accuracy, it’s recommended that you set the Windows 11 mouse sensitivity at 6/11.


3. Always keep drivers up to date
- Search for Device Manager and open the app.
- Expand Mice and other pointing devices.
- Right-click on the mouse you are using and select Update driver.


This can also be done directly from the gaming mouse’s dedicated software, so we are showing you an alternative.
Outdated drivers are the most common reason for slow performance regarding your PC. Updating drivers by yourself can be difficult. Therefore, an automatic driver monitoring tool is a great option.
4. Boost your Polling Rate
Many gamers know that the Polling Rate is the speed at which your mouse communicates input to your gaming PC.
To help you understand, remember that the base polling rate with USB is usually 125Hz or once every 8 milliseconds.
That being said, most gaming mice typically include a 1000Hz polling rate, once per millisecond or 1000 times per second.
If you want to change the Polling Rate, you can do so directly from the mouse’s buttons, using keyboard shortcuts, or through the mouse’s dedicated software.
- Recent Windows 11 update lets you disable profanity filter in voice typing
- Microsoft wants Windows 10 users to upgrade to Windows 11 or Copilot + PCs
- Windows 11 KB5055627 update makes File Explorer more fluid
- A few keyboard settings are moving from Control Panel to Settings app in Windows 11
- Details of Windows 11 25H2 spotted in the wild; likely to be a smaller update
5. Disable Angle Snapping
Again, a fact not known by many non-hardcore gamers is that Angle Snapping is a feature that helps your mouse cursor in a straight line.
As you can imagine, that is not necessarily a good thing when we’re talking about gaming, so it can inconvenience you.
This, just as adjusting the Polling Rate, can be done using your mouse’s dedicated software, so keep that in mind.

6. Enable Game Mode
- Search for Game Mode Settings and open the app.
- Turn on Game mode.


7. Use specialized mouse software
As we said above, if you are into gaming, you are better off spending money on a gaming mouse to optimize your experience completely.
And, to get the most out of a gaming mouse, you need to download and install the corresponding software.
This way, you will have access to all the different features that the mouse comes equipped with, and you can tweak a lot more performance and visual options.
For example, if you are using a Razer gaming mouse, you will need to download the Razer Synapse to unlock the mouse’s full potential.
8. Always play games in fullscreen mode
You might now know this, but even the unimportant things can improve mouse responsiveness.
That said, after entering your favorite game, make sure you visit the Visual/Graphics settings page and make some tweaks.

For the best performance, make sure that you avoid using Windowed, or Borderless Window mode while gaming.
9. Enable Auto-HDR
It goes without saying that the HDR display is better than SDR, which means that a smoother gaming experience must be complete from all sides.
Visual quality means your mouse will move smoothly, without lag or stuttering so that you can enjoy your adventure.
If you need any help turning on Auto HDR in Windows 11, we can help you with that as well, so just relax and focus on gaming.
10. Use Raw Input
You surely know that many games nowadays have the option to turn raw mouse input on or off if you look into the settings. menu.
Typically, mouse movements are much more accurate when using raw mouse input, especially in first-person shooters.
This actually varies from game to game, but in some games with raw mouse input of the mouse, aiming will be very inconsistent, especially with higher DPI settings.
Furthermore, the raw setting takes mouse input directly from the mouse instead of from the operating system, which will change the input based on things like the cursor position on the desktop, which can limit the maximum turning speed and create inconsistent turning speed.
How do I make my mouse faster in Windows 11?
This can be done directly from the mouse’s dedicated software interface, where you can tweak a lot for your mouse.
Otherwise, like we’ve shown you above, press Win + I to bring up Settings, go to Bluetooth & devices, then click on the Mouse option and modify all you want.
Should I turn off mouse acceleration for gaming?
Yes, if you are really into gaming, we strongly recommend disabling this feature for an improved gaming experience.
This won’t make all the difference in the world, but there will be a huge difference in how you control your mouse while in-game.
How do I reduce the mouse polling rate in Windows 11?
You might look at this as farfetched, but that is how you do it. Unplug the mouse from your computer. Press the numerical buttons 4 + 5 on your keyboard, and plug in the mouse.
If your mouse is properly connected, the polling rate has switched to 125 Hz. Press the numerical button 4, and plug in the mouse if you want to switch the report rate to 500 Hz.
So, if you were wondering how do I make my mouse smoother in Windows 11, you now know what to do for the best results.
Leave a comment below if you found any useful tips in this article or maybe some advice for even better gaming optimization.
Are you tired of your mouse cursor moving too fast or too slow on your Windows computer? Do you find it difficult to navigate precisely through your favorite games or complete tasks efficiently? If so, you’re not alone. Many users struggle with finding the perfect mouse sensitivity setting that suits their needs. Luckily, in this guide, we will explore how to change the Windows mouse sensitivity to the widely recommended setting of 6/11. By the end, you’ll have a better understanding of how mouse sensitivity works and be equipped with the knowledge to optimize your cursor movement for a smoother and more enjoyable experience.
Mouse sensitivity plays a crucial role in enhancing your computer interactions, whether you’re working on complex projects, browsing the web, or engaging in intense gaming sessions. The default setting of 6/11 in Windows is often regarded as the sweet spot, striking a balance between precision and speed. However, many users are unaware of this setting or may struggle with changing it. In this comprehensive guide, we’ll walk you through the step-by-step process of adjusting your Windows mouse sensitivity to 6/11, ensuring that you have the perfect sensitivity level for your needs. So, let’s dive in and unlock the full potential of your mouse on Windows!
How to Change Windows Mouse Sensitivity 6/11:
- Click on the Start menu and select “Settings”.
- In the Settings window, click on “Devices”.
- Choose “Mouse” from the left sidebar.
- Under “Related settings”, click on “Additional mouse options”.
- In the Mouse Properties window, go to the “Pointer Options” tab.
- Adjust the slider under “Motion” to change the sensitivity.
- Click “Apply” and then “OK” to save the changes.

Changing the mouse sensitivity on your Windows computer can greatly improve your overall user experience. Whether you need a faster or slower mouse movement, adjusting the sensitivity to the optimal level for your needs can make a significant difference. In this step-by-step guide, we will walk you through the process of changing your mouse sensitivity to 6/11 in Windows, ensuring smooth and precise cursor movement.
Step 1: Accessing Mouse Settings
The first step is to access the mouse settings on your Windows computer. To do this, navigate to the Control Panel by clicking on the Start menu and selecting “Control Panel” from the list of options. Once the Control Panel is open, locate and click on the “Mouse” option. This will open the Mouse Properties window, where you can make adjustments to your mouse settings.
In newer versions of Windows, you can access the mouse settings directly from the Settings menu. Simply click on the Start menu, select the “Settings” gear icon, and then click on “Devices.” From the left-hand side menu, choose “Mouse” and proceed to the next step.
Step 2: Adjusting Mouse Sensitivity
After opening the Mouse Properties window, navigate to the “Pointer Options” tab. Here, you will find a slider labeled “Select a pointer speed.” By default, this slider is set to the 6/11 position, which is considered the optimal sensitivity level for most users. However, if you need to adjust it, simply move the slider to the left for a slower mouse movement or to the right for a faster one. As you move the slider, you can preview the changes in the sample box provided.
It’s important to note that changing the mouse sensitivity may require some trial and error to find the perfect setting for your preferences. It’s recommended to make small adjustments and test the cursor movement before settling on a final sensitivity level. Once you are satisfied with the changes, click on the “Apply” button to save the settings. You can also click on “OK” to close the Mouse Properties window.
Step 3: Testing and Fine-Tuning
After adjusting the mouse sensitivity, it’s crucial to test the changes and fine-tune them if necessary. Open a program or navigate around your desktop to see how the cursor movement feels. If it’s too slow or too fast, repeat Step 2 to make further adjustments until you achieve the desired sensitivity level.
Remember, finding the perfect mouse sensitivity is a personal preference, and it may vary depending on the tasks you perform and the type of mouse you are using. Take your time to experiment and find what works best for you. Once you have found the optimal sensitivity, you can enjoy a smoother and more precise mouse experience on your Windows computer.
Frequently Asked Questions
Here are some commonly asked questions about changing the Windows mouse sensitivity 6/11:
Question 1: How do I change the mouse sensitivity in Windows 6/11?
To change the mouse sensitivity in Windows 6/11, follow these steps:
1. Go to the Start menu and open the Control Panel.
2. In the Control Panel, click on the “Mouse” option.
3. In the Mouse Properties window, navigate to the “Pointer Options” tab.
4. Under the “Motion” section, you will find a slider labeled “Select a pointer speed”.
5. Slide the pointer speed to the desired sensitivity level.
6. Click “Apply” and then “OK” to save the changes.
Question 2: What is the default mouse sensitivity in Windows 6/11?
The default mouse sensitivity in Windows 6/11 is set to the middle point on the pointer speed slider. This is usually the 6th notch out of 11 notches on the slider. However, the actual sensitivity may vary depending on the specific mouse and personal preferences.
Keep in mind that the default sensitivity may not always be ideal for everyone. You can adjust the sensitivity according to your preference by following the steps mentioned in the previous question.
Question 3: How does changing the mouse sensitivity affect cursor movement?
Changing the mouse sensitivity in Windows 6/11 affects the speed at which the cursor moves across the screen. Increasing the sensitivity will make the cursor move faster, while decreasing the sensitivity will make it move slower.
It’s important to find the right balance of sensitivity that suits your needs and feels comfortable for precise cursor movement. Experiment with different sensitivity settings to determine what works best for you.
Question 4: Can I change the mouse sensitivity for specific applications?
No, the mouse sensitivity setting in Windows 6/11 applies system-wide and affects the cursor movement in all applications. You cannot set different sensitivity levels for different applications using the default Windows settings.
However, some specific applications or gaming software may offer their own mouse sensitivity settings that can be customized independently from the Windows settings. Check the settings within the application or game you want to adjust the mouse sensitivity for.
Question 5: Will changing the mouse sensitivity affect the mouse’s DPI settings?
No, changing the mouse sensitivity in Windows 6/11 does not directly affect the mouse’s DPI (Dots Per Inch) settings. The DPI setting determines the mouse’s hardware sensitivity, while the Windows sensitivity setting adjusts the software sensitivity.
However, changing the Windows sensitivity can indirectly affect how the DPI setting feels. If you have a high DPI mouse, decreasing the Windows sensitivity may make the cursor movement feel smoother and more precise. Conversely, increasing the Windows sensitivity may make the cursor movement feel faster and more responsive, even if the DPI setting remains the same.
In conclusion, understanding and being able to adjust the mouse sensitivity on your Windows operating system can greatly enhance your overall computing experience. By following the step-by-step guide provided in this article, you can now confidently navigate through your computer with precision and speed. Whether you are a gamer looking for optimal control, a graphic designer needing accuracy, or simply someone who wants to customize their mouse settings to fit their personal preferences, changing the mouse sensitivity to 6/11 on Windows is a crucial skill to have.
Remember, finding the perfect mouse sensitivity may require some trial and error. It is important to experiment with different settings until you find the one that feels most comfortable and natural to you. So, don’t be afraid to tinker with your mouse settings and fine-tune them to your liking. With a little practice and patience, you’ll soon be gliding effortlessly across your screen, completing tasks with ease, and enjoying a more ergonomic and efficient computing experience.
Windows sensitivity 6 11: как поставить

Windows sensitivity 6 11 — это один из способов настройки чувствительности курсора мыши в Windows. Эта опция может быть полезна для игроков, которым нужна максимальная точность и скорость движения мыши.
Как поставить Windows sensitivity 6 11
Следуя этому шаг за шагом руководству, вы сможете легко установить Windows sensitivity 6 11 на вашем компьютере:
- Откройте меню «Пуск» в нижнем левом углу экрана.
- Напечатайте «Regedit» в поисковой строке и нажмите «Enter».
- Откройте редактор реестра.
- Найдите путь HKEY_CURRENT_USER\Control Panel\Mouse.
- Откройте параметр «MouseSensitivity».
- Измените значение на «6».
- Откройте параметр «MouseSpeed».
- Измените значение на «11».
- Перезагрузите компьютер.
Что такое чувствительность мыши и зачем она нужна

Чувствительность мыши — это настройка, позволяющая пользователю изменять скорость движения курсора при перемещении мыши.
Эта настройка может быть особенно полезна для людей, занимающихся графическим дизайном или игр, где нужна высокая точность и скорость движения мыши.
Как выбрать оптимальную чувствительность мыши
Выбор оптимальной чувствительности мыши зависит от вашей персональной предпочтительности и стиля игры. Некоторые игроки предпочитают очень низкую чувствительность, чтобы двигать мышь только немного, в то время как другие игроки предпочитают более высокую чувствительность, чтобы увеличить скорость движения мыши.
Чтобы выбрать оптимальную чувствительность мыши, попробуйте несколько разных настроек и посмотрите, какие характеристики вам нравятся больше всего.
Как обновить драйвер мыши
Альтернативный способ повышения чувствительности мыши на вашем компьютере — это обновить драйвер мыши.
Для обновления драйвера мыши вы можете выполнить следующие шаги:
- Откройте меню «Пуск».
- Напишите «Управление устройствами» в строке поиска и нажмите «Enter».
- Выберите «Мыши и другие устройства указателей» в списке устройств.
- Откройте свойства мыши.
- Перейдите на вкладку «Драйвер».
- Выберите «Обновление драйвера».
- Следуйте инструкциям на экране, чтобы установить последнюю версию драйвера мыши.
Итог
Настройка чувствительности мыши в Windows может увеличить точность и скорость движения курсора. Установка Windows sensitivity 6 11 позволяет быстро и легко изменить настройки чувствительности мыши на вашем компьютере.
Хотите узнать больше о настройке компьютера и программного обеспечения? Подписывайтесь на наш сайт, чтобы получать последние новости и советы по техническому обслуживанию компьютеров!
Windows sensitivity 6 11 как поставить

Настройка чувствительности мыши (sensitivity) в Windows — это одно из важных элементов, которые влияют на точность перемещения курсора или прицела. Некоторые игроки считают, что оптимальными параметрами являются 6/11. Но как их задать, чтобы достичь максимального эффекта? Об этом поговорим дальше.
Запуск настроек мыши
Прежде всего, необходимо запустить меню настройки мыши. Можно сделать это несколькими способами:
- Нажать правую кнопку мыши на пустом месте на рабочем столе и выбрать «Настройки отображения»
- Открыть «Панель управления», выбрать «Мышь» и затем «Настройка параметров мыши»
- В контекстном меню на значке «Мой компьютер» выбрать «Свойства», затем «Дополнительные параметры системы», «Свойства системы», «Дополнительно», «Настройки производительности», и затем выбрать «Подстройка для максимальной производительности».
Настройка параметров мыши
После запуска настроек мыши необходимо перейти на вкладку «Параметры». Затем следует настроить следующие параметры:
- Частота опроса мыши (polling rate) — это скорость, с которой мышь передает данные на компьютер. Она должна быть наибольшей, для достижения максимальной точности.
- Чувствительность мыши (sensitivity) — это скорость движения курсора при перемещении мыши. Оптимальные параметры — 6 устанавливается в настройках Windows, а в играх — 400 DPI. В то же время, каждый должен выбрать свои индивидуальные настройки согласно своей комфортности.
Другие способы настройки мыши
Помимо настроек в Windows, можно использовать дополнительные программы для настройки мыши. Причем такие программы предоставляют гораздо больший функционал и дополнительные настройки, которые не доступны в стандартных настройках Windows. Некоторые из таких программ:
- Razer Synapse
- Corsair iCue
- SteelSeries Engine
Итог

Чувствительность мыши — это важный параметр для тех, кто играет. Оптимальные настройки — 6/11 в Windows и 400 DPI в играх. Но каждый должен выбрать свои настройки согласно своей комфортности. Также можно использовать дополнительные программы для настройки мыши, которые предоставляют большую функциональность и дополнительные настройки.
Windows sensitivity 6 11 как поставить

Windows sensitivity — это настройка чувствительности мыши в Windows. Если вы играете в игры, то правильная настройка sensitivity может помочь вам улучшить свои навыки и достичь большего успеха в игре. Одна из самых распространенных настроек sensitivity — это значение 6/11. В этой статье мы рассмотрим, как установить эту настройку и почему это важно.
Что такое Windows sensitivity и как она работает?
Sensitivity — это настройка, которую вы можете изменить в Windows, чтобы изменить чувствительность мыши. Когда вы двигаете мышь, она отправляет сигналы компьютеру, который использует эти данные, чтобы определить, насколько и как быстро переместить указатель по экрану.
Но как же это работает? Ответ прост. Частота обновления скорости перемещения курсора зависит от настройки sensitivity. Чем выше настройка, тем быстрее курсор перемещается по экрану. При определенной скорости перемещения вы можете добиться максимальной точности, установив настройки в определенных пределах.
Как установить настройку sensitivity 6/11?

Теперь мы попробуем узнать, как установить настройку Windows sensitivity 6/11. Это очень просто и не займет много времени. Выполните следующие шаги:
- Шаг 1: Правый клик на пустом месте на рабочем столе и выберите «Панель управления» из меню.
- Шаг 2: Нажмите «Мышь» из списка в панели управления.
- Шаг 3: На вкладке «Параметры указателя» переместите бегунок под «Чувствительность» на положение 6/11.
- Шаг 4: Нажмите «Применить», затем «ОК».
Теперь ваша настройка sensitivity установлена на 6/11. Можете проверить ее на работоспособность и удобство в использовании.
Почему Windows sensitivity 6/11 важно для игр?
Windows sensitivity 6/11 считается наиболее удобной и точной настройкой для игроков. Множество профессиональных игроков используют эту настройку и рекомендуют ее своим зрителям и поклонникам. Это настройка обеспечивает равномерное распределение значения чувствительности во всех частях экрана. При использовании других настроек, курсор может перемещаться неравномерно, что может снизить точность при стрельбе или перемещении камеры в игре.
Настройка чувствительности мыши может быть важным фактором в производительности для игроков. Слишком высокая или слишком низкая sensitivity может привести к тому, что вы не сможете управлять курсором и играть на должном уровне.
Общий итог
В этой статье мы рассмотрели, что такое Windows sensitivity и как она работает. Мы также узнали, как установить настройку sensitivity 6/11 и почему она важна для игроков. Windows sensitivity 6/11 считается наиболее точной настройкой для игроков и рекомендуется