
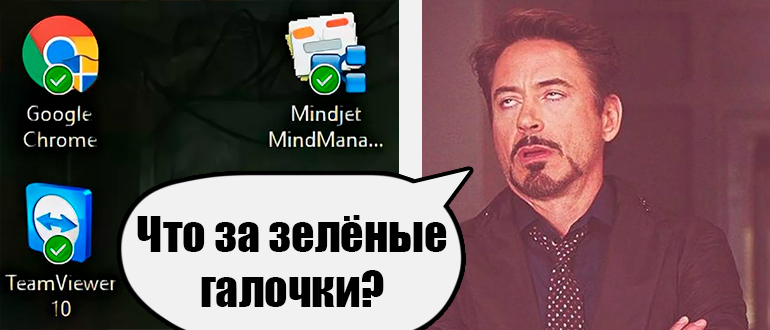
Зелёные галочки на значках рабочего стола — что означают и как убрать?
Пользователи Windows 11 и Windows 10 могут столкнуться с тем, что в правом нижнем углу ярлыков, папок и файлов рабочего стола отображаются отметки с зелёными галочками. Не все знают, что они означают, а некоторые предпочитают их не видеть.
В этой инструкции подробно об этих отметках, способах избавиться от них и дополнительная информация, которая может быть полезной.
Резервное копирование Рабочего стола в OneDrive
Зелёные галочки на ярлыках и других элементах рабочего стола означают, что они синхронизируются с OneDrive. При этом возможны два варианта их отображения. Первый — белые галочки в зелёных закрашенных кружках:
Что означает, что файл хранится локально, а его копия находится в OneDrive, при этом при изменении на другом устройстве или в облаке загрузка обновленной копии произойдет автоматически.
Второй вариант — зелёные галочки на белом фоне:
Это говорит о том, что файл хранится в облаке и может находиться или не находиться на ПК, может автоматически сгружаться с компьютера в облако, чтобы не занимать место на компьютере. Синхронизация версий производится при открытии файла.
Само резервное копирование обычно настраивается при первоначальной настройке Windows 11/10 после установки или создания нового пользователя.
Как убрать зеленые галочки с ярлыков, файлов и папок рабочего стола
Если вы не хотите видеть зелёные отметки на элементах рабочего стола, вы можете поступить одним из следующих способов:
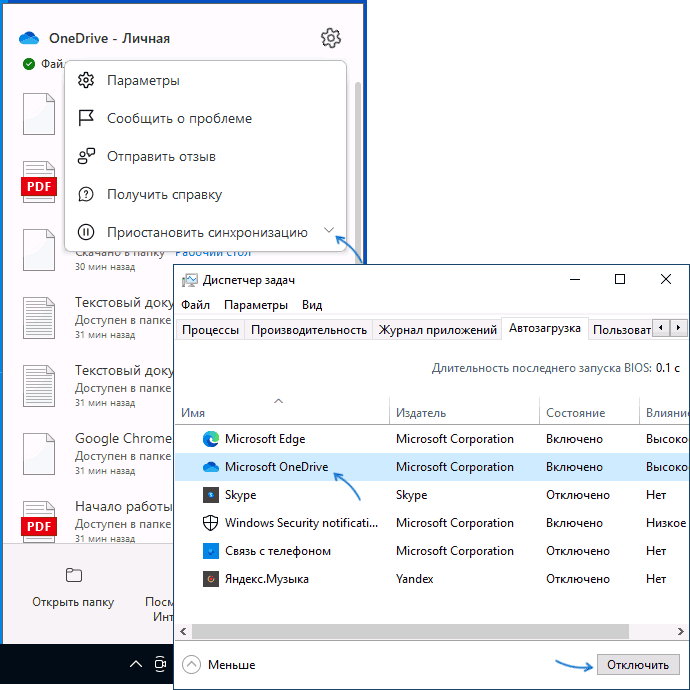
- Выйти из OneDrive (нажмите правой кнопкой по значку в области уведомлений, затем по кнопке «Параметров», затем — Выйти из OneDrive в разделе Приостановить синхронизацию) и убрать OneDrive из автозагрузки. При желании вы можете даже удалить OneDrive с компьютера.

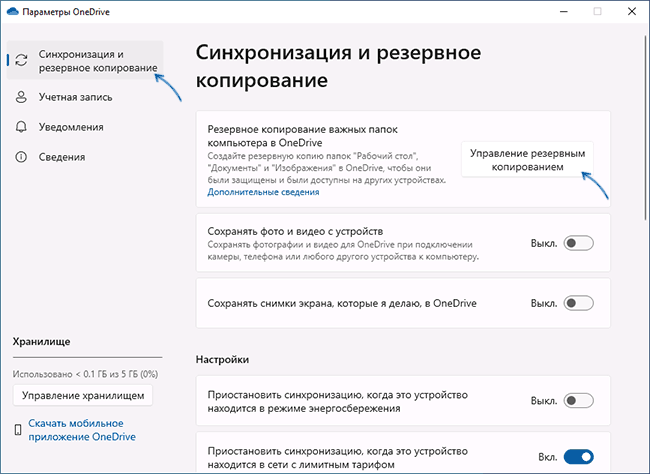
- Отключить резервное копирование рабочего стола в OneDrive. В этом случае сам OneDrive и, при необходимости, резервное копирование других папок пользователя продолжит работать. Подробнее все шаги описаны в этой инструкции.

При необходимости сохранить синхронизацию файлов рабочего стола включенной, убрав при этом зелёные галочки с них, к сожалению, рабочего способа для актуальной версии OneDrive я подсказать не могу. Ранее работал следующий метод:
- Запуск редактора реестра (Win+R — regedit).
- Переход к разделу
HKEY_LOCAL_MACHINE\SOFTWARE\Microsoft\Windows\CurrentVersion\Explorer\ShellIconOverlayIdentifiers
- Переименование или удаление всех вложенных подразделов с именами OneDrive с последующей перезагрузкой компьютера.

В моём тесте в Windows 10 и 11 последних версий способ не сработал: значки остались. Возможно, в вашем случае результат будет иным.
Надеюсь, инструкция поможет разобраться с зелёными галочками на элементах рабочего стола. Если у вас остались вопросы или есть собственные решения в контексте рассмотренной темы, буду рад вашему комментарию ниже.
Table of contents
- Why Are There Green Check Marks on My Desktop Icons?
- Types of Green Check Marks on Desktop Icons
- How to Get Rid of the Green Check marks on Desktop Icons?
- Method 1: Disable OneDrive sync
- Method 2: Turn off OneDrive
- Method 3: Build the icon cache anew
- Method 4: Delete the Files
- Fixing Green Checks All Over Windows
- Method 1: Disable Google Drive’s sync
- Method 2: Edit the registry
- How to Get Rid of Green Check Marks on Desktop Icons: Explained
- FAQ
Microsoft’s proprietary cloud service, OneDrive, blends effortlessly with Windows 10 and 11. It works as part of the OS connected to the cloud, and you can access your files from there anytime with an Internet connection.If icons on your desktop represent your OneDrive data, you may see green check marks on desktop icons.Google also offers a similar service to Google Drive, which uses check marks to indicate when the cloud service is running and when files are synced with cloud storage.So, why are there green check marks on desktop icons? This article tells you why and how to remove them.
Why Are There Green Check Marks on My Desktop Icons?
Green is the universal color for the Internet or being online. For example, a dot on most messaging platforms means that the person is online. So, when you notice check marks on some of your desktop icons, it signals something important.No, the green check marks don’t mean your PC has been invaded by malware. There’s no need to panic here.Instead, these marks are how Microsoft OneDrive tells you it has successfully backed up all your files. All your selected files and folders are now on the cloud. So, should you lose the PC or suffer storage failure, your important data remains safe on the OneDrive servers.Another fine consequence is the ability to port your desktop icons to another PC. If you ever wish to access your cloud files from another Windows PC, you can also restore your saved desktop icons to the new PC.See? Told you there is nothing to worry about.
Types of Green Check Marks on Desktop Icons
However, you should know what you’re dealing with here. Even though the color of the check marks is green, there are two types.
- The green outlined checkmark: When this type appears on your desktop icons, the highlighted icons represent an online file. They can’t be used offline but can be downloaded when needed.
- The solid green checkmark: This type of mark highlights a file that is fully accessible and downloadable offline. They can take up space on your local hard drive.
Before we move on, let’s briefly talk about two other colored check marks that OneDrive generates:
- The blue mark: Blue is the most common representation for uploading or downloading stuff. A blue checkmark on your desktop icon means that the file is being uploaded to OneDrive. Remember that you cannot access online-only files when your device is disconnected.
- The red mark: A red mark on your desktop icon means there’s a problem with the OneDrive file. It commonly shows up when the file isn’t synchronized with the cloud, such as if a network disruption interferes with cloud syncing.
Google Drive also has different icons that represent when a file is syncing, when it is queued, and when it is fully synced.
These days, Microsoft’s OneDrive and Google Drive no longer display the annoying green marks on Desktop icons.
However, these checkmarks are displayed in the respective apps and sometimes their folders, especially next to synced files.
Now, let’s see how you can remove the green check marks from your Windows desktop icons if they’re still visible.
How to Get Rid of the Green Check marks on Desktop Icons?
You have several ways to stop the appearance of these check marks on desktop icons. Whether you’re using Windows 10 or 11, the methods here will quickly fix the issue.
However, before you start, installing the latest version of your cloud solution can help you eliminate the problem. As mentioned, OneDrive and Google Drive no longer impose green marks on Desktop icons.
You can follow the methods below if you still see the annoying icons.
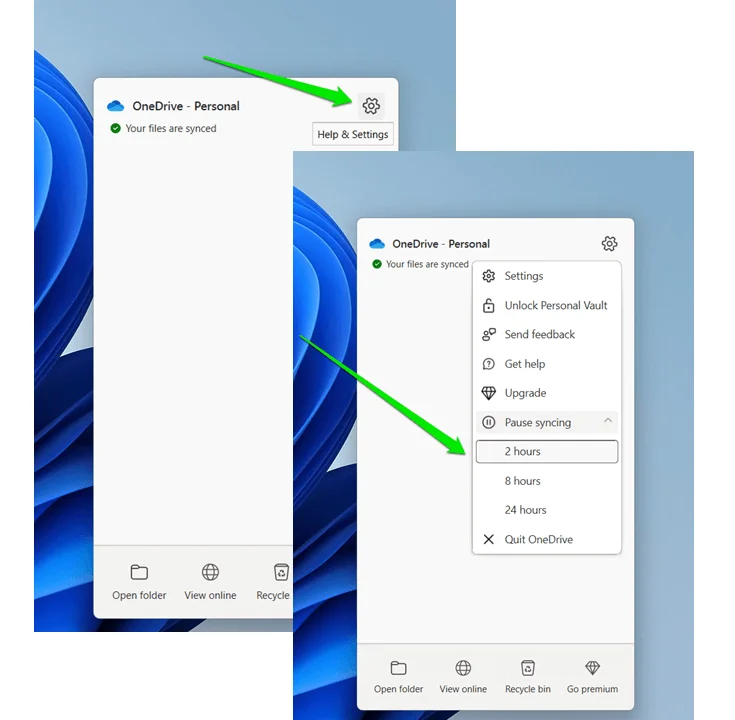
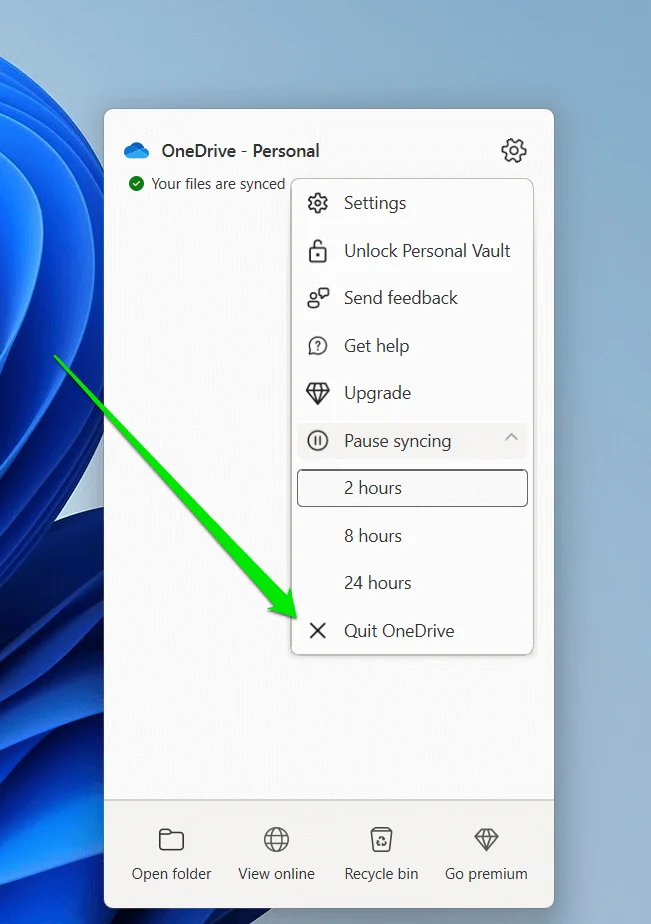
Method 1: Disable OneDrive sync
The green check marks represent that your files are on OneDrive and do not have issues with syncing. So, one way to remove them is to stop the cloud service from syncing your files.
- Locate the OneDrive icon in the system tray and click on it.
- A menu will pop up. Click on Help & Settings.
- Click on Pause syncing and select a timeframe.
Method 2: Turn off OneDrive
Since the marks represent OneDrive functions, disabling OneDrive will remove them.
- Locate the OneDrive icon in the system tray and click on it like before.
- Click on the Settings icon from the pop-up menu.
- Select Quit Drive to turn the service off.
You may receive notifications telling you to enable OneDrive again. If you decide to turn the service off on Windows 10/11, you will have to pay the price.
That said, you shouldn’t see the green checkmarks on Desktop icons anymore.
Also Read:[RESOLVED] There was a problem connecting to OneDrive
Method 3: Build the icon cache anew
The previous steps are usually sufficient to resolve the issue.If the green check marks persist, rebuilding the icon cache might help. The icon cache on Windows is a database that stores copies of every desktop icon. A refresh can eliminate the annoying marks and restore normal icons to your desktop.
- Hit the Windows key and type cmd in the Start menu.
- Right-click on Command Prompt in the search results and select Run as administrator. Alternatively, simply select Run as administrator in the right panel.
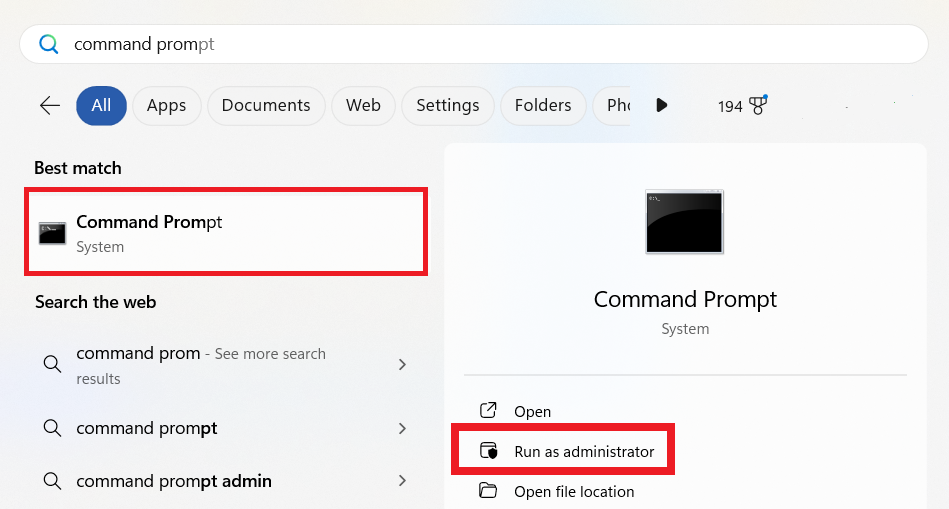
- When the elevated cmd app launches, you need to run some commands. Run each command below. Type or paste the command and press Enter. Do this for every command:
exe-show
taskkill /IM explorer.exe /F (note:- your desktop will go blank)
DEL /A /Q “%localappdata%\IconCache.db”
DEL /A /F /Q “%localappdata%\Microsoft\Windows\Explorer\iconcache*”
Shutdown/p
Once you execute the final command, your PC will shut down. After a few seconds, restart it, and everything should be fine.
Method 4: Delete the Files
The green check marks will disappear if you remove the parent icons. So, you can delete them if you don’t need them. This won’t affect the parent files in OneDrive. They will remain safely saved in the cloud.You can take the chance to find all the unnecessary files on your computer and delete them for good.
PRO TIP
Doing this manually can be daunting, as so many files will be scattered throughout your PC. You can use a utility like Auslogics BoostSpeed ’s cleanup tool to save the day and free up storage space on your PC.
For files specific to OneDrive, you can try out the service’s embedded “Free up space” tool. It will help you clean files you’ve copied from OneDrive but no longer need from your Windows 10/11 desktop.
To use this tool, simply right-click an icon with the green mark or check box and select “Free up space” in the context menu.
Once the icon disappears from your desktop, repeat the process for the other icons with the unwanted labeling.
Fixing Green Checks All Over Windows
Sometimes, the green check marks on Desktop icons may be the least of your worries. Using third-party cloud storage and syncing applications such as Google Drive’s Backup and Sync, you may see overlay icons while using your operating systems.Google Drive’s desktop solution for syncing and backing up files is similar to OneDrive. You can use it to keep your files in the cloud without saving them locally. Similarly, once synchronization is successful, green marks may appear on some synced folders. If you don’t like seeing this, you can take measures.
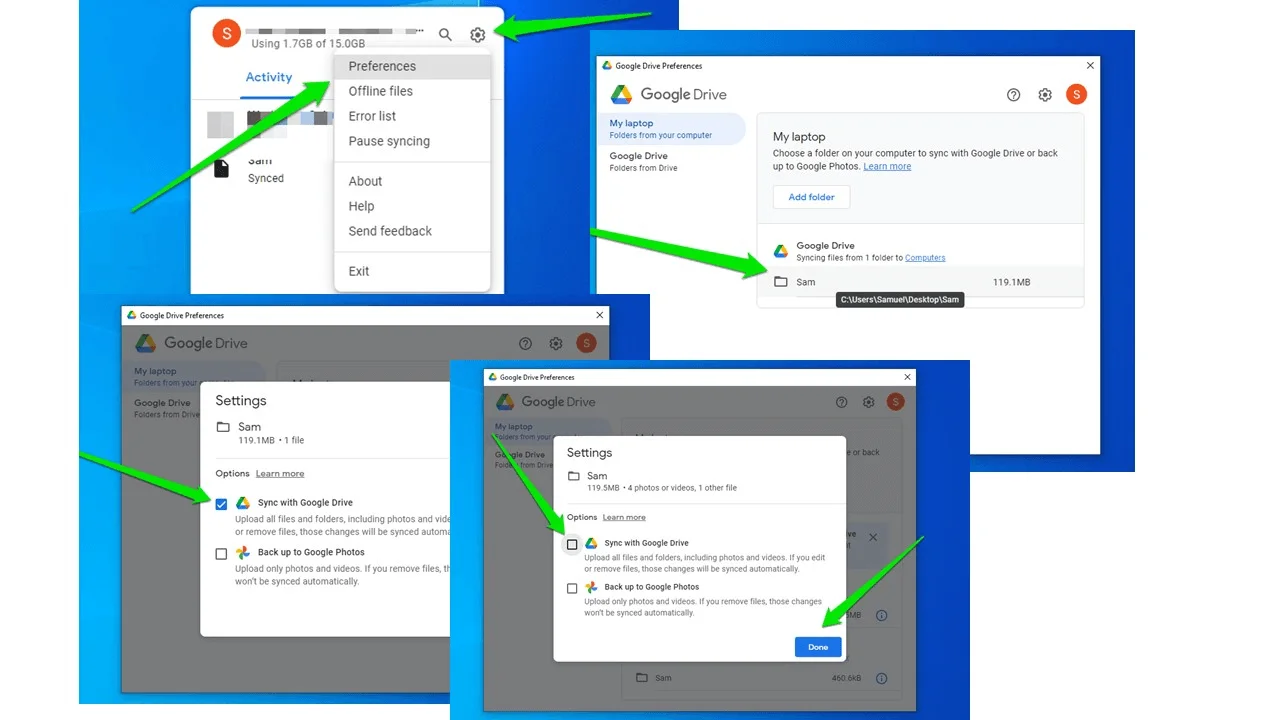
Method 1: Disable Google Drive’s sync
The first step is removing the folder where the green check shows. Here’s how:
- Go to the system tray and click on the Google Drive icon.
- Select the Settings icon in the top right and click on Preferences.
- Now, go to the My Laptop tab and click on the folder.
- Uncheck the Sync with Google Drive option and click Done.
Method 2: Edit the registry
Note
Before starting, please note that editing the registry has serious risks. If you change the wrong key or string, your operating system may begin to malfunction. So, back up the entire registry to be on the safe side.
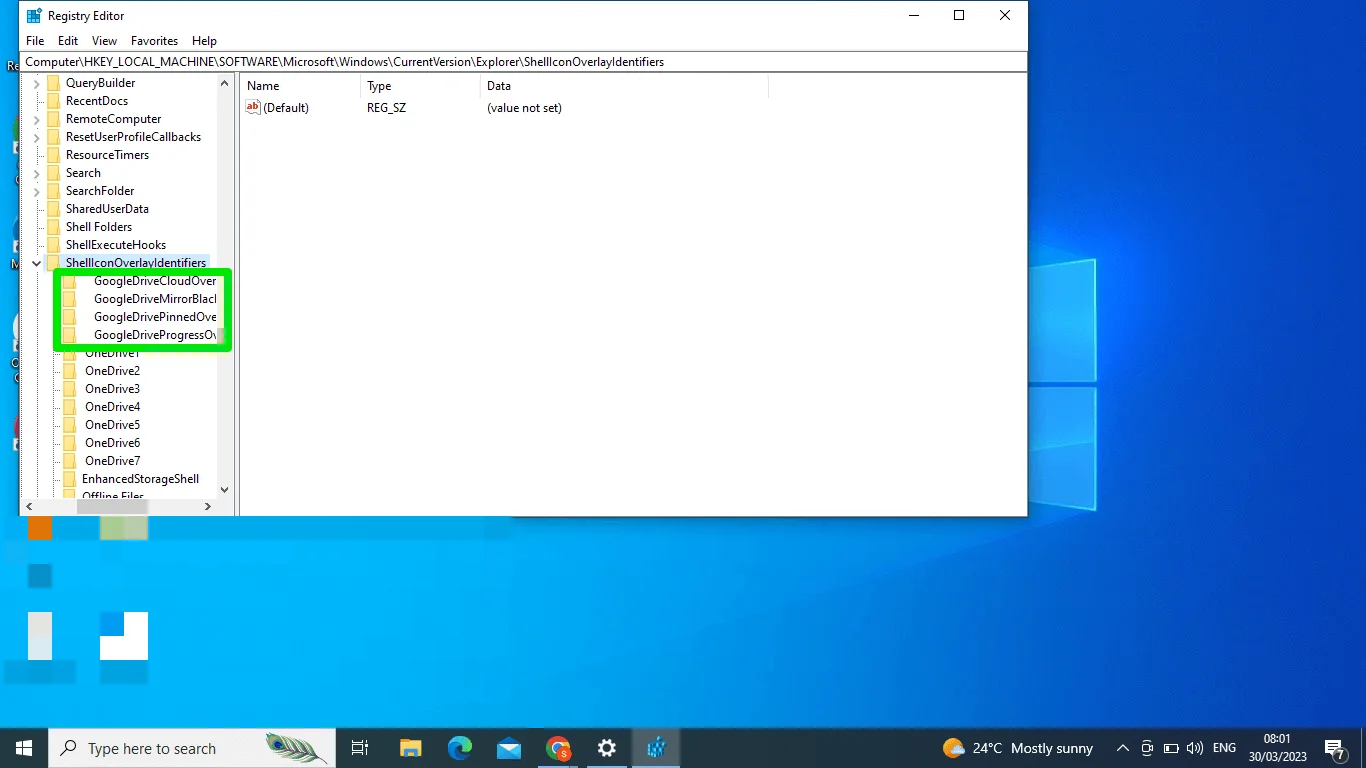
That being said, here is a step-by-step guide on how to get to the following key in the Windows registry:
- Press the Windows key + R on your keyboard to open the Run dialog box.
- Type
regeditIn the text field, press Enter or click OK. This will open the Registry Editor. - In the Registry Editor, navigate to the following key:
HKEY_LOCAL_MACHINE\SOFTWARE\Microsoft\Windows\CurrentVersion\Explorer - Click on the Explorer folder to expand it.
- Scroll down until you see the ShellIconOverlayIdentifiers folder. Click on this folder to expand it.
- You should now be at the desired key:
Computer\HKEY_LOCAL_MACHINE\SOFTWARE\Microsoft\Windows\CurrentVersion\Explorer\ShellIconOverlayIdentifiers. - Now, delete the Google folders under the ShellIconOverlayIdentifiers key.
- Restart your computer.
How to Get Rid of Green Check Marks on Desktop Icons: Explained
Throughout this guide, we’ve provided several ways to remove the green check marks on your desktop icons. Now that you’ve learned how to get rid of them, you can continue to give your Desktop area a cleaner look.
Was this article helpful? Please share with your friends who might find it helpful, and let us know your thoughts in the comment section below!
FAQ
A green outlined check mark means the file is available both offline and online. A solid green check mark indicates the file is always available on your device, even without an internet connection.
Files On-Demand lets you see and access all your OneDrive files without downloading them. Disabling it removes the check marks but will download all files locally, using more storage.
Yes, you can selectively sync files by marking some as Always keep on this device and using Files On-Demand for others, which removes the green check marks from those files.
To eliminate checkmarks from desktop icons, navigate to Windows 10’s desktop icon settings. Right-click on your desktop and choose Personalize from the context menu.
Select Themes from the left sidebar of the Settings window, and then select Desktop icon settings from the Related Settings section.
Uncheck the box next to Checkboxes in the Desktop Icon Settings dialog box, then click Apply and OK. After completing this process, your desktop icons will no longer have checkmarks.
If you see checkboxes (tick box, check mark) on each of your files and folders icons on the desktop or in File Explorer, this guide will show you how to remove the checkboxes from the icons in Windows 11.
Why is there a check mark on my desktop icons?
The check mark, or often known as check box or tick box, on icons is a feature in Windows that allows users to quickly select or highlight multiple files and folders by clicking on the check boxes of the items. This feature is called “Item check boxes”. If this feature is enabled, all icons on your desktop and files and folders in File Explorer will have check boxes on them.
You can disable the feature to get rid of the check boxes from your files and folders icons in Windows 11. Follow one of the two methods below to do so.
The Item checkbox feature is disabled by default in Windows 11. If you know you didn’t enable the feature but the checkboxes suddenly started appearing on files and folders icons in File Explorer and on the desktop, one of your programs may have altered the settings and enabled the item checkbox feature.
How to get rid of the checkbox in Windows 11
The item check boxes feature is an optional feature that some users may find useful when selecting or highlighting multiple files. If you don’t need the feature and want to get rid of the check boxes from desktop icons and items in File Explorer, here’s how to disable the item check boxes feature in Windows 11.
- Open File Explorer or This PC in Windows 11.
- On the menu bar, click on View.
- Hover your mouse over Show.
- Then, uncheck the option called “Item check boxes“.

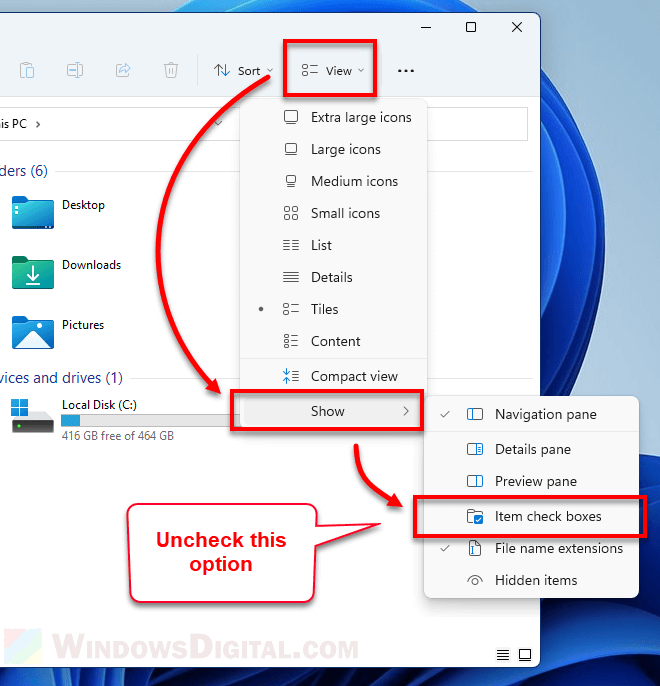
Once the feature is disabled, the check boxes on all icons will disappear.
To turn on the check boxes in Windows 11, simply repeat the steps above and enable the “Item check boxes” feature.
Disable item check box feature via Folder Options
If that doesn’t work to remove the check boxes from icons on your Windows 11, here’s another method to disable the item check boxes feature via the Folder Options in File Explorer.
- Open File Explorer.
- Click on the triple dotted icon at the top right corner of the window.
- Then, select Options.

- In the Folder Options window, click on View tab.
- In the Advanced settings column, scroll down and look for an option called “Use check boxes to select items“.
- Uncheck to disable the option.

- Click Apply, then OK to save the changes.

Both the “item check boxes” options mentioned in the two methods above are the same and correlated with each other. When you disable one, the other will be disabled too. So, you only need to follow one of the two methods above to enable or disable the “item check boxes” feature in Windows 11.
Всем привет! Сегодня я расскажу, что означают зеленые галочки в Windows 10 и Windows 11 на ярлыках, папках, и других файлах, которые можно увидеть на ПК. Иногда они отображаются на рабочем столе, в некоторых случаях их можно увидеть в отдельных разделах или папках. Ниже я подробно опишу – откуда они появляются. Дополнительно мы рассмотрим и другие похожие обозначения.
Содержание
- Ответ на вопрос
- Как убрать зеленые галочки с ярлыков на рабочем столе в Windows
- Способ 1
- Способ 2: Отключение резервного копирования рабочего стола
- Способ 3: Удаление OneDrive
- Видео
- Задать вопрос автору статьи
Ответ на вопрос
Итак, что же обозначают галочки на ярлыках в Win 10 и 11, и как их можно убрать?
Эти галочки обозначают, что эти папки, ярлыки и другие файлы работают с облаком OneDrive. Давайте рассмотрим несколько вариантов, чтобы вы поняли:
Читаем – что такое облако и как им пользоваться бесплатно.
Я вам советую почитать более подробно про саму программу OneDrive – по этой ссылке (переходим и читаем).
Напомню, что бесплатно Microsoft предоставляет пространства на 5 ГБ. В целом многим этого будет достаточно, если вы работаете в основном с текстовыми документами. Для хранения фотографий и видео – этого будет недостаточно.
Если по каким-то неведанным причинам у вас появились галочки на ярлыках в Windows 10 или 11, то их можно легко убрать, выключив синхронизацию с облаком OneDrive. Есть несколько способов.
Способ 1
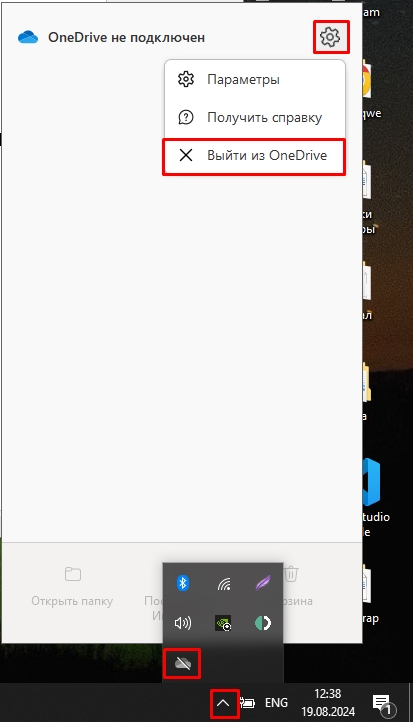
- Нажмите по стрелке в трее, чтобы открыть весь список программ в автозагрузке.
- Выбираем из списка OneDrive.
- Жмем по шестеренке – «Выйти из OneDrive».
- Подтверждаем действие.
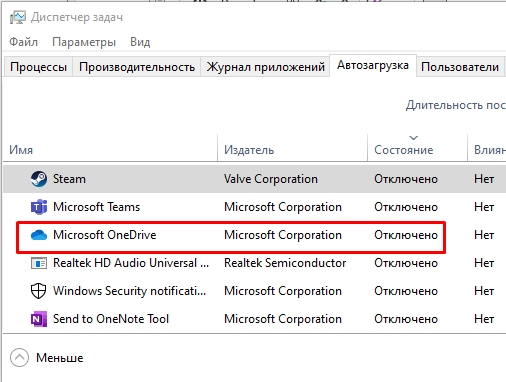
- Теперь надо убрать программу из автозагрузки, чтобы она не запускалась при включении или перезагрузке Виндовс. Кликаем правой кнопкой по пустому месту нижней линии. Выбираем «Диспетчер задач».
- На вкладке «Автозагрузки» находим «One Drive», кликаем по нему ПКМ и выбираем «Отключить».
Способ 2: Отключение резервного копирования рабочего стола
- «Пуск» – «Параметры».
- Переходим в «Обновление и безопасность».
- «Резервное копирование файлов» – жмем по ссылке в правом блоке с тем же названием.
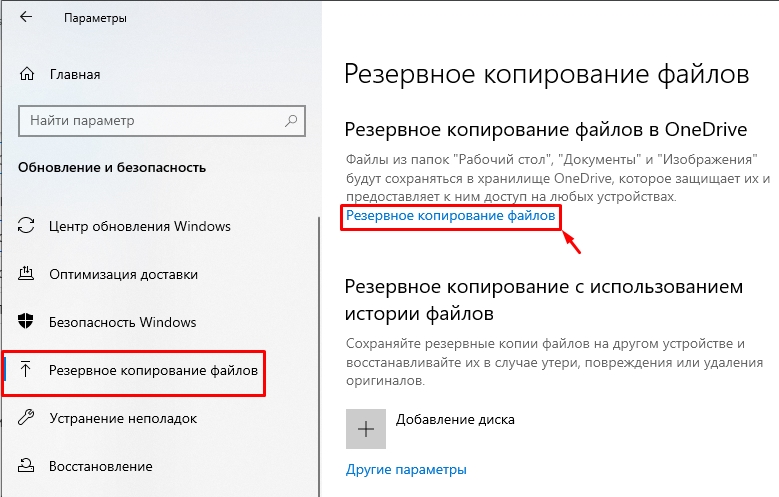
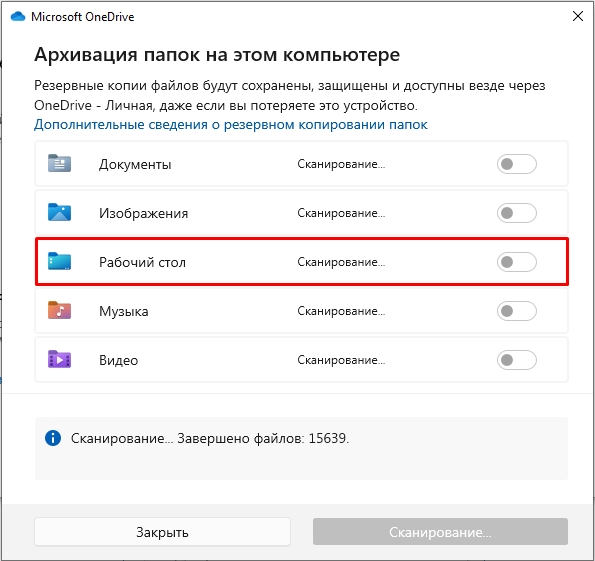
- Отключаем «Рабочий стол».
Способ 3: Удаление OneDrive
Есть даже возможность вообще удалить программу облака от Microsoft. Не переживайте, если она вам вновь понадобится, то вы снова сможете её установить. Читаем – как удалить OneDrive с ПК.

На этом все, дорогие друзья. Пишите свои дополнения в комментариях. До новых встреч на портале WiFiGiD.RU.