
-
Home
-
News
- How to Enable or Disable Peek at Desktop on Windows 10/11?
By Stella | Follow |
Last Updated
Do you know what Peek at desktop is on Windows 10? Is it still available on Windows 11? Do you know how to enable or disable Peek at desktop on Windows 10 or Windows 11? In this post, MiniTool Software will introduce the information you want to know.
What Is Peek at Desktop?
Peek, which is also known as Aero Peek, is the feature responsible for Peek at desktop and taskbar thumbnail live previews on a Windows 10 or Windows 11 computer.
Peek at desktop is still available on Windows 10, but it has been removed from the Show desktop button on Windows 11. However, you still can press and hold “Windows + ,” to peek at the desktop. If you release these two keys, you will go back to the previous screen.
What Is Taskbar Thumbnail Live Preview?
When you hover over your mouse pointer on a minimized icon of an open window on the taskbar, you can see a thumbnail preview of that open window. When you hover over the taskbar thumbnail preview, you will be able to see a live preview of that window. This is a taskbar thumbnail live preview.
How to disable and enable peek at desktop on Windows 10? Believe it or not, you still can turn it on or off on Windows 11. In the following parts, we will introduce these two sections:
- How to enable or disable peek at desktop on Windows 10?
- How to enable or disable peek at desktop on Windows 11?
How to Enable or Disable Peek at Desktop on Windows 10?
It is very easy to enable or disable peek at desktop on Windows 10. Here are two ways respectively.
How to Enable Peek at Desktop on Windows 10?
Way 1: From Taskbar Settings
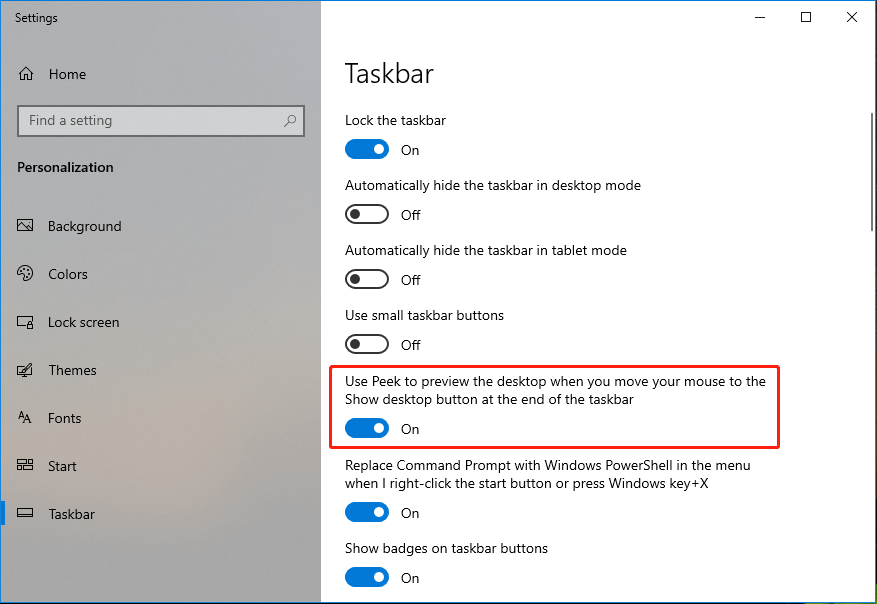
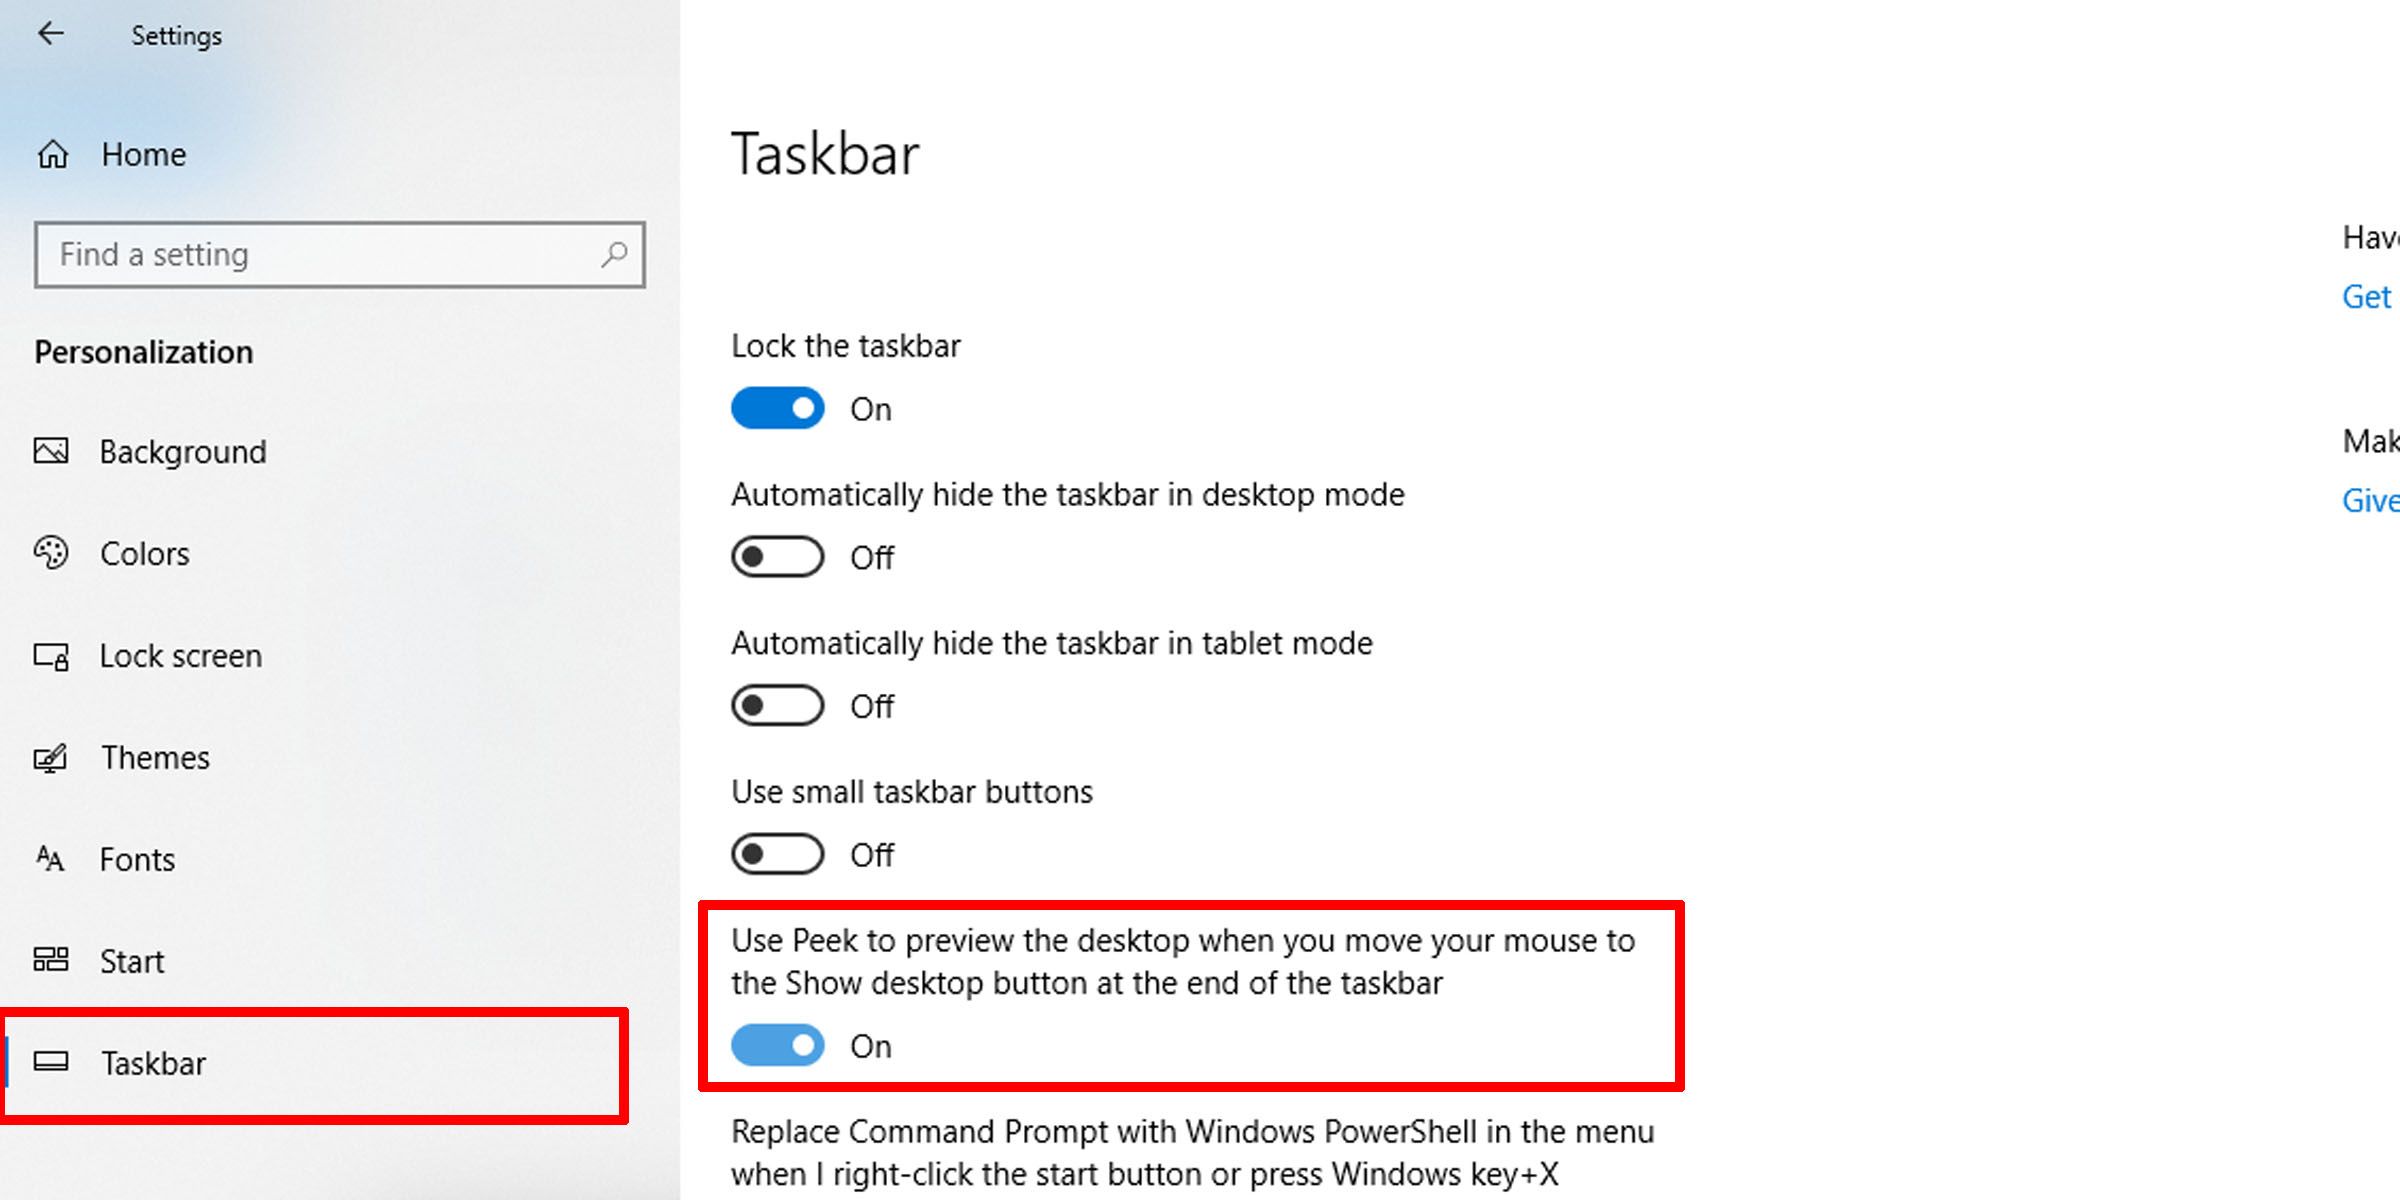
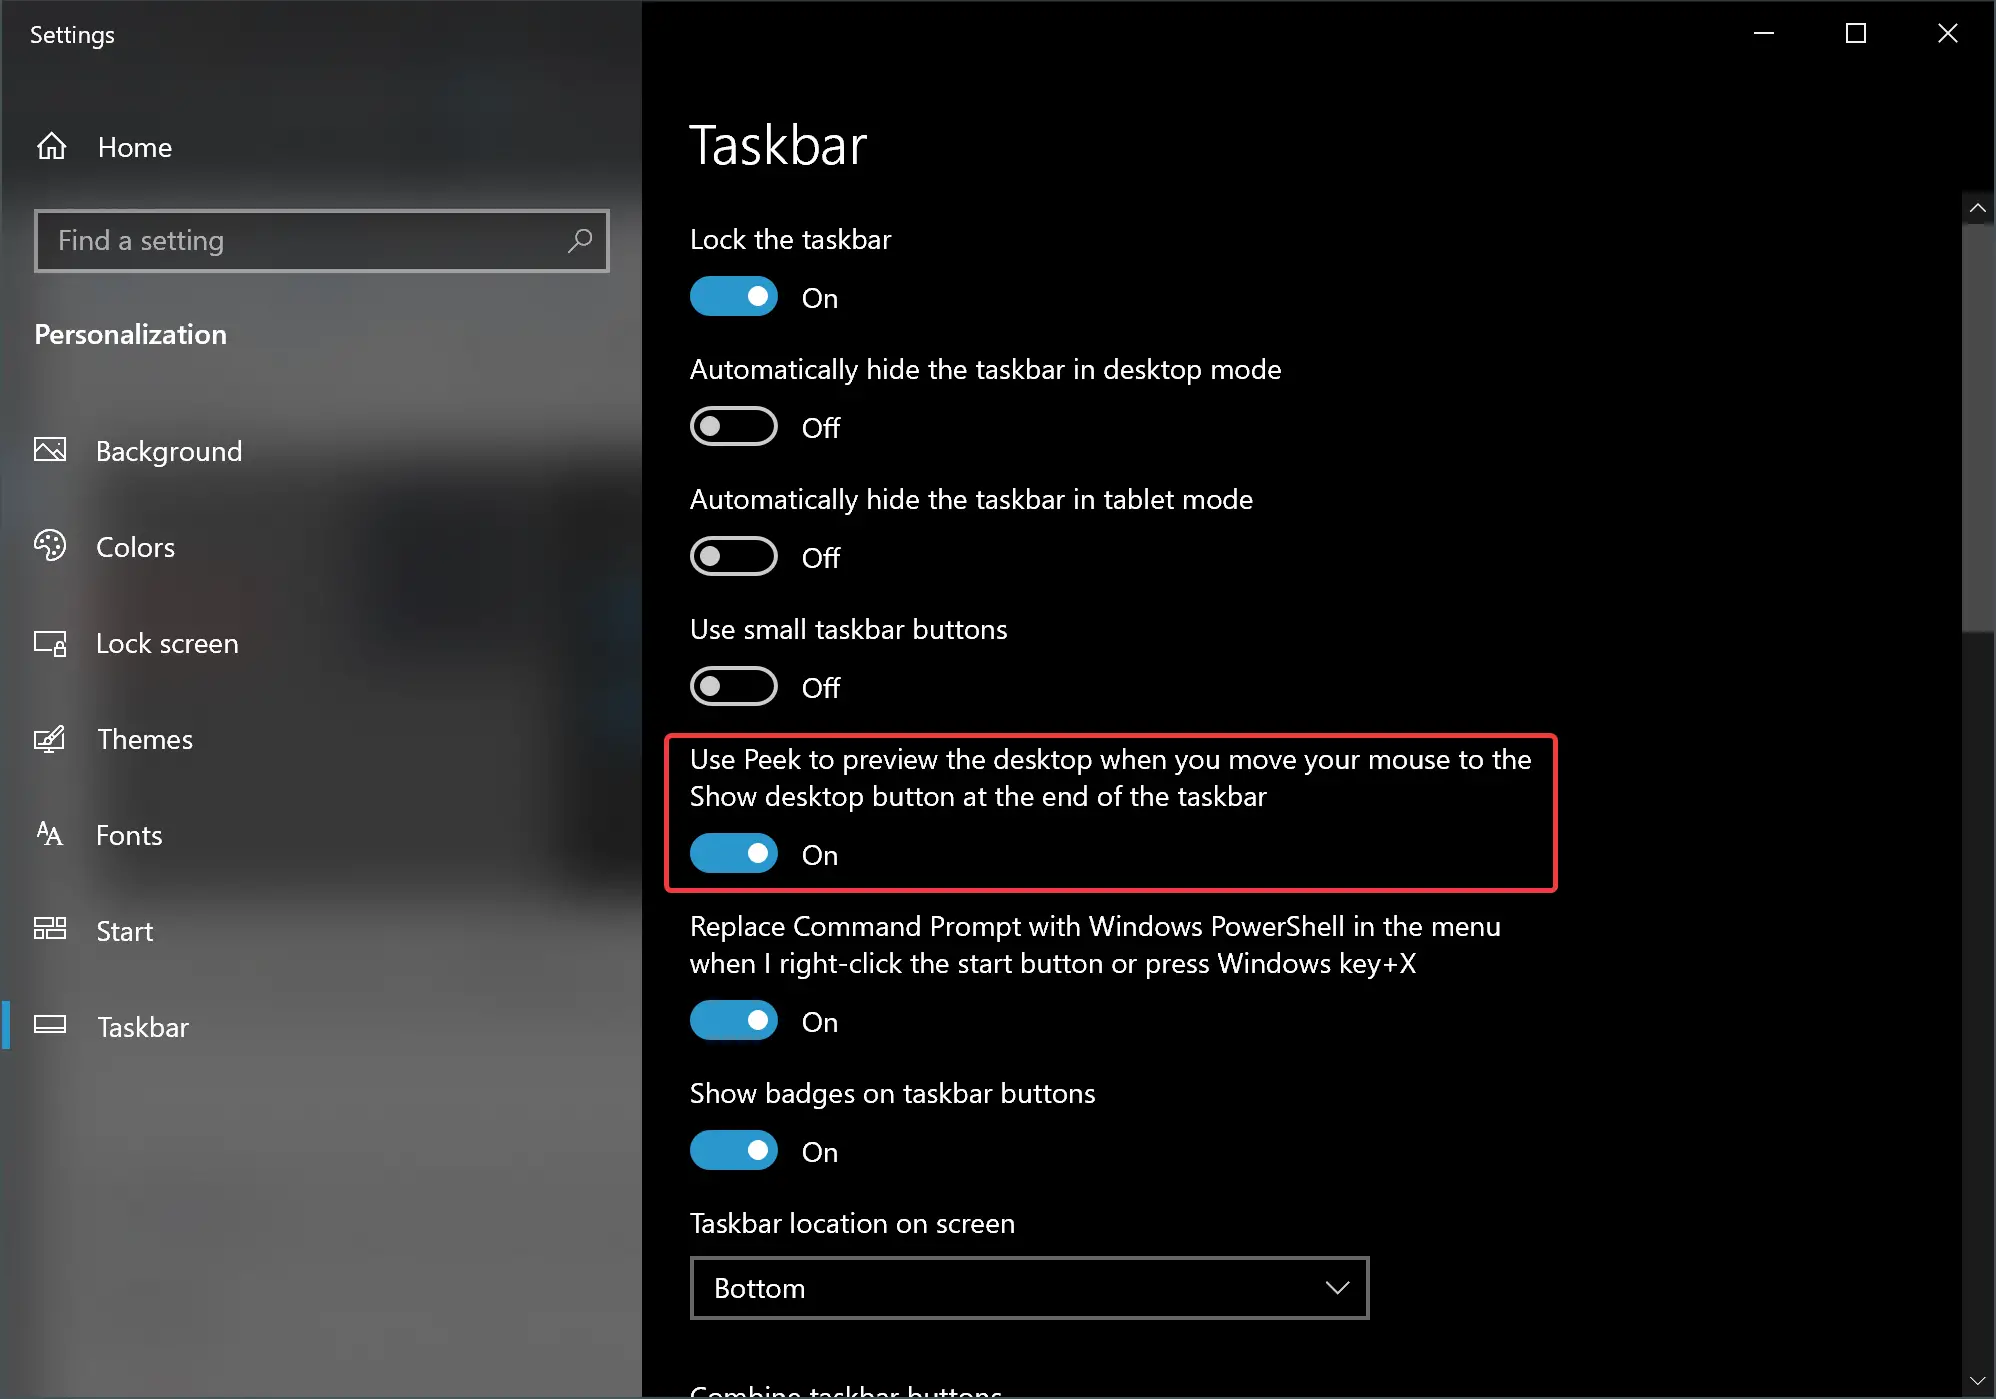
Step 1: Right-click the taskbar and select Taskbar settings.
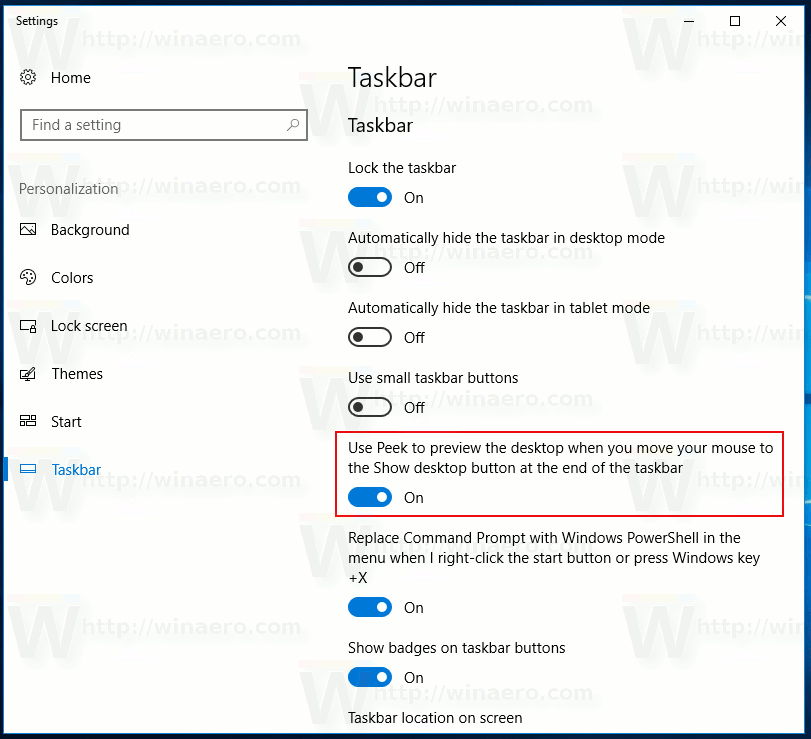
Step 2: You will see the Taskbar settings interface. Find this option: Use Peek to preview the desktop when you move your mouse to the Show desktop button at the end of the taskbar. Turn on the button next to this option. This will enable the peek feature on Windows 10.
Way 2: From Performance Options
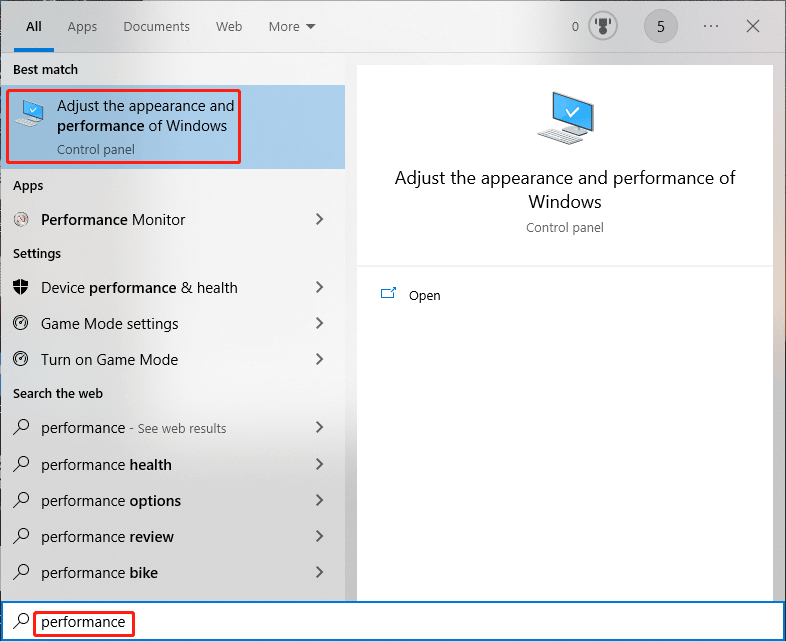
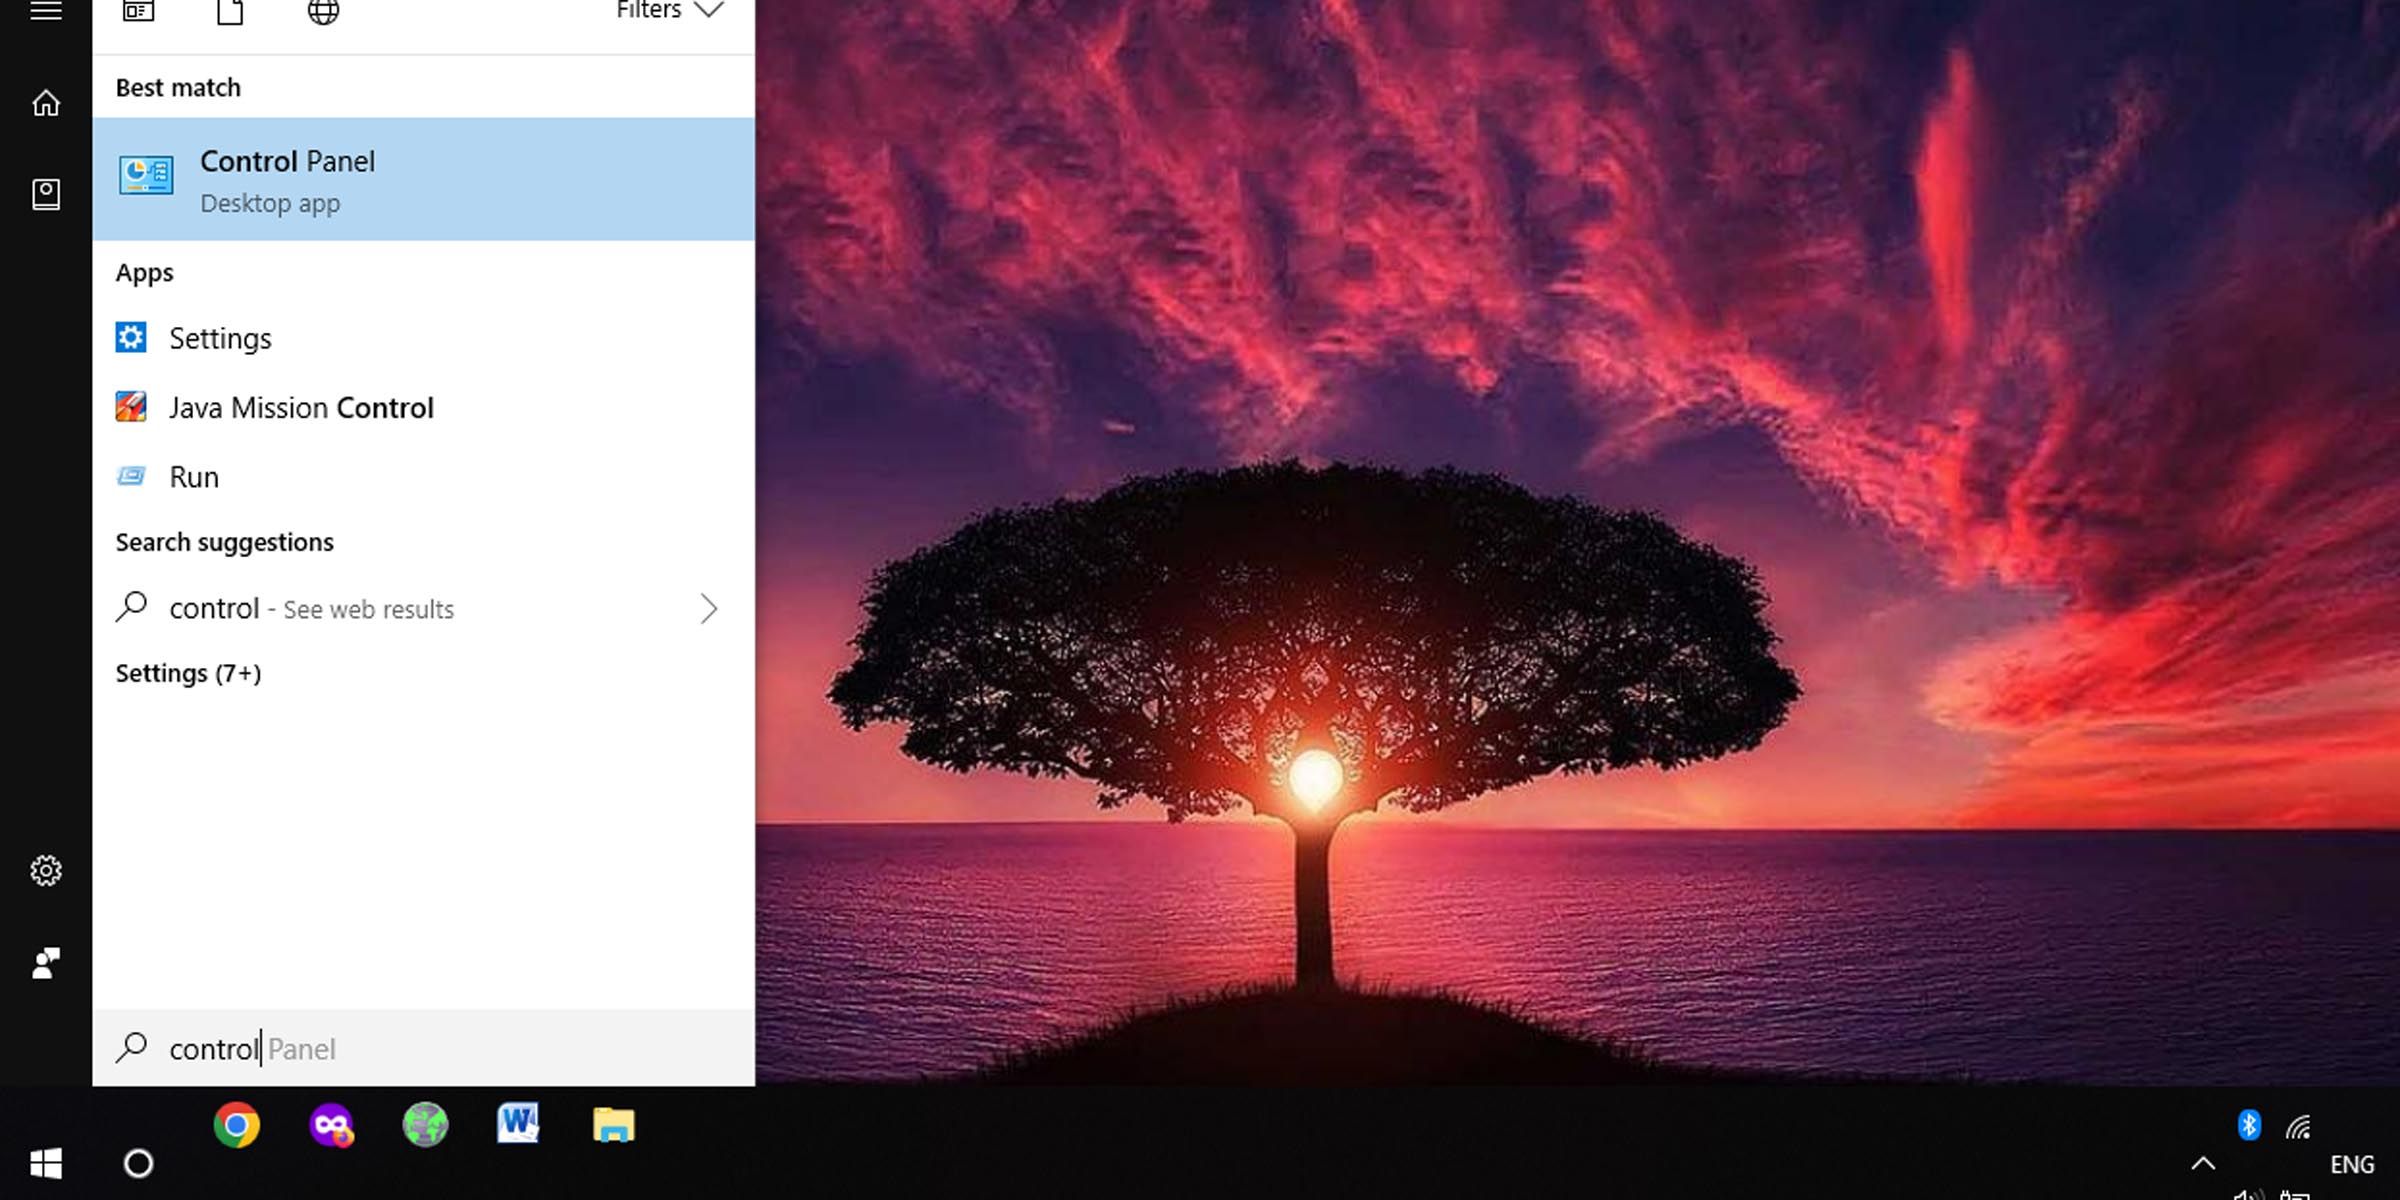
Step 1: Type performance into the search box on the taskbar.
Step 2: Select Adjust the appearance and performance of Windows from the search results. This will open the Performance Options interface.
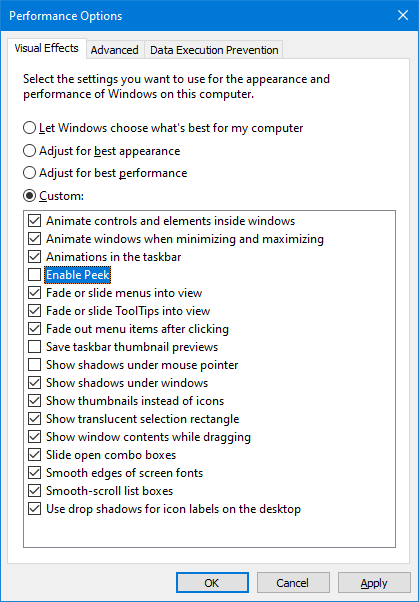
Step 3: Under Visual Effects, select Enable Peek.

Step 4: Click Apply.
Step 5: Click OK.
How to Disable Peek at Desktop on Windows 10?
Way 1: From Taskbar Settings
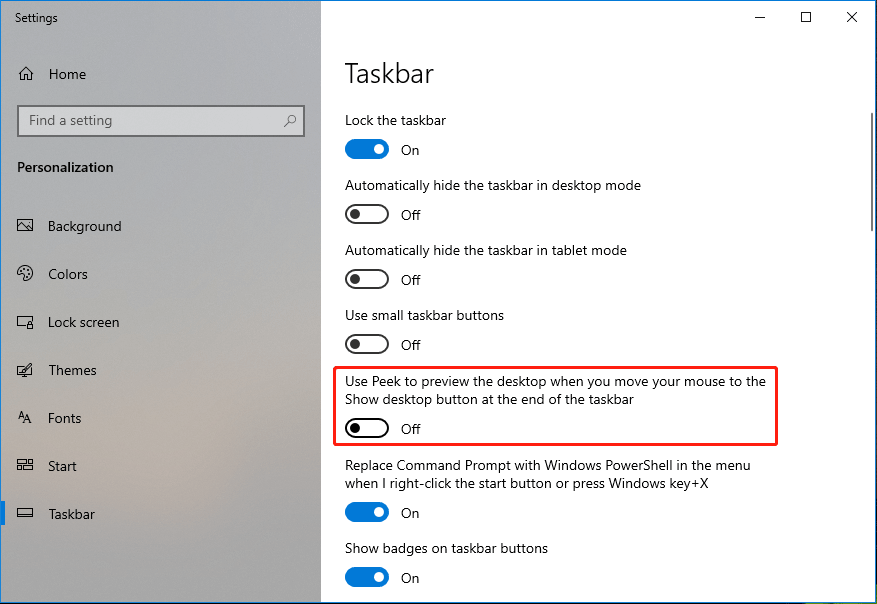
Step 1: Right-click the taskbar and select Taskbar settings.
Step 2: Turn off the button next to Use Peek to preview the desktop when you move your mouse to the Show desktop button at the end of the taskbar. This will disable the peek feature on Windows 10.
Way 2: From Performance Options
Step 1: Type performance into the search box on the taskbar.
Step 2: Select Adjust the appearance and performance of Windows from the search results. This will open the Performance Options interface.
Step 3: Deselect Enable Peek under Visual Effects.
Step 4: Click Apply.
Step 5: Click OK.
How to Enable or Disable Peek at Desktop on Windows 11?
How to Enable Peek at Desktop on Windows 11?
Step 1: Use search to search for Adjust the appearance and performance of Windows. Then, select it from the search result to open the Performance Options interface.
Step 2: Check Enable Peek under Visual Effects.
Step 3: Click Apply.
Step 4: Click OK.
How to Disable Peek at Desktop on Windows 11?
Step 1: Use search to search for Adjust the appearance and performance of Windows. Then, select it from the search result to open the Performance Options interface.
Step 2: Uncheck Enable Peek under Visual Effects.
Step 3: Click Apply.
Step 4: Click OK.
How to Recover Lost or Deleted Files on Windows 10/11?
If you want to recover your missing files on Windows 10/11 computers, you can use MiniTool Power Data Recovery. This is a free file recovery tool, which can help you recover files from different types of data storage devices under different situations.
MiniTool Power Data Recovery FreeClick to Download100%Clean & Safe
Bottom Line
If you want to enable or disable peek at desktop on Windows 10 or Windows 11, you can just try the methods mentioned in this post. You can select a suitable method based on your situation.
About The Author
Position: Columnist
Stella has been working in MiniTool Software as an English Editor for more than 8 years. Her articles mainly cover the fields of data recovery including storage media data recovery, phone data recovery, and photo recovery, videos download, partition management, and video & audio format conversions.
Sign in to your MUO account
Windows 10 has a nifty function called Peek at desktop which allow you to view your desktop without navigating to it. The Peek at desktop function comes in handy when you simply want a quick look at what’s on your desktop, but don’t necessarily want to minimize all your active windows.
Here’s how you can turn the Peek at desktop functionality on or off in Windows 10.
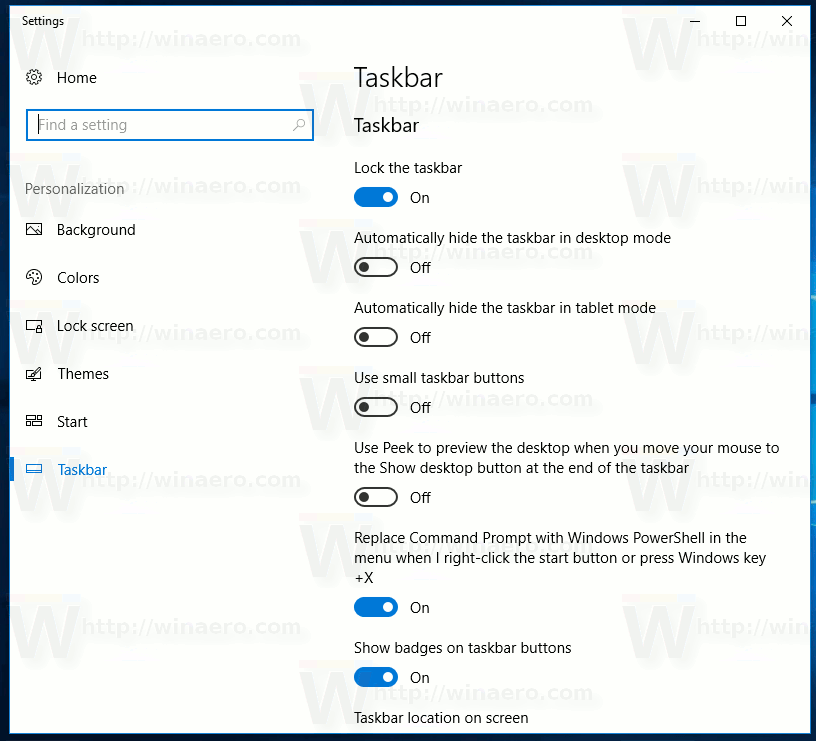
How to Turn «Peek at Desktop» On or Off via Settings
Windows 10’s «peek at desktop» feature is a great way to quickly access the desktop You can toggle how it works by going into Settings.
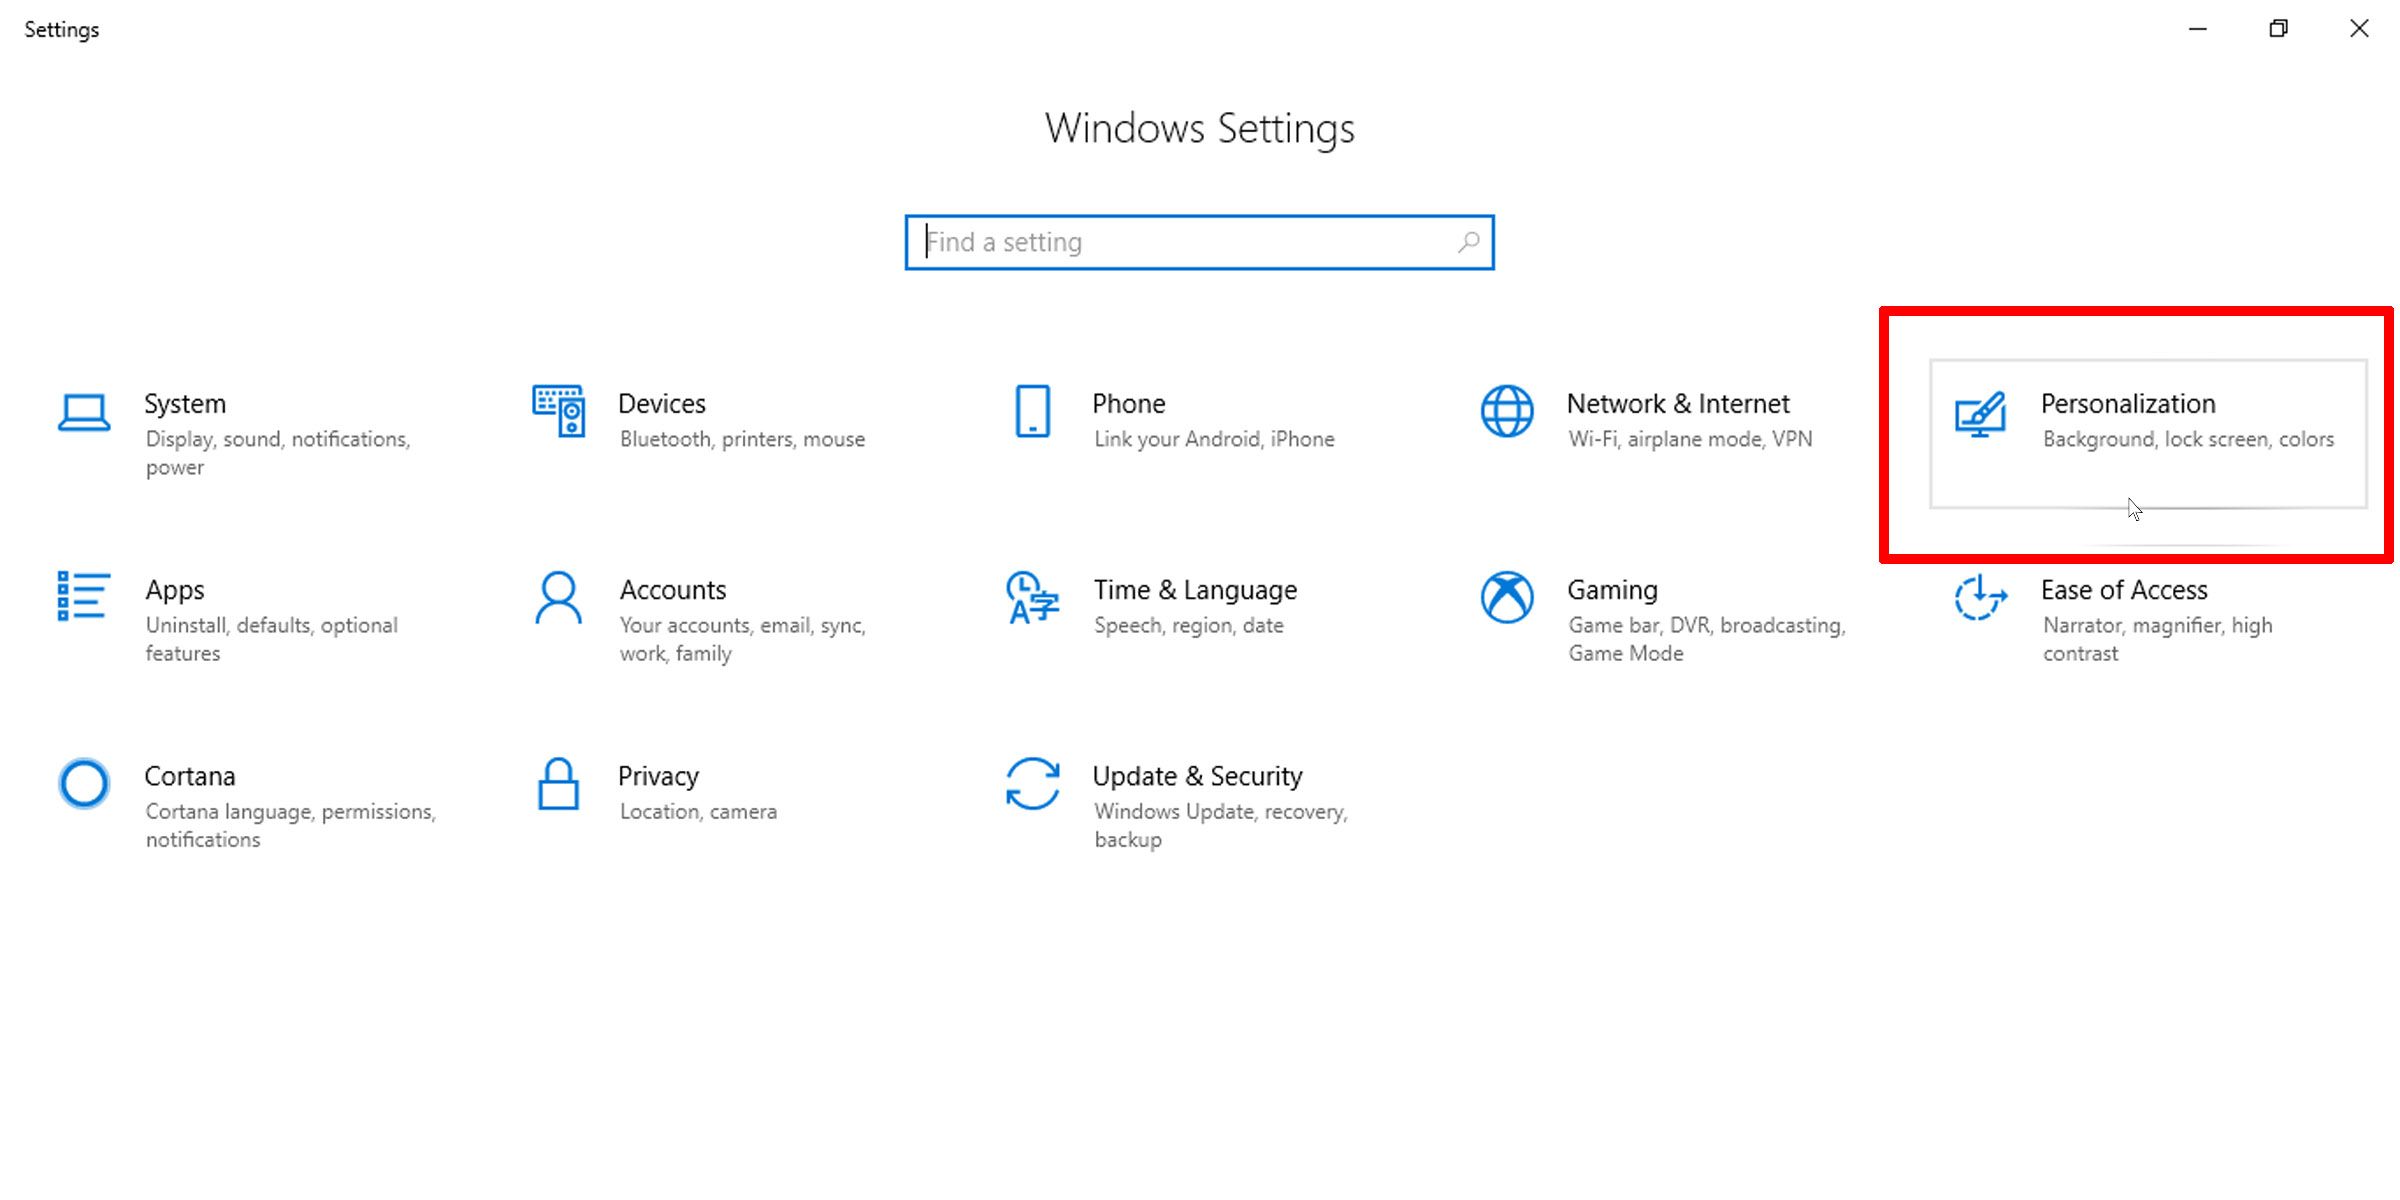
- Click on the Windows Start menu and select Settings.
-
Navigate to Personalization and then to Taskbar on the left panel.

-
Toggle the Use Peek to preview desktop option on or off.
How to Turn Peek at Desktop On or Off via Show Desktop Button
A still easier way to toggle «peek at desktop» on and off is to do it straight from the taskbar.
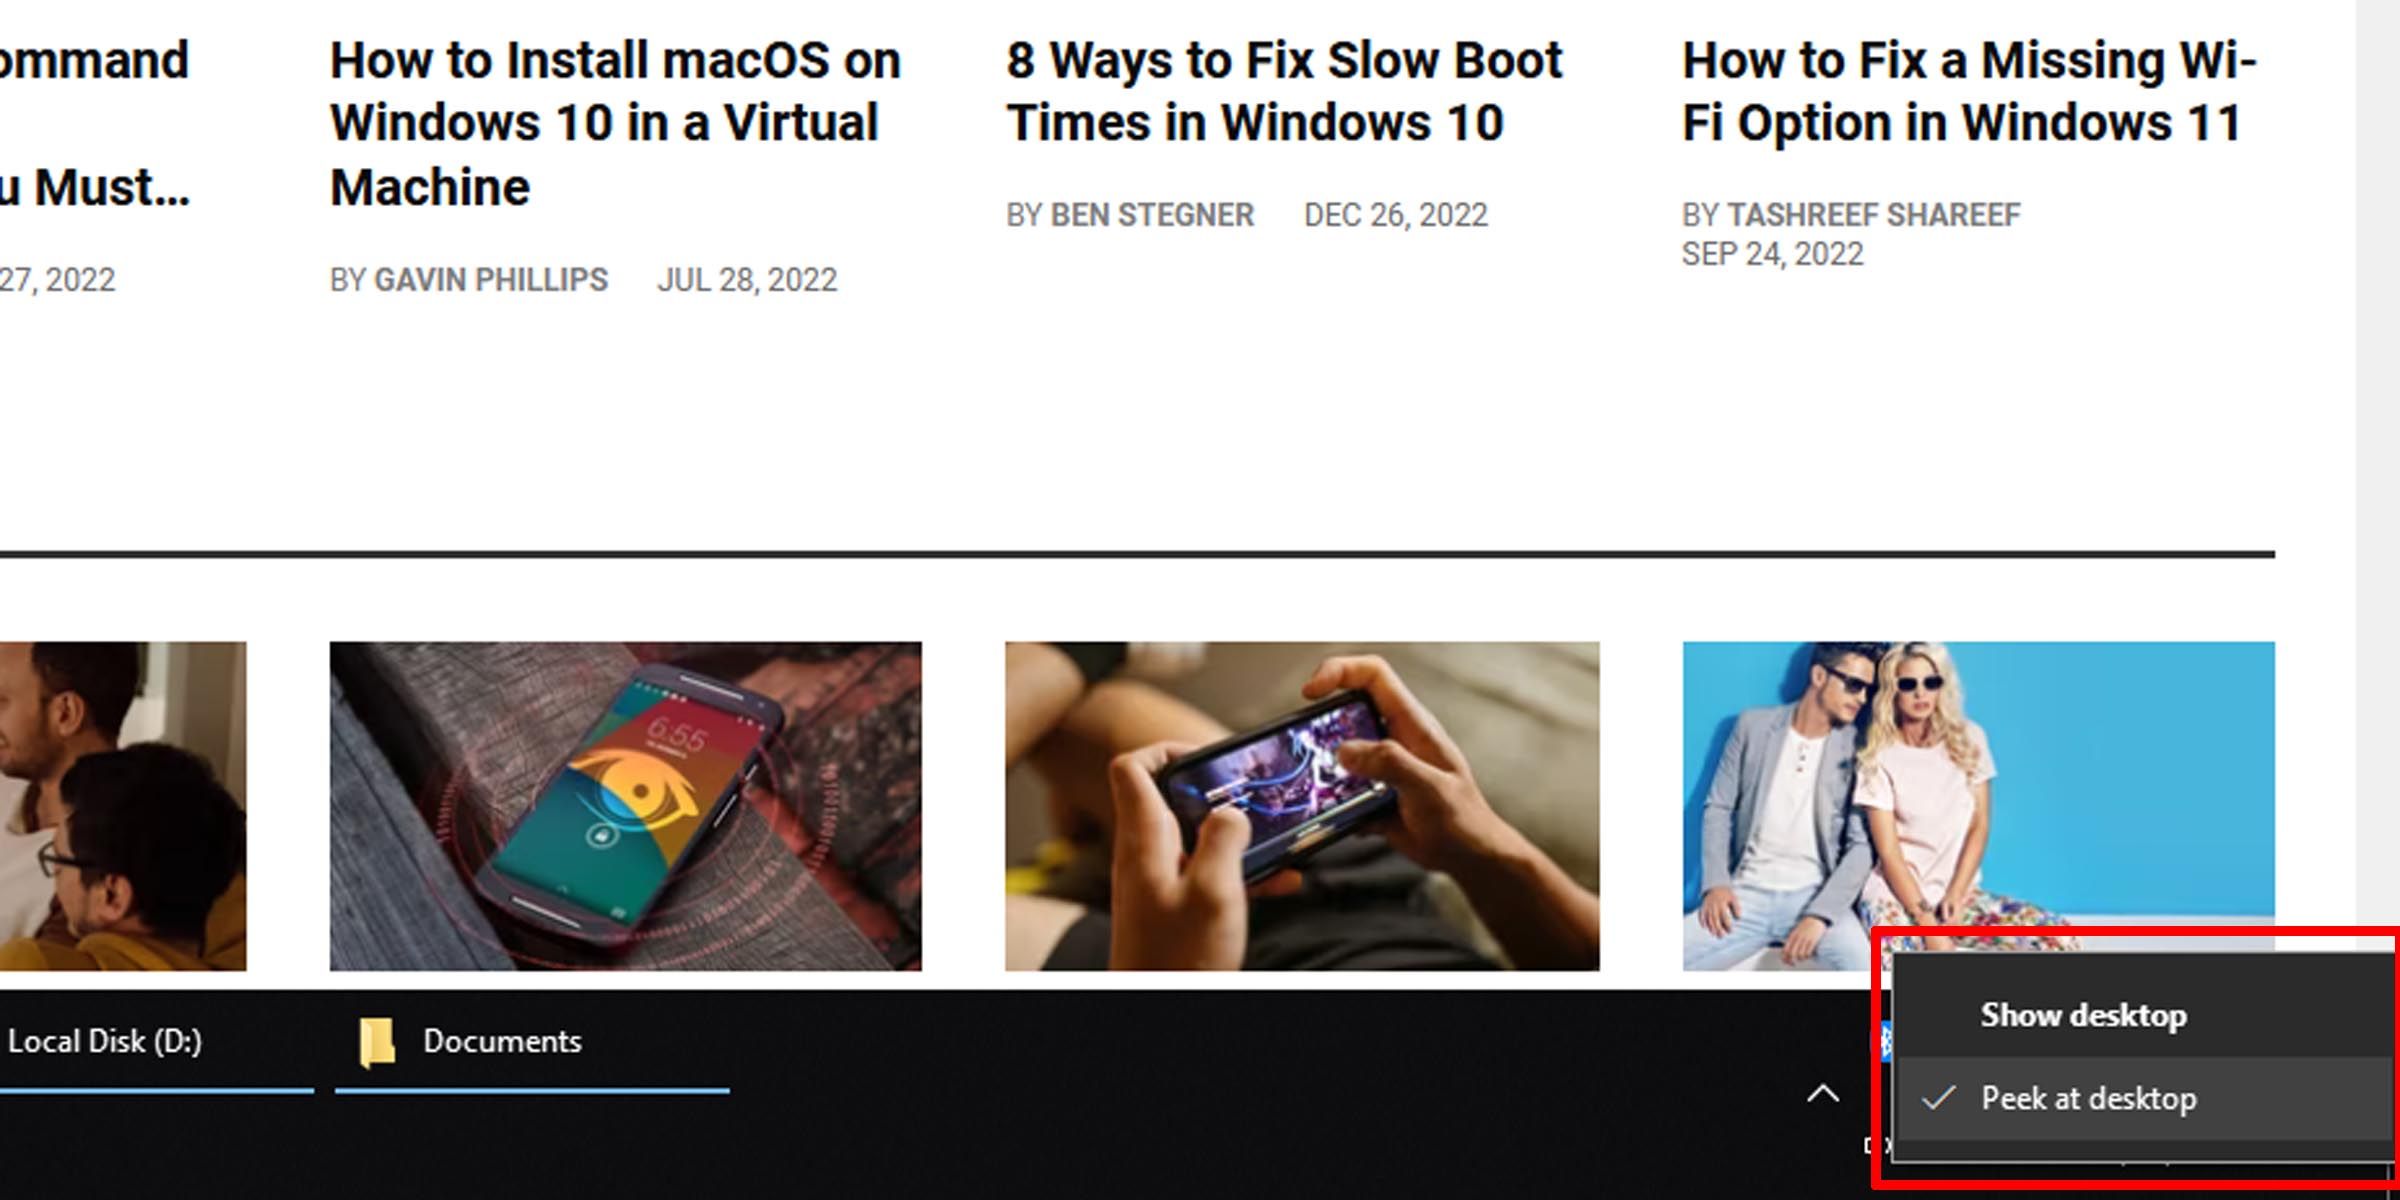
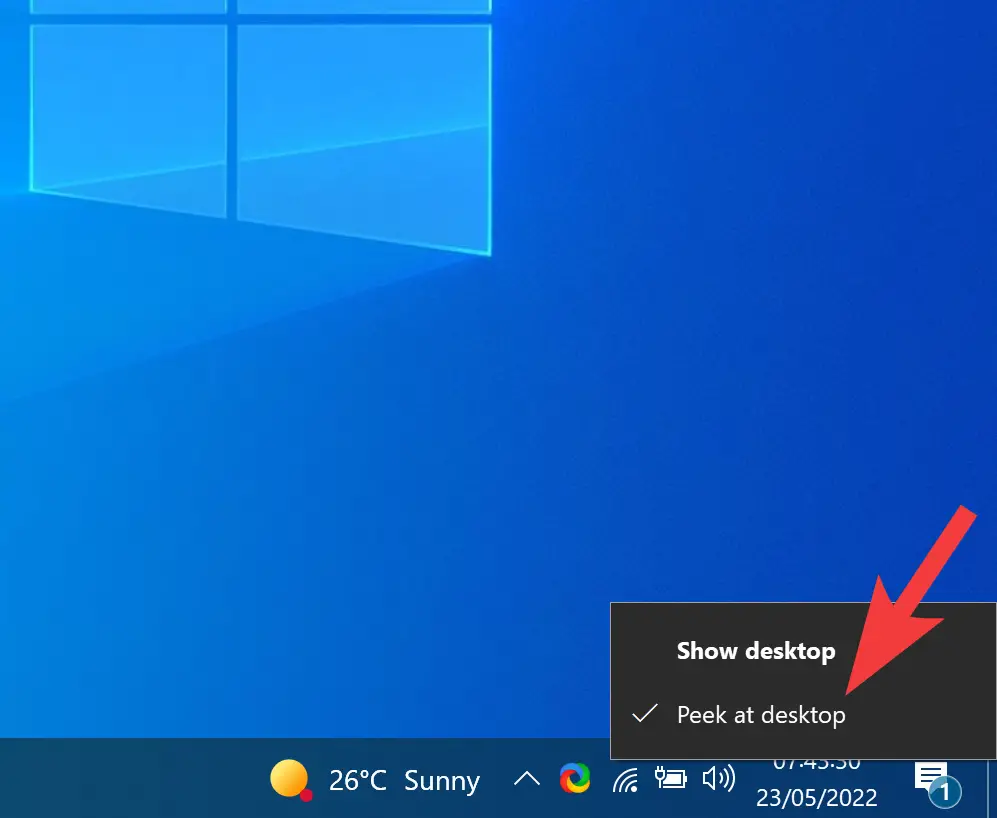
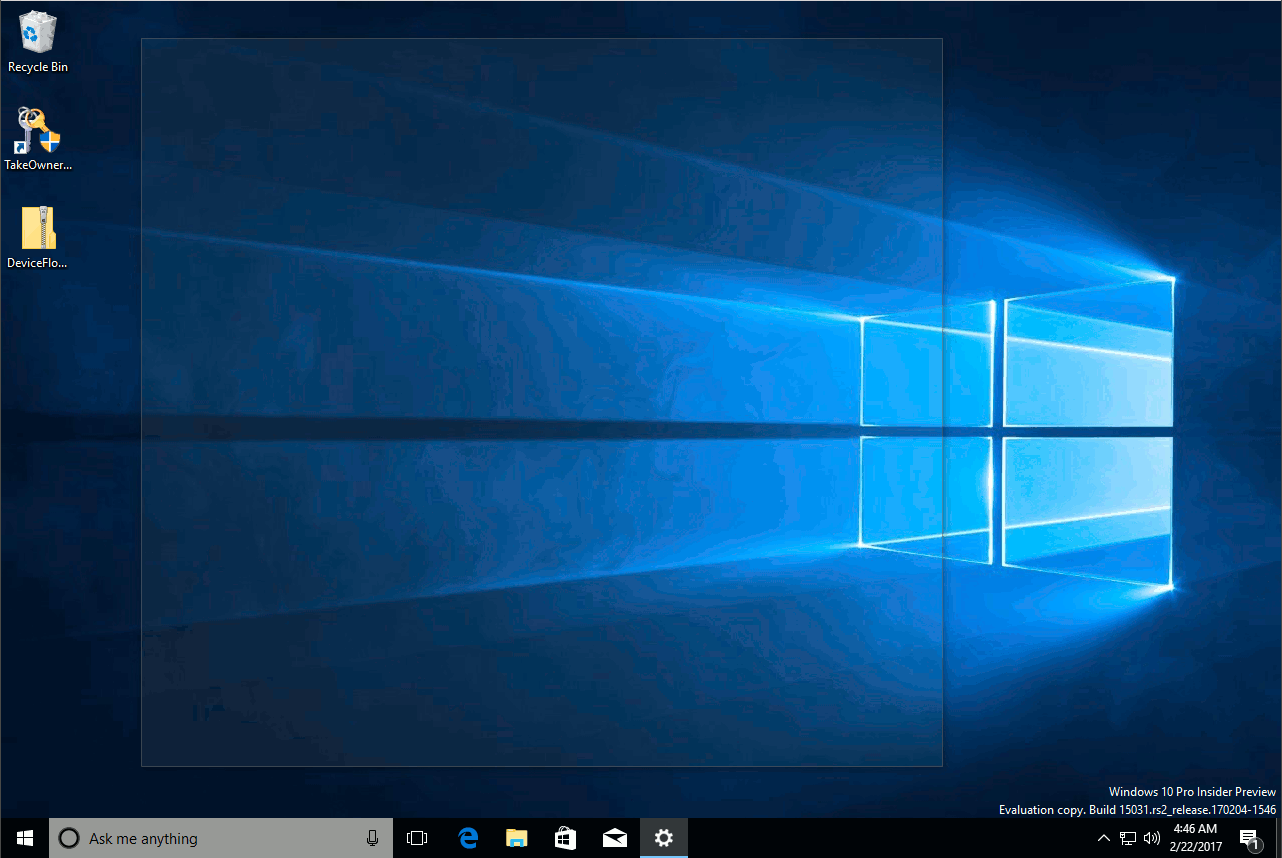
- Move your mouse to the end of the taskbar. This is by default on the bottom right of your Windows 10 screen and where the Show Desktop button resides.
- Right-click the button.
- To turn on Peek at desktop, select the option.
-
To turn it off, uncheck the Peek at desktop option.
If, however, the «peek at desktop» option shows as grayed out on the taskbar, this functionality is blocked at a higher level; you’ll have to enable it first. Follow the steps below to enable «peek at desktop» instead.
How to Turn «Peek at Desktop» On or Off via Visual Performance Options
If you want to disable this functionality in common use, here’s where you can do that.
-
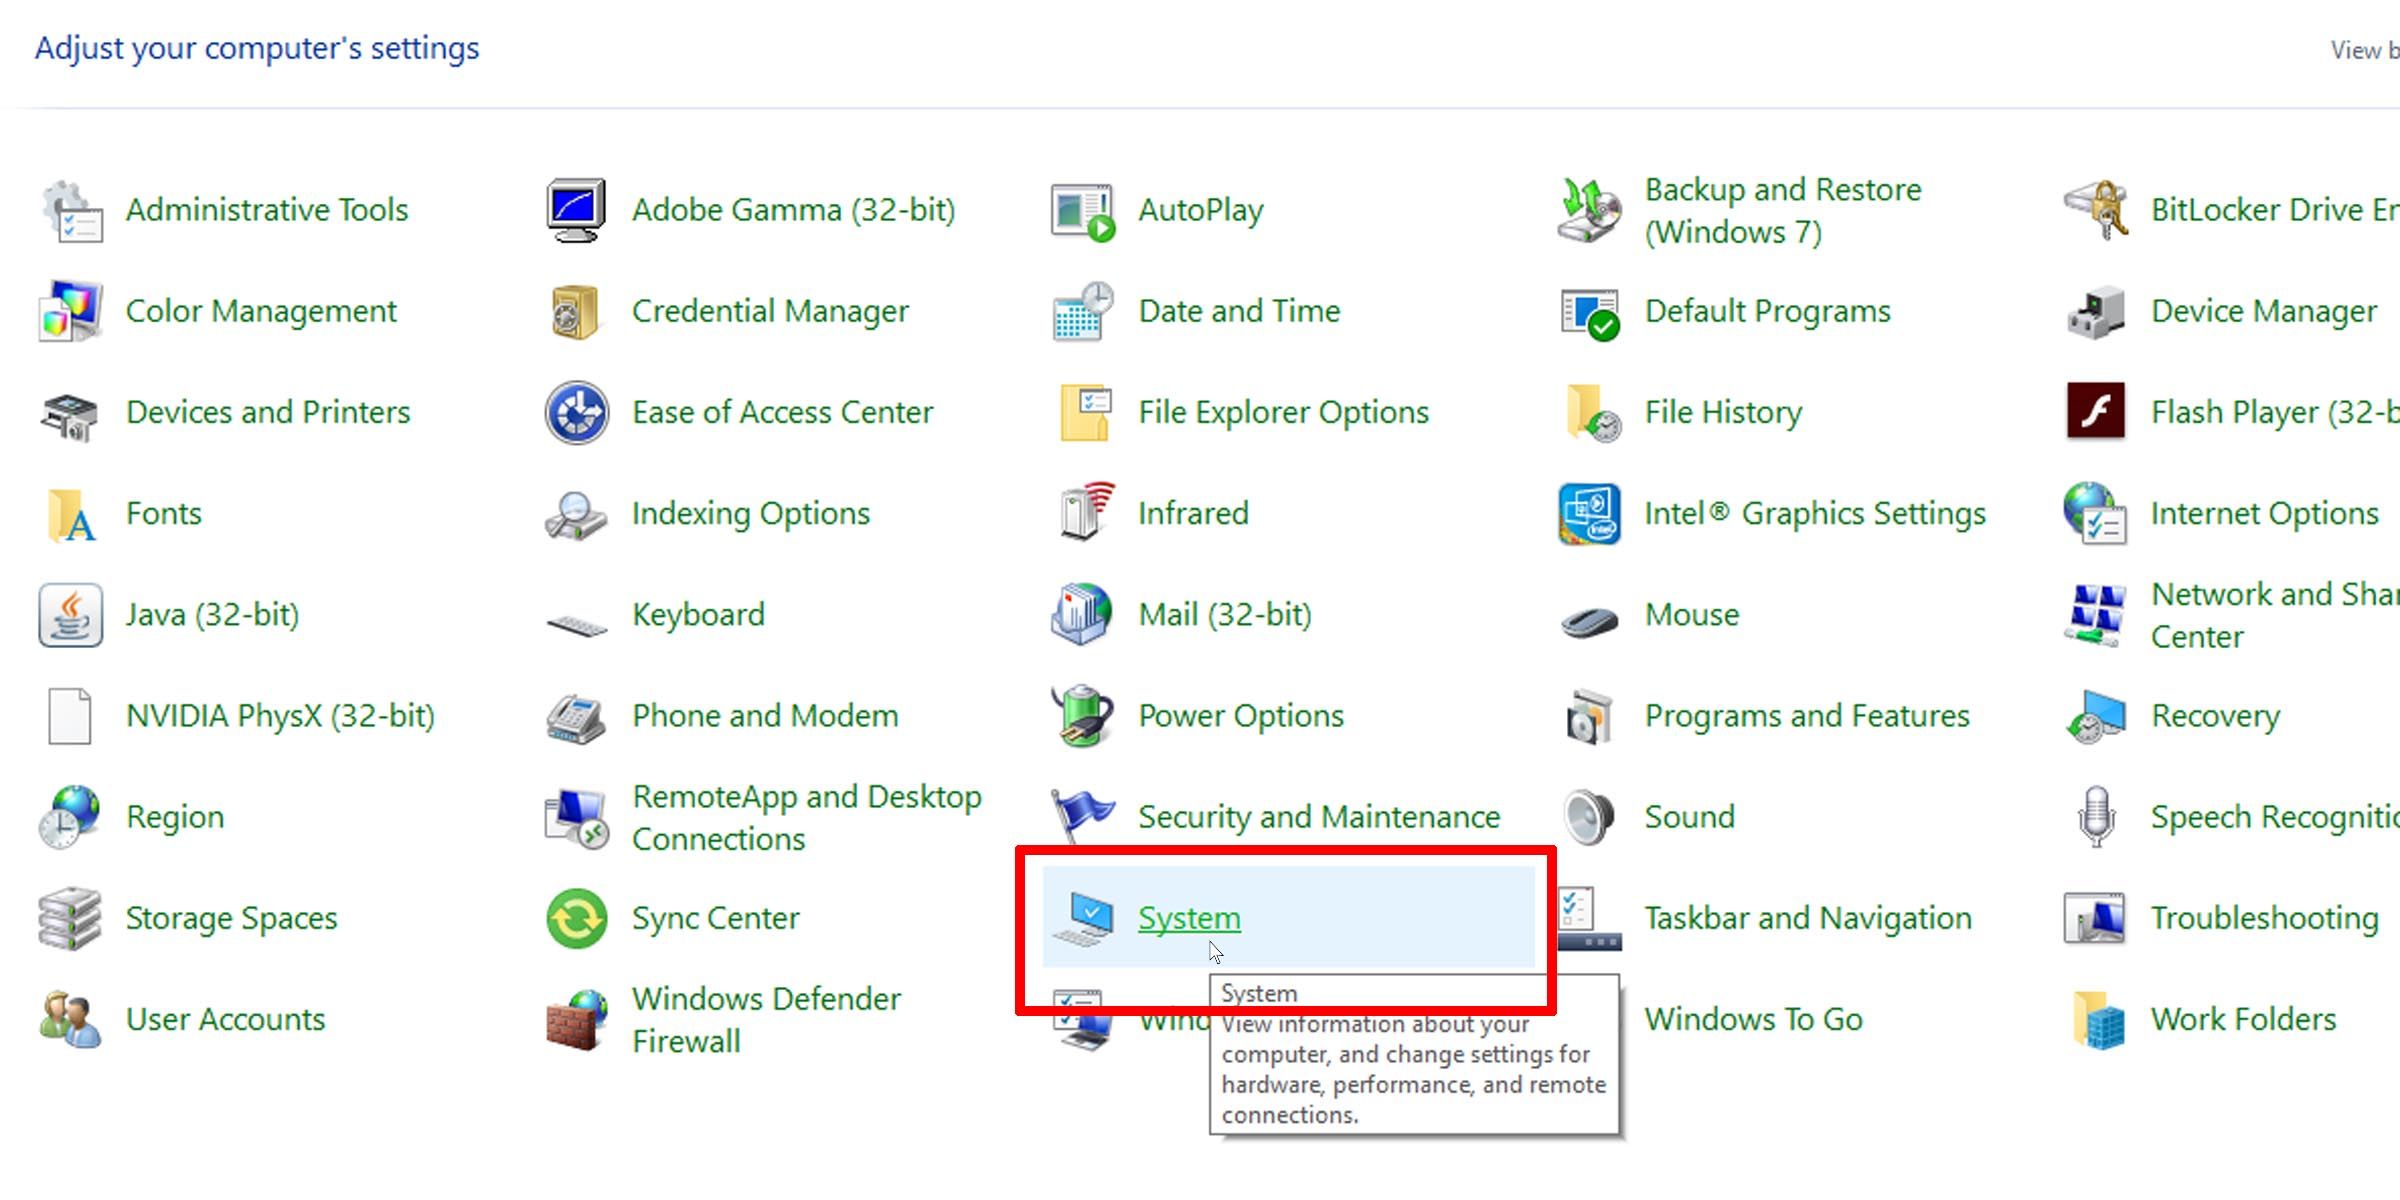
Open the Control Panel app.
-
Make sure you’re in icon view.
-
Go to System.
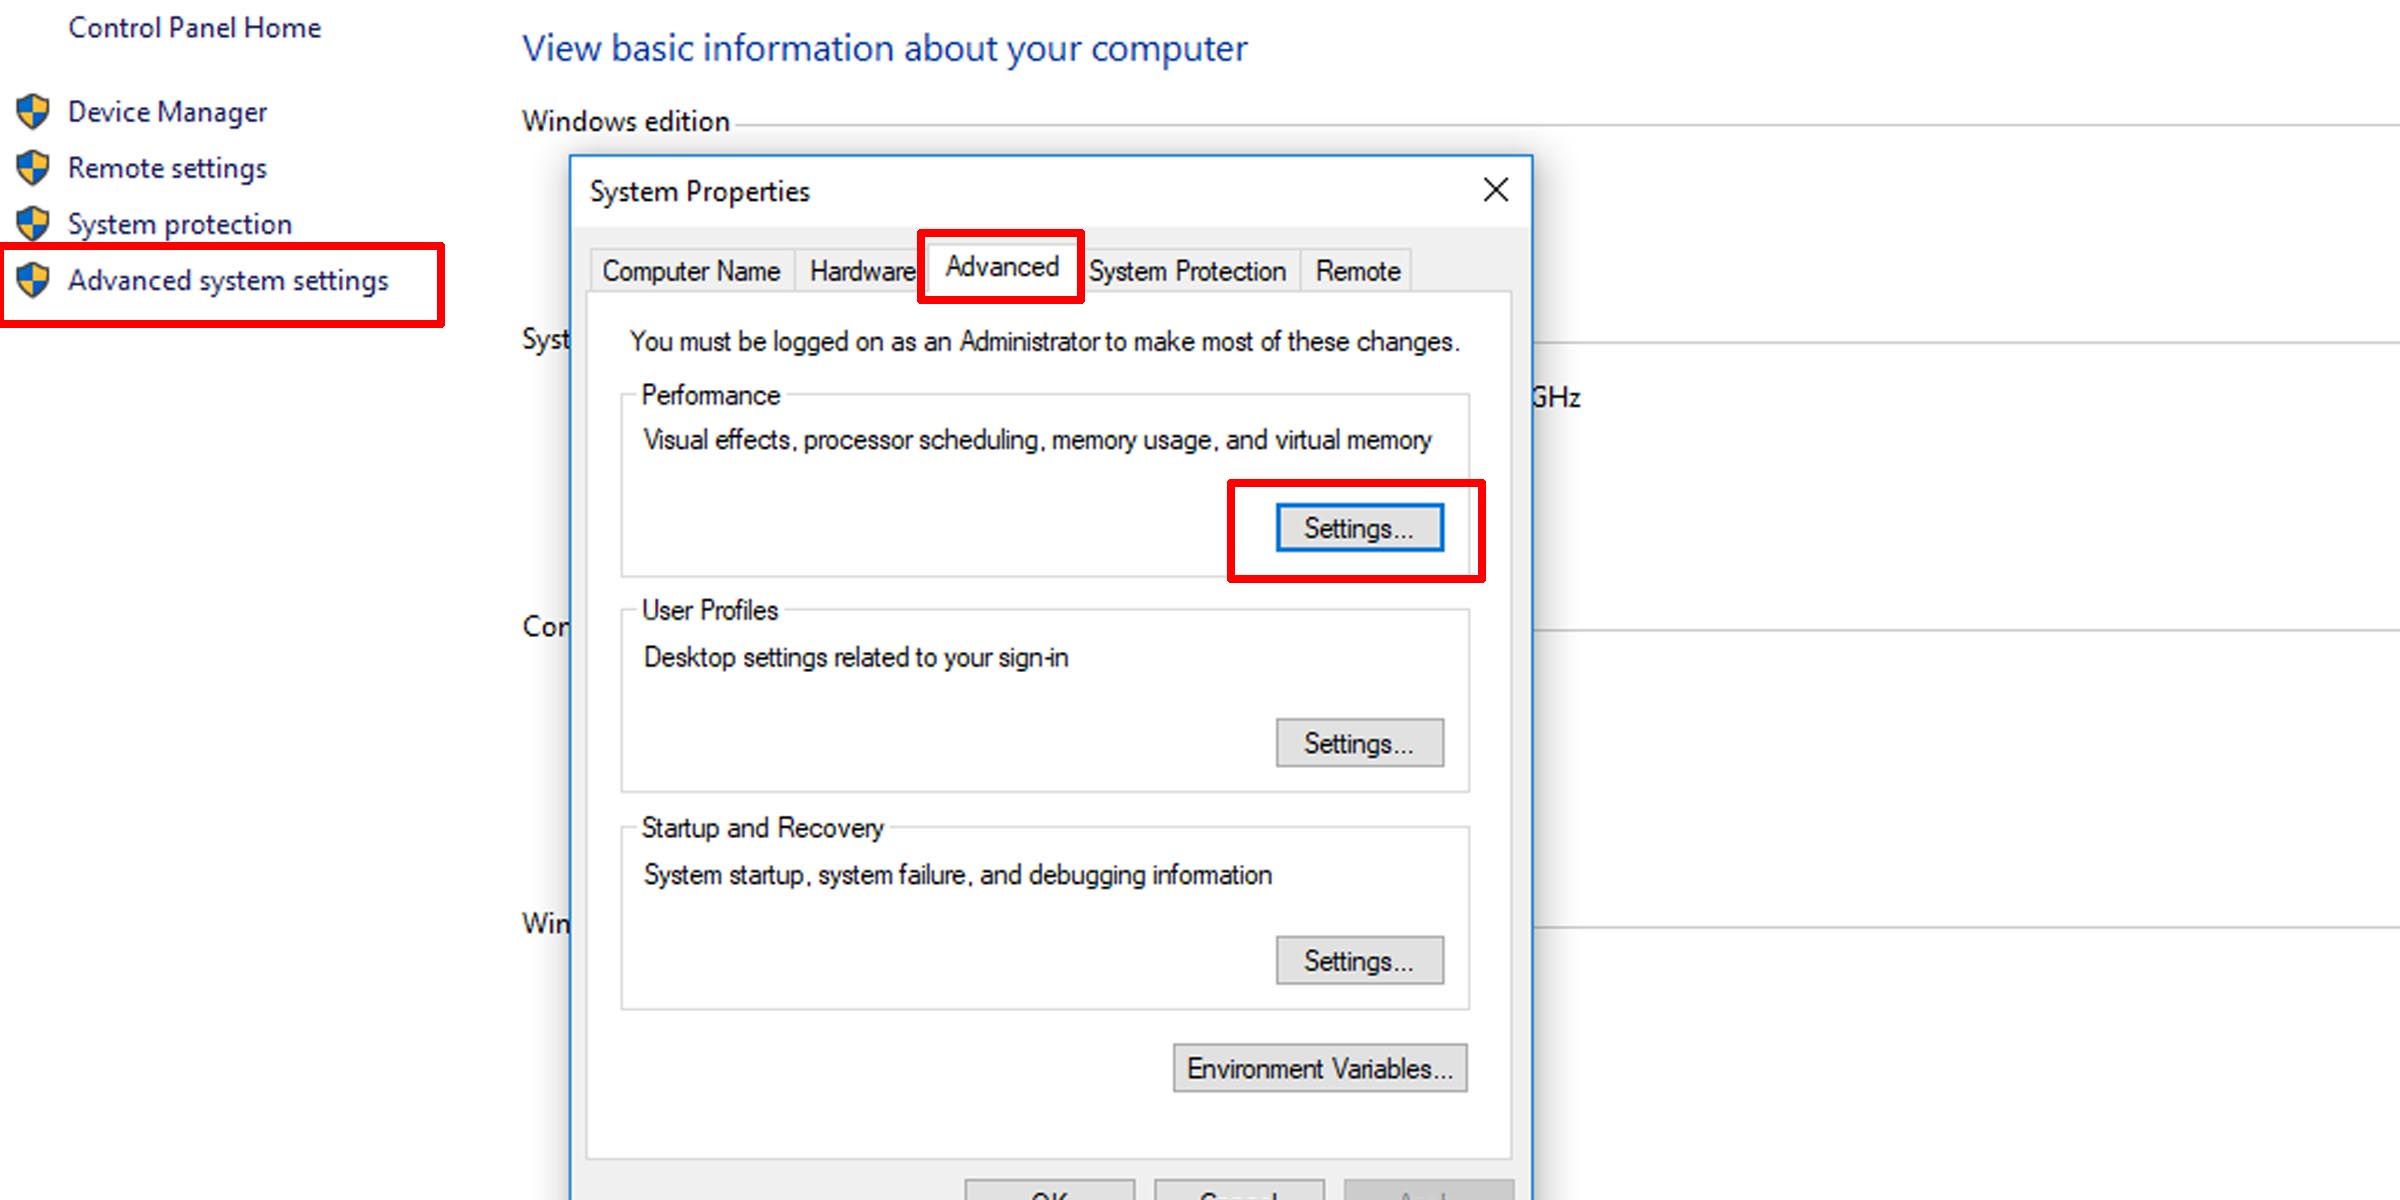
- On the left panel, click on Advanced system settings.
- A new window will pop up. Click on the Advanced tab on top.
-
Under the Performance section, click on the Settings button.
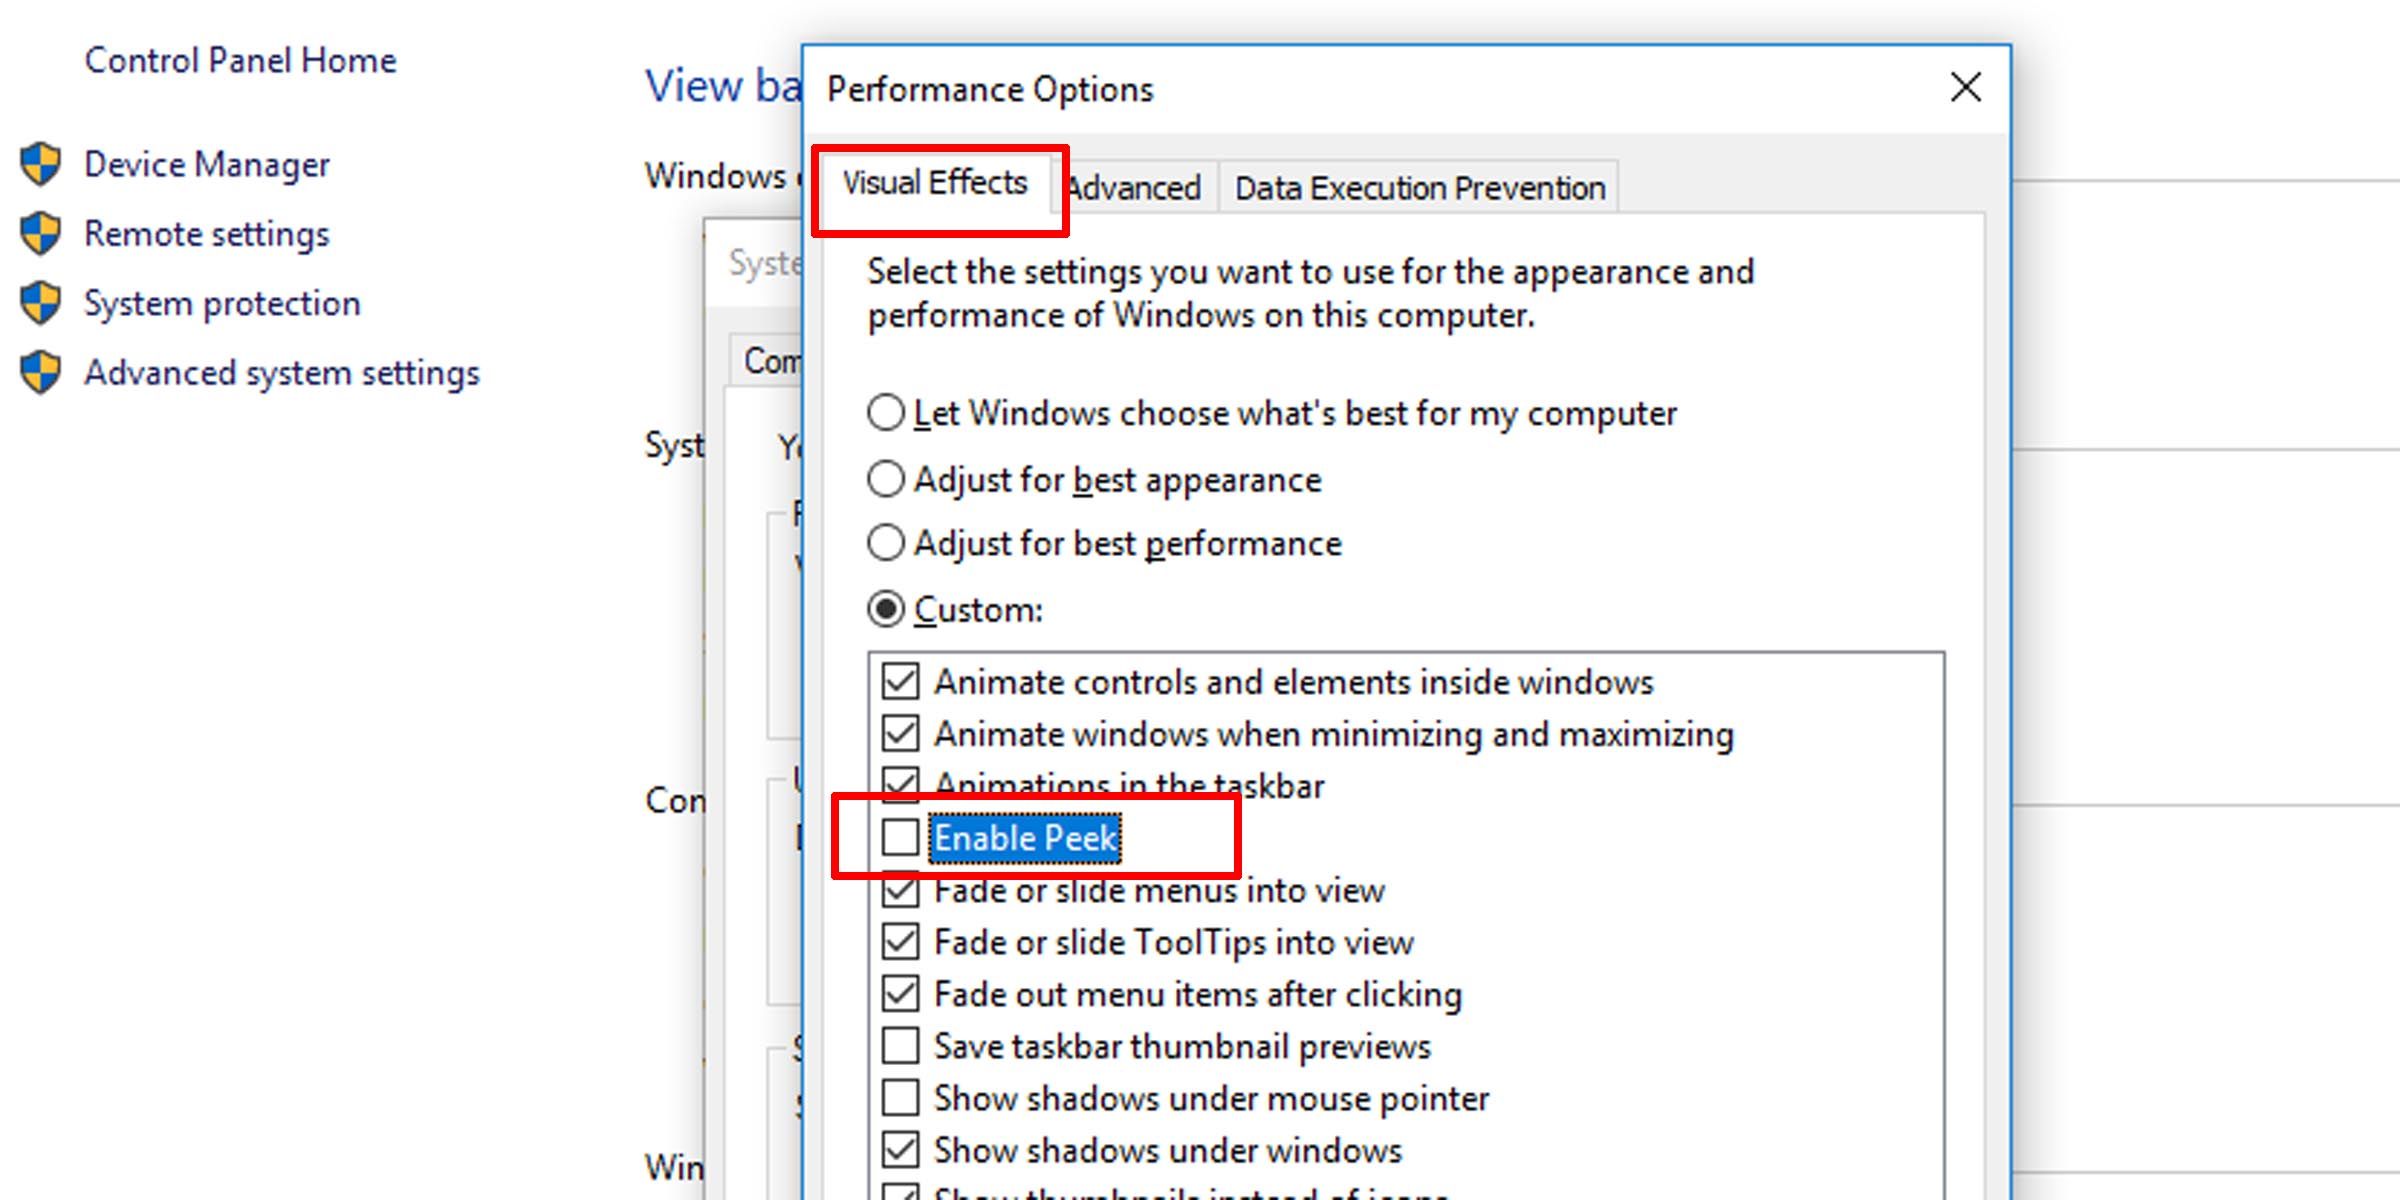
- Under the Visual Effects tab, make sure Enable Peek is checked to turn on Peek at desktop.
-
Uncheck this option to disable Peek at desktop.
If you’re unimpressed by Windows peek and fed up with your computer momentarily ghosting into open windows, you can even disable the taskbar thumbnail preview functionality completely.
Use Peek at Desktop on Windowsfor a Quick Glance at Things
«Peek at desktop» (sometimes called Aero Peek or Desktop Preview) enables you to look at your desktop and open windows at a glance, without actually switching to them. Some find it convenient and productivity-enhancing, but if it works as a hindrance for you, it’s just as easy to disable.
Starting Windows 7, Microsoft included the Aero Peek feature, allowing you to view the desktop temporarily without minimizing all the open windows. Just move the mouse cursor to the far right end of the taskbar, and all the open windows will go transparent, and you can view the desktop. When you move the mouse cursor away, all opened windows will be visible again.

The Show Desktop button is very narrow and hard to see, so you need to make sure to move your mouse cursor to the extreme right side of the Taskbar; Aero Peek will work.
In this gearupwindows article, we will guide you on enabling and disabling Aero Peek in Windows 10. There are several ways to turn on or off Aero Peek in Windows 10; we will review all of them.
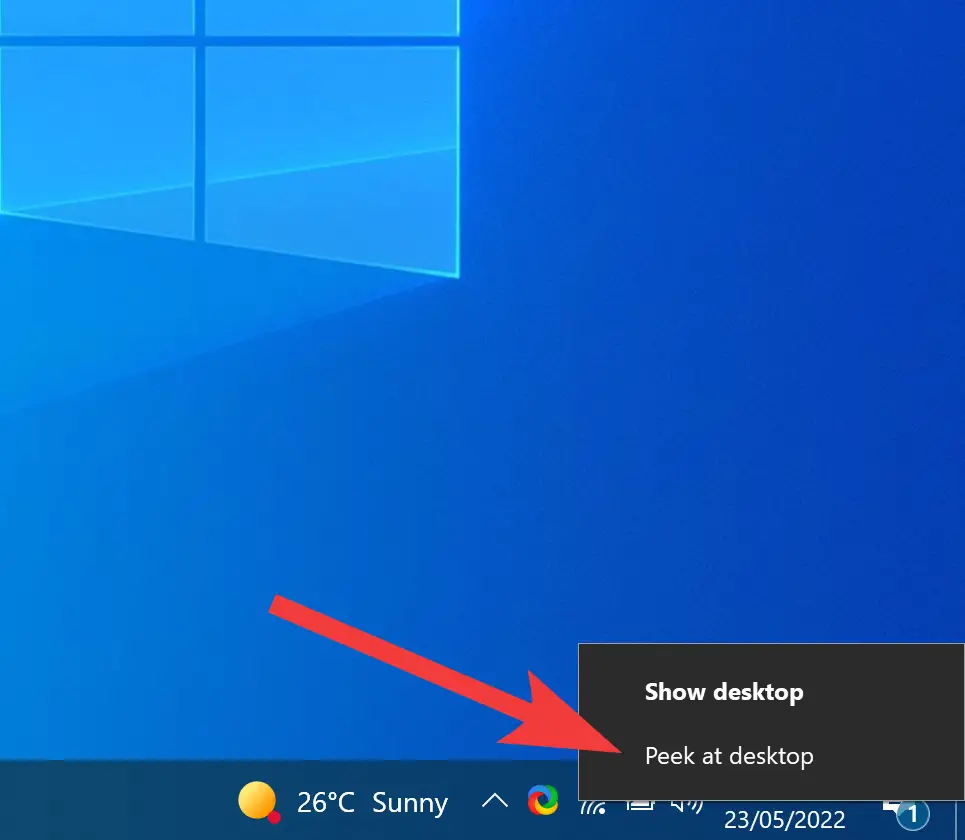
How to Turn On or Off Aero Peek via Right-clicking the “Show desktop” Button?
This is the easiest way to enable or disable Aero Peek in Windows 10. To turn on or off the Aero Peek, first move your mouse cursor over the “Show desktop” button, which is available as a small rectangle present in the right corner of the taskbar. Right-click on the Show desktop button and select Peek at desktop in the popup menu.
You will see a checkmark before the “Peek at desktop” option when the Aero Peek is turned on.
To disable the Aero Peek, move your mouse cursor over the “Show desktop” button. Right-click on the Show desktop button and deselect Peek at desktop in the popup menu. This action will turn off Aero Peek in Windows 10.
How to Enable or Disable Aero Peek using Windows 10 Settings?
Microsoft has also provided an option in Windows 10 Settings to enable or disable Aero Peek.
To turn on or off Aero Peek using Settings in Windows 10, do the following:-
Step 1. First, open Settings.
Step 2. Then, click on Personalization.
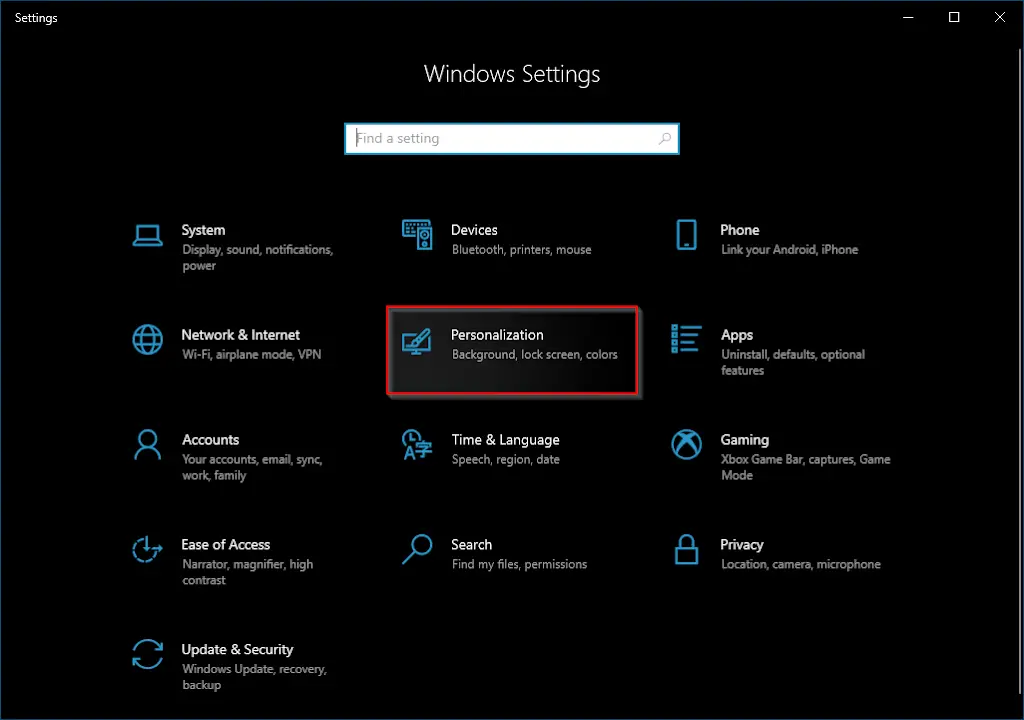
Step 3. Under Personalization, select Taskbar.
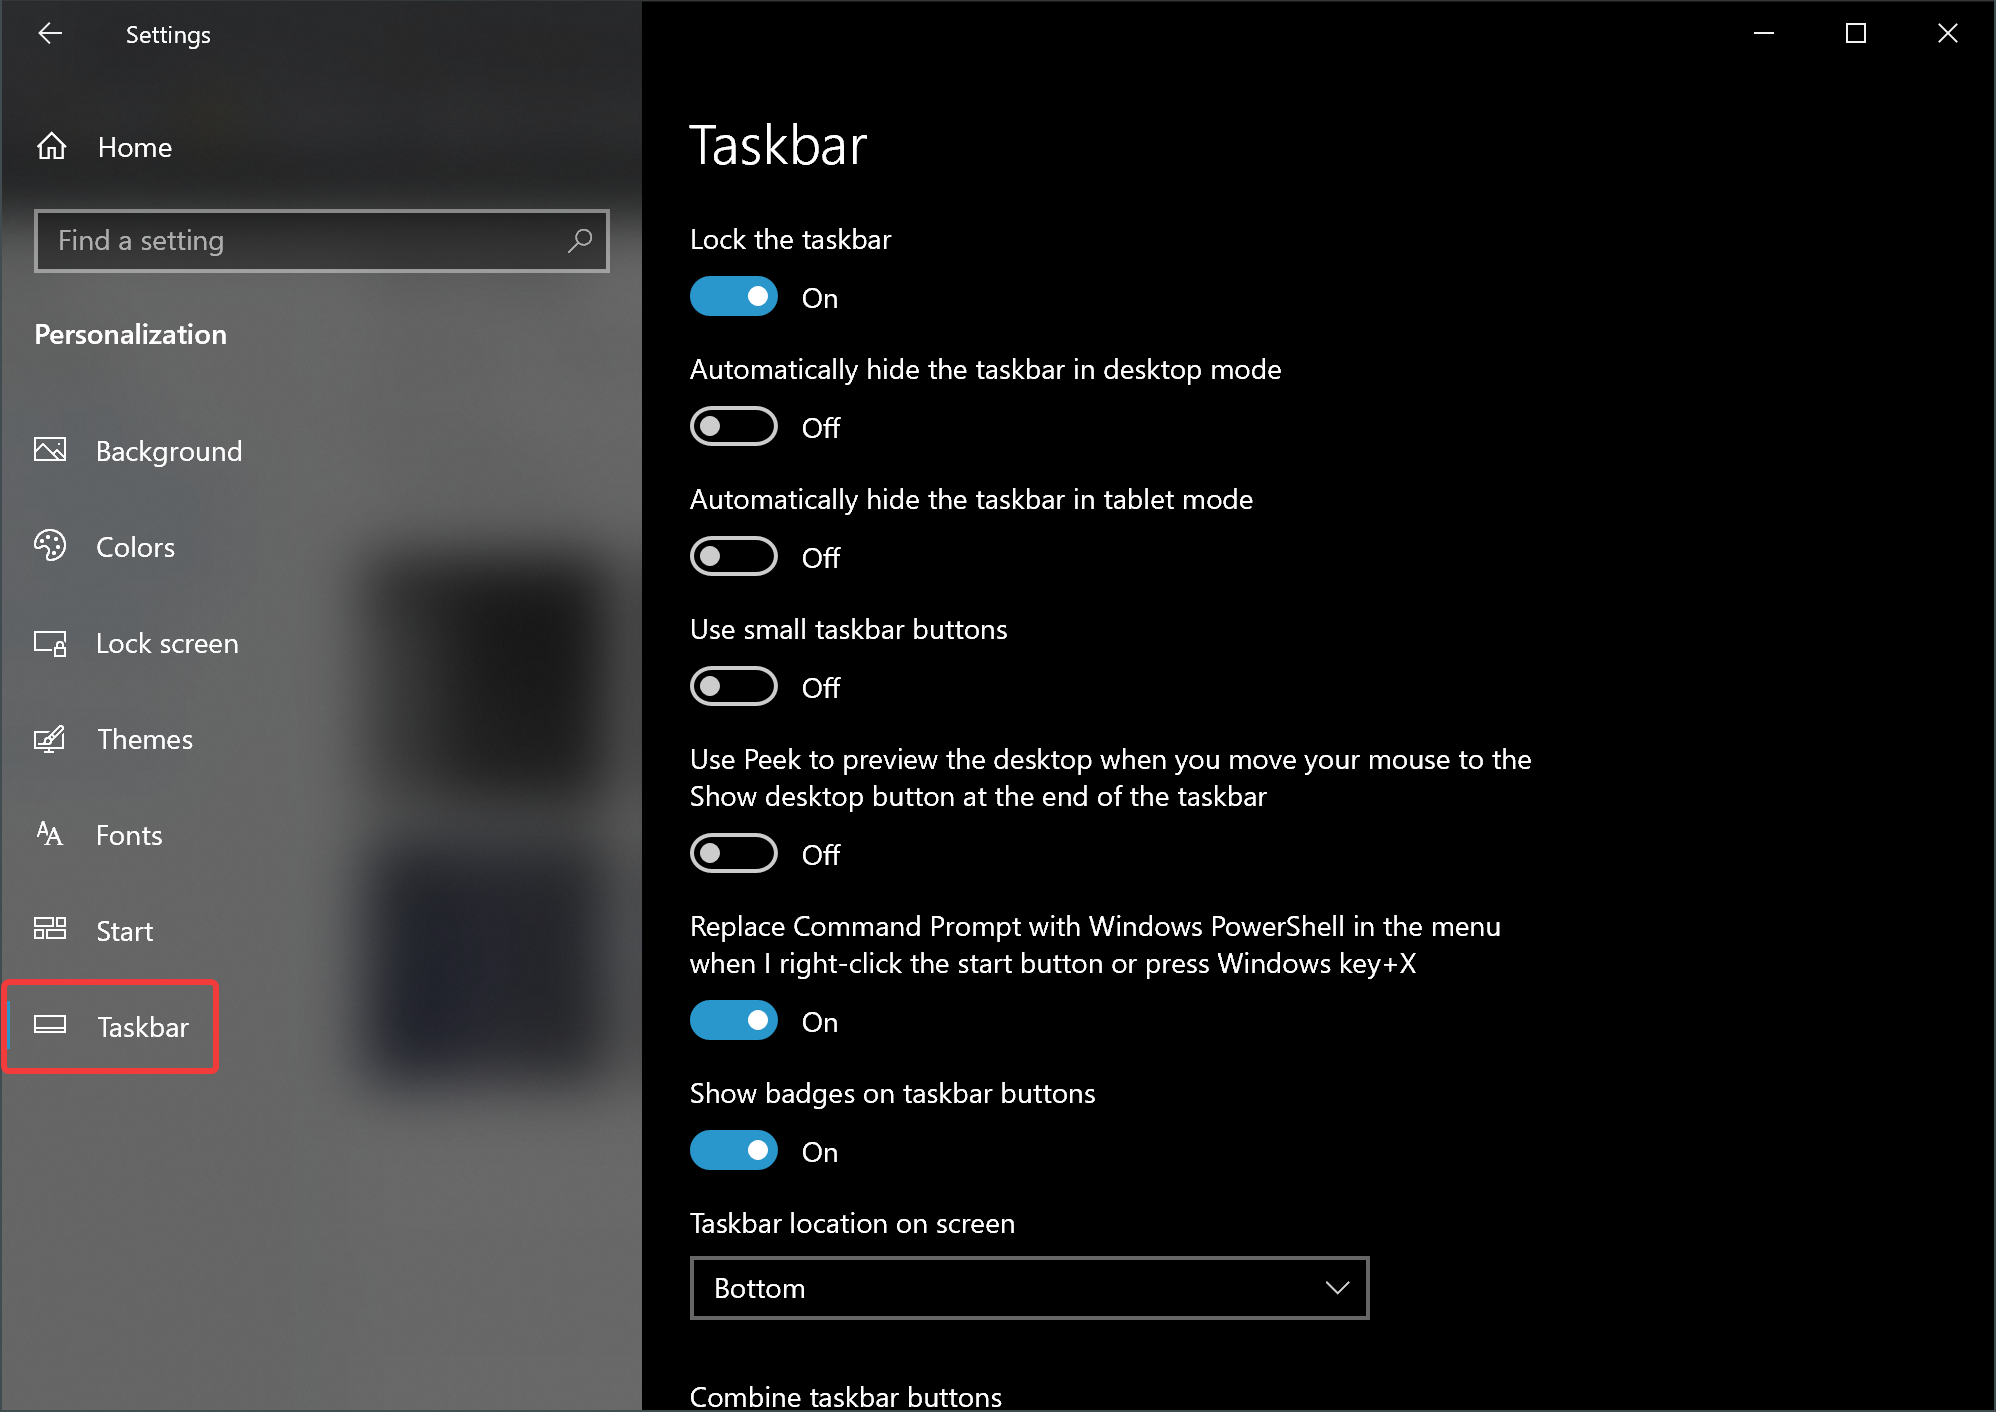
Step 4. On the right side of “Taskbar,” turn on the toggle switch “Use Peek to preview the desktop when you move your mouse to the Show desktop button at the end of the taskbar.”
If you want to turn off the Aero Peek, turn off the toggle switch “Use Peek to preview the desktop when you move your mouse to the Show desktop button at the end of the taskbar” in the above steps 4.
How to Enable Aero Peek if the Option is Greyed Out?
If Aero Peek is off and you want to enable it, but you find that the option is grayed out, that means Aero Peek is disabled in the System Properties.
To turn on or off Aero Peek via System Properties, do the following:-
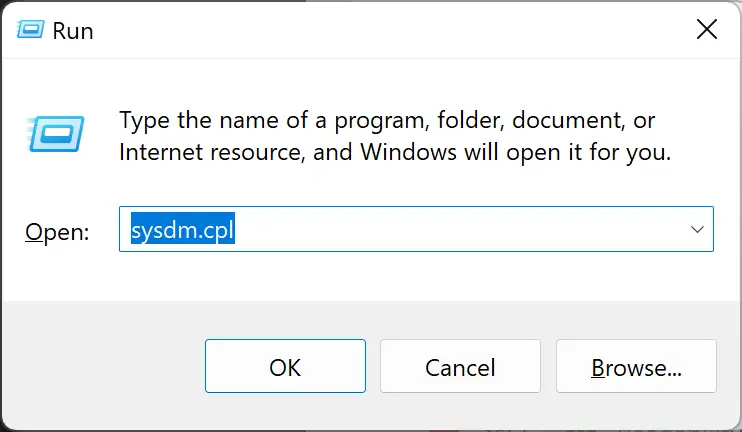
Step 1. Press the Windows + R keyboard combination to open the Run dialog.
Step 2. Then, type sysdm.cpl and hit Enter key on the keyboard.
Step 3. When the System Properties dialog opens, switch to the Advanced tab.
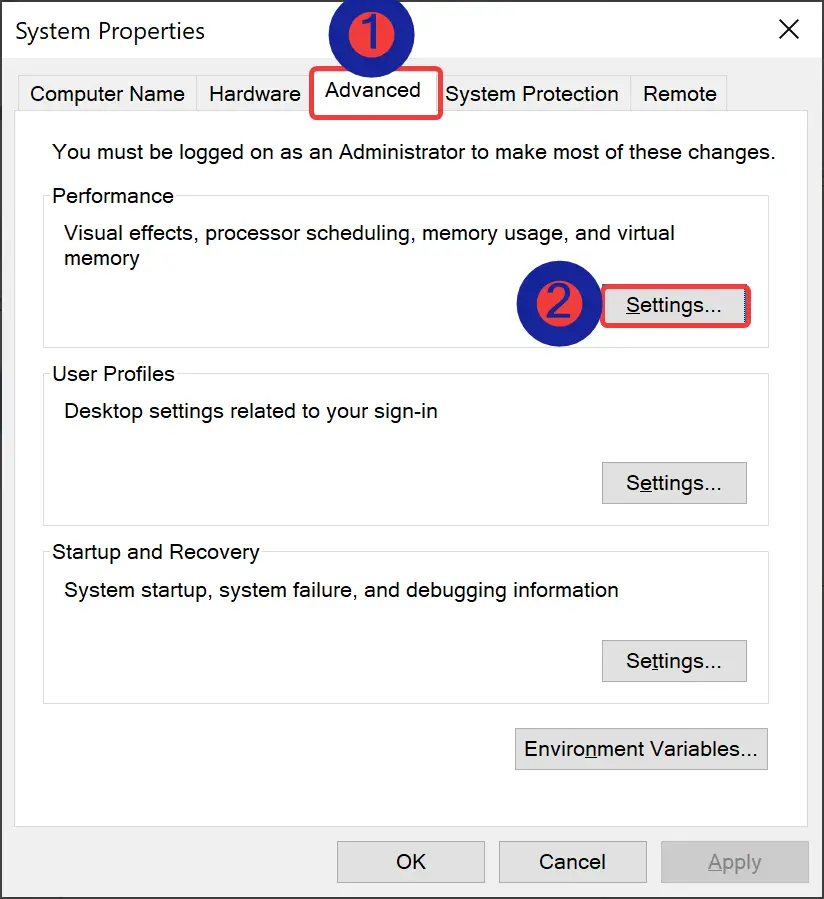
Step 4. Then, click the Settings button under the Performance section.
Step 5. On the “Performance Options” dialog, click on the Visual Effects tab.
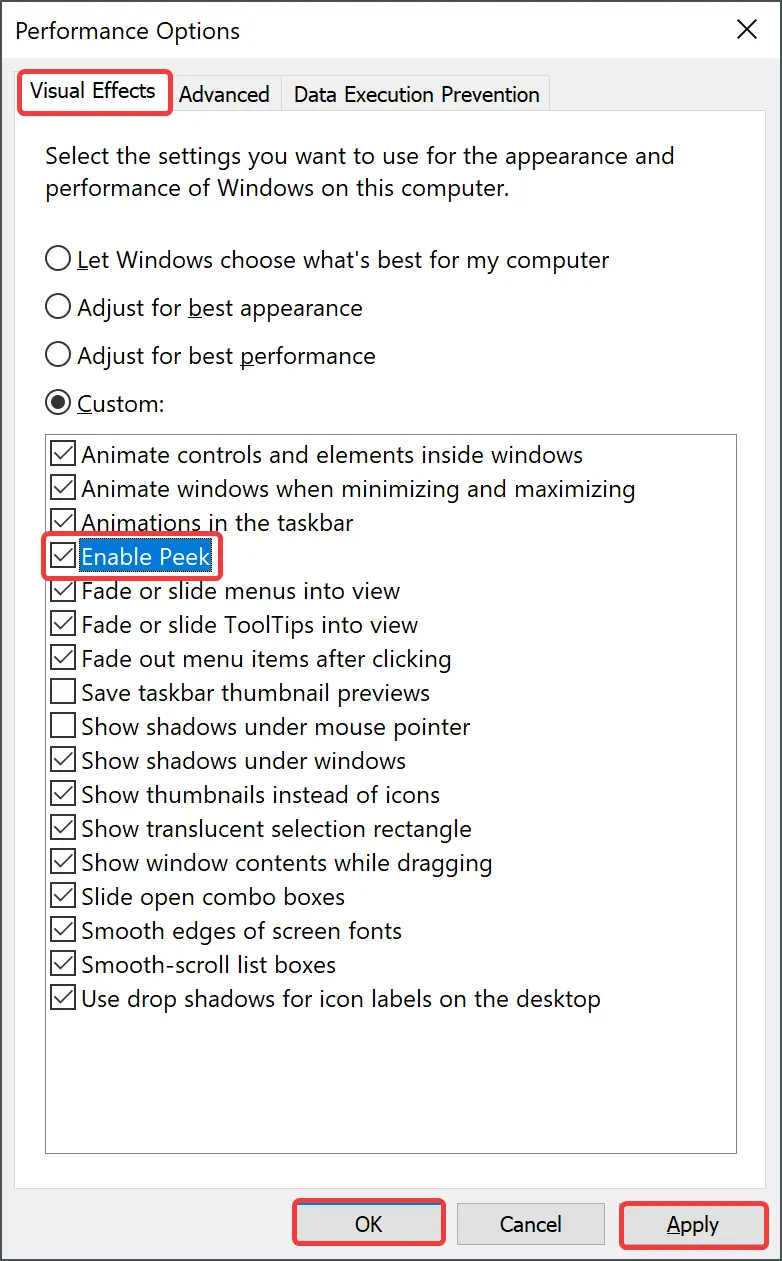
Step 6. Now, check or uncheck the Enable Peek option to turn the Aero Peek feature on or off.
Step 7. Click Apply.
Step 8. Click OK.
Step 9. Click OK.
How to Turn On or Off Aero Peek via Registry Editor?
If you want to enable or disable Aero Peek via Registry Editor, do these steps:-
Step 1. First, launch the Registry Editor.
Step 2. Then, navigate to the following key in the left sidebar of Registry Editor:-
HKEY_CURRENT_USER\Software\Microsoft\Windows\CurrentVersion\Explorer\Advanced
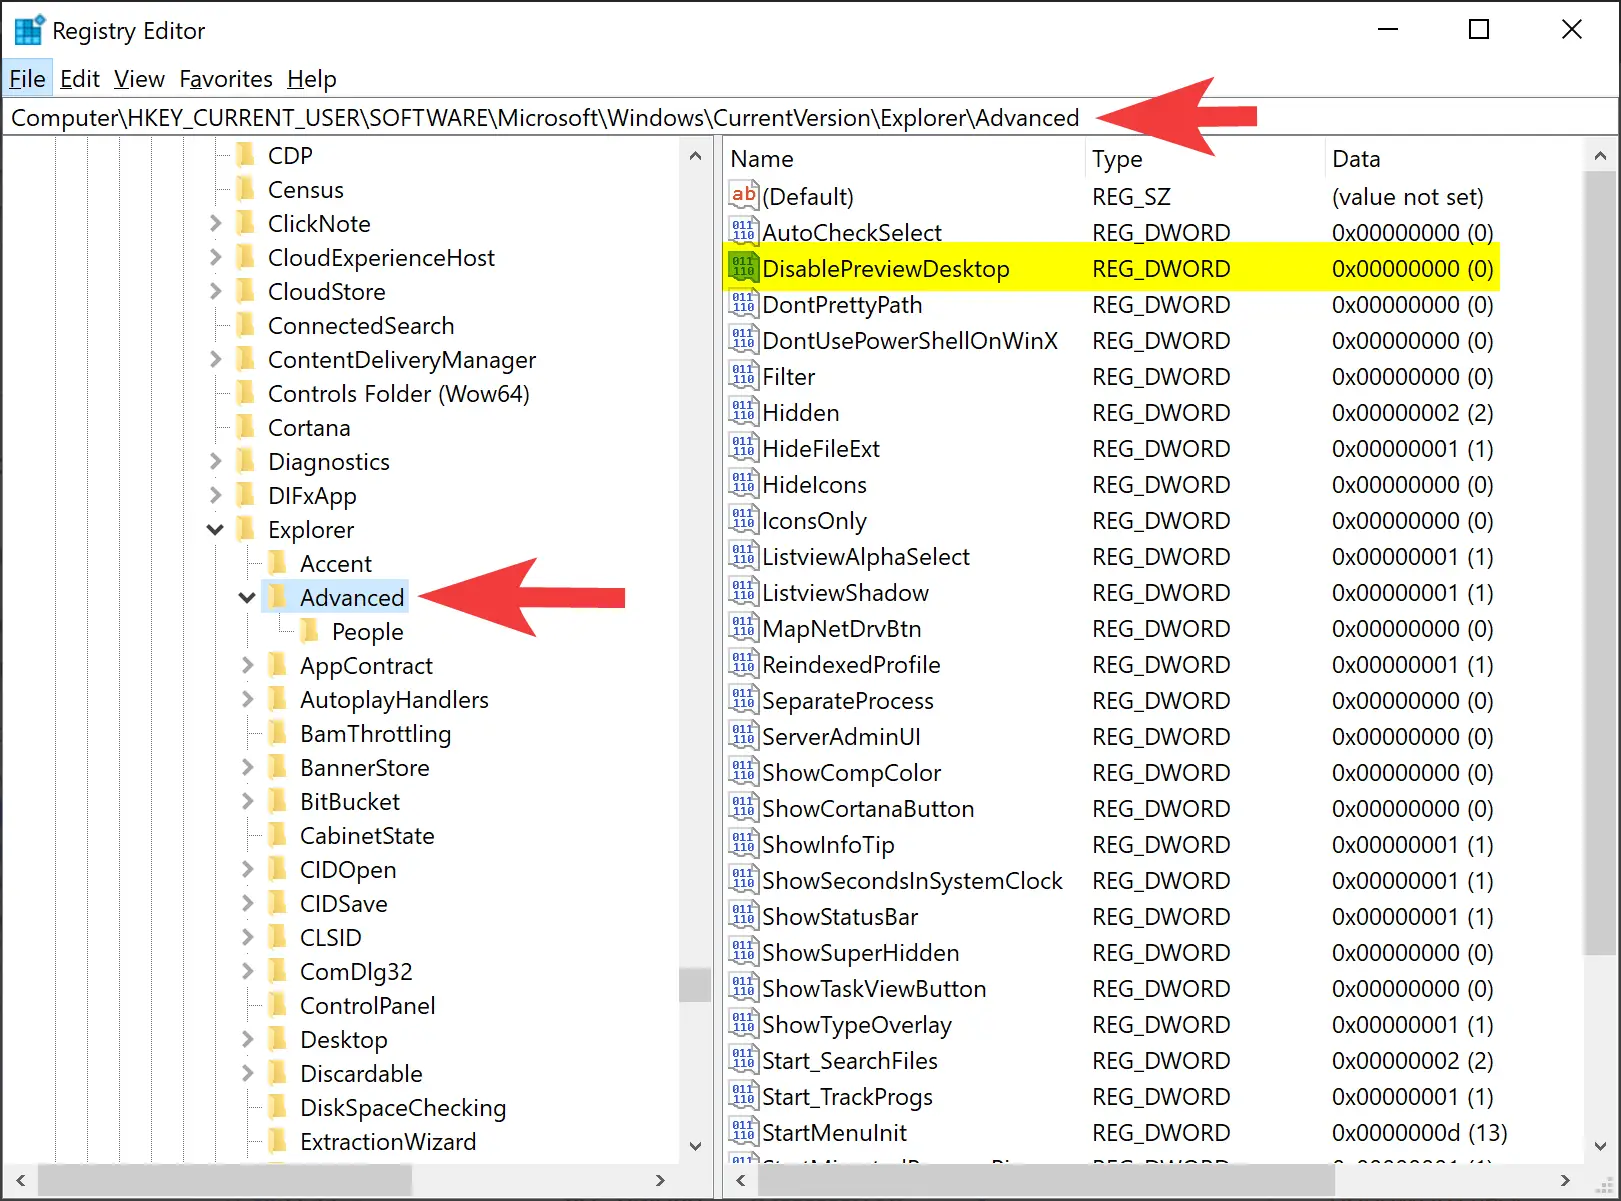
Step 3. On the opposite of the Advanced folder, double-click on the DisablePreviewDesktop REG_DWORD and set the following in the “Value data” field:-
- 0: To enable Aero Peek.
- 1: To disable Aero Peek.
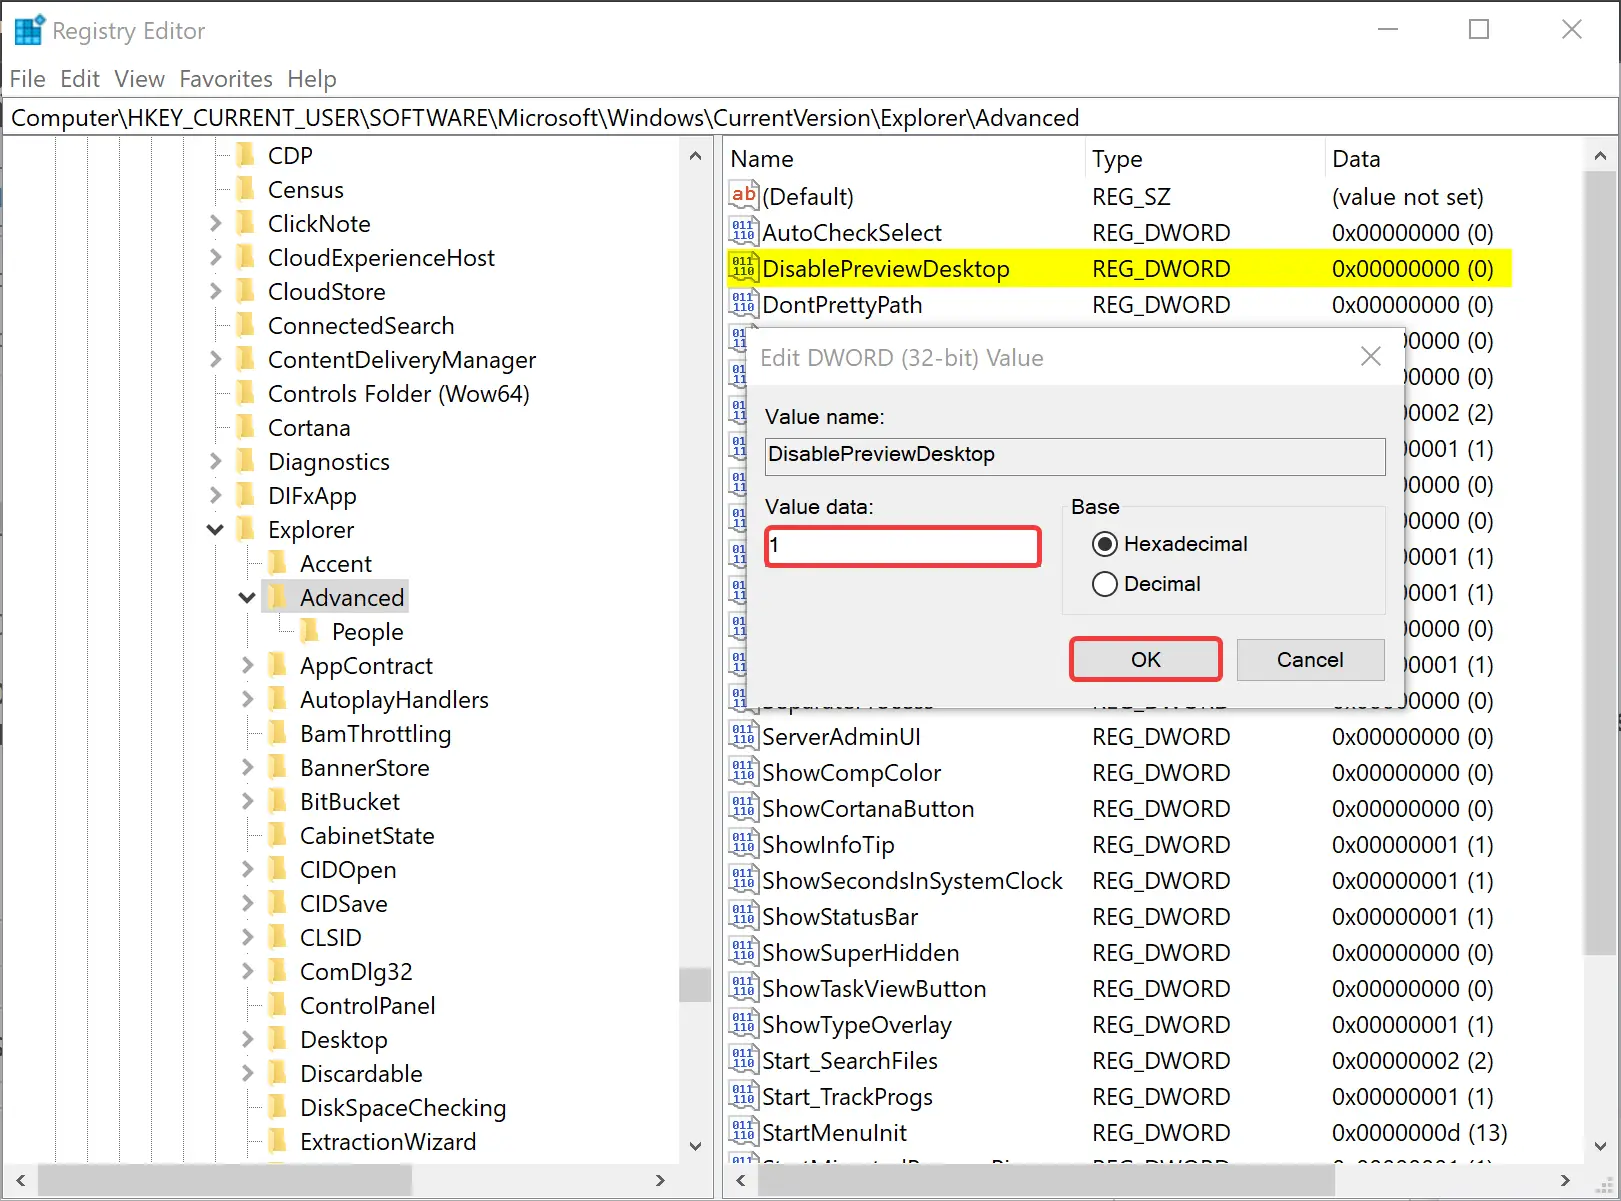
Step 4. Click OK.
Step 5. At last, reboot your computer to apply the changes.
Conclusion
In conclusion, Aero Peek is a convenient feature introduced by Microsoft in Windows 7, allowing users to view the desktop temporarily without minimizing all open windows. In this gearupwindows article, we have discussed several ways to enable or disable Aero Peek in Windows 10, including right-clicking the “Show desktop” button, using Windows 10 Settings, modifying System Properties, and editing the Registry Editor. By following these steps, users can easily turn on or off Aero Peek based on their preferences. It is worth noting that enabling or disabling Aero Peek can also impact the performance of the system, so users should consider their hardware specifications before making any changes.
Skip to content
Windows 10 comes with three useful features to help you to manage and arrange opened windows. These features are Aero Snap, Aero Peek and Aero Shake, all of them were available since Windows 7. The Snap feature allows you to work on two programs side-by-side by showing two windows side-by-side on the same screen. Today, I would like to cover Aero Peek. This feature allows users to quickly view the desktop by moving the mouse pointer to the bottom right corner of the taskbar. It is really useful if you need to view your desktop without minimizing all open applications. In Windows 10, this feature is disabled by default, so we will look, how to enable it back.
To enable Aero Peek in Windows 10, you need to follow these simple instructions:
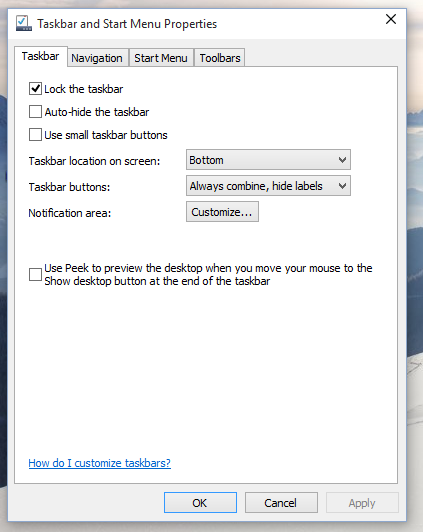
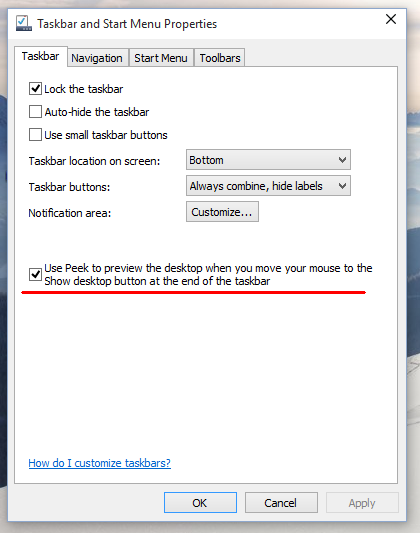
- Right click an empty space on the taskbar and select the «Properties» context menu item. The Taskbar Properties dialog will appear on the screen.

In Windows 10 Creators Update, the context menu item is called Taskbar settings. It looks as follows:It opens a new page in Settings.

- Now all you need to do is tick the checkbox that says Use Peek to preview the desktop when you move your mouse to the Show Desktop button at the end of the taskbar.

This enables Aero Peek. Click the Apply button.
The same option is available in the Settings app in Windows 10 Creators Update.
- The Aero Peek feature will be enabled. You are done!

Bonus tips: On Windows 10 you can activate Aero Peek with the Win + , (Win+comma) shortcut keys. Note that on Windows 7, Aero Peek is activated by pressing Win + Space. That’s all. This trick is also suitable for all Windows 8 versions, from Windows 8 to Windows 8.1 Update 2.
You might also be interested in our excellent Win hotkeys list.
Support us
Winaero greatly relies on your support. You can help the site keep bringing you interesting and useful content and software by using these options:
If you like this article, please share it using the buttons below. It won’t take a lot from you, but it will help us grow. Thanks for your support!
Also known as Aero Peek, the Peek option in Windows allows you to preview the desktop when you move your mouse over to the Show desktop button at the end of the taskbar.
The one in the very bottom corner at the right, usually.
To fix various Windows 10/11 problems, we recommend Outbyte PC Repair:
This software will repair common computer errors, protect you from file loss, malware damage, hardware failure, and optimise your computer for peak performance. In three simple steps, you can resolve PC issues and remove virus damage:
- Download Outbyte PC Repair Software
- Click Start Scan to detect Windows 10/11 issues that may be causing PC issues.
- Click Repair All to fix issues with your computer’s security and performance.
This month, Outbyte has been downloaded by 23,167 readers.
Peek is turned on by default in Windows 10, and this option is useful for quickly viewing desktop icons or folders when you’d rather not minimize all open windows and then restore them again. However, you can turn it off if you want.
The two easiest ways to do this are from the Show Desktop Button, or the shiny new Settings app.

For the former, simply right-click or press and hold the Show desktop button at the end of the taskbar, the one just to the right of the clock.
Click or tap on Peek at desktop to check or uncheck the option, which turns on or off the feature.

Alternatively, you can also accomplish this in the Settings app by selecting the Personalization icon, and sliding the Use Peek to preview the desktop when you move your mouse to the Show desktop button at the end of the taskbar toggle on or off.
Your selection should be in effect now.