
Это бесплатная глава книги Библия C#. В новом издании эта глава переписана с учетом универсальных при-ложений Windows, а старая версия главы, которая не потеряла еще своей актуаль-ности стала бесплатной и доступной всем.
Начнем с создания пустого приложения и посмотрим, что для нас сгенерирует
мастер Visual Studio, чтобы на экране появилось окно программы, и из чего все это состоит. Для создания проекта выполняем команду меню File | New | Project и в открывшемся окне выбираем Windows Forms Application в разделе языка программирования Visual C# | Windows (рис. 5.1). Я назвал свое новое приложение OurFirstVisualApplication.
Давайте посмотрим, какие модули добавлены в решение. Их всего два: Form1.cs (этот модуль состоит из нескольких файлов) и Program.cs. Начнем со второго файла, потому что именно с него начинается выполнение программы, и там находится
метод Main(). Код файла вы можете увидеть в листинге 5.1.
Листинге 5.1. Содержимое файла Program.cs
using System;
using System.Collections.Generic;
using System.Windows.Forms;

namespace OurFirstVisualApplication
{
    static class Program
    {
        [STAThread]
        static void Main()
        {
            Application.EnableVisualStyles();
            Application.SetCompatibleTextRenderingDefault(false);
            Application.Run(new Form1());
        }
    }
}
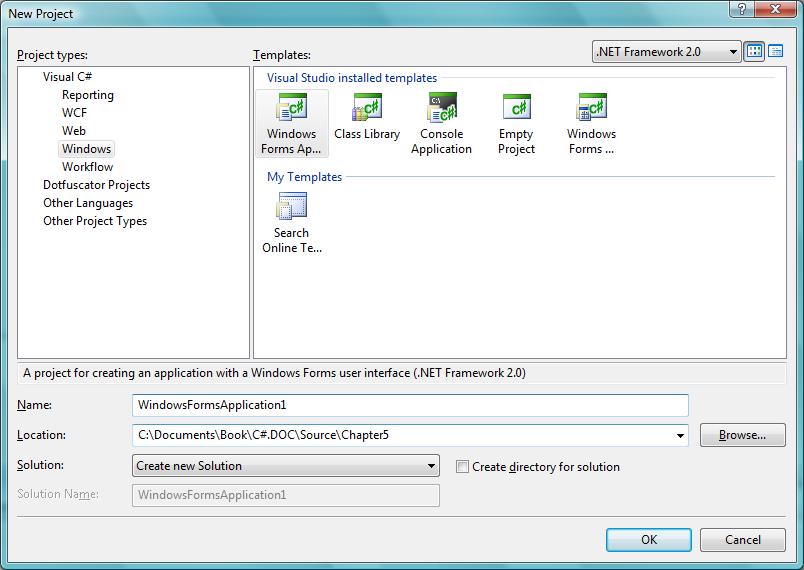
Рис. 5.1. Окно создания нового проекта (выделен пункт для создания визуального приложения)
Чтобы сэкономить место, я убрал комментарии, но в них всего лишь было написано, что перед нами входная точка приложения. А мы уже и без комментариев знаем, что метод Main() всегда вызывается первым при запуске приложения. Но давайте все по порядку.
Файл Program.cs нужен только в качестве заглушки, в которой объявлен класс с методом Main(). Он не несет в себе никакой логики, кроме создания приложения
и отображения главного окна программы. Чаще всего в этот файл вы заглядывать не будете, но знать о его существовании желательно.
5.1.1. Пространства имен
В самом начале файл Program.cs подключает три пространства имен, с которыми будет происходить работа. На самом деле для компиляции программы достаточно только двух пространств: первого и третьего. Второе пространство не нужно, и в данном коде не используется, поэтому мы не будем его пока рассматривать. Это пространство имен относится к коллекциям, а это тема отдельного и очень серьезного разговора главы 8.
Из необходимых остаются два пространства имен:
- System — мы подключали это пространство имен для всех приложений, которые писали до сих пор, — точнее, мастер подключал его вместо нас. В этом пространстве в .NET объявлены основные типы данных и все, без чего не проживет ни одно приложение .NET, которое хоть что-то делает;
- System.Windows.Forms — в этом пространстве имен расположено все, что необходимо для функционирования формы. Формами в .NET называют проект будущего окна. Если класс — это спецификация, по которой создается объект, то форма — это спецификация, по которой создается окно. Мы планируем работать с визуальным интерфейсом, поэтому это пространство имен просто необходимо.
Как узнать, какие пространства имен подключать, а какие не нужно? Тут может помочь файл помощи и MSDN, где при описании каждого класса, метода или свойства обязательно указывается, в каком пространстве имен его можно найти. Откройте файл помощи — командой меню Help | Index (Помощь | Индекс) — и введите в строку поиска Look for (Искать) в левой панели открывшегося окна: Application class. Щелкните по найденному имени двойным щелчком, и откроется страница помощи по этому классу (рис. 5.2).
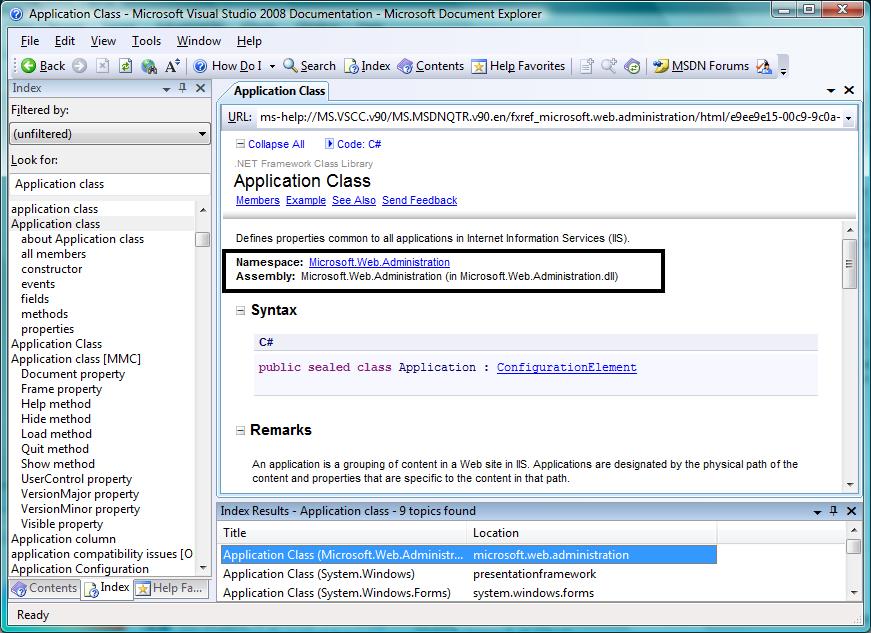
Рис. 5.2. Файл помощи по классу Application
На рис. 5.2 я выделил рамкой тот фрагмент, где как раз и написано, в каком пространстве имен находятся описание и сборка (DLL-файл) с реализацией класса. Нас больше интересует именно пространство имен, а не сборка. Мне ни разу не приходилось использовать файл сборки, по крайней мере этот. Все основные файлы добавляются в раздел References проекта автоматически при создании проекта. Но если вы будете использовать что-либо специфическое, то может потребоваться подключение нужного файла сборки самостоятельно.
Второй метод узнать пространство имен — не думать о нем, а возложить всю головную боль на среду разработки. У Visual Studio голова достаточно хорошая, и она с легкостью решит такую задачу.
Попробуйте сейчас ввести где-нибудь в коде метода Main() слово OleDbConnection. Это класс, который используется для соединения с базами данных, — компилятор не найдет его среди подключенных пространств имен и конечно же подчеркнет. Теперь вы можете щелкнуть правой кнопкой по подчеркнутому имени, в контекстном меню раскрыть пункт Resolve (Разрешить), и в его подменю будут перечислены пространства имен, в которых среда разработки смогла найти указанное слово (рис. 5.3).
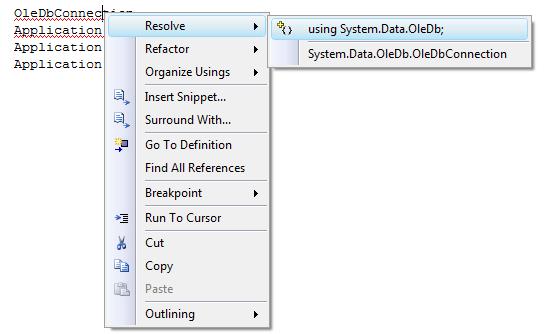
Рис. 5.3. Контекстное меню позволяет решить проблему подключения пространств имен
В контекстом меню доступны два варианта решения проблемы, между которыми находится разделитель. Выше разделителя указаны варианты, которые добавляют в начало модуля кода оператор using с выбранным пространством имен. Варианты ниже разделителя изменяют короткое имя метода на полное. То есть, в случае с типом данных OleDbConnection, если вы выберете вариант ниже разделителя, то тип данных заменится на System.Data.OleDb.OleDbConnection. Если вы знаете, что это единственное обращение к такому типу данных, то можно использовать полный путь, но если в модуле кода вы станете использовать этот тип данных много раз, то проще будет сразу добавить его в раздел using.
Чаще всего в этом подменю будет приведен только один вариант — и до разделителя, и после, но некоторые имена могут быть объявлены как для Windows, так и для Web. В таких случаях требуется выбрать нужную сборку. Это не сложно, потому что для Интернета чаще всего используется пространство имен System.Web. Например, класс Application для интернет-программирования находится в пространстве имен Microsoft.Web.Administration. Это определяется ключевым словом Web, которое находится в середине.
Обратите также внимание, что мастер создания проекта поместил весь код нашего проекта в пространство имен, идентичное имени проекта. Всегда обрамляйте код в пространство имен.
Пространство имен по умолчанию для вашего проекта можно изменить. Для этого щелкните правой кнопкой мыши по имени проекта и выберите в контекстном меню пункт Properties, чтобы изменить свойства проекта. Здесь в разделе Application
в поле Default namespace (Пространство имен по умолчанию) вы можете изменить имя пространства имен. При этом уже существующий код останется в старом пространстве имен. То есть, существующий код изменяться автоматически не будет, а вот новые файлы, которые будут добавляться в проект, станут попадать уже в новое пространство. Если вам нужно перенести существующий код в новое пространство, то следует сделать это руками, изменяя текущее пространство имен на новое. Можно оставить и старое имя, потому что в одной сборке могут быть и два, и три разных пространства имен, если вас это устраивает.
5.1.2. Потоки
Обратите внимание, что перед методом Main() в квадратных скобках стоит ключевое слово STAThread (см. листинг 5.1). Оно указывает на то, что модель разделения потоков для приложения будет одиночная (Single Thread Apartment model). Такой атрибут должен быть указан для всех точек входа в WinForms-приложения. Если он будет отсутствовать, то компоненты Windows могут работать некорректно.
Дело в том, что без атрибута STAThread приложение будет пытаться использовать многопоточную модель разделения MTAThread (Multi Threaded Apartment model), которая не поддерживается для Windows Forms.
5.1.3. Класс Application
В листинге 5.1 в методе Main() все строки кода являются обращением к классу Application, который предоставляет статичные свойства и методы (это значит, что не нужно создавать экземпляр класса, чтобы их вызвать) для поддержки работы приложения. Основными методами являются запуск и останов приложения, а также обработка сообщений Windows. При возникновении каких-либо ситуаций ОС отправляет окну событие, и окно должно отработать это событие. Например, если пользователь нажал на кнопку закрытия окна, то этому окну направляется событие WM_CLOSE (если мне не изменяет память). Поймав это событие, окно должно отреагировать, освободить запрошенные ресурсы и приготовиться к уничтожению. Любой ввод пользователя, включая нажатие клавиш на клавиатуре и движение курсора мыши, обрабатывает ОС, а потом с помощью сообщений отправляет изменения в приложение.
Чтобы отлавливать сообщения, которые направляет приложению операцион-
ная система, в приложении должен быть запущен цикл. В таких языках, как
С/С++, цикл получает от ОС сообщение, обрабатывает его и ожидает следующего сообщения. Этот цикл продолжается до тех пор, пока не произойдет выхода из программы.
Класс Application берет на себя всю ответственность за получение сообщений от системы и перенаправление их в окна, чтобы вы могли эти сообщения обработать. Чуть позже мы научимся ловить сообщения, а пока нам нужно знать, что за подготовку сообщения для обработки отвечает именно класс Application.
Рассмотрим методы, которые вызываются в классе, который сгенерировал нам мастер Visual Studio. Первый метод класса Application, который мы вызываем:
EnableVisualStyles(). Этот метод включает отображение в стилях ОС, на которой запущено приложение. Если удалить эту строку и запустить программу, то все элементы управления будут выглядеть в стиле Windows 9x с квадратными углами даже в Windows 7. Не вижу смысла возвращаться в доисторические времена визуального интерфейса, но если вам вдруг это понадобится, теперь вы знаете, какую строку нужно удалить.
Следующий метод приложения, который вызывает программа: SetCompatibleTextRenderingDefault(). Некоторые элементы управления могут отображать текст с помощью старых функций GDI или с помощью новых функций GDI+. Если методу SetCompatibleTextRenderingDefault() передать значение false, то будут использоваться функции GDI+.
Это все были подготовительные методы, а последний метод: Run() является наиболее важным. Этот метод запускает скрытый цикл обработки сообщений ОС и делает видимой форму, которая передается в качестве параметра. В нашем примере
в качестве параметра передается инициализация объекта класса Form1, для чего вызывается конструктор класса с помощью оператора new, как мы это делали ранее. Просто мы всегда присваивали результат выполнения new переменной, а в этом случае нам переменная не нужна, и мы больше не будем использовать объект
в методе Мain(), поэтому, нигде ничего не сохраняя, сразу передаем новый объект методу. То же самое можно было написать так:
   Form1 form = new Form1();
   Application.Run(form);
Все исходные коды главы 5 Библии C#
From Wikibooks, open books for an open world
To create a Windows desktop application we use the library represented by System.Windows.Forms namespace. Some commonly used classes in this namespace include:
- Control — generic class from which other useful classes, like
Form,TextBoxand others listed below are derived - Form — this is the base class for the program window. All other controls are placed directly onto a
Formor indirectly on another container (likeTabPageorTabControl) that ultimately resides on theForm. When automatically created in Visual Studio, it is usually subclassed asForm1. - Button — a clickable button
- TextBox — a singleline or multiline textbox that can be used for displaying or inputting text
- RichTextBox — an extended
TextBoxthat can display styled text, e.g. with parts of the text colored or with a specified font. RichTextBox can also display generalized RTF document, including embedded images. - Label — simple control allowing display of a single line of unstyled text, often used for various captions and titles
- ListBox — control displaying multiple items (lines of text) with ability to select an item and to scroll through it
- ComboBox — similar to
ListBox, but resembling a dropdown menu - TabControl and TabPage — used to group controls in a tabbed interface (much like tabbed interface in Visual Studio or Mozilla Firefox). A
TabControlcontains a collection ofTabPageobjects. - DataGrid — data grid/table view
The Form class (System.Windows.Forms.Form) is a particularly important part of that namespace because the form is the key graphical building block of Windows applications. It provides the visual frame that holds buttons, menus, icons, and title bars together. Integrated development environments (IDEs) like Visual C# and SharpDevelop can help create graphical applications, but it is important to know how to do so manually:
using System.Windows.Forms;

public class ExampleForm : Form    // inherits from System.Windows.Forms.Form
{
    public static void Main()
    {
        ExampleForm wikibooksForm = new ExampleForm();

        wikibooksForm.Text = "I Love Wikibooks";  // specify title of the form
        wikibooksForm.Width = 400;                // width of the window in pixels
        wikibooksForm.Height = 300;               // height in pixels
        Application.Run(wikibooksForm);           // display the form
    }
}
The example above creates a simple Window with the text «I Love Wikibooks» in the title bar. Custom form classes like the example above inherit from the System.Windows.Forms.Form class. Setting any of the properties Text, Width, and Height is optional. Your program will compile and run successfully, if you comment these lines out, but they allow us to add extra control to our form.
|
|
This section is a stub. You can help Wikibooks by expanding it. |
An event is an action being taken by the program when a user or the computer makes an action (for example, a button is clicked, a mouse rolls over an image, etc.). An event handler is an object that determines what action should be taken when an event is triggered.
using System.Windows.Forms;
using System.Drawing;

public class ExampleForm : Form    // inherits from System.Windows.Forms.Form
{
    public ExampleForm()
    {
        this.Text = "I Love Wikibooks";           // specify title of the form
        this.Width = 300;                         // width of the window in pixels
        this.Height = 300;                        // height in pixels

        Button HelloButton = new Button();
        HelloButton.Location = new Point(20, 20); // the location of button in pixels
        HelloButton.Size = new Size(100, 30);     // the size of button in pixels
        HelloButton.Text = "Click me!";           // the text of button

        // When clicking the button, this event fires
        HelloButton.Click += new System.EventHandler(WhenHelloButtonClick);

        this.Controls.Add(HelloButton);
    }

    void WhenHelloButtonClick(object sender, System.EventArgs e)
    {
        MessageBox.Show("You clicked! Press OK to exit this message");
    }

    public static void Main()
    {
        Application.Run(new ExampleForm());       // display the form
    }
}
|
|
This section is a stub. You can help Wikibooks by expanding it. |
The Windows Forms namespace has a lot of very interesting classes. One of the simplest and important is the Form class. A form is the key building block of any Windows application. It provides the visual frame that holds buttons, menus, icons and title bars together. Forms can be modal and modalless, owners and owned, parents and children. While forms could be created with a notepad, using a form editor like VS.NET, C# Builder or Sharp Develop makes development much faster. In this lesson, we will not be using an IDE. Instead, save the code below into a text file and compile with command line compiler.
using System.Windows.Forms;
using System.Drawing;

public class ExampleForm : Form    // inherits from System.Windows.Forms.Form
{
    public ExampleForm()
    {
        this.Text = "I Love Wikibooks";         // specify title of the form
        this.BackColor = Color.White;
        this.Width = 300;                       // width of the window in pixels
        this.Height = 300;                      // height in pixels

        // A Label
        Label TextLabel = new Label();
        TextLabel.Text = "One Label here!";
        TextLabel.Location = new Point(20, 20);
        TextLabel.Size = new Size(150, 30);
        TextLabel.Font = new Font("Arial", 12); // See! we can modify the font of text
        this.Controls.Add(TextLabel);           // adding the control to the form

        // A input text field
        TextBox Box = new TextBox();            // inherits from Control
        Box.Location = new Point(20, 60);       // then, it have Size and Location properties
        Box.Size = new Size(100, 30);
        this.Controls.Add(Box);                 // all class that inherit from Control can be added in a form
    }

    public static void Main()
    {
        Application.EnableVisualStyles();
        Application.Run(new ExampleForm());     // display the form
    }
}
Graphical User Interface (GUI) with Windows.Forms
Windows.Forms is the standard GUI toolkit for the .NET Framework. It is
also supported by Mono. Like every other thing in the world it has its
strong and weak points. Another GUI supported by .NET is Gtk#.
Which outguns which is up to you to judge. But before you can do that,
get a feel for Windows.Forms by going throught this tutorial.
Note 1: To compile programs using Windows.Forms you will need to
include -r:System.Windows.Forms in the compile command. E.g. if
you save the examples in the file MyFirstForm.n, compile them with:
ncc MyFirstForm.n -r:System.Windows.Forms -o MyFirstForm.exe
Note 2: I am not going to go too much into details of every single
thing you can do with Windows.Forms. These can be pretty easily checked in the
Class reference.
I will just try to show you how to put all the bricks together.
Table of Contents
-
The first step
- Buttons, labels and the rest
- A simple menu
- Basic events
- Cleaning up
-
The second step
- Painting
- Overriding event handlers
- A simple animation with double-buffering
- Bitmaps and images
- Adding icons to the menu
The first step
using System.Drawing;
using System.Windows.Forms;

class MyFirstForm : Form {
   public static Main() : void {
      Application.Run(MyFirstForm());
   }
}
This is not too complex, is it? And it draws a pretty window on the
screen, so it is not utterly useless, either 
Let us now try to customize the window a little. All the customization
should be placed in the class constructor.
using System.Drawing;
using System.Windows.Forms;

class MyFirstForm : Form {
   public this() {
      Text="My First Form";        //title bar
      ClientSize=Size(300,300);    //size (without the title bar) in pixels
      StartPosition=FormStartPosition.CenterScreen;     //I'm not telling
      FormBorderStyle=FormBorderStyle.FixedSingle;      //not resizable
   }

   public static Main() : void {
      Application.Run(MyFirstForm());
   }
}
An empty Windows.Forms form.
Buttons, labels and the rest
Wonderful. Now the time has come to actually display something in our window. Let us add a slightly customized button. All you need to do is to add the following code to the constructor of your Form class (i.e. somewhere between public this() { and the first } after it).
def button=Button();
   button.Text="I am a button";
   button.Location=Point(50,50);
   button.BackColor=Color.Khaki;
   Controls.Add(button);

def label=Label();
   label.Text="I am a label";
   label.Location=Point(200,200);
   label.BorderStyle=BorderStyle.Fixed3D;
   label.Cursor=Cursors.Hand;
   Controls.Add(label);
I hope it should pretty doable to guess what is which line responsible for. Perhaps you could only pay a little more attention to the last one. Buttons, labels, textboxes, panels and the like are all controls, and simply defining them is not enough, unless you want them to be invisible.
Also, the button we have added does actually nothing. But fear not, we shall discuss
a bit of events very soon.
A simple menu
Menus are not hard. Just take a look at the following example:
def mainMenu=MainMenu();

def mFile=mainMenu.MenuItems.Add("File");
def mFileDont=mFile.MenuItems.Add("Don't quit");
def mFileQuit=mFile.MenuItems.Add("Quit");

def mHelp=mainMenu.MenuItems.Add("Help");
def mHelpHelp=mHelp.MenuItems.Add("Help");

Menu=mainMenu;
It will create a menu with two drop-down submenus: File (with
options Don’t Quit and Quit) and Help with just
one option, Help.
A button, a label and a menu.
It is also pretty easy to add context menus to controls. Context menus are the ones which become visible when a control is right-clicked. First, you need to define the whole menu, and than add a reference to it to the button definition:
def buttonCM=ContextMenu();
   def bCMWhatAmI=buttonCM.MenuItems.Add("What am I?");
   def bCMWhyAmIHere=buttonCM.MenuItems.Add("Why am I here?");
...
def button=Button();
   ...
   button.ContextMenu=buttonCM;
A context menu.
Basic events
Naturally, however nice it all might be, without being able to actually
serve some purpose, it is a bit pointless. Therefore, we will need to
learn handling events. There are in fact two ways to do it. Let us take
a look at the easier one for the begnning.
The first thing you will need to do is to add the System namespace:
You can skip this step but you will have to write
System.EventArgs and so on instead of EventArgs.
Then, you will need to add a reference to the event handler to your
controls. It is better to do it first as it is rather easy to forget
about it after having written a long and complex handler.
button.Click+=button_Click;
...
mFileDont.Click+=mFileDont_Click;
mFileQuit.Click+=mFileQuit_Click;
...
mHelpHelp.Click+=mHelpHelp_Click;
Mind the += operator instead of = used when customizing
the controls.
Finally, you will need to write the handlers. Do not forget
to define the arguments they need, i.e. an object and an
EventArgs. Possibly, you will actually not use them but you have
to define them anyway. You can prefix their names with a _ to avoid
warnings at compile time.
private button_Click(_sender:object, _ea:EventArgs):void{
   Console.WriteLine("I was clicked. - Your Button");
}

private mFileQuit_Click(_sender:object, _ea:EventArgs):void{
   Application.Exit();
}
This is the way you will generally want to do it. But in this very case
the handlers are very short, and like all handlers, are not very often
used for anything else than handling events. If so, we could rewrite them
as lambda expressions which will save a good bit of space and clarity.
button.Click+=fun(_sender:object, _ea:EventArgs){
   Console.WriteLine("I wrote it. - button_Click as a lambda");
};

mFileQuit.Click+=fun(_sender:object, _ea:EventArgs){
   Application.Exit();
};
Cleaning up
After you are done with the whole application, you should clean
everything up. In theory, the system would do it automatically anyway
but it certainly is not a bad idea to help the system a bit. Especially
that it is not a hard thing to do at all, and only consists of two steps.
The first step is to add a reference to System.ComponentModel
and define a global variable of type Container:
using System.ComponentModel;
...

class MyFirstForm : Form {
   components : Container = null;
...
In the second and last step, you will need to override the Dispose
method. It could even fit in one line if you really wanted it to.
protected override Dispose(disposing : bool) : void {
   when (disposing) when (components!=null) components.Dispose();
   base.Dispose(d);
}
The second step
You should now have a basic idea as to what a form looks like. The time
has come to do some graphics.
Painting
There is a special event used for painting. It is called Paint and you
will need to create a handler for it.
using System;
using System.Drawing;
using System.Windows.Forms;

class MySecondForm : Form {
   public this() {
      Text="My Second Form";
      ClientSize=Size(300,300);

      Paint+=PaintEventHandler(painter);
   }

   private painter(_sender:object, pea:PaintEventArgs):void{
      def graphics=pea.Graphics;
      def penBlack=Pen(Color.Black);
      graphics.DrawLine(penBlack, 0, 0 , 150, 150);
      graphics.DrawLine(penBlack, 150, 150, 300, 0);
   }

   public static Main():void{
      Application.Run(MySecondForm());
   }
}
A reference to the painter method should be added in the form class
constructor (it affects the whole window), but this time it is a
PaintEventHandler. Same as PaintEventArgs in the handler
itself. In the handler, you should first define a variable of type
PaintEventArgs.Graphics. This is the whole window. This is where you will
be drawing lines, circles, strings, images and the like (but not pixels;
we will discuss bitmaps later on). To draw all those things you will
need pens and brushes. In our example we used the same pen twice. But
sometimes you will only need it once. In such case, there is no point
in defining a separate variable for it. Take a look at the next example.
Painting in Windows.Forms.
Overriding event handlers
Another way to define a handler is to override the default one provided
by the framework. It is not at all complicated, it is not dangerous and
in many cases it will prove much more useful. Take a look at the example
overriding the OnPaint event handler:
protected override OnPaint(pea:PaintEventArgs):void{
   def g=pea.Graphics;
   g.DrawLine(Pen(Color.Black), 50, 50, 150, 150);
}
Naturally, when you override the handler, there is no need any longer
to add a reference to it in the class constructor.
By the same token can you override other events. One of the possible
uses is to define quite complex clickable areas pretty easily:
protected override OnPaint(pea:PaintEventArgs):void{ def g=pea.Graphics; for (mutable x=0; x<300; x+=10) g.DrawLine(Pen(Color.Blue), x, 0, x, 300); } protected override OnMouseDown(mea:MouseEventArgs):void{ when (mea.X%10<4 && mea.Button==MouseButtons.Left) if (mea.X%10==0) Console.WriteLine("You left-clicked a line.") else Console.WriteLine($"You almost left-clicked a line ($(mea.X%10) pixels)."); }
Easily creating a complex clickable image map.
A simple animation with double-buffering
What is an animation without double-buffering? Usually, a flickering
animation. We do not want that. Luckily enough, double-buffering is as
easy as abc in Windows.Forms.
In fact, all you need to do is to set three style flags and override the
OnPaint event handler instead of writing your own handler and assigning
it to the event.
class Animation:Form{
   mutable mouseLocation:Point;         //the location of the cursor

   public this(){
      Text="A simple animation";
      ClientSize=Size(300,300);
      SetStyle(ControlStyles.UserPaint | ControlStyles.AllPaintingInWmPaint |
               ControlStyles.DoubleBuffer, true);         //double-buffering on
   }

   protected override OnPaint(pea:PaintEventArgs):void{
      def g=pea.Graphics;
      g.FillRectangle(SolidBrush(Color.DimGray),0,0,300,300);  //clearing the window

      def penRed=Pen(Color.Red);
      g.FillEllipse(SolidBrush(Color.LightGray),
                    mouseLocation.X-15, mouseLocation.Y-15, 29, 29);
      g.DrawEllipse(penRed, mouseLocation.X-15, mouseLocation.Y-15, 30, 30);
      g.DrawLine(penRed, mouseLocation.X, mouseLocation.Y-20,
                 mouseLocation.X, mouseLocation.Y+20);
      g.DrawLine(penRed, mouseLocation.X-20, mouseLocation.Y,
                 mouseLocation.X+20, mouseLocation.Y);
   }

   protected override OnMouseMove(mea:MouseEventArgs):void{
      mouseLocation=Point(mea.X,mea.Y);
      Invalidate();       //redraw the screen every time the mouse moves
   }

   public static Main():void{
      Application.Run(Animation());
   }
}
As you can see, the basic structure of a window with animation is
pretty easy. Main starts the whole thing as customized in the
constructor. The OnPaint event handler is called immediately. And
then the whole thing freezes waiting for you to move the mouse. When
you do, the OnMouseMove event handler is called. It checks the
new position of the mouse, stores it in mouseLocation and tells
the window to redraw (Invalidate();).
Try turning double-buffering off (i.e. comment the SetStyle…
line) and moving the mouse slowly. You will see the viewfinder
flicker. Now turn double-buffering back on and try again. See the
difference?
Well, in this example you have to move the mouse slowly to actually
see any difference because the viewfinder we are drawing is a pretty
easy thing to draw. But you can be sure that whenever anything more
complex comes into play, the difference is very well visible without
any extra effort.
A simple animation with double-buffering.
Bitmaps and images
I promised I would tell you how to draw a single pixel. Well, here we are.
protected override OnPaint(pea:PaintEventArgs):void{
   def g=pea.Graphics;
   def bmp=Bitmap(256,1);   //one pixel height is enough; we can draw it many times
   for (mutable i=0; i<256; ++i) bmp.SetPixel(i, 0, Color.FromArgb(i,0,i,0));
   for (mutable y=10; y<20; ++y) g.DrawImage(bmp, 0, y);
}
So, what do we do here? We define a bitmap of size 256,1. We draw onto
it 256 pixels in colours defined by four numbers: alpha (transparency),
red, green, and blue. But as we are only manipulating alpha and green,
we will get a nicely shaded green line. Finally, we draw the bitmap onto
the window ten times, one below another.
Mind the last step, it is very important. The bitmap we had defined is
an offset one. Drawing onto it does not affect the screen in any way.
Now, that you know the DrawImage method nothing can stop you from
filling your window with all the graphic files you might be having on
your disk, and modifying them according to your needs.
class ImageWithAFilter:Form{
   img:Image=Image.FromFile("/home/johnny/pics/doggy.png");  //load an image
   bmp:Bitmap=Bitmap(img);       //create a bitmap from the image

   public this(){
      ClientSize=Size(bmp.Width*2, bmp.Height);
   }

   protected override OnPaint(pea:PaintEventArgs):void{
      def g=pea.Graphics;
      for (mutable x=0; x<bmp.Width; ++x) for (mutable y=0; y<bmp.Height; ++y)
         when (bmp.GetPixel(x,y).R>0){
            def g=bmp.GetPixel(x,y).G;
            def b=bmp.GetPixel(x,y).B;
            bmp.SetPixel(x,y,Color.FromArgb(255,0,g,b));
         }
      g.DrawImage(img,0,0);            //draw the original image on the left
      g.DrawImage(bmp,img.Width,0);    //draw the modified image on the right
   }

   ...
}
This example draws two pictures: the original one on the left and the
modified one on the right. The modification is a very simple filter
entirely removing the red colour.
A simple graphic filter.
Adding icons to the menu
Adding icons is unfortunately a little bit more complicated than other
things in Windows.Forms.
You will need to provide handlers for two events: MeasureItem
and DrawItem, reference them in the right place, and set the menu
item properly.
mFileQuit.Click+=EventHandler( fun(_) {Application.Exit();} );
mFileQuit.OwnerDraw=true;
mFileQuit.MeasureItem+=MeasureItemEventHandler(measureItem);
mFileQuit.DrawItem+=DrawItemEventHandler(drawItem);
private measureItem(sender:object, miea:MeasureItemEventArgs):void{
   def menuItem=sender:>MenuItem;
   def font=Font("FreeMono",8);   //the name and the size of the font
   miea.ItemHeight=(miea.Graphics.MeasureString(menuItem.Text,font).Height+5):>int;
   miea.ItemWidth=(miea.Graphics.MeasureString(menuItem.Text,font).Width+30):>int;
}

private drawItem(sender:object, diea:DrawItemEventArgs):void{
   def menuItem=sender:>MenuItem;
   def g=diea.Graphics;
   diea.DrawBackground();
   g.DrawImage(anImageDefinedEarlier, diea.Bounds.Left+3, diea.Bounds.Top+3, 20, 15);
   g.DrawString(menuItem.Text, diea.Font, SolidBrush(diea.ForeColor),
                diea.Bounds.Left+25, diea.Bounds.Top+3);
}
A menu with an icon.
Приложения Windows Forms
Если вы захотите писать программы, похожие на привычные приложения Windows, то наверняка воспользуетесь классами из пространства имен System.Windows.Forms. Они позволяют задействовать кнопки, списки, текстовые поля, меню, окна сообщений и множество других «элементов управления». Элементы управления — это то, что вы помещаете в форму. Они нужны для вывода информации, например, текстовой (элемент управления Label ) или графической (элемент управления PictureBox ), либо для выполнения определенных действий, например, выбора значения или перехода к другой форме после нажатия кнопки. Все элементы управления помещаются на форму.
Понятие «форма», принятое в программировании, родственно понятию «форма анкеты» или «форма документа» из обычной жизни. На форме можно в определенном порядке расположить различные элементы (текст, картинки, поля для заполнения и т. д.). Когда нам дают готовую форму документа и просят ее заполнить, мы обычно читаем содержащуюся в ней типовую информацию, а затем вписываем недостающие данные в определенные строки.

В программировании понятие формы во многом похоже: форма позволяет размещать текст, изображения, поля ввода, кнопки и т. п., добиваясь их точного расположения на экране. В консольном приложении на экран выводятся только строки текста.
Компания Майкрософт предоставила в составе библиотеки классов .NET Framework огромное количество «элементов управления», которые можно помещать на формы. Освоив этот инструмент, вы сможете быстро создавать эффектные приложения.
Некоторые полезные классы из пространства имен System.Windows.Forms
Вот некоторые элементы управления, которые можно размещать на формах:
- Label (Надпись).
- Button (Кнопка).
- ListBox (Список).
- CheckBox (Флажок).
- RadioButton (Переключатель).
- MessageBox (Окно сообщений).
- Menu (Меню).
- TabControl (Управление вкладками).
- Toolbar (Панель инструментов).
- TreeView (Дерево).
- DataGrid (Сетка данных).
- PictureBox (Изображение).
- RichTextBox (Текстовое поле с поддержкой формата RTF).
Работа с примерами программ Windows Forms в Visual C# Express
Возможно, вы предпочтете не использовать уже заготовленные примеры проектов, а разрабатывать их «с нуля». В таком случае нужно учесть, что для каждого проекта C# Express сразу же создает два файла (с именами Form1.cs и Program.cs ) и наполняет их исходным кодом на языке C#, то есть вы изначально получаете простейшую, но полноценную программу. Предлагаемый нами способ работы с уже полученным проектом состоит в выполнении следующих действий:
- Удалите файл Form1.cs.
- Замените код в файле Program.cs на код примера, с которым вы работаете.
Оба этих действия не понадобятся, если вы открываете программы с помощью команды «Открыть проект» в меню «Файл» и находите нужный проект в той папке, куда его поместили после разархивации.
Пример программы 3.3
Рассмотрим пример простейшего приложения Windows Forms. Оно всего лишь создает новую форму и выводит определенный текст в заголовок окна формы.
using System.Windows.Forms;
  class SimpleWindowsForm : Form
  {
    // Метод-конструктор нашего класса
    public SimpleWindowsForm()
    {
      // Указываем заголовок окна
      this.Text = "Это простая форма с заголовком";
    }
    static void Main()
    {
      // Создаем новый экземпляр класса
      //и запускаем его на выполнение
      // В результате на экране дисплея откроется форма
      Application.Run(new SimpleWindowsForm());
    }
  }
Листинг
3.3.
Пример программы 3.4
Следующий пример тоже достаточно прост, но мы делаем шаг вперед — размещаем на форме кнопку.
using System.Windows.Forms;
  class SimpleWindowsFormWithButton : Form
  {
    Button button1;

    // Метод-конструктор нашего класса
    public SimpleWindowsFormWithButton()
    {
      // Указываем заголовок окна
      this.Text = "Форма с командной кнопкой";

      // Добавляем кнопку в коллекцию элементов управления формы
      // Хотя на кнопке написано: "Нажми меня!",
      // пока при нажатии ничего не происходит!
      button1 = new Button();
      button1.Text = "Нажми меня!";
      button1.Top = 100;
      button1.Left = 100;
      button1.Height = 50;
      button1.Width = 70;
      this.Controls.Add(button1);
    }

    static void Main()
    {
      // Создаем и запускаем форму
      Application.Run(new SimpleWindowsFormWithButton());
    }
  }
Листинг
3.4.
Пример программы 3.5
Кнопку на форму мы поместили, но при нажатии на нее ничего не происходит. Это скучно.
Нам нужно описать метод, который будет выполнять какое-либо действие при нажатии на кнопку. Пусть при этом текст в заголовке окна будет меняться. Поскольку такой метод отслеживает наступление некоторого события (в нашем случае – нажатие на кнопку) и затем каким-то образом обрабатывает его, он, напомним, называется «обработчик события». Кроме того, надо привязать обработчик события к соответствующему событию, то есть к нажатию на кнопку.
using System;
using System.Windows.Forms;
using System.Drawing;

class FormWithWorkingButton : Form
{
  Button mrButton;
  // Метод-конструктор нашего класса
  public FormWithWorkingButton()
  {
    // Указываем заголовок окна
    this.Text = "Форма с работающей кнопкой!";
    // Добавляем кнопку и привязываем ее к обработчику события
    mrButton = new Button();
    mrButton.Text = "Нажми меня";
    mrButton.Top = 100;
    mrButton.Left = 100;
    mrButton.Height = 50;
    mrButton.Width = 70;
    mrButton.Click += new System.EventHandler(mrButton_Click);
    this.Controls.Add(mrButton);
  }

  static void Main()
  {
    // Создаем и запускаем форму
    Application.Run(new FormWithWorkingButton());
  }

  // Обработчик события, срабатывающий при нажатии кнопки
  void mrButton_Click(object sender, EventArgs e)
  {
    // Изменяем текст
    mrButton.Text = "Кнопка была нажата!";
  }
}
Листинг
3.5.
Пример программы 3.6
Мы добились успеха: наша программа умеет выполнять основные действия. Теперь добавим на форму несколько новых элементов управления, аккуратно разместим их и немного поработаем с ними. Возьмем элементы управления 4-х типов: Button, ListBox, MessageBox и PictureBox.
Обратите внимание: кроме System.Windows.Forms в этом примере упоминается пространство имен System.Drawing. Дело в том, что мы используем элемент управления PictureBox, а для работы с изображениями требуются классы Drawing.
using System.Windows.Forms;
using System.Drawing;

class MyForm : Form
{
  // Объявим элемент ListBox как поле класса:
  // нам придется обращаться к нему из разных методов
  ListBox listBox1;

  // Метод-конструктор нашего класса
  public MyForm()
  {
    //Размеры формы
    this.Size = new Size(400, 400);
    // Создадим элемент PictureBox, поместим в него изображение,
    // добавим его на форму
    PictureBox pictureBox1 = new PictureBox();
    pictureBox1.SizeMode = PictureBoxSizeMode.StretchImage;
    Bitmap image1 = new Bitmap ("..//..//images//Zakat.jpg");
    pictureBox1.ClientSize = new Size(this.Width, 150);
    pictureBox1.Image = (Image)image1;
    this.Controls.Add(pictureBox1);
    // Создаем объект Button, определяем некоторые из его свойств
    Button button1 = new System.Windows.Forms.Button();
    button1.Location = new Point(150, 160);
    button1.Size = new Size(100, 30);
    button1.Text = "Нажми меня";
    button1.Click += new System.EventHandler(button1_Click);
    this.Controls.Add(button1);

    // Создаем ListBox, определяем свойства и добавляем на форму
    listBox1 = new System.Windows.Forms.ListBox();
    listBox1.Location = new System.Drawing.Point(20, 200);
    listBox1.Size = new Size(100, 100);
    listBox1.Items.Add("Лес");
    listBox1.Items.Add("Степь ");
    listBox1.Items.Add("Озеро");
    listBox1.Items.Add("Море");
    listBox1.Items.Add("Океан");
    listBox1.SelectedIndex = 2;
    this.Controls.Add(listBox1);
  }

  // Обработчик события, срабатывающий при нажатии кнопки
  void button1_Click(object sender, System.EventArgs e)
  {
    // Выводим сообщение с указанием выбранного в списке пункта
    MessageBox.Show(this, "Вы выбрали " + listBox1.SelectedItem,
    "Уведомление", MessageBoxButtons.OK);
  }

  static void Main()
  {
    // Создаем и запускаем форму
    Application.Run(new MyForm());
  }

  private void InitializeComponent()
  {
    this.SuspendLayout();
    //
    // MyForm
    //
    this.BackColor = System.Drawing.SystemColors.Control;
    this.ClientSize = new System.Drawing.Size(292, 273);
    this.Name = "MyForm";
    this.ResumeLayout(false);
  }
}
Листинг
3.6.
This C# tutorial shows how to use the Form type in Windows Forms.
Form. Every Windows Forms program will use the Form class. In many programs,
the Load, FormClosing and FormClosed event handlers provide needed functionality. We look closer at Form. We demonstrate several event handlers on the Form class.
Load. To start, create a new Windows Forms program. Next, we add the Load event handler. In Visual Studio, double-click somewhere on the visible Form. In Form1_Load, you can set things like the title text (Text property) or the Window position.
Tip: This is also a good place to put some initialization code. These run before the form is displayed.
C# program that uses Load, FormClosing, FormClosed

using System;
using System.Windows.Forms;

namespace WindowsFormsApplication1
{
    public partial class Form1 : Form
    {
	public Form1()
	{
	    InitializeComponent();
	}

	private void Form1_Load(object sender, EventArgs e)
	{
	    // You can set properties in the Load event handler.
	    this.Text = DateTime.Now.DayOfWeek.ToString();
	    this.Top = 60;
	    this.Left = 60;
	}

	private void Form1_FormClosing(object sender, FormClosingEventArgs e)
	{
	    // You can cancel the Form from closing.
	    if ((DateTime.Now.Minute % 2) == 1)
	    {
		this.Text = "Can't close on odd minute";
		e.Cancel = true;
	    }
	}

	private void Form1_FormClosed(object sender, FormClosedEventArgs e)
	{
	    // You can write to a file to store settings here.
	}
    }
}


FormClosing event handler. It’s sad to think anyone would want to close your program, but this will happen. In FormClosing, you can use logic to see if the program should stay open. Perhaps some data was not saved to the database.
Tip: Set the Cancel property on the FormClosingEventArgs to true and the Form will remain open. A dialog box might be helpful.
MessageBox.Show
In FormClosed, you know the Form has been closed. You can’t cancel it at this point. This is a good place to write settings to the disk or perform logic that affects the state of the system after the Form or entire program terminates.
Settings.settings
Base. The form class is an important one. It is the base class for all custom windows (such as Form1) that you might develop. You can reference all these derived types from the base type Form.
However: If you are handling child forms, it is probably best to reference them through the most derived type.
Using. The clearest way to create a new Form is to add the using statement to your code and then call Show or ShowDialog. To start, you can add a button_Click event handler to your button in Windows Forms by double-clicking on it in the Designer.
And: This will create the following method, which we have also added the using statement to.
Method that demonstrates using keyword on Form: C#

private void button4_Click(object sender, EventArgs e)
{
    using (Form2 form2 = new Form2())
    {
	form2.ShowDialog();
    }
}

We see the Click event handler for button4, which is just a regular Button control in Windows Forms. The two parameters, «object sender» and «EventArgs e» are not specific to this example and you can ignore them.
Button
Using statement. Let’s look carefully at how the using statement contains the assignment of a new instance of the Form2 form. The new Form2() constructor is inside the using condition.
Constructor
Also: ShowDialog is called on the new Form instance. This will show the dialog in the form. You can assign its result to a DialogResult.
DialogResult
IDisposable. Form types implement the IDisposable interface, which is a special interface that is called when you have the «using» statement. Windows Forms use system resources that must be cleaned up after you are done with them.
So: No matter what happens in ShowDialog, the Form instance will be properly disposed.
Using
Parameter. Here we see a short example of how you can use DialogResult and ShowDialog together. We also pass a parameter to the Form3 constructor. It is useful to pass parameters to Form constructors. You will need to modify the constructor manually.
Version that passes argument to Form: C#

private void button1_Click(object sender, EventArgs e)
{
    using (Form3 form3 = new Form3(new object())) // <-- Parameter
    {
	DialogResult result = form3.ShowDialog();
	if (result == DialogResult.OK) // <-- Checks DialogResult
	{
	}
    }
}

Summary. The Form type presents several important event handlers as well as properties. The Load, FormClosing, and FormClosed event handlers are of particular interest. Most of the properties and other event handlers are not covered here.
But: They can be used in a similar way to those in the example. And custom types that derive from Form can be used.
Related Links
Adjectives
Ado
Ai
Android
Angular
Antonyms
Apache
Articles
Asp
Autocad
Automata
Aws
Azure
Basic
Binary
Bitcoin
Blockchain
C
Cassandra
Change
Coa
Computer
Control
Cpp
Create
Creating
C-Sharp
Cyber
Daa
Data
Dbms
Deletion
Devops
Difference
Discrete
Es6
Ethical
Examples
Features
Firebase
Flutter
Fs
Git
Go
Hbase
History
Hive
Hiveql
How
Html
Idioms
Insertion
Installing
Ios
Java
Joomla
Js
Kafka
Kali
Laravel
Logical
Machine
Matlab
Matrix
Mongodb
Mysql
One
Opencv
Oracle
Ordering
Os
Pandas
Php
Pig
Pl
Postgresql
Powershell
Prepositions
Program
Python
React
Ruby
Scala
Selecting
Selenium
Sentence
Seo
Sharepoint
Software
Spellings
Spotting
Spring
Sql
Sqlite
Sqoop
Svn
Swift
Synonyms
Talend
Testng
Types
Uml
Unity
Vbnet
Verbal
Webdriver
What
Wpf