
АрхивСистема
В Windows XP существует инструмент «Удалённый помощник», позволяющий пользователям помогать друг другу решать различные проблемы.
В операционной системе Windows XP существует инструмент «Удалённый помощник», позволяющий пользователям помогать друг другу решать различные проблемы. Расскажем, как с ним работать.
Сначала пользователю, которому нужна помощь, необходимо разрешить работу удалённого помощника. Для этого следуем в «Мой компьютер -> Свойства -> Удалённые сеансы».
Там ставим галочку на «Разрешить отправку приглашения удалённому помощнику», потом нажимаем кнопку «Дополнительно».
Здесь можно разрешить удалённому помощнику управлять компьютером вместе с вами, иначе он будет только видеть ваш рабочий стол (и писать советы, где и что вам делать).
Теперь самое время настроить брандмауэр. Если используется стандартный брандмауэр, встроенный в Windows XP SP2, то идём в «Панель управления», находим там «Брандмауэр Windows» и на вкладке «Исключения» разрешаем «Удалённый помощник» или «Дистанционное управление рабочим столом».
Если используется брандмауэр стороннего производителя, то в настройках сетевого экрана необходимо разрешить входящие TCP-соединения на порт 3389 для процесса C:\WINDOWS\system32\sessmgr.exe.
Стандартно, тот, кого вы позвали на помощь, сам будет инициировать установку соединения, поэтому, если у вас доступ в интернет через NAT (допустим, в виде LAN ADSL-модема), то, во-первых, на NAT необходимо настроить форвардинг порта 3389, во-вторых, потом (сформировав приглашение) надо открыть в «Блокноте»1 файл приглашения (.msrcincident), найти в нём поле RCTICKET и подменить в нём внутренний IP-адрес на текущий внешний IP-адрес. В случае отсутствия возможности настройки NAT можно предварительно установить VPN-соединение с тем, кто будет вам помогать, и тогда сеанс помощи будет проводиться по VPN-каналу2.
Теперь начинаем звать помощников3.
Идём в «Пуск -> Справка и поддержка». Там в разделе «Запрос о поддержке» нажимаем ссылку «Приглашение на подключение для удалённого помощника».
Далее выбираем ссылку «Отправить приглашение». Там будет предложено использовать MSN или Outlook либо сохранить в файл. Приглашение — это обычный файл с IP-адресом того, кому нужна помощь. Файл можно доставить помощнику любым способом: по сети, ICQ, аттачем в TheBat! или даже на дискете. Для простоты и надёжности выбираем ссылку «Сохранить приглашение в файл»
Далее появится предложение ввести своё имя и срок действия приглашения.
Имя может быть любым, оно не связано с именем, указанным в Windows. Время действия, как сказано, служит для безопасности. Но рискнем предположить, что смысл его другой: дело в том, что непосредственно в начале сеанса помощи в любом случае система запросит у вас подтверждение. А вот по времени есть смысл ограничить интервал, через который вам уже помощь будет не нужна.
Далее вводим пароль.
Нажимаем кнопку «Сохранить приглашение». Приглашение будет сохранено в виде файла с расширением .msrcincident. Готово, все окна можно позакрывать. А файл приглашения и пароль к нему, надо передать любым способом тому, кто будет вам помогать.
Помощнику, который будет вам помогать, достаточно просто запустить в «Проводнике» этот файл.
Затем после установки связи он сначала увидит пустой экран.
А вам будет выдан запрос на разрешение начала сеанса помощи.
После того как вы дадите согласие, помощник увидит ваш экран.
Он может писать вам сообщение в нижнем левом углу своего окна, а вы можете ему писать сообщение в окне диалога «Удалённый помощник».
Вы также можете отправлять друг другу файлы при помощи кнопки «Отправить файл». Клавиша «Начать разговор» позволяет общаться голосом через микрофон.
При необходимости помощник может не только наблюдать, но и тоже управлять компьютером. Для этого ему надо нажать кнопку «Взять управление», после чего вам будет предложено разрешить ему управление.
Прервать совместное управление можно кнопкой «Прекратить управление», а кнопка «Отключить» полностью завершает сеанс помощи.
1. Файл содержит юникод, потому во многих альтернативных «Блокнотах» его не получится отредактировать. [вернуться]
2. Но для возможности установки VPN тогда другая сторона должна иметь либо прямое подключение к интернету (внешний/»белый»/реальный IP), либо возможность настройки своего NAT. [вернуться]
3. Если у вас несколько сетевых интерфейсов, то сначала желательно отключить все лишние сетевые интерфейсы (через которые помощник работать явно не будет). Дело в том, что в приглашении будут указаны все IP-адреса вашей машины, и помощник будет поочерёдно пытаться установить по ним связь. Это не страшно, просто будет потеряно несколько минут времени, пока он доберётся до того IP, который доступен из его сети. [вернуться]
Аннотация: В Windows XP Professional есть две новые функции: Remote Desktop (Удаленный рабочий стол) и Remote Assistance (Удаленный помощник). В данной лекции рассказывается о возможностях этих нововведений и методах работы с ними.
Уже многие годы работники технической поддержки используют программы, позволяющие им видеть и настраивать компьютеры пользователей без необходимости приходить к ним в офис. Такие программы, как Carbon Copy и pcAnywhere позволяют осуществлять удаленное управление и оказывать помощь непосредственно с компьютеров работников технической поддержки. В систему Windows XP Professional компания Microsoft интегрировала свою версию удаленного доступа.
В Windows XP Professional есть два инструмента для удаленного доступа и оказания технической поддержки. Первый из них называется Remote Desktop (Удаленный рабочий стол) и позволяет другому лицу пользоваться вашим компьютером посредством сетевого или dial-up-соединения. Инструмент Remote Assistance (Удаленный помощник) ориентирован больше на оказание помощи и используется при возникновении проблем с работой компьютера или приложения.
В этой лекции мы рассмотрим оба инструмента. Сначала мы обсудим рабочие качества Remote Desktop, а также установку и работу с этим инструментом. Затем мы обратимся к Remote Assistance и исследуем его работу, а также возможность его использования для помощи себе или другу.
Инструмент Remote Desktop (Удаленный рабочий стол)
Инструмент Remote Desktop позволяет вам, находясь на одном компьютере, удаленно управлять другим. Например, если вам нужно зайти в свой компьютер, находящийся в офисе, из дома (предположим, что вы заблаговременно настроили свой рабочий компьютер), то вы можете с помощью инструмента Remote Desktop получить доступ ко всем данным, находящимся на рабочем компьютере, включая файлы, приложения и сетевые соединения. Вы даже можете слышать звук, с которым открываются файлы.
Фактически Remote Desktop позволяет не только получать доступ к файлам удаленного компьютера, но и на самом деле видеть рабочий стол таким, какой он есть на удаленном компьютере. Более того, если удаленный компьютер работает в операционной системе Windows 2000 или .NET Server, то на нем могут удаленно работать несколько пользователей одновременно.
Работа инструмента Remote Desktop основана на технологии Terminal Services (Службы терминалов). Это значит, что удаленный рабочий стол позволяет запускать приложения на удаленном компьютере с операционной системой Windows XP Professional с любого компьютера-клиента, работающего в среде Windows.
Далее мы увидим, что технология Terminal Services является основой для работы удаленного помощника, который позволяет вашему другу или работнику технической поддержки устанавливать соединение с вашим компьютером, видеть ваш рабочий стол и управлять компьютером.
Для соединения инструмент Remote Desktop использует LAN, виртуальную частную сеть (VPN) или интернет-соединение. Как и следовало ожидать, работа удаленного рабочего стола сильно зависит от скорости установленного соединения.
В состав Remote Desktop соединения входят два компонента.
- Сервер. Им является удаленный компьютер, с которым вы устанавливаете соединение. Это может быть либо стационарный компьютер в офисе, либо портативный компьютер, с которым вы соединяетесь удаленно, когда его владелец находится в поездке.
- Клиент. Это тот компьютер, с которого вы устанавливаете соединение с сервером. Например, переносной компьютер для работы во время путешествия.
При необходимости можно пользоваться двумя различными версиями Remote Desktop.
- Remote Desktop (Удаленный рабочий стол). Первая версия подходит для использования в локальной сети и требует установки программного обеспечения на компьютере-клиенте.
- Remote Desktop Web Connection (Интернет-подключение к удаленному рабочему столу). Эта версия требует на клиентской машине только наличия браузера Internet Explorer, но на сервере для нее необходимо установить и настроить большее количество программ.
Характеристики
Remote Desktop обладает набором характеристик, которые делают работу с ним плодотворной и функциональной. К ним относятся: безопасность консоли, поддержка цвета и переадресация ресурсов.
Безопасность консоли
При использовании Remote Desktop вы можете не волноваться, что кто-то, сидя за удаленным компьютером, будет наблюдать за всеми вашими действиями. Remote Desktop использует безопасность консоли. Это означает, что во время сеанса связи с помощью Remote Desktop этот сеанс не отображается на экране компьютера-клиента и сервера. Более того, Windows XP Professional отключает дисплей удаленного компьютера, не допуская отслеживания ваших действий.
Поддержка цвета
Remote Desktop поддерживает 24-битные цвета. Это значит, что изображение на дисплее одинаково как для клиента, так и для сервера. Количество и глубину цветов пользователь может настраивать так, как ему необходимо.
Переадресация ресурсов
Важной частью всякой Remote Desktop-сессии является возможность фактически использовать компоненты удаленного компьютера. Remote Desktop применяет переадресацию ресурсов, позволяя удаленному пользователю работать, как если бы он сидел непосредственно за удаленным компьютером. Переадресация ресурсов обращается к некоторым свойствам активов удаленного компьютера, включая возможность использовать файловую систему удаленного компьютера в качестве общедоступного сетевого ресурса.
Переадресация звуков позволяет компьютеру-клиенту воспроизводить звуки, которые генерируются на компьютере-сервере. Если звуки воспроизводятся двумя приложениями, два потока сигналов объединяются. При проигрывании звуков Remote Desktop также учитывает пропускную способность полосы частот. Вместо того чтобы перегружать соединение звуковым сигналом при изменении пропускной способности, Remote Desktop меняет качество звука.
В Windows XP появилась технология для удаленного подключения к рабочему столу с целью помочь пользователю в решении проблем — Remote Assistance, или Удаленный Помощник.
Технология не очень удобная потому, что для подключения администратора к компьютеру клиента самому пользователю тоже надо кое-что сделать (отправить запрос Remote Assistance). Но в арсенале администратора такой метод доступа может быть не лишним. Иногда это удобно, если нет radmin-а или DameWare — Remote Assistance уже встроен в систему, и не нужно ничего устанавливать. Единственное ограничение — оба компьютера, и клиент (компьютер администратора) и сервер (компьютер пользователя, которому помогает администратор через Remote Assistance) должны работать под управлением Windows XP (и, возможно, клиент может еще работать под Windows 2003, поскольку эта система родственна XP). Во время запуска Remote Assistance на сервере временно автоматически отключается файервол (если верить справке Windows XP, но лучше на всякий случай файервол отключить). С точки зрения сетевых коммуникаций Remote Assistance использует встроенный в XP терминальный сервер и работает точно так же, как и Remote Desktop. Отличие от Remote Desktop в том (и это важное отличие, если необходима именно помощь пользователю), что при работе Remote Assistance экран сервера видят обе стороны (как в radmin и DameWare), а при использовании Remote Desktop происходит принудительное завершение сессии локального пользователя. Как использовать Remote Assistance, процесс по шагам:
1. На сервере (компьютер пользователя, которому помогает администратор через Remote Assistance) включаем Remote Assistance: Start -> Settings -> Control Panel -> System -> закладка Remote -> должна стоять галка Allow users to connect remotely to this computer (панель Remote Desktop). Там же ставим галку Allow Remote Assistance invitations to be sent from this computer (панель Remote Assistance). На всякий случай поверяем, что запущена служба Terminal Services (Start -> Settings -> Control Panel -> Administrative Tools -> Services или net start TermService).
2. Отключаем файервол на всякий случай (хотя в help Windows говорится, что это не требуется (Start -> Settings -> Control Panel -> Windows Firewall), либо останавливаем службу Windows Firewall/Internet Connection Sharing (ICS) — Start -> Settings -> Control Panel -> Administrative Tools -> Services или net stop SharedAccess.
3. Готовим запрос на доступ администратора через Remote Assistance. На сервере (компьютер пользователя, которому помогает администратор через Remote Assistance) делаем Start -> All Programs -> Accessories -> Remote Assistance. Щелкаем по ссылке «Invite someone to help you». Запускается нехитрый мастер, который сразу предлагает отправить запрос либо через Windows Messenger, либо через Outlook Express. Если по каким-то причинам они не настроены, есть еще третий способ — ссылка «Save invitation as a file (Advanced)» внизу. Она позволяет сохранить запрос в виде файла с расширением «*.msrcincident», и потом Вы должны этот файл каким-то образом передать администратору, чтобы он мог подключиться. Способы передачи могут быть разные — дискета, общая сетевая папка, ftp, email.
4. Администратор на своем компьютере двойным щелчком открывает полученный файл запроса, запускается клиент Remote Assistance, который подключается к серверу (в качестве сервера выступает компьютер пользователя, отправившего запрос) по протоколу RDP. При этом пользователь получает сообщение, что к его серверу производится попытка подключения Remote Assistance, и если пользователь подтвердит подключение, то оно устанавливается. И пользователь, и администратор видят один и тот же экран десктопа, и получают набор утилит для совместной работы, в числе которых есть текстовый чат.
5. В некоторых конфигурациях сетей необходимо предварительно подправить файл запроса. Например, если сервер находится за роутером NAT и имеет приватные адреса (192.168.x.y и т. п.). Это легко сделать, так как файл запроса — всего лишь обычный текстовый файл, где в понятной форме можно найти параметры подключения. Вот пример такого файла RAInvitation.msrcincident:
<?xml version=»1.0″ encoding=»Unicode» ?><UPLOADINFO TYPE=»Escalated»><UPLOADDATA USERNAME=»John» RCTICKET=»65538,1, 192.168.7.1:3389; 192.168.55.1:3389; 192.168.255.1:3389; vm:3389, *, pwXZUkKqxMS2zVoTavB6Pmr28BXhX46caZetCBx0B+I=, *, *, 0zjo2leurw5/UdMf7Eknrkb5Ekg=» RCTICKETENCRYPTED=»0″ DtStart=»1220932148″ DtLength=»60″ PassStub=»» L=»0″ /></UPLOADINFO>
Как можно догадаться, возможные адреса (куда будет коннектиться клиент Remote Assistance) в виде пар IP(или имя):порт прописаны с параметре RCTICKET. Эти адреса берутся от всех доступных на компьютере интерфейсов (терминальный сервер по умолчанию слушает их все на порту 3389). В этом примере на сервере есть 3 интерфейса с адресами 192.168.7.1 (адрес внутри локальной сети), 192.168.55.1 (VMware Virtual Ethernet Adapter for VMnet1) и 192.168.255.1 (VMware Virtual Ethernet Adapter for VMnet8), и, кроме этого, сервер имеет имя vm. Проблем не будет, если мы подключаемся через одну из этих доступных сетей. Если же, например, нам нужно подключиться через Интернет, то в файл запроса необходимо внести исправления. Предположим, что NAT-маршрутизатор транслирует приватный адрес и порт 192.168.7.1:3389 в публичный адрес и порт 93.128.79.149:3390. В этом случае содержимое файла RAInvitation.msrcincident будет таким:
<?xml version=»1.0″ encoding=»Unicode» ?><UPLOADINFO TYPE=»Escalated»><UPLOADDATA USERNAME=»John» RCTICKET=»65538, 1, 93.128.79.149:3390, *, pwXZUkKqxMS2zVoTavB6Pmr28BXhX46caZetCBx0B+I=, *, *, 0zjo2leurw5/UdMf7Eknrkb5Ekg=» RCTICKETENCRYPTED=»0″ DtStart=»1220932148″ DtLength=»60″ PassStub=»» L=»0″ /></UPLOADINFO>
Использовался материал статьи http://www.avkuzmin.ru/2007/07/remote-assistance-remote-desktop.html.
Remote Assistance
You may think you’ve experienced stress in your lifetime: deadlines, breakups, downsizing.
But absolutely nothing approaches the frustration of an expert trying to help a PC beginner over the phone—for both parties. The expert is flying blind, using Windows terminology that the beginner doesn’t know. Meanwhile, the beginner doesn’t know what to look for and describe to the expert on the phone. Every little operation takes 20 times longer than it would if the expert were simply seated in front of the machine. Both parties are likely to age ten years in an hour.
Fortunately, that era is at an end. One of Windows XP’s biggest big-ticket features is something called Remote Assistance. It lets somebody having trouble with the computer
extend an invitation to an expert, via the Internet. Through Remote Assistance, the expert can actually see the screen of the flaky computer, and even take control of it by remotely operating the mouse and keyboard. The guru can make even the most technical tweaks—running utility software, installing new programs, adjusting hardware drivers, even editing the Registry (Appendix C)—by long distance remote control. Remote Assistance really is the next best thing to being there.
Remote Assistance: Rest Assured
Of course, these days, most people react to the notion of Remote Assistance with stark terror. What’s to stop some troubled teenager from tapping into your PC in the middle of the night, rummaging through your files, and reading your innermost thoughts?
Plenty. First of all, you, the help-seeker, must begin the process by sending a specific electronic invitation to the expert. The invitation has a time limit: If the helper doesn’t respond within, say, 10 minutes, the electronic door to your PC slams shut again. Second,
the remote-control person can only see what’s on your screen. She can’t actually manipulate your computer unless you grant another specific permission. And finally, you must be present at your machine to make this work. The instant you see something fishy going on, a quick tap on your Esc key disconnects the interloper.
Tip
If, despite all of these virtual locks and chains, you absolutely can’t stand the idea that there’s a tiny keyhole
into your PC from the Internet, choose Start→Control Panel. Click “Switch to Classic View,” if necessary, and then double-click the System icon. In the System dialog box, click the Remote tab, and turn off “Allow Remote Assistance invitations to be sent from this computer.” Click OK. Now you’ve effectively removed the use of the Remote Assistance feature from Windows XP.
Remote Assistance via Windows Messenger
Windows Messenger is a little program that lets two people communicate across the Internet—by typing in a chat window, speaking into their microphones, or even watching each other via a video camera. It’s all detailed in Chapter 11.
For now, it’s enough to note that the Remote Assistance process is much simpler and more streamlined if both the helper and the helpee use Windows Messenger. Here’s how it works.
Instructions for the novice
Suppose you’re the person who needs help. If you suspect that your expert may need to install software or fiddle with your network settings while fooling around with your machine, sign into your PC with an Administrator account (Section 17.3.1). Then connect to the Internet, and proceed like this:
-
Open Windows Messenger.
For example, click Start→All Programs→Windows Messenger.
-
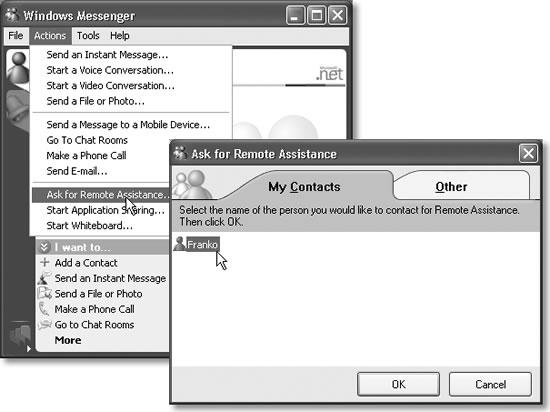
Choose Actions→Ask for Remote Assistance (Figure 4-5).
Now the Ask for Remote Assistance dialog box appears.

Figure 4-5. Getting going in Remote Assistance is easiest in Windows Messenger (left). Just specify who’s going to be the lucky one to troubleshoot your machine (right).
-
Specify who’s going to help you.
If the email address of your personal guru is listed on the My Contacts screen, just click the corresponding address (Figure 4-5, right). Otherwise, click the Other tab and type the guru’s email address into the appropriate box.
-
Click OK.
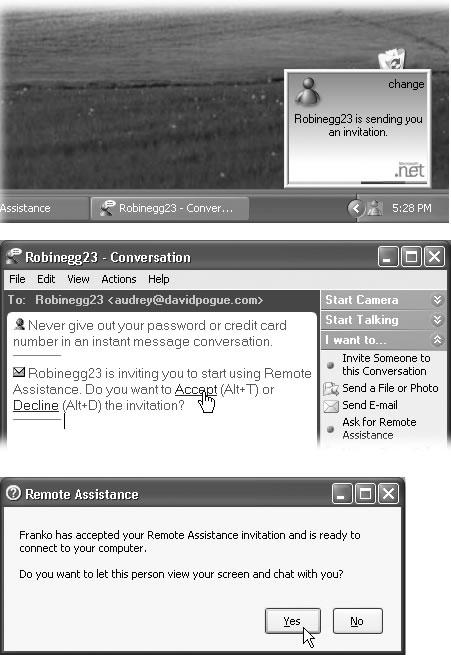
Windows Messenger sends an invisible invitation to your good Samaritan, who sees—thousands of miles away, perhaps—something like the top illustrations of Figure 4-6. If your buddy accepts the invitation to help you, then the message shown at bottom in Figure 4-6 appears, asking if you’re absolutely, positively sure you want someone else to see your screen.

Figure 4-6. Both parties have to be very, very sure that they want this connection to take place.
Top (expert’s screen): Somebody wants your attention, master!
Middle (expert’s screen): Click Accept or press Alt+T.
Bottom (beginner’s screen): You must confirm one last time that you really want a visitation from someone who’s technically savvier than you. -
Click Yes.
You’re in good shape. Let the help session begin (Figure 4-7).
The only further action that’s required on your part comes when the expert asks for permission to take charge of your machine. You’ll see a request like the one shown in Figure 4-8 Click Yes, and then watch in amazement and awe as your cursor begins flying around the screen, text types itself, and windows open and close by themselves. That’s just your friendly neighborhood computer wizard fixing your machine.
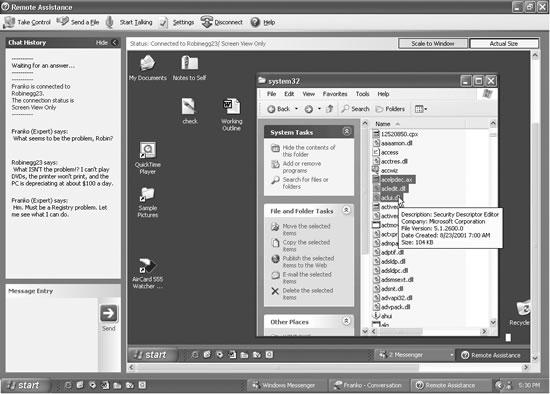
Figure 4-7. If the victim’s screen isn’t exactly the same size as yours, you have two options. If you click Actual Size, the other person’s screen is represented at full size, although you may have to scroll around to see all of it. If you click Scale to Window, Windows compresses (or enlarges) the other person’s screen image to fit inside your Remote Assistance window, even though the result can be distorted and ugly.
As noted earlier, if the expert’s explorations of your system begin to unnerve you, feel free to slam the door by clicking the Stop Control button on the screen—or just by pressing the Esc key. Your friend can still see your screen, but can no longer control it. (To close the connection completely, so that your screen isn’t even visible anymore, click the Disconnect button.)
Instructions for the expert
When your less-fortunate comrade sends you an electronic invitation to help, a little message on your Notification Area pops up, as shown in Figure 4-6 at top. Furthermore,
the Windows Messenger on your taskbar changes color to signal the invitation. Bring Windows Messenger to the front, and then click Accept or press Alt+T (Figure 4-6, middle). Assuming that the hapless novice is skilled enough to click Yes to grant final permission (Figure 4-6, bottom), you’re in.
At this point, you observe a strange sight: the other person’s screen in a special Remote
Assistance window (Figure 4-7). To communicate with your troubled comrade, use any of the Windows Messenger communications tools described in Chapter 11 (chat, microphone, video, sending files back and forth)—or just by chatting on the telephone simultaneously.
When you want to take control of the distant machine, click the Take Control button
on the toolbar at the top of your Remote Assistance screen. Of course, all you’ve actually done is just ask permission to take control (Figure 4-8). If it’s granted, you can now use your mouse, keyboard, and troubleshooting skills to do whatever work you need to do. When your job is done, click Disconnect on the toolbar—or wait for your grateful patient to do so.
Tip
Once you’ve taken control of the other person’s screen, your first instinct might be to close the gargantuan
Remote Assistance window that’s filling most of the screen. Don’t. If that window closes, the connection closes, too. What you really want is to minimize it, so it’s out of your way but not closed.
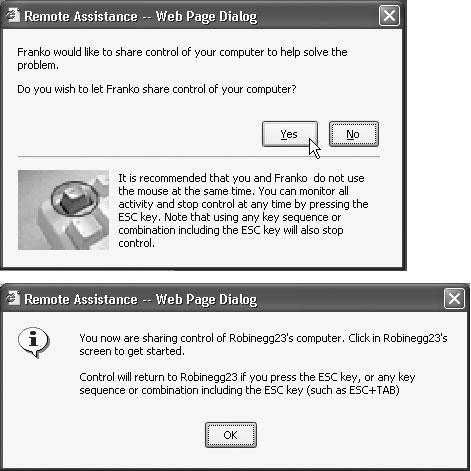
Figure 4-8. Top (beginner’s screen): Now the expert wants to touch, not just look. You’re not actually relinquishing control of your PC—you’re going to share it. Both you and your expert will be able to move the mouse and type simultaneously—a comical, strange, and fairly useless phenomenon. It’s probably best to keep your hands off your own machine while the work is being conducted.
Bottom (expert’s screen): Once you’re controlling the other machine, you can cancel at any time, too.
Remote Assistance without Windows Messenger
As noted earlier, using Remote Assistance is most efficient and satisfying when both participants fire up the Windows Messenger program. That’s not technically necessary,
however. Although more steps are involved, anybody with Windows XP can help anyone else with Windows XP, even if neither person has a Passport nor uses Windows Messenger.
Instructions for the novice
If you’re the one who wants help, send an invitation like this:
-
Choose Start→Help and Support.
The Help and Support Center appears, as described earlier in this chapter.
-
Click “Invite a friend to connect to your computer with Remote Assistance.” On the next screen, click “Invite someone to help you.”
The Remote Assistance Wizard is guiding you through the process of sending an invitation. You’re offered two ways of sending it: using Windows Messenger, exactly as described in the previous section, and using email. Of course, since the entire purpose of this exercise is to seek the help of someone who doesn’t have Windows Messenger, proceed like this:
-
Type your guru’s email address into the “Type an email address” box, and then click “Invite this person” (or press Enter).
This works only if you’ve already set up your PC for email, as described in Chapter 12.
Now the screen changes again.

Figure 4-9. Speaking of security, you can also set up a password here for even more protection. The guru won’t be able to connect to your machine without the password. (Of course, you need to find some way of telling him what the password is—maybe calling on the phone or sending a separate email.)
Note
If you click “Save invitation as a file (Advanced),” instead, Windows saves a little invitation ticket (with the unusually long filename extension .MsRcIncident) as a file on your hard drive. You can transfer this little file—the actual invitation to inhabit your PC—via disk or via network instead of emailing it.
-
In the From box, type the name you want to appear on the invitation. In the Message box, add a description of the problem, and then click Continue.
On this screen, Windows wants to know how long you want to keep your electronic invitation alive (Figure 4-9). If your guru doesn’t respond within, say, an hour, you may want the invitation to expire quietly, for security reasons.
Tip
On the other hand, if the expert is a friend or family member who rescues you frequently, you may as well change the settings to the maximum—30 days—so that he can tap into your machine whenever it’s convenient. (In fact, in the Control Panel program called System [Section 8.28], you can crank up the maximum to 99 days by clicking the Remote tab and then Advanced.) You save several connection steps this way.
-
Set up your security options. Make sure you’re online, and then click the Send Invitation button.
A little dialog box may appear, warning you that a program is attempting to send an email message on your behalf. (This dialog box is designed to be a safeguard against viruses that transmit themselves without your knowledge.)
-
Click the Send button.
Finally, the Remote Assistance wizard tells you, “Your invitation has been sent successfully.”
Instructions for the expert
When the novice sends you an email invitation, it arrives in your email program with an attachment—a tiny file called rcBuddy.MsRcIncident (see Figure 4-10). This is your actual invitation, a Remote Assistance ticket.
When you open it, a little electronic message goes back to the novice, where a message
like the one shown at bottom in Figure 4-6 appears. The online help session can now begin.
Get Windows XP Pro: The Missing Manual, Second Edition now with the O’Reilly learning platform.
O’Reilly members experience books, live events, courses curated by job role, and more from O’Reilly and nearly 200 top publishers.
Remote Assistance is a new feature for Windows operating systems. It provides the ability for one Windows XP user to remotely access and view another Windows XP computer’s desktop and, if given permission, to share control of the other person’s mouse and keyboard.
| Note |
Remote Assistance only works with Windows XP and .NET server. It cannot be used on older versions of Windows operating systems. |
Similar technologies, such as pcAnywhere (http://www.symentec.com) have been around for a number of years. However, Remote Assistance and another Windows XP feature called Remote Desktop negate the need to purchase such programs to support remote computers running Windows XP Professional.
| Note |
Remote Desktop is a Windows XP feature that allows a user or administrator to take remote control of another user’s desktop. Unlike Remote Assistance it does not require interaction between the user and a helper. More information about Remote Desktop is available in «Allowing Remote Desktop Access» in Chapter 15, «Supporting Mobile Users.» |
Remote Assistance operates using a subset of terminal service technology adapted from Microsoft Terminal Services. Remote Assistance is provided in the form of a service called the Remote Desktop Help Session Manager. This service can be viewed and managed using the Computer Management MMC and must be enabled on both computers in a Remote Assistance session in order for things to work.
| Tip |
To open the Computer Management MMC and view Windows XP services, rightclick on the My Computer icon and select Manage. Then expand the Services and Applications node and select Services. More information about administering Windows XP services is available in «Services and Applications» in Chapter 10, «Microsoft Management Consoles.» |
Remote Assistance provides a cost-effective alternative to maintaining an onsight technical staff at every remote site. Remote Assistance allows administrators to:
-
Monitor a remote computer’s desktop
-
Take control of a remote computer’s desktop
-
Send a file to a remote computer
-
Receive a file from a remote computer
-
Chat with remote users
-
Speak with remote users
| Note |
Windows XP Professional automatically creates a special local user account called HelpAssistant that is used by the helper during a Remote Assistance session. This account is disabled by default and is enabled whenever a Remote Assistance session is initialized. |
Remote Assistance supports two types of remote access:
-
Solicited. A Windows XP user creates a Remote Assistance invitation and sends it to a helper, soliciting the helper’s assistance.
-
Unsolicited. A helper sends an offer of remote assistance without receiving a Remote Assistance invitation.
Remote Assistance Security Considerations
Remote Assistance is a very helpful tool and can be used by administrators to provide hands-on assistance to remote users. However, Remote Assistance also introduces a number of security concerns that need to be identified and addressed. Remote Assistance’s default settings allow users to create and send Remote Assistance invitations. By default, users can send Remote Assistance invitations to anyone they wish on the corporate network or the Internet and have the ability to allow helpers to take remote control of their computer. This remote control capability includes access not only to the computer and its resources, but also to any network resources that the user has access to. Another default setting allows Remote Assistance invitations to be created that do not expire for up to 30 days.
There are a number of ways that administrators can manage Remote Assistance. Remote Assistance is based on Microsoft’s Terminal Services and uses the same TCP communications port, port 3389. Remote Assistance uses the RDP (Remote Desktop Protocol) to create a Remote Assistance session through this port. By ensuring that port 3389 is closed at the corporate firewall, administrators can increase security by blocking the use of Remote Assistance with external helpers while still allowing its use internally.
| Tip |
Blocking port 3389 also disables Terminal Services and Windows XP’s Remote Desktop. If blocking these services at the firewall is not an acceptable option, then Remote Assistance can be locked down from the Remote properties sheet on the System Properties dialog as described later in this section. In addition, domain or local group policy can be used to secure Remote Assistance. |
| Note |
Windows XP Professional’s internal personal firewall, ICF (Internet Connection Firewall), automatically configures itself to open port 3389 when Remote Assistance is used. However, if a third-party software-based personal firewall is being used instead of ICF, you may have to explicitly configure the personal firewall to allow traffic over port 3389 to pass through. Otherwise, Remote Assistance will not work. Additional information about ICF can be found in «Personal Firewalls» in Chapter 17, «Supporting Internet Communication.» |
Administrators can configure Remote Assistance from the Remote property sheet located on the System Properties dialog using the following procedure.
-
Click on Start and then right-click on My Computer and select Properties. The System Properties dialog appears.
-
Select the Remote properties sheet, as shown in Figure 3.6.
Figure 3.6: The Remote properties sheet on the System Properties dialog controls whether or not Remote Assistance is enabled -
To disable Remote Assistance, clear the Allow Remote Assistance invitations to be set from this computer option.
-
To configure specific Remote Access settings, click on Advanced. This opens the Remote Assistance Settings dialog, as shown in Figure 3.7.
Figure 3.7: Administering advanced Remote Assistance settingsNote Using Group Policy, you can configure whether or not users can generate Remote Assistance requests, whether Remote Assistance is enabled, and whether the user is allowed to grant remote control access to helpers. You can also prevent helpers from offering unsolicited Remote Assistance. Remote Assistance is configured in Group Policy by configuring the following two policies:
-
Solicited Remote Assistance. Configures whether users can create Remote Assistance invitations, whether remote control is allowed, and how long the requests remain valid.
-
Offer Remote Assistance. Determines whether unsolicited Remote Assistance is allowed.
These two policies are located within Group Policy under \Computer Configuration\ Administrative Templates\System\Remote Assistance. More information about Group Policy and its application is available in «Group Policy» in Chapter 9, «Security Administration.»
-
-
To prevent the user from granting remote control of the computer, clear the Allow this computer to be controlled remotely option.
-
To limit the maximum amount of time that a Remote Assistance invitation remains valid, configure the settings in the Invitations section. A value can be specified in units of minutes, hours, or days.
-
Click on OK to close the Remote Assistance Settings dialog.
-
Click on OK to close the System Properties dialog.
Establishing a Remote Assistance Session
When the user initiates a Remote Assistance invitation, Windows XP encrypts an XML-based ticket, which is then passed on to the helper. When the helper opens the ticket, the invitation is displayed.
| Tip |
The performance of a Remote Assistance session can be improved by lowering the Color Quality setting on the user’s computer. This reduces the amount of data that is transferred during the session. The Color Quality setting is changed on the Display Properties dialog. For information on how to access the Display Properties dialog and change this setting, refer to «Setting Resolution and Color» in Chapter 7, «Configuring Desktop Settings.» |
Remote Assistance provides three means of soliciting Remote Assistance:
-
Messenger Service. The user sends a Remote Assistance invitation to the helper using Windows Messenger.
-
E-mail. The user sends a Remote Assistance invitation using e-mail.
-
File. The user creates and saves a Remote Assistance invitation as a file and sends it to the helper via various means, such as FTP or a Webbased e-mail service like Yahoo mail.
Using Windows Messenger to Deliver a Remote Access Invitation
Use of Windows Messenger is prohibited in many environments in order to discourage employee abuse of the Internet and to cut off a possible avenue of attack from Internet hackers. In order to use Windows Messenger, the user must be able to connect to the Internet and port 3389 must be opened on any firewall
that resides between the user and the Internet connection. Also, the e-mail address of the helper must be defined in the user’s Buddies list within Windows Messenger, and the user must be logged on to Microsoft’s MSN network. However, if both the user and the helper have access to an internal ILS (Internet Location Service) then a connection to the MSN network is not required.
| Note |
Windows Messenger requires that all users log in to an ILS. Once logged on, users can see if any of the individuals in their Buddies list are also logged on. The ILS is also responsible for coordinating communications between computers. Typically most users log in to the Microsoft MSG network when using Windows Messenger. Optionally, networking administrators can install a local ILS inside the corporate network allowing corporate users to log in to it and use it to manage all internal Windows Messenger communications. |
Using an instant messenger requires that both the sender and the helper use Windows Messenger and that both are logged on. The following procedure outlines the steps involved when using Windows Messenger to deliver a Remote Assistance invitation.
-
Click on Start and then Help and Support Center.
-
Click on Invite a friend to connect to your computer with Remote Assistance. The screen shown in Figure 3.8 appears.
Figure 3.8: Creating a Remote Assistance invitation -
Click on Invite someone to help you. The screen shown in Figure 3.9 appears.
Figure 3.9: There are three ways to deliver Remote Assistance invitations -
Click on the Windows Messenger Sign In button. The .NET Messenger Service dialog appears requesting an e-mail address and password.
-
Type the e-mail address and password required to log in to Windows Messenger and click on OK.
-
The Windows Messenger dialog appears as shown in Figure 3.10.
Figure 3.10: Remote Assistance invitations can be sent using Windows Messenger -
Within Windows Messenger select Tools/Ask for Remote Assistance and then click on the e-mail address of the person who is to receive the invitation.
-
The Windows Messenger dialog changes appearance, as demonstrated in Figure 3.11. A message is displayed that states that the request has been sent to the helper. A similar dialog appears on the helper’s screen, as shown in Figure 3.12.
Figure 3.11: Windows Messenger waits while the invitation is sent to the helper
Figure 3.12: The helper receives the Remote Assistance invitation and clicks on Accept to initiate a Remote Assistance session -
When the helper clicks on Accept, a message appears in the user’s copy of Windows Messenger informing the user.
-
The Remote Assistance Console appears on the helper’s computer. The message Waiting for an answer appears in the left-hand pane.
-
On the user’s screen, a pop-up dialog appears, requiring the user to click on Yes to allow the helper to view the computer’s desktop and chat.
-
Next, the Remote Assistance dialog appears on the user’s computer. At the same time the Remote Assistance console on the helper’s computer displays the user’s desktop.
Using E-mail to Deliver a Remote Access Invitation
E-mail provides an alternative means of delivering Remote Assistance invitations. This option requires that the user and helper both use MAPI (Messaging API) compliant e-mail applications such as Outlook Express. The following procedure outlines the steps involved when using e-mail to deliver a Remote Assistance invitation.
| Note |
In order to use e-mail to deliver Remote Assistance, invitations Outlook Express needs to be configured. If it is not, a wizard will appear to assist in its setup. |
-
Click on Start and then Help and Support Center.
-
Click on Invite someone to help you.
-
Type an e-mail address in the Outlook Express e-mail field and click on Invite this person.
-
The screen shown in Figure 3.13 appears. Type the name that should appear in the invitation and a brief message explaining the reason for the invitation in the From and Message fields and click on Continue.
Figure 3.13: Supply a contact name and message describing the reason for the invitation -
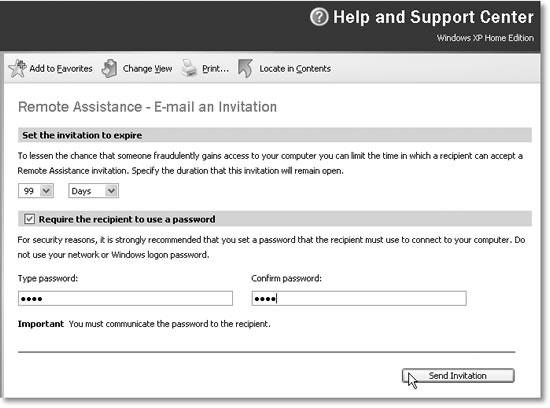
The screen shown in Figure 3.14 appears. Specify the invitation’s expiration time and date. Select Require the recipient to use a password option and type a password in the two password fields and click on Send Invitation.
Figure 3.14: To provide additional security, instruct users to limit invitation expiration periods and to assign a password to every invitation -
A confirmation dialog appears to verify that the invitation should be sent. Click on Send to deliver the invitation.
-
When the helper receives the e-mail, the invitation will be included as an attachment. When opened, the helper can accept the invitation, allowing the Remote Assistance session to be established.
Using a File to Deliver a Remote Access Invitation
Another alternative for creating Remote Assistance invitations is to create and save them as files. The invitations can then be sent to helpers in a variety of ways, such as uploading them to an FTP site or as attachments to e-mail generated by noncompliant MAPI e-mail applications.
The following procedure outlines the steps involved in creating an invitation and saving it as a file.
-
Click on Start and then Help and Support Center.
-
Click on Invite someone to help me.
-
Click on the Save invitation as a file (Advanced) link.
-
Type the name that should appear on the invitation and specify the invitation’s expiration time limit. Click on Continue.
-
Select Require the recipient to use a password option and type a password in the two password fields. Click on Save Invitation.
-
The Save As dialog appears. Type a name for the invitation file. A file extension of .msrincident will automatically be added. Specify the location where the file is to be saved and click on Save.
Once the file containing the invitation has been saved, arrange for it to be delivered to the helper. When the helper receives the file and opens it, the dialog shown in Figure 3.15 appears.
Figure 3.15: Opening a Remote Assistance invitation that was saved as an .msrincident file
The helper will see the name of the person who sent the invitation as well as the invitation’s expiration date. To start the Remote Assistance session, the helper must type the password assigned to the invitation and click on Yes when prompted to initiate the session.
Working with Remote Assistance
Once the user and helper have successfully established a Remote Assistance session, they can begin working together. During a Remote Assistance session, the user and helper see different Remote Assistance consoles. The user’s console, shown in Figure 3.16, is smaller than the helper’s console. It includes a chat area in the left page for sending and receiving text messages and a collection of controls in the right pane. These controls include:
Figure 3.16: The Remote Assistance console as seen on the user’s screen
-
Send a File. Sends a file to the other computer. In order for the transfer to complete, the helper’s computer displays a prompt requesting permission to allow the file to be received.
-
Start Talking. Enables voice communications if appropriate hardware is installed on the computer.
-
Settings. Used to configure console size and audio settings.
-
Disconnect. Terminates a Remote Assistance session.
-
Help. Provides access to Remote Assistance help information.
The helper’s console, shown in Figure 3.17, is larger than the user’s console. It includes the same collection of controls as the user’s console as well as a Take Control option. The controls are located at the top of the console in a toolbar. Underneath the toolbar, the rest of the screen is divided into two panes. The leftpane provides a chat area for sending and receiving text messages. The right pane displays the user’s desktop including the taskbar and the user’s Remote Assistance console.
Figure 3.17: The Remote Assistance console as seen on the helper’s screen
Taking Remote Control
By default Remote Assistance allows the helper to view the user’s screen and observe the user’s activities. However, the helper’s Remote Assistance console also includes a Take Control option, which sends a request to the user asking for permission to take active control of the user’s desktop. The user must click on Yes in order to grant the helper the ability to take remote control.
Even when granted permission by the user to take control of his or her computer, the helper never has complete control of the user’s computer. Control is actually shared and the user can continue to use the mouse and keyboard (although this will make things difficult for the helper). In addition, the user can terminate the Remote Assistance session at any time by clicking on Disconnect or pressing the Esc key.
Exchanging Text and Speech
In addition to providing the ability to take remote control of the user’s console, the user and helper can send and receive text messages by clicking the message entry area of their perspective consoles, typing a message, and clicking on the green Send button.
If both the user’s and helper’s computers are equipped with the appropriate hardware (for example, microphone, speakers, and an audio card), they can click on the Start Talking option. This sends a message to the other computer informing it of the request to begin voice communications. Voice communications can be very helpful when the administrator needs to convey complex information to the user that would otherwise be difficult to explain using plain text messages.
Configuring Audio and Screen Settings
Once in a Remote Assistance session, the user and the helper can also click on their Settings icon to display the Remote Assistance Settings—Web Page Dialog. Using this dialog, they can configure audio quality and start the Audio Tuning Wizard.
In addition to the audio settings, the helper’s dialog includes an option to configure the default screen view. The available options are Scale to windows and Actual size. These two options mirror the options displayed in the upper righthand corner of the helper’s Remote Assistance console. Selecting one of these settings specifies the default view of the user’s screen. The helper can toggle between these two settings using the buttons on his or her Remote Assistance console.
| Note |
The Audio Tuning Wizard steps you through a process that verifies that a digital camera, speakers, or a microphone works correctly. |
Sending and Receiving Files
Sometimes when assisting a remote user with Remote Assistance, it is helpful to be able to send the user a file. This file may contain self-help documentation to assist the user should the problem reoccur. It may also contain a configuration file for an application or a script that the administrator wants executed. In addition, it may be just as helpful to collect files on the user’s computer and send them to the helper for later analysis.
The following procedure outlines the steps involved in copying a file from the helper’s computer to the user’s computer.
-
Start Remote Assistance and establish a session with the user’s computer.
-
Click on the Send a file icon.
-
A dialog appears. Type the path and filename of the file to be copied or click on Browse to locate the file.
-
Click on Send File.
-
A pop-up dialog appears on the user’s computer announcing that the helper is sending a file. Two options are available:
-
Save As. Allows the user to specify the location where the file should be stored.
-
Cancel. Stops the file transfer process.
-
-
If the user elects to save the file, he or she is prompted to open the file. The user can click on Yes or No.
-
A pop-up message is displayed on the helper’s computer stating whether the user saved the file or terminated the transfer operation. Click on OK to acknowledge the prompt.
Disconnecting a Remote Assistance Session
The user or the helper can terminate a Remote Assistance session at any time. The helper terminates the session by clicking on the Disconnect icon on the toolbar at the top of the Remote Assistance console. The user can also terminate the session by clicking on the Disconnect icon. Once disconnected, the session between the helper’s and the user’s computers is closed and the helper is unable to reestablish the session without the user’s consent.
To prevent the helper from attempting to reestablish the session, the user can revoke or delete the invitation, as described in the next section.
Managing Invitations
Remote Assistance invitations can be viewed and managed locally. This provides their creator with the ability to perform any of the following tasks:
-
View invitation details. Displays additional information about invitations
-
Expire invitations. Invalidates invitations and prevents them from being used
-
Resend invitations. Resends e-mail–based invitations to their original recipients
-
Delete invitations. Removes invitations from the Remote Assistance invitation list and prevents them from being used
The following procedure outlines the steps involved in viewing and managing Remote Assistance requests.
-
Open the Help and Support Center.
-
Click on Invite someone to help me.
-
Click on View the status of all my invitations. Note that the number of outstanding invitations is listed just to the right of this link. The dialog shown in Figure 3.18 appears.
Figure 3.18: Viewing and managing Remote Assistance invitations -
To manage a Remote Assistance invitation, select it and click on the Details, Expire, Resend, or Delete button.
Remote Assistance invitations are listed in a table. The following data is displayed about each invitation:
-
Sent To. The e-mail address or MSN address of the invitation recipient or the location where the invitation was saved.
-
Expiration Time. The date and time that each invitation becomes invalid.
-
Status. The current status of the invitation. Valid status options are open, expired, and closed.
Offering Unsolicited Remote Assistance
Administrators can also configure Windows XP to allow helpers to offer unsolicited Remote Assistance. Unsolicited Remote Assistance is only applicable to corporate networks. It requires that the user and helper belong to the same domain or to domains that trust one another. In order to provide unsolicited Remote Assistance, the Offer Remote Assistance policy must be enabled in Group Policy. Once enabled, helpers can use Remote Assistance to offer help to users whom they know are experiencing problems, as outlined in the following procedure.
| Note |
In order to offer unsolicited Remote Assistance the Offer Remote Assistance Group Policy setting must be enabled on the helper’s computer. This policy is located within Group Policy under \Computer Configuration\Administrative Templates\ System\Remote Assistance. More information about Group Policy and its application is available in «Group Policy» in Chapter 9, «Security Administration.» |
-
Open the Help and Support Center.
-
Click on the Use Tools to view your computer information or diagnose problems option in the Pick a task section.
-
Click on the Offer Remote Assistance.
-
The Offer Remote Assistance screen is displayed. Type the IP address or DNS name assigned to the computer to which Remote Assistance is being offered and click on Connect.
-
A pop-up dialog appears on the user’s computer indicating the offer of Remote Assistance. Wait for the user to accept the invitation.