
Один из частых советов по ускорению работы Windows касается оптимизации файла подкачки. Можно задать его размер самостоятельно, переместить или вовсе удалить. Из этой статьи вы узнаете, зачем это нужно и стоит ли вообще что-либо менять.
Что такое «Файл подкачки»
Где находится файл подкачки
Как открыть настройки файла подкачки на Windows 10 и Windows 11
Как открыть настройки файла подкачки на старых версиях Windows
Что такое pagefile.sys и swapfile.sys
Как правильно настроить файл подкачки
Вывод
Что такое «Файл подкачки»
Где находится файл подкачки
Как открыть настройки файла подкачки на Windows 10 и Windows 11
Как открыть настройки файла подкачки на старых версиях Windows
Что такое pagefile.sys и swapfile.sys
Как правильно настроить файл подкачки
Вывод
Что такое «Файл подкачки»
Файл подкачки (сокращенно ФП) — это виртуальная память, которая представляет собой особый файл на жестком диске или твердотельном накопителе компьютера. Когда системе Windows не хватает оперативной памяти, то используется файл подкачки. Благодаря этому программы не выгружаются из оперативной памяти и не вылетают с ошибками.
Где находится файл подкачки
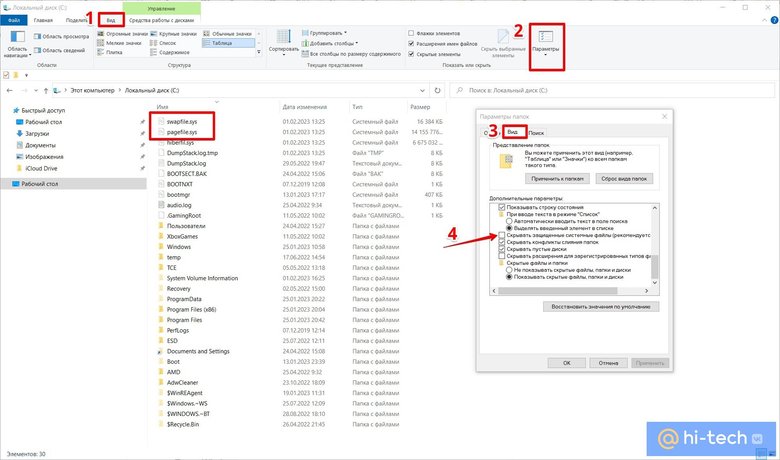
Файл подкачки имеет название pagefile.sys и находится в корне диска. Чтобы его увидеть, нужно включить отображение защищенных системных объектов. Сделать это можно так:
- Откройте корневую папку нужного диска и перейдите на вкладку «Вид».
- Кликните на «Параметры».
- Перейдите на вкладку «Вид».
- Снимите галочку с пункта «Скрывать защищенные системные файлы».
- Выскочит предупреждение, выберите «Да» и далее «ОК».
Имейте в виду, что оставлять на виду системные файлы Windows небезопасно. Не забудьте затем вернуть все как было. Также можно воспользоваться сторонними файловыми менеджерами вроде Total Commander. Там показать и затем скрыть элементы можно одним щелчком мыши.
Как открыть настройки файла подкачки на Windows 10 и Windows 11
В большинстве случаев вмешательство пользователя не требуется. Но если вы все же решитесь, то сделать это можно разными способами.
Поиск Windows
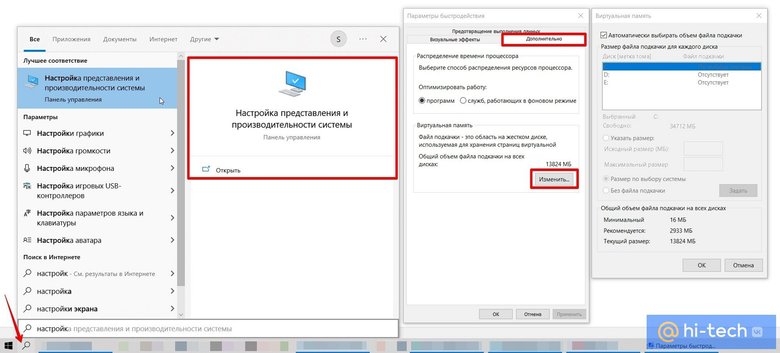
Проще всего использовать «Проводник», в частности, стандартный поиск Windows:
- откройте поисковую строку Windows (значок лупы на панели задач);
- введите любое слово из запроса «Настройка представления и производительности системы» (операционная система «Виндовс» должна показать нужную ссылку, еще до того, как вы закончите набор фразы);
- в открывшемся окне перейдите на вкладку «Дополнительно»;
- в разделе «Виртуальная память» выберите «Изменить».
Win + R
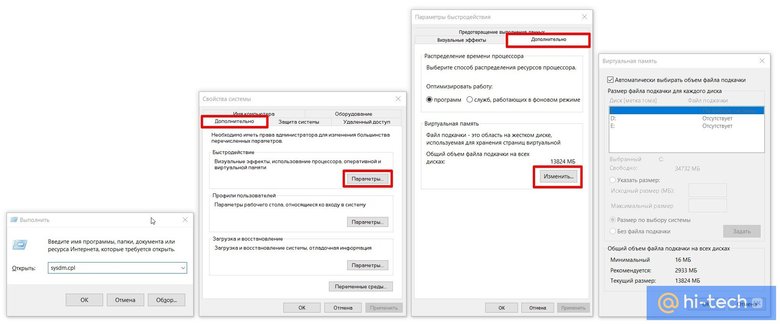
Также можно воспользоваться встроенной в Windows утилитой «Выполнить», но этот путь чуть дольше:
- нажмите сочетание клавиш Win + R;
- введите в появившемся окне команду sysdm.cpl и нажмите Enter;
- перейдите на вкладку «Дополнительно»;
- в разделе «Быстродействие» выберите «Параметры»;
- перейдите на вкладку «Дополнительно»;
- в разделе «Виртуальная память» выберите «Изменить».
Меню «Пуск»
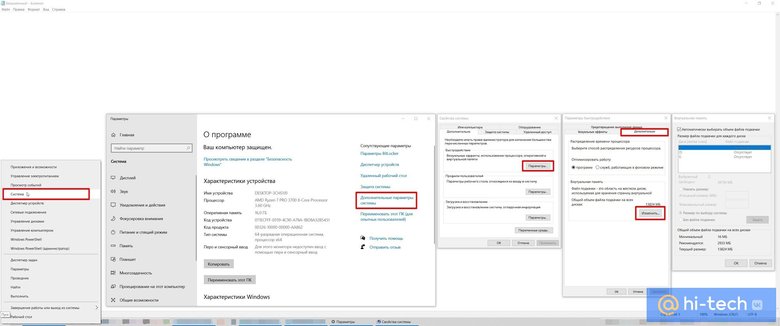
Найти нужное окно можно и через меню «Пуск»:
- кликните правой кнопкой мыши по «Пуску» и выберите «Система» (сюда же можно попасть, если зайти в свойства значка «Этот компьютер» через правый клик мыши);
- в правой части окна кликните на «Дополнительные параметры системы»;
- в разделе «Быстродействие» выберите «Параметры»;
- перейдите на вкладку «Дополнительно»;
- в разделе «Виртуальная память» выберите «Изменить».
Как открыть настройки файла подкачки на старых версиях Windows
На более старых версиях операционной системы Windows путь отличается незначительно. Детальные инструкции прописаны ниже.
Windows XP
На Windows XP выполните следующие шаги:
- нажмите правой кнопкой мыши на значке «Мой компьютер» и выберите «Свойства»;
- перейдите на вкладку «Дополнительно»;
- в разделе «Быстродействие» кликните на кнопку «Параметры».
- на вкладке «Дополнительно» кликните на кнопку «Изменить».
Windows 7 и Windows 8.1
В седьмой и восьмой версии Windows отличия от XP минимальные:
- кликните правой кнопкой мыши на значке «Мой компьютер» и выберите «Свойства»;
- в левой части экрана нажмите «Защита системы» (также сюда можно попасть через команду sysdm.cpl в окне «Выполнить», которое открывается сочетанием Win + R);
- перейдите на вкладку «Дополнительно» (или можно сразу перейти сюда, нажав на «Дополнительные параметры системы в предыдущем пункте)»;
- выберите «Параметры» в разделе «Быстродействие».
- на вкладке «Дополнительно» нажмите на кнопку «Изменить».
Что такое pagefile.sys и swapfile.sys
В Windows 8, 10 и 11 кроме pagefile.sys есть также swapfile.sys, который используется для приложений из Microsoft Store. Они взаимосвязаны, поэтому если вы отключаете файл подкачки, то оба файла пропадают. Находятся они все тоже в корневой папке диска в скрытом виде.
Как правильно настроить файл подкачки
Как правило, самостоятельно настраивать ничего не требуется. Операционная система Windows прекрасно работает и так, поэтому лучше оставить все, как задано по умолчанию. Тем не менее, некоторые вещи все же стоит знать.
Как увеличить или уменьшить файл подкачки
Если файл подкачки занимает слишком много места, то его размер можно изменить. Или, наоборот, увеличить, если возникают какие-либо неполадки. Сделайте следующее:
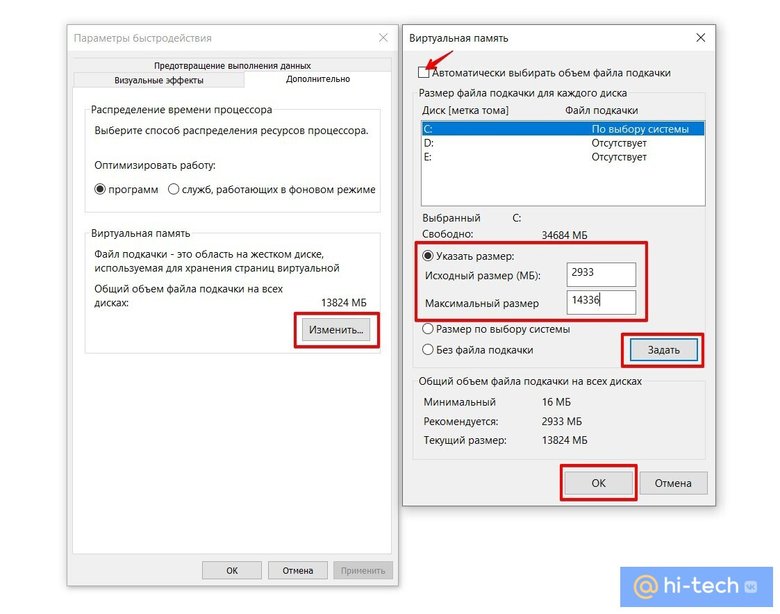
- перейдите в раздел «Виртуальная память» одним из перечисленных выше способов;
- снимите галочку с пункта «Автоматически выбирать объем файла подкачки»;
- активируйте переключатель «Указать размер» (текущий размер можно посмотреть в последней строке этого же окна);
- задайте исходный и максимальный размер в мегабайтах (помните, что 1 Гб = 1024 Мб, используйте калькулятор для расчета), можно задать одинаковое значение;
- кликните на «ОК» и перезагрузите ПК, чтобы изменения вступили в силу.
Какой оптимальный размер для файла подкачки?
Оптимальный размер определяет Windows. Самостоятельно рассчитать его сложно. Хотя в сети можно встретить самые разные рекомендации. Например, что размер файла подкачки должен быть в 1,5 или 2 раза больше объема ОЗУ (RAM), установленной в системе. Однако, рассуждая логически, можно сделать обратные выводы: чем больше физической оперативной памяти установлено на компьютере, тем меньше требуется дополнительной памяти. То есть умножать 16 Гб «оперативки» на 2 явно не стоит.
То же самое касается и вопросов в духе «Какой размер файла подкачки нужен, если в компьютере установлено 8 Гб оперативной памяти?». Все зависит от сценариев использования, но лучше предоставить выбор размера самой системе Windows.
Как переместить файл подкачки

Если решите переместить файл, выполните следующие шаги:
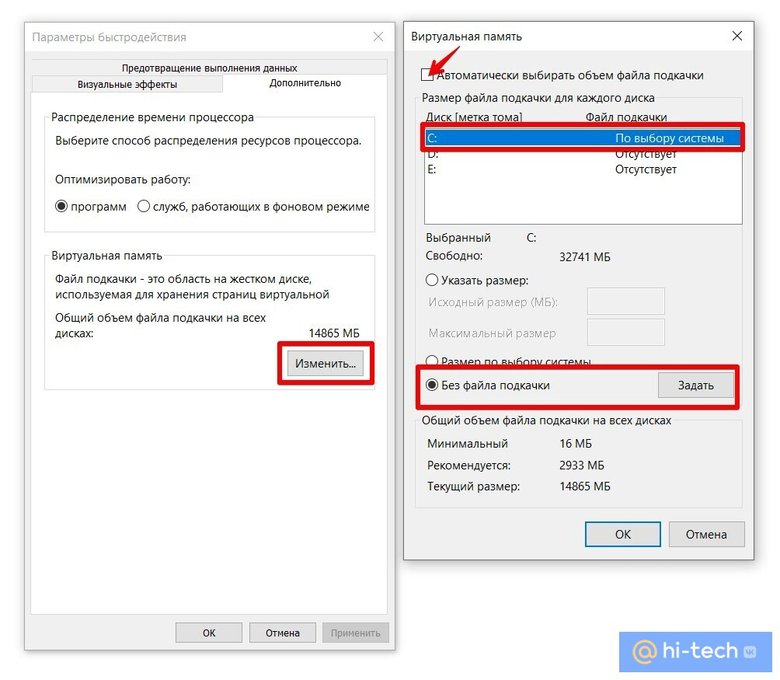
- перейдите в «Виртуальную память»;
- снимите галочку «Автоматически выбирать объем файла подкачки»;
- на текущем диске выберите «Без файла подкачки»;
- далее определите, куда следует перенести и на выбранном диске отметьте галочку «Размер по выбору системы» или выставьте размер самостоятельно;
- выберите «ОК» и перезагрузите Windows.
Стоит ли переносить файл подкачки на SSD?
Если файл подкачки расположен на HDD, то его перенос на SSD ускорит компьютер (о том, как еще можно «разогнать» Windows, читайте в отдельной статье). Так как скорость твердотельных накопителей намного выше, чем обычных жестких дисков.
С другой стороны, у некоторых пользователей могут возникнуть опасения, что накопитель будет быстрее изнашиваться. Это не лишено смысла, но на практике угробить накопитель таким образом вряд ли получится, даже при всем желании. Подробнее об уходе за SDD и о том, как определить его ресурс, читайте в нашей статье «Как ускорить работу и продлить жизнь SSD — правда и мифы».
Если же накопитель малого объема и места постоянно не хватает, то стоит оставить pagefile на обычном «ХДД». Хотя, как вариант, можно еще попробовать задать размер вручную, чтобы высвободить место.
Как отключить файл подкачки
Чтобы отключить файл подкачки, то есть удалить его, следуйте инструкции:
- перейдите в «Виртуальную память»;
- снимите галочку «Автоматически выбирать объем файла подкачки»;
- на всех дисках выберите «Без файла подкачки»;
- далее «ОК» и перезагрузите компьютер.
Стоит ли отключать файл подкачки?
На этот вопрос нельзя дать однозначный ответ. Все зависит от условий использования компьютера. В теории это позволит сэкономить место на накопителе и, возможно, даже повысить производительность, так как Windows не будет обращаться к медленному накопителю, а постарается использовать весь объем ОЗУ. С другой стороны, в некоторых случаях компьютер будет работать нестабильно: приложения могут вылетать, сообщать об ошибках (причем не обязательно явно связанных с оперативной памятью) или вовсе не запускаться. Не помогут даже 64 гигабайта оперативной памяти. Также не будут сохраняться дампы при сбоях системы.
То есть удалять файл подкачки стоит, только если на компьютере установлен достаточный для возложенных задач объем ОЗУ, и вы используете определенный набор приложений, которые стабильно работают без виртуальной памяти. При этом помните, что всегда есть риск забыть, что вы что-то меняли в системе, из-за этого в случае возникновения проблем, вероятно, придется долго искать причину. Например, из-за этого могут вылетать игры Escape From Tarkov и God of War.
Если вам нужно освободить пространство на диске, то вместо полного отключения, лучше уменьшить размер (но делать его микроскопическим все равно не стоит) или переместить pagefile.sys на более емкий накопитель.
Вывод
Лучшее, что вы можете сделать с файлом подкачки — это оставить его в покое. ОС Windows сама прекрасно справляется с определением оптимального размера, в то время как вмешательство в работу компьютера может негативно сказаться на стабильности и производительности. Тем не менее если pagefile находится на жестком диске, то его стоит перенести на твердотельный накопитель (при наличии).
Это тоже интересно:
- Сколько раз нужно делать дефрагментацию и для чего она нужна?
- Что будет, если зажать Shift и выключить ПК с Windows 10
- Как узнать, какая оперативная память установлена на компьютере с Windows
Время на прочтение3 мин
Количество просмотров323K
По запросу в любой поисковой системе «файл подкачки windows» можно получить тысячу-другую скопированных друг у друга, либо немного отличающихся ответов по выбору оптимальных размеров для pagefile.sys.
Самые распространенные советы выглядят примерно следующим образом: для машин с маленьким ОЗУ нужно задавать размер файла подкачки k*RAM, где RAM — объем физической памяти, k — какой-нибудь коэффициент, коих много самых разнообразных. И 1,5, и 2, и даже 3 встречал. Если же планок памяти стоит на 4Гб и больше, то «смело отключайте виртуальную память в принципе».
Статья о том, стоит ли верить ли этим советам, и если да, то насколько.
Что такое файл подкачки?
pagefile.sys, он же файл подкачки — файл, представляющий собой виртуальную память, которая позволяет одновременно выполняться большому количеству процессов, которые все сразу не смогли бы поместиться в физической памяти.
По умолчанию после установки Windows файл подкачки увеличивается автоматически при заполнении текущего объема.
Если отключить файл подкачки
Если попытаться отключить файл подкачки в windows 7, система выдаст предупреждающее окно, в котором сообщит о неприятных последствиях:
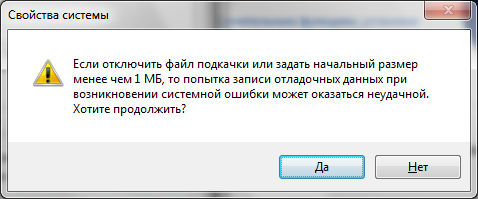
Отсюда следует, что не стоит полностью отказываться от использования виртуальной памяти, иначе в случае краха не получится даже проанализировать причину сбоя. Указанный на скриншоте минимальный размер в 1МБ берется из расчета конфигурации дампа памяти в настройках «загрузка и восстановление»:
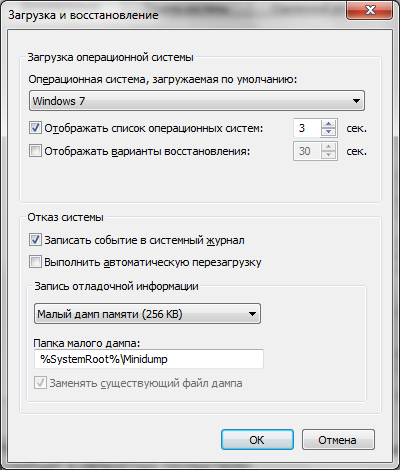
Если выбрать для записи отладочной информации полный дамп, то размер увеличивается на несколько порядков. У меня он составил 400МБ.
Кроме отсутствия возможности записи дампа, после отключения файла подкачки может появится назойливое сообщение о нехватке памяти. Появление его будет сопровождаться жуткими тормозами ресурсоемких приложений.
Если перенести файл подкачки на другой раздел
Куча статей по оптимизации вашей ОС рекомендует перенести файл подкачки на отдельно созданный и отформатированный в FAT32 раздел жесткого диска. При этом повышается быстродействие и уменьшается фрагментация этого файла.
При подобных манипуляциях не стоит забывать, что файл подкачки должен присутствовать в системном разделе для корректной записи отладочной информации. Выбирать приходится между быстродействием и возможностью сбора данных о возникших неприятностях.
Размер файла подкачки
Вернемся
к нашим апельсинам
к вопросу об оптимальном размере. Перекопав множество статей, информационных изданий и даже рекомендации Microsoft, я так и не нашел четкого и однозначного ответа на этот вопрос. Да и не нашел бы, как стало мне ясно после прочтения перевода статьи Марка Руссиновича Преодолевая ограничения Windows: виртуальная память. В заключении приведу ссылки на перевод и оригинал, а сейчас постараюсь объяснить, откуда же взять размер файла.
Для начала потребуется утилита Process Explorer, она является бесплатным аналогом дефолтного Task Manager’a, но обладает многими преимуществами. Скачать можно по ссылке.
После запуска Process Explorer’a выберите самые ресурсоемкие в плане используемой памяти приложения, которые используете в повседневной жизни, и запустите их все одновременно. В окне Process Explorer’a нажмите CTRL+I или выберите в меню View/System Information, из всего многообразия представленных в окне данных нужно выбрать область Commit Charge
Значение Peak — пиковое значение выделенной памяти для всех приложений, складываемое из физической и виртуальной памяти.
Далее вооружаемся калькулятором и вычитаем из этого значения размер оперативной памяти. Если получается отрицательное значение — берем требуемые системой 400МБ (может быть другое значение), необходимые для создания дампа. Если получается положительное значение — выставляем таким минимальное и максимальное значение файла подкачки. Можно подстраховаться и установить «про запас» максимум выше, но тогда вырастет фрагментация файла в случае увеличения его размеров. Поэтому лучше зафиксировать на одном месте.
Литература
Статья Марка Руссиновича Pushing the Limits of Windows: Virtual Memory;
Перевод на русский язык Преодолевая ограничения Windows: виртуальная память;
Описание программы Process Explorer .
Windows users have often heard about some page and swap file. In this article, we will discuss what it is, what it is used for, and how to set it up correctly.
Contents
- What is the swap (page) file in Windows?
- What is the recommended paging file size?
- How to change the swap (page) file size?
- How to disable swap (page) file in Windows 10?
- How to delete the swap file (pagefile.sys and swapfile.sys) in Windows 10?
- How to re-enable the swap (page) file in case of problems?
- How to move the swap file to a different disk drive?
- What to do if important data has been lost due to manipulation of the swap file?
What is the swap (page) file in Windows?
A swap file (aka virtual memory) is a kind of file stored on a hard disk (or SSD) where RAM data is written when it becomes insufficient for the correct functioning of the operating system.
To better understand what it is, let’s look at a real example. Suppose you have a few tabs in your browser. For the operation of any tab, the system allocates the amount of RAM needed to display its contents correctly. Naturally, the more complex the content on the page, the more RAM is needed. But what to do if there are several “heavy” programs running on your computer, several tabs in the browser, and you need to open more, but your computer starts lagging?
In such a situation, the system will copy the data of not used at the moment tabs and write them on the hard disk into the swap file. After that, the data will be unloaded from the RAM, and it will be free for other tasks.
If you need to open any of the above browser tabs again – the system will read the data from the swap file and copy them back to RAM.

And then there is a reasonable question – why use RAM at all, if data can be read directly from the drive? The answer is simple: hard disks (and even SSD disks) are too slow and do not allow to provide the necessary speed of data transfer between the processor and memory. RAM is many times faster and can provide the required speed. But at the same time, its main disadvantage is a complete data loss in case of power failure. And the price is noticeably more expensive.
For example, today for the price of 16 GB of RAM you can easily get a SSD drive of 512 GB or a regular hard drive of 2 terabytes. However, it is impossible to exclude the use of RAM because of the huge (in comparison even with SSD drives) data transfer rate.
Older versions of Windows used the pagefile.sys file as a page file. Since Windows 10, two files are used – pagefile.sys and swapfile.sys They always work together and are stored in the root of the C: drive. To view them, you need to enable the display of hidden and system files and folders. To do this, open the C: drive, select the “View” tab and check the “Hidden Items” box

The first file (pagefile.sys) stores data from applications that you installed yourself from third-party sources, so it can be up to several gigabytes in size. The second file (swapfile.sys) stores data from system applications, and those you installed from the Microsoft Store. Therefore it is strongly recommended not to disable the swap file to save space on the system disk, as many system applications will stop launching. If you need to free up memory on the system disk, there are other ways to do so. For more details, read the article “How to free up space on the system disk“.
What is the recommended paging file size?
By default, the Windows 10 operating system sets the swap file size, which, according to the developers, is universal for all user’s purposes. In addition, if the computer has a large amount of RAM installed, the swap file is used seldom.
But, sometimes, the user’s tasks require increasing its size. Windows developers anticipated such a situation, so they added the desired feature. Before you start changing the swap file size, you need to know what size you should set for maximum performance. Some users believe that the larger the paging file size, the better for system performance. It is far from the truth.
If you set the swap file too high — the system will just ignore the RAM, and you will get a horrible laggy operating system instead of a better performance (because the hard disk is slower at times).
If the user sets the swap file size too small — it will be equivalent to its disabling, and many system utilities may stop working.
The Internet today offers a range of recommendations on how to calculate the swap file size. We chose the two most sensible concepts.
The first says that the larger the amount of RAM — the smaller the swap file size. It is because if the amount of RAM is very large, all temporary data will be stored there, which means that the swap file will only load the hard disk. In this case, it is recommended that you use the following settings:
- if your computer has 1 GB of RAM installed – swap file – 2048 – 2048 MB;
- if your computer has 2GB of RAM installed – swap file – 1512 – 1512 MB;
- if your computer has 4 GB of RAM installed – swap file 1024 MB – 1024 MB;
- if your computer has 8 GB of RAM installed — it is best to use the automatic swap file mode;
You probably noticed that the size value is specified twice. It is the initial and maximum size of the swap file. In the old days, when hard disks in computers were very small, it made sense to set different sizes for the paging file to save disk space. Nowadays, however, it is best to use the same value for both counts. Thus you will reduce the load – the system will not constantly recalculate the swap file size, plus the fragmentation level will be reduced.
The second method involves calculating the optimal swap file size. To do this, you should:
Step 1: Run all the applications you need to work with. Then press the “Ctrl + Alt + Delete” key shortcut.
Step 2: The “Task Manager” will open in front of you. Click on the “Performance” tab. There you will see the amount of RAM being used.

Step 3: Multiply the amount of RAM used by a factor of two and subtract the amount of installed RAM in your computer from this value.
For example, in our example, we have 6 GB of RAM installed, but Task Manager shows that 3.7 GB is being used for the workload we need. The swap file size calculation will look like this:
3,7 GB х 2 – 6 GB = 1,4 GB
Based on the calculation, we can conclude that we need to set a value of 1400 MB.
If the result of these calculations is negative, you have sufficient RAM, and the swap file can be set to automatic mode.
Important: Never set the swap file to more than three times the amount of RAM you have installed. Otherwise, you will surely get an unworkable operating system. It is best to use any of the methods described above.
How to change the swap (page) file size?
If you have done all the necessary calculations and conclude that you need to increase or decrease the paging file size, follow a series of simple steps:
Step 1: Right-click on “Start” and choose “Settings“
Step 2: The Windows preferences window opens in front of you. Click on “System“

Step 3: Scroll all the options on the left side of the window to the bottom and select “About“. Then on the right side of the window find “Advanced System Settings” and click on it.

Step 4: In the System Properties window, in the “Performance” field click on the “Settings” button.

Step 5: In the window that appears, select the “Advanced” tab and in the “Virtual Memory” field you will see what size of paging file you are currently using. If you are don’t like this value, click on the “Change” button.

You will be taken to the window for changing the paging file size. First of all, we recommend that you look at the field labeled “Total paging file size on all drives“. Here you will see three fields:
Minimum allowed– the smallest possible size you can set. Using this value is not recommended, as it can lead to unexpected consequences
Recommended – the paging file size which the system recommends you to use (compare it with the one you calculated yourself);
Currently allocated – the size of the swap file currently used by the system;
Step 6: Uncheck the box next to “Automatically manage paging file size for all drives“, then check the “Custom size” box, enter the desired value in the “Initial size” and “Maximum size” fields, click “Set” and then “OK” button.
In our case, the system recommends 1615 MB (215 MB more than we expected), so we will follow the recommendation of the operating system and use 1615 MB.
If in your case the system’s suggestion will be very different from your calculations (for example, by 1 GB) – recalculate the required swap file size again (using the instructions from the previous paragraph of this article), and use the value you got, since the operating system does not always give the right recommendations.
After clicking “OK“, restart your computer to apply the changes.
Now, the paging file size will be changed. To check this, follow steps 1 to 5 again and check the “Total paging file size on all drives” field
How to disable swap (page) file in Windows 10?
If you decide to completely disable the swap file, you can do so using the built-in features of your operating system.
Note: It is strongly not recommended to disable the swap file in Windows 10, as this may cause the operating system to malfunction.
If you think that the amount of installed RAM in your computer is enough for all tasks – it is better to enable “System recommended size“. However, if you are sure you want to disable the swap file – follow these steps:
Step 1: Click on the “magnifying glass” icon near the “Start” button and type “Adjust the appearance and performance of Windows” in the search box and click on the appropriate search result.

Step 2: Uncheck the “Automatically manage paging file size for all drives” box, then check the “No paging file” box, and click the “Set” button. Then press “OK“
Step 3: A warning will appear about the possible consequences of disabling the swap file. Click “YES” and restart your computer.

Your swap file will now be disabled.
How to delete the swap file (pagefile.sys and swapfile.sys) in Windows 10?
The pagefile.sys and swapfile.sys files are system files, so you cannot delete them using Windows 10 explorer. Usually, after disabling the swap file using the method described in the previous paragraph of this article and rebooting the operating system, the pagefile.sys and swapfile.sys files are automatically deleted. However, sometimes a swap file will remain on the hard drive even after it has been disabled. Most often this applies to the swapfile.sys
To delete swapfile.sys file manually you should:
Step 1: Right-click on “Start” and choose “Run” (you can also use the “Win + R” key combination). In the window that appears, type the command “regedit” and press “Enter“

Step 2: The Registry Editor will open in front of you. Go to the following address: ComputerHKEY_LOCAL_MACHINESYSTEMCurrentControlSetControlSession ManagerMemory Management (you can copy this address, paste it into the registry editor and press “Enter“)

Step 3: Right-click on the free space on the right side of the window and select “New” and then “DWORD 32-bit Value“

Give the new parameter the name “SwapfileControl“. After that restart your computer. The file will be completely removed from the hard drive.

If you suddenly want to bring it back – delete the “SwapfileControl” parameter you just created using the Windows 10 registry editor.
How to re-enable the swap (page) file in case of problems?
If you have resized, disabled, or deleted the swap file and have problems with your operating system, the first thing you should do is to enable it back.
In order to re-enable the swap file you should:
Step 1: Open the “Start” menu and press the “space bar“. A search box will open in front of you. Enter the query “Adjust the appearance and performance of Windows” and click on the corresponding result.
Step 2: Select the “Advanced” tab and click “Change” in the “Virtual Memory” field
Step 3: Check the “Automatically manage paging file size for all drives” box and click the “OK” button. Then reboot your computer.
If the problem was with the swap file – it should be fixed after the reboot, as the operating system will automatically adjust the size of the swap file.
How to move the swap file to a different disk drive?
Sometimes users want to move the swap file to a different disk because of the system disk’s small capacity or for other reasons. Windows built-in tools allow you to do this. It looks like removing the swap file on the system drive and enabling it for a different local drive.
To move the swap file to a different local disk, follow these steps:
Step 1: Press the “Win + R” key combination, type the command “systempropertiesadvanced” and press “Enter“

Step 2: You will see the system properties in front of you. In the “Performance” field, click the “Settings” button.
Step 3: While in the performance settings, select the “Advanced” tab and click “Change” in the “Virtual Memory” field
Step 4: Uncheck the “Automatically manage paging file size for all drives” box. In the list of connected drives, select the drive that currently holds the page file (in our case, the system drive) and check the “No paging file” box below. Then click “Set“
Step 5: Without closing the window, select the disk to which you want to move the swap file (by clicking on it) and check the “Custom size” box below. Then specify the paging file size in the corresponding fields, or check the option “System managed size” to let Windows determine the paging file size itself and then click “Set” again. Then click the “OK” button and restart your computer.
During the next boot, the swap file will be deleted from the disk where it was stored, and created on the one you specified.
What to do if important data has been lost due to manipulation of the swap file?
Often manipulations with the swap file can cause Windows failure, and it is not always possible to restore its functionality. In such a situation, you usually reinstall the operating system, which inevitably results in formatting the C: drive, and if important information was stored there, it will be lost.
If such a situation has happened to you, use a professional RS Partition Recovery program right away. Otherwise important files may be lost forever.
The program has an intuitive interface, so the recovery process does not cause difficulties even for inexperienced PC users.
RS Partition Recovery supports ALL modern file systems, so it does not matter in what operating system the drive was used. The most important thing is that you connect the drive with the important file to the working computer.
We’d also like to mention the deep disk scanning mode, which allows you to recover even files that were lost several months ago.
So, in order to recover a lost file you should:
Step 1.
Install and launch the
RS Partition Recovery.
Step 2.
Select the drive or partition from which you want to recover data.

Step 3.
Choose the type of analysis.

Fast scan you should use in case the file was lost recently. The program will scan the drive quickly and show the files available for recovery.
The Full analysis function allows you to find lost data, after formatting, disc resizing, or file structure corruption (RAW).
Step 4.
Preview and select the files to recover it.

Step 5.
Add the files you want to save to the «Restore list» or select the entire partition and click Recovery.

It should be noted that it is best to save the recovered file to an external hard drive or USB flash drive.
Frequently Asked Questions
A swap file is a special system file into which Windows writes data from RAM when it becomes insufficient for the operating system to work correctly.
Paging file sizes are as follows: 1 GB RAM = 2048 to 2048 MB, 2 GB RAM = 1512 to 1512 MB, 4 GB RAM = 1024 to 1024 MB, 8 GB RAM = Best to use automatic paging file mode;
Yes. However, it is better to recover lost files before installing a new system. Connect your drive to a working computer and use the instructions on our website.
The pagefile.sys file stores RAM data for applications you have installed from alternate sources, while the swapfile.sys file stores RAM data for system utilities and programs you have downloaded from the Microsoft Store.
Yes, you can. The process to remove swapfile.sys separately from pagefile.sys is described in detail on our website.
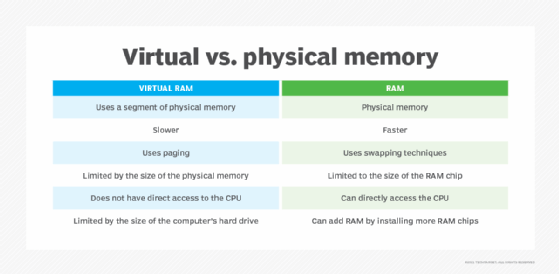
A swap file is a system file that creates temporary storage space on a solid-state drive or hard disk when the system runs low on memory. The file swaps a section of RAM storage from an idle program and frees up memory for other programs.
By using a swap file, the computer can use more memory than is physically installed. In other words, it can run more programs than it could run with just the limited resources of the installed RAM.
Swap files are not stored in physical RAM, which is why they are a type of virtual memory. Having a swap file allows a computer’s operating system (OS) to pretend that it has more RAM than it actually does. The least recently used files or programs in RAM can be «swapped out» to the hard disk until they’re needed later, allowing new files or programs to be «swapped in» to RAM.
The implementation of swap files varies with the OS, which takes care of creating and using a swap file as required. It also releases the drive space when it is no longer required by a program.
A swap file is also known as a page file, swap space or paging file. It is hidden on the system by default.
Why swap files are important
Swap files play two important roles in computer processing:
They can handle the extra load of memory consumption. Some applications consume a huge amount of RAM, depriving other background applications that also need memory. Swap files help resolve this situation by paging out idle files to provide extra virtual memory.
Unforeseen circumstances. When a particular program consumes extra memory, or when extra space is needed for device operations, swap files provide some breathing room until the user can come up with a more permanent solution, such as a RAM upgrade.
Benefits and drawbacks of swap files
While swap files help extend physical memory and thus make it possible to run more programs, they can also lead to system slowdowns. The file swaps out idle programs for in-use programs multiple times, which causes a lot of reading and writing on the system drive.
When the system starts using the swap file on the drive, performance may suffer because SSDs and hard disk drives (HDD) are much slower than RAM.
Temporary and permanent swap files
Swap files can be permanent or temporary. Operating systems such as Windows can be configured to use temporary swap files, while others such as Unix and Linux can set aside a permanent swap space to create a permanent swap file.
Temporary swap files usually use fragmented hard disk space. They don’t permanently reserve part of the system hard disk, so they’re more useful if disk space is limited.
Permanent swap files take a contiguous section of a hard disk. By organizing the swap file in a single contiguous space, fewer I/O operations are required to read or write a complete file, so it doesn’t affect system speed or performance as much as a temporary swap file. However, permanent swap files also take up more disk space, so if this space is already limited, they could slow down the system.
How to manage swap files in Windows 10
In Windows 10, swap files or page files are hidden with the .sys extension stored on the system drive. The swapping process begins automatically whenever a user opens more applications than the RAM can accommodate.
Usually, the minimum swap file size is 1.5 times the RAM capacity and the maximum is 4 times the RAM. For example:
RAM = 1 gigabyte (GB)
Minimum swap file = 1.5 GB
Maximum swap file = 4 GB
Windows 10 automatically manages the swap file according to the system configuration and RAM. However, a user can also manually adjust the swap file size if performance issues arise.
The steps for manually adjusting Windows 10 swap files are:
- Right click on the Start icon in the system tray and click on System. (Note: The system administrator account should be used to log into Windows 10.)
- Navigate to Advanced system settings and click on the Advanced
- Click on the Settings button in the Performance section and navigate to the Advanced
- Click the Change button and uncheck the Automatically manage paging file size for all drives checkbox
- Select the drive where Windows 10 is installed.
- Manually enter the maximum and minimum swap file size according to the physical memory present on the system.
- Click the Set button and then the OK button.
- Restart the computer.
Swap files in Linux
Linux has two types of swap space. One is the swap partition, a dedicated section or partition on the drive. The second is the swap file that resides among system and data files and is easy to resize.
With a swap file, a separate partition is not required. Instead, the user simply creates a file under the root, which the system then uses as the swap space.
To verify the swap space already available on a Linux system, two commands can be used, either free or swapon:
free command
Input: $ sudo free –h
Output:
|
total |
used |
free |
shared |
buff/cache |
available |
|
|
Mem: |
488M |
158M |
80M |
2.1M |
246M |
220M |
|
Swap: |
1.0G |
506M |
520M |
If there’s no swap space on the system, the output of the free command could look like this:
|
total |
used |
free |
shared |
buff/cache |
available |
|
|
Mem: |
488M |
158M |
80M |
2.1M |
246M |
220M |
|
Swap: |
0G |
0G |
0G |
The free command shows the size of the swap space. However, it doesn’t specify if the space is a swap partition or a swap file. For this, the swapon command is more useful
swapon command
Input: $ sudo swapon –show
Output:
|
NAME |
TYPE |
SIZE |
USED |
PRIO |
|
/swapfile |
file |
1024M |
500M |
-1 |
The swapon command cannot show any output if the system doesn’t have any swap space.

Creating a swap file and making it available in Linux
If the existing swap space is inadequate for system operations, a new swap file can be created in Linux. The steps involved are:
- Create a swap file with the mkfile command and specify the size of the swap file in k (kilobytes), b (blocks) or m (megabytes).
- Activate the swap file by using the swap command.
- Use the absolute path name to specify the swap file.
- To ensure that the swap file is activated automatically when the system boots, specify the entry of swap file to the /etc/vfstab.
- Finally, verify if the swap file is added.
A swap file in Linux can be created without root permissions. But to avoid accidental overwriting, the root should be the owner of the swap file.
Removing a swap file in Linux
If a Linux swap file is no longer needed, it can be removed using these steps with superuser access:
- Remove the swap space to remove the swap file name. This way, the file will no longer be available for swapping, although it will not be deleted.
- Edit the /etc/vfstab file to delete the swap file entry.
- Recover the disk space so it will be available for other use.
- Verify if the swap file is removed and no longer available.
Learn some tips to improve Windows 10 performance and check out the differences between Windows 10 and Windows 11. Also, explore over 80 useful Linux commands, read up on how to optimize Linux swap space usage and find out how memory compression compares to page swapping.
13 декабря 2010
13.12.10
16
32K
Swap (своп) или файл подкачки
Своп (swap) — это файл, либо раздел, т.е. определенное место на жестком диске (HDD), которое используется для «выгрузки» в него неиспользуемых страниц из оперативной памяти. Не зацикливайтесь на словосочетании «страница памяти» — это не столь важно на данный момент, ибо это уже углубление в принципы действия, которые вам не нужны на данном этапе и могут вообще не понадобится.
Стандартный HDD 3,5″ (На фото HDD от Western Digital)
Говоря же простым языком, в своп из оперативной памяти выгружается вся та информация, которая на данный момент не используется и к которой уже какое-то время не обращается ни одна программа. Т.е. своп в каком-то смысле создает дополнительный объем для вашей оперативной памяти, в который выгружается все ненужное на данный момент, но то, что может в скором времени понадобится какой-либо программе.
Думаю, многие знают и понимают, что HDD обладают в разы меньшим быстродействием, чем оперативная память и у вас может возникнуть логичный вопрос — зачем же использовать заведомо более медленное устройство?
Дело тут в том, что не возможно предусмотреть и предугадать объем оперативной памяти на каждом компьютере, а так же количество программ и процессов, которые будут запущены одновременно. Отсюда возникают ситуации, когда на некоторых компьютерах какая-либо программа может работать нормально, а на некоторых компьютерах появится проблема недостатка памяти.
Как раз для решения проблемы недостатка памяти и было придумано организовать специальное место на HDD — своп, в которое бы выгружалась вся ненужная на данный момент информация из оперативной памяти, освобождая место для активных программ и информации, которая используется на данный момент.
Если же к этой выгруженной в своп информации вновь поступает запрос, она загружается обратно в оперативную память, а из свопа удаляется, или просто поверх нее записывается что-то другое. А из-за того, что своп находится в одном и том же месте на HDD, время на поиск нужной информации минимально и не сравнится с процессом поиска, обработки и загрузки этой информации по-новой из директории программы.
С тем, что такое своп и зачем он нужен вроде бы разобрались. =) Надеюсь я не слишком вас утомил, ибо я старался объяснить подробнее и более простым языком, получилось у меня или нет уже вы мне скажете.
Теперь давайте перейдем к настройке самого своп-файла.
Настройки фйла подкачки в OC Windows (Диск E — это отдельный физический HDD)
В операционных системах на базе ядра Linux swap — представляет из себя специальное место на жестком диске, которое создается еще на стадии разметки диска при установке операционной системы. В Windows же дела обстоят иначе, тут swap представляется из себя файл pagefile.sys, который является скрытым системным файлом. Он располагается в файловой системе на одном или на нескольких логических дисках. И тут кроется с одной стороны преимущество, но с другой стороны и недостаток.
Преимущество такого решения в том, что можно мгновенно изменять размер свопа, но значительный недостаток кроется в том, что файл подкачки может фрагментироваться, т.е. разбиться на части, из-за других файлов, находящихся на логическом разделе. Подробнее о фргаментации вы можете прочитать в этой статье.
Поэтому для Windows есть определенный ряд правил и рекомендаций, которые нужно выполнять, если вы хотите что бы ваш компьютер нормально работал и не терял производительность из-за фрагментации своп-файла.
Практические советы по настройке своп-файла (файла подкачки) в ОС Wnidows
Где и как расположить файл подкачки?
1 — Файл подкачки нужно располагать как можно ближе к начальным секторам жесткого диска (HDD), потому что именно в этом месте у большинства HDD самые высокие показатели скорости чтения и записи.
В идеале заняться настройкой файла подкачки нужно как только вы установили систему, пока ваш жесткий диск не забит файлами.
2 — Если у вас несколько логических разделов на жестком диске (HDD), то файл подкачки нужно располагать на первом по счету из них, т.е. как можно ближе к начальным секторам.
3 — Если у вас в компьютере несколько жестких дисков (HDD), то своп-файл нужно располагать на самом быстром из них.
4 — Перед тем, как задавать новый размер файла подкачки обязательно на время удалите файл подкачки (на всех дисках задать — «Без файла подкачки») и проведите дефрагментацию выбранного вами под swap-файл раздела каким-нибудь дефрагментатором (например Defraggler).
5 — Не разбивайте файл подкачки на несколько логических или физических дисков — это только замедлит работу системы.
6 — Не стоит помещать файл подкачки на отдельный раздел, равный ему по размеру и отформатированный в журнальной файловой системе.
Например, в файловой системе NTFS из-за MFT логический раздел делится ровно на две части. Таким образом ваш файл подкачки на таком логическом разделе гарантированно будет разбит на 2 части, а то и более, так же не всегда есть возможность разместить подобный раздел в начале диска. И в конечном итоге вы таким образом ограничите себя в выборе максимального размера файла подкачки.
Какого размера должен быть файл подкачки?
Размер файла подкачки обязательно должен быть фиксированным, т.е. «Исходный размер» и «Максимальный размер» должны быть идентичными. Таким образом мы исключим возможную фрагментацию файла подкачки при разрастании от «Исходного» до «Максимального» размера.
Объем RAM Размер swap-файла
256МБ 1024МБ
512МБ 2048МБ
1024МБ-2048МБ 4096МБ
3072МБ-4096МБ 6144МБ-8192МБ
8192МБ и более можно указать минимальный размер (по-сути он не нужен, но
многие программы требуют его наличия)
Copyright © 2010 Tsiryuta G. N. <spbtgn@gmail.com>