
Stereo Mix in Windows 11 is a powerful audio feature that allows users to record and capture all the sounds playing on their computer. It’s like having a virtual microphone that can pick up any audio output, whether it’s from a streaming service, a video game, or even a VoIP call. This hidden gem can be a game-changer for content creators, musicians, and anyone who wants to capture high-quality audio directly from their computer.
With Stereo Mix, you no longer need to rely on external devices or complex software setups to record audio playing on your computer. This feature comes built-in with Windows 11 and offers a seamless way to capture audio directly from your computer’s audio system. Whether you want to create tutorials, record music, or simply save a memorable audio moment, Stereo Mix simplifies the process and ensures a pristine and accurate capture of the sound you desire. It’s a valuable tool that unlocks endless possibilities for audio enthusiasts and professionals alike.
Stereo Mix Windows 11 is a built-in audio feature that allows you to record audio playback directly from your computer. It acts as a virtual recording device, capturing the sounds playing on your computer, including system audio, media files, and streaming services. This feature is especially useful for creating tutorial videos or recording streaming music and podcasts. With Stereo Mix Windows 11, you can easily capture any audio output and save it as a recording file.

Understanding Stereo Mix in Windows 11: A Comprehensive Guide
If you are a Windows 11 user, you might have come across the term «Stereo Mix» while exploring your audio settings. But what exactly is Stereo Mix, and how does it work? In this article, we will delve into the world of Stereo Mix in Windows 11, exploring its definition, functionality, and how it can enhance your audio experience.
What is Stereo Mix?
Stereo Mix is a feature in Windows 11 that allows you to record and play back audio on your computer. It acts as a virtual audio device, capturing and redirecting the sound from your computer’s speakers or headphones. This means that you can record any audio playing through your computer, whether it’s from web browsers, media players, or other applications.
Enabled by default in many Windows 11 systems, Stereo Mix can be a useful tool for various tasks, such as recording podcasts, capturing streaming audio, or creating audio tutorials. It essentially captures the audio being output by your computer and makes it available as an input device for recording purposes.
However, it is worth noting that the availability of Stereo Mix may vary depending on your specific audio hardware and drivers. Some computers or sound cards might not have this feature, while others might require additional settings to enable it. It is recommended to check your system’s specifications or consult the manufacturer’s documentation for more information.
Now that we have a basic understanding of what Stereo Mix is let’s explore its functionality and how it can be used in Windows 11.
Functionality of Stereo Mix in Windows 11
Stereo Mix is primarily used for recording audio, but it offers a range of functionalities that can enhance your audio experience on Windows 11.
1. Audio Recording
The most notable function of Stereo Mix is recording audio. By selecting Stereo Mix as the recording device, you can capture any audio played through your computer. Whether you want to save a streaming song, record a video conference, or create a voice-over for a video, Stereo Mix allows you to easily record audio directly from your system’s output without the need for external microphones or complicated setups.
To access Stereo Mix as a recording device, you can follow these steps on Windows 11:
- Right-click on the speaker icon in the taskbar.
- Select «Open Sound settings» from the context menu.
- In the Sound settings, click on the «Sound Control Panel» option on the right side.
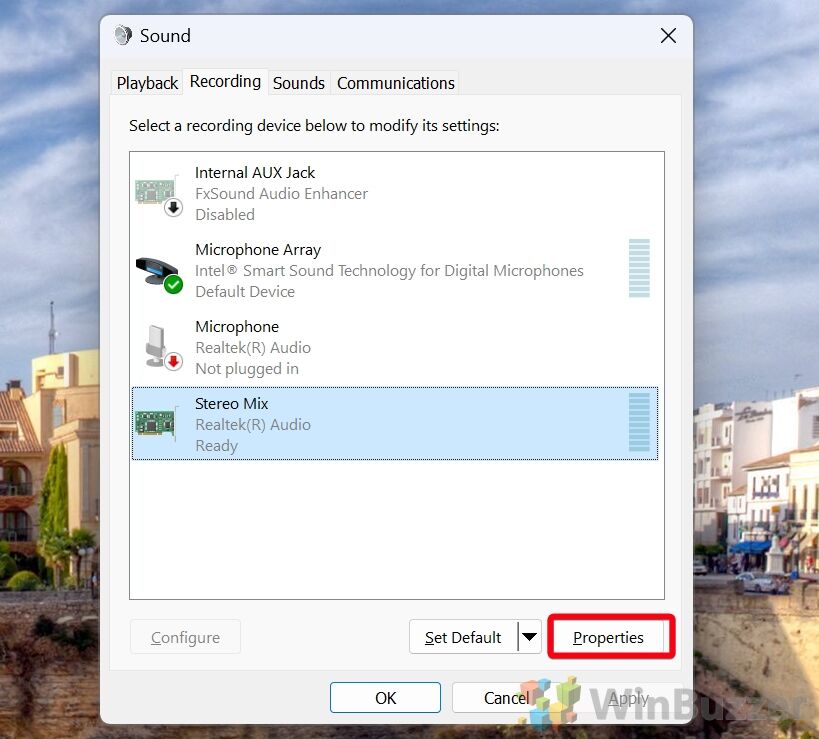
- In the Sound control panel, go to the «Recording» tab.
- Right-click on an empty area and make sure «Show Disabled Devices» and «Show Disconnected Devices» are checked.
- Look for «Stereo Mix» in the list of recording devices.
- Right-click on «Stereo Mix» and select «Enable» or «Set as Default Device» if it’s disabled.
Once enabled, you can use Stereo Mix to record audio from your speakers or headphones using applications like Audacity, OBS Studio, or any other audio recording software you prefer.
2. Audio Playback and Monitoring
Besides recording, Stereo Mix can also be used for audio playback and monitoring. When selected as the default playback device, Stereo Mix redirects the audio output from your computer to its virtual input, allowing you to listen to the sound directly without the need for physical speakers or headphones.
This feature can be particularly useful in scenarios where you want to play audio through a different device or capture audio for streaming or broadcasting purposes. By selecting Stereo Mix as your default playback device, you can route the sound to recording software or stream it to other devices without relying on physical connections.
3. Audio Enhancement and Customization
Another lesser-known aspect of Stereo Mix is its ability to enhance and customize your audio playback. By accessing the properties of Stereo Mix in the Sound control panel, you can adjust various audio settings, including equalization, volume levels, and audio effects.
These customization options allow you to fine-tune the audio output according to your preferences, whether you want to boost the bass, reduce background noise, or apply other audio enhancements.
With the flexibility provided by Stereo Mix, you can create a personalized audio experience tailored to your specific needs.
Enabling Stereo Mix on Windows 11
Enabling Stereo Mix on Windows 11 requires a few simple steps:
- Right-click on the speaker icon in the taskbar.
- Select «Open Sound settings» from the context menu.
- In the Sound settings, click on the «Sound Control Panel» option on the right side.
- In the Sound control panel, go to the «Recording» tab.
- Right-click on an empty area and make sure «Show Disabled Devices» and «Show Disconnected Devices» are checked.
- Look for «Stereo Mix» in the list of recording devices.
- Right-click on «Stereo Mix» and select «Enable» or «Set as Default Device» if it’s disabled.
If Stereo Mix is not displayed in the list of recording devices, it could indicate that your specific audio hardware does not support this feature. In such cases, you can explore alternative audio recording methods or consider upgrading your audio hardware to access the full functionality of Stereo Mix.
Exploring the Benefits of Stereo Mix in Windows 11
Now that we have covered the technical aspects of Stereo Mix in Windows 11, let’s explore the benefits it offers to users:
1. Seamless Audio Recording
Stereo Mix provides a convenient and straightforward method for recording audio from your computer’s output. Whether you need to capture streaming audio, save a conference call, or create high-quality voice-overs, Stereo Mix eliminates the need for external microphones or complex setups. With just a few clicks and the right recording software, you can effortlessly record any audio playing on your Windows 11 system.
2. Versatile Audio Playback and Monitoring
By using Stereo Mix as the default playback device, you can redirect the audio output from your computer to its virtual input, allowing for versatile audio playback and monitoring. Whether you want to stream audio to other devices, capture audio for broadcasting or content creation, or experiment with various audio setups, Stereo Mix offers a flexible solution without the need for physical connections or additional hardware.
3. Customizable Audio Experience
With its audio enhancement and customization features, Stereo Mix allows users to fine-tune their audio output according to their preferences. Whether you are a music enthusiast, a gamer, or a content creator, the ability to adjust equalization, volume levels, and apply audio effects can significantly enhance your overall audio experience on Windows 11.
4. Increased Productivity
Stereo Mix can also boost productivity in various scenarios. For example, if you are attending an online meeting or a virtual conference and want to capture important discussion points or take notes, Stereo Mix allows you to record the audio and revisit it later. Additionally, if you are creating tutorials or instructional videos, the ability to record audio directly from your system makes the process efficient and hassle-free.
By leveraging the capabilities of Stereo Mix, you can enhance your audio-related tasks and accomplish them more effectively.
Conclusion
In conclusion, Stereo Mix is a powerful tool in Windows 11 that allows users to record audio, playback and monitor audio, and customize their audio experience. By enabling Stereo Mix and selecting it as the recording or playback device, users can capture audio from their computer, stream audio to other devices, and adjust audio settings according to their preferences.
Whether you are a content creator, a professional, or simply a Windows 11 user looking to explore the possibilities of your audio system, Stereo Mix provides a range of functionalities that can enhance your audio experience and simplify audio-related tasks. Take advantage of this feature and unlock new possibilities in your digital audio journey.

Understanding Stereo Mix in Windows 11
Stereo Mix is a feature in Windows 11 that allows you to record audio output from your computer. It acts as a virtual input device, capturing and combining all sounds played on your system, including system sounds, music, video, and audio calls.
This functionality is particularly useful for content creators, gamers, and those who need to record audio from their computer. With Stereo Mix, you can easily capture audio from applications that don’t have recording capabilities, such as streaming platforms or games, and save it as a high-quality audio file.
In addition, Stereo Mix can be useful for troubleshooting purposes. It allows you to monitor and analyze the audio being played on your computer, which can help identify issues or conflicts with audio devices and drivers.
To access Stereo Mix on Windows 11, you may need to enable it in the Sound settings. Once enabled, you can select Stereo Mix as an input source in recording software or use it for live streaming, podcasting, or any other audio-related tasks.
Key Takeaways — What Is Stereo Mix Windows 11
- Stereo Mix in Windows 11 allows you to record audio playing on your computer.
- It can be used to capture system sounds, online streaming audio, and microphone input.
- Stereo Mix is a virtual audio device that enables audio looping within the operating system.
- You can enable Stereo Mix in Windows 11 by accessing the Sound settings.
- With Stereo Mix, you can create audio recordings or live streams with ease.
Frequently Asked Questions
Stereo Mix is a feature in Windows 11 that allows you to record and capture audio output from your computer. It can be useful for various purposes, such as recording streaming audio, creating tutorials, or troubleshooting audio issues. Here are some frequently asked questions about Stereo Mix in Windows 11:
1. How do I enable Stereo Mix in Windows 11?
To enable Stereo Mix in Windows 11, follow these steps:
1. Right-click on the speaker icon in the system tray and select «Open Sound settings.»
2. In the Sound settings, click on the «Sound Control Panel» link on the right-hand side.
3. In the Sound Control Panel, go to the «Recording» tab.
4. Right-click anywhere in the recording devices list and check the «Show Disabled Devices» and «Show Disconnected Devices» options.
5. Locate «Stereo Mix» in the list, right-click on it, and select «Enable.»
6. Click «OK» to save the changes.
2. How do I set Stereo Mix as the default recording device?
To set Stereo Mix as the default recording device in Windows 11, follow these steps:
1. Right-click on the speaker icon in the system tray and select «Open Sound settings.»
2. In the Sound settings, click on the «Sound Control Panel» link on the right-hand side.
3. In the Sound Control Panel, go to the «Recording» tab.
4. Right-click on «Stereo Mix» and select «Set as Default Device.»
5. Click «OK» to save the changes.
3. Can I record audio from specific applications using Stereo Mix?
Yes, you can record audio from specific applications using Stereo Mix in Windows 11. To do this, follow these steps:
1. Enable Stereo Mix as mentioned in the first question.
2. Open the application you want to record audio from.
3. In the application’s settings or preferences, select «Stereo Mix» as the input or recording device.
4. Start the audio recording in the application, and Stereo Mix will capture the audio output from that specific application.
4. Can I adjust the volume levels of Stereo Mix in Windows 11?
Yes, you can adjust the volume levels of Stereo Mix in Windows 11. Here’s how:
1. Right-click on the speaker icon in the system tray and select «Open Sound settings.»
2. In the Sound settings, click on the «Sound Control Panel» link on the right-hand side.
3. In the Sound Control Panel, go to the «Recording» tab.
4. Right-click on «Stereo Mix» and select «Properties.»
5. In the Properties window, go to the «Levels» tab.
6. Adjust the volume slider to your desired level.
7. Click «OK» to save the changes.
5. What are some common uses of Stereo Mix in Windows 11?
Some common uses of Stereo Mix in Windows 11 include:
— Recording streaming audio from online platforms, such as YouTube or Spotify.
— Creating tutorials or instructional videos that require capturing computer audio.
— Recording audio from video calls or conferences.
— Troubleshooting audio issues by capturing audio output for analysis or support.
Stereo Mix in Windows 11 provides a convenient way to record and capture audio from your computer, offering flexibility for various purposes.
In conclusion, Stereo Mix is a feature in Windows 11 that allows you to record audio from your computer’s sound card. It enables you to capture sound from your system’s audio output and use it for various purposes like recording audio streams, creating podcasts, or mixing audio tracks. Stereo Mix acts as a virtual microphone, combining all the audio sources on your system into one, and then capturing that combined audio.
To enable Stereo Mix on Windows 11, you can follow a few simple steps. First, right-click on the speaker icon in the system tray and select «Open Sound settings.» Then, click on the «Sound» tab and select your audio output device. Finally, locate and enable the «Stereo Mix» option under the «Input» section. Once enabled, you can use Stereo Mix to record audio from your computer’s speakers or headphones.
Stereo Mix is a feature that lets you record audio playing through your speakers or headphones, essentially allowing you to capture the internal audio of your computer. To use Stereo Mix in Windows 11, you’ll need to enable it in the Sound settings, adjust the recording levels, and select it as the recording device in the software you’re using to record audio. This article will guide you through the steps to use Stereo Mix on Windows 11.
Before we dive into the steps, let’s understand what we’re trying to achieve here. Enabling and using Stereo Mix will allow you to record the sound that is being played on your computer, whether it’s from a video, a music track, or any other source of audio.
Step 1: Open Sound Settings
Navigate to the Sound settings on your Windows 11 computer.
Sound settings can be accessed by right-clicking the speaker icon on the taskbar and selecting «Sound settings,» or you can search for it in the start menu.
Step 2: Show Disabled Devices
Right-click in the empty space within the Sound settings window and select ‘Show Disabled Devices’.
This step is important because Stereo Mix is often disabled by default, and you need to make it visible to enable it.
Step 3: Enable Stereo Mix
Find Stereo Mix, right-click on it, and select ‘Enable’.
Once you’ve enabled Stereo Mix, it will become an available option in your recording software.
Step 4: Set Stereo Mix as Default Device
Right-click on Stereo Mix and choose ‘Set as Default Device’.
Setting Stereo Mix as the default device ensures that it will be selected automatically in most recording software.
Step 5: Adjust Recording Levels
Double-click on Stereo Mix to open its properties, and adjust the levels according to your preferences.
Make sure to test the recording levels to find the right balance that doesn’t cause distortion or clipping of the audio.
After you complete these steps, Stereo Mix will be enabled and ready to use. When you record audio using any recording software, you should now see an option to select Stereo Mix as your recording device. By selecting it, you’ll be able to record any sound that’s played back by your computer’s speakers or headphones.
Tips for Using Stereo Mix Windows 11
- Make sure your sound drivers are up to date to avoid any compatibility issues.
- If you’re having trouble finding Stereo Mix, check if your sound card supports this feature.
- Test the recording levels beforehand to ensure clear audio quality.
- Use a good pair of headphones or speakers to monitor the audio while recording.
- Consider using audio editing software to enhance or clean up the recorded audio if necessary.
Frequently Asked Questions About Stereo Mix Windows 11
What is Stereo Mix?
Stereo Mix is a recording option that allows you to capture internal audio directly from your computer’s sound card.
Why can’t I find Stereo Mix on my Windows 11 computer?
It’s possible that your sound card does not support Stereo Mix, or it may be disabled or hidden by default in the Sound settings.
Can I use Stereo Mix to record audio from streaming services?
Yes, Stereo Mix can record any audio played on your computer, including from streaming services.
How can I improve the quality of the audio recorded with Stereo Mix?
Ensure your recording levels are appropriately set, and consider using audio editing software to refine the recording.
Can I use Stereo Mix to record audio from external devices?
No, Stereo Mix only records audio played internally on your computer. External audio requires a different input source.
Summary of Steps
- Open Sound Settings
- Show Disabled Devices
- Enable Stereo Mix
- Set Stereo Mix as Default Device
- Adjust Recording Levels
Conclusion
Being able to record internal audio through Stereo Mix on Windows 11 can be incredibly useful for various purposes, from creating content like podcasts and tutorials to simply saving a favorite piece of audio. With this feature, you gain more control over your audio recording capabilities, ensuring you capture exactly what you need. Just remember to follow the steps correctly, test your levels to ensure the best quality, and make the most out of this handy tool. Happy recording, and may your audio adventures in Windows 11 be crystal clear and hassle-free!
Matt Jacobs has been working as an IT consultant for small businesses since receiving his Master’s degree in 2003. While he still does some consulting work, his primary focus now is on creating technology support content for SupportYourTech.com.
His work can be found on many websites and focuses on topics such as Microsoft Office, Apple devices, Android devices, Photoshop, and more.
Stereo Mix is a lesser-known, yet incredibly powerful feature embedded within the Windows operating system that allows you to record internal audio seamlessly. This feature is especially useful for content creators, educators, and anyone looking to capture system sounds, gameplay audio, or audio from online sources without the need for external recording devices. You can use Stereo Mix to record a podcast, capture the audio of a live stream, or simply save a piece of music playing on your computer.
Navigating through the settings to enable and effectively use Stereo Mix can be a bit tricky, particularly for those who are new to audio recording on Windows 11 or Windows 10.
This tutorial provides you with a comprehensive step-by-step guide to enable Stereo Mix on your Windows system. You’ll learn not only how to set up Stereo Mix but also how to leverage its capabilities to record crisp, clear audio directly from your computer.
How to Enable Stereo Mix in Windows 10
Stereo Mix is a hidden feature in Windows 10 that needs to be enabled manually.
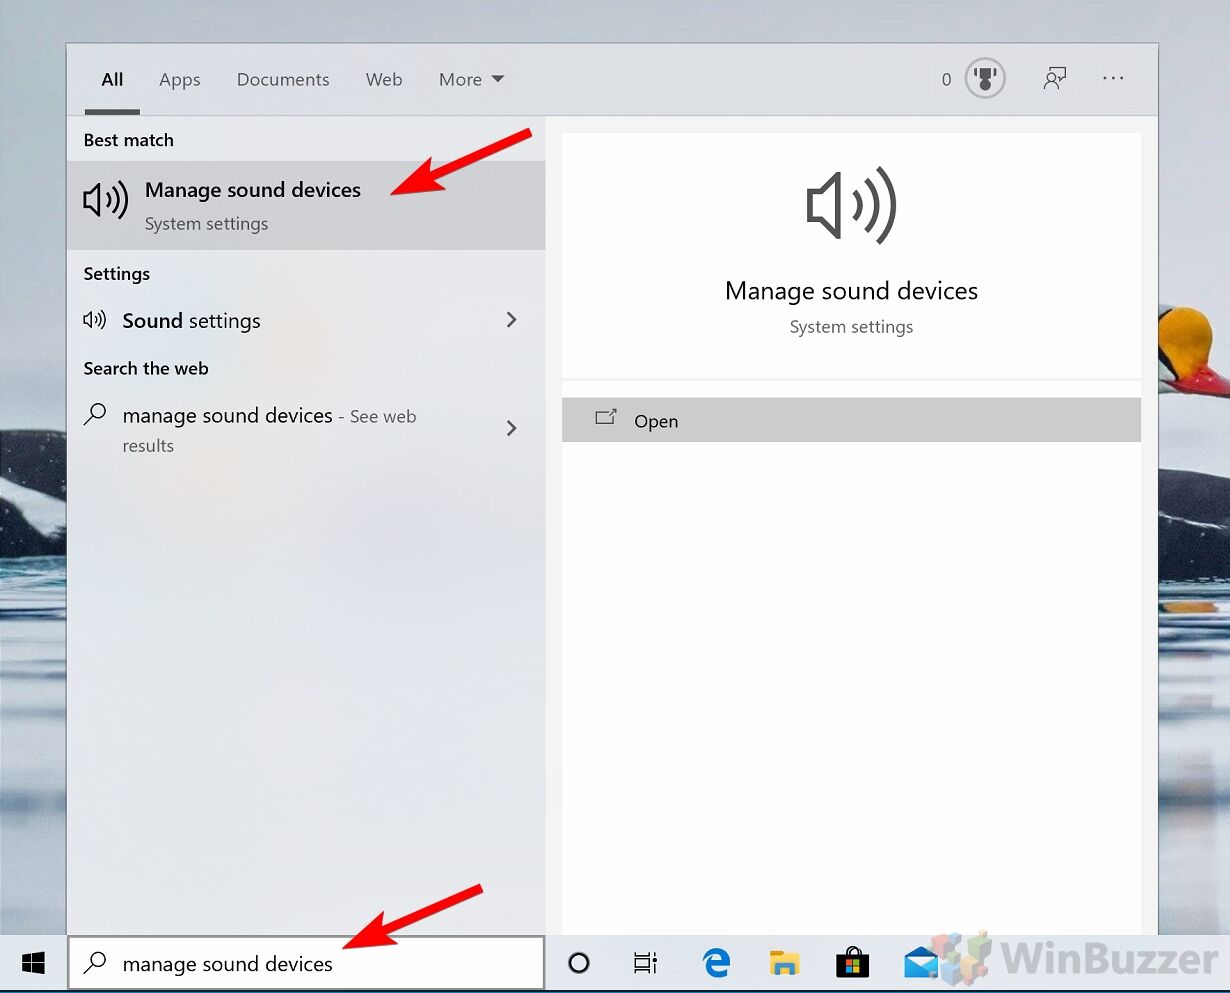
- Open “Input devices” in Windows 10 settings
The fastest way to see available “Input devices” in Windows 10 is by searching and opening “Manage sound devices”.

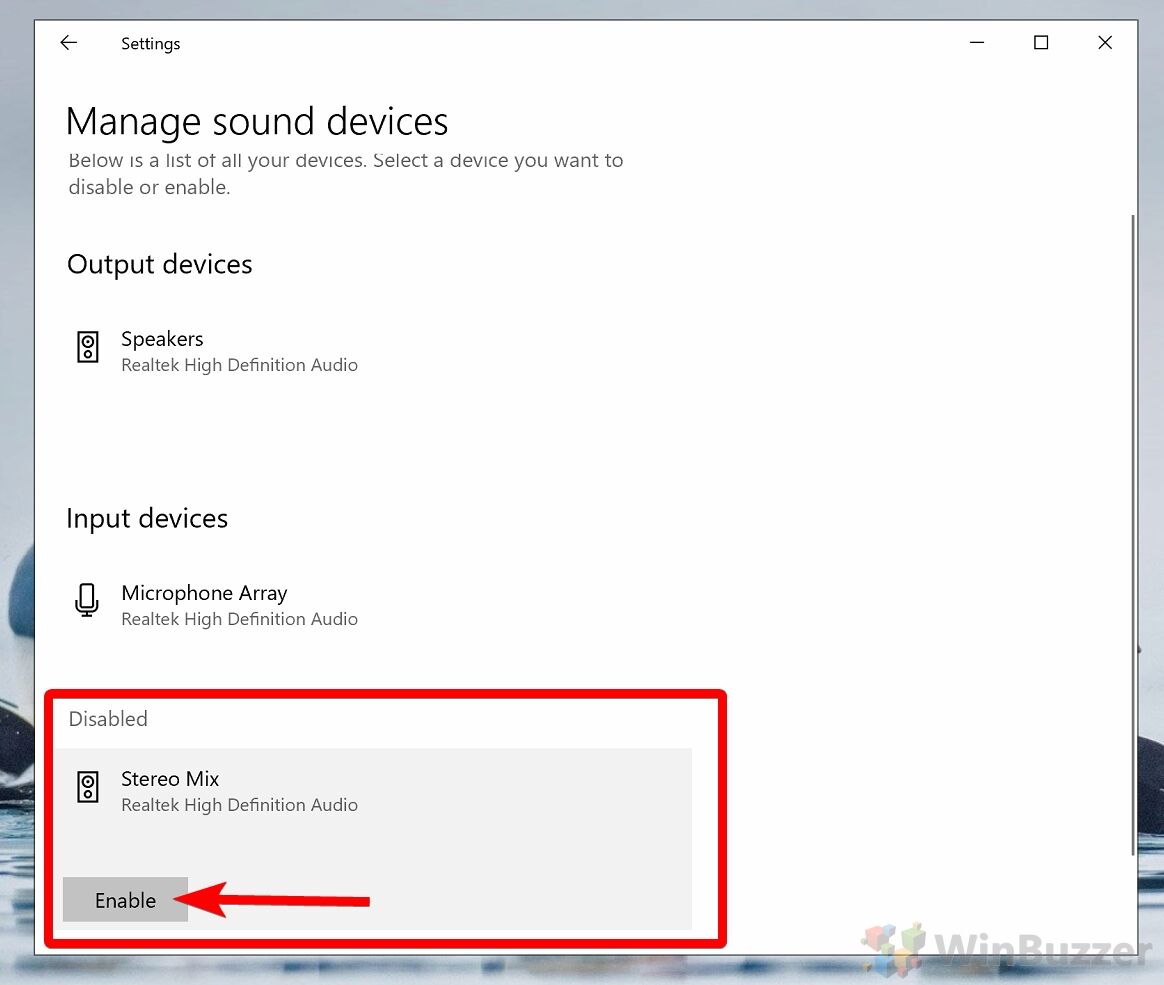
- Enable Stereo Mix in “Managed sound devices”
In “Manage sound devices” you will find a disabled “Stereo Mix” entry in “Input devices”. Just click on “Stereo Mix” to show the “Enable”-button. Then you can enable “Stereo Mix” with a simple click.

How to Enable Stereo Mix in Windows 11
The process in Windows 11 is similar but with slight differences in accessing sound settings.
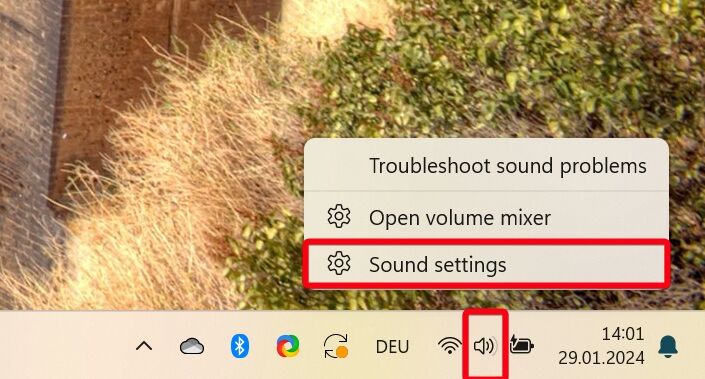
- Access Sound OptionsRight-click the speaker icon on the taskbar and select “Sound settings“.

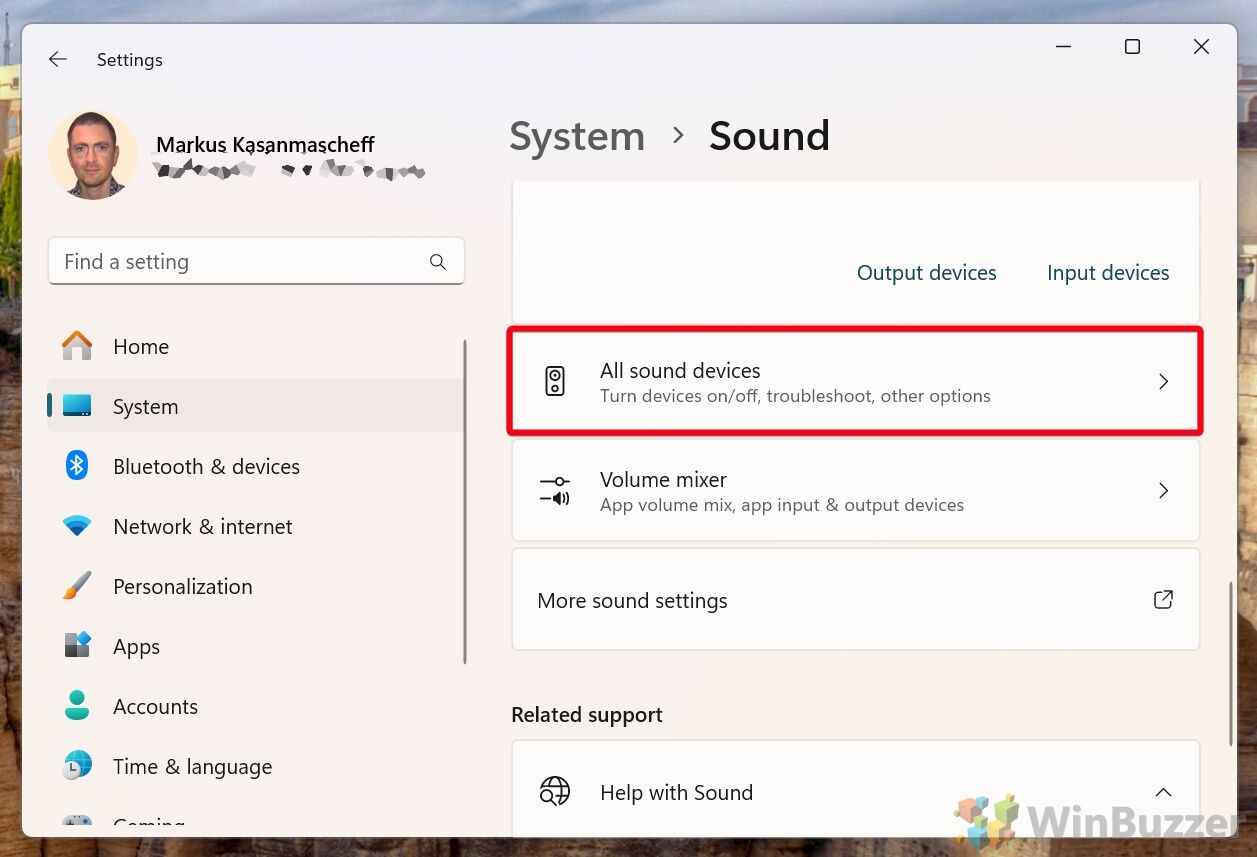
- Select “All sound devices”

- Scroll down to “Advanced” and click on “More sound settings”

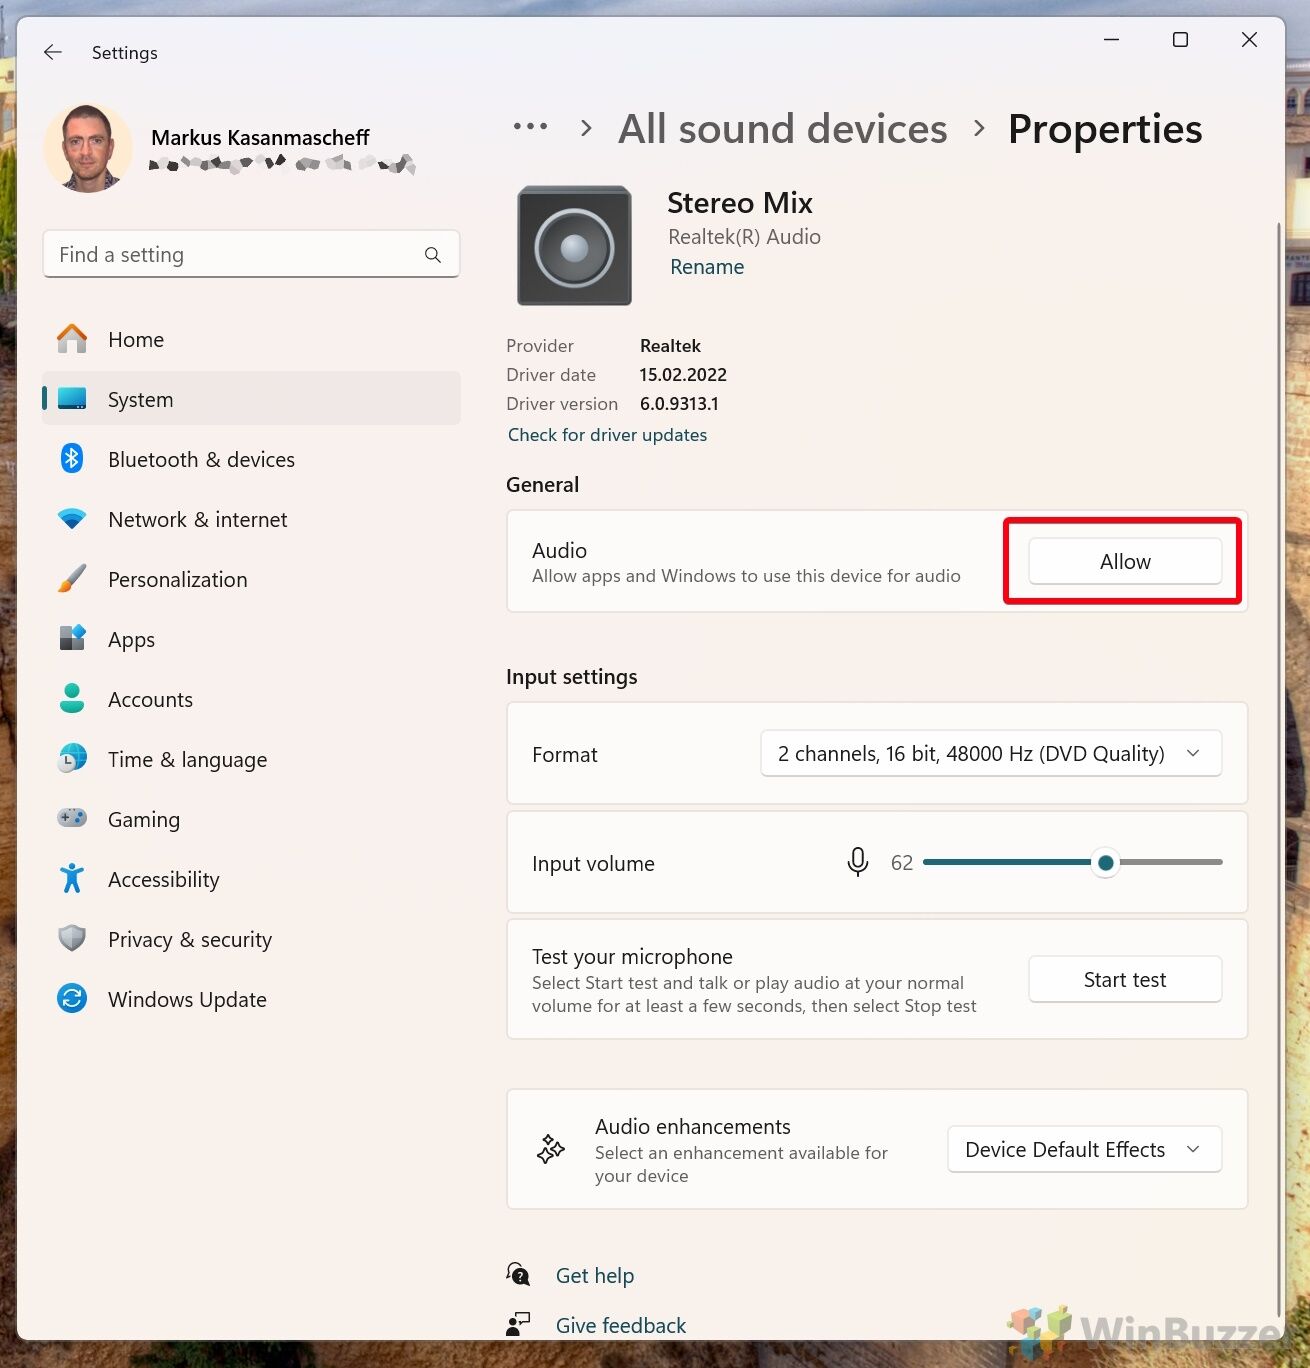
- Click “Allow” to Enable Stereo Mix Device

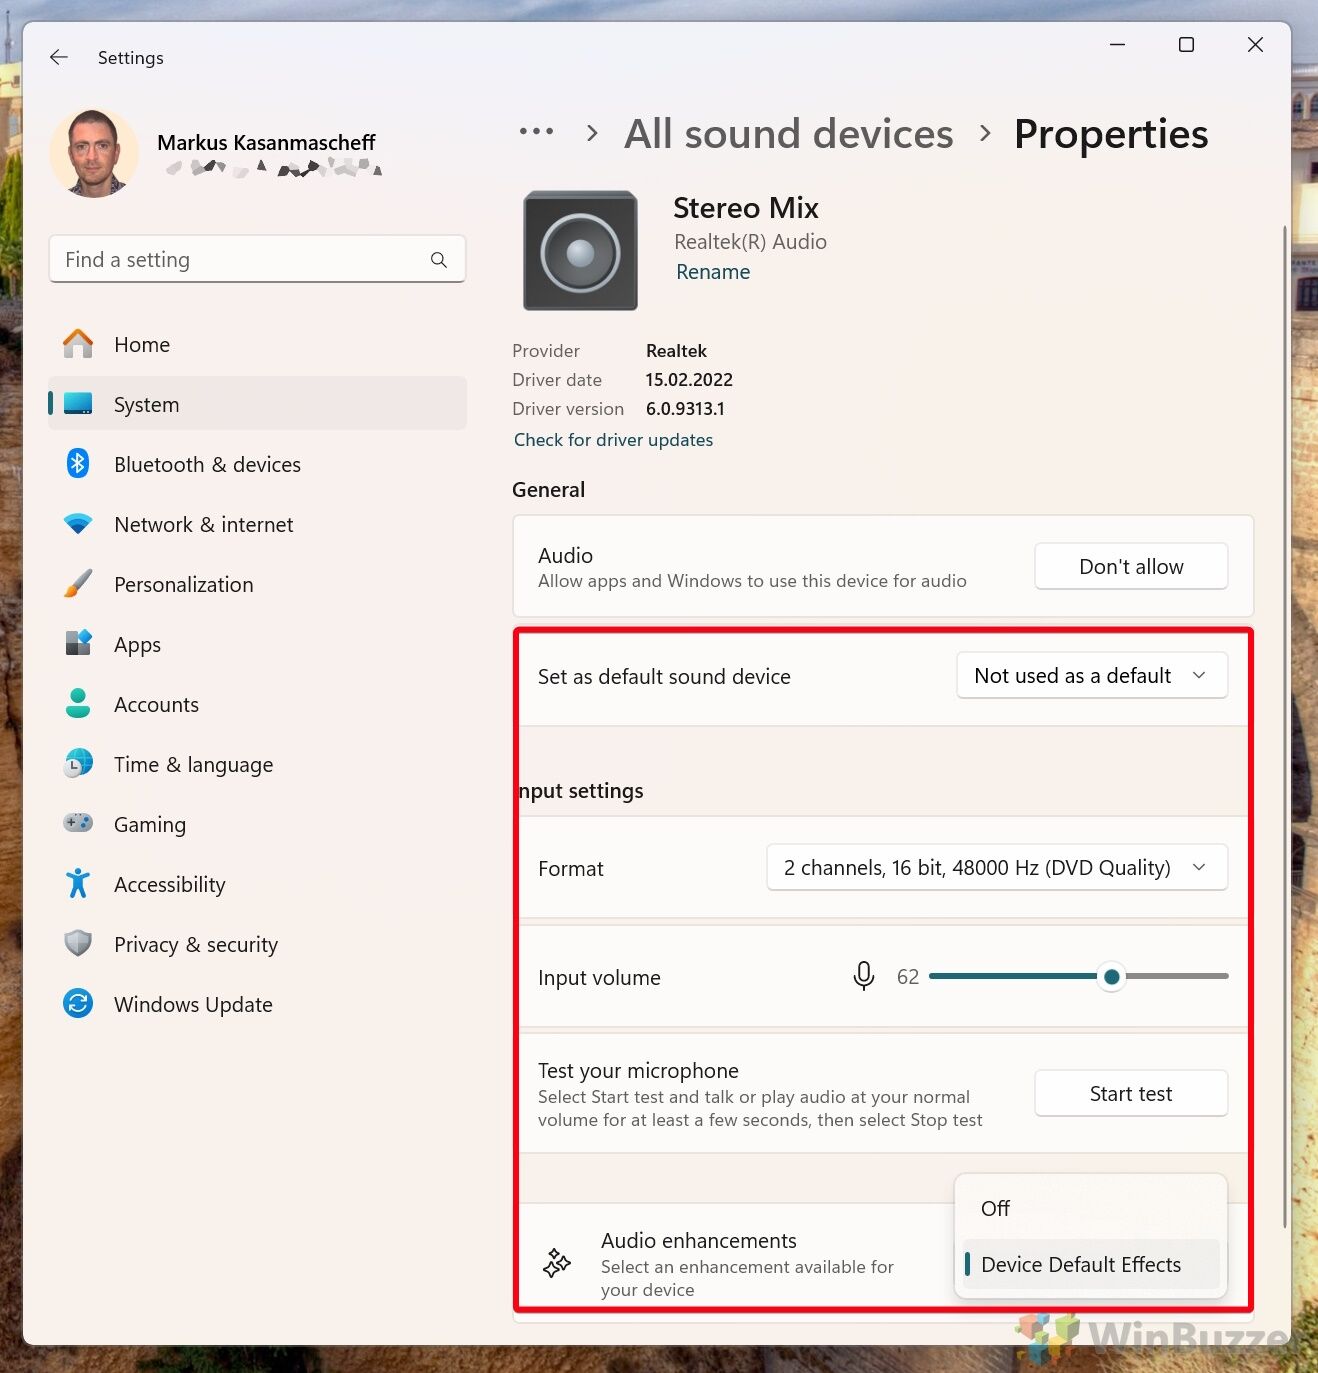
- Optional: Set Stereo Mix OptionsYou can set Stereo Mix as the “default sound device“, choose the “format/quality” via bitrate and mono instead of stereo if needed (1 channel), adjust the “Stereo Mix input volume” and enable or disable the available “Audio enhancements” available for your audio chipset.


How to Enable Stereo Mix via Control Panel in Windows 10 and Windows 11 for Advanced Options
For users who prefer the traditional Control Panel interface or if the Windows Settings approach does not reveal the Stereo Mix option, here’s how you can enable Stereo Mix there. In addition to what you can choose in Windows Settings, Control Panel allows to enable “Exclusive Mode” for Stereo Mix (see below).
-
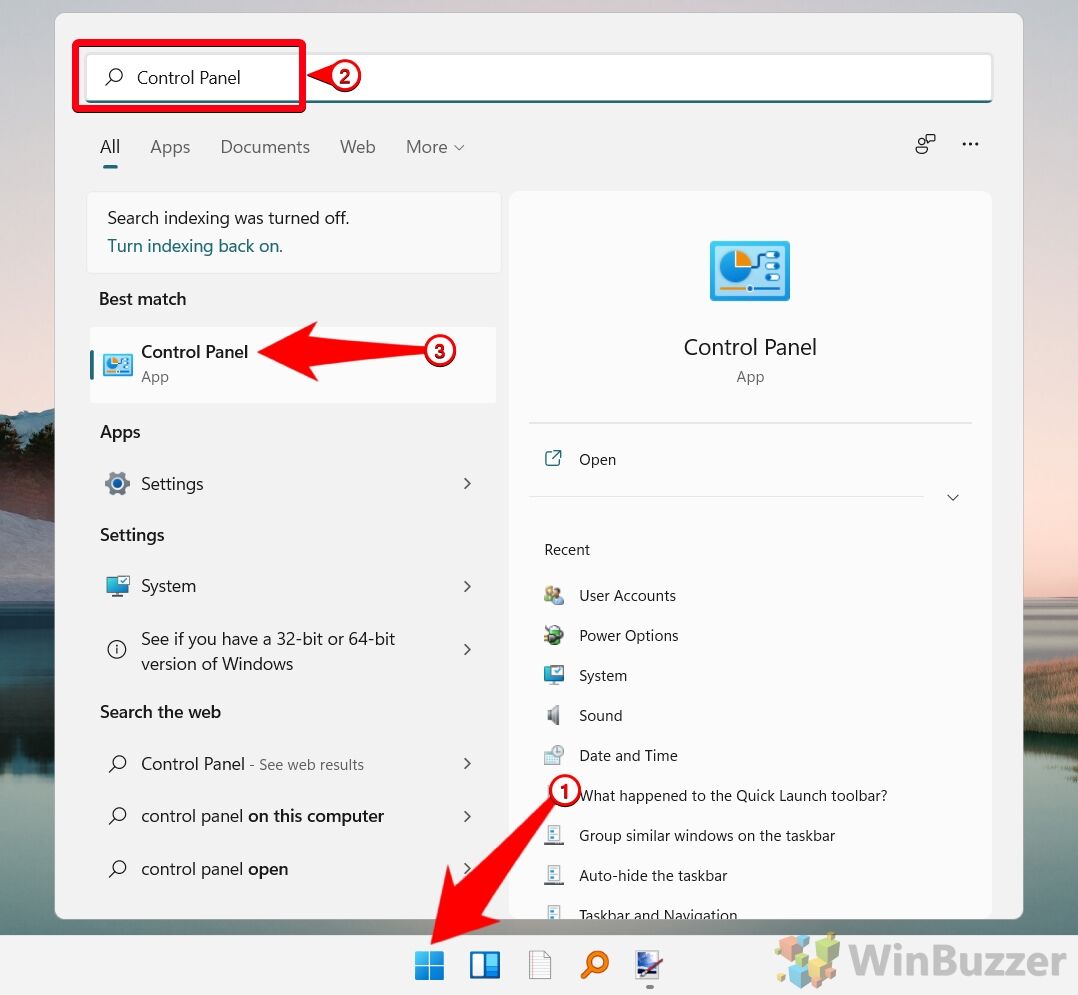
Open Control PanelPress
Windowsto open search, typeControl Paneland press Enter.
-
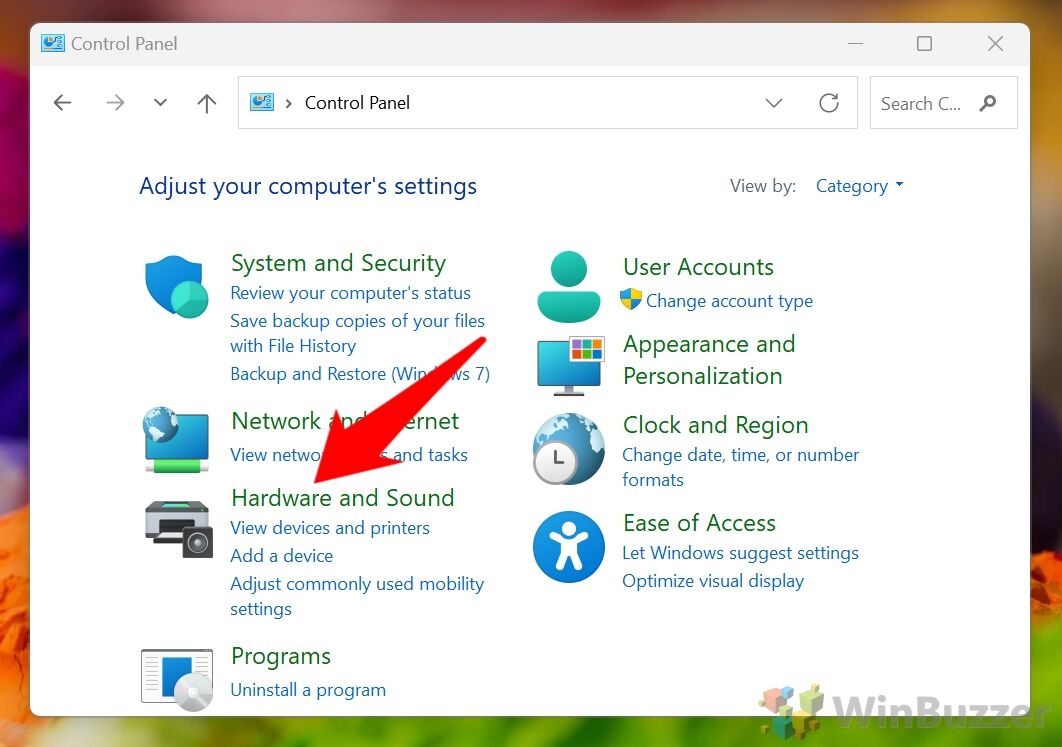
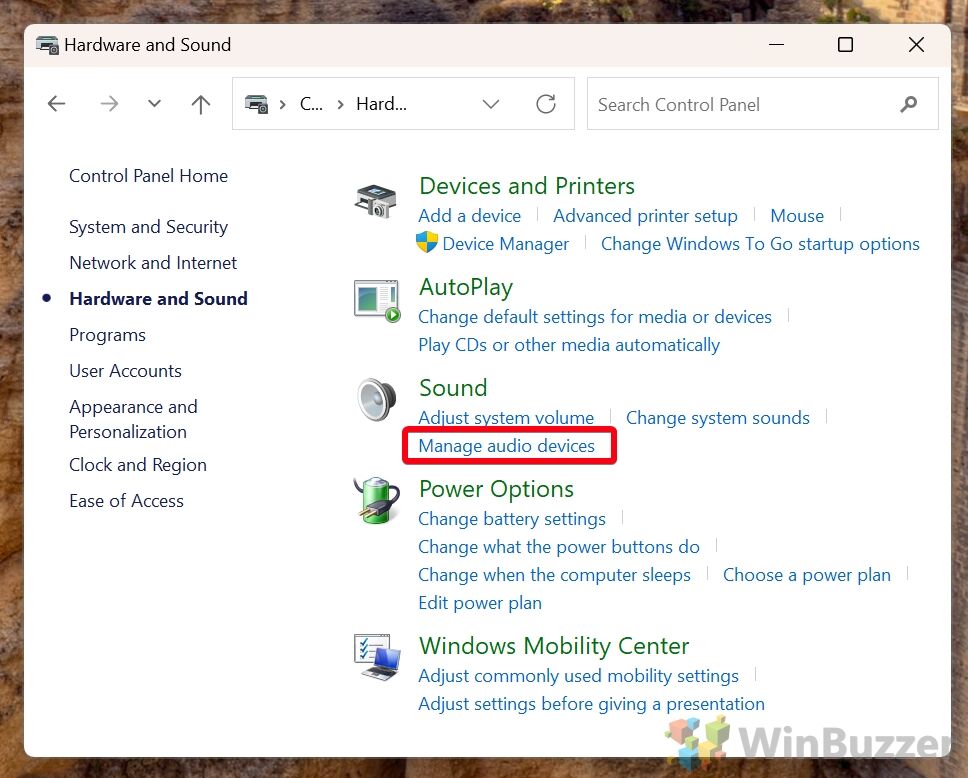
Open “Hardware and Sound”

-
Select “Manage audio devices”

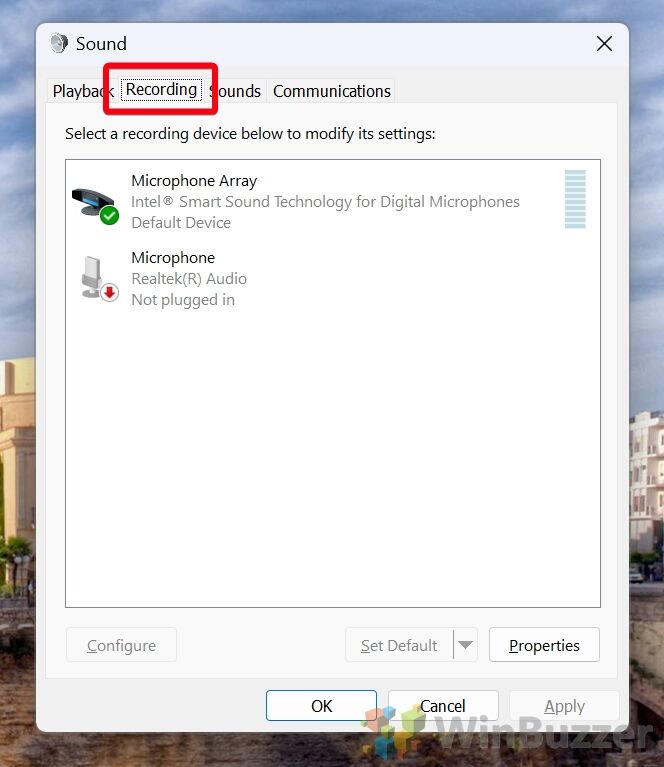
- Switch to “Recording”

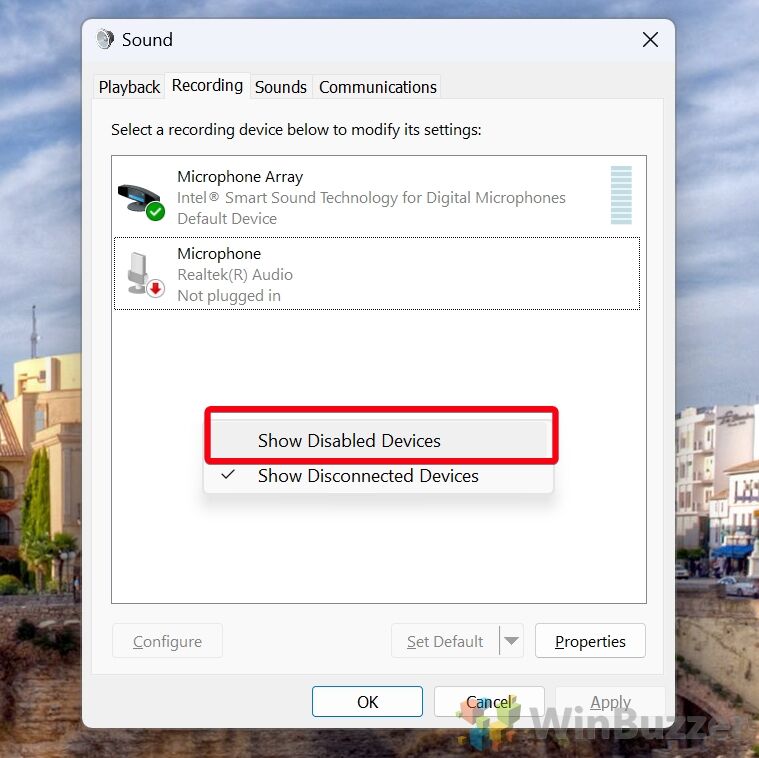
- Right-click into the white space and select “Show Disabled Devices”

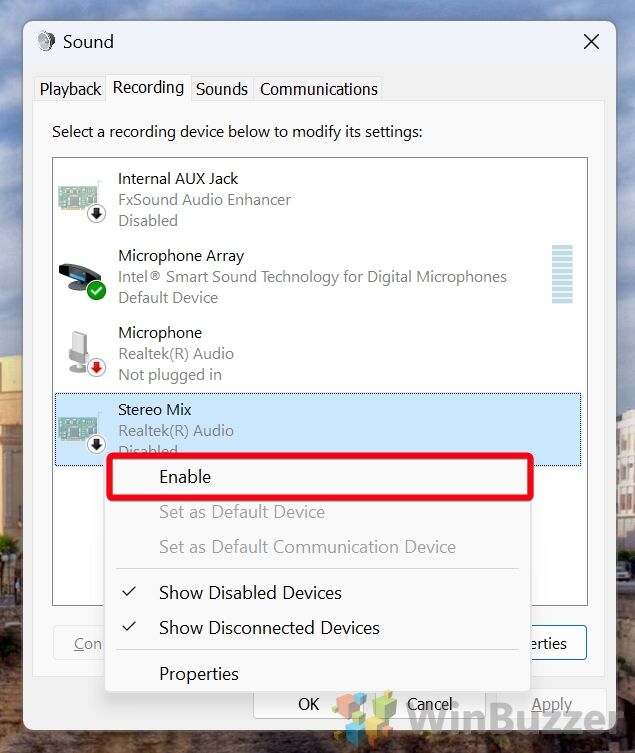
- Enable Stereo Mix via right-click

- Optional: Open Stereo Mix PropertiesThere you can set Stereo Mix as the “default sound device“, choose the “format/quality” via bitrate and mono instead of stereo if needed (1 channel), adjust the “Stereo Mix input volume” and enable or disable the available “Audio enhancements” available for your audio chipset.

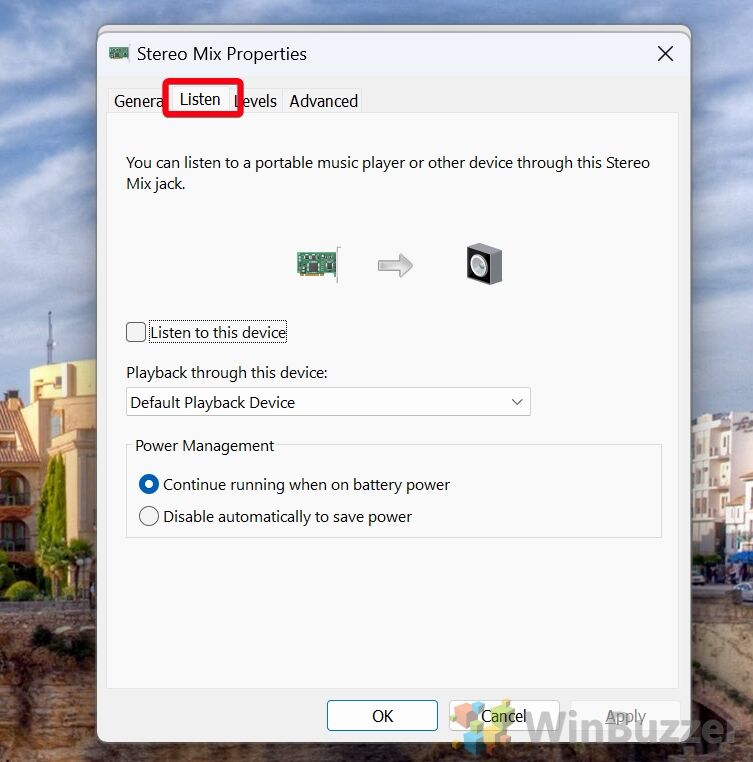
- Enable “Listen to this device” for Stereo Mix if desiredSelecting “Listen to this device” for Stereo Mix in the sound settings allows you to hear the audio that is being channeled through the Stereo Mix in real-time. Essentially, it routes the audio being played on your system (which Stereo Mix is set to capture) directly to your speakers or headphones, enabling you to monitor exactly what Stereo Mix is recording.

- Adjust Stereo Mix volume in “Levels”

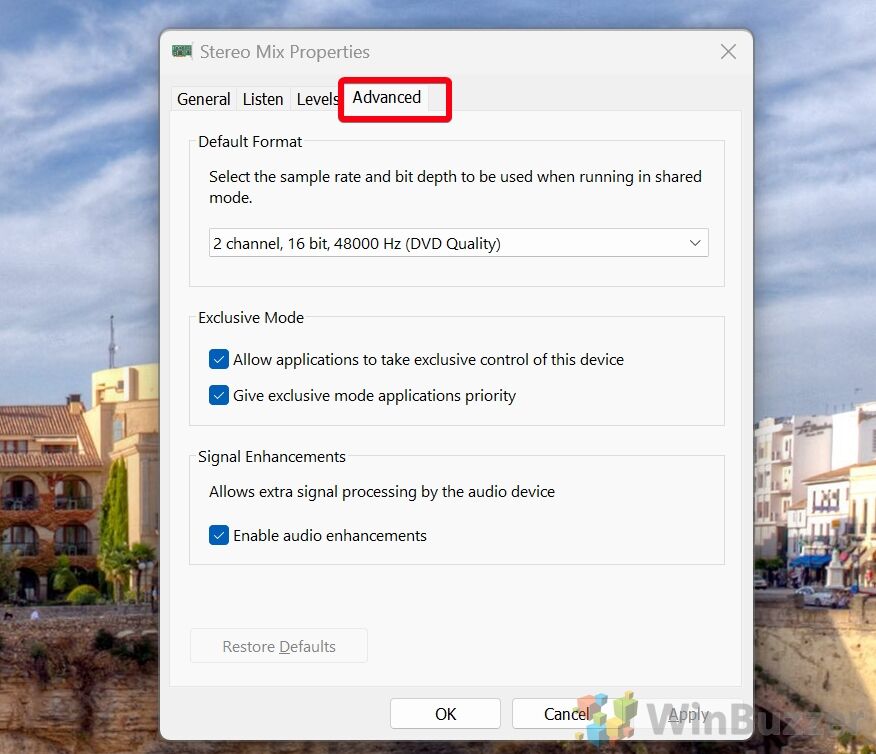
- Choose other audio device settings in “Advanced”In addition to what you can choose in Windows Settings, Control Panel allows to enable “Exclusive Mode” for Stereo Mix:
Allow applications to take exclusive control of this device: When this option is enabled, applications can request exclusive access to Stereo Mix. This means an application can take over the device and change its settings (like format and levels) without considering other applications’ needs. This can be useful for recording or streaming software that requires specific audio settings to function correctly. However, it might also lead to conflicts if multiple applications try to access the device simultaneously or if you want to use the device for more than one application at a time.
Give exclusive mode applications priority: This option works in conjunction with the first one. When both are enabled, applications that request exclusive control while another application is using Stereo Mix in shared mode can force the current application to release control. This ensures that high-priority applications (like professional recording software) can always access the device with the settings they need, even if another application is already using it.


B) Enabling Stereo Mix
-
Go to the Recording Tab: In the Sound dialog, switch to the “Recording” tab to see a list of available recording devices.
-
Reveal Hidden Devices: Right-click in an empty area within the tab and select “Show Disabled Devices”. This action should make the Stereo Mix option visible if it was hidden.
-
Enable Stereo Mix: Find “Stereo Mix” in the list, right-click on it, and choose “Enable”. You might also want to set it as the default device by right-clicking on it again and selecting “Set as Default Device”.
How to Record Windows System Audio using Stereo Mix in Audio Apps like Audacity
With Stereo Mix enabled on your Windows 10 or Windows 11 system, you can capture system audio directly through Audacity, a widely-used, free audio recording and editing software, or any other audio recording app. Here, we use Audacity as an example, but you can use this method in other recording software with slight variations.
Setting “Stereo Mix” as the Input Device in Audacity
-
Open Audacity
Launch Audacity. If it’s not installed, download it from the official website. Ensure you have the latest version for optimal compatibility with Windows 10 or Windows 11. -
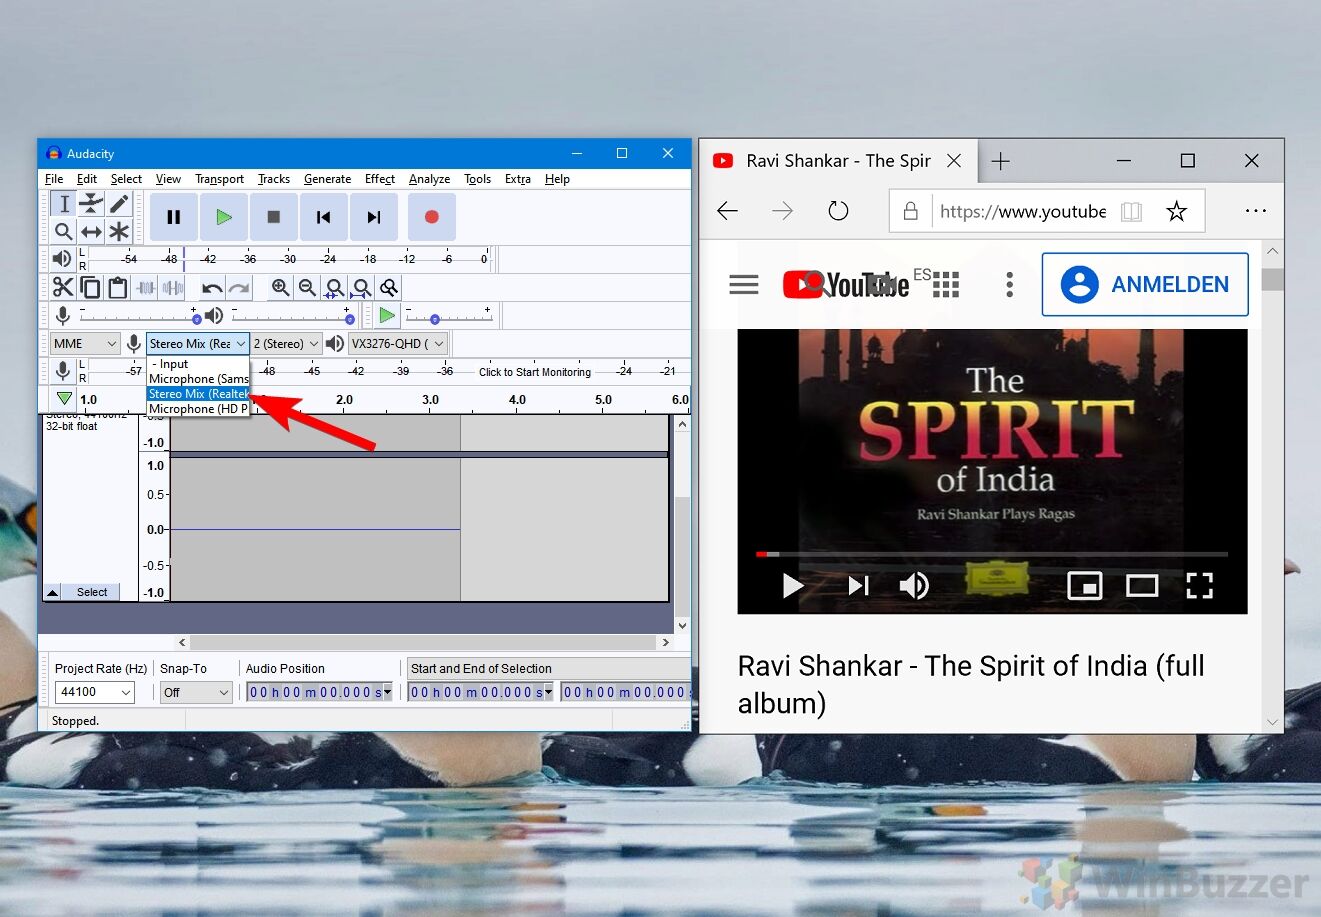
Select Stereo Mix
Find the microphone icon in the upper toolbar of Audacity. Click the dropdown menu next to it and choose “Stereo Mix” from the list. This action directs Audacity to use your system’s audio output as the recording source, instead of an external microphone.
-
Adjust Recording Levels
Play the audio you wish to record and observe Audacity’s level meters. Use the recording level slider, located next to the microphone icon, to adjust the input volume. Aim for a level that avoids distortion but is loud enough to capture clearly. -
Start Recording
Press the red “Record” button in Audacity to begin recording the audio playing on your system. Everything you hear through your speakers or headphones will be recorded. -
Stop and Save
Click the yellow “Stop” button when you’re done. Audacity allows you to edit the audio if necessary. To save your work, navigate to “File” > “Export” and select your preferred audio format.
Additional Tips for Using Stereo Mix with Other Recording Software
- The process of selecting “Stereo Mix” as the recording source should be similar in most audio recording applications. Look for an option to choose the input device or source and select “Stereo Mix” from there.
- If “Stereo Mix” does not appear as an option in your recording software, revisit your sound settings to ensure it’s enabled and set as the default device.
- Regularly update your recording software to maintain compatibility with your operating system and to access the latest features and fixes.
FAQ – Frequently Asked Questions about Stereo Mix
Can I use Stereo Mix to record online meetings or webinars?
Yes, you can use Stereo Mix to record the audio from online meetings or webinars. Ensure Stereo Mix is enabled and set as the default recording device, then use recording software to capture the audio.
Why can’t I find Stereo Mix on my Windows PC?
If Stereo Mix is not visible, it might be disabled or hidden, Enable it using one of the methods for Windows 11 or Windows 10.
How can I improve the audio quality of my Stereo Mix recordings?
To improve audio quality, ensure Stereo Mix is set to the highest quality format in its properties. Also, adjust the recording levels to avoid distortion and ensure your system’s sound settings are optimized for high-quality playback.
Is it possible to record only specific applications with Stereo Mix?
Stereo Mix grabs/records all system audio, so it’s not possible to isolate a specific application directly. However, you can close or mute other applications in Windows “Volume Mixer” to record only the desired one, or use software that supports application-specific audio recording.
How do I prevent echo or feedback when using Stereo Mix?
To prevent echo or feedback, especially when “Listen to this device” is enabled, use headphones instead of speakers. Also, adjust the Stereo Mix and speaker volumes to minimize feedback loops.
Can Stereo Mix capture audio from streaming services without quality loss?
Stereo Mix can record audio from streaming services, capturing what is played through your system. However, the recording quality can be affected by the original stream’s quality, your system’s audio settings, and the recording format you choose.
How to troubleshoot Stereo Mix if it’s not working?
If Stereo Mix isn’t working, check if it’s enabled and set as the default device. Ensure your audio drivers are up to date. If issues persist, try disabling exclusive mode in the device properties or check for conflicts with other audio software.
Can I use Stereo Mix to record audio on a virtual machine?
Recording audio with Stereo Mix on a virtual machine depends on the VM software’s ability to emulate or pass through the host’s audio devices. Check your VM settings for audio configuration options.
How to balance audio levels when recording with Stereo Mix?
Adjust the volume of your playback devices and the Stereo Mix recording level to balance audio levels. Use the recording software’s level meters as a guide to avoid clipping and ensure clear audio capture.
Is there a way to automate recordings with Stereo Mix?
Automating recordings with Stereo Mix would require third-party scheduling software that can start and stop your recording software at predetermined times, as Stereo Mix itself does not have scheduling features.
Can Stereo Mix be used with Bluetooth headphones?
Yes, Stereo Mix can work with Bluetooth headphones. Ensure your headphones are set as the default playback device, and Stereo Mix is the default recording device. Be aware of potential latency or quality issues with Bluetooth connections.
How do I edit audio recorded with Stereo Mix?
Use audio editing software like Audacity to edit Stereo Mix recordings. You can trim, normalize, apply effects, and adjust levels post-recording to enhance the audio.
Why is my Stereo Mix recording very quiet or silent?
If recordings are quiet or silent, check the Stereo Mix levels in Sound settings and increase if necessary. Also, ensure the audio you’re trying to record is playing at an adequate volume and that no mute settings are enabled.
Can Stereo Mix record system sounds even when using headphones?
Yes, Stereo Mix can record all system audio, including sounds played through headphones, as it captures the audio stream before it reaches the output device.
How to exclude microphone noise when recording with Stereo Mix?
To exclude microphone noise, ensure the microphone is muted or not set as the default recording device when using Stereo Mix. Use noise reduction features in your recording software to clean up the audio post-recording.
Last Updated on November 7, 2024 10:48 pm CET
,
If you want to use Stereo Mix in Windows 10/11 and Stereo Mix is not working or not showing as a recording device, then continue reading below. Stereo Mix is a feature on Windows 11/10 that allows you to record your computer’s output streams such as a broadcast radio, speaker output, live streaming audio, or system sounds.Stereo Mix is disabled by default in both Windows 10 and Windows 11 and in this tutorial I will show you how to enable it and how to troubleshoot problems with Stereo Mix.
Quick steps to Show/Enable Stereo Mix in Windows 10/11:
- Navigate to Control Panel > Sound
- At Recording tab, right-click at recording devices list and select Show Disabled Devices.
- Right-click on Stereo Mix and select Enable.
How to Install and Enable Stereo Mix in Windows 10/11.
- Unhide and Activate Stereo Mix.
- Install Stereo Mix driver.
- Troubleshoot Stereo Mix problems.
- Audacity.
Method 1. Enable Stereo Mix in Recording devices in Windows 10/11 Sound options.
As I said at the beginning of this article, Stereo Mix is disabled (hidden) by default and does not appear on Windows 10/11 recording devices. To activate Stereo on your device, follow the instructions below:
1. Press Windows + R keys simultaneously on your keyboard to open a Run dialog box.
2. Inside the text field of the dialog box, type mmsys.cpl and click OK to open the Sound utility.

3a. In the Sound dialog, head over to the Recording tab and then right-click anywhere below.
3b. Select Show Disabled Devices from the context menu to unhide the Stereo Mix device.
3c. Then, right-click on Stereo Mix and select Enable. When done, click Apply and then OK to save the changes. *
* Note: If you cannot see the Stereo Mix after the hidden devices are displayed, skip to method-2 below.

4. When done, open your recording program set Stereo Mix as the default recording source device and start recording.
Method 2. Install Stereo Mix using Realtek Audio drivers.
1. Head over to the Realtek website.
2. In the Realtek’s website, scroll down and locate a driver according to your Windows version and system type (32-bit or 64-bit). Then hit the download icon to download the Realtek Sound Driver/Codecs.*
* Note: For Windows 11 download the Windows 10 drivers.

3. Accept he the terms and click Download this file.

4. Type the letters shown in the Captcha window and hit Go to start the download.
5. One the file is downloaded, double-click on it and follow the onscreen instructions to install the Realtek drivers.

6. After drivers installation, restart your PC.
7. Navigate again in Sound options in Control panel and normally you should see the Stereo Mix at recording devices. If not, right-click anywhere and select (click) Show Disabled Devices from the context menu and then Enable Stereo Mix. *
* Note: If you cannot see the Stereo Mix after the hidden devices are displayed, skip to method-3 below to troubleshoot the problem.

8. When done, open your recording program set Stereo Mix as the default input device and start recording.
Method 3. Troubleshoot Stereo Mix device.
If after following the above methods your still cannot record from Stereo Mix (Stereo Not working), follow the next steps below:
Step 1. Enable Microphone Access.
If you are a Windows 10 user, follow the steps below. Click here for Windows 11 instructions.
1. Press Windows + I keys simultaneously to open Windows Settings.
2. Inside the Settings window, click on Privacy.

3a. Now, select Microphone from the left panel and click the Change button under Allow access to the microphone on this device.

3b. Turn the toggle to On.

4. Now scroll down in the same window and turn the toggle to On for Allow desktop apps to access your microphone.

5. Now open your recording program set Stereo Mix as the default recording source and start recording. If the problem persists continue to step-2.
Enable Microphone Access in Windows 11.
1. Type Microphone Privacy settings in the search box of your taskbar and click Open.

2. Turn the toggle for Microphone access to On.

Step 2. Update Audio Drivers
The final step to troubleshoot Stereo Mix issues is to Update the Audio driver. To do that:
1. Press Windows + R keys to load the Run dialog box.
2. Type devmgmt.msc and press Enter to open the device manager.
3a. in the Device Manager window, expand the Sound, video and game controllers option.
3b. Right-click on your audio device and select Update driver from the context menu.

3c. In the next dialog box, click Automatically search for drivers and let Windows find and install the latest drivers for your audio device. If Windows can’t find an updated driver, check your computer manufacturer’s support site to see if there is a new driver available.

Method 4. Record Audio with Audacity.
If you have tried the above methods and nothing works, keep in mind that not all sound cards support Stereo Mix. In such a case, you can use Audacity, which is a free third-party software designed for recording audio.
1. Download and install Audacity:
2. Open Audacity and go to Edit > Preferences.
3. In the Preferences window, select the Audio Settings tab and adjust the following:
- At Interface Host, choose Windows WASAPI
- At Playback Device, choose Speakers
- At Recording Device, choose Speakers (loopback)
4. Click OK to apply the changes.

6. Now start playing any audio file on your computer and then click the Record button in Audacity program to start recording the audio playing on your computer.
That’s it! Which method worked for you?
Let me know if this guide has helped you by leaving your comment about your experience. Please like and share this guide to help others.
If this article was useful for you, please consider supporting us by making a donation. Even $1 can a make a huge difference for us in our effort to continue to help others while keeping this site free:
- Author
- Recent Posts
Konstantinos is the founder and administrator of Wintips.org. Since 1995 he works and provides IT support as a computer and network expert to individuals and large companies. He is specialized in solving problems related to Windows or other Microsoft products (Windows Server, Office, Microsoft 365, etc.).
(Many of the links in this article redirect to a specific reviewed product. Your purchase of these products through affiliate links helps to generate commission for AudioLover.com, at no extra cost. Learn more)
Table of Contents
- Introduction
- Requirements
- Method 1: Enabling Stereo Mix through Sound Settings
- Method 2: Enabling Stereo Mix through Device Manager
- Method 3: Enabling Stereo Mix through Third-Party Software
- Troubleshooting Common Issues
- Conclusion
Introduction
Welcome to the world of stereo sound! Whether you are a music enthusiast, a content creator, or an avid gamer, having access to the Stereo Mix feature on your Windows 11 device can greatly enhance your audio experience. Stereo Mix allows you to capture and record all the sounds playing on your computer, not just from your microphone or external sources. This means that you can easily record streaming music, record audio from games, or even capture audio from online videos.
Unfortunately, the Stereo Mix feature is not readily available on Windows 11, unlike its predecessors. However, fear not! In this article, we will explore different methods to enable Stereo Mix on your Windows 11 machine, giving you the power to capture and record audio like a pro.
Before we dive into the methods, let’s take a moment to understand the requirements for enabling Stereo Mix. Firstly, you will need a Windows 11 device with appropriate sound drivers installed. Secondly, make sure you have administrative privileges on your computer, as some of the methods require making changes in system settings. Once you meet these requirements, you are ready to proceed.
Now, let’s explore the three different methods you can use to enable Stereo Mix on Windows 11.
Requirements
Enabling the Stereo Mix feature on Windows 11 requires a few basic requirements. Before proceeding, ensure that you meet the following criteria:
- A Windows 11 device: Make sure you are using a computer or laptop running the Windows 11 operating system. While the methods mentioned in this article may work on older versions of Windows, the steps and user interface may vary.
- Administrative Privileges: You will need administrative privileges on your Windows 11 device to make changes to system settings. If you are not the administrator, contact the person who has the necessary access.
- Compatible Sound Drivers: Ensure that your computer has compatible sound drivers installed. Sound drivers play a crucial role in enabling audio features, including Stereo Mix. Check your manufacturer’s website or Windows Update for any available driver updates.
Having these requirements in place will ensure that you have a smooth experience while enabling Stereo Mix on your Windows 11 device. Now that you have met the prerequisites, let’s move on to the methods for enabling Stereo Mix.
Method 1: Enabling Stereo Mix through Sound Settings
The first method to enable Stereo Mix on Windows 11 involves using the Sound Settings. Follow these steps:
- Right-click on the speaker icon in the system tray located at the bottom right corner of your screen.
- Select “Open Sound settings” from the context menu.
- In the Sound settings window, click on the “Sound control panel” link located on the right side of the window.
- The Sound control panel will open. Switch to the “Recording” tab.
- Right-click on an empty area in the list of recording devices and make sure that both “Show Disabled Devices” and “Show Disconnected Devices” options are checked.
- If Stereo Mix is listed but disabled, right-click on it and select “Enable.” If Stereo Mix is not listed, proceed to the next step.
- Right-click on an empty area in the list of recording devices and select “Show Disabled Devices” and “Show Disconnected Devices.” This will ensure that Stereo Mix appears in the list.
- Once Stereo Mix appears in the list, right-click on it and select “Set as Default Device.”
- Click “Apply” and then “OK” to save the changes.
That’s it! You have successfully enabled Stereo Mix through the Sound Settings in Windows 11. You can now use recording software to capture audio from your computer’s sound output.
Note: If you do not see Stereo Mix listed in the recording devices, don’t worry. There are alternative methods to enable it, which we will explore next.
Method 2: Enabling Stereo Mix through Device Manager
If the first method didn’t work for you, don’t worry. Another way to enable Stereo Mix on Windows 11 is through the Device Manager. Follow these steps:
- Right-click on the Start button and select “Device Manager” from the context menu.
- In the Device Manager window, expand the “Audio inputs and outputs” category.
- Locate the audio device that you are using, which is usually labeled as “Microphone” or “Line In.”
- Right-click on the audio device and select “Properties.”
- Switch to the “Driver” tab and click on the “Update Driver” button.
- In the next window, select “Browse my computer for drivers” and then “Let me pick from a list of available drivers on my computer.”
- A list of compatible drivers will appear. Look for “High Definition Audio Device” and select it.
- Click “Next” to begin the driver installation. Follow any on-screen instructions that may appear.
- Once the driver installation is complete, close the Device Manager.
- Repeat the steps mentioned in Method 1 to access the Sound Settings and navigate to the Recording tab.
- Now, check if Stereo Mix is listed. If it is, right-click on it and select “Set as Default Device.”
- Click “Apply” and then “OK” to save the changes.
Congratulations! You have successfully enabled Stereo Mix through the Device Manager. Now, you can use recording software to capture audio from your computer’s sound output.
If Method 2 didn’t work either, there is still one more method you can try – enabling Stereo Mix through third-party software. We will explore this method next.
Method 3: Enabling Stereo Mix through Third-Party Software
If the previous methods didn’t enable Stereo Mix on your Windows 11 device, you can try using third-party software to achieve the desired result. There are several applications available that offer virtual audio drivers, which can help you capture audio from your computer’s sound output. One popular example is VB-Audio Virtual Cable.
Follow these steps to enable Stereo Mix through third-party software:
- Download and install the virtual audio driver software on your Windows 11 device. In this case, we will use VB-Audio Virtual Cable as an example.
- Once installed, launch the virtual audio driver software.
- Select the virtual audio cable as the default recording device in the Windows Sound Settings.
- In your recording software, select the virtual audio cable as the recording device.
- Ensure that your playback software, such as media players or web browsers, are configured to use the virtual audio cable as their default audio output device.
- Start your recording software and test if Stereo Mix is capturing the audio from your computer’s sound output.
By using third-party software, you can bypass any limitations or compatibility issues that might have hindered the previous methods. These applications provide additional features and customization options, allowing you to have more control over the audio recording process.
Remember to configure your recording software, playback software, and system settings accordingly to achieve the best results with third-party software.
With the help of third-party software, you can now enjoy the benefits of the Stereo Mix feature on your Windows 11 machine.
Troubleshooting Common Issues
While enabling Stereo Mix on Windows 11 is a straightforward process, you may encounter some common issues along the way. Here are a few troubleshooting tips to help you overcome these challenges:
- Stereo Mix not appearing: If Stereo Mix does not appear in the list of recording devices, make sure that you have checked the “Show Disabled Devices” and “Show Disconnected Devices” options. If it still doesn’t appear, try updating your audio drivers or using third-party software.
- No sound being captured: If you have enabled Stereo Mix but are not capturing any sound, check if the recording device is set as the default device. Additionally, ensure that the volume level is not muted or too low.
- Compatibility issues: Certain sound drivers may not be fully compatible with Windows 11, resulting in issues with Stereo Mix. If you are experiencing compatibility problems, try updating your drivers or using alternative drivers such as “High Definition Audio Device.”
- Virtual audio driver conflicts: If you are using third-party software to enable Stereo Mix and experience conflicts with other audio drivers or applications, try disabling or uninstalling any conflicting software. Rebooting your system may also help resolve such conflicts.
- Audio quality or latency issues: Some virtual audio driver software may introduce latency or affect audio quality. Experiment with different settings or try using alternative virtual audio driver software to mitigate these issues.
If you encounter any other issues while enabling Stereo Mix, it is recommended to consult the documentation or support resources provided by the software or hardware manufacturer. They may have specific troubleshooting steps or solutions tailored to their products.
Remember that troubleshooting can vary depending on your specific system configuration and software setup. It’s always a good idea to research and explore forums or online communities where you can find guidance from other users who have encountered similar issues.
By following these troubleshooting tips, you’ll be able to overcome common challenges and enjoy the benefits of the Stereo Mix feature on your Windows 11 device.
Conclusion
Enabling the Stereo Mix feature on your Windows 11 device can greatly expand your audio recording capabilities. Whether you want to capture streaming music, record audio from games, or create content with synchronized audio, having access to Stereo Mix is invaluable.
In this article, we explored three different methods to enable Stereo Mix on Windows 11. Through the Sound Settings, Device Manager, or third-party software, you can find a solution that suits your needs and system configuration.
Remember to ensure that you meet the basic requirements, such as having a Windows 11 device, administrative privileges, and compatible sound drivers. These prerequisites will set you up for success in enabling Stereo Mix.
If the built-in Sound Settings or Device Manager methods do not work for you, utilizing third-party software can be a viable option. Virtual audio drivers, such as VB-Audio Virtual Cable, provide additional flexibility and customization for audio recording applications.
Lastly, we covered some common troubleshooting tips for issues you may encounter during the process. By following these suggestions, you can overcome hurdles and fully utilize the Stereo Mix feature.
In conclusion, with the right knowledge and tools at your disposal, you can easily enable Stereo Mix on your Windows 11 device. So go ahead, unleash your creativity, and enjoy capturing audio like never before!