
Stellar Data Recovery for Windows
Simple yet Powerful DIY Windows Data Recovery Software
Stellar Data Recovery for Windows (previously known as Stellar Phoenix) help you recovering data from any logical data loss situation e.g. accidental deletion of data, data lost due to virus attack, drive corruption, drive formatting, and more.
File Types and Formats
All Storage Devices Supported
Hard Disk
Supports all major hard drive brands.
PC/Laptop
Compatible with all PC and laptop brands.
SSD Compatible with leading SSD brands.
External Drive Works seamlessly with top external drive brands.
USB Works with all major USB drive brands.
SD Card Compatible with all major memory card brands.
Powerful Comprehensive Solution
Windows Data Recovery from All Data Loss Scenarios
Recovers Lost or Deleted Data
Stellar Data Recovery for Windows recovers data for all data loss scenarios. Be it an accidental deletion, drive formatting with no backup, drive corruption, disk errors, system errors, and more, this DIY data recovery software has got your back. You can even recover shift-deleted files from emptied recycle bins with this software.
Encrypted Drive Recovery
Reclaim your data from encrypted drives with this file recovery software. The software supports recovery from ‘BitLocker’ encrypted hard drives such as HDDs, SSDs, or other storage media drives. You can even perform data recovery from a BitLocker encrypted disk image. You need to enter the BitLocker password to recover deleted files.
RAW Drive Data Recovery
Recover data from severely corrupted RAW physical or removable storage drives with this Windows data recovery tool. Whether your system’s drive (physical) or an external storage drive has turned RAW or is inaccessible, the software competently scans the drive to locate the lost or deleted drive volumes and recover each bit of its data.
Recovers Data from Corrupt Drives
The software recovers data from corrupt hard drives and formatted partitions. It conducts an in-depth scan of the sectors of your corrupt hard drive or formatted partitions and digs out any data lying there. Even if Windows is unable to access the data, Stellar Data Recovery comprehensively scans your drive with its Deep Scan feature and recovers it securely.
SUCCESS STORIES
Customers Testimonials
Enhanced Features of Windows File Recovery
Add More Power
Unlimited File-Type Support
The software restores all file types and formats. It offers an ‘Add File-Type’ feature that allows the recovery of even files with unique extensions. Thus, enabling unlimited file-type recovery. You just need to select the RAW drive to restore your files.
Preview & Recover Your Priceless Memories
Get a real picture of your recoverable files with the ‘Preview File’ feature of this powerful Windows recovery software. The software recovers data in its original quality and format. You can preview the files before recovering them. Additionally, the software allows a full-screen mode option for recoverable video files.
Dual Scanning Mode for Recovery
With this powerful file recovery software, you get two scanning modes – Quick Scan and Deep Scan. Where Quick scan helps you recover data in all common data loss scenarios like deletion, formatting, etc. The deep scan helps you restore data in complex scenarios such as logical drive failure, RAW drives, BSoD errors, lost partitions, and more.
File Sorting for Easy Recovery
Stellar Data Recovery for Windows provides you with the facility to sort out the files to perform quick and easy file recovery. The software provides three different layouts «File Type», «Tree View» and «Deleted List,» that contain neat, well-sorted scan results. You can identify and select files to recover and save them in your chosen location.
Recovers Data from 4K Hard Drives
Stellar Data Recovery software recovers data from the modern 4K hard drives that store the files on large-sized sectors. The tool can easily scan and get back your data from storage sectors of 4096 bytes, maximizing the data recovery results across all types of hard drives. It performs effective recovery from all types of advanced 4K drives formatted with FAT32, ExFAT, or NTFS file systems.
Data Recovery on Dual Monitors
Stellar data recovery tool comes with dual monitor support, offering you the comfort to work on two screens simultaneously without the need to minimize or toggle. Dual monitor support facilitates a more precise and effortless recovery experience while you tackle multiple tasks.
Software Walkthrough
Screenshots & Video
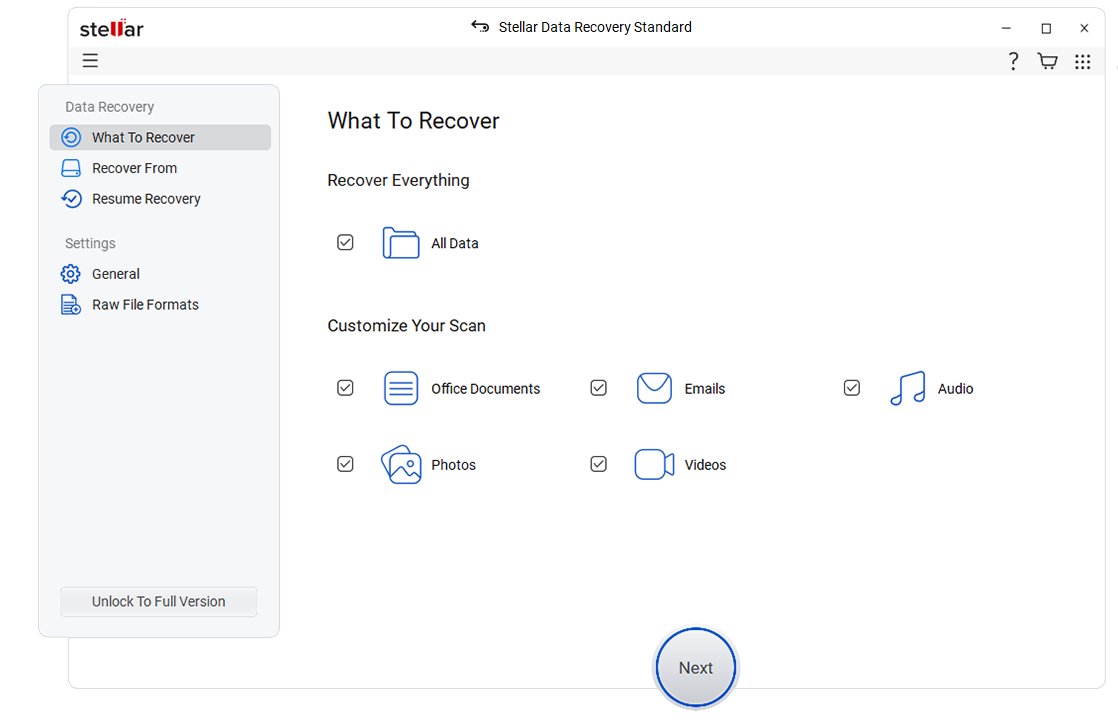
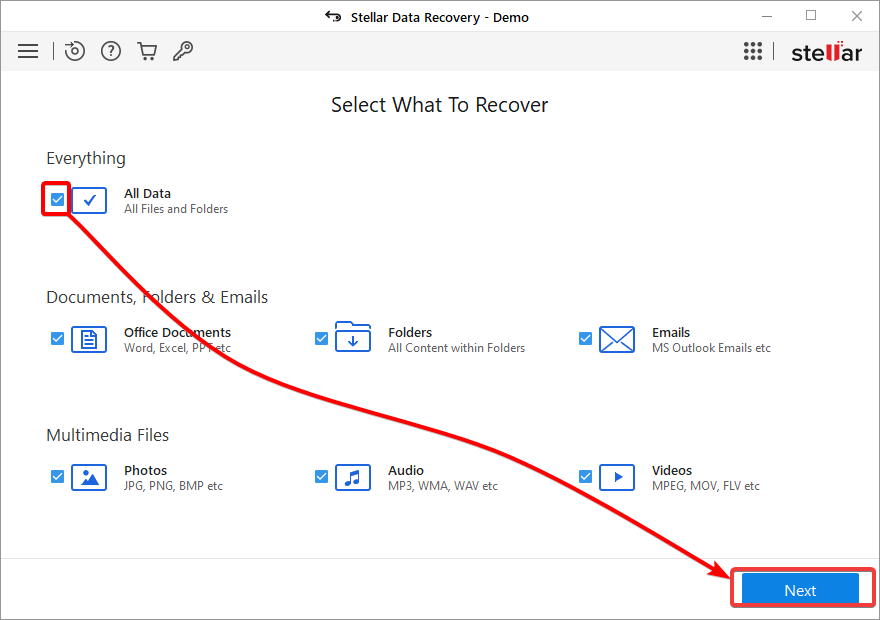
Select the type of data that you want to recover and click ‘Next.’
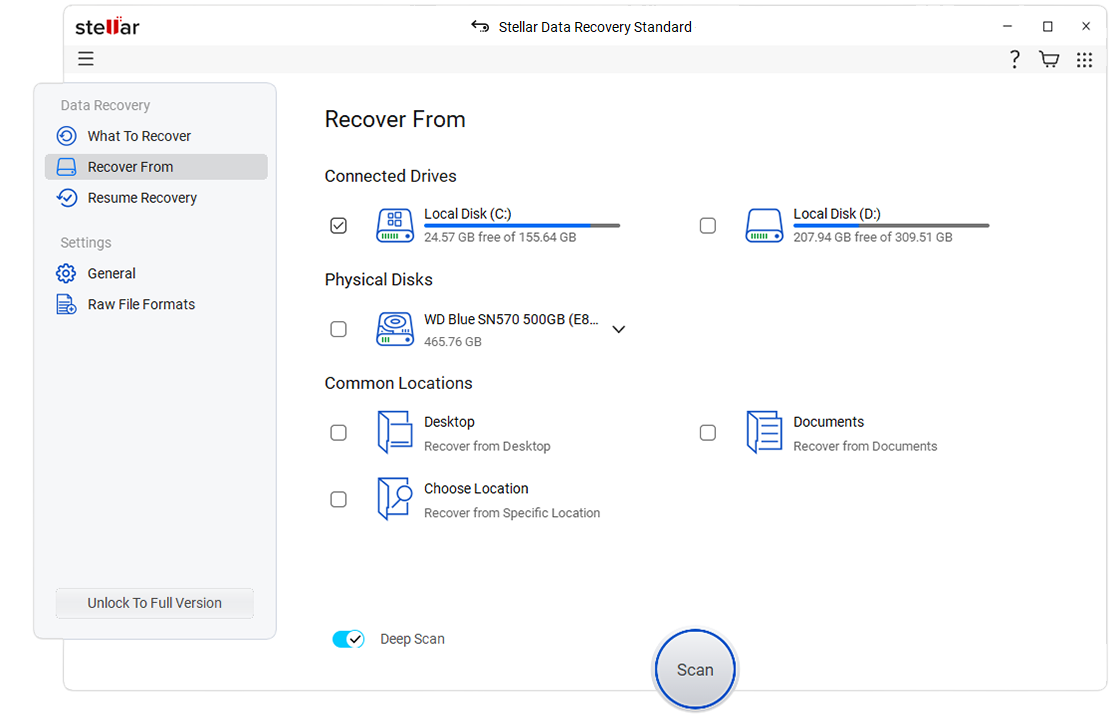
Select the folder location or drive volume and click ‘Scan.’
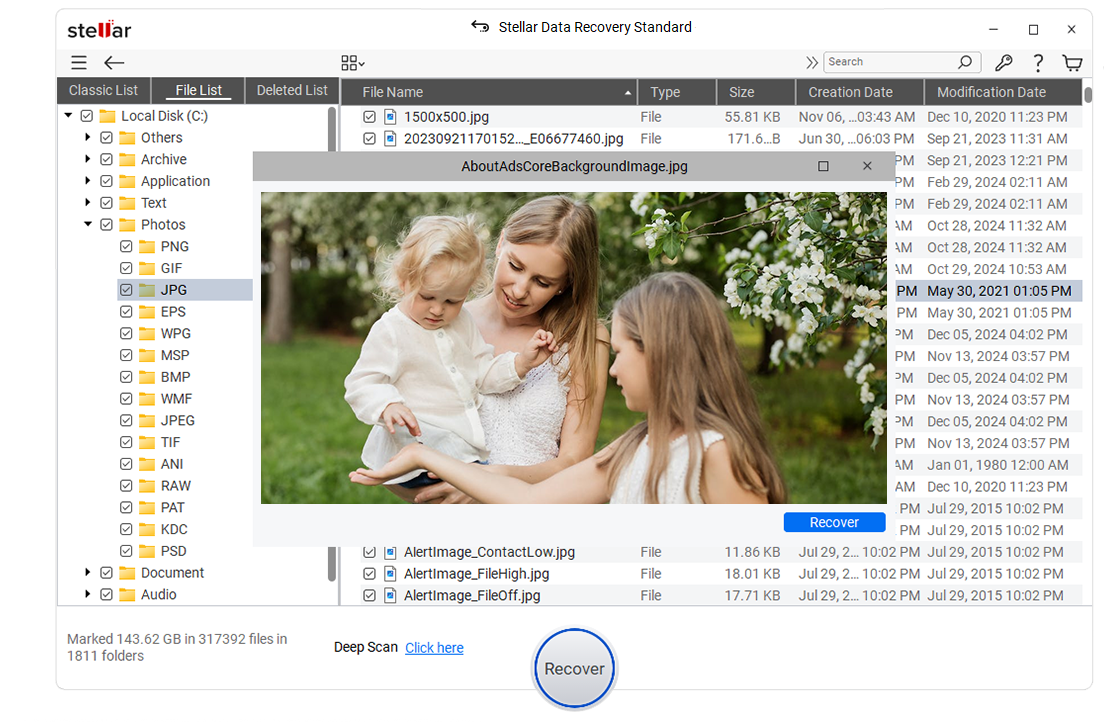
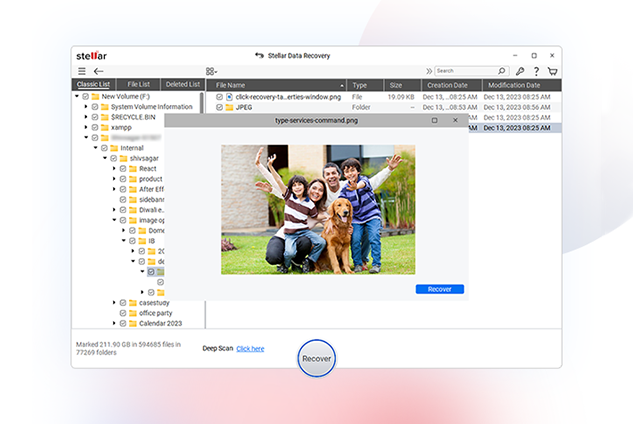
Select files after the scan and click ‘Recover’ to save recovered data.
WATCH NOW
Your browser does not support the video tag.
PRICING
Making Your Choice Easy
Standard
Recovers unlimited data
- Recovers Deleted Photos, Videos, and other Critical Files
- Recovers from Formatted Systems
- Recovers from Any Storage Media
- Recovers Data from Encrypted Drive
Read More
Best Seller
Professional
Recovers data from lost partitions and unbootable hard disk drives. In addition, offers Drive Monitor to track hard drive health
- Includes all features of Standard
- Recovers Files from Lost Partitions
- Supports Unbootable System Recovery
- Data Recovery from CD/DVD
Read More
Premium
World’s first Windows data recovery software with photo & video repair features.
- Includes all features of Professional
- Repairs Corrupt or Distorted Videos
- Repairs Corrupt or Distorted Photos
- Repairs Multiple Corrupt Photos & Videos in a Single Click
Read More
CUSTOMER REVIEWS
You’re in Good Hands
AWARDS & REVIEWS
Most tested. Most awarded. For over 30 years, we’ve been recognized as experts
Stellar Data Recovery is one of the best data recovery tools we’ve used, with highly customizable searches, a huge file-type library, and deep scan abilities.
See Techradar Review
Stellar Data Recovery’s strongest point, after its data recovery and repair capabilities of course, is its simplicity.
See Windows Report Review
Stellar Data Recovery Premium for Windows is the best place to start for your data recovery mission. It’s the only software in the world that has the ability to recover your data as well as repair your video and image files.
See XDA — Developers Review
Stellar Data Recovery is the best data recovery software for businesses that need to recover large amounts of data. It offers a wide range of features, including the ability to recover data from SSDs, and it has a very high success rate.
See Forbes Review
DATA SHEET
Technical Specifications
About Product
Stellar Data Recovery
| Version: | 12.1.0.4 |
| License: | Single System |
| Edition: | Standard, Professional, Premium, Technician, Toolkit |
| Language Supported: | English, Deutsch, Français, Português Brasileiro, Dutch, Italiano, Español, 日本語 , 한국어, हिंदी, 中国人 |
| Release Date: | April, 2025 |
| Processor: | Intel compatible (x64-based processor) |
| Memory: | 4 GB minimum (8 GB recommended) |
| Hard Disk: | 250 MB for installation files |
| Operating System: (64 Bit only) |
Windows 11, 10, 8.1, 8 and Windows Server 2022, 2019, 2016 |
TRY BEFORE YOU BUY
Free Trial Download
- It’s Easy as 1-2-3
- No Registration Required
- 100% Safe & Secure to Use
- Scan & Preview Your Data Now
*Free download to scan and preview your lost or deleted data.
USEFUL ARTICLES
Product Related Articles
Stellar Data Recovery Standard is a powerful DIY Windows recovery software that can recover data from all kinds of Windows devices and storage media—including drive that hasn’t been used for 3 years or more.
If you have formatted your drive and then installed Windows, it seems that you have lost all your volumes. You can recover all your lost volumes using Stellar Data Recovery.
You need to follow the mentioned steps to recover the data from lost or inaccessible partitions, however before that you need to upgrade to Professional or Premium version.
FIND YOUR ANSWERS
FAQ
How can I recover deleted data from windows?
You can recover your deleted data from Windows by following mentioned steps:
- Download Stellar Data Recovery software.
- Now Install the software and run it on your system.
- Select the type of data you want to recover under ‘Select What to Recover’ option.
- Choose the desired location from ‘Recover From’ to retrieve the deleted data.
- Click the scan option and it results in the list of files which are shown under ‘File Type,’ ‘Tree View’ and ‘Deleted List’.
- Select the files/folders which you want to recover and click on ‘Recover Button’.
- Save the recovered files by choosing a desired location.
Can I recover deleted files from desktop with this software?
Yes, the software recovers deleted data from desktop.
How much time Stellar Data Recovery will take to recover data?
The recovery time depends upon the size of hard disk or volume. If the scan is running that means the software is working and you would require to wait for the scan process to complete. Once the process completes, you can save the recovered files at your desired location.
Can I recover a specific file with the help of this software?
Yes. After scan is complete, right-click the file and choose ‘Recover’.
What is Quick scan and Deep scan?
Quick scan is a faster scanning option, which you can use to recover deleted files in Windows PC and from external drives. Deep scan is a bit slower but results are better than quick scan. Use it when the files are not recovered with Quick scan. Deep scan facilitates file signature-based RAW recovery and recovers data from formatted, corrupt, and severely corrupt storage media.
Does Stellar Data Recovery support exFAT partitions?
Yes, you can safely recover data from any exFAT-based volume or drive by using Stellar Data Recovery. The software also supports FAT (FAT16/FAT32) and NTFS partitions.
Can I recover deleted email files using this software?
Yes, you can recover deleted email data files with the help of Stellar Data Recovery. The software recovers EMLX, PST, MSG, EDB, MBOX, NSF, GWI, EML, DBX, and many more email file types.
Can this undelete software recover just the images from a removable storage device?
Yes, you can choose to specifically recover photos from removable devices such as pen drive, memory card etc. Select ‘Photos’ option from ‘Select What to Recover’ screen to search and recover only images from a removable media.
Does this Windows data recovery software recover data from CD or DVD?
No, Stellar Data Recovery doesn’t recover deleted data or inaccessible files from CD or DVD. You can use Stellar Data Recovery Professional software for recovery from CD/DVD.
What are the different file types that are supported by Stellar Data Recovery?
Stellar Data Recovery is a comprehensive tool that supports hundreds of different file types for recovery. You can easily recover any of the below-mentioned categories of file types using the software:
Documents Files
MDB, ACCDB, PDF, PS, CWK, FM3, FMT, WK1, WK3, WK4, DOC, DOCX, XLS, XLSX, PPT, PPTX, SDW, QXD, QXP, EPS, QBB, QBW, WPD, DOT, WBK, DOCM, DOTX, DOTM, DOCB, XLT, XLM, XLSM, XLTX, XLTM, XLSB, XLA, XLAM, XLL,
XLW, POT, PPS, PPTM, POTX, POTM, PPAM, PPSX, PPSM, SLDX, SLDM, ADE, ADP, MDA, MDN, MDT, MDF, MDE, LDB, AND, ACCDR, ACCDT, ACCDA, MDW, ACCDE, LLACCDB, XPS, ODT, OTT, ODM, ODS, OTS, ODP, OTP, ODB
Emails Files
EMLX, PST, MSG, EDB, MBOX, NSF, GWI, EML, DBX, DCI, VCF
Photos Files
NEF, CRW, CR2, ORF, SR2, SRF, K25, KDC, DCR, RAF, MRW, PEF, X3F, JPEG, JPG, TIFF, TIF, BMP, GIF, PNG, XCF, PAT, ARW, DNG, PSP, PCT, RAW, MOS, PSD, EPS, INDD, ERF, FH3, FH5, FH7, FH8, FH9, FH11, MCD, VWX, MEF, WP, CDR, CPT, VSD, DWG, PGM, PPM, PCX, MNG, MSP, WMF, WPG, EMF, ANI, NRW, TGA, JP2
Audio Files
WAV, AIFF, RPS, MIDI, MID, M4A, AU, OGG, WMA, AAC, RFL, RNS, RA, RM, MP3, M3D, CDA, AU, OGG, WMA, AAC, RFL, SND
Video Files
AVI, WMV, ASF, MP4, MOV, M4V, 3GP, MXF, MKV, MTS, DIVX, OGM, MOI, VOB, MPEG, MPG, AVS, DVM, QT, ANM, SMJPEG, SCR, FLC, CLK, ANI, FLA, SWF, FLV, M4P
Miscellaneous
MHT, MHTML, ASPX, JSP, PHP, DBF, QDG, QSD, ABD, CBK, CAS, CHM, HLP, NBP, QDF, RTF, TAX, TXT
Archive Files
ARJ, CAB, 7Z, LZA, RPM, TAR, BZ2, HQX, RAR, SIT, SITX, ZIP
Does the software work on a system having TPM chip?
Yes. Stellar Data Recovery software efficiently works on a system with TPM chips.
DATA RECOVERY IN-LAB SERVICES
Do you have complex data loss problems?
DATA RECOVERY IN-LAB SERVICES
Do you have complex data loss problems?
WHY STELLAR® IS GLOBAL LEADER
Why Choose Stellar?
-
0M+
Customers
-
0+
Years of Excellence
-
0+
R&D Engineers
-
0+
Countries
-
0+
PARTNERS
-
0+
Awards Received
Technology You Can Trust Data Care Experts Since 1993
И снова про программы для восстановления данных: в этот раз посмотрим, что в этом плане может предложить такой продукт как Stellar Phoenix Windows Data Recovery. Отмечу, что в некоторых иностранных рейтингах такого рода программного обеспечения Stellar Phoenix находится на одной из первых позиций. Кроме этого, на сайте разработчика также имеются другие продукты: NTFS Recovery, Photo Recovery, но рассматриваемая здесь программа включает в себя все перечисленное. См. также: 10 бесплатных программ для восстановления данных
Программа является платной, но перед покупкой можно скачать ее к себе на компьютер, запустить поиск потерянных файлов и данных, посмотреть, что получилось найти (включая предварительный просмотр фотографий и других файлов) и уже после этого принимать решение о покупке. Поддерживаются файловые системы NTFS, FAT и exFAT. Внимание обзор новой версии программы доступен здесь: Восстановление данных в Stellar Data Recovery.
Восстановление данных с отформатированного диска в Stellar Phoenix

Главное окно программы содержит три основные функции восстановления:
- Drive Recovery — поиск всех типов файлов на жестком диске, флешке или другом накопителе. Имеется два типа сканирования — Normal (обычное) и Advanced (продвинутое).
- Photo Recovery — для быстрого поиска удаленных фотографий, в том числе на отформатированной карте памяти, впрочем такой поиск можно выполнить и на жестком диске в случае, если вам требуется восстановить только фотографии — возможно, это ускорит процесс.
- Пункт Click Here to Search Lost Volumes предназначен для поиска потерянных разделов на накопителе — стоит попробовать, если при подключении флешки вы видите сообщение о том, что диск не отформатирован или вдруг файловая система определяется как RAW.
В моем случае я буду использовать Drive Recovery в режиме Advanced (данный режим включает в себя поиск потерянных разделов). На тестовом диске были размещены изображения и документы, которые я удалил, после чего также отформатировал диск из NTFS в FAT32. Посмотрим, что получится.
Все действия просты: выбор диска или раздела в списке подключенных устройств, выбор режима и нажатие кнопки «Scan Now» (сканировать сейчас). И ожидание после этого. Нужно сказать, что для 16 Гб диска сканирование заняло около часа (в режиме Normal — пара минут, но ничего не нашлось).

Впрочем, при использовании режима Advanced программа тоже не смогла ничего найти, что странно, ведь некоторые бесплатные программы для восстановления данных, о которых я писал раньше прекрасно справлялись в точно такой же ситуации.
Восстановление фотографий
С учетом того, что на отформатированном накопителе были, в том числе, фотографии (или, скорее, просто картинки), решил попробовать вариант Photo Recovery — использовалась та же флешка, на которой при предыдущих двух попытках, отнявших у меня час с лишним, восстановить файлы не удалось.

Восстановление фотографий прошло успешно
И что же мы видим, запустив режим восстановления фотографий? — все изображения на месте и их можно просмотреть. Правда, при попытке восстановить, программа просит купить ее.
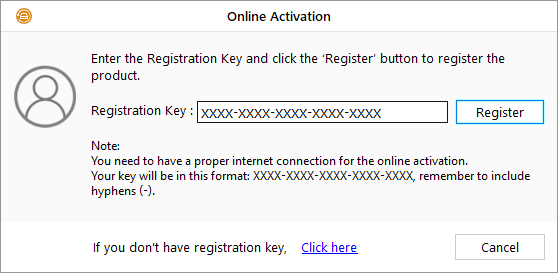
Зарегистрируйте программу, чтобы восстановить файлы
Почем в данном случае удалось найти удаленные файлы (пускай лишь фото), а при «продвинутом» сканировании — нет, мне непонятно. Позже я попробовал еще несколько вариантов восстановления данных с этой же флешки, результат тот же самый — ничего не находится.
Заключение
Не по душе пришелся мне этот продукт: бесплатные программы для восстановления данных (во всяком случае, некоторые из них) справляются лучше, каких-то расширенных функций (работа с образами жестких дисков и USB накопителей, восстановление с RAID, широкий список поддерживаемых файловых систем), которые есть у программного обеспечения со сходной ценой, в Stellar Phoenix Windows Data Recovery тоже нет.
In the History of Internet, the word data has great access to meeting your needs. The computer data has been one of the most valuable sources by which we could have advanced properly. With the availability of the integrated Internet devices, we could send or receive the data at the same time and without any hesitation. However, what will happen if the data is lost some day?

Well, though we all know that the deleted data are present within the device but requires external software to view. With the help of the Stellar Phoenix Windows Data Recovery V7 Review, you can easily recover your lost data and then keep it stored. In other words, the software is effective for anyone to use to save or to store data which is not used simply.
Key Features of Stellar Phoenix Windows Data Recovery V7 Review
There are a lot of features for using the software which might ultimately help you in using the software. You can easily recover the lost files or the folders as well as the documents and the other important files with the help of the software. Here are some of the most exciting key features to use:
Easy to Do:
One of the most exciting features which you might love to use is the simple step recovery option. The software is very user-friendly, and there are no complications for using the software efficiently. You can simply recover the deleted or the lost files in 2 simple steps to get your needs fulfilled.
Safe to use:
The software is very efficient in work, and the procedure to recover the files is very simple which allows you to use the files just as you need to do. Once you can get the files, you can simply allow efficient recovery to meet your needs. Yo can almost recover data from any type of files including media content or even encrypted contents. Even if the PC is formatted, you can still recover the files.
Recover the specific Files:

Once you start to recover, you can recover any file types and also formats according to your needs. The best part of all is that you can even recover data from removable devices or flash drives when it is connected to the PC. With the help of add new file types, you can recover any data.
Recover
One of the best features that you might receive is just with the recovery options. Apart from recovering the whole files or even the subfolders, you can even recover the single lost file which is a great advantage. The software thoroughly supports all versions of Windows to work with.
Key Updates in Stellar Phoenix Windows Data Recovery V7
There are many changes that have come up from the V6 version to the latest and upgraded V7 version. Some of the most valuable updates are as follows:
Interface:
Having a brand new interface allows all the users to make the Stellar Phoenix Windows Data Recovery V7 a great platform. With the efficient data recovery system, operating the software becomes easy, and it also has become a lot easier when the interface is benefited.
Free Version:
One of the key things that we could get is the free version of the Stellar Phoenix Windows Data Recovery V7. With the help of free version, you can restore upto 1GB of lost data. To download the free version, you simply need to click here. Also, you need to enter the editor special NFR Key F7A3-42FA-7867-FAA2-A944 to register with the free version.
Dedicated:
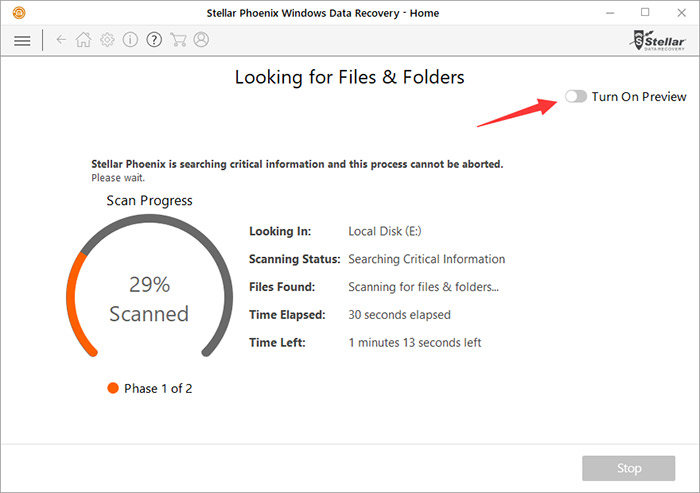
One of the most beneficial advantages of using the Stellar Phoenix Windows Data Recovery V7 is that the software is completely dedicated. You can easily recover either folders, documents multimedia files or even speed up the scan time by turning off preview during scan.
Raw File Recovery:
One of the major benefits of using the software is that the output over the years have proven that the software brings 25% better recovery results than all the others. The improved RAW File Recovery is now fully automatic and is also available for the users to use.
Enhanced Support:
One of the key things that you can easily come up with is the enhanced support options for adding the new file types for data recovery. The scanning engine of the latest version of Stellar Phoenix is upto 40% more effective than all the previous versions to use.
Product Functionalities:
Select What to Recover

With the latest versions of Key Updates in Stellar Phoenix Windows Data Recovery V7, you can recover the specific type of data instantly. This optimizes the performance of the software and also saves your time a lot. Infact, all that you need to do is select “Everything” to recover all the data. Apart from this, you can also get an option to select the documents, folders as well as the media files which you can easily get.
Select the Location for searching Data

With the help of the Stellar Phoenix Windows Data Recovery V7, you can get an option to look at the specific locations of the storage. Remember one thing that the data is not lost until the file has been overwritten. So what you need to do is make sure that you undergo the browse section and choose the destination for the file to be saved.
Deep scan
The Stellar Phoenix Windows Data Recovery V7 has an additional function of conducting the Deep scan. Though the software has an original scan where most of the recovery files can be found, some of the data may still not be found.
So all that you need to do is to run the deep scan option to find out the undiscovered items. Once you can find them, you can now easily recover the files. 🙂
Michael Austin is an expert writer who loves creating engaging and easy-to-understand content. With years of experience, he specializes in writing well-researched articles that inform, inspire, and entertain readers. His clear and simple writing style makes complex topics easy to grasp. Whether it’s trending news, helpful guides, or expert insights, Michael’s content is designed to be valuable and SEO-friendly, ensuring it reaches the right audience. Stay connected for his latest articles!
Stellar Phoenix Windows Data Recovery Home is an intuitive and powerful data recovery application. If you have lost or deleted your important photos, videos, audio files, office documents, database files, etc. from either the internal drive or external drive, the data recovery software can assist you in getting the data back to your Windows laptop or desktop.
The following is a user manual of how to recover your priceless files on your Windows computer with Stellar Phoenix Windows Data Recovery Home.
You can download and run the data recovery software on common Windows machines, such as Windows 10, Windows 8.1, Windows 8, Windows 7, Windows Vista, Windows 2000 and Windows XP. Make sure that the RAM is higher than 1GB and the hard disk contains over 50 MB free spaces.
The installation process of Stellar Phoenix Windows Data Recovery is similar to most of the Windows applications. After the installation, you can launch the software and start your data recovery with the following instructions:
Part 1. Scan Data with Stellar Phoenix Windows Data Recovery Home
To recover your lost or deleted data, you need to perform a hard disk or volume scan.
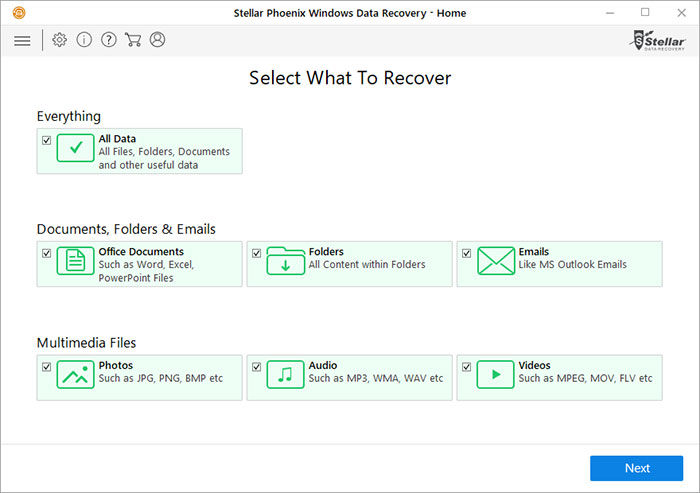
On the “Select What To Recovery” page, you have 3 main recovery options:
— Everything. This option enables you to recover all the supported formats of files from the selected storage device, including another two recovery options below.
— Documents, Folders & Emails. This option only allows you to recover all the Office documents, content within folders and emails.
— Multimedia Files. Check this option if you just want to get back your photos, audio files, videos or other multimedia files.
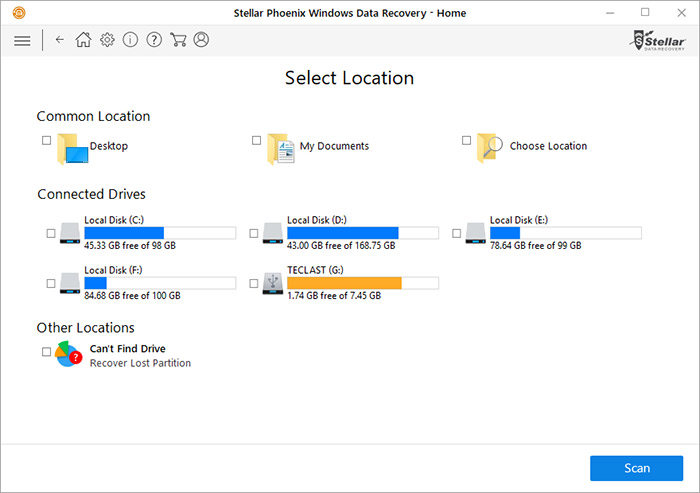
Choose one or more recovery options and click the “Next” button. Then you come to the “Select Location” page. Stellar Phoenix Windows Data Recovery Home provides 4 main scan types to search your missing files
Section 1. Scan Data from Normal Hard Disk Drive
You can search lost or deleted files on the hard disk drive on your laptop or desktop. Stellar Phoenix Windows Data Recovery supports NTFS, FAT, FAT16, FAT32, and ExFat file systems and you can recover almost all data of the volume on the selected volume or removable media.
— Common Location. You can scan deleted files on location(s), including Desktop, My Documents, and other locations.
1. Choose a location.
2. Click the “Scan” button.
3. Click “OK” when the scanning completed.

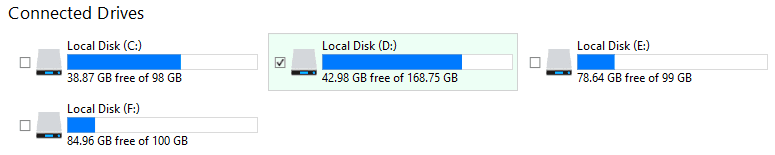
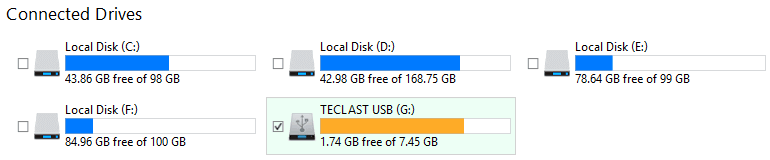
— Connected Drives. Scanning options for Local Disk (C:) (D:) (E:) (F:) (G:) or more are available here.
1. Choose the local drive(s).
2. Click the “Scan” button to begin the searching.
3. Click “OK” when it finished.
Section 2. Scan Data from External Storage Devices
To get back your missing data on external storage devices, like USB thumb drives, pen drives, external hard drives, memory cards, etc., you can start the scanning with the following steps:
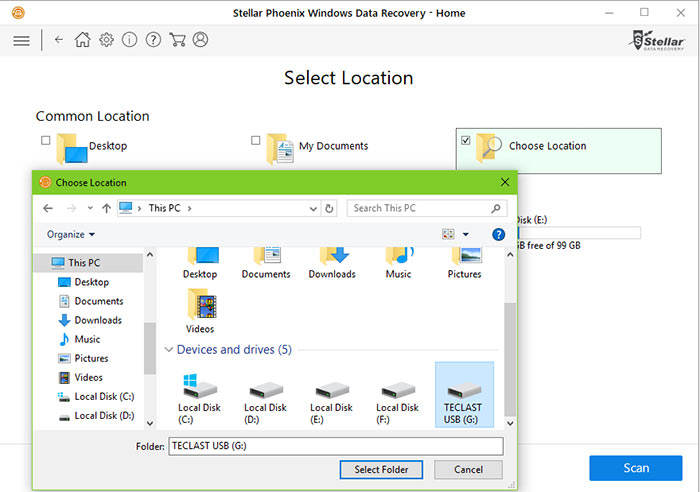
— Common Location. Scan deleted files on the selected location.
1. Connect your movable media device to the Windows PC.
2. Check the “Choose Location”.
3. Find your external storage device.
4. Click “OK”.
5. Click the “Scan” button.
6. Click “OK” when the scanning completed.
— Connected Drives. Scanning options for your removable devices are available here.
1. Connect your movable media device to the Windows PC.
2. Choose the external storage device.(Note: If you can’t find the external storage devices, you can quit the software and re-launch it.)
3. Click the “Scan” button to begin the searching.
4. Click “OK” when it finished.
Section 3. Scan Data from Deleted Partitions
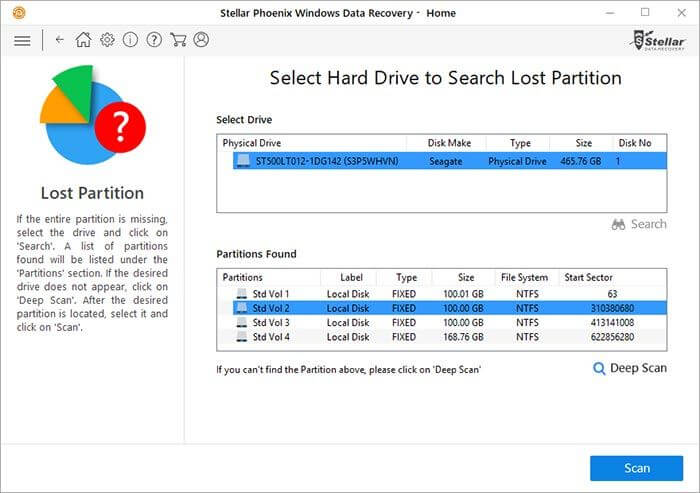
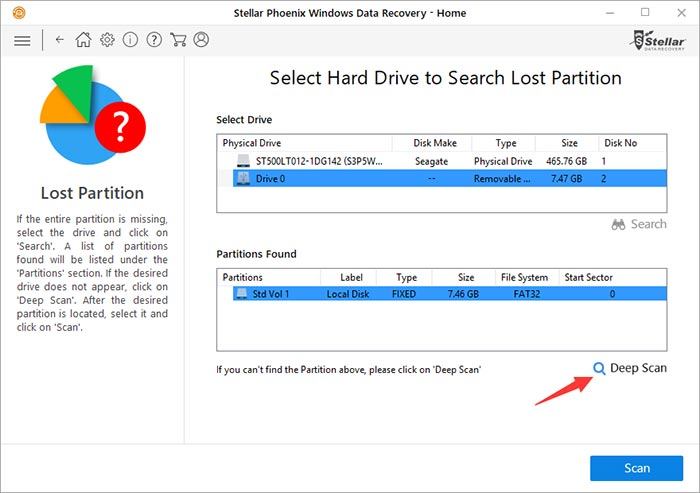
Stellar Phoenix Windows Data Recovery enables you to recover lost partitions on the hard drive disk or removable media device and recover the lost data on the partitions.
— Other Locations. You can recover lost partitions on the hard disks or the external storage devices with the steps below.
1. Choose the “Can’t Find Drive” option.
2. Click the “Scan” button.
3. Highlight the drive in the “Select Drive” box.
4. Click the “Search” icon.
5. When it finished, highlight the partition in the “Partitions Found” box.
6. Click the “Scan” button to continue with the recovery process.
7. Click “OK” when it completed.
Section 4. Quick Scan & Deep Scan
The data recovery software provides two scan modes: Quick Scan and Deep Scan. The Quick Scan happens after you choose the device and click the first “Scan” button. If you can’t find your desired files or partitions, you can go to the Deep Scan to perform a comprehensive scan.
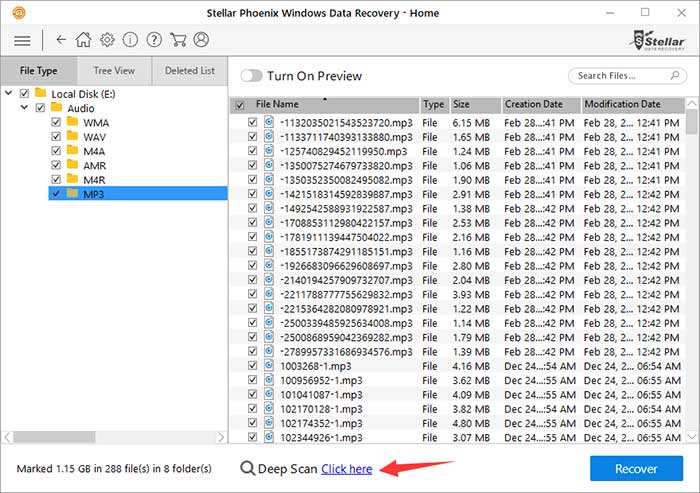
— Deep Scan of the Selected Drive. Once the quick scan is completed, choose “Click Here” link at the bottom to start the Deep Scan.
— Deep Scan of the Selected Partition. For a further scanning for your desired partition in the “Partition Found” section, you can click the “Deep Scan” icon to perform a comprehensive scan lost partition.
Note: You are allowed to stop the scanning at any time just by clicking the red cross icon or the “Stop” button.
Part 2. Preview Scan Results
Stellar Phoenix Windows Data Recovery Home supports scan result preview after the scanning, and you can easily find the specific pictures, audio files, videos, etc. without referring to their file names.
— Turn On/Off Preview. You can enable or disable the preview feature at any time. (Note: During the scanning, it is recommended to turn off the preview to enhance the scanning speed.)
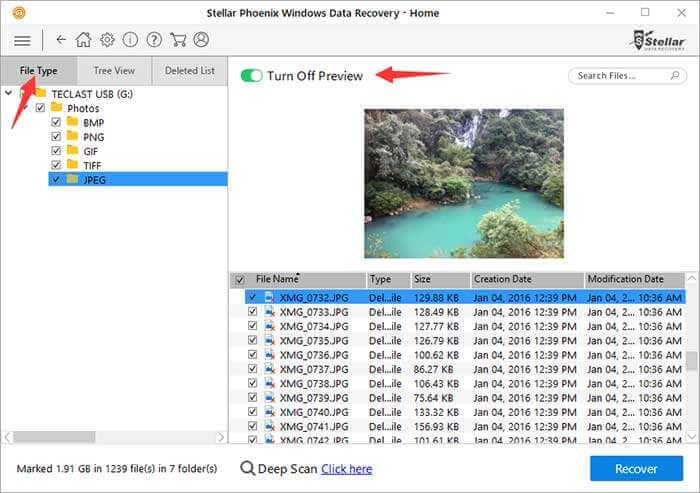
— Preview files by the File Type. You can preview your lost or deleted data by the File Type.
1. Turn on the preview feature.
2. Choose the “File Type” tab in the left pane.
3. Expand the folders listed according to their type.
4. Highlight a folder of a type to show files in the bottom right pane.
5. Highlight a file to preview the file that is preview-supported.
Note: Stellar Phoenix Windows Data Recovery Home support over 300 file types, including:
Documents Files
MDB, ACCDB, PDF, PS, CWK, FM3, FMT, WK1, WK3, WK4, DOC, DOCX, XLS, XLSX, PPT, PPTX, SDW, QXD, QXP, EPS, QBB, QBW, WPD, DOT, WBK, DOCM, DOTX, DOTM, DOCB, XLT, XLM, XLSM, XLTX, XLTM, XLSB, XLA, XLAM, XLL, XLW, POT, PPS, PPTM, POTX, POTM, PPAM, PPSX, PPSM, SLDX, SLDM, ADE, ADP, MDA, MDN, MDT, MDF, MDE, LDB, AND, ACCDR, ACCDT, ACCDA, MDW, ACCDE, LLACCDB, XPS, ODT, OTT, ODM, ODS, OTS, ODP, OTP, ODB, etc.
Emails Files
EMLX, PST, MSG, EDB, MBOX, NSF, GWI, EML, DBX, DCI, VCF, etc.
Photos Files
NEF, CRW, CR2, ORF, SR2, SRF,K25, KDC, DCR, RAF, MRW, PEF, X3F, JPEG, JPG, TIFF, TIF, BMP, GIF, PNG, XCF, PAT, ARW, DNG, PSP, PCT, RAW, MOS, PSD, EPS, INDD, ERF, FH3, FH5, FH7, FH8, FH9, FH11, MCD, VWX, MEF, WP, CDR, CPT, VSD, DWG, PGM, PPM, PCX, MNG, MSP, WMF, WPG, EMF, ANI, NRW, TGA, JP2, etc.
Audio Files
WAV, AIFF, RPS, MIDI, MID, M4A, AU, OGG, WMA, AAC, RFL, RNS, RA, RM, MP3, M3D, CDA, SND, etc.
Video Files
AVI, WMV, ASF, MP4, MOV, M4V, 3GP, MXF, MKV, MTS, DIVX, OGM, MOI, VOB, MPEG, MPG, AVS, DVM, QT, ANM, SMJPEG, SCR, FLC, CLK, ANI, FLA, SWF, FLV, M4P, etc.
Miscellaneous
MHT, MHTML, ASPX, JSP, PHP, DBF, QDG, QSD, ABD, CBK, CAS, CHM, HLP, NBP, QDF, RTF, TAX, TXT, etc.
Archive Files
ARJ, CAB, 7Z, LZA, RPM, TAR, BZ2, HQX, RAR, SIT, SITX, ZIP, etc.
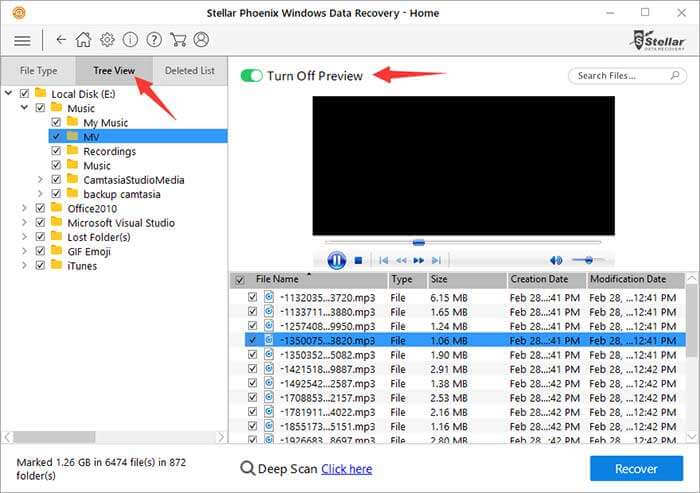
— Preview files by the Tree View. You can preview your lost or deleted data by the Tree View.
1. Turn on the preview feature.
2. Choose the “Tree View” tab on the left side.
3. Expand the folders listed in a hierarchical arrangement.
4. Choose a folder to show files in the bottom right pane.
5. Select a file to preview the file that is preview-supported.
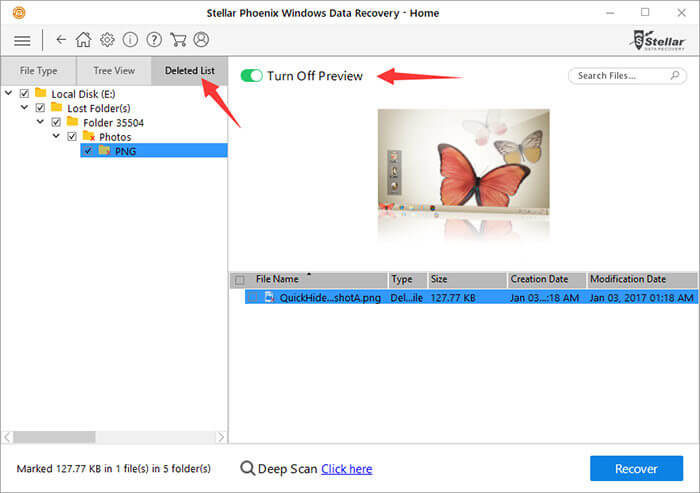
— Preview files by the Deleted List. The data recovery software also supports previewing your lost or deleted data by the Deleted List.
1. Turn on the preview feature.
2. Choose the “Deleted List” tab.
3. Expand the folders listed under this view.
4. Click a folder to show files in the bottom right pane.
5. Highlight a file to preview the file that is preview-supported.
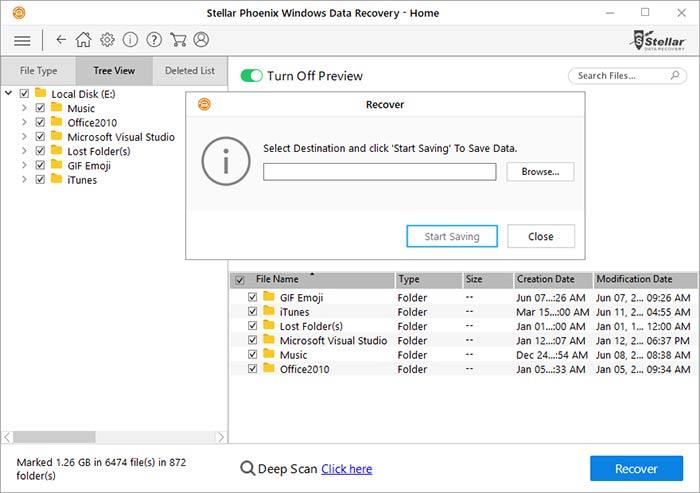
Part 3. Recover Data or File(s)
You have the following options to recover your lost, missing or deleted data to your Windows desktop or laptop with Stellar Phoenix Windows Data Recovery application:
— Recover All the Files. The software allows you to recover all of the lost files once.
1. On the left side, select the root node of the drive. Or check the box beside the “File Name”.
2. Click the “Recover” button.
3. Click “Browse” to select a location on your Windows computer. Or paste a path to the bar.
4. Click the “Start Saving” button.
5. Find the recovery folder “#Root” on your PC and view the file(s).
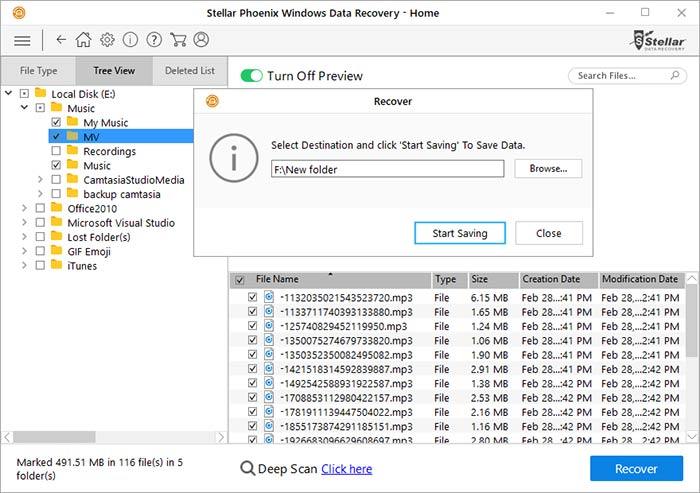
— Recover Individual Folder(s). You can also recover the lost or deleted folder(s) that contains the files you need.
1. On the left side, select the parent folder including your desired folder(s).
2. Check the folder(s) in the bottom right pane.
3. Click the “Recover” button.
4. Click “Browser” to select a location on your Windows computer. Or paste a path to the bar.
5. Click the “Start Saving” button.
6. Find the recovery folder “#Root” on your PC and view the folder(s).
Note: If you fail to find the folder(s) among the long list, you can go to the search bar on the top right.
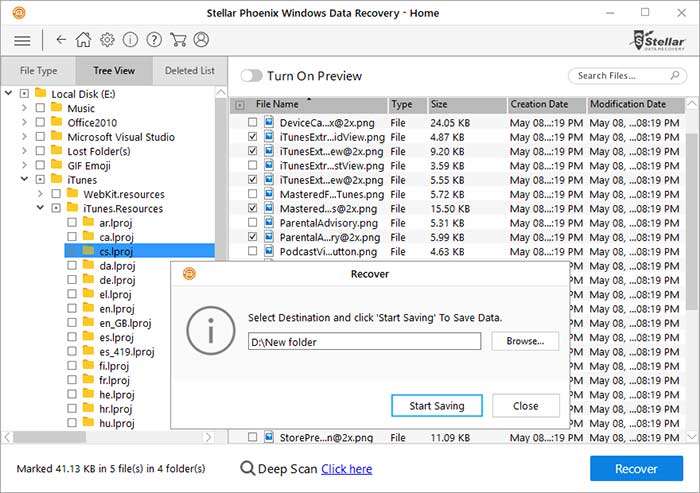
— Recover Specific File(s). Individual file(s) recovery is also available.
1. On the left side, select the folder including your desired file(s).
2. Check the file(s) in the bottom right pane.
3. Click the “Recover” button.
4. Click “Browser” to select a location on your Windows computer. Or paste a path to the bar.
5. Click the “Start Saving” button.
6. Find the recovery folder “#Root” on your PC and view the file(s).
Note: If you fail to find the file(s) among the long list, you can go to the search bar on the top right.
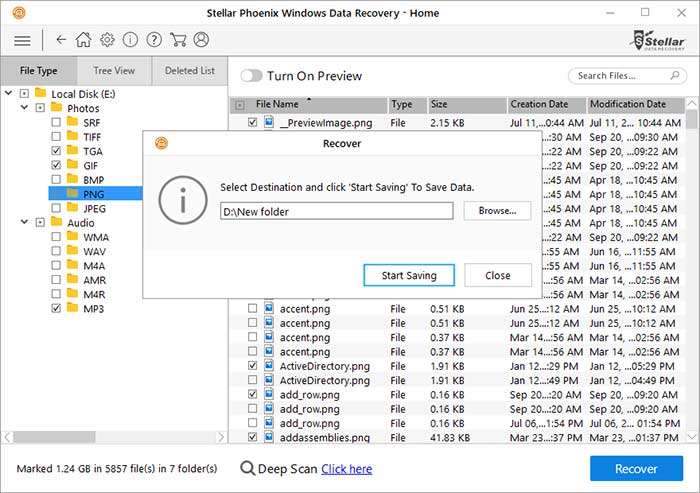
— Recover Folder(s)/File(s) by the Category. You can recover specific types of the files.
1. On the left side, choose the “File Type” tab.
2. Select the parent folder(s) including your desired file type(s).
3. Check the folder(s)/file(s) in the type in the bottom right pane.
4. Click the “Recover” button.
5. Click “Browser” to select a location on your Windows computer. Or paste a path to the bar.
6. Click the “Start Saving” button.
7. Find the recovery folder “#Root” on your PC and view the file(s).
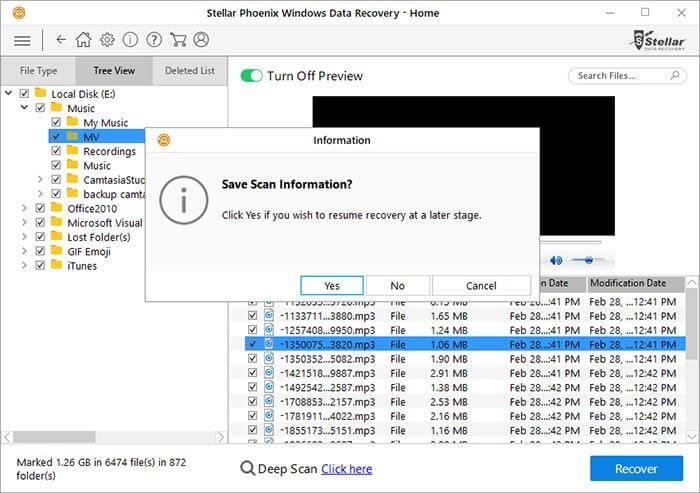
Part 4. Save Scan Results to Recover Data Later on
Stellar Phoenix Windows Data Recovery provides the scan result save option, which enables you to resume the data recovery with the .DAT file next time so that you won’t need to spend a long period waiting for the scanning results. You can save scan result of any scanning process: complete or incomplete recovery process.
— Save Scan Results of Complete Recovery Process. To save the whole scan results, you can follow the steps below:
1. Finish a completed scanning on the software.
2. Click the “Back” icon or the “Home” icon.
3. Click the “Yes” button.
4. Select a location on your Windows PC to save the .DAT file.
5. Click the “Save” button.
— Save Scan Results of Incomplete Recovery Process. To save the incomplete recovery process, do the following:
1. Click the “Stop” during the drive Deep Scan. Or click the red cross icon during the partition scan.
2. Click the “Yes” to abort the scan.
3. Click the “Back” icon or the “Home” icon.
4. Click the “Yes” button.
5. Select a location on your Windows PC to save the .DAT file.
6. Click the “Save” button.
Note: To resume recovery scan from a .DAT file, go to Part 5 for the details.
Part 5. Advanced Settings
Stellar Phoenix Windows Data Recovery software allows you to do more management with great features in “Advanced Settings” or other configuration panels. There are seven icons on the top left of the user interface:

— Back. Click the “Back” icon to go back to the last page.
— Home. Click the “Home” icon to go to the home page, aka the “Select What To Recovery” page.
— Advanced Settings. Click the gear icon to enter the “Advanced Settings”. In the “Advance Settings”, you can manage your Stellar Phoenix Windows Recovery software:
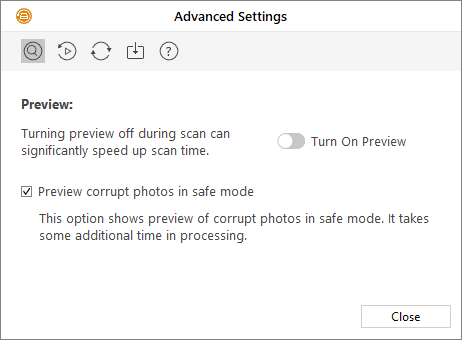
Preview. Preview option allows you to apply settings for preview window of the application.
1. Open the “Advanced Settings”.
2. Click the “Preview” icon on the top.
3. Toggle the switch to “Turn On/Off Preview” to control the scan speed.
4. Check or uncheck the “Preview corrupt photos in safe mode” to control the corrupt photos display in safe mode.
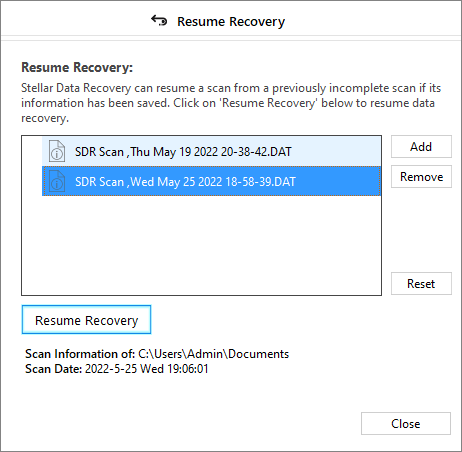
Resume Recovery. This option enables you to continue your data recovery process with the .DAT file you’ve saved before.
1. Open the “Advanced Settings”.
2. Click the “Resume Recovery” icon on the top.
3. Click the “Add” button.
4. Select the .DAT file that contains the scan information.
5. Click the “Open” button.
6. Click the “Resume Recovery” button below to resume data recovery.
Note: You can remove the selected .DAT file from the list with the “Remove” button. Or click the “Reset” button to empty the list.
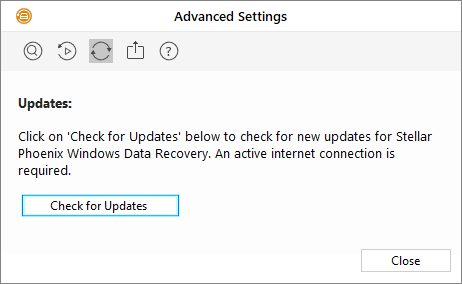
Update. You can check for the latest version of Stellar Phoenix Windows Data Recovery Home with this option.
1. Open the “Advanced Settings”.
2. Click the “Update” icon on the top.
3. Click the “Check for Updates” to see if there are updatable versions.
Export License. The software allows you to export the license of the registered app to another PC.
1. Launch the FREE version of Stellar Phoenix Windows Data Recovery on your new computer.
2. Open the “Advanced Settings”.
3. Click the “Import License” icon on the top.
4. Choose the “I want to import license from another machine”.
5. Click the “Next” button.
6. Record the “Registration ID”, which will be typed into the same bar on your original PC.
7. Launch the registered version on your original computer.
8. Go to the “Advanced Settings”.
9. Click the “Import License” icon on the top.
10. Choose the “I want to export license to other machine”.
11. Click the “Next” button.
12. Type into the “Registration ID” you got in step 6.
13. Click the “Transfer In” to generate the license key. (Note: You can click the “Save to File” to save the “Registration ID” and the “License Key”.)
14. Go to the new computer and type into the “License Key”.
15. Click the “Register” button.
16. Click “OK” to complete the activation process.

Note: Exporting the license will deactivate the software on your original computer and reactivate the product on the target PC.
Help. Once you click this option, it will pop up the Help box.
— About. Click the “About” icon to check the Stellar Phoenix Windows Recovery software information and view the user license.
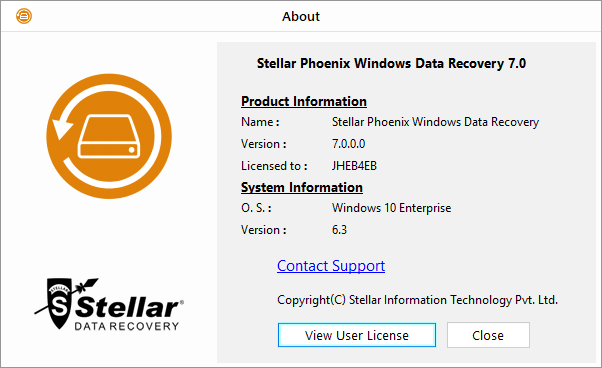
PICTURE stellar-phoenix-about-settings
— Help. Click the “Help” icon to open user help box.
— Buy Online. Click the “Buy Online” icon to buy Stellar Phoenix Windows Recovery online.
— Register. Click the “Register” icon to activate the software.
Missing data can be a nightmare, especially critical work-related files or treasured family photos. But the question is, can data still be recovered? In these situations, you need a reliable data recovery solution. And guess what? Stellar Phoenix Windows Data Recovery can get the job done quickly and effectively.
Stellar Phoenix Data Recovery is a powerful software designed specifically for recovering lost or deleted data from any system like Windows, Linux, macOS, etc. And in this tutorial, you’ll learn how to recover missing data from your system with Stellar Phoenix Data Recovery.
Feel excited yet? Read on and recover data like they never went missing!
Prerequisites
This tutorial will be a hands-on demonstration. If you’d like to follow along, be sure you have a Windows 10 machine.
Downloading and Installing Stellar Phoenix Windows Data Recovery
Even though Stellar Phoenix Data Recovery works in many OSs, it doesn’t come installed by default. So before you can recover data, you’ll first have to download and install Stellar Phoenix Data Recovery on your machine.
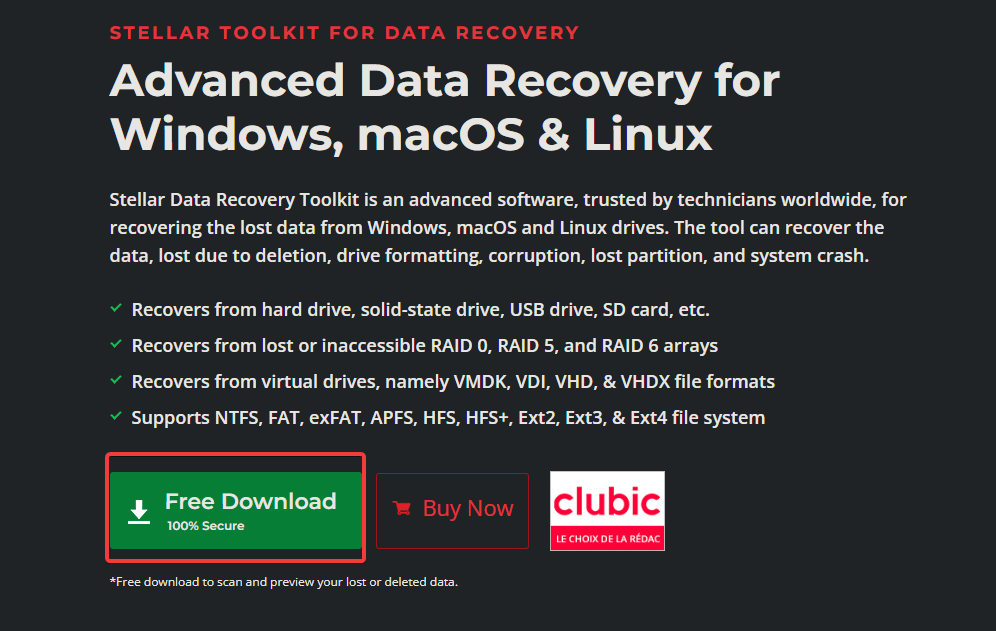
1. Open your favorite web browser, navigate the official website, and click on the Free Download button to download the free demo version.
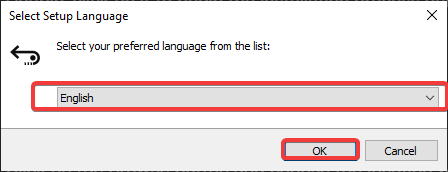
2. Launch the installer you downloaded, select your preferred language on the pop-up window, and click on OK.
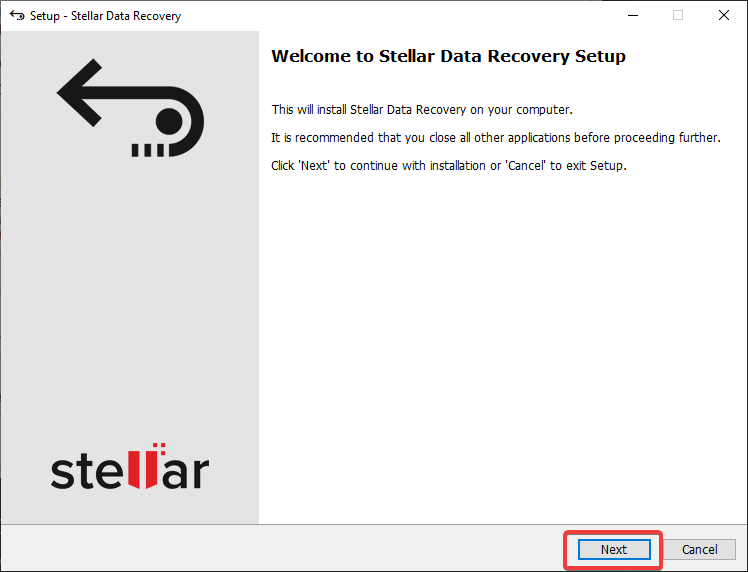
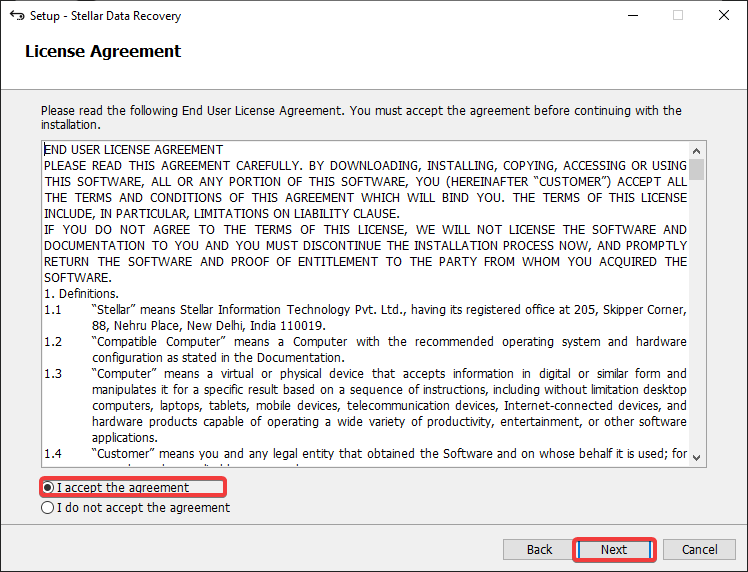
3. Click on Next on the welcome page below to continue with the installation.
4. Now, select the I accept the agreement option and click on Next.
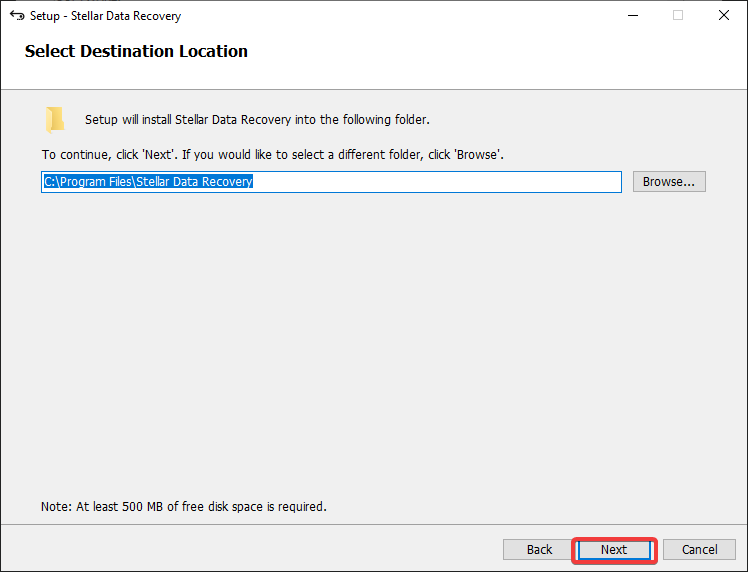
5. Click on Browse to choose a location to install the software, and click Next. But the default location (C:\) is usually fine. But ensure your target disk has enough free space for the program and associated recovered data.
If you have a solid-state drive SSD, don’t hesitate to select it as your installation drive for Stellar’s core product and any associated tools. Why? The Stellar Phoenix Windows Data Recovery uses a lot of disk activities (reads and writes) when recovering data. Your SSD can handle the increased disk activities more than a hard drive(HDD).
Installing might take a few minutes to complete depending on your internet connection speed, as the installer downloads additional files required for the software to run.
So relax and grab a cup of coffee while you wait. Once the download completes, the program will automatically be installed on your machine.

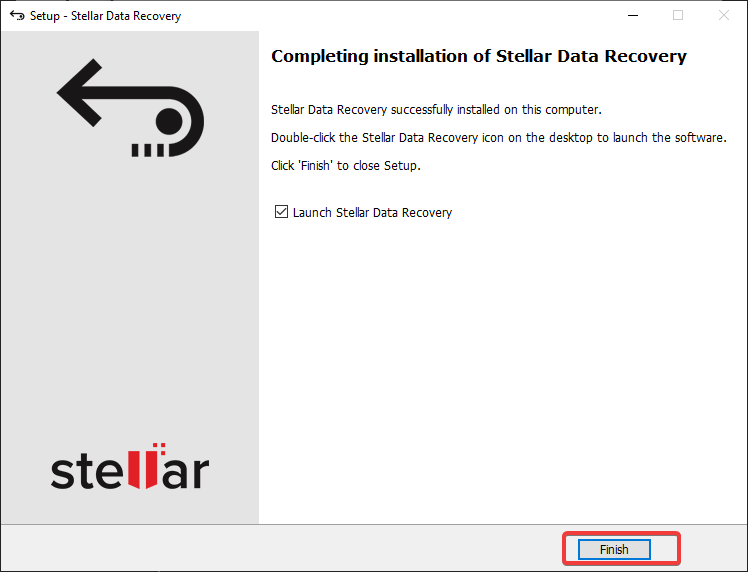
6. Finally, click on Finish to exit the installer and launch Stellar Phoenix Data Recovery once the installation completes.
Discovering Files to Recover
Now you have Stellar Phoenix Windows Data Recovery installed on your machine, it’s time to dig into your disks and recover data. But first, you’ll scan for files that you can recover with the software. Scanning is the most crucial part of the data recovery process because it allows you to select which files you want to recover.
When you first launch Stellar Phoenix Linux Data Recovery, you’ll get the screen below. The main interface is well-organized into different intuitive sections, where you can select the type of recovery you want to perform. This design is helpful when you’re looking for specific types of files, such as photos, videos, or documents.
1. Tick the checkbox beside your desired option, and click Next. This tutorial’s choice is All Data since it’s the most comprehensive option.
After selecting what to recover, you’ll see the page below where you can choose which drive/location you want to scan for lost or deleted files. You can see all your drives listed, including any external drives connected to your machine.
This feature can be helpful if you accidentally deleted a file from your USB drive or external hard drive. The list below explains the options you can select depending on your needs:
- Choose Location – A custom location. This option can be helpful if you know the exact location of the lost data.
- RAID Recovery – An advanced option for users with a RAID system. Most users won’t use this option.
- Virtual Machine Recovery – for users who have a virtual machine. Like with RAID Recovery, this option is advanced that most users won’t use.
- Recovery from Disk Image – An option for users who have a disk image. A disk image is a copy of your entire drive, including the lost or deleted data.
This option is useful if you created a disk image before you lost or deleted your data. But then again, most users won’t use this option.
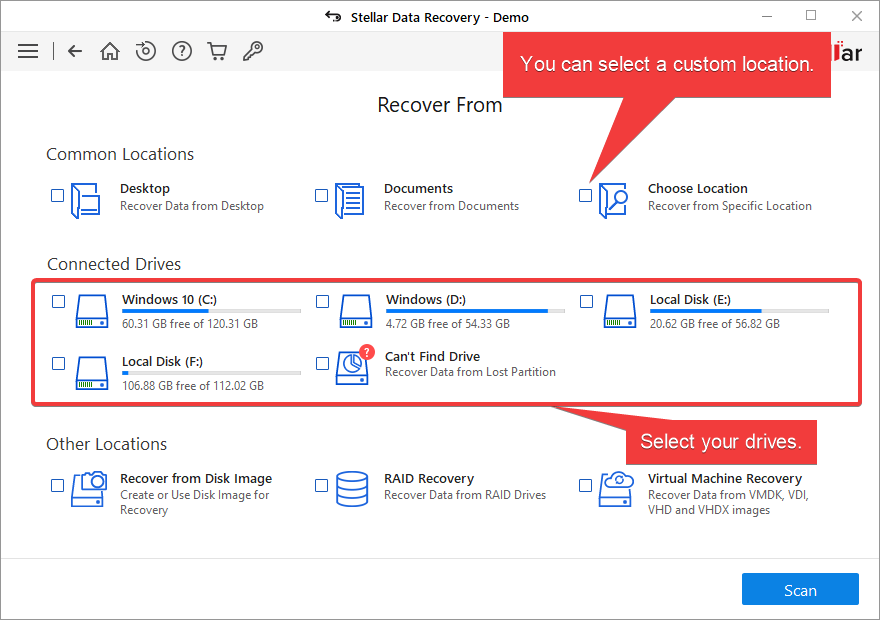
If you get lost, click the back arrow (top-left) to go back to the previous screen or the home button to start over.

2. Next, tick the box beside the location(s) or drive(s) you want to scan and click on Scan. This tutorial selects the Documents location to scan for lost or deleted office files.
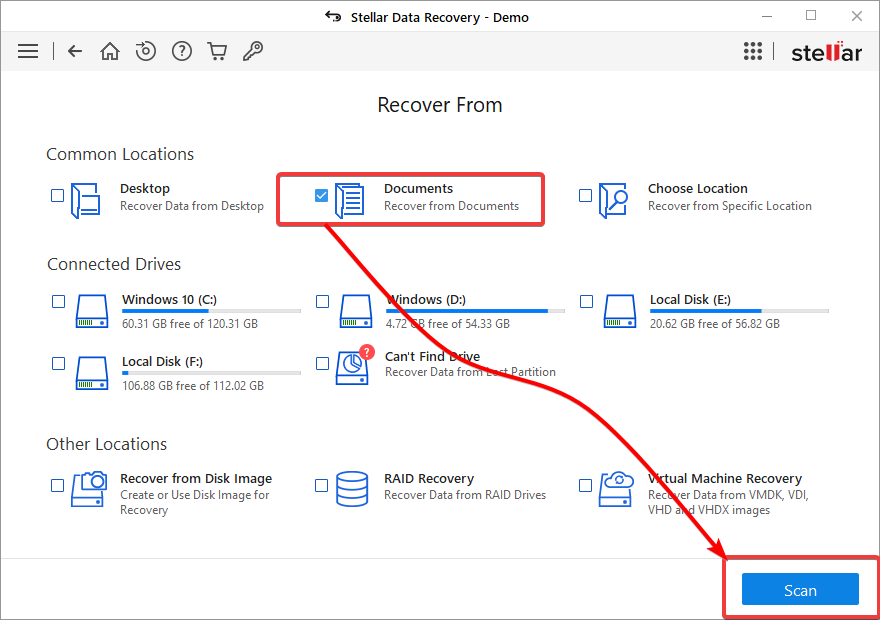
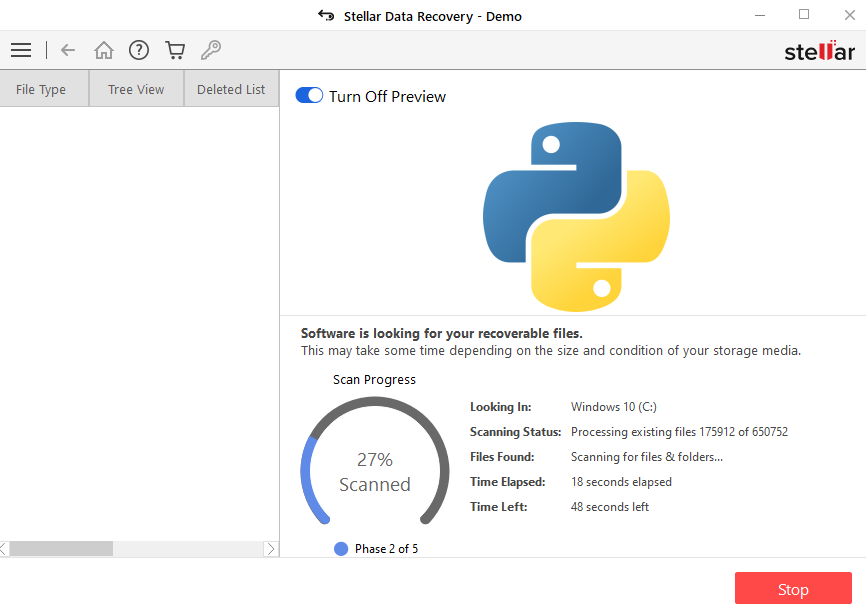
Stellar Phoenix Data Recovery starts scanning your drive for lost or deleted data. This process can take a few minutes up to a few hours, depending on the size of your drive and the number of files you have.
This tutorial tests a normal scan on an external SSD drive of 256 GB in size and has about 100,000 files. The scan took less than three minutes to complete, which is pretty fast compared to other recovery software.
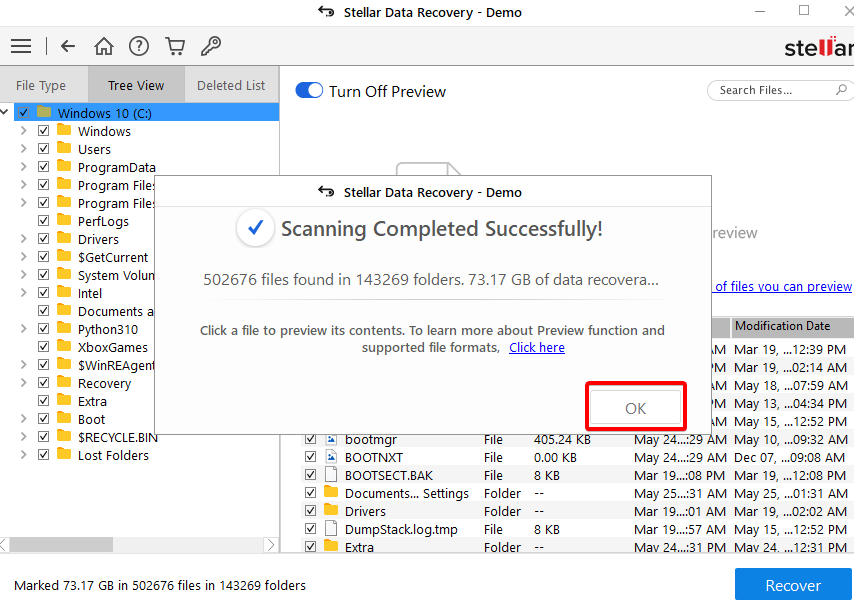
3. After scanning, click on OK to close the summary window once satisfied with the scan results.
You’ll see a summary of the scan, including the number of files found and the total size of the lost data, as shown below.
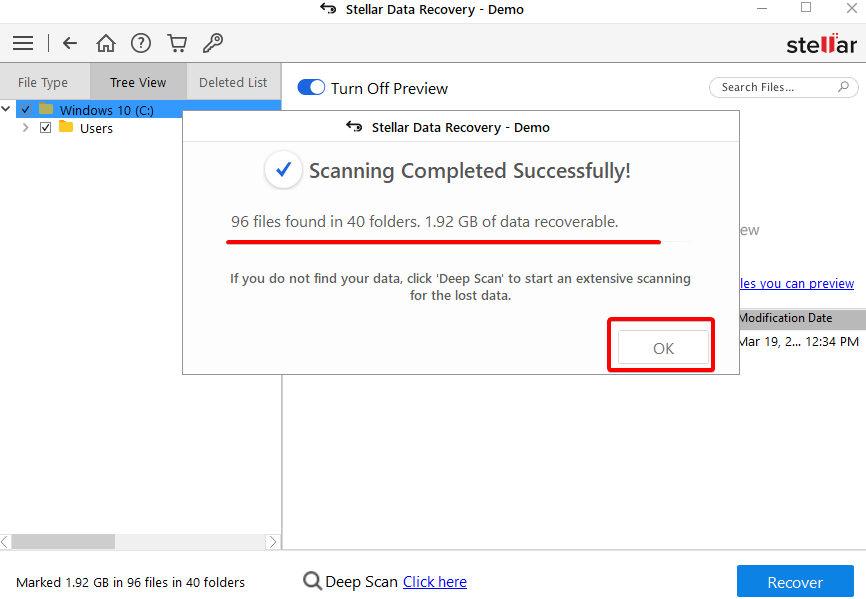
4. Now, click on the Click here hyperlink at the bottom of the window to perform a deep scan. Deep scanning helps you dig deeper into your disk if you’re not satisfied with the scan result or don’t see the file(s) you’re looking for.
A normal scan is enough for recently lost or deleted files. But deep scan is beneficial, especially if your disk has just undergone a hard drive format.
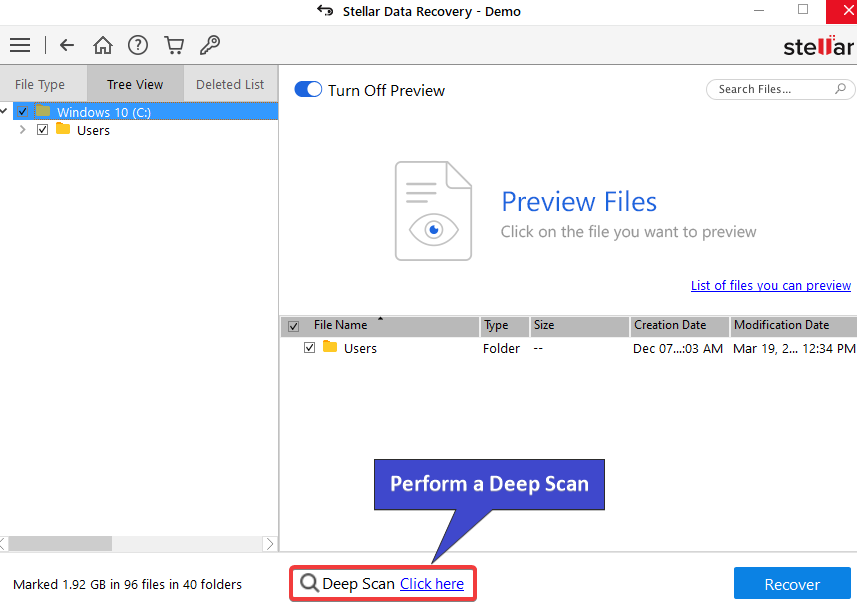
As the name suggests, the deep scan can take a while to complete than a normal scan.
This tutorial tests a deep scan on the same external SSD drive of 256 GB in size and has about 100,000 files. And the deep scan took about 15 minutes to complete.
You can see the deep scan process shown in the screenshot below. Once the deep scan completes, you’ll see a summary window pops up, just like the normal scan (step five).
5. After scanning, click on OK to close the summary window once satisfied with the scan results. You’ll see that this time there are more files deep scan found.
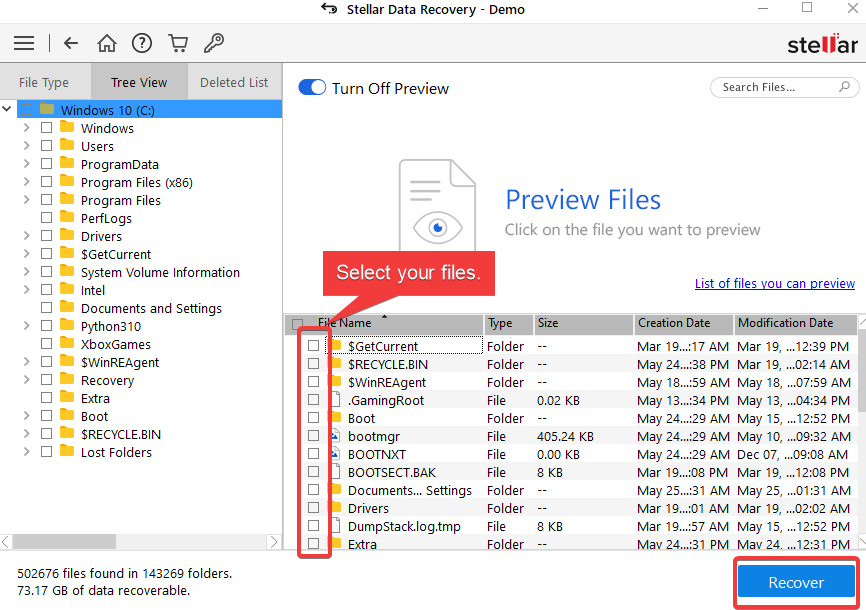
6. Finally, tick the box beside the file(s) or folder(s) you like to recover and click on Recover (bottom-right) to recover them.
The demo version lets you scan and preview the lost files for free. But you need to buy the software where you can actually recover the lost data. In the demo version, though, you get the main idea of how the software works and what to expect.
Advanced Options for Recovery
You’ve seen how to recover data after a normal or deep scan. But Stellar Phoenix Data Recovery also comes with some advanced options for data recovery.
Suppose you’re recovering a large drive, but the recovery process was interrupted. Perhaps your computer ran out of battery, or there’s a power outage. If so, can you still resume the recovery later? Yes! If you saved the scan information beforehand, that is.
1. After scanning, click on the menu icon (top-left) —> Save Scan to save the scan information.
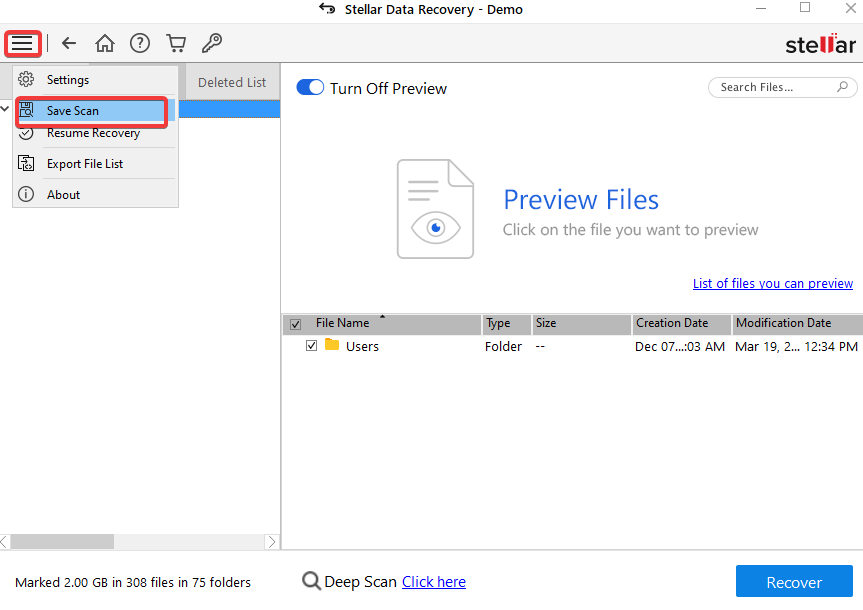
Note that you can only save the scan information in a different location than the drive where you’re trying to recover your data.
2. Open Stellar Phoenix Data Recovery after fixing what caused the interruption on recovery.
3. Click on the menu icon, and choose Resume Recovery to start resumption of the interrupted recovery.
4. Lastly, select the scan information you saved in step one, and click Resume Recovery. The recovery process picks up from where it left off and resumes the recovery process.
Conclusion
Even just the thought of losing your data can be devastating. But in this tutorial, you’ve learned how to recover lost data, both recent and old ones. Data recovery can be a daunting task, but with Stellar Phoenix Linux Data Recovery by your side, you can rest assured that your data is in good hands.
At this point, you can confidently recover lost data and save the day with Stellar Phoenix Windows Data Recovery. But why not automate a regular backup for your data and save yourself the trouble of performing data recovery?