
Readers help support Windows Report. We may get a commission if you buy through our links.
Read our disclosure page to find out how can you help Windows Report sustain the editorial team. Read more
You might be familiar with rsync if you’re a Linux user, but many don’t know what is rsync on Windows and how to use it. Today we’re going to answer this question and help you learn about this tool.
What is rsync in Windows and how can I install it?
What is rsync in Windows?
Rsync is a command line utility for transferring and syncing files on a local PC or remotely. This is a Linux feature and it’s not available natively on Windows.
How to install rsync in Windows?
1. Use MSYS2
- Download and install MSYS2 from msys2.org.
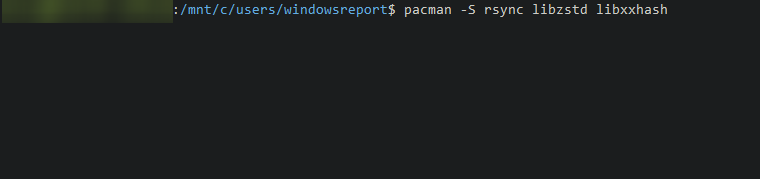
- Open the MSYS2 shell and execute the following command to install Rsync along with the required libraries:
pacman -S rsync libzstd libxxhash
- Verify the installation by typing:
rsync --version
2. Use cwRsync
- Download cwRsync from itefix.net.
- Run the installer and follow the default installation settings, typically installing to:
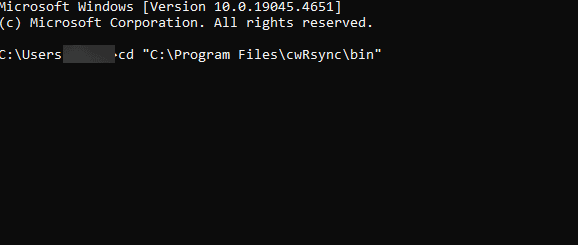
C:\Program Files\cwRsync - After installation, open Command Prompt (cmd) and navigate to the cwRsync bin directory:
cd "C:\Program Files\cwRsync\bin"
- Type the following command to check if Rsync is installed correctly:
rsync --version
3. Use Windows Subsystem for Linux (WSL)
- Open PowerShell as Administrator. You can do this by typing PowerShell in the Start menu, right-clicking on Windows PowerShell, and selecting Run as administrator.

- Type the following command and press Enter to enable the WSL feature:
wsl --install - Wait for the installation to complete. This command enables optional components, downloads the Linux kernel, sets WSL 2 as the default, and installs a Linux distribution (Ubuntu by default).
- Restart your computer as prompted.
- After restarting, open PowerShell again and type the following command to install Rsync in your Linux distribution:
sudo apt-get install rsync
- Once installed, you can use Rsync commands in the Linux terminal.


Keep in mind that you’ll need to run WSL every time you want to use rsync, and WSL can be cumbersome to install.
If you’re not familiar with WSL, don’t miss our guide on how to access files in WSL for more information.
- Sony engineers worked on greatly enhancing Microsoft’s exFAT File System on Linux
- Plugin-container.exe: What is it & Should I Remove it?
- Conhost.exe: What is it & how to Fix Its High CPU Usage
- HydraDM.exe: What is It & Should I Remove It?
- HsMgr64.exe: What is It & Should I Delete It?
What is the advantage of rsync?
- Incremental transfer – This allows rsync to transfer only parts of the file that have changed, thus making the process faster and reducing data usage.
- Data compression – With rsync your data will be compressed which makes it a great option for remote syncing.
- Checksum verification – To ensure that all your files are transferred completely, there’s checksum verification available.
- Various options – With support for various flags, you can preserve file permissions, modify timestamps, exclude specific files or directories, and more.
- Interruption handling – Rsync can resume the transfer if the interruption occurs.
- Support for scripting and scheduling – Since this is a command line tool, you can use various scripts or schedule it with ease.
What are some disadvantages of using rsync?
- Complexity – Rsync is a command-line tool, so some users might find it difficult to use. It also has a learning curve that is daunting to new users.
- No native encryption – Rsync doesn’t have native encryption, but that can be mitigated by using an SSH connection.
- No native scheduling –The tool relies on other services and applications for scheduling.
- No native support for cloud storage – If you’re using AWS, Google Drive, and other cloud storage services, rsync might not be the best choice.
- No versioning –There’s no version control with rsync so there’s a chance for you to overwrite or delete files if you’re not careful.
- Performance issues with large data sets – You might experience high CPU and memory usage when working with large files or directories. Issues can also occur with very frequent synchronization tasks.
What is the Windows equivalent of rsync?
The closest to rsync on Windows is robocopy, but many users prefer using file sync software instead. If you’re looking for command line tools, our copy vs xcopy vs robocopy will tell you everything you need to know.
By mastering rsync on Windows, you can ensure your files are always backed up efficiently. This isn’t the only Linux tool available on Windows, and we also have a great guide on how to use sudo on Windows, so don’t miss it.
Milan Stanojevic
Windows Toubleshooting Expert
Milan has been enthusiastic about technology ever since his childhood days, and this led him to take interest in all PC-related technologies. He’s a PC enthusiast and he spends most of his time learning about computers and technology.
Before joining WindowsReport, he worked as a front-end web developer. Now, he’s one of the Troubleshooting experts in our worldwide team, specializing in Windows errors & software issues.
Уровень сложностиСредний
Время на прочтение5 мин
Количество просмотров45K

На Хабре периодически рассказывают о новых инструментах для синхронизации данных. Это интересная тема. Такие программы используются:
- для синхронизации файлов на разных устройствах,
- дедупликации,
- резервного копирования,
- сжатия.
Малейшая оптимизация даёт экономию трафика, места, ускоряет синхронизацию и общую производительность любых систем. Всё, везде и сразу. В эпоху веб-приложений и клиент-серверной архитектуры со множеством девайсов, которые работают в единой инфраструктуре, синхронизация — Святой Грааль, одна из базовых технологий в компьютерной области.
Кроме того, инструменты синхронизации интересны с алгоритмической точки зрения. Любопытно, как люди умудряются оптимизировать базовые алгоритмы типа rsync, которые вроде бы работают идеально. Но нет, всегда можно придумать что-то получше.
rsync
Как известно, инструмент для быстрой синхронизации файлов rsync разработан австралийским программистом Эндрю Триджеллом по кличке Тридж в 1996 году для его кандидатской диссертации.
Суть алгоритма заключается в том, что файл разбивается на куски фиксированного размера, для каждого из них вычисляется MD4-хеш и скользящий хеш (rolling hash). Хеши отправляются второму компьютеру для сверки. В упрощённом виде схема выглядит так:

Этот алгоритм и концепция скользящего хеша используются во многих программах для синхронизации файлов, включая rdiff, librsync (Dropbox), sftp, macOS 10.5+, zsync (Ubuntu и другие Linux-дистрибутивы), rclone и др.
В последующие годы для rsync было разработано множество оптимизаций, особенно в части сжатия данных при их передаче.
CDC
Главным улучшением стало изобретение блоков переменного размера, когда границы скользящего окна не смещаются по биту, а устанавливаются в зависимости от содержимого файла. Другими словами, если у нас в битовом потоке попадается одинаковый фрагмент до 64 бит, то рамки скользящего окна сдвигаются на границу этого фрагмента. То есть разбиение на блоки происходит в зависимости от контента. Так появился алгоритм CDC (Content Defined Chunking), который благодаря своей простоте и эффективности стал по-настоящему гениальным изобретением.
Для сравнения, вот схема работы CDC:

CDC решает «проблему сдвига границы», показанную на КДПВ.
А теперь мы переходим к самому интересному…
Помните, был такой игровой сервис Stadia, который повторил судьбу десятков замечательных проектов компании Google, прибитых на взлёте? Сегодня он встречает похоронной надписью на главной странице:

Проект закрылся 18 января 2023 года…
Главная инновация Stadia состояла в трансляции видео с серверов Google на тонкие клиенты пользователей с минимальной задержкой. Говорят, работало фантастически. И просто удивительно, что Google решила убить такой перспективный проект.
Так или иначе, одной из внутренних технологий Stadia была эффективная синхронизация данных между Windows-серверами (большинство игр работает под Windows) и облачными Linux-инстансами для разработчиков. Сами разработчики Stadia первоначально использовали обычный scp, но он всегда копировал полные файлы без режима копирования «дельты» изменений, и в нём не было быстрого сжатия. Поэтому разработчики Stadia написали внутренние инструменты, которые решают эту проблему.
И после закрытия Stadia они отдали эти инструменты во всеобщее пользование!
CDC File Transfer
В репозитории CDC File Transfer выложены две утилиты для синхронизации и стриминга файлов между машинами Windows → Windows или Windows → Linux. Это cdc_rsync и cdc_stream, соответственно. Обе используют упомянутый ранее алгоритм Content Defined Chunking (CDC) для максимально эффективного сжатия с учётом контента.
И теперь все желающие могут без проблем использовать эти инструменты для своих личных нужд, ставить на свои серверы и интегрировать в свои проекты. Чем многие не преминули воспользоваться: за несколько месяцев у проекта уже 75 форков и более 2700 звёзд на Github.
▍ cdc_rsync
Если вкратце, cdc_rsync работает примерно так же, как известная линуксовая утилита rsync. В большинстве случаев она просто быстро копирует файлы с одной системы на другую, но оптимизирована для ситуаций, когда на целевой системе уже есть старые копии файлов. В этом случае программа быстро проверяет метку времени и размер файла (тогда файл игнорируется с минимальной тратой времени на проверку). Если файл существует, но изменился, то утилита определяет, какие конкретно части файла изменились — и обновляет только их. И во всех случаях используется быстрый алгоритм сжатия данных.

Алгоритм удалённой сверки файлов основан на CDC, а по внутренним тестам Google он работает примерно в 30 раз (!) быстрее, чем rsync. Причины такого ускорения заключаются в значительной оптимизации по сравнению со стандартным алгоритмом rsync, который при сравнении копий файла использует скользящее окно фиксированного размера.
Эта оптимизация сильно влияет на общее время синхронизации файлов. На следующей диаграмме из репозитория показаны результаты реального тестирования cdc_rsync и линуксового rsync под Cygwin в Windows.

В целом, cdc_rsync синхронизирует файлы примерно в три раза быстрее, чем rsync под Cygwin. В качестве тестовых данных использовались девелоперские билды игры общим размером 40-45 ГБ. На трёх билдах, вероятно, потерялись какие-то файлы, что резко увеличило время синхронизации.
В итоге получается, что алгоритм cdc_rsync гораздо быстрее, чем rsync, и при этом проще. Поскольку границы блоков перемещаются вместе со вставками или удалениями, задача сопоставления локального и удалённого хешей является тривиальной операцией разности множеств. Она больше не включает поиск побайтовой хеш-карты.
▍ cdc_stream
В свою очередь, cdc_stream — это инструмент для потоковой передачи файлов и каталогов с Windows на Linux. Концептуально он похож на sshfs, но оптимизирован для скорости чтения. Утилита не поддерживает запись файлов обратно из Linux в Windows. Каталог Linux доступен только для чтения.
Вот как работает программа:
А ниже сравнительные графики производительности: время запуска игры от начала операции до появления меню на экране. Тестировались разные игры для Stadia, но в целом процесс демонстрирует скорость потоковой передачи любых файлов:
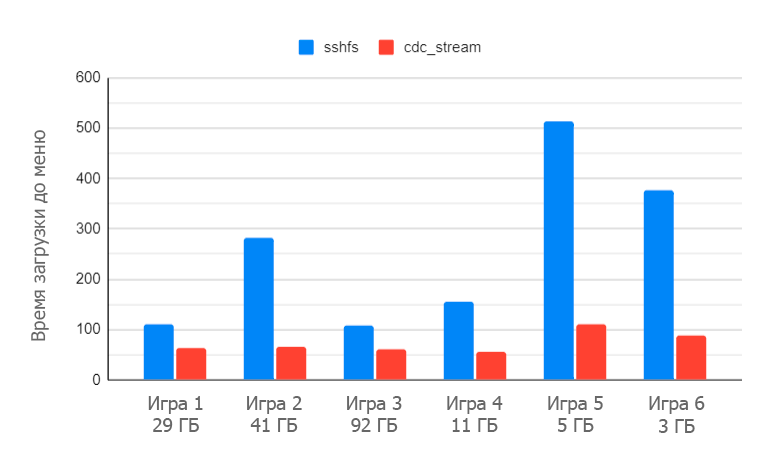
Судя по проведённым тестам, cdc_stream копирует файлы примерно в 2–5 раз быстрее, чем sshfs. Как можно понять из объяснений выше, эта разница обеспечена преимуществом CDC над стандартным алгоритмом rsync. Для эффективного диффиринга используется тот же алгоритм на основе CDC, что и в программе cdc_rsync.
Если файл изменился на Windows, то в систему Linux передаются только различия (дельта). Это происходит в момент считывания файла под Linux. Остальное считывается из кэша. Изменения в файлах Windows отражаются в Linux с задержкой от 0,5 с (плюс примерно 0,7 с на каждый гигабайт).
Операции stat выполняются очень быстро, поскольку метаданные (имена файлов, разрешения и т.д.) оптимизированы для потоковой передачи.
Более подробно об использовании инструментов cdc_rsync и cdc_stream и необходимой конфигурацией SSH и SFTP см. в документации на Github, а также в документации/комментариях внутри кода. В целом, cdc_rsync используется аналогично scp или rsync, с таким же синтаксисом, понимает стандартные виндовые заменители типа * и ?:
cdc_rsync C:\path\to\*.txt user@linux.device.com:~
Локальная синхронизация с Windows на Windows рекурсивно (-r) с визуальным индикатором прогресса (-v):
cdc_rsync C:\path\to\assets\* C:\path\to\destination -vrПримечание. Инструменты cdc_rsync и cdc_stream — не единственные, в которых реализован алгоритм разбиения на блоки с учётом контента (CDC). Его использует restic и другие продвинутые инструменты для синхронизации и резервного копирования. В последние годы оптимальной реализацией CDC считалась FastCDC с поддержкой Gear-based CDC (GC) со скользящими хешами для разного размера окон, что повышает производительность вычислений (с оптимизациями 2020 года), есть версии на Rust, Python, C и др.
Подобные инструменты можно использовать для дедупликации файлов и резервного копирования по дельте. В большом масштабе это высвободит большой объём дискового пространства, сэкономит время и повысит скорость операций.
Разработчики пишут, что софт сделан на основе FastCDC с учётом конкретной сферы применения: максимально быстрой инкрементальной синхронизации файлов. И кажется, что это наследие Stadia — действительно лучший вариант для синхронизации/стриминга с Windows на Linux.
По крайней мере, крах Stadia принёс какую-то пользу обществу.
Пол-лимона подарков от RUVDS. Отвечай на вопросы и получай призы ?

doc:sysadmin:rsync_server_in_windows
RSync сервер в ОС Windows
RSync является сервисом синхронизации данных между удаленными машинами, который можно использовать для резервного копирования. RSync изначально был доступен для открытых систем Linux, BSD и с некоторого времени был портирован в ОС Windows. Далее рассматривается один из таких портов cwrsync, который вы можете скачать с нашего сервера.
Последовательность действий
1. скачиваем и устанавливаем. Сервер RSync будет установлен в качестве службы, что несомненно является плюсом. Путь установки: C:\Program Files\ICW
2. правим конфигурационный файл rsyncd.conf (c:\Program Files\ICW\), к примеру:
use chroot = false
strict modes = false
hosts allow = *
log file = rsyncd.log # лог-файл располагается по пути C:\Program Files\ICW
motd file = new_motd  # файл с приветствием
uid = 0
gid = 0
#
# Все пути прописываются таким образом: все слеши (\) заменяются на обратный (/), буква диска (например C:) заменяется на /cygdrive/буква_диска
#
[1C]
path = /cygdrive/f/Backup/1sbases/Rsync/
read only = false
transfer logging = yes
auth users = backup
secrets file = rsyncd.scrt
3. Создаем файл с паролем rsyncd.scrt, который имеет формат: имя_пользователя:пароль_в_открытом_виде
4. Перезапускаем службу RSyncServer
5. Пробуем подключиться к серверу через клиент.
TAG:
· Последнее изменение: d.m.Y H:i —
127.0.0.1
Rsync, or Remote Sync, is a tool in Linux/Unix for backing up and synchronizing data. With the Rsync command, you can sync files and folders on different folders, hard drives, or computers connected in a network, whether they’re nearby or far away.
In Windows, you might need to do the same thing: copy files from one folder to another on your computer, sync files between your computer and a network server, or do it the other way around.
Since Linux isn’t run by Microsoft, getting Linux commands to work on Windows requires some initial setup. How to set it up? Just keep reading.
How to run Rsync command in Windows
To run Linux commands in Window, you can install Windows Subsystem for Linux (WSL) on your computer for assistance. Functioning as a Windows tool, it lets you operate a Linux distribution in command line mode. This offers a relatively simple method to utilize Windows Rsync and also applies to other Linux utilities. The whole process is as follows:
- Install WSL.
If you are running Windows 10 2004 or later versions, open PowerShell or Command Prompt as administrator and type wsl –install.
If you are running older Windows versions, you’ll have to follow some extra steps to manually install WSL.
- First, open PowerShell as Administrator and enter dism.exe /online /enable-feature /featurename:Microsoft-Windows-Subsystem-Linux /all /norestart.
- Then, you can choose to upgrade to WSL 2 or stick with WSL 1. If you opt for the latter, you can pick a Linux distribution from the Microsoft Store. There are various choices like Ubuntu, SUSE, Debian, Fedora, Pengwin, and more.
- The first time you open the Linux distribution, you’ll need to wait a few minutes while the files are stored on your computer. Additionally, you’ll have to set up a user account with a password for the Linux distribution.
- Run Rsync command.
Open Command Prompt as administrator and enter the required Rsync command. To get detailed information about Rsync commands, type wsl man rsync.
Free alternative to Rsync – easier way to sync files
As you see, it’s not easy to run Rsync in Windows. Is there an easier way to sync files in Windows 11/10/8/7? AOMEI Backupper Standard comes to help.
- Batch Processing: You can sync multiple folders at the same time, which helps you avoid doing repetitive tasks.
- Automatic Sync: You have the option to create a schedule for running the file sync task on a daily, weekly, monthly basis, or triggered by a specific event.
- Wide Compatibility: It works with different source and target storage devices, like local or external drives, network locations, and the cloud.
Want to know how to sync files from one location to another using AOMEI Backupper? Here are the detailed steps.
Note: If you’re aiming to synchronize files/folders with an external device, ensure you connect it and verify that File Explorer can detect it beforehand.
Step 1. Download and open the Windows alternative to Rsync. Go to the Sync tab and choose Basic Sync.

Step 2. Modify the Task Name as needed. Click on Add Folder to pick the folder you wish to sync. You can do this again to include more folders.
Step 3. Pick a destination path. If you need to set up a network share/NAS, click the small triangle next to the selection box and select Add Share or NAS Devices.
Step 4. (Optional) If desired, use Schedule Sync to automate the task on a daily, weekly, or monthly basis.
Step 5. Finally, click on Start Sync to initiate the file synchronization process.
That’s it. Once you’ve established a scheduled sync task, there’s no need to configure it again. It will run automatically in the background without interrupting your ongoing tasks. There are other sync settings available, such as write a comment for your sync task and set up email notification to let the program send you the sync results via emails.
What’s more, AOMEI Backupper Standard is the best free disk clone software. It offers the Disk Clone and Partition Clone features. Disk Clone lets you replicate an entire disk onto another disk. If you want to copy a particular partition to another partition, you can use Partition Clone. Why not try it yourself?
Author Bio :-
Ivy – Junior Product Editor, AOMEI
Ivy is an editor of AOMEI Technology. she covers backup & restore, hard disk &partitions management, Cloud files transfer and so on for AOMEI. She enjoys helping people find solutions to their problems. She loves traveling, eating, reading and so on. She spends most of time with her family when she is not working.
-
The articles published under this profile are written by guest bloggers whose author details are attached below the corresponding posts.
View all posts
Synchronizing files between Linux and Windows can seem challenging, especially if you’re not familiar with the tools available. However, with the Windows Subsystem for Linux (WSL), this process becomes much simpler.
WSL allows you to run a Linux environment directly on Windows, enabling you to use powerful Linux tools like Rsync to sync files between the two operating systems.
In this article, we’ll walk you through the entire process of using Rsync to sync files between Linux and Windows using WSL. We’ll cover everything from setting up WSL to writing scripts for automated syncing.
By the end, you’ll have a clear understanding of how to efficiently manage file synchronization across these two platforms.
What is Rsync?
Rsync (short for “remote synchronization“) is a command-line tool used to synchronize files and directories between two locations, which is highly efficient because it only transfers the changes made to files, rather than copying everything every time, which makes it ideal for syncing large files or large numbers of files.
Why Use Rsync with WSL?
- WSL allows you to run Linux commands and tools directly on Windows, making it easier to use Rsync.
- Rsync only transfers the differences between files, saving time and bandwidth.
- You can sync files between a Linux machine and a Windows machine effortlessly.
- Rsync can be automated using scripts, making it perfect for regular backups or syncing tasks.
Prerequisites
Before we begin, ensure you have the following:
- WSL is supported on versions of Windows 10 and 11.
- You need to have WSL installed and set up on your Windows machine.
- Install a Linux distribution (e.g., Ubuntu) from the Microsoft Store.
- Rsync is usually pre-installed on Linux distributions, but we’ll cover how to install it if it’s not.
- Rsync uses SSH to securely transfer files between systems.
Step 1: Install and Set Up WSL
If you haven’t already installed WSL, then open PowerShell as administrator by pressing Win + X and selecting “Windows PowerShell (Admin)” or “Command Prompt (Admin)” and run the following command to install WSL.
wsl --install
This command installs WSL and the default Linux distribution (usually Ubuntu). After installation, restart your computer to complete the setup.
Once your computer restarts, open the installed Linux distribution (e.g., Ubuntu) from the Start menu. Follow the on-screen instructions to create a user account and set a password.
Step 2: Install Rsync on WSL
Rsync is usually pre-installed on most Linux distributions. However, if it’s not installed, you can install it using the following commands.
sudo apt update
sudo apt install rsync
rsync --version
This should display the installed version of Rsync.
Step 3: Set Up SSH on WSL
To enable SSH on WSL, you need to install the OpenSSH server.
sudo apt install openssh-server
Next, start and enable the SSH service to start automatically every time you launch WSL.
sudo service ssh start
sudo systemctl enable ssh
Verify that the SSH service is running.
sudo service ssh status
Step 4: Sync Files from Linux (WSL) to Windows
Now that Rsync and SSH are set up, you can start syncing files. Let’s say you want to sync files from your WSL environment to a directory on your Windows machine.
Launch your Linux distribution (e.g., Ubuntu) and identify the Windows directory, which typically mounted under /mnt/. For example, your C: drive is located at /mnt/c/.
Now run the following command to sync files from your WSL directory to a Windows directory:
rsync -avz /path/to/source/ /mnt/c/path/to/destination/
Explanation of the command:
-a: Archive mode (preserves permissions, timestamps, and symbolic links).-v: Verbose mode (provides detailed output).-z: Compresses data during transfer./path/to/source/: The directory in your WSL environment that you want to sync./mnt/c/path/to/destination/: The directory on your Windows machine where you want to sync the files.
Step 5: Sync Files from Windows to Linux (WSL)
If you want to sync files from a Windows directory to your WSL environment, you can use a similar command:
rsync -avz /mnt/c/path/to/source/ /path/to/destination/
Explanation of the command:
/mnt/c/path/to/source/: The directory on your Windows machine that you want to sync.- /
path/to/destination/: The directory in your WSL environment where you want to sync the files.
Step 6: Automate Syncing with a Script
To make syncing easier, you can create a bash script to automate the process.
nano sync.sh
Add the following lines to the script:
#!/bin/bash
rsync -avz /path/to/source/ /mnt/c/path/to/destination/
Save the file and make the script executable:
chmod +x sync.sh
Execute the script to sync files.
./sync.sh
You can use cron to schedule the script to run at specific intervals. For example, to run the script every day at 2 AM, add the following line to your crontab:
0 2 * * * /path/to/sync.sh
Conclusion
Using Rsync with WSL is a powerful and efficient way to sync files between Linux and Windows. By following the steps outlined in this article, you can easily set up Rsync, configure SSH, and automate file synchronization.