
The «enhanced metafile» format was introduced in the 32-bit versions of Windows. It
involves a bunch of new function calls, a couple of new data structures, a new
clipboard format, and a new filename extension of .EMF.
The most important enhancement is that the new metafile format includes
more extensive header information accessible through a function call. This information aids
in helping an application display the metafile image.
Some of the enhanced metafile functions allow you to translate back and forth
between the enhanced metafile (EMF) format and the old metafile format, which is also
called the Windows metafile (WMF) format. Of course, this conversion may not proceed
without hitches because the old metafile format does not support some of the new 32-bit
graphics features, such as paths.
The Basic Procedure
Figure 18-3 shows the EMF1 program, which creates and displays an enhanced
metafile with a fairly minimal amount of distraction.
Figure 18-3. The EMF1 Program.
EMF1.C
/*-------------------------------------
   EMF1.C -- Enhanced Metafile Demo #1
             (c) Charles Petzold, 1998
  -------------------------------------*/

#include <windows.h>

LRESULT CALLBACK WndProc (HWND, UINT, WPARAM, LPARAM) ;

int WINAPI WinMain (HINSTANCE hInstance, HINSTANCE hPrevInstance,
                    LPSTR lpszCmdLine, int nCmdShow)
{
     static TCHAR szAppName[] = TEXT ("EMF1") ;
     HWND         hwnd ;
     MSG          msg ;
     WNDCLASS     wndclass ;

     wndclass.style         = CS_HREDRAW | CS_VREDRAW ;
     wndclass.lpfnWndProc   = WndProc ;
     wndclass.cbClsExtra    = 0 ;
     wndclass.cbWndExtra    = 0 ;
     wndclass.hInstance     = hInstance ;
     wndclass.hIcon         = LoadIcon (NULL, IDI_APPLICATION) ;
     wndclass.hCursor       = LoadCursor (NULL, IDC_ARROW) ;
     wndclass.hbrBackground = GetStockObject (WHITE_BRUSH) ;
     wndclass.lpszMenuName  = NULL ;
     wndclass.lpszClassName = szAppName ;

     if (!RegisterClass (&wndclass))
     {
          MessageBox (NULL, TEXT ("This program requires Windows NT!"),
                      szAppName, MB_ICONERROR) ;
          return 0 ;
     }

     hwnd = CreateWindow (szAppName, TEXT ("Enhanced Metafile Demo #1"),
                          WS_OVERLAPPEDWINDOW,
                          CW_USEDEFAULT, CW_USEDEFAULT,
                          CW_USEDEFAULT, CW_USEDEFAULT,
                          NULL, NULL, hInstance, NULL) ;

     ShowWindow (hwnd, nCmdShow) ;
     UpdateWindow (hwnd) ;

     while (GetMessage (&msg, NULL, 0, 0))
     {
          TranslateMessage (&msg) ;
          DispatchMessage (&msg) ;
     }
     return msg.wParam ;
}

LRESULT CALLBACK WndProc (HWND hwnd, UINT message, WPARAM wParam, LPARAM lParam)
{
     static HENHMETAFILE hemf ;
     HDC                 hdc, hdcEMF ;
     PAINTSTRUCT         ps ;
     RECT                rect ;

     switch (message)
     {
     case WM_CREATE:
          hdcEMF = CreateEnhMetaFile (NULL, NULL, NULL, NULL) ;

          Rectangle (hdcEMF, 100, 100, 200, 200) ;

          MoveToEx  (hdcEMF, 100, 100, NULL) ;
          LineTo    (hdcEMF, 200, 200) ;

          MoveToEx  (hdcEMF, 200, 100, NULL) ;
          LineTo    (hdcEMF, 100, 200) ;

          hemf = CloseEnhMetaFile (hdcEMF) ;
          return 0 ;

     case WM_PAINT:
          hdc = BeginPaint (hwnd, &ps) ;

          GetClientRect (hwnd, &rect) ;

          rect.left   =     rect.right  / 4 ;
          rect.right  = 3 * rect.right  / 4 ;
          rect.top    =     rect.bottom / 4 ;
          rect.bottom = 3 * rect.bottom / 4 ;

          PlayEnhMetaFile (hdc, hemf, &rect) ;

          EndPaint (hwnd, &ps) ;
          return 0 ;

     case WM_DESTROY:
          DeleteEnhMetaFile (hemf) ;

          PostQuitMessage (0) ;
          return 0 ;
     }
     return DefWindowProc (hwnd, message, wParam, lParam) ;
}
During WM_CREATE message processing in EMF1’s window procedure, the
program creates the enhanced metafile, beginning with a call to
CreateEnhMetaFile. This function requires four arguments, but you can set all of them to NULL. I’ll discuss how to use
these arguments with non-NULL values shortly.
Like CreateMetaFile, the
CreateEnhMetaFile function returns a special device
context handle. The program uses this handle to draw a rectangle and two lines connecting
the opposite corners of the rectangle. These function calls and their arguments are
converted to a binary form and stored in the metafile.
Finally, a call to CloseEnhMetaFile wraps up the creation of the enhanced
metafile and returns a handle to it. This is stored in a static variable of type HENHMETAFILE.
During the WM_PAINT message, EMF1 obtains the dimensions of the program’s
client window in a RECT structure. The four fields of the structure are adjusted so that
the rectangle is half the width and height of the client window and centered within it.
EMF1 then calls PlayEnhMetaFile. The first argument is a handle to the window’s device
context, the second argument is the handle to the enhanced metafile, and the third
argument is a pointer to the RECT structure.
What happens here is that during creation of the metafile, GDI figures out the
entire dimensions of the metafile image. In this case, the image is 100 units high and wide.
When displaying the metafile, GDI stretches the image to fit the rectangle specified in
the PlayEnhMetaFile function. Three instances of EMF1 running under Windows are
shown in Figure 18-4.
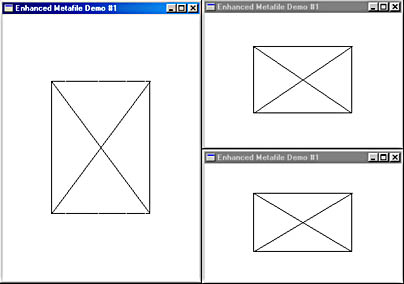
Figure 18-4. The EMF1 Display.
Finally, during the WM_DESTROY message, EMF1 deletes the metafile by
calling DeleteEnhMetaFile.
Let’s take note of a few things we can learn from the EMF1 program.
First, in this particular program, the coordinates used in the rectangle and
line-drawing functions when creating the enhanced metafile don’t really mean all that much. You
can double them all or subtract a constant from them all, and the results will be the same.
All that matters is that the coordinates have a relationship among themselves in defining an image.
Second, the image is stretched to fit the rectangle passed to the
PlayEnhMetaFile function. Thus, as Figure 18-4 clearly shows, the image can be distorted. The
metafile coordinates imply that the image is square, but that’s not what we get in the general
case. And sometimes, that’s exactly what you want. For embedding images in a word
processing text, you may want the user to specify a rectangle for the image and be assured
that the entire image fits exactly within the rectangle without any wasted space. Let the
user worry about the correct aspect ratio by adjusting the rectangle appropriately.
However, there are times when something else is appropriate. You may want
to maintain the aspect ratio of the original image because it may be vitally important to
rendering the visual information. For example, a police sketch of a crime suspect
shouldn’t be fatter or squatter than it was originally drawn. Or, you may want to preserve the
metrical size of the original image. It may be important that the image is two inches high
and shouldn’t normally be reproduced otherwise.
Notice also that the lines drawn in the metafile don’t seem to exactly meet the
corners of the rectangle. This is the result of a problem in the way that Windows stores
rectangle coordinates in the metafile. We’ll work on a fix to this problem later in this chapter.
Looking Inside
You can get a good feel for how metafiles work by looking at the contents of the
metafile. This is easiest if you have a disk-based metafile to look at, so the EMF2 program
shown in Figure 18-5 creates one for you.
Figure 18-5. The EMF2 Program.
EMF2.C
/*-------------------------------------
   EMF2.C -- Enhanced Metafile Demo #2
             (c) Charles Petzold, 1998
  -------------------------------------*/

#include <windows.h>

LRESULT CALLBACK WndProc (HWND, UINT, WPARAM, LPARAM) ;

int WINAPI WinMain (HINSTANCE hInstance, HINSTANCE hPrevInstance,
                    LPSTR lpszCmdLine, int nCmdShow)
{
     static TCHAR szAppName[] = TEXT ("EMF2") ;
     HWND         hwnd ;
     MSG          msg ;
     WNDCLASS     wndclass ;
     wndclass.style         = CS_HREDRAW | CS_VREDRAW ;
     wndclass.lpfnWndProc   = WndProc ;
     wndclass.cbClsExtra    = 0 ;
     wndclass.cbWndExtra    = 0 ;
     wndclass.hInstance     = hInstance ;
     wndclass.hIcon         = LoadIcon (NULL, IDI_APPLICATION) ;
     wndclass.hCursor       = LoadCursor (NULL, IDC_ARROW) ;
     wndclass.hbrBackground = GetStockObject (WHITE_BRUSH) ;
     wndclass.lpszMenuName  = NULL ;
     wndclass.lpszClassName = szAppName ;

     if (!RegisterClass (&wndclass))
     {
          MessageBox (NULL, TEXT ("This program requires Windows NT!"),
                      szAppName, MB_ICONERROR) ;
          return 0 ;
     }

     hwnd = CreateWindow (szAppName, TEXT ("Enhanced Metafile Demo #2"),
                          WS_OVERLAPPEDWINDOW,
                          CW_USEDEFAULT, CW_USEDEFAULT,
                          CW_USEDEFAULT, CW_USEDEFAULT,
                          NULL, NULL, hInstance, NULL) ;

     ShowWindow (hwnd, nCmdShow) ;
     UpdateWindow (hwnd) ;

     while (GetMessage (&msg, NULL, 0, 0))
     {
          TranslateMessage (&msg) ;
          DispatchMessage (&msg) ;
     }
     return msg.wParam ;
}

LRESULT CALLBACK WndProc (HWND hwnd, UINT message, WPARAM wParam, LPARAM lParam)
{
     HDC          hdc, hdcEMF ;
     HENHMETAFILE hemf ;
     PAINTSTRUCT  ps ;
     RECT         rect ;

     switch (message)
     {
     case WM_CREATE:
          hdcEMF = CreateEnhMetaFile (NULL, TEXT ("emf2.emf"), NULL,
                                      TEXT ("EMF2\0EMF Demo #2\0")) ;

          if (!hdcEMF)
               return 0 ;

          if  (GetVersion () & 0x80000000)               //Windows 98
                Rectangle (hdcEMF, 100, 100, 201, 201) ;
          else                                              //Windows NT
               Rectangle (hdcEMF, 101, 101, 202, 202) ;

          MoveToEx  (hdcEMF, 100, 100, NULL) ;
          LineTo    (hdcEMF, 200, 200) ;

          MoveToEx  (hdcEMF, 200, 100, NULL) ;
          LineTo    (hdcEMF, 100, 200) ;

          hemf = CloseEnhMetaFile (hdcEMF) ;

          DeleteEnhMetaFile (hemf) ;
          return 0 ;

     case WM_PAINT:
          hdc = BeginPaint (hwnd, &ps) ;

          GetClientRect (hwnd, &rect) ;

          rect.left   =     rect.right  / 4 ;
          rect.right  = 3 * rect.right  / 4 ;
          rect.top    =     rect.bottom / 4 ;
          rect.bottom = 3 * rect.bottom / 4 ;

          if (hemf = GetEnhMetaFile (TEXT ("emf2.emf")))
          {
               PlayEnhMetaFile (hdc, hemf, &rect) ;
               DeleteEnhMetaFile (hemf) ;
          }
          EndPaint (hwnd, &ps) ;
          return 0 ;

     case WM_DESTROY:
          PostQuitMessage (0) ;
          return 0 ;
     }
     return DefWindowProc (hwnd, message, wParam, lParam) ;
}
In EMF1, all the arguments to the
CreateEnhMetaFile function were set to NULL.
In EMF2, the first argument is also set to NULL. This argument can be a device context
handle. GDI uses this argument to insert metrical information in the metafile header, as we’ll
see shortly. If the argument is set to NULL, GDI assumes that this metrical information is
based on the video device context.
The second argument to CreateEnhMetaFile is a filename. If you set this argument to NULL (as EMF1 does but EMF2 does not), then the function creates a memory metafile. EMF2 creates a disk-based metafile with the name EMF2.EMF.
The third argument to the function is an address of a RECT structure that
indicates the total dimensions of the metafile in 0.01 mm units. This piece of vital information (one of the deficiencies of the earlier Windows metafile format) goes into the metafile header, as we’ll soon see. If you set this argument to NULL, GDI will figure out the dimensions for you. I like the idea of operating systems doing things for me, so I’ve set the
argument to NULL. If performance is critical in your application, you might want to use this argument to avoid some extraneous work on GDI’s part.
Finally, the last argument is a text string describing the metafile. This text string is specified in two pieces: the first piece is the name of the application (not necessarily the program filename) followed by a NULL character, and the second piece describes the visual image and is followed by two NULL characters. For example, using the C notation of `\0′ for a NULL character, the description string could be «LoonyCad V6.4\0Flying Frogs\0\0». Because C normally puts a NULL character at the end of quoted strings, you need only one `\0′ at the end, as EMF2 demonstrates.
After creating the metafile, EMF2 proceeds like EMF1 and makes a few GDI
function calls by using the device context handle returned from the
CreateEnhMetaFile function. The program then calls
CloseEnhMetaFile to destroy the device context handle and
obtain a handle to the completed metafile.
Then, still during WM_CREATE processing, EMF2 does something EMF1 does not: right after obtaining the metafile handle, the program calls
DeleteEnhMetaFile. That gets rid of all memory resources required to maintain the metafile. However, the disk-based
metafile stays behind. (If you ever want to get rid of that file, use a normal file-deletion
function such as DeleteFile.) Notice that the metafile handle is not stored as a static variable as
in EMF1, which implies that it is not required to be saved between messages.
Now, to use that metafile, EMF2 needs to access the disk file. It does this during the WM_PAINT message by calling
GetEnhMetaFile. The single argument to the
function is the metafile filename, and the function returns a handle to the metafile. EMF2 passes this handle to the PlayEnhMetaFile function, just as in EMF1. The metafile image is
displayed in the rectangle described by the last argument to the function. But unlike EMF1, EMF2 deletes the metafile before concluding WM_PAINT processing. During any following WM_PAINT messages, EMF2 gets the metafile again, plays it, and deletes it.
Keep in mind that deleting the metafile involves deleting only the memory resources required for maintaining the metafile. The disk-based metafile stays behind, even after the program has concluded execution.
Because EMF2 leaves behind a disk-based metafile, you can take a look at it. Figure 18-6 shows a simple hexadecimal dump of the EMF2.EMF file that the program
creates.
0000  01 00 00 00 88 00 00 00 64 00 00 00 64 00 00 00  ........d...d...
0010  C8 00 00 00 C8 00 00 00 35 0C 00 00 35 0C 00 00  ........5...5...
0020  6A 18 00 00 6A 18 00 00 20 45 4D 46 00 00 01 00  j...j... EMF....
0030  F4 00 00 00 07 00 00 00 01 00 00 00 12 00 00 00  ................
0040  64 00 00 00 00 00 00 00 00 04 00 00 00 03 00 00  d...............
0050  40 01 00 00 F0 00 00 00 00 00 00 00 00 00 00 00  @...............
0060  00 00 00 00 45 00 4D 00 46 00 32 00 00 00 45 00  ....E.M.F.2...E.
0070  4D 00 46 00 20 00 44 00 65 00 6D 00 6F 00 20 00  M.F. .D.e.m.o. .
0080  23 00 32 00 00 00 00 00 2B 00 00 00 18 00 00 00  #.2.....+.......
0090  63 00 00 00 63 00 00 00 C6 00 00 00 C6 00 00 00  c...c...........
00A0  1B 00 00 00 10 00 00 00 64 00 00 00 64 00 00 00  ........d...d...
00B0  36 00 00 00 10 00 00 00 C8 00 00 00 C8 00 00 00  6...............
00C0  1B 00 00 00 10 00 00 00 C8 00 00 00 64 00 00 00  ............d...
00D0  36 00 00 00 10 00 00 00 64 00 00 00 C8 00 00 00  6.......d.......
00E0  0E 00 00 00 14 00 00 00 00 00 00 00 10 00 00 00  ................
00F0  14 00 00 00                                      ....
Figure 18-6. A hexadecimal dump of EMF2.EMF.
I should note that Figure 18-6 shows the metafile created by EMF2 under
Microsoft Windows NT 4 running with a video display resolution of 1024 by 768. The
metafile created by the same program running under Windows 98 will be 12 bytes shorter, as
I’ll discuss shortly. Also, the video display resolution will affect some of the information
in the metafile header.
Looking at the enhanced metafile format allows us to more deeply understand
the workings of metafiles. The enhanced metafile consists of variable-length records.
The general format of these records is described by the ENHMETARECORD structure,
defined in the WINGDI.H header file like so:
typedef struct tagENHMETARECORD
{
     DWORD iType ;         // record type
     DWORD nSize ;         // record size
     DWORD dParm [1] ;     // parameters
}
ENHMETARECORD ;
Of course, that array of one element really indicates a variable number of array
elements. The number of parameters depends on the record type. The
iType field can be one of nearly 100 constants beginning with the prefix EMR_ defined in the WINGDI.H file. The
nSize field is the size of the total record, including the
iType and nSize fields, and one or
more dParm fields.
With this knowledge, let’s look at Figure 18-6. The first field has a type of
0x00000001 and a size of 0x00000088, so it occupies the first 136 bytes of the file. A record type of
1 is the constant EMR_HEADER. I want to leave the discussion of the header for later, so
for now let’s just skip to offset 0x0088, at the end of this first record.
The next five records correspond to the five GDI calls that EMF2 makes after
creating the metafile. The record at offset 0x0088 has a type code of 0x0000002B, which
is EMR_RECTANGLE, obviously the metafile record for the
Rectangle call. It has a length of 0x00000018 (24 in decimal) bytes to accommodate four 32-bit arguments. The
Rectangle function actually has five arguments, of course, but the first—the handle to the
device context—is not stored in the metafile because it would have no real meaning. There
are two arguments of 0x00000063 (or 99) and two arguments of 0x000000C6 (or 198),
even though the function call in EMF2 specifies that the
Rectangle corners are (100, 100) and (200, 200). The metafile created by the EMF2 program under Windows 98 will show
the first two arguments as 0x00000064 (or 100) and the next two as 0x000000C7 (or
199). Obviously, Windows is making an adjustment to the
Rectangle arguments before they are stored in the metafile but not doing it consistently. This is why the lines do not match
the corners of the rectangle.
Next, we have four 16-byte records corresponding to the two
MoveToEx (0x0000001B or EMR_MOVETOEX) and
LineTo (0x00000036 or EMR_LINETO) calls. The arguments
in the metafile are the same as those passed to the functions.
The metafile ends with a type code of 0x0000000E or EMR_EOF («end of file»),
a 20-byte record.
The enhanced metafile always begins with a header record. This corresponds to
a structure of type ENHMETAHEADER, which is defined like so:
typedef struct tagENHMETAHEADER
{
     DWORD iType ;          // EMR_HEADER = 1
     DWORD nSize ;          // structure size
     RECTL rclBounds ;      // bounding rectangle in pixels
     RECTL rclFrame ;       // size of image in 0.01 millimeters
     DWORD dSignature ;     // ENHMETA_SIGNATURE = " EMF"
     DWORD nVersion ;       // 0x00010000
     DWORD nBytes ;         // file size in bytes
     DWORD nRecords ;       // total number of records
     WORD  nHandles ;       // number of handles in handle table
     WORD  sReserved ;
     DWORD nDescription ;   // character length of description string
     DWORD offDescription ; // offset of description string in file
     DWORD nPalEntries ;    // number of entries in palette
     SIZEL szlDevice ;      // device resolution in pixels
     SIZEL szlMillimeters ; // device resolution in millimeters
     DWORD cbPixelFormat ;  // size of pixel format
     DWORD offPixelFormat ; // offset of pixel format
     DWORD bOpenGL ;        // FALSE if no OpenGL records
}
ENHMETAHEADER ;
The existence of this header record is probably the single greatest improvement
of the enhanced metafile format over the old Windows metafile. You do not need to use
the file I/O function on the disk-based metafile to obtain this header information. If you
have a handle to the metafile, you can use the
GetEnhMetaFileHeader function:
GetEnhMetaFileHeader (hemf, cbSize, &emh) ;
The first argument is the metafile handle, the last is a pointer to an
ENHMETAHEADER structure, and the second is the size of this structure. You can use the similar
GetEnhMetaFileDescription function to obtain the description string.
As defined above, the ENHMETAHEADER structure is 100 bytes in length, but in
the EMF2.EMF metafile the size of the record includes the description string, so the size is
0x88 or 136 bytes. The header stored in a Windows 98 metafile does not include the last
three fields of the ENHMETAHEADER structure, which accounts for the 12-byte difference in size.
The rclBounds field is a RECT structure that indicates the size of the image in
pixels. Translating from hexadecimal, we see that the image is bounded by the points (100,
100) on the upper left and (200, 200) on the lower right, exactly what we expect.
The rclFrame field is another rectangle structure that provides the same
information but in units of 0.01 millimeters. In this case, the file shows a bounding rectangle of
(0x0C35, 0x0C35) by (0x186A, 0x186A) or, in decimal, (3125, 3125) by (6250, 6250). Where does
this information come from? We’ll see shortly.
The dSignature field is always the value ENHMETA_SIGNATURE, or 0x464D4520.
That seems like a strange number, but if you reverse the byte ordering (in accordance with
how multibyte values are stored in memory with Intel processors) and convert to ASCII,
it’s simply the string » EMF». The
dVersion field is always 0x00010000.
This is followed by the nBytes field, which in this case is 0x000000F4, the total
byte size of the metafile. The nRecords field (in this case, 0x00000007) indicates the number
or records—the header record, the five GDI function calls, and the end-of-file record.
Next we have two 16-bit fields. The
nHandles field is 0x0001. Normally this
field would indicate the number of nondefault handles to graphics objects (such as pens,
brushes, and fonts) used in the metafile. We haven’t done that, so you might expect the field to
be zero, but GDI reserves the first one for itself. We’ll see how handles are stored in
metafiles shortly.
The next two fields indicate the length of the description string in characters and
its offset within the file, in this case 0x00000012 (18 in decimal) and 0x00000064. If the
metafile did not have a description string, both these fields would be zero.
The nPalEntries field indicates the number of entries in the metafile’s palette
table, in this case none.
The header record continues with two SIZEL structures, which contain two
32-bit fields, cx and cy. The
szlDevice field (at offset 0x0040 in the metafile) indicates the size
of the output device in pixels, and the
szlMillimeters field (at offset 0x0050) is the size of
the output device in millimeters. In the documentation of the enhanced metafile, this
output device is called the «reference device.» It is based on the device context indicated by
the handle passed as the first argument to the
CreateEnhMetaFile call. If the argument is
set to NULL, GDI uses the video display. When EMF2 created the metafile shown above,
I happened to be running Windows NT in a 1024 by 768 video mode, so that’s what
GDI used as the reference device.
GDI obtains this information from
GetDeviceCaps. The szlDevice field in
EMF2.EMF is 0x0400 by 0x0300 (that is, 1024 by 768), which is obtained from
GetDeviceCaps using the HORZRES and VERTRES arguments. The
szlMillimeters field is 0x140 by 0xF0 or
320 by 240, obtained from GetDeviceCaps using the HORZSIZE and VERTSIZE arguments.
A simple division reveals that the pixels are 0.3125 millimeters high and wide,
which is how GDI figures out the dimensions of the
rclFrame rectangle described above.
The ENHMETAHEADER structure is followed in the metafile by the
description string, which was the last argument to
CreateEnhMetaFile. In this example, this is
the string «EMF2» followed by a NULL character and «EMF Demo #2» followed by two
NULL characters. That’s a total of 18 characters, or 36 bytes because it’s stored in Unicode.
The string is always stored in Unicode regardless of whether the program creating the
metafile is running under Windows NT or Windows 98.
Metafiles and GDI Objects
We’ve now seen how GDI drawing commands are stored in metafiles. Now let’s
examine how GDI objects are stored. The EMF3 program shown in Figure 18-7 is similar to the EMF2 program shown earlier, except that it creates a nondefault pen and
brush for drawing the rectangle and lines. I’ve also provided a little fix for the problem
with the coordinates to Rectangle. EMF3 uses
GetVersion to determine if it’s running
under Windows 98 or Windows NT, and to adjust the arguments appropriately.
Figure 18-7. The EMF3 program.
EMF3.C
/*-------------------------------------
   EMF3.C -- Enhanced Metafile Demo #3
             (c) Charles Petzold, 1998
  -------------------------------------*/

#include <windows.h>

LRESULT CALLBACK WndProc (HWND, UINT, WPARAM, LPARAM) ;

int WINAPI WinMain (HINSTANCE hInstance, HINSTANCE hPrevInstance,
                    PSTR szCmdLine, int iCmdShow)
{
     static TCHAR szAppName[] = TEXT ("EMF3") ;
     HWND         hwnd ;

     MSG          msg ;
     WNDCLASS     wndclass ;

     wndclass.style         = CS_HREDRAW | CS_VREDRAW ;
     wndclass.lpfnWndProc   = WndProc ;
     wndclass.cbClsExtra    = 0 ;
     wndclass.cbWndExtra    = 0 ;
     wndclass.hInstance     = hInstance ;
     wndclass.hIcon         = LoadIcon (NULL, IDI_APPLICATION) ;
     wndclass.hCursor       = LoadCursor (NULL, IDC_ARROW) ;
     wndclass.hbrBackground = GetStockObject (WHITE_BRUSH) ;
     wndclass.lpszMenuName  = NULL ;
     wndclass.lpszClassName = szAppName ;

     if (!RegisterClass (&wndclass))
     {
          MessageBox (NULL, TEXT ("This program requires Windows NT!"),
                      szAppName, MB_ICONERROR) ;
          return 0 ;
     }

     hwnd = CreateWindow (szAppName, TEXT ("Enhanced Metafile Demo #3"),
                          WS_OVERLAPPEDWINDOW,
                          CW_USEDEFAULT, CW_USEDEFAULT,
                          CW_USEDEFAULT, CW_USEDEFAULT,
                          NULL, NULL, hInstance, NULL) ;

     ShowWindow (hwnd, iCmdShow) ;
     UpdateWindow (hwnd) ;

     while (GetMessage (&msg, NULL, 0, 0))
     {
          TranslateMessage (&msg) ;
          DispatchMessage (&msg) ;
     }
     return msg.wParam ;
}

LRESULT CALLBACK WndProc (HWND hwnd, UINT message, WPARAM wParam, LPARAM lParam)
{
     LOGBRUSH     lb ;
     HDC          hdc, hdcEMF ;
     HENHMETAFILE hemf ;
     PAINTSTRUCT  ps ;
     RECT         rect ;

     switch (message)
     {
     case WM_CREATE:
          hdcEMF = CreateEnhMetaFile (NULL, TEXT ("emf3.emf"), NULL,
                                      TEXT ("EMF3\0EMF Demo #3\0")) ;

          SelectObject (hdcEMF, CreateSolidBrush (RGB (0, 0, 255))) ;

          lb.lbStyle = BS_SOLID ;
          lb.lbColor = RGB (255, 0, 0) ;
          lb.lbHatch = 0 ;

          SelectObject (hdcEMF,
               ExtCreatePen (PS_SOLID | PS_GEOMETRIC, 5, &lb, 0, NULL)) ;

          Rectangle (hdcEMF, 100, 100, 200, 200) ;

          MoveToEx  (hdcEMF, 100, 100, NULL) ;
          LineTo    (hdcEMF, 200, 200) ;

          MoveToEx  (hdcEMF, 200, 100, NULL) ;
          LineTo    (hdcEMF, 100, 200) ;

          DeleteObject (SelectObject (hdcEMF, GetStockObject (BLACK_PEN))) ;
          DeleteObject (SelectObject (hdcEMF, GetStockObject (WHITE_BRUSH))) ;

          hemf = CloseEnhMetaFile (hdcEMF) ;

          DeleteEnhMetaFile (hemf) ;
          return 0 ;

     case WM_PAINT:
          hdc = BeginPaint (hwnd, &ps) ;

          GetClientRect (hwnd, &rect) ;

          rect.left   =     rect.right  / 4 ;
          rect.right  = 3 * rect.right  / 4 ;
          rect.top    =     rect.bottom / 4 ;
          rect.bottom = 3 * rect.bottom / 4 ;

          hemf = GetEnhMetaFile (TEXT ("emf3.emf")) ;

          PlayEnhMetaFile (hdc, hemf, &rect) ;
          DeleteEnhMetaFile (hemf) ;
          EndPaint (hwnd, &ps) ;
          return 0 ;

     case WM_DESTROY:
          PostQuitMessage (0) ;
          return 0 ;
     }
     return DefWindowProc (hwnd, message, wParam, lParam) ;
}
As we’ve seen, when you call GDI functions using the device context handle returned from CreateEnhMetaFile, the function calls are stored in the metafile rather than being rendered on the screen or printer. However, some GDI functions do not refer to a particular device context at all. One important category of these GDI functions are those that create graphics objects, including pens and brushes. Although the definitions of logical pens and brushes are stored in memory maintained by GDI, these abstract definitions are not associated with any particular device context when they’re created.
EMF3 calls both the CreateSolidBrush and
ExtCreatePen functions. Because these functions do not require a device context handle, this implies that GDI will not store these
calls in the metafile. This implication is true. When called by themselves, GDI functions simply create the graphics drawing object without affecting the metafile at all.
However, when a program calls SelectObject to select a GDI object into the metafile device context, GDI encodes both an object-creation function (essentially derived from the internal GDI data used to stored the object) and a SelectObject call in the metafile. To see how this works, let’s take a look at the hexadecimal dump of EMF3.EMF,
shown in Figure 18-8.
0000  01 00 00 00 88 00 00 00 60 00 00 00 60 00 00 00  ........`...`...
0010  CC 00 00 00 CC 00 00 00 B8 0B 00 00 B8 0B 00 00  ................
0020  E7 18 00 00 E7 18 00 00 20 45 4D 46 00 00 01 00  ........ EMF....
0030  88 01 00 00 0F 00 00 00 03 00 00 00 12 00 00 00  ................
0040  64 00 00 00 00 00 00 00 00 04 00 00 00 03 00 00  d...............
0050  40 01 00 00 F0 00 00 00 00 00 00 00 00 00 00 00  @...............
0060  00 00 00 00 45 00 4D 00 46 00 33 00 00 00 45 00  ....E.M.F.3...E.
0070  4D 00 46 00 20 00 44 00 65 00 6D 00 6F 00 20 00  M.F. .D.e.m.o. .
0080  23 00 33 00 00 00 00 00 27 00 00 00 18 00 00 00  #.3.....'.......
0090  01 00 00 00 00 00 00 00 00 00 FF 00 00 00 00 00  ................
00A0  25 00 00 00 0C 00 00 00 01 00 00 00 5F 00 00 00  %..........._...
00B0  34 00 00 00 02 00 00 00 34 00 00 00 00 00 00 00  4.......4.......
00C0  34 00 00 00 00 00 00 00 00 00 01 00 05 00 00 00  4...............
00D0  00 00 00 00 FF 00 00 00 00 00 00 00 00 00 00 00  ................
00E0  25 00 00 00 0C 00 00 00 02 00 00 00 2B 00 00 00  %...........+...
00F0  18 00 00 00 63 00 00 00 63 00 00 00 C6 00 00 00  ....c...c.......
0100  C6 00 00 00 1B 00 00 00 10 00 00 00 64 00 00 00  ............d...
0110  64 00 00 00 36 00 00 00 10 00 00 00 C8 00 00 00  d...6...........
0120  C8 00 00 00 1B 00 00 00 10 00 00 00 C8 00 00 00  ................
0130  64 00 00 00 36 00 00 00 10 00 00 00 64 00 00 00  d...6.......d...
0140  C8 00 00 00 25 00 00 00 0C 00 00 00 07 00 00 80  ....%...........
0150  28 00 00 00 0C 00 00 00 02 00 00 00 25 00 00 00  (...........%...
0160  0C 00 00 00 00 00 00 80 28 00 00 00 0C 00 00 00  ........(.......
0170  01 00 00 00 0E 00 00 00 14 00 00 00 00 00 00 00  ................
0180  10 00 00 00 14 00 00 00                          ........
Figure 18-8. A hexadecimal dump of EMF3.EMF.
You may want to compare this metafile with EMF2.EMF shown earlier. The first difference you’ll see in the header section of EMF3.EMF is the
rclBounds field. EMF2.EMF indicated that the image was bound between coordinates (0x64,0x64) and (0xC8, 0xC8). In EMF3.EMF it’s (0x60,0x60) and (0xCC,0xCC). This reflects using a wider pen. The
rclFrame field (indicating the size of the image in units of 0.01 millimeters) is also affected.
While the nBytes field (located at offset 0x0030) of EMF2.EMF indicated that
the metafile was 0xFA bytes, EMF3.EMF is 0x0188 bytes. The EMF2.EMF metafile contained
7 records (the header, 5 GDI function calls, and the end-of-file record), but EMF3.EMF
has 15. As we’ll see, the extra 8 records are for 2 object-creation functions, 4 calls to
SelectObject, and 2 DeleteObject calls.
The nHandles field (at offset 0x0038 in the file) indicates the number of handles
to GDI objects. This is always one more than the number of nondefault objects used by
the metafile. (The way that the Platform SDK documentation indicates this is «Index zero
in this table is reserved.») The field is 1 in EMF2.EMF and 3 in EMF3.EMF, indicating the
pen and the brush.
Let’s skip to offset 0x0088 in the file, which is the second record (the first
after the header). The record type is 0x27, which corresponds to the constant EMR_CREATEBRUSHINDIRECT. This is the metafile record for the
CreateBrushIndirect function, which requires a pointer to a LOGBRUSH structure. The size of the record is
0x18 (or 24) bytes.
Each nonstock GDI object that is selected into the metafile device context is
assigned a number beginning with 1. This is indicated by the next 4-byte word in this record, at
offset 0x0090 in the metafile. The next three 4-byte fields in this record correspond to the
three fields of the LOGBRUSH structure, 0x00000000 (the
lbStyle field of BS_SOLID), 0x00FF0000 (the
lbColor field), and 0x00000000 (the
lbHatch field).
At offset 0x00A0 in EMF3.EMF is the next record, which has a record type of
0x25, or EMR_SELECTOBJECT, the metafile record for the
SelectObject call. The record is 0x0C (or 12) bytes long, and the next field is the number 0x01, indicating that it’s selecting
the first GDI object, which is the logical brush.
At offset 0x00AC in EMF3.EMF is the next record, which has a record type of
0x5F, or EMR_EXTCREATEPEN. The record is 0x34 (or 52) bytes. The next 4-byte field is
0x02, which means this is the second nonstock GDI object used in the metafile.
I won’t pretend that I know why the next four fields of the
EMR_EXTCREATEPEN record repeat the record size twice, interspersed with 0 fields, but there they are: 0x34,
0x00, 0x34, and 0x00. The next field is 0x00010000, which is the pen style of
PS_SOLID (0x00000000) combined with PS_GEOMETRIC (0x00010000). The width of five units is
next, followed by the three fields of the logical brush structure used in the
ExtCreatePen function, followed by a field of 0.
If you create a custom extended pen style, the EMR_EXTCREATEPEN record will
be longer than 52 bytes, and this will be reflected not only in the second field of the
record, but in the two repeated size fields. Following the three fields that describe the
LOGBRUSH structure, the next field will not be 0 (as it is in EMF3.EMF) but will indicate the
number of dashes and spaces. This is followed by that many fields for the dash and space lengths.
The next 12-byte field in EMF3.EMF is another
SelectObject call indicating the second object—the pen. The next five records are the same as EMF2.EMF—a record type
of 0x2B (EMR_RECTANGLE), and two sets of records of 0x1B (EMR_MOVETOEX) and
0x36 (EMR_LINETO).
These drawing functions are followed by two sets of 12-byte records of 0x25 (EMR_SELECTOBJECT) and 0x28 (EMR_DELETEOBJECT). The select-object records have
arguments of 0x80000007 and 0x80000000. When the high bit is set, it indicates a stock
object, in this case 0x07 (corresponding to BLACK_PEN) and 0x00 (WHITE_BRUSH).
The DeleteObject calls have arguments of 2 and 1, for the two nondefault objects
used in the metafile. Although the
DeleteObject function does not require a device context
handle as the first argument, GDI apparently keeps track of objects used in the metafile that
are deleted by the program.
Finally, the metafile concludes with a 0x0E record, which is EMF_EOF («end of file»).
To sum up, whenever a nondefault GDI object is first selected into a metafile
device context, GDI encodes both a record indicating the object-creation function (in this
case, EMR_CREATEBRUSHINDIRECT and EMR_EXTCREATEPEN). Each object will have a
unique number beginning with 1, indicated by the third field of the record. This record will
be followed by an EMR_SELECTOBJECT record referencing that number. On subsequent
times an object is selected into the metafile device context (without being deleted in the
interim), only an EMR_SELECTOBJECT record is required.
Metafiles and Bitmaps
Let’s try something a little more complex now, in particular drawing a bitmap in a
metafile device context. This is shown in EMF4, in Figure 18-9.
Figure 18-9. The EMF4 program.
EMF4.C
/*-------------------------------------
   EMF4.C -- Enhanced Metafile Demo #4
             (c) Charles Petzold, 1998
  -------------------------------------*/

#define OEMRESOURCE
#include <windows.h>

LRESULT CALLBACK WndProc (HWND, UINT, WPARAM, LPARAM) ;

int WINAPI WinMain (HINSTANCE hInstance, HINSTANCE hPrevInstance,
                    PSTR szCmdLine, int iCmdShow)
{
     static TCHAR szAppName[] = TEXT ("EMF4") ;
     HWND         hwnd ;
     MSG          msg ;
     WNDCLASS     wndclass ;

     wndclass.style         = CS_HREDRAW | CS_VREDRAW ;
     wndclass.lpfnWndProc   = WndProc ;
     wndclass.cbClsExtra    = 0 ;
     wndclass.cbWndExtra    = 0 ;
     wndclass.hInstance     = hInstance ;
     wndclass.hIcon         = LoadIcon (NULL, IDI_APPLICATION) ;
     wndclass.hCursor       = LoadCursor (NULL, IDC_ARROW) ;
     wndclass.hbrBackground = GetStockObject (WHITE_BRUSH) ;
     wndclass.lpszMenuName  = NULL ;
     wndclass.lpszClassName = szAppName ;

     if (!RegisterClass (&wndclass))
     {
          MessageBox (NULL, TEXT ("This program requires Windows NT!"),
                      szAppName, MB_ICONERROR) ;
          return 0 ;
     }

     hwnd = CreateWindow (szAppName, TEXT ("Enhanced Metafile Demo #4"),
                          WS_OVERLAPPEDWINDOW,
                          CW_USEDEFAULT, CW_USEDEFAULT,
                          CW_USEDEFAULT, CW_USEDEFAULT,
                          NULL, NULL, hInstance, NULL) ;

     ShowWindow (hwnd, iCmdShow) ;
     UpdateWindow (hwnd) ;


     while (GetMessage (&msg, NULL, 0, 0))
     {
          TranslateMessage (&msg) ;
          DispatchMessage (&msg) ;
     }
     return msg.wParam ;
}

LRESULT CALLBACK WndProc (HWND hwnd, UINT message, WPARAM wParam, LPARAM lParam)
{
     BITMAP       bm ;
     HBITMAP      hbm ;
     HDC          hdc, hdcEMF, hdcMem ;
     HENHMETAFILE hemf ;
     PAINTSTRUCT  ps ;
     RECT         rect ;

     switch (message)
     {
     case WM_CREATE:
          hdcEMF = CreateEnhMetaFile (NULL, TEXT ("emf4.emf"), NULL,
                                      TEXT ("EMF4\0EMF Demo #4\0")) ;

          hbm = LoadBitmap (NULL, MAKEINTRESOURCE (OBM_CLOSE)) ;

          GetObject (hbm, sizeof (BITMAP), &bm) ;

          hdcMem = CreateCompatibleDC (hdcEMF) ;

          SelectObject (hdcMem, hbm) ;

          StretchBlt (hdcEMF, 100, 100, 100, 100,
                      hdcMem,   0,   0, bm.bmWidth, bm.bmHeight, SRCCOPY) ;

          DeleteDC (hdcMem) ;
          DeleteObject (hbm) ;

          hemf = CloseEnhMetaFile (hdcEMF) ;

          DeleteEnhMetaFile (hemf) ;
          return 0 ;

     case WM_PAINT:
          hdc = BeginPaint (hwnd, &ps) ;

          GetClientRect (hwnd, &rect) ;
	         rect.left   =     rect.right  / 4 ;
          rect.right  = 3 * rect.right  / 4 ;
          rect.top    =     rect.bottom / 4 ;
          rect.bottom = 3 * rect.bottom / 4 ;

          hemf = GetEnhMetaFile (TEXT ("emf4.emf")) ;

          PlayEnhMetaFile (hdc, hemf, &rect) ;
          DeleteEnhMetaFile (hemf) ;
          EndPaint (hwnd, &ps) ;
          return 0 ;

     case WM_DESTROY:
          PostQuitMessage (0) ;
          return 0 ;
     }
     return DefWindowProc (hwnd, message, wParam, lParam) ;
}
For convenience, EMF4 loads a system bitmap indicated by the constant
OEM_CLOSE. The customary way of displaying a bitmap in a device context is to create a memory
device context compatible with the destination device context (in this case, that’s the
metafile device context) by calling
CreateCompatibleDC. Then you select the bitmap into
that memory device context by using
SelectObject and call BitBlt or
StretchBlt from the memory source device context to the destination device context. When you’re finished, you
delete both the memory device context and the bitmap.
You’ll note that EMF4 also calls GetObject to determine the size of the bitmap.
This is necessary for the SelectObject call.
At first, the storage of this code in a metafile seems like a real challenge for GDI.
No function leading up the StretchBlt call involves the metafile device context at all. So
let’s see how it’s done by taking a look at EMF4.EMF, which is partially shown in Figure 18-10.
0000  01 00 00 00 88 00 00 00 64 00 00 00 64 00 00 00  ........d...d...
0010  C7 00 00 00 C7 00 00 00 35 0C 00 00 35 0C 00 00  ........5...5...
0020  4B 18 00 00 4B 18 00 00 20 45 4D 46 00 00 01 00  K...K... EMF....
0030  F0 0E 00 00 03 00 00 00 01 00 00 00 12 00 00 00  ................
0040  64 00 00 00 00 00 00 00 00 04 00 00 00 03 00 00  d...............
0050  40 01 00 00 F0 00 00 00 00 00 00 00 00 00 00 00  @...............
0060  00 00 00 00 45 00 4D 00 46 00 34 00 00 00 45 00  ....E.M.F.4...E.
0070  4D 00 46 00 20 00 44 00 65 00 6D 00 6F 00 20 00  M.F. .D.e.m.o. .
0080  23 00 34 00 00 00 00 00 4D 00 00 00 54 0E 00 00  #.4.....M...T...
0090  64 00 00 00 64 00 00 00 C7 00 00 00 C7 00 00 00  d...d...........
00A0  64 00 00 00 64 00 00 00 64 00 00 00 64 00 00 00  d...d...d...d...
00B0  20 00 CC 00 00 00 00 00 00 00 00 00 00 00 80 3F  ..............?
00C0  00 00 00 00 00 00 00 00 00 00 80 3F 00 00 00 00  ...........?....
00D0  00 00 00 00 FF FF FF 00 00 00 00 00 6C 00 00 00  ............l...
00E0  28 00 00 00 94 00 00 00 C0 0D 00 00 28 00 00 00  (...........(...
00F0  16 00 00 00 28 00 00 00 28 00 00 00 16 00 00 00  ....(...(.......
0100  01 00 20 00 00 00 00 00 C0 0D 00 00 00 00 00 00  .. .............
0110  00 00 00 00 00 00 00 00 00 00 00 00 C0 C0 C0 00  ................
0120  C0 C0 C0 00 C0 C0 C0 00 C0 C0 C0 00 C0 C0 C0 00  ................
. . . .
0ED0  C0 C0 C0 00 C0 C0 C0 00 C0 C0 C0 00 0E 00 00 00  ................
0EE0  14 00 00 00 00 00 00 00 10 00 00 00 14 00 00 00  ................
Figure 18-10. A partial hexadecimal dump of EMF4.EMF.
This metafile contains just three records—a header, a 0x4D (or
EMR_STRETCHBLT) record that is 0x0E54 bytes long, and an end-of-file record.
I won’t pretend to have deciphered what each and every field of this record
means. But I will point out the crucial key to understanding how GDI can translate the series
of function calls in EMF4.C to a single metafile record.
GDI has converted the original device-dependent bitmap to a
device-independent bitmap (DIB). The entire DIB is stored in this record, which accounts for its size. I
suspect that when it comes time to play the metafile and display the bitmap, GDI actually
uses the StretchDIBits function rather than
StretchBlt. Or, GDI could convert the DIB back to
a device-dependent bitmap by using
CreateDIBitmap and then use a memory device
context and StretchBlt for the display.
The EMR_STRETCHBLT record begins at offset 0x0088 in the metafile. The DIB
is stored beginning at offset 0x00F4 in the metafile and continues to the end of the record
at 0x0EDC. The DIB begins with a 40-byte structure of type BITMAPINFOHEADER. This
is followed at offset 0x011C by 22 rows of 40 pixels each. This is a 32 bit-per-pixel DIB,
so each pixel requires 4 bytes.
Enumerating the Metafile
When you wish to get access to the individual records of a metafile you use a process
called metafile enumeration. This is demonstrated by the EMF5 program shown in
Figure 18-11. This program uses a metafile to display the same image as EMF3 but works by using
metafile enumeration.
Figure 18-11. The EMF5 program.
EMF5.C
/*-------------------------------------
   EMF5.C -- Enhanced Metafile Demo #5
             (c) Charles Petzold, 1998
  -------------------------------------*/

#include <windows.h>

LRESULT CALLBACK WndProc (HWND, UINT, WPARAM, LPARAM) ;

int WINAPI WinMain (HINSTANCE hInstance, HINSTANCE hPrevInstance,
                    PSTR szCmdLine, int iCmdShow)
{
     static TCHAR szAppName[] = TEXT ("EMF5") ;
     HWND         hwnd ;
     MSG          msg ;
     WNDCLASS     wndclass ;

     wndclass.style         = CS_HREDRAW | CS_VREDRAW ;
     wndclass.lpfnWndProc   = WndProc ;
     wndclass.cbClsExtra    = 0 ;
     wndclass.cbWndExtra    = 0 ;
     wndclass.hInstance     = hInstance ;
     wndclass.hIcon         = LoadIcon (NULL, IDI_APPLICATION) ;
     wndclass.hCursor       = LoadCursor (NULL, IDC_ARROW) ;
     wndclass.hbrBackground = GetStockObject (WHITE_BRUSH) ;
     wndclass.lpszMenuName  = NULL ;
     wndclass.lpszClassName = szAppName ;

     if (!RegisterClass (&wndclass))
     {
          MessageBox (NULL, TEXT ("This program requires Windows NT!"),
                      szAppName, MB_ICONERROR) ;
          return 0 ;
     }

     hwnd = CreateWindow (szAppName, TEXT ("Enhanced Metafile Demo #5"),
                          WS_OVERLAPPEDWINDOW,
                          CW_USEDEFAULT, CW_USEDEFAULT,
                          CW_USEDEFAULT, CW_USEDEFAULT,
                          NULL, NULL, hInstance, NULL) ;

     ShowWindow (hwnd, iCmdShow) ;
     UpdateWindow (hwnd) ;

     while (GetMessage (&msg, NULL, 0, 0))
     {
          TranslateMessage (&msg) ;
          DispatchMessage (&msg) ;
     }
     return msg.wParam ;
}

int CALLBACK EnhMetaFileProc (HDC hdc, HANDLETABLE * pHandleTable,
                              CONST ENHMETARECORD * pEmfRecord,
                              int iHandles, LPARAM pData)
{
     PlayEnhMetaFileRecord (hdc, pHandleTable, pEmfRecord, iHandles) ;

     return TRUE ;
}

LRESULT CALLBACK WndProc (HWND hwnd, UINT message, WPARAM wParam, LPARAM lParam)
{
     HDC          hdc ;
     HENHMETAFILE hemf ;
     PAINTSTRUCT  ps ;
     RECT         rect ;

     switch (message)
     {
     case WM_PAINT:
          hdc = BeginPaint (hwnd, &ps) ;

          GetClientRect (hwnd, &rect) ;

          rect.left   =     rect.right  / 4 ;
          rect.right  = 3 * rect.right  / 4 ;
          rect.top    =     rect.bottom / 4 ;
          rect.bottom = 3 * rect.bottom / 4 ;

          hemf = GetEnhMetaFile (TEXT ("..\\emf3\\emf3.emf")) ;

          EnumEnhMetaFile (hdc, hemf, EnhMetaFileProc, NULL, &rect) ;
          DeleteEnhMetaFile (hemf) ;
          EndPaint (hwnd, &ps) ;
          return 0 ;

     case WM_DESTROY:
          PostQuitMessage (0) ;
          return 0 ;
     }
     return DefWindowProc (hwnd, message, wParam, lParam) ;
}
This program uses the EMF3.EMF file created by the EMF3 program, so make
sure you run that one before this one. Also, you need to run both programs from within the Visual C++ environment so that the directory paths are correct. In WM_PAINT processing, the major difference
between the two programs is that EMF3 called
PlayEnhMetaFile, but EMF5 calls
EnumEnhMetaFile. You’ll recall that the
PlayEnhMetaFile function has the following syntax:
PlayEnhMetaFile (hdc, hemf, &rect) ;
The first argument is the handle to the device context on which the metafile is to be
rendered. The second argument is a handle to the enhanced metafile. The third argument
is a pointer to a RECT structure that describes a rectangle on the device context surface.
The metafile image is stretched to fit, but not exceed, this rectangle.
The EnumEnhMetaFile has five arguments, three of which are the same as those
to PlayEnhMetaFile (although the pointer to the RECT structure has been moved to the
end of the argument list).
The third argument to EnumEnhMetaFile is the name of an enumeration function,
which I’ve chosen to call EnhMetaFileProc. The fourth argument is a pointer to arbitrary data
you may wish to pass to the enumeration function. I’ve simply set this argument to NULL.
Now let’s take a look at the enumeration function. When you call
EnumEnhMetaFile, GDI will call
EnhMetaFileProc once for each record in the metafile, including the
header record and the end-of-file record. Normally the enumeration function returns TRUE,
but it could return FALSE to abort the enumeration process.
The enumeration function has five parameters, which I’ll describe shortly. In
this program, I just pass the first four to
PlayEnhMetaFileRecord, which causes GDI to
execute the function call represented by that record just as if you had called it explicitly.
EMF5 uses EnumEnhMetaFile and
PlayEnhMetaFileRecord to get the same results
as EMF3 got by calling PlayEnhMetaFile. The difference is that EMF5 now has a hook into
the process of metafile rendering and gets access to every metafile record. This can be useful.
The first parameter to the enumeration function is a handle to a device context.
GDI simply obtains this handle from the first parameter to
EnumEnhMetaFile. My enumeration function passes it on to
PlayEnhMetaFileRecord to identify the device context on
which the image is to be rendered.
Let me skip to the third parameter of the enumeration function. This is a pointer
to a structure of type ENHMETARECORD, which I described earlier. This structure
describes the actual metafile record, exactly as it’s encoded in the metafile itself.
You can write code to examine these records if you wish. Perhaps you might
elect not to pass some records to the
PlayEnhMetaFileRecord function. For example,
in EMF5.C, try inserting the following line right before the
PlayEnhMetaFileRecord call:
if (pEmfRecord->iType != EMR_LINETO)
Recompile the program, run it, and you’ll see only the rectangle, not the two
lines. Or try the following:
if (pEmfRecord->iType != EMR_SELECTOBJECT)
That little change will cause the image to be rendered with default objects—not
the pen and brush we’ve created.
One thing you should not do is modify the metafile record. But before you get
upset about this restriction, let’s take a look at the EMF6 program in Figure 18-12.
Figure 18-12. The EMF6 program.
EMF6.C
/*-------------------------------------
   EMF6.C -- Enhanced Metafile Demo #6
             (c) Charles Petzold, 1998
  -------------------------------------*/

#include <windows.h>

LRESULT CALLBACK WndProc (HWND, UINT, WPARAM, LPARAM) ;

int WINAPI WinMain (HINSTANCE hInstance, HINSTANCE hPrevInstance,
                    PSTR lpszCmdLine, int iCmdShow)
{
     static TCHAR szAppName[] = TEXT ("EMF6") ;
     HWND         hwnd ;
     MSG          msg ;
     WNDCLASS     wndclass ;

     wndclass.style         = CS_HREDRAW | CS_VREDRAW ;
     wndclass.lpfnWndProc   = WndProc ;
     wndclass.cbClsExtra    = 0 ;
     wndclass.cbWndExtra    = 0 ;
     wndclass.hInstance     = hInstance ;
     wndclass.hIcon         = LoadIcon (NULL, IDI_APPLICATION) ;
     wndclass.hCursor       = LoadCursor (NULL, IDC_ARROW) ;
     wndclass.hbrBackground = GetStockObject (WHITE_BRUSH) ;
     wndclass.lpszMenuName  = NULL ;
     wndclass.lpszClassName = szAppName ;

     if (!RegisterClass (&wndclass))
     {
          MessageBox (NULL, TEXT ("This program requires Windows NT!"),
                      szAppName, MB_ICONERROR) ;
          return 0 ;
     }

     hwnd = CreateWindow (szAppName, TEXT ("Enhanced Metafile Demo #6"),
                          WS_OVERLAPPEDWINDOW,
                          CW_USEDEFAULT, CW_USEDEFAULT,
                          CW_USEDEFAULT, CW_USEDEFAULT,
                          NULL, NULL, hInstance, NULL) ;

     ShowWindow (hwnd, iCmdShow) ;
     UpdateWindow (hwnd) ;
     while (GetMessage (&msg, NULL, 0, 0))
     {
          TranslateMessage (&msg) ;
          DispatchMessage (&msg) ;
     }
     return msg.wParam ;
}

int CALLBACK EnhMetaFileProc (HDC hdc, HANDLETABLE * pHandleTable,
                              CONST ENHMETARECORD * pEmfRecord,
                              int iHandles, LPARAM pData)
{
     ENHMETARECORD * pEmfr ;

     pEmfr = (ENHMETARECORD *) malloc (pEmfRecord->nSize) ;

     CopyMemory (pEmfr, pEmfRecord, pEmfRecord->nSize) ;

     if (pEmfr->iType == EMR_RECTANGLE)
          pEmfr->iType = EMR_ELLIPSE ;


     PlayEnhMetaFileRecord (hdc, pHandleTable, pEmfr, iHandles) ;

     free (pEmfr) ;

     return TRUE ;
}

LRESULT CALLBACK WndProc (HWND hwnd, UINT message, WPARAM wParam, LPARAM lParam)
{
     HDC          hdc ;
     HENHMETAFILE hemf ;
     PAINTSTRUCT  ps ;
     RECT         rect ;

     switch (message)
     {
     case WM_PAINT:
          hdc = BeginPaint (hwnd, &ps) ;

          GetClientRect (hwnd, &rect) ;

          rect.left   =     rect.right  / 4 ;
          rect.right  = 3 * rect.right  / 4 ;
          rect.top    =     rect.bottom / 4 ;
          rect.bottom = 3 * rect.bottom / 4 ;

          hemf = GetEnhMetaFile (TEXT ("..\\emf3\\emf3.emf")) ;

          EnumEnhMetaFile (hdc, hemf, EnhMetaFileProc, NULL, &rect) ;
          DeleteEnhMetaFile (hemf) ;
          EndPaint (hwnd, &ps) ;
          return 0 ;

     case WM_DESTROY:
          PostQuitMessage (0) ;
          return 0 ;
     }
     return DefWindowProc (hwnd, message, wParam, lParam) ;
}
Like EMF5, EMF6 uses the EMF3.EMF metafile created by the EMF3 program, so
be sure to run that program before this one and run all programs within Visual C++.
EMF6 demonstrates that if you want to modify metafile records before
rendering them, the solution is fairly simple: you make a copy and modify that. As you can see,
the enumeration procedure begins by using
malloc to allocate a block of memory the size
of the metafile record, indicated by the
nSize field of the pEmfRecord structure passed to
the function. A pointer to this block is saved in the variable
pEmfr, which is a pointer to an ENHMETARECORD structure.
Using CopyMemory, the program copies the contents of the structure pointed to
by pEmfRecord to the structure pointed to by
pEmfr. Now we have something that we can alter. The program checks whether the record is of type EMR_RECTANGLE and, if so,
replaces the iType field with EMR_ELLIPSE. The
pEmfr pointer is passed to
PlayEnhMetaFileRecord and then freed. The result is that the program draws an ellipse rather than a
rectangle. Everything else is the same.
Of course, our little alteration worked quite easily because the
Rectangle and Ellipse functions have the same arguments that define the same thing—a bounding box for
the figure. Making more extensive alterations will require some knowledge about the
formats of the various metafile records.
Another possibility is to slip in an extra record or two. For example, replace the
if statement in EMF6.C with the following:
if (pEmfr->iType == EMR_RECTANGLE)
{
     PlayEnhMetaFileRecord (hdc, pHandleTable, pEmfr, nObjects) ;

     pEmfr->iType = EMR_ELLIPSE ;
}
Whenever a Rectangle record comes through, the program renders it and then changes it
to an Ellipse, which is also rendered. Now the program draws both a rectangle and an ellipse.
Let’s examine now how GDI objects are dealt with when you enumerate a metafile.
In the metafile header, the nHandles field of the ENHMETAHEADER structure is
a value of one more than the number of GDI objects created in the metafile. Thus, for
the metafiles in EMF5 and EMF6, this field is 3, accounting for the pen, the brush,
and something else. What this «something else» really is I’ll reveal shortly.
You’ll notice that the penultimate parameter to the enumeration functions in
EMF5 and EMF6 is also called nHandles. It’ll be the same number, which is 3.
The second parameter to the enumeration function is a pointer to a structure
called HANDLETABLE, defined in WINGDI.H like so:
typedef struct tagHANDLETABLE
{
     HGDIOBJ objectHandle [1] ;
}
HANDLETABLE ;
The HGDIOBJ data type is a generalized handle to a GDI object and is defined as
a 32-bit pointer, as are all the other GDI objects. As you’ll note, this is one of those
structures that has an array field with just one element. This means the field is actually of
variable length. The number of elements in the objectHandle array is equal to
nHandles, which in the case of our programs is 3.
Within the enumeration function, you can obtain these handles using the expression
pHandleTable->objectHandle[i]
where i is either 0, 1, or 2 for the three handles.
Whenever the enumeration function is called, the first element of the array will
contain the handle to the metafile being enumerated. That’s the «something else» I
referred to above.
When the enumeration function is first called, the second and third elements of
the table will be 0. These are placeholders for the handles of the brush and the pen.
Here’s how it works: The first object-creation function in the metafile has a
record type of EMR_CREATEBRUSHINDIRECT. This record indicates an object number of 1.
When the record is passed to
PlayEnhMetaFileRecord, GDI creates the brush and obtains a
handle to it. This handle is stored as element 1 (the second element) of the
objectHandle array. When the first EMR_SELECTOBJECT record is passed to
PlayEnhMetaFileRecord, GDI notes that the handle number is 1 and is able to retrieve the actual handle from the table
and use it in a SelectObject call. When the metafile eventually deletes the brush, GDI sets
element 1 of the objectHandle array back to 0.
By accessing the objectHandle array, you can use calls such as
GetObjectType and GetObject to obtain information about the objects used in the metafile.
Embedding Images
Perhaps the most important use of metafile enumeration is to embed other images (or
even entire metafiles) in an existing metafile. Actually, the existing metafile remains
unchanged; what you really do is create a new metafile that combines the existing metafile and
the new embedded images. The basic trick is to pass a metafile device context handle as
the first argument to EnumEnhMetaFile. That allows you to render both metafile records
and GDI function calls on the metafile device context.
It’s easiest to embed new images at the beginning or end of the metafile
command sequence—that is, right after the EMR_HEADER record or right before the
EMF_EOF record. However, if you are familiar with the existing metafile, you can embed
new drawing commands anywhere you want. That’s what’s done in the EMF7 program
shown in Figure 18-13.
Figure 18-13. The EMF7 program.
EMF7.C
/*-------------------------------------
   EMF7.C -- Enhanced Metafile Demo #7
             (c) Charles Petzold, 1998
  -------------------------------------*/

#include <windows.h>

LRESULT CALLBACK WndProc (HWND, UINT, WPARAM, LPARAM) ;

int WINAPI WinMain (HINSTANCE hInstance, HINSTANCE hPrevInstance,
                    PSTR lpszCmdLine, int iCmdShow)
{
     static TCHAR szAppName[] = TEXT ("EMF7") ;
     HWND         hwnd ;
     MSG          msg ;
     WNDCLASS     wndclass ;

     wndclass.style         = CS_HREDRAW | CS_VREDRAW ;
     wndclass.lpfnWndProc   = WndProc ;
     wndclass.cbClsExtra    = 0 ;
     wndclass.cbWndExtra    = 0 ;
     wndclass.hInstance     = hInstance ;
     wndclass.hIcon         = LoadIcon (NULL, IDI_APPLICATION) ;
     wndclass.hCursor       = LoadCursor (NULL, IDC_ARROW) ;
     wndclass.hbrBackground = GetStockObject (WHITE_BRUSH) ;
     wndclass.lpszMenuName  = NULL ;
     wndclass.lpszClassName = szAppName ;

     if (!RegisterClass (&wndclass))


     {
          MessageBox (NULL, TEXT ("This program requires Windows NT!"),
                      szAppName, MB_ICONERROR) ;
          return 0 ;
     }

     hwnd = CreateWindow (szAppName, TEXT ("Enhanced Metafile Demo #7"),
                          WS_OVERLAPPEDWINDOW,
                          CW_USEDEFAULT, CW_USEDEFAULT,
                          CW_USEDEFAULT, CW_USEDEFAULT,
                          NULL, NULL, hInstance, NULL) ;

     ShowWindow (hwnd, iCmdShow) ;
     UpdateWindow (hwnd) ;

     while (GetMessage (&msg, NULL, 0, 0))
     {
          TranslateMessage (&msg) ;
          DispatchMessage (&msg) ;
     }
     return msg.wParam ;
}

int CALLBACK EnhMetaFileProc (HDC hdc, HANDLETABLE * pHandleTable,
                              CONST ENHMETARECORD * pEmfRecord,
                              int iHandles, LPARAM pData)
{
     HBRUSH   hBrush ;
     HPEN     hPen ;
     LOGBRUSH lb ;

     if (pEmfRecord->iType != EMR_HEADER && pEmfRecord->iType != EMR_EOF)

          PlayEnhMetaFileRecord (hdc, pHandleTable, pEmfRecord, iHandles) ;

     if (pEmfRecord->iType == EMR_RECTANGLE)
     {
          hBrush = SelectObject (hdc, GetStockObject (NULL_BRUSH)) ;

          lb.lbStyle = BS_SOLID ;
          lb.lbColor = RGB (0, 255, 0) ;
          lb.lbHatch = 0 ;

          hPen = SelectObject (hdc,
               ExtCreatePen (PS_SOLID | PS_GEOMETRIC, 5, &lb, 0, NULL)) ;

          Ellipse (hdc, 100, 100, 200, 200) ;

          DeleteObject (SelectObject (hdc, hPen)) ;
          SelectObject (hdc, hBrush) ;
     }
     return TRUE ;
}

LRESULT CALLBACK WndProc (HWND hwnd, UINT message, WPARAM wParam, LPARAM lParam)
{
     ENHMETAHEADER emh ;
     HDC           hdc, hdcEMF ;
     HENHMETAFILE  hemfOld, hemf ;
     PAINTSTRUCT   ps ;
     RECT          rect ;

     switch (message)
     {
     case WM_CREATE:

               // Retrieve existing metafile and header

          hemfOld = GetEnhMetaFile (TEXT ("..\\emf3\\emf3.emf")) ;

          GetEnhMetaFileHeader (hemfOld, sizeof (ENHMETAHEADER), &emh) ;

               // Create a new metafile DC

          hdcEMF = CreateEnhMetaFile (NULL, TEXT ("emf7.emf"), NULL,
                                      TEXT ("EMF7\0EMF Demo #7\0")) ;

               // Enumerate the existing metafile

          EnumEnhMetaFile (hdcEMF, hemfOld, EnhMetaFileProc, NULL,
                           (RECT *) & emh.rclBounds) ;

               // Clean up

          hemf = CloseEnhMetaFile (hdcEMF) ;

          DeleteEnhMetaFile (hemfOld) ;
          DeleteEnhMetaFile (hemf) ;
          return 0 ;

     case WM_PAINT:
          hdc = BeginPaint (hwnd, &ps) ;

          GetClientRect (hwnd, &rect) ;
          rect.left   =     rect.right  / 4 ;
          rect.right  = 3 * rect.right  / 4 ;
          rect.top    =     rect.bottom / 4 ;
          rect.bottom = 3 * rect.bottom / 4 ;

          hemf = GetEnhMetaFile (TEXT ("emf7.emf")) ;

          PlayEnhMetaFile (hdc, hemf, &rect) ;
          DeleteEnhMetaFile (hemf) ;
          EndPaint (hwnd, &ps) ;
          return 0 ;

     case WM_DESTROY:
          PostQuitMessage (0) ;
          return 0 ;
     }
     return DefWindowProc (hwnd, message, wParam, lParam) ;
}
EMF7 uses the EMF3.EMF metafile created by the EMF3 program, so make sure
you run that program to create the metafile before you run EMF7.
Although WM_PAINT processing in EMF7 has reverted to using
PlayEnhMetaFile rather than
EnumEnhMetaFile, WM_CREATE processing is quite different.
First, the program obtains a metafile handle for the EMF3.EMF file by calling
GetEnhMetaFile. It also gets the enhanced metafile header by calling
GetEnhMetaFileHeader. The sole purpose of getting the header is to use the
rclBounds field in the forthcoming
EnumEnhMetaFile call.
Next, the program creates a new disk-based metafile to be stored with the
name EMF7.EMF. The CreateEnhMetaFile function returns a device context handle for the
metafile. Then EnumEnhMetaFile is called using the metafile device context handle for
EMF7.EMF and the metafile handle from EMF3.EMF.
Now let’s take a look at EnhMetaFileProc. If the record being enumerated is not
the header or the end-of-file, the function calls
PlayEnhMetaFileRecord to transfer the
record into the new metafile device context. (It’s not strictly necessary to exclude the header
or end-of-file record, but they make the metafile somewhat larger.)
If the record just transferred is the
Rectangle call, the function creates a pen
to draw an ellipse with a green outline and a transparent interior. Notice how the code
restores the state of the device context by saving the previous pen and brush handles.
During this time, all these functions are inserted into the metafile. (Keep in mind that you
can also use PlayEnhMetaFile to insert an entire metafile in the existing one.)
Back in WM_CREATE processing, the program calls
CloseEnhMetaFile to obtain a handle to the new metafile. Then it deletes both metafile handles, leaving behind both
the EMF3.EMF and EMF7.EMF files on disk.
It’s obvious from the program’s display output that the ellipse is drawn after
the rectangle but before the two crisscrossing lines.
An Enhanced Metafile Viewer and Printer
Using the clipboard for transferring enhanced metafiles is quite simple. The clipboard
type is CF_ENHMETAFILE. The
GetClipboardData function returns a handle to the
enhanced metafile; the SetClipboardData also uses the metafile handle. Need a copy of the
metafile? Use the CopyEnhMetaFile function. If you put an enhanced metafile in the
clipboard, Windows will make available a metafile in the old format for those programs that need
it. If you put an old-format metafile in the clipboard, Windows will make available an
enhanced metafile.
The EMFVIEW program shown in Figure 18-14 shows code to transfer metafiles
to and from the clipboard, and it also allows loading metafiles, saving metafiles, and
printing them.
Figure 18-14. The EMFVIEW program.
EMFVIEW.C
/*----------------------------------------
   EMFVIEW.C -- View Enhanced Metafiles
                (c) Charles Petzold, 1998
  ----------------------------------------*/

#include <windows.h>
#include <commdlg.h>
#include "resource.h"

LRESULT CALLBACK WndProc (HWND, UINT, WPARAM, LPARAM) ;

TCHAR szAppName[] = TEXT ("EmfView") ;

int WINAPI WinMain (HINSTANCE hInstance, HINSTANCE hPrevInstance,
                    PSTR szCmdLine, int iCmdShow)
{
     HACCEL   hAccel ;
     HWND     hwnd ;
     MSG      msg ;
     WNDCLASS wndclass ;

     wndclass.style         = CS_HREDRAW | CS_VREDRAW ;
     wndclass.lpfnWndProc   = WndProc ;
     wndclass.cbClsExtra    = 0 ;
     wndclass.cbWndExtra    = 0 ;
     wndclass.hInstance     = hInstance ;
     wndclass.hIcon         = LoadIcon (NULL, IDI_APPLICATION) ;
     wndclass.hCursor       = LoadCursor (NULL, IDC_ARROW) ;
     wndclass.hbrBackground = (HBRUSH) GetStockObject (WHITE_BRUSH) ;
     wndclass.lpszMenuName  = szAppName ;
     wndclass.lpszClassName = szAppName ;

     if (!RegisterClass (&wndclass))
     {
          MessageBox (NULL, TEXT ("This program requires Windows NT!"),
                      szAppName, MB_ICONERROR) ;
          return 0 ;
     }

     hwnd = CreateWindow (szAppName, TEXT ("Enhanced Metafile Viewer"),
                          WS_OVERLAPPEDWINDOW,
                          CW_USEDEFAULT, CW_USEDEFAULT,
                          CW_USEDEFAULT, CW_USEDEFAULT,
                          NULL, NULL, hInstance, NULL) ;

     ShowWindow (hwnd, iCmdShow) ;
     UpdateWindow (hwnd) ;

     hAccel = LoadAccelerators (hInstance, szAppName) ;

     while (GetMessage (&msg, NULL, 0, 0))
     {
          if (!TranslateAccelerator (hwnd, hAccel, &msg))
          {
               TranslateMessage (&msg) ;
               DispatchMessage (&msg) ;
          }
     }
     return msg.wParam ;
}

HPALETTE CreatePaletteFromMetaFile (HENHMETAFILE hemf)
{
     HPALETTE     hPalette ;
     int          iNum ;
     LOGPALETTE * plp ;

     if (!hemf)
          return NULL ;

     if (0 == (iNum = GetEnhMetaFilePaletteEntries (hemf, 0, NULL)))
          return NULL ;

     plp = malloc (sizeof (LOGPALETTE) + (iNum - 1) * sizeof (PALETTEENTRY)) ;

     plp->palVersion    = 0x0300 ;
     plp->palNumEntries = iNum ;
     GetEnhMetaFilePaletteEntries (hemf, iNum, plp->palPalEntry) ;

     hPalette = CreatePalette (plp) ;

     free (plp) ;

     return hPalette ;
}

LRESULT CALLBACK WndProc (HWND hwnd, UINT message, WPARAM wParam, LPARAM lParam)
{
     static DOCINFO      di = { sizeof (DOCINFO), TEXT ("EmfView: Printing") } ;
     static HENHMETAFILE hemf ;
     static OPENFILENAME ofn ;
     static PRINTDLG     printdlg = { sizeof (PRINTDLG) } ;
     static TCHAR        szFileName [MAX_PATH], szTitleName [MAX_PATH] ;
     static TCHAR        szFilter[] =
                               TEXT ("Enhanced Metafiles (*.EMF)\0*.emf\0")
                               TEXT ("All Files (*.*)\0*.*\0\0") ;
     BOOL                bSuccess ;
     ENHMETAHEADER       header ;
     HDC                 hdc, hdcPrn ;
     HENHMETAFILE        hemfCopy ;
     HMENU               hMenu ;
     HPALETTE            hPalette ;
     int                 i, iLength, iEnable ;
     PAINTSTRUCT         ps ;
     RECT                rect ;
     PTSTR               pBuffer ;

     switch (message)
     {
     case WM_CREATE:
               // Initialize OPENFILENAME structure

          ofn.lStructSize       = sizeof (OPENFILENAME) ;
          ofn.hwndOwner         = hwnd ;
          ofn.hInstance         = NULL ;
          ofn.lpstrFilter       = szFilter ;
          ofn.lpstrCustomFilter = NULL ;
          ofn.nMaxCustFilter    = 0 ;
          ofn.nFilterIndex      = 0 ;
          ofn.lpstrFile         = szFileName ;
          ofn.nMaxFile          = MAX_PATH ;
          ofn.lpstrFileTitle    = szTitleName ;
          ofn.nMaxFileTitle     = MAX_PATH ;
          ofn.lpstrInitialDir   = NULL ;
          ofn.lpstrTitle        = NULL ;
          ofn.Flags             = 0 ;
          ofn.nFileOffset       = 0 ;
          ofn.nFileExtension    = 0 ;
          ofn.lpstrDefExt       = TEXT ("emf") ;
          ofn.lCustData         = 0 ;
          ofn.lpfnHook          = NULL ;
          ofn.lpTemplateName    = NULL ;
          return 0 ;

     case WM_INITMENUPOPUP:
          hMenu = GetMenu (hwnd) ;

          iEnable = hemf ? MF_ENABLED : MF_GRAYED ;

          EnableMenuItem (hMenu, IDM_FILE_SAVE_AS,    iEnable) ;
          EnableMenuItem (hMenu, IDM_FILE_PRINT,      iEnable) ;
          EnableMenuItem (hMenu, IDM_FILE_PROPERTIES, iEnable) ;
          EnableMenuItem (hMenu, IDM_EDIT_CUT,        iEnable) ;
          EnableMenuItem (hMenu, IDM_EDIT_COPY,       iEnable) ;
          EnableMenuItem (hMenu, IDM_EDIT_DELETE,     iEnable) ;

          EnableMenuItem (hMenu, IDM_EDIT_PASTE,
               IsClipboardFormatAvailable (CF_ENHMETAFILE) ?
                    MF_ENABLED : MF_GRAYED) ;
          return 0 ;

     case WM_COMMAND:
          switch (LOWORD (wParam))
          {
          case IDM_FILE_OPEN:
                    // Show the File Open dialog box

               ofn.Flags = 0 ;

               if (!GetOpenFileName (&ofn))
                    return 0 ;

                    // If there's an existing EMF, get rid of it.

               if (hemf)
               {
                    DeleteEnhMetaFile (hemf) ;
                    hemf = NULL ;
               }
                    // Load the EMF into memory

               SetCursor (LoadCursor (NULL, IDC_WAIT)) ;
               ShowCursor (TRUE) ;

               hemf = GetEnhMetaFile (szFileName) ;

               ShowCursor (FALSE) ;
               SetCursor (LoadCursor (NULL, IDC_ARROW)) ;

                    // Invalidate the client area for later update

               InvalidateRect (hwnd, NULL, TRUE) ;

               if (hemf == NULL)
               {
                    MessageBox (hwnd, TEXT ("Cannot load metafile"),
                                szAppName, MB_ICONEXCLAMATION | MB_OK) ;
               }
               return 0 ;

          case IDM_FILE_SAVE_AS:
               if (!hemf)
                    return 0 ;

                    // Show the File Save dialog box

               ofn.Flags = OFN_OVERWRITEPROMPT ;

               if (!GetSaveFileName (&ofn))
                    return 0 ;

                    // Save the EMF to disk file

               SetCursor (LoadCursor (NULL, IDC_WAIT)) ;
               ShowCursor (TRUE) ;

               hemfCopy = CopyEnhMetaFile (hemf, szFileName) ;

               ShowCursor (FALSE) ;
               SetCursor (LoadCursor (NULL, IDC_ARROW)) ;

               if (hemfCopy)
               {
                    DeleteEnhMetaFile (hemf) ;
                    hemf = hemfCopy ;
               }
               else
                    MessageBox (hwnd, TEXT ("Cannot save metafile"),
                                szAppName, MB_ICONEXCLAMATION | MB_OK) ;
               return 0 ;

          case IDM_FILE_PRINT:
                    // Show the Print dialog box and get printer DC

               printdlg.Flags = PD_RETURNDC | PD_NOPAGENUMS | PD_NOSELECTION ;

               if (!PrintDlg (&printdlg))
                    return 0 ;

               if (NULL == (hdcPrn = printdlg.hDC))
               {
                    MessageBox (hwnd, TEXT ("Cannot obtain printer DC"),
                                szAppName, MB_ICONEXCLAMATION | MB_OK) ;
                    return 0 ;
               }
                    // Get size of printable area of page

               rect.left   = 0 ;
               rect.right  = GetDeviceCaps (hdcPrn, HORZRES) ;
               rect.top    = 0 ;
               rect.bottom = GetDeviceCaps (hdcPrn, VERTRES) ;

               bSuccess = FALSE ;

                    // Play the EMF to the printer

               SetCursor (LoadCursor (NULL, IDC_WAIT)) ;
               ShowCursor (TRUE) ;

               if ((StartDoc (hdcPrn, &di) > 0) && (StartPage (hdcPrn) > 0))
               {
                    PlayEnhMetaFile (hdcPrn, hemf, &rect) ;

                    if (EndPage (hdcPrn) > 0)
                    {
                         bSuccess = TRUE ;
                         EndDoc (hdcPrn) ;
                    }
               }
               ShowCursor (FALSE) ;
               SetCursor (LoadCursor (NULL, IDC_ARROW)) ;
               DeleteDC (hdcPrn) ;

               if (!bSuccess)
                    MessageBox (hwnd, TEXT ("Could not print metafile"),
                                szAppName, MB_ICONEXCLAMATION | MB_OK) ;
               return 0 ;

          case IDM_FILE_PROPERTIES:
               if (!hemf)
                    return 0 ;

               iLength = GetEnhMetaFileDescription (hemf, 0, NULL) ;
               pBuffer = malloc ((iLength + 256) * sizeof (TCHAR)) ;

               GetEnhMetaFileHeader (hemf, sizeof (ENHMETAHEADER), &header) ;

                    // Format header file information

               i  = wsprintf (pBuffer,
                              TEXT ("Bounds = (%i, %i) to (%i, %i) pixels\n"),
                              header.rclBounds.left, header.rclBounds.top,
                              header.rclBounds.right, header.rclBounds.bottom) ;

               i += wsprintf (pBuffer + i,
                              TEXT ("Frame = (%i, %i) to (%i, %i) mms\n"),
                              header.rclFrame.left, header.rclFrame.top,
                              header.rclFrame.right, header.rclFrame.bottom) ;

               i += wsprintf (pBuffer + i,
                              TEXT ("Resolution = (%i, %i) pixels")
                              TEXT (" = (%i, %i) mms\n"),
                              header.szlDevice.cx, header.szlDevice.cy,
                              header.szlMillimeters.cx,
                              header.szlMillimeters.cy) ;

               i += wsprintf (pBuffer + i,
                              TEXT ("Size = %i, Records = %i, ")
                              TEXT ("Handles = %i, Palette entries = %i\n"),
                              header.nBytes, header.nRecords,
                              header.nHandles, header.nPalEntries) ;

                    // Include the metafile description, if present
               if (iLength)
               {
                    i += wsprintf (pBuffer + i, TEXT ("Description = ")) ;
                    GetEnhMetaFileDescription (hemf, iLength, pBuffer + i) ;
                    pBuffer [lstrlen (pBuffer)] = `\t' ;
               }

               MessageBox (hwnd, pBuffer, TEXT ("Metafile Properties"), MB_OK) ;
               free (pBuffer) ;
               return 0 ;

          case IDM_EDIT_COPY:
          case IDM_EDIT_CUT:
               if (!hemf)
                    return 0 ;

                    // Transfer metafile copy to the clipboard

               hemfCopy = CopyEnhMetaFile (hemf, NULL) ;

               OpenClipboard (hwnd) ;
               EmptyClipboard () ;
               SetClipboardData (CF_ENHMETAFILE, hemfCopy) ;
               CloseClipboard () ;

               if (LOWORD (wParam) == IDM_EDIT_COPY)
                    return 0 ;
                                        // fall through if IDM_EDIT_CUT
          case IDM_EDIT_DELETE:
               if (hemf)
               {
                    DeleteEnhMetaFile (hemf) ;
                    hemf = NULL ;
                    InvalidateRect (hwnd, NULL, TRUE) ;
               }
               return 0 ;

          case IDM_EDIT_PASTE:
               OpenClipboard (hwnd) ;
               hemfCopy = GetClipboardData (CF_ENHMETAFILE) ;
               CloseClipboard () ;

               if (hemfCopy && hemf)
               {
                    DeleteEnhMetaFile (hemf) ;
                    hemf = NULL ;
               }

               hemf = CopyEnhMetaFile (hemfCopy, NULL) ;
               InvalidateRect (hwnd, NULL, TRUE) ;
               return 0 ;

          case IDM_APP_ABOUT:
               MessageBox (hwnd, TEXT ("Enhanced Metafile Viewer\n")
                                 TEXT ("(c) Charles Petzold, 1998"),
                           szAppName, MB_OK) ;
               return 0 ;

          case IDM_APP_EXIT:
               SendMessage (hwnd, WM_CLOSE, 0, 0L) ;
               return 0 ;
          }
          break ;

     case WM_PAINT:
          hdc = BeginPaint (hwnd, &ps) ;

          if (hemf)
          {
               if (hPalette = CreatePaletteFromMetaFile (hemf))
               {
                    SelectPalette (hdc, hPalette, FALSE) ;
                    RealizePalette (hdc) ;
               }
               GetClientRect (hwnd, &rect) ;
               PlayEnhMetaFile (hdc, hemf, &rect) ;

               if (hPalette)
                    DeleteObject (hPalette) ;
          }
          EndPaint (hwnd, &ps) ;
          return 0 ;

     case WM_QUERYNEWPALETTE:
          if (!hemf || !(hPalette = CreatePaletteFromMetaFile (hemf)))
               return FALSE ;

          hdc = GetDC (hwnd) ;
          SelectPalette (hdc, hPalette, FALSE) ;
          RealizePalette (hdc) ;
          InvalidateRect (hwnd, NULL, FALSE) ;

          DeleteObject (hPalette) ;
          ReleaseDC (hwnd, hdc) ;
          return TRUE ;

     case WM_PALETTECHANGED:
          if ((HWND) wParam == hwnd)
               break ;

          if (!hemf || !(hPalette = CreatePaletteFromMetaFile (hemf)))
               break ;

          hdc = GetDC (hwnd) ;
          SelectPalette (hdc, hPalette, FALSE) ;
          RealizePalette (hdc) ;
          UpdateColors (hdc) ;

          DeleteObject (hPalette) ;
          ReleaseDC (hwnd, hdc) ;
          break ;

     case WM_DESTROY:
          if (hemf)
               DeleteEnhMetaFile (hemf) ;

          PostQuitMessage (0) ;
          return 0 ;
     }
     return DefWindowProc (hwnd, message, wParam, lParam) ;
}
EMFVIEW.RC (excerpts)
//Microsoft Developer Studio generated resource script.

#include "resource.h"
#include "afxres.h"

/////////////////////////////////////////////////////////////////////////////
// Menu

EMFVIEW MENU DISCARDABLE
BEGIN
    POPUP "&File"
    BEGIN
        MENUITEM "&Open\tCtrl+O",               IDM_FILE_OPEN
        MENUITEM "Save &As...",                 IDM_FILE_SAVE_AS
        MENUITEM SEPARATOR
        MENUITEM "&Print...\tCtrl+P",           IDM_FILE_PRINT
        MENUITEM SEPARATOR
        MENUITEM "&Properties",                 IDM_FILE_PROPERTIES
        MENUITEM SEPARATOR
        MENUITEM "E&xit",                       IDM_APP_EXIT
    END
    POPUP "&Edit"
    BEGIN
        MENUITEM "Cu&t\tCtrl+X",                IDM_EDIT_CUT
        MENUITEM "&Copy\tCtrl+C",               IDM_EDIT_COPY
        MENUITEM "&Paste\tCtrl+V",              IDM_EDIT_PASTE
        MENUITEM "&Delete\tDel",                IDM_EDIT_DELETE
    END
    POPUP "Help"
    BEGIN
        MENUITEM "&About EmfView...",           IDM_APP_ABOUT
    END
END

/////////////////////////////////////////////////////////////////////////////
// Accelerator

EMFVIEW ACCELERATORS DISCARDABLE
BEGIN
    "C",            IDM_EDIT_COPY,          VIRTKEY, CONTROL, NOINVERT
    "O",            IDM_FILE_OPEN,          VIRTKEY, CONTROL, NOINVERT
    "P",            IDM_FILE_PRINT,         VIRTKEY, CONTROL, NOINVERT
    "V",            IDM_EDIT_PASTE,         VIRTKEY, CONTROL, NOINVERT
    VK_DELETE,      IDM_EDIT_DELETE,        VIRTKEY, NOINVERT
    "X",            IDM_EDIT_CUT,           VIRTKEY, CONTROL, NOINVERT
END
RESOURCE.H (excerpts)
// Microsoft Developer Studio generated include file.
// Used by EmfView.rc

#define IDM_FILE_OPEN                   40001
#define IDM_FILE_SAVE_AS                40002
#define IDM_FILE_PRINT                  40003
#define IDM_FILE_PROPERTIES             40004
#define IDM_APP_EXIT                    40005
#define IDM_EDIT_CUT                    40006
#define IDM_EDIT_COPY                   40007
#define IDM_EDIT_PASTE                  40008
#define IDM_EDIT_DELETE                 40009
#define IDM_APP_ABOUT                   40010
EMFVIEW also has complete palette logic, just in case a palette has been
encoded in the metafile. (The way it gets in there is by a call to
SelectPalette.) The program extracts the palette in its
CreatePaletteFromMetaFile function, which is called when it displays
a metafile during WM_PAINT and also while processing the WM_QUERYNEWPALETTE
and WM_PALETTECHANGED messages.
In response to a Print command from the menu, EMFVIEW displays the common
printer dialog box and then obtains the dimensions of the printable area of the page. The
metafile is stretched to fill that whole area. EMFVIEW displays a metafile in its window similarly.
The Properties item from the File menu causes EMFVIEW to display a message
box containing information from the metafile header.
If you print the EMF2.EMF metafile image created earlier in this chapter, you may
find that the lines are very thin on high-resolution printers, perhaps nearly invisible. Vector
images should really have wider pens (for example, 1-point wide) for printing. The ruler
image shown later in this chapter does that.
Displaying Accurate Metafile Images
The great thing about metafile images is that they can be stretched to any size and
still maintain reasonable fidelity. This is because a metafile normally consists of a series of
vector graphics primitives, such as lines, filled areas, and outline fonts. Enlarging or
compressing the image simply involves scaling all the coordinate points that define these
primitives. Bitmaps, on the other hand, can lose vital information when compression results in
dropping entire rows and columns of pixels.
Of course, metafile compression in real life is not entirely flawless either. We
live with graphical output devices that have a finite pixel size. A metafile image
consisting of lots of lines could start to look like an indecipherable blob when compressed in
size. Also, area-filling patterns and color dithering start to look odd at small sizes. And, if
the metafile contains embedded bitmaps or old-fashioned raster fonts, these too can
pose familiar problems.
For the most part, though, metafiles are freely scaleable. This is most useful
when dropping a metafile into a word processing or desktop publishing document.
Generally, when you select a metafile image in such an application, you’ll be presented with a
bounding rectangle that you can grab with the mouse and scale to any size. The image will
also have the same relative size when rendered on a printer.
Sometimes, however, arbitrarily scaling a metafile is not such a hot idea. An
example: Suppose you have a banking system that stores facsimiles of account-holders’
signatures as a series of polylines stored in a metafile. Widening or heightening this metafile
would make the signature look different. At the very least, you should keep the image’s
aspect ratio constant.
In the sample programs shown previously, we’ve based the bounding rectangle
in the PlayEnhMetaFile call on the size of the client area. Thus, as you resize the
program’s window, you effectively resize the image. This is conceptually similar to resizing a
metafile image within a word-processing document.
Accurately displaying a metafile image—either in specific metrical sizes or with
a proper aspect ratio—requires using size information in the metafile header and setting
the rectangle structure accordingly.
The sample programs in the remainder of this chapter will use a shell program
called EMF.C that includes printing logic, a resource script named EMF.RC, and a
RESOURCE.H header file. Figure 18-15 shows these files along with EMF8.C, a program that uses
these files to display a 6-inch ruler.
Figure 18-15. The EMF8 program.
EMF8.C
/*-------------------------------------
   EMF8.C -- Enhanced Metafile Demo #8
             (c) Charles Petzold, 1998
  -------------------------------------*/

#include <windows.h>

TCHAR szClass [] = TEXT ("EMF8") ;
TCHAR szTitle [] = TEXT ("EMF8: Enhanced Metafile Demo #8") ;

void DrawRuler (HDC hdc, int cx, int cy)
{
     int     iAdj, i, iHeight ;
     LOGFONT lf ;
     TCHAR   ch ;

     iAdj = GetVersion () & 0x80000000 ? 0 : 1 ;

          // Black pen with 1-point width
     SelectObject (hdc, CreatePen (PS_SOLID, cx / 72 / 6, 0)) ;

          // Rectangle surrounding entire pen (with adjustment)

     Rectangle (hdc, iAdj, iAdj, cx + iAdj + 1, cy + iAdj + 1) ;

          // Tick marks

     for (i = 1 ; i < 96 ; i++)
     {
               if (i % 16 == 0) iHeight = cy /  2 ;    // inches
          else if (i %  8 == 0) iHeight = cy /  3 ;    // half inches
          else if (i %  4 == 0) iHeight = cy /  5 ;    // quarter inches
          else if (i %  2 == 0) iHeight = cy /  8 ;    // eighths
          else                  iHeight = cy / 12 ;    // sixteenths

          MoveToEx (hdc, i * cx / 96, cy, NULL) ;
          LineTo   (hdc, i * cx / 96, cy - iHeight) ;
     }
          // Create logical font

     FillMemory (&lf, sizeof (lf), 0) ;
     lf.lfHeight = cy / 2 ;
     lstrcpy (lf.lfFaceName, TEXT ("Times New Roman")) ;

     SelectObject (hdc, CreateFontIndirect (&lf)) ;
     SetTextAlign (hdc, TA_BOTTOM | TA_CENTER) ;
     SetBkMode    (hdc, TRANSPARENT) ;

          // Display numbers

     for (i = 1 ; i <= 5 ; i++)
     {
          ch = (TCHAR) (i + `0') ;
          TextOut (hdc, i * cx / 6, cy / 2, &ch, 1) ;
     }
          // Clean up

     DeleteObject (SelectObject (hdc, GetStockObject (SYSTEM_FONT))) ;
     DeleteObject (SelectObject (hdc, GetStockObject (BLACK_PEN))) ;
}

void CreateRoutine (HWND hwnd)
{
     HDC          hdcEMF ;
     HENHMETAFILE hemf ;
     int          cxMms, cyMms, cxPix, cyPix, xDpi, yDpi ;

     hdcEMF = CreateEnhMetaFile (NULL, TEXT ("emf8.emf"), NULL,
                                 TEXT ("EMF8\0EMF Demo #8\0")) ;
     if (hdcEMF == NULL)
          return ;

     cxMms = GetDeviceCaps (hdcEMF, HORZSIZE) ;
     cyMms = GetDeviceCaps (hdcEMF, VERTSIZE) ;
     cxPix = GetDeviceCaps (hdcEMF, HORZRES) ;
     cyPix = GetDeviceCaps (hdcEMF, VERTRES) ;

     xDpi = cxPix * 254 / cxMms / 10 ;
     yDpi = cyPix * 254 / cyMms / 10 ;

     DrawRuler (hdcEMF, 6 * xDpi, yDpi) ;

     hemf = CloseEnhMetaFile (hdcEMF) ;

     DeleteEnhMetaFile (hemf) ;
}

void PaintRoutine (HWND hwnd, HDC hdc, int cxArea, int cyArea)
{
     ENHMETAHEADER emh ;
     HENHMETAFILE  hemf ;
     int           cxImage, cyImage ;
     RECT          rect ;

     hemf = GetEnhMetaFile (TEXT ("emf8.emf")) ;

     GetEnhMetaFileHeader (hemf, sizeof (emh), &emh) ;

     cxImage = emh.rclBounds.right - emh.rclBounds.left ;
     cyImage = emh.rclBounds.bottom - emh.rclBounds.top ;

     rect.left   = (cxArea - cxImage) / 2 ;
     rect.right  = (cxArea + cxImage) / 2 ;
     rect.top    = (cyArea - cyImage) / 2 ;
     rect.bottom = (cyArea + cyImage) / 2 ;

     PlayEnhMetaFile (hdc, hemf, &rect) ;

     DeleteEnhMetaFile (hemf) ;
}
EMF.C
/*--------------------------------------------------------
   EMF.C -- Enhanced Metafile Demonstration Shell Program
            (c) Charles Petzold, 1998
  --------------------------------------------------------*/

#include <windows.h>
#include <commdlg.h>
#include "..\\emf8\\resource.h"

extern void CreateRoutine (HWND) ;
extern void PaintRoutine  (HWND, HDC, int, int) ;

LRESULT CALLBACK WndProc (HWND, UINT, WPARAM, LPARAM) ;

HANDLE hInst ;

extern TCHAR szClass [] ;
extern TCHAR szTitle [] ;

int WINAPI WinMain (HINSTANCE hInstance, HINSTANCE hPrevInstance,
                    PSTR szCmdLine, int iCmdShow)
{
     TCHAR    szResource [] = TEXT ("EMF") ;
     HWND     hwnd ;
     MSG      msg ;
     WNDCLASS wndclass ;

     hInst = hInstance ;

     wndclass.style         = CS_HREDRAW | CS_VREDRAW ;
     wndclass.lpfnWndProc   = WndProc ;
     wndclass.cbClsExtra    = 0 ;
     wndclass.cbWndExtra    = 0 ;
     wndclass.hInstance     = hInstance ;
     wndclass.hIcon         = LoadIcon (NULL, IDI_APPLICATION) ;
     wndclass.hCursor       = LoadCursor (NULL, IDC_ARROW) ;
     wndclass.hbrBackground = GetStockObject (WHITE_BRUSH) ;
     wndclass.lpszMenuName  = szResource ;
     wndclass.lpszClassName = szClass ;

     if (!RegisterClass (&wndclass))
     {
          MessageBox (NULL, TEXT ("This program requires Windows NT!"),
                      szClass, MB_ICONERROR) ;
          return 0 ;
     }

     hwnd = CreateWindow (szClass, szTitle,
                          WS_OVERLAPPEDWINDOW,
                          CW_USEDEFAULT, CW_USEDEFAULT,
                          CW_USEDEFAULT, CW_USEDEFAULT,
                          NULL, NULL, hInstance, NULL) ;

     ShowWindow (hwnd, iCmdShow) ;
     UpdateWindow (hwnd) ;

     while (GetMessage (&msg, NULL, 0, 0))
     {
          TranslateMessage (&msg) ;
          DispatchMessage (&msg) ;
     }
     return msg.wParam ;
}

BOOL PrintRoutine (HWND hwnd)
{
     static DOCINFO  di ;
     static PRINTDLG printdlg = { sizeof (PRINTDLG) } ;
     static TCHAR    szMessage [32] ;
     BOOL            bSuccess = FALSE ;
     HDC             hdcPrn ;
     int             cxPage, cyPage ;

     printdlg.Flags = PD_RETURNDC | PD_NOPAGENUMS | PD_NOSELECTION ;

     if (!PrintDlg (&printdlg))
          return TRUE ;

     if (NULL == (hdcPrn = printdlg.hDC))
          return FALSE ;

     cxPage = GetDeviceCaps (hdcPrn, HORZRES) ;
     cyPage = GetDeviceCaps (hdcPrn, VERTRES) ;

     lstrcpy (szMessage, szClass) ;
     lstrcat (szMessage, TEXT (": Printing")) ;

     di.cbSize      = sizeof (DOCINFO) ;
     di.lpszDocName = szMessage ;

     if (StartDoc (hdcPrn, &di) > 0)
     {
          if (StartPage (hdcPrn) > 0)
          {
               PaintRoutine (hwnd, hdcPrn, cxPage, cyPage) ;
               if (EndPage (hdcPrn) > 0)
               {
                    EndDoc (hdcPrn) ;
                    bSuccess = TRUE ;
               }
          }
     }
     DeleteDC (hdcPrn) ;

     return bSuccess ;
}

LRESULT CALLBACK WndProc (HWND hwnd, UINT message, WPARAM wParam, LPARAM lParam)
{
     BOOL        bSuccess ;
     static int  cxClient, cyClient ;
     HDC         hdc ;
     PAINTSTRUCT ps ;

     switch (message)
     {
     case WM_CREATE:
          CreateRoutine (hwnd) ;
          return 0 ;

     case WM_COMMAND:
          switch (wParam)
          {
          case IDM_PRINT:
               SetCursor (LoadCursor (NULL, IDC_WAIT)) ;
               ShowCursor (TRUE) ;

               bSuccess = PrintRoutine (hwnd) ;

               ShowCursor (FALSE) ;
               SetCursor (LoadCursor (NULL, IDC_ARROW)) ;

               if (!bSuccess)
                    MessageBox (hwnd,
                                TEXT ("Error encountered during printing"),
                                szClass, MB_ICONASTERISK | MB_OK) ;
               return 0 ;

          case IDM_EXIT:
               SendMessage (hwnd, WM_CLOSE, 0, 0) ;
               return 0 ;

          case IDM_ABOUT:
               MessageBox (hwnd, TEXT ("Enhanced Metafile Demo Program\n")
                                 TEXT ("Copyright (c) Charles Petzold, 1998"),
                           szClass, MB_ICONINFORMATION | MB_OK) ;
               return 0 ;
          }
          break ;

     case WM_SIZE:
          cxClient = LOWORD (lParam) ;
          cyClient = HIWORD (lParam) ;
          return 0 ;

     case WM_PAINT:
          hdc = BeginPaint (hwnd, &ps) ;

          PaintRoutine (hwnd, hdc, cxClient, cyClient) ;

          EndPaint (hwnd, &ps) ;
          return 0 ;

     case WM_DESTROY :
          PostQuitMessage (0) ;
          return 0 ;
     }
     return DefWindowProc (hwnd, message, wParam, lParam) ;
}
EMF.RC (excerpts)
//Microsoft Developer Studio generated resource script.

#include "resource.h"
#include "afxres.h"

/////////////////////////////////////////////////////////////////////////////
// Menu

EMF MENU DISCARDABLE
BEGIN
    POPUP "&File"
    BEGIN
        MENUITEM "&Print...",                   IDM_PRINT
        MENUITEM SEPARATOR
        MENUITEM "E&xit",                       IDM_EXIT
    END
    POPUP "&Help"
    BEGIN
        MENUITEM "&About...",                   IDM_ABOUT
    END
END
RESOURCE.H (excerpts)
// Microsoft Developer Studio generated include file.
// Used by Emf.rc
//
#define IDM_PRINT                       40001
#define IDM_EXIT                        40002
#define IDM_ABOUT                       40003
During the WM_CREATE message, EMF.C calls an external function called
CreateRoutine. This function will create a metafile. EMF.C calls a function named
PaintRoutine in two places: once during the WM_PAINT message and again in the function
PrintRoutine in response to a menu command to print the image.
Because modern printers often have a much higher resolution than video
displays, the ability to print a metafile is an important tool for testing our ability to render an
image in a specific size. The EMF8 program creates a metafile image that makes most sense
when displayed in a specific size. The image is that of a ruler 6 inches wide by 1 inch
high, complete with tick marks every
16th inch and the numbers 1 through 5 in a TrueType font.
To draw a 6-inch ruler, we need to know something about device resolution.
The CreateRoutine function in EMF8.C begins by creating a metafile and calling
GetDeviceCaps four times using the device context handle returned from
CreateEnhMetaFile. These calls obtain the width and height of the display surface in both millimeters and pixels.
This may sound a bit odd. The metafile device context is usually seen as a
storage medium for GDI drawing commands. It’s not a real device like a video display or a
printer, so how can it have a width and height?
Well, as you may recall, the first argument to
CreateEnhMetaFile is known as the «reference device context.» GDI uses this to establish device characteristics for the
metafile. If the argument is set to NULL (as in EMF8), GDI uses the video display as the
reference device context. Thus, when EMF8 calls
GetDeviceCaps using the metafile device
context, it actually obtains information about the video display.
EMF8.C calculates a resolution in dots per inch by dividing the pixel dimension
by the millimeter dimension and multiplying by 25.4, the number of millimeters in an inch.
Even though we’ve taken great care to draw this metafile ruler in its correct size,
the work is not yet done. When it comes time to render the image, the
PlayEnhMetaFile function will display it stretched to the rectangle passed as its last argument. This rectangle
must be set to the size of the ruler.
For this reason, the PaintRoutine function in EMF8 calls the
GetEnhMetaFileHeader function to obtain the header information in the metafile. The
rclBounds field of the ENHMETAHEADER structure indicates the bounding rectangle of the metafile image
in pixels. The program uses this information to center the ruler in the client area, as
shown in Figure 18-16.
Figure 18-16. The EMF8 display.
Keep in mind that if you hold a ruler up to the screen, you probably won’t
match exactly. The video display only approximates actual metrics, as I discussed in Chapter 5.
This technique appears to have worked, but now try printing the image. Oops! If you have a 300-dpi laser printer, the ruler will be about
11/3 inches wide. That’s because
we’ve used a pixel dimension based on the video display. Although you may think the little printed ruler looks kind of cute, it’s not what we want. Let’s try again.
The ENHMETAHEADER structure contains two rectangle structures that describe
the size of the image. The first, which EMF8 uses, is the
rclBounds field. This gives the size of the image in pixels. The second is the
rclFrame field, which gives the size of the image
in units of 0.01 millimeters. The relationship between these two fields is governed by
the reference device context originally used when creating the metafile, in this case the
video display. (The metafile header also contains two fields named
szlDevice and szlMillimeters, which are SIZEL structures that indicate the size of the reference device in pixels
and millimeters, the same information available from
GetDeviceCaps.)
The information about the millimeter dimensions of the image is put to use by
EMF9, shown in Figure 18-17.
Figure 18-17. The EMF9 program.
EMF9.C
/*--------------------------------------
   EMF9.C -- Enhanced Metafile Demo #9
             (c) Charles Petzold, 1998
  --------------------------------------*/

#include <windows.h>
#include <string.h>

TCHAR szClass [] = TEXT ("EMF9") ;
TCHAR szTitle [] = TEXT ("EMF9: Enhanced Metafile Demo #9") ;

void CreateRoutine (HWND hwnd)
{
}

void PaintRoutine (HWND hwnd, HDC hdc, int cxArea, int cyArea)
{
     ENHMETAHEADER emh ;
     HENHMETAFILE  hemf ;
     int           cxMms, cyMms, cxPix, cyPix, cxImage, cyImage ;
     RECT          rect ;

     cxMms = GetDeviceCaps (hdc, HORZSIZE) ;
     cyMms = GetDeviceCaps (hdc, VERTSIZE) ;
     cxPix = GetDeviceCaps (hdc, HORZRES) ;
     cyPix = GetDeviceCaps (hdc, VERTRES) ;

     hemf = GetEnhMetaFile (TEXT ("..\\emf8\\emf8.emf")) ;

     GetEnhMetaFileHeader (hemf, sizeof (emh), &emh) ;

     cxImage = emh.rclFrame.right - emh.rclFrame.left ;
     cyImage = emh.rclFrame.bottom - emh.rclFrame.top ;

     cxImage = cxImage * cxPix / cxMms / 100 ;
     cyImage = cyImage * cyPix / cyMms / 100 ;

     rect.left   = (cxArea - cxImage) / 2 ;
     rect.right  = (cxArea + cxImage) / 2 ;
     rect.top    = (cyArea - cyImage) / 2 ;
     rect.bottom = (cyArea + cyImage) / 2 ;

     PlayEnhMetaFile (hdc, hemf, &rect) ;

     DeleteEnhMetaFile (hemf) ;
}
EMF9 uses the metafile created by EMF8, so be sure to run EMF8 before running
this program.
The PaintRoutine function in EMF9 begins by calling
GetDeviceCaps four times using the destination device context. As in the
CreateRoutine function in EMF8, these calls provide information about the resolution of the device. After getting the metafile
handle, it obtains the header structure and uses the
rclFrame field to calculate the size of the
metafile image in units of 0.01 millimeters. That’s the first step.
The function then converts this dimension to pixels by multiplying by the pixel
dimension of the output device, dividing by the millimeter dimension, and then dividing
by 100 to account for the metrical dimension in 0.01 millimeters. The
PaintRoutine function now has the dimensions of the ruler in pixels—but not specific to the video display.
This is a pixel dimension appropriate for the destination device. From there on, it’s easy to
center the image.
As far as the screen goes, the EMF9 display looks the same as the EMF8 display. But
if you print the ruler from EMF9, you’ll see something that looks much more normal—a
ruler 6 inches wide by 1 inch high.
Scaling and Aspect Ratios
There may be times when you want to use the ruler metafile created by EMF8 but
without necessarily displaying the 6-inch image. Still, it might be nice to maintain the correct
6-to-1 aspect ratio of the image. As I mentioned before, using a bounding box to size a
metafile in a word-processing program (or whatever) may be convenient, but it could result in
certain undesirable distortions. In such applications, users should be given an option to keep
the original aspect ratio regardless of how the bounding box is sized. That is, the
bounding box selected by the user would not be used directly to define the rectangle structure
passed to the PlayEnhMetaFile. The rectangle structure passed to that function would be only
part of the bounding box.
Let’s examine how to do this in the EMF10 program shown in Figure 18-18.
Figure 18-18. The EMF10 program.
EMF10.C
/*---------------------------------------
   EMF10.C -- Enhanced Metafile Demo #10
              (c) Charles Petzold, 1998
  ---------------------------------------*/

#include <windows.h>

TCHAR szClass [] = TEXT ("EMF10") ;
TCHAR szTitle [] = TEXT ("EMF10: Enhanced Metafile Demo #10") ;

void CreateRoutine (HWND hwnd)
{
}

void PaintRoutine (HWND hwnd, HDC hdc, int cxArea, int cyArea)
{
     ENHMETAHEADER emh ;
     float         fScale ;
     HENHMETAFILE  hemf ;
     int           cxMms, cyMms, cxPix, cyPix, cxImage, cyImage ;
     RECT          rect ;

     cxMms = GetDeviceCaps (hdc, HORZSIZE) ;
     cyMms = GetDeviceCaps (hdc, VERTSIZE) ;
     cxPix = GetDeviceCaps (hdc, HORZRES) ;
     cyPix = GetDeviceCaps (hdc, VERTRES) ;

     hemf = GetEnhMetaFile (TEXT ("..\\emf8\\emf8.emf")) ;

     GetEnhMetaFileHeader (hemf, sizeof (emh), &emh) ;

     cxImage = emh.rclFrame.right - emh.rclFrame.left ;
     cyImage = emh.rclFrame.bottom - emh.rclFrame.top ;

     cxImage = cxImage * cxPix / cxMms / 100 ;
     cyImage = cyImage * cyPix / cyMms / 100 ;

     fScale = min ((float) cxArea / cxImage, (float) cyArea / cyImage) ;

     cxImage = (int) (fScale * cxImage) ;
     cyImage = (int) (fScale * cyImage) ;

     rect.left   = (cxArea - cxImage) / 2 ;
     rect.right  = (cxArea + cxImage) / 2 ;
     rect.top    = (cyArea - cyImage) / 2 ;
     rect.bottom = (cyArea + cyImage) / 2 ;

     PlayEnhMetaFile (hdc, hemf, &rect) ;

     DeleteEnhMetaFile (hemf) ;
}
EMF10 stretches the ruler image to fit the client area (or the printable area of the
printer page) but without otherwise distorting it. Usually you’ll see the ruler stretching the full
width of the client area but centered between the top and bottom. If you make the
window somewhat stout, the ruler will be as tall as the client area but centered horizontally.
There are probably numerous ways of calculating the proper display rectangle,
but I decided to build upon the code in EMF9. The
PaintRoutine function in EMF10.C begins like EMF9.C, by calculating the pixel size of the 6-inch-wide image appropriate for
the destination device context.
The program then calculates a floating point value, named
fScale, that is the minimum of the ratio of the width of the client area to the width of the image, and the ratio
of the height of the client area to the height of the image. This factor is then used to
increase the pixel dimensions of the image before the bounding rectangle is calculated.
Mapping Modes in Metafiles
We’ve been drawing a ruler that displays inches, and we’ve also been dealing with
dimensions in units of millimeters. Such jobs might seem like good candidates for using the
various mapping modes provided under GDI. Yet I’ve insisted on using pixels and doing all
the necessary calculations «manually.» Why is that?
The simple answer is that the use of mapping modes in connection with
metafiles can be quite confusing. But let’s try it out to see.
When you call SetMapMode using a metafile device context, the function is
encoded in the metafile just like any other GDI function. This is demonstrated in the EMF11
program shown in Figure 18-19.
Figure 18-19. The EMF11 program.
EMF11.C
/*---------------------------------------
   EMF11.C -- Enhanced Metafile Demo #11
              (c) Charles Petzold, 1998
  ---------------------------------------*/

#include <windows.h>

TCHAR szClass [] = TEXT ("EMF11") ;
TCHAR szTitle [] = TEXT ("EMF11: Enhanced Metafile Demo #11") ;

void DrawRuler (HDC hdc, int cx, int cy)
{
     int     i, iHeight ;
     LOGFONT lf ;
     TCHAR   ch ;

          // Black pen with 1-point width

     SelectObject (hdc, CreatePen (PS_SOLID, cx / 72 / 6, 0)) ;

          // Rectangle surrounding entire pen (with adjustment)
     if (GetVersion () & 0x80000000)              // Windows 98
          Rectangle (hdc, 0, -2, cx + 2, cy) ;
     else                                         // Windows NT
          Rectangle (hdc, 0, -1, cx + 1, cy) ;

          // Tick marks

     for (i = 1 ; i < 96 ; i++)
     {
               if (i % 16 == 0) iHeight = cy /  2 ;    // inches
          else if (i %  8 == 0) iHeight = cy /  3 ;    // half inches
          else if (i %  4 == 0) iHeight = cy /  5 ;    // quarter inches
          else if (i %  2 == 0) iHeight = cy /  8 ;    // eighths
          else                  iHeight = cy / 12 ;    // sixteenths

          MoveToEx (hdc, i * cx / 96, 0, NULL) ;
          LineTo   (hdc, i * cx / 96, iHeight) ;
     }
          // Create logical font

     FillMemory (&lf, sizeof (lf), 0) ;
     lf.lfHeight = cy / 2 ;
     lstrcpy (lf.lfFaceName, TEXT ("Times New Roman")) ;

     SelectObject (hdc, CreateFontIndirect (&lf)) ;
     SetTextAlign (hdc, TA_BOTTOM | TA_CENTER) ;
     SetBkMode    (hdc, TRANSPARENT) ;

          // Display numbers

     for (i = 1 ; i <= 5 ; i++)
     {
          ch = (TCHAR) (i + `0') ;
          TextOut (hdc, i * cx / 6, cy / 2, &ch, 1) ;
     }
          // Clean up

     DeleteObject (SelectObject (hdc, GetStockObject (SYSTEM_FONT))) ;
     DeleteObject (SelectObject (hdc, GetStockObject (BLACK_PEN))) ;
}

void CreateRoutine (HWND hwnd)
{
     HDC          hdcEMF ;
     HENHMETAFILE hemf ;

     hdcEMF = CreateEnhMetaFile (NULL, TEXT ("emf11.emf"), NULL,
                                 TEXT ("EMF11\0EMF Demo #11\0")) ;

     SetMapMode (hdcEMF, MM_LOENGLISH) ;

     DrawRuler (hdcEMF, 600, 100) ;

     hemf = CloseEnhMetaFile (hdcEMF) ;

     DeleteEnhMetaFile (hemf) ;
}

void PaintRoutine (HWND hwnd, HDC hdc, int cxArea, int cyArea)
{
     ENHMETAHEADER emh ;
     HENHMETAFILE  hemf ;
     int           cxMms, cyMms, cxPix, cyPix, cxImage, cyImage ;
     RECT          rect ;

     cxMms = GetDeviceCaps (hdc, HORZSIZE) ;
     cyMms = GetDeviceCaps (hdc, VERTSIZE) ;
     cxPix = GetDeviceCaps (hdc, HORZRES) ;
     cyPix = GetDeviceCaps (hdc, VERTRES) ;

     hemf = GetEnhMetaFile (TEXT ("emf11.emf")) ;

     GetEnhMetaFileHeader (hemf, sizeof (emh), &emh) ;

     cxImage = emh.rclFrame.right - emh.rclFrame.left ;
     cyImage = emh.rclFrame.bottom - emh.rclFrame.top ;

     cxImage = cxImage * cxPix / cxMms / 100 ;
     cyImage = cyImage * cyPix / cyMms / 100 ;

     rect.left   = (cxArea - cxImage) / 2 ;
     rect.top    = (cyArea - cyImage) / 2 ;
     rect.right  = (cxArea + cxImage) / 2 ;
     rect.bottom = (cyArea + cyImage) / 2 ;

     PlayEnhMetaFile (hdc, hemf, &rect) ;

     DeleteEnhMetaFile (hemf) ;
}
The CreateRoutine function in EMF11 is simpler than the one in EMF8 (our
original ruler-metafile program) because it does not need to call
GetDeviceCaps to determine the resolution of the video display in dots per inch. Instead, EMF11 calls
SetMapMode to set the mapping mode to MM_LOENGLISH, where logical units are equal to 0.01 inches.
Thus, the dimensions of the ruler are 600 units by 100 units, and these numbers are passed
to DrawRuler.
The DrawRuler function in EMF11 is the same as the one in EMF9, except for
the MoveToEx and LineTo calls that draw the tick marks of the ruler. When drawing in
units of pixels (the default MM_TEXT mapping mode), units on the vertical axis increase
going down the screen. For the MM_LOENGLISH mapping mode (and the other metrical
mapping modes), they increase going up. That required a change to this code. The
adjustment factors in the Rectangle function were also changed.
The PaintRoutine function in EMF11 is basically the same as the one in EMF9,
which was the version of the program that successfully displayed the ruler in its correct
dimensions on both the video display and the printer. The only difference is that EMF11
uses the EMF11.EMF file, whereas EMF9 used the EMF8.EMF file created by EMF8.
The image displayed by EMF11 is basically the same as EMF9. So, we see here
how embedding a SetMapMode call into a metafile can simplify the metafile creation and
doesn’t affect at all the mechanics of playing the metafile in its correct size.
Mapping and Playing
Calculating the destination rectangle in EMF11 involves some calls to
GetDeviceCaps. Our second goal is to eliminate those and use a mapping mode instead. GDI treats the
coordinates of the destination rectangle as logical coordinates. Using the MM_HIMETRIC
mode seems like a good candidate for these coordinates, because that makes logical units
0.01 millimeters, the same units used for the bounding rectangle in the enhanced metafile header.
The EMF12 program shown in Figure 18-20 restores the DrawRuler logic as originally presented in EMF8 but uses the MM_HIMETRIC mapping mode to
display the metafile.
Figure 18-20. The EMF12 program.
EMF12.C
/*---------------------------------------
   EMF12.C -- Enhanced Metafile Demo #12
              (c) Charles Petzold, 1998
  ---------------------------------------*/

#include <windows.h>

TCHAR szClass [] = TEXT ("EMF12") ;
TCHAR szTitle [] = TEXT ("EMF12: Enhanced Metafile Demo #12") ;


void DrawRuler (HDC hdc, int cx, int cy)
{
     int     iAdj, i, iHeight ;
     LOGFONT lf ;
     TCHAR   ch ;

     iAdj = GetVersion () & 0x80000000 ? 0 : 1 ;

          // Black pen with 1-point width

     SelectObject (hdc, CreatePen (PS_SOLID, cx / 72 / 6, 0)) ;

          // Rectangle surrounding entire pen (with adjustment)

     Rectangle (hdc, iAdj, iAdj, cx + iAdj + 1, cy + iAdj + 1) ;

          // Tick marks

     for (i = 1 ; i < 96 ; i++)
     {
               if (i % 16 == 0) iHeight = cy /  2 ;    // inches
          else if (i %  8 == 0) iHeight = cy /  3 ;    // half inches
          else if (i %  4 == 0) iHeight = cy /  5 ;    // quarter inches
          else if (i %  2 == 0) iHeight = cy /  8 ;    // eighths
          else                  iHeight = cy / 12 ;    // sixteenths

          MoveToEx (hdc, i * cx / 96, cy, NULL) ;
          LineTo   (hdc, i * cx / 96, cy - iHeight) ;
     }
          // Create logical font

     FillMemory (&lf, sizeof (lf), 0) ;
     lf.lfHeight = cy / 2 ;
     lstrcpy (lf.lfFaceName, TEXT ("Times New Roman")) ;

     SelectObject (hdc, CreateFontIndirect (&lf)) ;
     SetTextAlign (hdc, TA_BOTTOM | TA_CENTER) ;
     SetBkMode    (hdc, TRANSPARENT) ;

          // Display numbers

     for (i = 1 ; i <= 5 ; i++)
     {
          ch = (TCHAR) (i + `0') ;
          TextOut (hdc, i * cx / 6, cy / 2, &ch, 1) ;
     }
          /
/ Clean up

     DeleteObject (SelectObject (hdc, GetStockObject (SYSTEM_FONT))) ;
     DeleteObject (SelectObject (hdc, GetStockObject (BLACK_PEN))) ;
}

void CreateRoutine (HWND hwnd)
{
     HDC          hdcEMF ;
     HENHMETAFILE hemf ;
     int          cxMms, cyMms, cxPix, cyPix, xDpi, yDpi ;

     hdcEMF = CreateEnhMetaFile (NULL, TEXT ("emf12.emf"), NULL,
                                 TEXT ("EMF13\0EMF Demo #12\0")) ;

     cxMms = GetDeviceCaps (hdcEMF, HORZSIZE) ;
     cyMms = GetDeviceCaps (hdcEMF, VERTSIZE) ;
     cxPix = GetDeviceCaps (hdcEMF, HORZRES) ;
     cyPix = GetDeviceCaps (hdcEMF, VERTRES) ;

     xDpi = cxPix * 254 / cxMms / 10 ;
     yDpi = cyPix * 254 / cyMms / 10 ;

     DrawRuler (hdcEMF, 6 * xDpi, yDpi) ;

     hemf = CloseEnhMetaFile (hdcEMF) ;

     DeleteEnhMetaFile (hemf) ;
}

void PaintRoutine (HWND hwnd, HDC hdc, int cxArea, int cyArea)
{
     ENHMETAHEADER emh ;
     HENHMETAFILE  hemf ;
     POINT         pt ;
     int           cxImage, cyImage ;
     RECT          rect ;

     SetMapMode (hdc, MM_HIMETRIC) ;

     SetViewportOrgEx (hdc, 0, cyArea, NULL) ;

     pt.x = cxArea ;
     pt.y = 0 ;

     DPtoLP (hdc, &pt, 1) ;

     hemf = GetEnhMetaFile (TEXT ("emf12.emf")) ;

     GetEnhMetaFileHeader (hemf, sizeof (emh), &emh) ;

     cxImage = emh.rclFrame.right - emh.rclFrame.left ;
     cyImage = emh.rclFrame.bottom - emh.rclFrame.top ;

     rect.left   = (pt.x - cxImage) / 2 ;
     rect.top    = (pt.y + cyImage) / 2 ;
     rect.right  = (pt.x + cxImage) / 2 ;
     rect.bottom = (pt.y - cyImage) / 2 ;

     PlayEnhMetaFile (hdc, hemf, &rect) ;

     DeleteEnhMetaFile (hemf) ;
}
The PaintRoutine function in EMF12 first sets the mapping mode to
MM_HIMETRIC. As with the other metric modes, values of
y increase going up the screen. However,
the origin is still at the upper left corner, which means that
y-coordinates within the client area are negative. To correct this oddity, the program calls
SetViewportOrgEx to set the origin to the lower left corner.
The device point (cxArea, 0) is at the upper right corner of the screen. Passing
that point to the DPtoLP («device point to logical point») function gives us the size of the
client area in 0.01 millimeters.
The program then loads the metafile, gets the header, and finds the dimensions
of the metafile in 0.01 millimeters. The destination rectangle centered in the middle of
the client area is then easy to calculate.
Now we’ve seen how we can use a mapping mode when creating the metafile
and also for displaying it. Can we do both?
It turns out that it works, as EMF13 (shown in Figure 18-21) demonstrates.
Figure 18-21. The EMF13 program.
EMF13.C
/*---------------------------------------
   EMF13.C -- Enhanced Metafile Demo #13
              (c) Charles Petzold, 1998
  ---------------------------------------*/

#include <windows.h>

TCHAR szClass [] = TEXT ("EMF13") ;
TCHAR szTitle [] = TEXT ("EMF13: Enhanced Metafile Demo #13") ;

void CreateRoutine (HWND hwnd)
{
}
void PaintRoutine (HWND hwnd, HDC hdc, int cxArea, int cyArea)
{
     ENHMETAHEADER emh ;
     HENHMETAFILE  hemf ;
     POINT         pt ;
     int           cxImage, cyImage ;
     RECT          rect ;

     SetMapMode (hdc, MM_HIMETRIC) ;

     SetViewportOrgEx (hdc, 0, cyArea, NULL) ;

     pt.x = cxArea ;
     pt.y = 0 ;

     DPtoLP (hdc, &pt, 1) ;

     hemf = GetEnhMetaFile (TEXT ("..\\emf11\\emf11.emf")) ;

     GetEnhMetaFileHeader (hemf, sizeof (emh), &emh) ;

     cxImage = emh.rclFrame.right - emh.rclFrame.left ;
     cyImage = emh.rclFrame.bottom - emh.rclFrame.top ;

     rect.left   = (pt.x - cxImage) / 2 ;
     rect.top    = (pt.y + cyImage) / 2 ;
     rect.right  = (pt.x + cxImage) / 2 ;
     rect.bottom = (pt.y - cyImage) / 2 ;

     PlayEnhMetaFile (hdc, hemf, &rect) ;

     DeleteEnhMetaFile (hemf) ;
}
In the EMF13 program, it’s not necessary to create the ruler metafile by using
a mapping mode because it’s already been created by EMF11. EMF13 simply loads that
one and uses a mapping mode to calculate the destination rectangle, just as EMF11 does.
Now we can establish a couple principles. When the metafile is created, GDI
uses any embedded changes to the mapping mode to calculate the size of the metafile
image in pixels and millimeters. The size of the image is stored in the metafile header. When
the metafile is played, GDI establishes the physical location of the destination rectangle
based on the mapping mode in effect at the time of the
PlayEnhMetaFile call. Nothing in the metafile can change that location.
1. Лекция 10
Метафайлы Windows
2. Графические файлы
Графический файл — это способ записи графических данных.
Растровые изображения — комбинация разноцветных пикселей,
которые легко рассмотреть при увеличении картинки.
У файлов с изображениями в таком формате большой размер.
Качество и «вес» напрямую зависят от количества пикселей.
Чем четче и качественнее фото, тем больше памяти оно занимает
на устройстве.
Векторные изображения состоят из опорных точек и кривых линий
между ними. Всего этого пользователь не замечает даже при
сильном увеличении картинки.
Благодаря этому масштабирование происходит без потери качества.
Однако такие графические элементы выглядят гораздо проще.
3. Растровые форматы
Чаще всего используются для загрузки
фотографий и оцифрованных картинок.
Для таких типов файлов есть две
системы записи цвета — CMYK и RGB:
CMYK, если изображение готовится к
печати.
RGB, если картинка предназначена
для размещения на электронной
платформе.
4. Векторные форматы
Векторные форматы графических файлов
используют для создания иллюстраций,
шрифтов, логотипов, значков, элементов для
оформления сайта или документа и т.д.
Все типы файлов изображений, исполненных в
векторной графике, не теряют детализацию и
качество при изменении размера.
5. Пример.Вставка таблицы Excel в документ Word
File1.doc (Таблица Excel)
File2.doc
(вставка объекта Excel)
Объект оживает в Word
(загружается Excel)
6. Размеры сохраненных файлов
7. Определение метафайла
Метафайл – это изображение, которое хранится в виде
последовательности команд рисования и параметров.
Метафайлы также называют векторными изображениями.
Команды и параметры, записанные в Метафайле , могут
храниться в памяти или сохраняться в файле.
Форматы:
формат метафайла Windows (WMF)
EMF (Enhanced Metafile —расширенный метафайл)
EMF+ (GDI+)
GDI+ может отображать метафайлы, хранящиеся
в любом формате, но записывать метафайлы в форматах
EMF и EMF+, но не в формате WMF.
8. Метафайлы в Builder C++
Класс TMetafile
Создание
1.
Создать объект метафайл
2.
Создать канву для создания изображения на метафайле
Дополнение метафайла
1.
Создать новую канву
2.
Поместить на нее предыдущее изображение (проиграть
изображение)
Сохранение и извлечение метафайла
1.
Метод SaveToFile
2.
Метод LoadFromFile
9. Создание и сохранение метафайла
TMetafile * NewMetafile;
TMetafileCanvas* NewCanvas;
NewMetafile = new TMetafile;
NewMetafile->Enhanced=true; // Формат .emf
NewCanvas = new TMetafileCanvas(NewMetafile,0);
NewCanvas->Brush->Color=clWhite;
NewCanvas->Rectangle (0,0,300,300);
NewCanvas-> Pen->Color=clYellow;
NewCanvas-> Pen->Width=3;
NewCanvas-> Brush->Color=clBlue;
NewCanvas->Ellipse (100,50,200,250);
NewCanvas->MoveTo(50,250);
NewCanvas->LineTo(250,50);
delete NewCanvas;
Form1->Canvas->Draw(10,10,NewMetafile);
NewMetafile->SaveToFile(«metaf1.emf»);
delete NewMetafile;
10. Загрузка метафайла
TMetafile *NewMetafile;
NewMetafile= new TMetafile;
NewMetafile->LoadFromFile(«metaf1.emf»);
NewMetafile->Enhanced=true;
TMetafileCanvas* NewCanvas;
NewCanvas = new TMetafileCanvas(NewMetafile,0);
NewCanvas->Draw (0,0,NewMetafile);
NewCanvas->Pen->Color=clBlue;
NewCanvas->Brush->Color=RGB(128,128,128);
NewCanvas->RoundRect(50,50,130,150,10,10);
delete NewCanvas;
Form1->Canvas-> Draw(0,0,NewMetafile);
NewMetafile->SaveToFile(«metaf2.emf»);
delete NewMetafile;
11. Буфер обмена
TMetafile *NewMetafile;
NewMetafile=new TMetafile;
NewMetafile ->
LoadFromFile(«metaf1.emf»);
// Копируем в буфер обмена
Clipboard()->
Assign(NewMetafile);
delete NewMetafile;
Form2->Show();
Аналогично будет работать с
битовыми картами.
TMetafile *NewMetafile;
NewMetafile=new TMetafile;
//Загружаем из буфера в метафайл
NewMetafile->Assign(Clipboard());
Form2-> Canvas->Draw
(0,0,NewMetafile);
delete NewMetafile;
12. Метафайлы GDI
В файле записаны команды интерфейса графических устройств (GDI).
Функция PlayMetaFile() воспроизводит визуальное изображение.
Обеспечивают независимые от устройства средства хранения и выборки
графической информации.
Достаточно легко создаются.
Экономят память, так как команды метафайла остаются на диске.
Удобны для программ отображающих большое количество графических
изображений.
Длина метафайла практически не ограничена.
Идеально подходят для таких изображений как карты, диаграммы,
архитектурные чертежи.
Удобны для передачи в буфер обмена Windows (если изображение можно
нарисовать командами GDI, его можно передавать через метафайл).
Расширение файла: .wmf .emf, можно назначить свое расширение или
сохранить без расширения.
13. Информация метафайла
Три вида метафайла: стандартный, размещаемый и буферный
(отличия вариантов состоят только в разных структурах
заголовков).
В размещаемом дополнительная информация о размерах
(заголовок – 22 байта, нужна для отображения в одинаковых
размерах на различных устройствах).
Контекст устройства метафайла — это область памяти куда
помещаются вызовы GDI –функций.
Контексты устройств метафайла не имеют предварительно
определенных атрибутов (инструментов) и используют то,
что определено для окна, в котором создается метафайл.
14. Информация метафайла
Представление информации в метафайле:
С графическими функциями связаны значения констант определенных
в Windows.
Значения констант хранятся в записях метафайла и являются ссылками на
GDI – команды.
Константы состоят из двух частей: идентифицируют номер функции и
суммарное число байт, которое требуется для хранения параметров
этой функции.
Параметр контекста устройства не входит в число хранящихся параметров,
контексты обеспечиваются при воспроизведении метафайла (т.е. обеспечиваются
программой).
Некоторые функции не хранятся в метафайле (создание инструментов,
например, CreateSolideBrush, которая создает кисть для рисования).
Команда создания (повторного создания) объекта будет сгенерирована, когда
кисть выбирается в контексте устройства метафайла.
15. Правила работы с метафайлами
Дескриптор: HMETAFILE используется для ссылки на метафайл, после того
как он был создан и закрыт.
Дескриптор контекста устройства метафайл (HDC) используется только для
создания метафайла.
Воспроизведение метафайла может влиять на текущие атрибуты контекста
устройства, поэтому лучше окружить функцию PlayMetaFile функциями сохранения
и восстановления атрибутов:
SaveDC (hDC)
PlayMetaFile(hDC,hmetF);
Restore(hDC,-1) // -1 означает восстановление последнего сохраненного набора атрибутов.
Все объекты, которые создаются во время проигрывания метафайла, удаляются
автоматически (команду DeleteObject использовать не надо).
Предупреждение. Метафайлы принадлежат GDI, а не программе. Они
не удаляются автоматически после завершения программы. Для предотвращения
утечки памяти надо удалять матафайлы после завершения работы с ними
(DeleteMetafile). При этом удаляется лишь копия метафайла в памяти.
16. Сценарий работы с метафайлом (1-й вариант)
1. Создать контекст метафайла и получить его
дескриптор
(CreateMetafile)
2. Выполнить функции рисования
3. Получить дескриптор метафайла
( CloseMetafile )
4. Проиграть метафайл на устройстве
(например, в окне)
5. Сохранить метафайл ( CopyMetaFile
копировать метафайл в файл и получить
дескриптор нового )
6. Удалить метафайл
( DeleteMetafile )
17. Создание метафайла
Создаем новый метафайл в памяти,
рисуем и затем сохраняем в файл
HDC h1= CreateMetaFile( NULL); // контекст метафайла в памяти
// Выполняем функции рисования
hbr=CreateSolidBrush(col);
SelectObject(h1,hbr);
Ellipse(h1,100,100,200,150);
DeleteObject(hbr);
hbr=CreateSolidBrush(0x00FF0000);
SelectObject(h1,hbr);
Rectangle(h1,250,250,300,450);
DeleteObject(hbr);
18. Получаем дескриптор метафайлов
HMETAFILE han, newhan;
han=CloseMetaFile(h1); // закрывает контекст метафайла и
// создает дескриптор метафайла
Рисуем в окне (проигрываем метафайл )
HDC h=GetDC(hWnd);
PlayMetaFile (h,han); // проигрываем метафайл в окне
Сохраняем на диске (копируем метафайл в файл)
newhan = CopyMetaFile (han, L»met111.wmf»); // сохраняем в файл
Если имя файла NULL, то копируется в память. Возвращается
дескриптор нового метафайла.
Удаляем метафайл из памяти
DeleteMetaFile (newhan); — освобождает связанные с ним ресурсы.
19. Сценарий работы с метафайлом (2-й вариант)
1. Получить метафайл из файла (GetMetaFile)
2. Создать контекст метафайла в памяти
(CreateMetaFile)
3. Проиграть метафайл в контексте
(PlayMetaFile)
4. Удалить метафайл (DeleteMetaFile)
5. Функции рисования в контексте
6. Закрыть контекст (CloseMetaFile)
7. Проиграть метафайл в контексте окна
8. Сохранить метафайл на диске
(CopyMetaFile)
9. Удалить метафайл (DeleteMetaFile)
20. Получаем метафайл из файла
Открываем метафайл из файла, проигрываем его
в контексте, рисуем в контексте и сохраняем новый файл
HMETAFILE han, newhan;
han= GetMetaFile( L»met111.wmf»); // создать метафайл из файла
HDC h1= CreateMetaFile( NULL); // контекст метафайла в памяти
PlayMetaFile (h1,han); // Проигрываем метафайл
DeleteMetaFile (han);
hbr= CreateSolidBrush (0x000000FF);
SelectObject (h1,hbr);
Ellipse (h1,250,0,300,200);
DeleteObject(hbr);
han=CloseMetaFile (h1); // Закрываем контекст
PlayMetaFile(h,han); // например, HDC h = GetDC(hWnd)
newhan=CopyMetaFile(han,L»met111.wmf»);
DeleteMetaFile(newhan);
21. Сценарий работы с метафайлом (3-й вариант)
1.
2.
3.
4.
Создать контекст метафайла из файла
Рисуем в контексте
Закрыть метафайл и получить дескриптор метафайла
Можно проигрывать, сохранять
Удалить метафайл
HDC h1 = CreateMetaFile (<имя файла>.wmf)
// Рисуем в контексте h1
HMETAFILE han =CloseMetaFile(h1);
DeleteMetaFile(han);
Получается, что рисовать можно прямо в файле (добавить
команды GDI в файл)
22.
void __fastcall TForm1::Button2Click(TObject *Sender)
{
HDC h1 = CreateMetaFile («metaf1.emf»);
HBRUSH br=CreateSolidBrush(RGB(255,0,0));
HBRUSH oldbr=SelectObject(h1,br);
RoundRect(h1,200,250,250,300,10,10);
SelectObject(h1,oldbr);
DeleteObject(br);
HMETAFILE han =CloseMetaFile(h1);
DeleteMetaFile(han);
}
void __fastcall TForm1::Button3Click(TObject *Sender)
{
HMETAFILE han, newhan;
han= GetMetaFile( «metaf1.emf»);
PlayMetaFile(GetDC(Form1->Handle),han);
newhan=CopyMetaFile(han,»met111.wmf»);
DeleteMetaFile(newhan);
}
23. Тема
Клавиатура — одно из основных устройств
24. ВВОД ИНФОРМАЦИИ С КЛАВИАТУРЫ
Windows обеспечивает аппаратно — независимую
поддержку клавиатуры для прикладных программ,
при помощи клавиатурного драйвера.
Драйвер принимает от клавиатуры скэн-коды,
которые передаются в соответствии с
раскладкой символов на ней.
Скэн-код (scan code) — это аппаратно-зависимый
идентификатор клавиши на клавиатуре
(генерируются два скэн-кода, которые
соответствуют нажатию и отпусканию клавиши).
25. Код виртуальной клавиши
Драйвер клавиатуры переводит скэн-код в код виртуальной
клавиши (virtual-key code), то есть в не зависящее от устройства
значение, определяемое Windows, которое идентифицирует
целевую клавишу.
После этого в системную очередь помещается сообщение, которое
включает в себя скэн-код и код виртуальной клавиши.
В конечном итоге сообщения клавиатуры поступают в окно с
фокусом клавиатуры.
Фокус клавиатуры (keyboard focus) — это временное свойство окна.
Окно, которое имеет фокус, принимает все сообщения клавиатуры,
пока фокус не перейдет к другому окну.
26. Фокус ввода – временное свойство окна
С помощью перемещения фокуса клавиатуры система дает
возможность совместно использовать клавиатуру всем окнам на экране.
Программа может вызвать функцию GetFocus, чтобы определить,
какое из ее окон в настоящее время имеет фокус клавиатуры:
HWND GetFocus(void);
Передать фокус одному из окон можно с помощью
HWND SetFocus( HWND);
Если параметр равен 0 – сообщения клавиатуры будут игнорироваться.
Функция SetFocus посылает сообщения WM_KILLFOCUS и
WM_SETFOCUS и делает активным окно, получившее фокус (либо его
родительское окно).
Фокус клавиатуры связан с понятием активного окна (active window — окно
верхнего уровня, с которым пользователь в настоящее время работает).
Окно с фокусом клавиатуры является или активным окном, или его
дочерним окном.
27. Сообщения передачи фокуса ввода
Первым посылается сообщение
WM_KILLFOCUS — окно теряет фокус.
Параметр сообщения wParam является идентификатором окна,
которое должно получить фокус ввода (или NULL).
Например, родительское окно, обрабатывая сообщение
WM_KILLFOCUS, может предотвратить получение фокуса ввода
дочерним окном:
case WM_KILLFOCUS:
if (hwnd == GetParent((HWND) wParam))
SetFocus(hwnd); break;
Вторым посылается сообщение
WM_SETFOCUS — окно получает фокус.
Параметр сообщения wParam является идентификатором окна,
которое теряет фокус ввода (или NULL).
28. Сообщения клавиатуры
WM_KEYDOWN или WM_SYSKEYDOWN — клавиша нажата (в
зависимости от клавиши и была ли эта клавиша нажата в
комбинации с клавишей <Alt>);
WM_KEYUP или WM_SYSKEYUP — клавиша отпущена.
Сообщения с префиксом WM_SYS ( <ALT+клавиша> системные клавиатурные сообщения) редко обрабатываются
приложением (предназначены для Windows и в неизменном виде
передаются функции DefWindowProc).
Обработка системных клавиатурных сообщений обычно сводится к
выбору элементов меню, переключения на другое окно или другое
приложение.
29. Параметры клавиатурных сообщений
сase WM_KEYDOWN:
wsprintf( buf, «lParam: %lx,\n wParam: %lx\n», lParam, wParam);
MessageBox(NULL, buf, «Сообщение WM_KEYDOWN»,
MB_OK | MB_ICONINFORMATION);
return DefWindowProc(hWnd, message, wParam, lParam);
break;
Параметр lParam содержит информацию низкого уровня:
0-15 — счетчик повторов (если нажать клавишу и держать ее в нажатом состоянии, несколько
сообщений WM_KEYDOWN и WM_SYSKEYDOWN будут слиты в одно);
16-23 — OEM скан-код клавиши, который генерируется клавиатурным контроллером
(изготовители аппаратуры OEM — Original Equipment Manufacturer могут заложить в своей
клавиатуре различное соответствие скан-кодов и обозначений клавиш);
29 — код контекста (равен 1, если сообщение соответствует комбинации клавиши <Alt> с
любой другой, и 0 в противном случае);
30 — предыдущее состояние клавиши (если перед приходом сообщения клавиша,
соответствующая сообщению, была в нажатом состоянии, этот бит равен 1, если нет — бит
равен 0);
31 — флаг изменения состояния клавиши (если клавиша была нажата, бит равен 0, если
отпущена – 1).
30. Виртуальные коды клавиш
Параметр wParam содержит код виртуальной клавиши,
соответствующий нажатой физической клавише (этот параметр
используется приложениями для идентификации клавиши).
Код виртуальной клавиши не зависит от аппаратной
реализации клавиатуры.
Примеры:
Клавиша “Левый Shift”
lParam=2a0001, wParam=10.
Символьная клавиша ‘w’ lParam=110001, wParam=57.
Многие коды виртуальных клавиш имеют символьные обозначения
с префиксом VK_ (Virtual Key):
VK_LBUTTON, VK_RBUTTON — кнопки мыши (0x1,0x2),
VK_CANCEL — комбинация клавиш <Control + Break> (0x3),
31. Виртуальные коды
VK_BACK — клавиша <Backspace> (0x8),VK_RETURN – клавиша ввода
<Enter> (0xd), VK_SHIFT – клавиша <Shift> (0x10), VK_CONTROL
— клавиша <Ctrl> (0x11), VK_CAPITAL – клавиша <Caps Lock> (0x14),
VK_ESCAPE – клавиша <Esc>(1b),VK_SPACE — клавиша пробела (0x20),
VK_PRIOR, VK_NEXT, VK_END, VK_HOME — клавиши <PgUp>, <PgDn>,
<End>, <Home> (0x21-0x24),
VK_LEFT, VK_UP, VK_RIGHT, VK_DOWN — клавиши перемещения курсора
влево вверх вправо вниз (0x25 — 0x28),
VK_SNAPSHOT — клавиша <PrtSc> (0x2c),VK_INSERT- клавиша <Insert>
(0x2d), VK_DELETE – клавиша <Delete> (0x2e),
VK_NUMPAD0 — VK_NUMPAD9 — цифровые клавиши (0x60-0x69),
VK_F1 — VK_F12 — управляющие клавиши <F1>-< F12> (0x70-0x7b).
32. Символьные клавиши
Клавиши, соответствующие символам, имеют соответствующий
виртуальный код, но у них нет специальных символьных имен.
Используя только коды, невозможно различить строчные и
прописные буквы. Чтобы определить состояния клавиш <Shift>,
<Caps Lock>, <Control> и т.д. необходимо использовать
специальные функции.
При помощи программы установки параметров компьютера
BIOS SETUP пользователь может задать любое произвольное
состояние переключающих клавиш после запуска системы.
33. Проверка состояния клавиш
Функция GetKeyState, вызванная сразу после получения
сообщения, возвращает состояние клавиши на момент извлечения
сообщения из очереди приложения функцией GetMessage:
int WINAPI GetKeyState (int vkey); vkey — код виртуальной клавиши,
состояние которой проверяется (если старший бит равен 1 — клавиша
была нажата)).
Младший бит результата указывает состояние переключения.
Для клавиш <Caps Lock> или <Num Lock> он равен 1, если
клавиша во включенном состоянии.
Например, следующий код проверяет значение переключения клавиши
<Caps Lock>:
int kl= GetKeyState(VK_CAPITAL);
wsprintf( buf, «Клавиша: %x», kl);
SetWindowText(hSt,buf);
34. Состояние клавиш в произвольный момент
Функция GetAsyncKeyState позволяет узнать состояние клавиш
в любой произвольный момент времени:
int WINAPI GetAsyncKeyState (int vkey);
Если старший бит результата равен 1 — указанная клавиша была
нажата в момент вызова функции, если равен 0 — не была.
Младший бит возвращаемого значения установлен в 1, если
указанная клавиша была нажата с момента последнего вызова
функции GetAsyncKeyState.
Если для функции в качестве параметра задать значения VK_LBUTTON
или VK_RBUTTON, можно узнать состояние клавиш мыши.
Функция GetKeyboardState позволяет определить состояние всех
клавиш одновременно:
bool GetKeyboardState (PBYTE lpKeyState);
Параметр lpbKeyState этой функции — дальний указатель на
массив из 256 байт. После вызова функции этот массив будет
заполнен информацией о состоянии всех виртуальных клавиш
в момент генерации клавиатурного сообщения (аналогично функции
GetKeyState).
35. Примеры получения состояния клавиш
1. Получение состояния клавиш клавиатуры
BYTE kbrd[256];
GetKeyboardState (kbrd);
wsprintf( buf,»kbrd= [VK_CAPITAL], %x», kbrd [VK_CAPITAL] );
MessageBox(NULL, buf, «Функция GetKeyboardState»,
MB_OK | MB_ICONINFORMATION);
return DefWindowProc(hWnd, message, wParam, lParam);
2. Изменение состояния клавиатуры
После вызова функции GetKeyboardState можно изменить
содержимое массива и вызвать функцию SetKeyboardState
для изменения состояния клавиатуры.
Например, можно инвертировать текущее состояние клавиши
<NumLock> и установить новое состояние клавиш:
GetKeyboardState(kbrd); kbrd [VK_NUMLOCK] ^= 1;
SetKeyboardState(kbrd);
36. Наименование клавиш
Функция GetKeyNameText возвращает для заданного кода виртуальной
клавиши название соответствующей клавиши в виде текстовой строки
(эти названия определены в драйвере клавиатуры):
int WINAPI GetKeyNameText(LONG lParam, LPSTR lpszBuffer, int cbMaxKey);
Параметр lParam определяет клавишу в формате lParam клавиатурного сообщения
(удобно использовать значение lParam, полученное функцией окна вместе с
клавиатурным сообщением WM_KEYDOWN, WM_SYSKEYDOWN и т.д.).
Параметр lpszBuffer — указатель на буфер, в котором вернется название клавиши,
cbMaxKey содержит длину буфера уменьшенную на 1.
Примеры:
1. Удобно использовать в обработчике сообщения WM_KEYDOWN:
GetKeyNameText(lParam, buf, 79);
MessageBox(NULL, buf, «Название клавиши», MB_OK | MB_ICONINFORMATION);
2. Код вернет название клавиши «Enter»:
GetKeyNameText(0x1c0001, buf, 79);
MessageBox(NULL, buf, «Название клавиши», MB_OK | B_ICONINFORMATION);
37. Символьные сообщения
Сообщение WM_CHAR – нажатие символьной клавиши
Для работы с обычными символьными клавишами рассмотренные
ранее сообщения не очень удобны, так как необходимо различать
прописные и строчные буквы, учитывать особенности работы
с национальными алфавитами.
В цикл обработки сообщений включена функция
TranslateMessage (&msg);
Эта функция преобразует клавиатурные сообщения
WM_KEYDOWN, WM_KEYUP, WM_SYSKEYDOWN, WM_SYSKEYUP
в символьные сообщения WM_CHAR, WM_SYSCHAR.
WM_CHAR и WM_SYSCHAR помещаются в очередь сообщений
(оригинальные клавиатурные сообщения также остаются в очереди).
38. Параметры символьных сообщений
Значение параметра lParam остается прежним, а параметр wParam содержит код
символа, соответствующего нажатой клавише (в стандарте ANSI, принятом в
Windows для представления символов).
Код символа определяется функцией TranslateMessage с учетом состояния клавиш
<Control>, <Shift>, <Alt>, <Caps Lock> и используемого языка.
case WM_CHAR:
wsprintf( buf, «lParam: %lx,\n wParam %lx\n», lParam, wParam);
MessageBox(NULL, buf, «Сообщение WM_CHAR», MB_OK | MB_ICONINFORMATION);
Например, код для символьной клавиши ‘w’ выдаст lParam=110001, а wParam может
иметь различные значения.
Печать символа: wsprintf( buf, «Символ: %c»,wParam);
MessageBox(NULL, buf,»Сообщение WM_CHAR», MB_OK | MB_ICONINFORMATION);
Наиболее используемым является сообщение WM_CHAR, которое передается
функции окна в результате трансляции сообщения WM_KEYDOWN. Сообщение
WM_SYSCHAR образуется из сообщения WM_SYSKEYDOWN и обычно
приложением не обрабатывается (передается функции DefWindowProc).
39. Задачи для самопроверки
Путем ряда программных экспериментов определить, какие клавиатурные
сообщения и когда срабатывают (WM_KEYDOWN, WM_SYSKEYDOWN,
WM_KEYUP и WM_SYSKEYUP), распечатать и пояснить значения параметров
сообщений для различных клавиш.
Для сообщения WM_CHAR определить (с помощью ряда программных
экспериментов) какие значения может принимать параметр wParam для
символьной клавиши ‘s’. Определив также название данной символьной
клавиши, убедиться, что оно не зависит от раскладки клавиатуры.
После нажатия символа ‘q’ (строчная буква q) пользователем, включить режим
CAPS LOCK, чтобы все остальные буквы были большими.
Создать в главном окне кнопку нажатия Button и поле для ввода Edit.
Убедившись, что фокус ввода имеют теперь только элементы управления,
определить на какую клавиатурную клавишу срабатывает кнопка Button.
По щелчку левой кнопкой мыши (в клиентской области окна) вернуть окну фокус
ввода. Все символьные сообщения WM_CHAR, полученные окном, пересылать
в поле Edit.
Сделать так, чтобы дочерние окна никогда не получали фокус ввода.
40.
• Все!!!

147
Сохранение метафайлов на диске
В приведенном выше примере использование NULL в качестве параметра функции CreateMetaFile означало, что мы хотим создать метафайл в памяти. Мы можем также создать метафайл, сохраняемый на диске как обычный файл. Этот метод предпочтителен для больших метафайлов, поскольку он требует меньше памяти. Windows необходимо выделить относительно небольшой фрагмент памяти для хранения имени файла, содержащего метафайл. Однако, каждый раз, когда вы проигрываете метафайл, сохраненный на диске, будет осуществляться доступ к диску.
Для преобразования программы METAFILE для работы с дисковым метафайлом вам необходимо заменить параметр NULL в функции CreateMetaFile именем файла. По завершении обработки сообщения функцией WM_CREATE вы можете удалить описатель метафайла с помощью функции DeleteMetaFile. Описатель удаляется, но файл на диске остается.
Во время обработки сообщения WM_PAINT вы можете получить описатель метафайла, соответствующего этому дисковому файлу, вызывая функцию GetMetaFile:
hmf = GetMetaFile(szFileName);
Теперь вы можете проиграть метафайл также, как раньше. Когда обработка сообщения WM_PAINT закончится, вы можете удалить описатель метафайла:
DeleteMetaFile(hmf);
Когда придет время обработки сообщения WM_DESTROY, вам не нужно удалять метафайл, поскольку он был удален по завершении обработки сообщения WM_CREATE и в конце обработки каждого сообщения WM_PAINT. Но вам следует удалить дисковый файл (конечно, в том случае, если он вам более не нужен):
remove(szFileName);
В главе 9 будут рассмотрены ресурсы, определяемые пользователем. Ресурсы — это обычные двоичные данные, хранящиеся в EXE-файле программы, но отдельно от обычных областей кода и данных. Метафайл тоже может быть ресурсом. Если у вас есть блок данных, содержащий метафайл, вы можете создать метафайл, используя функцию:
hmf = SetMetaFileBitsEx(iSize, pData);
Функция SetMetaFileBitsEx имеет парную функцию GetMetaFileBitsEx, которая копирует содержимое метафайла в блок памяти.
Расширенные метафайлы
С устаревшими (но еще поддерживаемыми) метафайлами, рассмотренными выше, связаны некоторые проблемы. В частности, программа, использующая метафайл, созданный другой программой, не может легко определить размер отображаемого образа, представляемого метафайлом. Ей нужно просмотреть метафайл и проанализировать все команды рисования. Это большая проблема.
Ранее Microsoft рекомендовала создавать метафайлы, не содержащие вызовов функции SetMapMode и других функций, изменяющих преобразование окно/область вывода. Соблюдение данной рекомендации делает метафайлы зависимыми от устройства и не дает возможности приложению изменить размер выводимого изображения. Таким образом, все координаты в метафайле — просто числа, не связанные с какой-либо системой координат.
Как мы увидим в главе 16, метафайлы устаревшего типа не передаются через буфер обмена непосредственно. Вместо этого, буфер обмена работает с неким объектом под названием «картина метафайла» (metafile picture). Это структура типа METAFILEPICT. Описатель метафайла является полем этой структуры. Кроме того, в этой структуре также содержатся идентификатор режима отображения (отражающий единицы измерения по осям координат для всех функций GDI, содержащихся в метафайле) и размеры изображения. Эта информация помогает программе, импортирующей метафайл, установить соответствующую среду GDI для отображения образа.
Структура картины метафайла — настоящая находка. Ее, очевидно, добавили в GDI для устранения недостатков формата метафайла. Следует отметить, что аналогичная возможность не была разработана для дисковых метафайлов, и именно поэтому вам не удавалось увидеть большинство из этих файлов, используемых для обмена картинками. Они просто очень сложны для использования.
Делаем это лучше
Также как и Windows NT, Windows 95 поддерживает новый формат «расширенного метафайла». Кроме того добавляются несколько новых функций, несколько новых структур данных, новый формат буфера обмена и новое расширение файла — EMF.

148
Главное усовершенствование состоит в том, что новый формат метафайла содержит более обширный информационный заголовок, доступный посредством вызова функций. Эта информация призвана помочь приложениям выводить изображения, содержащиеся в метафайлах.
Некоторые из расширенных функций работы с метафайлами позволяют вам преобразовывать метафайлы из нового расширенного формата .EMF в устаревший формат .WMF и обратно. Конечно, это преобразование не может быть произведено без потерь. Устаревший формат метафайлов не поддерживает некоторые из новых графических возможностей (например, пути).
Базовая процедура
На рис. 4.30 приведена программа EMF1, которая создает и выводит на экран расширенный метафайл.
EMF1.MAK
#———————
# EMF1.MAK make file
#———————
emf1.exe : emf1.obj
$(LINKER) $(GUIFLAGS) -OUT:emf1.exe emf1.obj $(GUILIBS)
emf1.obj : emf1.c
$(CC) $(CFLAGS) emf1.c
EMF1.C
|
/*————————————- |
|
|
EMF1.C — |
Enhanced Metafile Demo #1 |
|
(c) Charles Petzold, 1996 |
|
|
————————————- |
*/ |
#include <windows.h>
LRESULT CALLBACK WndProc(HWND, UINT, WPARAM, LPARAM);
int WINAPI WinMain(HINSTANCE hInstance, HINSTANCE hPrevInstance, PSTR szCmdLine, int iCmdShow)
{
static char szAppName[] = «EMF1»;
|
HWND |
hwnd; |
|
MSG |
msg; |
|
WNDCLASSEX |
wndclass; |
|
wndclass.cbSize |
= sizeof(wndclass); |
|
wndclass.style |
= CS_HREDRAW | CS_VREDRAW; |
|
wndclass.lpfnWndProc |
= WndProc; |
|
wndclass.cbClsExtra |
= 0; |
|
wndclass.cbWndExtra |
= 0; |
|
wndclass.hInstance |
= hInstance; |
|
wndclass.hIcon |
= LoadIcon(NULL, IDI_APPLICATION); |
|
wndclass.hCursor |
= LoadCursor(NULL, IDC_ARROW); |
|
wndclass.hbrBackground |
=(HBRUSH) GetStockObject(WHITE_BRUSH); |
|
wndclass.lpszMenuName |
= NULL; |
|
wndclass.lpszClassName |
= szAppName; |
|
wndclass.hIconSm |
= LoadIcon(NULL, IDI_APPLICATION); |
RegisterClassEx(&wndclass);
hwnd = CreateWindow(szAppName, «Enhanced Metafile Demo #1», WS_OVERLAPPEDWINDOW,
CW_USEDEFAULT, CW_USEDEFAULT,
CW_USEDEFAULT, CW_USEDEFAULT,
NULL, NULL, hInstance, NULL);
ShowWindow(hwnd, iCmdShow);

149
UpdateWindow(hwnd);
while(GetMessage(&msg, NULL, 0, 0))
{
TranslateMessage(&msg);
DispatchMessage(&msg);
}
return msg.wParam;
}
LRESULT CALLBACK WndProc(HWND hwnd, UINT iMsg, WPARAM wParam, LPARAM lParam)
{
static HENHMETAFILE hemf;
|
HDC |
hdc, hdcEMF; |
|
PAINTSTRUCT |
ps; |
|
RECT |
rect; |
switch(iMsg)
{
case WM_CREATE:
hdcEMF = CreateEnhMetaFile(NULL, NULL, NULL, NULL);
Rectangle(hdcEMF, 100, 100, 200, 200);
|
MoveToEx |
(hdcEMF, 100, 100, NULL); |
|
LineTo |
(hdcEMF, 200, 200); |
|
MoveToEx |
(hdcEMF, 200, 100, NULL); |
|
LineTo |
(hdcEMF, 100, 200); |
hemf = CloseEnhMetaFile(hdcEMF);
return 0; case WM_PAINT:
hdc = BeginPaint(hwnd, &ps);
GetClientRect(hwnd, &rect);
|
rect.left |
= |
rect.right |
/ 4; |
|
|
rect.right |
= |
3 |
* rect.right |
/ 4; |
|
rect.top |
= |
rect.bottom / 4; |
||
|
rect.bottom = |
3 |
* rect.bottom / 4; |
PlayEnhMetaFile(hdc, hemf, &rect);
EndPaint(hwnd, &ps); return 0;
case WM_DESTROY: DeleteEnhMetaFile(hemf);
PostQuitMessage(0); return 0;
}
return DefWindowProc(hwnd, iMsg, wParam, lParam);
}
Рис. 4.30 Программа EMF1
В процессе обработки сообщения WM_CREATE в оконной процедуре программы EMF1, с помощью функции CreateEnhMetaFile создается расширенный метафайл. Эта функция требует задания четырех параметров, но вы можете задать их все равными NULL. (Как удобно!) Позднее будет рассказано, как использовать эту функцию с параметрами, отличными от NULL.
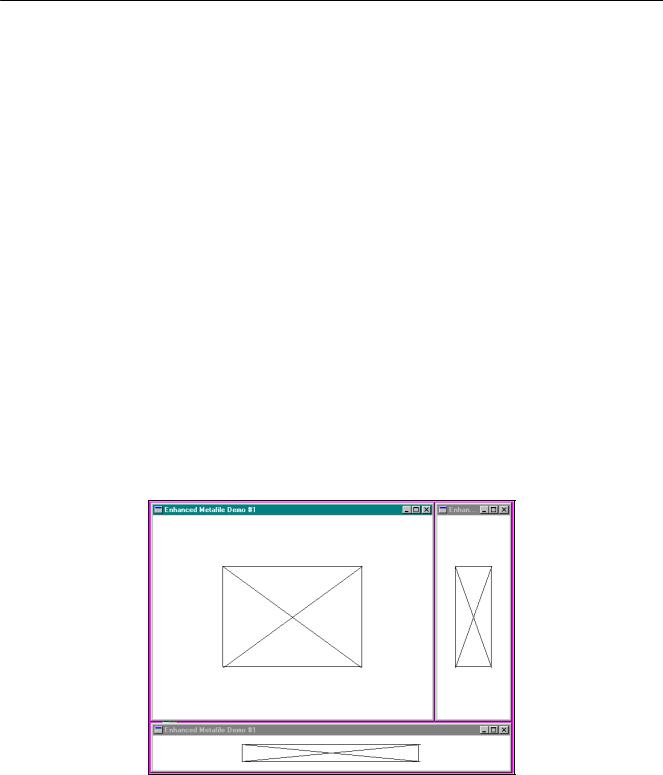
150
Так же, как и функция CreateMetaFile, функция CreateEnhMetaFile возвращает описатель специального контекста устройства. Программа использует этот описатель для рисования прямоугольника и двух прямых, соединяющих противоположные углы прямоугольника. Эти вызовы функций конвертируются в двоичный вид и запоминаются в метафайле.
Наконец, вызов функции CloseEnhMetaFile завершает формирование расширенного метафайла и возвращает его описатель. Он запоминается в статической переменной типа HENHMETAFILE.
В процессе обработки сообщения WM_PAINT программа EMF1 получает размеры рабочей области окна и записывает их в структуру типа RECT. Четыре поля этой структуры пересчитываются таким образом, что прямоугольник приобретает ширину, равную половине ширины рабочей области, и высоту, равную половине высоты рабочей области, а весь прямоугольник располагается в центре рабочей области. Затем программа EMF1 вызывает функцию PlayEnhMetaFile. Первый параметр этой функции — описатель контекста устройства окна, второй — описатель расширенного метафайла, третий параметр — указатель на структуру типа RECT.
Здесь произойдет то, что происходило при создании метафайла — GDI вычислит размеры изображения, хранящегося в метафайле. В нашем случае изображение имеет ширину и высоту 100 единиц. При отображении метафайла GDI растягивает изображение так, чтобы полностью занять указанный в вызове функции PlayEnhMetaFile прямоугольник. Три примера работы программы EMF1 в среде Windows 95 показаны на рис. 4.31.
Наконец, при обработке сообщения WM_DESTROY программа EMF1 удаляет метафайл, вызывая функцию
DeleteEnhMetaFile.
Давайте обратим внимание на некоторые вещи, которым мы могли бы научиться из программы EMF1.
Во-первых, в этой конкретной программе координаты, используемые функциями рисования прямоугольника и линий для создания расширенного метафайла, на самом деле определяют далеко не все. Вы можете удвоить их значения или вычесть константу из них — результат останется таким же. Таким образом, можно сделать вывод, что координаты имеют взаимосвязи друг с другом в определении образа.
Во-вторых, изображение растягивается так, чтобы занять весь прямоугольник, передаваемый как параметр в функцию PlayEnhMetaFile. Следовательно, как показано на рис. 4.31, изображение может быть искажено. При задании координат в метафайле предполагается, что изображение — квадрат, но в общем случае мы его не получим.
Рис. 4.31 Окна программ EMF1.
Иногда это как раз то, что требуется. В программах обработки текстов пользователю может быть предоставлена возможность задавать прямоугольник для изображения так, чтобы все изображение целиком занимало указанную область без потерь места. Пусть пользователь устанавливает правильный относительный размер, изменяя соответствующим образом размеры прямоугольника.
Однако, существуют случаи, когда нужно другое. Можно установить относительный размер исходного изображения, поскольку это бывает крайне важно для визуального представления информации. Например, эскиз лица подозреваемого в преступлении (полицейский фоторобот) не должен быть искажен относительно оригинала. Или можно сохранить метрические размеры исходного изображения, так как важно то, что образ имеет высоту два дюйма, и не должен изображаться иначе.
Соседние файлы в предмете Операционные системы
- #
- #
- #
- #
Содержание
- Содержание
- История
- Структура метафайлов
- Записи растрового изображения
- Записи чертежа
- Объект записи
- Записи состояния
- Escape-записи
- Реализации
- Содержание
- История
- Структура метафайлов
- Записи растрового изображения
- Записи чертежа
- Объект записи
- Записи состояния
- Escape-записи
- Реализации
- Содержание
- История
- Структура метафайла
- Записи растровых изображений
- Записи чертежей
- Записи об объектах
- Государственные записи
- Записи о побегах
- Реализации
- Содержание:
- Тип файла 1 Расширенный метафайл Windows
- двоичный
- Что такое файл EMF?
- Тип файла 2Jasspa MicroEmacs Macro File
- Текст
- .EMF File Association 2
- О файлах EMF
- Проблема высокой загрузки памяти системным файловым кэшем на Windows Server 2008 R2
- Высокая загрузка оперативной памяти на файловом сервере Windows
- Что такое метафайл в Windows?
- Быстрая очистка метафайла MFT в памяти
- Служба Dynamic Cache Service для управления файловым кэшем
Содержание
История
Исходный 16-битный формат файла WMF был полностью указан в томе 4 документация Windows 3.1 SDK 1992 года (по крайней мере, если она сочетается с описаниями отдельных функций и структур в других томах), но эта спецификация расплывчата по некоторым деталям. Эти руководства были опубликованы в виде печатных книг, доступных в книжных магазинах без переходов по EULA или других необычных лицензионных ограничений (просто общее предупреждение о том, что при покупке в составе пакета программного обеспечения программное обеспечение будет подлежат одному).
Инкапсулированные контрольными записями записи, составляющие само изображение. Эти записи работают в так называемом контексте устройства воспроизведения, который представляет собой набор свойств и объектов, составляющих графическую среду устройства, когда метафайл «воспроизводится» на этом устройстве вывода.
Другие записи. чем управляющие записи могут быть в значительной степени сгруппированы в записи растровых изображений, записи чертежей, записи объектов, записи состояний и записи перехода.
Записи растрового изображения
Записи чертежа
Записи чертежа производят графический вывод.
Объект записи
Графические объекты могут быть кистями (определяет стиль, цвет и узор кисти, который определяет, как для рисования области рисунка), шрифтов (определяет свойства, которые влияют на отображение текста), палитры (задает цвета как независимые от устройства значения, определенные приложением), перья (задает графические атрибуты линии) и области (которые определяют сегменты линии и кривой, определяющие форму).
Записи состояния
Записи состояния управляют графическими свойствами контекста устройства воспроизведения.
Escape-записи
Следующие escape-записи составляют файл WMF.
После того, как Стив Гибсон из Gibson Research Corporation обвинил Microsoft в преднамеренном внедрении бэкдора в свой код, Марк Руссинович представил опровержение и заявил, что:
. все было по-другому, когда формат был разработан. В Windows 3.1 код модели «большой» памяти по своей природе не зависит от местоположения, и Windows никогда не была исправлена, поэтому и Windows, и приложение могли просто скопировать функцию приложения в файл WMF и предположить, что она будет работать при воспроизведении одним и тем же приложением в более поздний сеанс запуска. В любом случае неясно, предполагали ли разработчики приложения, создающие метафайлы на диске с процедурами прерывания. Кроме того, как Стивен Тулуза из Microsoft указал в опровержении Microsoft утверждений Стива, ландшафт безопасности в начале 1990-х сильно отличался от сегодняшнего, и всему коду, включая тот, который хранится в файле WMF, по своей сути доверяли. 319>Питер Ферри из Symantec Security Response, США, также не согласился с Гибсоном, отметив, что:
Как и файлы WMF, записи могут быть классифицированы по функциям, однако есть больше записей типов в файлах EMF, чем в файлах WMF. Записи могут быть классифицированы как элементы управления, растровые изображения, обрезки, комментарии, рисование, экранирование, создание объекта, манипулирование объектами, OpenGL, скобки пути, записи состояния и преобразования.
С выпуском Windows XP был представлен формат расширенного формата метафайлов плюс расширения (EMF +). EMF + предоставляет способ сериализации вызовов API GDI + таким же образом, как WMF / EMF хранит вызовы GDI.
Существуют также сжатые версии метафайлов Windows, известные как сжатый метафайл Windows (WMZ) и сжатый расширенный метафайл Windows (EMZ), которые в основном представляют собой сжатые gzip файлы WMF и EMF соответственно.
Реализации
Источник
По сути, метафайл хранит список записей, состоящий из команд рисования, определений свойств и графических объектов для отображения изображения на экране. Используемые команды рисования тесно связаны с командами API интерфейса графического устройства (GDI), используемыми для рисования в Microsoft Windows.
Содержание
История
Файлы WMF и EMF обрабатывают объекты иначе, чем записи EMF + в файлах EMF. В процессе обработки файлов WMF и EMF записи считываются в таблицу объектов после определения объекта. Если объект удален, объект удаляется из таблицы, и идентификатор можно использовать повторно. Примечательно, что объект не будет использоваться, пока он не будет специально выбран во время воспроизведения записи. Это отличается от файлов EMF +, которые также используют ассоциативный массив через хэш-карту, которая записывает объект вместе с идентификатором объекта. Однако, в отличие от файлов WMF и EMF, которые могут удалять объект, когда создается новый объект, имеющий тот же индекс, что и существующий объект, запись в таблице заменяется новым объектом. EMF-файлу также не нужно специально выбирать объект перед его использованием.
Записи, отличные от записей управления, могут быть в основном сгруппированы в записи растровых изображений, записи чертежей, записи объектов, записи состояния и записи перехода.
Записи растровых изображений
Записи чертежей
Записи чертежей обеспечивают вывод графики.
Записи об объектах
Графическими объектами могут быть кисти (определяет стиль, цвет и узор кисти, которые определяют, как рисовать область графики), шрифты (определяют свойства, влияющие на отображение текста), палитры (задают цвета как независимые от устройства значения, определяется приложением), перьями (задает графические атрибуты линии) и областями (которые определяют сегменты линии и кривой, определяющие форму).
Государственные записи
Записи состояния управляют графическими свойствами контекста устройства воспроизведения.
| имя | Описание |
|---|---|
| META_ANIMATEPALETTE | Переопределяет записи в логической палитре, которая определяется в контексте устройства воспроизведения с помощью указанного объекта палитры. |
| META_EXCLUDECLIPRECT | Устанавливает область отсечения, которая определена в контексте устройства воспроизведения, равной существующей области отсечения за вычетом указанного прямоугольника. |
| META_INTERSECTCLIPRECT | Устанавливает область отсечения, которая определена в контексте устройства воспроизведения, на пересечение существующей области отсечения и указанного прямоугольника. |
| META_MOVETO | Устанавливает позицию вывода в контексте устройства воспроизведения в указанную точку. |
| META_OFFSETCLIPRGN | Перемещает область отсечения, определенную в контексте устройства воспроизведения, на заданные смещения. |
| META_OFFSETVIEWPORTORG | Перемещает начало координат области просмотра в контексте устройства воспроизведения на заданные горизонтальные и вертикальные смещения. |
| META_OFFSETWINDOWORG | Перемещает исходную точку окна вывода в контексте устройства воспроизведения на заданные горизонтальные и вертикальные смещения. |
| META_REALIZEPALETTE | Сопоставляет записи из логической палитры, определенной в контексте устройства воспроизведения, с системной палитрой. |
| META_RESIZEPALETTE | Повторно определяет размер логической палитры, определенной в контексте устройства воспроизведения. |
| META_RESTOREDC | Восстанавливает контекст устройства воспроизведения из ранее сохраненного контекста устройства. |
| META_SAVEDC | Сохраняет контекст устройства воспроизведения для последующего использования. |
| META_SCALEVIEWPORTEXT | Масштабирует горизонтальные и вертикальные пределы области просмотра, которая определена в контексте устройства воспроизведения, с использованием соотношений, образованных указанными множителями и делителями. |
| META_SCALEWINDOWEXT | Масштабирует горизонтальные и вертикальные пределы окна вывода, которое определено в контексте устройства воспроизведения, с использованием соотношений, образованных указанными множителями и делителями. |
| META_SETBKCOLOR | Устанавливает заданный цвет фона в контексте устройства воспроизведения. |
| META_SETBKMODE | Устанавливает режим фонового микширования в контексте устройства воспроизведения. |
| META_SETLAYOUT | Определяет ориентацию макета в контексте устройства воспроизведения. |
| META_SETMAPMODE | Определяет режим отображения в контексте устройства воспроизведения. |
| META_SETMAPPERFLAGS | Определяет алгоритм, который использует средство сопоставления шрифтов при сопоставлении логических шрифтов с физическими шрифтами. |
| META_SETPALENTRIES | Определяет значения цвета RGB в диапазоне записей в логической палитре, которая определяется в контексте устройства воспроизведения. |
| META_SETPOLYFILLMODE | Определяет режим заливки многоугольника в контексте устройства воспроизведения для графических операций заливки многоугольников. |
| META_SETRELABS | Неиспользованная запись. |
| META_SETROP2 | Определяет режим смешивания работы с растром переднего плана в контексте устройства воспроизведения. |
| META_SETSTRETCHBLTMODE | Определяет режим растяжения растрового изображения в контексте устройства воспроизведения. |
| META_SETTEXTALIGN | Определяет значения выравнивания текста в контексте устройства воспроизведения. |
| META_SETTEXTCHAREXTRA | Определяет межсимвольный интервал для выравнивания текста в контексте устройства воспроизведения. |
| META_SETTEXTCOLOR | Определяет цвет текста переднего плана в контексте устройства воспроизведения. |
| META_SETTEXTJUSTIFICATION | Определяет количество места, которое нужно добавить для разрыва символов в строке выровненного текста. |
| META_SETVIEWPORTEXT | Определяет горизонтальную и вертикальную границы области просмотра в контексте устройства воспроизведения. |
| META_SETVIEWPORTORG | Определяет источник области просмотра в контексте устройства воспроизведения. |
| META_SETWINDOWEXT | Определяет горизонтальный и вертикальный размеры окна вывода в контексте устройства воспроизведения. |
| META_SETWINDOWORG | Определяет источник окна вывода в контексте устройства воспроизведения. |
Записи о побегах
Следующие escape-записи составляют файл WMF.
После того как Стив Гибсон из Gibson Research Corporation обвинил Microsoft в намеренном внедрении бэкдора в свой код, Марк Руссинович представил опровержение и заявил, что:
Питер Ферри из Symantec Security Response, США, также не согласен с Гибсоном, отметив, что:
Как и файлы WMF, записи можно классифицировать по функциям, однако в файлах EMF больше типов записей, чем в файлах WMF. Записи могут быть классифицированы как элементы управления, растровые изображения, обрезки, комментарии, рисование, экранирование, создание объекта, манипулирование объектами, OpenGL, скобки пути, записи состояния и преобразования.
Существуют также сжатые версии метафайлов Windows, известные как сжатый метафайл Windows (WMZ) и сжатый расширенный метафайл Windows (EMZ), которые в основном представляют собой сжатые с помощью gzip файлы WMF и EMF соответственно.
Реализации
Источник
разработчикMicrooft популярность 2,8 (26 голосов) категорияВекторные файлы изображений ФорматБинарный Х Этот файл сохраняется в двоичном формате, который требует определенной программы для чтения его
Содержание:
| разработчик | Microsoft |
| популярность | 2,8 (26 голосов) |
| категория | Векторные файлы изображений |
| Формат | Бинарный Х |
двоичный
Этот файл сохраняется в двоичном формате, который требует определенной программы для чтения его содержимого.
Что такое файл EMF?
Формат векторной графики Windows, распознаваемый многими приложениями для редактирования изображений; в основном 32-битная версия оригинального формата метафайлов Windows (.WMF), которая поддерживает только 16-битные данные; сохраняет данные изображения в формате RGB и не поддерживает данные CMYK. Дополнительная информация
EMF также может использоваться в качестве графического языка для драйверов принтера.
Тип файла 2Jasspa MicroEmacs Macro File
| разработчик | Jasspa |
| популярность | 2.0 (8 голосов) |
| категория | Текстовые файлы |
| Формат | Текст X |
Текст
Этот файл сохраняется в текстовом формате. Вы можете открыть и просмотреть содержимое этого файла с помощью текстового редактора.
.EMF File Association 2
Макро-файл, содержащий команды для автоматизации задач в выпуске Jasspa MicroEmacs, расширяемого текстового редактора; используется для автоматизации повторяющихся задач, которые в противном случае были бы очень трудоемкими и однообразными для выполнения вручную. Дополнительная информация
Пользователи могут писать собственные макросы и создавать новые команды, используя обширный язык макросов Jasspa MicroEmac, а затем сохранять их в виде файлов EMF.
НОТА: Файлы EMF не совместимы с другими выпусками MicroEmacs.
Общие имена файлов EMF
Программы, открывающие файлы EMF
Обновлено 27.09.2013
О файлах EMF
Все типы файлов, описания форматов файлов и программы, перечисленные на этой странице, были индивидуально исследованы и проверены командой FileInfo. Мы стремимся к 100% точности и публикуем информацию только о тех форматах файлов, которые мы тестировали и проверяли.
Если вы хотите предложить какие-либо дополнения или обновления на этой странице, пожалуйста, сообщите нам об этом.
Источник
Проблема высокой загрузки памяти системным файловым кэшем на Windows Server 2008 R2
На одном из файловых серверов под управлением Windows Server 2008 R2 обнаружилась проблема с высокой загрузки оперативной памяти (RAM), выливающаяся в проблемы с производительностью сервера и запущенных на нем служб. Как оказалось, память забивалась системным файловым кэшем с метаданными файловой системы. Проблеме потенциально подвержены все файловые сервера с большим количеством файлов, к которым обращаются пользователя. Наиболее критична проблема для 64 битных версий Windows, на которых размер метафайла в памяти может занять практически всю емкость установленной оперативной памяти. В статье разберемся как проявляется проблема, выявим ее источники и способы решения.
Высокая загрузка оперативной памяти на файловом сервере Windows
Проблема проявляется следующим образом: в диспетчере задач (Task Manager) видим, что на сервере оперативная память занята на 95-99%.
Перейдя на вкладку процессов, не удастся найти какой-то утекший процесс с аномально высоким потреблением памяти. Кроме того, если навскидку сложить память, занятую всеми процессами, отображаемыми в диспетчере задач, даже близко не удается приблизиться к 50% физической памяти, установленной на сервере. Так кто же съел всю память?
Реальный расклад по использованию оперативной памяти может дать утилита RAMMap (Марка Руссиновича). Качаем архив с утилитой и запускаем из архива файл RAMMap.exe с правами администратора. На вкладке Use Counts, видим, что больше всего физической памяти использует объектом Metafile (в нашем случае на него приходится 11 из 25 Гб оперативной памяти сервера).
Метафайл (Metafile) — это часть системного кэша, который содержит метаданные файловой системы NTFS и используется для увеличения быстродействия файловой системы при доступе к файлам. Метаданные NTFS включают в себя данные таблицы MFT (Master File Table). Для каждого файла/папки, к которому обращались пользователи, в метафайле создается соответствующий блок, размером как минимум 1 Кб (запись об атрибуте каждого файла занимает 1кб, и каждый файл имеет как минимум один атрибут). Таким образом, на файловых серверах с большим количеством файлов, к которым идут постоянные обращения, размер системного кэша NTFS (метафайла) может достигать нескольких гигабайт.
Отключить этот кэш или управлять им с помощью стандартных средств Windows не получится. Как решение, можно увеличить количество памяти на сервере, но реализуемо это далеко не всегда.
Если перезагрузить сервер, память используемая метафайлом освобождается, но со временем размер метафайла в памяти все равно начинает неконтролируемо расти.
К примеру, оценить размер MFT таблицы можно с помощью еще одной утилиты Руссиновича – ntfsinfo. К примеру, в нашем примере для 2 Тб диска размер MFT таблицы составляет 13 Гб.
Основной недостаток такого метода – процесс очистки ручной и никак не автоматизируется.
Служба Dynamic Cache Service для управления файловым кэшем
Другим, более кардинальным, решением проблемы высокой загрузки оперативной памяти метафайлом файловой системы является установка службы Dynamic Cache Service (http://www.microsoft.com/en-us/download/details.aspx?id=9258). Данная служба через системные API позволяет управлять параметрами выделяемого кэша.
Установка DynCache довольно простая (подробные инструкции есть в архиве с программой).
В нашем случае, после установки службы DynCache, использование памяти метафайлом перестало превышать заданного нами значения 4 Гб. Пользователи каких-либо проблем с ухудшением производительности файлового сервера не выявили.
Источник
Для чего нужен файловый формат .EMZ?
Расширение .emz служит для обозначения формата файлов «Сжатый расширенный метафайл Windows» (Windows Compressed Enhanced Metafile) и ассоциированного с ним типа файлов EMZ. EMZ представляет собой сжатый вариант формата «Расширенный метафайл Windows» (Windows Enhanced Metafile, EMF). В свою очередь, EMF — это специфичный для среды MS Windows формат, используемый главным образом для векторной графики и являющийся расширением более раннего формата «Метафайл Windows» (Windows Metafile, WMF). Как WMF, так и EMF относятся к Windows-форматам и построены на сериализации GDI-вызовов.
Файл .emz — это сжатое EMF-изображение. Фактически файл .emz представляет собой GZIP-архив со сжатым файлом EMF.
EMZ-файлы в целом поддерживаются только в MS Windows. Их можно непосредственно открывать при помощи встроенного средства просмотра изображений Windows, а также приложений MS Office. Помимо MS Windows, файлы EMZ(EMF) можно открывать и/или импортировать средствами нескольких приложений для работы с векторной графикой, а также других офисных пакетов.
К тому же, файл .emz можно рассматривать как архив .gzip. Его содержимое (файл .emf) можно извлечь любым GZIP-совместимым архиватором, хотя при этом может потребоваться вручную изменить расширение извлеченного файла на .emf.
Программы для открытия или конвертации EMZ файлов
Вы можете открыть файлы EMZ с помощью следующих программ: