
If you’re regularly downloading files from the Internet, you might have been advised to check the files with Windows MD5 Checker. The concept of file hashing algorithms, MD5 checksum could be unfamiliar to you, unless you’re a software engineer or a maths student.
Recommended: Scan Your Computer with Clone Files Checker and delete 1000s of duplicate files.
Before we head on to the actual process, here’s a quick explanation of the concept of checksum and why it holds significance. In the latter part of the article, we’ll discuss how to delete identical files with Windows MD5 Checker. Let’s begin.
What is Checksum? How Does it Work?
A checksum is an alphanumeric string produced by cryptographic file comparison algorithms. It is a fixed-character string that helps you identify whether a file is identical in nature to another file. A checksum usually contains a random set of characters with a fixed length.
No matter whether you hash a small file with only 20 characters or a large file with 2000 characters, the resulting checksum would still have the same character length. Hashing the same file over and again will produce the same checksum again without any change. Remember, if you modify the file contents or add just a little single extra space, the entire set of checksum characters would change.
But wait, do not confuse checksums with file encryptions. It is not yet another technology to encode and decode information or to shorten (compress) your text. You cannot encrypt a 2000 character text into a 16 character checksum and then decode it back to its original state. It doesn’t work like that. File checksums are not meant for transferring confidential information or for compressing larger data into smaller texts.
Why Does a Checksum Hold Significance in Computing?
There are different circumstances when you will need to compute a file’s checksum. Here are some typical scenarios:
Validate your Downloaded Files
Internet connectivity issues are not uncommon. If you’re downloading a large file, constant Internet issues can surely irritate you in many ways. Your download may get worse during peak hours. The increased load on your bandwidth distribution can cause the download to become terribly slower or even stop in the middle for apparently no reason.
Windows MD5 Checker can help you verify the integrity of your downloaded files. If you’ve downloaded a large file (e.g. 5 GB), you may want to validate it to ensure that it is completely downloaded.
File validation is a common practice while sharing large files. The publishers of large Linux distributions such as Ubuntu, often provide a checksum of those files. After downloading your distribution, you can use those checksums to verify if your file has been completely downloaded.
Digital Security
Downloading files from untrusted sources can have adverse and disastrous consequences. Unsolicited programs and files could transmit computer malware, viruses, or Trojans. They can perform backdoor activities without your consent. So if you’ve downloaded a file without verifying its legitimacy, you can use Windows MD5 Checker to do it now.
Identify Duplicate Files
Computing the file checksum will enable you to identify unique and duplicate files. If your PC has gotten gunked up with too many identical files eating your storage, you can compute the file hashes to find and delete duplicate files. Cleaning duplicates on a regular basis is a good practice to save storage, make room for new files and increase your computer’s performance.
How to Use Windows MD5 Checker?
Here are the steps to use Windows MD5 Checker to computer file hashes and identify duplicates:
- Download Microsoft File Checksum Integrity Verifier.
- After successful download, double-click the Windows-KB841290-x86-ENU.exe file.
- Click Yes to accept the License Agreement.
- Click on Browse, and select your desired folder (preferably, MS MD5 Checker on your Desktop) to extract the Microsoft File Checksum Integrity Verifier tool.
- Click on OK thrice.
- Now navigate to the folder where you’ve extracted your files. (MS MD5 Checker in our example).
- Copy the file fciv.exe to C:\Windows\System32 directory.
- Your computer will prompt you to approve the administrative privileges. Click Yes.
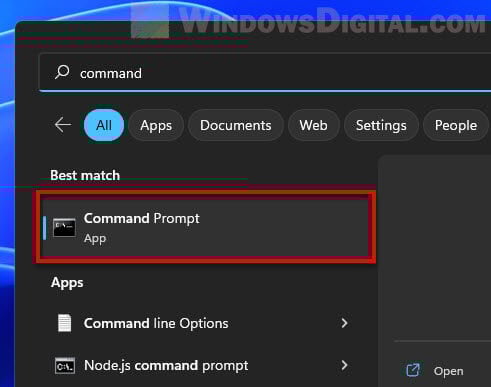
- Type Command Prompt in the Search Box on the taskbar.
- Right-click on Command Prompt, select Run as administrator.
- Use one of the following commands:Generate MD5 hashTo generate the MD5 hash of a file, use the following command:FCIV.exe -md5 directory\file.ext
Example: To generate the MD5 hash of a file Project.pdf stored in the Documents directory, type the following command. Replace the user name example with your actual user name.
FCIV.exe -md5 C:\Users\Vikas\Documents\Project.pdf
Generate SHA1 hash
Similarly, to generate the SHA1 hash of a file, use the following command:
FCIV.exe -sha1 directory\file.ext
Example:
FCIV.exe -sha1 C:\Users\Vikas\Documents\Project.pdf
Generate both MD5 and SHA1
You can also generate both the MD5 and SHA1 hashes together for a file using the command given below:
FCIV.exe -md5 -sha1 directory\file.ext
Example:
FCIV.exe -md5 -sha1 C:\Users\Vikas\Documents\Project.pdf
- Now, going ahead, you’ll need to store these hash values in one place and compare them to distinguish unique and duplicate files. How will you do that?
There are two ways:- Create a database: Using the in-house functionality, you can create a database of all the MD5 or SHA1 checksums you’ve calculated.
- Manually store in an Excel spreadsheet: You can also store your MD5 or SHA1 checksums into a Microsoft Excel spreadsheet for reviewing later.
- Once you’ve created an automated database or an Excel spreadsheet, review and compare all the hashes. Files with matching hashes are duplicates. Files with unique hashes are originals.
- Keep one original file aside in each duplicate pair (group), and move the rest of the files to a separate folder on your hard disk.
Drawbacks
Although you can use Windows MD5 Checker to find and compare duplicates, it has some major drawbacks as well. It is the most suited option for hashing a few dozen files rather than a collection of hundreds of files. Manually scanning multiple files using Windows MD5 Checker can be a long, tedious job. You will need to hash each file independently, store the results and then review the hashes yourself. It’s simply not worth your time.
Moreover, Microsoft has officially discontinued the support for Windows MD5 Checker. So, we cannot rule out the possibility of running into compatibility issues or other technical glitches with the usage of this product on newer operating systems. As an unsupported product, you will NOT avail of any technical support or assistance should you run into any issues.
A Better Alternative
Thanks to the advancement in technology, there are better alternatives available today. Clone Files Checker is a fully automated duplicate files finder that does the automated hash computing and duplicates cleaning tasks in minutes.
- Download and install Clone Files Checker.
- First, add the folders that you want to scan for duplicates.
- Select a scan type (All Files to search for all file types, or Custom scan to search only specific file types).
- Use the optional file size settings if you want to further limit the scope of your scan.
- Start the scan and wait for some time.
- Once the scan is finished, you can use the Wizard-based appearance to automatically fix duplicates in seconds.
- Alternatively, you can review your files and use automated file selection patterns to batch select/ de-select your files.
- Finally, use the Select Action menu to choose if you want to permanently delete the duplicates or move them to a folder.
Raza Ali Kazmi
Raza Ali Kazmi works as an editor and technology content writer at Sorcim Technologies (Pvt) Ltd. He loves to pen down articles on a wide array of technology related topics and has also been diligently testing software solutions on Windows & Mac platforms. If you have any question about the content, you can message me or the company’s support team.
Проверка контрольной суммы скачанного файла позволяет проверить его целостность и убедиться, что содержимое файла не было изменено. Чаще всего администраторы используют процедуру проверки чексуммы для загруженных дистрибутивов ОС и установочных образов ПО.
Идея контрольной суммы заключается в том, что для оригинального файла выполняется расчет некоего значения (хэша) по определенному алгоритму получения хэш-функции (чаще всего это MD5, SHA1 и SHA256), а пользователи потом могут выполнить такую же проверку для файла, который они скачали. Сравнение этих двух значений хэшей позволяет убедиться, что вы получили не модифицированный оригинальный файл. Если хэши файлов отличаются, значит файл был изменен или поврежден.
Для проверки контрольной суммы файла в Windows можно использовать встроенный PowerShell командлет Get-FileHash или утилиту certutil.
Например, чтобы получить значение хэша ISO образа, выполните команду:
Get-FileHash "F:\ISO\en-us_windows_10_enterprise_ltsc_2021_x64_dvd_d289cf96.iso"

Черех некоторое время (расчет может занять некоторое время в зависимости от размера файла), командлет вернет контрольную сумму файла по алгоритму SHA-256 (по умолчанию). С помощью атрибута
-Algorithm
можно задать другой алгоритм вычисления контрольной суммы
-
SHA1 -
SHA256
(по умолчанию) – наиболее популярный алгоритм с наименьшей вероятности возникновения коллизий (когда два разных файла имеют одинаковую контрольную сумму) -
SHA384 -
SHA512 -
MD5
– самый быстрый, но устаревший алгоритм хэширования
Аналогично можно получить хэш сумму файла с помощью certutil.exe:
certutil -hashfile F:\ISO\en-us_windows_10_enterprise_ltsc_2021_x64_dvd_d289cf96.iso SHA256

Где получить контрольные суммы оригинальных ISO файлов образов Windows?
Если у вас есть учетная запись Microsoft, вы можете найти контрольную сумму интересующего вас дистрибутива на сайте https://my.visualstudio.com/Downloads/. Для этого не обязательно иметь активную подписку MSDN. Информация о контрольной сумме образа доступна на вкладке с информацией о продукте.
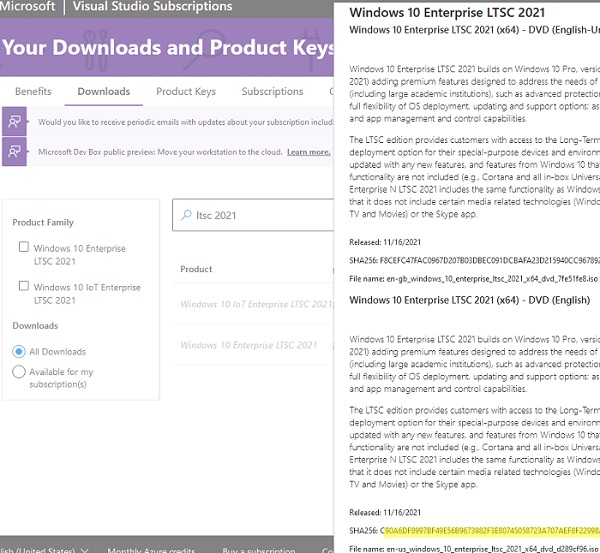
Также список всех оригинальных образов от Microsoft и их хэшей доступен в следующей сторонней онлайн базе https://files.rg-adguard.net/search. В отличии от сайта Microsoft, здесь можно искать сразу по значению хэша. Выполните поиск по полученному хэшу, чтобы убедиться, что вы скачали оригинальный файл образа.
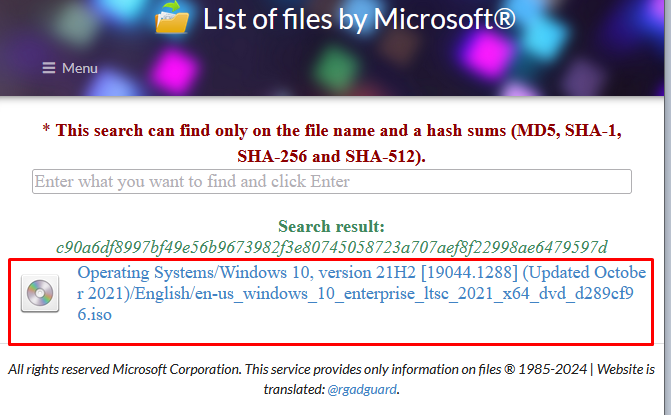
Регистр символов в хэш сумме не имеет значения.
Для автоматизации проверки хэш сумму скачанного образа с оригинальным значением, можно использовать такой однострочник PowerShell:
((get-filehash .\ en-us_windows_10_enterprise_ltsc_2021_x64_dvd_d289cf96.iso).hash) -eq "c90a6df8997bf49e56b9673982f3e80745058723a707aef8f22998ae6479597d"

Команда вернет
True
, если контрольная сумма файла совпадает с эталонной.
This guide shows you how to check the MD5 or SHA256 checksum (or other hashing algorithms) of any file in Windows 11 or Windows 10 using only Command Prompt or Windows Terminal.
What is checksum and why do we use it?
A checksum is a unique set of numbers and letters generated for a file using a hash algorithm such as MD5 or SHA-256 (the most commonly used checksum algorithms) to verify if the file has not been modified during transmission (e.g. downloading the file).
Most software vendors display the checksum of their downloadable files (such as installers and zip files) so that users can check the integrity of the file using the checksum after download. This is to ensure that the file has not been altered in any way during transfer.
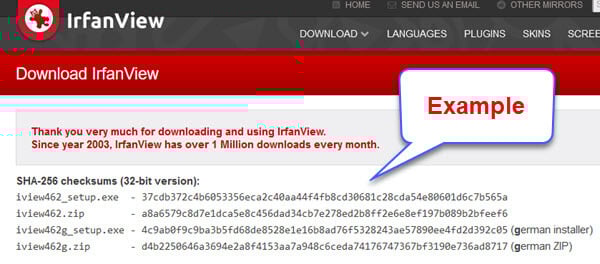
After downloading a file, you can generate the checksum of the downloaded file and see if it matches the checksum provided by the software vendor. If it matches, this means that there were no errors or alternations during the transfer and that the files were identical before and after the transfer.
See also: How to Compare Two Folders in Windows 11
How to check MD5 or SHA256 checksum of a file in Windows 11
To verify the MD5 checksum or SHA256 checksum of a file in Windows 11, follow the steps below.
- First, right-click the file you want to verify the checksum for and select “Copy as path“. You will need this path later.

- Next, open Command Prompt (search for “CMD” via Start) or Windows Terminal (right-click Start and select Windows Terminal).

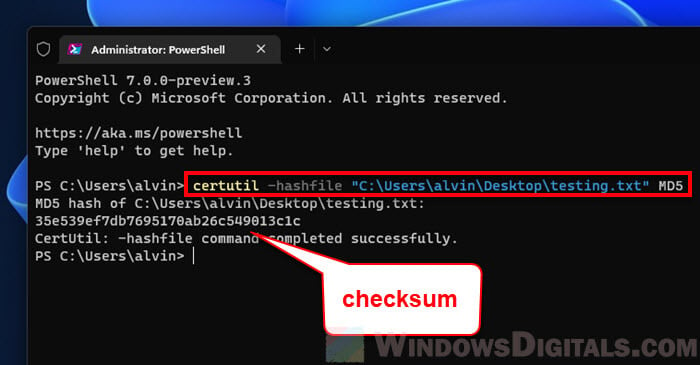
- To check the MD5 checksum of a file, type the following command in the Command Prompt or Windows Terminal window.
certutil -hashfile filepath MD5
Replace filepath with the actual path to the file that you want to check the checksum for. You can highlight the filepath and press Ctrl + V to paste the path you’ve copied in step 1. For example:
certutil -hashfile "C:\Users\alvin\Desktop\testing.txt" MD5

To check the SHA256 checksum of the file, replace MD5 with SHA256. For example:
certutil -hashfile "C:\Users\alvin\Desktop\testing.txt" SHA256

- Press Enter to execute the command. The checksum of the file will then be shown.


Related: How to Password Protect a Folder in Windows 11
Verify different checksum algorithms
To check the checksum of a file using a different hashing algorithm, replace the MD5 in the command line with the checksum algorithm that you want to use. The following are the hashing functions that the certutil command-line tool supports.
- MD2
- MD4
- MD5
- SHA1
- SHA256
- SHA384
- SHA512
What to do if the checksums do not match?
If the checksum of the file you generated on your computer do not match the one provided by the software vendor, it indicates that the file is corrupted, incomplete or has been altered.
In most circumstances, if the checksums do not match, you should not open the file because the data may have been tampered with and could pose a security risk if you run the file.
- If you suspect that the file is corrupted or incomplete, try to download the file again from the same source.
- If the checksum still does not match on your second try, you may want to contact and notify the source from which you download the file. The cause of the problem may be on their side.
- Try to download the file from a different trusted source.
- Clear your browser’s cache (if you use your browser to download the file) and history before downloading the file again. This is to ensure that the browser will request new download from the source again instead of re-downloading the corrupted file from your browser’s cache.
- Before you re-download the file, delete the old one whose checksum does not match.
Getting Started with MD5 Checksum
An MD5 checksum is a unique string of letters and numbers that serves as a digital fingerprint for a file. You can use it to verify a file’s integrity and authenticity by comparing its checksum value with the original. Learning how to Check MD5 Checksum on Windows is easy and can ensure your downloaded files are complete and uncorrupted.
This comprehensive guide will take you through everything you need to know about MD5 hashes and how to Check MD5 Checksum on Windows using various methods.
What is an MD5 Checksum and Why Use It?
An MD5 checksum, also known as an MD5 hash value or just MD5 hash, is a 128-bit alphanumeric string calculated from a file’s binary content. The MD5 algorithm processes the file’s data and generates a distinct checksum value that can act like a fingerprint for that file.
Key Facts about MD5 Checksums
The main use case for MD5 hashes is to check the integrity and authenticity of downloaded files. By comparing a file’s generated MD5 against the original value provided, you can ensure:
For example, software developers post MD5 hashes so users can verify the installer downloads are complete and official. People distributing Linux ISO images often include the MD5 hash to check whether the ISO file contents are original or unmodified.
Other uses of MD5 include verifying cached files, detecting duplicate data, and providing a checksum in data transmission protocols.
How to Generate an MD5 Checksum Value in Windows
To check a file’s MD5 hash, you first need to calculate the checksum value on your end to compare it with the original.
Here are some easy ways to generate MD5 hashes in Windows:
Using Microsoft File Checksum Integrity Verifier
Microsoft provides the small utility tool File Checksum Integrity Verifier (FCIV) to generate and validate checksums for files.
To use it:
From File Explorer’s Properties
You can view a file’s MD5 hash in the Properties window:
Generate MD5 Hash Using PowerShell
To generate the MD5 hash in PowerShell:
Generate MD5 Using Command Prompt
In Command Prompt, use the certUtil -hashfile command:
Create MD5 Hash Using Third-Party Tools
Many free tools like QuickHash and, WinMD5 can easily generate MD5 hashes for files.
Follow their instructions to select a file and produce the MD5 checksum value.
Step-by-Step Guide for Comparing the Generated MD5 Hash
Once you have the MD5 checksum from your downloaded file, you can verify it matches the original value provided by the file source.
Here are the steps:
Matching MD5 hashes gives you confidence in the integrity and authenticity of your downloaded files. This verification is useful for installing software, checking disk images, examining sensitive data, and other situations where file accuracy matters.
Why MD5 Hashes May Not Match
If the generated MD5 and original value do not match, there are a few common reasons:
If you are certain, you have the right original hash, a mismatch almost always indicates a corrupted or tampered file. Delete it and re-download it to generate a new MD5.
MD5 Checksum Use Cases and Examples
Here are some common situations where using MD5 hashes to check file integrity is very useful:
MD5 Hashing Limitations and Alternatives
While still very useful, MD5 hashes have some limitations:
Due to these flaws, security-conscious users may want to consider stronger modern hashing algorithms:
How to Check MD5 Hash on Windows: Step-by-Step Walkthrough
Here is a step-by-step walkthrough to clearly demonstrate verifying an MD5 checksum on Windows:
Final Thoughts
Verifying MD5 checksums on Windows is a straightforward process that ensures your downloaded files are intact and uncorrupted. By comparing the MD5 hash values, you can confirm that the file contents match the original. This simple checksum verification gives you peace of mind that your downloaded file has not been tampered with or corrupted during transfer.
While MD5 has some limitations in terms of collision resistance, it remains a quick and easy way to check file integrity on Windows. Following the simple steps outlined, even beginners can learn to generate and compare MD5 checksums.
FAQs about MD5 Hashes in Windows
Here are some frequently asked questions about using MD5 checksums on Windows systems:
What is the best software tool for generating MD5 hashes on Windows?
Microsoft’s FCIV utility and PowerShell are good built-in tools. Third-party options like QuickHash GUI also provide user-friendly MD5 generation.
Can I generate an MD5 checksum for a folder or drive?
No, MD5 hashes are calculated from a file’s complete binary contents. They cannot be created for folders, partitions, or disks.
Does turning off a virus scanner improve MD5 generation performance?
Yes, antivirus software can slow down MD5 generation. Excluding the file or pausing your antivirus may speed up checksum calculation.
How do I verify a large download with MD5 without recalculating the entire hash?
Use a utility like HashCheck Shell Extension, which can incrementally update the MD5 value as part of a large file download.
Can MD5 hash detect if files are infected with malware or viruses?
No, MD5 only verifies if a file’s binary contents match the original. To scan for malware, use dedicated antivirus software.
What hash algorithm does Windows use for NTFS file integrity checking?
NTFS uses CRC-32 hashes, not MD5, for its internal file integrity checks on system files.
Содержание статьи:
- Узнаем контрольную сумму
- Способ 1
- Способ 2
- Способ 3
- Способ 4
- Способ 5
- Вопросы и ответы: 0
Вводная (зачем это нужно): когда вы скачиваете из сети какую-нибудь программу, архив, образ ISO (особенно больших размеров) — есть определенная вероятность, что у вас может оказаться битый файл (или поддельный, т.е. кем-то измененный, например, вирусами).
Чтобы убедиться, что перед вами оригинальный файл (а не подделка) — нужно сравнить контрольные суммы* своего файла на диске, с контрольными суммами файла на сайте его разработчика (они их обычно всегда приводят). Если совпадут — значит все OK!
* Важный момент: контр. сумма (или хэш-сумма) представляет из себя текстовую строку с буквами и цифрами, которая уникальна для каждого файла (как подпись у человека). И если содержимое файла изменится хоть на один байт — контрольная сумма тоже изменится! Разумеется, если хэш-сумма вашего файла не совпадает с оригиналом — лучше его не открывать, и перезагрузить информацию…
*
Узнаем контрольную сумму
Способ 1
Пожалуй, наиболее быстрый и удобный способ — воспользоваться программой Total Commander (ссылка на сайт разработчика: https://www.ghisler.com/download.htm). Это аналог проводника, который сильно упрощает взаимодействие с большим кол-вом файлов.
Что делать:
- скачивание, установка, запуск у Total Commander стандартны, и поэтому я их не рассматриваю;
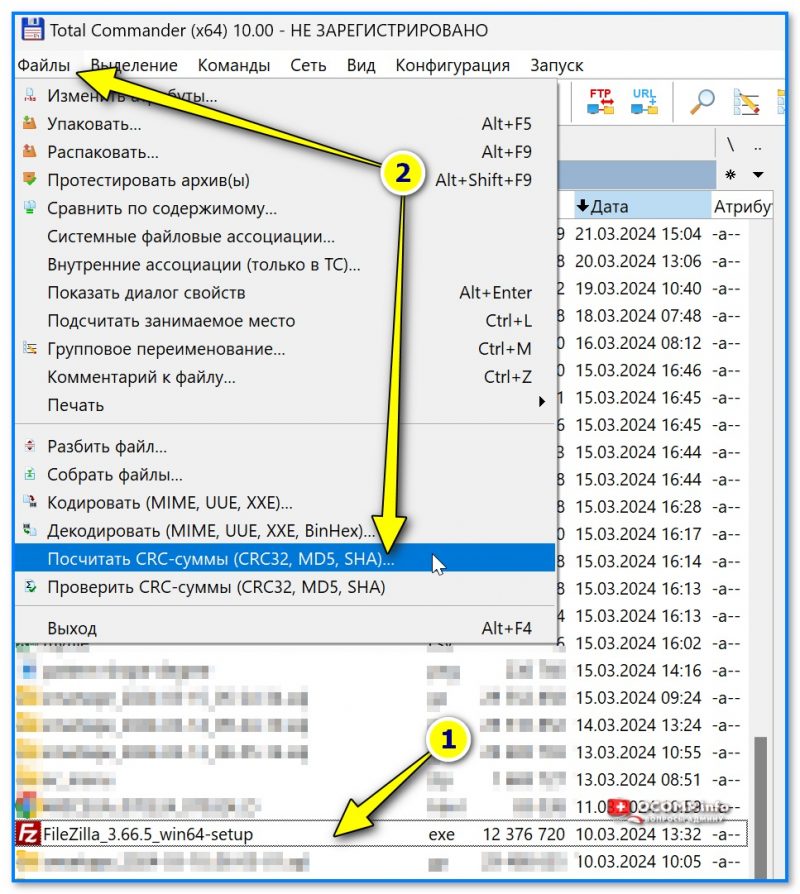
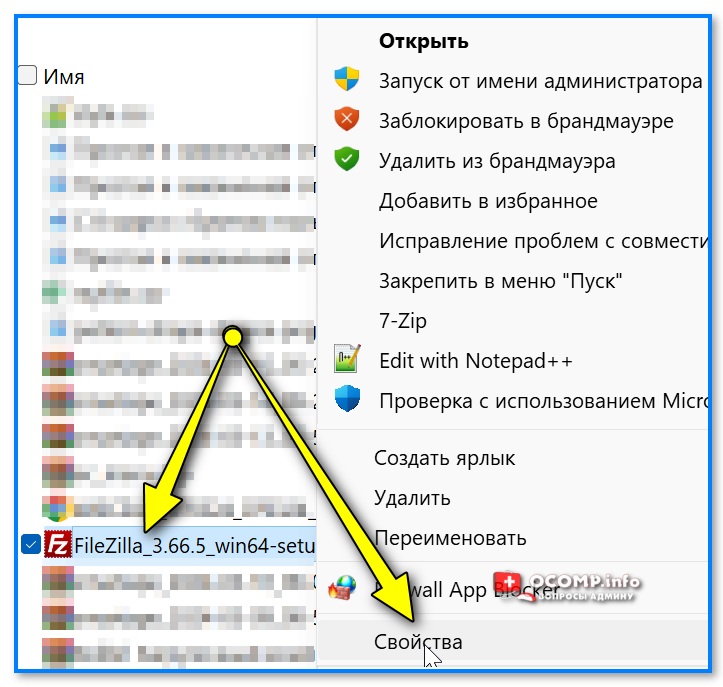
- далее в панели нужно выбрать тот файл, для которого вам требуется контрольная сумма, и перейти в меню «Файл — посчитать CRC суммы». См. скриншот ниже; 👇

Файл — посчитать CRC суммы
- затем указать тип контрольной суммы: MD5, SHA256, SHA1 и др. (обычно выбирают тот тип, который указан на сайте, с которого вы загрузили файл. Иначе как сравнивать-то? 😉);

Тип контрольной суммы
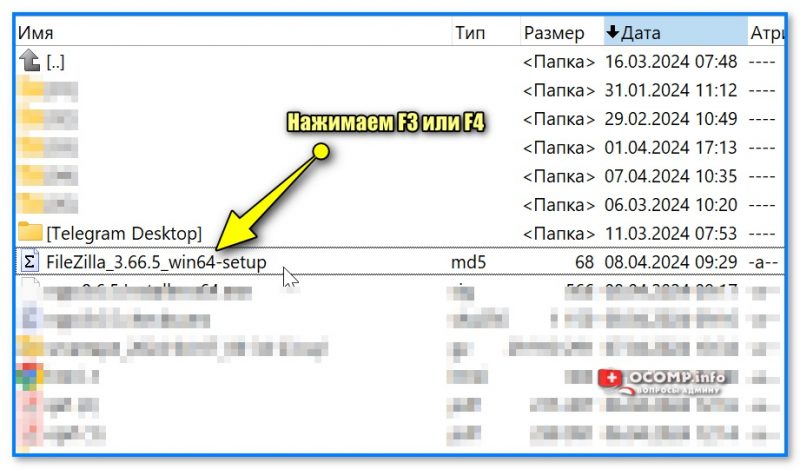
- после этого у вас в этой же папке с файлом появится новый текстовый файл (в моем случае с расширением MD5). Необходимо открыть его: для этого нужно его выбрать и нажать F3 (на ноутбуках возможно Fn+F3);

Открываем полученный текстовый файл
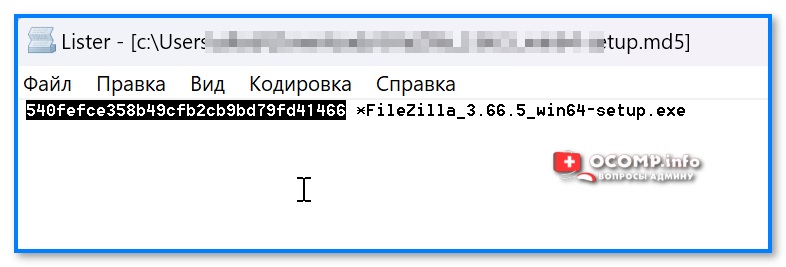
- ву-а-ля, перед вами контрольная сумма! Эту строку теперь можно скопировать и сравнить со строкой от разработчиков вашего файла: если совпадает — значит ваш файл никто не изменил… (не подделка…).

Напротив каждого файла своя контр. сумма

*
Способ 2
Если вы достаточно часто что-то качаете и загружаете (и нужно постоянно проверять хеш-суммы) — возможно, вам придется по душе дополнение для проводника HashTab V 6.0 (ссылка на сайт разработчика).
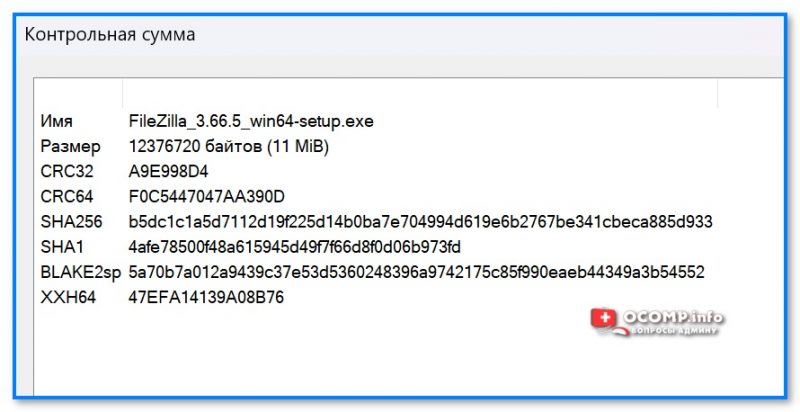
После его установки — достаточно просто открыть свойства нужного файла и перейти во вкладку «Хеш-суммы файлов». В ней будут представлены следующие типы контр. сумм: CRC32, MD5, SHA-1, SHA-256 (в настройках можно добавить и другие).
Удобно?! 👌👇👇
Свойства файла
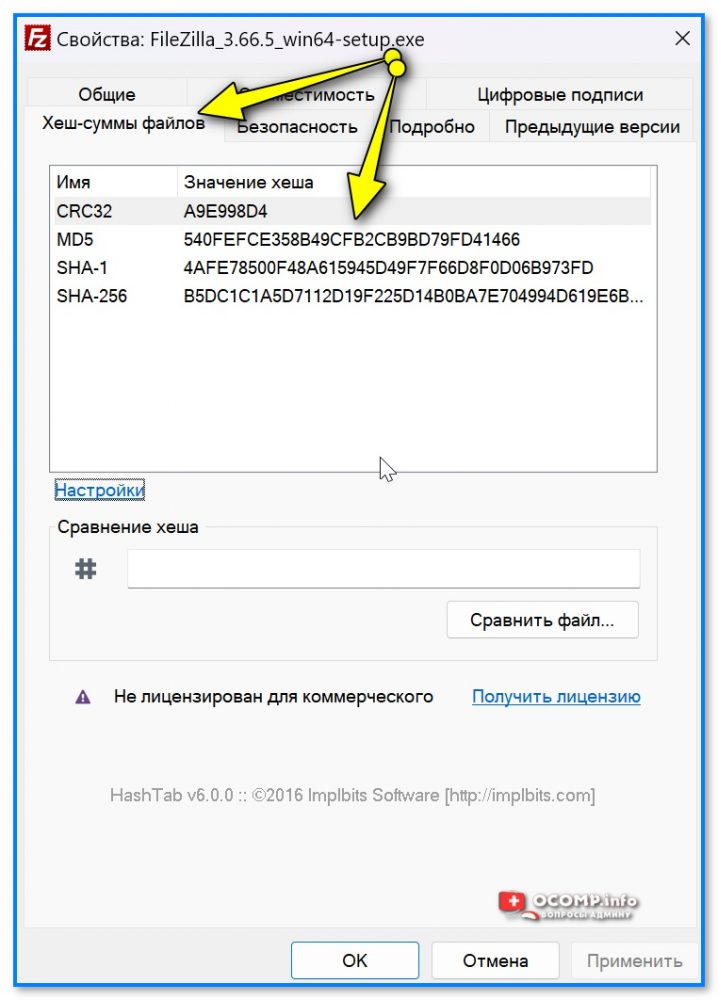
Хеш-суммы файлов
*
Способ 3
Есть еще одна достаточно удобная утилита для подсчета хеш-сумм — File Checksum Calculator (сайт разрабочтика: https://vovsoft.com/software/file-checksum-calculator/).
После запуска File Checksum Calculator — нужно-то лишь указать расположение файла: через 1-2 сек. вы получите всё необходимое (строки CRC32, MD5, SHA1, SHA256, SHA512)! См. скрин ниже. 👇
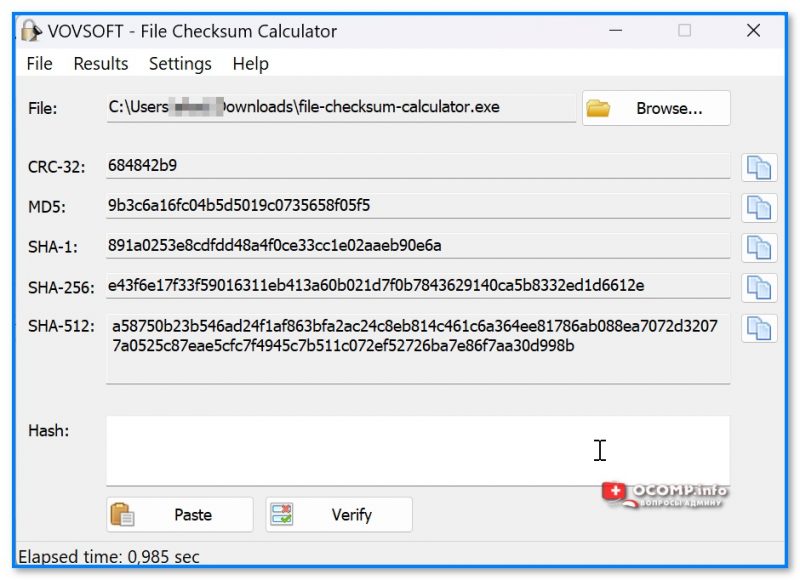
File Checksum Calculator — скрин окна приложения
*
Способ 4
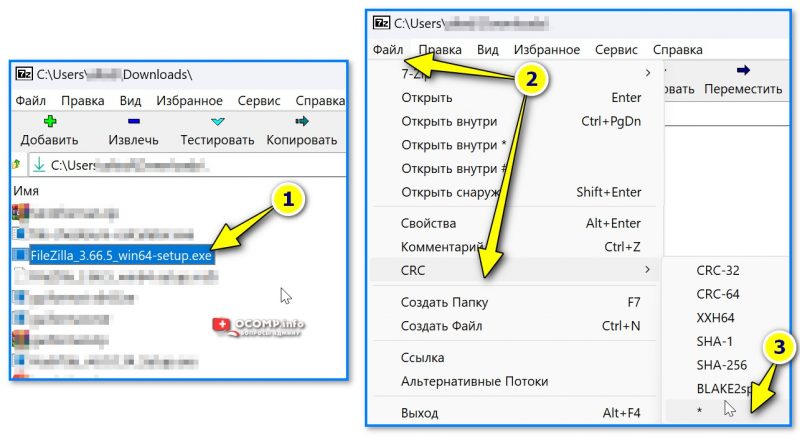
Если вы пользуетесь архиватором 7ZIP (ссылка на офиц. сайт: https://www.7-zip.org/) — то достаточно просто узнать хэш-суммы в нем:
- для этого нужно открыть сам архиватор (через ярлык в меню ПУСК, например);
- выбрать в нем файл и перейти в меню «Файл / CRC / *» (см. стрелку 3 на скрине ниже);

7ZIP — файл — CRC
- архиватор тут же представит неск. типов контрольных сумм (CRC32, 64, SHA256, SHA1 и др.). Задача выполнена?!

7zip — контрольные суммы
*
Способ 5
Можно также воспользоваться встроенной в Windows утилитой CertUtil (для этого понадобиться 📌запустить командную строку, ввести в нее нижеприведенную команду и нажать Enter).
certutil -hashfile C:\Users\alex\Downloads\FileZilla_3.66.5_win64-setup.exe MD5
Обращаю внимание на то, что:
- вместо моего пути к программе (C:\Users\alex\Downloads\FileZilla_3.66.5_win64-setup.exe) — вам нужно указать свой путь!
- вместо MD5 — можно указать другой тип контр. суммы (SHA1 или SHA256, например).
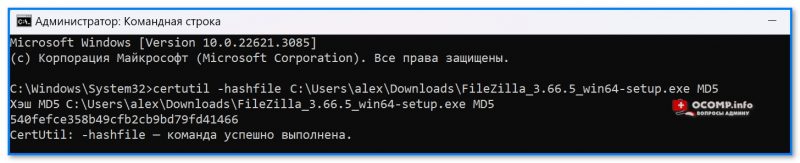
Командная строка — хэш-сумма // в качестве примера
✏️ Кстати!
Чтобы узнать имя и расположение своего файла — нажмите по нему правой кнопкой мыши и откройте его свойства: во вкладке «Общие» эти сведения указаны (см. скрин ниже). 👇
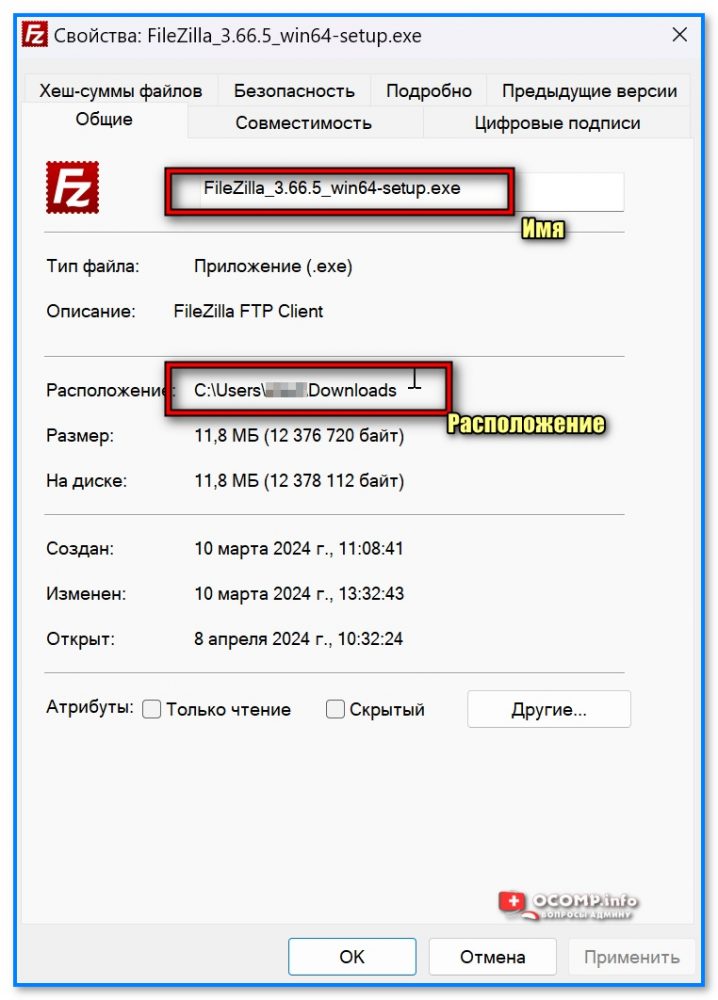
Свойства файла — имя и расположение
*
Иные (более простые) способы — приветствуются в комментариях ниже.
Всего доброго!
👋