
Internet Connection Sharing (ICS) is the name given by Microsoft to a feature of its Windows operating system (as of Windows 98 Second Edition and later) for sharing a single Internet connection on one computer between other computers on the same local area network. It makes use of DHCP and Network address translation (NAT).
ICS routes TCP/IP packets from a small LAN to the Internet. ICS maps individual IP addresses of local computers to unused port numbers in the TCP/IP stack. Due to the nature of the NAT, IP addresses on the local computer are not visible on the Internet. All packets leaving or entering the LAN are sent from or to the IP address of the external adapter on the ICS host computer.
On the host computer the shared connection is made available to other computers by enabling ICS in Network Connections, and other computers that will connect to and use the shared connection. Therefore, ICS requires two or more network interface cards.
ICS offers configuration for other standard services and some configuration of NAT.
Limitation[]
However, while ICS makes use of DHCP, there is no way to review (renew?) DHCP leases using ICS. The service is also not customizable in terms of which addresses are used for the internal subnet, and contains no provisions for bandwidth limiting or other features common to more advanced systems, that can be also combined with Wi-Fi and dial-up mobile modems.
The server will normally have the IP address 192.168.0.1 (the IP Address is changeable) and will provide NAT services to the whole 192.168.0.x subnet, even if the address on the client was set manually, not by the DHCP server. Windows 7 uses the subnet 192.168.137.x by default.
Troubleshoot[]
Besides making sure that the firewall settings are correct, for Windows XP host with more than one Ethernet interface cards and a wireless WAN connection, bridging the Ethernet interface cards may help eliminating some ICS malfunction problems. It is found from repeated testing that without bridging, ICS may not work correctly if only one of the several Ethernet cards is selected from the wireless connection’s Internet Connection Sharing option drop down box. [needs citation]
Windows XP SP3 Bug[]
Windows XP Service Pack 3 (SP3) introduces a bug in ICS that requires restarting the ICS Windows service after several events, including disconnecting the network cable from the ICS machine.
- In Microsoft support article KB951446, the process of restarting the ICS service is explained, but there is no mention of a plan to fix this bug in the future[1].
- In later Microsoft support article KB951830, more details and a hotfix (Update for Windows XP (KB951830)) are given.[2][3] This hotfix is not currently being distributed via Windows Update, and so it must be manually installed.
Dial-up computer freeze[]
There is a problem with ICS and the IPv6 protocol. It causes a temporary lock eliminating the possibility to begin new processes after connecting with a dial-up modem. Any computers connecting with ICS, using the locked computer as a host will not be able to access the Internet until the lock clears. This lock remains in effect for some arbitrary amount of time, and then any new programs started during that time are all opened at once. The issue is caused by running the «Network Setup Wizard», as it installs IPv6 into the computer it was run on. The problem can be remedied by uninstalling the IPv6 protocol on the affected computer. [citation needed]
See also[]
- Dial-up access
- Firewall (computing)
- Modem
- Network address translation
- Proxy Server
- Router
- Wi-Fi and Wireless LAN
References[]
- ↑ KB951446: Windows XP Service Pack 3-based computers in a private network that uses Internet Connection Sharing may lose network connectivity after you change the network adapter settings of the private adapter on the Internet Connection Sharing computer
- ↑ KB951830: When you disable and then re-enable the LAN-side network adapter on a Windows XP SP3-based computer that is configured as a Connection Sharing host, a client computer on the network cannot access the Internet
- ↑ Update for Windows XP (KB951830)
External links[]
- Configuring ICS to use a different IP Range other than 192.168.0.*, on XP (ex: 192.168.2.*, 192.168.3.*, etc)
- Annoyances.org — Setting up Internet Connection Sharing
- Microsoft.com — Description of Internet Connection Sharing
- Microsoft.com — Setting Up Internet Connection Sharing With XP
- Microsoft.com — Setting Up Internet Connection Sharing With Vista
- Sniperxpx.com — How to use Internet Connection Sharing between two computers
- Setup Internet Connection Sharing between two or more computers tutorial
- Internet Connection Sharing Setup Tutorial (XP and Vista)
| Microsoft Windows components | |
| Core |
|
| Management |
|
| Applications |
|
| Games |
|
| Kernel |
|
| Services |
|
| File Systems |
|
| Server |
|
| Architecture |
|
| Security |
|
| Compatibility |
|
| Edit — View |
ta:இணைய இணைப்பைப் பகிர்தல்
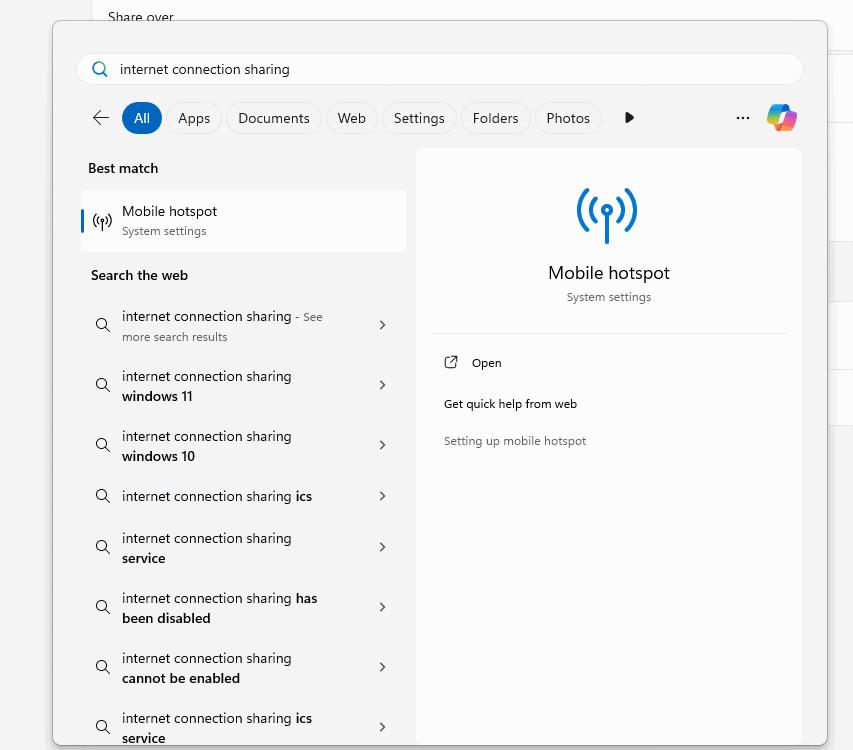
You can share your computer’s internet connection with other devices using Windows to control things like the password, connection sharing type, name, properties, and more. Also called Mobile hotspot, this this function is helpful when you have limited access to Wi-Fi or ethernet or if certain devices need to connect through the type of connection your computer can provide (versus directly connecting through some other way).
Setting up internet sharing is easy and can be done in just a few clicks in the network settings. Once set up, other devices can connect as if it were a normal Wi-Fi network, which is great for connecting game consoles, smart TVs, or other computers that don’t have their own internet access. It’s important to understand the limitations and potential impact on your internet speed and data usage before enabling this feature.
Sharing Your Internet Connection: A Guide for Windows Users
What is Internet Connection Sharing (ICS)?
ICS lets you share your computer’s internet connection with other devices. It essentially turns your Windows PC into a Wi-Fi hotspot.
Why Use ICS?
- No extra hardware: No need for a separate router or hotspot device.
- Emergency internet: Useful when your primary router is down.
- Sharing with devices: Connect smartphones, tablets, or other laptops to the internet.
How to Enable ICS
- Open Network Connections:
- Press
Windows key + Xand select “Network Connections”. - Alternatively, go to
Settings>Network & Internet>Mobile hotspot.
- Press
- Select the Internet Connection to Share:
- Choose the network adapter you want to share (e.g., Ethernet or Wi-Fi).
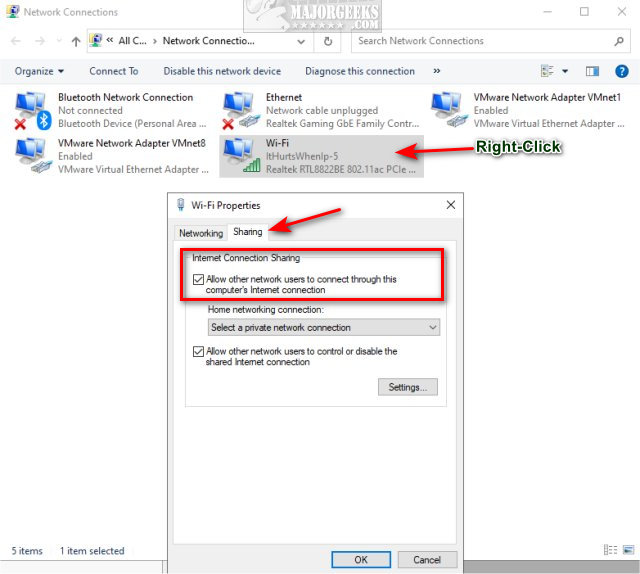
- Enable Sharing:
- Right-click the chosen adapter >
Properties>Sharingtab. - Check “Allow other network users to connect through this computer’s Internet connection”.
- Select the network adapter you want to share the connection over (usually a Wi-Fi adapter).
- Right-click the chosen adapter >
- Configure Hotspot (Optional):
- In the “Mobile hotspot” settings, you can customize the network name and password.
- Connect Devices:
- On other devices, search for available Wi-Fi networks and connect to the one you just created.
Important Considerations
- Internet speed: Shared internet speed will likely be slower than your original connection.
- Security: Set a strong password for your hotspot to prevent unauthorized access.
- Data usage: Be mindful of data limits if your internet connection has them.
- Firewall: Your firewall might need configuration to allow ICS.
Troubleshooting
- No internet access on connected devices:
- Ensure ICS is enabled correctly on the host computer.
- Restart the network adapters on both the host and connected devices.
- Check your firewall settings.
Alternatives to ICS
- Dedicated mobile hotspot: Offers better performance and battery life than using a laptop.
- Travel router: Creates a Wi-Fi network from an existing wired connection.
Compatibility
| Windows Version | ICS Support |
|---|---|
| Windows 11 | Yes |
| Windows 10 | Yes |
| Windows 8/8.1 | Yes |
| Windows 7 | Yes |
Key Takeaways
- Internet sharing lets one Windows device provide internet to others
- You can share Wi-Fi or ethernet connections in just a few steps
- Other devices connect to the shared network like a normal Wi-Fi hotspot
Setting Up Internet Connection Sharing on Windows
Internet Connection Sharing (ICS) lets you share one device’s internet with other devices on your network. This feature is useful when you have limited internet access or want to create a small local network.
Understanding Internet Connection Sharing (ICS)
ICS allows a Windows computer to share its internet connection with other devices. It turns your computer into a gateway for other devices to access the internet. This feature is handy in places with only one internet connection.
ICS works with various connection types like Ethernet, Wi-Fi, and cellular data. The computer sharing its connection becomes a DHCP server. This means it assigns IP addresses to other devices on the network.
One downside of ICS is that it may slow down the internet speed for all connected devices. It’s best used as a temporary solution or for small networks.
Accessing Network and Sharing Center
To set up ICS, you need to access the Network and Sharing Center. This is where you manage network settings in Windows.
Here’s how to find it:
- Open the Control Panel
- Click on “Network and Internet”
- Select “Network and Sharing Center”
You can also use the Windows search bar. Just type “Network and Sharing Center” and click on the result.
In Windows 11, you can reach similar settings through the Settings app. Go to “Network & Internet” > “Advanced network settings”.
Configuring Network Adapters
Before enabling ICS, you need to set up your network adapters. These are the connections you’ll use to share internet.
To view your network adapters:
- Open Network and Sharing Center
- Click “Change adapter settings”
You’ll see a list of all your network connections. The connection you want to share is called the “host” connection. The connection you’re sharing to is the “client” connection.
Right-click on the host connection and select “Properties”. This is where you’ll enable sharing in the next step.
Enabling ICS on Windows 10 and Windows 11
Now you’re ready to turn on ICS. The steps are similar for Windows 10 and 11:
- In the host connection’s Properties, click the “Sharing” tab
- Check the box next to “Allow other network users to connect through this computer’s Internet connection”
- From the dropdown menu, select the client connection
- Click “OK” to save changes
Your computer will now share its internet connection. Other devices can connect to the client connection to access the internet.
Remember to set up security measures like a strong password for your shared network. This helps keep your connection safe from unwanted users.
Managing Shared Connections and Networks
Setting up and managing shared connections in Windows helps multiple devices use one internet source. This section covers creating Wi-Fi hotspots, configuring IP settings, and fixing common issues.
Setting Up a Wi-Fi Hotspot
Windows lets you turn your PC into a Wi-Fi hotspot. This feature shares your internet with other devices.
To set up a hotspot:
- Open Settings
- Click on Network & Internet
- Select Mobile Hotspot
- Turn on “Share my internet connection with other devices”
- Choose the connection to share
- Set a network name and password
Your PC now broadcasts a Wi-Fi signal. Other devices can connect using the name and password you chose.
Configuring IP Addresses for Shared Networks
IP addresses help devices talk to each other on a network. When sharing a connection, Windows handles most IP settings automatically.
The main PC acts as a DHCP server. It gives out IP addresses to connected devices. Most of the time, you don’t need to change these settings.
If you need to set a static IP:
- Open Network Connections
- Right-click the shared connection
- Select Properties
- Click on Internet Protocol Version 4
- Choose “Use the following IP address”
- Enter the IP details
Be careful when changing IP settings. Wrong settings can stop devices from connecting.
Monitoring and Troubleshooting Shared Connections
Keeping an eye on your shared network helps spot and fix problems quickly.
To check connected devices:
- Go to Settings
- Click Network & Internet
- Select Mobile Hotspot
- Look under “Devices connected”
If devices can’t connect:
- Check the password is correct
- Restart the hotspot
- Make sure the main internet connection works
For slow speeds:
- Move devices closer to the hotspot
- Reduce the number of connected devices
- Check for background downloads
If problems persist, try turning the shared connection off and on again. This often solves many common issues.
Frequently Asked Questions
Internet Connection Sharing in Windows lets you share your internet with other devices. Here are some common questions about setting it up and using it.
How can I enable Internet Connection Sharing (ICS) in Windows 11?
To enable ICS in Windows 11:
- Open Settings
- Click on Network & Internet
- Select Advanced network settings
- Click on Change adapter options
- Right-click on the internet connection you want to share
- Choose Properties
- Go to the Sharing tab
- Check “Allow other network users to connect through this computer’s Internet connection”
- Click OK
What steps are required to share my internet connection through Ethernet on Windows 10?
To share internet through Ethernet on Windows 10:
- Open Network Connections
- Right-click on the internet connection you want to share
- Select Properties
- Go to the Sharing tab
- Check “Allow other network users to connect through this computer’s Internet connection”
- Choose the Ethernet connection from the dropdown menu
- Click OK
How can I resolve issues with Internet Connection Sharing being disabled by the network administrator in Windows?
If ICS is disabled by your network admin:
- Talk to your IT department
- Ask for permission to use ICS
- They may need to change group policy settings
- Or they might give you admin rights to enable ICS yourself
What is the procedure to allow other network users to connect through my computer’s Internet connection in Windows?
To let others use your internet in Windows:
- Open Network Connections
- Right-click on your internet connection
- Click Properties
- Go to the Sharing tab
- Check “Allow other network users to connect through this computer’s Internet connection”
- Pick the connection you want to share with
- Click OK
How can I share my internet from one computer to another using an Ethernet cable?
To share internet with an Ethernet cable:
- Connect the computers with an Ethernet cable
- On the sharing computer, open Network Connections
- Right-click the internet connection
- Select Properties
- Go to the Sharing tab
- Check “Allow other network users to connect”
- Choose the Ethernet connection
- Click OK
- On the other computer, set the network to obtain an IP address automatically
Is there a method to turn off Internet Connection Sharing on a Windows operating system?
To turn off ICS in Windows:
- Open Network Connections
- Right-click the shared connection
- Click Properties
- Go to the Sharing tab
- Uncheck “Allow other network users to connect”
- Click OK
This will stop sharing your internet with other devices.
Internet Connection Sharing (ICS, в русской версии ОС Windows переводится как «Общий доступ подключения к Интернету») — возможность, появившаяся в ОС Windows, начиная с версии Windows 98 Second Edition, заключающаяся в совместном использовании одного подключения к Интернету несколькими компьютерами, находящимися в локальной сети. При этом используются технологии DHCP и NAT.
Ссылки
[править | править код]
- Настройка общего доступа к интернету локальной сети при помощи ICS Архивная копия от 24 февраля 2010 на Wayback Machine
- Настройка общего доступа к подключению Интернета в Windows XP Архивная копия от 12 января 2012 на Wayback Machine
См. также
[править | править код]
- Маршрутизация
- IP Masquerading, NAT
- Шлюз по умолчанию
|
Это статья-заготовка о программном обеспечении. Помогите РУВИКИ, дополнив эту статью, как и любую другую. |
By Timothy Tibbettson 06/15/2023 |
Internet Connection Sharing (ICS) allows you to share your Windows 10, 8, and 7 internet connection with other computers on your Local Area Internet. You can enable or disable ICS following this guide.
How to Enable or Disable Internet Connection Sharing in Windows — Control Panel
While enabling or disabling ICS is easy to do, we want to access Control Panel settings to make the changes.
Press the Windows Key + R, type in ncpa.cpl, and press Enter.
Right-click on your internet connection, and click Properties.
Click on the Sharing tab.
Click the box next to Allow other network users to connect through this computer’s Internet connection to turn Internet Connection Sharing (ICS) on or off.
If you have only one internet connection, you’re all set. But, if you want to share multiple internet connections, you need to repeat each connection’s steps.
How to Enable or Disable Internet Connection Sharing in Windows — Services
If you don’t use ICS, it should be Stopped and Disabled in Services. Let’s take a look at your status.
Press the Windows Key + R, type in services.msc, and press Enter.
Scroll down and double-click Internet Connection Sharing (ICS).
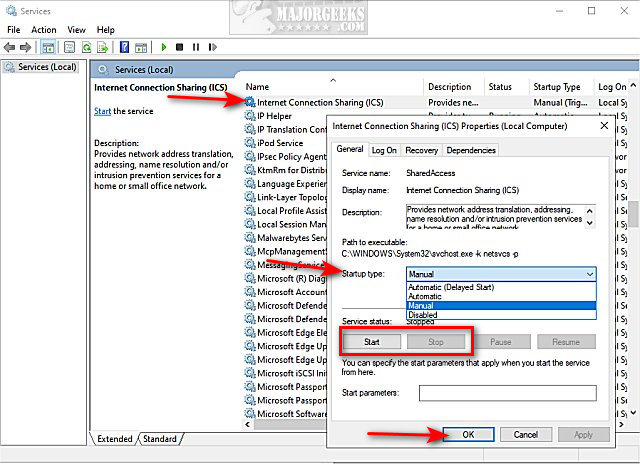
The default setting is Manual.
If you want to disable ICS, click on Stop under Service status.
Click on the dropdown box next to Startup type, and click on Disabled.
Click on OK.
comments powered by Disqus
Before you start
Objectives: Learn what is ICS and when can we use it on our network.
Prerequisites: no prerequisites.
Key terms: ics, network, internet, connection, private, server, address, dhcp, configure, dns, computer
What is ICS
With ICS feature we can share the Internet connection on one computer with multiple computers on a single, private network. ICS is implemented in such way that most configuration is automatic. When we configure our computer as ICS server, it actually becomes a NAT router. Also, additional services like DHCP and DNS proxy are enabled. With DNS proxy, DNS requests are forwarded to DNS servers on the Internet.
Remember that the ICS server has to have two network connections. One connection has to be connected to the Internet (public network), and the second connection has to be connected to the Local Area Network – LAN (private network). When we configure ICS server, the IP address for the private interface is automatically changed to a specific IP address. In Windows XP the address is 192.168.0.1, while in Windows 7 it is 192.168.137.1. The subnet mask is the same on both systems, it is 255.255.255.0.
The ICS server delivers information to hosts on the private network by using DHCP. Hosts get an IP address in the range from 192.168.0.2 to 192.168.0.254 (Windows XP) or from 192.168.137.2 to 192.168.137.254 (Windows 7), with a subnet mask of 255.255.255.0. They are also configured with a Gateway and a DNS server address which is of 192.168.0.1 (the private interface of the ICS system on Windows XP) or 192.168.137.1 (the private interface of the ICS system on Windows 7).
As you can see, in order for all to function properly, clients on our private network have to be DHCP enabled, so they can get an IP address that’s going to be compatible with the 192.168.0.0 or 192.168.137.0 network. If we have another DHCP server on the network, we should disable it. To force clients to use new DHCP server we can use the “ipconfig /release” and “ipconfig /renew” commands. This way they will get a new IP address from the new ICS DHCP server. Also, the private network should not have DNS servers, or domain controllers. We can configure our ICS to connect to the Internet on demand. For example, if an ICS is currently not connected to the Internet, and if a client computer needs to access some resources on the Internet, it will send a message to ICS saying that it needs to go to the Internet. At that particular moment, the ICS server will connect to the Internet and establish the connection, so that any of those clients can have full access to the Internet.
Internet Connection Firewall (ICF) should be enabled on the Internet connection on the ICS server, and not on the private connection. If we enable ICF on a private connection, this can disable communication with hosts on the private network. By default, the Firewall allows all outgoing Web traffic and responses to that traffic, but blocks all incoming traffic that is initiated from the public network. To allow incoming Web traffic, we have to open ports in the firewall based on the services we want to allow in. If the incoming service is hosted by a computer on the private network, we have to redirect the incoming port to the private host. We have separate article in which we provide more information about Firewall.
Example Configurations
We have separate articles in which we show how to configure ICS in different versions of Windows OS: