
Продолжаем серию статей, где разбираем предназначение различных процессов, найти которые вы можете внутри Диспетчера задач. Потребность в подобных статьях объясняется простым любопытством пользователей (многим интересно, зачем нужны эти десятки процессов) или необходимостью узнать, почему тот или иной процесс в определенных условиях начинает больше потреблять ресурсы компьютера, а именно память, процессор, диск или сеть. Эта статья рассказывает о том, что такое Хост Windows Shell Experience и что делать, если он постоянно грузит процессор.
Хост Windows Shell Experience – что это?
Сразу же отметим, что этот процесс является частью Windows 10. Это системный компонент, который работает всегда и обеспечивает вам работу универсальных приложений Windows. Кроме того, на его цифровые плечи возложена задача управлять графическими элементами интерфейса, вроде меню Пуск, прозрачности панели задач, всплывающие меню сетевого подключения, громкости, центра уведомлений и так далее. Хост Windows Shell Experience также управляет изменением фонового изображения рабочего стола, если пользователь активировал слайд-шоу.
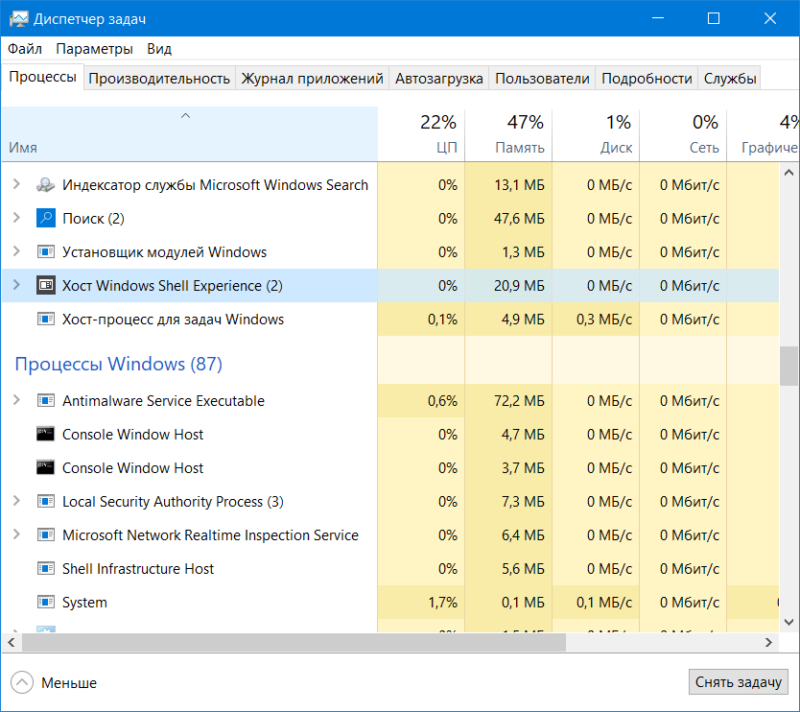
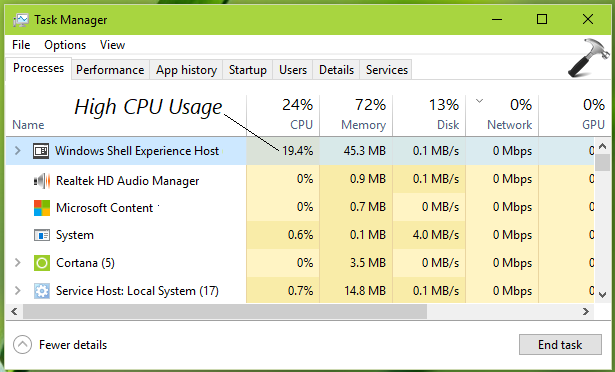
Хост Windows Shell Experience в своей привычной среде обитания. 0% нагрузки на ЦП и десяток мегабайт в оперативке.
Само имя процесса подсказывает его предназначение. Windows Shell – оболочка Windows. Окна, панели, кнопки и другие элементы интерфейса – все это работа Хост Windows Shell Experience.
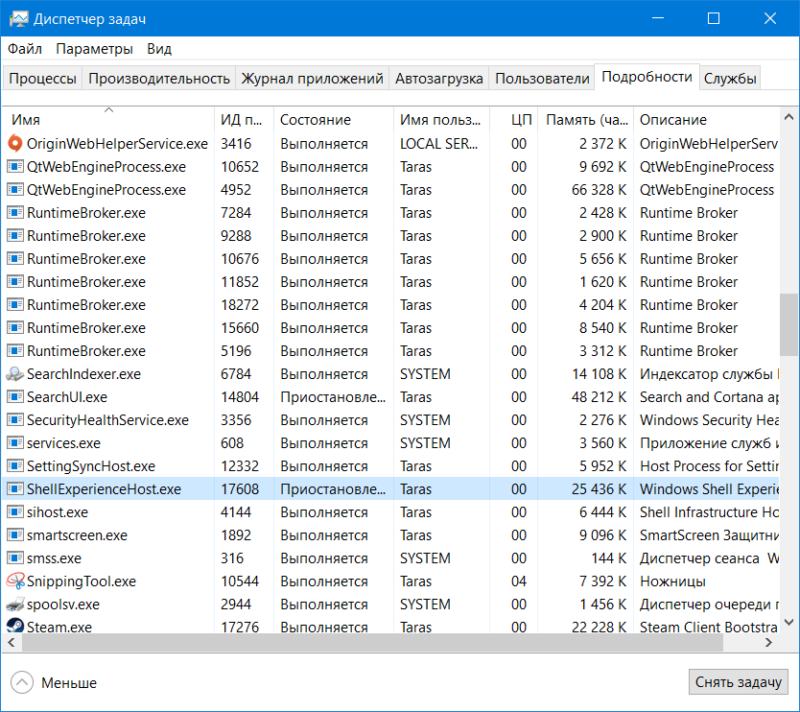
Вид сбоку, а точнее — из вкладки «Подробности».
Когда Windows 10 только появилась на свет и начала распространятся в виде бесплатного обновления, многие пользователи жаловались на неадекватное поведение процесса Хост Windows Shell Experience. Он сильно грузил процессор, а также потреблял много памяти. Хотя эти проблемы (они в основном были связаны с процессом апгрейда с Windows 7 / 8.1 до Windows 10) уже исправили, пользователи иногда все-таки сталкиваются с тем, что Хост Windows Shell Experience начинает дичать.
Хост Windows Shell Experience грузит процессор
В обычных условиях Хост Windows Shell Experience фактически никак не влияет на производительность компьютера. Несмотря на важность его существования, нормально работающий процесс Хост Windows Shell Experience не грузит процессор вообще, а объем потребляемой памяти не превышает нескольких десятков мегабайт. Нагрузка на процессор может слегка подскочить, когда вы открываете приложения или перемещаете окна, но она опять же, не должна превышать лишь пары процентов.
Как уже было сказано выше, бывают случаи, когда Хост Windows Shell Experience начинает постоянно напрягать процессор на уровне 20-30%, а объем потребляемой памяти вырастает до пары сотен мегабайт. В таком случае вам надо попытаться собственноручно решить ситуацию.
Как отключить Хост Windows Experience Host
Вручную вам не стоит его отключать, да и вы не сможете это сделать. Это важный системный процесс, отвечающий за графику в Windows 10. Даже если вы снимите эту задачу в диспетчере задач, система активирует ее повторно буквально спустя несколько секунд. Причину повышенной нагрузки таким образом не решить. Для этого есть другие методы.
Прежде всего проверьте наличие обновлений для операционной системы и установленных приложений. Быть может, обновление Windows или какого-нибудь из установленных приложений исправит ситуацию. После обновления дайте компьютеру пару минут на то, чтобы прийти в чувство. Можно также попробовать перезагрузить систему (в очень большом количестве случаев помогает именно перезагрузка) и затем понаблюдать за поведением процесса. Если ничего из этого не помогло, двигайтесь далее.
Зачастую проблемы в работе процесса Хост Windows Shell Experience спрятаны в системе слайд-шоу рабочего стола. Вполне нормально, если в процессе смены фонового изображения процесс немного нагружает процессор / память. Но после этого нагрузка должна упасть до минимума. Если не падает, сделайте следующее:
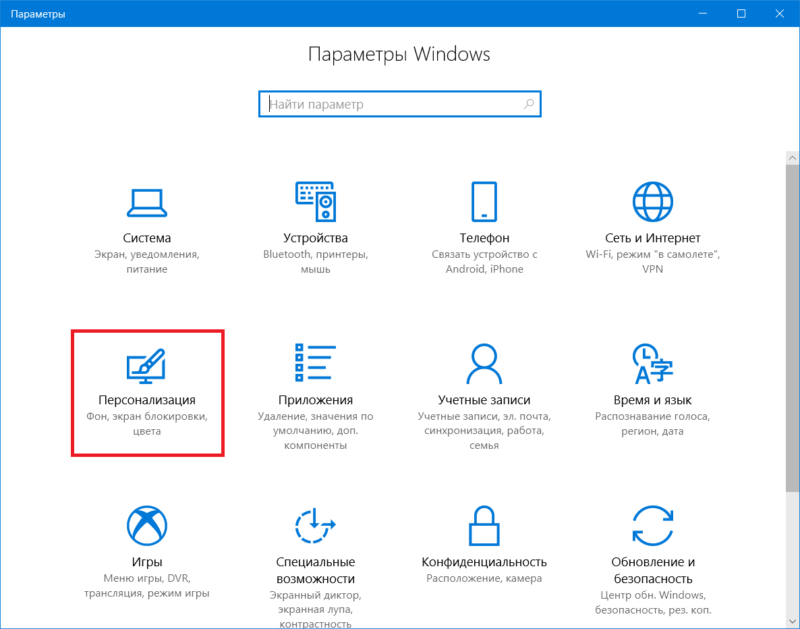
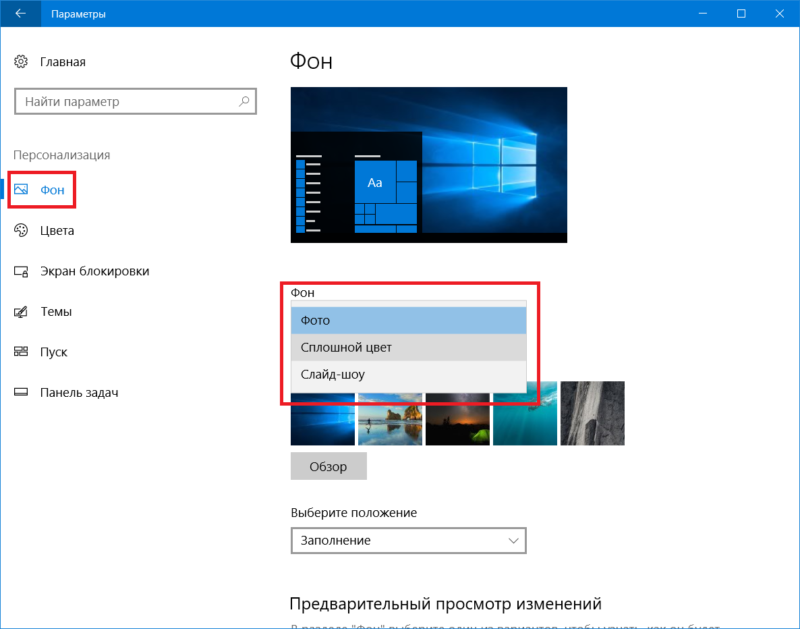
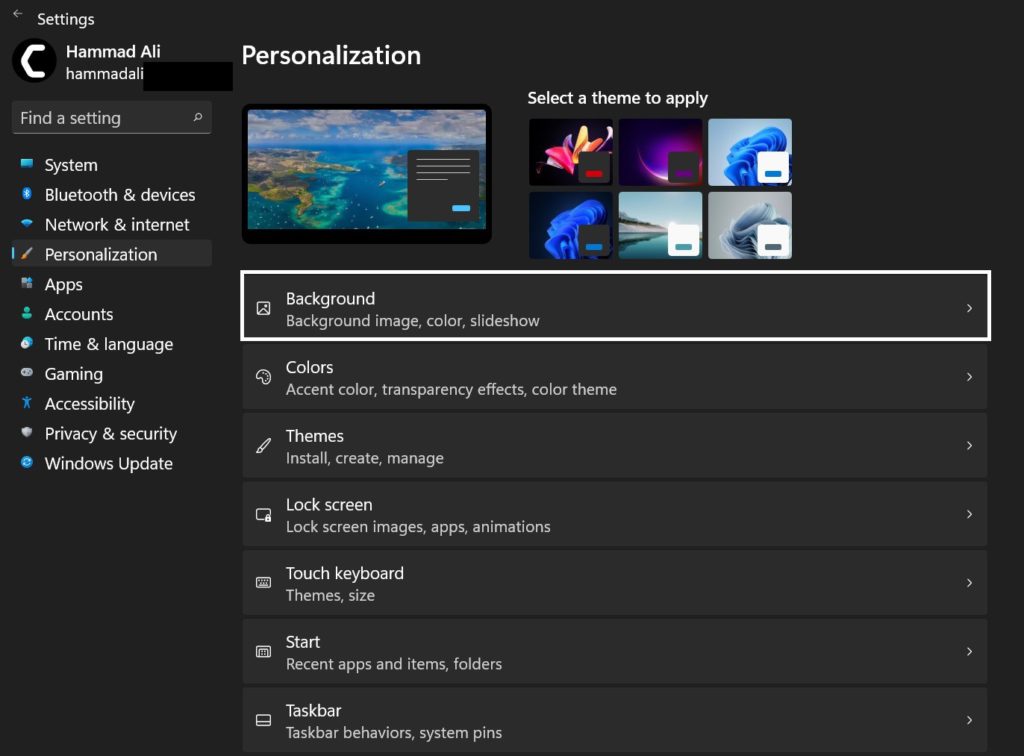
- Нажмите Win + I (вы можете открыть Параметры любым удобным вам способом) и перейдите в раздел Персонализация – Фон.

- Вместо Слайд-шоу установите параметр Сплошной цвет. После этого понаблюдайте за работой процесса. Если нагрузка упала до минимальной и держится в пределах нормы, можно попробовать установить одно изображение в качестве фоновой картинки.
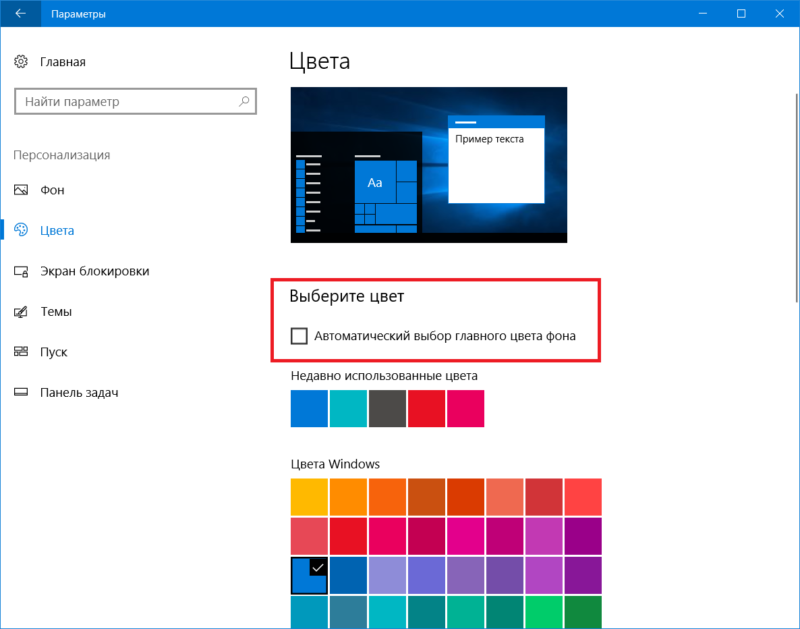
Другая причина может прятаться в система автоматического подбора акцентного цвета в зависимости от установленного изображения. Если на рабочем столе у вас картинка с синими цветами, цвет системы будет автоматически установлен на синий. Попробуйте отключить эту функцию.
- Откройте параметры (Win + I) и затем перейдите в раздел Персонализация – Цвета.
- Снимите флажок с параметра Автоматический выбор главного цвета фона. Можете также установить любой другой цвет, чтобы сбросить этот параметр. Опять же, пару минут последите за процессом. Если все пришло в нормальное состояние, значит вы нашли причину повышенной нагрузки на процессор. Если же не помогло, двигайтесь далее.
Третий вариант – отключение параметров прозрачности. Он расположен на том же экране, что и автоматический выбор главного цвета фона. Отключите параметр Эффекты прозрачности и посмотрите на эффект.

Хост Windows Experience Host – вирус?
Скорее всего нет. На момент написания этой статьи не было случаев, когда какой-то вирус выдавал себя за системный процесс Хост Experience Host. Все же есть способом, который поможет вам лишний раз убедиться в том, что вы имеете дело с подлинным системным компонентом, а не какой-то заразой.
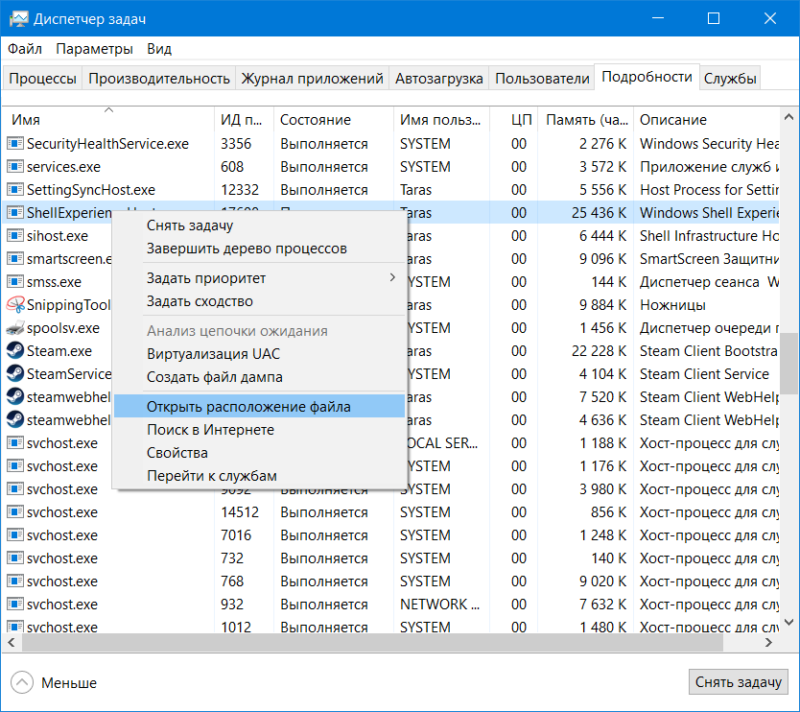
- Откройте Диспетчер задач (все возможный способы открыть Диспетчер задач описаны в статье «Как открыть Диспетчер задач») и перейдите на вкладку Подробности.
- Найдите в списке процессов ShellExperienceHost.exe. Кликните на строчку Имя, чтобы отсортировать процессы по алфавитному порядку и скорее найти нужный вам.
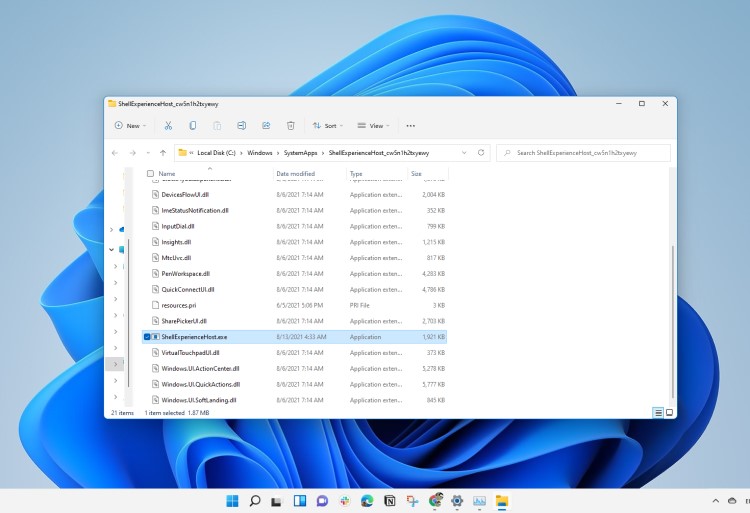
- Нажмите правой кнопкой мыши по ShellExperienceHost.exe и выберите Открыть расположение файла.

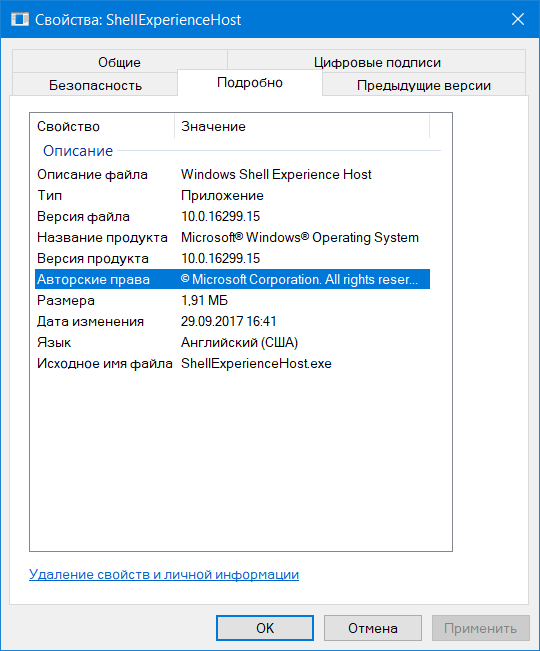
- Система должна открыть Проводник по адресу C:\Windows\SystemApps\SHellExperienceHost_cw5n1h2txyewy. Файл ShellExperienceHost будет автоматически выделен.

- Далее кликните по файлу правой кнопкой мыши и выберите Свойства. Откройте вкладку Подробно и убедитесь, что описание соответствует аналогичному на скриншоте.


Если у вас все именно так, как мы описали, тогда Хост Windows Shell Experience точно не является вирусом, а причина повышенной нагрузки или потребления ресурсов заключается в другом. Попробуйте описанные выше способы, чтобы привести этот системный процесс в адекватное состояние.
Usually, we refer Windows Shell as the graphical user interface (GUI) in Windows operating systems (OSes). This GUI can contain the visual elements which users see on their Desktop and running programs/applications. As we all know that some of the processes in Windows may require same functionality of resources. When the processes require similar resources, there will be duplication of processes using same resource. To avoid this duplication, group of processes shares a framework which is known as “host“. There are many type of hosts present in Windows OSes.
Windows 10 introduces a new host, called as Windows Shell Experience Host. First, let see what it is actually.
What Is Windows Shell Experience Host In Windows 10?
Well, Windows Shell Experience Host/Microsoft.Windows.ShellExperienceHost or ShellExperienceHost.exe is a process host in Windows 10. It is responsible to drive visuals on Start Menu, Action Center, Timeline feature (including Task View function as well), File Explorer, Taskbar etc. It may handle few elements on Desktop as well. The owner of this host by default is TrustedInstaller. This keeps running in background and you can easily locate it in Task Manager window, as shown below:
Some of the newbies to Windows 10 may treat this host as mysterious and often label it as “virus”, which is obviously wrong. In fact in absence of this host, Start Menu and other related elements managed by it won’t work as expected. This host file can be located at %WinDir%\SystemApps\ShellExperienceHost_cw5n1h2txyewy.
FIX: Windows Shell Experience Host High CPU Usage
From past experiences, we have often seen users reporting this common issue of high CPU usage by Windows Shell Experience Host. Usually, the host is not supposed to use CPU to such higher limits, but if you configure personalization settings to highly dynamic states, the host has no option left.
In order to reduce high CPU usage problem with Windows Shell Experience Host, you can try these things:
1. Run System File Checker scan. If it fails, try DISM commands to repair inbox corruption.
2. Turn off the transparency effects and select static accent color.
3. If you’ve enabled Windows Spotlight or slideshow feature, turn it off temporarily and see if it helps.
4. If you’re using any third-party customization programs, remove them.
We hope after trying above mentioned suggestions, Windows Shell Experience Host should reduce high CPU usage.
That’s it!
Related: “Microsoft.Windows.ShellExperienceHost” and “Microsoft.Windows.Cortana” applications need to be installed correctly.
RELATED ARTICLES
Introduction
In the world of Windows operating systems, many background processes run quietly to ensure the smooth functioning of your desktop environment. One such process is the Windows Shell Experience Host, identified in the Task Manager as ShellHost.exe. While this executable may not be one of the more well-known components, it plays a crucial role in rendering the Windows user interface and handling various visual elements. However, users have reported instances where ShellHost.exe leads to high CPU usage, resulting in a sluggish system and degraded performance. This article aims to guide you through understanding the Shell Experience Host and providing several methods to fix high CPU usage.
Understanding ShellHost.exe
What is Shell Experience Host?
The Shell Experience Host is a component of the Windows operating system starting from Windows 10. It is responsible for displaying key user interface elements, including the Start Menu, Taskbar, and Windows Store apps. Essentially, it is a part of the user interface layer that bridges the core operating system with the graphical aspects of applications running in Windows.
Why does ShellHost.exe cause high CPU usage?
High CPU usage by ShellHost.exe can be attributed to several factors, including:
-
Bugs in Windows Updates: Occasionally, updates can introduce bugs that disrupt the normal functioning of ShellHost.exe.
-
Corrupted User Profile: If your user profile becomes corrupted, it can lead to various processes misbehaving, including ShellHost.exe.
-
Third-party software conflicts: Some applications, especially those affecting the GUI experience, might conflict with ShellHost.exe.
-
Visual Effects Settings: Certain visual effects can demand more resources, causing increased CPU usage under ShellHost.exe.
-
Malware: In rare cases, malicious software masquerading as ShellHost.exe can also drive CPU usage up.
Symptoms of High CPU Usage
When ShellHost.exe consumes a high percentage of CPU resources, you might experience the following symptoms:
- System lag or freeze.
- Applications taking longer to open or respond.
- Fans running at high speed due to overheating caused by increased CPU load.
- Battery drain on laptops due to sustained high CPU usage.
Preliminary Steps for Diagnosis
Before diving into solutions, it’s essential to confirm that ShellHost.exe is indeed the culprit for high CPU usage.
Step 1: Check Task Manager
- Right-click on the taskbar and select Task Manager from the context menu.
- Go to the Processes tab.
- Look for ShellHost.exe and observe its CPU usage percentage.
Step 2: Verify the Location
To rule out the possibility of malicious software disguising itself as ShellHost.exe:
- In Task Manager, right-click on ShellHost.exe.
- Select Open file location.
- Ensure that the file is located in
C:WindowsSystemAppsMicrosoft.Windows.ShellExperienceHost_*(the exact version number may vary).
If the file is present in a different directory, you may be dealing with malware.
Methods to Fix High CPU Usage by ShellHost.exe
If you’ve confirmed that ShellHost.exe is responsible for the high CPU consumption, proceed with the following solutions:
Method 1: Restart Windows Explorer
Sometimes, a simple restart of Windows Explorer can resolve temporary glitches.
- Open Task Manager (Ctrl + Shift + Esc).
- Locate Windows Explorer in the Processes tab.
- Right-click on it and select Restart.
Check the CPU usage after restarting to see if the issue persists.
Method 2: Update Windows
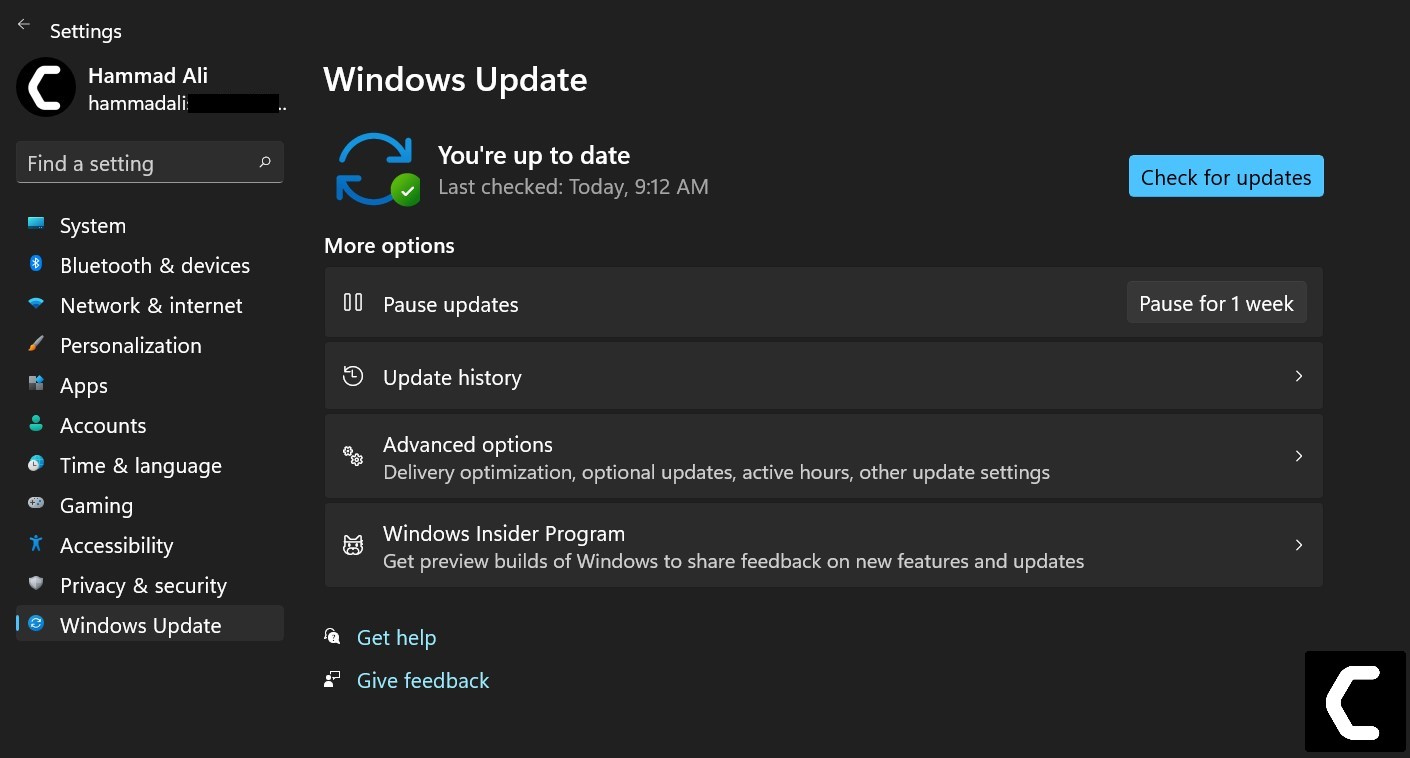
It’s crucial to have the latest updates installed, as Microsoft continually works to fix bugs and improve performance.
- Navigate to Settings > Update & Security.
- Click Check for Updates.
- Install any available updates.
Restart your computer and check if CPU usage has reduced.
Method 3: Change Visual Effects
Reducing the visual effects may help lighten the load on ShellHost.exe.
- Right-click on This PC and select Properties.
- Click on Advanced system settings.
- In the Performance section, click on Settings.
- Choose Adjust for best performance or manually uncheck unnecessary visual effects.
- Click OK and restart your computer.
Method 4: Check for Conflicting Applications
Some third-party applications may interfere with ShellHost.exe.
- Enter MSCONFIG in the search box and press Enter.
- Go to the Startup tab and click Open Task Manager.
- Disable all non-Microsoft applications.
- Restart your computer.
If the CPU usage normalizes, re-enable the applications one by one to identify the conflict.
Method 5: Create a New User Profile
If your user profile is corrupted, creating a new profile could resolve the issue.
- Go to Settings > Accounts > Family & other users.
- Click on Add someone else to this PC.
- Follow the prompts to create a new user account.
- Log into the new account and check if ShellHost.exe’s CPU usage remains normal.
Method 6: Scan for Malware
To rule out malware as a cause of high CPU usage, run a full system scan with a trusted antivirus software.
- Open your antivirus software and choose Full Scan.
- Follow the instructions to complete the scan.
- Remove any detected malicious files.
Method 7: Disable the Start Menu
If the issue persists, you can temporarily disable the Start Menu to prevent ShellHost.exe from running unnecessarily.
- Open PowerShell with administrative privileges (right-click Start > Windows PowerShell (Admin)).
- Run the command:
Get-AppxPackage | Remove-AppxPackage - Restart your computer.
Note that this will remove all Microsoft Store apps, including the Start Menu; however, you can reinstall them later.
Method 8: Perform a Clean Boot
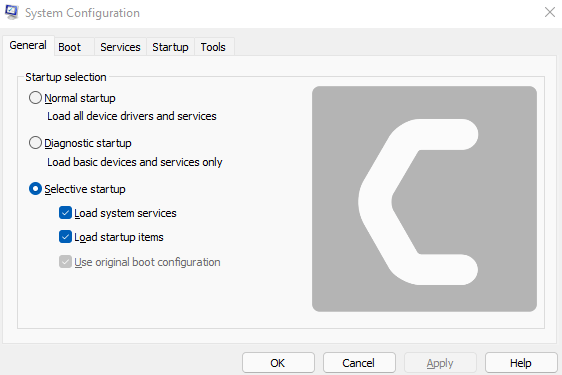
Performing a clean boot helps to identify if background services or startup items are causing the issue.
- Open System Configuration (type
msconfigin the search bar). - On the General tab, select Selective startup and uncheck Load startup items.
- Navigate to the Services tab, check Hide all Microsoft services, and click Disable all.
- Click OK and restart your computer.
If the issue is resolved, revert to normal mode by re-enabling services individually to identify the culprit.
Method 9: Reinstall Windows
If all else fails, a fresh installation of Windows might be your best option, especially if you suspect system corruption.
- Backup all necessary data to an external storage device.
- Download the Windows Media Creation Tool from Microsoft’s website.
- Use the tool to create an installation media and follow on-screen instructions to reinstall Windows.
Note: This method should be considered a last resort.
Method 10: System Restore
If ShellHost.exe’s high CPU usage started after a specific event (e.g., an update), using System Restore could help revert the system settings to the point before the problem began.
- Type
System Restorein the search box and select Create a restore point. - Click on System Restore in the System Properties window.
- Follow the wizard to choose a restore point and initiate the restoration process.
Conclusion
The Windows Shell Experience Host (ShellHost.exe) is a vital component for providing a seamless user interface in Windows. Although high CPU usage attributed to ShellHost.exe can significantly hamper system performance, the aforementioned methods offer various ways to diagnose and rectify the problem. By following a systematic approach—beginning from simple restarts to possibly reinstalling the operating system—you can effectively restore your system’s performance.
Always ensure that your Windows is up-to-date, and avoid installing untrusted third-party applications that might disrupt the functionality of system processes. If the problem persists even after multiple attempts, considering professional technical support might be the most prudent course of action.
By taking measures to optimize your Windows experience, you can enjoy a more responsive and efficient computing environment.
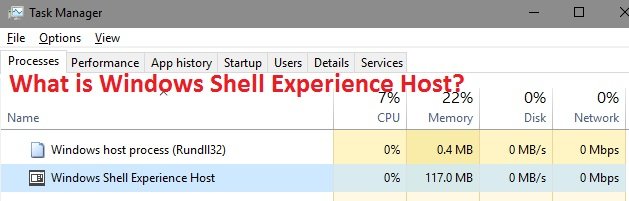
You just saw Windows Shell Experience Host High CPU Usage Consumption in Task Manager?
And,
You would be wondering what even Shellexperiencehost.exe/startmenuexperiencehost is?
Recently, users have reported that when they opened the Task Manager they saw that Shellexperiencehost.exe is using almost 90% of the CPU which was very unusual.
First of all, you don’t need to worry much because you are not alone in this and many users were trying some wrong fixes for Windows Shell Experience Host on Windows 11.
But,
We have compiled a list of the best solutions for you to fix the startmenuexperiencehost.exe error.
What is ShellExperienceHost exe?
Shellexperiencehost exe is an executable file and stands for Windows Shell Experience Host.
It was introduced in Windows 10, and can also be found in the latest versions of Windows 11.
Windows Shell Experience Host is an important part f Windows OS and its role is to display universal apps in a windowed interface. The process also handles the taskbar, Start Menu transparency, calendar, clock, etc.
Shellexperiencehost.exe is allocated in C:\Windows\SystemApps\ShellExperienceHost folder and has a file size of 1,653,600 bytes.
Windows Shell Experience Host helps other graphical parts to make Windows more attractive and when it does use the resources which leads to high CPU usage which is sometimes not normal so, disabling it will lead to malfunctioning of other systems related to Windows OS.
Also Read: LockApp.exe? What’s It? Is It Safe?
Is ShellExperienceHost a virus?
It’s totally safe as Windows Shell Experience Host is a legitimate program digitally signed by Microsoft Corporation.
As it is legitimate but hackers can still attack the program to make changes and carry out their illegal activities through shellexperiencehost.exe.
Moreover, if you are a Windows XP or Windows Vista and 8 users and if you see this startmenuexperiencehost process running on your PC then it’s an unwanted program as this file no longer works there.
Also, we can clear our doubt that the Shellexperiencehost exe is a virus or not by checking the file location as it should be located in its default file location when it was originally developed.
But still, to be on the safe side you can check if there’s a virus or not through Task Manager:
- Press together Ctrl + Shift + Esc keys to open Task Manager.
- Go to details and look for Shellexperiencehost.exe
- Also on your right side under the description column make sure its name is correct.
- Right-click on it and select Open file location.
- If it is located at C:\Windows\SystemApps\ShellExperienceHost

And if it’s not in the given address, then it might be a virus or a spyware.
Solution 1: Update Windows 11
Sometimes your outdated PC is the main cause of the Windows Shell Experience Host High CPU usage
For the best performance of your PC, you need to make sure that your Windows OS is up to date.
and with new updates, the bugs or errors like startmenuexperiencehost and high memory usage will be fixed.
So, here is how you can update your Windows 11 OS:
- Click on the Windows icon
- Click on the Settings icon and a new window will pop up

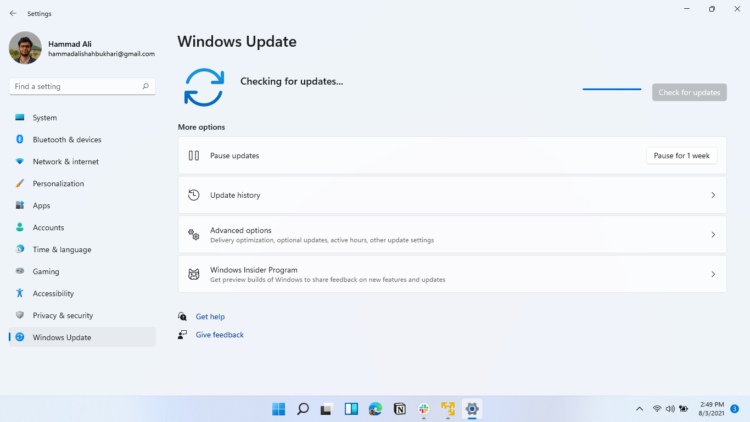
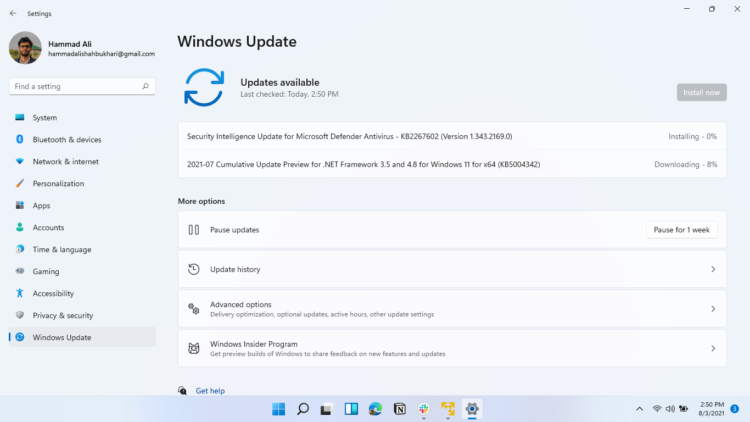
- Select Windows Update from the left menu

- The new window will pop up
- Then click on Check for updates button.
- If there is any update it will start updating the PC
- It will take some time to update Windows OS and after that, you can restart your PC.
Also Read: FIX: Microsoft Block Level Backup Engine Service?
Solution 2: Turn Off Automated Accent Colors For Background
So, if your background changes automatically then you need to disable the automated accent colors.
As every time the background changes your PC will pick a new accent color it will lead to high CPU usage as it’s the responsibility of the Windows Shell Experience Host.
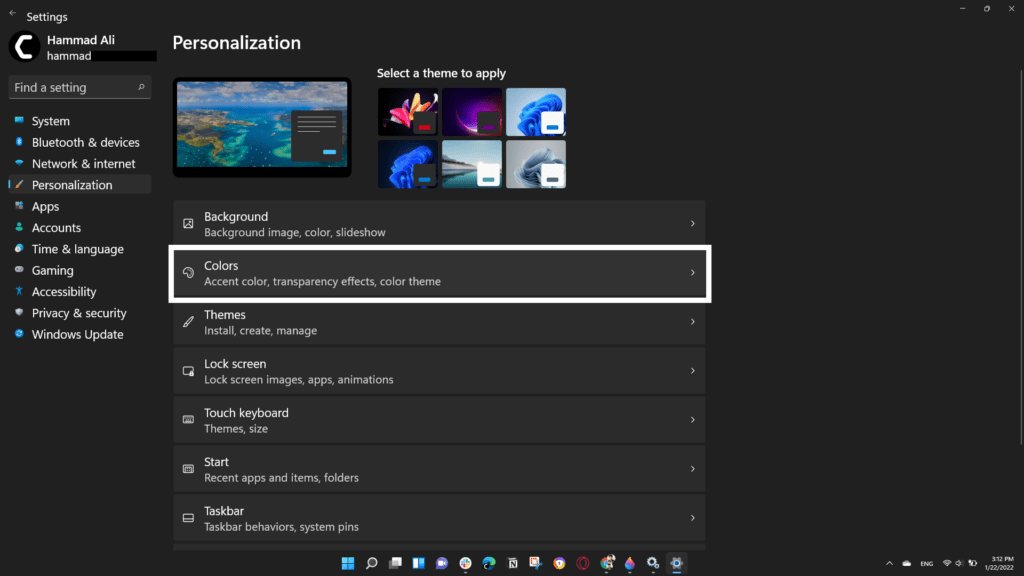
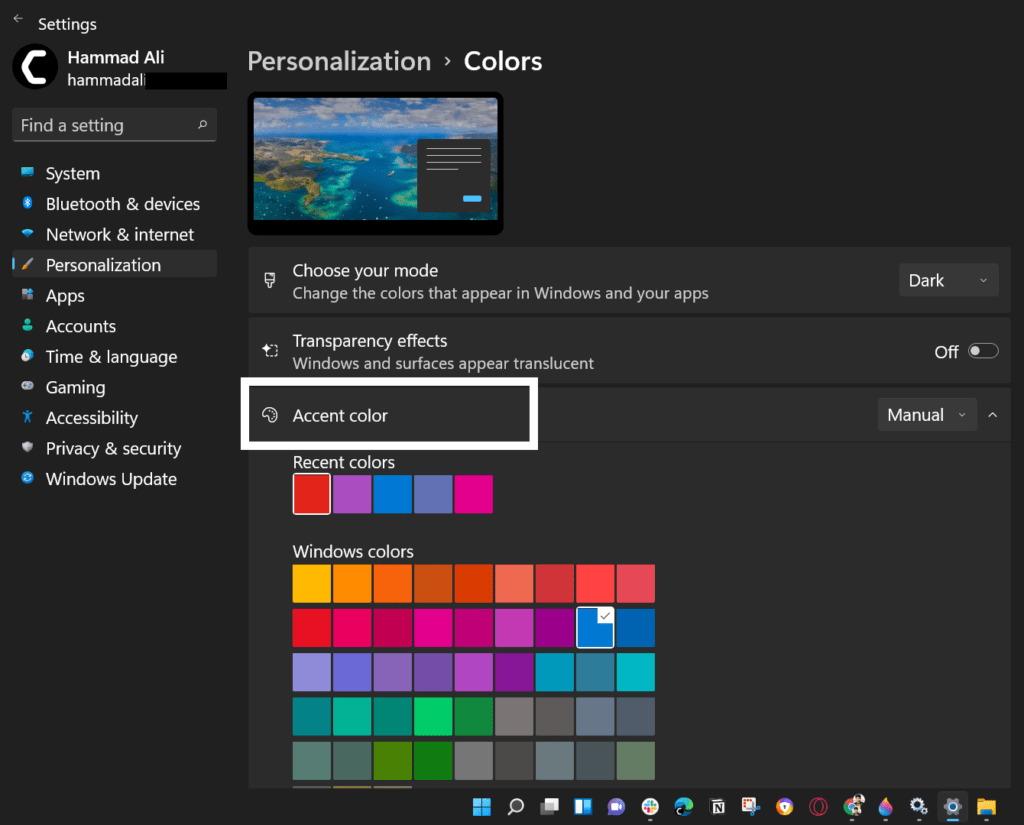
Here’s how you can turn off automatic accent colors on Windows 11:
- Press Windows key + I to go to Settings
- In the Settings screen choose Personalization
- Now click on Colors

- Click on the Accent color option and change it to Manual

- Restart your PC and check if Windows Shell Experience Host high CPU usage is fixed or not.
Solution 3: Turn Off Slideshow Background To Fix Windows Shell Experience Host
If turning off didn’t help you fix shellexperiencehost.exe high CPU usage then you should try to get over slideshow background.
As whenever your background changes shellexperiencehost.exe will use a lot of memory so
Here’s how you can turn off slideshow backgrounds in Windows 11:
- Press Windows key + I to go to Settings
- In the Settings screen choose Personalization
- Now click on Background

- Click on Personalize your background and set it to Picture or Solid color

- After some time check if Windows Shell Experience Host high CPU usage is solved or not.

If the above solution didn’t help you fix the shell infrastructure host then continue to SFC scan
Also Read: MMC.exe Error Blocked
Solution 4: Perform a System File Check to Fix shellexperiencehost.exe High CPU Usage
Sometimes the damaged file can lead to startmenuexperiencehost.exe high CPU usage on Windows 11 and your program will be unable to run.
So, the Sfc(System file checker) helps you scan the errors and replaces them if the shell infrastructure host replicated itself.
Here’s what you need to do to fix the Windows Shell Experience Host error:
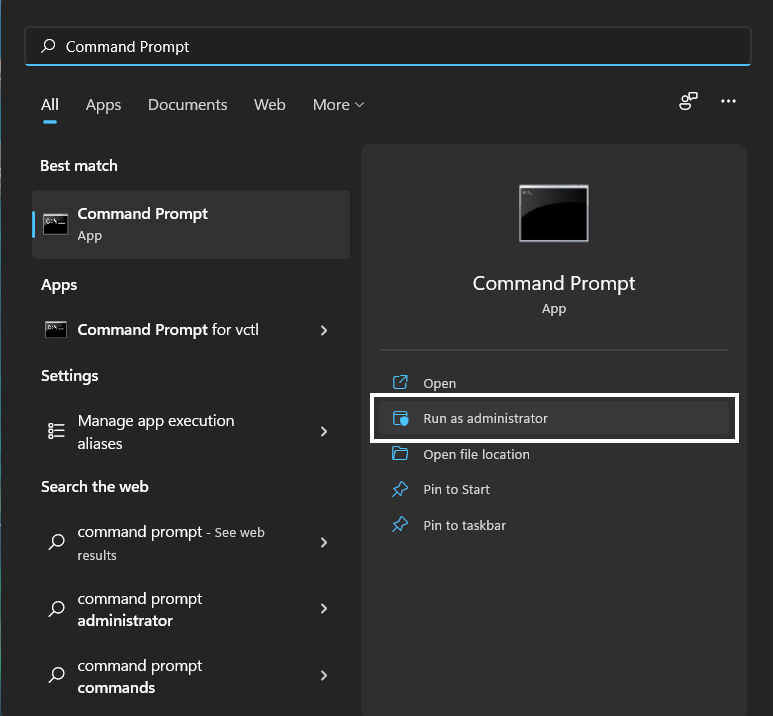
- Open Command Prompt as an Administrator, press Windows Key + X
- Or, search “Command Prompt” in the Startup menu, then choose Run as administrator

- Type “sfc /scannow”

- Be careful with the spaces between commands.
- This action may take up to 20 minutes so don’t interrupt it.
- After that restart your PC and check if shell infrastructure host high CPU usage is solved or not.

Having a High CPU Error CHECK OUT: What is Acrord32.exe?
Solution 5: Run System Maintenance Troubleshooter
This system maintenance troubleshooter will look for errors all-around your PC and will fix them if you couldn’t manage to fix startmenuexperiencehost from the above solution.
Moreover, the corrupted files that will get fixed with it will also solve Windows Shell Experience Host High CPU Usage.
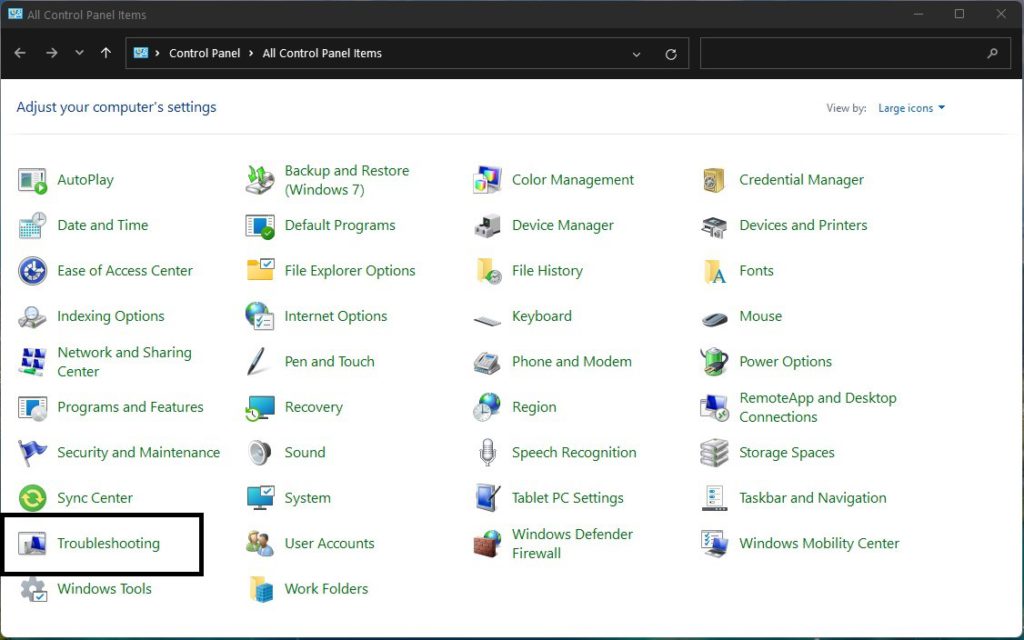
So, here’s how to run a system maintenance troubleshooter:
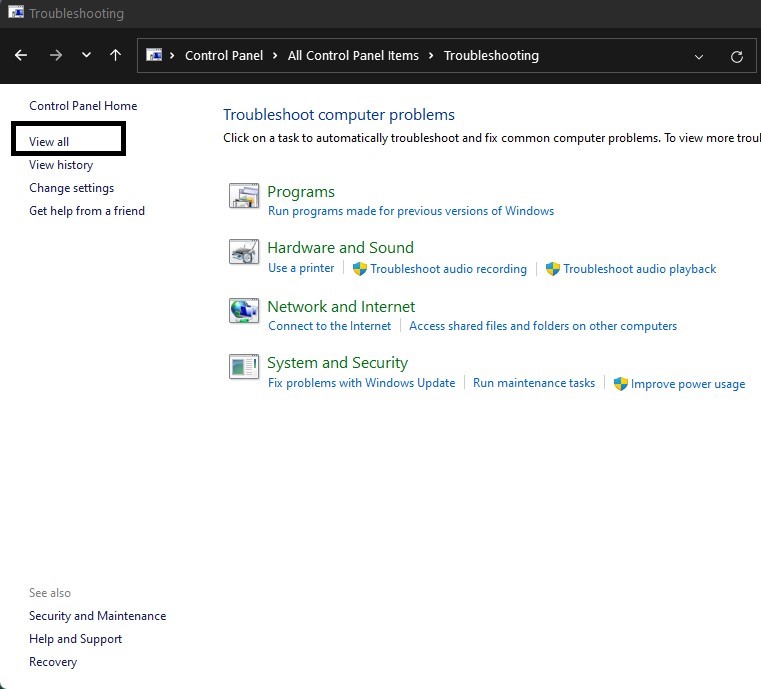
- Click on the Search icon
- Select Control Panel.
- Now look for Troubleshooting

- In the left pane click on View all.

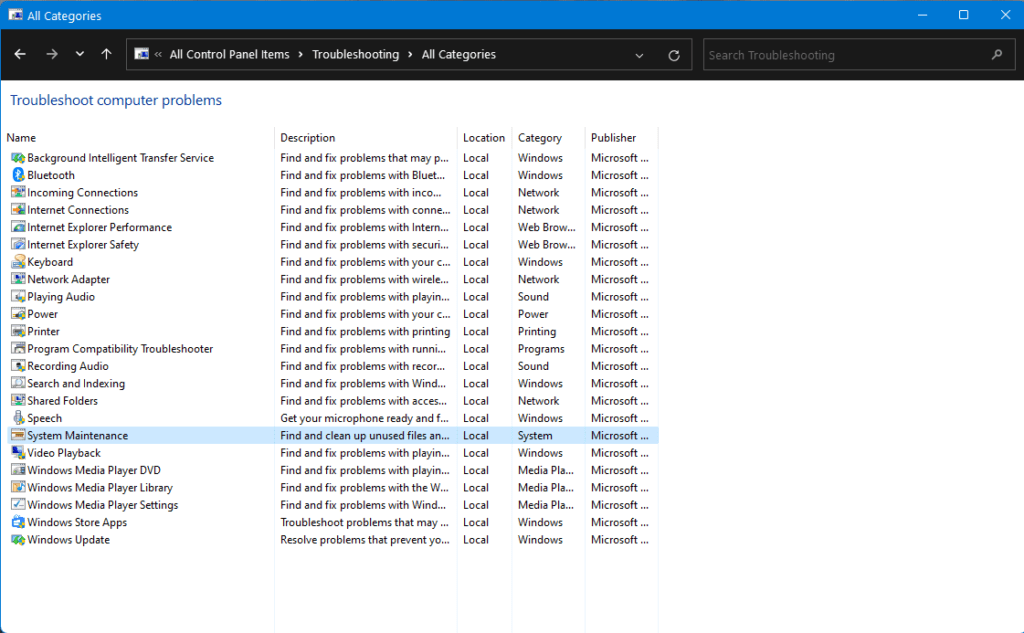
- And select System Maintenance.

After the troubleshooting is done you need to run your Windows in Safe Mode.
And you do this by following the steps below:
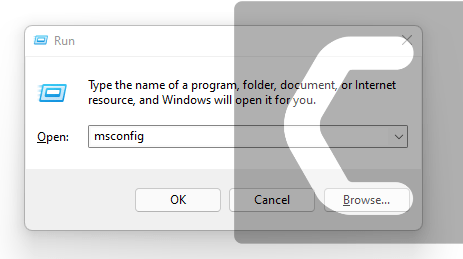
- Press Windows Button + R Key
- The Run Dialogue Box will appear
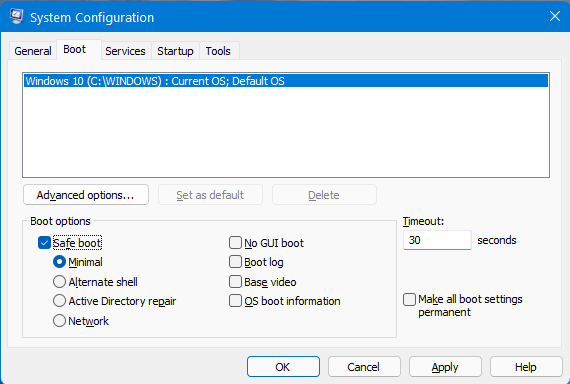
- Type “msconfig“ and press Enter.
- The System Configuration window will open and then click on the Boot tab.
- Now checkbox the Safe boot option.

- Then click on Apply and OK for the system to reboot in safe mode.
- After rebooting check if shellexperiencehost.exe high CPU usage is fixed or not.
Also Read: FIXED: WaasMedic Agent.exe High Disk Usage?
If troubleshooting didn’t work out for you in fixing Windows Shell Experience Host then continue to clean boot your PC.
Solution 6: Performing a Clean Boot Using MSConfig to Fix Windows Shell Experience Host High CPU Usage
Clean boot will help you to eliminate the unnecessary applications which are running on the backend.
Also, it will help fix startmenuexperiencehost and will replace the corrupted file that is helping in high CPU usage.
And shut down any applications which are conflicting with each other.
Here is how to perform a Clean Boot:
- Press Windows Button + R Key
- The Run Dialogue Box will appear
- Type “msconfig“ and press Enter.

- The System Configuration window will open
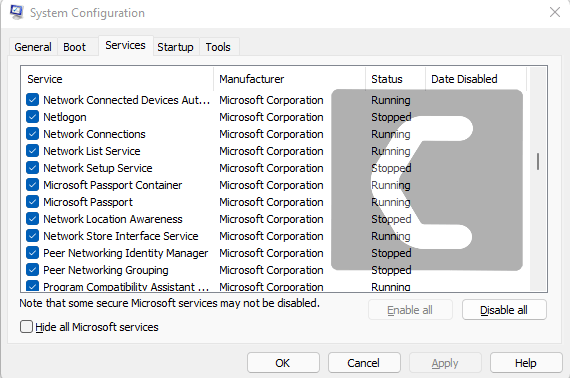
- In the General tab uncheck Load system services and Load startup items box as this will only use services issued by Microsoft when your PC will reboot.

- Now Select the Service tab and uncheck all the unnecessary service

- Only check those who are not using high CPU usage
- And your clean boot is done and the unnecessary services are eliminated
- After restarting your PC your startmenuexperiencehost.exe error on Windows 11 will be fixed.
Conclusion
So, these are the best fixes we could get for you in fixing Windows Shell Experience Host High CPU Usage in Windows 11 and
Disabling startmenuexperiencehost from your system is not that much of an easy job and also we don’t recommend it to so that’s why we have provided you with the best possible solutions.
It’s best you try all the solutions and if you have any other fix related to the Shellexperiencehost.exe error or any type of question then just let us know in the comment section below.
FAQs
-
Where is Windows Shell Experience Host located?
Windows Shell Experience Host is allocated in C:\Windows\SystemApps\ShellExperienceHost where it was stored default when developed.
-
How to check GPU Usage of Werfault?
You can check GPU Usage of Shellexperiencehost.exe by:
1. Gooing to the Task Manager.
2. Look for Shellexperiencehost.exe and click on the GPU usage column -
Why does ShellExperienceHost exe crash?
ShellExperienceHost exe crashes due to corrupt files or when malware attacks your PC.
-
Is ShellExperienceHost exe a virus?
ShellExperienceHost exe is not a virus unless it replicates itself or harms your computer.
Zul is an avid gamer with a passion for RPG and racing games. He enjoys playing games like Need for Speed and Grand Theft Auto 5 and is also skilled at fixing errors and crashes to enhance the gaming experience. Zul stays up-to-date with the latest gaming news and enjoys sharing his knowledge through writing gaming guides and articles.
Follow him on Twitter
“windows shell experience host” is an important process of windows, which is responsible for showing universal apps in windowed interface. It handles various graphical elements of various interface if the problem is still not solved, you can revert the changes done or keep the changes that you have done. The next culprit could be “if transparency effect is you should run a malware, trojan horses,viruses scan frequently. Clean your hard disk regularly. Remove redundant and unnecessary files from hard disk. You can disable. …
If you are using Windows OS then you might have seen that a process named “Windows Shell Experience Host” is running and you can see that in your Task Manager window. You might have asked yourself, why is it continuously running and why it consuming so much CPU and Memory. In this post, we will tell you all the things that you need to know about Windows Sheel Experience Host. So get ready.
If you are interested in Best Windows 10 Dark Themes in 2018, you can have a look at that.
“Windows Shell Experience Host” is an important process of Windows, which is responsible for showing Universal Apps in Windowed Interface.
Some important functions of “Windows Shell Experience Host” are:
- It handles various graphical elements of various interface such as Start Menu, Taskbar, Titlebar, such as its transparency and other special animation effects.
- Control Desktop Background i.e it can responsible for changing the Desktop Background as well as creating Slideshow on your Desktop Background.
The file ShellExperienceHost.exe is located in a subfolder of C:Windows.
When Windows 10 was first released, some people experienced problems with “Windows Shell Experience Host” which was consuming a lot of CPU as well as RAM. Now with further updates from Microsoft this problem has been sorted out for most of the users.
Why does “Windows Shell Experience Host” consume so much CPU and RAM?
Ideally, it should not consume any of your CPU but sometimes it can spike up to few percentages. It happens when you change your Windows Graphics Settings such as Changing your Wallpaper, setting Windows Themes. And it generally consumes 100-200 MB of your RAM. It generally consumes high memory for some time then immediately settles down. But things can move from ideal to worse, if “Windows Shell Experience Host” is consuming around 25-30% of your CPU consistently or more than 200 MB of RAM, then you have a problem to sort out.
How to solve High CPU and High RAM consumption problem of “Windows Shell Experience Host”?
First, you have to make sure that your Universal Apps and your Windows is Updated to latest version. If not immediately do it, maybe this problem is sorted out in the updates only.
Solution 1: Update your Windows and Universal Apps
- Make sure that your Windows is updated properly. The changes are that your problem solution is already lying there in the updates.
- Make sure all your Universal Apps are updated to the latest available version.
- To download the updates,
- Open Windows
Store
- Click your User Icon which is next to the Search bar
- Now select “Downloads and Updates” option from the menu that appears
- Now the “Downloads and updates” window will open, then click on “Check for updates” button and if updates are available then click on “Update all”
Solution 2: Check for Some other Common Potential Causes
Even after installing all the latest updates for Windows and Universal Apps, the problem remain. We will now discuss other possible Solutions. Take a look at each solution that is provided, if it works then perfect otherwise just revert the changes done.
- When you change your Background or Theme then ideally CPU consumption should increase temporarily and same is the case for RAM, but if it doesn’t settle down then for testing the potential cause, go to:
- Settings,
- Then select Personalization
- and then select Background
- From here select a Solid Color background, this could solve the problem.
- If you want to run Slideshow in your Desktop Background, you can do it using some third party app such as John’s Background Switcher (free) or DisplayFusion (its paid, but its free version will also do the job).
- If the problem still persists, you can revert the changes done or just keep the changes that are done, that will also be fine.
- The next potential reason could be that Windows is automatically picking the accent color based on your Desktop Background. Now to check it, go to:
- Settings
- Hover over to Personalization
- Select Colors
- And then Turn Off the “Automatically pick an accent color from my background” option.
- Wait for sometime, and check if the problem is resolved or not. If the problem still persists, you can revert the changes that you have done.
- Next culprit could be “if Transparency Effect is enabled” for TaskBar, Start Menu and Action Center.If it is turned on, you can turn it off, using following steps:
- Goto Settings
- Then Click on Personalization
- Select Colors option
- Now turn off the “Make Start, taskbar and action center transparent” option.
- Hopefully, this should resolve the issue.
Solution 3: Keep Scanning your PC for various Malware or Viruses frequently

Chances could be that your PC is slowed down due to a Malware or Virus. So,
- You should run a Malware, Trojan Horses,Viruses scan frequently.
- Clean your Hard Disk regularly. Cleaning basically means removing redundant and unnecessary files from Hard Disk.
- Uninstall any unnecessary Application
- Remove any Autostart programs that are not needed. You can disable then by:
- Open Run terminal by pressing Win + R key.
- type msconfig in the dialog box that appears.
- Then check for any unnecessary application which is there and disable it
- Keep periodic backups and Restore points to revert back.
Hope your problem would be sorted out by using any of the above methods. You may get a question that can I kill the “Windows Shell Experience Host” process. You can do that by choosing “End Task” while you have selected “Windows Shell Experience Host” process in the Task Manager. But it will automatically restart it again after some time. So its a must process to run, you cannot disable it.
Conclusion
Hopefully, by now you would have understood most of the things about “Windows Shell Experience Host” and if you have faced any problem because of it, it would be resolved by the methods we have described in our post. You may think whether its a virus that’s why it’s slowing down my PC. But the answer is No. Its a system process that needs to be active everytime your PC is ON.
You can share your comments below if you face any problem.
We hope you liked reading this articles.
For more tech articles visit ursuperb.com
Hello friends. I am John from USA and very passionate about technology. I love reading Motivational Books, playing Piano and doing Blogging.