
Quick Links
-
Schedule the Do Not Disturb Mode
-
Customize the Sound of Notifications
-
Force Apps to Use Your Dedicated GPU
-
Shake a Window to Minimize Others
I used to think I knew Windows pretty well—until I stumbled upon some features hidden in plain sight, which can make a big difference in how you use your device. Even if you’ve been using Windows for years, there’s a good chance you’ve missed a few of these. Here are some features worth checking out.
5
Make Use of Dynamic Lock
Imagine your PC locking itself when you walk away—no extra effort required. That’s precisely what Windows’ Dynamic Lock feature offers. It lets you pair your smartphone with your computer via Bluetooth, and when you step away with your phone, the weakened or lost Bluetooth connection tells Windows you’re no longer nearby—so it locks the device.
To set it up, enable Bluetooth on your device and smartphone and pair them like you usually would for file sharing. After that, open the Settings app, go to Accounts > Sign-In Options, scroll down to the «Dynamic Lock» section, and check the box that says «Allow Windows to lock your device automatically when you’re away.»

Once enabled, your PC will automatically lock itself when your phone moves out of range—usually about 30 feet—helping keep prying eyes away from your data.
4
Schedule the Do Not Disturb Mode
Do constant system and app notifications pull you out of focus while working on your laptop? If so, you likely use Do Not Disturb mode to silence them. But here’s something even more helpful—you can schedule this mode to turn on automatically during certain hours, like your work schedule or meeting times, and turn off once you’re done.
This way, you won’t have to remember to toggle it on and off every time. To set it up, open the Settings app and go to System > Notifications > Do Not Disturb. Expand the «Turn on do not disturb automatically» section, check «During These Times,» and define your preferred start and end times along with the repeat schedule.
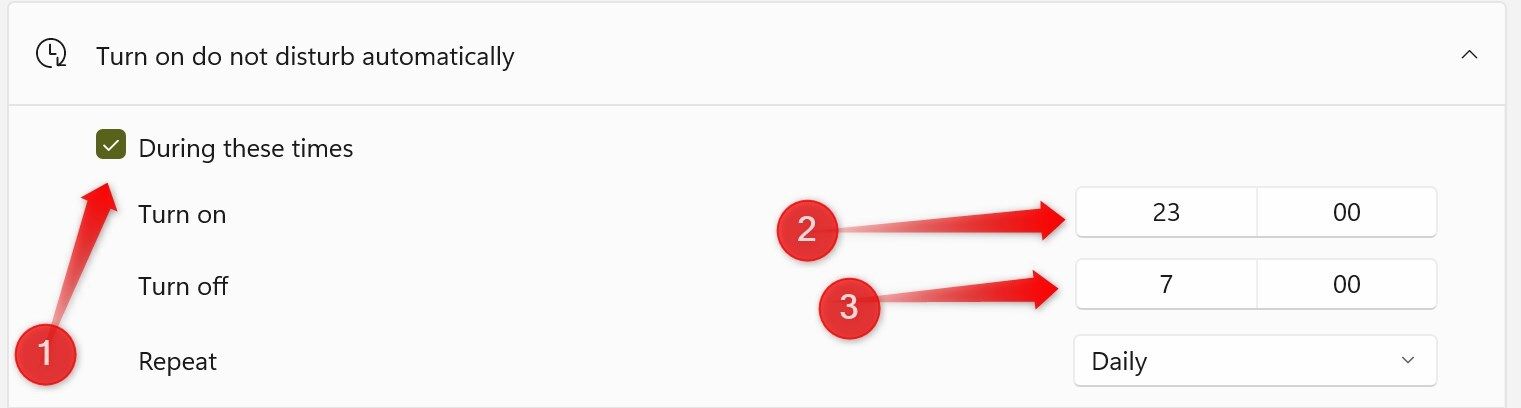
Just below that, you’ll find «Set Priority Notifications.» Use it to select which apps or contacts can still send notifications, even when Do Not Disturb is active.
Related
Do Not Disturb Mode Is My Secret to Sanity
My inner peace has a strict no-interruption policy.
3
Customize the Sound of Notifications
Windows has a default set of sounds for various system events—like a different ping when your battery hits a critical level, a new email arrives, or you put your laptop to sleep. While these default tones are easily recognizable, they might feel generic or not quite your style. The good news? You can easily customize them and use tones of your liking.
To change the sound for a specific event, open the Settings app, go to the «System» tab, and navigate to the «Sound» settings. Here, scroll down and click on «More Sound Settings.» In the Sound properties window, switch to the «Sounds» tab. From there, select the event you’d like to customize and choose a new sound from the dropdown list.
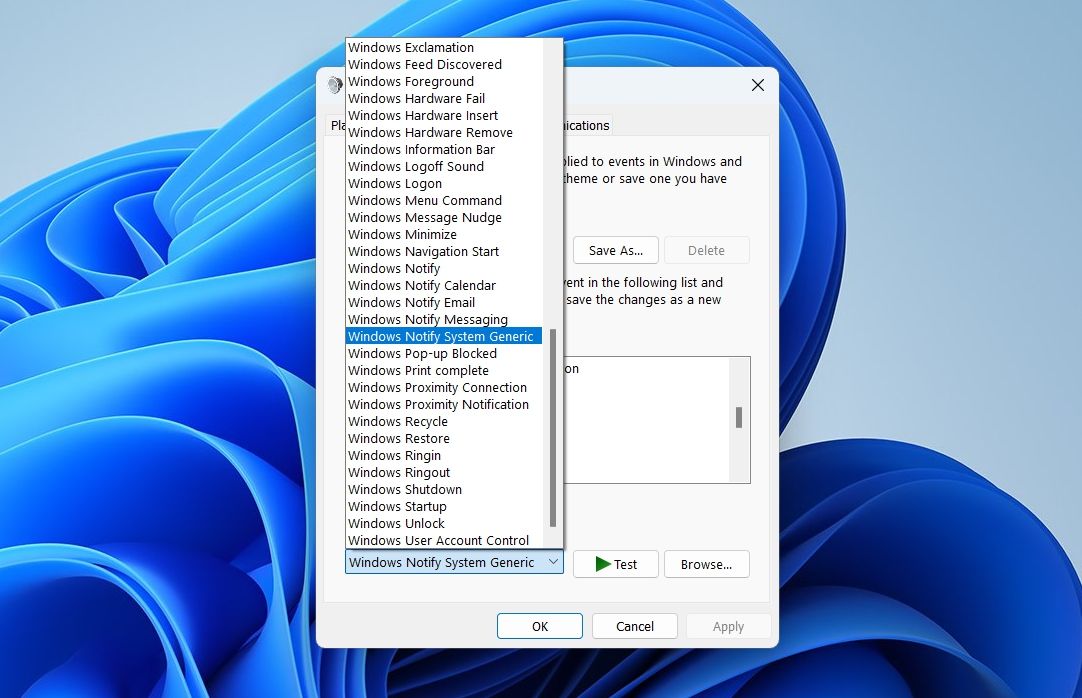
You can click the «Test» button to preview the sound. You can also use a downloaded sound file by clicking “Browse.” Once you’re happy with the selection, click «Apply» and «OK.»

2
Force Apps to Use Your Dedicated GPU
Have you ever noticed that some games and apps run smoothly while others—despite being less resource-intensive—struggle with performance? That happens because Windows often defaults to using the integrated graphics card for some apps instead of your more powerful dedicated GPU, which causes lag and slower performance for graphics-intensive tasks.
Fortunately, you can manually assign the dedicated GPU to specific apps that need better performance. Simply open Settings, go to System > Display > Graphics, click «Browse,» and choose the app for which you want to adjust the graphics preference. Once added, click the app, select «Options,» and choose “High Performance” to make it use the dedicated GPU.
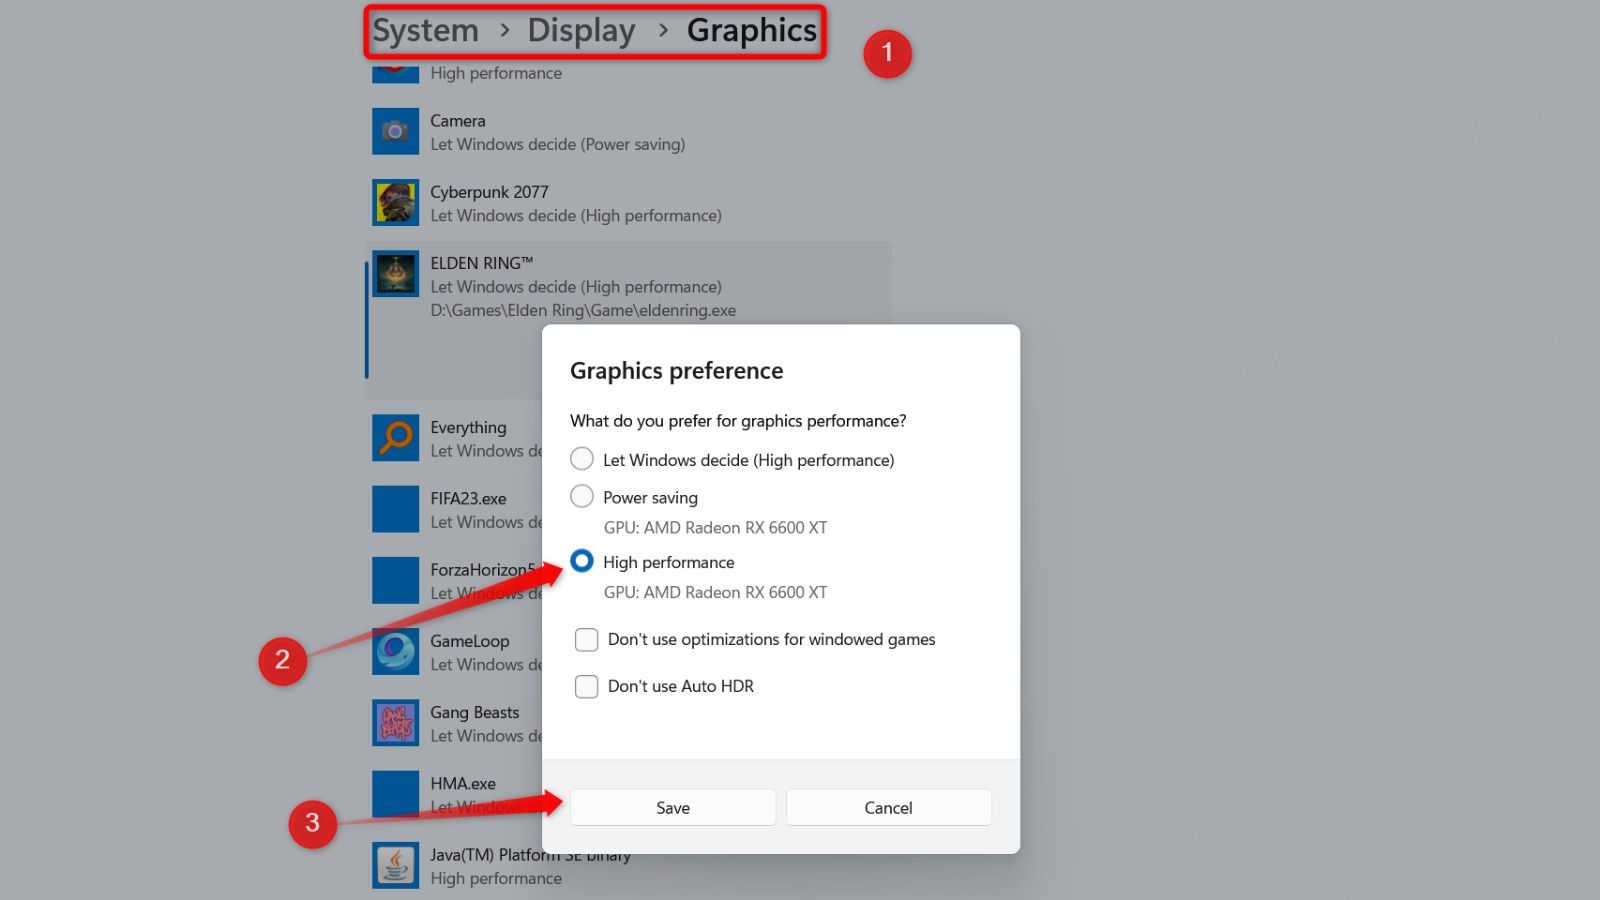
You can repeat this for other apps and games, too. Remember that if you’re on a laptop, using the dedicated GPU more often can drain your battery quickly.
Related
How to Disable Your Integrated Graphics on Windows 11
When games and other graphics-intensive applications starts to lag, this is what you do!
1
Shake a Window to Minimize Others
One habit I dislike about myself is constantly opening new app windows without closing the old ones. It clutters my desktop, switching between windows becomes a chore, and makes it harder to focus on a single window. Thankfully, Windows has a nifty feature called Shake to Minimize that helps clean up the mess.
It’s not a flawless fix, but it does the job—grab the window you want to keep, give it a quick shake, and all other open windows will automatically minimize. This means I don’t have to manually minimize every other window to focus on one. Even better, shaking the same window again restores all the minimized ones.
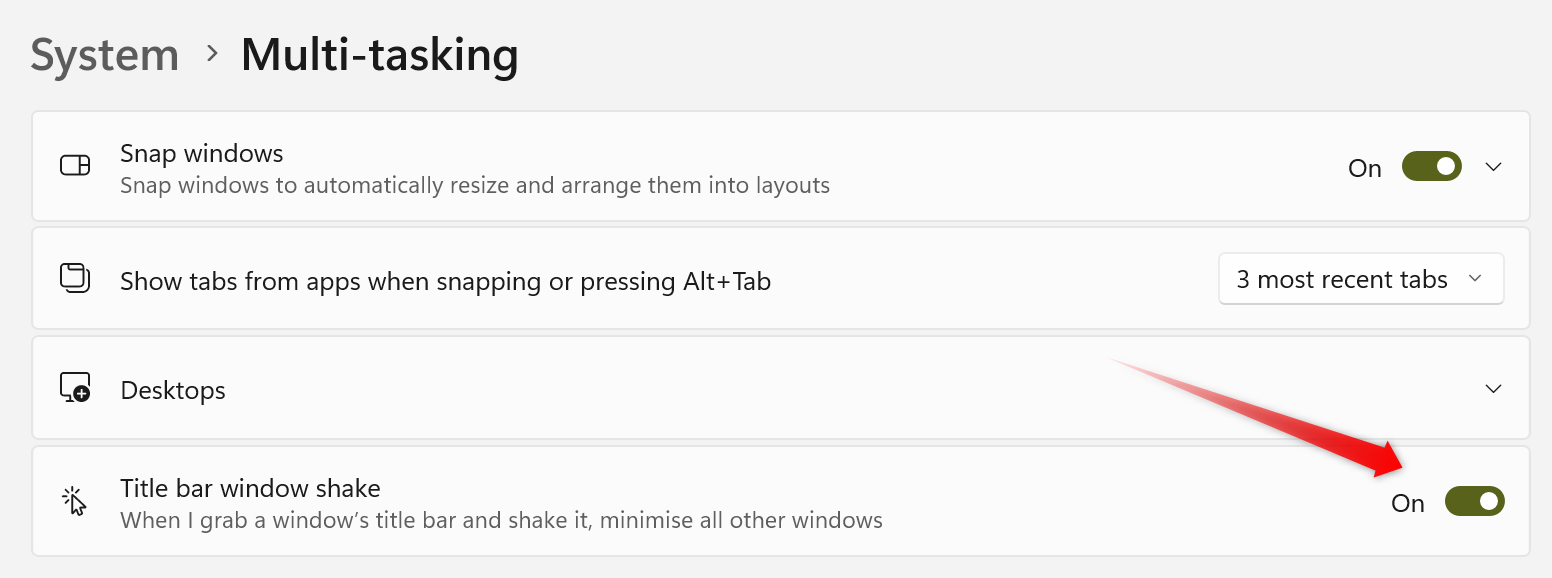
To turn on this feature, open the Settings app, go to System > Mult-tasking, and ensure the toggle next to “Title Bar Window Shake” is turned on.
These underrated, lesser-known Windows features can seriously improve your overall experience. If you haven’t explored them yet, try them—they can help protect your privacy, boost app performance, automatically silence notifications during busy times, and let you fine-tune notification sounds to match your preferences.
Hidden Windows 10 features that you may not know about have been recently gaining popularity especially in the ranks of content writers, students and gamers. Windows 10 has proven to be leaps and bounds better than its predecessor, Windows 8.
The latest Microsoft OS has shown to have an organic and fluid dynamic to it. Being able to personalize your OS in order to make it your own has never been easier.
That said, some people are not too keen on playing with its settings; they might be afraid or unaware of the endless possibilities they have. Others cannot wait to play with the settings and learn about what the system can do.
However, chances are that the vast majority of our users are unaware of these amazing hidden Windows 10 features. To clarify, this guide will not show you the grand features that have been overly reported and easy to find. Furthermore, it will also avoid talking about the most prominent features released under the Windows 10 Creators Update, which have been already covered on our blog.
That is because all these updates are already wildly known. Game Mode is a useful feature, but it was constantly announced and promoted by Microsoft. In fact, it could be argued it was the centerpiece of the Creators Update.
This article is only for those features that were implemented without a massive fanfare, the ones that you can only know if you tinker with your PC too much. So with that in mind, up next are the hidden Windows 10 features you may not know about.
Background scrolling of inactive windows
You will think this feature was already a Windows standard. In fact, you can swear you have used it before. However, that cannot be further from the truth, and this is what makes this feature the most important hidden Windows 10 features implemented. Until Windows 10, you could only scroll in a particular window or application if it was active.
Furthermore, if your mouse was hovering on an inactive window or app and tried to scroll, the scrolling would have had occurred, unintentionally, in the windows that remained active. Thus, what you might be remembering is clicking your way around the different opened windows in order to scroll through them.
But like as said, that all changed with Microsoft’s latest OS. In Windows 10 you have the option to scroll up or down on inactive windows. All you have to do is go to Settings > Devices and then turn on the option: “Scroll inactive windows when I hover above them”.
Turning this option makes a lot of sense for plenty of people. For example, students or writers that want to check their different sources without having to flip between windows.
Moreover, it is also useful for gamers that are reviewing their stats or game plan while playing. So if you are part of one of those tribes or simply someone that tends to have many different windows open at the same time, turn this option on and you will never regret it!
Per-monitor display scaling
Over the past several years we have seen monitors jump at a surprisingly fast rate regarding their resolution. And while this jump in resolution comes at a hefty price, lately, those prices have been dropping considerably. A 4k monitor that used to cost just as much as high-range PC is now affordable enough for people to buy without breaking the bank. However, the affordability of 4k does not mean that your 1080p screen is any less useful.
Ergo, you may want to keep both screens and run a dual-screen rig. The problem with that is that Windows did not allow you to have both screens configured at the proper scale. So your 4k screen was scaled at 1080p, which made the icons and content look blurry and out of shape.
Microsoft realized that this scenario was going to become more common as monitor prices kept lowering. Thus, they introduced their display scaling. If you go to Settings> Display you will be faced with the monitors that you currently have connected, labeled from “1” to “n”, where n is the number of monitors.
Number “1” represents your main monitor. If you click there you will have the chance to set your preferred size for text, app and other items. You can also choose your resolution and orientation.
Numbers “2 to n” are your attached screens, and here is where this feature becomes useful: you can elect to have these screens as an extension of your desktop, while also choosing their resolution and orientation.
You can also choose to not have them as an extension of your desktop and still select different resolutions and orientations for each one. This scaling ability does not stop at monitors. If you have a high-resolution laptop but a standard resolution monitor, Windows 10 allows you to keep the same scales and resolutions between both displays.
By making use of these hidden Windows 10 features, you will never have to suffer from watching things get distorted by colliding monitor resolutions.
Hidden Windows 10 features that are automated: Storage Sense
Most Windows users are used to knowing the location of most of their files. Sadly, they do not know the size of all the files that are on their computer at any given time.
This is where Storage Sense comes in. Borrowing a page from the mobile operating software, Storage Sense lets users known how much space is occupied by different types of content. Want to know how much space are all your movies taking? Storage Sense tells you which portion of the disk is being taken by multimedia files. Furthermore, this system works with multiple HDD or SDD even if it is an external drive that is connected by USB.
To learn more about your current storage capacity on Windows 10, after installing the Creators Update, go to Settings> this PC and you will be presented with a detailed breakdown of what is currently taking space on your disk(s). This feature will even tell you how large are your hibernation files and your system restore files.
Native FLAC, MKV, and HEVC support
Windows Media Player may not be a new feature. From all the things we are listing today, this is the oldest feature we are showcasing. It is a staple of Windows, and if you are using Windows 10 than you should start using it more often. That is because with Windows 10 the Media Player got updated to support the latest and widely-used formats.
The most popular of the formats that Windows Media Player now supports is, of course, Matroska (MKV) native support. MKV is a widely used container for H.264 videos. That is because it can hold multiple audio, video and subtitle streams.
The second format that got native support was FLAC audio. This is good news for those audiophiles out there that are that enjoy high-quality sound. Lastly, the up-and-coming HEVC/H.265 video compression standard also got native support.
Having HEVC with native support will become incredibly important in the upcoming years as 4k videos and stream become the standard resolution for users. So feel free to close VLC for a moment and give your Windows Media Player a try.
These new codecs will enable Windows 10 users to play different types of multimedia content without the need to install third party software that may or may not be legitimate. Such things are almost guaranteed to make your experience far more enjoyable than ever before.
Connect the Windows key to your Microsoft account
The last hidden Windows 10 feature that will be mentioned here is probably the one that you never thought about until just now.
Cloud technology has become a driving force and companies are paying attention to that fact. Microsoft did not shy away from this notion and introduced the option to connect your Windows key to your Microsoft account. That means that next time you buy a new computer, you do not need to worry about whether or not you need to buy a new Windows key. If your HDD crashed and you need a new disk, just get a new HDD and download Windows 10 with no worries.
Microsoft made it easy to activate this option even when they did not put much emphasis in mentioning this marvelous feature. All you have to do is go to Settings > Update & Security > Activation. Once that is done, you will never have to worry about upgrading your PC again.
If you see the Windows 10 error code: 0x800704CF, then it means that your network location cannot be reached by the activation servers. Make sure that your computer is connected to the Internet and try again.
Can jv16 PowerTools clean software leftovers that Windows 10 Storage Sense misses?
Short answer: yes!
Long answer: First, make sure that you have enabled Storage Sense automatic cleaning (see our blog post on the topic of Windows 10 Storage Sense). When Storage Sense is enabled, Windows periodically deletes any files in your temp folders that aren’t currently being used by applications and any files in your Recycle Bin that are more than 30 days old.
After using Storage Sense, do a test scan using Clean and SpeedUp My Computer. This tool is part of the jv16 PowerTools PC System Utilities software. You can download jv16 PowerTools from our website and enjoy a free, fully functional, 60 days trial.
HideWindow.exe file information
The process known as Hide Window Hotkey belongs to software Hide Window Hotkey by unknown.
Description: HideWindow.exe is not essential for the Windows OS and causes relatively few problems. The file HideWindow.exe is located in a subfolder of «C:\Program Files».
The file size on Windows 10/8/7/XP is 459,264 bytes.
There is an icon for this program on the taskbar next to the clock.
There is no description of the program. You can uninstall this program in the Control Panel. It can change the behavior of other programs or manipulate other programs. It is not a Windows system file.
HideWindow.exe is able to record keyboard and mouse inputs and monitor applications.
Therefore the technical security rating is 59% dangerous.
Uninstalling this variant:
If you are having problems with HideWindow.exe, you may also uninstall the program using the Control Panel ⇒ Uninstall a Program ⇒ Hide Window Hotkey.
Recommended: Identify HideWindow.exe related errors
If HideWindow.exe is located in a subfolder of the user’s profile folder, the security rating is 56% dangerous. The file size is 453,120 bytes.
The program has a visible window. There is no information about the author of the file. It can change the behavior of other programs or manipulate other programs. It is not a Windows system file.
HideWindow.exe is able to record keyboard and mouse inputs and monitor applications.
Important: Some malware camouflages itself as HideWindow.exe, particularly when located in the C:\Windows or C:\Windows\System32 folder. Therefore, you should check the HideWindow.exe process on your PC to see if it is a threat. We recommend Security Task Manager for verifying your computer’s security. This was one of the Top Download Picks of The Washington Post and PC World.
Best practices for resolving HideWindow issues
A clean and tidy computer is the key requirement for avoiding problems with HideWindow. This means running a scan for malware, cleaning your hard drive using 1cleanmgr and 2sfc /scannow, 3uninstalling programs that you no longer need, checking for Autostart programs (using 4msconfig) and enabling Windows’ 5Automatic Update. Always remember to perform periodic backups, or at least to set restore points.
Should you experience an actual problem, try to recall the last thing you did, or the last thing you installed before the problem appeared for the first time. Use the 6resmon command to identify the processes that are causing your problem. Even for serious problems, rather than reinstalling Windows, you are better off repairing of your installation or, for Windows 8 and later versions, executing the 7DISM.exe /Online /Cleanup-image /Restorehealth command. This allows you to repair the operating system without losing data.
To help you analyze the HideWindow.exe process on your computer, the following programs have proven to be helpful: ASecurity Task Manager displays all running Windows tasks, including embedded hidden processes, such as keyboard and browser monitoring or Autostart entries. A unique security risk rating indicates the likelihood of the process being potential spyware, malware or a Trojan. BMalwarebytes Anti-Malware detects and removes sleeping spyware, adware, Trojans, keyloggers, malware and trackers from your hard drive.
Other processes
fbwmgr.exe wifiprotlauncher.exe adjust.exe HideWindow.exe winmine.exe wscsvc.exe egisservice.exe p2psvr.exe hdrexpose3service.exe steelvinemanager.exe tomcat7w.exe [all]
Reducing the Usage of Hidden Windows in Vim
Introduction
As a Vim user, you may have encountered the issue of too many hidden windows being created, which can lead to problems with autocmd and other similar features. In this article, we will explore the solution to this problem and provide you with some tips on how to reduce the usage of hidden windows in Vim.
Understanding Hidden Windows
Hidden windows in Vim are windows that are not visible on the screen but are still open in the background. These windows can be created when you open a new file or when you use certain plugins or scripts that require a new window. While hidden windows can be useful in certain situations, too many of them can cause problems with autocmd and other features that rely on the state of the windows.
The Problem with Autocmd
Autocmd is a powerful feature in Vim that allows you to automate certain tasks based on events such as file opening, file saving, and window creation. However, when there are too many hidden windows, autocmd can become confused and start to malfunction. This can lead to unexpected behavior and errors in your Vim sessions.
Solution 1: Using TabLeave to Delete Windows
One solution to the problem of too many hidden windows is to use the TabLeave event to delete windows before leaving a tab. The TabLeave event is triggered when you leave a tab, and it provides an opportunity to clean up any windows that are no longer needed.
To use TabLeave to delete windows, you can add the following code to your ~/.vimrc file:
autocmd TabLeave * silent! only
This code will delete all windows in the current tab when you leave it.
Solution 2: Rewriting Window Management Code
Another solution to the problem of too many hidden windows is to rewrite the window management code and check if the various modules even need their own windows. This can involve reviewing the code for each module and removing any unnecessary window creation.
For example, if you have a plugin that creates a new window for each file, you may be able to modify the plugin to use a single window instead. This can help to reduce the number of hidden windows and improve the performance of your Vim sessions.
Best Practices for Reducing Hidden Windows
In addition to using TabLeave and rewriting window management code, there are several best practices that you can follow to reduce the usage of hidden windows in Vim:
- Use a single window for multiple files: Instead of creating a new window for each file, consider using a single window to display multiple files.
- Use buffers instead of windows: Buffers are a way to store files in memory without creating a new window. You can use buffers to display multiple files in a single window.
- Avoid using plugins that create new windows: Some plugins may create new windows for each file or for each operation. Consider avoiding these plugins or modifying them to use a single window instead.
- Use Vim’s built-in features: Vim has many built-in features that can help you to manage windows and buffers. Consider using these features instead of relying on plugins or scripts.
Conclusion
Reducing the usage of hidden windows in Vim can help to improve the performance of your Vim sessions and prevent problems with autocmd and other features. By using Leave to delete windows, rewriting window management code, and following best practices, you can reduce the number of hidden windows and make your Vim sessions more efficient.
Additional Tips
- Use
:buffersto list all buffers: The:bufferscommand can help you to list all buffers in your Vim session. This can be useful for identifying which buffers are causing problems with autocmd. - Use
:windoto list all windows: The:windocommand can help you to list all windows in your Vim session. This can be useful for identifying which windows are causing problems with autocmd. - Use
:set hiddento enable hidden buffers: The:set hiddencommand can help you to enable hidden buffers in your Vim session. This can be useful for reducing the number of hidden windows.
Frequently Asked Questions
- Q: What is the difference between a window and a buffer?
A: A window is a visible area of the screen that displays a file or other content. A buffer is a way to store a file in memory without creating a new window. - Q: How can I reduce the number of hidden windows in my Vim session?
A: You can useTabLeaveto delete windows, rewrite window management code, and follow best practices such as using a single window for multiple files and avoiding plugins that create new windows. - Q: What is autocmd and how does it relate to hidden windows?
A: Autocmd is a feature in Vim that allows you to automate certain tasks based on events such as file opening, file saving, and window creation. When there are too many hidden windows, autocmd can become confused and start to malfunction.
Frequently Asked Questions: Reducing Hidden Windows in Vim
Q&A
Q: What is the difference between a window and a buffer?
A: A window is a visible area of the screen that displays a file or other content. A buffer is a way to store a file in memory without creating a new window. Think of it like a file on your computer — you can have multiple files open at the same time, but you only need to have one window open to view them.
Q: How can I reduce the number of hidden windows in my Vim session?
A: There are several ways to reduce the number of hidden windows in your Vim session:
- Use
TabLeaveto delete windows before leaving a tab. - Rewrite the window management code and check if the various modules even need their own windows.
- Use a single window for multiple files instead of creating a new window for each file.
- Use buffers instead of windows to store files in memory.
- Avoid using plugins that create new windows for each file or operation.
- Use Vim’s built-in features to manage windows and buffers.
Q: What is autocmd and how does it relate to hidden windows?
A: Autocmd is a feature in Vim that allows you to automate certain tasks based on events such as file opening, file saving, and window creation. When there are too many hidden windows, autocmd can become confused and start to malfunction. This can lead to unexpected behavior and errors in your Vim sessions.
Q: How can I identify which buffers are causing problems with autocmd?
A: You can use the :buffers command to list all buffers in your Vim session. This can help you to identify which buffers are causing problems with autocmd.
Q: How can I identify which windows are causing problems with autocmd?
A: You can use the :windo command to list all windows in your Vim session. This can help you to identify which windows are causing problems with autocmd.
Q: What is the :set hidden command and how does it relate to hidden buffers?
A: The :set hidden command allows you to enable hidden buffers in your Vim session. This means that you can have multiple buffers open at the same time without creating a new window for each one.
Q: How can I use the :set hidden command to reduce the number of hidden windows?
A: You can use the :set hidden command to enable hidden buffers and then use the :buffers command to list all buffers in your Vim session. This can help you to identify which buffers are causing problems with autocmd and reduce the number of hidden windows.
Q: What are some best practices for reducing hidden windows in Vim?
A: Some best practices for reducing hidden windows in Vim include:
- Using a single window for multiple files instead of creating a new window for each file.
- Using buffers instead of windows to store files in memory.
- Avoiding plugins that create new windows for each file or operation.
- Using Vim’s built-in features to manage windows and buffers.
- Regularly cleaning up hidden windows and buffers to prevent them from causing problems with autocmd.
Q: How can I troubleshoot problems with autocmd and hidden windows?
A: To troubleshoot problems with autocmd and hidden windows, you can try the following:
- Use the
:bufferscommand to list all buffers in your Vim session. - Use the
:windocommand to list all windows in your Vim session. - Use the
:set hiddencommand to enable hidden buffers and see if it resolves the issue. - Check your
~/.vimrcfile for any plugins or scripts that may be causing the problem. - Try disabling any plugins or scripts that may be causing the problem and see if it resolves the issue.
Conclusion
Reducing the number of hidden windows in Vim can help to improve the performance of your Vim sessions and prevent problems with autocmd and other features. By following the best practices outlined in this article and using the :buffers, :windo, and :set hidden commands, you can identify and resolve problems with autocmd and hidden windows.
Окно может быть видимым или скрытым. Windows отображает на экране видимое окно (visible window). Она скрывает скрытое окно (hidden window), не прорисовывая его. Если окно видимое, пользователь может обеспечивать окно вводимой информацией и просматривать выводимую информацию в окне. Если окно скрытое, оно в действительности заблокировано. Скрытое окно может обрабатывать сообщения из Windows или из других окон, но оно не может обрабатывать вводимую информацию от пользователя или отображать на экране выводимую информацию. Прикладная программа устанавливает состояние видимости окна при создании окна. Позже, прикладная программа может изменять состояние видимости.
Окно видимо тогда, когда для окна установлен стиль WS_VISIBLE. По умолчанию, функция CreateWindowEx создает скрытое окно, если прикладная программа не определяет стиль WS_VISIBLE. Как правило, прикладная программа устанавливает стиль WS_VISIBLE после того, как она создала окно, чтобы хранить скрытыми от пользователя подробности процесса создания его. Например, прикладная программа может сохранять скрытым новое окно, пока она настраивает вид этого окна. Если стиль WS_VISIBLE определен в CreateWindowEx, Windows, после создания окна, посылает окну сообщение WM_SHOWWINDOW, но перед тем как показать его на экране.
Прикладная программа может определить, является ли окно видимым, используя функцию IsWindowVisible. Прикладная программа может показывать (делать видимым) или скрывать окно, используя функции ShowWindow, SetWindowPos, DeferWindowPos или SetWindowPlacement. Эти функции показывают или скрывают окно, устанавливая или удаляя WS_VISIBLE стиль для окна. Они также посылают сообщение WM_SHOWWINDOW окну перед показом или сокрытием его.
Когда окно владельца свернуто, Windows автоматически скрывает связанные с владельцем окна. Точно так же, когда окно владельца восстановлено, Windows автоматически показывает связанные с владельцем окна. В обоих случаях, Windows посылает сообщение WM_SHOWWINDOW окнам имеющим окно -«хозяина» перед сокрытием или показом их. Иногда, прикладной программе возможно надо скрыть находящиеся в собственности окна без необходимости свертывать или скрывать владельца. В этом случае, прикладная программа использует функцию ShowOwnedPopups. Эта функция устанавливает или удаляет стиль WS_VISIBLE для всех находящихся в собственности окон и посылает сообщение WM_SHOWWINDOW находящимся в собственности окнам перед сокрытием или показом их. Скрытие окна владельца не оказывает никакого эффекта на состоянии видимости находящихся в собственности окон.
Когда родительское окно видимое, связанные с ним дочерние окна также видимы. Точно так же, когда родительское окно скрыто, его дочерние окна также скрыты. Свертывание родительского окна не оказывает никакого эффекта на состояние видимости дочерних окон; то есть дочерние окна свертываются вместе с родителем, но стиль WS_VISIBLE не изменяется.
Даже если окно имеет стиль WS_VISIBLE, пользователь может быть не способен видеть окно на экране; другие окна могут полностью накладываться на него, или оно, возможно, было перемещено за края экрана. А также, видимое дочернее окно подчиненно правилам закрепления, установленными для него родительскими и дочерними взаимоотношениями. Если родительское окно окна не видимо, оно будет также невидимо. Если родительское окно перемещается за краями экрана, дочернее окно также перемещается, потому что дочернее окно выводится относительно верхнего левого угла родителя. Например, пользователь может перемещать родительское окно, содержащее дочернее окно достаточно далеко от края экрана, так что пользователь может быть не способен видеть дочернее окно, даже притом, что дочернее окно и его родительское окно оба имеют WS_VISIBLE стиль.
Дополнительные материалы на сайте:
- «Шаг 4 — Окно Windows на С»
- «N/A»
- «N/A»