
Windows is one of the most advanced and highly used OS. As a user, you have often come across situations like Blue Screen of death or BSOD and Black Screen with Cursor after an Update. These issues usually occur at unexpected times and for a user with not much computer system knowledge you are bound to think that it is due to a virus of your computer crashing due to any malware infections. It is not true as one of the major issues with your laptop is caused by DISM Host Servicing Process
DISM stands for Deployment Image Servicing and Management. It is a command-line tool that assists with Windows images or PE planning (Preinstallation Environment). It is one of the most useful features, or within Windows computers, we may claim resources. This DISM Host Servicing Process will, however, begin to consume lots of your computer resources on various occasions and make it incredibly slow. The slowdown can occur at any time and you will have at most of the moment.
Here we will explore all the issues you have faced with the DISM Host Servicing Process or the DISM.exe. Most of you don’t even know what is DISM Host Servicing Process and how it is affecting your computer system. So with this article, we will help you find a fix for those issues and try to understand more about DISM Host Servicing Process.
Deployment image servicing and management popularly known as DISM is a command-line tool. The service is used to create a Windows Preinstallation Environment a.k.a. Windows PE in the background. DismHost is a Windows function used in different processes, as we discussed earlier. But because it operates in the background, this name may not be identified to most Windows users. However the main aim of this tool, or we may claim the software, is to read the Windows picture preinstallation environment for Windows.
In adding/removing drivers, enumerating packages, or enabling/disabling such windows functions, DISM often finds its use. The troubling thing about DismHost.exe is that in temp files, it makes multiple copies of itself. This is how heavy disc consumption is caused by this DISM Host Servicing Process.
Many Windows users reported having found thousands of DISM host servicing process files in C:\Windows\Temp and/or \Users\<UserName>\appdata\local\temp folders.
Also, DismHost.exe does not open in any window and neither does its icon appear on the taskbar. It can only be found in folder C, Program files, User folder or temp folder. According to the software experts
- It is 34% dangerous if found in C:\Windows
- It is 19% dangerous if found in C:\Program Files, and
- 28% dangerous if found in User’s previous folder
The common errors you get because of DismHost.exe are:
- “dismhost.exe high disk usage”
- “Service Host Local Service Network Restricted”
- “dismhost.exe Application Error.”
- “dismhost.exe failed.”
- “dismhost.exe has encountered a problem and needs to close. We are sorry for the inconvenience.”
- “dismhost.exe is not a valid Win32 application.”
- “dismhost.exe is not running.”
- “dismhost.exe not found.”
- “Cannot find dismhost.exe.”
- “Error starting program: dismhost.exe.”
- “Faulting Application Path: dismhost.exe.”
These were some common error messages that might pop up indicating there is a DISM.exe issue. Alongside these, there are some system-related issues too that you will face that will indicate to you that your computer has been affected and is having performance issues.
Different Types of issues caused by DismHost.exe
This error basically hampers the performance of your beloved computer. The error makes fault moves and reduces the performance rate of your computer. Due to the rapid multiplication, this error is bound to reduce the speed of functioning, and more than not your computer will crash dump or show nothing on the screen.
The Blue Screen of Death is also the major outcome of the DismHost.exe. The BSOD is the point where you can see nothing but just a plain blue screen on your monitor and no kinds of functions apply to your computer. The only way out of that situation then is to restart your computer.
Other issues that are created by dismhost.exe are –
- exe slows down your system.
- As it is malware, you are often faced with security issues.
- It automatically generates multiple files in your computer. It is estimated to have more than 90K files from untrusted sources.
- Does not stop functioning and keeps running in the background even after closing it from the taskbar
- You can see some strange software downloaded in your system that you have never given permission for or installed in your system
- Since it acts like malware, it creates different types of errors in your system apart from those which have been mentioned.
- It creates errors like high disk usage.
The above mentioned are some of the most commonly seen issues which the user faces when they are encountered with DISM host servicing process’s high disk usage.
How to Fix DismHost.exe High Disk Usage Issue
Here we will tell you about some of the methods that we have tried and tested to remove this error and get our computers back to their working state. These methods are not harmful and easy to perform so we suggest that you first read the whole method before starting it right away. Let’s go and see the way to fix DismHost.exe High Disk Usage Issue –
1. Update your Windows System
Before trying anything you should try checking if you have an available Windows update and if you are left behind on updating your OS. This is a viable option because often Microsoft updates the internal softwares while dropping a Windows update and hence there can be chances that the DISM Host Servicing could have received an update that will only work with the latest version of Windows. Also a Windows update will refresh and reload the system files while also updating the files and applications to their latest available version.
Not only this bug, but Windows Update will also help you fix various other driver-related problems and things. When the Windows upgrade is completed, the new configurations and Windows components will be ready to operate the device effectively. Here’s how to check for and update the Windows –
Step – 1: Press the “Windows” and “X” keys simultaneously.
Step – 2: Then click on the “Setting” option. Or press Windows + I to open Windows Settings.
Step – 3: Follow it by navigating to the “Update and Security” option and clicking on it.

Step – 4: Now, go to “Windows Update” and then click on “Check for Updates.”

Step – 5: The computer will then check if there are any updates available and update the Windows.
Step – 6: Wait for it to get over and then restart your computer.
Once the computer has restarted check if the pesky error is still troubling you. It is advised to have a good and stable internet connection while the update takes place and don’t do any functions on your computer in the meantime. The error should be eradicated by now but if that does not happen, go on to the next method.
2. Check DismHost.exe for Malware Infections
Often DismHost.exe can pose a threat to your computers like malware or virus. This is pretty easy to identify as the error caused by this issue will directly be viewed as a virus when you perform a full computer scan either through Microsoft’s Malicious Software Removal Tool i.e MSRT or by an Anti-virus. Scanning and fixing the DISM host servicing process high cpu issue with this method is very easy. The following are the symptoms to Check DismHost.exe for Malware Infections –
- It’s recreating itself every few minutes in C:\Windows\Temp
- Multiple of copies of DismHost.exe are running
- 100,000 of unknown files are being created in \Users\myname\appdata\local\temp
- Utilizes 95-100% of your disk space.
- You lose control of your computer. For example, programs are running automatically
- Slows down computer performance significantly.
If you have the above-mentioned problems, this means that any malware on your machine is camouflaging itself as the DISM host service process. Before your system is corrupted on a large scale, this demands your immediate attention. Scan and fix this issue with the above-mentioned options and this should do the trick for you if your issue was that the DismHost.exe has Malware Infections.
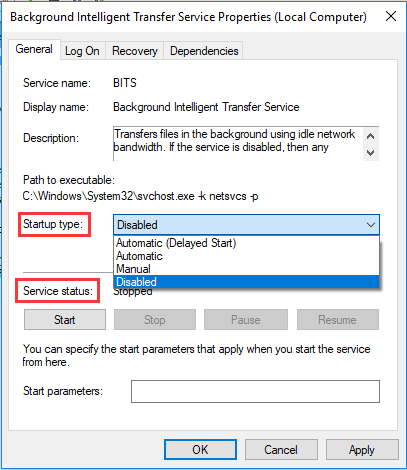
3. Disable the Background Intelligence Transfer (BIT) Service
BIT (Background Intelligence Transfer) is the service that is used to handle all the apps and tasks working in the background of your computer. Most notably, dismhost.exe uses this service to send some files for other purposes on the internet. Your internet capital will even end up being eaten. This service may also prompt the mistake you see.
The way to fix this is just to disable the service. This way there are no chances for it to interfere with your work and give a chance for the dismhost.exe to replicate. The users have benefited from knowing this method as it does help you eradicate the issue from the root. It is anyways good to know this trick and have it up your sleeves. Here is how to do it –
Step – 1: Press Windows and “R” simultaneously to launch the search window.
Step – 2: Then type “services.msc” and press the “Enter” key.
Step – 3: The search will open the “Services” window. Search for Background Intelligence Transfer Service” or “BIT service” follow it by right-clicking on it and open its “Properties.”

Step – 4: Click on “Stop” in the bottom half of the popped-up window.

Step – 5: Then go ahead and select “Disabled” from the “Startup type” menu and follow it by clicking on the “Apply” button to get the changes done.

Step – 6: After doing this, your changes will be saved, so restart your computer and see if your issue with the dismhost still persists.
If this method does not get the job done for you, don’t worry, we have another way to help you solve it.
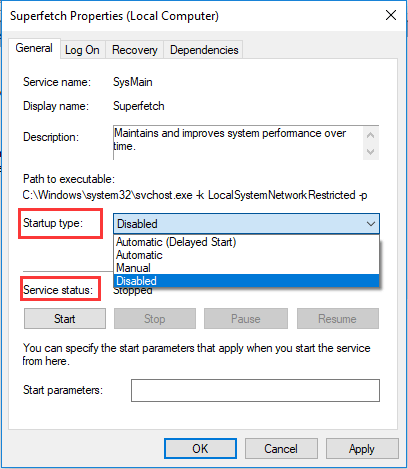
4. Disable the Superfetch service
Just like Disable the Background Intelligence Transfer (BIT) Service, this service in Windows OS utilizes high CPU usage while controlling the running of background apps and files. The purpose of this tool is to reduce the opening time of your system apps and whenever you launch them. It would effectively allow you to open files that you need frequently almost immediately. In this scenario, though the Superfetch approach could trigger the dismhost.exe app to open over and over again and also cause your machine to have different problems.
The best way to get rid of your issue if this is the reason is to disable the Superfetch service. This is a better option as disabling will allow you to enable it again if you ever need it. The way to disable the Superfetch service to fix dismhost.exe is simple. Here is how to do it –
Step – 1: Press Windows and “R” simultaneously to launch the search window.
Step – 2: Then type “services.msc” and press the “Enter” key.
Step – 3: This search will then open the “Services” window, and follow it by searching for the “Superfetch” service.
Step – 4: Then right-click on the “Superfetch” option and click on “Properties” next. This will make the properties window of Superfetch pop on your screen.’

Step – 5: Now click on the “Stop” button on the bottom half of the screen.

Step – 6: Follow it by selecting “Disabled” from the “Startup type” menu and then click on the “Apply” button to save the changes you made.
Step – 7: You will be able to see the difference in your computer significantly. Restart your computer then and check if the issue is still troubling you.
If this method does seem to be working, then there is another way that could be helpful for you. Check it out below.
5. Uninstall DismHost.exe
If none of those methods work for you and you are still facing the issue affecting your progress and hence your computer processing, the only way you are left to solve it is by uninstalling the dismhost.exe. With any other applications, you will certainly not find this malware directly on your PC, but it is likely that you have installed some third-party or malicious software that triggers this problem. So now you’re going to have to delete all the programs that you feel are unwelcoming. You can follow the procedure given below for that –
Step – 1: Navigate to “Control Panel” and open it. Then click on the option “Uninstall a program”.

Step – 2: Search for the unwanted program(s) and right-click on them followed by selecting “Uninstall.” This will uninstall the program and disk/CPU usage should be restored to normal.
Step – 3: Then open “C:/Program Files”. There look for the folder named “DISM host servicing process.” If it does not exist, that means DismHost.exe has been removed successfully.
Step – 4: To be sure, check the registry at HKEY_LOCAL_MACHINE to see if the DISM Host Servicing Process is present under the “SOFTWARE” category. If it is still there, you need to remove it again. To open the registry, find “Regedit” in the windows search bar.

This way you are assured to get safe riddance from the DISM Host Servicing Process. There are ways to get it back and restore it if you ever need it again even though it is highly unlikely for that to happen. Hence use this as a last resort to solve your issue.
Related Posts:
- How to Fix 0x800f081f DISM Error Code in Windows 10
- How to Fix 0xc0000001 Error Code in Windows 10
- How to Repair Windows 11
Conclusion
This post will help you bid goodbye to the dismhost.exe causing you issues with the computer’s functioning. The Blue Screen Of Death and the Black Screen with Cursor after an Update are major issues that you face because of it. By now if you followed the above-given methods step by step then you would have surely found a cure for the computer’s sickness. We would suggest you try all the methods one after another if the previous one does not work. This way you have a good chance and none of them are permanent or harmful so you can always reverse your action if you feel the need to do so. Even after all those fixes, if you still have not been able to beat the dismhost.exe then we suggest you go to the experts with your device.
Let us know which of the methods you use in the comment section below. If you are stuck at some point, let us know so we can guide you with an adequate solution in the comment section below. Stay tuned with us as we will keep solving your problems and find various ways around them to get new hacks and tricks.
Demystifying DISM Host Servicing Process in Windows 10: A Comprehensive Guide. Windows 10, Microsoft’s flagship operating system, employs various background processes to maintain system health and integrity. One such process is the DISM (Deployment Image Servicing and Management) Host Servicing Process, which plays a crucial role in managing and servicing Windows images. Despite its importance, many users are unfamiliar with DISM and its functionalities. In this guide, we’ll delve into the DISM Host Servicing Process, explore its significance, and provide insights into its operation in Windows 10.
Understanding the DISM Host Servicing Process:
1. What is DISM?
- DISM, short for Deployment Image Servicing and Management, is a command-line tool used for servicing Windows images offline or while the operating system is running.
2. DISM Host Servicing Process:
- The DISM Host Servicing Process is a background service in Windows 10 responsible for executing DISM commands and managing Windows image files.
Significance of DISM Host Servicing Process:
1. System Health Maintenance:
- DISM ensures the health and integrity of the Windows operating system by facilitating the repair and maintenance of system files and components.
2. Image Deployment and Management:
- DISM enables administrators to deploy and manage Windows images across multiple devices, making it a valuable tool for system administrators and IT professionals.
3. Feature Updates and Servicing:
- DISM plays a crucial role in applying feature updates, patches, and servicing operations to Windows images, ensuring that systems remain up-to-date and secure.
Operation of DISM Host Servicing Process:
1. Command-Line Tool:
- DISM is primarily accessed and utilized through the Command Prompt or PowerShell, where users can execute various commands to perform servicing operations.
2. Offline and Online Servicing:
- DISM can service Windows images both offline (when the operating system is not running) and online (while the operating system is running), providing flexibility and versatility in maintenance operations.
3. Repairing System Files:
- One of DISM’s key functionalities is repairing corrupted or missing system files by using Windows Update or an installation media as the source.
4. Adding or Removing Features:
- DISM allows users to add or remove features, packages, and drivers to Windows images, customizing the operating system to meet specific requirements.
5. Applying Updates and Patches:
- DISM can apply updates, patches, and hotfixes to Windows images, ensuring that systems are equipped with the latest security and performance enhancements.
Common DISM Commands and Usage:
1. Check the Health of Windows Image:
- DISM /Online /Cleanup-Image /CheckHealth
- Check the health of the Windows image for corruption or integrity issues.
2. Repair Windows Image:
- DISM /Online /Cleanup-Image /RestoreHealth
- Repairs the Windows image by using Windows Update as the source.
3. Add or Remove Features:
- DISM /Online /Enable-Feature /FeatureName:Feature /All
- DISM /Online /Disable-Feature /FeatureName:Feature
- Adds or removes features from the Windows image.
4. Apply Updates:
- DISM /Online /Cleanup-Image /RestoreHealth /Source:WIM:Path\to\install.wim:Index
- Applies updates to the Windows image from a specified installation media.
Best Practices for Utilizing DISM:
1. Regular Maintenance:
- Incorporate DISM into regular system maintenance routines to ensure the health and integrity of Windows images.
2. Backup Windows Image:
- Create backups of Windows images before performing any servicing operations to avoid data loss or system instability.
3. Keep System Updated:
- Regularly apply updates and patches to Windows images using DISM to stay protected against security vulnerabilities.
4. Test Commands in a Safe Environment:
- Test DISM commands in a controlled or virtualized environment before applying them to production systems to avoid unintended consequences.
Troubleshooting DISM Host Servicing Process:
1. Check System Requirements:
- Ensure that the system meets the minimum requirements for running DISM commands, such as having administrative privileges and sufficient disk space.
2. Verify Internet Connectivity:
- DISM may require an internet connection to access Windows Update or other online sources for servicing operations. Verify network connectivity if commands fail to execute.
3. Review Error Messages:
- Error messages generated by DISM commands can provide valuable insights into the cause of failures. Review error messages carefully to identify and address issues.
4. Check DISM Logs:
- DISM generates logs that contain detailed information about servicing operations. Check DISM logs for errors or warnings that may indicate underlying problems.
Conclusion:
The DISM Host Servicing Process is a vital component of Windows 10’s maintenance and management infrastructure, enabling users to service and manage Windows images efficiently. By understanding its significance, operation, and common commands, users can leverage DISM to ensure the health and integrity of their Windows operating systems. Incorporating best practices and troubleshooting techniques enhances the effectiveness and reliability of DISM, empowering users to maintain optimal system performance and security.
-
Home
-
News
- Solved – DISM Host Servicing Process High CPU Usage
By Tina |
Last Updated
What is DISM host servicing process? How to fix the error DISM host servicing process high CPU? How to uninstall DismHost.exe? This post from MiniTool will demonstrate all solutions respectively.
What Is DISM Host Servicing Process?
DISM, whose full name is Deployment Image Servicing and Management, handles the process of mounting, unmounting the Windows Image files while installing the critical system updates. The DISM is a command line tool which can be used in the background to deploy and mount the Windows image safely.
However, as for the DISM Host Service process or DismHost.exe, there is some conflicting information. Some users claim that it is an important component of Windows operating system, while some antivirus programs regard it as the malware.
In my opinion, the DismHost.exe can’t be regarded as the component of the Windows operating system. You can’t see any window or can’t have an icon of this file on the Taskbar.
In addition, the DISM host servicing process may lead to several problems, such as:
- Be regarded as malware.
- Lead to the Service Host Local System network restricted problem.
- Lead to high disk /CPU usage, usually up to 90% – 100%.
- Consume Internet Bandwidth.
In general, the DISM host servicing process high CPU is the most common one. So, in the following section, we will show you how to solve the DISM Host Service Process high disk usage error.
How to Fix DISM Host Servicing Process High CPU
In this part, we will show you how to fix the error DISM host servicing process high CPU or high disk usage problem.
Method 1. Disable Superfetch Service
In order to fix the DismHost.exe DISM host servicing process high CPU problem, you can choose to disable Superfetch service.
Now, here is the tutorial.
- Press Windows key and R key together to open Run dialog.
- In the pop-up window, type services.msc in the box and click OK to continue.
- In the Services window, find out the Superfetch and double-click it.
- In the Properties window, change the Startup type to Disabled and Service status to Stopped.
- Then click Apply and OK to save the changes.
When it is finished, reboot your computer and check whether the error DISM host servicing process high CPU is solved.
Method 2. Stop BIT Service
In order to fix the error DISM host servicing process Windows 10 high disk usage, you can choose to stop the BIT service.
Now, here is the tutorial.
- Press Windows key and R key together to open Run dialog.
- Then type services.msc in the box and click OK to continue.
- In the pop-up window, find out the Background Intelligent Transfer Service and double-click it.
- Then change the Startup type to Disabled and Service status to Stopped.
- Click Apply and OK to save the changes.
When it is finished, reboot your computer and check whether the error DISM host servicing process high disk usage is solved.
Method 3. Run Malware or Virus Scan
If virus or malware program uses the DismHose.exe file as its host, Windows Defender may not find it as a threat, and it will be used to steal and send information to the hackers. And it may give rise to the error DISM host servicing process high CPU.
So, in order to fix this DismHost.exe problem, you can choose to run malware or virus scan. Now, here is the tutorial.
- Press Windows key and I key together to open Settings.
- In the pop-up window, choose Update & Security.
- Go to Windows Defender tab, and click Open Windows Defender Security Center.
- Then choose Virus & threat protection.
- In the pop-up window, click Quick scan to continue.
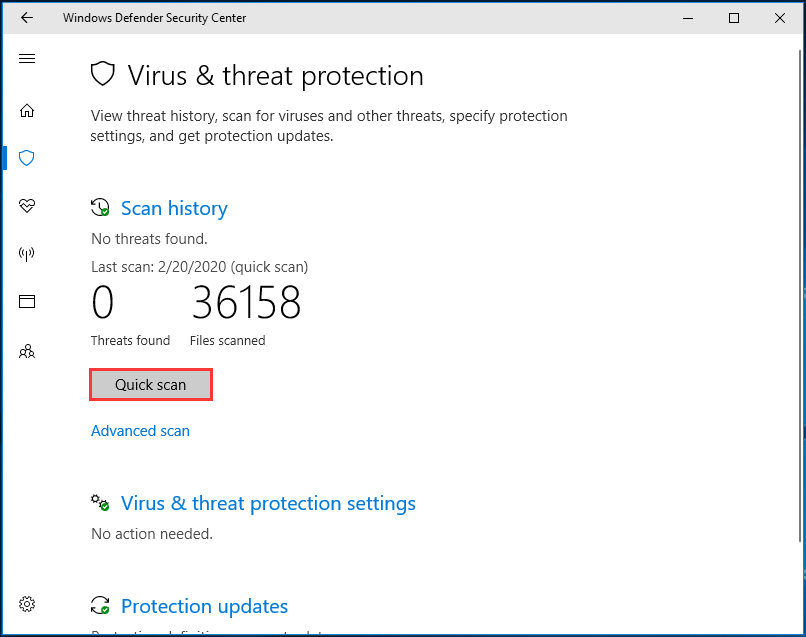
After the scanning process is finished, if there is any virus or malware on your computer, Windows Defender will remove it. After that, reboot your computer and check whether the DISM host servicing process high CPU error is solved.
Method 4. Uninstall DismHost.exe
As we have mentioned in the above part, the DismHost.exe is not a component of Windows operating system and it is often regarded as the virus or malware by the antivirus program. So, in order to fix the error DISM host servicing process high CPU, you can choose to uninstall DismHost.exe.
Now, here is the tutorial.
- Open Control Panel.
- Then choose Uninstall a program under Programs.
- Find out the program and right-click it to choose Uninstall.
- Then open C:/Program Files and find the folder with the name of DISM host servicing process. If you can’t find it, it means that the DismHost.exe has been removed.
- In addition, you can open Registry Editor window and navigate to HKEY_LOCAL_MACHINE> Software and see if the DISM host servicing process is here. If it is, remove it again.
After all steps are finished, reboot your computer and check whether the error DISM host servicing process high CPU is solved.
>> See what you can do if DISM /Online /Cleanup-image /Restorehealth is stuck.
Final Words
To sum up, this post introduced what the DISM host servicing process is and how to fix the DISM host servicing process high CPU error. If you have any different ideas to fix this problem, please share it in the comment zone.
About The Author
Position: Columnist
Tina is a technology enthusiast and joined MiniTool in 2018. As an editor of MiniTool, she is keeping on sharing computer tips and providing reliable solutions, especially specializing in Windows and files backup and restore. Besides, she is expanding her knowledge and skills in data recovery, disk space optimizations, etc. On her spare time, Tina likes to watch movies, go shopping or chat with friends and enjoy her life.
Windows 10 has several built-in tools that help to automatically analyze and repair corrupt files in your system. One such tool is DISM or Deployment Image Servicing and Management. It is a command-line tool that assists in servicing and preparing Windows images on Windows Recovery Environment, Windows Setup, and Windows PE. DISM works in those cases too, when the System File Checker is not working correctly. However, at times you may face DISM host servicing process high CPU Usage error. This article will discuss what is DISM host servicing process is and how to fix high CPU usage issues. Read till the end!

Table of Contents
What is DISM Host Servicing Process?
Despite the various advantages of the DISM host servicing process, there are many conflicts associated with DismHost.exe as well. Many users claim that it is an essential component of the Windows Operating system. However, some people do not agree with this claim as you cannot see its icon on the Taskbar. On the other hand, some antivirus applications consider it malware. Hence, the DISM host servicing process leads to various issues like:
- High CPU usage up to 90 to 100%
- Malware threat
- High bandwidth consumption
Read more about DISM here from the Microsoft website.
Read and implement the given solutions to fix DISM Host Servicing Process causing the High CPU Usage issue on Windows 10.
Method 1: Restart Your PC
Before trying out the rest of the methods, you are advised to reboot your system. In most cases, a simple restart fixes the issue, without much effort.
1. Press the Windows key and select the Power icon
Note: Power icon is found at the bottom in Windows 10 system, while in Windows 8 system, it is located at the top.
2. Several options like Sleep, Shut down, and Restart will be displayed. Here, click on Restart, as shown.
Restarting your system will refresh RAM and will lower CPU consumption.
Method 2: Disable SuperFetch (SysMain)
The startup time for applications and Windows is improved by a built-in feature called SysMain (formerly, SuperFetch). However, system programs do not benefit much from it. Instead, background activity is increased, leading to a reduction in the operational speed of the computer. These Windows services consume a lot of CPU resources, and hence, it is often, recommended to disable SuperFetch in your system.
1. Launch the Run dialog box by holding Windows + R keys together.
2. Type services.msc as shown and click OK to launch the Services window.

3. Now, scroll down and right-click on SysMain. Then, select Properties, as depicted.

4. Here, in the General tab, set the Startup type to Disabled from the drop-down menu, as highlighted below.

5. Finally, click Apply and then, OK to save the changes.
Also Read: Fix DISM Error 14098 Component Store has been corrupted
Method 3: Disable Background Intelligent Transfer Service
Similarly, disabling BITS will help fix DISM host servicing process high CPU usage error.
1. Navigate to the Services window using the steps mentioned in Method 2.
2. Scroll and right-click on Background Intelligent Transfer Service and select Properties.

3. Here, in the General tab, set the Startup type to Disabled, as depicted.

4. Finally, click Apply then, OK to save the changes.
Method 4: Disable Windows Search Service
Likewise, this process too takes up a lot of CPU resources and can be easily disabled to fix said problem, as explained below.
1. Again, launch the Services Window as mentioned in the above Method 2.
2. Now, right-click on Windows Search Service, and select Properties, as shown.

3. Here, in the General tab, set the Startup type to Disabled, as highlighted.

4. Click on Apply > OK and exit.
Also Read: Fix DISM Source Files Could not be Found Error
Method 5: Run Malware or Virus Scan
Windows Defender may not recognize the threat when a virus or malware uses the DismHost.exe file as camouflage. Thereby, hackers may easily intrude into your system. Few malicious software such as worms, bugs, bots, adware, etc. might also contribute to this problem.
However, you can identify if your system is under malicious threat through the unusual behavior of your Operating System.
- You will notice several unauthorized access.
- Your system will crash more frequently.
Few anti-malware programs can help you overcome malicious software. They routinely scan and safeguard your system. Therefore, to avoid DISM host servicing process high CPU usage error, run an antivirus scan in your system and check if the problem is solved. Follow the below-mentioned steps to do so:
1. Navigate to Windows Settings by pressing Windows + I keys together.
2. Here, click on Update & Security, as shown.

3. Click on Windows Security in the left pane.
4. Next, select the Virus & threat protection option under Protection areas, as depicted.

5A. Click on Start Actions under Current threats to take action against the listed threats.

5B. If you do not have any threats in your system, the system will display No actions needed alert.

6. Reboot your system and check if DISM high CPU usage error is fixed.
Method 6: Update/Reinstall Drivers
If the new drivers you have installed or updated in your system are incompatible or outdated in relevance to the operating system files, you will face the DISM host servicing process high CPU usage problem. Therefore, you are advised to update your device and drivers to prevent the said problem.
1. Launch Device Manager from the Windows 10 search as shown.

2. Double-click on System devices to expand it.

3. Now, right-click on your system driver and click on Update driver, as highlighted.

4. Click on Search automatically for drivers to let Windows locate and install the driver.

5A. Now, the drivers will update to the latest version, if they are not updated.
5B. If they are already in an updated stage, the screen displays: Windows has determined that the best driver for this device is already installed. There may be better drivers on Windows Update or on the device manufacturer’s website. Click on the Close button to exit the window.
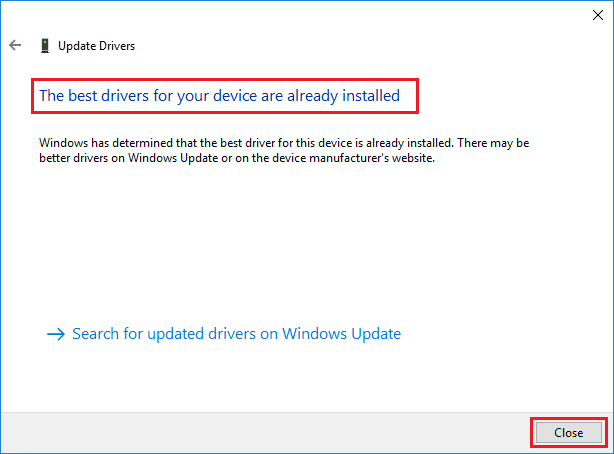
6. Restart the computer, and confirm that the high CPU usage issue is fixed.
In some cases, users could fix high CPU usage issue by reinstalling the drivers that were causing the said issue like Display or Audio or Network drivers.
1. Launch Device Manager and expand any section by double-clicking on it.
2. Now, right-click on the driver, e.g. Intel Display Adapter, and select Uninstall device, as shown.

3. Check the box titled Delete the driver software for this device and confirm the prompt by clicking Uninstall.
4. Now, visit the manufacture’s website and download the latest version of the said driver.
Note: You can download Intel, AMD, or NVIDIA display drivers from here.
5. Then, follow the on-screen instructions to run the executable and install the driver.
Note: When installing a new driver on your device, your system may reboot several times.
Also read: What is Device Manager? [EXPLAINED]
Method 7: Update Windows
If you did not obtain fix by the above methods, then installing the latest version of Windows should solve the DISM host servicing process high CPU usage issue.
1. Navigate to Settings > Update & Security as instructed in Method 5.
2. Now, select Check for Updates from the right panel.

3A. Follow the on-screen instructions to download and install the latest update, if available.

3B. If your system is already up-to-date, then it will show You’re up to date message.

4. Restart your PC to complete the installation.
Method 8: Reinstall DismHost.exe
Sometimes reinstalling DismHost.exe file can fix the DISM host servicing process high CPU usage issue.
1. Launch Control Panel through the Search Bar as shown below.

2. Set View by > Category and click on Uninstall a program, as depicted below.

3. Here, search for DismHost.exe and click on it. Then, select Uninstall.
Note: Here, we have used Google Chrome as an example.

4. Now, confirm the prompt by clicking on Uninstall.
5. In the Windows Search box, type %appdata% to open App Data Roaming folder.

6. Here, right-click on the DismHost.exe folder and click Delete.
Note: We have used Chrome as an example here.

7. Reinstall DismHost.exe from here and follow the on-screen instructions.
Also Read: Fix DISM Error 0x800f081f in Windows 10
Method 9: Perform System Restore
If you are still facing high CPU usage issue, then the last resort is to perform a system restore. Follow the steps below to do the same:
1. Launch Control Panel as mentioned above.
2. Set View by > Large icons and click on Recovery, as shown.

2. Click on Open System Restore option.

3. Now, click on Next.

4. Select the last update and click on Next, as shown highlighted below.

5. Finally, click on Finish to restore your Windows PC to the state where DISM Servicing Process wasn’t causing any issues.
Recommended:
- Fix DISM Error 87 in Windows 10
- How to Fix Git Merge Error
- Fix Device Not Migrated Error on Windows 10
- Fix There Are Currently No Power Options Available
We hope that this guide was helpful and you could fix DISM host servicing process high CPU usage issue. Let us know which method worked for you. Also, if you have any queries or suggestions, then feel free to drop them in the comment section.
Have you ever wondered why your computer suddenly starts running slow and the CPU usage spikes? It could be due to the Dism Host Servicing Process consuming a high percentage of CPU resources. This can be a frustrating experience for computer users, as it can cause lag, delays, and overall poor performance. So, what exactly is the Dism Host Servicing Process and why does it lead to high CPU usage?
The Dism Host Servicing Process, also known as Deployment Image Servicing and Management, is a Windows utility tool that helps in repairing and maintaining the system image and its components. It is responsible for tasks such as installing Windows updates, applying driver packages, and preparing the system for deployment. However, when the Dism Host Servicing Process encounters errors or fails to complete its tasks, it can result in high CPU usage. This can be mitigated by troubleshooting the process, updating drivers, or running system scans to identify and resolve any underlying issues.
If you’re experiencing high CPU usage due to the «Dism Host Servicing Process,» there are a few steps you can take to resolve the issue. First, open the Task Manager and identify the «DismHost.exe» process. Next, right-click on it and select «End Task.» If this doesn’t help, run a System File Checker scan by opening Command Prompt as an administrator and typing «sfc /scannow.» Finally, restart your computer. These steps should help alleviate the high CPU usage caused by the Dism Host Servicing Process.

Understanding the Dism Host Servicing Process
The Dism Host Servicing Process is an essential component of the Windows operating system. It stands for Deployment Image Servicing and Management. This process is responsible for maintaining and servicing Windows image files, including operating system updates, driver installations, and system component repairs. However, in some cases, users may encounter a high CPU usage issue related to the Dism Host Servicing Process, which can impact system performance and responsiveness. Understanding the causes and potential solutions for this problem is crucial for resolving it effectively.
Causes of High CPU Usage in the Dism Host Servicing Process
Several factors can contribute to high CPU usage in the Dism Host Servicing Process. One possible cause is corrupted system files or a malfunctioning Windows Update service. When the system files responsible for the Dism process become corrupted, it can result in abnormal CPU usage. Additionally, if the Windows Update service is not functioning correctly, it can lead to the Dism process continuously running in the background, consuming excessive CPU resources.
Another potential cause of high CPU usage is outdated or incompatible device drivers. When outdated or incompatible drivers are present on the system, the Dism process may struggle to perform its tasks efficiently, leading to increased CPU usage. Moreover, malware or virus infections can also interfere with the Dism Host Servicing Process, causing it to consume excessive CPU resources. It is essential to regularly scan the system for malware and ensure that security software is up to date.
Lastly, insufficient system resources, such as low memory or a slow hard drive, can contribute to high CPU usage in the Dism Host Servicing Process. If the system does not have enough available memory to carry out its tasks, or if the hard drive is slow and struggling to keep up with the demands of the Dism process, it can lead to increased CPU usage as the system compensates for these limitations.
Troubleshooting Steps for High CPU Usage in the Dism Host Servicing Process
1. Run Windows Update Troubleshooter
An effective first step to resolve high CPU usage in the Dism Host Servicing Process is to run the Windows Update Troubleshooter. This built-in tool can identify and fix common issues that may be affecting the Windows Update service and, consequently, the Dism process. To run the Windows Update Troubleshooter, follow these steps:
- Open the Windows Settings by pressing Win + I on your keyboard.
- Click on «Update & Security» and navigate to the «Troubleshoot» tab.
- Find the «Windows Update» troubleshooter and click on it.
- Click on «Run the troubleshooter» and follow the on-screen instructions to complete the process.
2. Perform a System File Check
If corrupted system files are causing the high CPU usage in the Dism Host Servicing Process, running a System File Check can help resolve the issue. The System File Check utility scans the system files for any inconsistencies and automatically repairs them if possible. To run a System File Check, follow these steps:
- Open Command Prompt as an administrator.
- Type the command
sfc /scannowand press Enter. - Wait for the scan to complete. If any issues are found and resolved, restart the computer.
3. Update Device Drivers
Outdated or incompatible device drivers can also contribute to high CPU usage in the Dism Host Servicing Process. Updating the drivers to their latest versions can often resolve this issue. There are two main methods to update device drivers:
- Manual Method: Visit the manufacturer’s website for each device and download the latest drivers directly from their respective websites. Install the drivers following the provided instructions.
- Automatic Method: Use third-party driver update software, such as Driver Booster or Driver Easy, to automatically scan the system and update outdated drivers.
Preventive Measures to Avoid High CPU Usage in the Dism Host Servicing Process
Preventing high CPU usage in the Dism Host Servicing Process can help maintain optimal system performance. Here are some preventive measures to avoid encountering this issue:
1. Keep the Operating System Updated
Regularly installing operating system updates ensures that the system remains stable and secure. Updates often include important bug fixes and patches that can prevent high CPU usage issues. Enable automatic updates or manually check for updates frequently to stay up to date with the latest fixes and improvements.
2. Use Reliable Antivirus Software
Malware infections can disrupt the functioning of the Dism Host Servicing Process and cause high CPU usage. To prevent malware-related issues, install reliable antivirus software and keep it updated. Regularly scan the system for malware and take necessary actions to remove any detected threats.
3. Maintain Adequate System Resources
Ensure that your system has sufficient resources to support the Dism Host Servicing Process. Maintain an adequate amount of free disk space to avoid overloading the hard drive. Consider upgrading the system’s memory or RAM if it is frequently running low. By providing ample resources, you can prevent CPU usage spikes caused by resource limitations.
Optimizing System Performance for Dism Host Servicing Process
To optimize system performance and minimize high CPU usage in the Dism Host Servicing Process, it is crucial to follow certain best practices:
Best Practices for Optimizing System Performance
Implement the following best practices to optimize system performance:
1. Close Unnecessary Background Processes
Closing unnecessary background processes frees up system resources and reduces CPU usage. Use the Task Manager (Ctrl + Shift + Esc) to identify and close any unnecessary applications or processes running in the background.
2. Disable Startup Programs
Disable unnecessary programs from running at startup to minimize the strain on system resources. Use the Task Manager or the System Configuration tool (msconfig) to manage startup programs and disable any unwanted entries.
3. Optimize System Settings for Performance
Adjusting system settings for performance can help allocate system resources effectively. Right-click on «This PC» and select «Properties.» In the «Advanced system settings,» navigate to the «Advanced» tab and click on «Settings» under the «Performance» section. Choose the «Adjust for best performance» option or manually select specific settings to optimize performance based on individual preferences.
Monitoring System Performance
Monitoring system performance can provide valuable insights into the resource usage of the Dism Host Servicing Process and identify potential issues. Windows provides built-in performance monitoring tools, such as the Task Manager and Resource Monitor. These tools display real-time resource usage, including CPU, memory, disk, and network activity. Regularly monitor these performance indicators to detect any abnormal activity or spikes in CPU usage.
Understanding the Dism Host Servicing Process and troubleshooting high CPU usage issues is essential for maintaining optimal system performance. By following the recommended steps and implementing preventive measures, users can effectively resolve high CPU usage in the Dism Host Servicing Process and optimize overall system performance.

Understanding the DISM Host Servicing Process
When encountering high CPU usage on a Windows computer, one possible culprit could be the DISM Host Servicing Process. DISM stands for Deployment Image Servicing and Management, and it is a command-line tool used for servicing and managing Windows images.
The DISM Host Servicing Process, or «dismhost.exe,» is responsible for various tasks related to image servicing, such as running system repairs, applying updates, and adding or removing features. It is an essential component for maintaining a healthy Windows operating system.
Addressing High CPU Usage by DISM Host Servicing Process
If you notice that the DISM Host Servicing Process is causing high CPU usage, there are a few steps you can take to address the issue:
- Check for Windows updates and ensure that your system is running the latest version.
- Scan your computer for malware using reputable antivirus software.
- Perform a system file check using the «sfc /scannow» command in an elevated Command Prompt.
- Try running the DISM tool with the «RestoreHealth» parameter to repair any damaged system files.
- If the issue persists, consider seeking assistance from a professional IT technician who can further diagnose and resolve the problem.
Key Takeaways: Dism Host Servicing Process High CPU
- The Dism Host Servicing Process can consume high CPU resources on Windows operating systems.
- This process is responsible for performing various system maintenance tasks, including software updates and repairs.
- A high CPU usage by the Dism Host Servicing Process may indicate a problem with the Windows Update service.
- One way to address high CPU usage is to restart the Windows Update service.
- If the high CPU usage persists, it may be necessary to troubleshoot and repair corrupted system files using the Deployment Image Servicing and Management (DISM) tool.
Frequently Asked Questions
The following are some commonly asked questions regarding the issue of Dism Host Servicing Process High CPU.
1. What is the Dism Host Servicing Process?
The Dism Host Servicing Process is a Windows utility that performs various servicing tasks on the operating system. It is used to deploy, install, configure, and uninstall Windows updates, packages, and features. The process runs in the background and ensures the integrity and functionality of the Windows operating system.
When the Dism Host Servicing Process encounters an issue or experiences high CPU usage, it can cause system slowdowns and performance problems.
2. Why is the Dism Host Servicing Process using high CPU?
There can be several reasons why the Dism Host Servicing Process is using a high amount of CPU resources. Some possible causes include:
1. Windows updates are being installed or configured in the background.
2. The process is scanning and repairing corrupt files on the system.
3. The process is performing maintenance tasks, such as cleaning up old or unused system files.
If the high CPU usage persists for a prolonged period or significantly affects system performance, it is recommended to investigate further and identify any underlying issues.
3. How can I troubleshoot high CPU usage by the Dism Host Servicing Process?
To troubleshoot high CPU usage by the Dism Host Servicing Process, you can try the following steps:
1. Restart your computer: Sometimes, a simple restart can resolve temporary issues with the process.
2. Update Windows: Ensure that your system is up to date with the latest Windows updates. Installing any pending updates may address any known issues with the Dism Host Servicing Process.
3. Run a virus scan: Perform a thorough scan of your system using reliable antivirus software to check for any malware or viruses that may be affecting the Dism Host Servicing Process.
4. Use the Windows Troubleshooter: Windows provides a built-in troubleshooter that can help identify and fix issues related to the Dism Host Servicing Process. Run the troubleshooter and follow the on-screen instructions.
4. Can I disable the Dism Host Servicing Process?
It is not recommended to disable the Dism Host Servicing Process. The process is responsible for managing and maintaining the Windows operating system’s integrity and functionality. Disabling it can lead to issues with Windows updates, package installations, and system stability.
If you are experiencing high CPU usage by the Dism Host Servicing Process, it is advisable to investigate the underlying cause and take appropriate troubleshooting steps instead of disabling the process altogether.
5. When should I seek professional help for high CPU usage by the Dism Host Servicing Process?
If you have tried the troubleshooting steps mentioned above and are still experiencing persistent high CPU usage by the Dism Host Servicing Process, it may be a sign of a deeper underlying issue. In such cases, it is recommended to seek professional help from a qualified IT technician or contact Microsoft Support for further assistance.
In conclusion, the Dism Host Servicing Process can sometimes cause high CPU usage on a computer. This process is a built-in Windows tool that is responsible for maintaining system health and integrity. It is necessary for managing Windows images, updates, and repairs.
However, when the Dism Host Servicing Process starts utilizing a significant amount of CPU resources and slows down the system, it can be a cause for concern. High CPU usage by this process can be due to various factors, such as corrupt system files or compatibility issues with software or hardware.