
Skip to content
Windows 10 comes with three useful features to help you to manage and arrange opened windows. These features are Aero Snap, Aero Peek and Aero Shake, all of them were available since Windows 7. The Snap feature allows you to work on two programs side-by-side by showing two windows side-by-side on the same screen. Today, I would like to cover Aero Peek. This feature allows users to quickly view the desktop by moving the mouse pointer to the bottom right corner of the taskbar. It is really useful if you need to view your desktop without minimizing all open applications. In Windows 10, this feature is disabled by default, so we will look, how to enable it back.
To enable Aero Peek in Windows 10, you need to follow these simple instructions:
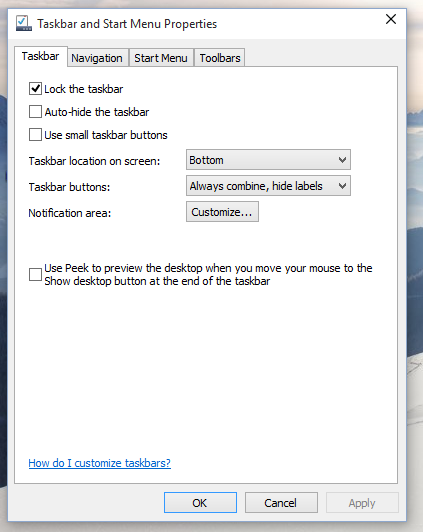
- Right click an empty space on the taskbar and select the «Properties» context menu item. The Taskbar Properties dialog will appear on the screen.

In Windows 10 Creators Update, the context menu item is called Taskbar settings. It looks as follows:It opens a new page in Settings.

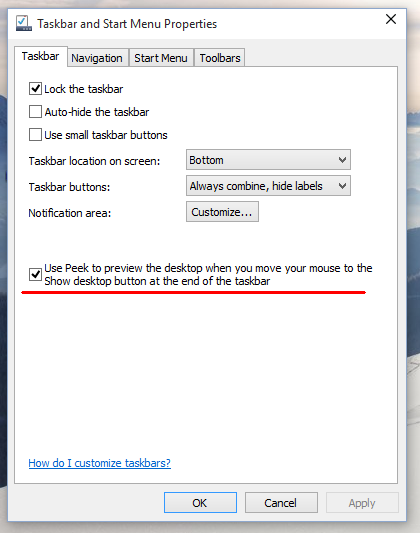
- Now all you need to do is tick the checkbox that says Use Peek to preview the desktop when you move your mouse to the Show Desktop button at the end of the taskbar.

This enables Aero Peek. Click the Apply button.
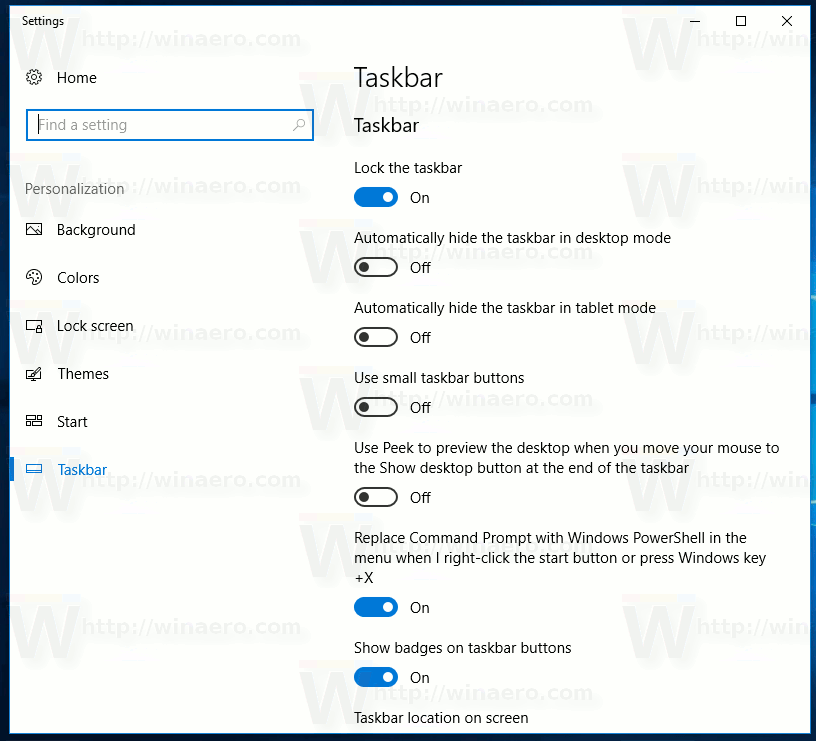
The same option is available in the Settings app in Windows 10 Creators Update.
- The Aero Peek feature will be enabled. You are done!

Bonus tips: On Windows 10 you can activate Aero Peek with the Win + , (Win+comma) shortcut keys. Note that on Windows 7, Aero Peek is activated by pressing Win + Space. That’s all. This trick is also suitable for all Windows 8 versions, from Windows 8 to Windows 8.1 Update 2.
You might also be interested in our excellent Win hotkeys list.
Support us
Winaero greatly relies on your support. You can help the site keep bringing you interesting and useful content and software by using these options:
If you like this article, please share it using the buttons below. It won’t take a lot from you, but it will help us grow. Thanks for your support!
Starting Windows 7, Microsoft included the Aero Peek feature, allowing you to view the desktop temporarily without minimizing all the open windows. Just move the mouse cursor to the far right end of the taskbar, and all the open windows will go transparent, and you can view the desktop. When you move the mouse cursor away, all opened windows will be visible again.

The Show Desktop button is very narrow and hard to see, so you need to make sure to move your mouse cursor to the extreme right side of the Taskbar; Aero Peek will work.
In this gearupwindows article, we will guide you on enabling and disabling Aero Peek in Windows 10. There are several ways to turn on or off Aero Peek in Windows 10; we will review all of them.
How to Turn On or Off Aero Peek via Right-clicking the “Show desktop” Button?
This is the easiest way to enable or disable Aero Peek in Windows 10. To turn on or off the Aero Peek, first move your mouse cursor over the “Show desktop” button, which is available as a small rectangle present in the right corner of the taskbar. Right-click on the Show desktop button and select Peek at desktop in the popup menu.
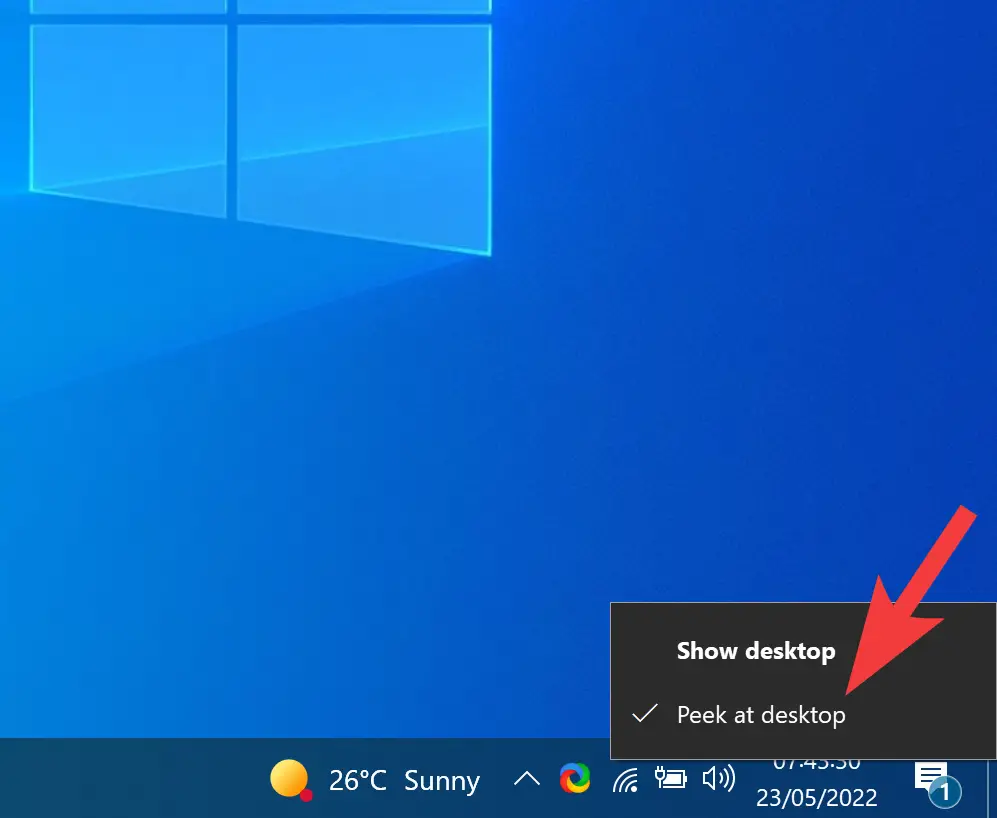
You will see a checkmark before the “Peek at desktop” option when the Aero Peek is turned on.
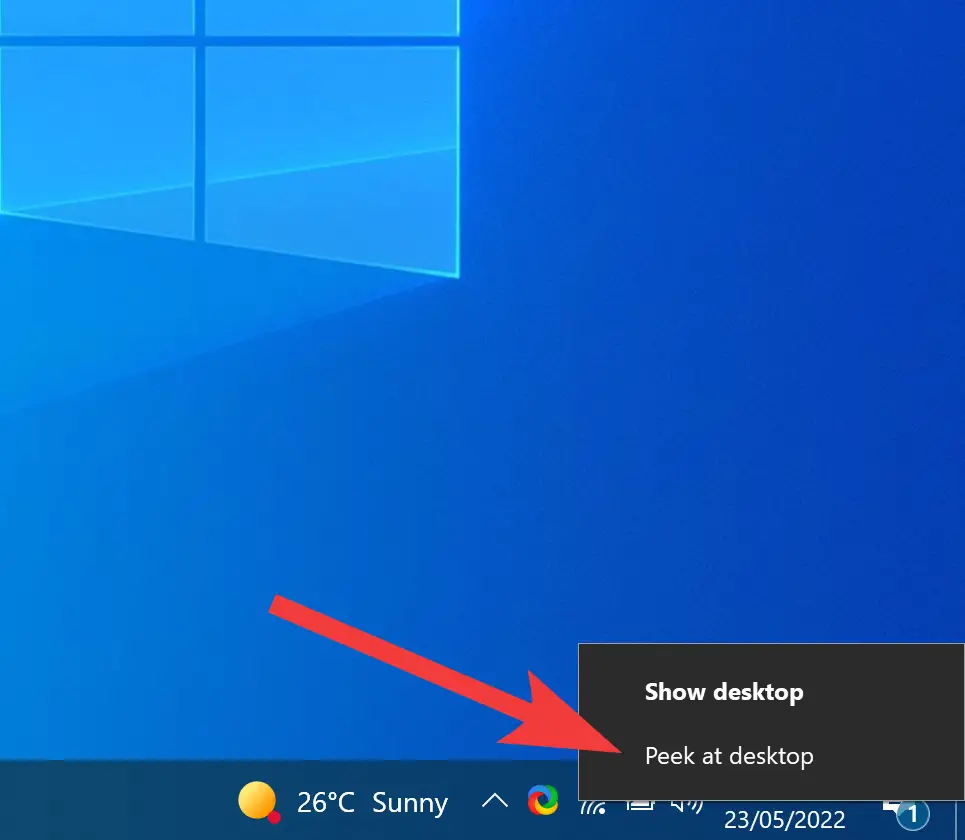
To disable the Aero Peek, move your mouse cursor over the “Show desktop” button. Right-click on the Show desktop button and deselect Peek at desktop in the popup menu. This action will turn off Aero Peek in Windows 10.
How to Enable or Disable Aero Peek using Windows 10 Settings?
Microsoft has also provided an option in Windows 10 Settings to enable or disable Aero Peek.
To turn on or off Aero Peek using Settings in Windows 10, do the following:-
Step 1. First, open Settings.
Step 2. Then, click on Personalization.
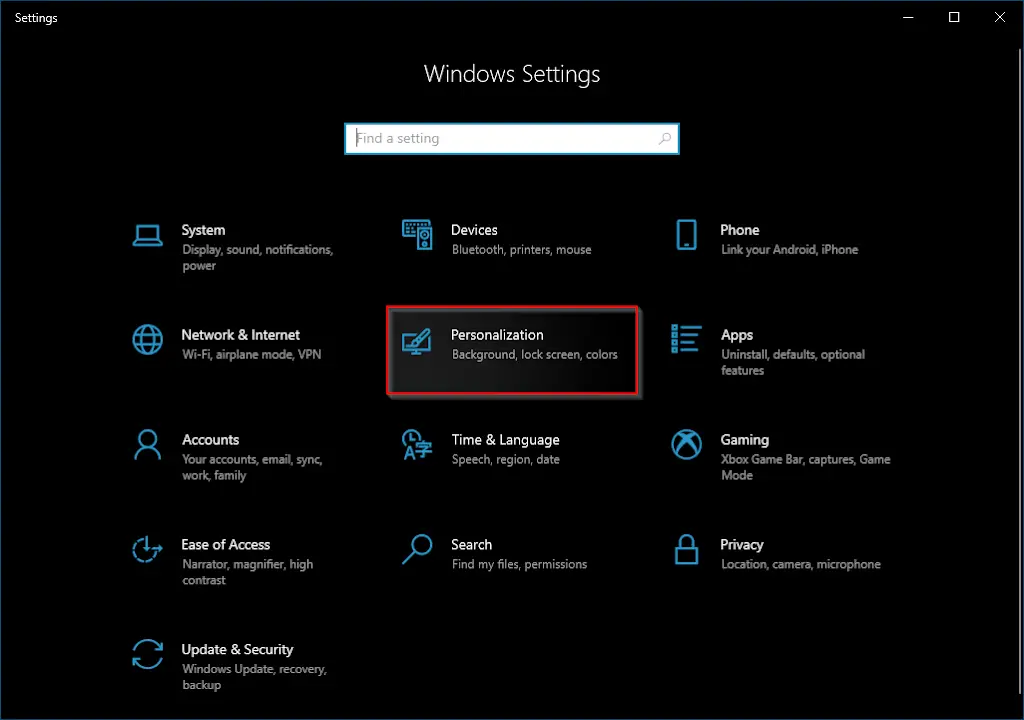
Step 3. Under Personalization, select Taskbar.
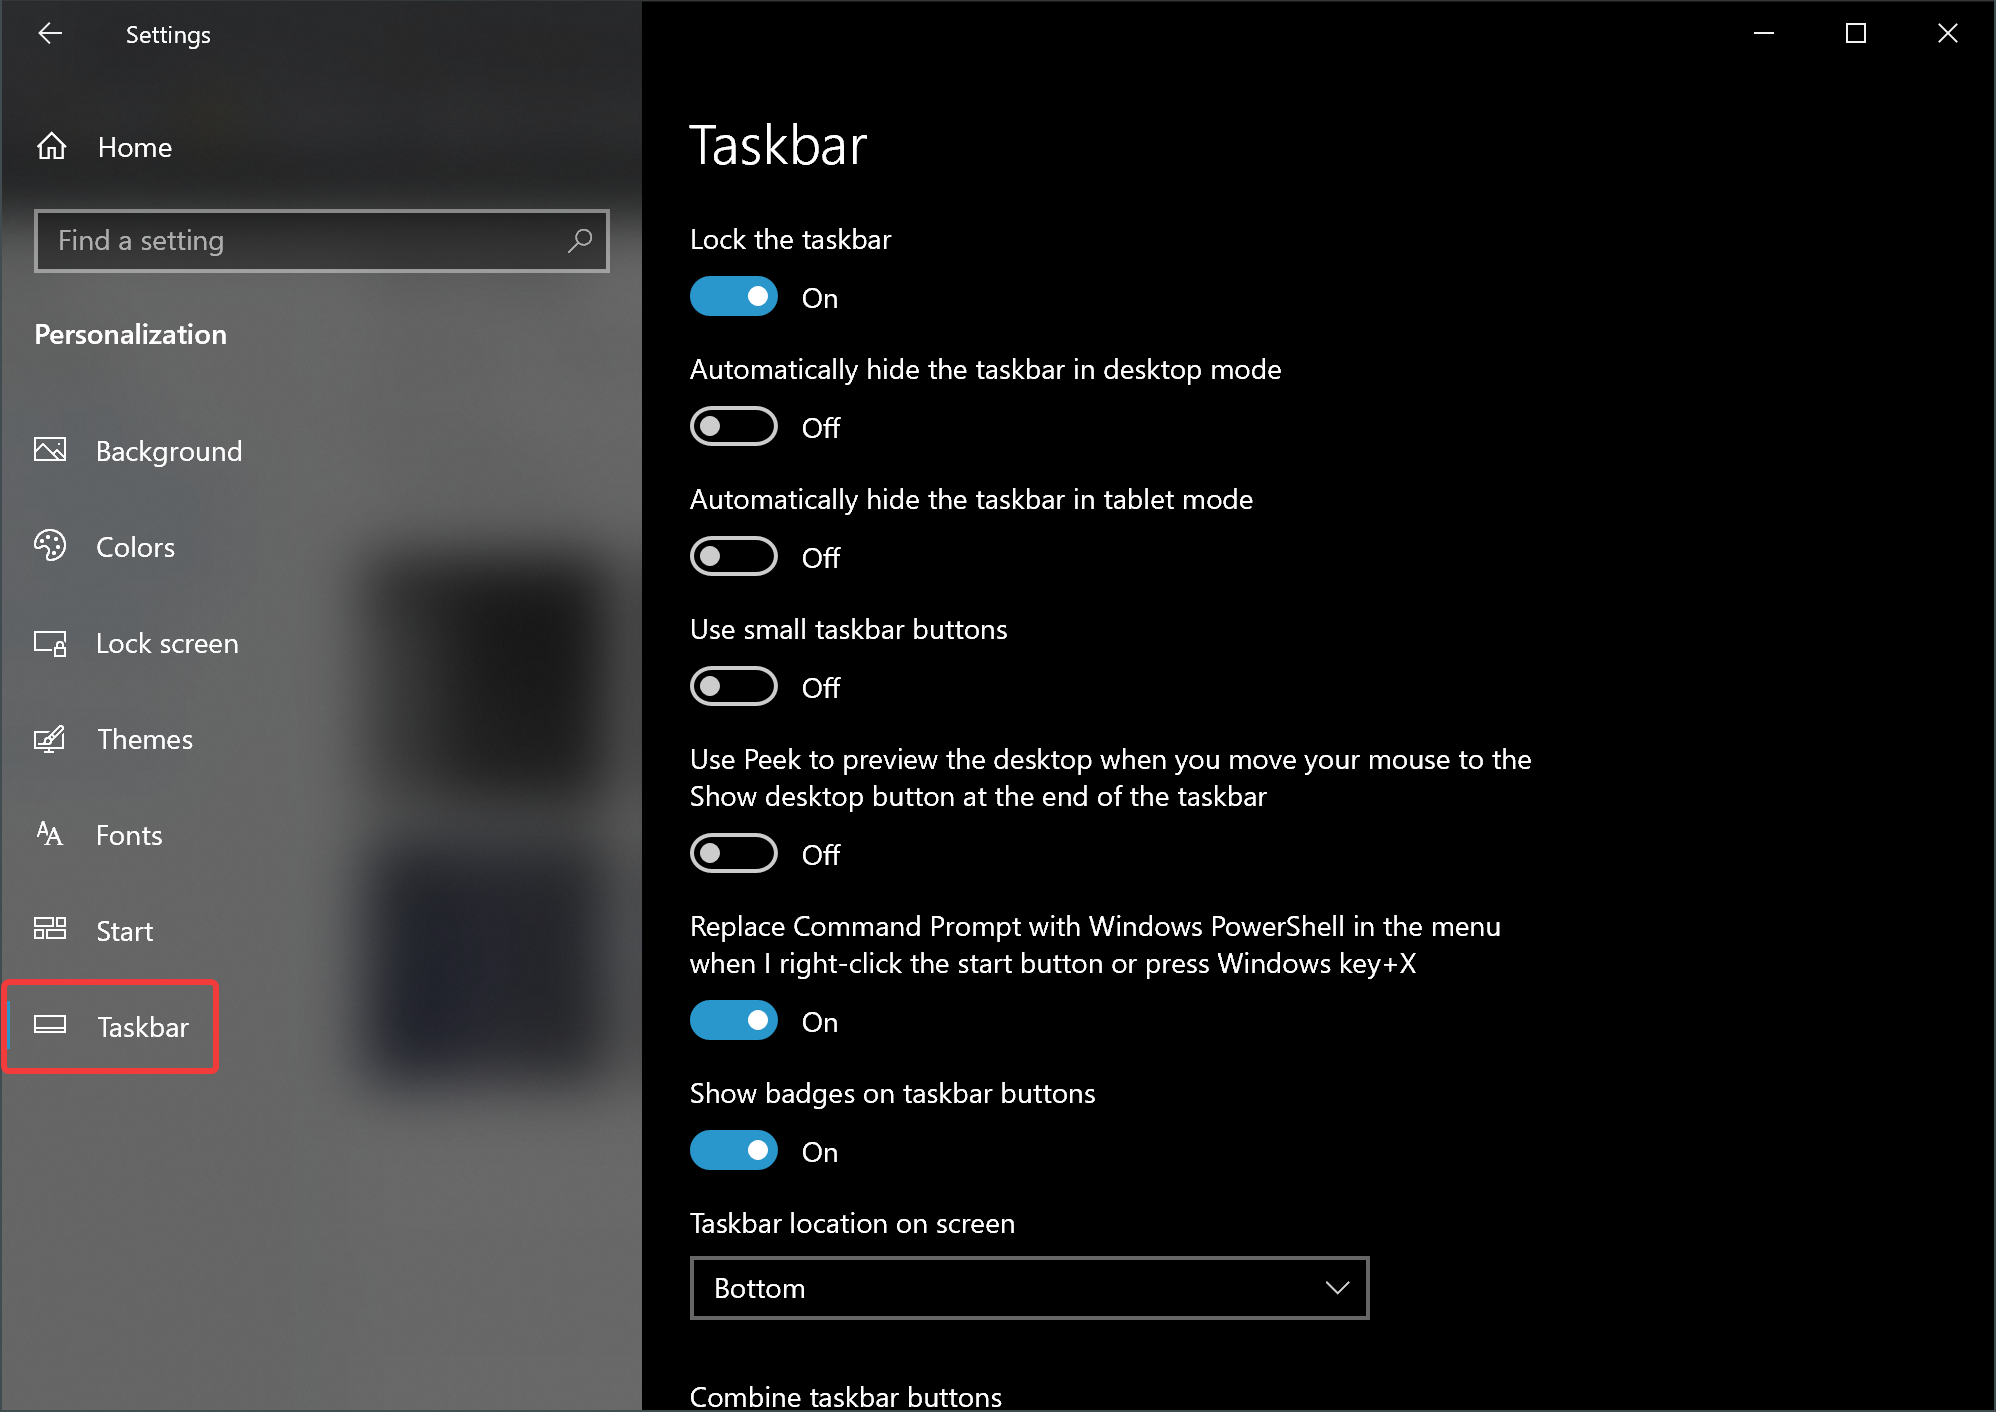
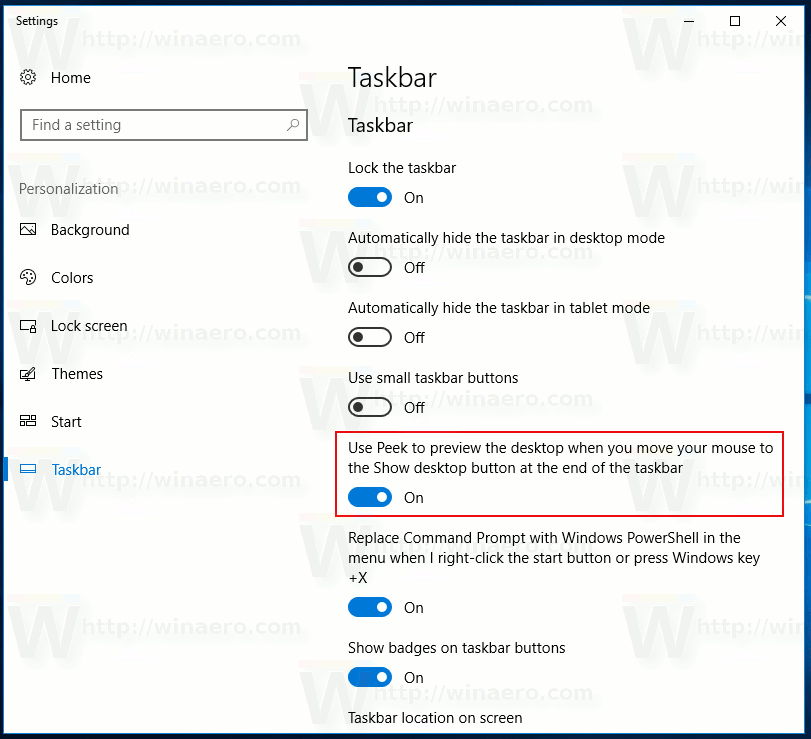
Step 4. On the right side of “Taskbar,” turn on the toggle switch “Use Peek to preview the desktop when you move your mouse to the Show desktop button at the end of the taskbar.”
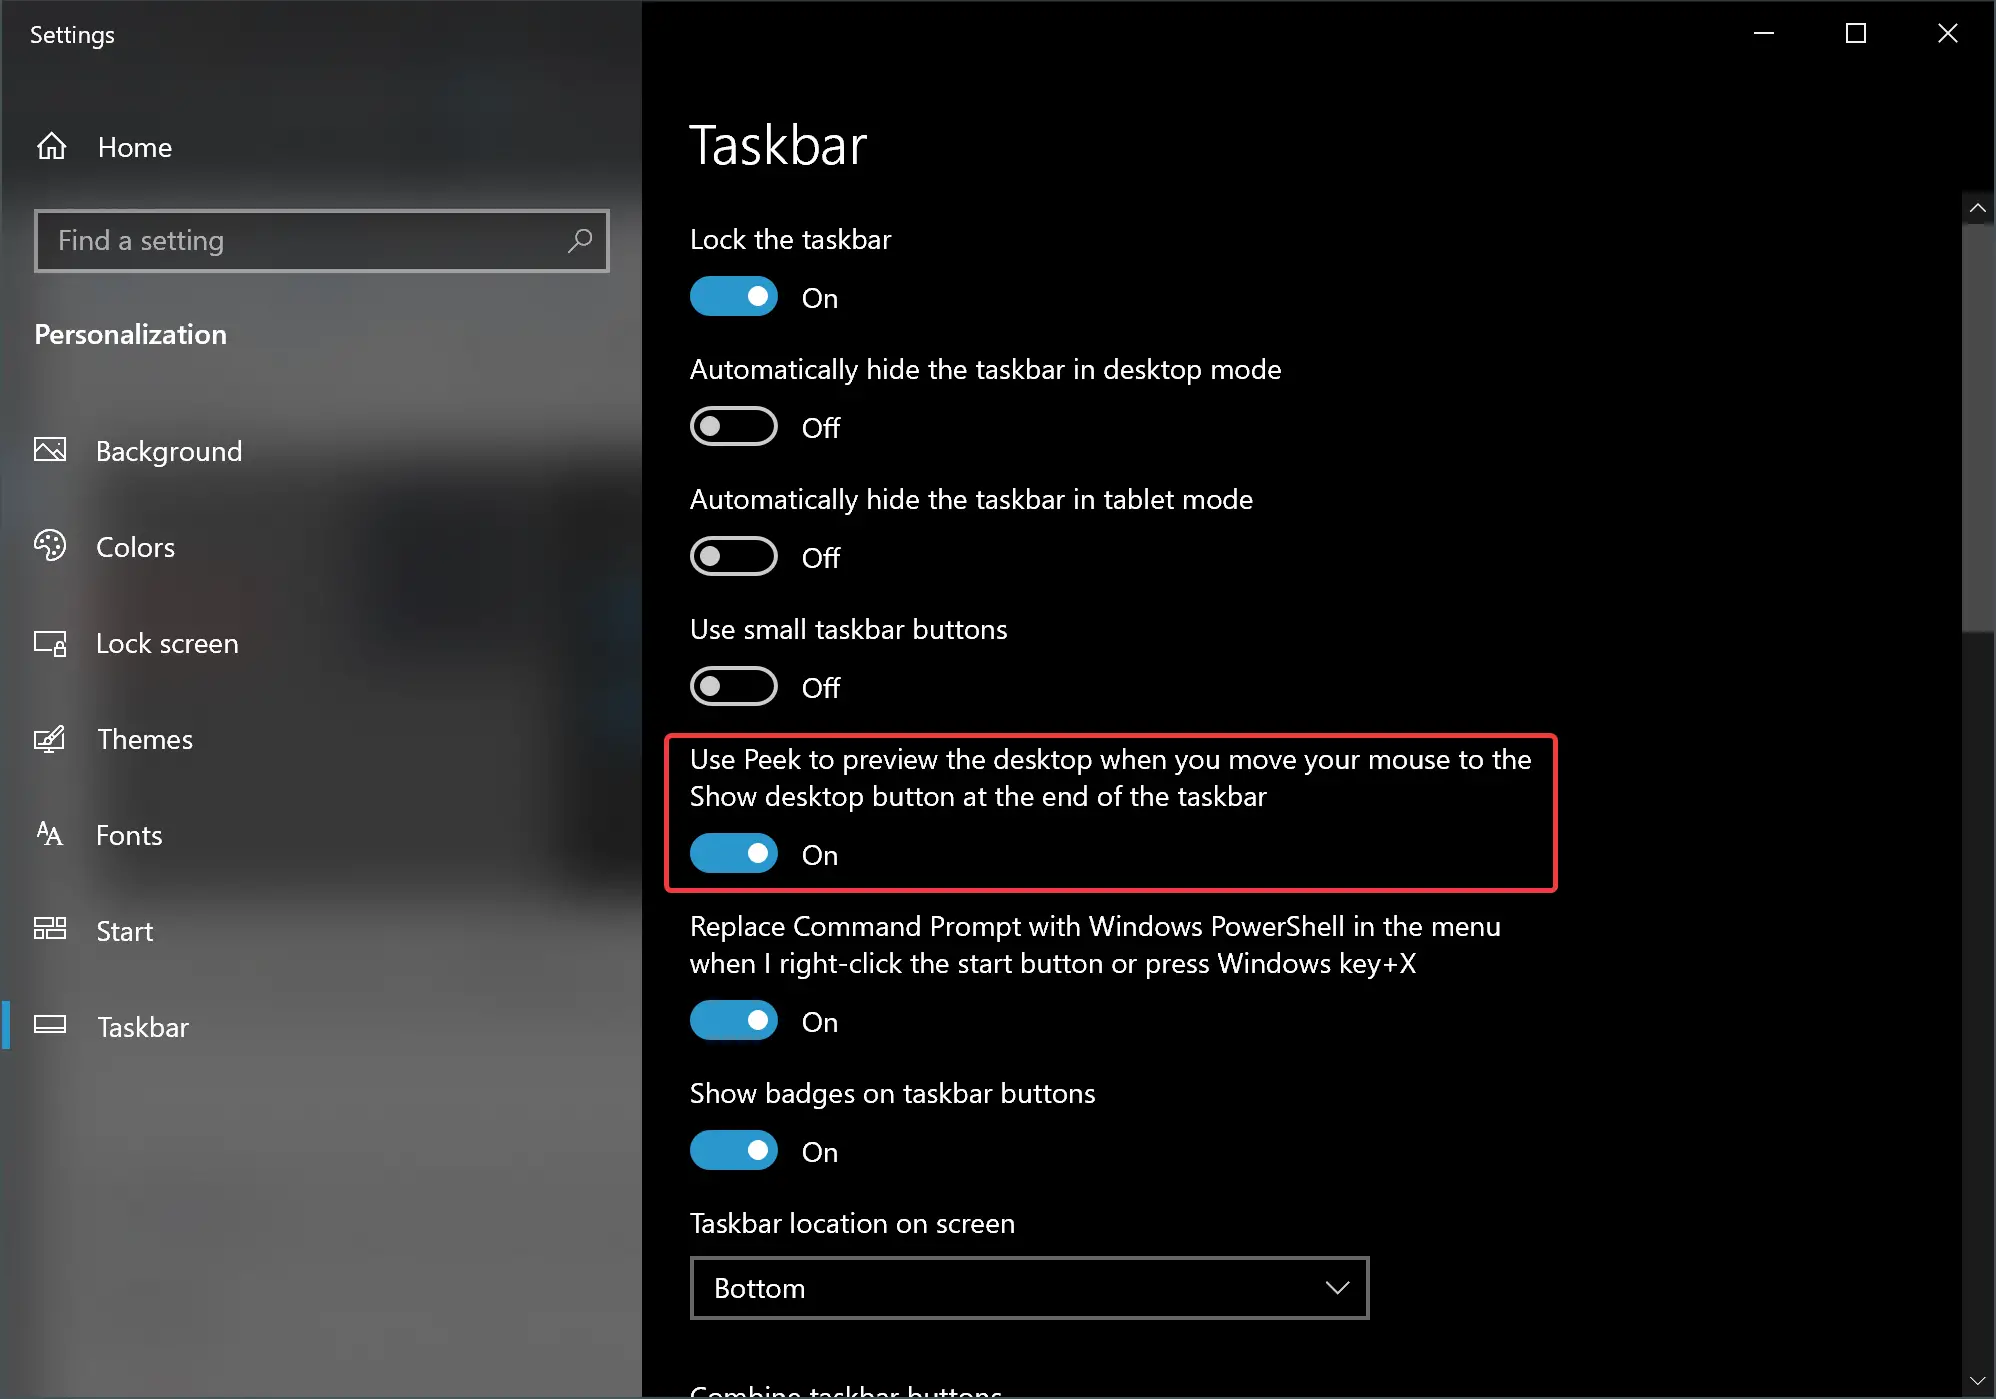
If you want to turn off the Aero Peek, turn off the toggle switch “Use Peek to preview the desktop when you move your mouse to the Show desktop button at the end of the taskbar” in the above steps 4.
How to Enable Aero Peek if the Option is Greyed Out?
If Aero Peek is off and you want to enable it, but you find that the option is grayed out, that means Aero Peek is disabled in the System Properties.
To turn on or off Aero Peek via System Properties, do the following:-
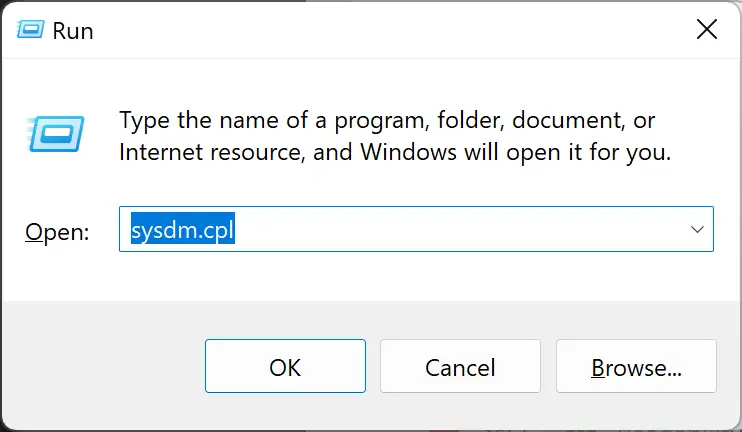
Step 1. Press the Windows + R keyboard combination to open the Run dialog.
Step 2. Then, type sysdm.cpl and hit Enter key on the keyboard.
Step 3. When the System Properties dialog opens, switch to the Advanced tab.
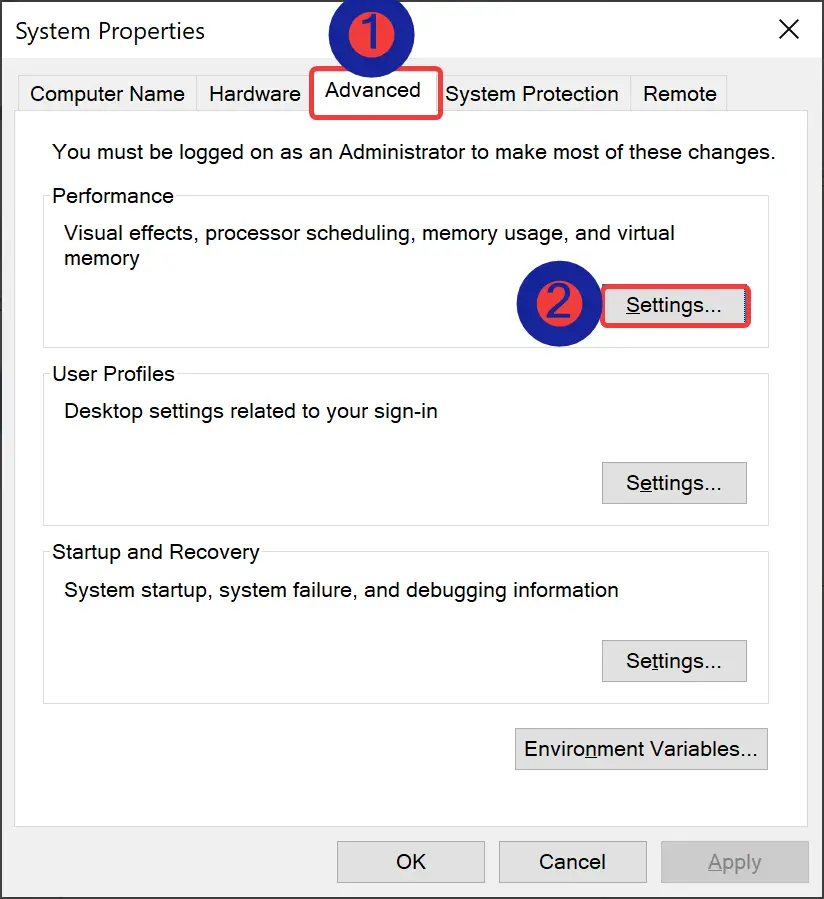
Step 4. Then, click the Settings button under the Performance section.
Step 5. On the “Performance Options” dialog, click on the Visual Effects tab.
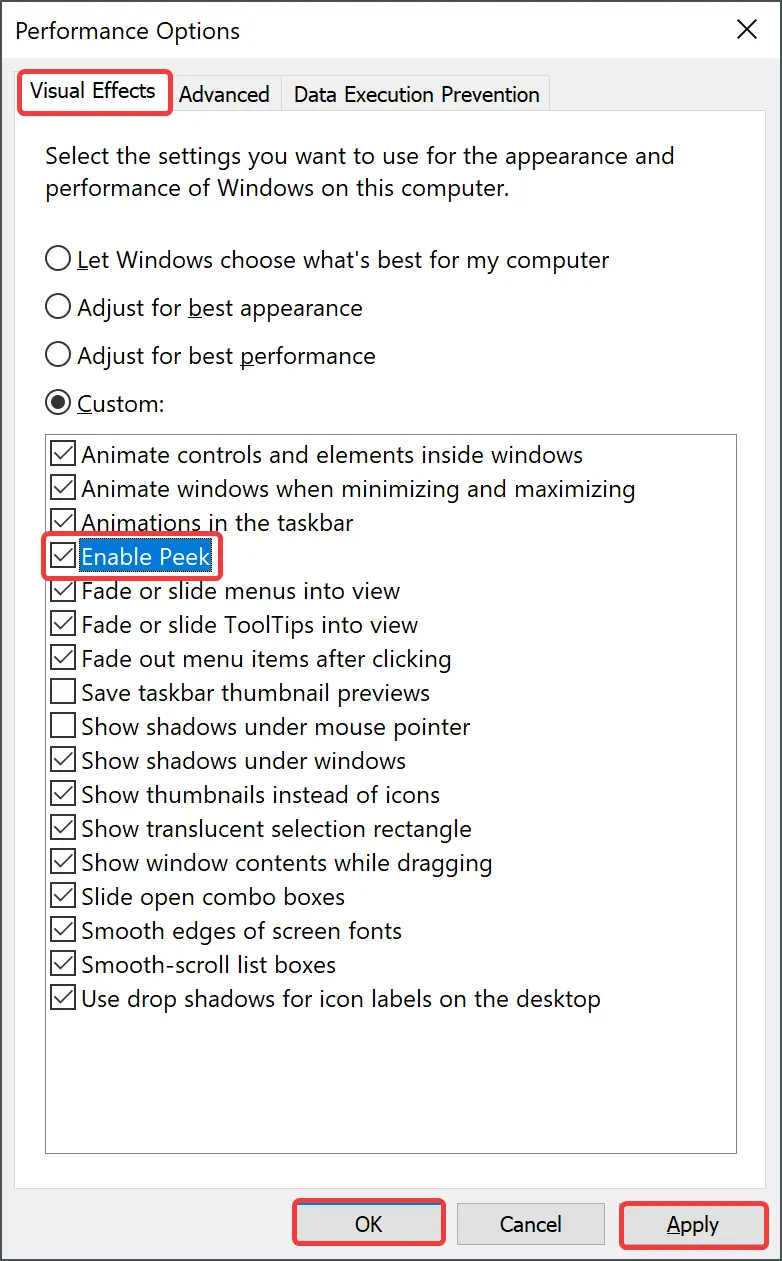
Step 6. Now, check or uncheck the Enable Peek option to turn the Aero Peek feature on or off.
Step 7. Click Apply.
Step 8. Click OK.
Step 9. Click OK.
How to Turn On or Off Aero Peek via Registry Editor?
If you want to enable or disable Aero Peek via Registry Editor, do these steps:-
Step 1. First, launch the Registry Editor.
Step 2. Then, navigate to the following key in the left sidebar of Registry Editor:-
HKEY_CURRENT_USER\Software\Microsoft\Windows\CurrentVersion\Explorer\Advanced
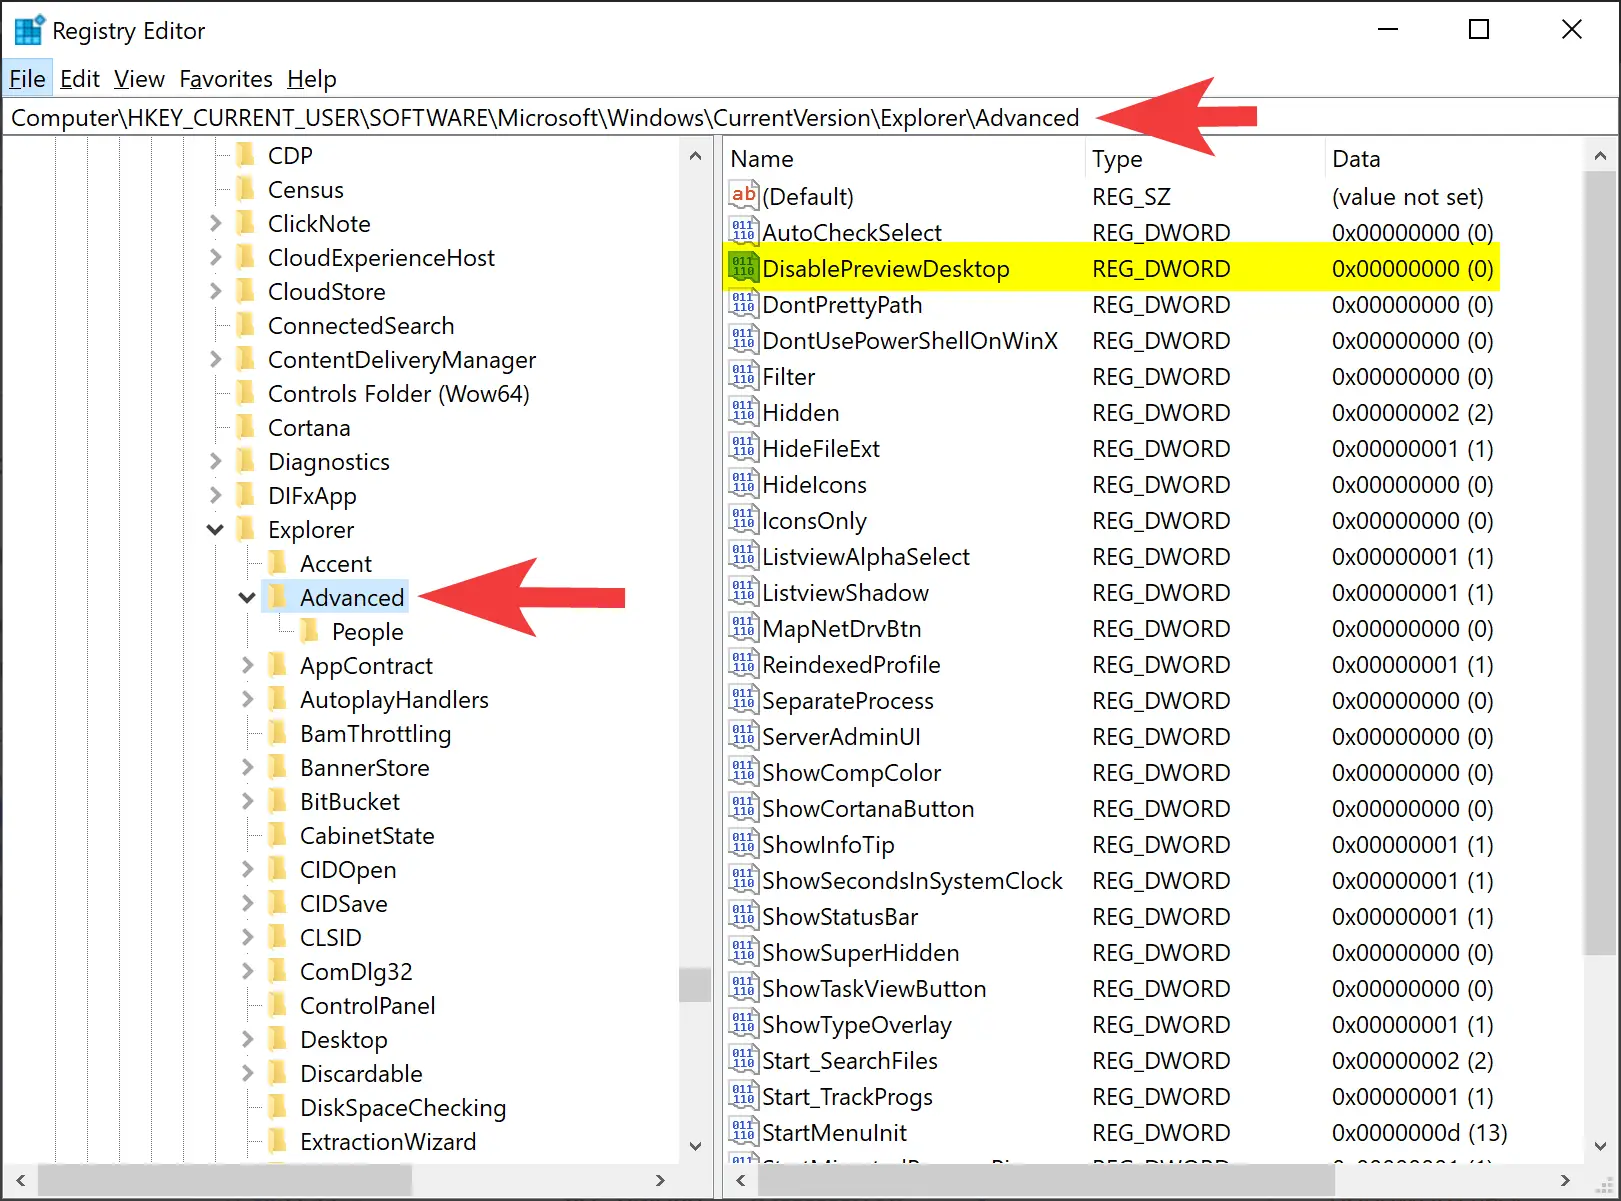
Step 3. On the opposite of the Advanced folder, double-click on the DisablePreviewDesktop REG_DWORD and set the following in the “Value data” field:-
- 0: To enable Aero Peek.
- 1: To disable Aero Peek.
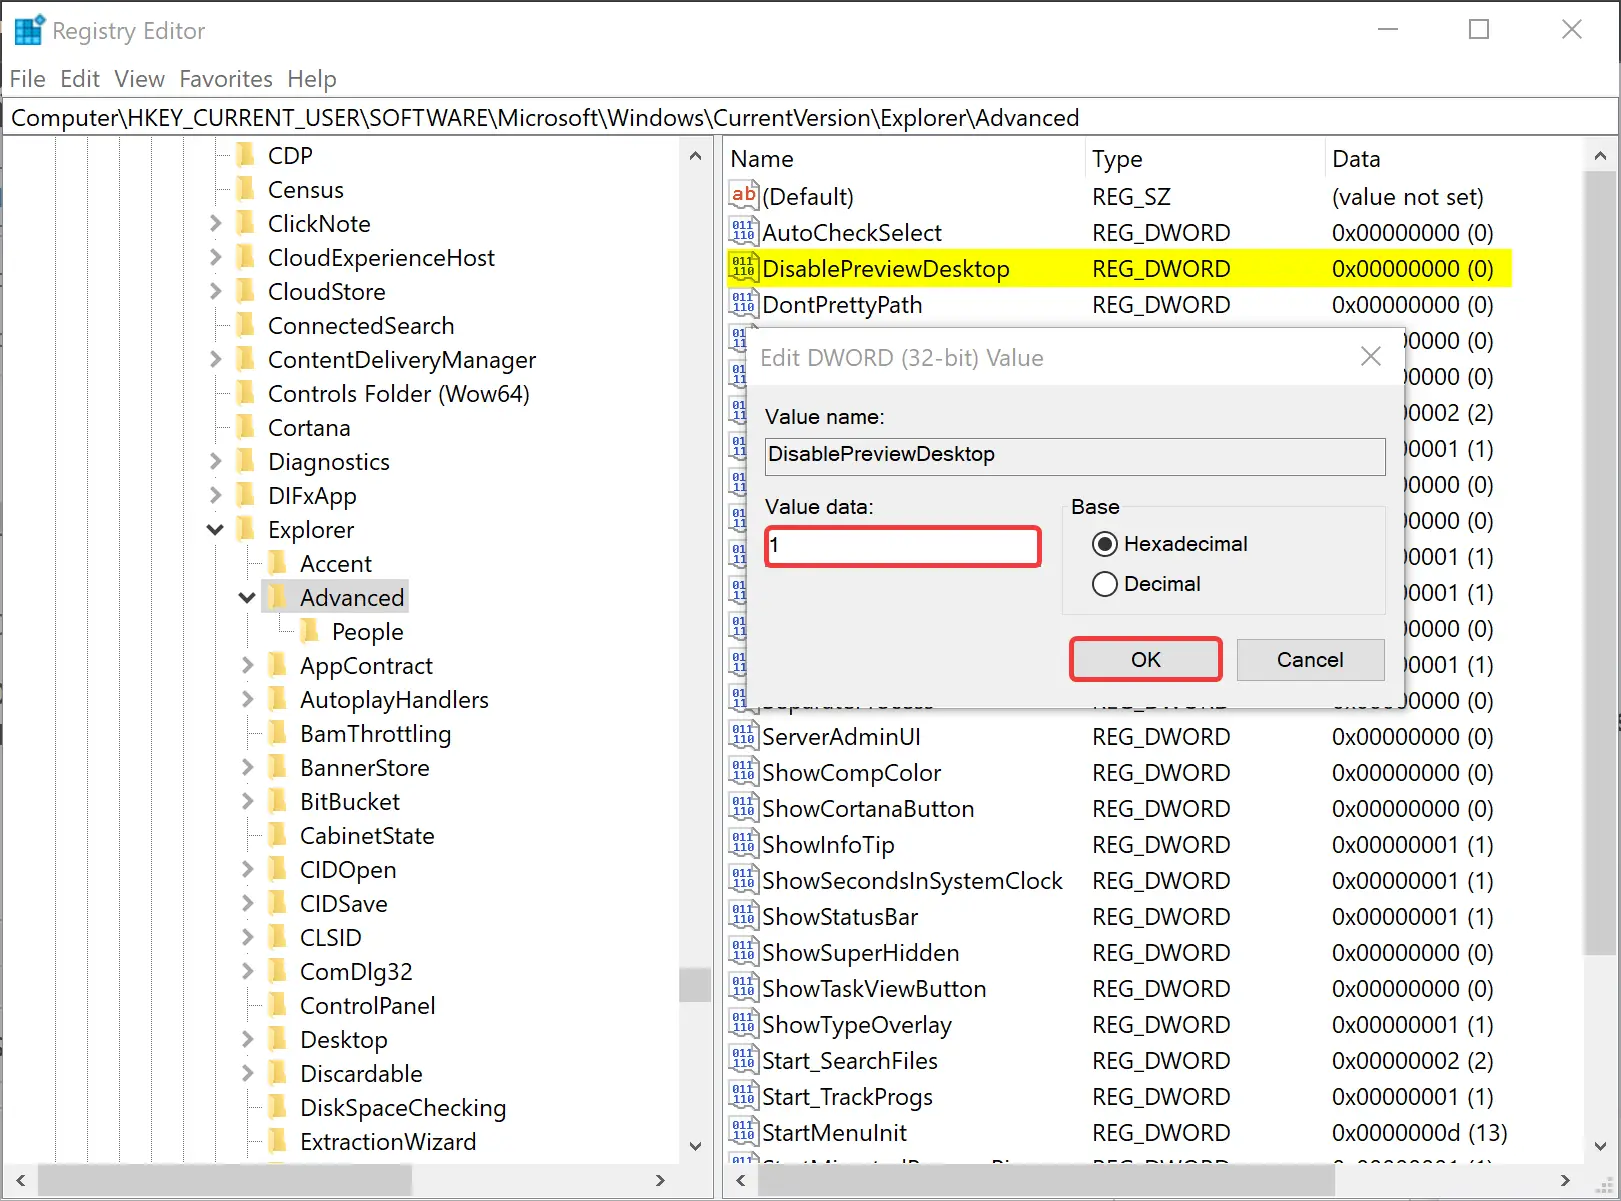
Step 4. Click OK.
Step 5. At last, reboot your computer to apply the changes.
Conclusion
In conclusion, Aero Peek is a convenient feature introduced by Microsoft in Windows 7, allowing users to view the desktop temporarily without minimizing all open windows. In this gearupwindows article, we have discussed several ways to enable or disable Aero Peek in Windows 10, including right-clicking the “Show desktop” button, using Windows 10 Settings, modifying System Properties, and editing the Registry Editor. By following these steps, users can easily turn on or off Aero Peek based on their preferences. It is worth noting that enabling or disabling Aero Peek can also impact the performance of the system, so users should consider their hardware specifications before making any changes.
You can use Peek (aka: Aero Peek) to preview the desktop when you move your mouse to the Show desktop button at the end of the taskbar. … Peek also allows you to see taskbar thumbnail live previews of open items when you hover over their taskbar thumbnail. Peek is turned on by default in Windows 10.
- What is the peek feature used for?
- How do I get rid of peek on my desktop?
- Where is Peek button located?
- How do I use Aero Peek on Windows 10?
- What is the Aero Peek feature of Windows 10?
- Which feature of Windows 10 takes you directly to the desktop?
- How do I enable peek on my desktop Windows 10?
- What does show desktop mean?
- How do I stop Windows 10 from previewing my taskbar?
- How do you see the taskbar if it is auto hidden?
- What is enable Aero Peek?
What is the peek feature used for?
Windows Aero Peek (also called Desktop Preview) is a cool new feature in Windows 7 that lets you “sneak” a preview of windows that are on your taskbar so you can more easily sift through the multitude of windows you use daily.
How do I get rid of peek on my desktop?
The quickest way to disable Aero Peek is to move your mouse to the far right side of the Taskbar, right-click on the Show Desktop button, and then select “Peek at desktop” from the popup menu. When Aero Peek is off, there should be no check mark next to the Peek at desktop option.
Where is Peek button located?
Aero Peek, also called Show Desktop, is a feature introduced in Windows 7, and available in Windows 8 and Windows 10. It allows the user to view their desktop by placing (and not clicking) their mouse over Aero Peek in the far right-side of the taskbar.
How do I use Aero Peek on Windows 10?
How to enable Aero Peek in Windows 10
- Right click an empty space on the taskbar and select the «Properties» context menu item. …
- Now all you need to do is tick the checkbox that says Use Peek to preview the desktop when you move your mouse to the Show Desktop button at the end of the taskbar. …
- The Aero Peek feature will be enabled.
What is the Aero Peek feature of Windows 10?
Aero Peek: Hovering over a taskbar thumbnail shows a preview of the entire window. Aero Peek is also available through the «Show desktop» button at the right end of the taskbar, which makes all open windows transparent for a quick view of the desktop. A similar feature was patented during Windows Vista development.
Which feature of Windows 10 takes you directly to the desktop?
Answer. Clicking on the right bottom corner of the screen will take you to desktop.
How do I enable peek on my desktop Windows 10?
Enable Windows 10 Desktop Peek. First, right-click the taskbar and select Settings. Then select Taskbar from the list on the left. Now, on the right, toggle the Peek option on.
What does show desktop mean?
Show Desktop is a shortcut that minimizes all open windows to make the desktop background visible. That way, you can quickly grab a file or launch yet another program from the always useful desktop space in Windows.
How do I stop Windows 10 from previewing my taskbar?
If you have Windows 10 Pro, please follow this procedure:
- Press WINDOWS + R.
- Type «gpedit.msc» without quotes and press ENTER.
- Click «Administrative Templates» under «User Configuration»
- Click «Start and taskbar»
- Double click «Disable taskbar previews»
- Click «Enable»
- Click «Apply»
- Reboot.
How do you see the taskbar if it is auto hidden?
Press the Windows key on the keyboard to bring up the Start Menu. This should also make the taskbar appear. Right-Click on the now-visible taskbar and select Taskbar Settings. Click on the ‘Automatically hide the taskbar in desktop mode’ toggle so that the option is disabled.
What is enable Aero Peek?
This will show you how to turn Windows 7 Aero Peek, also known as Desktop Preview, On or Off to temporarily make all open windows on the desktop transparent when you place the mouse pointer on the button at the far right end of the taskbar.
Все способы:
- Способ 1: Перезапуск «Проводника»
- Способ 2: Настройки экрана
- Способ 3: Изменение темы
- Способ 4: Функция Aero Peek
- Способ 5: Отключение анимации окон
- Способ 6: Проверка системных файлов на целостность
- Способ 7: Точка восстановления системы
- Способ 8: Создание новой учетной записи
- Вопросы и ответы: 1
Способ 1: Перезапуск «Проводника»
Чаще всего проблема, из-за которой нижняя панель Windows 10 отображается поверх всех окон, связана со сбоями в работе «Проводника» операционной системы. В таких случаях помогает перезапуск встроенного средства:
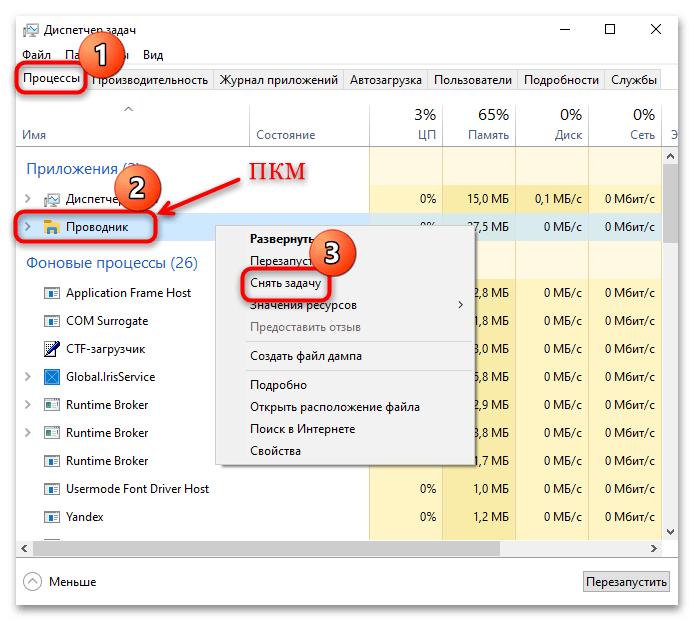
- Кликните по нижней панели правой кнопкой мыши и выберите пункт «Диспетчер задач».
- Если открывшееся окно свернуто, нажмите на «Подробнее».
- На вкладке «Процессы» найдите строку «Проводник», затем кликните по ней правой кнопкой мыши и выберите пункт «Снять задачу». Работа «Проводника» завершится, а панель задач вовсе пропадет, поэтому область внизу будет свободная.

Если вам нужно переключаться между браузером, через который вы проделываете шаги из нашей инструкции, и «Диспетчером задач», используйте сочетание клавиш «Alt + Tab».
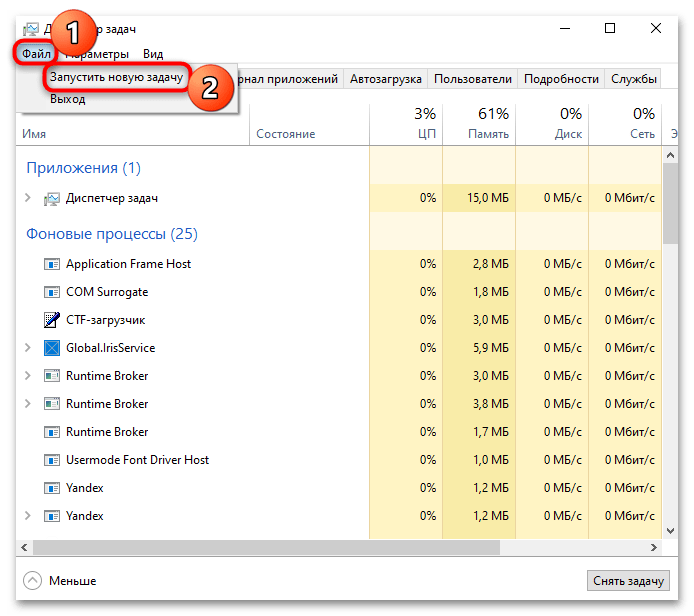
- Далее потребуется вновь вручную запустить «Проводник». Для этого в окне «Диспетчера задач» выберите вкладку «Файл», затем — «Запустить новую задачу».
- В текстовом поле появившегося окна введите
explorer, затем отметьте пункт «Создать задачу с правами администратора», если это доступно, и нажмите на «ОК».
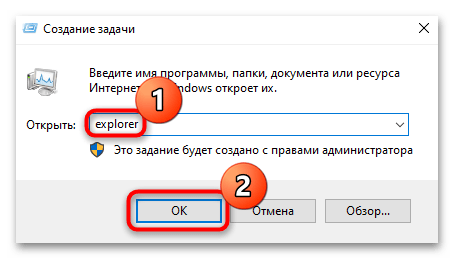
После выполненных действий «Проводник» снова заработает и появится панель задач. Проверьте, решена ли проблема, открыв полноэкранное приложение либо игру.
Способ 2: Настройки экрана
Некоторые сбои в системе вызваны непонятными причинами, из-за чего порой решения могут показаться довольно странными. Так, определенным пользователям помогает временное изменение каких-либо параметров в разделе с настройками экрана. Для примера попробуем сменить масштаб экрана:
- Кликните правой кнопкой мыши по свободной области рабочего стола, затем через контекстное меню вызовите «Параметры экрана».
- Из выпадающего меню «Изменение размера текста, приложений и других элементов» выберите иное значение. К примеру, если установлено «100%», поставьте «120%».

Закройте окно «Параметров», перезагрузите систему, затем верните предыдущее значение масштаба, если потребуется, аналогичным образом.
Способ 3: Изменение темы
Если между операционной системой и текущей темой оформления возник конфликт, иногда случаются проблемы с отображением некоторых элементов интерфейса, например панели задач. В этом случае неполадку решит смена темы:
- Через контекстное меню рабочего стола (нажатие правой кнопкой мыши по свободной области) перейдите в раздел «Персонализация» штатных «Параметров».
- Через панель слева переключитесь на вкладку «Темы», затем в центральной части окна выберите другую тему оформления.
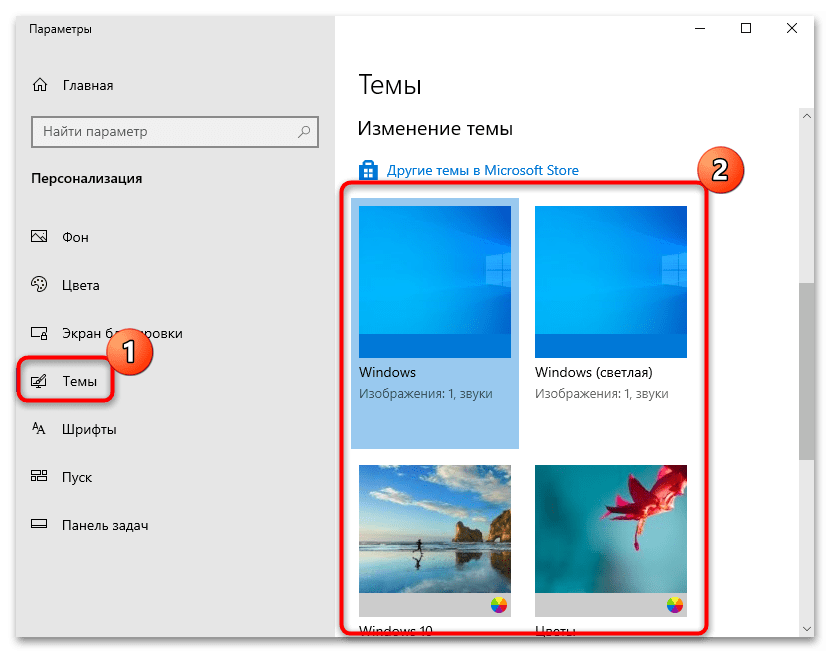
В Microsoft Store есть и другие варианты оформления интерфейса, которые можно дополнительно скачать и установить. Используйте эту возможность, если предустановленные темы не подходят. Также можно создать свой стиль персонализации, но в любом случае часто после применения новой темы проблема с отображающейся поверх всех окон нижней панелью пропадает. Если потребуется, можете таким же способом вернуть предыдущий вариант стиля.
Способ 4: Функция Aero Peek
В Windows 10 реализована функция Aero Peek, представляющая собой целый комплекс различных эффектов, облегчающих работу с панелью задач. С ее помощью можно просматривать насквозь содержимое всех открытых окон. Она срабатывает при наведении курсора мыши на специальную область справа в нижней панели. Если предыдущие способы не помогли решить проблему, тогда можно отключить функцию:
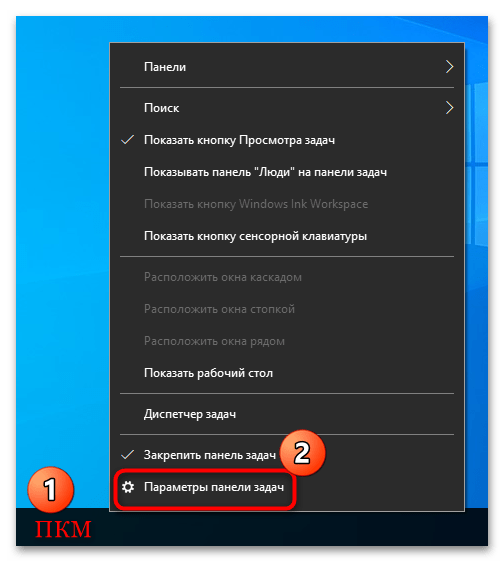
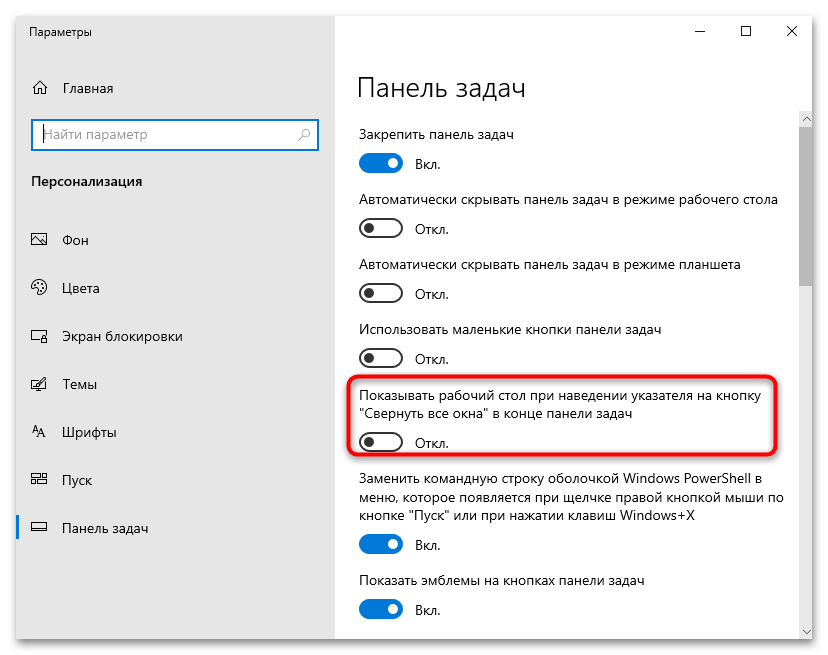
- Кликните правой кнопкой мыши по нижней панели и выберите из меню пункт «Параметры панели задач», чтобы быстро перейти к этому разделу «Параметров».
- Найдите опцию «Показывать рабочий стол при наведении указателя на кнопку «Свернуть все окна» в конце панели». Если она включена, деактивируйте функцию, переведя переключатель в соответствующее состояние.
После перезагрузите компьютер и проверьте, решена ли проблема. Также некоторым помогает выключение, затем повторное включение Aero Peek.
Способ 5: Отключение анимации окон
Нередко случается так, что проблема с нижней панелью тесно связана с настройками анимации окон Windows 10. Чтобы проверить, так ли это, можно временно отключить дополнительные эффекты:
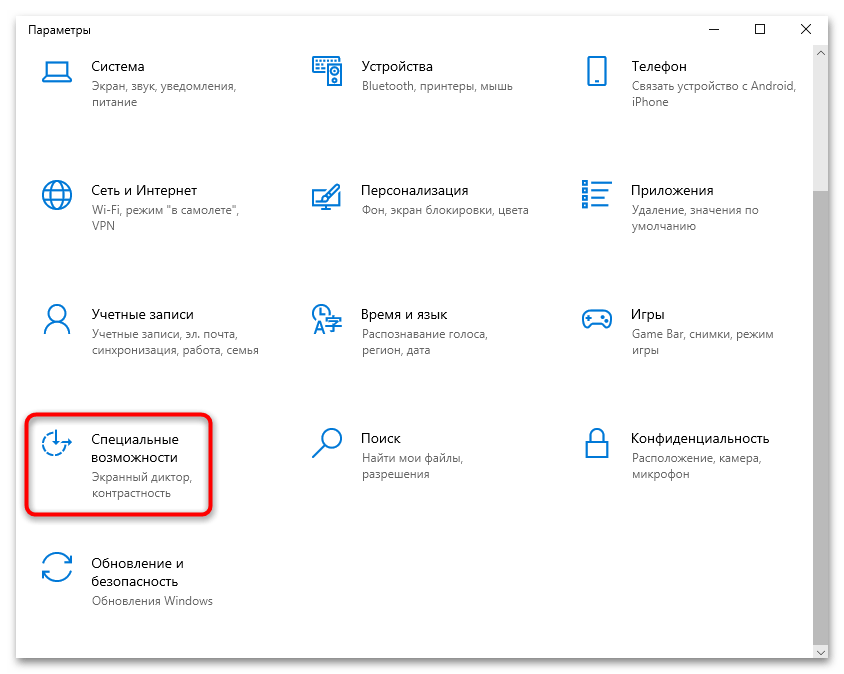
- Через штатные «Параметры» перейдите в раздел «Специальные возможности».
- Через навигационную панель переключитесь на вкладку «Дисплей», затем в основной части окна отключите опцию «Показывать анимацию в Windows».

Способ 6: Проверка системных файлов на целостность
Если предыдущие способы не помогли, есть смысл проверить системные файлы на целостность. Бывает, что элементы интерфейса работают некорректно ввиду повреждения по каким-то причинам, например из-за ошибки в работе ОС или вирусной атаки. К счастью, процесс фактически автоматизирован: пользователю потребуется только запустить предустановленную утилиту SFC с помощью консольной команды.
Также в Windows реализовано и другое консольное средство, с помощью которого можно просканировать само хранилище системных файлов, используемое SFC для восстановления. Иногда оно справляется с поставленной задачей, если утилита SFC не приносит положительного результата (находит проблемы, но не может их устранить). То, как использовать упомянутые встроенные инструменты, наш автор разбирал более детально в отдельном материале на сайте.
Подробнее: Как проверить целостность системных файлов в Windows 10

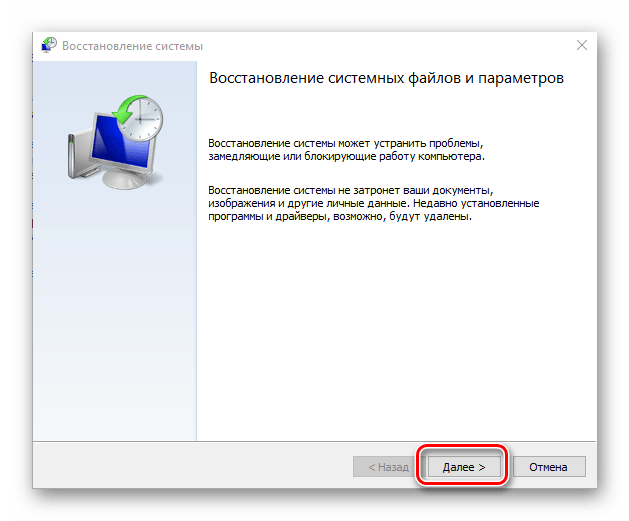
Способ 7: Точка восстановления системы
Вероятно, недавно установленные обновления или сторонний софт стали причиной проблем с элементами интерфейса. Тогда может потребоваться откат состояния системы до того момента, когда подобных проблем не наблюдалось. Если у вас включена функция автоматического создания точек восстановления, то вернуться к предыдущему состоянию Windows не составит труда, в особенности если следовать нашему руководству по ссылке ниже.
Подробнее: Откат к точке восстановления в Windows 10
Способ 8: Создание новой учетной записи
Если данная неполадка появилась только в определенной учетной записи (вероятно, в результате каких-то настроек или правки в реестре), то ситуацию можно исправить, создав второй профиль на компьютере с Windows 10 и скопировав в него все данные.
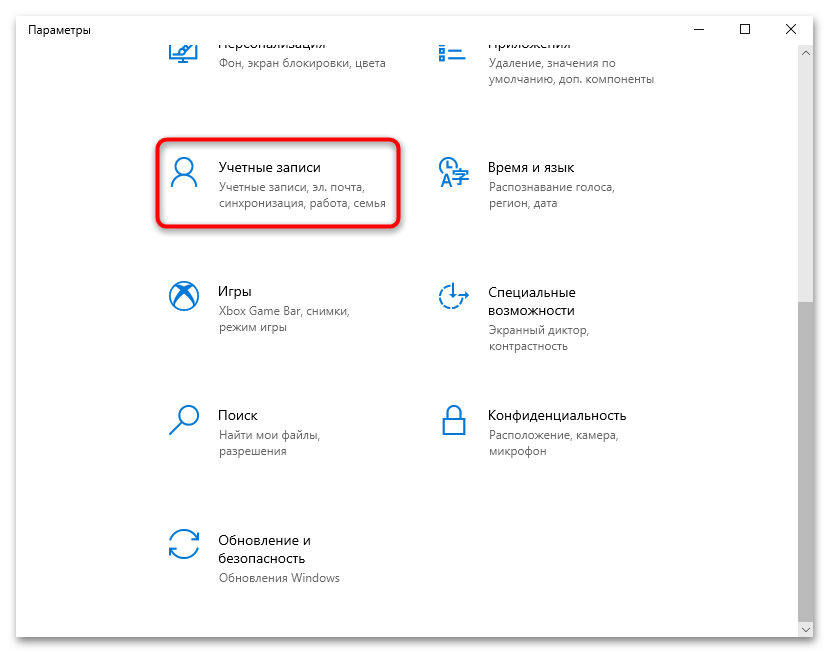
- Первым этапом данного способа станет непосредственное создание второго профиля с правами администратора на компьютере. Сделать это можно несколькими методами, в том числе через соответствующий раздел штатных «Параметров» или консоль. Выбрать наиболее подходящий вариант можно из нашего отдельного руководства.
Подробнее: Создание второго профиля в Windows 10
- Войдите в систему под новым именем, после чего будут созданы пользовательские папки, различные системные файлы, каталог «Документы» и другие. Затем, если потребуется, вернитесь в старый аккаунт и скопируйте все данные оттуда в новый, поскольку она будет пустая (без файлов с рабочего стола и пользовательских папок). Приложения, которые были в той учетной записи, понадобится установить заново. Переключение между профилями происходит через главное меню: нажмите на «Пуск», затем кликните по аватарке профиля, после чего станет доступен выбор учетных записей.
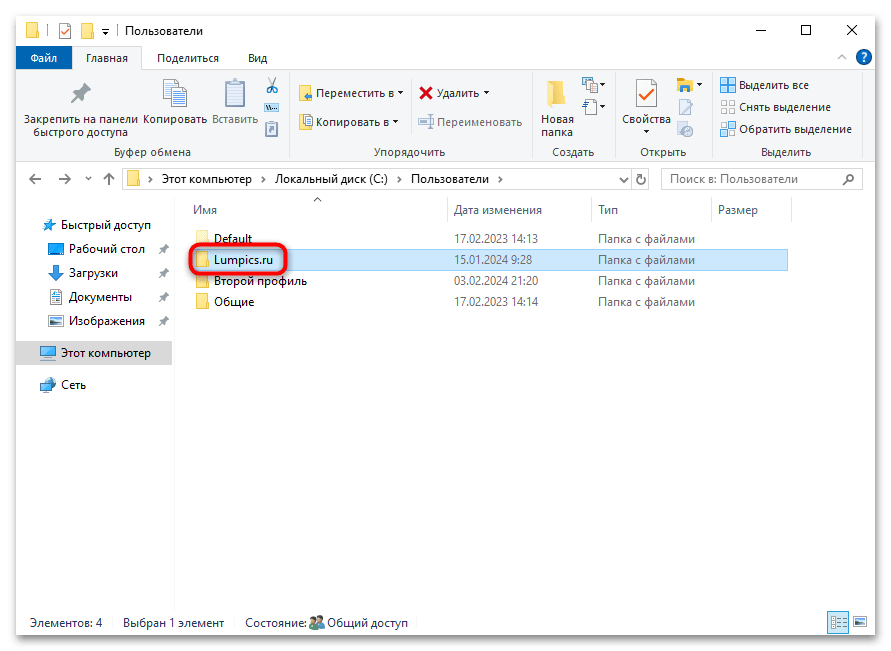
- Запустите «Проводник», выберите «Локальный диск (C:)», затем папку «Пользователи». Как видно, в списке учетных записей появился еще один пункт – имя нового профиля.
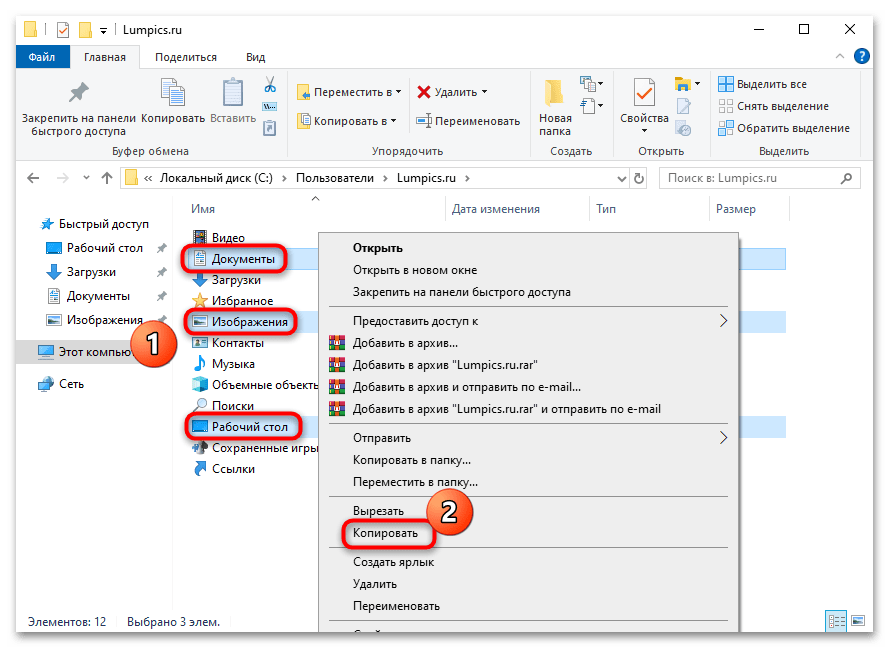
- Теперь можно переходить к копированию важных файлов со старого профиля. К таким данным, как правило, относятся документы, загрузки, рабочий стол, сохранения игр, файлы браузера, информация о различных программах. Для начала откройте папку текущего профиля – название индивидуальное.
- Выделите те каталоги, которые нужно скопировать, кликните правой кнопкой мыши и выберите пункт «Копировать» (либо можно воспользоваться сочетанием клавиш «Ctrl + C»).
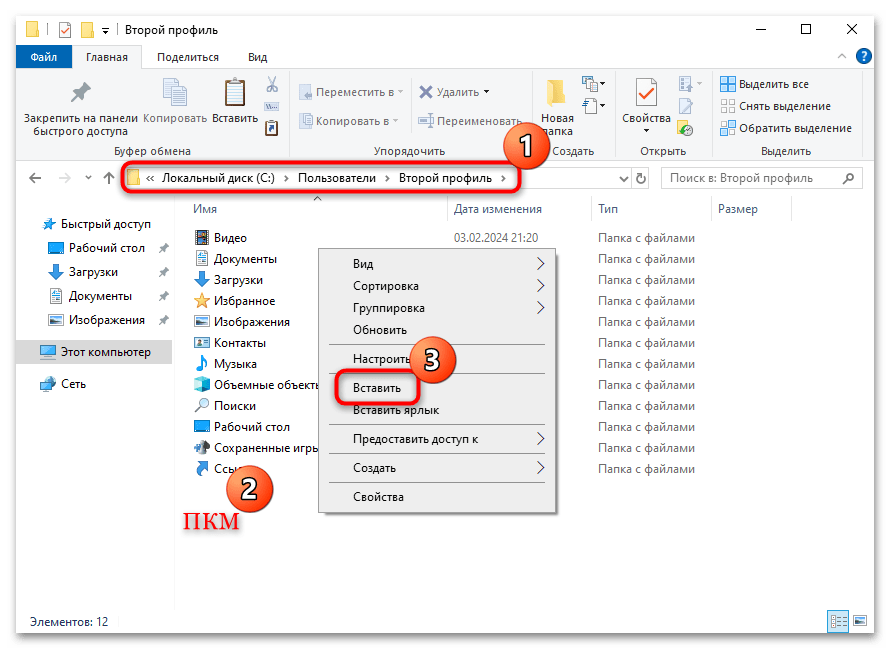
- Перейдите к тому же месту, но в другой локальной записи – вернитесь в предыдущее окно и щелкните по названию второго профиля. Кликните правой кнопкой мыши по свободной области и воспользуйтесь пунктом «Вставить» (или клавишами «Ctrl + V»).
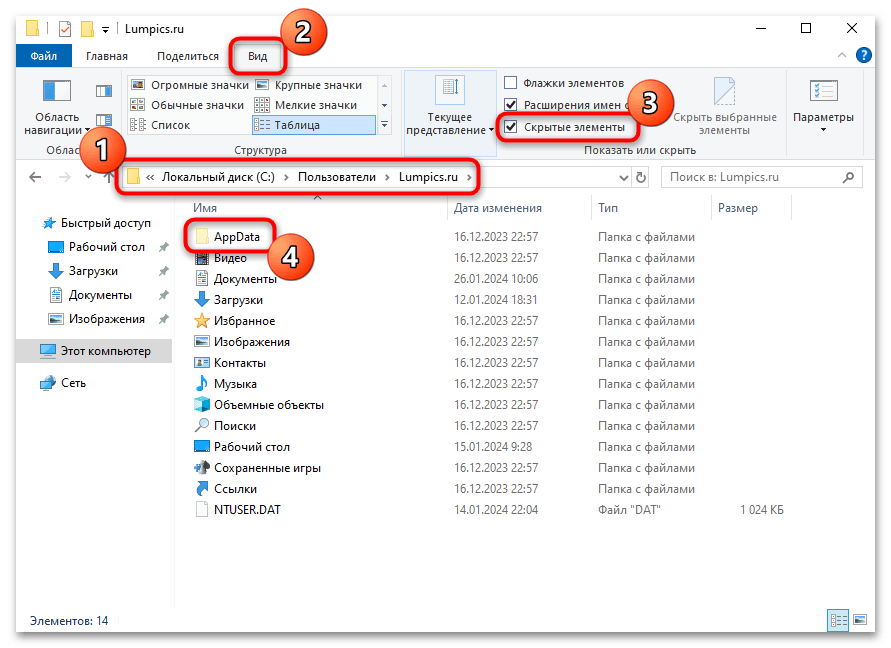
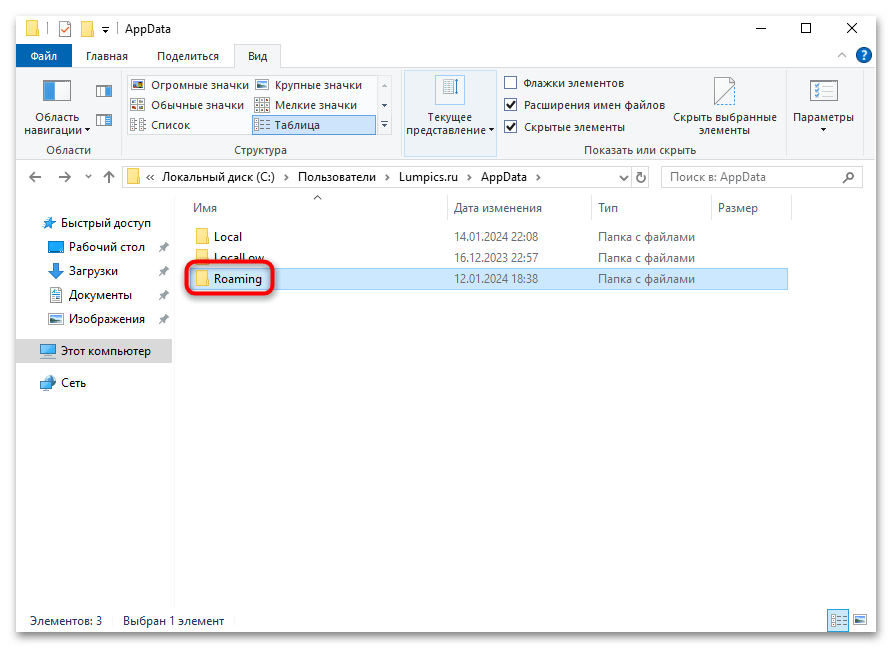
- Аналогичным образом копируйте другую важную информацию, например системные файлы. Помните, что сперва их надо сделать видимыми, включив показ скрытых и защищенных данных. На вкладке «Вид» системного «Проводника» в блоке «Показать или скрыть» поставьте отметку у опции «Скрытые элементы». Затем в корневой папке текущего пользователя появится папка «AppData» — откройте ее.
- Сначала перейдите в каталог «Local» и скопируйте оттуда всю необходимую информацию, касающуюся приложений. Например, если это браузер от Яндекс, то найдите папку с названием «Yandex».

Для выделения сразу нескольких объектов, которые не располагаются по порядку, кликайте поочередно на каждый левой кнопкой мыши, зажав клавишу «Ctrl».
- То же самое проделайте с файлами, хранящимися в папке «Roaming».


Обратите внимание, что скопированные файлы должны быть помещены в ту же директорию новой учетной записи. Убедитесь, что вся важная информация была перенесена в новый профиль Windows 10. Спешить не стоит – лучше подождать несколько дней, чтобы наверняка не упустить чего-то важного, после чего можно удалить старый профиль при условии, что во второй учетной записи проблем с нижней панелью нет.
Подробнее: Удаление учетной записи Microsoft в Windows 10
Наша группа в TelegramПолезные советы и помощь
Windows 10 is a versatile operating system that offers a plethora of features designed to enhance user experience. Among these features is Aero Peek, a functionality that allows users to swiftly glance at open windows without fully interacting with them. Although this feature provides convenience, it may not be suitable for every user. This article will guide you through the process of enabling or disabling Aero Peek in Windows 10, alongside explanations of its benefits, drawbacks, and additional tips to improve your overall Windows experience.
What is Aero Peek?
Aero Peek is part of the Aero desktop feature first introduced in Windows 7 and has carried over into subsequent Windows versions, including Windows 10. This feature allows users to view their desktop without minimizing open applications by simply hovering over the «Show Desktop» button on the far right of the taskbar. Additionally, it helps users quickly preview the contents of open windows when they hover over their icons in the taskbar.
Benefits of Aero Peek
- Efficient Navigation: Aero Peek allows for quick viewing of the desktop or other application windows, facilitating faster navigation between tasks.
- Cleaner Workspace: Users can maintain an organized view of their desktop while still having access to open applications.
- Improved Productivity: Reducing the need to minimize windows enhances workflow efficiency, especially for multitaskers.
Drawbacks of Aero Peek
- Distraction: For some users, having too much information visible at once can lead to distractions.
- Unwanted Activation: Users may accidentally trigger Aero Peek while hovering over the taskbar, which can interrupt their workflow.
- System Resources: Although Aero Peek uses minimal resources, some users prefer to disable all visual effects for performance reasons.
Now that we understand what Aero Peek is, let’s dive into the steps to enable or disable it on Windows 10.
How to Enable or Disable Aero Peek in Windows 10
Method 1: Using System Properties
This method involves accessing the System Properties through the Control Panel, where you can easily enable or disable Aero Peek.
-
Open System Properties:
- Right-click on the Start button or press Windows + X.
- Click on System to open the System window.
- From the left sidebar, select Advanced system settings.
-
Access Performance Options:
- In the System Properties window, navigate to the Advanced tab.
- Under the Performance section, click on the Settings button.
-
Adjust Visual Effects:
- The Performance Options window will appear. Here, you will find various options.
- Navigate to the Visual Effects tab.
- Look for Enable Aero Peek in the list of options.
-
Enable or Disable Aero Peek:
- To enable Aero Peek, ensure that the checkbox next to Enable Aero Peek is checked.
- To disable Aero Peek, uncheck the box.
- Once you’ve made your selection, click Apply, then OK, and finally close the remaining windows.
This method allows users to quickly access performance options and manage visual effects, including the Aero Peek feature.
Method 2: Using the Registry Editor
For advanced users, altering settings through the Windows Registry allows for more granular control of system features. Proceed with caution and back up your registry before making any changes.
-
Open the Registry Editor:
- Press Windows + R to open the Run dialog.
- Type
regeditand press Enter to launch the Registry Editor.
-
Navigate to the Aero Peek Key:
- In the Registry Editor, use the left sidebar to navigate to the following path:
HKEY_CURRENT_USERSoftwareMicrosoftWindowsCurrentVersionExplorerAdvanced
- In the Registry Editor, use the left sidebar to navigate to the following path:
-
Modify the Aero Peek Value:
- In the right pane, locate the value named
ExtendedUIHoverTime. - Double-click on
ExtendedUIHoverTimeto edit its value.- For enabling Aero Peek, set the value to
0. - For disabling Aero Peek, set the value to
1(or any value greater than0).
- For enabling Aero Peek, set the value to
- Click OK to save your changes.
- In the right pane, locate the value named
-
Close the Registry Editor:
- Once you’ve made the necessary changes, close the Registry Editor.
-
Restart Windows Explorer (Optional):
- In some cases, you might need to restart Windows Explorer or log off your account for the changes to take effect. To restart Windows Explorer:
- Press Ctrl + Shift + Esc to open Task Manager.
- Find Windows Explorer in the list, right-click it, and select Restart.
- In some cases, you might need to restart Windows Explorer or log off your account for the changes to take effect. To restart Windows Explorer:
Method 3: Using Group Policy Editor (For Windows 10 Pro, Education, and Enterprise)
If you are running Windows 10 Pro, Education, or Enterprise, you can also use Group Policy Editor to enable or disable Aero Peek.
-
Open Group Policy Editor:
- Press Windows + R to open the Run dialog.
- Type
gpedit.mscand hit Enter.
-
Navigate to the Aero Peek Setting:
- In the Local Group Policy Editor, navigate to:
User Configuration -> Administrative Templates -> Start Menu and Taskbar
- In the Local Group Policy Editor, navigate to:
-
Locate the Aero Peek Policy:
- Find the policy named «Turn off Aero Peek» in the right pane.
-
Modify the Policy Setting:
- Double-click on Turn off Aero Peek
- To enable Aero Peek, select Not configured or Disabled.
- To disable Aero Peek, select Enabled.
- Click Apply, then OK.
- Double-click on Turn off Aero Peek
-
Close Group Policy Editor:
- Exit the Group Policy Editor.
-
Restart Your Computer (Optional):
- Restarting your computer can help ensure that the changes take effect.
Additional Tweaks
After enabling or disabling Aero Peek, you might want to explore additional tweaks and tips to enhance your Windows 10 experience.
Adjusting Transparency Effects
Aero Peek works best in a visually dynamic environment. By adjusting transparency effects, the usability of the feature can be improved.
-
Access Settings:
- Press Windows + I to open Settings.
- Navigate to Personalization and then Colors.
-
Toggle Transparency Effects:
- Find the toggle switch for Transparency effects and turn it on or off based on your preference.
Using Virtual Desktops
To further boost your productivity, consider utilizing the virtual desktop feature in Windows 10. This allows you to create multiple desktop environments, enabling you to segregate tasks and reduce visual clutter.
-
Create a Virtual Desktop:
- Click on the Task View button (or press Windows + Tab).
- Click on New desktop in the top left corner.
-
Switch Between Desktops:
- You can switch between desktop spaces via the Task View button or by using keyboard shortcuts.
Troubleshooting Aero Peek Issues
If you find that Aero Peek isn’t functioning as intended after enabling it, here are some troubleshooting steps you can take.
Check Graphics Drivers
Outdated graphics drivers may impede the proper functioning of Aero Peek. Consider updating your drivers:
-
Open Device Manager:
- Right-click on the Start button and select Device Manager.
-
Expand Display Adapters:
- Find your graphics card, right-click, and select Update driver.
-
Follow On-Screen Prompts:
- Select Automatically search for updated driver software and follow the prompts.
Ensure Visual Effects Are Enabled
If Aero Peek does not perform correctly, it may be due to disabled visual effects. Check your performance settings by following the steps outlined in Method 1.
Run the System File Checker
Corrupted system files can also hinder Aero Peek’s functionality. Running the System File Checker (SFC) tool can rectify this:
-
Open Command Prompt as Administrator:
- Type
cmdin the Start menu, right-click on Command Prompt, and select Run as administrator.
- Type
-
Execute the SFC Command:
- Type
sfc /scannowand press Enter. This will scan for and attempt to repair any corrupted system files.
- Type
Conclusion
Aero Peek is an exciting feature that can boost your productivity and enhance your Windows 10 experience. However, whether you choose to enable or disable this feature depends on your personal workflow and preferences. By following the methods outlined above, you can easily toggle Aero Peek on or off and apply additional tweaks to optimize your system.
Whether you are a casual user wanting a cleaner workspace or a power user seeking functional efficiency, understanding how to manage Aero Peek empowers you to customize Windows 10 to meet your needs. With a variety of methods to enable and disable this feature, it is straightforward to tailor the operating system to your liking.
Regardless of your choice, having a deeper understanding of Windows 10’s capabilities can lead to a more streamlined and enjoyable computing experience. Dive into your system settings today, explore these features, and maximize your use of Windows 10!