
ЦЕЛИ КУРСА
После прохождения этого курса вы получите следующие умения:
- Понимание основных принципов использования Windows ACL с вашим ASUSTOR NAS.
- Использовать Windows ACL для управления правами доступа к данным в вашем ASUSTOR NAS.
ПРЕДВАРИТЕЛЬНЫЕ УСЛОВИЯ
Предварительные условия курса:
NAS 106: Работа с NAS в Microsoft Windows
Слушатели должны получить следующие практические знания:
Общие папки, Управление доступом
ПЛАН КУРСА
1. Введение в Windows ACL
1.1 Должен ли я включить Windows ACL?
2. Конфигурирование Windows ACL
2.1 Включение Windows ACL
2.2 Настройка разрешений Windows ACL с Файловый менеджер ADM
2.3 Настройка разрешений Windows ACL с Проводником Windows
2.4 Правила разрешений и меры предосторожности Windows ACL
2.5 Перемещение объектов в ваш NAS с одновременным поддержанием разрешений ACL
1. Введение в Windows ACL
Windows ACL – это 13 разных типов прав доступа к файлам, разработанных Microsoft для файловых систем NTFS, которые могут быть применены к определенным пользователям и группам. В рамках этого типа инфраструктуры администраторы могут создавать более подробные и точные конфигурации прав доступа.
Кроме того, в доменной инфраструктуре AD Windows (широко используемой предприятиями), права доступа Windows ACL могут быть применены для всех пользователей и групп в домене. Пользователи для входа могут использовать любой компьютер в сети, и до тех пор, пока они используют одно и то же имя учетной записи, все права остаются прежними. ИТ-персоналу не нужно настраивать разрешения для каждого отдельного сервера и рабочей станции ПК, что существенно повышает эффективность управления.
Для того, чтобы более тесно интегрировать ASUSTOR NAS с доменами AD, упрощая управление ИТ и повышая производительность, ASUSTOR глубоко интегрировал систему разрешений Windows ACL с ADM, предоставляя следующие уникальные характеристики:
- Возможность включить Windows ACL для отдельных общих папок.
- Комплексная поддержка всех 13 типов разрешений Windows ACL.
- Возможность просматривать действующие разрешения Windows ACL внутри ADM в деталях.
- Поддержка сетевых пользователей и групп.
- Возможность применить разрешения ACL к протоколам передачи файлов Samba, Файловый Менеджер, AFP, FTP, WebDAV, Rsync.
1.1 Должен ли я включить Windows ACL?
Как описано в предыдущем разделе, Windows ACL предоставляет до 13 различных настроек разрешений, которые могут быть применены ко всем пользователям и группам на NAS и на домене (если NAS была добавлена к домену Windows AD). В случае неправильного планирования или конфигурации разрешений существует вероятность того, что никто из пользователей не сможет получить доступ к определенной папке или файлу. Очевидно, этот тип ошибки может быть решен с помощью использования учетной записи администратора, но количество потраченного времени от момента возникновения до момента решения может быть рассмотрено как существенная нематериальная стоимость для предприятий.
ASUSTOR NAS разработан на основе операционной системы Linux, поэтому собственные настройки ADM используют механизм управления разрешениями Linux:
- Применимые разрешения: RW (Чтение и Запись), RO (Только чтение), DA (Запретить доступ)
- Разрешения могут быть применимы к: “Владельцу”, группе, где владелец является частью, и “Другие”.
Меньшее количество опций позволяет более простые конфигурации. Тем не менее гибкость и регулируемость разрешений очень ограничена. Например, при использовании механизма разрешений Linux нет возможности дать пользователю способность редактировать файл, при этом не давая им разрешение на удаление файла.
Если вы используете ваш NAS только между собой и ограниченным числом семьи и друзей, то рекомендуется использовать исходный механизм управления разрешениями ADM. Однако, если ваш NAS используется для хранения бизнес-данных предприятия, рекомендуется сначала проконсультироваться с вашим ИТ-персоналом, чтобы решить, уместно-ли включить разрешения для Windows ACL, и затем исполнить план развертывания разрешений, если вы решили его использовать.
Мы обеспечили вас гибкостью включения или отключения Windows ACL для отдельных общих папок, что очень полезно при оценивании и планировании. Вы можете создать общую папку для тестирования, включить Windows ACL, и затем настроить параметры разрешений. После этого вы можете проверить, отвечают ли результаты вашим ожиданиям. Как только вы получили требующиеся вам результаты, вы можете применить настройки к выбранной вами общей папке. Это позволит вам избежать каких-либо ошибок в планировании, что могут закрыть доступ к важным данным, и, таким образом, повлиять на работу вашего предприятия.
2. Конфигурирование Windows ACL
2.1 Включение Windows ACL
Создание новой общей папки:
- Войдите в ADM под учетной записью администратора с помощью веб-браузера.
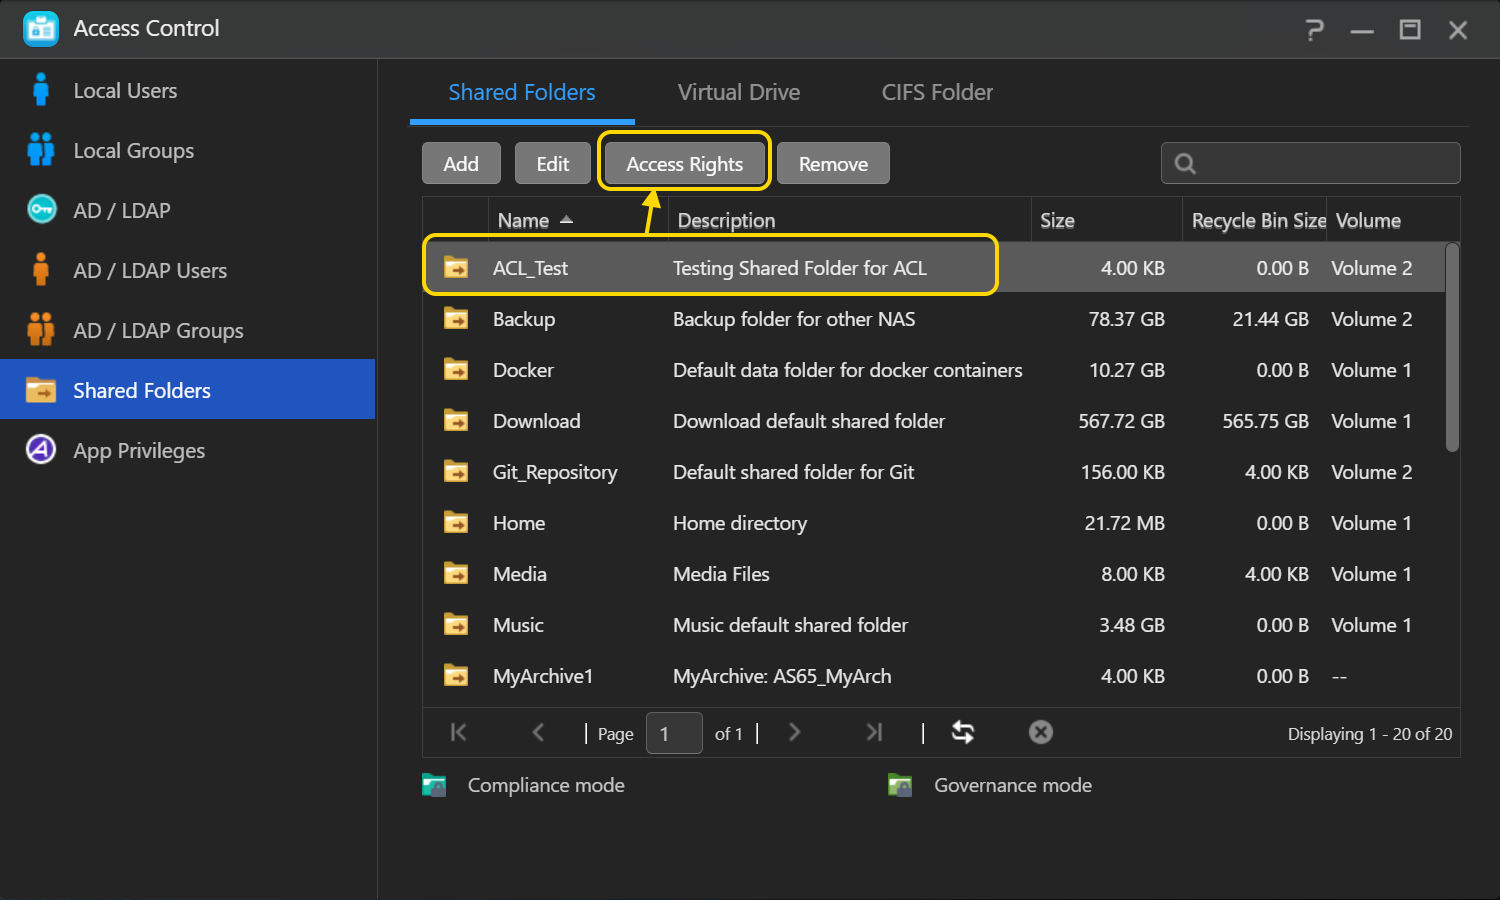
- Выберите Общие папки в разделе Управление доступом.
- Нажмите Добавить.
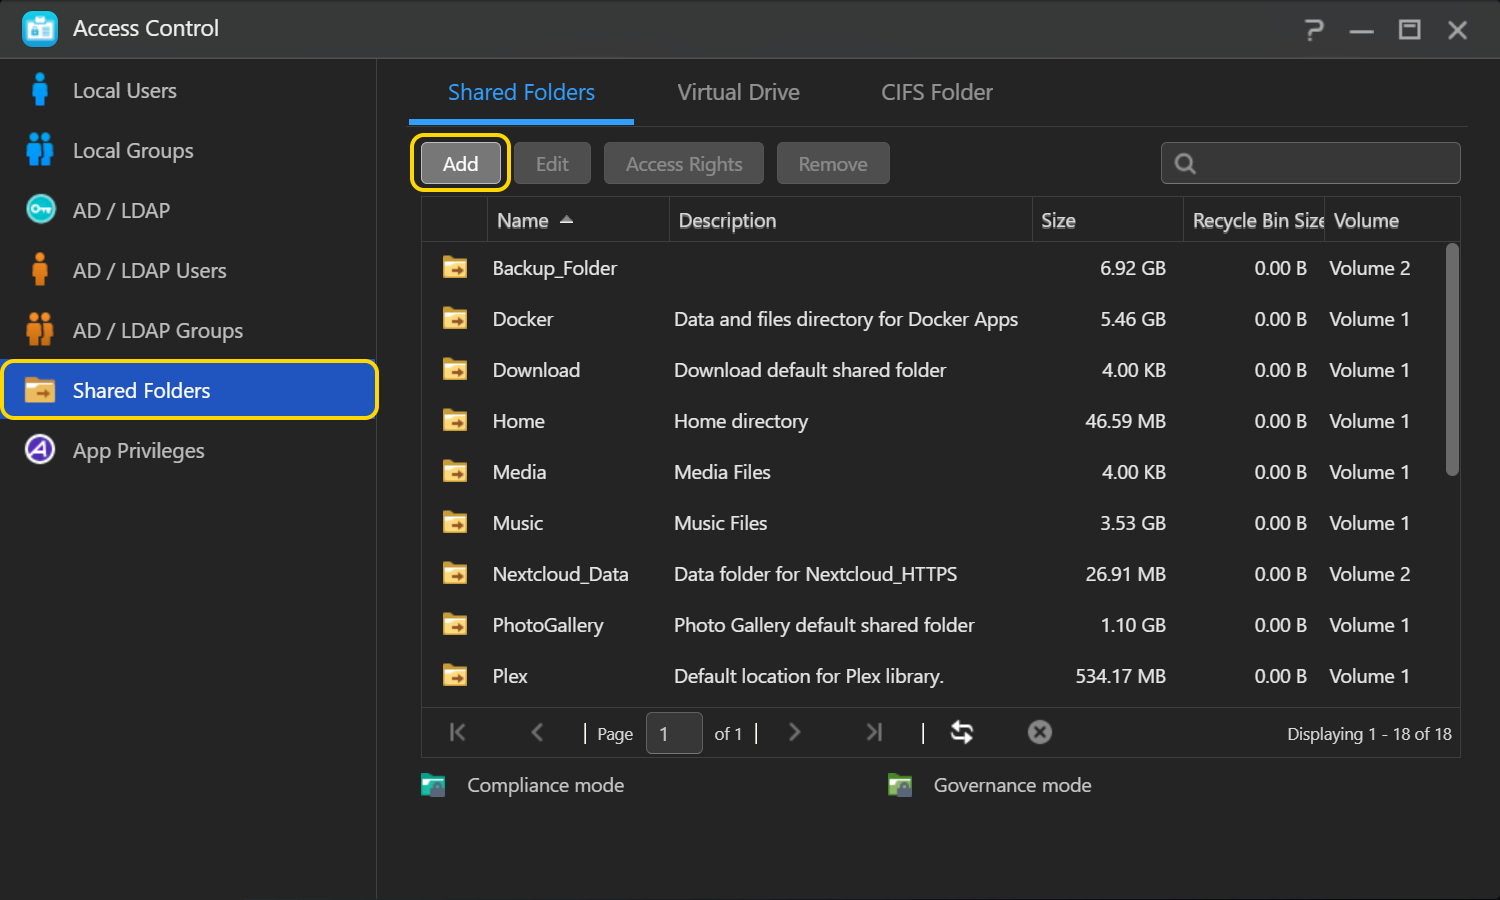
- Введите имя для новой папки. Нажмите [Далее].
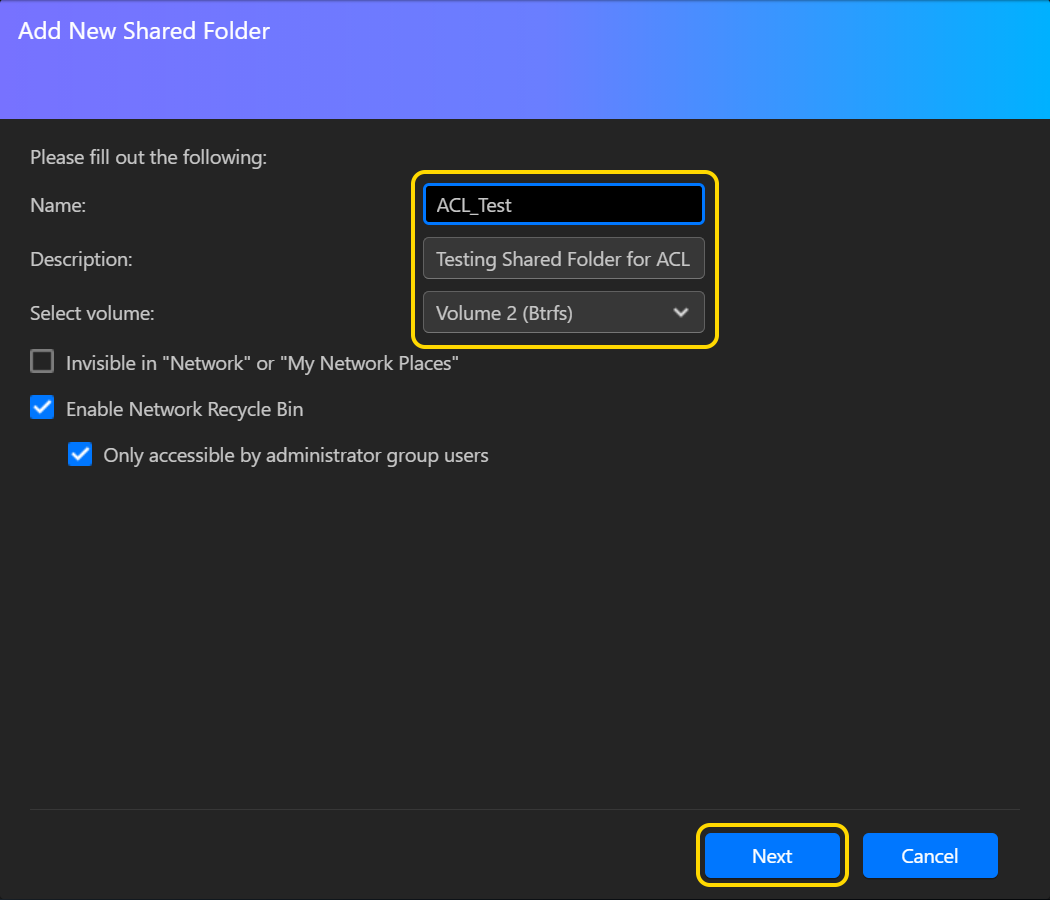
- После настройки прав доступа к общей папке отметьте галочкой [Включить Windows ACL] и нажмите [Далее].
Примечание: Права доступа к общей папке — это первый слой проверки разрешений. Если пользователю или группе не были здесь даны разрешения «Чтение & Запись», то любые назначенные им права доступа для Windows ACL будут заблокированы. Поэтому рекомендуется в начале настроить более мягкие права доступа к общим папкам, имеющим включенный Windows ACL, и затем позднее использовать Windows ACL для дальнейшей настройки более конкретных разрешений.
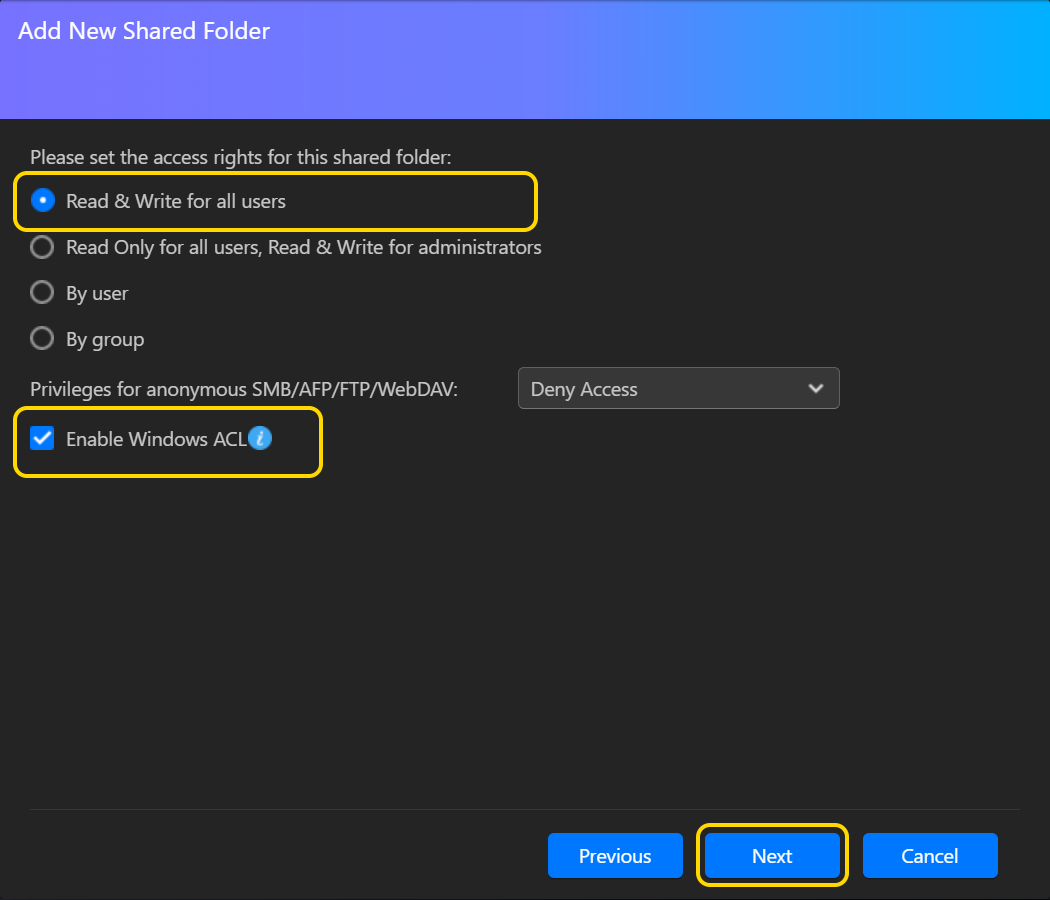
- Выберите [Пропустить] и нажмите [Далее].
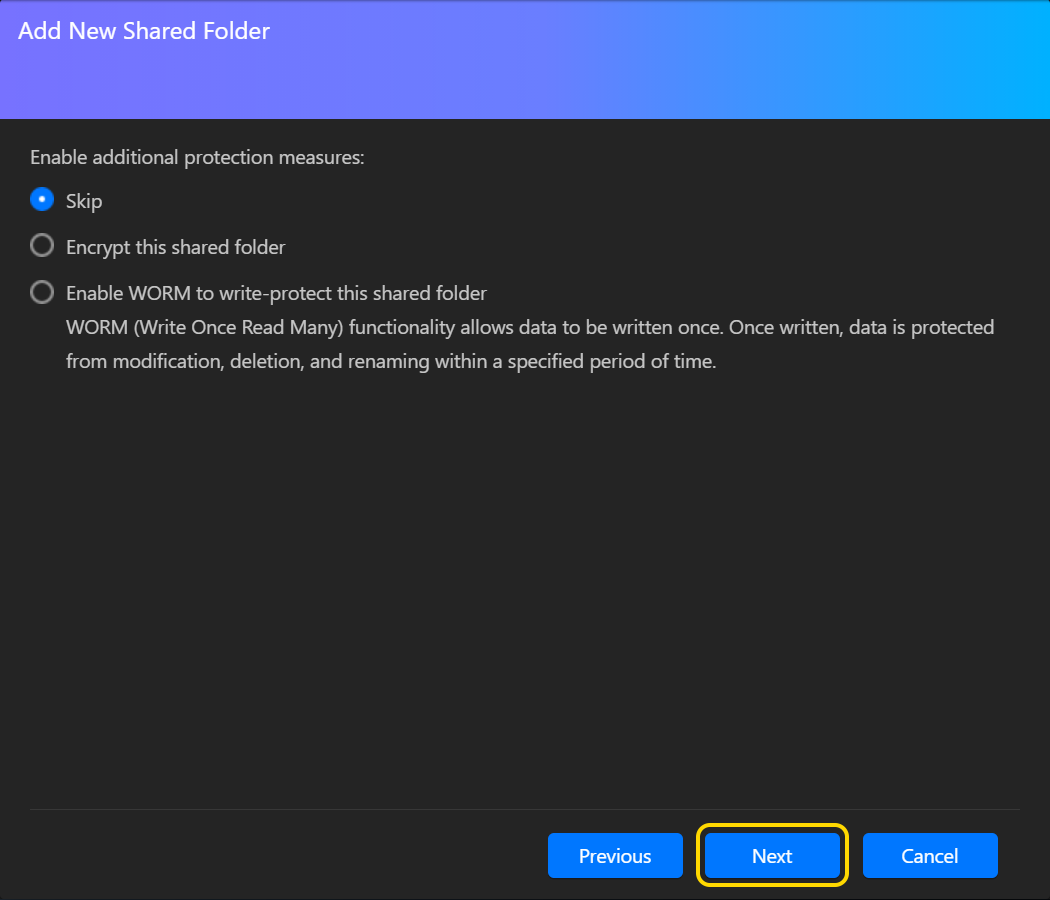
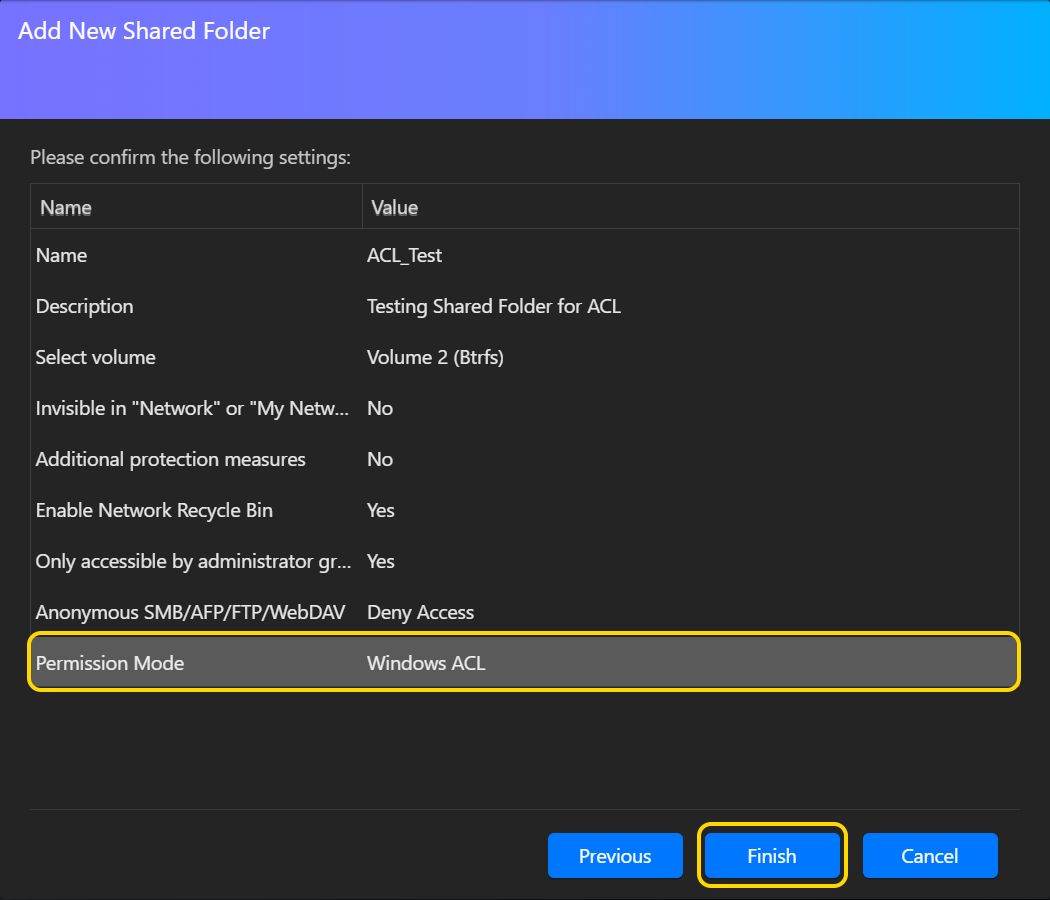
- Подтвердите настройки и нажмите [Завершить].
Включение Windows ACL для уже существующих общих папок:
- Выберите Общие папки в разделе Управление доступом.
- Выберите общую папку, для которой необходимо включить Windows ACL, а затем нажмите [Редактировать]..

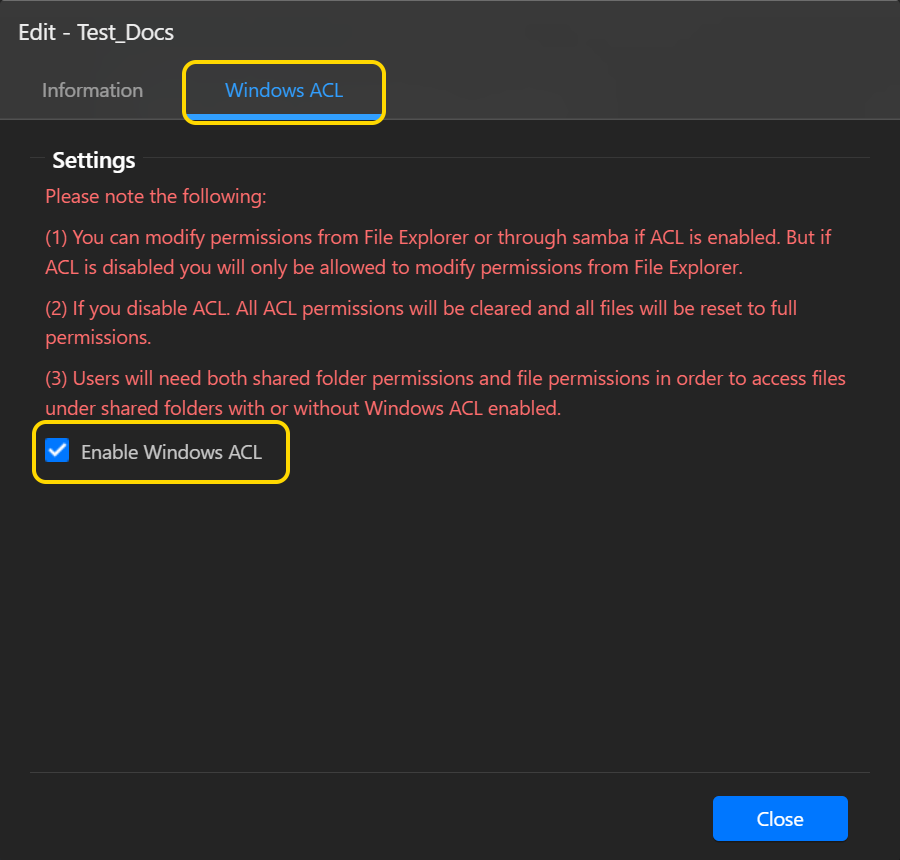
- Выберите [Windows ACL].
- Выберите [Включить Windows ACL], а затем нажмите [Закрыть].
Про Windows ACL
- При включении Windows ACL для общей папки пользовательские или групповые разрешения могут назначаться общей папке и входящим в нее вложенным папкам и файлам.
- Следующие общие папки не поддерживают разрешения Windows ACL: Home, User Homes, PhotoGallery, Web, Surveillance, MyArchive, Network Recycle Bin (Сетевая корзина), виртуальные устройства, внешние устройства (USB жесткие диски, оптические диски).
- Включив Windows ACL, вы сможете использовать Диспетчер файлов ADM или Microsoft Windows Explorer для настройки разрешений. Но в случае отключения Windows ACL настраивать разрешения можно только из Диспетчера файлов ADM.
- Если параметр Windows ACL был включен, а позже появилась необходимость его отключения, всем пользователям будут назначены другие разрешения «Чтение и запись» для всех файлов и папок.
- Независимо от использования Windows ACL, для доступа к файлам пользователям необходима общая папка и разрешения на доступ к файлам.
2.2 Настройка разрешений Windows ACL с Файловый менеджер ADM
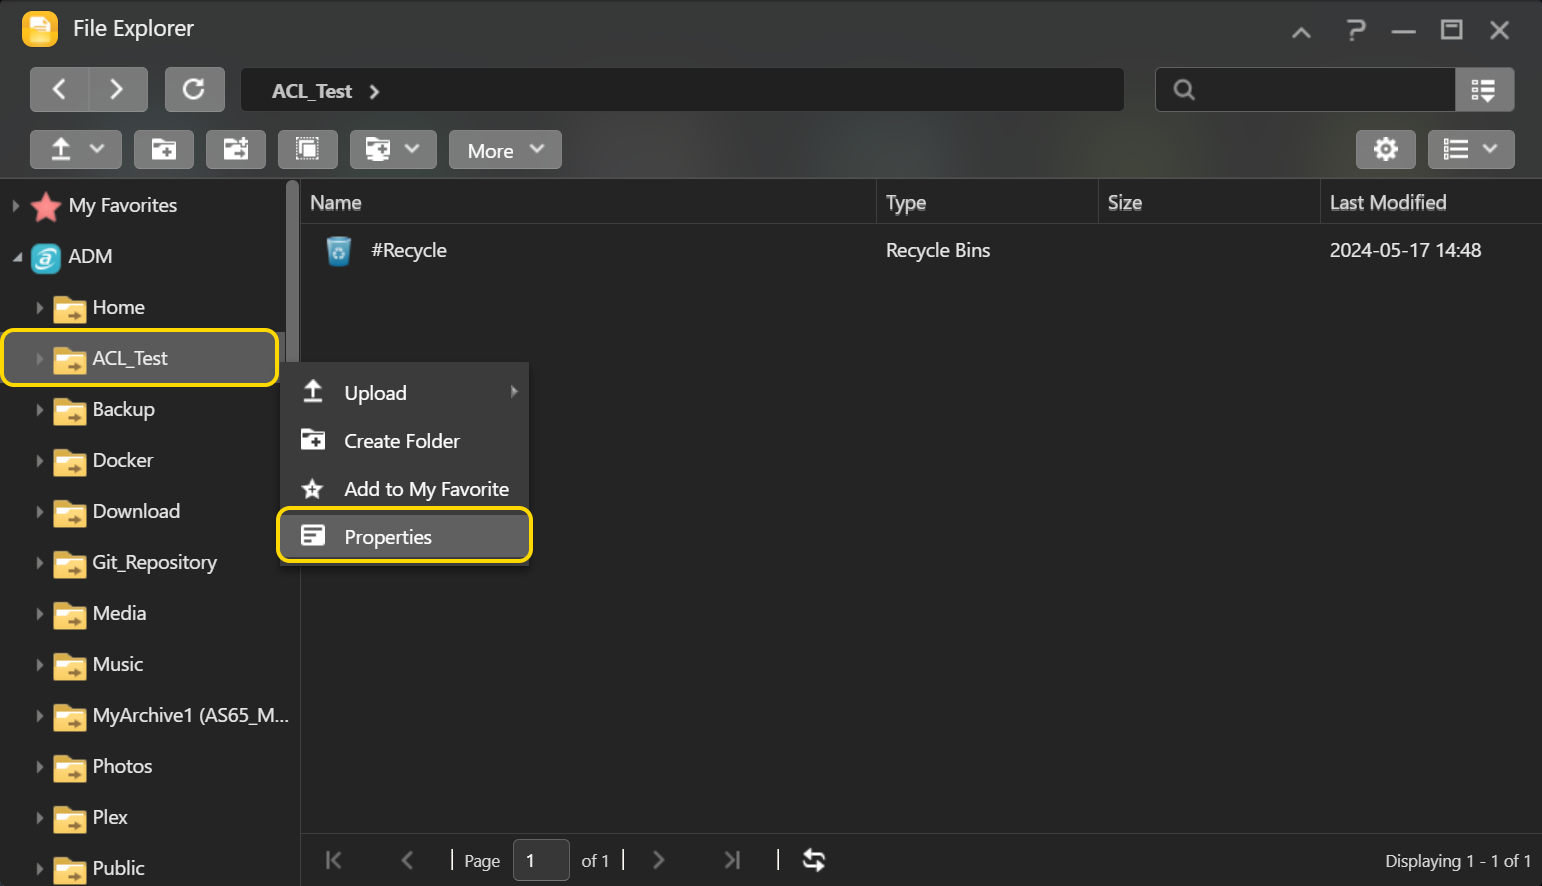
- На рабочем столе ADM выберите [Файловый менеджер].
- Выберите общую папку (или подпапку или файл) для которой вы включили Windows ACL. Нажмите правую кнопку мышки и выберите [Параметры].
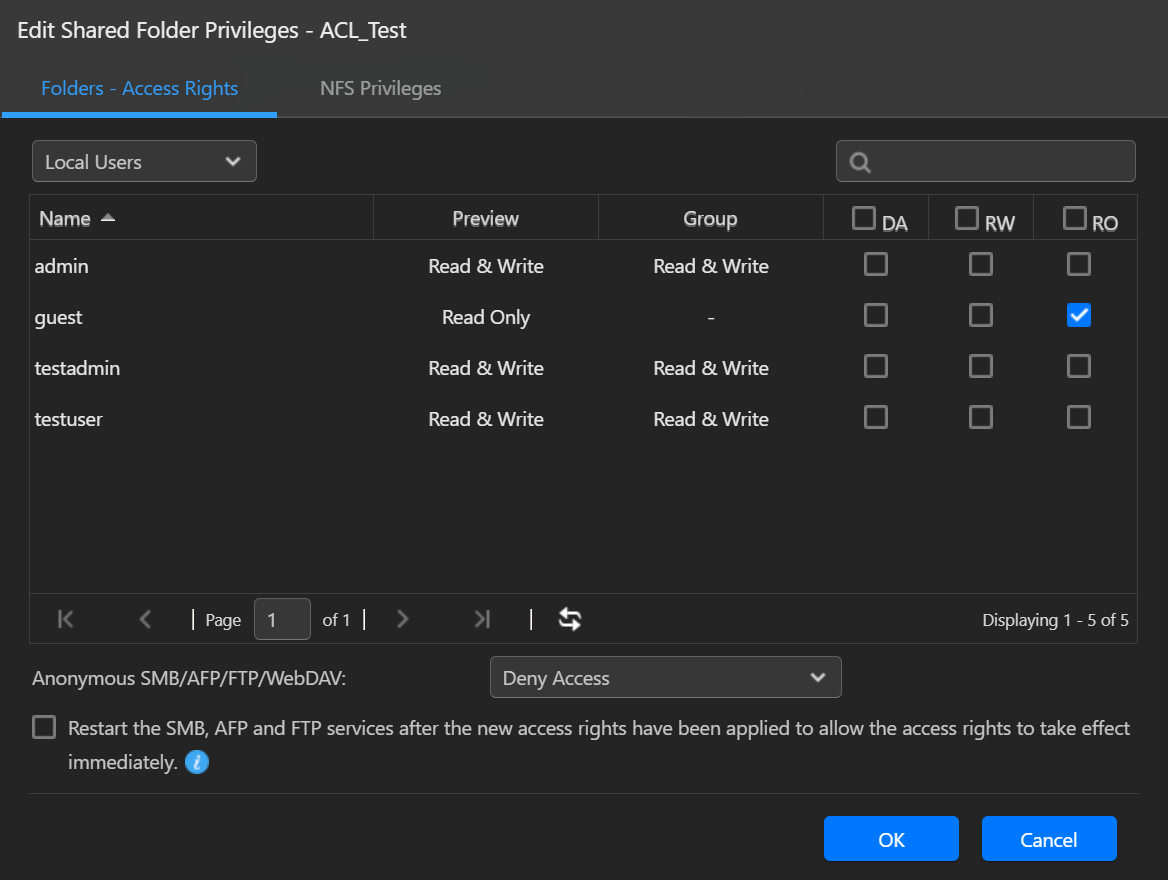
- Из окна параметров выберите вкладку [Права доступа]. Здесь вы сможете увидеть разрешения для папки, настроенные в настоящее время. Также, здесь можно управлять разрешениями для папки.
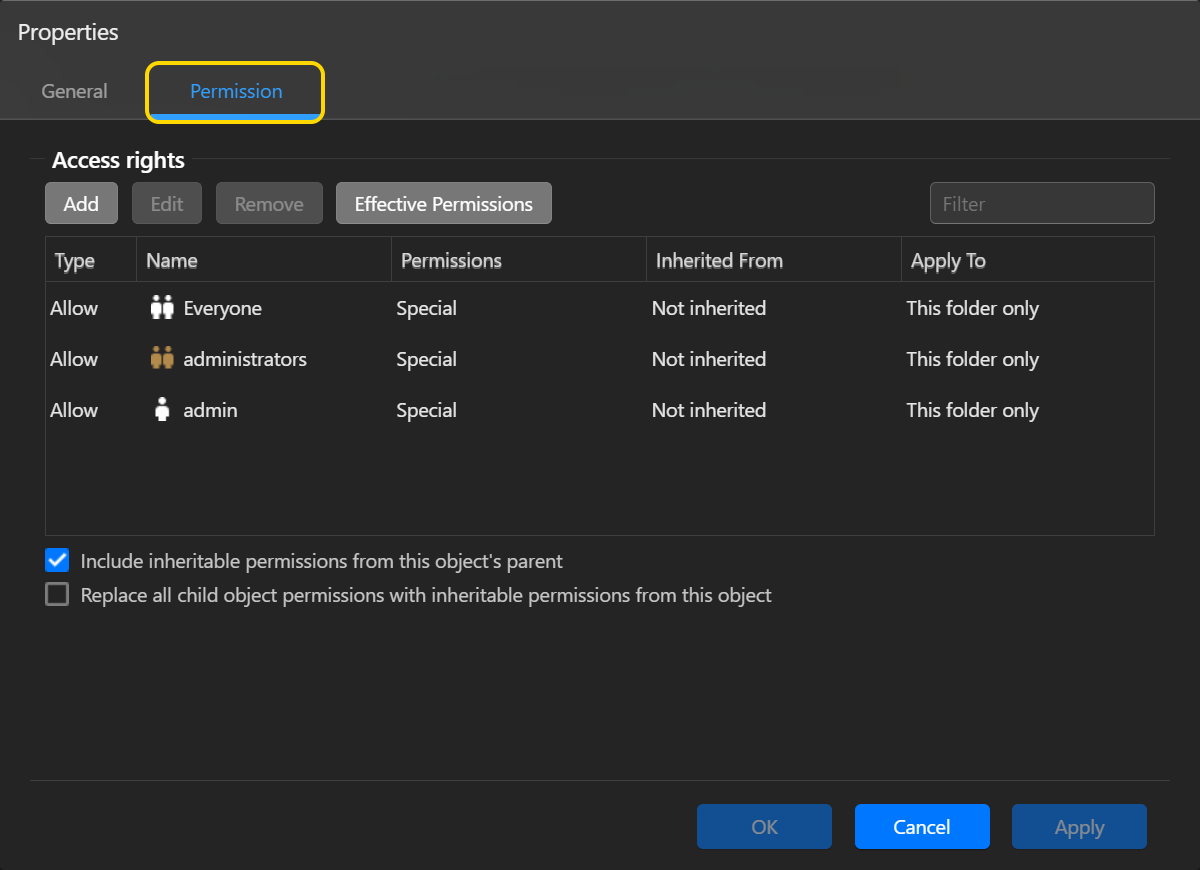
После включения Windows ACL для общей папки система по умолчанию выдаст разрешение “Чтение и Запись, но нельзя Удалить” для учетных записей “Everyone”, “администраторов” и “admin”. Эти разрешения будут применяться только к общей папке и не будут наследоваться объектами ниже. Эти разрешения, установленные по умолчанию, могут быть изменены с помощью кнопки [Редактировать] или [Удалить].
Примечание: Отдельным файлом или папкой используется не более 250 разрешений Windows ACL (включая унаследованные разрешения).
- Включить разрешения, наследуемые от родителя этого объекта:
Эта опция включена по умолчанию. Система будет автоматически настраивать подпапки и файлы, чтобы унаследовать разрешения от вышестоящего объекта. Отключение этой опции отвергнет все наследуемые разрешения и сохранит только вновь добавленные разрешения. - Заменить все разрешения дочернего объекта на наследованные разрешения от данного объекта:
Включение этой опции заменит все разрешения подпапок и файлов на те, что исходят от родительского объекта.
Вы сможете использовать следующие функции управления:
Добавить:
- Нажмите кнопку [Добавить], чтобы создать новое разрешение для объекта.
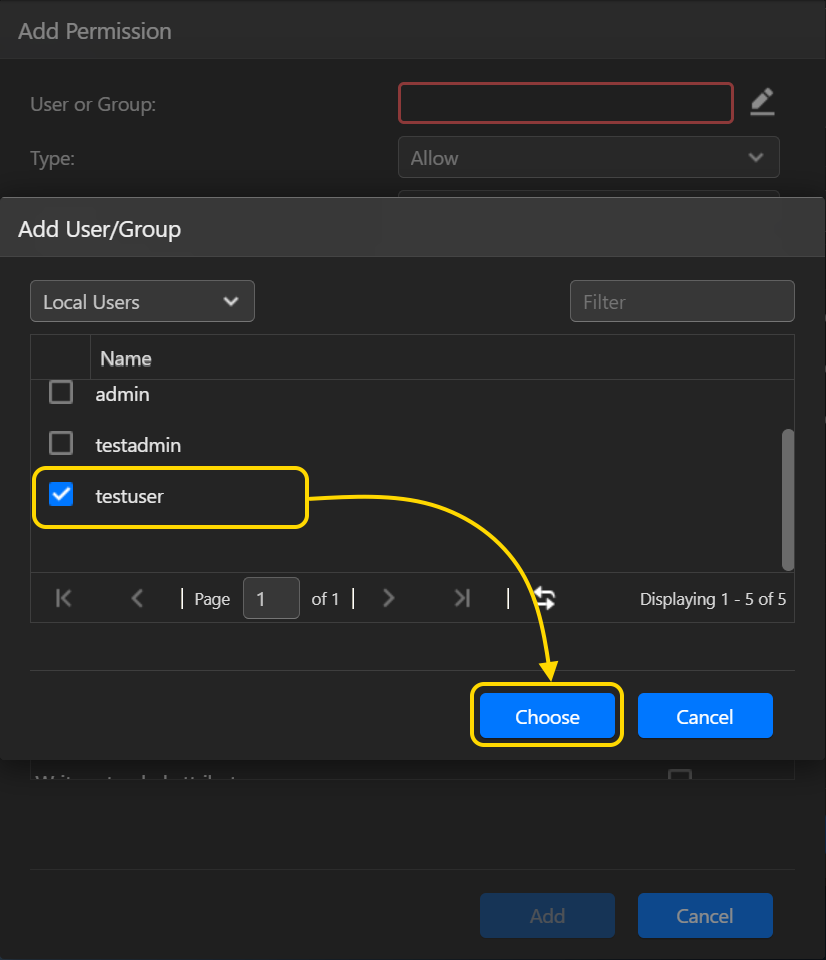
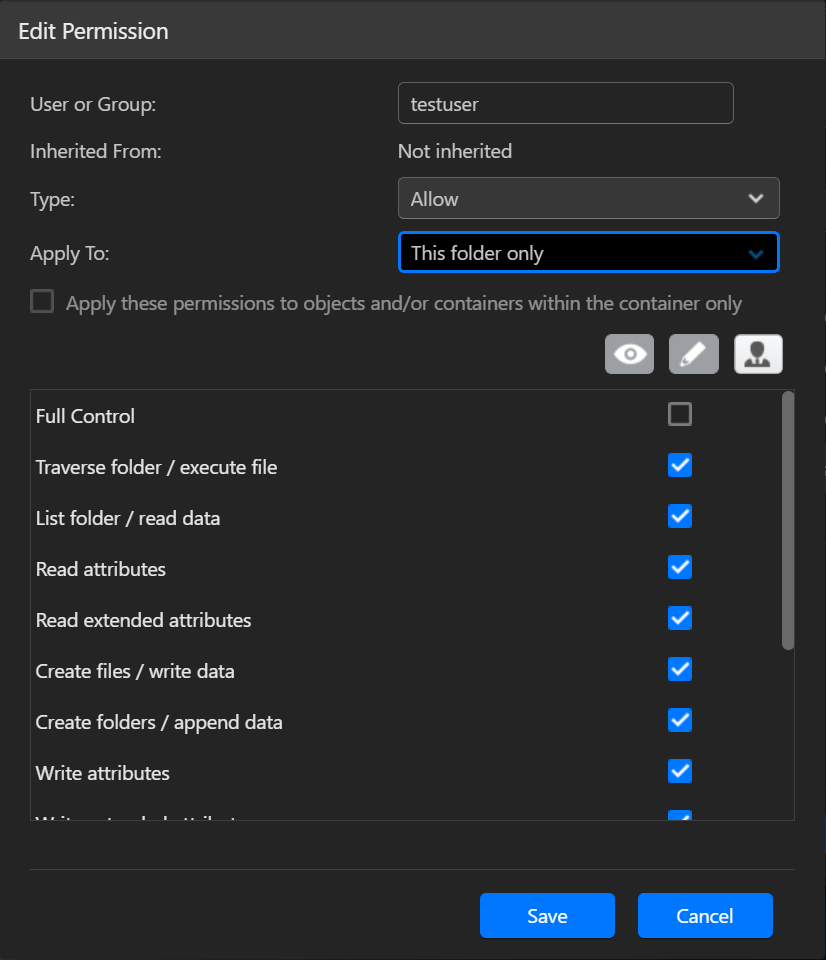
- Пользователь или группа:
указать пользователя или группу, по отношению к которым вы хотите применить разрешение.
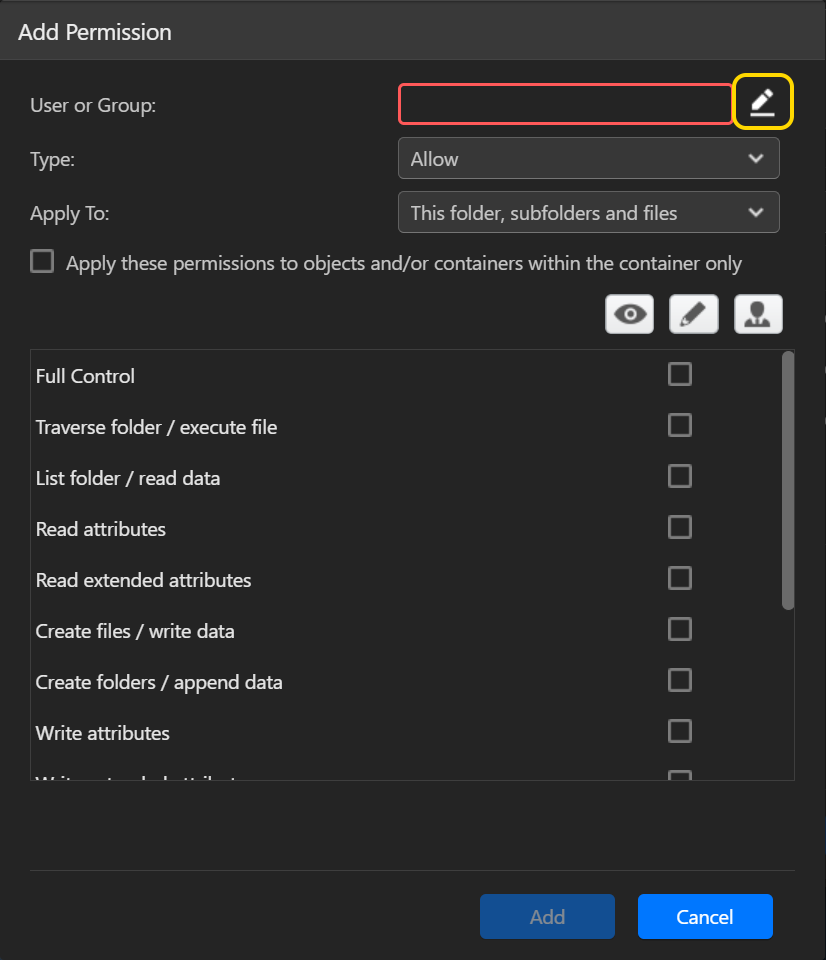
- Тип:
Выберите [Разрешить] или [Запретить], чтобы предоставить или запретить разрешение пользователю или группе. - Применить к:
Эта опция появится только при добавлении разрешений к папке. Из выпадающего меню вы можете выбрать, где будет применяться разрешение. Способ, по которому будет применяться разрешение, определится тем, отметите-ли вы галочкой [Эти разрешения применяются только к объектам и (или) контейнерам, которые находятся внутри контейнера], или нет. - Эти разрешения применяются только к объектам и (или) контейнерам, которые находятся внутри контейнера:
- Когда параметр не отмечен:
Применить к Применить разрешение к данной папке Применить разрешение к подпапкам в данной папке Применить разрешение к файлам в данной папке Применить разрешение ко всем последующим подпапкам Применить разрешение к файлам во всех последующих подпапках Только данная папка Данная папка, подпапки и файлы Данная папка и подпапки Данная папка и файлы Только подпапки и файлы Только подпапки Только файлы - Когда опция отмечена:
Применить к Применить разрешение к данной папке Применить разрешение к подпапкам в данной папке Применить разрешение к файлам в данной папке Применить разрешение ко всем последующим подпапкам Применить разрешение к файлам во всех последующих подпапках Только данная папка Данная папка, подпапки и файлы Данная папка и подпапки Данная папка и файлы Только подпапки и файлы Только подпапки Только файлы
- Когда параметр не отмечен:
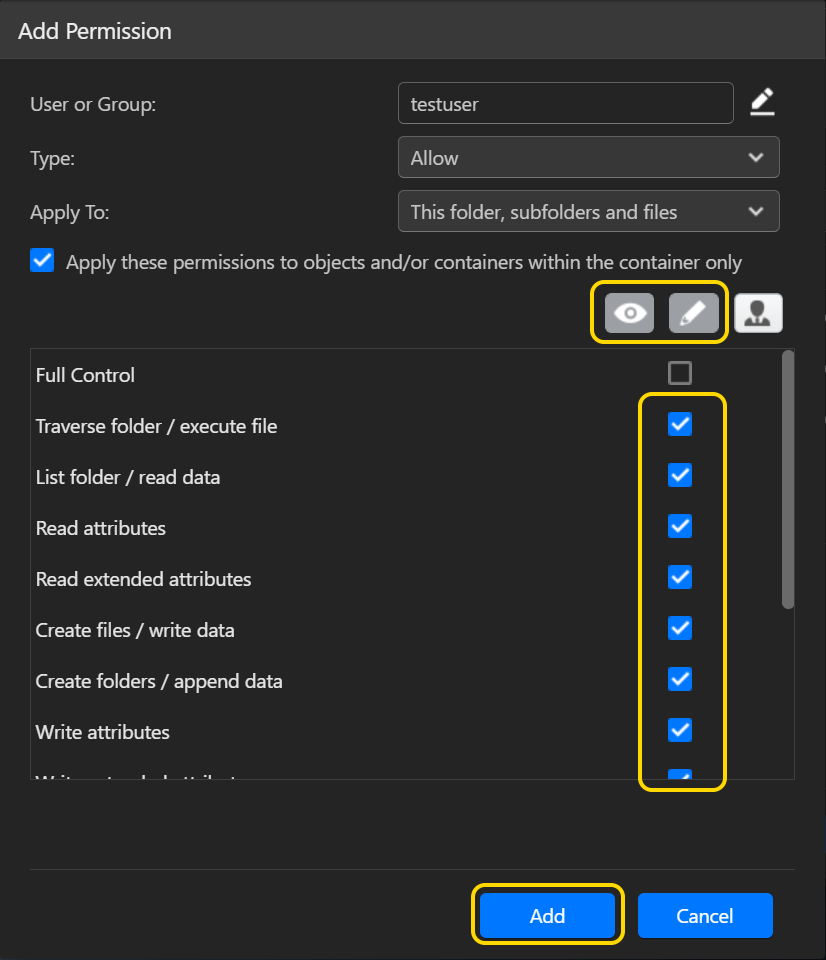
13 типов разрешений Windows ACL описаны ниже:
- Обзор папок/Выполнение файлов: «Обзор папок» разрешает или запрещает перемещение по папкам, чтобы добраться до других файлов или папок, даже если пользователь не имеет прав доступа к пройденным папкам (применимо только к папкам). «Выполнение файлов» разрешает или запрещает работать программные файлы (применимо только к файлам).
- Содержание папки/Чтение данных: «Содержание папки» разрешает или запрещает просмотр имен файлов и подпапок в папке (применимо только к папкам). «Чтение данных» разрешает или запрещает просмотр данных в файлах (применимо только к файлам).
- Чтение атрибутов: Позволяет или запрещает просмотр атрибутов файла или папки, такие, как «только для чтения», «скрытый», «сжатый» и «зашифрованный».
- Чтение дополнительных атрибутов: Позволяет или запрещает просмотр дополнительных атрибутов файла или папки. Дополнительные атрибуты определяются программами и могут варьироваться в зависимости от программы.
- Создать файлы/запись данных: «Создать файлы» разрешает или запрещает создание файлов в папке (применимо только к папкам). «Запись данных» разрешает или запрещает внесение изменений в файл и перезапись существующего контента (применимо только к файлам).
- Создать папки/добавление данных: «Создать папки» разрешает или запрещает создание папок внутри папки (применимо только к папкам). «Добавление данных» разрешает или запрещает внесение изменений в конец файла, но не изменение, удаление или перезапись существующих данных (применимо только к файлам).
- Запись атрибутов: Позволяет или запрещает изменение атрибутов файла или папки.
- Запись дополнительных атрибутов: Позволяет или запрещает изменение дополнительных атрибутов файла или папки. Дополнительные атрибуты определяются программами и могут варьироваться в зависимости от программы.
- Удалить подпапки и файлы: Позволяет или запрещает удаление подпапок и файлов, даже если разрешение «Удалить» для подпапки или файла не было предоставлено (применимо к папкам).
- Удалить: Позволяет или запрещает удаление файла или папки.
- Чтение разрешений: Позволяет или запрещает чтение разрешений файла или папки.
- Изменить разрешения: Позволяет или запрещает изменение прав доступа к файлу или папке.
- Взять право владения: Позволяет или запрещает брать право владения файлом или папкой. Владелец файла или папки всегда может изменить разрешения на них, независимо от любых существующих разрешений, защищающих файл или папку.
Редактировать:
- Выбрав разрешение и затем нажав кнопку [Редактировать], вы сможете его модифицировать.
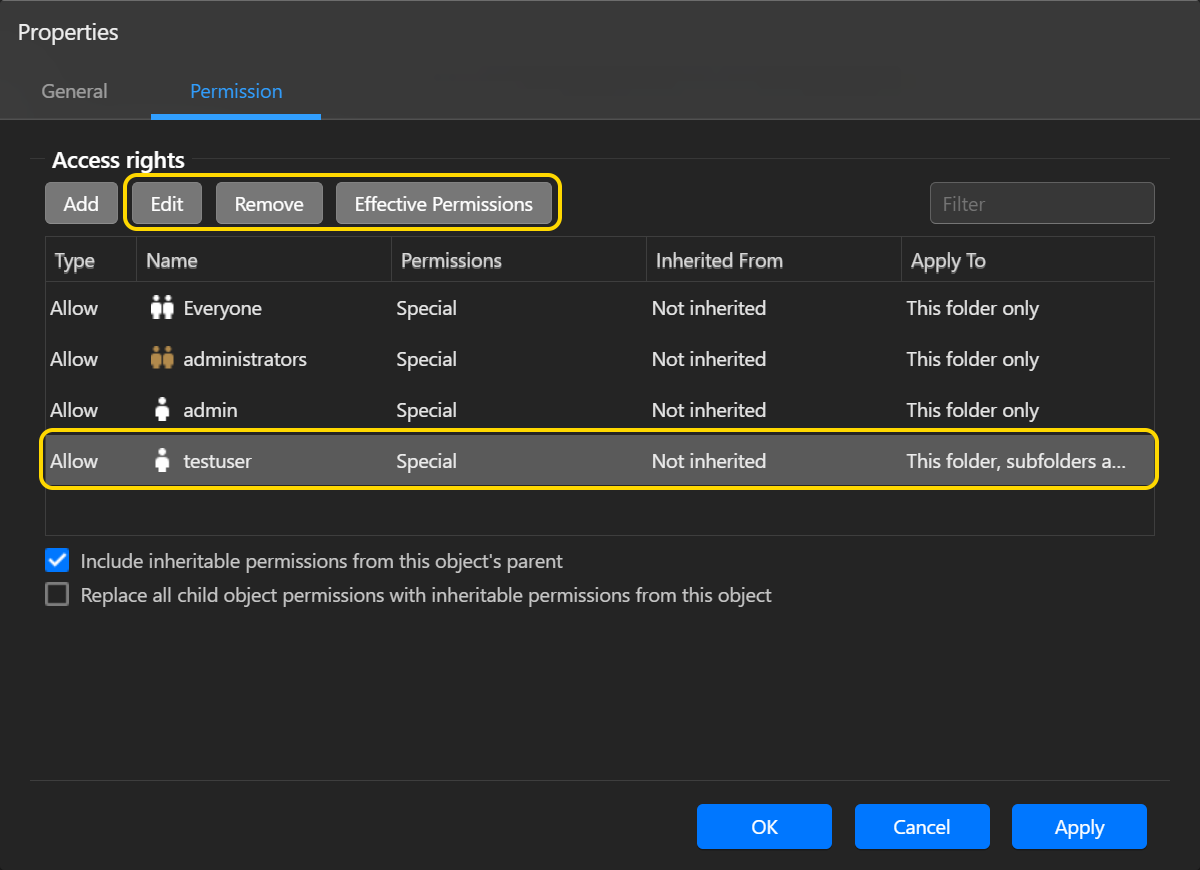
Удалить:
- Выбрав разрешение и затем нажав на кнопку [Удалить], вы удалите разрешение от данного объекта.
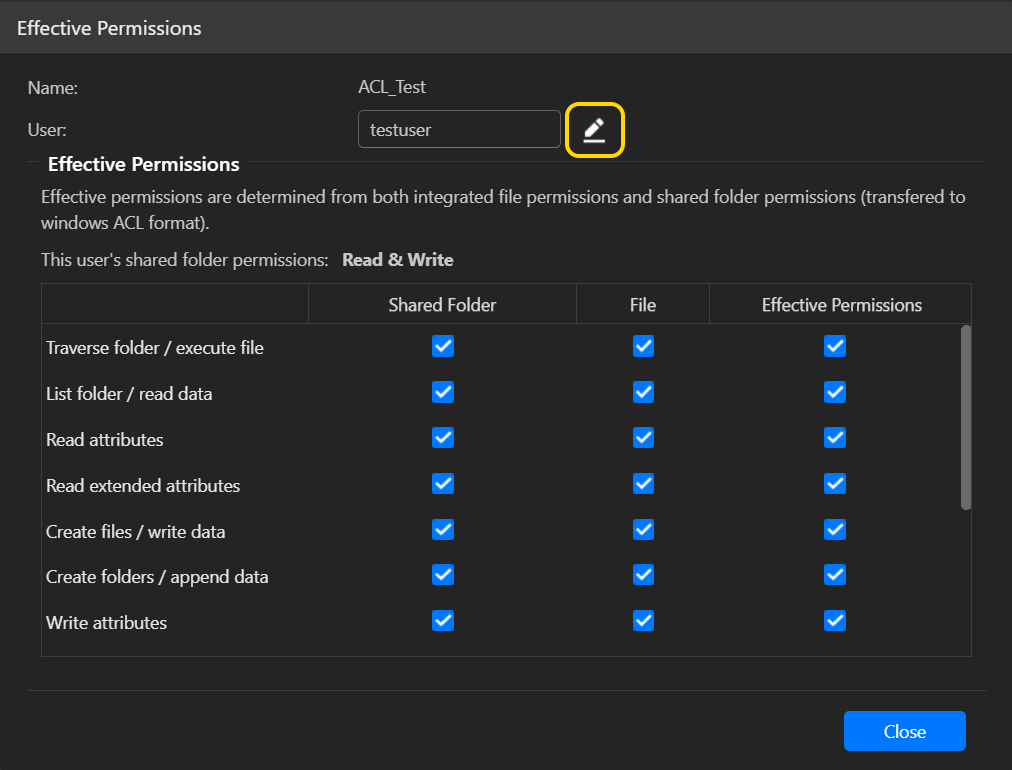
Действующие разрешения:
- При нажатии на кнопку [Действующие разрешения], и затем выбрав пользователя из списка, вы сможете просматривать эффективные разрешения пользователя по отношению к указанной папке или файлу. Действующие разрешения определяются комбинацией разрешений Windows ACL и правами доступа к общей папке.
2.3 Настройка разрешений Windows ACL с Проводником Windows
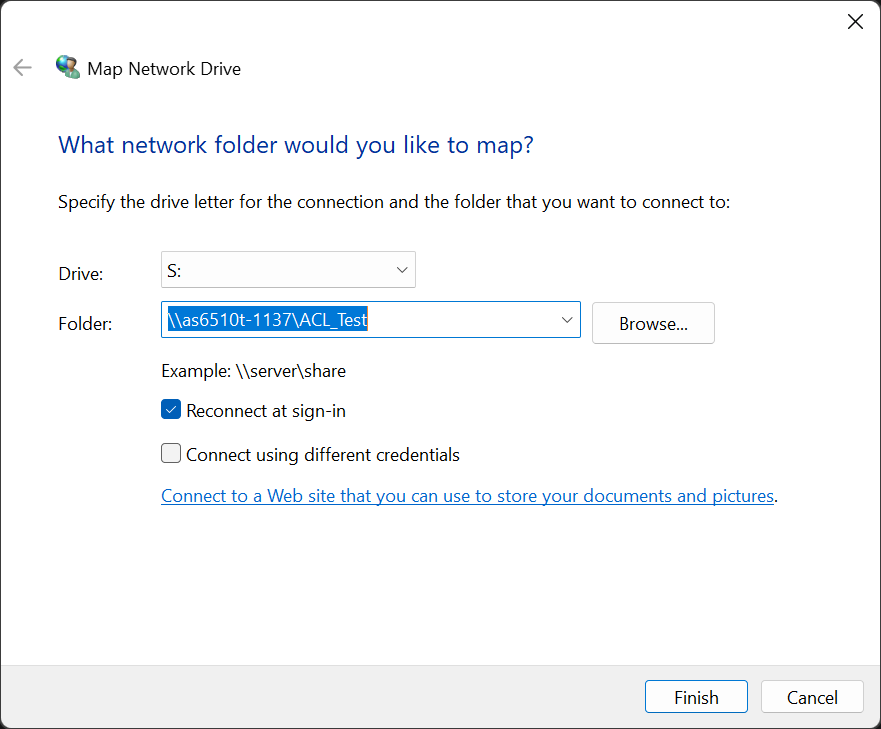
Во-первых, используйте учетную запись администратора для отображения включенной общей папки под управлением Windows ACL в качестве сетевого диска. Для дальнейшей информации, пожалуйста, обратитесь к курсу NAS 106: Работа с NAS в Microsoft Windows.
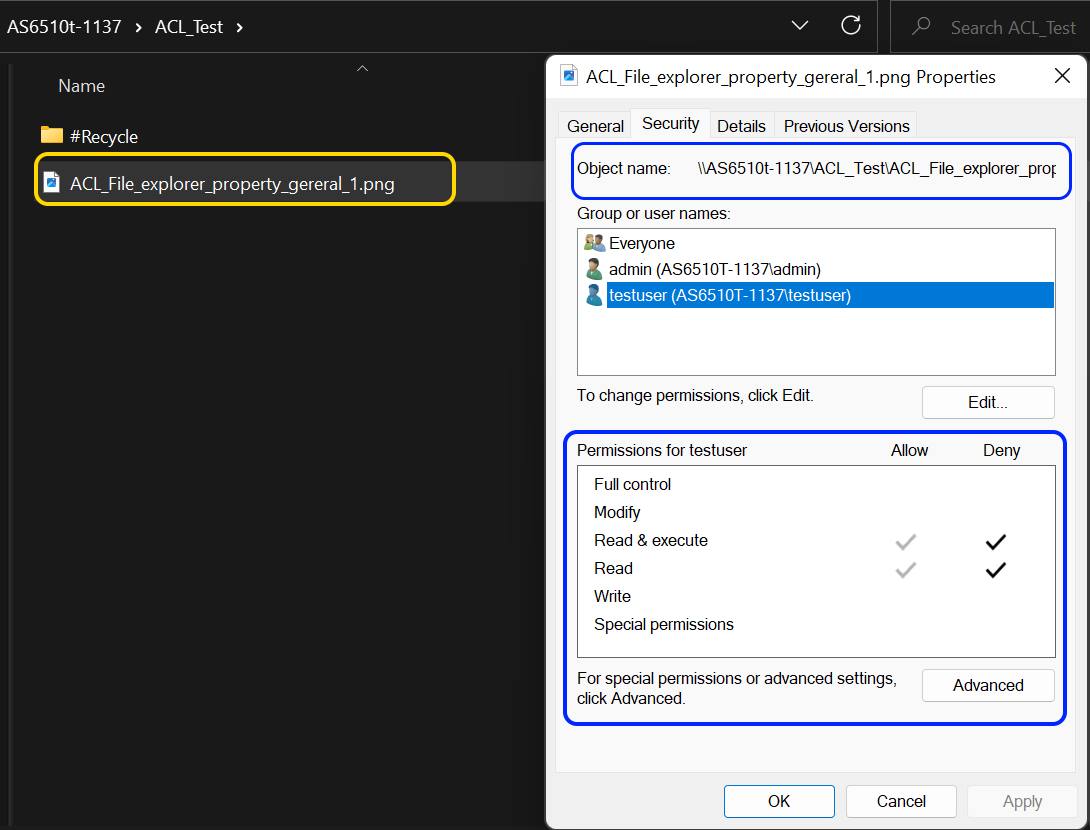
- Нажмите правую кнопку мышки на любой файл или подпапку внутри общей папки и затем выберите [Параметры].
- Выберите вкладку [Безопасность]. Здесь вы сможете увидеть список пользователей и групп пользователей и их права доступа ACL для файла или подпапки.

Если объект одновременно унаследовал разрешения от своего родителя и также явные разрешения, унаследованные разрешения будут выведены серым цветом, в то время, как явные разрешения будут выведены черным цветом.
- Нажмите [Редактировать] [Добавить].
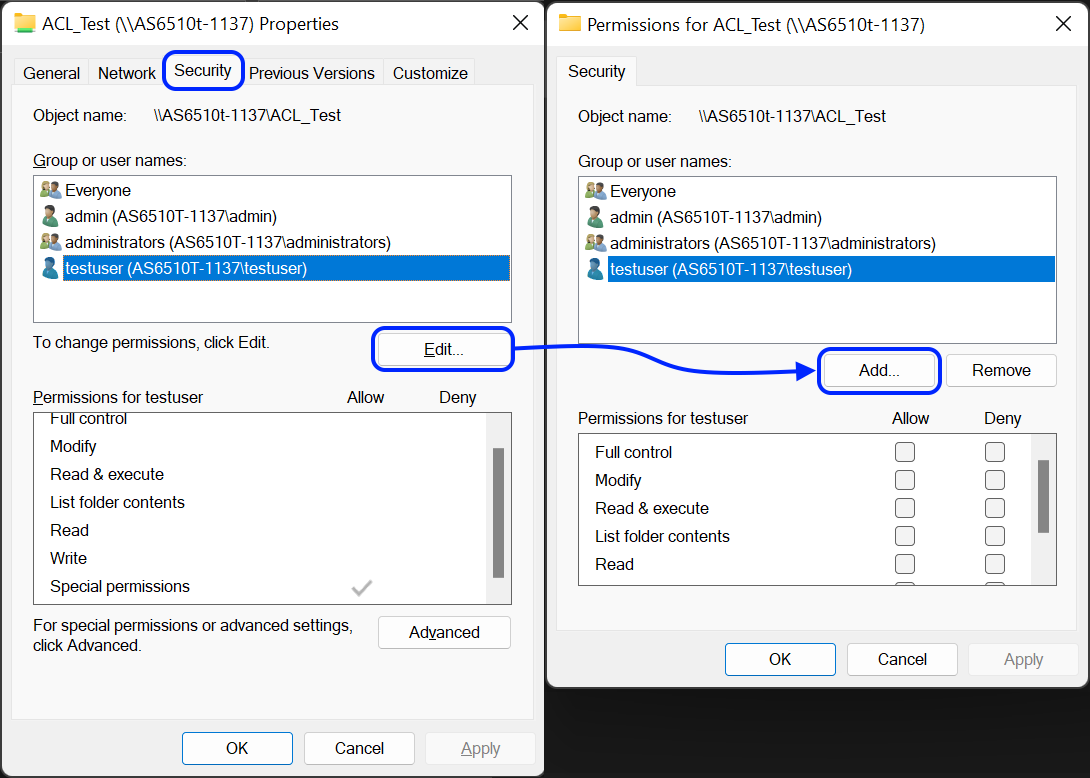
- В поле [Из этой локации:] вы должны увидеть следующую информацию:
- Если NAS был добавлен к домену Windows AD, вы увидите имя домена AD.
- Если NAS не был добавлен к домену Windows AD, вы увидите IP адрес NAS.
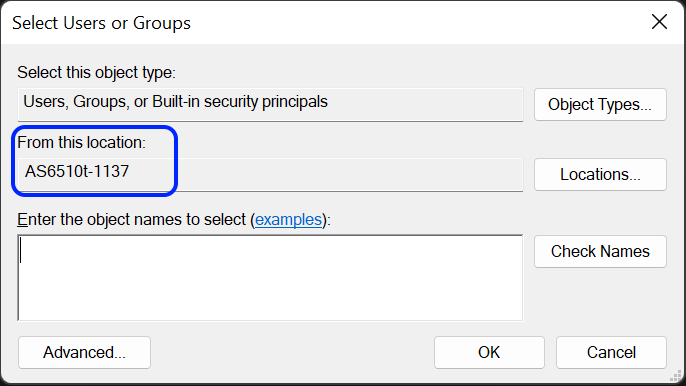
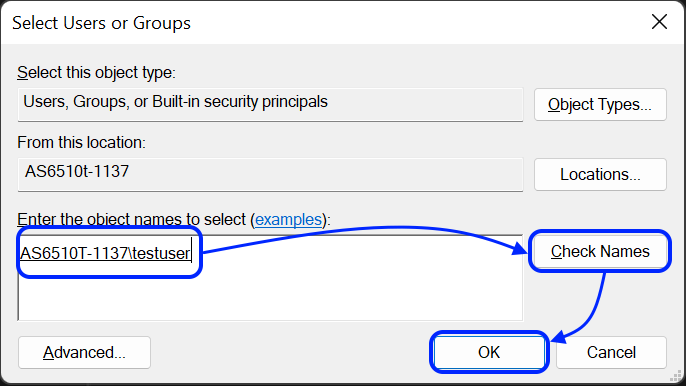
- В поле [Введите имена объектов для выбора] введите следующую информацию:
- Если NAS был добавлен в домен Windows AD, введите имя пользователя или группы пользователей домена и затем нажмите [Проверить имена] для того, чтобы подтвердить имя пользователя/группы. Затем нажмите [OK].
- Если NAS не был добавлен в домен Windows AD, введите имя локального пользователя или группы ADM и затем нажмите [Проверить имена] для того, чтобы подтвердить имя пользователя/группы. Затем нажмите [OK].
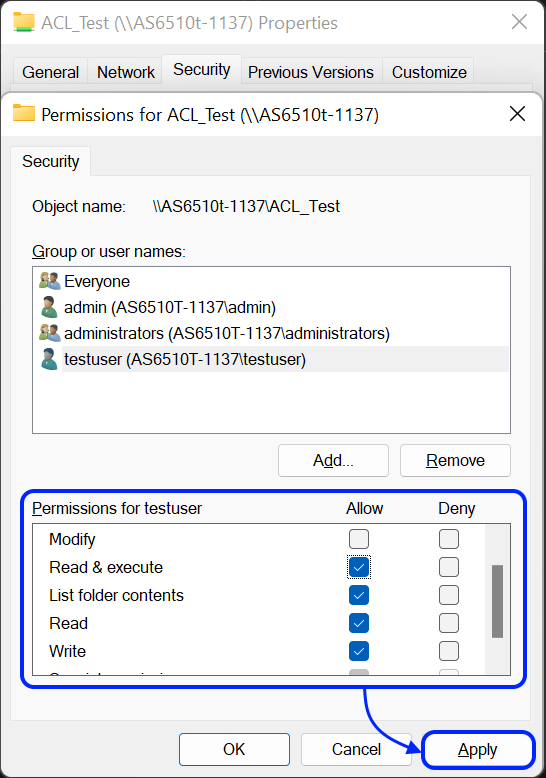
- Теперь вы можете увидеть вновь добавленного пользователя или группу в списке [Group or user names:]. Выберите пользователя или группу, и затем используйте флажки [Разрешить] и [Запретить] для настройки их прав доступа на данный объект. По завершении нажмите [Применить].
2.4 Правила разрешений и меры предосторожности Windows ACL
Конфликтующие разрешения ACL:
- Если вы столкнулись с конфликтующими разрешениями Windows ACL, приоритет будет отдан явным разрешениям объекта. Например, если пользователь «testuser» наследует разрешения «Разрешить чтение и выполнение» для файла, но заданные явные разрешения для файла «Запретить чтение и выполнение», то «testuser» не сможет получить доступ к файлу.
- И наоборот, если «testuser» наследует разрешение «Запретить Чтение», но явным разрешением, данным для файла, является «Разрешить чтение», то «testuser» сможет получить доступ к файлу.
Правила перемещения файлов и папок:
| Копировать | Переместить | ||
|---|---|---|---|
| Перемещение в той же общей папке | A1. ACL Oтключен | Сохранить существующие разрешения | Сохранить существующие разрешения |
| A2. ACL Включен |
|
|
|
| Перемещение между различными общими папками | B1. ACL Oтключен ACL Oтключен | Сохранить существующие разрешения | Сохранить существующие разрешения |
| B2. ACL Oтключен ACL Включен | Применить разрешения ACL, наследованные от папки назначения | Применить разрешения ACL, наследованные от папки назначения | |
| B3. ACL Включен ACL Oтключен |
|
|
|
| B4. ACL Включен ACL Включен |
|
|
Исключения: Когда данные удалены из общей папки с включенным ACL и перемещены в сетевую корзину, правила из «B3» в приведенной выше таблице не будут применяться. Это сделано для предотвращения ситуации, когда файлы с разрешением «Запретить доступ» могут быть удалены и перемещены в сетевую корзину, и затем стать полностью доступными для всех пользователей. Принимая во внимание конфиденциальность и безопасность, файлам, перемещенным в сетевую корзину из папки с включенным ACL, будет присвоено разрешение «Чтение и запись для владельцев, запретить доступ для всех других пользователей».
Разрешения удаления файлов:
Есть 2 разрешения, связанные с удалением файлов:
- Пользователь имеет явное разрешение «Удалить» для файла.
- Пользователь имеет разрешение «Удалить подпапки и файлы» для родительской папки файла.
Если какое-либо из вышеуказанных разрешений настроено как «Запретить», то пользователь не сможет удалить файл. Только если ни одно из вышеуказанных разрешений был сконфигурировано как «Запретить», и по крайней мере одно из них был сконфигурировано как «Разрешить», то пользователь сможет удалить файл.
Права Доступа объектов:
После того как Windows ACL включен для папки общего доступа, каждый объект (подпапки и файлы), содержащийся в папке, также будет иметь право доступа.
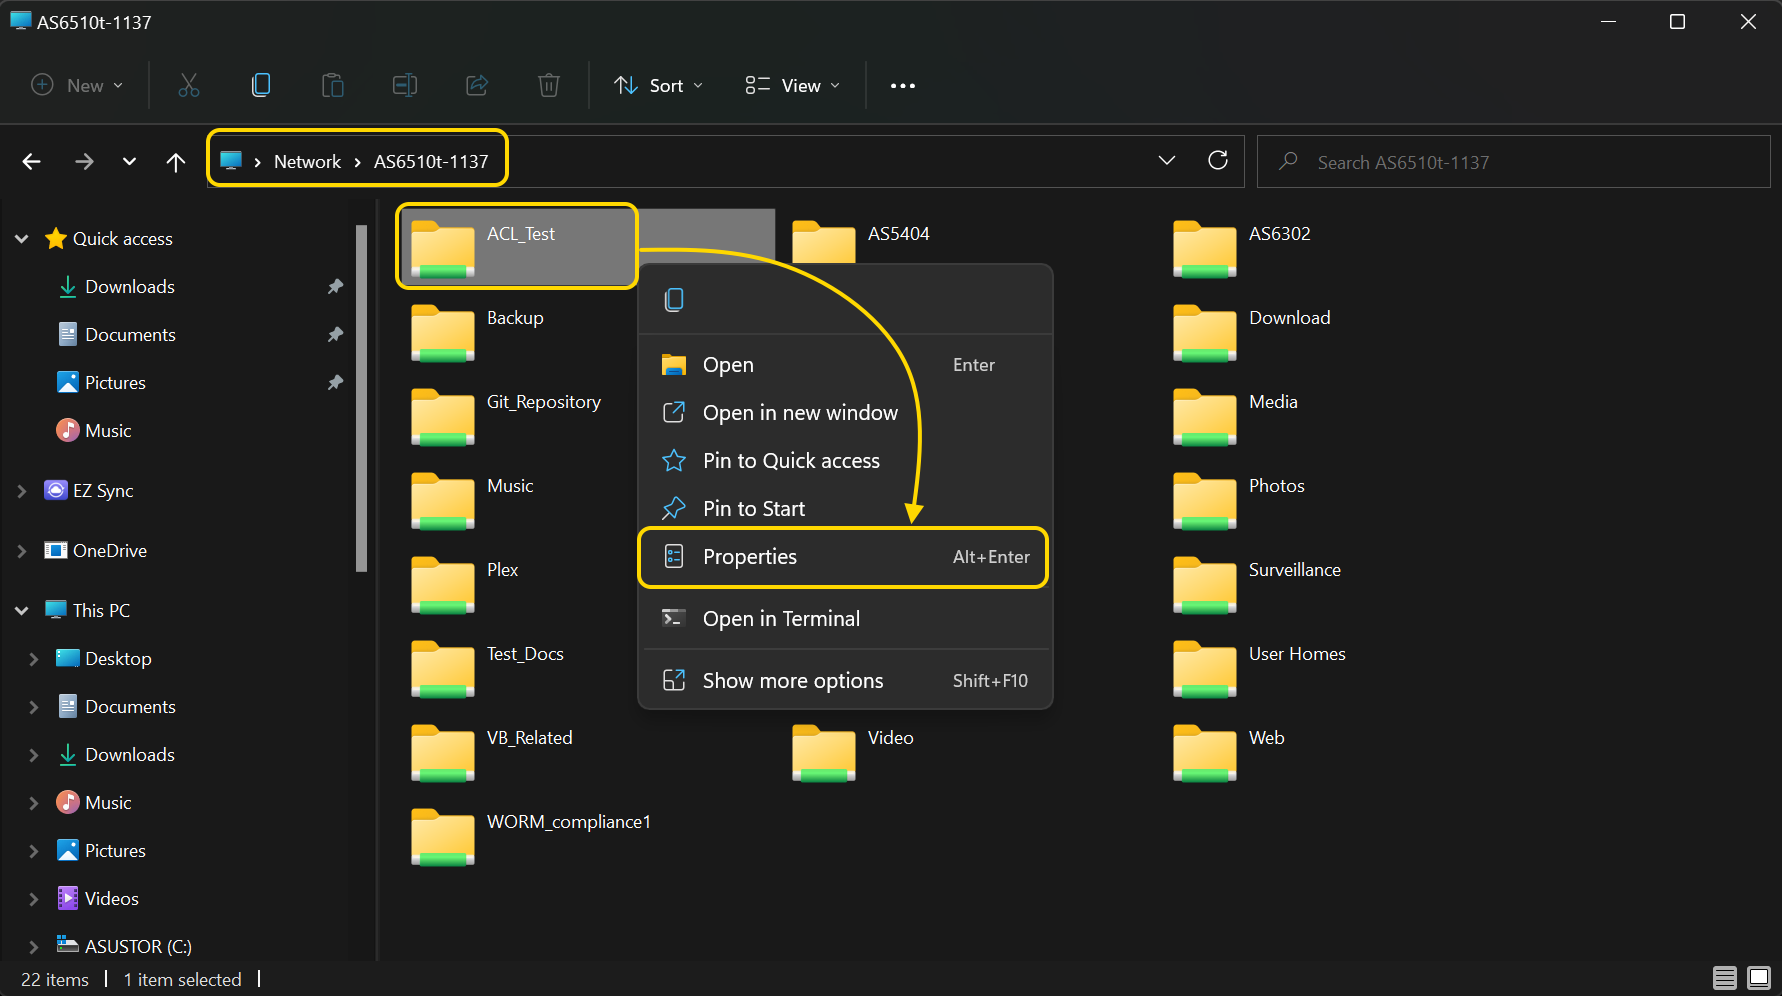
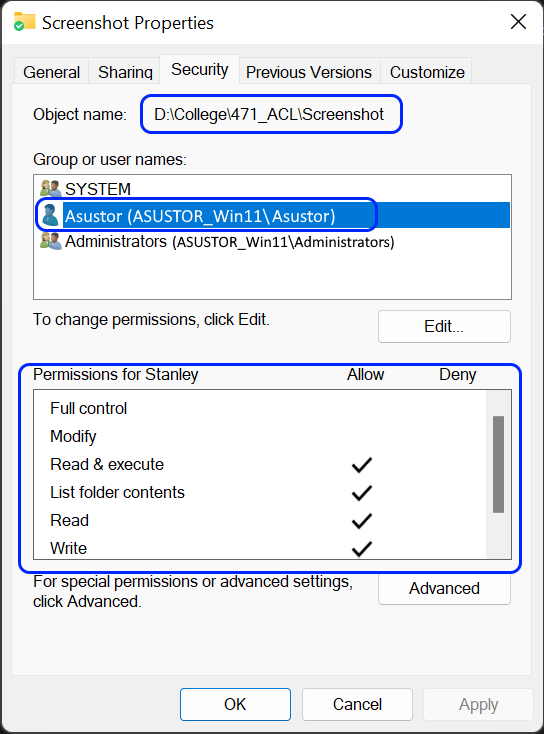
- Для того, чтобы увидеть права доступа к объекту, выберите его из Файлового Менеджера ADM, нажмите правую кнопку мышки и выберите [Параметры]. Там будет ссылка для редактирования в секции [Права доступа к общей папке] во вкладке [Общие сведения].
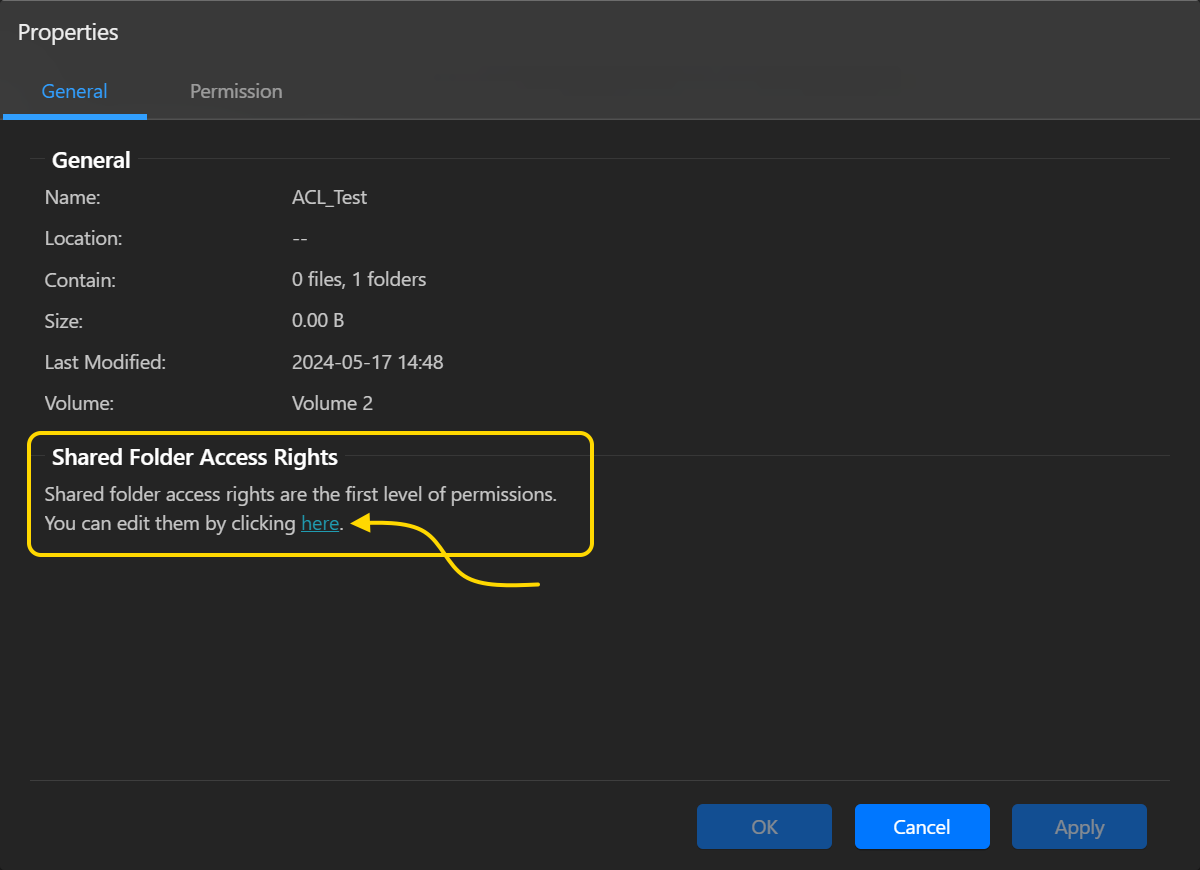
Человек, имеющий право доступа, сможет настраивать разрешения ACL. Например, пользователь admin в приведенном выше рисунке, является владельцем папки ACL_Test. Поэтому admin сможет настраивать разрешения ACL для папки и подпапки, и файлов, содержащихся в нем.
Для каждого вновь добавленного объекта права доступа для создателя объекта будет установлены по умолчанию. Кроме того, пользователи в группе администраторов смогут менять права доступа. Например, если мы хотели передать право владения папки ACL_Test другим пользователям (то есть, testuser), то admin и все пользователи в группе администратора будут иметь способность передавать право собственности. Как только testuser становится владельцем папки ACL_Test, он будет иметь возможность перенастраивать разрешения для подпапок и файлов, даже если первоначально она не имела права доступа к ним.
2.5 Перемещение объектов в ваш NAS с одновременным поддержанием разрешений ACL
В момент, когда все ПК с ОС Windows и устройства NAS в сетевой среде были добавлены к тому же домену Windows AD, все учетные записи пользователей и разрешения к домену могут быть объединены вместе. Тем не менее, при перемещении файлов или папок с сервера ПК на NAS существующие разрешения ACL не будут сохранены (используя правила из предыдущего раздела). Это заставит ИТ-персонал перенастроить разрешения.
Если вы хотите сохранить существующие разрешения ACL при перемещении файлов или папок на NAS, вы можете воспользоваться Fastcopy–сторонним програмным обеспечением. В примере ниже показано, как пользоваться FastCopy.
- Во-первых, используйте учетную запись администратора для отображения включенной общей папки под управлением Windows ACL в качестве сетевого диска. Для дальнейшей информации, пожалуйста, обратитесь к курсу NAS 106: Работа с NAS в Microsoft Windows.
- Откройте FastCopy.
- [Source]: Укажите исходную папку здесь.
- [DestDir]: Укажите здесь папку назначения (сетевой диск, отображенный на предыдущем шаге).
- Отметьте галочкой [ACL], чтобы гарантировать, что FastCopy сохранит исходные разрешения ACL ваших файлов при их перемещении.
- Нажмите [Execute], чтобы начать перемещение папки.
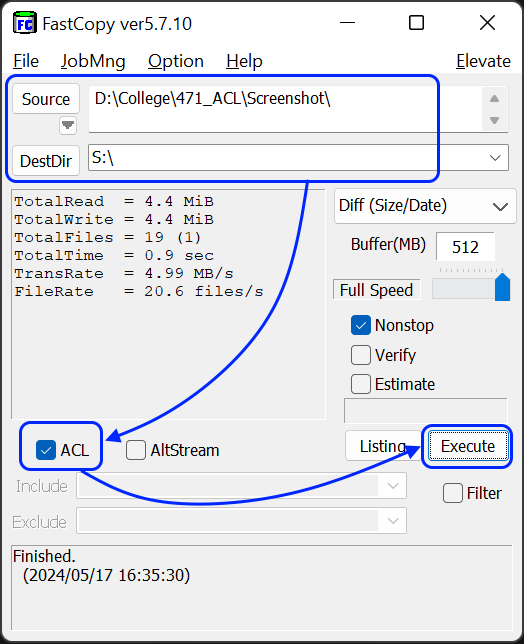
- После того, как папка была успешно перемещена, все данные, перемещенные в место назначения, сохранят свои разрешения ACL от источника (включая все явные и наследуемые разрешения). Эти данные не будут наследовать разрешения от родительского объекта в источнике.

Была ли эта статья полезной? Да / Нет
Не связано с моей проблемой
Слишком сложно
Неправильная информация
Недостаточно информации
У вас есть другое отзывы об этой статье?
Предложите тему
Пройти тест
Controlling who has access to what, is a fundamental aspect of securing applications, data points, and network resources in an enterprise environment. In the realm of enterprise networks, access control is pivotal in restricting user and machine access solely to the necessary applications or data points required for their specific roles.
At the heart of access control lies the concept of security features designed to regulate who gains access to the resources in an operating system and the extent of their access. This concept, often referred to as network access control, lays the foundation for segmenting your network—a critical requirement in network security.
An Overview of Acess Control Lists (ACLS) and How They Work
At the core of Windows Access Control mechanisms are Access Control Lists (ACLs). Implementing ACLs involves delineating permissions for various users and devices, thus defining the level of access each has to specific network resources or objects. This process is central to securing an organization’s data and system integrity. A Public Key Infrastructure (PKI) can be used to enhance an organization’s network access control even further through the use of digital certificates.
In the broader context, PKIs, including those compatible with Microsoft environments, play a crucial role in establishing a secure environment for certificate management. Within such ecosystems, certificate authorities (CAs) are tasked with validating the identities of users and devices, ensuring that access is granted only to verified entities. This creates a layered security model that enhances the effectiveness of ACLs by integrating digital certificates, which are instrumental in establishing secure connections.
The components of ACLs, namely Discretionary Access Control Lists (DACLs) and System Access Control Lists (SACLs), along with Access Control Entries (ACEs), are fundamental in specifying access permissions in a granular manner. DACLs determine access permissions for users or groups to objects, while SACLs are focused on the auditing of access attempts, playing a vital role in security incident response and prevention.
The essence of using PKIs that are interoperable with Microsoft systems lies in leveraging the robust framework they provide for authenticating users and devices across both on-premises and cloud environments. Microsoft does offer its own PKI solutions, including Active Directory Certificate Services (AD CS) and its newer Microsoft Cloud PKI. However, neither of these are managed solutions, and a PKI can be difficult to set up and maintain on its own. Managed PKI services, such as SecureW2’s, can integrate with Microsoft environments and allow organizations to quickly implement the security of a PKI.
What Are Securable Objects & Security Descriptors?
Any object can be called a securable object if it has a security descriptor. Though all named Windows objects are securable, some unnamed objects, too, can have security descriptors. Some examples of named and unnamed objects are:
- Unnamed Objects — Processes and threads such as a huddle in Slack. They are not saved, and the process or thread ends the moment the activity stops.
- Named Objects — Files, directories, access tokens, network shares, devices, printers, desktops, Windows stations, and active directory objects such as users or user groups.
Security Descriptors hold the security information about securable objects, such as:
- Ownership details like security identifiers (SID) of the owner of an object and the group it belongs to.
- A list of the users and groups allowed or denied access and the degree of access they have to the securable object. This list is called the DACL.
- A list that contains the types of access attempts that are to be audited. This list is called the SACL.
In the context of Active Directory, all objects have security descriptors. You will find more information about DACL and SACL in the next section, where we’ll discuss the access control list and its components.
What Is an Access Control List?
Access Control Lists in action
An ACL is a detailed data table that allows an operating system to discern the level of access granted to users and machines, thus embodying the principles of least privilege necessary for maintaining robust security. In the broader spectrum of PKI-enabled security ecosystems, ACLs facilitate a seamless mechanism for defining and administering access permissions. This is achieved through Access Control Entries (ACEs), which explicitly outline the permissions granted to individuals or groups for actions such as reading, writing, and executing.
The strategic application of ACLs, supported by a flexible and interoperable PKI framework, ensures that access to critical resources is restricted to authenticated and authorized entities. This not only enhances the security of an organization’s data and systems but also introduces a layer of adaptability for integrating cloud-based PKI solutions, thereby reinforcing the infrastructure against potential security threats and unauthorized access attempts. This approach underscores the importance of leveraging a versatile PKI that aligns with the ever-evolving needs of modern enterprise networks, including those utilizing Windows devices.
In cloud-based PKIs, ACLs extend their utility beyond traditional boundaries, such as enabling a seamless and secure interaction with Active Directory Certificate Services (AD CS). This integration empowers administrators to leverage CAs to authenticate and authorize access requests efficiently. Each entry in an ACL, the ACEs, specifies the permissions available to a user or group, including actions such as read, write, and execute.
How Does an Access Control List Work?
ACLs function by attaching a list of permissions, or ACEs, to each securable resource, such as files or directories. These ACEs dictate the specific actions that individual users or groups are permitted to perform, ranging from viewing to editing content. By consulting the ACL, the system can instantly determine whether a request for access by a user or device conforms to the established permissions. This process ensures that access decisions are made swiftly and accurately, aligning with predefined security policies and minimizing the risk of unauthorized access. Through their role in managing permissions effectively, ACLs serve as the backbone of a secure and efficiently governed digital environment.
Types of Access Control Lists
As discussed above, every object has a security descriptor, and two important ACLs that they have are as follows.
Discretionary Access Control List (DACL)
A DACL or discretionary access control list lists users and groups allowed or denied access to an object. A user or a member of a particular group that DACL does not identify will be denied access.
By default, a DACL is controlled by the user who created the object or the owner of the object that the DACL belongs to. Just like in the case of an ACL, each entry of the list is called an access control entry or ACE.
System Access Control List (SACL)
A SACL or system access control list is the list that defines the users or events that need auditing to be done when they are granted or denied access to the object. This is very useful in identifying security breaches and determining the exact location and degree of damage.
Just as in the case of a DACL, the system access control lists are controlled by default by the owner or creator of the object. The access control entries (ACEs) of an SACL determine whether recording has to be done for a failed attempt or a successful one at the time of a user trying to access the object.
Use Cases of Access Control Lists
Access Control Lists provide for the management of access rights across various scenarios. Among some use cases that illustrate the applicability and effectiveness of ACLs in enhancing security include:
- Network Security Segmentation: Leveraging ACLs enables organizations to segment their network effectively, creating barriers that restrict access based on user roles or device types. This segmentation is crucial for protecting sensitive data and systems from unauthorized access, aligning with compliance requirements.
- Resource Access Management in Active Directory: Utilizing ACLs in conjunction with Active Directory Certificate Services allows for granular control over who can access specific resources within an enterprise network. By defining precise access rights, organizations ensure that only authenticated and authorized users can interact with critical infrastructure components, hence mitigating the risk of data breaches.
- Regulatory Compliance and Audit Trails: The integration of SACLs with CAs facilitates the generation of audit trails for accessing sensitive data. This capability is essential for organizations needing to comply with regulatory standards that mandate monitoring and recording access to certain information.
- Remote Access Control: With the adoption of cloud-based PKIs, ACLs extend their utility to manage remote access permissions effectively. This ensures that remote workers or external devices connecting to the network are authenticated through a PKI, granting access only to resources necessary for their roles while maintaining strict security controls.
Implementing Access Control on Windows
Implementing Access Control in Windows environments, particularly those managed through a Windows server, fundamentally revolves around the utilization of Access Control Lists (ACLs). These ACLs ensure that only authorized individuals and systems can access certain data or operations, adhering to the principles of least privilege and role-based access control. The integration of Microsoft’s PKI significantly amplifies the security measures by facilitating the management and distribution of a public key, which, when paired with its corresponding private key, enables a secure authentication and encryption process.
How Windows Access Control Works
Windows Access Control operates on a sophisticated foundation that integrates with Active Directory to manage resources securely. The process is outlined as follows:
- Certificate Authority: Central to Microsoft PKI, the CA issues certificates to entities, verifying their identity using a combination of a public key (which is made publicly available) and a private key (which is kept secure by the user or organization).
- Certificate Templates: Predefined settings for issuing certificates. Windows Server administrators can configure these templates, tailoring the certification process to specific organizational needs, such as the level of access or the type of user.
- Certificate Enrollment: The process by which entities request and receive a certificate from a CA. Windows automates this process, easing the burden of manual certificate management.
- Active Directory: Integrates with PKI to assign and enforce access policies based on the issued certificates, ensuring that only entities with the correct credentials can access certain areas of the network.
This integration of components forms a robust system for managing access control, with the dual keys (public key and private key) playing a pivotal role in the authentication and authorization processes.
Challenges With Windows Access Control
While Windows access control systems, bolstered by Microsoft PKI, offer robust security features, they are not without challenges. These include:
- Complexity in Management: The intricate setup of certificate authorities, coupled with certificate enrollment and management, requires specialized knowledge, making it daunting for some organizations.
- Scalability Issues: As organizations grow, the task of managing an increasing number of certificates and access permissions can become cumbersome.
- Dependency on On-Premise Infrastructure: Traditional Windows Server-based PKI solutions rely heavily on on-premise infrastructure, which might not align well with the growing trend towards cloud-based solutions.
Cloud-Based Public Key Infrastructure Solutions
As organizations grapple with the intricacies of managing access control within Windows environments, the shift towards cloud-based PKI solutions emerges as a solution. The challenges associated with traditional Windows access control—ranging from the complex management of certificate authorities to scalability issues and the heavy dependency on on-premise infrastructure—underscore the necessity for more agile, scalable, and accessible solutions. Cloud-based PKIs represent a pivotal evolution in overcoming these hurdles, offering a streamlined, flexible, and cost-effective approach to securing digital assets and managing access rights.
The SecureW2 PKI exemplifies the next generation of access control solutions, providing a robust, vendor-neutral platform that effortlessly integrates with existing systems, including those operated on Microsoft environments. By leveraging the cloud, SecureW2 PKI eliminates the traditional complexities associated with PKI deployment and certificate management. Organizations can now facilitate secure access with unprecedented ease and efficiency, ensuring that only authenticated and authorized users can access critical resources, regardless of their location. This transition not only addresses the pressing challenges of traditional access control systems but also paves the way for enhanced security, scalability, and operational flexibility.
Access Control Lists With Other Solutions
The versatility and effectiveness of ACLs are not confined to Windows environments alone. They extend their utility to other platforms and solutions, broadening the scope of access control measures across different technological ecosystems.
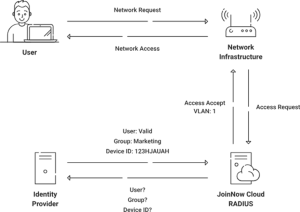
Access Control Lists With RADIUS
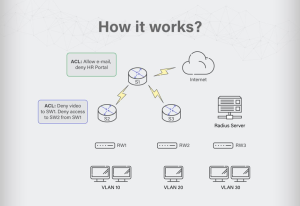
The utilization of ACLs extends to network access control solutions such as Remote Authentication Dial-In User Service (RADIUS) servers, which act as a central authority for authenticating and authorizing network access requests. Integrating ACLs with RADIUS servers, alongside the deployment of Microsoft PKI, enhances the security of wireless and wired networks. This setup allows for the dynamic assignment of roles and access permissions based on certificate authentication, where certificates issued by a trusted certificate authority validate the identity and permissions of a user or device.
The RADIUS server, leveraging certificates authenticated by Microsoft PKI, can enforce access policies more securely and efficiently, ensuring that only authorized entities gain access to network resources. This approach significantly mitigates the risks associated with traditional password-based authentication methods, providing a more secure and manageable solution for network access control.
Cloud RADIUS for Network Access Control
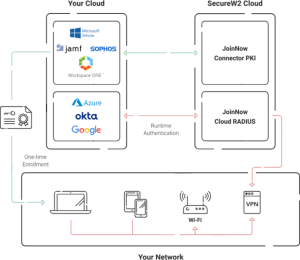
Cloud RADIUS can help mitigate the risks involved with password-based authentication and provides a well-rounded infrastructure for network access control. This is because Cloud RADIUS was designed with passwordless authentication in mind, integrating with a PKI for certificate-driven wired and wireless security.
Additionally, Cloud RADIUS is vendor-neutral, and capable of integrating with all major SAML Identity Providers (IDPs), including Azure AD/Entra ID, Okta, Google, OneLogin, and more. At the time of authentication, it communicates in real-time with your IDP, ensuring only the most current access policies are applied.
SecureW2 Cloud RADIUS
Implement Modern Cloud Access Control With SecureW2
Access control as a concept of network security is vast and has many facets that only one solution cannot cover. ACLs are crucial in implementing network access control. However, they alone cannot secure your information. There is a need for a comprehensive solution that covers all aspects of access control, authentication, authorization, and accounting.
SecureW2 offers end-to-end network access control solutions from onboarding to creating and implementing customized network access policies to monitoring network activity. Secure your network with SecureW2 solutions that are affordable and can be customized to best fit your organization’s needs. Click here to learn more about pricing.
Overview
Access Control Lists — known as ACLs (pronounced «ackles») — determine
who’s allowed to see, change, or move your AFS files. The permissions you set
with ACLs don’t work on the files themselves: they work on the folders that
hold the files. On this page we show you how to add, remove, and edit permissions
using a Windows XP or Vista computer.
Stanford OpenAFS makes this all possible. It puts AFS onto your desktop. If you
don’t have the program, you can obtain it from the Stanford OpenAFS
site.
The following example shows how to set ACLs on a folder located inside your personal WWW folder.
- Get to your destination
- Are you allowed to set permissions?
- How to set ACLs
- Commonly used ACLs
- Setting pickier ACLs
- Setting group ACLs
- Tips and tricks
- What each «ACL» stands for
Get to your destination
Start Stanford Open AFS and put your AFS Home
Folder onto your desktop . If you need help doing this, see Using Stanford OpenAFS for Windows. Your home folder will open
on your desktop. Inside this window are your WWW files and folders:
you are now in AFS. Double click on the WWW folder in order to get
inside it.
Right-click the folder for which you want to set permissions. A contextual
menu for that folder will pop up.
Slide your cursor down to AFS on the menu.
Move the cursor to the right to open the submenu.
Click Access Control Lists.
Note: Your menu screens may look slightly different
depending on your operating system and desktop settings. The important instruction
is to click AFS then Access
Control Lists.
A Set AFS ACL window will appear. This window
shows what permissions are currently controlling your folder.
Are you allowed to set permissions?
Check the «Normal» list window. Make sure you have
the administrative permissions required to set ACLs in this folder. If
your own SUNet ID does not appear in the folder with «rlidwka» permissions—it’s
that «a»
at the end that’s important—then you’ll have to find a way to get administrative
permissions before you can set ACLs. The Are you
allowed to set permissions page suggests ways to get administrative
permissions. When you’re in your own home folder you almost always have «rlidwka»
permissions, but when you’re not in your home folder this issue is crucial.
How to set ACLs
We’ll pretend you’re adding, removing or changing ACLs for someone whose SUNet
ID is «gsmith» and that you’re going to give this person «write»
privileges.
To add someone to the Access Control list
- Click the Add… button. An Add
ACL Entry window will appear. - In the Name: field type the SUNet ID of
the person you want to add. In our example, you’d type:gsmith
- Click on the r — Read , l — Lookup,
i — Insert, d — Delete, w — Write,
and k — Lock buttons. - Click the OK button.
- Check the Set AFS ACL window to make sure
your addition was recorded. - Click OK.
To remove someone from the Access Control List
- Click on and highlight the SUNet ID of the person you want
to remove in the Set AFS ACL window. - Click the Remove button.
- Check the Set AFS ACL window to make sure
your removal was recorded. - Click OK.
To edit permissions in the Access Control List
In our example there is no «gsmith» ACL in the Set AFS ACL
window. In real life, however, you may want to update or edit ACLs
from one kind of permission to another. The next section, Commonly
used ACLs, tells you which ACLs give which permissions.
- Click on and highlight the SUNet ID you want to edit in
the Set AFS ACL window. - Click or unclick the «Permissions» buttons you
want.
When you’re done making changes in the Set AFS ACL
window, click OK.
Commonly used ACLs
This page tells you which ACLs to assign based on what you want to do.
These are the most commonly used ACLs. You can set
even pickier ACLs if you need to.
We’ll presume that you’re inside the folder or directory you want to set
ACLs in, know that you possess the administrative privileges to do so and,
for the sake of example, want to give ACLs to someone with the SUNet ID
of «gsmith».
- Look but don’t touch — Click the following buttons:
- r — Read and l — Lookup
- This lets people list your files, and open your files so they can read
them, but prevents them from changing anything. Double check your work
in the Set AFS ACL window: you should see «<sunetid>
rl». - Almost total power — Click the following buttons:
-
r — Read, l — Lookup, i
— Insert, d — Delete, w — Write,
and k — Lock - This is the most popular ACL. It’s called «Write» permission
for short. It lets someone work in your folder, change files, delete them,
add new files, etc. Double check your work in the Set AFS ACL
window: you should see «<sunetid> rlidwk». - Total power (administrative perms) — Click the following
buttons: - r — Read, l — Lookup, i
— Insert, d — Delete, w — Write,
k — Lock and a — Administer - Be stingy when granting administrative permissions … the wrong person
can wreak havoc in your and other folders. Double check your work in the
Set AFS ACL window: you should see «<sunetid>
rlidwka». - To kick someone out of a directory
- Use the instructions (above) for removing someone from the Access Control
List. This works even if the SUNet ID your remove had admin perms (rlidwka).
Double check your work in the Set AFS ACL window: the
SUNet ID of the person whose permissions you removed should be absent.
Note, however, that if this person is a member of a group ACL they may
still be able to influence your folder. - If you’re an instructor and are having many students submit
tests, papers, homework, etc. into a single directory, you’ll want to
prevent the files they submit from being altered once they’re added to
the directory, and also prevent students from accidentally reading or
deleting other students’ work. - Use the instructions above to:
- Add or edit an entity called: system:anyuser
(It’s not a SUNet ID, but works nevertheless.) - Click on the following buttons: l -List, i
— Insert, and k — Lock
- Add or edit an entity called: system:anyuser
- If you’re adding it, don’t forget the colon in the word «system:anyuser».
Double check your work in the Set AFS ACL window: you
should see «system:anyuser lik».
Last modified
An introduction to ACL based security and the Windows Access Control model.
Figure 1: The ACL Editor
Introduction
In this series of articles, I will discuss the Windows Access Control model and its implementation in Windows NT and 2000. I intend this series to be four parts long. I originally intended this series of articles to be just one part long (I was only going to write about the Windows-2000 style ACL editor), but there is so much you need to know about Windows Access Control, I might as well devote an entire series dedicated to the topic.
This first article serves as an introduction to ACL-based Authorization (from a programming point of view) in Windows NT and how the access control model is implemented. If you have never programmed with Windows security, or are just starting, this first article is for you. Although this first article will display structures in C, you should read this article even if you aren’t programming in C. It contains concepts relevant to all programmers.
This series of articles isn’t meant as a primer on security administration (there are plenty of articles, websites, courses and books on that). Rather, it is intended to discuss the Windows NT Security model from a programmatic perspective. I will already assume you know how to set permissions on files, registry keys, and are quite proficient with the ACL editor. I will also assume you know what users are and what groups are.
Access Control is not available in 16-bit Windows or Windows 95/98/ME.
Table Of Contents
The table of contents is for the entire series.
- Part 1 — Background and Core Concepts. The Access Control Structures
- The Security Identifier (SID)
- The Security Descriptor (SD)
- The Access Control List (ACL)
- Choosing a good discretionary access control list
- Windows 2000 Inheritance Model
- The Token
- A Note on the Security Descriptor Definition Language
- Coming Up
- Part 2 — Basic Access Control programming
- Choosing your language
- Fun with SIDs
- Which Groups are you a member of?
- Enabling Token Privileges
- Dissecting the Security Descriptor
- Walking an Access Control List
- Creating an Access Control List
- Do I Have Access?
- Creating and Editing a Secure Object
- Making Your Own Classes Secure
- Toy Programs Download
- Part 3 — Access Control programming with .NET v2.0
- A history of .NET security.
- Reading a SID in .NET.
- Whoami .NET.
- Privilege handling in .NET.
- Running as an unprivileged user in .NET.
- Obtaining and editing a security descriptor in .NET, and applying it to an object.
- Access checks in .NET.
- NetAccessControl program and AccessToken class library.
- Part 4 — The Windows 2000-style Access Control editor
- Features of the ACL editor (ACLUI).
- Getting Started.
- Implementing the
ISecurityInformationInterface. ISecurityInformation::SetSecurity- Optional Interfaces.
- Presenting the interface.
- Filepermsbox — A program to display the security descriptor on an NTFS file or folder.
- History
Background
One of the original design goals of Windows NT was to provide a layer that can implement security for the operating system. The way Windows NT implemented security for its objects was through the Access control model. Even role-based security and the .NET classes could not replace this ACL-based security model. ACLs are far too embedded in the NTFS architecture objects, and the registry was to be rendered obsolete (so much so, that .NET v2.0 had to relent and end up supporting the ACL model too).
To start off, I will describe the different types of structures you may meet when programming for access control. This article is intended for all programmers (this part contains no code, just structures and programming concepts).
1. The Security Identifier (SID)
Before delving into the concepts of authorization, I should take a discussion about the Security Identifier (SID). We humans like to refer to a user by their user name (like «Administrator»). A computer must refer to the user in binary. It recognises a user by means of a hash (which is called a SID). When a user is created, the computer generates a SID for that user and from then on, it will refer to that user by its SID (not its username). To see a list of your own SIDs, open up regedit and expand the HKEY_USERS tree (you will see a list of the SIDs for the currently logged on users). You can convert the raw SID struct into a textual form by using ConvertSidToStringSid(). A textual SID (usually starts with S-1-5-21-…) consists of at least 3 dash-separated values (which stand for revision, authority, sub authority, ID and primary groups).
A SID can also represent a user group, a computer, a domain or even a forest. Windows maintains a list of hardcoded SIDs called the Well-Known SIDs (they represent accounts like the LocalSystem, or the NetworkService account). You can view a list of these SIDs in the WELL_KNOWN_SID_TYPE enumeration.
To convert a SID to a username, you would need to call LookupAccountSid(), and LookupAccountName() to convert a user name to a SID. However, most of the security functions accept either a SID or a username (they actually accept a TRUSTEE structure, which is a kind of union of the username and SID).
2. The Security Descriptor (SD)
Windows NT secures its objects by means of a structure called the security descriptor (SECURITY_DESCRIPTOR). The security descriptor is an integral part of the structure from which Windows objects are built. This means every object (be it file objects, registry keys, network shares, mutexes, semaphores, processes, threads, tokens, hardware, services, drivers…) recognized by Windows NT can be secured. The security descriptor structure exists in both kernel mode and user mode (and is identical in both modes). Although this allows for code reuse for both kernel mode and user mode security, it also means the SECURITY_DESCRIPTOR inherits some nasty quirks from kernel mode.
If you open up Winnt.h and scroll down to the SECURITY_DESCRIPTOR struct, you’ll see the structure of the security descriptor (Fig. 2). This SECURITY_DESCRIPTOR may actually be one of two structs, one is an absolute security descriptor (SECURITY_DESCRIPTOR), and the other is a self-relative security descriptor (Fig. 3 SECURITY_DESCRIPTOR_RELATIVE).
typedef struct _SECURITY_DESCRIPTOR
{
    BYTE Revision;
    BYTE Sbz1;
    SECURITY_DESCRIPTOR_CONTROL Control;

    PSID Owner;
    PSID Group;
    PACL Sacl;
    PACL Dacl;
} SECURITY_DESCRIPTOR, *PISECURITY_DESCRIPTOR;
Figure 2: The Absolute Security Descriptor.
Notice that a security descriptor consists of five members (excluding the two version control members):
- Discretionary Access Control List (
Dacl): This is where the permissions of the object are kept (who’s allowed access to the object, who’s denied). - System Access Control List (
Sacl): Specifies the type of auditing to be performed on the object. If an auditing event occurs, it will be stored in the Auditing Event Log. Owner: Specifies the owner of the object (as a SID). The owner of the object can always alter the security descriptor, regardless if someone else has locked out access.Group: Specifies the primary group of the object (as a SID). Windows mostly ignores this parameter (it was for POSIX compatibility, but its presence is rather vestigial now).Control: A bunch of flags that make up a 16-bit integer. It can be zero or more of the following flags:SE_DACL_PRESENT: TheDaclmember is valid.SE_SACL_PRESENT: TheSaclmember is valid.SE_DACL_AUTO_INHERITED: The DACL auto-inherits and gets entries from its parent included in itself.SE_SACL_AUTO_INHERITED: same asSE_DACL_AUTO_INHERITED, but it applies to the SACL.SE_DACL_PROTECTED: If the parent’s ACLs conflict with any ACL defined here, override the parent’s ACL. Useful for overriding inheritance.SE_SACL_PROTECTED: Same asSE_DACL_PROTECTED, but for SACLs.SE_DACL_DEFAULTED: TheDaclmember equals the default DACL for this object type.SE_SACL_DEFAULTED: TheSaclmember equals the default SACL for this object type.SE_GROUP_DEFAULTED: TheGroupmember equals the default Group for this object type.SE_OWNER_DEFAULTED: TheOwneris defaulted.SE_SELF_RELATIVE: Indicates this security descriptor is self-relative.
The last 4 entries of this structure are all pointers, and they point to the buffers where the ACLs etc. can be found. These pointers can point to any valid location in memory (not necessarily in a contiguous block). Because the security descriptors aren’t contiguous, it is going to be rather cumbersome to write the security descriptors to disk, or across processes. Microsoft solved this problem by introducing a new structure, called the self-relative security descriptor (Fig. 3 SECURITY_DESCRIPTOR_RELATIVE).
typedef struct _SECURITY_DESCRIPTOR_RELATIVE
{
    BYTE  Revision;
    BYTE  Sbz1;
    SECURITY_DESCRIPTOR_CONTROL Control;

    DWORD OwnerOffset;

    DWORD GroupOffset;
    DWORD SaclOffset;
    DWORD DaclOffset;

    struct SecurityDescriptorData
    {

        ...
        SID Owner;
        ...
        SID Group;
        ...
        ACL Sacl[];

        ...
        ACL Dacl[];
    } ;
} SECURITY_DESCRIPTOR_RELATIVE, *PISECURITY_DESCRIPTOR_RELATIVE;
Figure 3: The structure of the relative security descriptor
The self-relative security descriptor is much more complicated than the absolute security descriptor (so complex, that you cannot represent it in C++). Although the first three fields are the same as the absolute security descriptor, the security descriptors become very different after that. Following the Control member are four DWORDs (which represent offsets to the data). The data for the security descriptor all follow these four DWORDs. I’ve inserted padding bytes into the structure to illustrate that the data can appear anywhere in the buffer (simply change the Offset members to move the buffer). The four members do not need to appear in any particular order either. By choosing special offsets, you can make the Owner member appear after the group. At the expense of being horrendously complicated, the self-relative security descriptor occupies one contiguous block, making it suitable for transporting between application boundaries and storage media.
How can you tell the difference between an absolute and self-relative security descriptor? The difference is that with an absolute security descriptor, after the Control member are four pointers to the Group / Owner / SACL / DACL (in that order), and these four pointers point to separate locations in memory where the data can be found. With a self-relative security descriptor, after the Control member are four DWORDs which represent offsets to the Group / Owner / SACL / DACL. For example, if the group member has the value 0xf, then it’s telling Windows, «You can find the group SID 0xf bytes after me». 64-bit Windows makes this even more confusing when these two structures have differing sizes!
To make matters worse, Microsoft doesn’t distinguish between the absolute or self-relative security descriptor in their docs. Microsoft has reserved the right to make internal changes to the security descriptor, meaning you cannot rely on this structure being the same in future. Instead, if you want to manipulate a security descriptor, you should do so using the authorization APIs. Using the APIs encapsulate the complexity of these structures from you. So to distinguish between an absolute security descriptor and a self-relative one, call GetSecurityDescriptorControl(), and test for the SE_SELF_RELATIVE flag.
It’s important that you know which API expects an absolute security descriptor, and which ones expect a self-relative one. In Part 2 [^] of this series, you will get around to actually building a security descriptor.
3. The Access Control List (ACL)
Whenever you perform an action (e.g. a read) on an object in Windows NT, the action is encoded into a 32 bit integer (called the ACCESS_MASK). The ACCESS_MASK is specific to the object you are trying to create (if you read a file, the ACCESS_MASK would be FILE_GENERIC_READ). When you open the object with the requested ACCESS_MASK, Windows will get your username (inside your thread token) and then start reading the discretionary access control list (obtained from the security descriptor).
The DACL can be thought of as a table of user SIDs, ACCESS_MASKs, and access types. Don’t try to code it as an array of structs though. Use the low-level ACL functions GetAce(), GetAclInformation() & friends if you want to parse an ACL. In NT4, Microsoft provides a view of the ACL that looks exactly like a table of SIDs, ACCESS_MASKs and types (the EXPLICIT_ACCESS structure).
struct ACE
{
    BYTE AceType;
    BYTE AceFlags;
    ...
    ACCESS_MASK Mask;
    ...
    SID Sid;
} ;

struct ACL
{
    BYTE AclRevision;
    ...
    WORD AceCount;
    ...
    ACE AceList[this->AceCount];
} ;


typedef struct _EXPLICIT_ACCESS
{
    DWORD grfAccessPermissions;
    ACCESS_MODE grfAccessMode;
    DWORD grfInheritance;
    TRUSTEE Trustee;
} EXPLICIT_ACCESS, *PEXPLICIT_ACCESS;
Figure 4: An outline of the ACL and the ACE.
If the DACL is a table, then each row in the table is called an Access Control Entry. When an action is performed, Windows will enumerate this list of ACEs to find an entry that refers to you (you being the thread token). Windows enumerates the ACEs in the order they appear in the ACL. At first sight this goes against your intuition, the Help documentation, and what the MCP books say («I thought Windows walks the Deny ACEs first, then walks the Allow ACEs. Now you’re telling me this is wrong?»). Actually, we are both right. When Windows sets the DACL, it sorts the access control entries [^] so that deny ACEs do precede allow ACEs, and the access control model follows what you were taught.
If you make a call to the low level functions, you can circumvent the sorting, and make the ACEs appear in any order you like. The Cygwin tools utilise this technique to create DACLs unordered. However, these DACLs will not obey the access control rules, and you can make files with broken ACLs.
If you (your token) isn’t found in the ACL, then the open object function fails (Access denied). If you are found, Windows will look in the ACE to see what you are allowed to do. If the ACE allows you to open the object, you are granted access. If anything fails here, you are denied access (this is an example of a security best practice: «if anything goes wrong, make sure you fail securely»).
Now that you have been granted or denied access, Windows will now make a check on the other ACL, the System Access Control List. The difference between an SACL and a DACL is that DACL contains allow / deny entries, but an SACL contains audit entries. The SACL tells Windows which actions to log in the Security Event Log (audit successes / failures). Apart from that, you can treat the SACL / DACL as the same. If Windows finds an SACL which tells it to audit the access, then the access attempt is written to the Event log.
If you want to see if an ACL allows you access to the object, use the AccessCheck() API on the object.
4. Creating a good discretionary access control list
In almost every case, Windows has already decided a good discretionary access control list for you. When you encounter an API that asks for a security descriptor (or a SECURITY_ATTRIBUTES structure), simply pass in NULL for this parameter. Passing in NULL for either the SECURITY_ATTRIBUTES or SECURITY_DESCRIPTOR will tell the system to apply the default security descriptor. And that is probably what you were after.
If you need more advanced security, make sure you create a security descriptor that has a filled DACL. If you’ve initialized a security descriptor, but have forgotten to build up a DACL (and attach it to the security descriptor), you will get a NULL DACL. Windows sees this NULL DACL as an object that has the following ACE:
«Everyone: Full control»
Therefore, Windows will allow access to the object regardless of the action. This is one case where Microsoft broke its own best practices. When it encounters something unexpected, Windows should fail securely. In this case it doesn’t. So with a NULL DACL, everyone (including malware) will be able to do anything to the object (including setting a nasty rootkit-style DACL). For this reason, don’t create security descriptors with NULL DACLs.
Setting a NULL DACL isn’t the same as setting a NULL security descriptor. When passing a NULL security descriptor, Windows will replace it with a default security descriptor, and this security descriptor is secure, and allows enough access to the object. Setting a NULL DACL means passing a valid security descriptor, whose Dacl member happens to be NULL.
In a similar way, you probably don’t want to set a DACL that doesn’t contain any Access Control entries. In this DACL, when Windows attempts to enumerate the Access Control List, it will fail on the first attempt, therefore, it will deny access regardless of the action. The result is a completely inaccessible object (not much better than a non-existent object). You must have a filled DACL if you want to access the object.
So how do we build a Discretionary access control list?
Think about who you want to allow access to and who you don’t want to allow access. Is your DACL black list based (full of deny ACEs), or white list based (full of allow ACEs). If you are creating an ACL, you should prefer a white list approach to the security descriptor. How long is the object going to last? Is it a long running object (like the app mutex for a long running process), a short running object (like a synchronization event), or is it a permanent object (like a file)?
To determine a good security descriptor decide what you are going to do to the object. If you are securing a kernel object, you probably only need to synchronize, read and read the security on it. If you are securing a file, you’ll probably need all accesses available (one day).
Generally, for permanent objects you need at least two accounts to have access to the object. The first user is the LocalSystem account (restricting access to this account can lead to serious problems if it is a permanent object). The other is the object creator (or alternatively, the current owner) of the object. You should also consider giving administrators full control to the object. Another technique you can consider is only allowing the users read and execute access. When they want to delete the file, they will have to add the DELETE right themselves, then delete it.
For short running objects, you should apply the principal of least privilege to the object. For example, if all you are going to do with an object is read from it and synchronize it, then create a DACL that only allows read and synchronize access (you can even restrict the LocalSystem’s account this way if it is a short lived object).
If your object supports inheritance, then you don’t need a special DACL on the object (unless your file is special in terms of security), you can just apply the DACL for the parent (do this by setting the auto inherit flag in the Control member of the security descriptor). The default security descriptor will apply the inheritance flag for you.
And finally, if in doubt, ask the admins!
5. Windows 2000 Inheritance Model
Starting with Windows 2000, ACLs can be set to inherit from their parent. What this means is that the ACL of the parent will be applied to the child (e.g. the permissions for «\Program Files\Common Files\Microsoft Shared» will be the same as «\Program Files\Common Files«). A special flag in the ACE will state that it is inherited.
As stated in the previous section, Windows walks the list of ACEs until it reaches the end or finds an ACE that matches you. If inheritance is enabled, when Windows reaches the end of the list, it will start walking the ACL of the parent folder to find a matching ACE. Therefore, the object will have the parent’s ACL applied to itself, automatically. This only occurs if the ACL is set to inherit from the parent object.
If the folder also has inheritance, Windows will walk up that folder too. This can continue all the way until Windows hits a folder that has inheritance disabled, or it hits the root of the drive. The result is that the resultant ACL is a merged view of the current object and its parent. The ACEs that come from the parent are called inherited ACEs, and the ACEs that come from the file itself are called the protected ACEs.
To support ACL inheritance, you must design your classes to have parent-child relationships (like a file/folder, or a registry key/value). The parent will be referred to as a container (e.g. folder), and the child will be referred to as an object (like a file).
For really advanced ACL control, Windows 2000 supports applying ACEs only to folders and not files (and vice versa). The ACE flag that controls inheritance also states which type of inheritance to apply. There are four flags:
OBJECT_INHERIT_ACE(OI): indicates the ACE gets inherited to child objects (e.g. files).CONTAINER_INHERIT_ACE(CI): indicates the ACE gets inherited to child containers (e.g. subfolders).INHERIT_ONLY_ACE(IO): indicates the ACE applies not to this object, but to child objects (e.g. child files/subfolders only).NO_PROPAGATE_INHERIT_ACE(NP): do not apply this ACE to grandchildren, just the direct children (e.g. apply files but not files in subfolders).
These flags can be (and usually are) combined. To make the ACE apply to every child object within yourself (including inside subfolders), specify (OBJECT_INHERIT_ACE | CONTAINER_INHERIT_ACE).
For a more complete description of ACE inheritance, check out Keith Brown’s book.
6. The Access Token
The final structure I will describe today is the Access token. I don’t want to delve too much into this structure otherwise I may stray off topic (it’s relevant not only to access control, but to privileges, policy, group membership as well as IPC across logon sessions). The access token forms an integral part of both the thread and process objects. The access token identifies who you are in the context of security. Windows NT maintains user information per process, as this allows processes and threads to run as a different user (if you wanted to know how Task Manager knows which user a process runs under, it’s in the access token). The access token is the feature that allows services, runas, and fast user switching to exist.
The access token can either be a process token, a primary thread token, or a thread impersonation token. Unless your thread is impersonating, your thread doesn’t have a token (you’ll be using the process token instead). Once you’ve made your thread impersonating, you’ll have an impersonation token associated with your thread. You can convert your impersonation token into a primary token (suitable for CreateProcessAsUser()) by calling DuplicateTokenEx()).
When you log in to Windows, your processes will have their tokens set to your username when run. If you open your own token and look inside it, you can find out the name of the user you are running as (all without needing to invoke GetUserName()).

Figure 5: An illustration of the access token.
There’s a lot of information you can gleam from a token via GetTokenInformation(). For example:
TokenUser: Which user the process runs as.TokenGroupsandPrivileges: Which groups the user belongs to (as well asTokenGroups,TokentRestrictedSids,TokenPrivilegesandTokenUser).TokenGroups: The complete list of groups to which the user belongs (gives more information than «net.exe user <user>«, WMI, User Management console, and «control userpasswords2«).TokenPrivileges: The list of privileges.TokenDefaultDacl,TokenOwner,TokenDefaultGroup: The definition of a default security descriptor.TokenType: Whether this token impersonates.TokenSource: The source of the access token.TokenRestrictedSids: The list of restricted SIDs.
For the purposes of access control, most of the information we need from the access token are in the TokenGroupsandPrivileges structure. With this value, you rollup the GetUserName(), NetUserGroups(), CheckTokenMembership() and LookupPrivilegeValue() APIs all in one. The token shows that being a member of the administrators group also makes you a member of the None group, the Authenticated Users group, the Users group, the Power Users group, and the LOCAL group. This is useful to you as you now have a list of user groups to which you belong, and can now search an ACL using this list. To see if an ACL grants you access:
- Open up your thread token.
- Get the list of groups.
- Obtain the
SECURITY_DESCRIPTORfor the object. - Get the ACL from the security descriptor.
- For each ACE in the ACL, lookup the SID associated with that ACE.
- Lookup this SID in the list of groups you created in step 2.
- If found, see if it is a deny or allow ACE.
- If it is an allow ACE, compare the
ACCESS_MASKwith your desiredACCESS_MASK. - If all accesses are allowed, you are allowed access.
- If an error occurs, you are denied access.
Add in error/parameter checking to the above list (and auditing), and you have just created yourself a pseudo AccessCheck() function.
You’ve probably already encountered the default security descriptor. Whenever you encountered an API that requested a SECURITY_ATTRIBUTES parameter, you most likely passed in NULL for that parameter (which means «default security descriptor»). By calling GetTokenInformation(TokenDefault*), you can find out what that default security descriptor is.
The privileges are a list of policies that must be enabled before you are allowed to perform certain system-critical functions (like shutdown the system, or install drivers). These privileges are configurable via group policy (user rights assignment), and are listed in your thread token. The privileges are disabled by default (exception: SeChangeNotifyPrivilege), so you must enable the privilege before you can use it. The Platform SDK provides a sample function SetPrivilege() that can enable and disable a privilege whenever you need it. I strongly suggest you add this function to your security utility library, because you are going to reuse that function again and again, especially with access control. Enabling a privilege then becomes a matter of adding two lines to your code:
...
SetPrivilege(SePrivilegeName, TRUE);


SetPrivilege(SePrivilegeName, FALSE);
...
Figure 16: Enabling and disabling a privilege using the Platform SDK sample function.
I don’t want to go into sandboxing or impersonation (since they are rather off topic for access control). If you want to know more about impersonation and privileges, look at this WindowsSecurity article, or Paul Cooke’s book.
7. A note on the Security Descriptor Definition Language
The Security Descriptor Definition Language is an attempt to represent a security descriptor in text form that both administrators and programs can understand. The full reference (and in my humble opinion, the only decent reference) to the SDDL format is located in the help documentation.
Briefly, the SDDL string contains the following parts: a group, an owner, the DACL and SACL. These sections are delimited by a one-letter label followed by a colon (O: delimits the owner, G: delimits the group, D: delimits the DACL, S: delimits the SACL). Following the group and delimiters are SIDs that denote the owner and group. Following the D: and S: delimiters are a list of bracket separated entries (each bracket represents an ACE in the list).
The ACE bracket consists of six semicolon delimited terms that represent ACE type, inheritance, ACCESS_MASK, GUID, inherited GUID, and user SID respectively. The ACE brackets are stacked up in the list to form the overall ACL. Prefixing the list of ACE brackets can be some other flags; these represent the control flags for the security descriptor. The following is an example SDDL we will dissect (I’ve separated the different sections for clarity):
O:AOG:DAS:D:(A;;RPWPCCDCLCSWRCWDWOGA;;;S-1-0-0)(A;;GA;;;SY)
First, tokenize this string using the delimiters:
| O: | G: | S: | D: |
AO |
DA |
(A;;RP WP CC DC LC SW RC WD WO GA;;;S-1-0-0) (A;;GA;;;SY) |
Figure 7a: The SDDL string tokenized into separate strings.
Next, expand the SID strings and ACE strings:
| Owner | Group | SACL | DACL |
| Account Operators | Domain Administrators | (A;;ADS_RIGHT_DS_READ_PROP | ADS_RIGHT_DS_WRITE_PROP | ADS_RIGHT_DS_CREATE_CHILD | ADS_RIGHT_DS_DELETE_CHILD | ADS_RIGHT_DS_LIST | ADS_RIGHT_DS_SELF | READ_CONTROL | WRITE_DAC | WRITE_OWNER | GENERIC_ALL;;; null SID)(A;;GENERIC_ALL;;;LocalSystem) |
Figure 7b: The SDDL string with the SID strings and ACE strings expanded
Finally, expand the constant strings:
| Owner | Group | SACL | DACL |
| Account Operators | Domain Administrators | Allow (null SID): 0x01e000bb Allow LocalSystem: 0x100000 |
Figure 7c: The security descriptor that the SDDL string specifies.
This is the meaning of the SDDL string specified. For a whole bunch of example SDDL strings, take a look at the %windir%\security\templates\*.inf files. This is what Windows Setup used to apply the default security descriptors for your Windows installation. See if you can decrypt the security descriptors for those strings. (To find out the answers, you can call the ConvertStringSecurityDescriptorToSecurityDescriptor() function on the security descriptor strings.)
Sorry about the poor explanation about SDDL strings. Like I said, the best reference for SDDL is in the SDK documentation, and I still stand by that statement.
8. Coming Up
In this part, you learnt how Windows NT secured its objects using security descriptors. You discovered that Windows recognizes users, groups and computers as SIDs. You learnt that security descriptors originally came from kernel mode, therefore they can be complex beasts. You were shown the parts of a security descriptor, the five components which make it up, and how it is stored in memory. You were then shown the two types of access control list. You discovered the structure of the ACL, how Windows reads an ACL, and how inheritance is implemented within the Access control model. The last structure you learnt about was the access token. You were taught what information can be read from a token, and finished off with enabling a permission.
In Part 2, you will start writing some example code for reading and writing security descriptors. You will also obtain information from the primary token to create a WhoAmI clone. Whilst you are waiting for the next article to come up, I want you to choose which technique you are going to program with. I am going to present four ways of programming with security:
- The low level way. If you need to program for NT3.5, and don’t have ATL, you’ll have no choice but to choose this method. This method makes direct calls to the low level ACL functions, and they are horrible! Not only is it nontrivial to program, this method is also excessively complex and error prone (no wonder Windows NT had so many security bugs [^]!). Unless you need to support backward compatibility (since when did you care about backward compatibility?), I strongly recommend you steer clear of this method if you can help it. If you want a preview of this method, check out the SDK docs on
SetEntriesInAcl()[^]. - The Windows 2000 way. Realising how difficult method 1 was, Microsoft invented an alternative API for creating security descriptors, the Security Descriptor Definition Language (SDDL). Initially, SDDL may not be much better than low level authorisation (just as complex, and not as compatible). However, being in text mode makes SDDL infinitely more readable, for both programmers and administrators. And if you look closely at a number of SDDLs, along with the corresponding ACLs, you’ll soon get the hang of it. Windows 2000 also introduces API helpers to automate repetitive tasks (like printing a SID in text form). If you want a preview, check out the SDK docs on
ConvertStringSecurityDescriptorToSecurityDescriptor()[^]. - The ATL way. As part of the Trustworthy Computing Initiative, Microsoft made a number of updates to ATL, culminating in the ATL security classes. If you have Visual C++ .NET, and don’t mind programming with ATL C++, you’ll want to choose this method. To see a preview, check out the
CSecurityDesc()[^] class from the Visual C++ help. - The .NET way. Starting with v2.0 of the .NET Framework, you can also choose to program security descriptors in a fully object oriented managed environment. Note, that I will not cover this in part 2 of the series. Instead programming security in .NET will have its very own part in this series (Part 3). If you have Visual Studio .NET 2005, you should strongly consider choosing this method. You can see a preview in the
System.Security.AccessControl[^].
History
The history and bibliography are now maintained in Part 4 [^].
Next Part… [^]
Access Control Lists (ACLs) are an integral part of the Microsoft Windows security model. In addition to controlling access to secured resources, they are also used in sandboxing, event auditing, and specifying mandatory integrity levels. They are also exceedingly painful to programmatically manipulate, especially in Rust. Today, help has arrived — we released windows-acl, a Rust crate that simplifies the manipulation of access control lists on Windows.
A short background on Windows ACLs
Windows has two types of ACLs: discretionary (DACL) and system (SACL). Every securable object in Windows (such as files, registry keys, events, etc.) has an associated security descriptor with a DACL and SACL.
The difference between DACL and SACL lies in the type of held entries. DACLs are used to control an entity’s access to a resource. For instance, to deny a user from reading a registry key, the registry key’s DACL needs to contain an access denied entry for the user. SACLs are used for managing the types of actions required to generate an audit event and for setting mandatory integrity labels on resources. As an example, to audit access failures by a user group on a specific file, the specified file’s SACL must contain an audit entry for the user group.
Adding and removing ACL entries from an existing ACL requires the creation of a new ACL. The removal process is fairly simple — copy all of the existing ACL entries over except the target to be deleted. The insertion process is a bit more difficult for discretionary ACLs. The access rights that a DACL allows a user depend on the ordering of the ACEs in the DACL. Correctly inserting a new access control entry (ACE) at the preferred location is the responsibility of the developer. Furthermore, the new DACL must ensure that the to-be-inserted ACE must not have a conflict with existing ACE entries. For instance, if the existing DACL has an access allowed entry for a user with read/write privileges and the to-be added ACE is an access allowed entry for a user with only read privileges, the existing entry must not be copied into the new DACL. No one wants to deal with this complexity, especially in Rust.
How windows-acl simplifies the task
Let’s take a look at appjaillauncher-rs for a demonstration of windows-acl’s simplicity. Last year, I ported the original C++ AppJailLauncher to Rust. appjaillauncher-rs sandboxes Windows applications using AppContainers. For sandboxing to work correctly, I needed to modify ACLs on specific resources — it was an arduous task without the help of Active Template Library classes (see CDacl and CSacl), the .NET framework, or PowerShell. I ended up with a solution that was both imperfect and complicated. After implementing windows-acl, I went back and updated appjaillauncher-rs to use windows-acl. With windows-acl, I have a modular library that handles the difficulties of Windows ACL programming. It provides an interface that simplifies the act of adding and removing DACL and SACL entries.
For example, adding a DACL access allow entry requires the following code:
match ACL::from_file_path(string_path, false) {
    Ok(mut acl) => {
        let sid = string_to_sid(string_sid).unwrap_or(Vec::new());
        if sid.capacity() == 0 {
            return false;
        }
        acl.remove(
            sid.as_ptr() as PSID,
            Some(AceType::AccessAllow), None
        ).unwrap_or(0);
        if !acl.allow(sid.as_ptr() as PSID, true, mask).unwrap_or_else(|code| {
               false
           }) {
            return false;
        }
    },
    ...
}
Similarly for removing a DACL access allow entry:
match ACL::from_file_path(string_path, false) {
    Ok(mut acl) => {
        let sid = string_to_sid(string_sid).unwrap_or(Vec::new());
        if sid.capacity() == 0 {
            return false;
        }
        let result = acl.remove(
                         sid.as_ptr() as PSID,
                         Some(AceType::AccessAllow),
                         None);
        if result.is_err() {
            return false;
        }
    },
    ...
}
Potential Applications and Future Work with windows-acl
The windows-acl crate opens up new possibilities for writing Windows security tools in Rust. The ability to manipulate SACLs allows us to harness the full power of the Windows Event auditing engine. The Windows Event auditing engine is instrumental in providing information to detect endpoint compromise. We hope this work contributes to the Windows Rust developers community and inspires the creation of more Rust-based security tools!