NFS (Network File System) — сетевой протокол доступа к доступ к файлам и файловой системе NFS-сервера, популярный в семейства ОС Linux/ UNIX, а также различных системах хранения. Microsoft также, не желая отставать от конкурентов, внедрила базовый функционал NFS сервера еще в Windows Server 2003 R2. В последующих версиях серверных платформ Microsoft возможности встроенного NFS Windows сервера расширялись, появлялся новый функционал и средства управления. NFS сервер в Windows Server 2012 – очередная веха в развитии данной технологии.
Что же нового предлагают нам разработчики Microsoft в данном продукте? Новые возможности NFS сервера в Windows Server 2012:
- Поддержка стандарта NFS v4.1. Поддержка последней версии NFS 4.1 – одно из основных новшеств Windows Server 2012. По сравнению с NFS v3 этот протокол обеспечивает повышенную безопасность, производительность и совместимость, полностью реализуя все аспекты RFC 5661.
- Производительность «из коробки». Благодаря использованию новой транспортной инфраструктуры RPC-XDR, оптимальная производительность NFS сервера может быть достигнута сразу «из коробки» без необходимости тонкой настройки параметров системы. Оптимальная производительность достигается за счет автоматически настраивающегося кэша, разделения рабочих процессов на пулы и динамическое управление пулами, основанное на их нагрузке.
- Упрощенное развертывание и управление. Данный факт достигнут за счет:
- — более 40 командлетов PowerShell для настройки сервера NFS и управления общими папками
- — простого графического интерфейса управления, позволяющего одновременно управлять как SMB, так и NFS шарами, а также настройками скрининга файлов и файловой классификации.
- — фиксации RPC порта (порт 2049) для простоты настройки файерволов
- — нового провайдера WMI v2
- — упрощенной идентификации за счет плоского файла мапинга
- Улучшения в NFSv3. За счет быстрой отправки клиентам уведомлений о сбоях монитором NSM (Network Status Monitor), старые NFS клиенты лучше и быстрее обрабатывают процедуру failover, что означает меньшее время простоя.
Итак, NFS сервер в Windows Server 2012 значительно улучшен с точки зрения простоты развертывания, масштабируемость, стабильность, доступность, надежность, безопасности и совместимости. Общие папки могут быть одновременно доступны по протоколам SMB и NFS, что означает возможность использования Windows Server 2012 в качестве хранилища в гетерогенных сетях.
Далее мы разберем сценарий развертывания и управления сервером NFS в Windows Server 2012.
Установка NFS сервера в Windows Server 2012
NFS сервер в Windows Server 2012 можно установить с помощью GUI и Powershell. Чтобы установить NFS сервер с помощью графического интерфейса, откройте консоль Server Manager и внутри роли файлового сервера (File and Storage Services) отметьте компонент Server for NFS.
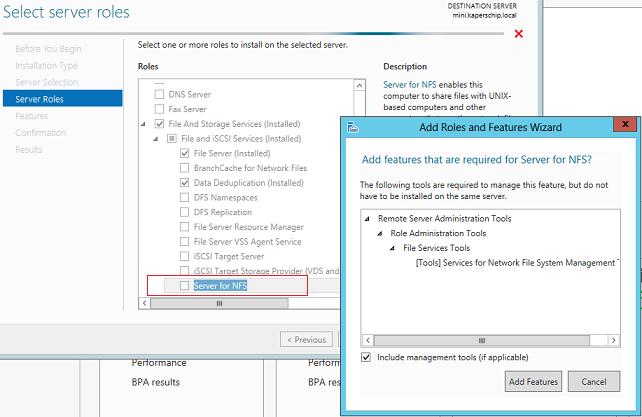
После окончания установки компонента NFS, сервер необходимо перезагрузить.
Установка этой же роли с помощью Powershell также не вызывает затруднений, просто выполните команду:
Add-WindowsFeature "FS-NFS-Service"

Настройка общей папки NFS в Windows Server 2012
Далее мы покажем, как с помощью установленной нами роли создать NFS шару (общую папку) на сервере Windows. Создать NFS шару можно опять несколькими способами: с помощью графического интерфейса или Powershell.
Создание общего каталога NFS с помощью консоли Server Manager
Откройте консоль Server Manager, перейдите в раздел Share management (находится внутри роли File and Storage Services).
В контекстном меню запустите мастер создания нового общего каталога- New Share…

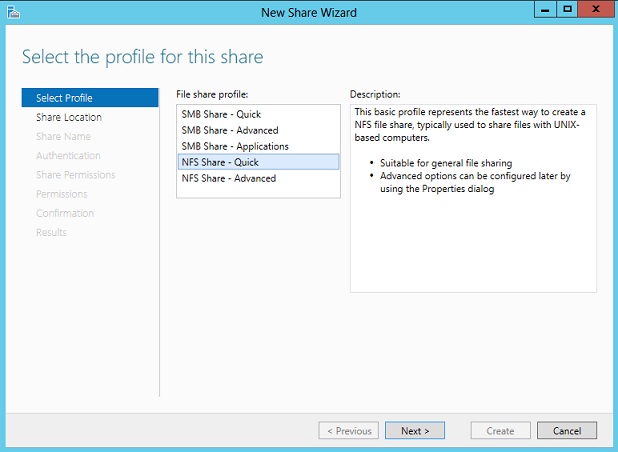
Выберите тип шары NFS Share — Quick
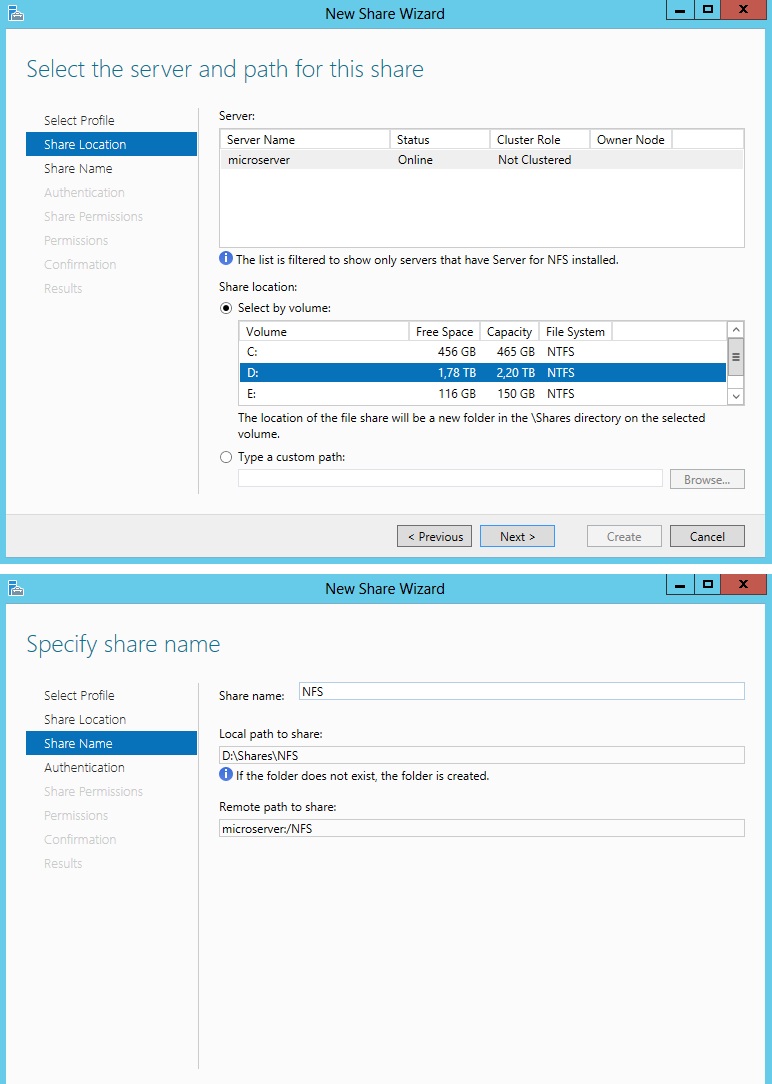
Далее нужно указать местоположение каталога на диске и путь, по которому должны подключатся удаленные NFS клиенты.
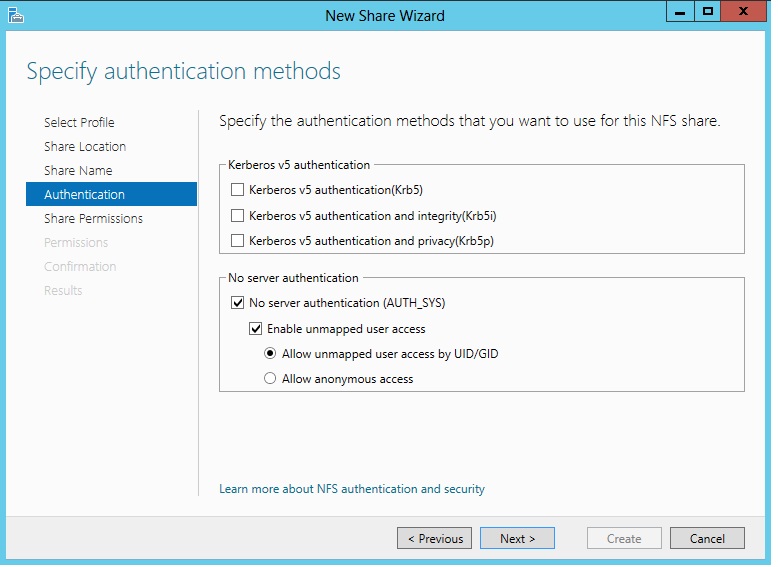
Затем необходимо задать тип аутентификации NFS клиентов: возможно, задействовать как Kerberos- аутентификацию, так и анонимную.
Предположим, в качестве потребителя создаваемого NFS ресурса будет выступать сервер виртуализации ESXi, в котором возможность аутентифицировать NFS соединения отсутствует (ESXi не поддерживает NFSv4). Поэтому тип аутентификации будет No Server Authentication, отметим также опции Enable unmapped user access и Allow unmapped user access by UID/GID.
Чтобы немного обезопасить создаваемую NFS шару от доступа сторонних лиц, ограничим доступ к NFS ресурсу по IP адресу клиента.
Host: 192.168.1.100
Language Encoding : BIG5
Share Permissions : Read/Write
Allow root access : Yes
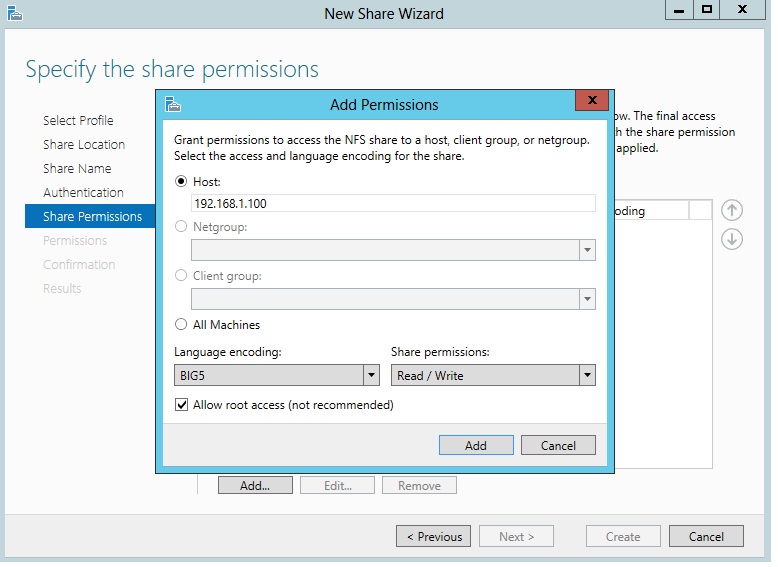
Далее осталось проверить, что на уровне NTFS пользователь, в которого мапится подключающийся юзер, имеет доступ на чтение/запись (если решено задействовать анонимный доступ, придется для пользователя Everyone дать полные r/w права на уровне NTFS).
Как создать NFS шару с помощью Powershell
Создадим новую NFS шару:
New-NfsShare -Name "NFS " -Path "d:\shares\nfr" -AllowRootAccess $true -Permission Readwrite -Authentication sys
Разрешим доступ к шаре для IP адреса 192.168.1.100 и зададим кодировку BIG5 (возможность просмотра содержимого NFS шары для клиента ESXi).
Grant-NfsSharePermission -Name “NFS” -ClientName 192.168.1.100 -ClientType host -LanguageEncoding BIG5
Созданную NFS шару можно использовать, например, как NFS-datastore в среде виртуализации VMWare vSphere, или для доступа к данным с других Unix-like клиентов. Как смонтировать NFS шару в Windows — клиентах описано в этой статье.
Introduction
NFS (Network File System) is one of the most widely used protocols for sharing files across a network, enabling computers to access files remotely as if they were on the local system. It is commonly used in Linux/Unix environments but has also found its way into Windows Server installations. As organizations continue to build heterogeneous IT environments, understanding how to set up and use NFS in Windows Server 2025 is more important than ever.
This blog post will provide a complete guide on how to install, configure, and use NFS on Windows Server 2025, discuss its key features and characteristics, and outline when and why you should choose NFS for your file sharing needs.
Table of Contents
What is NFS
NFS (Network File System) is a protocol developed by Sun Microsystems in 1984 that allows a computer to access files over a network as if they were part of its local storage. Initially designed for UNIX-based systems, NFS has become a standard protocol for shared file systems, especially in Linux/Unix environments. Over time, support for NFS was extended to Windows and other platforms, making it a cross-platform file-sharing protocol.
Key Characteristics of NFS:
- File Sharing over the Network: NFS allows files stored on one computer to be accessed over a network by other computers as though they were local files.
- Network Transparency: With NFS, users can seamlessly access remote files without needing to know the physical location of those files.
- Scalable: NFS allows for easy scaling of storage across multiple machines without the need for complicated configurations.
Features and Characteristics of NFS
Centralized Storage
NFS allows for centralized storage of files that can be accessed by multiple clients across a network. This reduces redundancy and simplifies data management.
Ease of Configuration
NFS is relatively easy to set up and configure, especially on Windows Server 2025, making it accessible even to less experienced administrators.
Cross-Platform Compatibility
NFS allows files to be shared across different platforms (Linux, UNIX, and Windows), enabling diverse environments to work together seamlessly.
Security and Authentication
Windows Server 2025 supports Kerberos authentication for secure access to NFS shares. This ensures that only authorized users and systems can access the shared files.
Performance
NFS is generally considered lightweight, but it’s important to note that the performance can depend on the network, server, and hardware specifications. It offers good performance for most standard workloads.
Scalability
NFS supports the addition of more clients and servers without significant changes to the network infrastructure. This makes it a scalable solution for businesses of all sizes.
Support for Different NFS Versions
Windows Server 2025 supports NFSv3 and NFSv4. NFSv4 includes improved features like stateful operations, security improvements, and better support for firewalls.
When to Use NFS?
NFS is an excellent choice for a wide range of use cases, particularly when you need to share files across mixed environments (Windows, Linux, UNIX). Here are some scenarios where you might want to use NFS:
Sharing Files Between Windows and UNIX/Linux Systems
If your organization uses both Windows and UNIX/Linux systems, NFS allows seamless file sharing between these diverse environments. NFS’s cross-platform compatibility means it can integrate Windows Server 2025 with UNIX/Linux-based servers.
2. Centralized File Storage
If you want to centralize the storage of files, NFS is a good solution. You can mount remote NFS shares onto Windows Server 2025, ensuring all files are stored in one place, easily accessible by multiple systems.
3. Simplified Configuration
For environments where file sharing simplicity is critical, NFS is a straightforward solution. Unlike more complex file-sharing methods, NFS can be quickly configured and maintained.
4. Integration with Virtualized Environments
In virtualized environments (such as VMware), NFS is a reliable storage protocol for shared storage. Windows Server 2025 can use NFS to store virtual machine files and configuration data.
5. Cost-Effective Storage Solutions
NFS provides an affordable solution for businesses looking to implement shared network storage without investing in expensive storage hardware.
Step-by-Step Tutorial: Installing and Configuring NFS in Windows Server 2025
Now, let’s dive into the process of setting up NFS on Windows Server 2025. Follow these steps to install and configure NFS for file sharing.
Install the NFS Server Feature
Open Server Manager:
Click on the Start button and open Server Manager.
Add Roles and Features:
In Server Manager, click on Manage in the top-right corner, and then select Add Roles and Features.
Select NFS Server Feature:
On the Select server roles screen, expand:
File and Storage Services
File and iSCSI Services. Check the box for Server for NFS. If any required features are needed, it will prompt you to add them. click Add Features. Click Next.

Wait for Installation:
The Select features screen may already have some default features selected you don’t need to add anything here unless specifically required.
Just click Next. On the Confirmation screen:
Review the selections. Optionally check Restart the destination server automatically if required. Click Install.
Wait for the installation to complete. It may take a few minutes. Once done, click Close. At this point, Server for NFS is installed, and you can now proceed to configure NFS shares on your Windows Server.
Configure NFS Server
Open NFS Configuration:
After installation, open Server Manager again, go to the Tools menu, and select Services for Network File System.
Start NFS Server:
Find the NFS Server service in the list and make sure it is running. If it is not, right-click and select Start.
Open Server Manager > File and Storage Services > Shares.
Click Tasks > New Share.
Select NFS Share – Quick or NFS Share – Advanced, depending on your needs.

Choose NFS Share Type. You’ll now see several options for types of shares:
NFS Share – Advanced: Allows more customization (e.g., permissions, quotas, etc.).
NFS Share – Quick: Simplified setup, default options.
For most purposes, select NFS Share – Quick, then click Next.
You’ll be asked to choose where to create the NFS share. Select an existing folder or create a new one.
In our case we set the path to: C:\Shares\vmorecloud_share
Then click Next.

Configure Authentication and Permissions
Authentication:
Choose No server authentication (AUTH_SYS) for standard NFS access.
Specify Permissions:
Click Add to define which hosts can access this NFS share.
In the permission entry:
Enter hostname or IP address of client (e.g., 192.168.119.145).
Choose access type:
- Read-Only
- Read-Write
- Check or uncheck root access as needed.
For basic setups, choose Read-Write and disable root access for security. Click Next.
Configure NFS Client Access
Allow NFS Client Access
To allow remote clients (Linux or Windows) to mount the shared folder, go to the Share settings and specify the IP addresses or hostnames of the client machines.
You can configure NFS to allow access to specific machines or networks by using IP-based access control.
Adjust Firewall Settings
If you are using Windows Firewall, ensure that the firewall allows inbound traffic on the NFS port (2049). You may need to create a rule in the Windows Firewall settings to enable this traffic.
Enable NFS Client Feature
Go to Control Panel > Programs > Turn Windows features on or off.
Scroll down and enable:
Services for NFS
Client for NFS
Click OK and restart if required.
Open Command Prompt as Administrator and run:
On a Windows Client
Open Command Prompt as Administrator.
Mount the Share
mount \\<Server_IP>\vmorecloud_share Z:
Example:
mount -o nolock \\192.168.1.10\sharedFolder Z:
This mounts the NFS share as drive Z.
Verify Access
Open File Explorer. Navigate to *Z: *. You should see the contents of the shared NFS folder.
On a Linux Client
Install NFS Client (if not already installed). On Ubuntu/Debian open the terminal and type this command.
sudo apt-get install nfs-common
Create a Mount Point
This is the directory where the remote NFS share will be mounted.
sudo mkdir -p /mnt/nfs_share
Mount the Share
sudo mount -t nfs <Server_IP>:/nfsdata /mnt/vmorecloud_share
Verify the Setup
Check Mounted Shares
On the client machine, verify that the NFS share is accessible by navigating to the mounted drive or folder. Type the following command:
df -h | grep nfs
Or list the contents.
ls /mnt/nfs_share
Test File Access
Try creating, editing, and deleting files on the NFS share to ensure proper permissions are set.
Make the Mount Persistent
Edit /etc/fstab and add:
192.168.1.10:/nfsdata /mnt/vmorecloud_share nfs defaults 0 0
Conclusion
By following this step-by-step guide, you’ve learned how to install and configure NFS on Windows Server 2025. NFS is a powerful and cost-effective solution for file sharing, particularly in mixed-OS environments. Its ease of configuration and cross-platform compatibility make it an attractive choice for organizations that need centralized storage and seamless access across Windows, Linux, and UNIX systems.
Whether you’re looking to integrate NFS into your existing virtualized infrastructure, need centralized file storage, or want to simplify file-sharing across a network, NFS on Windows Server 2025 is a robust choice.
Remember: NFS may not be suitable for every scenario, particularly in environments where performance and security are the highest priorities.
In this guide we will show you how to install NFS Server on Windows Server 2019. NFS (Network File System) is one of the most commonly used file-based storage systems often used to access files over a network. It is a popular protocol for sharing files over the LAN on Linux, Unix, and Windows platforms. You can mount the remote directory on the local system as if they were locally mounted. It allows you to group resources onto centralized servers on a network for easy sharing. NFS server has a right on the shared directory and can give specific permission based on the client’s requirement.
Advantages of NFS (Pros)
- It provides centralized storage for all users that will decrease the workload for the administrator in terms of backups.
- Allows users to access their files from any remote PC.
- With NFS, you can keep all users’ accounts on the central NFS server. This way you can mount all user’s home directories from the NFS server to their local system.
- All data and user accounts could be kept and maintained in one place.
In this post, we will explain how to install NFS server on Windows server 2019. We will also explain to install the NFS client and mount the NFS share on the client machine.
Install NFS Server on Windows Server 2019
in order to install the NFS Server Role in Windows Server 2019. Follow the below steps to perform the installation:
Step 1 – Log in to the Windows server 2019 as an administrator user, press the Windows key, search for Server Manager and open it as shown on the following page:


Step 2 – Click on Add Roles and Features button. You should see the following screen:

Step 3 – Click on the Next button. You should see the Select Installation Type page:

Step 4 – Select Role-based or feature-based installation and click on the Next button. You will be asked to select the destination server as shown on the following screen:

Step 5 – Select the server you want to install NFS server and click on the Next button. You will be asked to select the Role in the following screen:

Step 6 – Expand File and Storage Services then again expand File and iSCSI Services then check the “Server for NFS” box and click on the Next button. You should see the Select Feature page:

Step 7 – Click on the Next button. You will be asked to confirm the installation as shown on the following screen:

Step 8 – Confirm all settings and click on the Install button to start the installation.
Once the installation has been finished, you will need to restart your system to apply the changes. Once your system is restarted, you can proceed to create an NFS share.
Create an NFS Share
After installing the NFS server, you will need to create an NFS share folder that your want to export to all clients. Follow the below steps to create an NFS share folder named nfsshare inside the C drive:
Step 1 – Open the Server Manager as shown in the following screen:

Step 2 – In the left pane, click on the File and Storage Services. You should see the following screen:

Step 3 – Select the Shares then click on the TASKS menu and click on New Share. You should see the following screen:

Step 4 – Select NFS Share-Quick and click on the Next button. You should see the following screen:

Step 5 – Select Type a custom path, define your nfsshare directory and click on the Next button. You should see the following screen:

Step 6 – Provide your NFS share name and click on the Next button. You will be asked to select the authentication method on the following screen:

Step 7 – Specify the authentication method and click on the Next button. You should see the following screen:

Step 8 – Click on the Add button to specify the share permission. You should see the following screen:

Step 9 – Provide the IP address of the client machine, provide read/write permission and click on the Add button. You should see the following screen:

Step 10 – Click on the Next button. You should see the following screen:

Step 11 – Confirm all settings and click on the Create button to create an NFS share. Once the NFS share has been created, you should see the following page:

Step 12 – Click on the Close button to exit from the wizard.
At this point, NFS share is created. You can now proceed to install the NFS client on the client machine and mount the NFS share.
Install NFS Client on Client Machine
In this section, we will show you how to install the NFS client on the client machine. Follow the below steps to install the NFS client on the client machine:
Step 1 – Open the Server Manager as shown in the following screen:

Step 2 – Click on Add Roles and Features. You should see the following screen:

Step 3 – Click on the Next button. You should see the Select Installation Type page:

Step 4 – Select Role-based or feature-based installation and click on the Next button. You should see the destination server selection screen:

Step 5 – Select the server you want to install NFS client and click on the Next button. You should see the Select Role screen:

Step 6 – Click on the Next button. You should see the following screen:

Step 7 – Check the box “Client for NFS” and click on the Next button. You should see the following screen:

Step 8 – Confirm the Installation selections and click on the Install button to install the NFS client.
Once the NFS client has been installed, you can proceed to the next step.
Mount the NFS Share on the Client Machine
Now, you will need to mount the NFS share from the NFS server machine to the client machine. You can mount it using the mount.exe command:
Open the PowerShell with Administrator privileges and run the following command:
mount.exe 104.245.35.28:/nfsshare E:\

Where: 104.245.35.28 is the IP address of the NFS server and nfsshare is the name of the NFS share.
Once the NFS share is mounted. Open the File Explorer and check if NFS share is mounted or not. You should see your mounted share on the following screen:

Install NFS Server on Windows Server 2019 Completed
In the above post, we explained how to install the NFS server and NFS client on Windows Server 2019. We also explained how to mount the NFS share from the server machine to the client machine.
Estimated reading: 3 minutes
460 views
In this guide, we are going to install and configure NFS Server and create NFS Share. This is an efficient way to share a directory with other client machines in your organization. You can use it as a central repository that can be mounted to clients and hence be able to access similar files as though they were part of the system.
Follow the steps shown in this post to install and configure the NFS Server in your Windows Server 2022. If you encounter any issues don’t hesitate to contact us in the comments section.
Install NFS Server
Install NFS Server to share files and folders. There are 2 ways:
Method 1: Run PowerShell with Admin Privilege and Install NFS Server
You can run the following command on Powershell.
Install-WindowsFeature FS-NFS-Service -IncludeManagementTools
Method 2: Using GUI
Step 1: Open Server Manager
Hit the “Windows” key and search for “Server Manager“. Once open, click on “Add Roles and Features“

Step 2: Click Next on Wizard
On the first page of the “Add Roles and Features Wizard“, click “Next“

Step 3: Role-Based
In the “Select Installation type page“, select “Role-based or feature-based-installation” and click “Next“

Step 4: Choose Server
Select the server you will install NFS on and click “Next“.

Step 5: Select Role
In this “Select server roles” part, expand “File and Storage Services” and further expand “File and iSCSI Services” then check the box against “Server for NFS“. A pop-up window will come forth.

Step 6: Add Features
In the pop-up window, click “Add Features” and hit “Next“.
Step 7: Features
In this “Select features” page, simply click on “Next“.

Step 8: Confirm and Install
Confirm your installation selections and hit “Install“. Let’s finish installing then click “Close” and you will have finished the installation process.

Configure NFS Server
Step 1: Configure NFS Share Folder
We are now going to configure a folder that we shall export to clients. Create a directory/folder in your desired disk partition. I will create TestShare in the C partition.
Head over to “Server Manager“. Click “File and Storage Services” and select Shares from the expanded menu. After that, click on the “TASKS” drop-down menu and select “New Share…“. A “New Share Wizard” will open.
Step 2: Select profile
On the first page of the wizard, select “NFS Share-Quick” and Click “Next” as shown below.

Step 3: Select the Share Folder
On this page, choose “Type a custom path“, browse for your directory, and click “Next“

Step 4: Name your Share
Type in a name for your share and hit “Next“

Step 5: Specify authentication methods
Depending on the authentication methods that your organization uses, you have a choice to make at this stage. Choose the one that befits your use case and hit “Next“.

Step 6: Choose Hosts to Access the Share
Click on “Add” in the window below and you now have many options to choose the hosts to access the share. You can place only one host, a Netgroup, a Client group, or all servers that can reach it. Make your choice and click on “Next“


Step 7: Specify Permissions
You can tweak the permissions to befit your scenario here. Once done, click “Next“.

Step 8: Confirm your selections and click Create

Step 9: Finish
Once done creating, click “Close“

Step 10: Confirm your share is created
Go back to “Server Manager” > “File and Storage Services” > “Shares“

Conclusion
We have successfully installed the Server and created a share. Next, we are going to install an NFS Client and connect to our created NFS Share.
In this article, I will explain how you can install and configure an NFS Server on a Windows 2019 Server. I will also show you the steps to create an NFS shared folder and mount the shared folder on Linux clients.
What is the Network File System (NFS)?
Network File System (NFS) provides a file-sharing solution that lets you transfer files between computers running Windows Server and other non-Windows operating systems such as Linux or UNIX using the NFS protocol.
NFS in Windows Server includes Server for NFS and Client for NFS. A computer running Windows Server can use Server for NFS to act as an NFS file server for other non-Windows client computers.
Client for NFS allows a Windows-based computer running Windows Server to access files stored on a non-Windows NFS server.
Understanding Test lab:
For this, we will use the virtual test lab created in VirtualBox.
- WS2K19-DC01: Domain Controller and DNS
- UBUNTU1804: Ubuntu OS, NFS client.
Install Server for NFS role service in Windows Server 2019:
To install the Server for NFS role service in Windows Server 2019, follow the below steps:
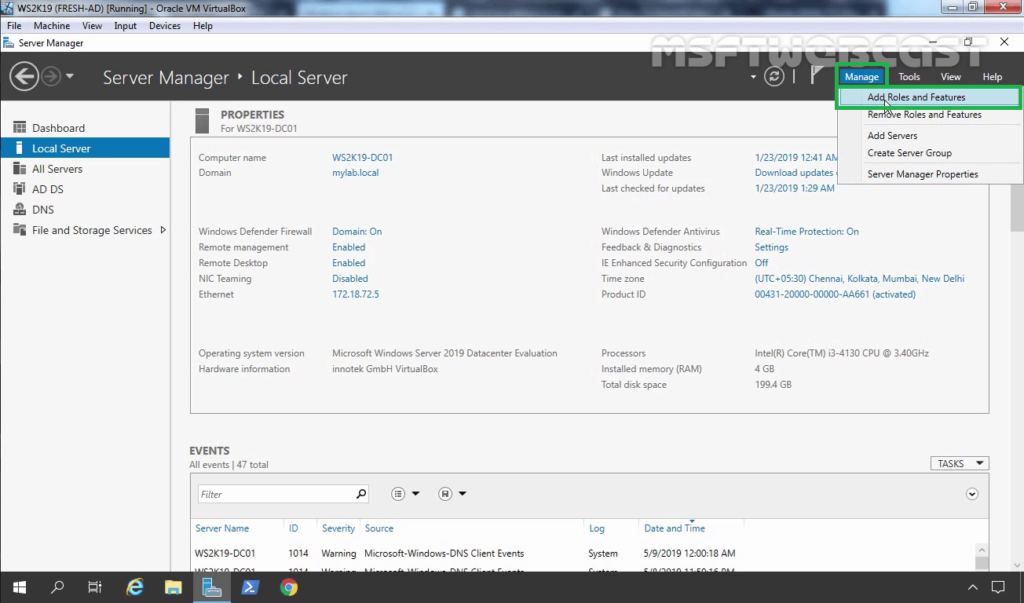
1. Open Server Manager. Click on Tools and select Add Role and Features.
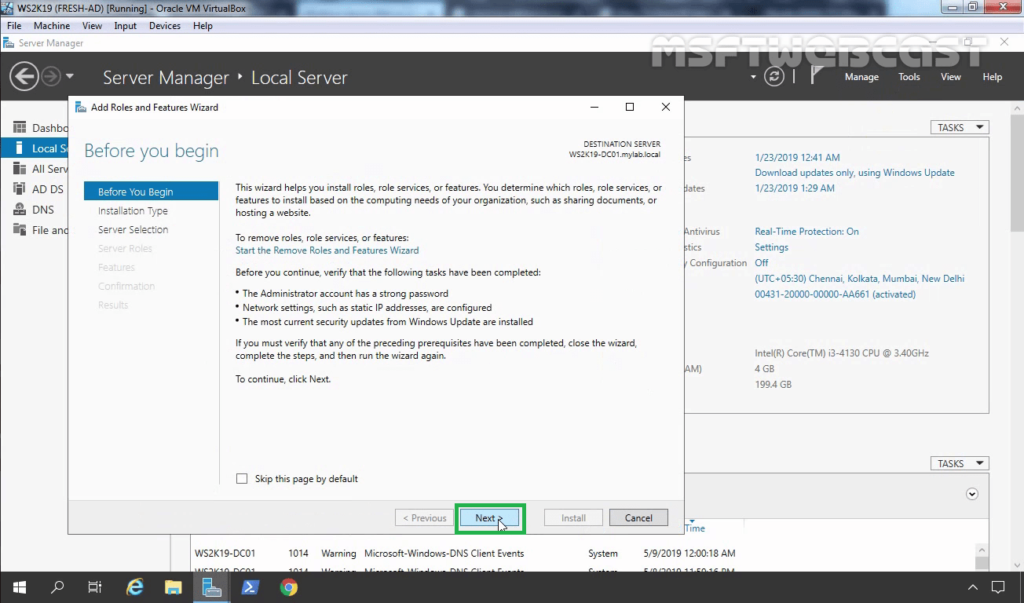
2. On the Before you begin page, click Next.
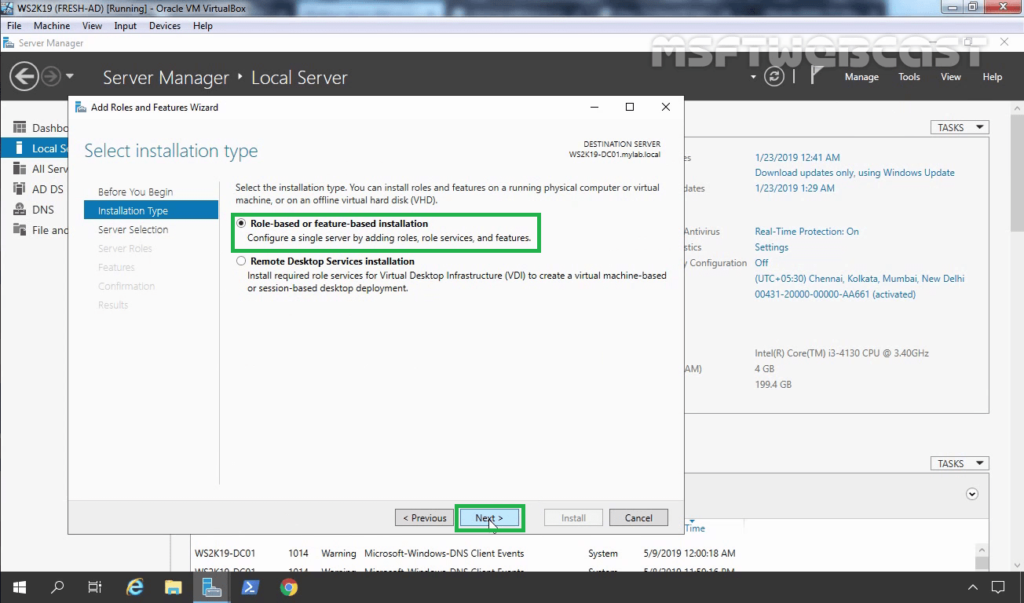
3. Select Role-based or feature-based installation and click Next.
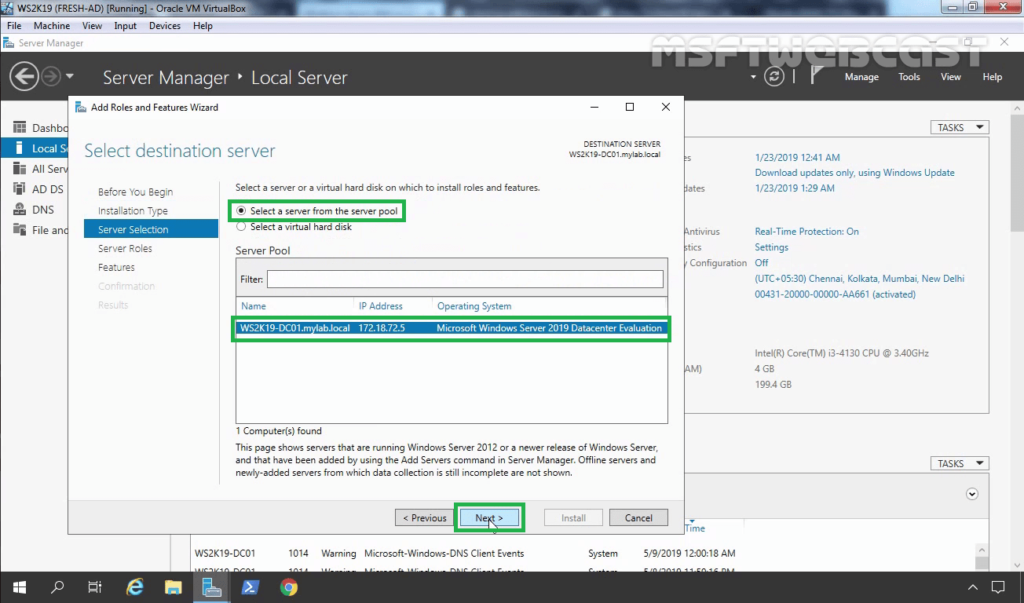
4. Select a server from the server pool on which you want to install the Network File System for Server role service, click Next.
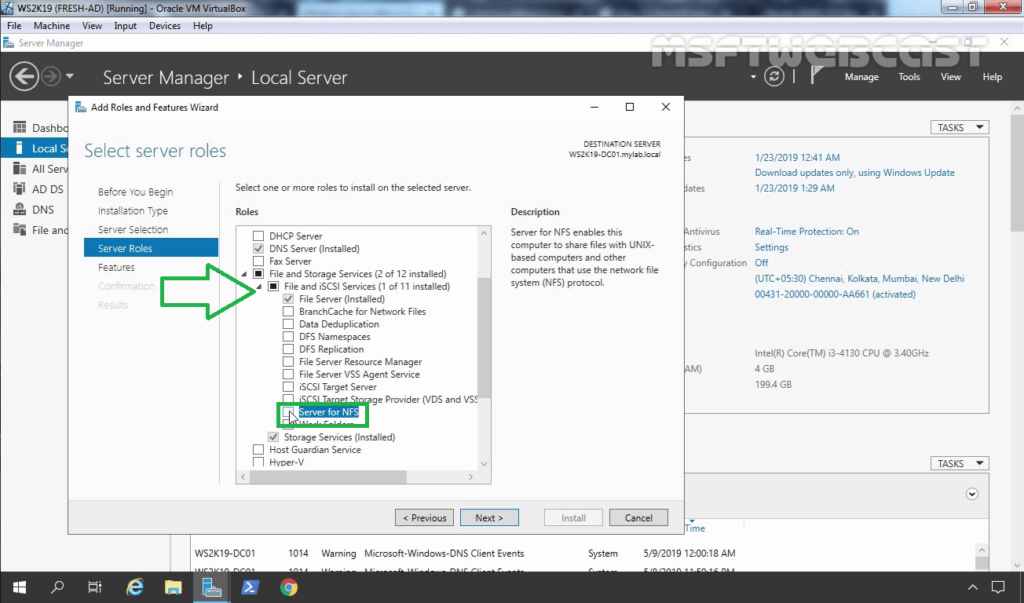
5. On select server roles page, expand File and Storage Services, expand File and iSCSI Services. Select Server for NFS checkbox.
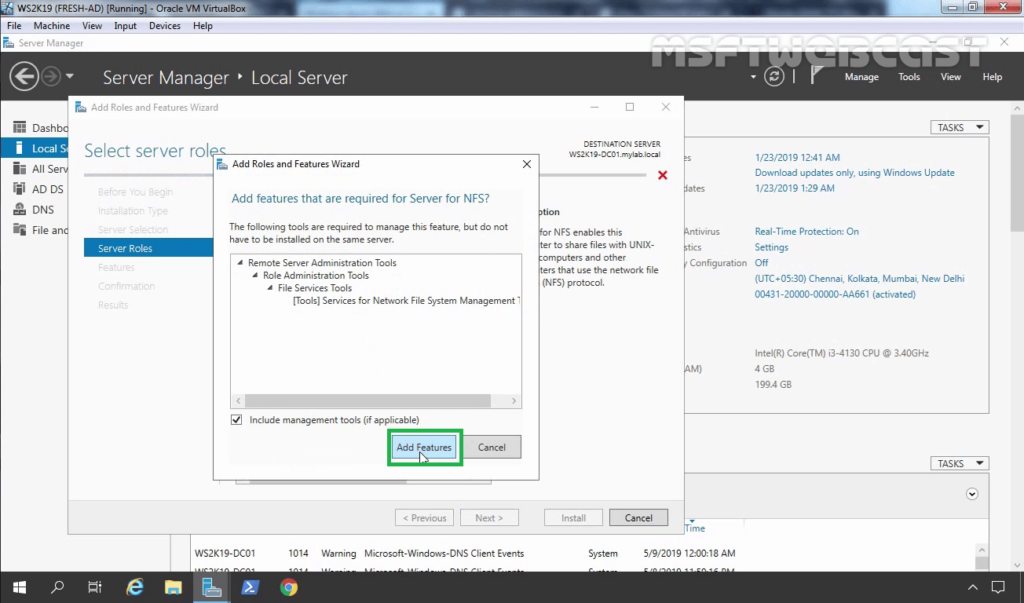
6. A new window will pop up, click on Add Features to include required features and management tools needed by the NFS server.
7. Make sure that the Server for NFS role service is selected. Click Next.
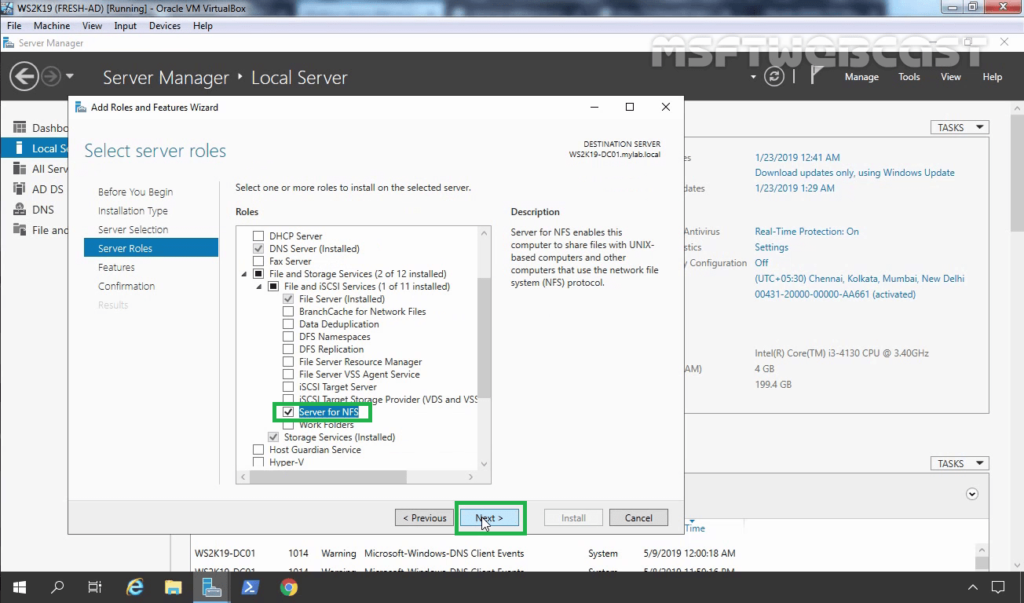
8. On select features, click Next.
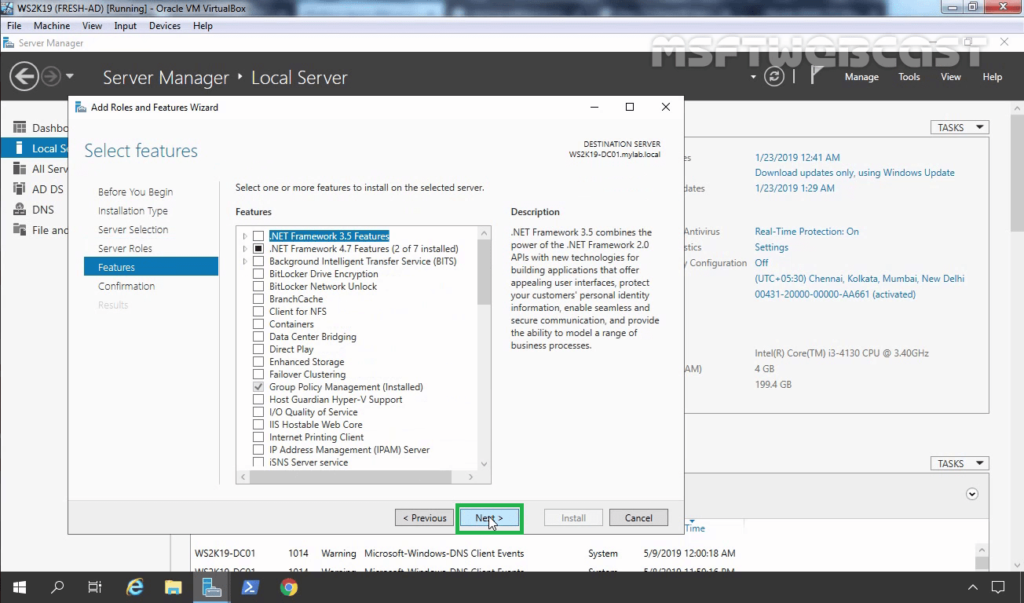
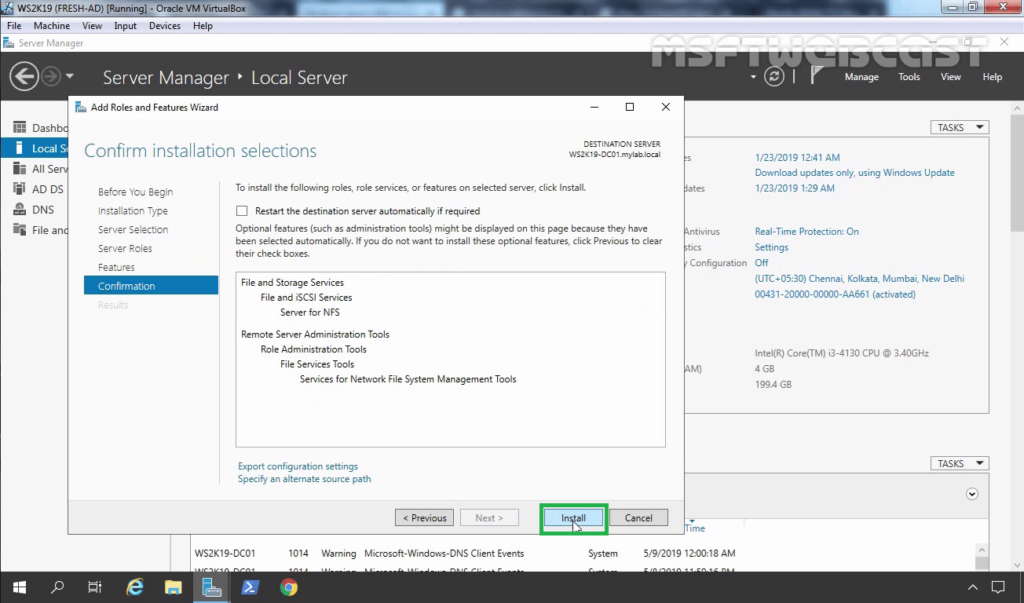
9. Click Install and complete the installation process.
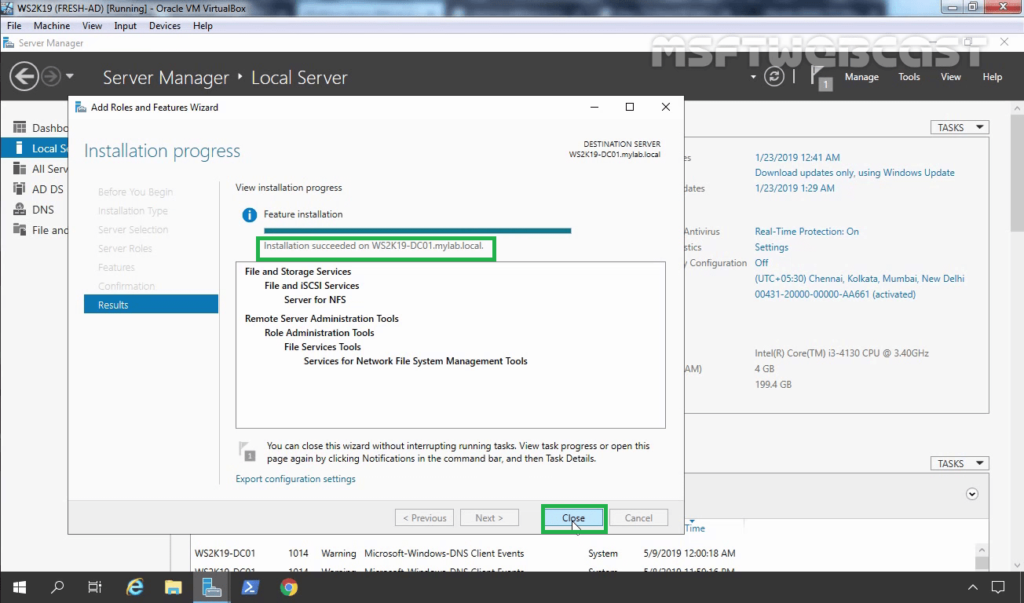
10. Click Close to finish the installation.
How to Create an NFS Shared Folder on Server 2019:
After installing the Server for NFS on Windows Server 2019, the next step is to create an NFS shared folder by using the File and Storage Services console.
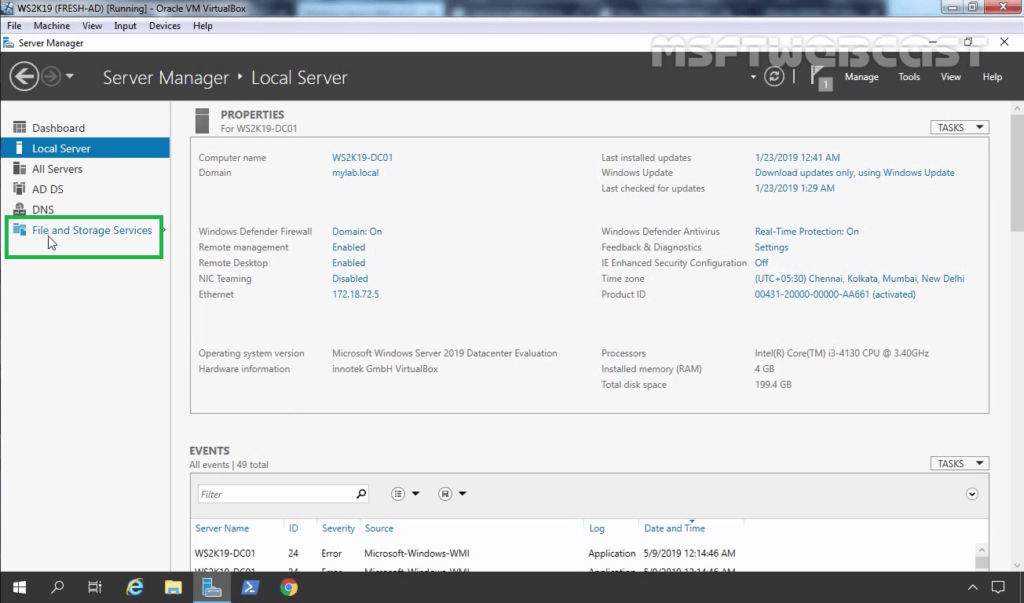
11. On the Server Manager Console, click on File and Storage Services.
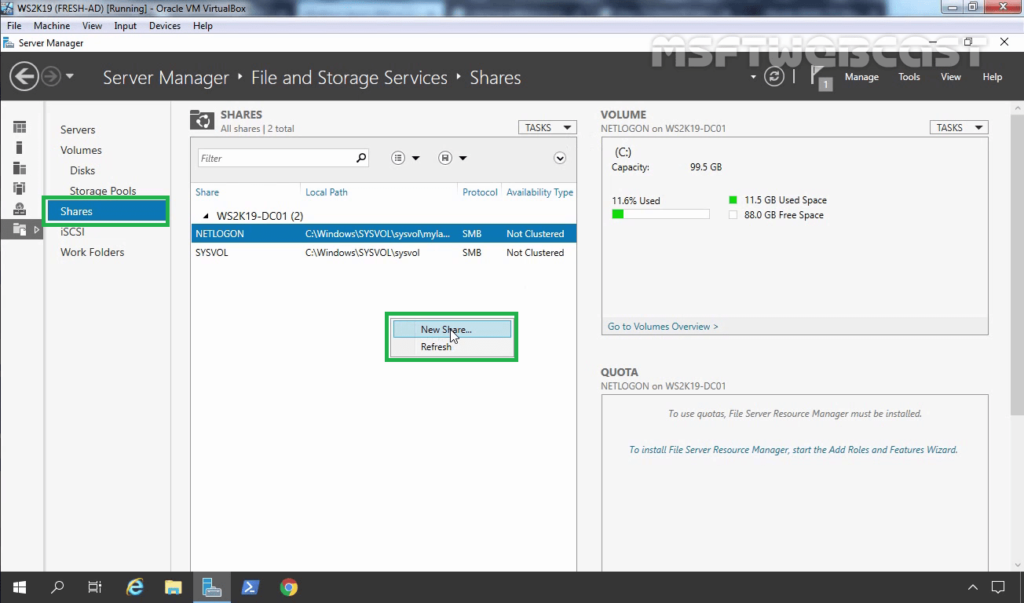
12. Click on Shares. Right-click in the empty area and select New Share.
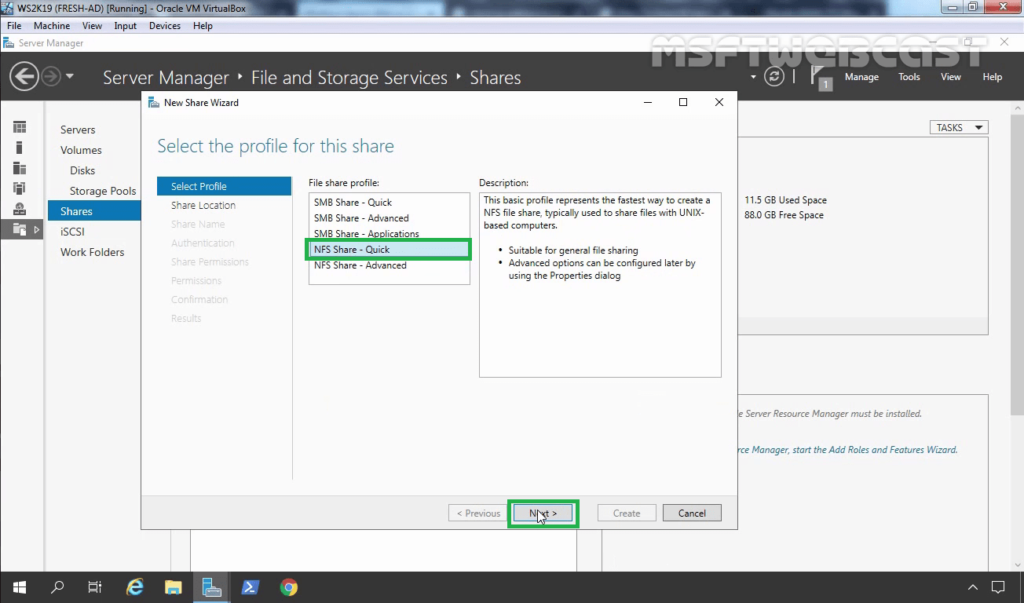
13. On Select the profile for this share, select NFS Share – Quick profile. Click Next.
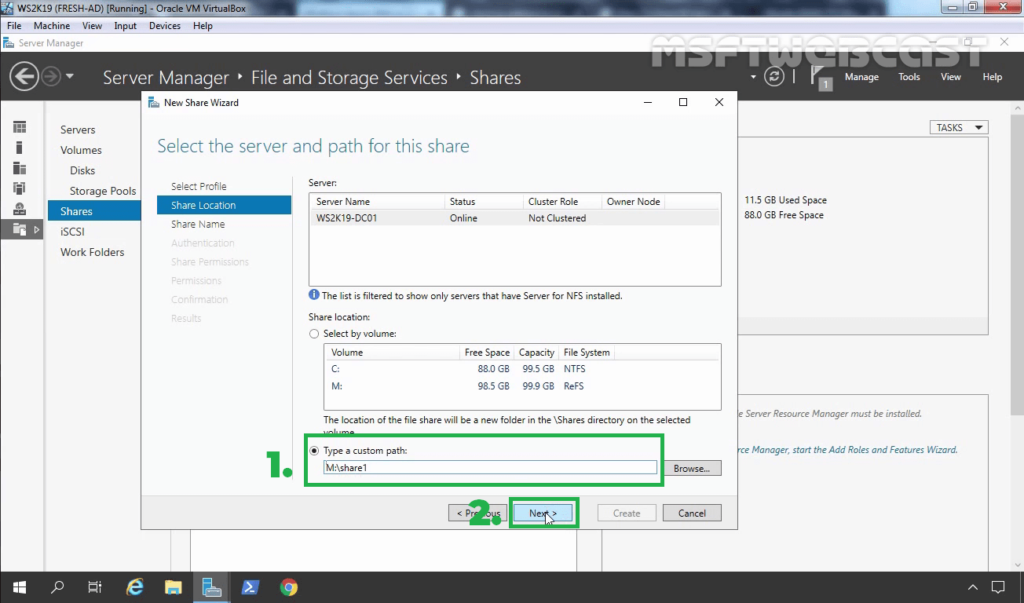
14. To configure a specific folder as NFS shared folder, select the checkbox Type a custom path and type the path for the specific folder you’d like to set as a shared folder. Click Next.
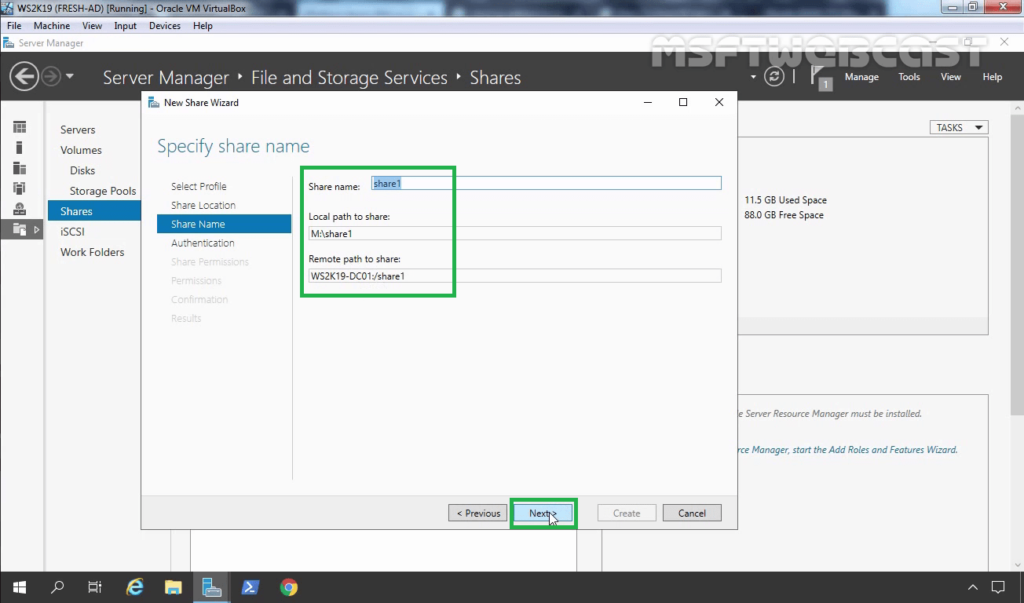
15. Verify share name, local path and remote path for NFS shared folder. Click Next.
16. Specify the Authentication methods as per your requirement.
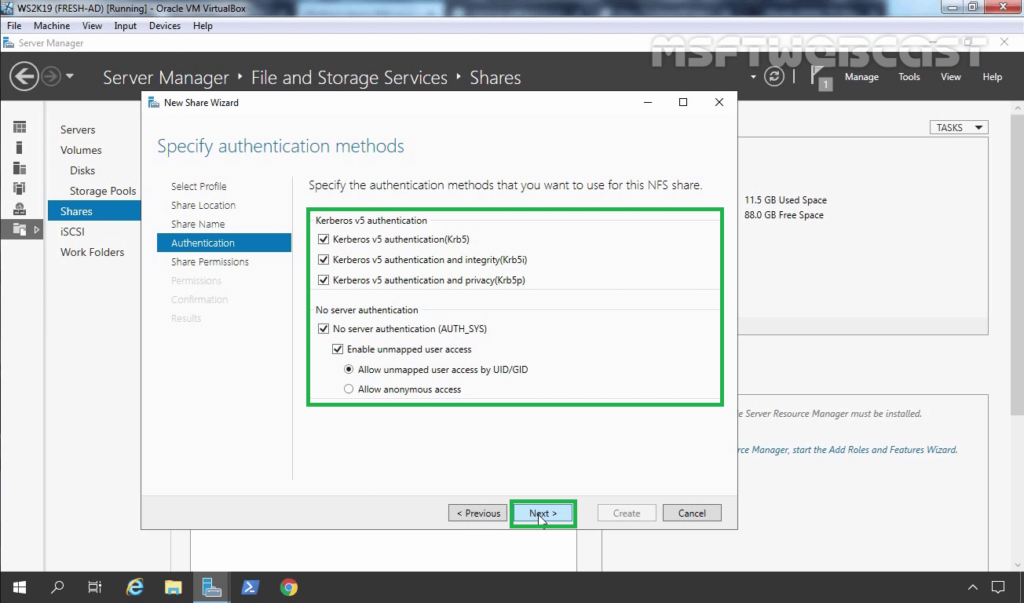
17. To set up the NFS share permissions, click Add button.
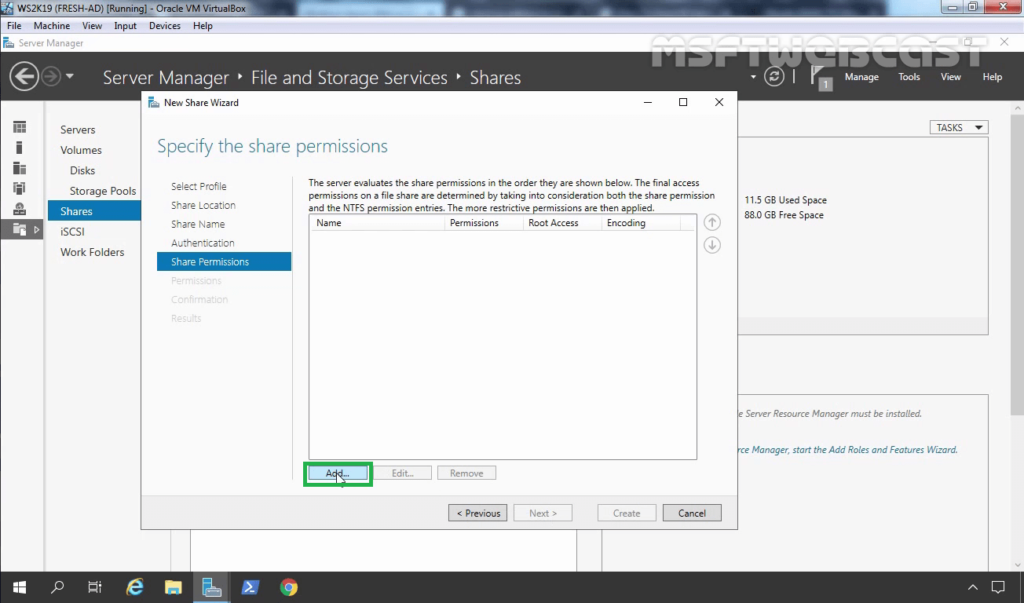
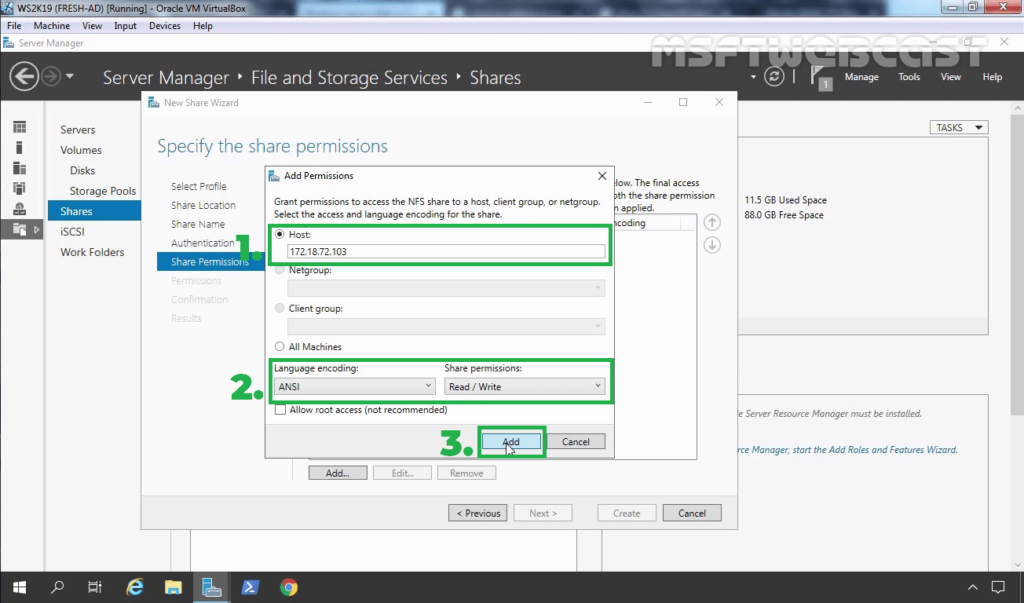
18. Specify the Hosts you’d like and assign the access permissions from the drop-down menu.
- Host: 172.18.72.103 (IP address of Ubuntu VM)
- Share Permissions: Read/Write
19. Click on Add.
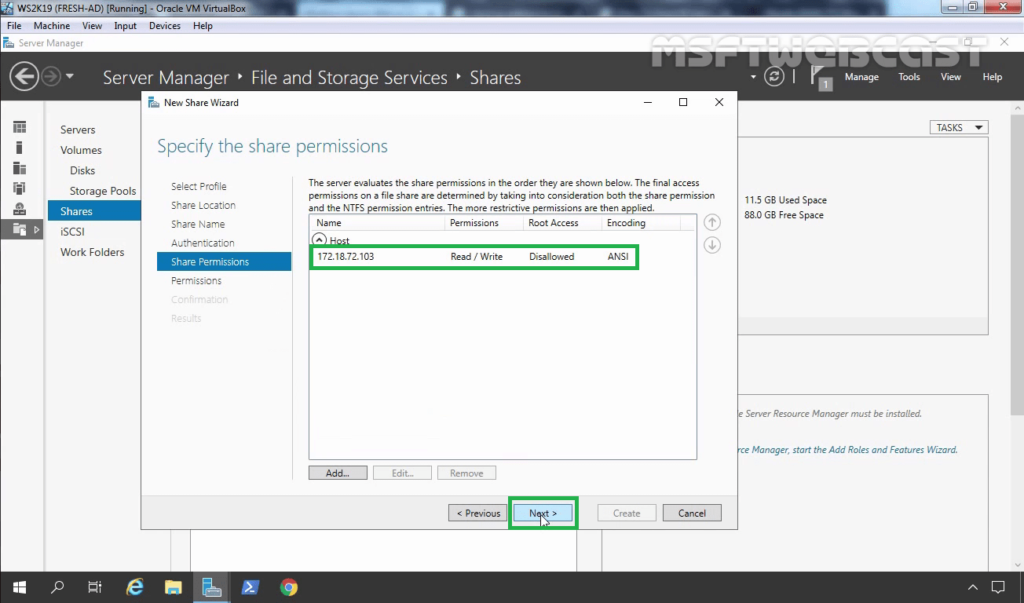
20. Using the same steps, you can add permission for other Hosts as well. Click Next.
21. Specify NTFS permission. As we are just testing NFS sharing, we are going with default permission. Click Next.
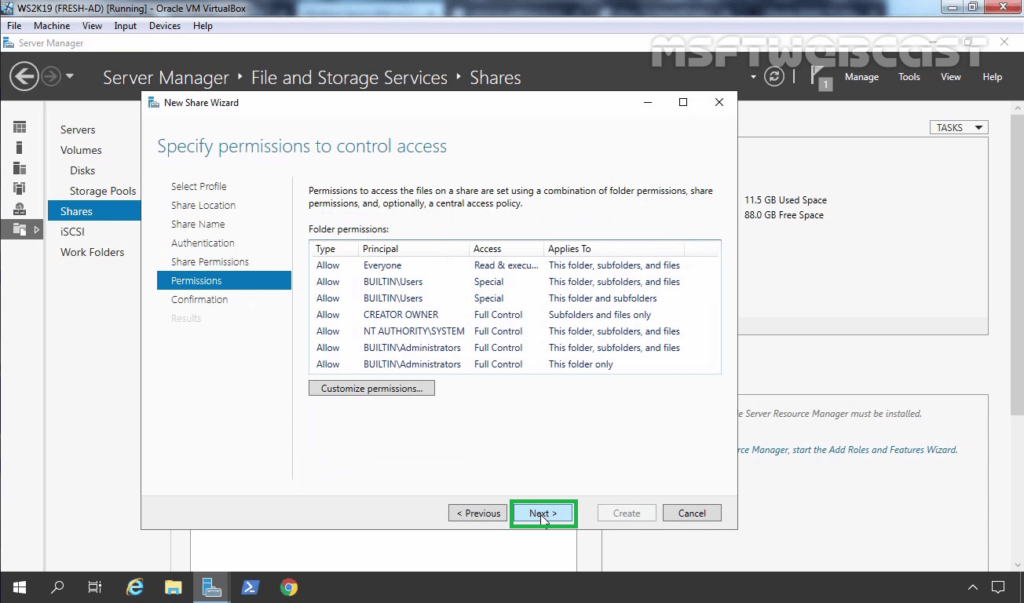
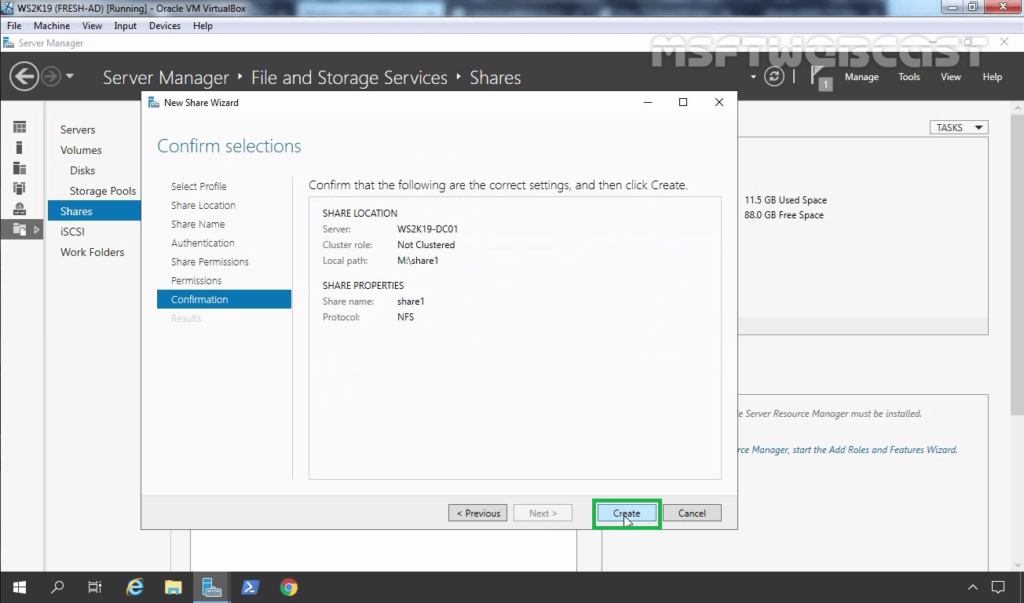
22. Review the selections, click on the Create button.
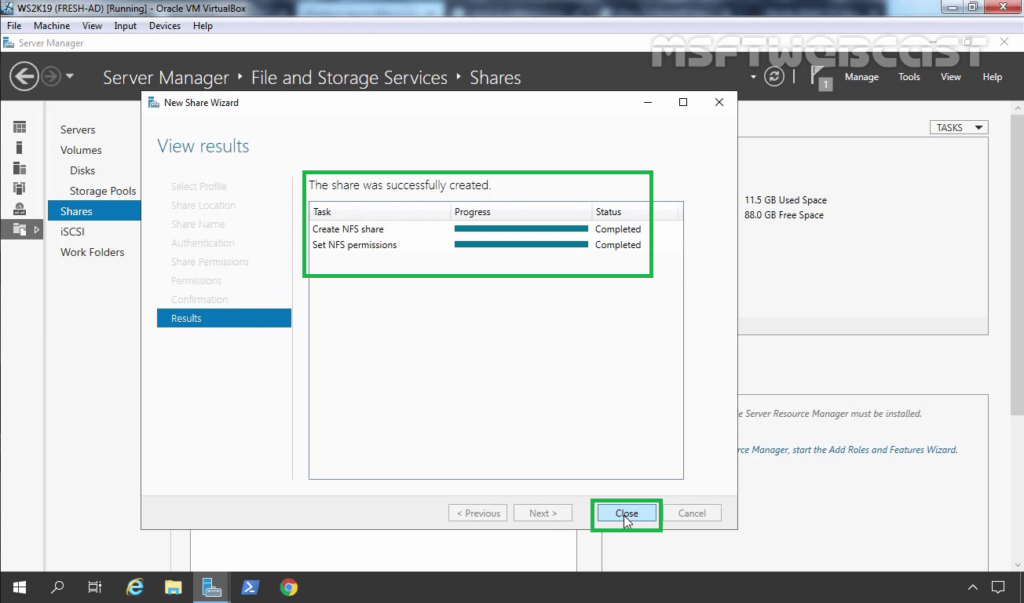
23. Click on the close button after verifying the successful creation of the NFS shared folder.
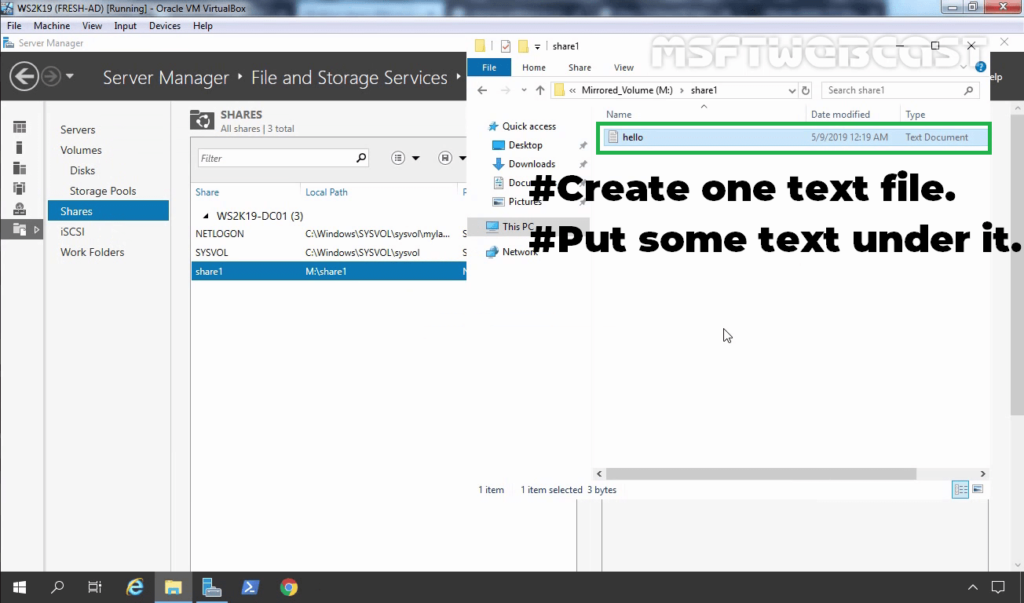
24. Verify the NFS shared folder under the shares list. Access the local path of the NFS shared folder. Create one text file and put some text under it.
Mount the NFS shared Folder on Linux Client (Ubuntu Machine):
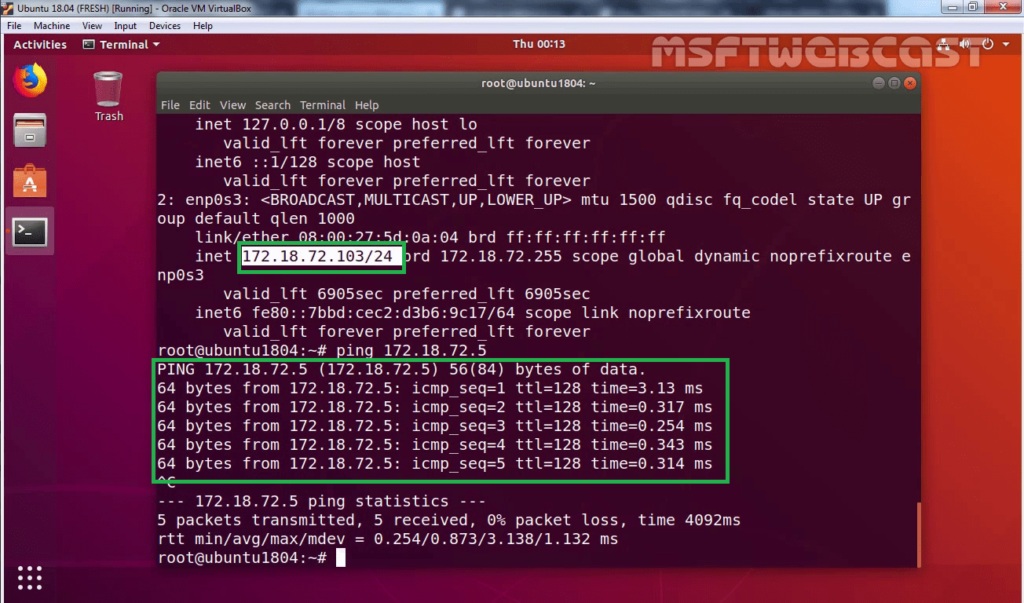
25. On the Ubuntu machine, verify the local IP address and network connectivity with the NFS server.
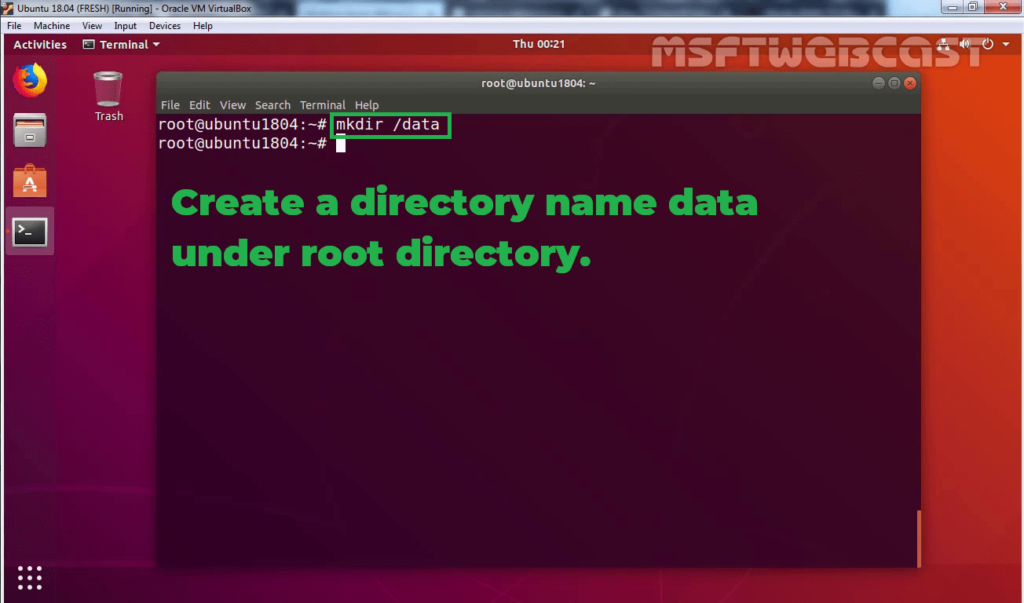
26. To mount an NFS shared folder on a Linux machine, open terminal. Type command: mkdir /data
This command will create one directory name data under the root directory.
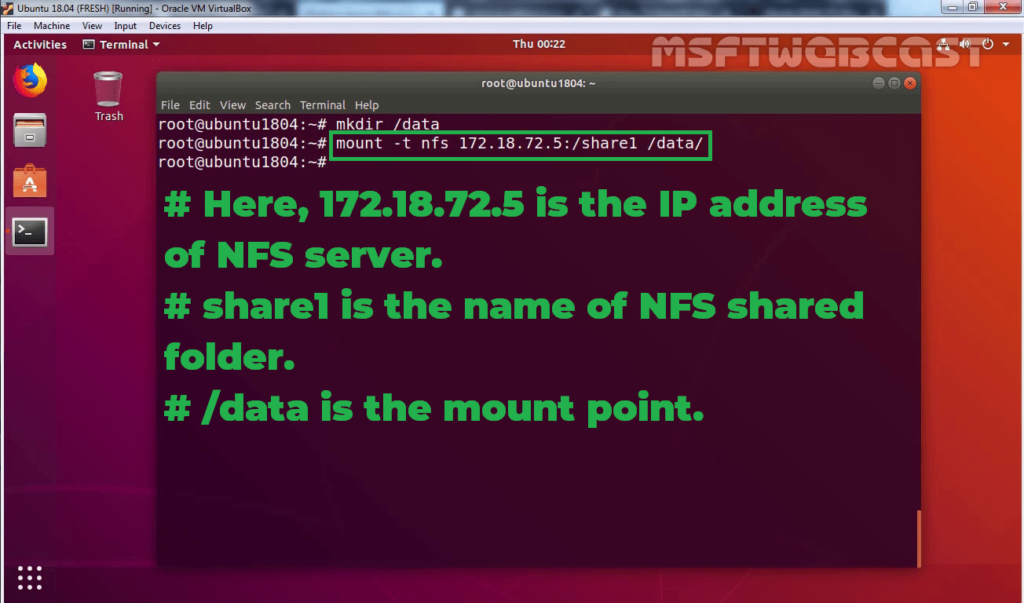
27. Type command:
Syntax: mount -t nfs <NFS-Server-IP>/<NFS-Shared-Folder-Name> /<Mount-Point>
For example, to mount an NFS shared folder named share1 of the NFS server that is configured with IP address 172.18.72.5, the folder should be mapped on the /data mount point.
In our case command will look like:
mount –t nfs 172.18.72.5:/share1 /data
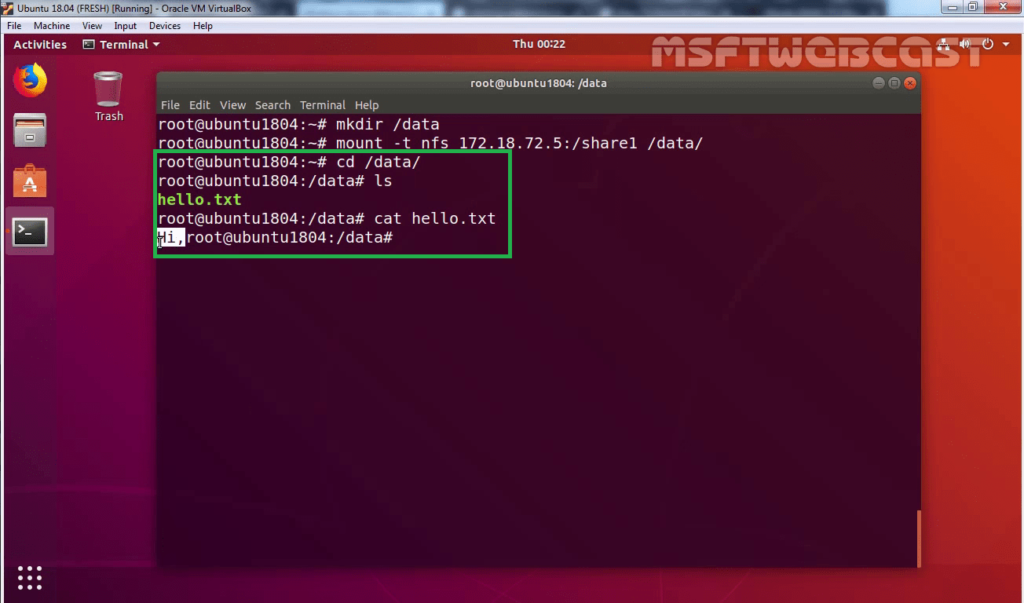
28. Verify the content of the text file which we have created earlier on the NFS server.
In this blog post, we have learned the steps on how to install and configure NFS in Windows Server 2019.
I hope, you enjoyed it. Thank you for reading.
Video Guide: Installing and Configuring NFS Server role in Windows Server 2019
Post Views: 5,974
