
Исправляем ошибку: не удалось обнаружить правильно установленный сетевой адаптер
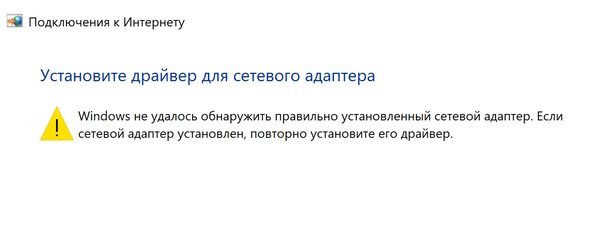
Если на ноутбуке или компьютере при проводном или беспроводном подключении отсутствует Интернет, при запуске опции встроенного устранения неполадок сети можно получить уведомление: «Установите драйвер для сетевого адаптера. Windows не удалось обнаружить правильно установленный сетевой адаптер».
Наша пошаговая инструкция расскажет вам о том, как справиться с данной ошибкой, если у вас операционная система Windows 10 или Windows 11, о правильной установке драйвера сетевого адаптера, а также познакомит с другой полезной информацией, которая поможет решить данную проблему.
Сетевой адаптер в диспетчере устройств
Начинать решать проблему лучше всего с проверки адаптеров (Ethernet или Wi-Fi) в Диспетчере устройств. После чего можно перейти к установке драйверов, если проблема будет в них.
Алгоритм действий такой:
- Жмем правой кнопкой мыши на кнопку «Пуск», выбираем пункт меню «Диспетчер устройств».
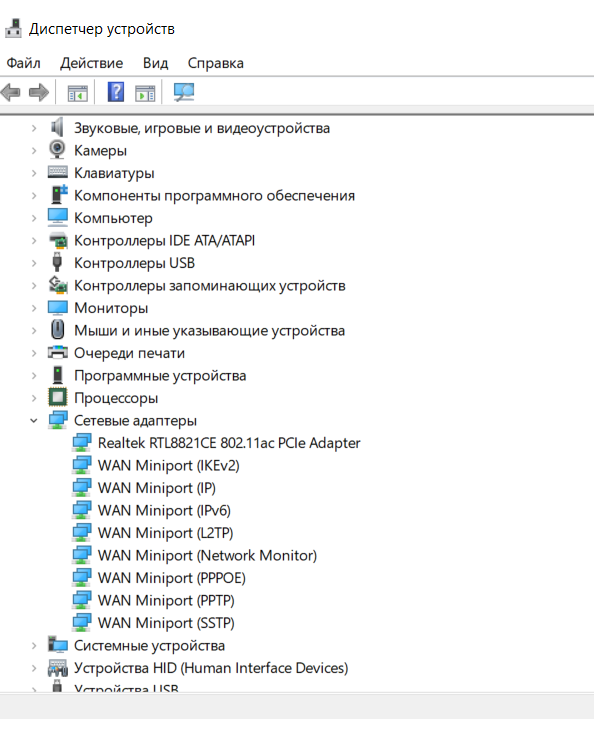
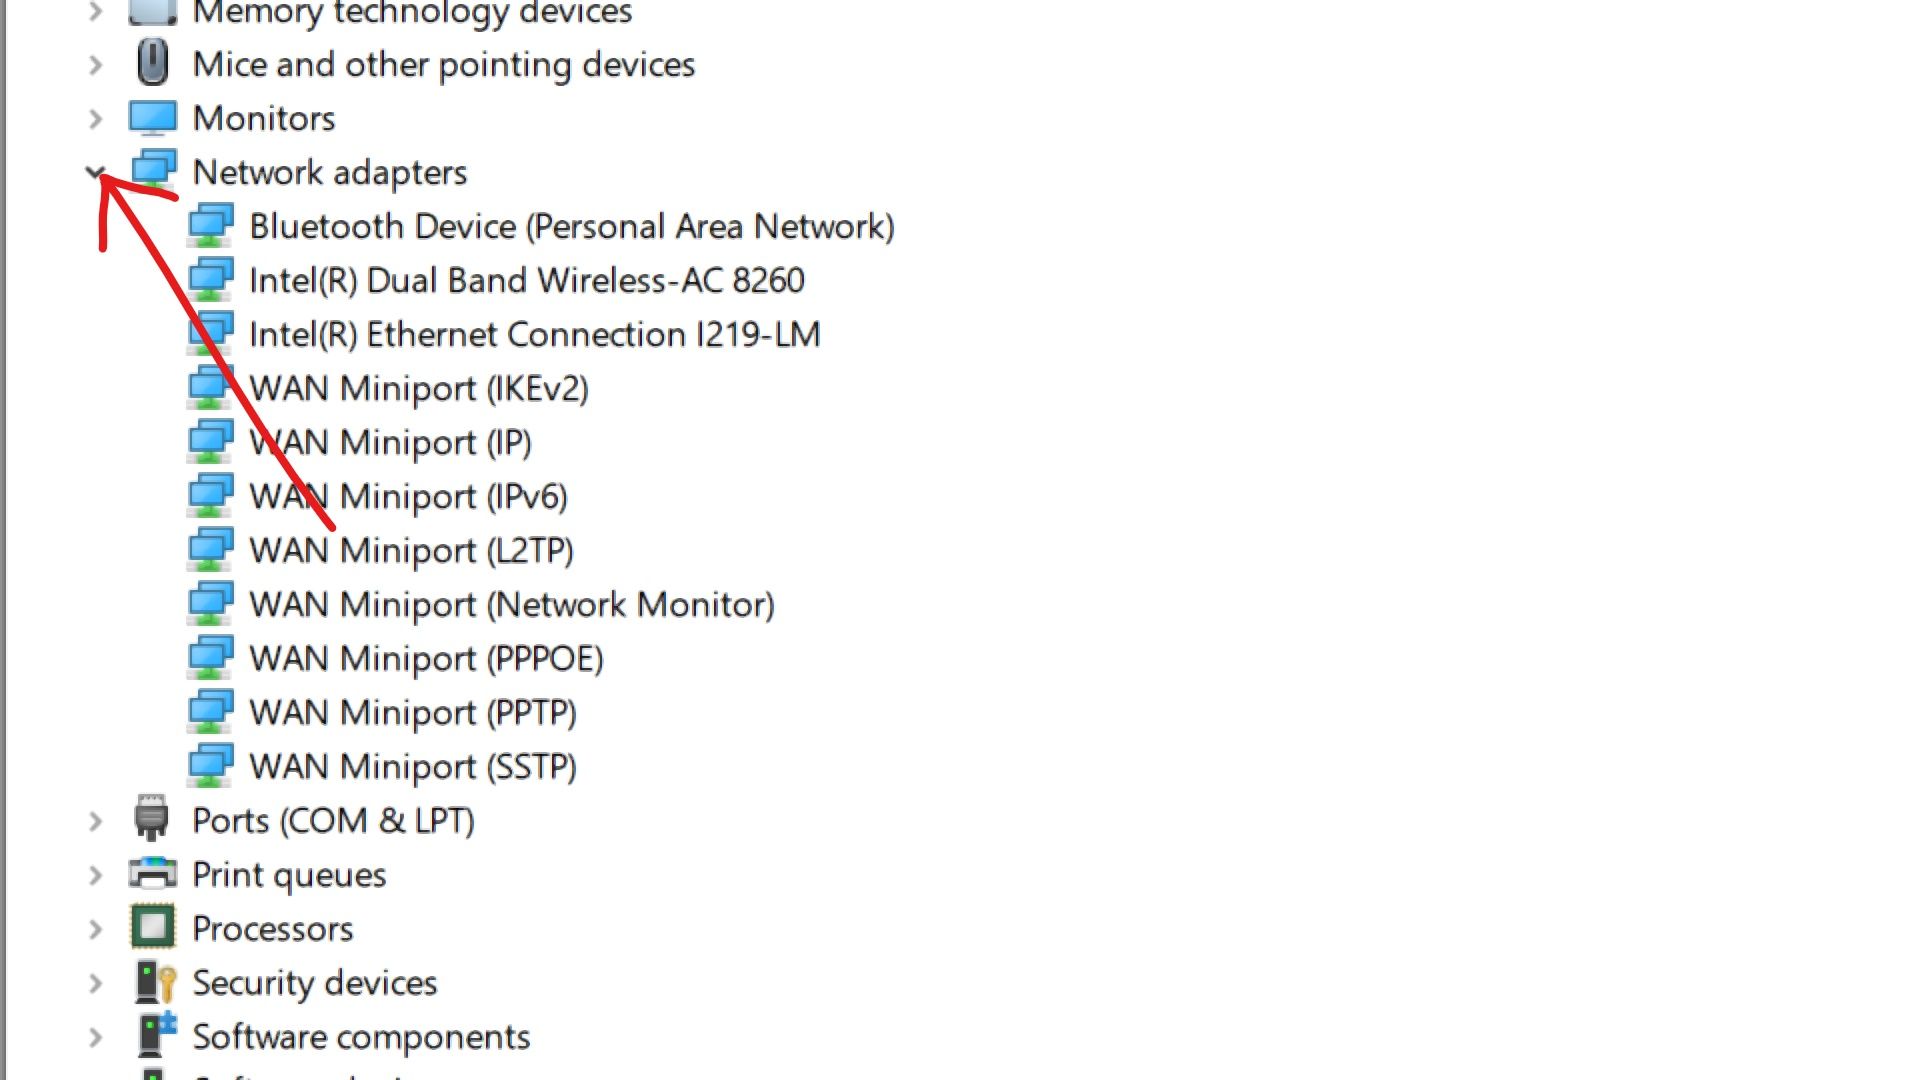
- Раскрываем здесь раздел «Сетевые адаптеры», чтобы увидеть, имеются ли в перечне необходимые адаптеры: Ethernet (если подключение через кабель) или Wi-Fi (WLAN). Обратите внимание, что показанные ниже на картинке адаптеры WAN Miniport нам не подходят.

- Если адаптер в списке вы нашли, однако около значка адаптера имеется значок со стрелкой, это говорит о том, что адаптер не включен: кликните правой кнопкой мыши, чтобы выбрать настройку «Включить».

- Когда на значке адаптеров вы видите восклицательный знак желтого цвета, нужно 2 раза нажать на устройство, чтобы понять, в чем ошибка и изучить ее описание по соответствующему коду во вкладке «Общие» (пункт «Состояние устройства»). Найти информацию можно в Интернете по коду.
- Если сетевой адаптер имеет такую ошибку, то вы можете попробовать следующий метод: кликаем правой кнопкой для удаления устройства, а затем выбираем «Обновить конфигурацию оборудования» в пункте меню «Действие» Диспетчера устройств — в некоторых случаях этого оказывается достаточно, чтобы справиться с проблемой.

- Если необходимые сетевые адаптеры отсутствуют, то заходим в пункт «Вид» главного меню Диспетчера устройства, где включаем отображение скрытых устройств и смотрим, есть ли в прочих разделах другие неопознанные устройства либо устройства, которые работают с ошибками (подсказкой будет желтый восклицательный знак). Если нашли их, то вероятно они и являются нужными нам адаптерами, но придется выполнить ряд действий, чтобы они заработали.

Драйверы сетевой карты или Wi-Fi адаптера
Если в разделе «Сетевые адаптеры» у Диспетчера устройств имеются сетевые карты или адаптеры Wi-Fi, либо вы нашли неизвестные, а также работающие с ошибками устройства, в первую очередь надо попытаться выполнить установку подходящих драйверов вручную. Для этого выполним следующие шаги:
- Находим при помощи компьютера или смартфона официальный сайт, где осуществляется поддержка модели вашей материнской платы (если у вас ноутбук или компьютер). Достаточно будет набрать в поиске название используемой модели и слово «поддержка».
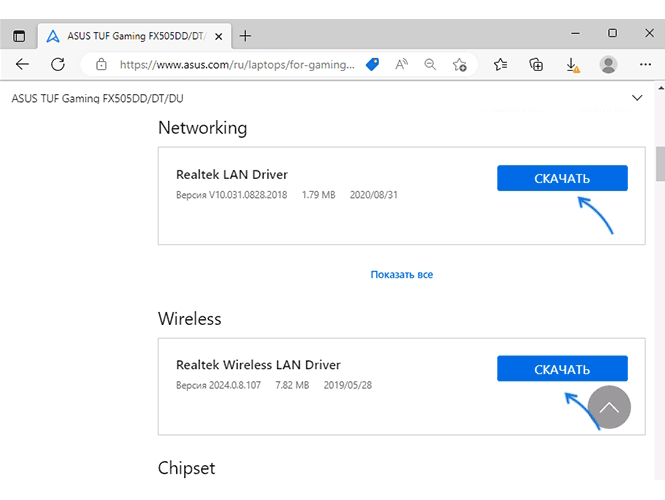
- На сайте нужно будет найти страницу, где загружены драйверы, среди которых выбрать подходящие для вашего сетевого адаптера. Если подключение кабельное, то это будет: Ethernet Driver, LAN Driver, Network Driver, если беспроводное — Wireless LAN или либо Wi-Fi, WLAN.

Важно: иногда официальный сайт предлагает только драйверы сетевой карты для более ранних версий операционной системы, вы можете смело скачивать их, скорее всего, они будут отлично работать и на Windows 10 или Windows 11.
- Помимо это можно выполнить скачивание драйверов чипсета, и, если у вас ноутбук, драйверы управления электропитанием (ACPI, Power Management, ATK). Также могут понадобиться драйверы Management Engine или Intel ME, так как их отсутствие в некоторых случаях приводит к сложностям с включением сетевой карты.
- При установке скачанных драйверов соблюдаем определенный порядок:
- Чипсет.
- Управление электропитанием (при наличии)
- Драйвер сетевой карты и/или Wi-Fi адаптера.
- Если нужно, перезагружаем компьютер и проверяем, исчезла ли ошибка.
Иногда, если сетевой адаптер видно в диспетчере устройств, однако функционирует он с ошибками, вы можете попробовать такой вариант:
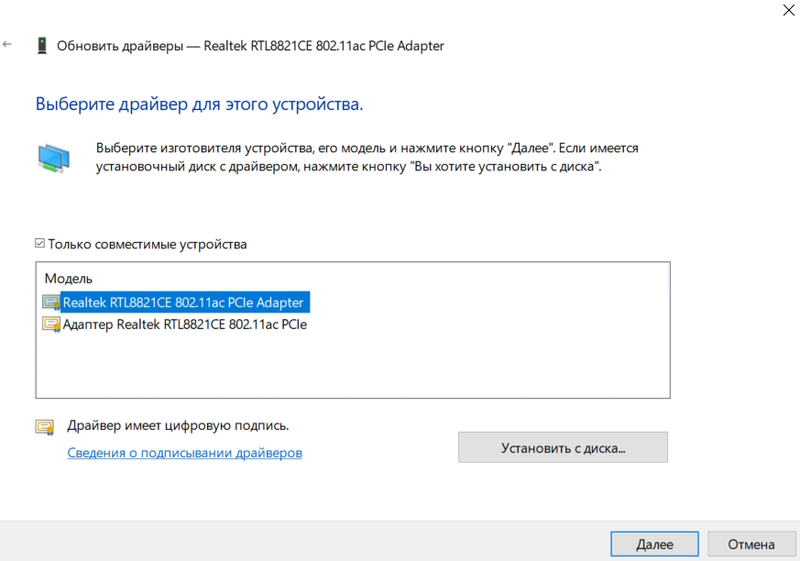
- Нажимаем правой кнопкой мыши на сетевой адаптер, выбираем «Обновить драйвер», после чего выбираем путь: Найти драйверы на этом компьютере — Выбрать драйвер из списка доступных драйверов на компьютере.
- Теперь нужно посмотреть, есть ли в перечне прочие совместимые драйверы. Если да, выбираем их, жмем на кнопку «Далее» и проверяем, помогло ли это решить проблему с Интернетом и сетью.
При сложностях с загрузкой и установкой драйверов с официальной страницы, можно попробовать поискать драйвер неизвестного устройства или же использовать специальную программу для поиска и установки драйверов – SDI.
Включение сетевого адаптера в БИОС/UEFI
Если вы не обнаружили сетевой адаптер в Диспетчере устройств, это может означать, что его отключили в БИОС/UEFI на вашем компьютере или ноутбуке.
- Заходим в БИОС/UEFI, если у вас ноутбук, используем клавишу F2, если компьютер, то Del, впрочем, иногда бывает и по-другому.
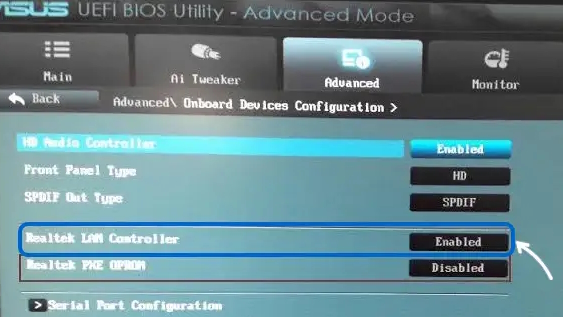
- Находим опцию, чтобы включить Integrated NIC, LAN Controller, Ethernet Controller, Onboard LAN, Gigabit LAN (такие пункты, если у вас Ethernet-адаптер).
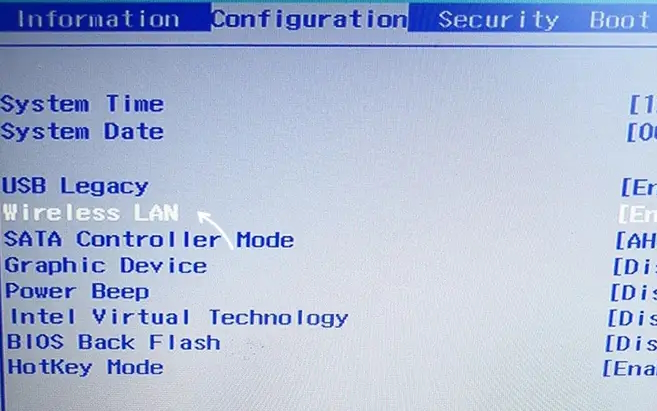
- Для беспроводного подключения ищем опцию Wireless LAN, WLAN, Wi-Fi Adapter (для беспроводной сети).

- Выбираем значение «Enabled». Найти параметры включения и отключения сетевых адаптеров можно в разделах: Advanced, Network Configuration, Configuration, Onboard Devices, Chipset, Integrated Peripherals.

- Сохраняем настройки БИОС и перезагружаем ПК.
В том случае, если причиной ошибки были проблемы с БИОС, когда компьютер перезагрузится, Windows самостоятельно найдет сетевое устройство и выполнит установку подходящих драйверов.
Дополнительные способы решения проблемы
Если ошибка «Установите драйвер для сетевого адаптера. Windows не удалось обнаружить правильно установленный сетевой адаптер» сохранилась, и предыдущие методы не помогли, можно попробовать следующее:
- Когда ошибка обнаруживается по окончании работы и нового включения, но не проявляется при использовании перезагрузки, можно попытаться выполнить отключение быстрого запуска ОС Windows.
- Попытайтесь сбросить сетевые настройки.
- Попробуйте вернуть систему к прежнему состоянию, когда ошибка еще не возникала, при помощи точек восстановления системы.
Мы надеемся, что наша статья была вам полезна, и вы смогли справиться с проблемой. Если остались вопросы, вы можете задать их в комментариях.
Комментарии
Категории
Читайте также:
Мы используем файлы cookie. Продолжая использовать этот сайт, вы соглашаетесь с использованием файлов cookie в соответствии с нашей Политикой конфиденциальности.
Не удалось обнаружить правильно установленный сетевой адаптер — как исправить?
При отсутствии Интернета на компьютере или ноутбуке, как по кабелю, так и по Wi-Fi, запустив встроенное устранение неполадок сети вы можете получить сообщение: «Установите драйвер для сетевого адаптера. Windows не удалось обнаружить правильно установленный сетевой адаптер».
В этой пошаговой инструкции подробно о том, как исправить ошибку «Не удалось обнаружить правильно установленный сетевой адаптер» в Windows 11 и Windows 10, как установить драйвер сетевого адаптера и дополнительная информация, которая может быть полезной при решении проблемы.
Сетевой адаптер в диспетчере устройств

Начать решение проблемы рекомендую с диспетчера устройств и установки драйверов, возможно, не только для Ethernet или Wi-Fi адаптера.
Первые шаги будут следующими:
- Нажмите правой кнопкой мыши по кнопке «Пуск», выберите пункт «Диспетчер устройств».
- В диспетчере устройств раскройте раздел «Сетевые адаптеры» и посмотрите, есть ли в списке нужные Ethernet (для подключения кабелем) или Wi-Fi (WLAN) адаптеры. Учитывайте, что адаптеры «WAN Miniport», как на изображении ниже — это не то, что нужно.
- Если адаптеры есть в списке, но рядом со значком адаптера вы видите значок со стрелкой, значит адаптер отключен: нажмите по нему правой кнопкой мыши и выберите пункт «Включить».
- Если на значке адаптера отображается желтый восклицательный знак, дважды нажмите по такому адаптеру и посмотрите код ошибки и её описание на вкладке «Общие» в пункте «Состояние устройства» — этот код может помочь разобраться, в чём дело: выполните поиск по коду ошибки в Интернете.
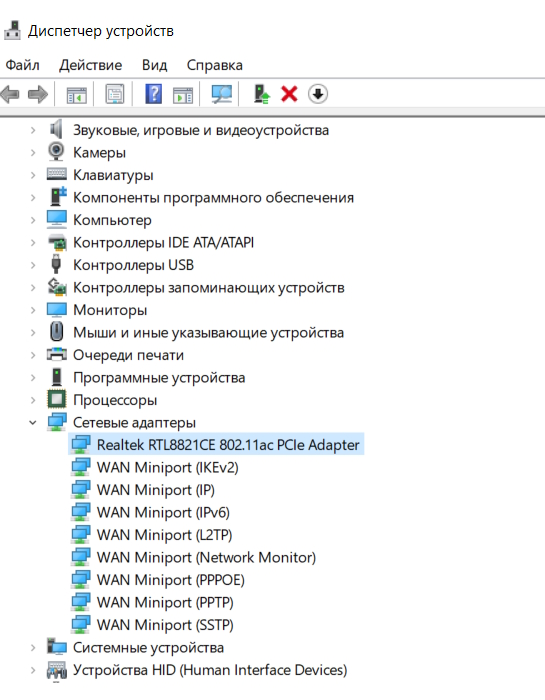
- Для сетевого адаптера с ошибкой также можно попробовать следующий подход: правый клик — удалить устройство и, после удаления, выбрать пункт «Обновить конфигурацию оборудования» в пункте меню «Действие» диспетчера устройств — иногда это помогает быстро решить проблему.

- При отсутствии нужных сетевых адаптеров в списке, в главном меню диспетчера устройств в пункте «Вид» включите показ скрытых устройств и посмотрите, присутствуют ли какие-либо неизвестные устройства или устройства с ошибками (желтым восклицательным знаком) в других разделах диспетчера устройств. Если таковые есть в наличии — возможно, это и есть нужный сетевой адаптер, далее рассмотрим, как заставить его работать.

Драйверы сетевой карты или Wi-Fi адаптера
При наличии сетевой карты или Wi-Fi адаптера в разделе «Сетевые адаптеры» диспетчера устройств, а также при наличии неизвестных устройств и устройств с ошибками в других разделах, первое, что следует попробовать — вручную установить нужные драйверы. Общий порядок действий:
- Используя другой компьютер или даже смартфон найдите официальную страницу поддержки вашей модели материнской платы (для ПК) или ноутбука. Для этого в любой поисковой системе обычно достаточно ввести «модель_устройства поддержка».
- На странице поддержки вашего устройства найдите раздел для загрузки драйверов, а на нем — нужные драйверы для сетевых адаптеров, которые могут называться: Network Driver, LAN Driver, Ethernet Driver для подключения кабелем, либо Wi-Fi, WLAN, Wireless LAN — для Wi-Fi подключения. Внимание: может оказаться, что на официальном сайте представлены драйверы сетевой карты только для предыдущих версий системы, в этом случае рекомендую скачать их — как правило, они исправно работают и на Windows 11/10.

- Дополнительно рекомендую скачать имеющиеся драйверы чипсета, а для ноутбуков, при наличии — драйверы управления электропитанием (Могут называться: Power Management, ACPI, ATK. Дополнительно имеет смысл загрузить драйверы Intel ME или Management Engine). Иногда при их отсутствии возможны проблемы при включении сетевого адаптера.
- Установите скачанные драйверы в следующем порядке: Чипсет — Управление электропитанием (если были доступны) — Драйвер сетевой карты и/или Wi-Fi адаптера.
- При необходимости, перезагрузите компьютер и проверьте, решило ли это проблему.
- В некоторых случаях, когда сетевой адаптер отображается в диспетчере устройств, но работает неправильно, может помочь следующий подход: нажмите правой кнопкой мыши по сетевому адаптеру, выберите «Обновить драйвер», затем используйте следующие пункты: Найти драйверы на этом компьютере — Выбрать драйвер из списка доступных драйверов на компьютере. Посмотрите, присутствуют ли в списке другие совместимые драйверы (не те, что установлены в текущий момент). При их наличии — попробуйте выбрать, нажать «Далее» и проверить, решило ли это проблемы с сетью и Интернетом после установки драйвера.


Если по какой-то причине загрузить и установить драйверы с официального сайта не удается, вам могут пригодиться способы найти драйвер неизвестного устройства, а также описание использования SDI — программы с открытым исходным кодом для автоматического поиска и установки драйверов.
Включение сетевого адаптера в БИОС/UEFI
При отсутствии любых признаков наличия сетевого адаптера в диспетчере устройств может оказаться, что он отключен в БИОС/UEFI вашего компьютера или ноутбука.
- Зайдите в БИОС/UEFI, на ноутбуке это обычно клавиша F2, на ПК — Del, но бывают и другие варианты: Как зайти в БИОС на компьютере или ноутбуке.
- Найдите опцию для включения LAN Controller, Onboard LAN, Ethernet Controller, Gigabit LAN, Integrated NIC (это варианты пунктов для Ethernet-адаптера).
- Или опцию WLAN, Wireless LAN, Wi-Fi Adapter (для беспроводной сети).

- Установите её значение в «Enabled». Сами параметры включения и отключения сетевых адаптеров могут находиться в разделах: Advanced, Configuration, Chipset, Onboard Devices, Integrated Peripherals, Network Configuration, но возможны иные варианты.

- Сохраните настройки БИОС и перезагрузите компьютер.


Если причина была именно в этом, то после перезагрузки Windows автоматически определит ваше сетевое устройство и установит драйверы для него.
В случае, если предыдущие варианты не помогли решить проблему «Установите драйвер для сетевого адаптера. Windows не удалось обнаружить правильно установленный сетевой адаптер», можно попробовать следующие методы:
- Если проблема появляется после завершения работы и последующего включения, но исчезает, если использовать пункт «Перезагрузка», попробуйте отключить быстрый запуск Windows.
- Выполните сброс сетевых параметров: Как сбросить сетевые настройки Windows 11, Сброс сетевых настроек Windows 10.
- Если проблема появилась недавно, а Windows не переустанавливалась, могут помочь точки восстановления системы на дату, когда всё работало исправно.
Надеюсь, один из вариантов поможет исправить ситуацию: буду рад прочитать о сработавшем решении в комментариях ниже.

Is your PC unable to connect to the internet? You might get the error “Windows could not find a driver for your network adapter”. A common problem often occurs when your network adapter drivers are out of date.
A network adapter is a fundamental component that enables your PC to connect to the internet. If your computer cannot connect to the available network, chances are that your PC is missing a LAN driver for Windows 11,10,7 or later.
The issue can be easily highlighted by running the troubleshooter. Usually, the error states says, “Windows could not find a driver for your network adapter.”
In this blog, let us take a closer look at how you can resolve this issue easily.
Also Read: A Driver Cannot Load on This Device
Ways To Fix Windows Could Not Find a Driver For Network Adapter
Windows is an advanced operating system with built-in diagnostic capabilities to find and troubleshoot errors. If you are facing an issue related to the network adapter driver on Windows 10 PC, chances are that your computer can fix the problem on its own.
The first and most common way to solve the error is manually installing the required drivers. The error “Windows could not find a driver for your network adapter” only occurs when the driver installed for the adapter is either outdated, corrupted, or it is unavailable to use.
Here’s how you can resolve the issue –
- Press Windows + R on your keyboard to bring up the Run box.
- Type – devmgmt.msc and press Enter to open the Device Manager.
- In the Device Manager, click on the network adapter and select the adapter from the dropdown.
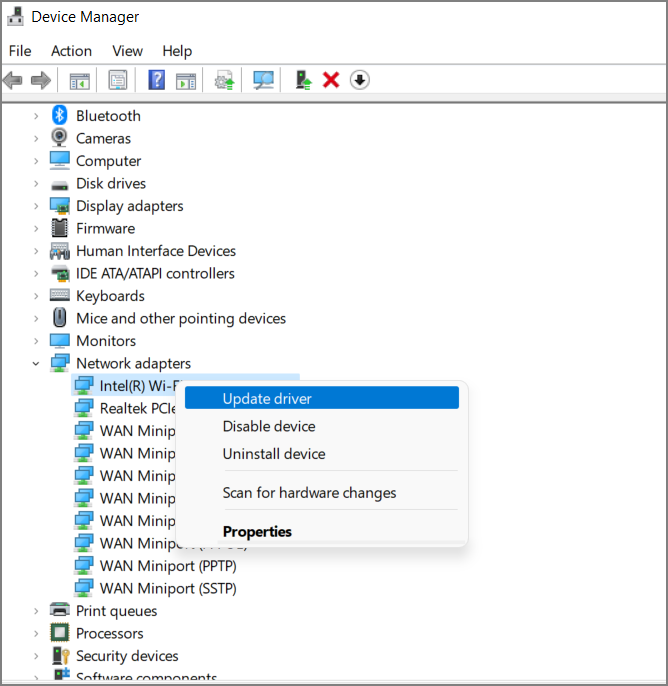
- Right-click on your network adapter and from the context menu, click on→Update Driver.

- This will open up a new window that has two options. One asks you to connect to the internet and find the best available drivers to install. The second one allows you to find the driver file on your PC.
- If you have a downloaded driver file ready, simply click on browse computer.

- Locate the driver software on your hard disk and install it right away. Restart your PC, and it should do the trick for you.
If installing the updated network adapter driver for Windows 10 manually does not crack it for you, there’s another way that you can try; however, it has its ups and downs. What you have to do is completely remove the network adapter from your PC and uninstall the existing drivers.
Also Visit: How to Find Existing Driver Versions on Your Windows PC
This way, when you restart, the computer will automatically install the latest drivers, and your PC might start running properly. Here’s how you can do that!
- Press Windows + R on your keyboard to bring up the Run box.
- Type – devmgmt.msc and press Enter to open the Device Manager.
- In the Device Manager, click on the network adapter and select the adapter from the dropdown.
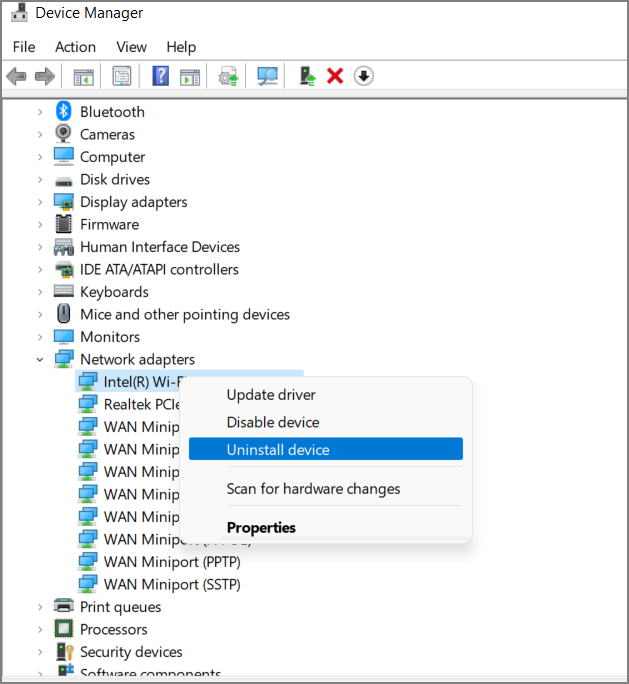
- Right-click on your network adapter to open the context menu. Click on the Uninstall Device option.

- Remove the network adapter completely by following the onscreen instructions to uninstal the driver.
- On the top of the window, you will find an Action toggle. Click on it and then click on Scan for hardware changes.

- Once the scan is completed, your PC will have automatically reinstalled the adapter.
These are the two ways integrated within the operating system that you can use to rectify the situation with the network controller driver. It is possible that these do not yield the expected results as their use case is somewhat limited.
If you do not get the resolution through these two ways, do not worry as there’s another way to handle the error. Check out the next section to find out more!
Advanced Driver Updater: The Ultimate Fix to Windows Could Not Find a Driver for Network Adapter
Advanced Driver Updater is a tool used to update all the missing drivers from a PC. It works flawlessly with your computer and finds the list of all the drivers that are outdated, corrupted or missing on your PC.
The tool can find the latest drivers for your network adapter and resolve the connectivity issue in just a few clicks –
- Install the Advanced Driver Updater from the below button.
- Click on Start Scan to initiate the search for missing drivers. The software will search for all the missing drivers, which means the ones other than your network adapter will also be highlighted.

- The scanning might take a few minutes based on the number of applications and drivers on your PC. Ideally, it takes not more than 5 minutes.


- Find your Network Adapter Driver to install on priority, or if you have time, you can simply click on the Update driver and let the software work and you can also update all outdated driver in one click.

After initiating the process, give the software time to install the drivers. Once the process is completed, restart your computer, and your problem will be solved.
Also Read: How to Update Drivers On PC
In Conclusion
If you are missing out on multiple drivers and your PC is turning into a sluggish machine, scanning it with Advanced Driver Updater is a good option. It will highlight the outdated, missing, and corrupt drivers causing the problem. Download the software today and see the impact for yourself.
I hope the blog gives you the solution you need. “Windows could not find a driver for your network adapter” is a common problem, and you are not the only one facing it. So relax and use the given fixes to resolve the issue. Good Luck!
Recommended-
Fix – Unable To Connect To Intel 82579LM Gigabit Network Connectivity Driver
Here’s How To Fix Wi-Fi Network Not Showing Up Issue On Windows PC (2022)
How to Download HP Network Driver for Windows 11,10,8,7
How To Fix Realtek Ethernet Drivers That Keep Disappearing
| Workable Solutions | Step-by-step Troubleshooting |
|---|---|
| Solution 1: Restart the PC | Please turn off the device, wait for a minute or two and turn it on…Full steps |
| Solution 2: Run Hardware and Devices Troubleshooter | Press Windows + R on your PC to open the Run app…Full steps |
| Solution 3: Reset Windows Socket (Winsock) Catalog | Search for Command Prompt and open it in administrator mode…Full steps |
| Solution 4: Update Network Drivers | Search for the Device Manager and Open it…Full steps |
| Solution 5: Reinstall the Network Drivers | Open Device Manager and locate «Network Adapters…Full steps |
Network Drivers manage all the network connections on your device. If there is any fault in them, it will trigger Windows did not detect a properly installed network adapter error. Such faulty drivers restrict you from having proper internet and Wi-Fi connections. If you meet the same issue, this passage discusses the reasons and methods to fix the Windows Did Not Detect a Properly Installed Network Adapter in simple steps. Please go through it to resolve your issue.

Drivers play a significant role in our devices, as they act as a medium of communication between software and hardware. They need to be up to date and properly installed to maintain the functions related to the particular drivers. If they are faulty or improperly installed, the device behaves abnormally.
Reasons of Windows Did Not Detect a Properly Installed Network Adapter
As discussed above, multiple reasons could cause this issue. But let us know the root cause of the problem to understand why it is the Windows unable to detect the properly installed adapter.
1. Missing Driver Updaters
The drivers cannot update themselves. They use the updaters to identify new updates and install the updates. If the Network Drivers Updaters are missing or faulty, it could cause detection issues. We can rectify this by resetting the Winsock catalog.
2. Improperly Installed Drivers
If the network drivers are not correctly installed, the windows cannot detect them. This triggers detection problems. In such cases, you can uninstall and reinstall the drivers and adapters.
We can try out multiple solutions capable of solving the detection issues. Let us take a look at the most effective ones. Try them one after the other, and see if it solves the problem.
Solution 1: Restart the PC
If you continuously run your PC without any restarts, it can be problematic, sometimes resulting in abnormal issues.
A simple restart refreshes all the programs on the PC and rectifies minor glitches in the system’s software. If the issue is due to any little hardware or software issue, the restart could help us solve the problem. Please turn off the device, wait for a minute or two and turn it on the device again.
Try checking the applications using network adapters to see if the issue is solved.
Solution 2: Run Hardware and Devices Troubleshooter
Windows uses troubleshooters to identify the internal reasons for software malfunctions and suggest or solve if any issues exist. Hardware and Device Troubleshooters can fix problems related to hardware and devices you need to run so that that system can identify the reason for detection issues.
Steps to run hardware and device troubleshooter:
Step 1. Press Windows + R on your PC to open the Run app.
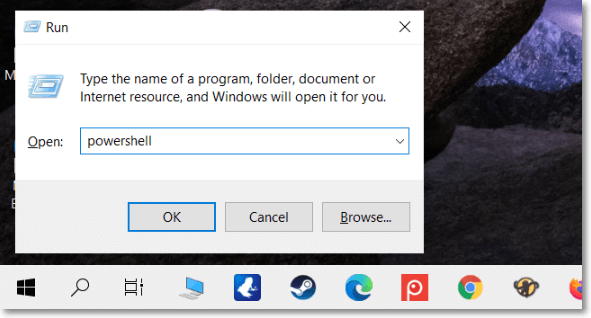
Step 2. Enter Powershell in the dialog box. Press Ctrl + Shift + Enter to open PowerShell in administrator mode.
Step 3. Enter the below command and press Enter to open the Hardware and Device Troubleshooter.
msdt.exe -id DeviceDiagnostic
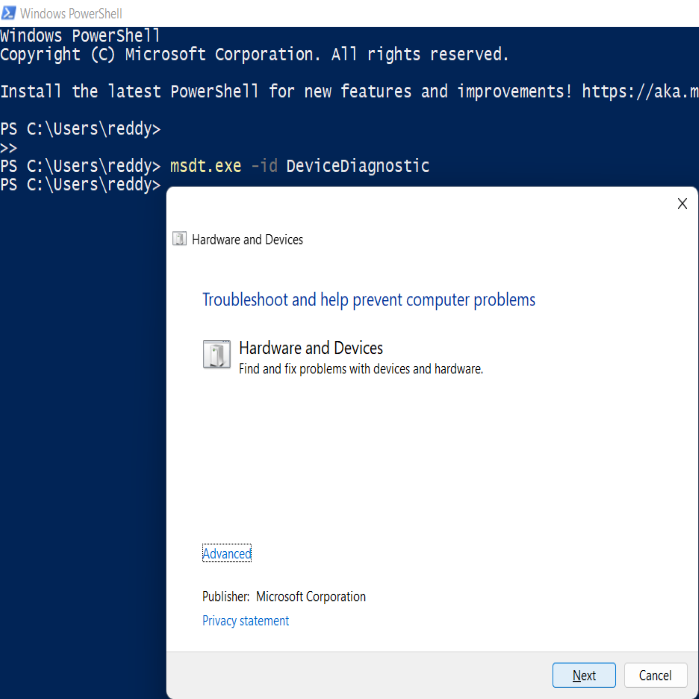
Step 4. Follow the instructions on the screen to complete the process. Check for the working again to see if the issue is rectified.
Solution 3: Reset Windows Socket (Winsock) Catalog
Winsock (Windows Sockets) maintains network communication between applications and devices. If there is a problem with any of those, resetting Winsock could help.
Steps to reset Winsock Catalog:
Step 1. Search for Command Prompt and open it in administrator mode.
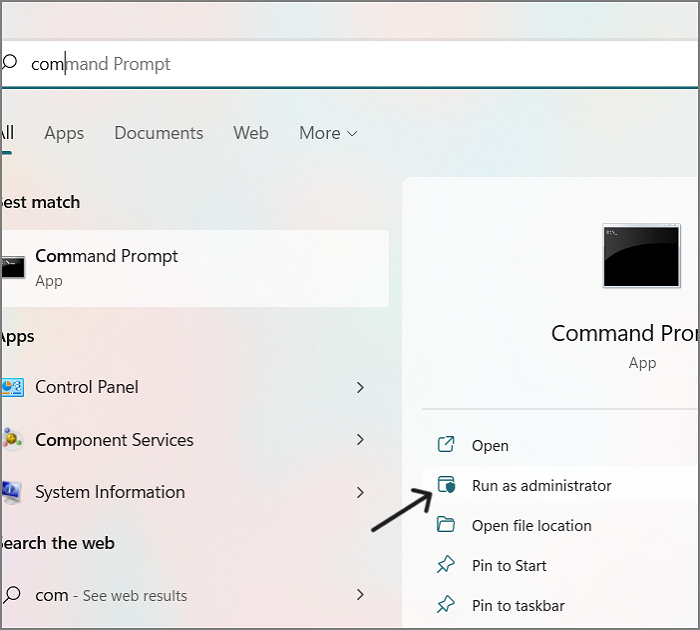
Step 2. Enter the below command and execute it.
netsh Winsock reset
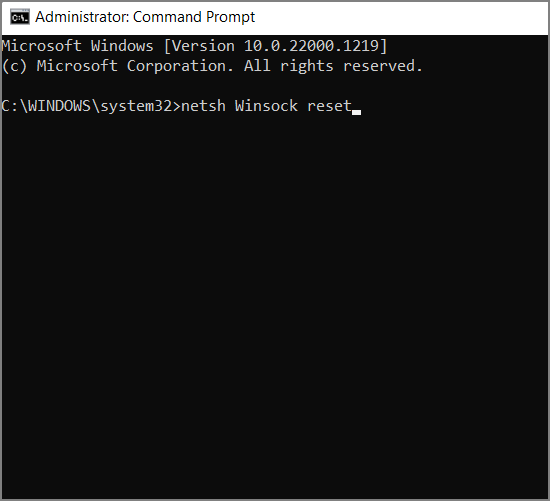
Step 3. After resetting, check for the working of the drivers.
Solution 4: Update Network Drivers
The detection issues occur not only due to faulty drivers but also due to outdated or corrupt drivers. If we keep our network drivers up to date, we can resolve issues related to them.
Steps to update network drivers manually:
Step 1. Search for the Device Manager and Open it.
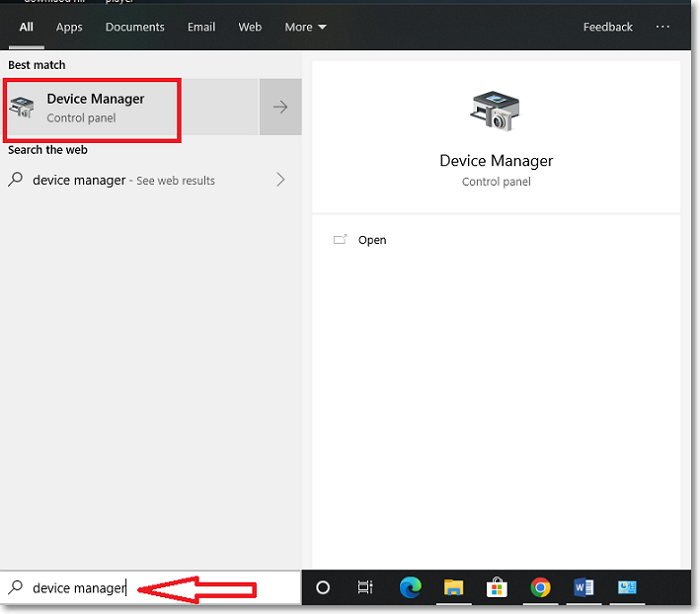
Step 2. You can see all the available drivers on your computer here, find and expand the Network Adapters.
Step 3. Right-Click on the driver or required drivers and Select Update.
Solution 5: Reinstall the Network Drivers
You can reinstall the network drivers if the issue persists even after updating. If any of the drivers have faulty software, it will cause detection issues, eliminating it.
Steps to reinstall Network Drivers:
Step 1. Open Device Manager and locate «Network Adapters.»
Step 2. Expand the Network Adapters, navigate to the required drivers, and right-click on them.
Step 3. Select Uninstall. Perform a restart after this, and the device’s OS will reinstall the missing drivers automatically.
If none works, you can perform a system restore, which takes the system back to the previous state. You can also try resetting the router, which is responsible for the internet connection.
Final Verdict
The Windows did not detect a properly installed Network Adapter is a standard error due to fault or corrupt drivers. You can notice this with the pop-up message across your screen. You generally encounter this after updating the Windows OS. Try the solutions one by one to see if the error is resolved.
I hope you like the article and it answers all your questions. Feel free to leave a comment about my work or any queries regarding the article’s content. Share it with your friends.
On Windows 10 and other versions of the Windows operating system, you need a network adapter to connect to the internet through a wired or wireless network.
Sometimes, you might get an error that your network adapter is missing. This can be very frustrating because you won’t be able to connect to the internet.
There are some simple fixes you can use to fix this issue, including:
- removing and reinserting your computer battery
- turning off Antivirus and VPN apps
- restarting your computer
But these might not be enough to fix the issue.
So, in this article, I’m going to show you 5 better ways you can fix the network adapter missing error so you can start connecting your computer to the internet again.
Windows 10 has a built-in network reset tool that can reset your settings to default. This often fixes this issue for you.
To fix the network adapter missing error with this solution, follow the detailed steps below:
Step 1: Click on Start and select Settings.
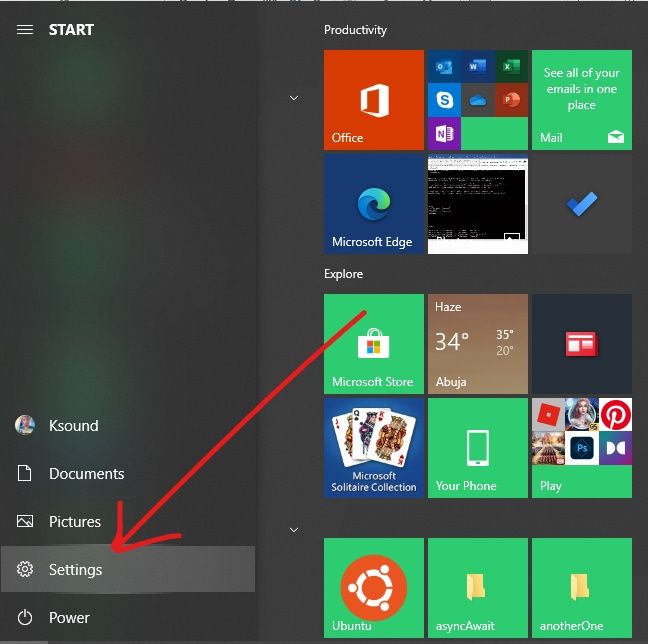
Step 2: Choose Network and Internet from the menu tiles.
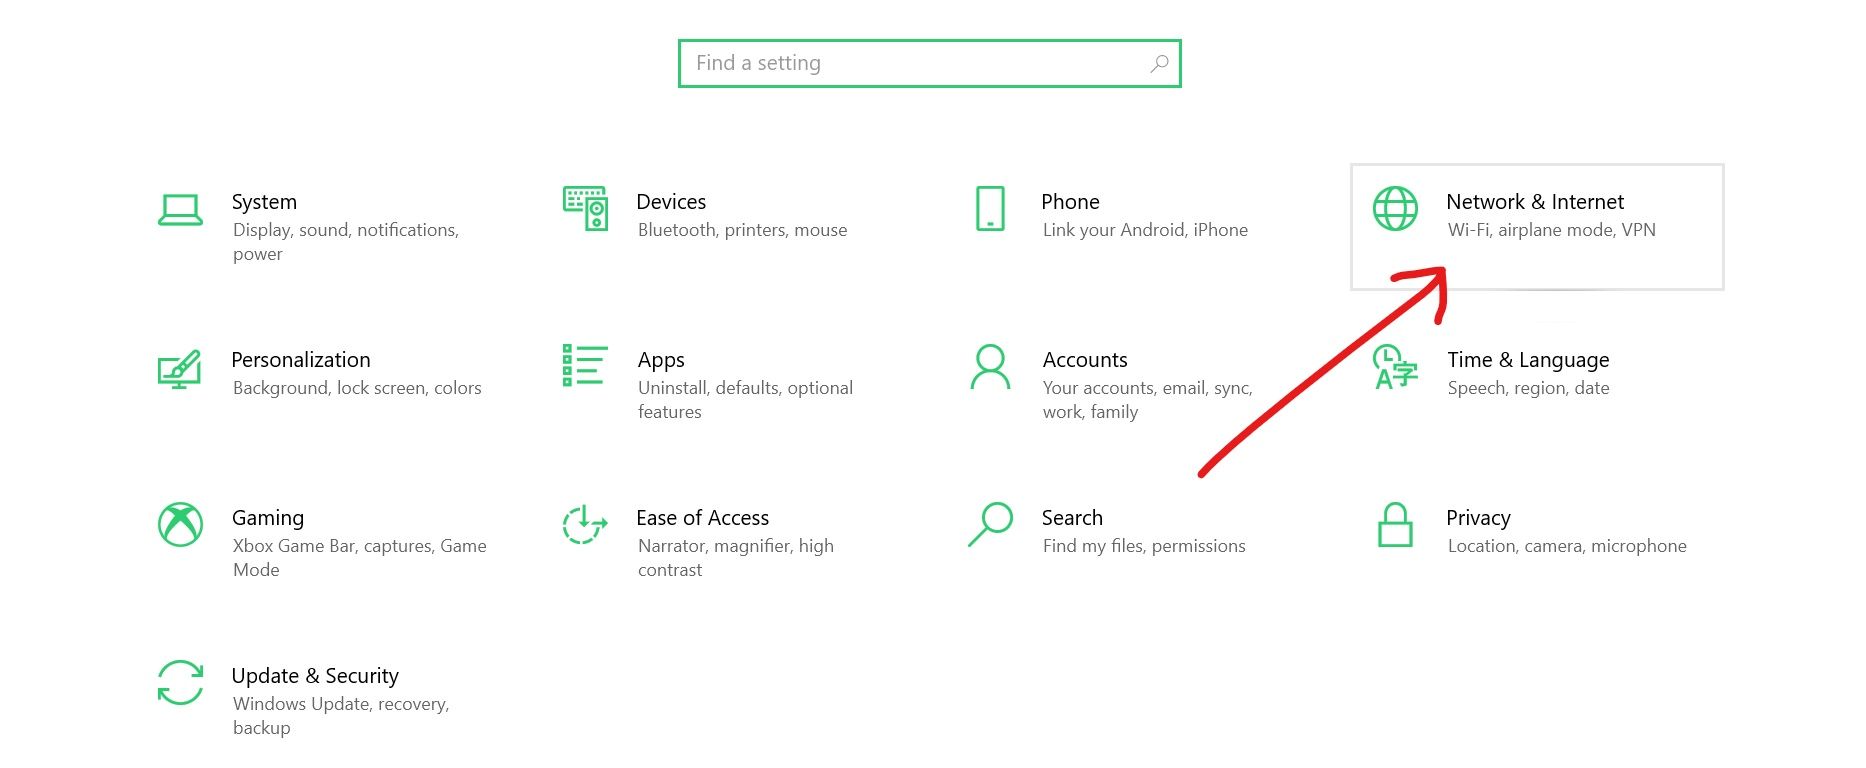
Step 3: Under “Status”, click the Network reset link.
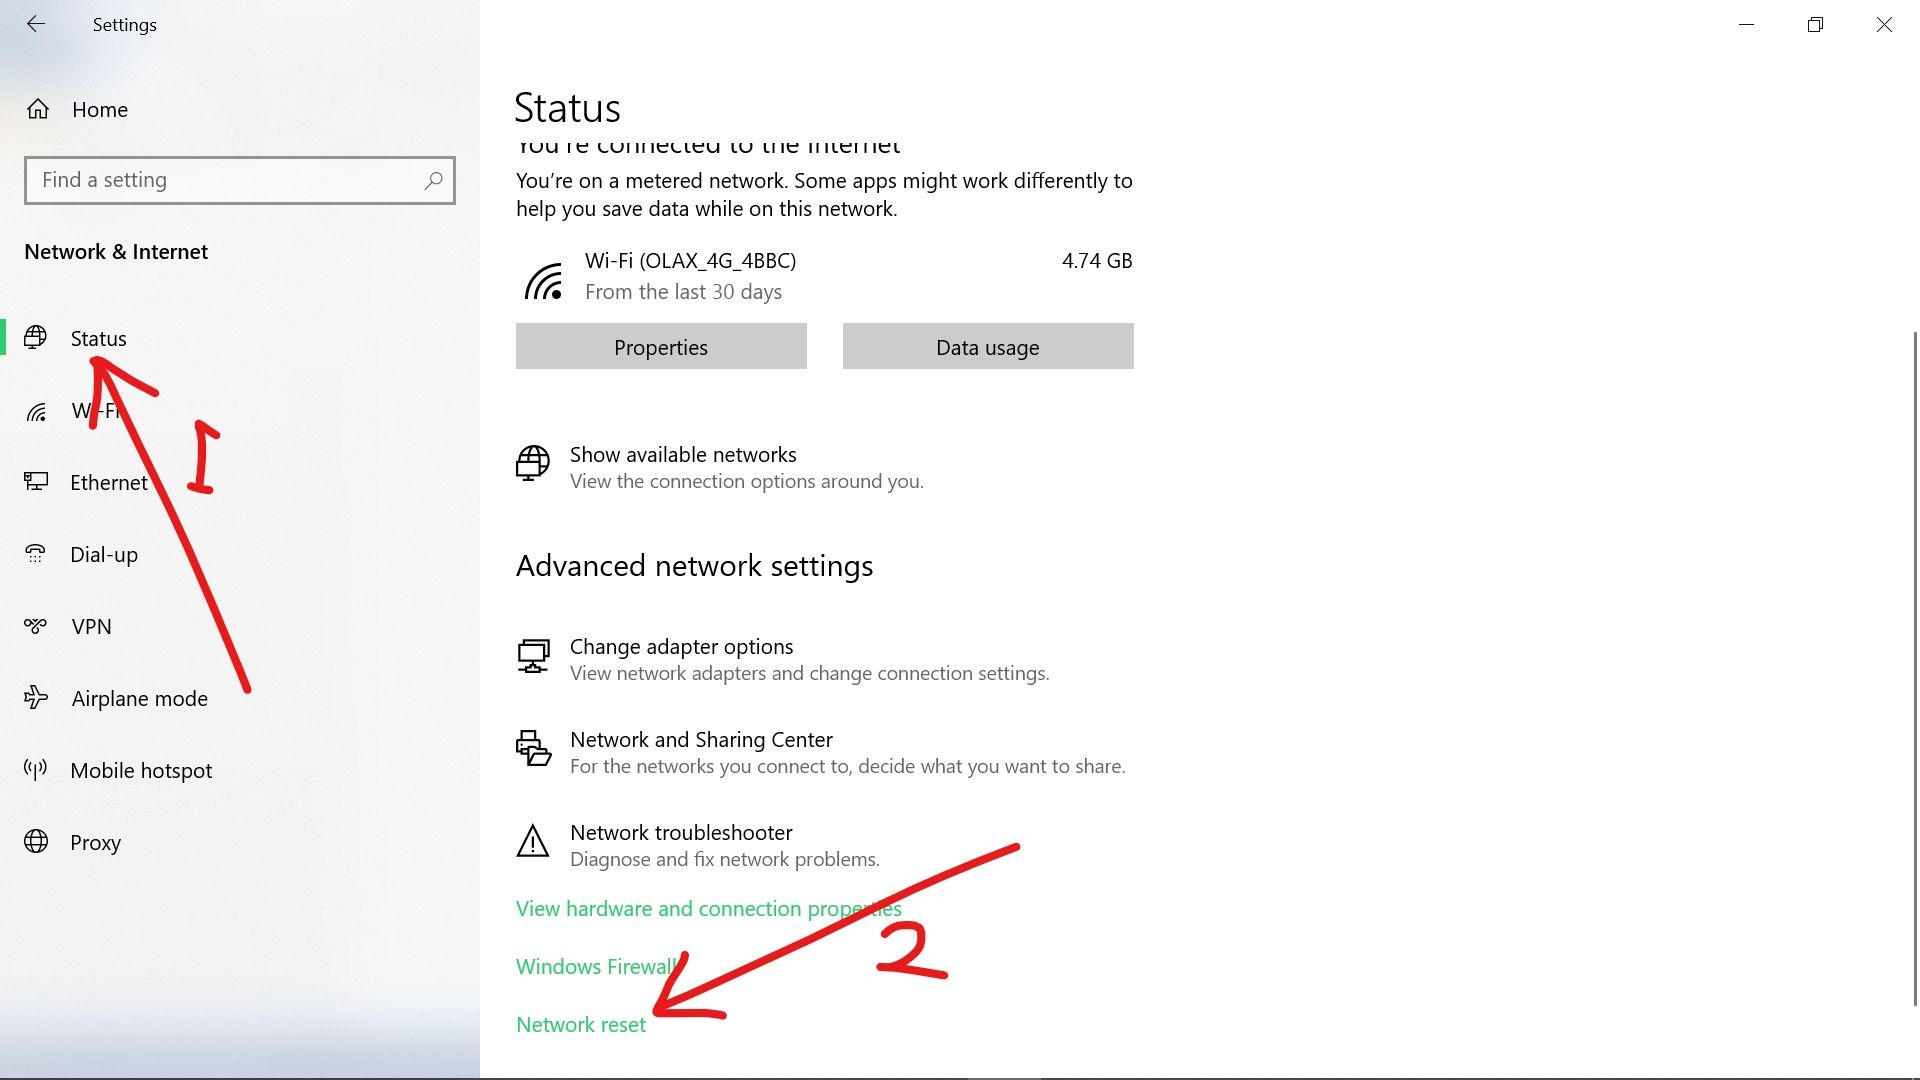
Step 4: Click the Reset now link.
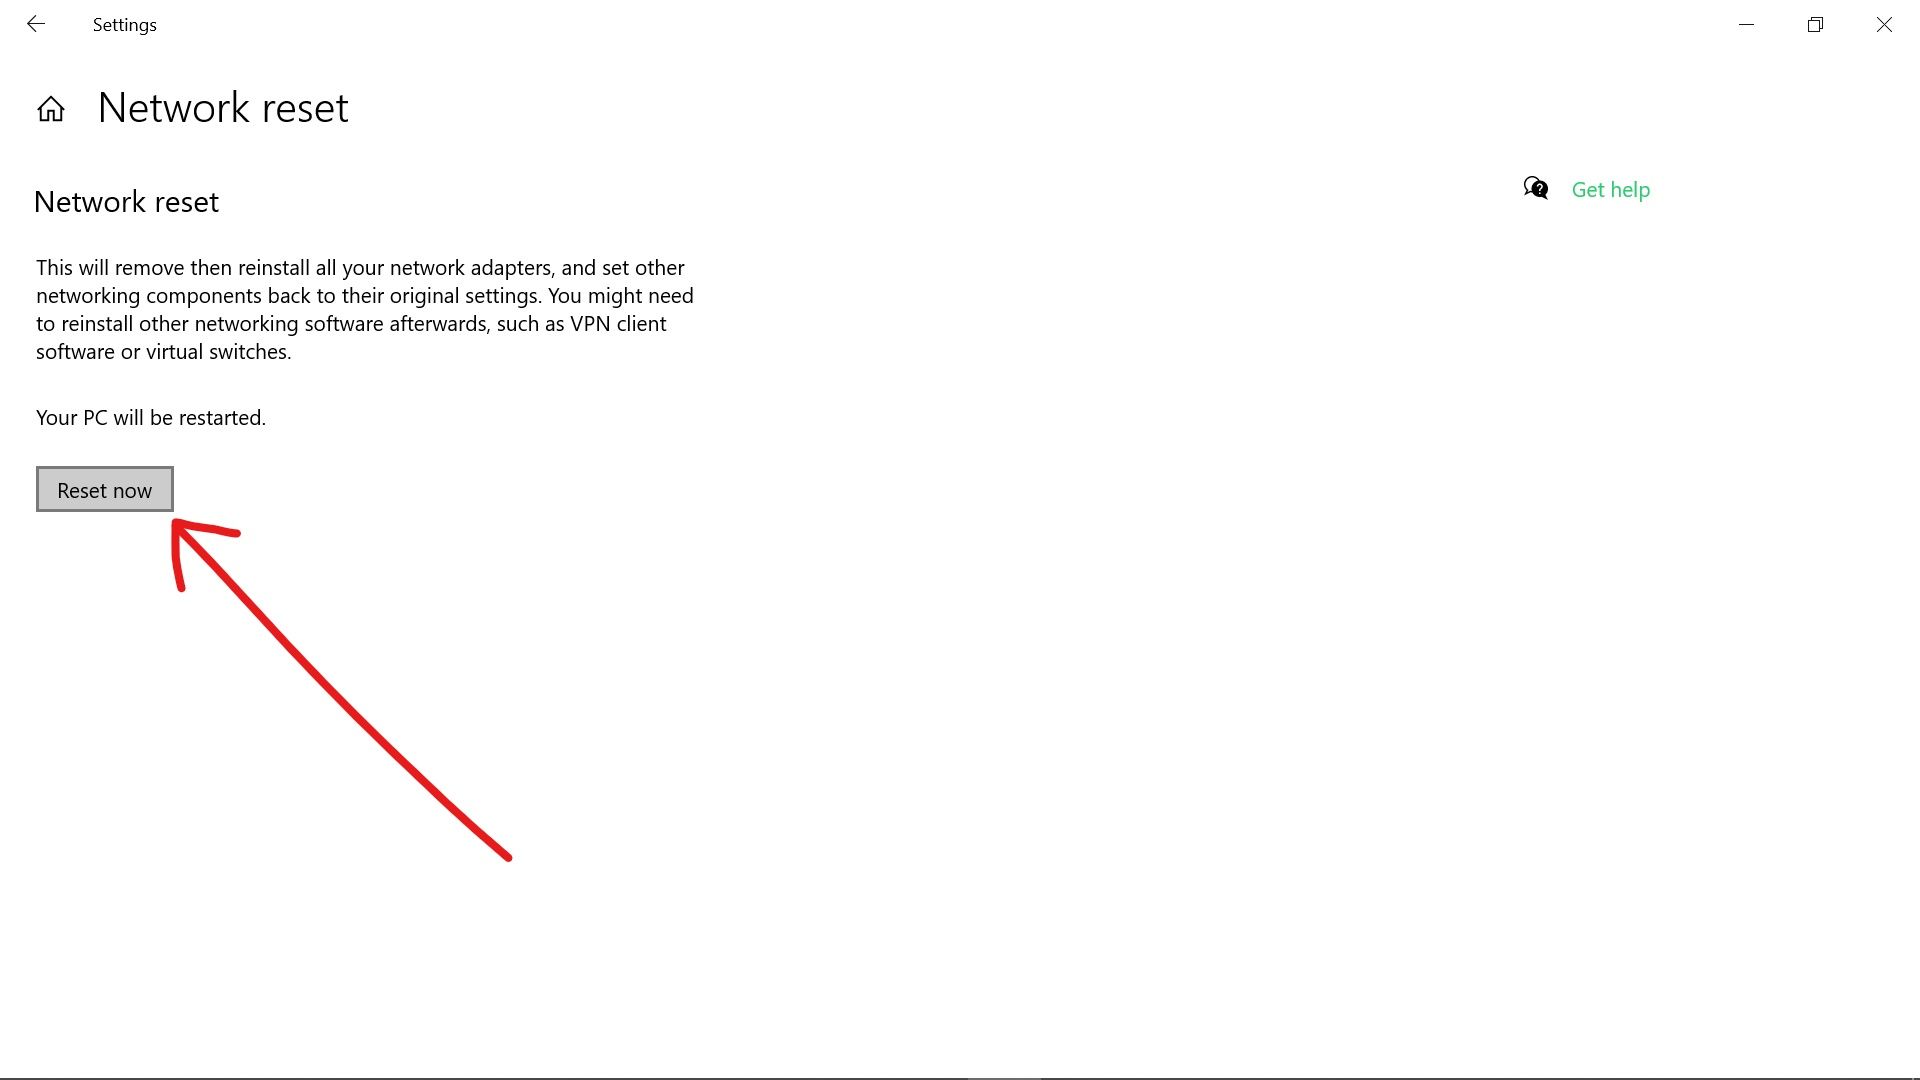
If you use this fix, be aware that you have to reinstall any VPN app on your computer and also reenter WiFi passwords.
How to Fix Network Adapter Missing by Checking the Driver’s Power Management Settings
Windows 10 is optimized for better power management, so when your laptop battery is low, some devices could be turned off to save power.
You could experience the network adapter missing error due to this power optimization.
To turn off this feature for your network adapter driver, follow the steps below:
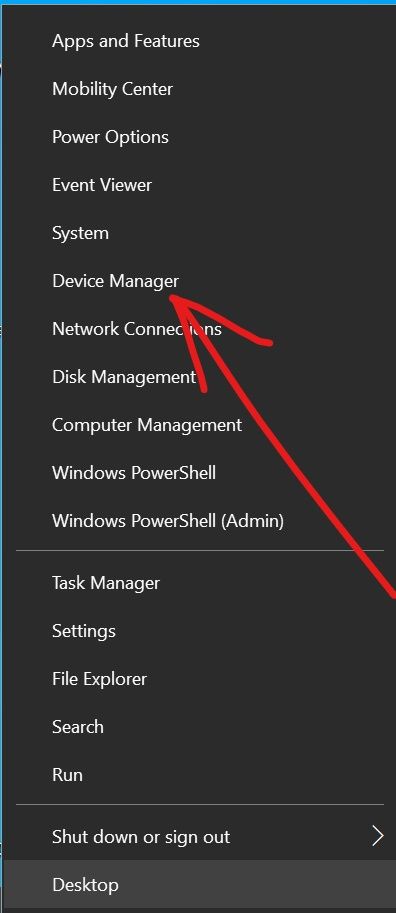
Step 1: Right-click on Start and select Device Manager.
Step 2: Expand Network Adapters.
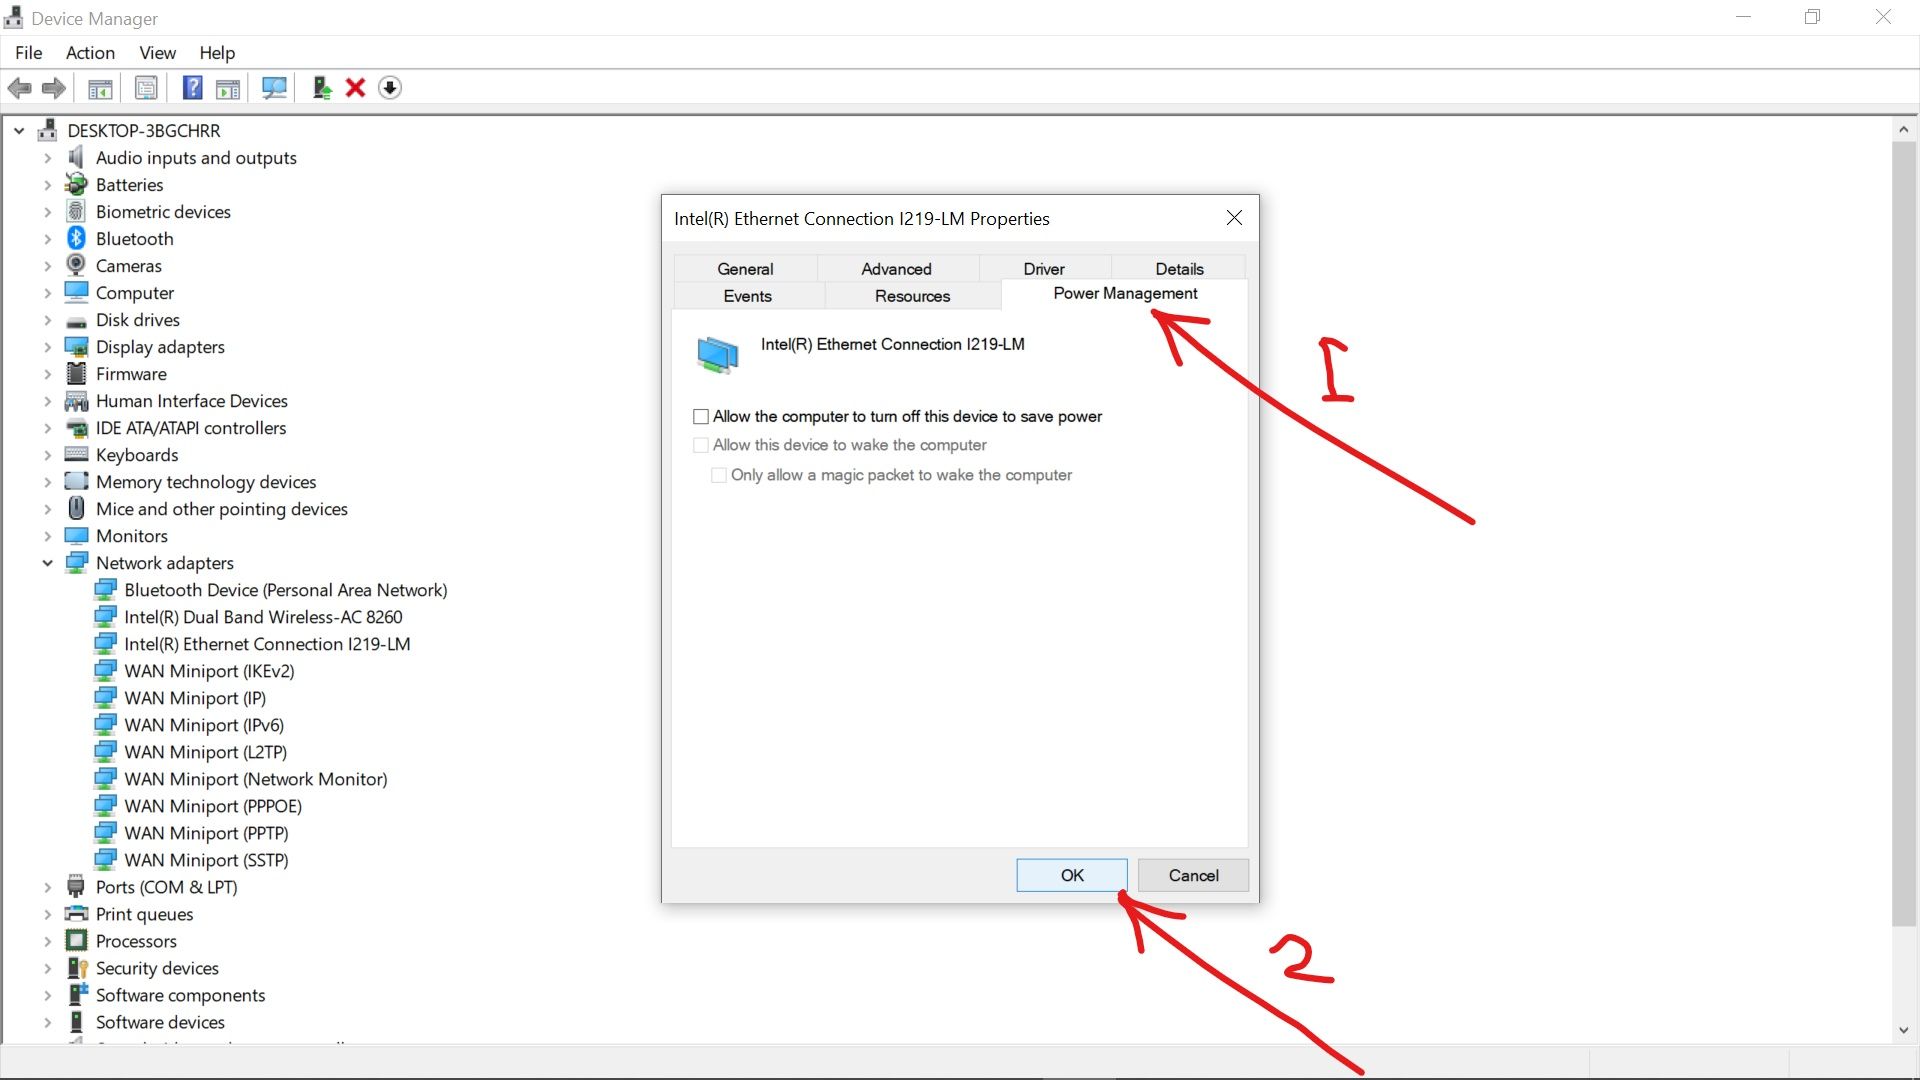
Step 3: Right-click on the affected network adapter and select Properties.
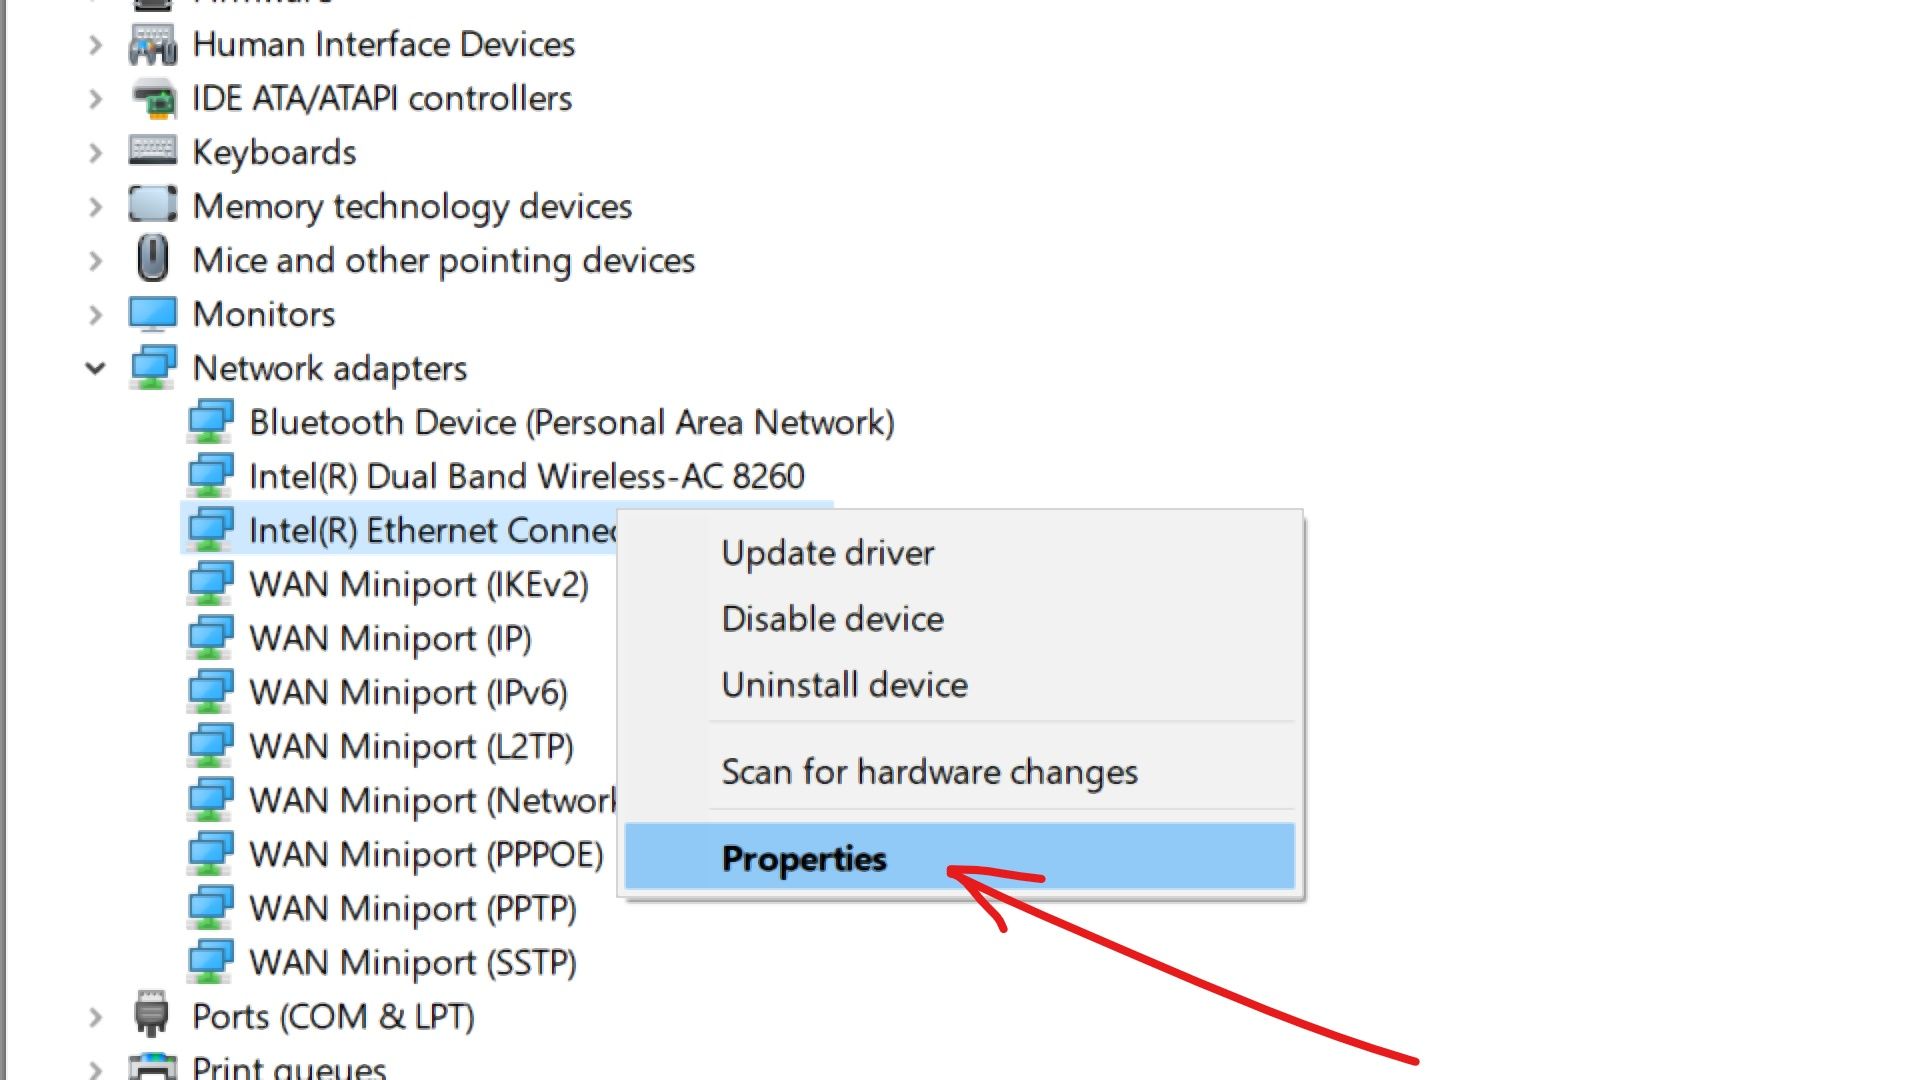
Step 4: Switch to the Power Management tab and uncheck «Allow the computer to turn off this device to save power» and click «Ok».
How to Fix Network Adapter Missing by Resetting Winsock Settings in the Command Line
Winsock is a program that determines how network services are used on a Windows computer.
If things go wrong with Winsock, it could cause the network adapter missing error.
To reset Winsock, follow the steps below:
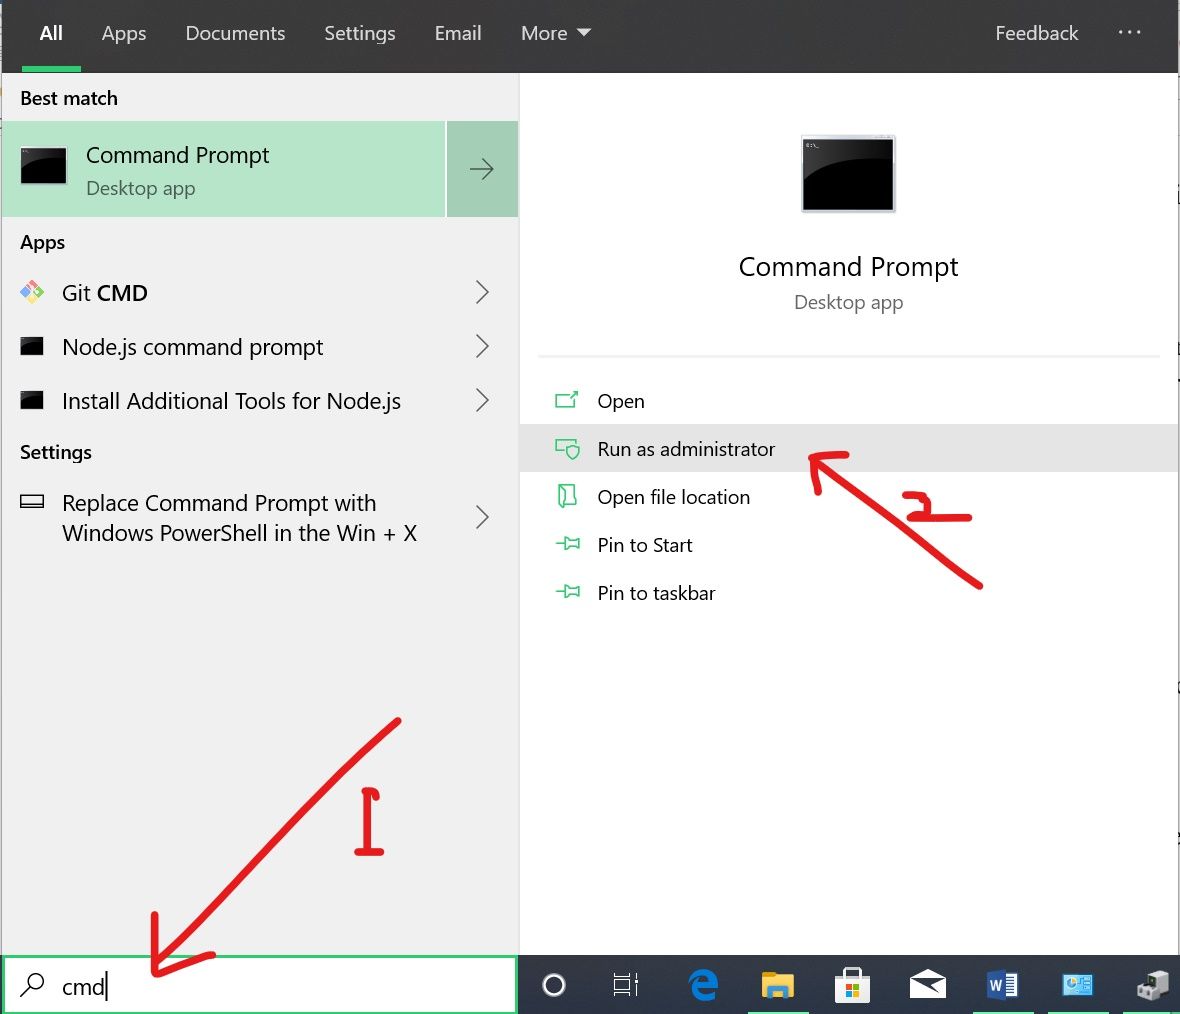
Step 1: Click on Start and search for «cmd», then select «Run as Administrator» on the right.
Step 2: In the command line, type in «netsh winsock reset» and hit ENTER.
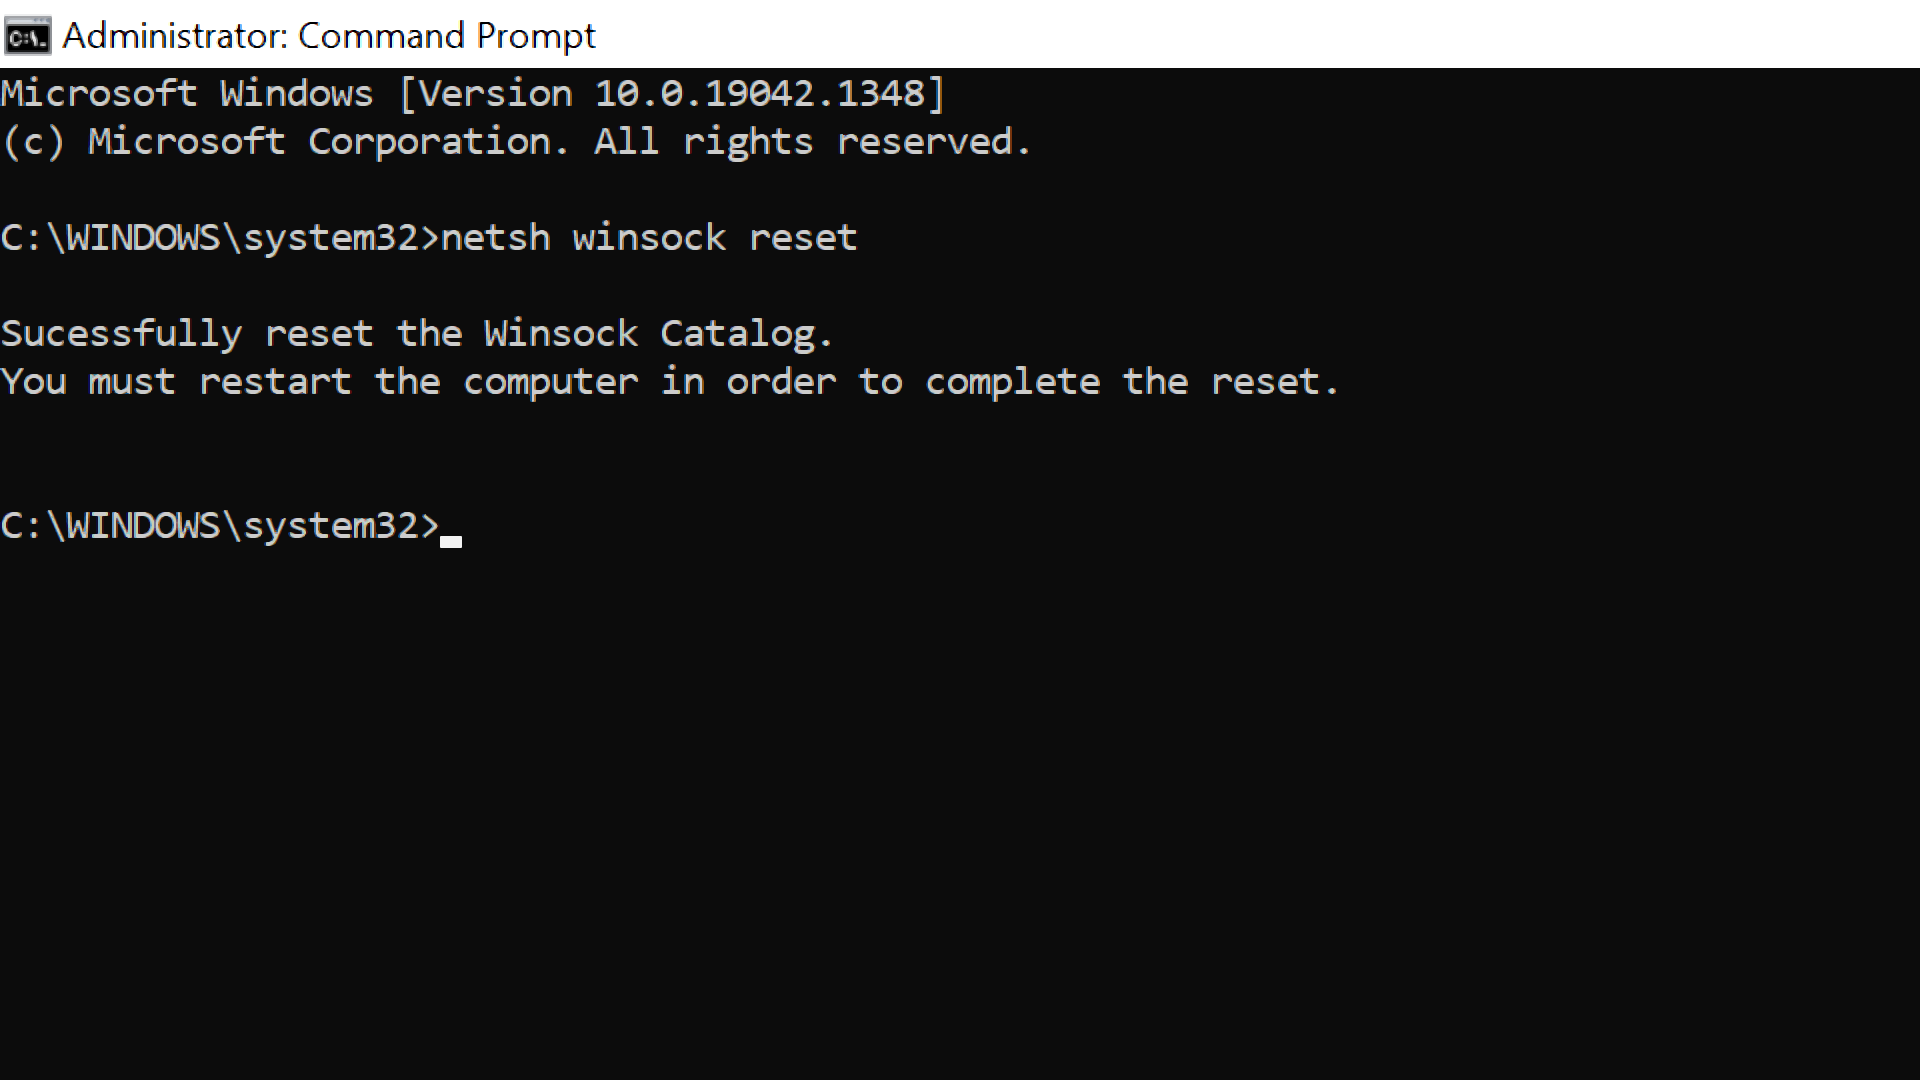
Step 3: Restart your computer.
How to Fix Network Adapter Missing by Reinstalling or Updating the Network Adapter Driver
If the solutions already discussed fail to work for your computer, then you should try and reinstall or update your network adapter driver to fix the issue.
To reinstall your network adapter driver, you should follow the steps below:
Step 1: Click on Start and select Device Manager.
Step 2: Expand Network Adapters.
Step 3: Right-click on the affected driver and select Uninstall device.

Step 4: Choose Search automatically for updated driver software.
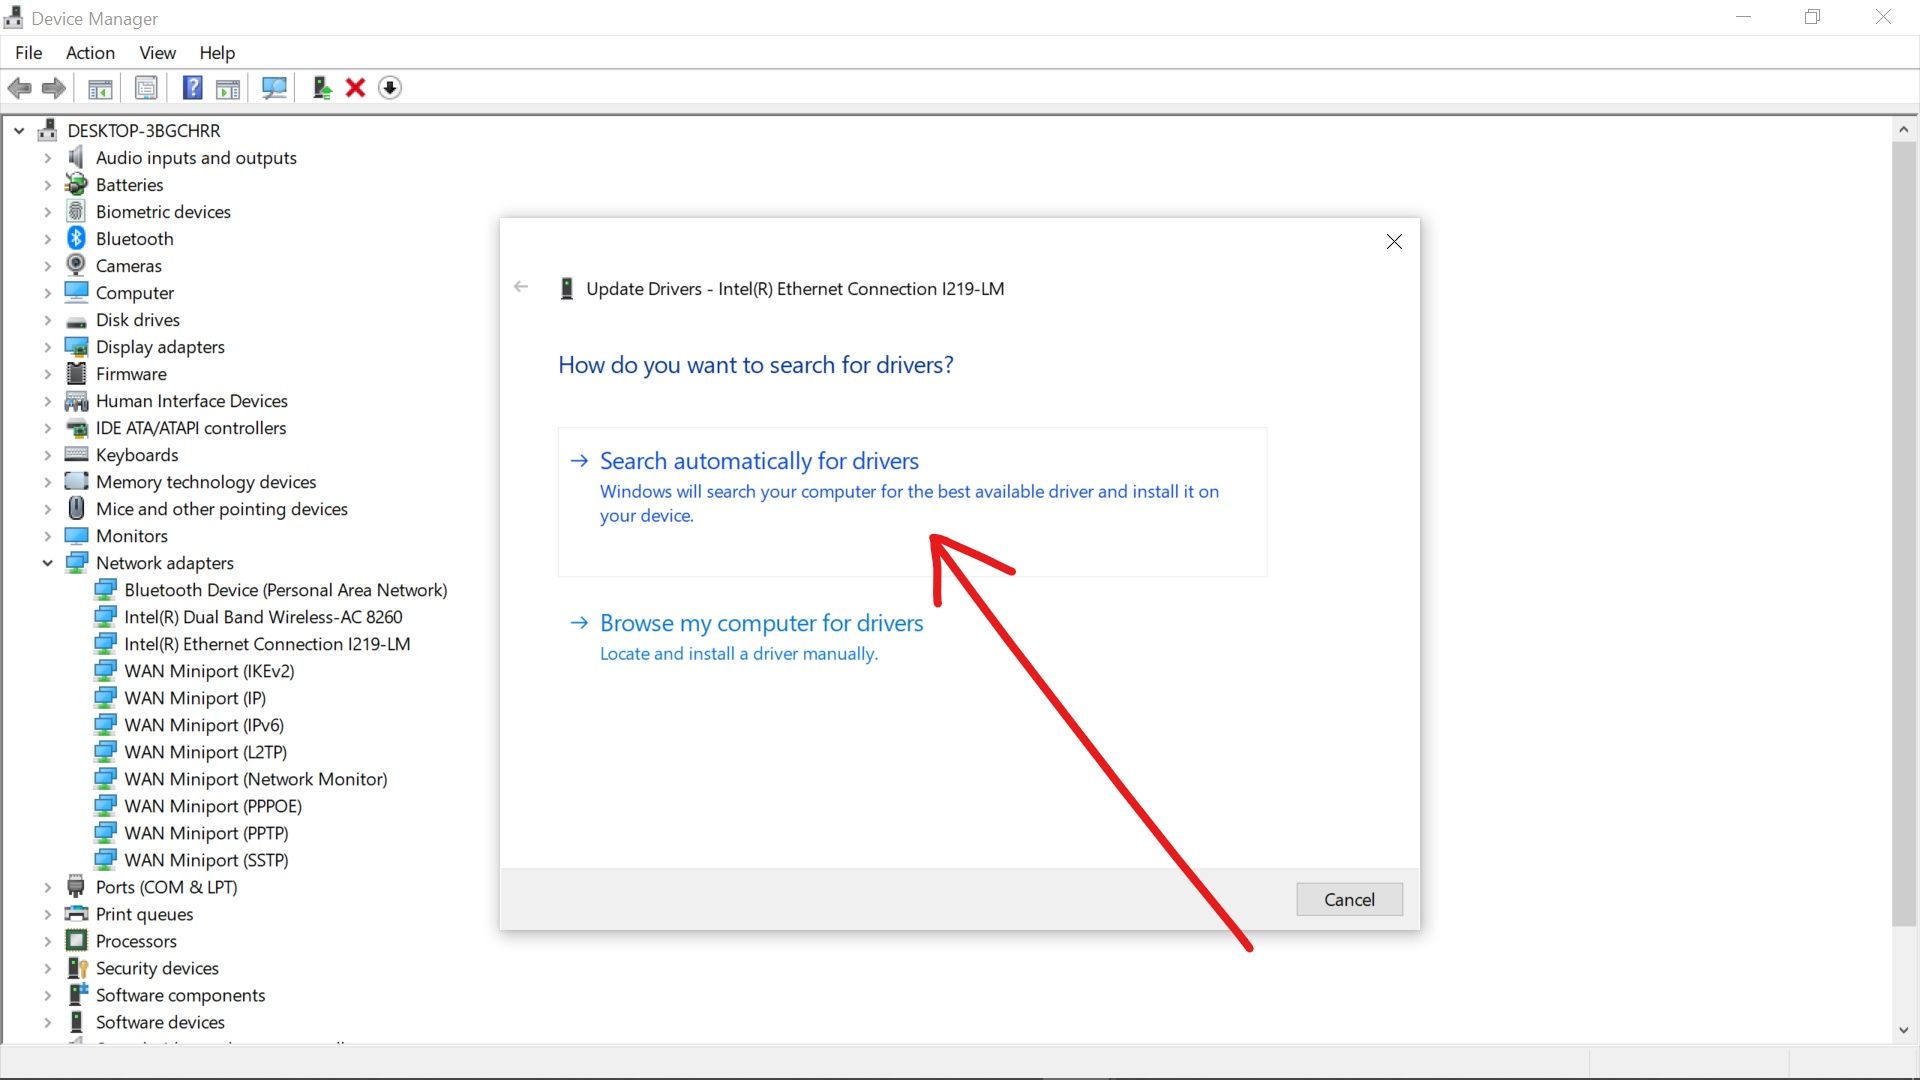
Step 5: Restart your computer and the driver will be automatically reinstalled for you.
Conclusion
In this detailed guide, you learned how you can fix the network adapter missing error so you can connect to the internet again with your computer.
If you find this article helpful, consider sharing it with your friends and family so it can help them too.
Thank you for reading.
Learn to code for free. freeCodeCamp’s open source curriculum has helped more than 40,000 people get jobs as developers. Get started