
Many users panic immediately when they notice that a folder containing some valuable files has gone missing or has been deleted. There should be no cause for alarm whenever you experience a situation like this. An accidentally deleted documents folder in Windows can be recovered as easily and quickly as lacing a pair of shoes.
🗨️
This article provides useful information on how you can recover a deleted documents folder in Windows 10.
Quick Navigation
|
Problem |
Solution |
|
I have recently deleted the file from the documents folder |
Restore a Previous Version |
|
My documents folder is missing |
Restore a Previous Version |
|
I have accidentally deleted my documents folder |
Recover from the Recycle Bin |
|
I can’t find the documents I believe supposed to be in my documents folder |
Recreate the Documents folder |
|
My documents folder disappeared on Windows 10 |
Restore a Previous Version |
|
I want to restore deleted documents folder in Windows |
Restore a Previous Version |
|
I want to restore another version of the documents folder |
Restore a Previous Version |
|
I deleted the documents folder and it’s not in the Recycle Bin. |
Recover with data recovery software |
1. Check your Recycle Bin
The first thing to do anytime you notice that your folder has gone missing is to check the Windows Recycle Bin. While many users forget to check the Recycle Bin, it must be noted that doing this will save you time as very often than not, our deleted folders are kept there for a limited period. As you may already be aware, the default location for temporarily storing deleted items on a Windows PC is the Recycle Bin
👀
In case you identify your folder in the Recycle Bin, recovering it is straightforward. Following these simple instructions should help you recover your documents folder to its original location.
- Double-click the Recycle Bin icon on your Desktop.

- Navigate through the files and folders to identify your missing Documents folder.
- If you successfully identified your folder, right-click on it and select the “Restore” option. Restoring the folder puts it back in its original location.


⚠️
Keep in mind that checking the Recycle Bin for deleted files and folders should precede any additional recovery methods.
2. Restore a Previous Version of the Documents Folder
An amazing feature that comes with Windows is the ability to restore a folder to a previous version. This feature works like a regular backup tool and allows you to recover a previous version of a file or folder in case you lose them.
Previous Version is essentially a copy of files and folders created automatically by the Windows system as part of a restore point. You can use this feature to restore folders that have been modified or deleted unintentionally.
⚠️
The Previous Version feature comes in handy if your folder has been erased from your PC, including the Recycle Bin. A downside to this feature is that you will not be able to recover the latest version of your folder (which means you may lose some files). However, due to how the system restore point feature works, you shouldn’t worry about losing too many files.
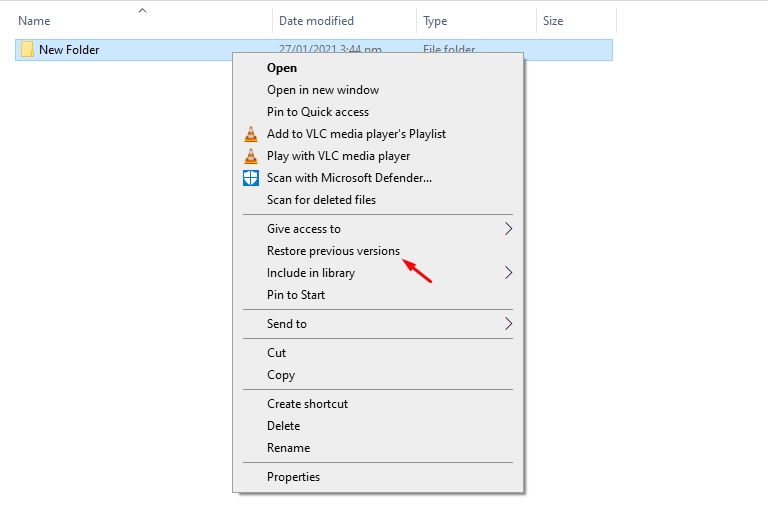
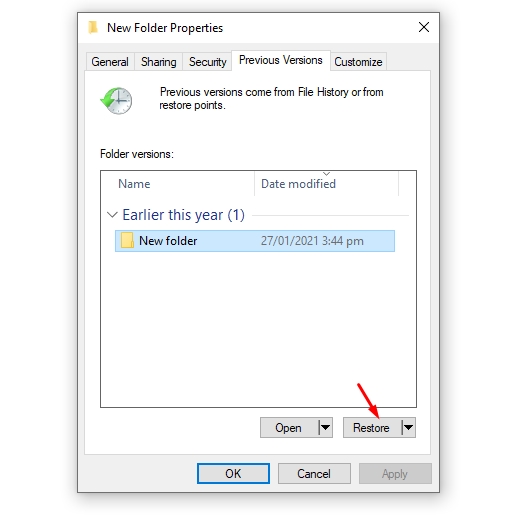
To restore a Documents folder using the Previous Version utility, follow these instructions:
- Open File Explorer.

- Identify the specific folder you intend to recover.
- Right-click the folder, and then select Restore previous versions.

- Select the particular version you wish to restore.
- Finally, click on the Restore Button.


👀
To restore a folder using the previous version feature on your Windows PC, you should have previously enabled it using File History.
How to Enable Previous Versions to Recover Folders in Windows 10
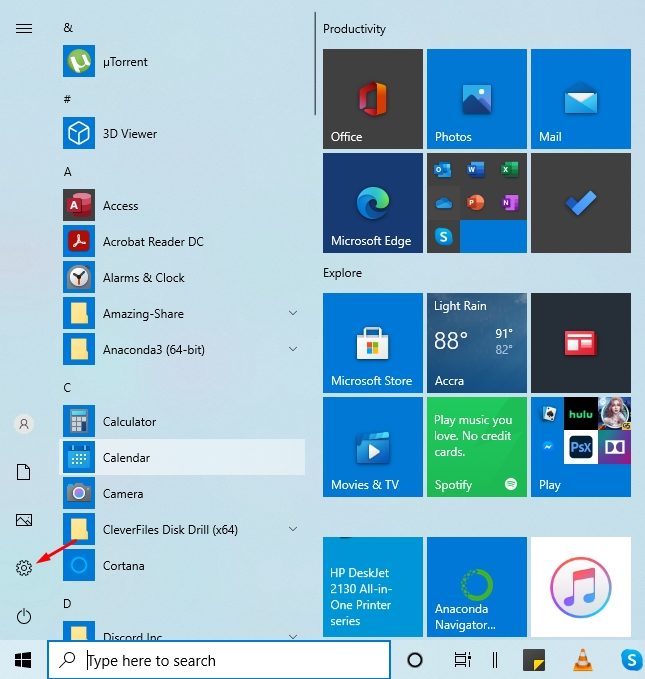
As discussed, you can only utilize the Previous Versions feature only if you have enabled it. To do this, we must use File History. Follow these simple steps:
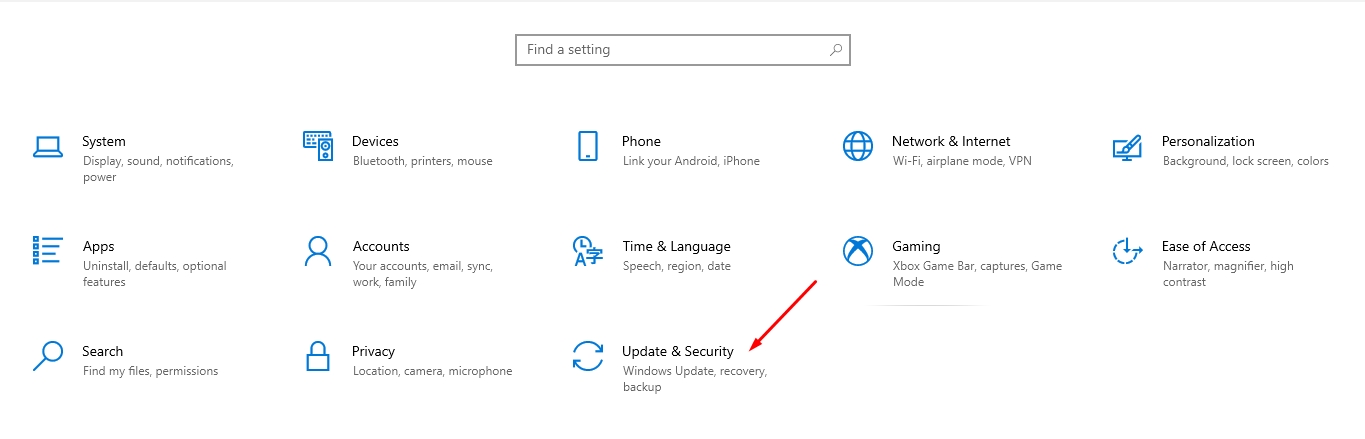
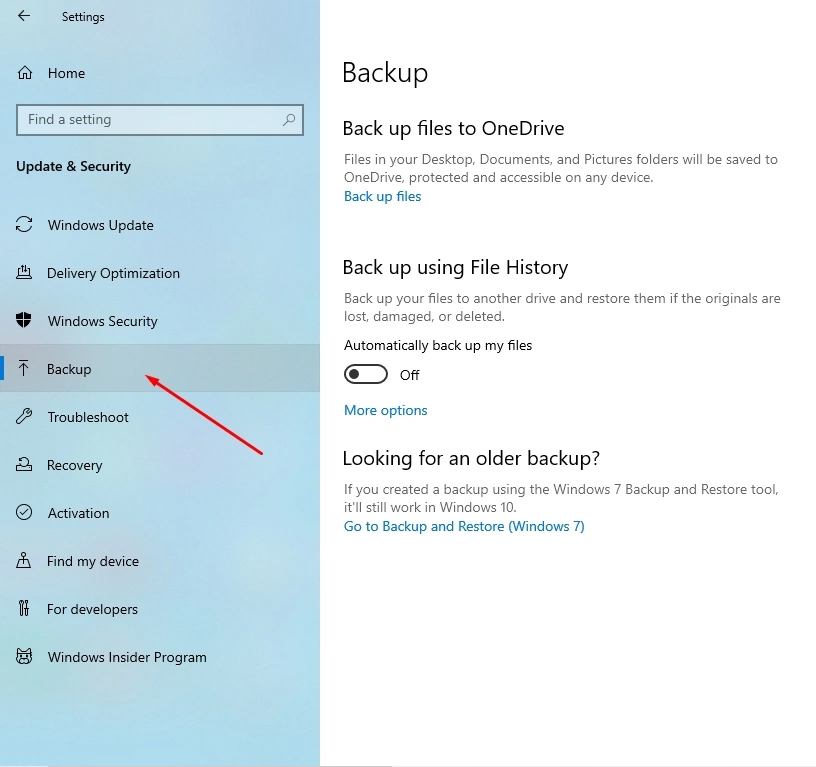
- Open the Settings app on your PC.

- Select Update & Security.

- Click on Backup.

- Select the Add a drive button.
- Choose the drive you want to use as the backup drive.
3. Recover Accidentally Deleted Documents Folder via Data Recovery Software
Data recovery software augments the existing capabilities of your Windows system by recovering data that basic tools and features on your PC are unable to do. That means that you should be able to achieve greater success in recovering an accidentally deleted folder hassle-free.
Data recovery with software is possible because of the nature of the Windows firmware. Typically when a folder is deleted, Windows erases the pathways that make the folder accessible and marks the space initially occupied by the folder as available for use.
As long as you do not overwrite the previous data with new data, data recovery software is capable of restoring the missing links that make it possible to get your data back.
⚠️
You should discontinue overwriting your drive with new data immediately when you notice that a folder or file has gone missing on your PC. This prevents previous data from being overwritten and increases your chances of recovery.
Choosing the Right Recovery Tool to Restore Your Documents Folder
There are a ton of data recovery applications at your disposal. However are they all worth it? Not quite! The delicate process associated with successful data recovery requires that you select an application with a proven track record of data recovery, not one that promises to do it and fails.
👀
Here is a brief selection of the best data recovery software solutions according to our tests:
1
Disk Drill
Platform: Windows, macOS
Distributed as: Freemium
2
PhotoRec
Platform: Windows, macOS, Linux
Distributed as: Free
3
EaseUS Data Recovery
Platform: Windows, macOS
Distributed as: Freemium
After many trials carried out using multiple data recovery software, we found Disk Drill to be very useful. For the majority of the features we had in mind, Disk Drill gave us a run for our money.
The user interface is intuitive and pretty easy to use. The application also supports hundreds of file formats and fortunately for Windows users, they can recover up to 500 MB for free. Additionally, we were amazed at the speed with which Disk Drill recovered our lost folder and the possibility of pausing the scan and resuming later.
🔗
Want to learn more about Disk Drill? Read our comprehensive Disk Drill review.
Recover Permanently Deleted Documents Folder Using Disk Drill
Long story short, we were highly impressed with the overall features of the Disk Drill app and we recommend it for restoring your missing Documents folder. The following steps will guide you to restore your deleted folder with Disk Drill.
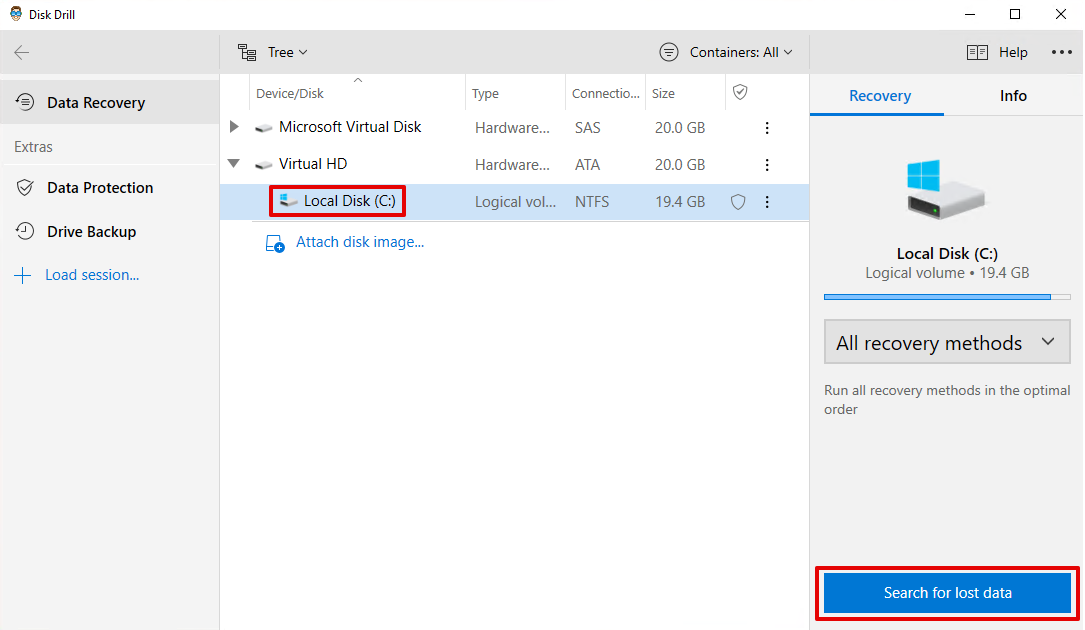
- Download and install Disk Drill for Windows.
- In the list of available partitions, select the one that contained the deleted Documents folder.

- Click Search for lost data to begin the search process.
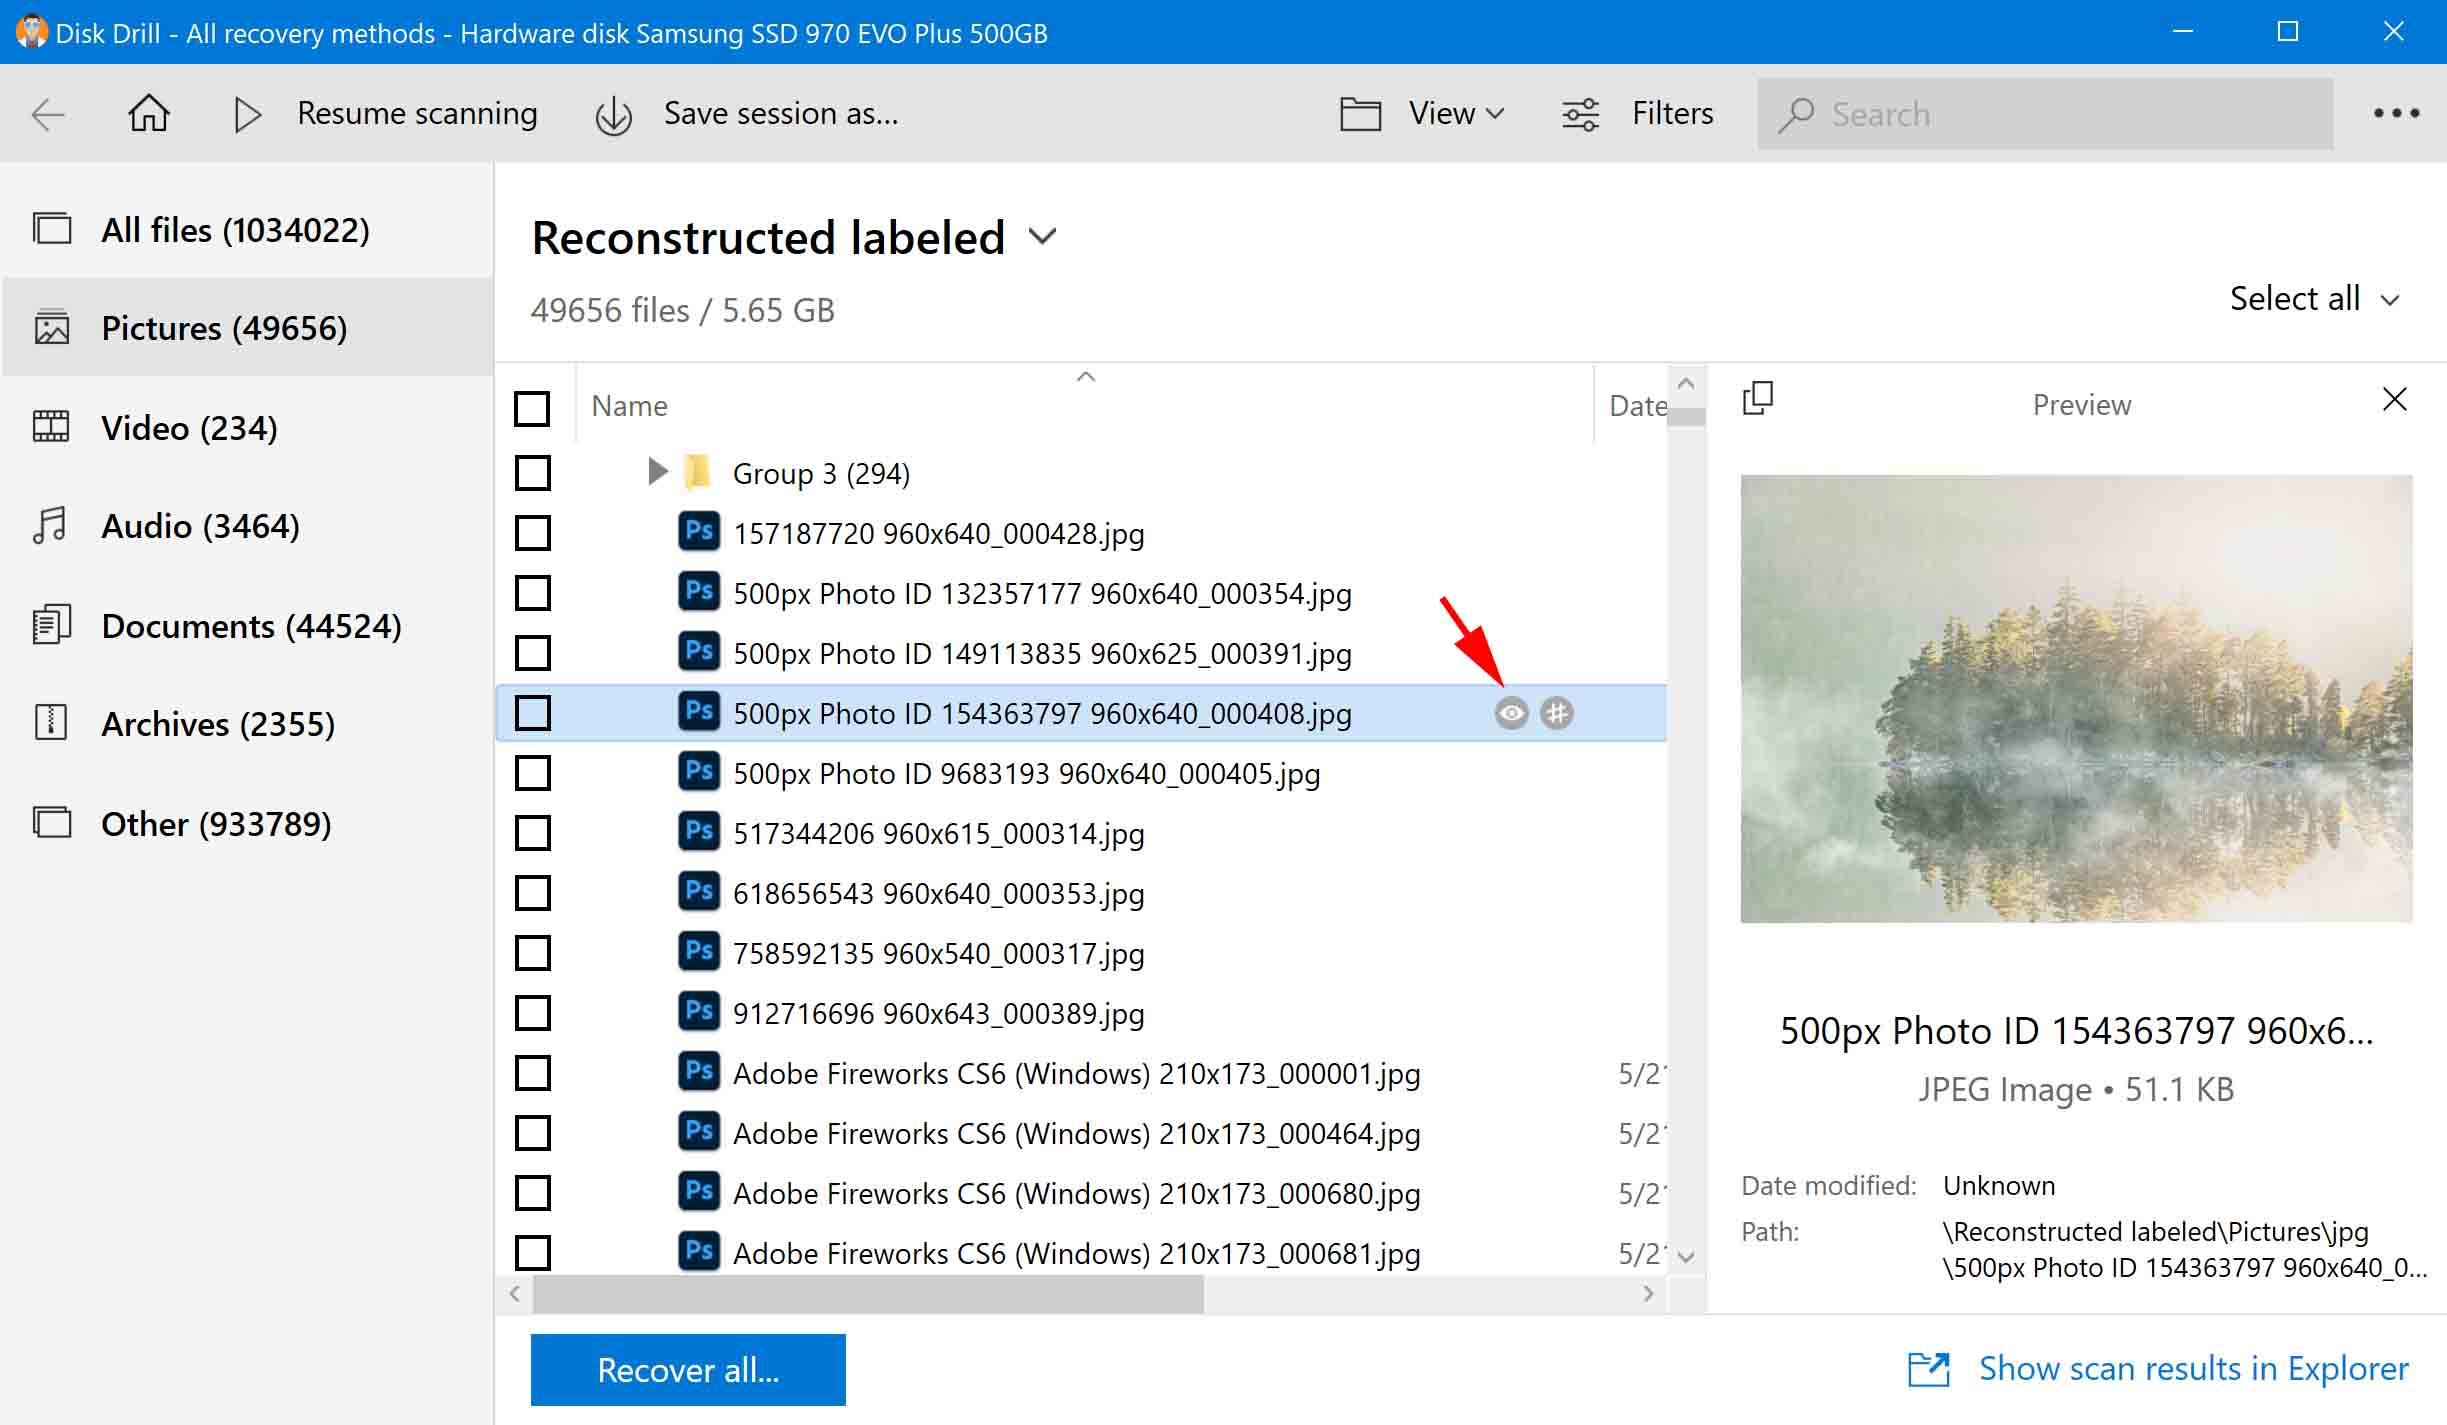
- Preview the scanned files and select the folder you want to keep.

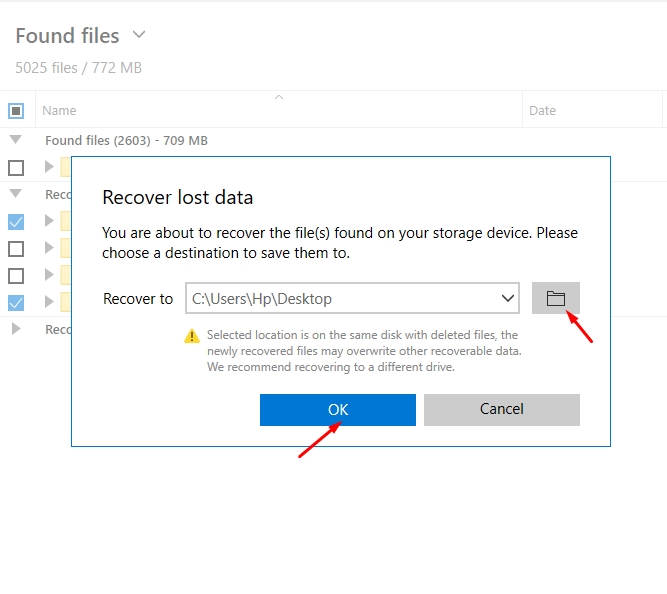
- Select the folder and choose a new location.

- Click the Restore button to restore the folder to its new location.
✅
Compared to other data recovery methods, using software combines some of the most sophisticated features to increase the rate of recovery.
4. Try to Find You Files/Documents via Windows Search
To avoid complicating things sometimes we encourage you to run a simple search on your Windows PC. The reason for doing this is simple: The folder could have moved to a different location on your PC mistakenly without you knowing about it.
Transferring items from one location to another on your PC is a very common practice. Perhaps in a previous attempt, you might have moved your Documents folder to an unknown location accidentally when in fact you think it has been deleted. To find your files, we suggest that you manually search for them as an additional measure.
- Launch File Explorer.
- Proceed to the search tab at the top-right corner.
- Type in *.doc or *.docx to display all the available word documents stored on your PC.
- Once you recognize any files, right-click on any of them and select open file location.
- Select the folder and move it to its original location.
5. Recreate the Documents Folder/Restore Document Library
In case you didn’t know, the folders you see on the left pane in File Explorer which includes Documents, Music, Pictures, Videos, are created by default on Windows. These libraries can be restored quickly if you deleted them mistakenly.
Without exception, if you mistakenly deleted the Documents folder, there are two ways to restore it. You can choose to recreate the Documents folder or restore the Document library.
Recreate the Documents Folder
Instead of using a data recovery application to restore your missing folder, you can directly recreate a new Documents folder as an alternative procedure. You can do this by following the steps below:
- Create a new Documents folder in File Explorer.
- Reset the Registry User Folder Settings.

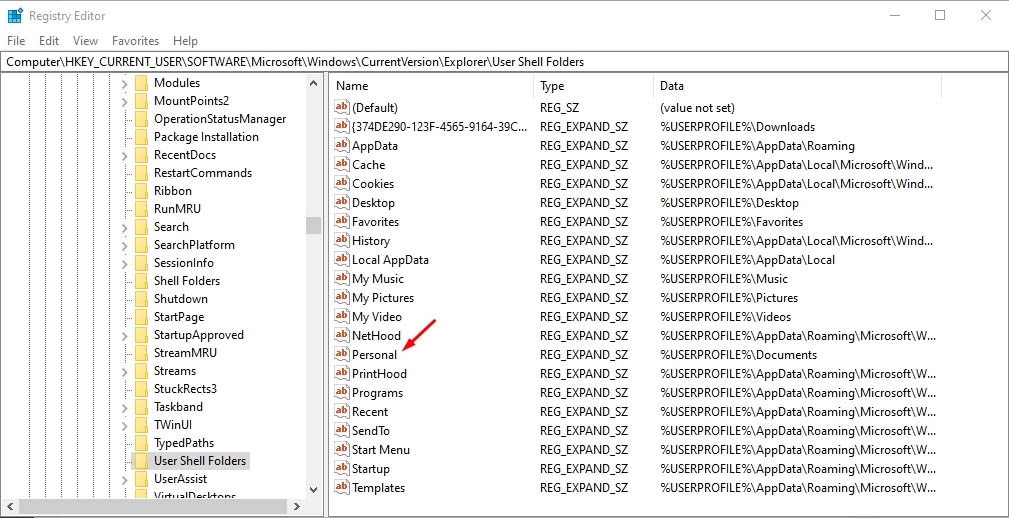
- Using the Win + R command, type regedt32 and click OK to bring up “Registry Editor Utility”.
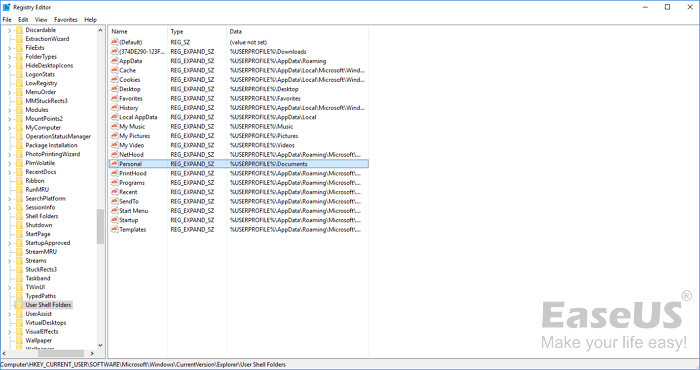
- Navigate:HKEY_CURRENT_USER\Software\Microsoft\Windows\CurrentVersion\Explorer\User Shell Folders
- Verify the name and data of the Documents folder, which is typically Personal, %USERPROFILE%\Documents. Double-check to confirm that they have been correctly represented. If not, you can manually adjust the name and data value.
- Recreate the Documents folder.
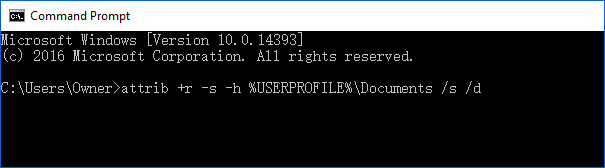
- Click the Windows button on your keyboard. Type cmd to display the Command Prompt utility. Right-click on it and select “Run as administrator”.
- Type attrib + r -s -h %USERPROFILE%\Documents /S /D and click Enter.
After you complete these steps, we suggest restarting your computer. You should see the Documents folder displayed on your Desktop after the boot process.
Restore the Documents Library
Besides the option to recreate the Documents folder, you may also decide to restore the documents library, which is a less cumbersome approach. To do this, you need to follow these guidelines:
- Open File Explorer.

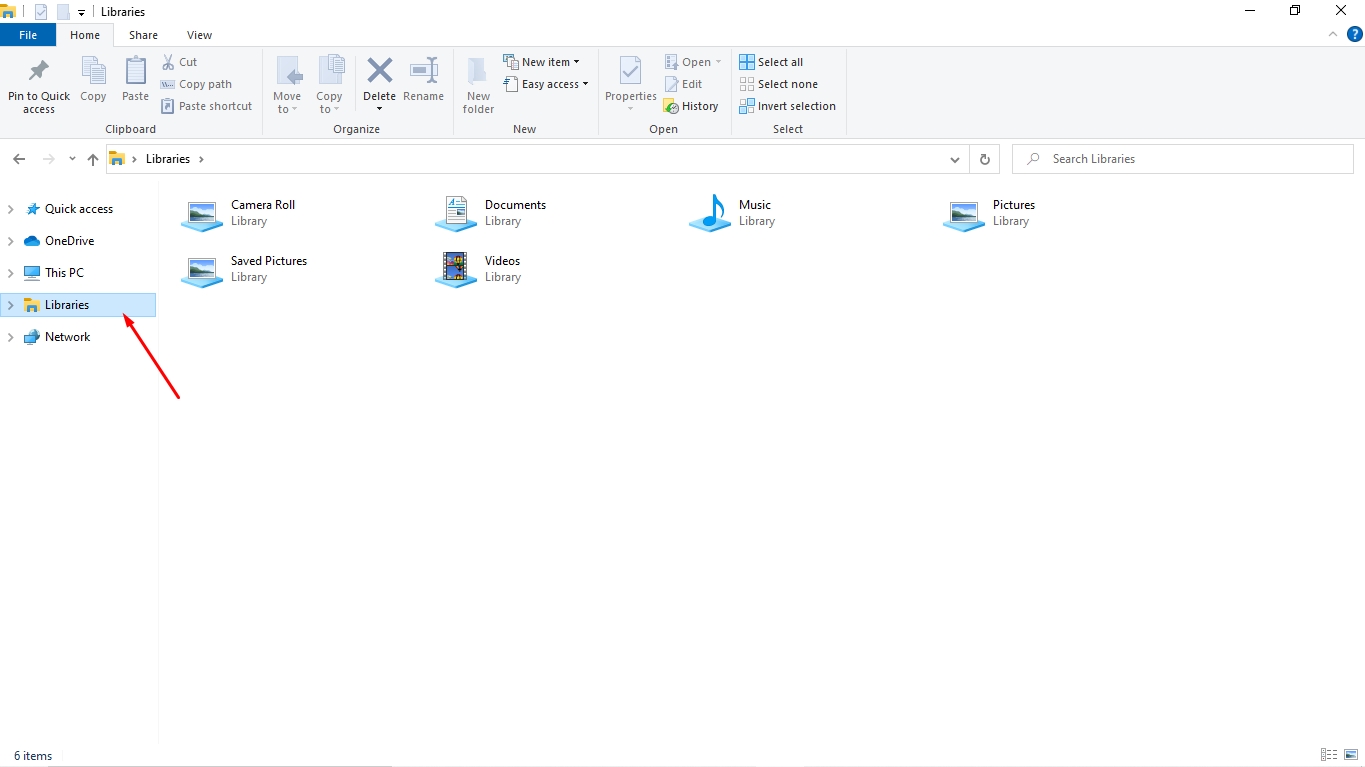
- Click on Libraries on the left pane to open the folder.
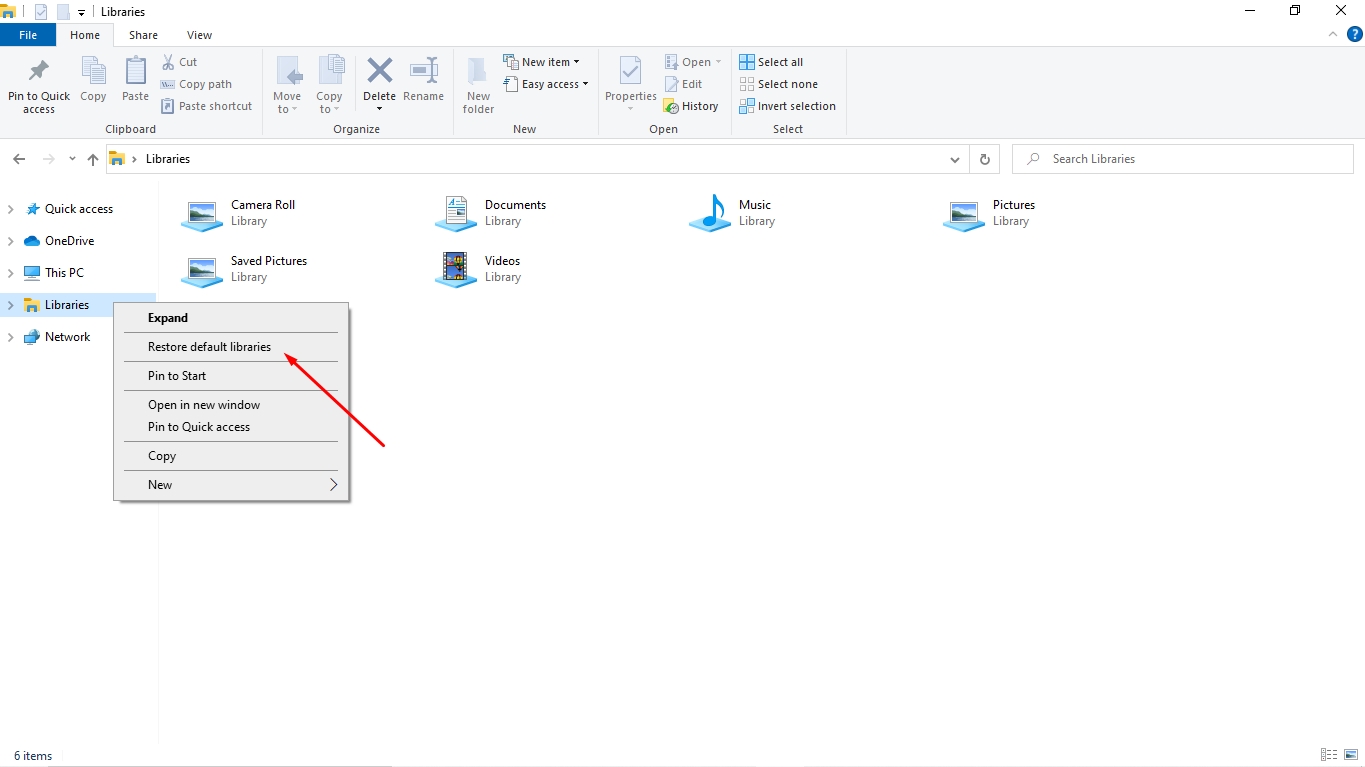
- Right-click the Libraries item on the left and select Restore default libraries in the context menu.
✅
The Documents library will resurface after you have completed the steps above.
FAQ
How do I restore my Documents folder?
Restoring your Documents folder can be achieved in many ways. You can do this by restoring it directly from the Recycle Bin or by using data recovery software like Recuva, Disk Drill, R-Studio, and more. We also describe additional methods in the article.
How do I find my documents in windows 10?
By default practice, your documents may be found in the Documents folder. To locate the folder, you need to open file explorer, and on the left pane, you will see the Documents folder.
Why can’t I move the Documents folder on Windows 10?
It’s possible to move the Documents folder, but some users may have issues doing it. A common bug that you may encounter is “Source Path Too Long” which can be solved using the chkdsk command.
How to change the default location of user folders in Windows?
Changing the default location of user folders is achievable in Windows. You can do this by following the instructions outlined here.
Final Thoughts
Losing an important file or folder is a pretty common phenomenon. Instead of fretting over an obvious mistake, many solutions, especially on the Windows platform can help you to deal with such a situation. When in doubt, we recommend using data recovery software, particularly one capable of delivering impeccable results like the example reviewed in the article.
About article
This article was written by Michael Alimo, a Contributing Writer at Handy Recovery Advisor. It was also verified for technical accuracy by Andrey Vasilyev, our editorial advisor.
Curious about our content creation process? Take a look at our Editor Guidelines.
How do you rate the article?
Submitted:
The My Documents folder or Documents folder is an important system folder in Windows operating system. It’s commonly used to save essential documents including personal files and application data like game progress.
Nowadays Documents folder missing problem arises, which tends to happen after deleting or unlinking OneDrive, after Windows OS upgrade, or under other unexpected situations. If you need to restore the Documents folder missing in Windows 11/10 and get back files in it, this article must be your landing page.
Where is the Documents Folder in Windows 11/10?
The Documents folder is created automatically when we create a user account, thus located in the user profiles folder. By default it’s present on the drive where Windows operating system is installed. For example, if Windows 11 is installed on the C drive and your user account name is “username”, the Windows 11 Documents folder location will be C:\Users\username\Documents.
7 Ways to Fix Documents Folder Missing in Windows 11/10
Normally, we can easily reach Documents folder from Quick Access column in File Explorer. In case you’ve found the Documents folder missing in your Windows 11 or 10 computer, no worries, here come 7 solutions to restore it back.
1# Recover Documents Folder and Files with Software
Sometimes the lost Documents folder seems to be less annoying, but all files disappearing along with it would be a huge disaster without doubt. To safely restore the missing Documents folder and files, you’re recommended to opt for a piece of professional data recovery software.
Among the multitude of recovery tools available, Cisdem Data Recovery stands out as your top choice owing to its advanced scanning algorithms and high recovery rate. In addition to document files, this versatile program can support retrieval of more than 1000 file types like photos, videos, audios, compressed files, emails, from computer hard drive (internal), HDD, SSD, USB flash drive, memory card, digital camera, etc.
Useful features of Cisdem Data Recovery:
- Restore Documents folder and files missing due to various reasons
- Recover data from specific folders: Documents, Downloads, Desktop, Recycle Bin…
- Search for files quickly using filter tools
- Repair corrupted images, videos and even documents automatically
- Preview files before recovery
- Save previous scan records to avoid rescanning
- Support crashed PC recovery
Steps to Restore Missing Documents Folder and Files in Windows 11/10:
- Download and install Cisdem on your PC.
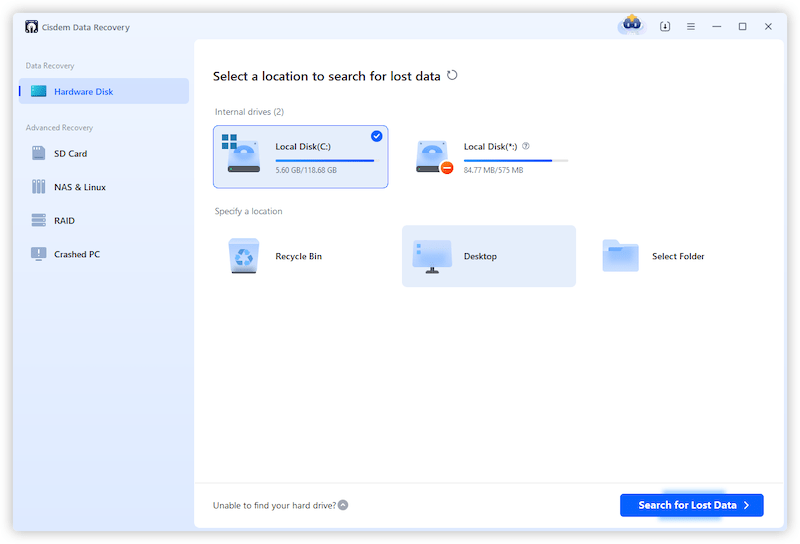
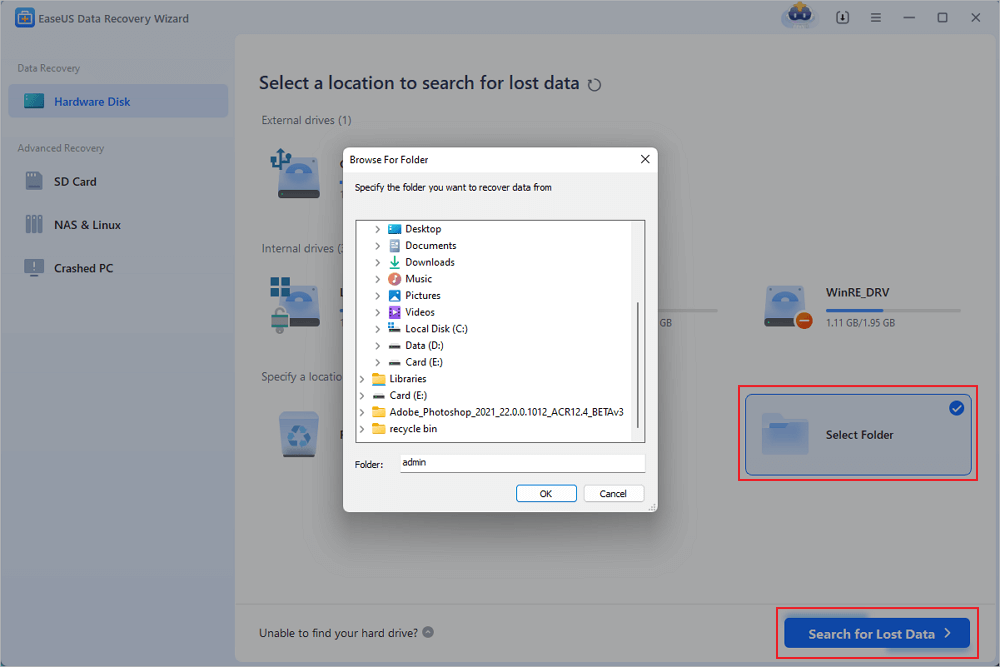
Free Download Windows 11/10/8/7 - Launch this program, go to PC Recovery, click on “Select Folder” to specify a location for scanning, and select OK to start. Here we choose Documents folder.

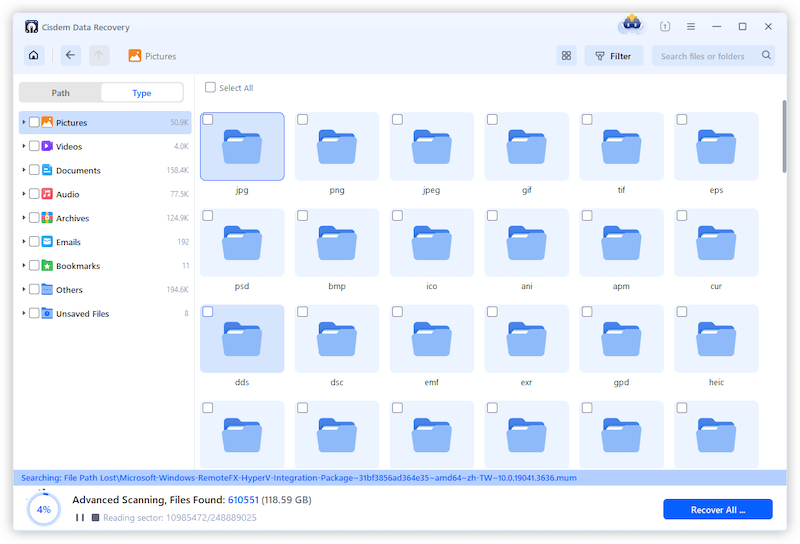
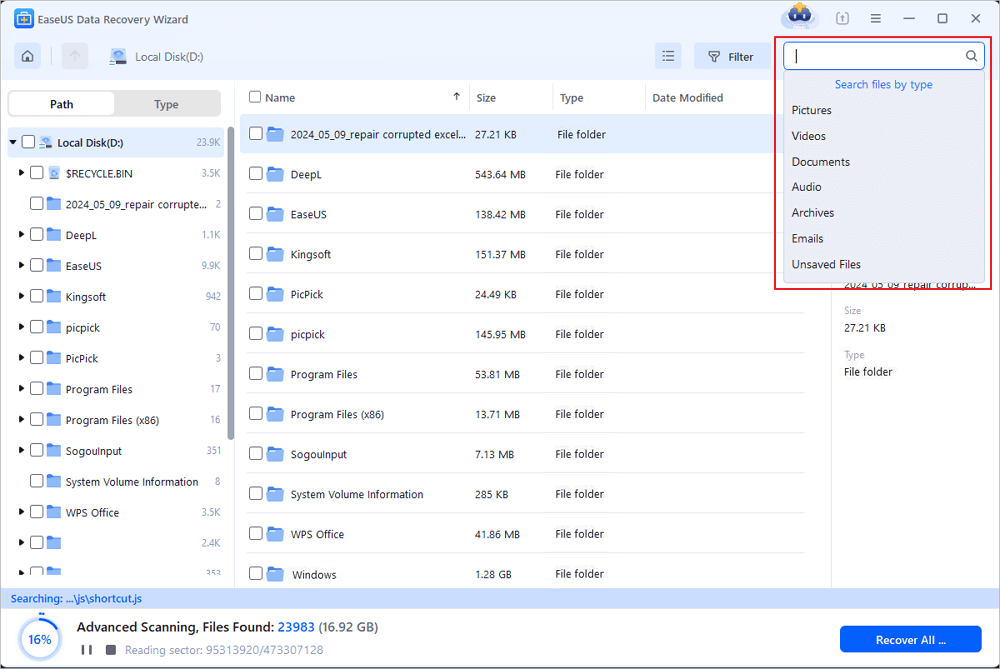
- After scanning done, choose Path or Type, and look through the listed folders or use filters to locate your lost items.
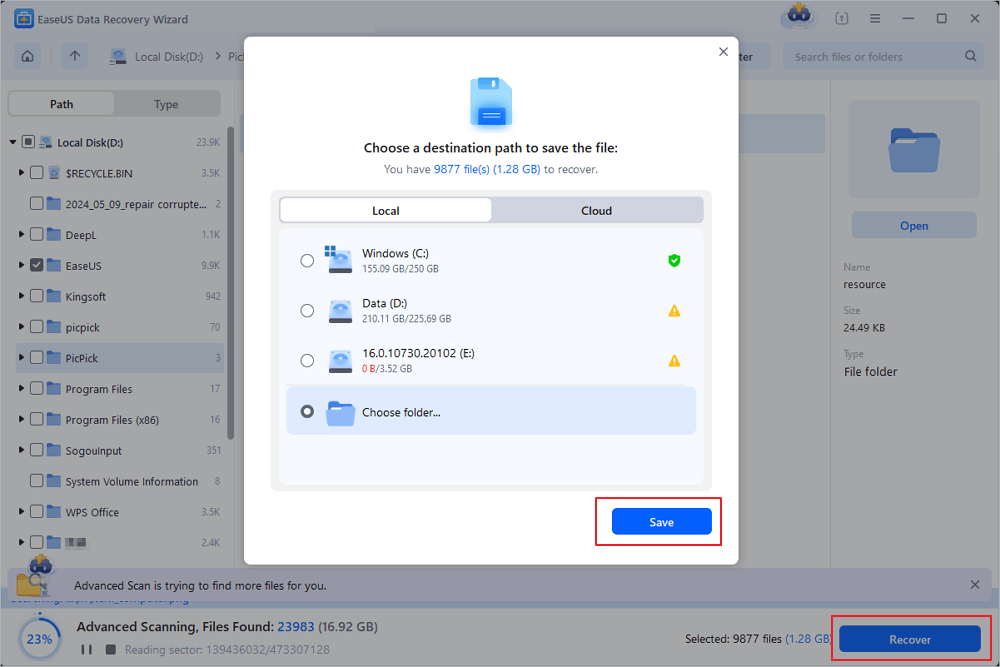
- Select them and click Recover button to restore missing Documents folder or files. You’re allowed to preview the wanted files before recovery.

2# Show Hidden Folder
The missing Documents folder may just become invisible after being hidden accidentally. Here’s a simple trick to make it reappear using “Show hidden files, folders, and drives” option on Windows 11 or 10.
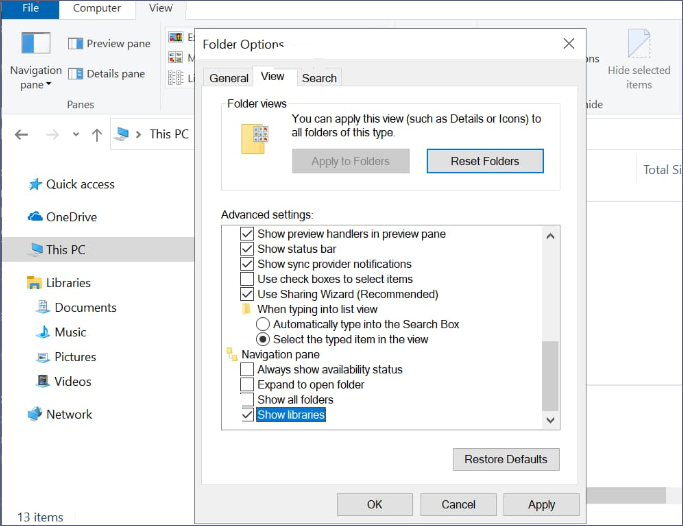
- Go to File Explorer > View tab > Options.
- In the Folder Options window, under Hidden files and folders section, make sure “Show hidden files, folders, and drives” is checked. If no, check it, click Apply and OK.
- Confirm if your Windows 11/10 Documents missing from Quick Access or somewhere else shows up again.

#3 Restore Default Location of Documents Folder in Properties
If Documents folder is misplaced somehow, it seems to be missing as well. Then it’s a wise option to restore the Documents folder to its default location in Windows OS, so that this folder could be regained easily.
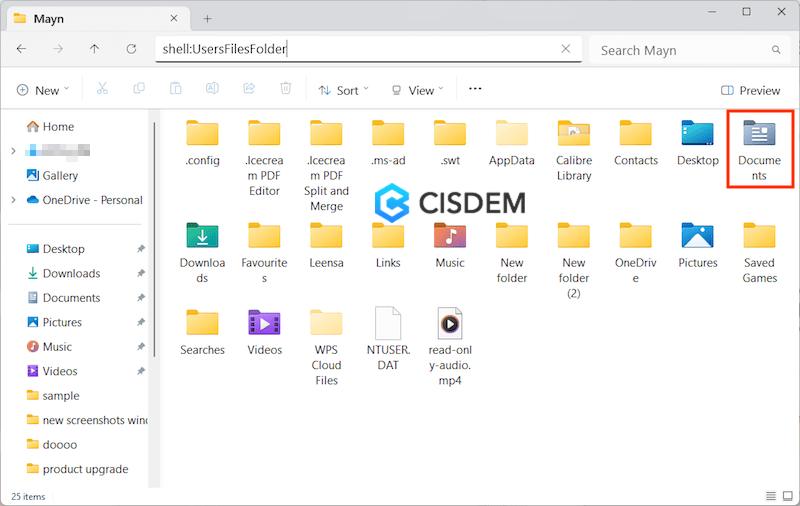
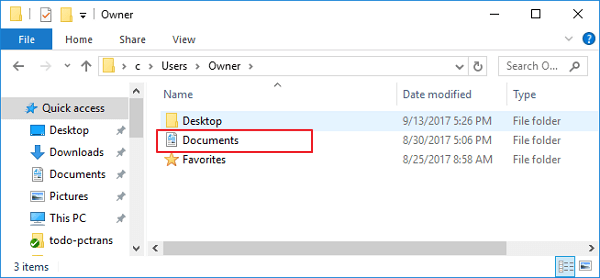
- Open File Explorer, copy and paste shell:UsersFilesFolder into your address bar > press Enter.
- Right-click on Documents folder you want to restore > select Properties.
- Click Location tab > Restore Default button > OK.
- If prompted to create a folder at the default location, choose Yes.
- If prompted to move all files from old location to the new default one, continue to select Yes.
- Finally go to check whether the missing Documents folder is present in its default location.
4# Restore Documents Folder by System Restore
In the event that any system changes lead to Windows 11/10 Documents folder missing issue, such as update, downgrade, reinstallation, etc., the most suitable fix is to try System Restore. It will revert your system status back to an earlier point when Documents folder was still available. Keep in mind that this works only if you have created a System Restore point before changes.
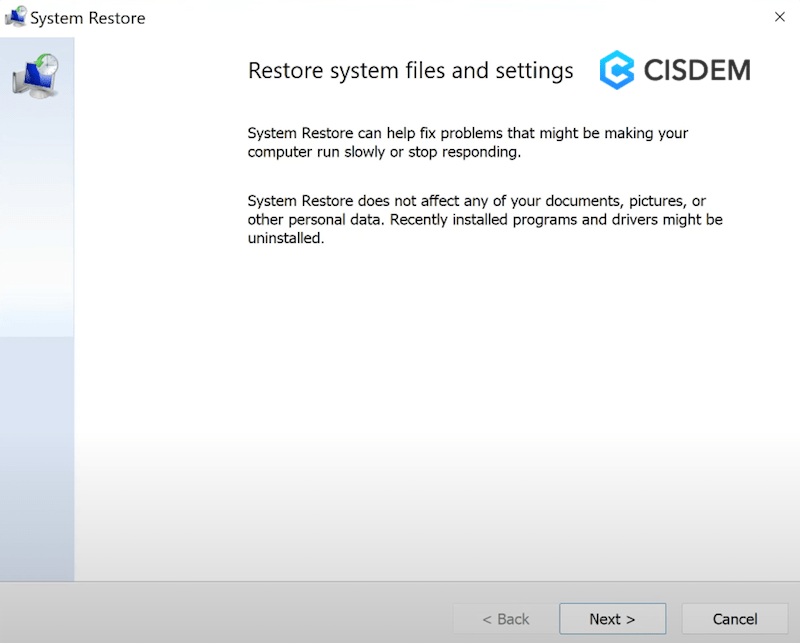
- Right-click on the Start button > select Run.
- Type rstrui.exe > click OK.
- Click Next to continue.
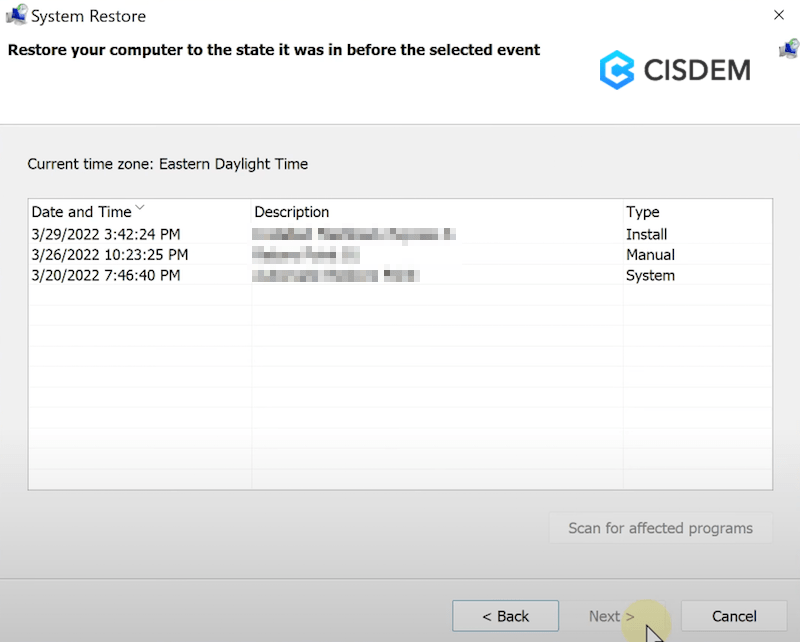
- Choose an appropriate restore point > click Next.
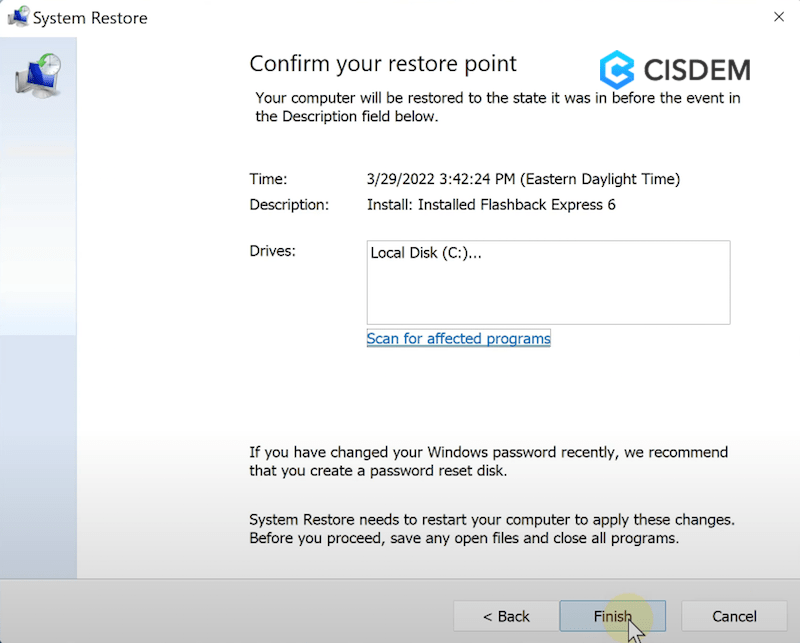
- Confirm your selected restore point > click Finish to start the system restore.
- After restoration, the missing Documents folder should reveal in Windows 11/10.

5# Create A New Documents Folder
Providing your missing Documents folder is empty or you don’t think lost files in this folder is important, this method is for you. It’s suggested to rebuild a new Documents folder from scratch, using Registry Editor utility combined with Windows Command Prompt.
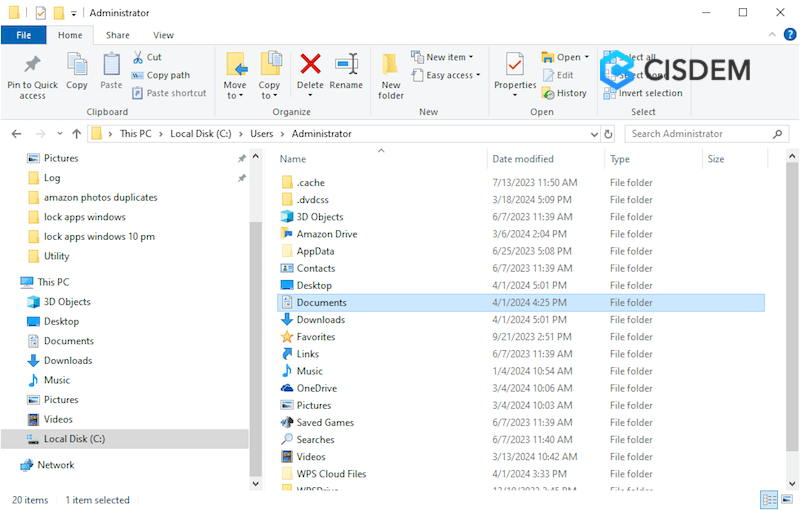
- Create a new Documents folder in default Windows 11/10 Documents folder location (C:\Users\username).
- Exit File Explorer.
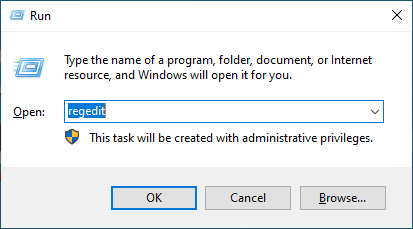
- Press Win+R to open Run windows, and input regedit > click OK.
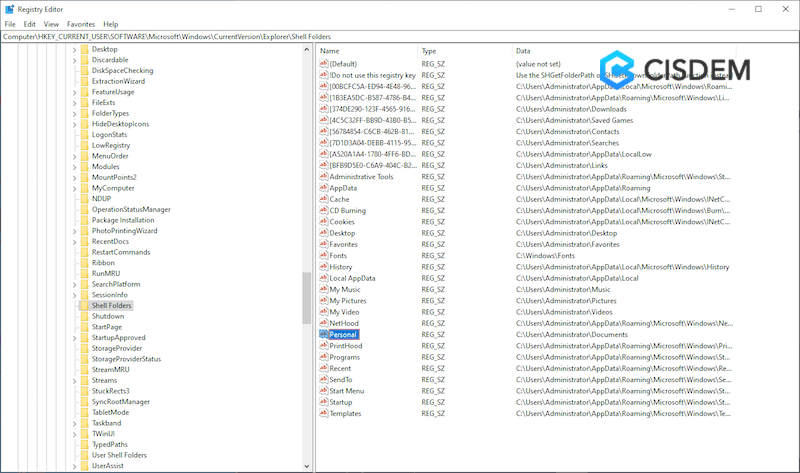
- In Registry Editor, navigate to this path: HKEY_CURRENT_USER\Software\Microsoft\Windows\CurrentVersion\Explorer\Shell Folders.
- Find Personal registry key > input the location of Documents folder you created in the first step > click OK.
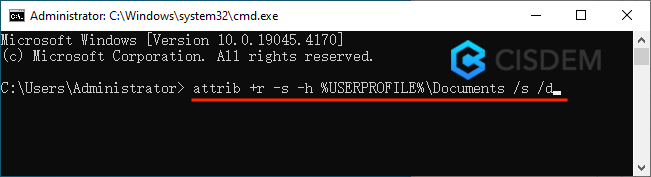
- Run CMD as administrator.
- Type this command: attrib +r -s -h %USERPROFILE%\Documents /s /d and press Enter.
- Restart your Windows 11/10 PC to get back the missing Documents folder.
6# Run Anti-Virus App
Malware or virus infection is also one of major factors causing system glitches like Documents folder missing in Windows 11/10. So running your anti-virus app is well worth a shot. The following tutorial matches if you’re using Microsoft’s Windows Security as your anti-virus tool. Workflow for other 3-rd party anti-virus apps would be pretty much the same.
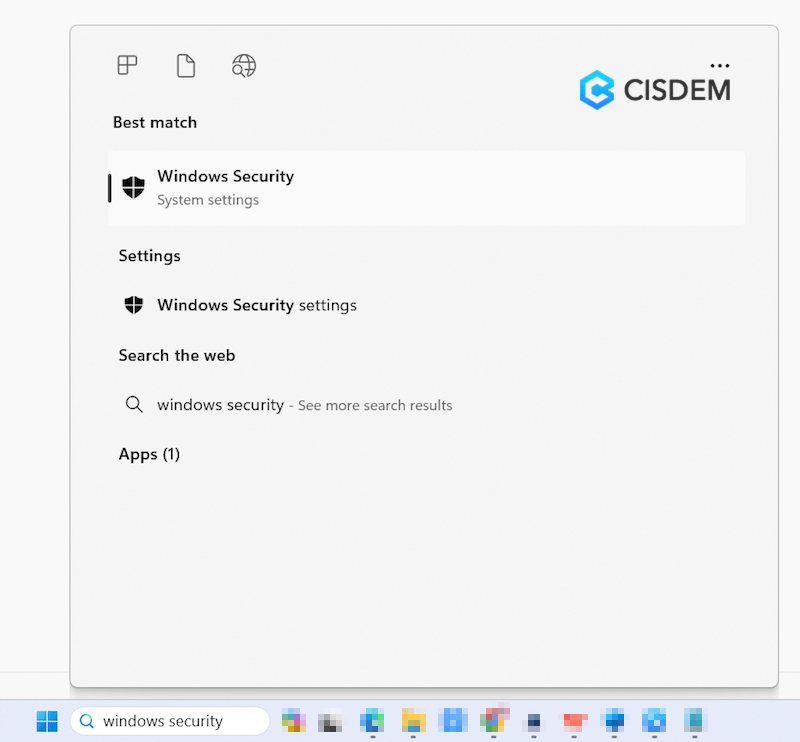
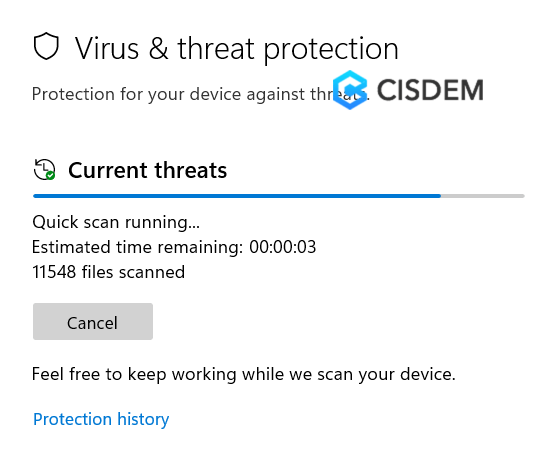
- Open up Windows search menu > search and open Windows Security.
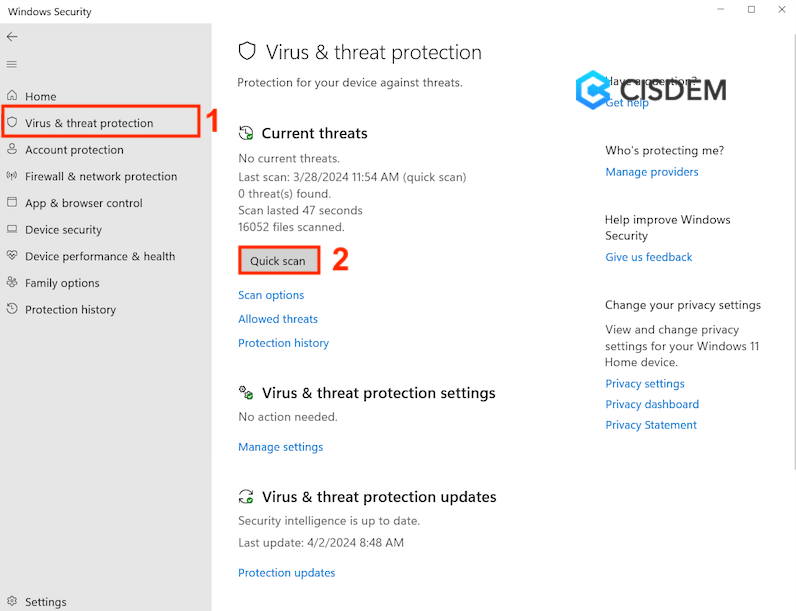
- Go to Virus & threat protection > click Quick scan button to detect and remove any viruses.
- Wait for the scan to complete. Finally check if your Documents folder is back.
7# Reset Windows PC
All the above solutions fail to fix Windows 11/10 Documents folder missing trouble? As a last resort, make an attempt to reset your PC, which will send system settings back to their defaults and possibly recover the missing Documents folder.
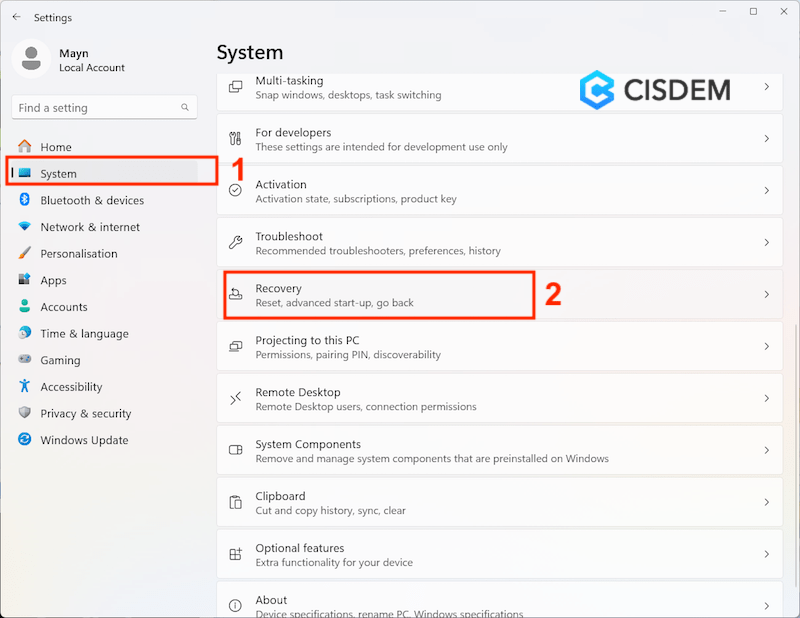
- Press Win+I to open Windows Settings on your PC.
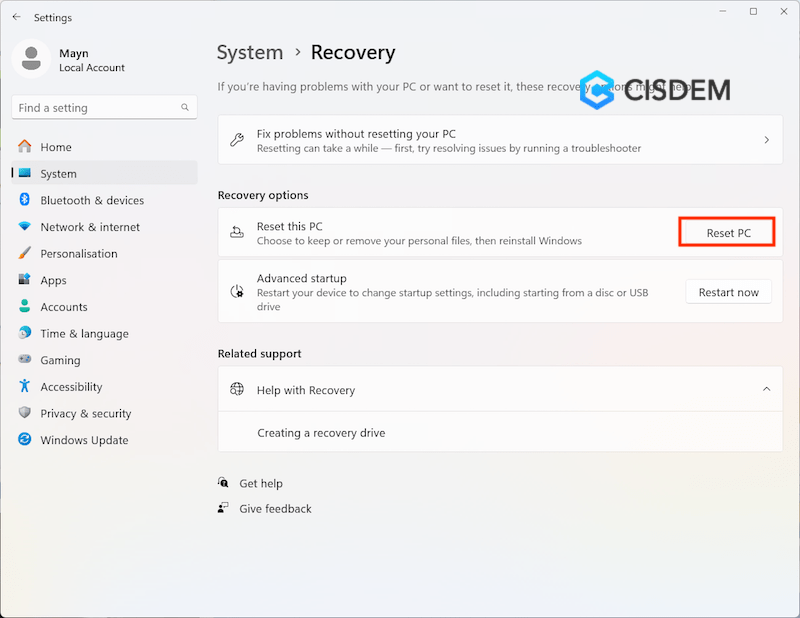
- Head over to System > Recovery.
- From Recovery options, click Reset PC button.
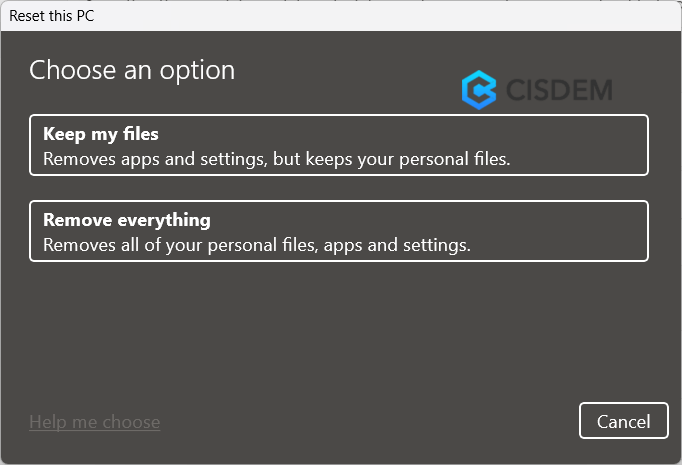
- Choose an option between “Keep my files” and “Remove everything”. If you have no backup in hand, go with the former one.
- Continue to choose an option between “Cloud download” and “Local install”, to download the new copy of Windows.
- Click Next and Reset to begin the factory reset.
- When the installation is finished, the Documents folder should reappear.
Bottom Line
There might be a same resonance that you can get Windows 11/10 Documents folder missing unexpectedly, even after a minor change done to your PC. Disappeared Documents folder and files would always result in inconvenience and massive loss for you. Luckily, one of the fixes from above should have helped you get rid of this problem by now, among which Cisdem Data Recovery must be our first recommendation.
Zoey shows a great interest in what she does. Although not long with Cisdem, she has possessed a professional understanding of data recovery.
Последнее обновление 22 февраля 2024 г. by Юлия Ильина
При использовании компьютера часто случаются случаи потери файлов, что может быть связано с такими аппаратными проблемами, как повреждение диска или случайное удаление людьми. Когда вы столкнулись с 2 вышеперечисленными ситуациями, не нужно паниковать, ведь вам помогут целевые методы. восстановить папку потерянных документов. Вам просто нужно внимательно прочитать статью и выбрать соответствующий метод в зависимости от разных ситуаций.

- Часть 1: Как быстро восстановить утерянные документы до их полного удаления
- Часть 2: Как восстановить папку потерянных документов без использования программного обеспечения
- Часть 3. Как использовать профессиональное программное обеспечение для восстановления данных для восстановления папки потерянных документов
Часть 1: Как быстро восстановить утерянные документы до их полного удаления
Способ 1: функция вывода
В Windows 10 обновлена новая функция отмены, которая позволяет отменить команду удаления после удаления файла и напрямую восстановить документ в соответствующую область хранения. Но этот метод можно использовать только до выключения компьютера, и после выключения компьютера выполнить эту операцию не получится.
Шаг 1: Откройте проводник, шаг за шагом найдите папку, из которой файл был удален, и вы увидите папку, из которой файл был удален. На этом этапе щелкните правой кнопкой мыши в любом месте папки, чтобы открыть контекстное меню.
Шаг 2: Нажмите Отменить удаление в появившемся контекстном меню, и вы сможете быстро восстановить удаленные документы в программе. В то же время вы также можете использовать комбинацию клавиш Ctrl+Z, чтобы отменить команду удаления сразу после удаления.
Способ 2: корзина
Если ваш компьютер выключен или из вашей учетной записи выполнен выход, вы можете выбрать Корзина действовать. Восстановление документов в корзине происходит относительно быстро. Пока вы не очистили корзину, вы можете быстро войти в корзину, найти в ней потерянную папку, просмотреть и восстановить ее.
Шаг 1: значок «Корзина» в Windows находится на рабочем столе, щелкните его, и появится соответствующее диалоговое окно. Найдите документ, который хотите восстановить, прямо в нем или воспользуйтесь фильтром для быстрой фильтрации результатов.
Шаг 2: Когда появится результат, вы можете выбрать его, щелкнуть правой кнопкой мыши, чтобы открыть контекстное меню, и нажать кнопку Восстановить кнопка. В это время удаленную папку можно напрямую восстановить по исходному адресу хранения.

Способ 3: восстановление файлов Windows
Для документов, которые были удалены в течение длительного времени и не могут быть восстановлены с помощью корзины, в Microsoft Store также имеется программное обеспечение. Восстановление файлов Windows от Microsoft — официальный инструмент для восстановления документов с жестких дисков, SD-карт, USB-накопителей и других носителей информации. Вот конкретные шаги.
Шаг 1: Ищи Восстановление файлов Windows в Microsoft Store и нажмите кнопку Получите кнопку для установки программного обеспечения. в Начните В строке меню вы можете напрямую выполнить поиск по восстановлению файлов и щелкнуть значок Откройте Нажмите кнопку в результатах поиска, и вы попадете в диалоговое окно с приглашением командной строки.

Шаг 2: Введите следующую командную строку: исходный-диск winfr: целевой-диск: /switches, исходный-диск — это место, где файл хранится перед удалением, целевой-диск — это адрес, по которому хранится восстановленный документ, а переключатели — это файл, который необходимо восстановить.

Шаг 3: При успешном запуске командной строки папка потерянных документов будет восстановлена в соответствующее место. При запуске следует отметить, что исходный и целевой диски должны быть разными, иначе командную строку невозможно запустить.
Win Скачать Mac Скачать
Часть 2: Как восстановить папку потерянных документов без использования программного обеспечения
В Windows 10 есть способ восстановить удаленные документы без использования какого-либо программного обеспечения, но предпосылка этого использования заключается в том, что вы включили функцию резервного копирования файлов. История файлов — это программа автоматического резервного копирования файлов. Когда вы включаете функцию резервного копирования, она автоматически сохраняет файлы и соответствующие копии через определенные промежутки времени.
Шаг 1: введите папку на своем компьютере, в которую необходимо восстановить файл, и перейдите на страницу сведений. В это время файл уже находится в состоянии удаления. Нажмите кнопку История Кнопка на Главная вкладка для вызова истории сохранения файлов.

Шаг 2: В нем видно много удаленных файлов. Выберите документы, которые хотите восстановить, нажмите кнопку Восстановить кнопку, и документы можно восстановить.

Win Скачать Mac Скачать
Часть 3. Как использовать профессиональное программное обеспечение для восстановления данных для восстановления папки потерянных документов
Если вышеуказанные методы не могут помочь вам восстановить документы, вам необходимо использовать профессиональное программное обеспечение для восстановления данных. Как профессиональное программное обеспечение для восстановления данных, Aiseesoft Data Recovery может решить проблему потери файлов в различных ситуациях, таких как безвозвратное удаление, очистка корзины, повреждение диска и форматирование системы. Эти ситуации нельзя решить через корзину.
1. Восстановление различных типов файлов, включая мультимедийные файлы, такие как аудио и видео, и файлы документов, такие как docx и xls.
2. Функция фильтра позволяет быстро искать файлы, экономя время поиска.
3. Предварительно просмотрите данные, чтобы просмотреть соответствующую информацию перед восстановлением файлов.
4. Глубоко сканируйте данные, чтобы получить восстанавливаемые документы и обеспечить безопасность восстановления данных.
Win Скачать Mac Скачать
Шаг 1: Установите и запустите программное обеспечение на своем компьютере. После входа в программное обеспечение вы можете напрямую увидеть функциональную область на основе разделов компьютера и типов файлов, с которой очень легко работать. Выберите тип файла, который будет обнаружен как Документы, что может ускорить обнаружение файлов.

Шаг 2: Перед запуском можно настроить сканирование раздела компьютера, где хранятся файлы. После завершения выбора нажмите кнопку Сканировать кнопку, и программа запустится Быстрое сканирование для обнаружения папки потерянных документов. Когда появится результат обнаружения и нет папки с документами, которую вы хотите восстановить, нажмите кнопку Глубокий анализ Кнопка, чтобы начать глубокое обнаружение.

Шаг 3: После глубокого сканирования в появившихся результатах вы можете выбрать файл, который хотите восстановить. После завершения выбора в правом нижнем углу появится размер файла и информация об элементе. Убедившись в правильности, нажмите кнопку Recover Кнопка, чтобы восстановить папку потерянного документа и снова сохранить ее на своем компьютере.

Win Скачать Mac Скачать
Заключение
Выше приведено все содержание этой статьи. Когда документы в Windows удаляются, будь то конкретная функция Windows или использование профессионального программного обеспечения для восстановления данных для восстановления документов, это очень хороший выбор. Но с точки зрения успешности и удобства восстановления Aiseesoft Data Recovery — очень хороший выбор.
Not to be confused with a written document, the My Documents or Documents folder is a special system folder to store personal documents in the Microsoft Windows folder. You can find the missing documents folder in Windows 11 in this path:
C:\Users\UserName\Documents. And some other system folders also can be found here, like Downloads, Music, Pictures, and Favorites.
However, the Documents folder and files inside will be missing because of accidental deletion, location shift issues, hard drive formatting, system issues, or any other matter. If you experience a Windows 11 Documents folder missing problem, use the recommended 5 methods below to restore the missing Documents folder and its files.
| Workable Solutions | Step-by-step Troubleshooting |
|---|---|
| Fix 1. Restore Folder via Data Recovery Software | When the Documents folder is missing in Windows 11, you need quick data recovery…Full steps |
| Fix 2. Recreate the Document Library Folder | Restoring the Document library is another option. It just takes a few easy steps…Full steps |
| Fix 3. Recreate My Documents with CMD | If there is no file in the Documents folder, you can recreate a new folder…Full steps |
| Fix 4. Recover the Folder from Previous Versions | Your files from the restore point and File History are copies of the earlier versions…Full steps |
| Fix 5. Create Documents Folder via Registry | Your Windows OS may probably be harmed if there is a problem when modifying the Registry…Full steps |
Fix 1. Restore Document Folder via Data Recovery Software
Whatever the reason causes the Documents folder missing in Windows 11, you need to perform quick data recovery as long as you want your data back. EaseUS Data Recovery Wizard Pro offers easy and reliable solutions to restore the Documents folder and all the files within three steps. And except for data recovery from HDD/SSD, EaseUS Data Recovery Wizard Pro also allows you to recover deleted files from a USB flash drive, external hard drive, pen drive, SD card, micro card, music player, etc.
Follow the details below to return the missing Documents folder in Windows 11.
Step 1. Run EaseUS Data Recovery Wizard. Choose «Select Folder» under Specify a location. Browse for the location where you lost the folder and click «OK» to scan.
Step 2. You can search for the target folder or use the Filter feature to find a certain type of files in the folder.
Step 3. You can preview the recovered folder. Then, click «Recover» and choose a new & secure location on your PC or cloud storage to keep the recovered data.
After restoring, the Documents folder will continue to work normally. If you encounter a folder not showing files in Windows 10 in daily use, here are the useful troubleshooting methods.
📺There is a video for the details on how to open the documents folder in Windows 11:
- 00:37 — Open the Documents Folder from File Explorer
- 00:57 — Expand Home Folder
- 01:20 — Find the Documents folder in the drive where Windows 11 operating system is installed
- 01:44 — Open the Documents Folder from Search Window
- 01:56 — Open the Documents Folder from the Run Command
- 02:20 — Open the Documents Folder from the Start Menu
If you find this information helpful, please share it with others on social media to assist them in overcoming this common challenge.
Fix 2. Recover the Document Library to Get the Folder Back
Restoring the Document library is another option. It just takes a few easy steps. What you should do is as follows:
Step 1. Locate the Libraries option in the left-hand quick access pane of your PC’s file explorer window. If not, you can see it by following the screenshot.
Step 2. Choose «Restore default libraries» from the menu that appears when you right-click on the Libraries option.
Step 3. Windows should immediately restore your My Documents folder missing in Windows 11 and other libraries, including those for music, videos, and pictures.
Restarting is unnecessary while using this option, but you should only use it to prevent data loss if your other libraries are empty.
Fix 3. Recreate My Documents Folder with CMD
If there is no file in the Documents folder or you don’t want to restore the missing files, you can recreate a new folder rather than use a data recovery tool to regain the folder. See how to do it with the steps below.
Step 1. Recreate a new Documents folder in File Explorer.
Step 2. Reset the Registry User Folder Settings.
- Go Start and search for regedt32. Click to run «Registry Editor Utility».
- Go through this path: HKEY_CURRENT_USER\Software\Microsoft\Windows\CurrentVersion\Explorer\User Shell Folders
- Check the name and data of the Documents folder, which should be Personal, %USERPROFILE%\Documents. Make sure they are correct. If not, you can manually change the name and data value.
Step 3. Fix or Recreate the Documents folder.
- Click «Start», and type cmd, right-click the Command Prompt, and choose «Run as administrator».
- Type attrib +r -s -h %USERPROFILE%\Documents /S /D and press Enter.
After these operations, restart your Windows 11 computer, then the Documents folder will go back to the desktop immediately.
CMD File Recovery — Recover Deleted Files Using Command Prompt
This article will show you how to recover deleted files from USB using CMD to recover deleted files with a few clicks. Read more >>
Fix 4. Recover My Documents Folder from Previous Versions
Your files from the restore point and File History are copies of the earlier versions. If you enable it, try this method to recover deleted files from Windows 11’s My Documents folder.
Step 1. Press the «Win + E» keys to launch Windows File Explorer, then find the folder that holds the files you want to recover.
Step 2. Select the folder by using a right-click and then selecting «Properties».
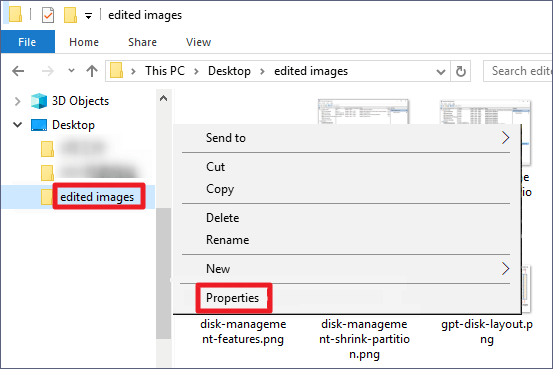
Step 3. Select the «Previous Versions» option in the Properties box. After choosing the preferred version of the folder from all those that are accessible, press the «Restore» button.
Fix 5. Create Documents Folder via Registry
The missing My Documents folder can also be recovered by making a new, blank folder and utilizing the Registry to update the path address. Nevertheless, your Windows OS may probably be harmed if there is a problem when modifying the Registry. So let’s see how it operates.
Step 1. To create a new Documents folder, navigate to the standard storage location C:\Users\UserName.
Step 2. To open your Registry, press «Win + R» and type regedit in the Run box.
Step 3. Open the Shell Folders directly from:
Computer\HKEY-CURRENT-USER\SOFTWARE\Microsoft\Windows\CurrentVersion\Explorer.
Step 4. After launching Value Name-Personal, fill in the Value data box with the relevant saved path of the newly formed Documents folder. Next, press the «OK» button.
Conclusion
Here is a list of five efficient ways to recover deleted documents from a Windows 11 computer. All methods can recover your deleted data, even though each has pros and cons. We advise utilizing a useful and simple-to-use program, such as EaseUS Data Recovery Wizard Pro, for the best chance of success.
If you still have some questions about why has my documents folder disappeared, check the quick answers below to help yourself out:
1. How do I restore My Documents folder in Windows 11?
- Fix 1. Recover the Document Library
- Fix 2. Recreate My Documents with CMD
- Fix 3. Recover from Previous Versions
- Fix 4. Create Documents Folder via Registry
2. Where is the documents folder hidden in Windows 11?
You can find the Documents folder in this path: C:\Users\UserName\Documents.
3. Where are all of your documents saved?
Using the taskbar or a right-click on the Start menu, open File Explorer. From the left pane, choose a location to search or explore. For instance, choose This PC to search through your computer’s disks and devices or Documents to search through just the items kept there.
4. How do you add a folder to your «my documents» file?
- Navigate to the Documents app.
- Press the Plus icon.
- Choose «New Folder.»
- After typing the folder’s name, select Done.
The desired documents can now be dropped into the newly created folder.