
Способ 1: Переход на Pro-редакцию Windows 11
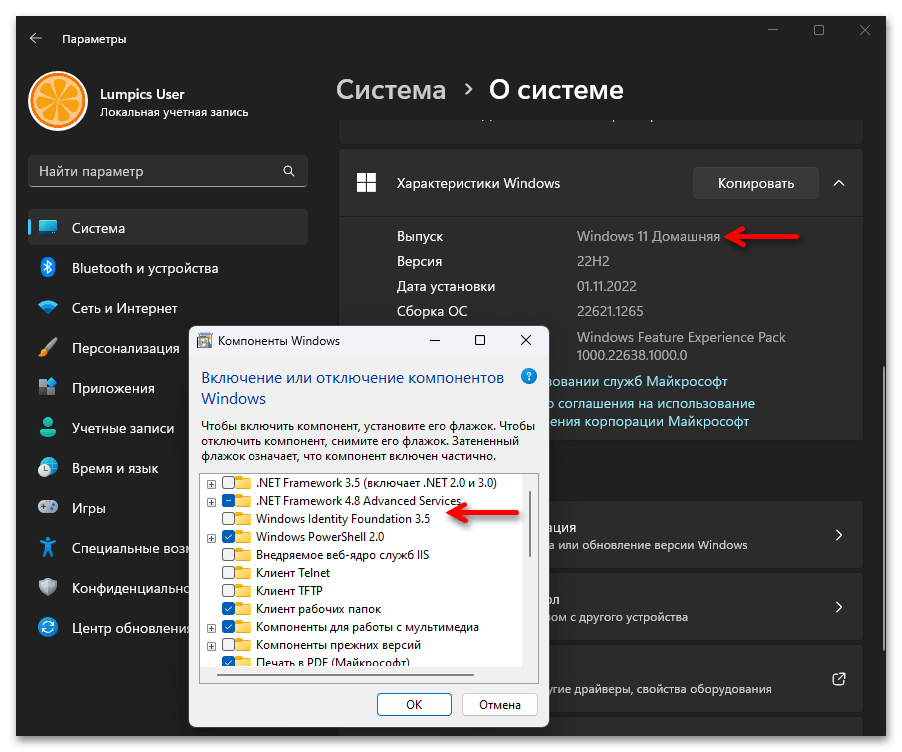
В 99% случаев отсутствие Hyper-V среди доступных к активации необязательных компонентов Windows 11 вызвано не какой-либо неисправностью операционной системы, а её определённым Microsoft комплектом поставки. Из трёх основных редакций Windows 11 – «Профессиональная», «Корпоративная» и «Домашняя» — гипервизор по умолчанию доступен только в первых двух,
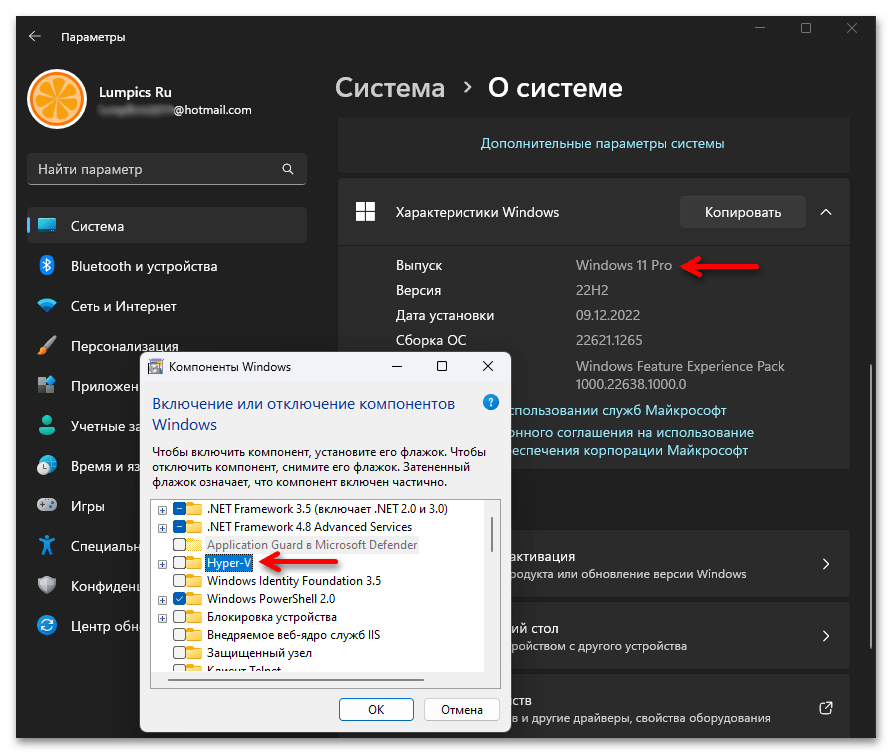
а пользователи третьей эксплуатировать его возможности не имеют.
Читайте также: Просмотр сведений о версии и сборке Windows 11
Таким образом, единственным официальным и, если можно так выразиться, верным способом получения доступа к изначально не включённому разработчиком в Windows 11 Home компоненту Hyper-V и его возможностям является переход на содержащий нужную функциональность выпуск ОС, то есть её обновление до редакции «Pro».
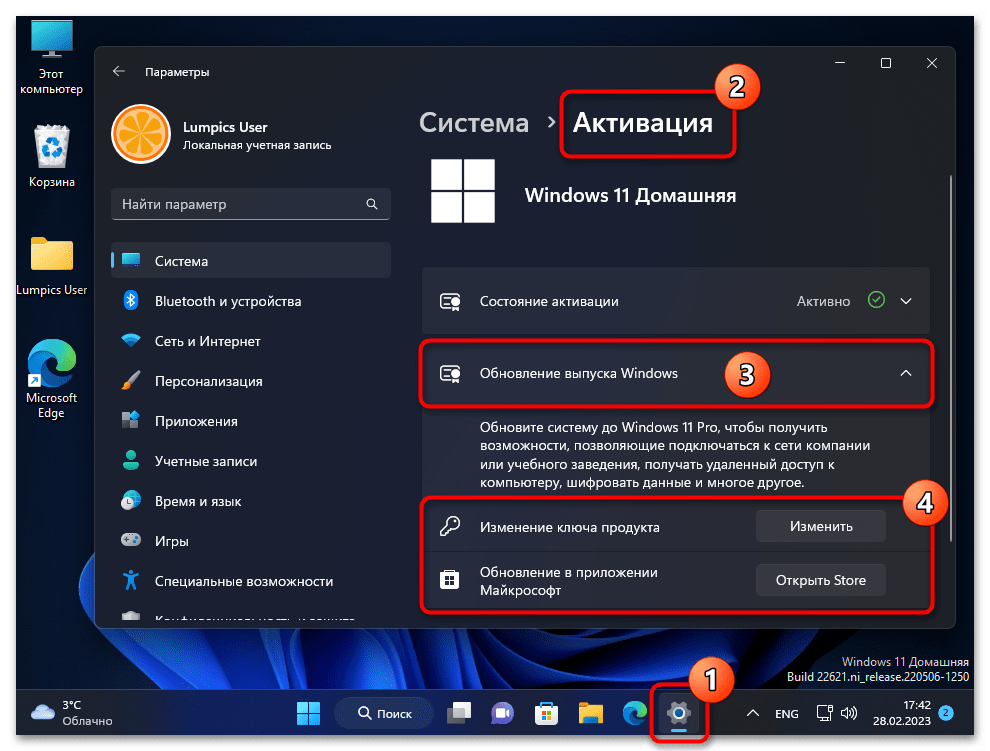
Это, несмотря на возможно кажущуюся сложность, — практически полностью автоматизированная и вполне доступная для проведения пользователем операционки от Microsoft с любым уровнем подготовки процедура, кроме прочего, не предполагающая потери каких-либо файлов или данных. Подробные инструкции по решению указанной задачи представлены в отдельном материале нашего сайта:
Подробнее: Обновление Windows 11 «Home» до редакции «Pro»
После перехода на Windows 11 «Профессиональная» Hyper-V (а также, к слову, «Песочница» и «Редактор локальной групповой политики») станет доступным в перечне необязательных компонентов ОС и практически готовым к эксплуатации, останется включить гипервизор с помощью элемента «Панели управления» «Компоненты Windows» или иным способом и приступить к его использованию в собственных целях.
Подробнее: Активация и запуск Hyper-V в Windows, установка и настройка виртуальной машины
Способ 2: DISM
В ситуациях, когда переход на редакцию Win 11 «Профессиональная» с «Домашней» по каким-либо причинам неосуществим, а доступ к возможностям гипервизора Hyper-V получить необходимо, придётся задействовать достаточно давно известную хитрость — включить компонент в состав операционной системы при помощи встроенной в неё, предназначенной для обслуживания образов развёртывания Windows и управления ими программы командной строки DISM. С поставленной целью потребуется создать и запустить специализированный исполняемый файл (скрипт), что несложно выполнить по следующей инструкции.
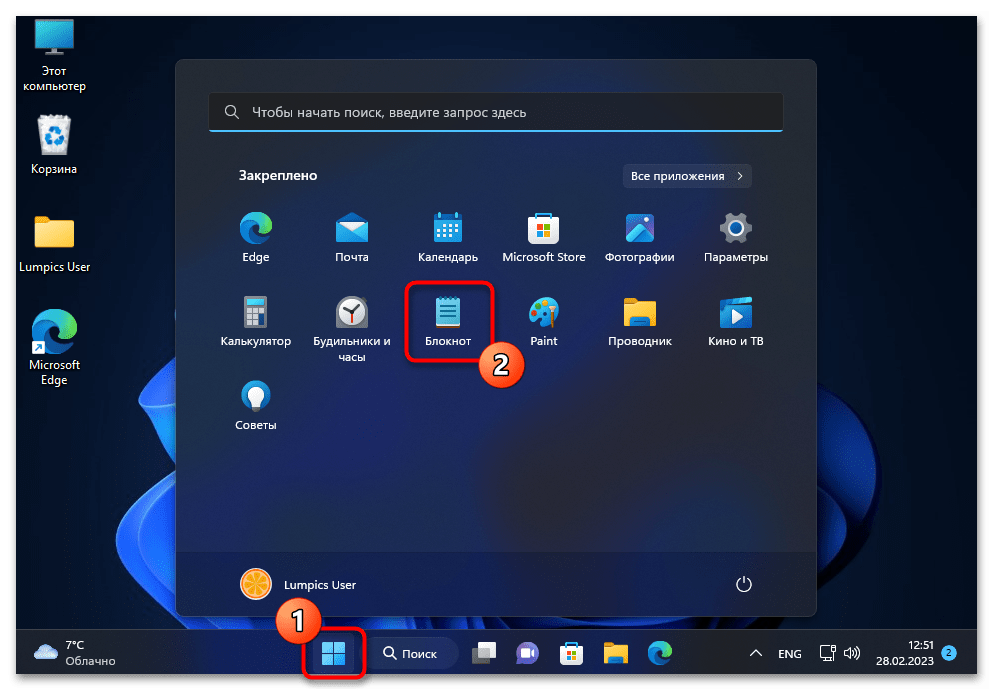
- Отыскав в Главном меню Windows 11 и нажав на наименование, открываем стандартное и простейшее приложение для работы с текстовыми файлами — «Блокнот».

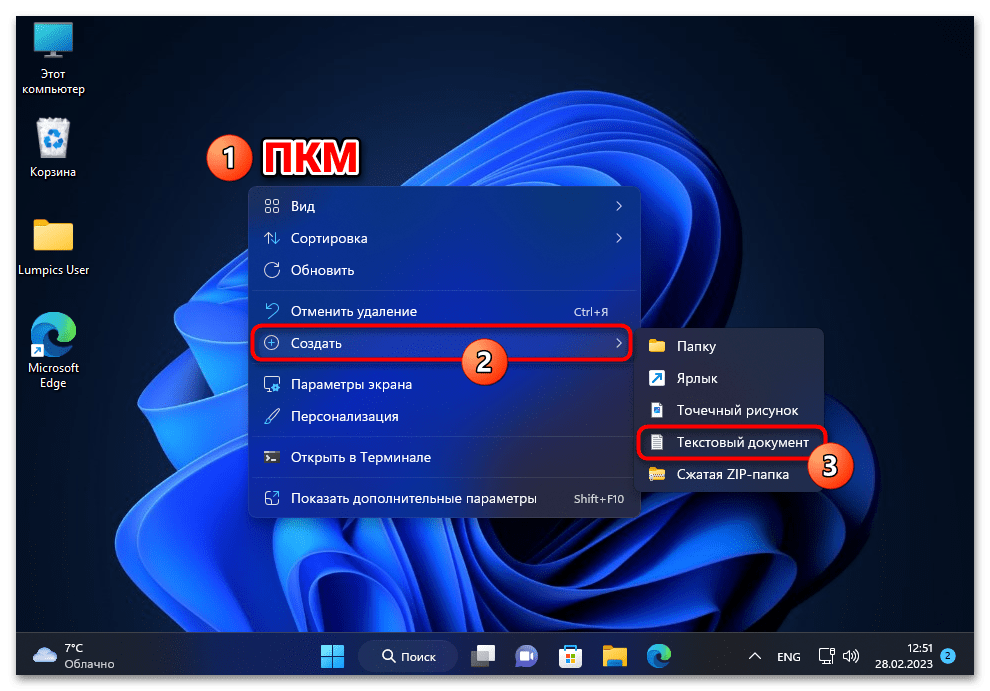
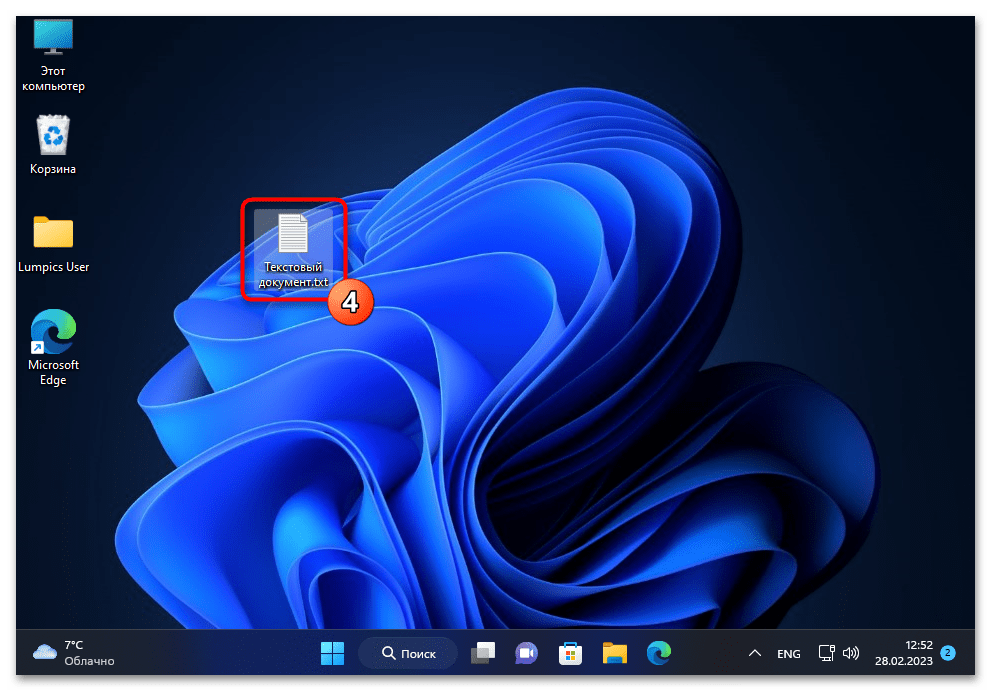
Другой вариант получения «основы» для создаваемого далее скрипта: кликаем в любой открытой через «Проводник» папке либо на Рабочем столе Win 11 правой кнопкой мыши, выбираем «Создать» — «Текстовый документ» в отобразившемся меню,

после чего открываем получившийся файл.
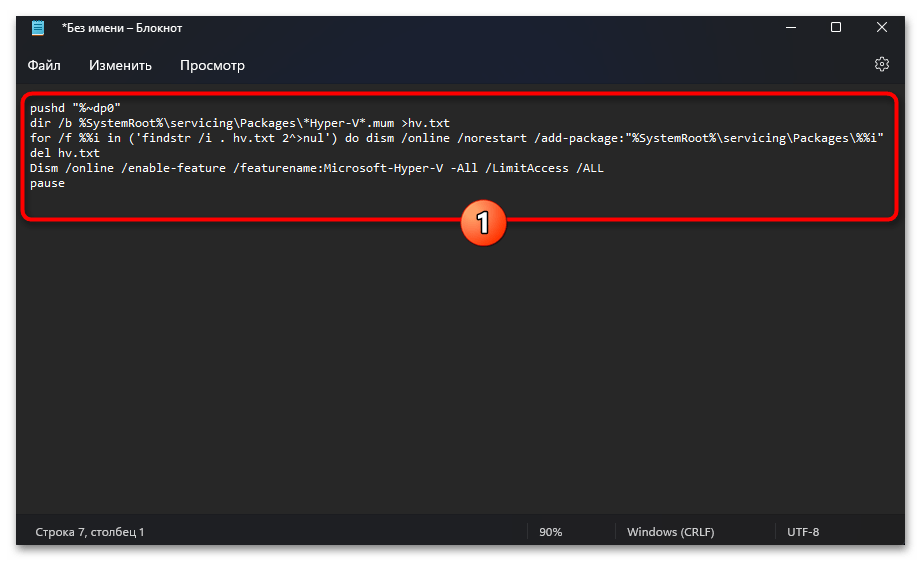
- Копируем из текста этой статьи в буфер обмена операционной системы следующий код:
pushd "%~dp0"
dir /b %SystemRoot%\servicing\Packages\*Hyper-V*.mum >hv.txt
for /f %%i in ('findstr /i . hv.txt 2^>nul') do dism /online /norestart /add-package:"%SystemRoot%\servicing\Packages\%%i"
del hv.txt
Dism /online /enable-feature /featurename:Microsoft-Hyper-V -All /LimitAccess /ALL
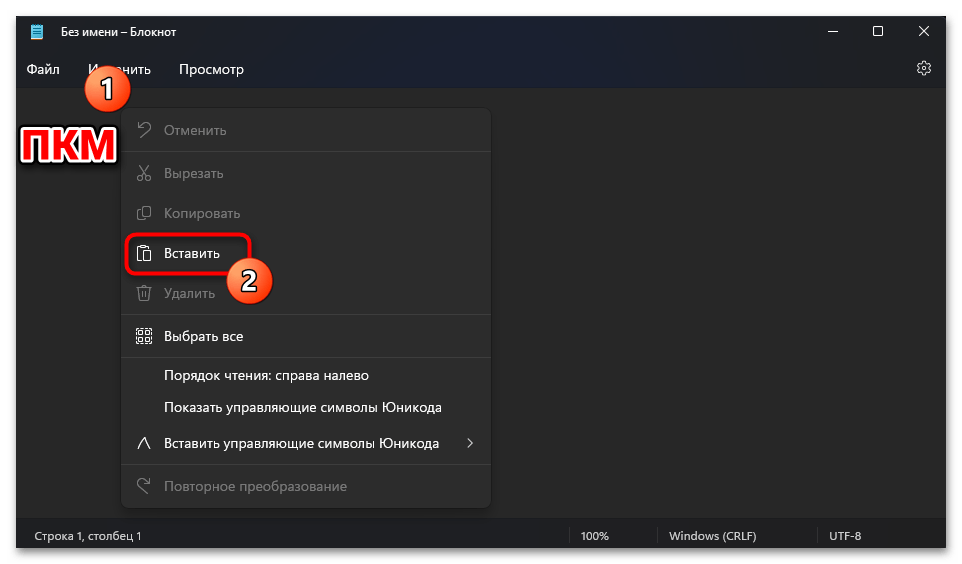
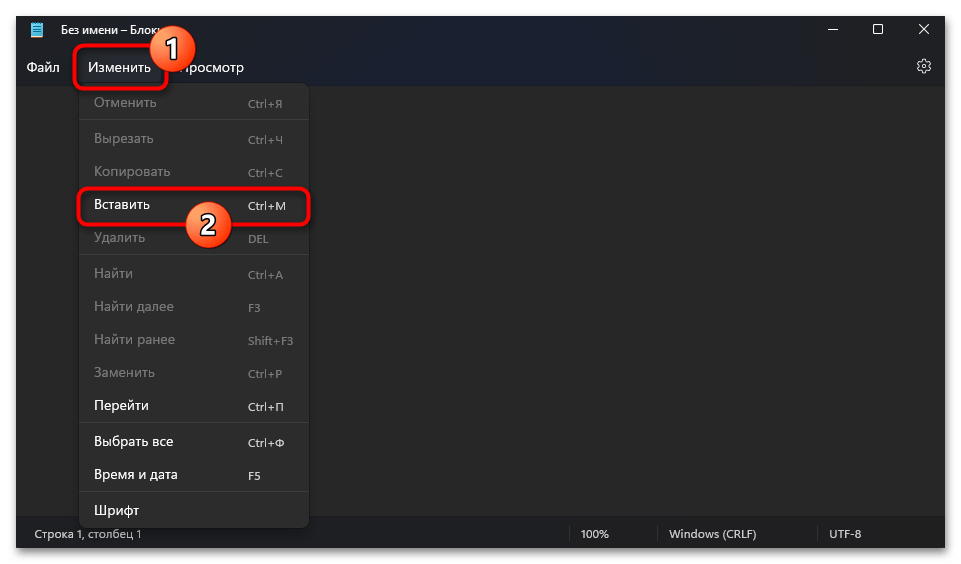
pause - Перемещаемся в «Блокнот», кликаем правой кнопкой мыши в основной рабочей области окна приложения, выбираем «Вставить» в отобразившемся меню

(или открываем в приложении меню «Изменить», и в нём кликаем по пункту «Вставить»).
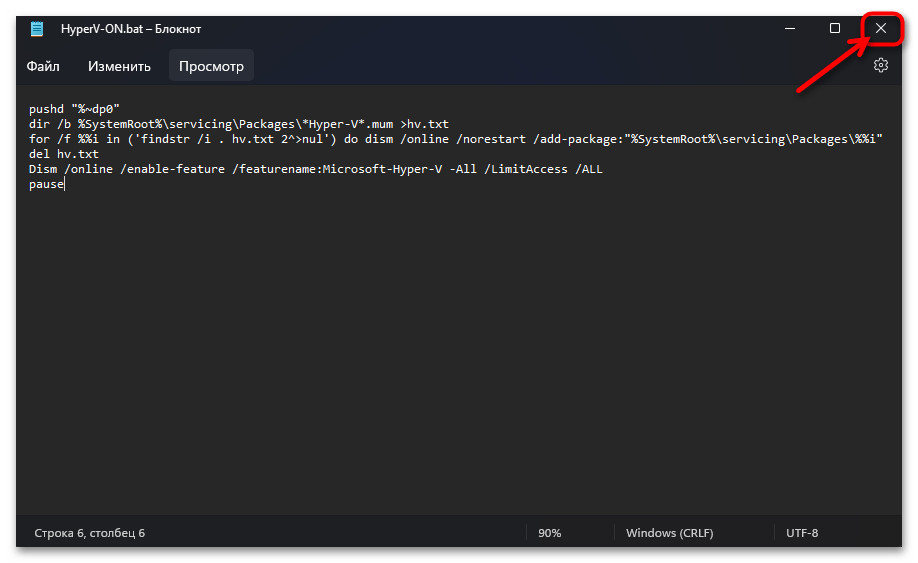
- Убедившись, что в «Блокноте» получена соответствующая следующему скриншоту картина,

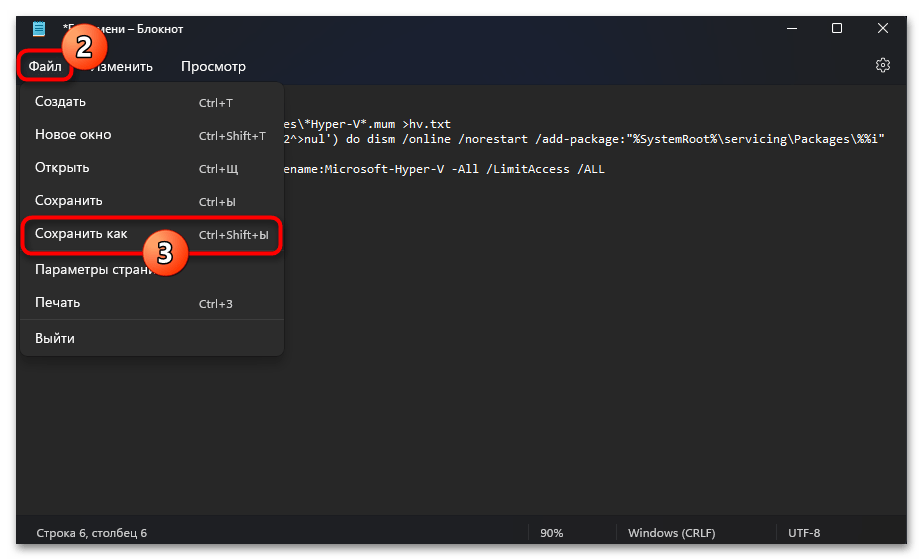
вызываем его меню «Файл», в нём выбираем пункт «Сохранить как».
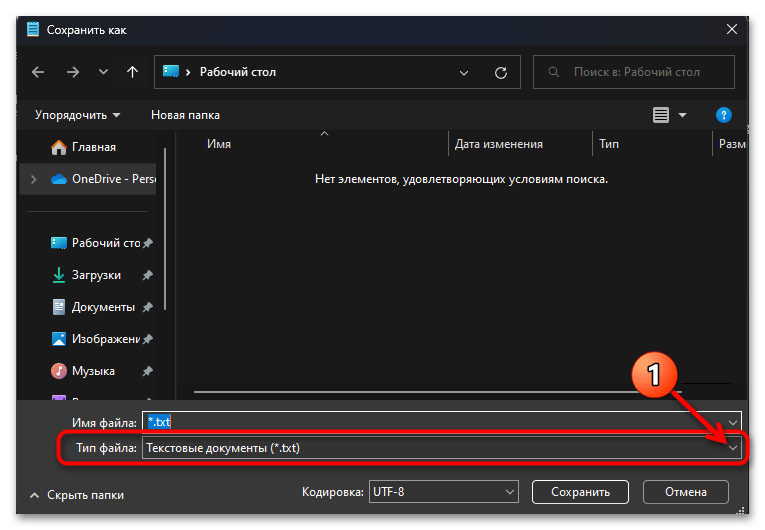
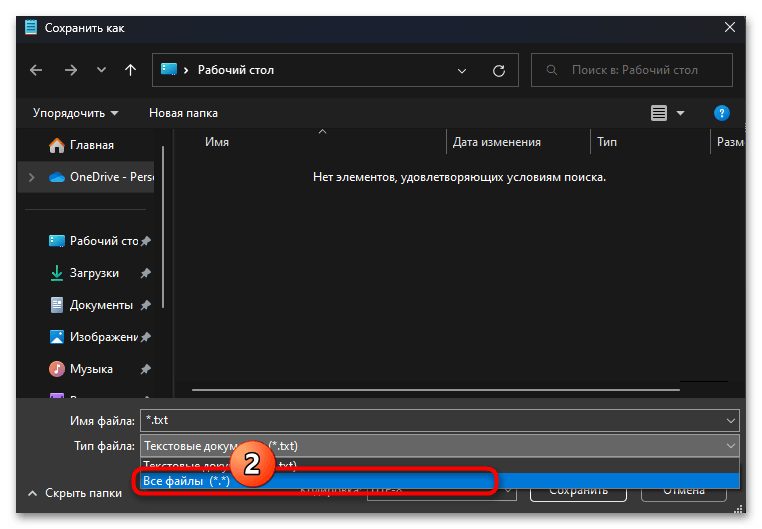
- Через окно «Сохранить как» перемещаемся в каталог, где будет храниться создаваемый исполняемый файл и откуда его будет удобно запустить (в примере – «Рабочий стол»), после чего щёлкаем по расположенному внизу раскрывающемуся списку «Тип файла» и

выбираем в нём «Все файлы *.*».
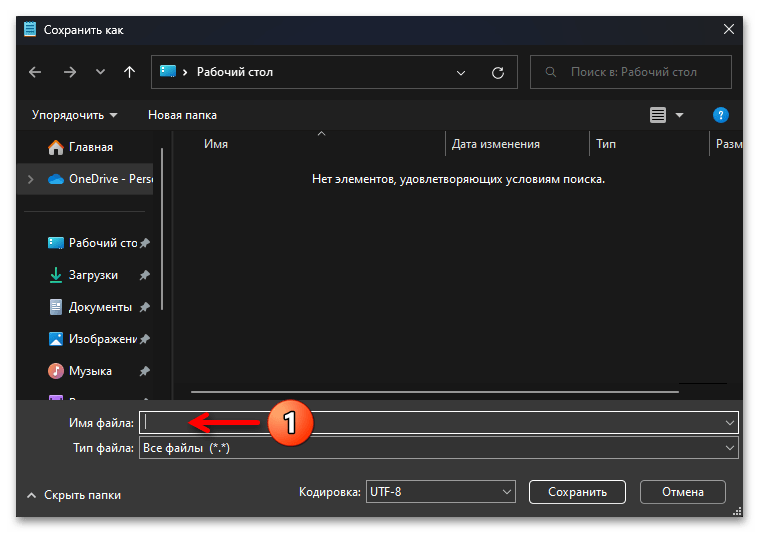
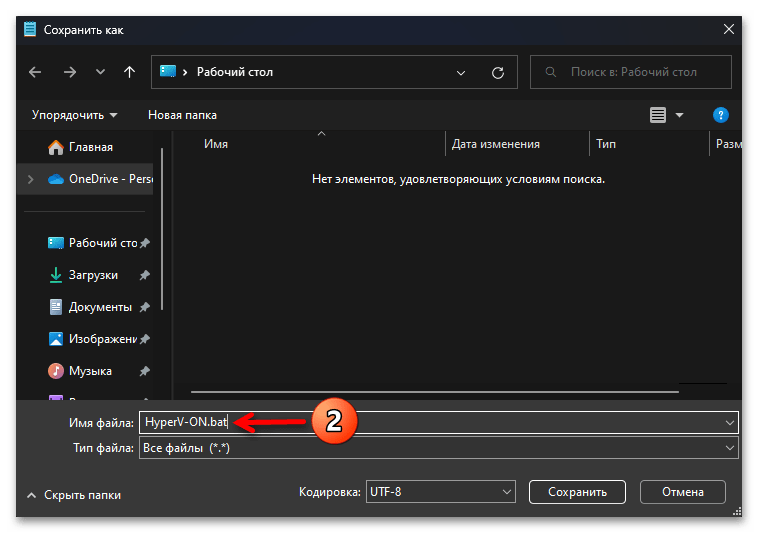
- Далее вводим название будущего скрипта (может быть любым) в поле «Имя файла»,

а самое главное — ставим точку и пишем расширение файла – bat.
- Нажимаем на кнопку «Сохранить» и затем закрываем Блокнот.
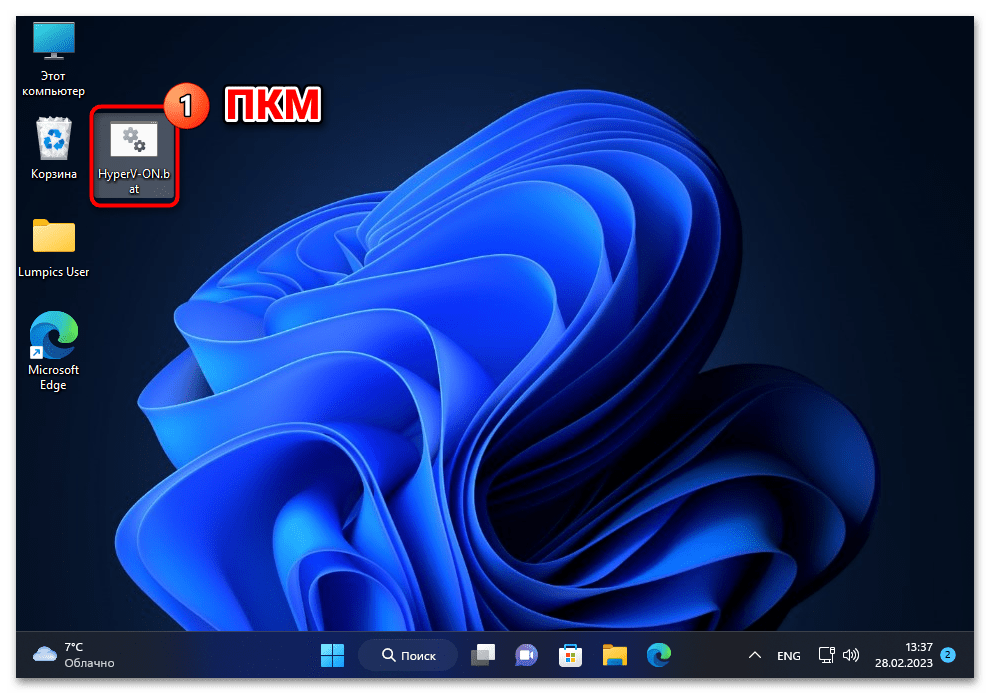
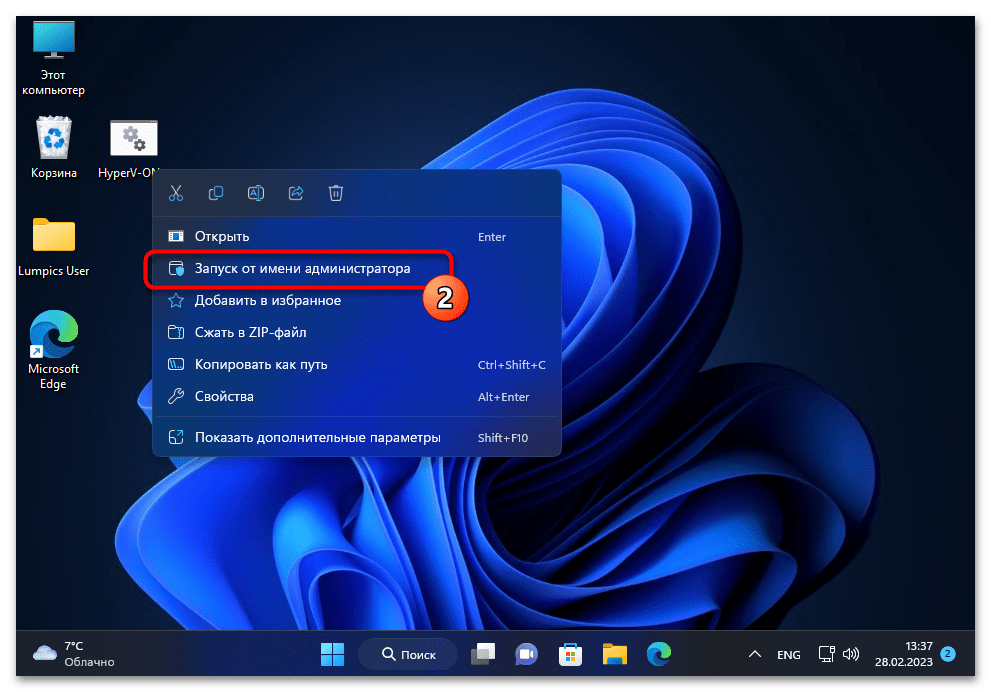
- Перемещаемся в папку, куда был сохранён сформированный в результате выполнения предыдущих пунктов этой инструкции батник, щёлкаем по его значку правой кнопкой манипулятора,

после чего выбираем «Запуск от имени администратора» в контекстном меню.

Читайте также:
Включение отображения расширений файлов в Windows 11
Запуск исполняемых файлов от имени Администратора в Windows 11 - Кликнув «Да» в появившемся окне «Контроля учётных записей», разрешаем «Обработчику команд Windows» вносить изменения на устройстве.
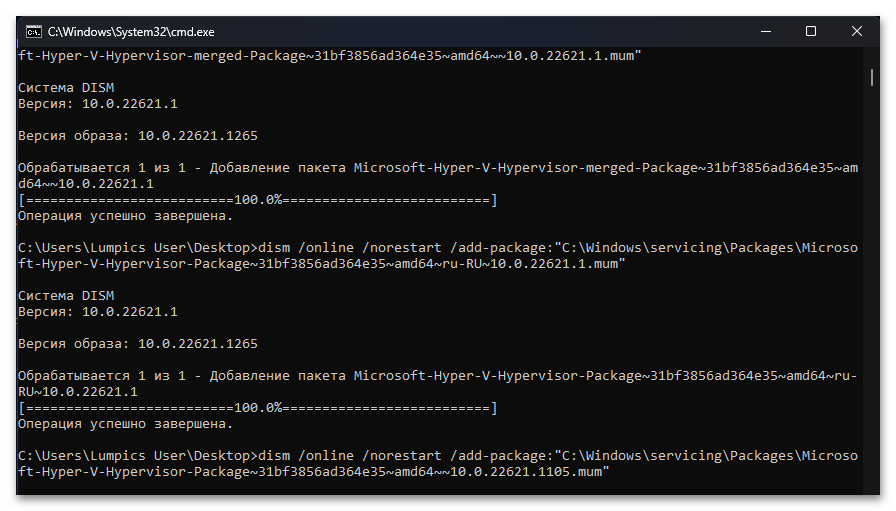
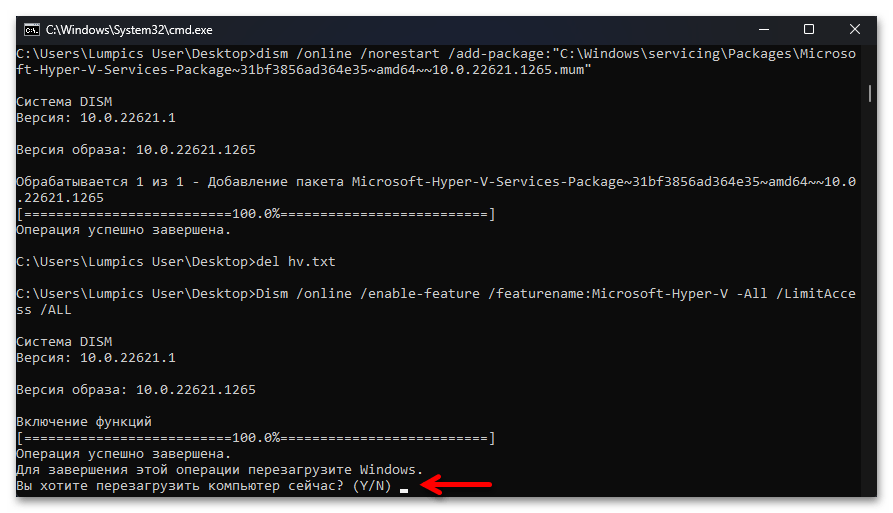
- В результате откроется окно «Командной строки» Windows и начнётся полностью автоматизированное выполнение предусмотренных созданным нами скриптом процедур. Ничего не предпринимая, ожидаем завершения всех инициированных манипуляций.
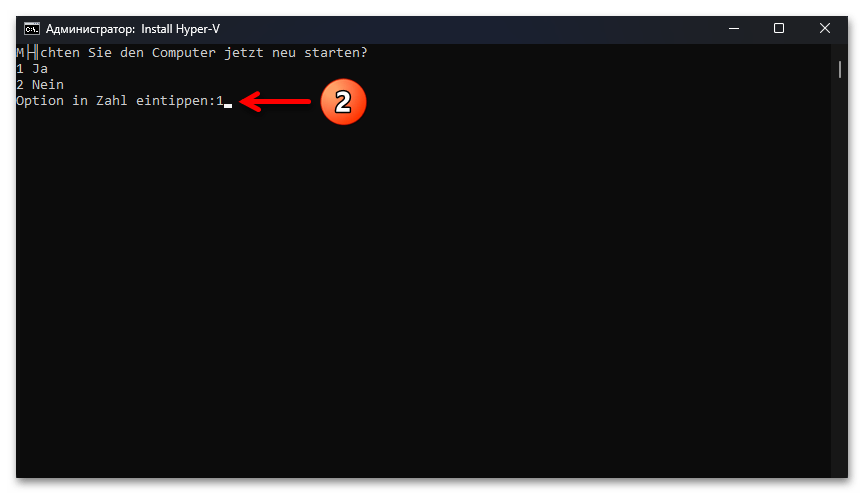
- После того как в консоли отобразится оповещение «Операция успешно завершена» и появится запрос на перезагрузку компьютера, c клавиатуры вводим в командную строку
y, нажимаем «Enter». - Далее ПК перезапустится и

начнётся непосредственная интеграция Hyper-V в Windows 11, —

вновь ожидаем.
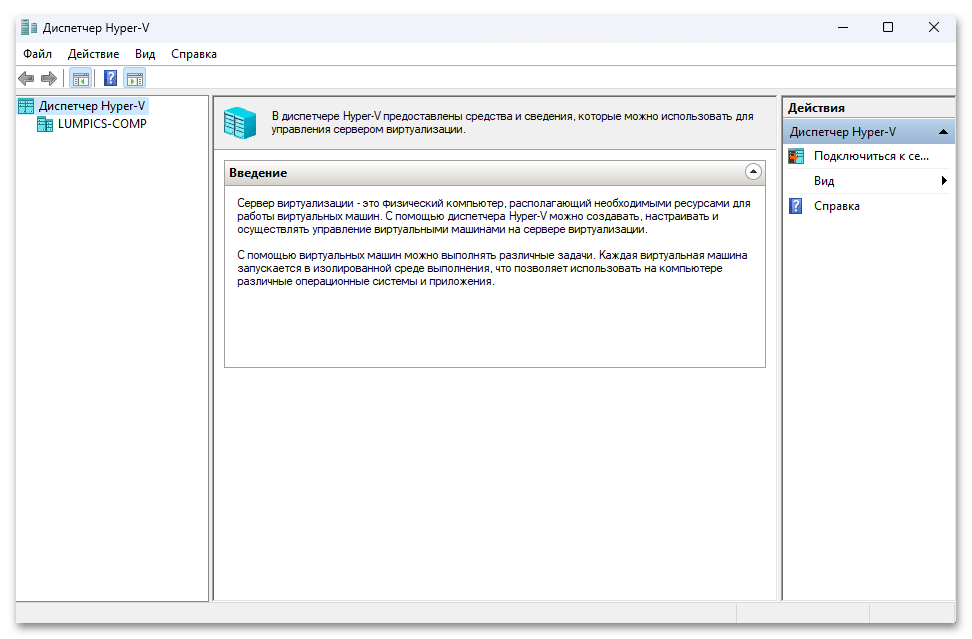
- По завершении перезагрузки нашу задачу следует считать решённой — гипервизор не только окажется доступным в «Компонентах Windows», но также активированным в операционке.

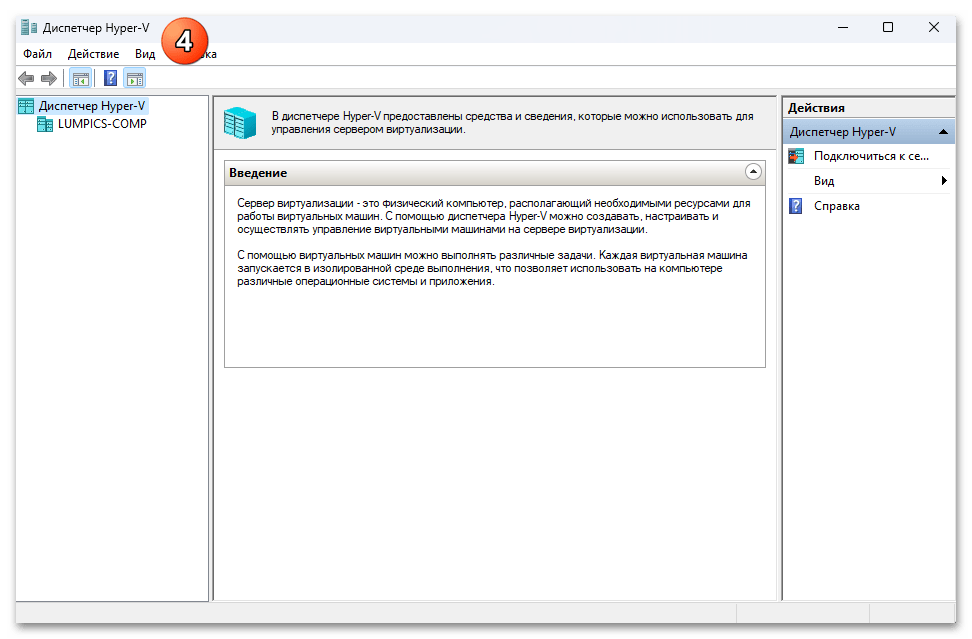
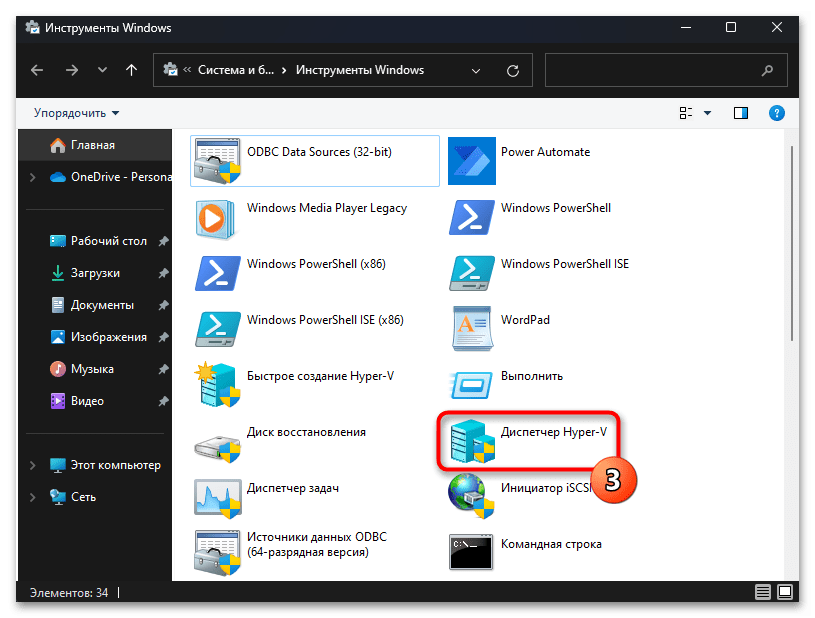
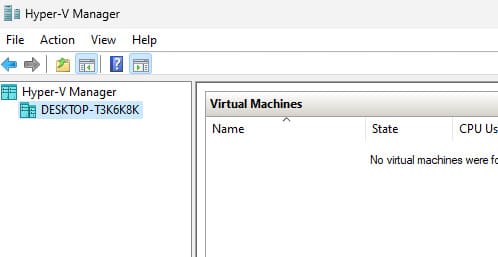
То есть можно сразу, без дополнительных манипуляций переходить к запуску «Диспетчера Hyper-V»
и его эксплуатации.


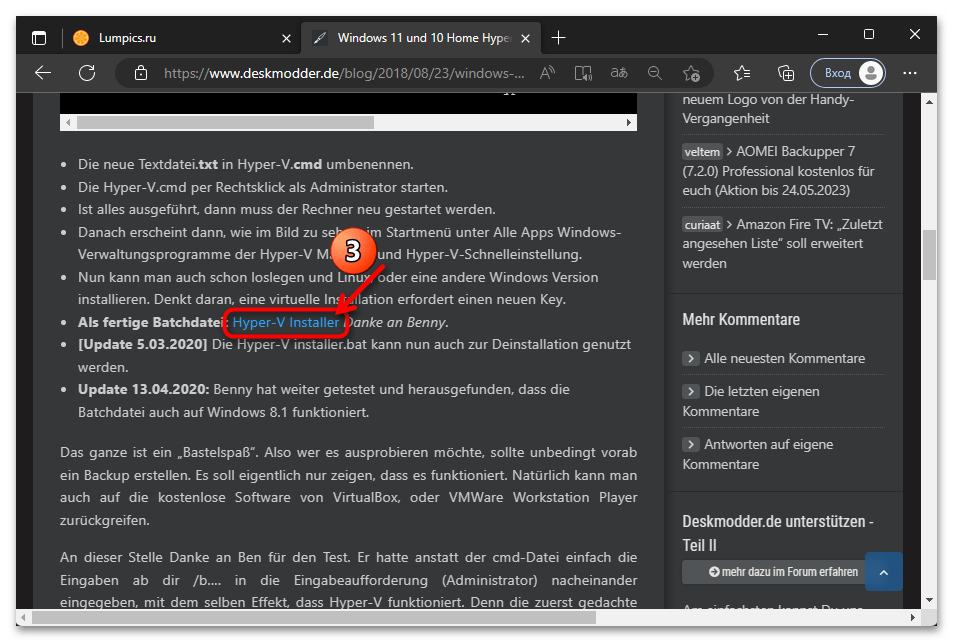
Способ 3: Hyper-V Installer
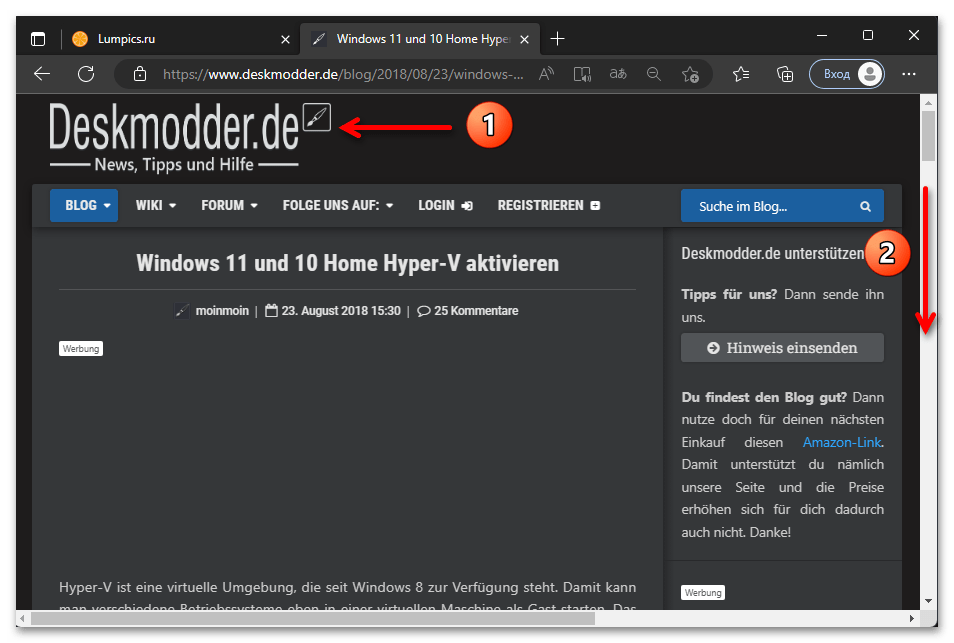
Если желания осваивать принципы создания BAT-файлов и формировать самостоятельно исполняемый файл-установщик Hyper-V для Windows 11 Home нет, можно воспользоваться готовым скриптом, которые в массе созданы и выложены в свободный доступ энтузиастами. Пожалуй, самое известное и, главное, многократно проверенное из таких решений, получило от своего автора название Hyper-V Installer, — именно его получение и применение описывает следующая инструкция.
Скачать Hyper-V Installer
- Перейдя по предложенной выше ссылке, открываем веб-ресурс создателя готового и решающего нашу задачу скрипта Hyper-V Installer. К слову, сайт, а также получаемый с него софт на немецком языке, но разобраться здесь несложно. Прокручиваем отобразившуюся страницу,

находим в представленном здесь тексте ссылку «Hyper-V Installer», нажимаем на неё.
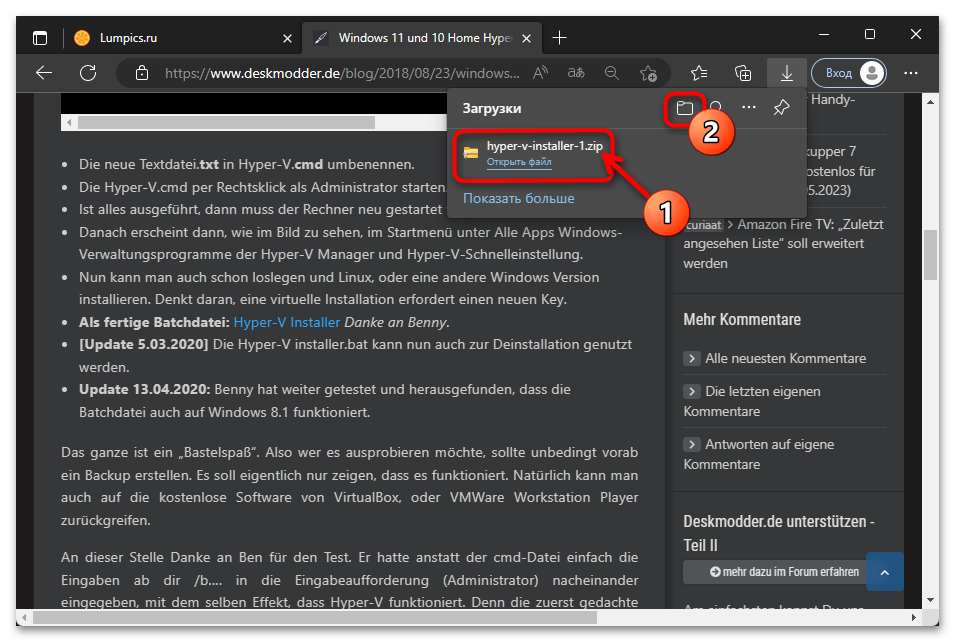
- Скачиваем предоставляемый сайтом deskmodder.de файл hyper-v-installer-1.zip в любую папку на диске компьютера, затем открываем последнюю в «Проводнике» Win 11.
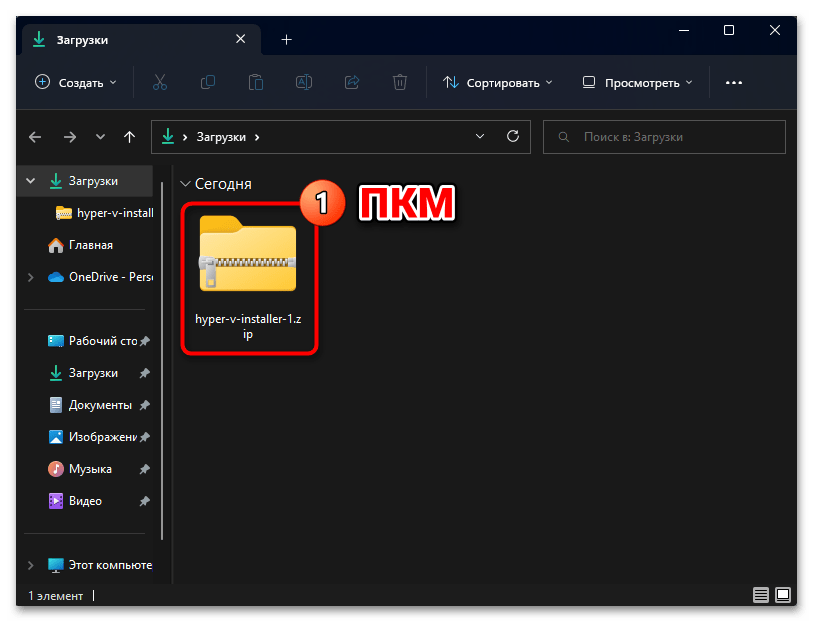
- Распаковываем содержащий требуемый нам скрипт ZIP-архив (клик ПКМ по имени или значку файла –

выбор «Извлечь всё…» в отобразившемся меню).
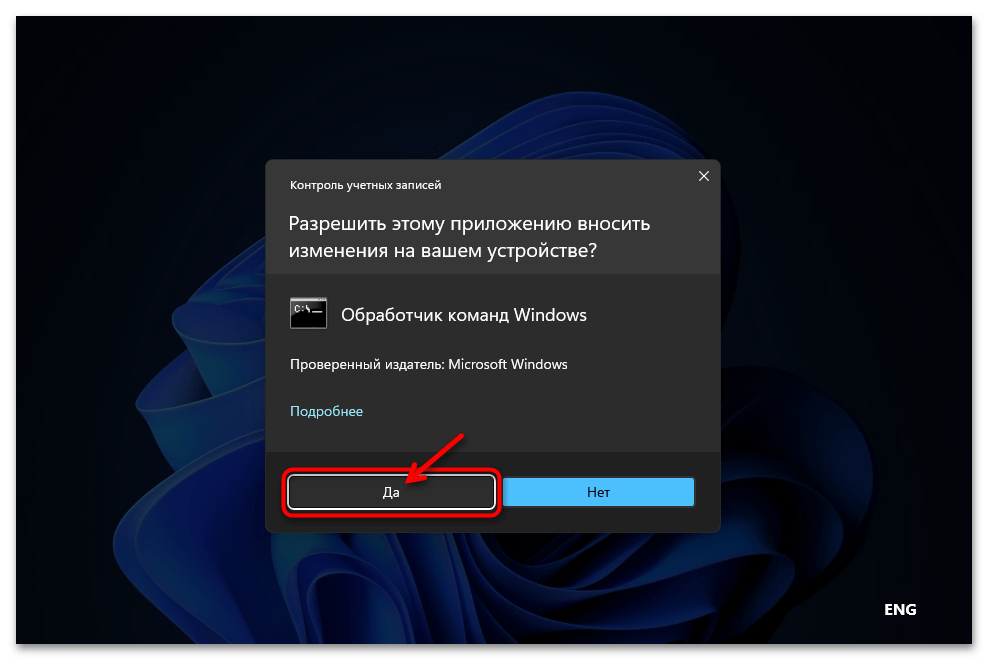
- Перемещаемся в получившийся по результату извлечения данных из архива каталог, двойным кликом запускаем исполняемый файл Hyper-V Installer.bat.
- Немного ожидаем, после чего нажатием на кнопку «Да» подтверждаем появившийся запрос системного модуля «Контроль учётных записей».
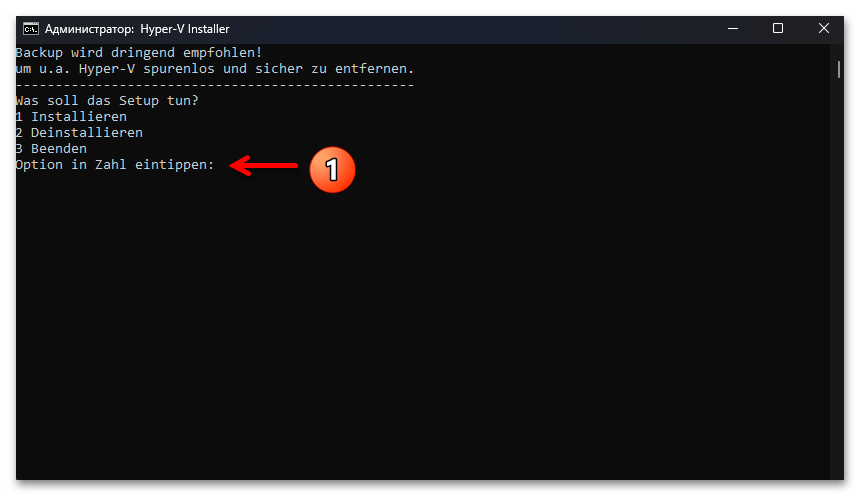
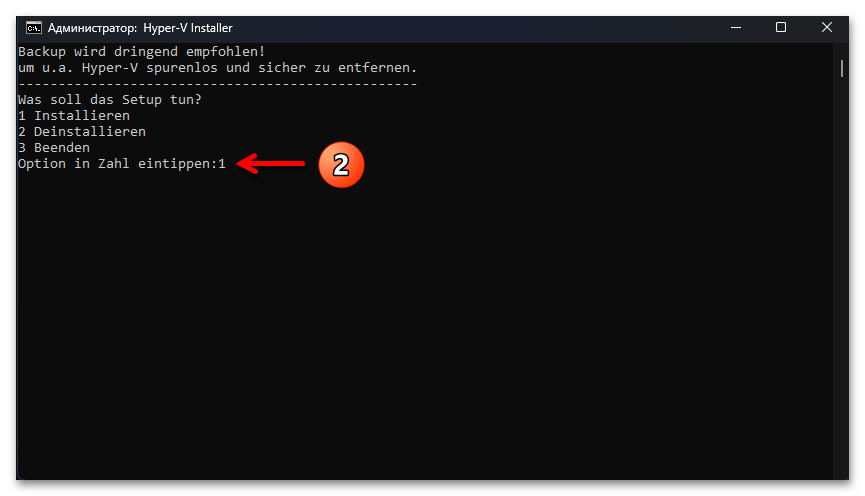
- Вводим
1в открывшееся окно «Командной строки»,
после чего нажимаем «Ввод» на клавиатуре.
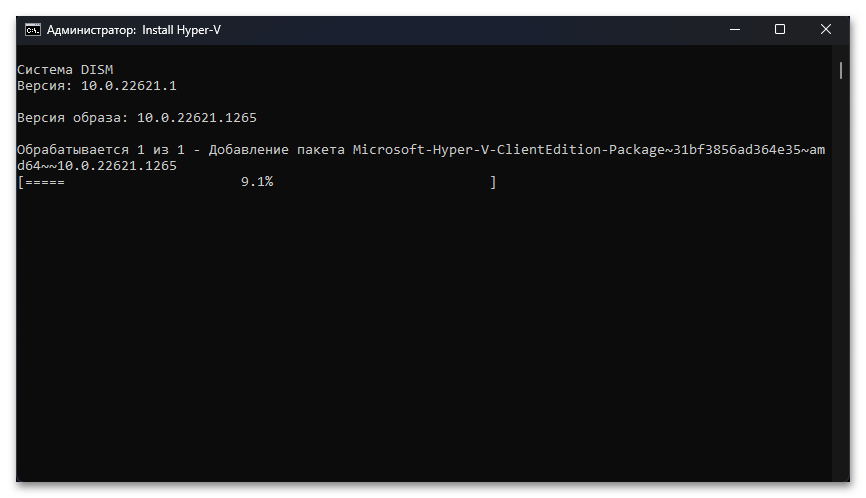
- Далее ждём, пока будут осуществлены все предусмотренные скриптом и обеспечивающие реализацию нашей конечной цели операции –

ход их выполнения можно наблюдать в окне консоли, предпринимать в процессе ничего не следует.
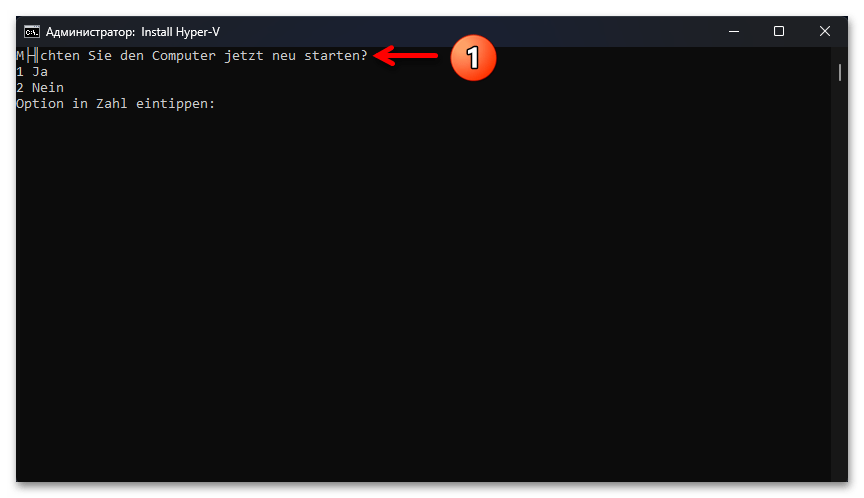
- Завершается работа Hyper-V Installer запросом на перезапуск Windows 11 для завершения интеграции и активации гипервизора в следующем виде:

Нажимаем
1, и затем «Enter» на клавиатуре компьютера, чтобы инициировать его перезагрузку. - Далее останется дождаться окончания перезапуска системы,

в течение которого рассматриваемый компонент будет непосредственно добавлен в неё и включён.
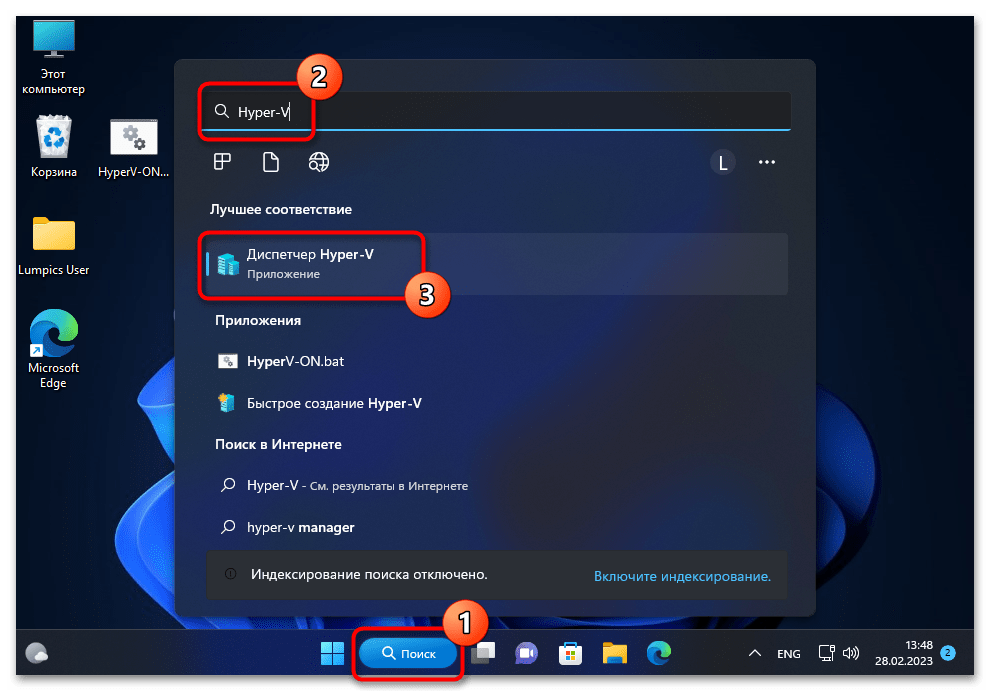
- На этом всё, вызываем теперь доступное в Win 11 приложение «Диспетчер Hyper-V»

и решаем изначально поставленные задачи с его помощью.


Наша группа в TelegramПолезные советы и помощь
For step-by-step instructions, check out the YouTube video at the bottom of the post! It will guide you through the process of enabling and installing Hyper-V on Windows 11 Home in detail.
Hyper-V is a virtualization feature built into Windows, allowing you to create and run virtual machines (VMs) on your PC. However, if you’re using Windows 11 Home Edition, then Hyper-V is missing. It’s because Hyper-V isn’t enabled by default on Windows 11 Home Edition, and you won’t find it in the Windows features list.
Fortunately, there’s a workaround to install and enable Hyper-V on Windows 11 Home. Follow these steps:
Step 1: Check System Requirements
Before proceeding, ensure that your system meets the following requirements:
- Windows 11 Home
- At least 4 GB of RAM (8 GB recommended)
- Virtualization enabled in BIOS/UEFI (usually labeled as Intel VT-x or AMD-V)
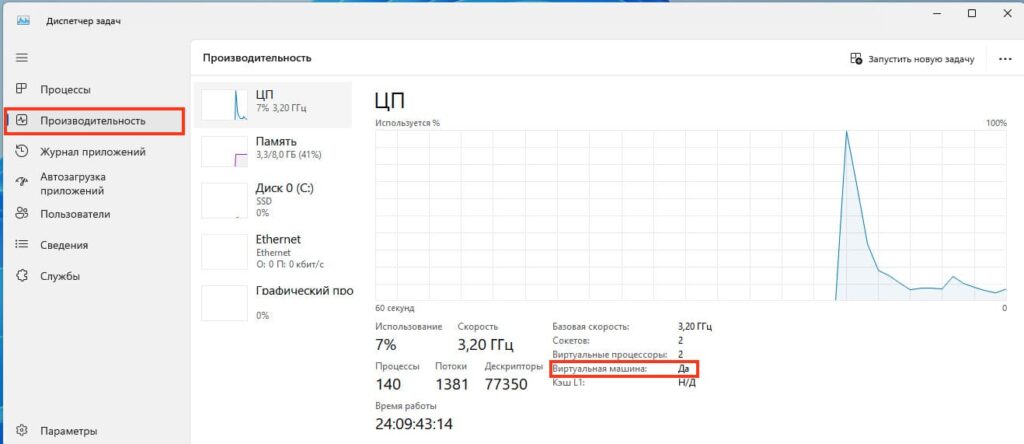
To check if virtualization is enabled, open Task Manager (Ctrl + Shift + Esc), go to the Performance tab and look for the Virtualization section at the bottom right. If it says, enabled, then head over to the next step. Otherwise, enable Hyper V from your BIOS first.
Step 2: Create a Script to Enable Hyper-V
Hyper-V isn’t officially available on Windows 11 Home, but you can enable it via a batch script:
Open Notepad and paste the following code:
   pushd "%~dp0"

dir /b %SystemRoot%\servicing\Packages\*Hyper-V*.mum >hyper-v.txt

for /f %%i in ('findstr /i . hyper-v.txt 2^>nul') do dism /online /norestart /add-package:"%SystemRoot%\servicing\Packages\%%i"

del hyper-v.txt

Dism /online /enable-feature /featurename:Microsoft-Hyper-V -All /LimitAccess /ALL

pause
Save this file with a .bat extension (e.g., Enable_HyperV.bat).
Right-click the file and select Run as Administrator.
This script will install and enable Hyper-V on your Windows 11 Home system.
Step 3: Restart Your PC
After the script runs successfully, restart your computer to apply the changes.
Step 4: Verify Installation
Once your PC restarts, you can verify if Hyper-V is installed:
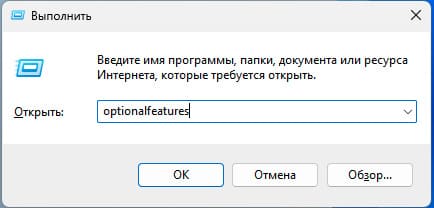
Press Windows + R, type optionalfeatures.exe, and press Enter.
Scroll through the list and ensure that Hyper-V is enabled.
You can now use the Hyper-V Manager to create and manage virtual machines.
That’s it! You’ve successfully installed and enabled Hyper-V on Windows 11 Home. If you have any questions or run into issues, feel free to drop a comment below.
Have you ever experienced the issue of Hyper-V not appearing on Windows 11 or 10? This situation can prevent you from enabling the feature and using Hyper-V virtual machines correctly. Typically, the cause of this problem is the lack of meeting operating system or hardware requirements.
What are the Requirements to use Hyper-V on Windows?
The requirements for Hyper-V are as follows:
Software Requirements:
The Hyper-V role can only be enabled on Windows 11/10 Enterprise, Windows 11/10 Pro, and Windows 11/10 Education. If you are running Windows 11/10 Home, you will not be able to find the Hyper-V role in the system unless you use specific methods.
Hardware Requirements:
If you are already using the correct OS version, the reason for Hyper-V not appearing may be the failure to enable Virtualization Technology or the lack of a CPU that supports VM Monitor Mode Extension.
To solve the issue of Hyper-V not appearing, we will provide a checklist of what needs to be prepared beforehand and how to properly enable or install Hyper-V on Windows 10/11. Keep reading and try the solutions provided.
As stated above, the problem of Hyper-V not appearing is most likely due to not meeting the system or hardware requirements. To resolve this issue in Windows 11, please check the following list item by item, and then enable Hyper-V with the correct steps.
Checklist before Installing Hyper-V on Windows 11
1. Check CPU support for SLAT
Check if your PC has a 64-bit CPU that supports Second Level Address Translation (SLAT), such as modern Intel or AMD 64-bit processors.
2. Check if Visualization is Enabled in BIOS
It is necessary to enable visualization in the BIOS setup menu. Press F2 (or another specific key according to brands and models) to access BIOS and select Advanced > Virtualization.
Tip: Read our detailed guide on how to boot Windows into BIOS.
3. Upgrade to Windows 11 Pro or Above
If you are using a Windows version that does not support the Hyper-V feature, such as Windows 11 Home version, then Hyper-V will not appear. Upgrade your computer to Windows 11 Pro first.
4. Prepare Enough Memory Size
Prepare enough memory size for the expected VM workloads, at least 4 GB.
5. Verify Hardware Compatibility
Verify the compatibility on Windows. Open the command prompt, type “systeminfo“, then check the “Hyper-V Requirements” section and its value “YES,” which means you can enable the Hyper-V role. If it shows “No,” please go back to check the requirements.
3 Ways to Enable Hyper-V on Windows 11
1. Enable Hyper-V on Windows 11 via Control Panel
On a computer that meets all the requirements, access Windows features to enable Hyper-V on Windows 11.
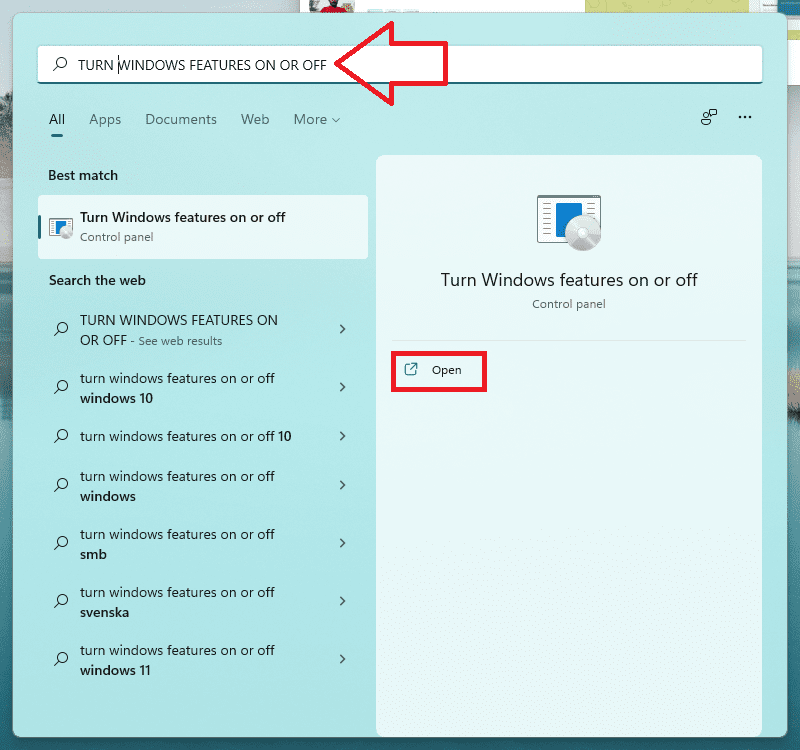
1. Launch Control Panel and open “Turn Windows features on or off” (or search for “Windows features” on the taskbar) to check if the Hyper-V option has been checked.
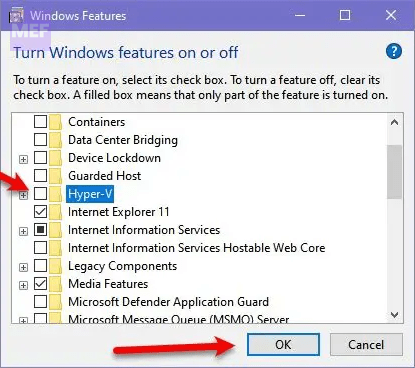
2. If it has not been checked, go to the opened Windows Features wizard, select all the Hyper-V features, and click OK. This process may take a while to apply the changes on Windows 11 Pro.
3. After completing the requested changes, reboot the PC by clicking “Restart now.” Then you can enable the Hyper-V Manager on Windows 11 Pro, allowing you to create and manage virtual machines efficiently.
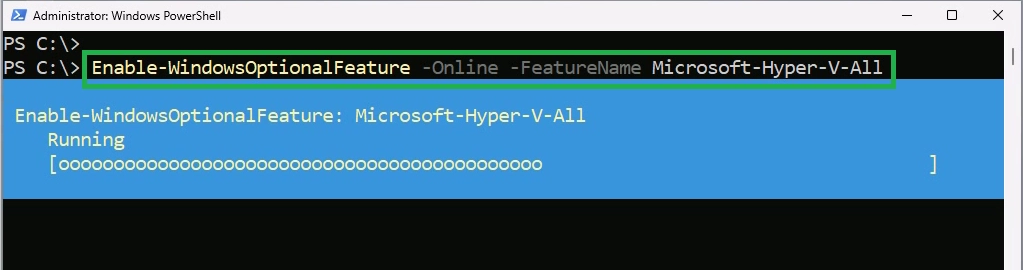
2. Enable Hyper-V on Windows 11 with Windows PowerShell
You can also install Hyper-V with PowerShell command in Windows 11, try the following:
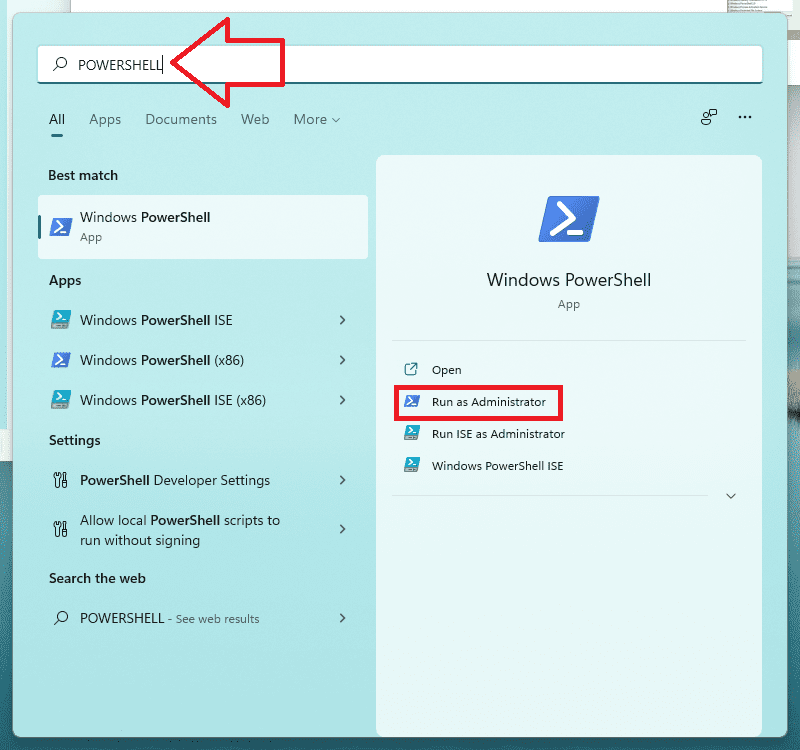
1. Press the Win key and type “PowerShell” to run it as an administrator.
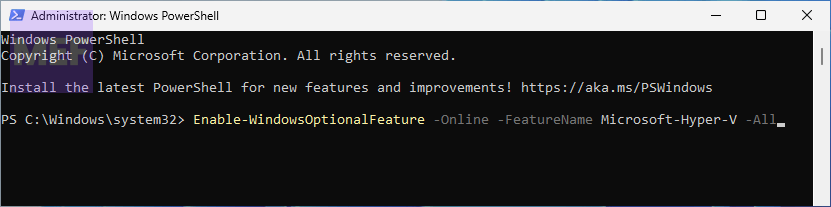
2. Type the command and press Enter to run the command:
Enable-WindowsOptionalFeature -Online -FeatureName Microsoft-Hyper-V -All
Wait for the process to complete.
3. Restart your computer.
3. Enable Hyper-V on Windows 11 using Command Line
Alternatively, you can also use the Command Line to enable Hyper-V on your Windows 11 computer. Here are the steps you need to follow:
1. Press the “Win” key and search for “CMD“.
2. Right-click on “Command Prompt” and select “Run as administrator“.
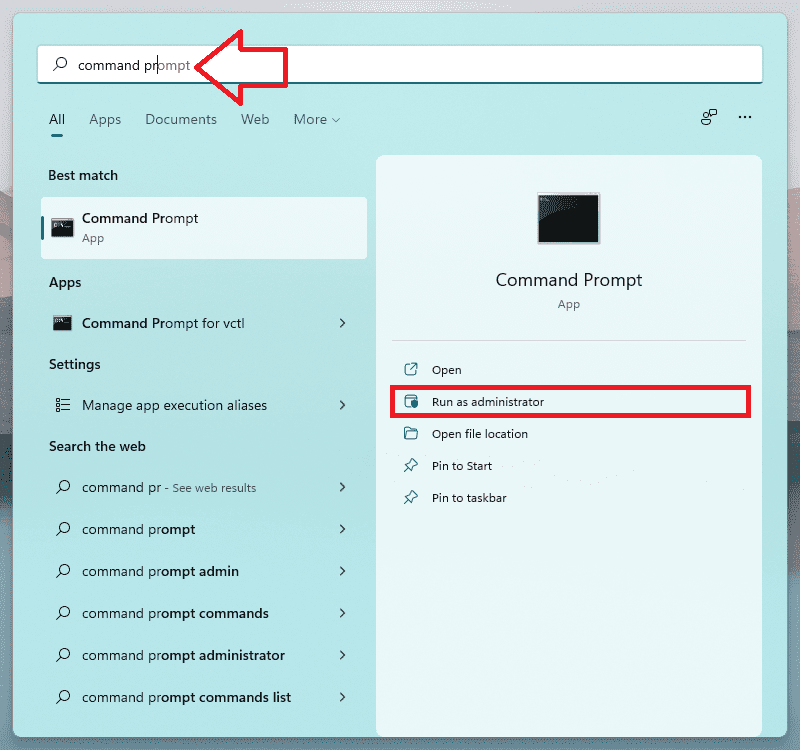
3. Type the following command and press “Enter“:
DISM /Online /Enable-Feature /All /FeatureName:Microsoft-Hyper-V
Wait for the installation to complete.
3. Restart your computer.
3 Ways to check if Hyper-V is enabled
Once you’ve enabled Hyper-V using any of the above methods, you may want to check whether it’s working correctly. Here are three ways to do that:
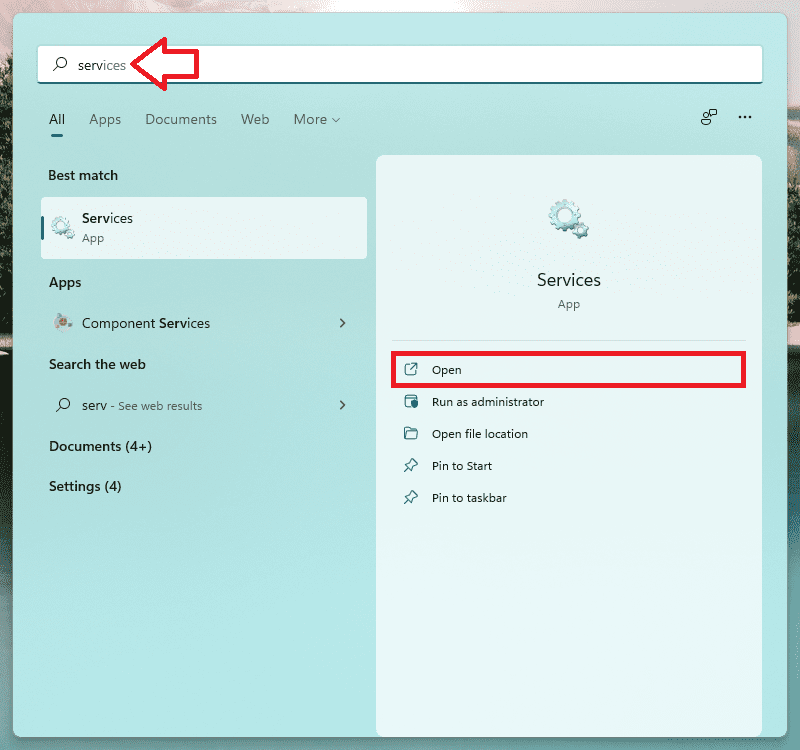
1. Check if the Hyper-V services are running
Press “Win + R” and type “services.msc” in the Run dialog box. In the Services window, check if all the services beginning with “Hyper-V” are “Running”.
2. Use PowerShell
Enter the following command to check the status: Get-WindowsOptionalFeature -Online -FeatureName Microsoft-Hyper-V If the “State” reads “Enabled”, then Hyper-V is enabled properly on your Windows 11 computer.
3. Use Windows Features
Open Windows Features to check the Hyper-V box or directly search for “Hyper-V Manager” to see if you can launch it now.
If, after all the troubleshooting and checking, your Hyper-V is still not started properly, it may be time to consider whether there is a problem with your installed operating system or some other relatively rare causes. In that case, you may need to turn to professionals for further help.
It’s evident that not all issues have a definitive solution, despite having enabled Hyper-V on your Windows 11/10 system with success. There are several unpredictable variables that can lead to the failure of virtual machines (VMs). That’s why it’s crucial to choose the appropriate tool to safeguard Hyper-V VMs in the event of significant data loss caused by system glitches or hardware malfunctions.
It’s essential to understand that merely enabling Hyper-V doesn’t guarantee that your virtual machines will function flawlessly. Technical problems such as system crashes, power failures, hardware damage, and software conflicts can disrupt the smooth functioning of VMs. These challenges can cause severe data loss and can even make it impossible to recover critical files and data.
Therefore, selecting a reliable and efficient tool that can protect Hyper-V VMs from such disasters is crucial. Such tools offer a comprehensive backup solution that enables you to create backup copies of your virtual machines at regular intervals. These backups can be restored in the event of system failure or data loss, ensuring that your critical data remains secure.
Платформа виртуализации Hyper-V доступна не только на серверных версиях Windows, но и в десктопных редакциях Windows 10 и 11. С помощью встроенного гипервизора Hyper-V можно создавать и управлять виртуальными машинами. В этой статье расскажем, как включить компоненты Hyper-V в Windows 10 и 11.
Приобрести оригинальные ключи активации Windows всегда можно у нас в каталоге:
Windows 11 — от 1690 ₽
Windows 10 — от 1490 ₽
Проверка совместимости с Hyper-V
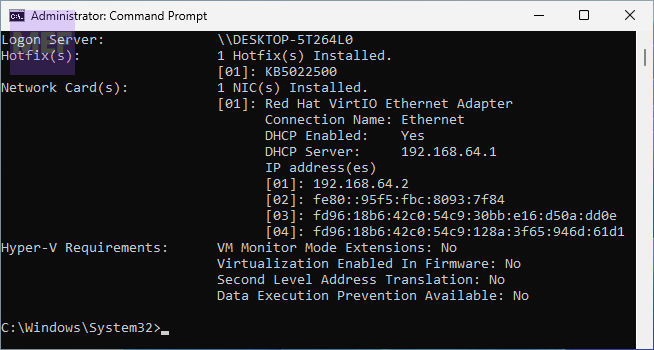
Компоненты Hyper-V доступны в редакциях Pro и Enterprise Windows 10 и 11. Чтобы проверить, поддерживает ли ваш компьютер Hyper-V, выполните следующие шаги:
1. Откройте командную строку с правами администратора.
2. Введите команду:
systeminfo
3. Промотайте вывод до раздела Hyper-V Requirements и убедитесь, что все указанные параметры включены:
— VM Monitor Mode Extensions: Yes
— Virtualization Enabled In Firmware: Yes
— Second Level Address Translation: Yes
— Data Execution Prevention Available: Yes
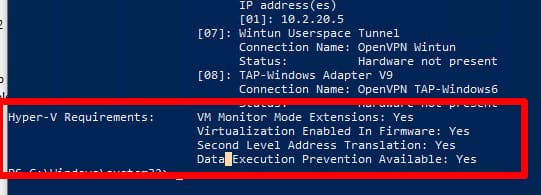
Если параметр Virtualization Enabled In Firmware имеет значение No, необходимо включить виртуализацию в настройках BIOS/UEFI (параметр может называться Intel VT-X или AMD-V).
Также проверить совместимость вашего процессора можно на вкладке CPU в диспетчере задач Windows. Здесь должно быть указано Virtualization: Enabled .
Как включить Hyper-V в Windows через компоненты Windows
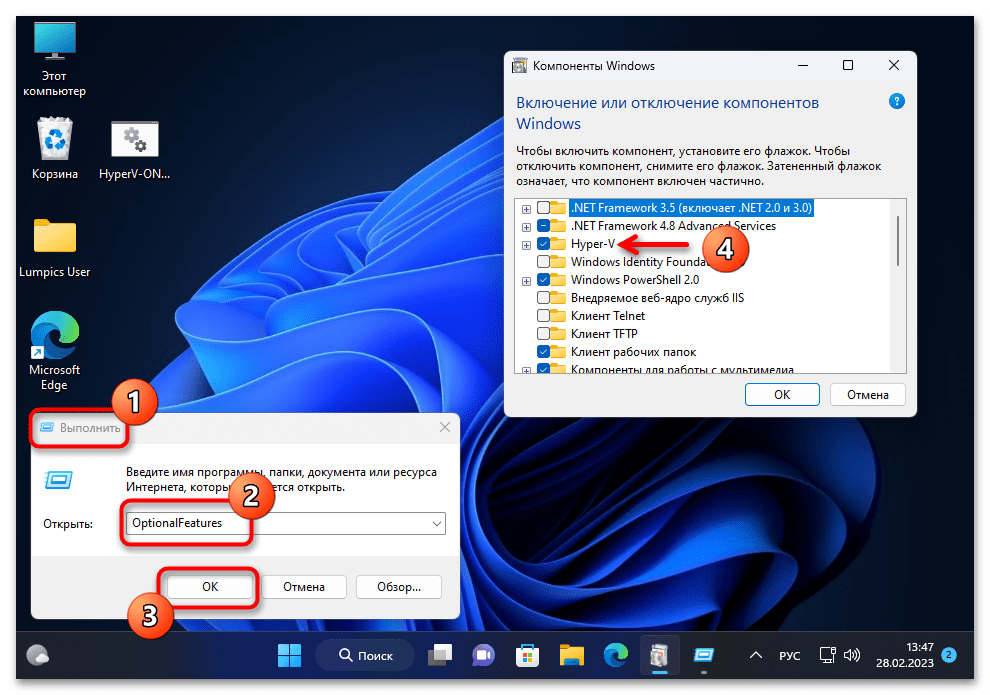
1. Нажмите Win + R и впишите команду optionalfeatures, после чего нажмите Enter. (Либо через Панель управления > Программы и компоненты > Включение и отключение компонентов Windows).
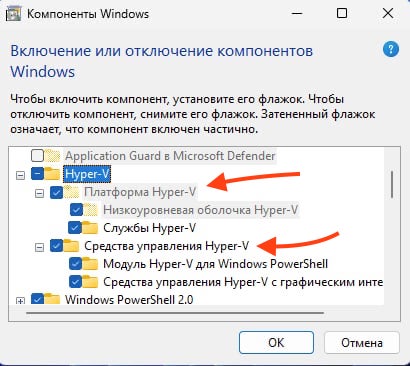
2. В списке найдите и выберите для установки компоненты Платформа Hyper-V и Средства управления Hyper-V.
3. Нажмите ОК для установки и перезагрузите компьютер.
Включение Hyper-V через PowerShell
Чтобы включить Hyper-V с помощью командной строки или PowerShell, выполните следующие команды:
1. Откройте PowerShell от имени администратора.
2. Выполните команду:
Enable-WindowsOptionalFeature -Online -FeatureName Microsoft-Hyper-V -All
Или с помощью DISM:
dism.exe /Online /Enable-Feature:Microsoft-Hyper-V-All

3. Перезагрузите компьютер после установки.
Проверка установки Hyper-V
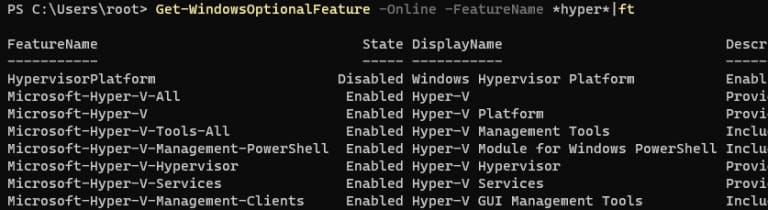
Чтобы убедиться, что компоненты Hyper-V успешно установлены, выполните следующую команду в PowerShell:
Get-WindowsOptionalFeature -Online -FeatureName *hyper*|ft
Также включите автоматический запуск Hyper-V при загрузке системы:
bcdedit /set HypervisorLaunchType auto
Управление Hyper-V
Для управления виртуальными машинами можно использовать графическую консоль Hyper-V Manager. Чтобы открыть её, выполните команду:
virtmgmt.msc
Также для управления виртуальными машинами можно использовать командлеты PowerShell из модуля Hyper-V.
Как включить Hyper-V в редакции Home
Hyper-V недоступен в редакциях Home, однако его можно установить через командную строку с использованием компонента WinSxS. Для этого выполните следующие шаги:
1. Создайте на рабочем столе файл enable-hyperv.bat и вставьте в него следующий код:
pushd "%~dp0"

dir /b %SystemRoot%\servicing\Packages\*Hyper-V*.mum >hyper-v.txt

for /f %%i in ('findstr /i . hyper-v.txt 2^>nul') do dism /online /norestart /add-package:"%SystemRoot%\servicing\Packages\%%i"

del hyper-v.txt
   Dism /online /enable-feature /featurename:Microsoft-Hyper-V -All /LimitAccess /ALL

pause
2. Запустите этот BAT файл с правами администратора.
3. После завершения процесса установки перезагрузите компьютер.
Теперь проверка виртуализации Hyper-V будет доступна даже в домашней редакции Windows 10 или 11.
Следуя этой инструкции, вы сможете успешно включить Hyper-V и начать использовать виртуальные машины в вашей системе.
Лицензионный ключ активации Windows от
If you’re looking to run virtual machines directly from your Windows 11 PC, Hyper-V is a great built-in tool from Microsoft. It allows you to run multiple operating systems on the same hardware, ideal for testing, development, and sandboxing. In this guide, we’ll walk you through how to enable Hyper-V on Windows 11 in just a few steps.
Table of Contents
Be sure to read our previous blog post on how to install and configure the Hyper-V Role on Windows Server 2025.
What is Hyper-V?
Hyper-V is a hardware virtualization technology developed by Microsoft that allows you to create and manage virtual machines (VMs) on a physical computer. It allows you to run multiple operating systems simultaneously on a single device, each in its own isolated environment. Hyper-V is commonly used for testing, development, server management, and creating virtualized environments, making it a powerful tool for developers and IT professionals. It is included in the Pro, Enterprise, and Education editions of Windows 10 and 11.
System Requirements
Before enabling Hyper-V on your Windows 11 device, it’s important to verify that your system meets the necessary requirements. Below are the prerequisites for running Hyper-V on Windows 11:
- Windows 11 Pro, Enterprise, or Education edition
- A 64-bit processor with Second Level Address Translation (SLAT)
- Virtualization enabled in BIOS or UEFI
- At least 4 GB of RAM (8 GB recommended, more is better for VM performance)
Note: Windows 11 Home doesn’t officially support Hyper-V, though workarounds exist.
Step-by-Step: How to Enable Hyper-V on Windows 11
There are three methods available to enable the Hyper-V feature on a Windows 11 system: through Windows Features, using Windows PowerShell, and via the DISM command. In this guide, I will cover all three methods to enable Hyper-V on Windows 11.
Method 1: Enable Hyper-V on Windows 11 using Windows Features
To enable Hyper-V on Windows 11 using Windows Features, follow these steps:
Click on the Start menu, then select Settings to open the Settings app.

Click on Systems, scroll down and then click Optional features.

Under the Related settings section, click on More Windows features setting.

In the Windows Features window, scroll down to Hyper-V and check the box next to it.
Make sure the Hyper-V Management Tools and Hyper-V Platform checkboxes are selected.
Click OK and wait for the installation process to complete.

Once the installation is complete, click Restart Now to restart your Windows 11 computer and enable the Hyper-V feature.

That’s it! You have successfully enabled the Hyper-V feature on your Windows 11 device.
Method 2: Enable Hyper-V on Windows 11 Using PowerShell
On the Windows 11 desktop, right-click the Start button and select Windows PowerShell (Admin) to launch Windows PowerShell with administrative privileges.

In the PowerShell window, type the following cmdlet and hit Enter:
Enable-WindowsOptionalFeature -Online -FeatureName Microsoft-Hyper-V-AllPowerShell will execute the cmdlet and begin the process of enabling the Hyper-V feature.
If successful, you will be prompted to restart your Windows 11 device. Type “Y” and press Enter to restart the Windows 11 device.

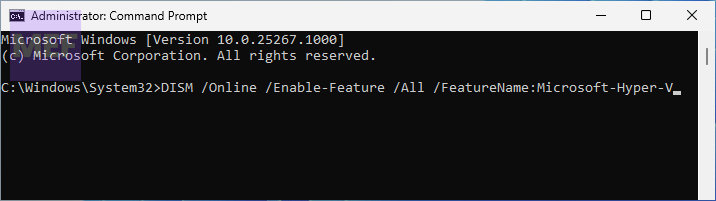
Method 3: Enable Using Command Prompt (DISM)
Open Command Prompt as Administrator.

In the command prompt window, type the following command and hit Enter:
DISM /Online /Enable-Feature /FeatureName:Microsoft-Hyper-V /All
Once the command completes successfully, restart your Windows 11 device.

How to Configure Hyper-V Settings
After enabling the Hyper-V feature on your Windows 11 device, you can adjust settings to optimize your virtual machines for maximum performance.
Hyper-V Settings: You can change the default locations of your virtual hard disk and virtual machine configuration files, configure NUMA spanning for storage migration, and enable enhanced session mode.

Virtual switch Manager: Hyper-V uses a virtual switch to connect virtual machines to your physical network, allowing you to create External, Internal, or Private switches.

Open the Start menu, type Hyper-V Manager, and click on it to open the Hyper-V Manager console.
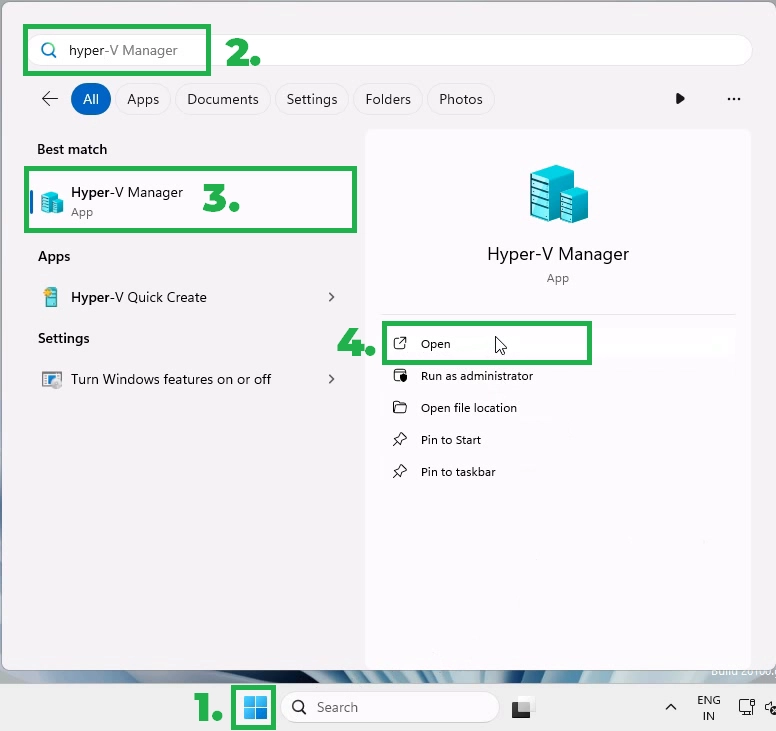
From the Hyper-V Manager console, you can start creating and managing virtual machines.

Conclusion:
Enabling Hyper-V on Windows 11 is quick and straightforward—provided your system is compatible. Whether you’re testing software, exploring different operating systems, or building development environments, Hyper-V offers a fast and flexible virtualization platform with native Windows support. You can now easily test various OS environments, create development sandboxes, or isolate risky tasks within virtual machines.
Have questions or run into any issues? Feel free to leave them in the comments below!
Want to learn how to create your first VM with Hyper-V on Windows 11? Stay tuned for our upcoming tutorial!
Post Views: 10