
Все способы:
- Способ 1: Удаление программ
- Способ 2: Отключение залипания клавиш
- Способ 3: Удаление одного из языков
- Способ 4: Обновление драйверов для тачпада (только ноутбуки)
- Способ 5: Устранение аппаратных неполадок
- Вопросы и ответы: 6
Операционной системой можно пользоваться даже без мышки, посредством горячих клавиш. Иногда, впрочем, эта функция перестаёт работать, и сегодня мы расскажем, почему это происходит и как с этим бороться.
Способ 1: Удаление программ
Наиболее часто описываемый сбой возникает из-за специфического софта, такого как средства для автоматической смены раскладки или менеджеров буфера обмена. Решением проблемы будет его деинсталляция.
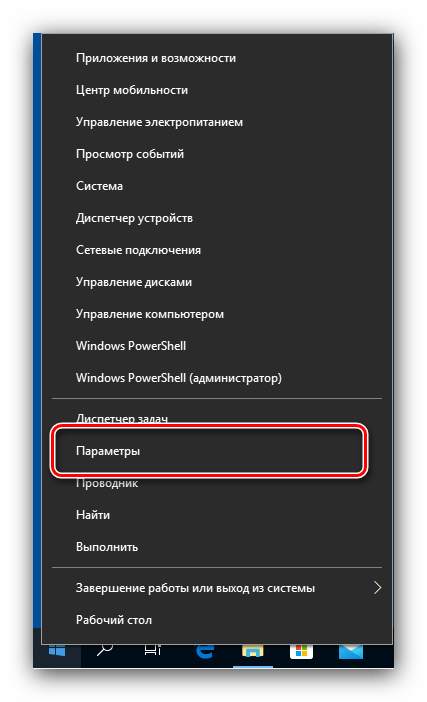
- Откройте «Параметры» любым удобным способом – например, кликните правой кнопкой мыши по кнопке «Пуск» и выберите соответствующий пункт в меню.
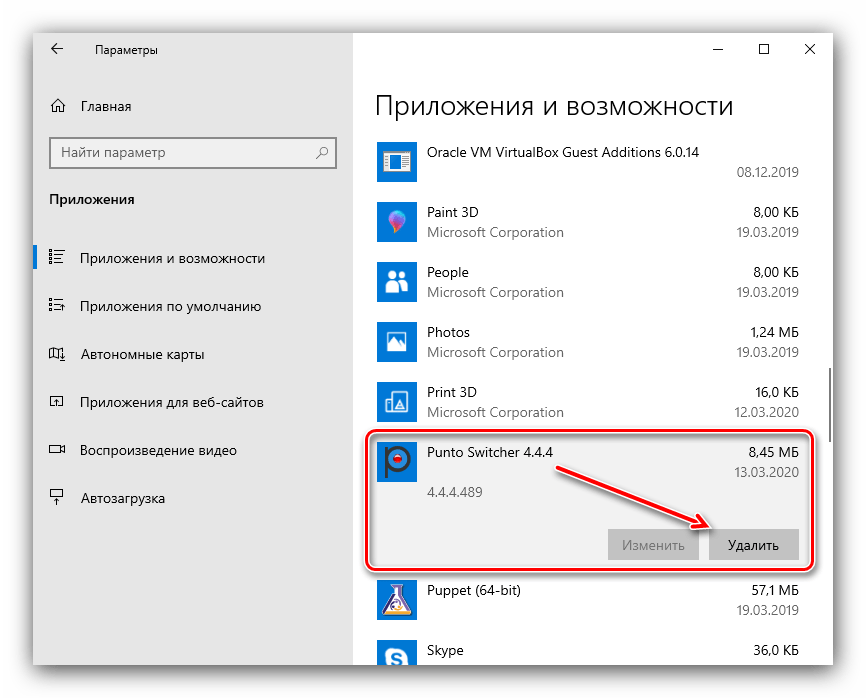
- В окне «Параметров» откройте пункт «Приложения».
- Прокрутите страницу вниз для доступа к списку инсталлированных программ. Найдите там нужное ПО и кликните по нему левой кнопкой мыши, затем воспользуйтесь кнопкой «Удалить».
- Используйте инструмент удаления программы, после чего перезапустите ПК. Проверьте работоспособность горячих клавиш Виндовс – наверняка проблема будет решена.

Способ 2: Отключение залипания клавиш
Иногда хоткеи неработоспособны из-за активной опции залипания. Отключить её можно следующим образом:
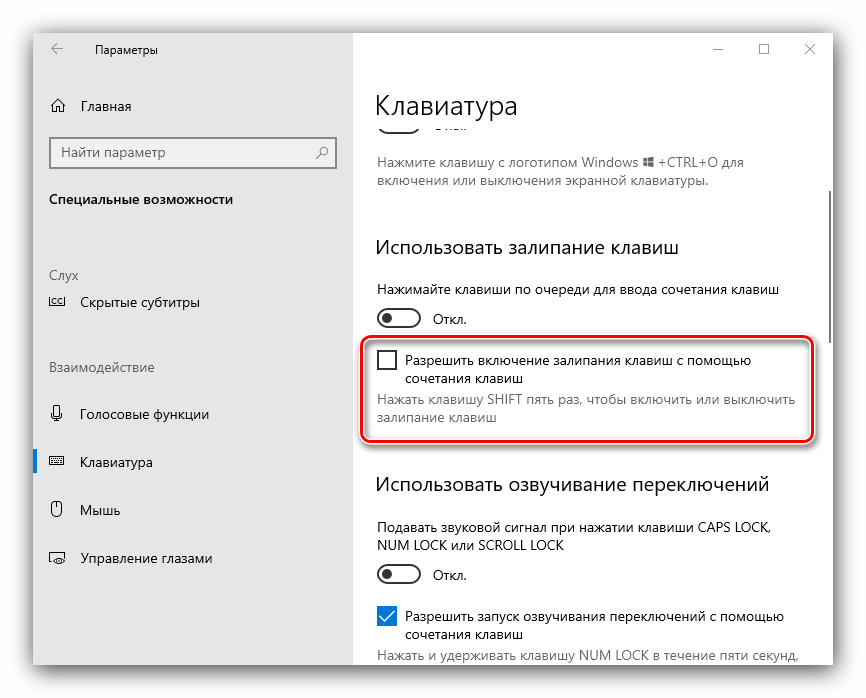
- Снова воспользуйтесь «Параметрами», но на этот раз выберите пункт «Специальные возможности».
- Прокрутите боковое меню до раздела «Клавиатура» и перейдите к нему.
- Найдите блок «Использовать залипание клавиш». Если переключатель «Нажимайте клавиши по очереди…» включён, переведите его в положение «Откл».
- Также отключите пункт «Разрешить включение залипания клавиш с помощью сочетания клавиш».


Проверьте работоспособность функции хоткеев – она должна работать без проблем.
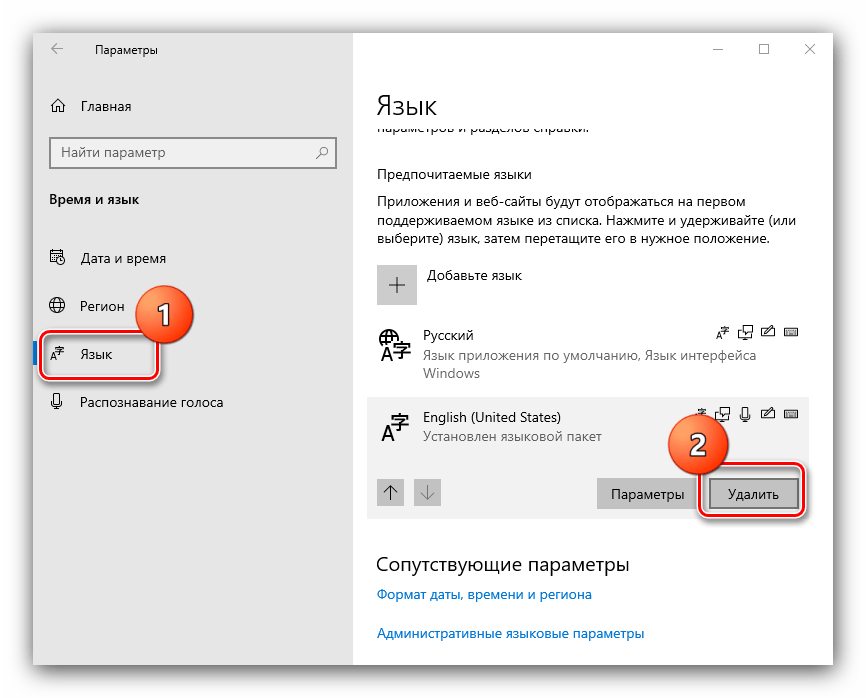
Способ 3: Удаление одного из языков
Также горячие клавиши могут не работать на некоторых из языковых пакетов. Решение проблемы заключается в определении сбойного компонента и его удалении.
- Для начала стоит выяснить, с каким языком не работает рассматриваемая возможность. Проверить это достаточно просто – по очереди переключайте раскладки и прожимайте комбинации.
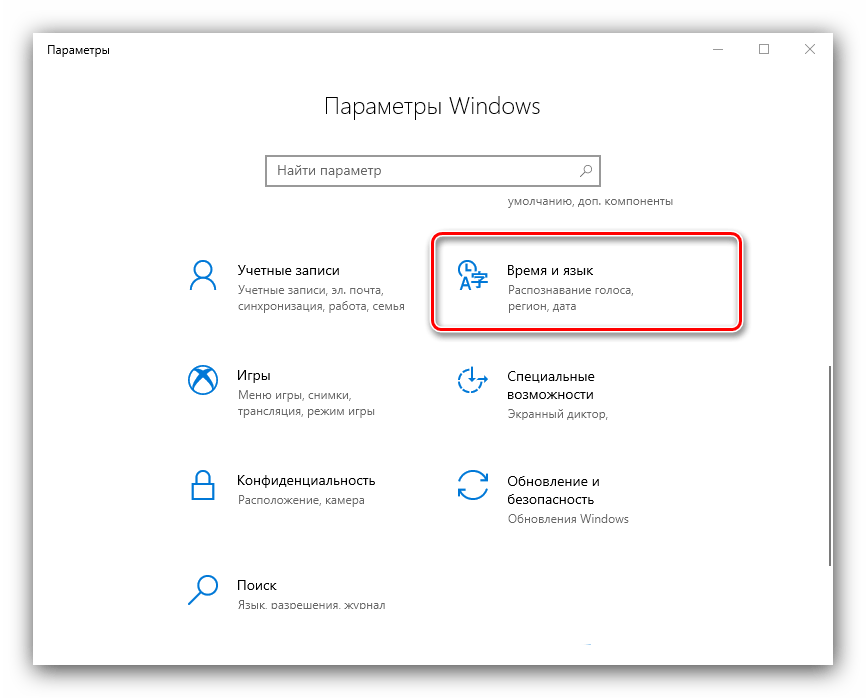
- Для удаления проблемного пакета нужно воспользоваться «Параметрами»: вызовите оснастку и перейдите к разделу «Время и язык».
- Откройте пункт «Язык», затем в правой части окна найдите список языков. Выделите его и нажмите на кнопку «Удалить».
- Подождите, пока пакет будет удалён, после чего перезагрузите машину.
- После запуска ОС проверьте, работают ли сочетания клавиш. Если да, попробуйте снова добавить удалённый языковой пакет, если он вам требуется.
Подробнее: Добавление языковых пакетов в Windows 10
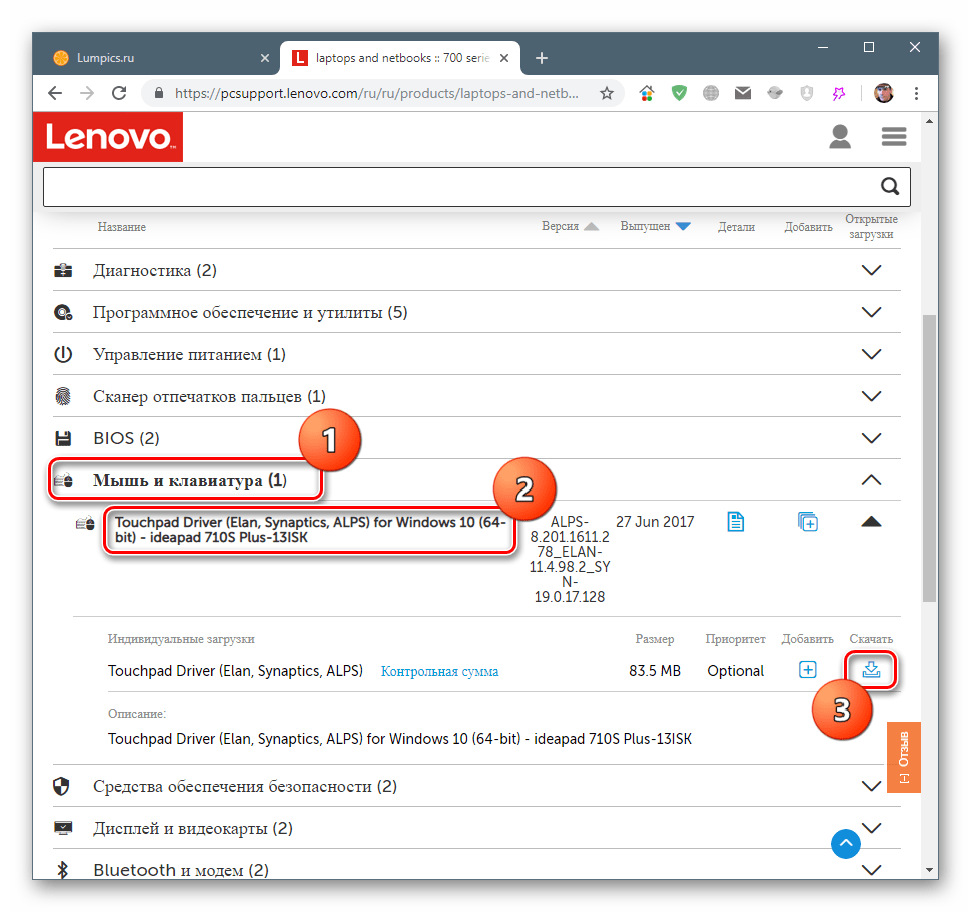
Способ 4: Обновление драйверов для тачпада (только ноутбуки)
Пользователи ноутбуков могут столкнуться с рассматриваемым сбоем после обновления служебного софта для тачпада. Проделайте следующёе:
- Удалите текущую версию драйверов по инструкции далее.
Подробнее: Удаление драйверов в Windows 10
- Загрузите с сайта производителя вашего лэптопа предыдущий вариант служебного ПО для сенсорной панели и инсталлируйте его.

Подробнее: Установка драйверов для тачпада
- Проверьте, пропала ли проблема – если её причиной был конфликтующий софт, она должна быть устранена.
Способ 5: Устранение аппаратных неполадок
Если программные методы решения рассматриваемой проблемы не помогают, логично предположить, что сбой имеет аппаратную природу, на стороне клавиатуры либо самого компьютера. Для определения причины выполните следующее:
- На настольном компьютере подключите его клавиатуру к другой машине, заведомо работоспособной. Для ноутбуков же, напротив, подсоедините к нему внешнее решение. Если проблема всё так же наблюдается, её источником является клавиатура. Методом устранения в такой ситуации будет замена устройства.
- Если же на другом настольном ПК либо с другой клавиатурой на ноутбуке сбой всё ещё присутствует, его причина на стороне компьютера. В нём выйти из строя может как разъём подключения (для проводных комплектующих), так и беспроводной модуль (для Bluetooth-средств). Здесь можно порекомендовать только обращение в сервисный центр.
Таким образом, мы выяснили, почему в Windows 10 перестают работать горячие клавиши, и предложили вам несколько вариантов решения этой проблемы.
Наша группа в TelegramПолезные советы и помощь
Приветствую всех, кто зашел на мою страницу! Сегодня я хочу поделиться с вами своей историей о том, как я столкнулся и решил проблему с неработающими горячими клавишами в Windows 10. Это было непростое испытание, но благодаря нему я узнал много нового и теперь готов поделиться этими знаниями с вами.
Первые Признаки: Горячие Клавиши Отказываются Работать
Все началось довольно неожиданно. Однажды я попытался использовать привычные комбинации клавиш, такие как Ctrl+C для копирования текста, и ничего не произошло. Сначала я подумал, что это просто маленький сбой, но со временем понял, что проблема куда серьезнее.
Проверка Индивидуальных Клавиш
Первым делом я убедился, что проблема не в самих клавишах:
1. Проверил работу Ctrl, Alt и Shift в других сочетаниях и приложениях.
2. Убедился, что проблема касается всех горячих клавиш в целом.
Поиск и Устранение Неполадок: Мои Шаги
Поняв, что дело не в отдельных клавишах, я начал поиск способов решения проблемы.
Перезагрузка Системы
Как часто бывает, первый и самый простой шаг – это перезагрузка компьютера. Иногда это помогает решить множество небольших проблем.
Проверка Языковых Настроек
1. Я проверил, не были ли изменены языковые настройки клавиатуры, так как это могло повлиять на работу горячих клавиш.
Обновление Драйверов Клавиатуры
1. Через «Диспетчер устройств» я обновил драйверы клавиатуры, чтобы исключить возможные проблемы с ними.
Более Глубокие Решения: Технические Действия
Когда базовые методы не помогли, я перешел к более серьезным шагам.
Использование Встроенной Функции Устранения Неполадок Windows
1. Я запустил встроенный инструмент устранения неполадок Windows для клавиатуры через «Панель управления«.
Сброс Настроек Системы
1. Я пробовал восстановить систему до последней рабочей точки восстановления, чтобы отменить возможные изменения, повлиявшие на работу горячих клавиш.
Финальные Шаги: Решение Найдено
В итоге, проблема оказалась в конфликте между недавно установленным программным обеспечением и системными настройками горячих клавиш. После удаления этой программы и повторной настройки горячих клавиш все вернулось в норму.
Это был настоящий вызов, но я рад, что смог найти и устранить причину проблемы. Надеюсь, что мой опыт окажется полезным для всех, кто сталкивается с подобными трудностями. Помните, что для каждой проблемы найдется решение, главное – не сдаваться и методично искать источник неполадки. Удачи вам, и до новых встреч в моем блоге!
Всем привет! Что же делать, если не работают горячие клавиши в Windows 10 или 11? В статье ниже мы постараемся с этим разобраться. В частности мы поговорим про неработающую клавишу «Win», которая находится в нижней части клавы. Но советы помогут и для других сочетаний быстрых кнопок.
Содержание
- Причина 1: Игровые клавиатуры и доп ПО
- Переустановка драйвера
- Средства устранения неполадок
- Фильтрация ввода
- Реестр
- Дополнительные советы
- Видео
- Задать вопрос автору статьи
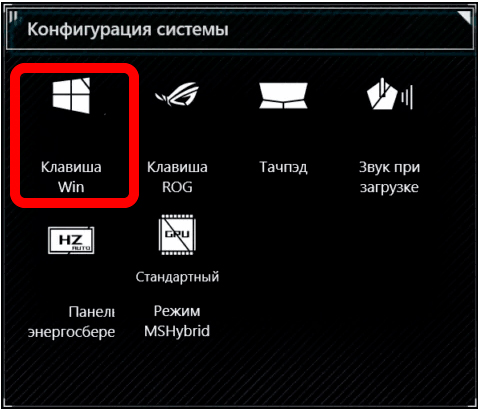
Причина 1: Игровые клавиатуры и доп ПО

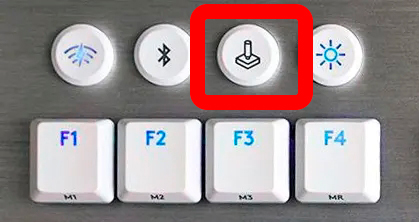
В некоторых игровых клавиатурах есть специальная клавиша или функция дополнительного программного обеспечения, отключающая кнопку «Win» или другие вспомогательные клавиши. Это нужно, чтобы она не мешала во время игры. Например, у ASUS есть отдельная программа Armoury Crate или iCUE. Поэтому если у вас в Виндовс стоит что-то подобное, проверьте, чтобы там была отключена функция деактивации кнопки Win.
Помимо этого, кнопка может отключаться с помощью специального сочетания кнопок у отдельных моделей:
- Red Square: Fn + или Fn + + L
- XPG: Fn + F1
- Logitech: Fn + F8
- Другие модели: Fn + F6
Внимательно ознакомьтесь со всеми возможными комбинациями для вашей клавиатуры на официальном сайте производителя. Также эта информация может быть написана в руководстве пользователя, которую обычно кладут в коробку. Некоторые модели имеют отдельную кнопку, которая переключает устройство в «Игрой режим» (Game Mode).
Игровой режим также есть и в Виндовс, его можно попробовать тоже отключить. Более подробно про то, как это сделать – читаем в этой статье.
Переустановка драйвера
Первое что мы можем сделать – это переустановить драйвера для клавиатуры. Это может помочь, если у вас обычная клавиатура и перестала работать какая-то из функциональных кнопок, в том числе и клавиша «Win».
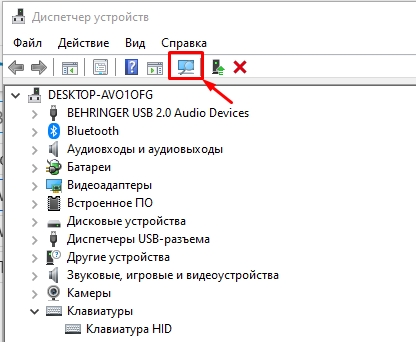
- Заходим в «Диспетчер устройств».
- Откройте «Клавиатуры» и удалите все устройства через правую кнопку мыши.

- Перезагрузите компьютер.
- Проверьте, чтобы драйвера установились повторно. Если этого не произошло, кликните по кнопке обновления конфигурации ПК.
Если и это не помогло, попробуйте обновить все драйвера, скачав их с официального сайта. В особенности сделайте упор на дрова для материнской платы. Дополнительно можно попробовать переподключить клавиатуру в другой USB порт. Если у вас стационарный компьютер, используйте задние подключения, напрямую к материнской плате. В переднюю панель лучше не подключать, так как там не всегда есть достаточно питания.
Средства устранения неполадок
Можно позволить системе самой решить проблему с помощью встроенного функционала. Для этого воспользуемся «Средством устранения неполадок».
- «Пуск» – «Параметры».
- Откройте раздел «Обновление безопасность».
- «Устранение неполадок» – «Дополнительные средства устранения неполадок».
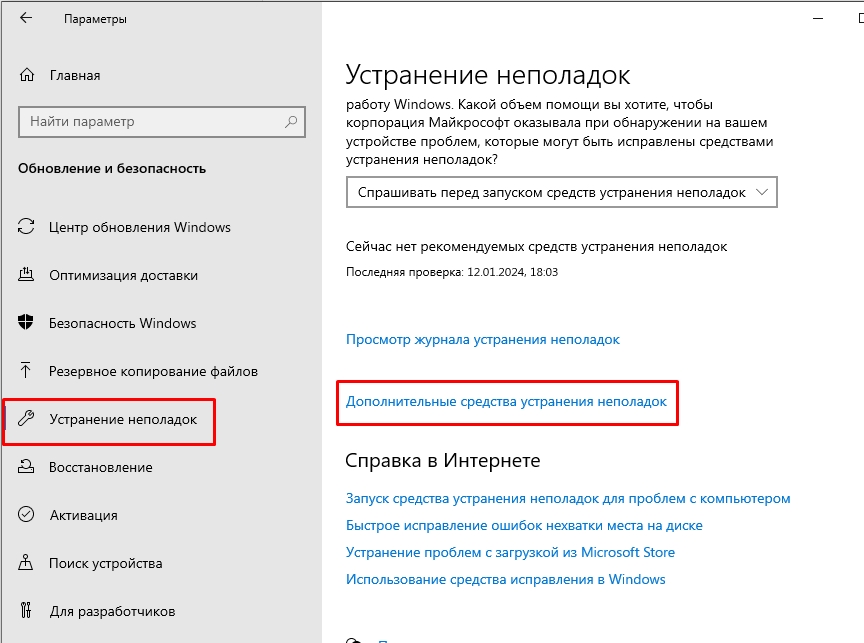
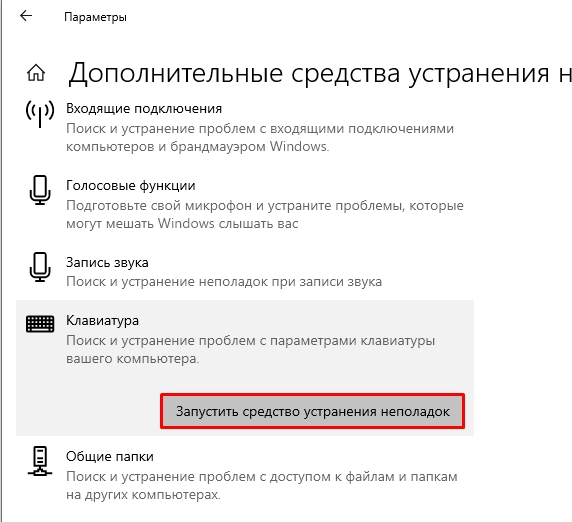
- Выберите клавиатуру и запустите средство. Далее действуем согласно инструкциям на экране.
Фильтрация ввода
Данная функция позволяет выключить реагирование системы на краткое или повторное нажатие на определенные кнопки. Лучше её выключить
- В «Параметрах» системы в меню «Пуск» найдите пункт «Специальные возможности».
- Перейдите на вкладку «Клавиатура».
- Найдите саму функцию справа и отключите.
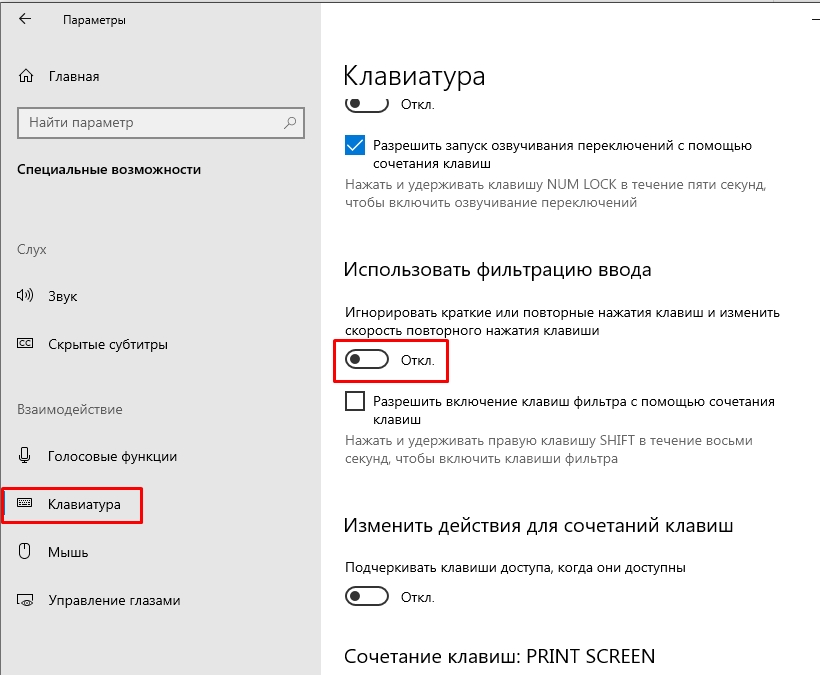
- Можете дополнительно перезагрузить ПК.
Реестр
- Через поиск найдите «Редактор реестра» и откройте его.
- Перейдите по пути:
HKEY_CURRENT_USER\Software\Microsoft\Windows\CurrentVersion\Policies\Explorer
- Посмотрите, нет ли параметра «NoWinKeys», если он есть – удалите!
- И аналогично проверьте путь:
HKEY_LOCAL_MACHINE\Software\Microsoft\Windows\CurrentVersion\Policies\Explorer
- Перезагрузите комп.
Дополнительные советы
- Если вы до этого устанавливали какие-то программы, работающие с клавиатурой, типа Punto Switcher – удалите их с ПК.
- Проверьте систему на наличие вирусов.
- Откатите систему до самой ранней точки восстановления.
- Не забываем, что проблема может быть аппаратная – то есть кнопка просто сломалась.
- С помощью программы AutoHotkey, можно переназначить клавишу на другую.
Остались какие-то вопросы, может появилась ошибка? – Пишите в комментариях, чтобы команда портала WiFiGiD.RU вам помогла.
Видео
This post will guide you on what to do if your keyboard shortcuts or hotkeys are not working on your Windows 10 computer. A lot of users use hotkeys as they make things easier for them as they use their computer. However, there are instances when these hotkeys suddenly stop working. It’s actually one of the most common problems with keyboards. And so to resolve this problem, you can try out some suggestions prepared on this post.
Option 1 – Clean the keyboard keys physically
Your keyboard might not be working properly due to some dirt or other corrosion. First, you need to shut down your computer and then unplug the keyboard if you are using a desktop computer and then prepare it for cleaning. After that, use a small cotton ear cleaning tool to get between the creases and clean them. You can dip it slightly in alcohol to make it more efficient in cleaning dust and dirt. And if you can, you have the option to pull apart the keyboard completely and then wipe away all the corrosion from the inside. Once you’re done, put the keyboard back together and then plug it back into your PC. Now turn your PC on and check if the hotkeys are now working.
Option 2 – Try running the Hardware and Devices Troubleshooter
The first thing you can do to fix the problem is by running the Hardware Troubleshooter. Although it won’t make much of a difference, there’s still a possibility that it could automatically fix the problem with these function keys. To use it, refer to these steps:
- The first thing you need to do is click on Start and then on the gear-like icon to pull up the window for Settings.
- After opening Settings, look for the Update and Security option and select it.
- From there, go to the Troubleshoot option located on the left-hand side of the list.
- Next, select Hardware and Devices from the list and open the Troubleshooter and run it. Once it is doing its job, wait for it to complete the process and then restart the system.
- After the system restarts, check if the problem’s now fixed. If not, refer to the next option given below.
Option 3 – Try connecting the keyboard to a different USB port
The problem might have something to do with the USB port that’s currently in use by your keyboard. It could be that it’s not working so it makes sense to unplug it and attach it to another USB port. You can also clean the USB port on both ends to ensure that they are not affected by corrosion.
Option 4 – Uninstall previously installed keyboard software
If you have been previously using another keyboard, it might be better if you make sure that the software for the old device has been removed since there are instances when multiple software can cause problems due to similarities in actions.
Option 5 – Update the keyboard driver
You can also update the keyboard driver to fix the problem. There are cases when an outdated or corrupted driver can fix the problem. To do so, follow the steps below.
- Tap the Win + R keys to open the Run dialog box.
- Then type “devmgmt.msc” in the field and hit Enter to open the Device Manager.
- From there, look for the keyboard driver and click on it.
- Next, right-click on the keyboard driver and select the Update driver option.
- After that, click the “Search automatically for updated driver software” option to proceed.
Option 6 – Reinstall the keyboard driver
If updating the keyboard driver didn’t help, then you might want to reinstall it. How? Follow the steps below.
- Tap the Win + R keys to launch Run.
- Type in MSC into the box and tap Enter or click OK to open the Device Manager.
- After that, a list of device drivers will be displayed. Look for keyboard driver, right-click on it and then select “Uninstall device”.
- After that, unplug the device and restart your PC.
- Then plug your device back in. Assuming your device is connected to your PC, open the Device Manager again.
- Next, click on the Action button and click the Scan for hardware changes button. That should fix the problem.
Note: You could also completely uninstall the driver and go directly to the manufacturer’s website and download the latest driver for your hardware and then install it.
Option 7 – Enable Human Interface Device (HID) Service
Another thing to consider is the Human Interface Device Service. If this service is disabled, then no wonder why your hotkeys are not working. Thus, you need to enable this service. Refer to the following steps to do that:
- Tap the Win + R key to launch the Run dialog box.
- Then type “services.msc” in the field and hit Enter to open Services.
- After opening Services, scroll down until you see the Human Interface Device service.
- Double click on HID and make sure that its Startup Type is set to “Automatic” and then click OK.
- Restart your PC and check if the hotkeys are now working or not.
Option 8 – Try resetting the keyboard
You might also want to try resetting the keyboard as it can also help in fixing the problem. Setting it back to its default state will surely help.
Do You Need Help with Your Device?
Our Team of Experts May Help
Troubleshoot.Tech Experts are There for You!
GET HELP
Troubleshoot.Tech experts work with all versions of Microsoft Windows including Windows 11, with Android, Mac, and more.
Share this article:
You might also like
In every task carried out in the Windows 10 operating system, some of them don’t go smoothly and it could encounter a couple of errors along the way. One of these errors you could encounter is the Windows Update error code 0x8007000e. This particular error was reported to occur a lot when downloading and installing a Feature update via Windows Updates. And recently, it has been reported to occur a couple of times for the Windows 10 1903 May 2019 update. According to security experts, this error could be caused by a lack of memory or disk space as well as issues in the Windows Update mechanism. Whatever the cause is, troubleshooting this problem shouldn’t be hard as this post will give you some potential fixes you can check out.
To fix this error, here are some options you need to consider:
Option 1 – Clear up temporary or junk files
The error could be caused by some temporary or junk files in your computer and so you need to clear them up to fix the problem. You can achieve that using the Storage Sense feature.
- Open Setting > System > Storage from the WinX Menu.
- From there, you will see a list of all the local and connected storage devices along with the details on the free space. Make sure that Storage Sense is on.
- Next, find a link that says “Free Up Space” and click it to open.
- After that, a screen which is the built-in program in Windows 10 will appear and will scan your computer for the following junk files so you can free up disk space:
- Windows Upgrade Log Files
- System created Windows Error Reporting Files
- Thumbnails
- Temporary Internet Files
- Previous Windows Installation Files
- Delivery Optimisation Files
- DirectX Shader Cache
- Choose the files you want to get rid of and then click on the remove files option. Note that you’ll have an idea of the total size as you select any of the junk files listed above.
- Now go to the “Free Up Space Now” section and click the Clear Now button. This will get rid of all the temporary or junk files in your computer and should hopefully fix the Windows Update error 0x8007000e.
Option 2 – Reset the Windows Update components
If by any chance that the second option didn’t work, resetting the Windows Update components could also help you resolve the problem. How? Refer to the following steps:
- Open Command Prompt with admin privileges.
- After that, type each one of the following commands and hit Enter after you key in one after the other.
- net stop wuauserv
- net stop cryptsvc
- net stop bits
- net stop msiserver
Note: The commands you entered will stop the Windows Update components such as Windows Update service, Cryptographic services, BITS and MSI Installer.
- After disabling WU components, you need to rename both the SoftwareDistribution and Catroot2 folders. To do that, type each one of the following commands below and don’t forget to hit Enter after you type one command after the other.
- ren C:/Windows/SoftwareDistribution/SoftwareDistribution.old
- ren C:/Windows/System32/catroot2/Catroot2.old
- Next, restart the services you’ve stopped by entering another series of commands. Don’t forget to hit Enter after you key in one command after the other.
- net start wuauserv
- net start cryptsvc
- net start bits
- net start msiserver
- Close Command Prompt and reboot your PC.
Option 3 – Try configuring the Windows Update-related Services
- Tap the Win + R keys to open the Run dialog box.
- Then type “cmd” in the field and tap Enter to open an elevated Command Prompt.
- Next, execute the following commands. Note that you have to type and enter each the command one after the other.
- SC config wuauserv start= auto
- SC config bits start= auto
- SC config cryptsvc start= auto
- SC config trustedinstaller start= auto
- The commands you executed will make sure that the Windows Update-related services are available. Once it’s done, restart your computer and see if the Windows Update error is now fixed.
Option 4 – Try running the Windows Update troubleshooter
Windows 10 have various troubleshooters that can help you resolve many system issues. So if you’re dealing with Windows Update errors like Error 0x8007000e, you can run the Windows Update troubleshooter to resolve it.
To run it, go to Settings and then select Troubleshoot from the options. From there, click on Windows Update and then click the “Run the troubleshooter” button. After that, follow the next on-screen instructions and you should be good to go.
Option 5 – Try to use the Media Creation tool
The Media Creation tool in Windows allows you to use the ISO installation file to make a bootable device that you can use to install Windows on your PC. Note that this is kind of different from the usual installation process as it could erase your computer’s current settings and data on the primary drive. Thus, before you proceed, you need to backup all your data into some removable drive and then use the Media Creation tool to make a bootable drive.
- After making the bootable drive, you need to plug it in your computer and then reboot.
- Next, tap the F10 or Esc key to open the boot options.
- Now set the boot priority of the removable drive the highest. Once the setup comes forth, follow the next onscreen instructions and install Windows without any problems.
Read More
A lot of programs in Windows utilize the helper processes to ensure that they can get the job done as early as possible. And one of the programs that use these processes is Microsoft Edge. This built-in browser uses a process called the Edge Content process. The moment you start your computer, these system processes are loaded which makes the Edge browser load faster.
To be specific, these are the three processes that are related to Microsoft Edge:
- MicrosoftEdge.exe
- MicrosoftEdgeCP.exe
- MicrosoftEdgeSH.exe
The process that ends with the “CP.exe” is the content process in Edge. However, when this process stopped working, this can affect the Edge browser. In such cases, when you check the Reliability Monitor, you will see that the state of the “Microsoft Edge Content Process” is “Stopped working” which keeps on appearing. To resolve this issue, you can try to clear the browsing data of Microsoft Edge or repair or reset it. You can also try re-registering Edge via Windows PowerShell as well as check your security programs that might be causing interference with the process.
Option 1 – Clear the browsing data of Microsoft Edge
- Open Microsoft Edge.
- Then click on the three horizontal dots to open the menu.
- From there, click on Settings. And under Settings, click the “Choose what to clear” button under the Clear browsing data section.
- Next, check all the checkboxes and then click the Clear button to clear the browsing data in the Edge browser.
- Restart Edge.
Option 2 – Try to reset, repair or reinstall Edge via Settings
You can reset, repair or reinstall the Edge browser through Settings.
If none of it helped, you can try the following:
- Open File Explorer and then go to this path – C:/Users/YourUsername/AppData/Local/Packages
Note: Before you type in the path in the Address bar, make sure that you put your user account name in place with the “YourUsername”.
- Tap Enter to proceed.
- Next, look for the folder named “MicrosoftEdge_8wekyb3d8bbwe” then right-click on it.
- Click on Properties and uncheck the option “Read-only” under the General tab in the Properties window.
- Click on Apply and then OK to save the changes made.
- After that, look for the MicrosoftEdge_8wekyb3d8bbwe folder again and delete it. And if a prompt stating “Folder Access Denied” appears on your screen, just click on the Continue button to proceed – doing so will delete most of the content inside the folder except for the folder named “AC”.
- Restart your computer
Option 3 – Re-register Edge via Windows PowerShell
- In the Start Menu, search “Windows PowerShell”.
- Right-click on Windows PowerShell from the search results and select the “Run as administrator” option.
- Type in this command in the PowerShell windows and tap Enter – Cd C:/Users/YourUsername
- After that, type in this command and tap Enter – Get-AppXPackage -AllUsers -Name Microsoft.MicrosoftEdge | Foreach {Add-AppxPackage -DisableDevelopmentMode -Register «$($_.InstallLocation)AppXManifest.xml» -Verbose}
- Restart your PC.
Get-AppXPackage -AllUsers -Name Microsoft.MicrosoftEdge | Foreach {Add-AppxPackage -DisableDevelopmentMode -Register “$($_.InstallLocation)AppXManifest.xml” -Verbose}
Option 4 – Try to check your security program
It is possible that a security program installed in your computer is the one that’s causing the problem which is why you have to check it. According to security experts, there are some security programs that could be detecting the Edge’s content process as suspicious, blocking or terminating it as a result. Thus, you need to modify your security program’s settings to fix the problem.
Read More
Website breaches and stealing user data is nothing new in the world of the internet. Although a very unpleasant experience it still happens even on some high-quality websites. In this article, we will not focus on how can you not be the target of this kind of attack, because you really cannot. Weel you can kind of if you decide not to have your data on websites at all, but let’s just say that is not something you are willing to do.

So, in this case, you have some social, forum, or gaming accounts but you heard that service has been breached and that your email or password might be stolen. Well in this case all you need to do is of course to login into the service and change your password. But, what happens if you are not aware at all that service has been compromised?
Mozilla foundation has asked themselves this same question it seems and they have decided to help us out. They have placed a free online service where you can just by typing in your email address find out if your email or data has been compromised in any way.
Go to https://monitor.firefox.com/ and check it out, if you find out that there is some website that you did not know was breached, change your password right away, and if you have used the same password for anything else (I hope not), change them as well.
Read More
Computers viruses, worms, ransomware, etc. are kinds of malicious software that no user should take lightly. On several occasions, we have touched upon security steps that each user should take in order to protect its identity and data. Sadly sometimes even when all precautions are taken some malware can still slip through and wreak havoc. Today we are looking at some of the worst or the best, depending on your view that has indeed wreaked plenty of havoc.

10 worst computer viruses in history
In the list of the 10 most famous computer viruses below, we show the costs, dates, reach, and other key facts. First a note about terms: we use the words “virus” and “worm” interchangeably because most readers search for them that way. But there’s a subtle difference that we explain after the list.
1. Mydoom – $38 billion
The worst computer virus outbreak in history, Mydoom caused estimated damage of $38 billion in 2004, but its inflation-adjusted cost is actually $52.2 billion. Also known as Novarg, this malware is technically a “worm,” spread by mass emailing. At one point, the Mydoom virus was responsible for 25% of all emails sent.
Mydoom scraped addresses from infected machines, then sent copies of itself to those addresses. It also roped those infected machines into a web of computers called a botnet that performed distributed denial of service (DDoS) attacks. These attacks were intended to shut down a target website or server.
Mydoom is still around today, generating 1% of all phishing emails. That’s no small feat considering the 3.4 billion phishing emails sent each day. By that figure, Mydoom has taken on a life of its own, infecting enough poorly-protected machines to send 1.2 billion copies of itself per year, 16 years after its creation.
Though a $250,000 reward was offered, the developer of this dangerous computer worm was never caught.
Wondering what makes the world’s most secure computers so safe? See the Tech@Work guide: Upgrade to the World’s Most Secure and Manageable PC
2. Sobig – $30 billion
The 2003 Sobig computer virus is actually another worm. It is second only to the Mydoom virus in its scope. The $30 billion figure is a worldwide total, including Canada, the U.K., the U.S., mainland Europe, and Asia. Several versions of the worm were released in quick succession, named Sobig.A through Sobig.F, with Sobig.F being the most damaging.
This cybercriminal program masqueraded as legitimate computer software attached to emails. It disrupted ticketing at Air Canada and interfered with countless other businesses. Despite its widespread damage, the creator of the successful bug was never caught.
3. Klez – $19.8 billion
Klez is a close third on the list of the worst computer viruses ever created. With nearly $20 billion in estimated damages, it infected about 7.2% of all computers in 2001, or 7 million PCs. The Klez worm sent fake emails, spoofed recognized senders and, among other things, attempted to deactivate other viruses.
As with other viruses and worms, Klez was released in several variants. It infected files, copied itself, and spread throughout each victim’s network. It hung around for years, with each version more destructive than the last.
Windows has come a long way since most of the computer viruses on this list hit the web. Thankfully, built-in protection with Microsoft Defender is always on the watch.
4. ILOVEYOU – $15 billion
The year 2000’s ILOVEYOU virus worked by sending a bogus “love letter” that looked like a harmless text file. Like Mydoom, this attacker sent copies of itself to every email address in the infected machine’s contact list. Shortly after its May 4 release, it had spread to more than 10 million PCs.
The virus was created by a college student in the Philippines named Onel de Guzman. Lacking funds, he wrote the virus to steal passwords so he could log into online services he wanted to use for free. He reportedly had no idea how far his creation would spread. This virus is also known as Loveletter.
Need to up your remote work security game before there’s another entry on the list of most deadly computer viruses? See our guide: How to Work Remotely and Securely
5. WannaCry – $4 billion
The 2017 WannaCry computer virus is ransomware, a virus that takes over your computer (or cloud files) and holds them hostage. The WannaCry ransomware ripped through computers in 150 countries, causing massive productivity losses as businesses, hospitals, and government organizations that didn’t pay were forced to rebuild systems from scratch.
The malware raged like wildfire through 200,000 computers worldwide. It stopped when a 22-year-old security researcher in the U.K. found a way to turn it off. Computers with out-of-date operating systems were hit especially hard. That’s why security experts always recommend updating your systems frequently.
Ransomware strikes again
In September 2020, one of the potentially largest computer virus attacks in medical history hit Universal Health Services. The U.S. hospital chain, which has more than 400 locations, was reportedly struck by damaging ransomware. The attack forced the cancellation of surgeries and made healthcare workers switch to paper records.
6. Zeus – $3 billion
The Zeus computer virus is an online theft tool that hit the web in 2007. A whitepaper by Unisys three years later estimated that it was behind 44% of all banking malware attacks. By then, it had breached 88% of all Fortune 500 companies, 2,500 organizations total, and 76,000 computers in 196 countries.
The Zeus botnet was a group of programs that worked together to take over machines for a remote “bot master.” It originated in Eastern Europe and was used to transfer money to secret bank accounts. More than 100 members of the crime ring behind the virus, mostly in the U.S., were arrested in 2010. It’s not as prominent today, but some of the virus’ source code lives on in newer botnet viruses and worms.
Zeus caused documented damage of $100 million. But the real cost in terms of lost productivity, removal, and undocumented theft is undoubtedly much higher. A $3 billion estimate, adjusted for inflation, puts this virus at a cost of $3.7 billion in today’s dollars.
7. Code Red – $2.4 billion
First observed in 2001, the Code Red computer virus was yet another worm that penetrated 975,000 hosts. It displayed the words “Hacked by Chinese!” across infected web pages, and it ran entirely in each machine’s memory. In most cases it left no trace in hard drives or other storage.
Financial costs are pegged at $2.4 billion. The virus attacked websites of infected computers and delivered a distributed denial of service (DDoS) attack on the U.S. White House’s website, www.whitehouse.gov. In fact, the White House had to change its IP address to defend against Cod Red.
Can your printer get a virus? See our cool infographic: The State of Printer Security
8. Slammer – $1.2 billion
The SQL Slammer worm cost an estimated $750 million across 200,000 computer users in 2003. This computer virus randomly selected IP addresses, exploiting vulnerabilities and sending itself on to other machines. It used these victim machines to launch a DDoS attack on several internet hosts, significantly slowing internet traffic.
The Slammer worm hit banks in the U.S. and Canada especially hard, taking ATMs offline in many locations. Customers of Toronto’s Imperial Bank of Commerce found themselves unable to access funds. The attack reared its ugly head again in 2016, launching from IP addresses in Ukraine, China, and Mexico.
9. CryptoLocker – $665 million
Thankfully, ransomware attacks like the 2013 CryptoLocker virus have dipped since their 2017 peak. This malware attacked upwards of 250,000 machines by encrypting their files. It displayed a red ransom note informing users that “your important files encryption produced on this computer.” A payment window accompanied the note.
The virus’ creators used a worm called the Gameover Zeus botnet to make and send copies of the CryptoLocker virus. According to a report by security firm Sophos, the average ransomware attack costs a business $133,000. If we estimate that CryptoLocker hit 5,000 companies, that would put its total cost at $665 million.
Where will cybersecurity go next? See our guide: The Future of Cybersecurity
10. Sasser – $500 million
The Sasser worm was written by a 17-year-old German computer science student named Sven Jaschan. He was arrested at the age of 18 in 2004 after a $250,000 bounty was posted for the computer virus’ creator. A friend of Jaschan’s tipped authorities that the youth had penned not only the Sasser worm but also the damaging Netsky.AC attack.
Jaschan was given a suspended sentence after it was found he was a minor when he wrote the malware. The Sasser worm crashed millions of PCs, and though some reports put damages at $18 billion, the relatively low infection rate suggests a more likely cost of $500 million.
Other notable viruses
The top 10 worst computer viruses above are just the ugly tip of a gargantuan digital iceberg. With a million new malware programs popping up every 3 years, we may miss the forest for a few outstanding trees. Here are just a few more viruses that have wreaked havoc over the years:
Mimail: This worm tried to harvest data from infected machines to launch a string of DDoS attacks, but was relatively easy to remove.
Yaha: Yet another worm with several variants, thought to be the result of a cyber-war between Pakistan and India.
Swen: Written in C++, the Swen computer worm disguised itself to look like a 2003 OS update. Its financial cost has been pegged at $10.4 billion, but not reliably.
Storm Worm: This worm showed up in 2007 and attacked millions of computers with an email about approaching bad weather.
Tanatos/Bugbear: A 2002 keylogger virus that targeted financial institutions and spread to 150 countries.
Sircam: A computer worm from 2001 that used counterfeit emails with the subject line, “I send you this file in order to have your advice.”
Explorezip: This worm used fake emails to spread to every machine on thousands of local networks.
Melissa: The most dangerous computer virus in 1999, Melissa sent copies of itself that looked like NSFW pics. The U.S. FBI estimated cleanup and repair costs at $80 million.
Flashback: A Mac-only virus, Flashback infected over 600,000 Macs in 2012 and even infected Apple’s home base in Cupertino, Calif. In 2020, there’s now more malware on Macs than on PCs.
Conficker: This 2009 virus still infects many legacy systems and could do significant damage if it ever activates.
Stuxnet: This worm is reported to have destroyed Iranian nuclear centrifuges by sending damaging instructions.
Read More
Many users would probably agree that the Windows Media Player, in most cases, is a lot better than the Groove. Although it is understandable why the Groove Music app was created, it may be time for Microsoft to bring its focus back on Windows Media Player. Even more, so that some users are experiencing an issue where they were not able to play their playlist in the Windows Media Player on their Windows 10 PCs.
One particular user claimed that when he removed his music from the C drive and transferred them to the C drive for some reason he didn’t state. Right after he did that, any attempts to play songs in the Windows Media Player just don’t seem to work. Transferring music to a different location shouldn’t cause any issue but for some unknown reason, it did. According to security experts, the reason why the Windows Media Player didn’t play the playlist is that it still believes that the songs are still located in the C drive when they’re really not. So the question here is, how can you get the Windows Media Player to recognize the exact and correct location of the songs? Worry not, for this post will show you how exactly you can do that.
Carefully follow each one of the instructions given below to fix the Windows Media Player issue.
Option 1 – Try running the WMP Troubleshooters
In case there are any issues with the Windows Media Player, you can always count on the WMP Troubleshooters to fix the problem for you. These built-in troubleshooters, namely, Windows Media Player Library and Windows Media Player DVD Troubleshooters can help you fix the problem, so run them both and see if you can now play those songs or not.
Option 2 – Try rebuilding the Windows Media Player Database
If the first option didn’t work for you, you might have to rebuild the Windows Media Player database. You can do this by following the steps below.
- Tap the Win + R keys at the same time to open the Run dialog box.
- After that, copy and paste this command in the field: %userprofile%Local SettingsApplication DataMicrosoftMedia Player
- Once you’ve pasted the command, hit Enter then you will see a new File Explorer which is the folder for the Media Player. You will have to delete every item in this folder, except for the folders. Meaning to say, you must only delete the individual contents inside but not the folders.
- Now launch the Windows Media Player again and watch as it rebuilds the music library automatically.
Read More
A number of users reported that they encountered an error that says, “Windows doesn’t have a network profile for this device” while they tried to connect Network devices such as printers and speakers to their Windows 10 computers. On the other hand, this kind of issue is reported for non-network devices as well. This kind of error might be due to incompatibility between the device and your operating system or it could be that the network drivers in your computer need to be updated in order to recognize the new device. Whatever the cause is here are a couple of suggestions you can try to resolve the “Windows doesn’t have a network profile for this device” error.
Option 1 – Check if the network device is compatible with your operating system
As mentioned, the error could be due to incompatibility between the device and the system. To verify, just go to the website of the device’s manufacturer since you can find all the information about the device there.
Option 2 – Make sure that your computer is discoverable
- Click on the Start button.
- Then click on the gear-like icon to open Settings.
- After that, select Network & Internet >> Wi-Fi.
- Next, change the Network Profile to Private.
- Now restart your computer and then connect the device again and see if the error is gone or not.
Option 3 – Try to update or rollback or uninstall the Network drivers
You might also want to update or roll back or disable your Network drivers to fix the “This operation failed as no adapter is in the state permissible for this operation” error.
- Tap the Win + R keys to launch the Run window and then type in the “devmgmt.msc” command and hit Enter to open the Device Manager window.
- Under the Device Manager, you will see a list of drivers. From there, look for the Network Adapters and expand it.
- Then right-click on each one of the Network drivers and depending on your preference, you can either select “Update driver”, “Disable device” or “Uninstall device”.
- After that, restart your PC and see if it helped in fixing the “Windows doesn’t have a network profile for this device” error.
Option 4 – Try to check the SNMP status
- Tap the Win + R keys to open the Run dialog box and type “services.msc” in the field and tap Enter to open the Service Manager window.
- After opening the Service Manager, look for the SNMP Service from the list of services.
- Once you’ve found the SNMP Service, make sure that its Service Status is set to “Running”. If the service is not running, just right-click on it and select Properties.
- From there, change the Service Status to Automatic and then click on the Apply and OK buttons.
- After that, click on the Start button again and check if the error is now fixed.
Note: If your printer is the one that triggers the error, refer to these steps:
- You have to go to Control Panel > Devices & Printers.
- From there, right-click on the printer which is the one that causes the error, and then select Printer Properties.
- Next, click the Configure Port button under the Ports tab and select SNMP Status Enabled.
- Now click the OK button and check if it fixes the error or not.
Option 5 – Run the Hardware and Devices Troubleshooters
You could also run this troubleshooter to fix the “Windows doesn’t have a network profile for this device” error.
- The first thing you need to do is click on Start and then on the gear-like icon to pull up the window for Settings.
- After opening Settings, look for the Update and Security option and select it.
- From there, go to the Troubleshoot option located on the left-hand side of the list.
- Next, select Hardware and Devices from the list and open the Troubleshooter and run it. Once it is doing its job, wait for it to complete the process and then restart the system.
- After the system restarts, check if the problem’s now fixed. If not, refer to the advanced guide given below.
Read More
As you know, the Settings app is a vital part of Windows 10 as it helps in fixing issues in the system and offers users access to various Troubleshooters, as well as the Reset function and many more. So if you want to Reset this PC or a Windows Store app, you need to use the Settings app to do so. However, one of the most annoying errors you can encounter when using the Settings app is that it crashes or sometimes does not open at all. Thus, if you are having issues with this app, worry not for there are alternative ways you can try to reset your Windows 10 PC.
For you to reset your Windows 10 PC without using the Settings app, the main option you have is to use the Advanced Startup options and there are different methods by which it can be accessed. It can be accessed via Lockscreen, Command Prompt window, or via Start Menu.
Option 1 – Reset Windows 10 via Lockscreen
- You need to first boot into the Advanced Startup options from the lock screen. If you’re already logged in to your account, you have to hit the Win + L keys to get on the lock screen.
- Next, click on the Power button located at the bottom right corner of the screen.
- After that, hold the Shift key and click on Restart to restart your computer into the Advanced Setup option mode. And from there, you can reset your Windows 10 computer.
Option 2 – Reset Windows 10 via Command Prompt
- Search for “cmd” in the Cortana search box or hit the Win + R keys to open the Run box and type “cmd” in the field and hit Enter to open Command Prompt.
- If a User Account Control or UAC prompt appears, click Yes to proceed in opening Command Prompt.
- After that, type the following command and hit Enter to execute it:
shutdown /r /o /f /t 00
- After you execute the command, it will restart your computer into the Advanced Startup options where you can reset your Windows 10 computer.
Option 3 – Reset Windows 10 via Start Menu
- Tap the Win key or click on the Start button located in the Taskbar.
- Then click on the Power button at the bottom right portion of the screen.
- Next, press and hold the Shift key on your keyboard and then click on Restart. This will restart your Pc into the Advanced Startup options.
Note: Once you have access to the Advanced Startup options, you have to go to the setting which allows you to Reset your Windows 10 PC. All you have to do is select Troubleshoot > Reset this PC to reach the following screen
Afterward, select either the “Keep my files” option or the “Remove everything” option depending on your preference, and then proceed to the next on-screen instructions that follow to reset your Windows 10 computer.
Read More
New malware with extensive spyware capabilities steals data from infected Android devices and is designed to automatically trigger whenever new info is read to be exfiltrated. The spyware can only be installed as a ‘System Update’ app available via third-party Android app stores as it was never available on Google’s Play Store. This drastically limits the number of devices it can infect, given that most experienced users will most likely avoid installing it in the first place. The malware also lacks a method to infect other Android devices on its own, adding to its limited spreading capabilities.
However, when it comes to stealing your data, this remote access trojan (RAT) can collect and exfiltrate an extensive array of information to its command-and-control server. Zimperium researchers who spotted it observed it while «stealing data, messages, images and taking control of Android phones.»
What happens when malicious software is installed
«Once in control, hackers can record audio and phone calls, take photos, review browser history, access WhatsApp messages, and more,» they added. Zimperium said its extensive range of data theft capabilities includes:
- Stealing instant messenger messages;
- Stealing instant messenger database files (if the root is available);
- Inspecting the default browser’s bookmarks and searches;
- Inspecting the bookmark and search history from Google Chrome, Mozilla Firefox, and Samsung Internet Browser;
- Searching for files with specific extensions (including .pdf, .doc, .docx, and .xls, .xlsx);
- Inspecting the clipboard data;
- Inspecting the content of the notifications;
- Recording audio;
- Recording phone calls;
- Periodically take pictures (either through the front or back cameras);
- Listing of the installed applications;
- Stealing images and videos;
- Monitoring the GPS location;
- Stealing SMS messages;
- Stealing phone contacts;
- Stealing call logs;
- Exfiltrating device information (e.g., installed applications, device name, storage stats).
How does it work?
Once installed on an Android device, the malware will send several pieces of info to its Firebase command-and-control (C2) server, including storage stats, the internet connection type, and the presence of various apps such as WhatsApp. The spyware harvests data directly if it has root access or will use Accessibility Services after tricking the victims into enabling the feature on the compromised device. It will also scan the external storage for any stored or cached data, harvest it, and deliver it to the C2 servers when the user connects to a Wi-Fi network. Unlike other malware designed to steal data, this one will get triggered using Android’s contentObserver and Broadcast receivers only when some conditions are met, like the addition of a new contact, new text messages, or new apps being installed.
«Commands received through the Firebase messaging service initiate actions such as recording of audio from the microphone and exfiltration of data such as SMS messages,» Zimperium said.
«The Firebase communication is only used to issue the commands, and a dedicated C&C server is used to collect the stolen data by using a POST request.»
Camouflage
The malware will also display fake «Searching for the update..» system update notifications when it receives new commands from its masters to camouflage its malicious activity. The spyware also conceals its presence on infected Android devices by hiding the icon from the drawer/menu. To further evade detection, it will only steal thumbnails of videos and images it finds, thus reducing the victims’ bandwidth consumption to avoid drawing their attention to the background data exfiltration activity. Unlike other malware that harvests data in bulk, this one will also make sure that it exfiltrates only the most recent data, collecting location data created and photos taken within the last few minutes.
If you would like to read more helpful articles and tips about various software and hardware visit errortools.com daily.
Read More
Recently, a number of users reported an error in Google Chrome that says, “ERR_SOCKET_NOT_CONNECTED”. If you are one of these users, read on as this post will guide you in resolving this error. This kind of error in Chrome is kind of vague so it could be caused by a couple of factors like DNS server issues, Socket Pools, third-party plugins or extensions, and many more.
Whatever the cause may be, there are several options you can check out to resolve the problem. You can try to flush the Socket Pool or change the DNS address or remove unwanted extensions or reset your Google Chrome browser.
Option 1 – Try to flush the Socket Pool
- Open Google Chrome and in the address bar, type “chrome://net-internals/”.
- After that, select Sockets on the left side panel.
- Next, select Flush socket pools from the right-side panel.
- And once it’s done, restart your Chrome browser and check if the “ERR_SOCKET_NOT_CONNECTED” is fixed or not.
Option 2 – Try to change the DNS Server
In this option, you can try changing your current DNS settings to the Google Public DNS as it could also help in fixing the “ERR_SOCKET_NOT_CONNECTED” error. To do so, follow the steps below.
- The first thing you have to do is right-click on the network icon in the Taskbar and select Network and Sharing Center.
- Next, click on the “Change Adapter Settings” option.
- After that, search for the network connection that you are using to connect to the internet. Note that the option might be “Wireless Connection” or “Local Area Connection”.
- Right-click on your network connection and click on Properties.
- Then select the new window to choose the “Internet Protocol 4 (TCP/IPv4)” option.
- After that, click on the Properties button and click the checkbox in the new window for the option “Use the following DNS server addresses”.
- Type in “8.8.8.8” and “8.8.4.4” and click OK and exit.
Option 3 – Get rid of any conflicting browser extensions
- Open Chrome and press Alt + F keys.
- Go to More tools and click Extensions to look for any suspicious browser extensions or toolbars.
- Click the Recycle bin and select Remove.
- Restart Chrome and press Alt + F keys again.
- Proceed to On Startup and mark Open a specific page or set of pages.
- To check if the browser hijacker is still active, click Set pages, if it is active, overwrite the URL.
Option 4 – Try to reset Google Chrome
Before you proceed, make sure that the Chrome browser is not running anywhere in the background via Task Manager. Once you’ve made sure that it’s no longer running, refer to these steps:
- Tap the Win + R keys to open the Run dialog box.
- Then type “%USERPROFILE%AppDataLocalGoogleChromeUser Data” in the field and tap Enter to open this location.
- From there, look for the Default folder and then tap the Shift + Delete button and if a confirmation prompt appears, click on Yes.
- After deleting the Default folder, open Google Chrome and click on the three vertical dots icon located in the top-right corner to open the menu.
- Next, click on Settings and scroll down and then click on Advanced to open the Advanced Settings.
- Then scroll down until you see the “Reset and clean up” section and click the “Restore Settings to their original defaults” option.
- After that, you will see a confirmation box and from there, click on the Reset settings button to reset your Google Chrome browser.
Read More
If your operating system cannot or is not able to load a required DLL file on your Windows startup and you encounter a message saying, “Failed to load DLL”, then you’ve come to the right place as this post will guide you in fixing this problem.
When you encounter this kind of issue, you will see either of the following error messages on your screen:
“The dynamic library dll failed to load.”
“Failed to load dll library.”
This kind of error can occur when your Windows operating system fails to locate the DLL library which the system needs to access during startup. It can also occur when the DLL file is not in a directory specified in the path or when the DLL file is corrupted or has gone missing. Moreover, you can also encounter this error if the DLL file is infected with some malware. Whatever the case is, here are some suggestions you have to check out to resolve the problem.
Option 1 – Try to reinstall the program
The first thing you can do is to reinstall the program that’s giving you this error. Once you’ve uninstalled the program, download its latest setup file from its official site and then install it again.
Option 2 – Try checking the startup programs
You might also want to check the startup programs on your computer, especially the Windows Registry startup paths, and then remove the startup entry to the concerned DLL file.
Option 3 – Try to re-register the problematic DLL file
You may have to re-register the ntdll.dll file using the regsvr32.exe before you can successfully install the program and fix the ntdll.dll file crash error. The Regsvr32 tool is a command-line utility that can be used to register and unregister OLE controls like DLL and ActiveX (OCX) control in the Windows operating system. Follow the steps below to use it.
- Open Command Prompt as admin from the WinX menu.
- Next, type the following commands in the elevated Command Prompt and hit Enter to execute the command. This will re-register the affected DLL file using the Windows operating system tool, regsvr32.exe.
- exe /[DLL file]
- exe [DLL file]
Note: Replace “[DLL file]” with the name of the DLL file that was pointed out in the error.
- After you execute the given commands, you should see a message saying, “DllRegisterServer in vbscript.dll succeeded” if the Regsvr32 tool was able to run successfully. After that, try to install the program again and see if it now works.
Option 4 – Try to replace the DLL file with a trusted source
- First, you need to get the new DLL file from another computer with preferably the same file version number.
- After that, you need to boot your PC into Safe Mode and navigate to the paths listed below and then replace the file using a USB drive or other external storage devices.
- x86: This PC > C:/Windows/System32
- x64: This PC > C:/Windows/SysWOW64
- Next, type “cmd” in the Cortana search box and right-click on Command Prompt, and select “Run as administrator” to open it with administrator privileges.
- Now type the “regsvr32 ntdll.dll” command and hit Enter.
- Restart your PC and check if the error is now fixed.
Option 5 – Try checking the details in the Event Viewer
Checking the details in the Event Viewer can also help you find out the root cause of the problem as the Event Viewer usually contains detailed information about the error.
Option 6 – Try running the DISM tool
You might want to repair potentially corrupted files in your system as having them could also trigger the “Failed to load DLL” error. To repair these corrupted system files, you can run the DISM commands:
- Tap the Win + X keys and click on the “Command Prompt (Admin)” option.
- After that, input each one of the commands listed below sequentially to execute them:
- Dism /Online /Cleanup-Image /CheckHealth
- Dism /Online /Cleanup-Image /ScanHealth
- Dism /Online /Cleanup-Image /RestoreHealth
- Once you’ve executed the commands given above, restart your computer and check if the “Failed to load DLL” error is now fixed.
Option 7 – Try scanning your computer using Windows Defender
The DLL file might also be infected with malware or virus and to eliminate it which could explain why you’re getting the “Failed to load DLL” error. Thus, you have to scan your computer using security programs like Windows Defender.
- Tap the Win + I keys to open Update & Security.
- Then click on the Windows Security option and open Windows Defender Security Center.
- Next, click on Virus & threat protection > Run a new advanced scan.
- Now make sure that Full Scan is selected from the menu and then click the Scan Now button to get started.
Read More
Copyright © 2023, ErrorTools. All Rights Reserved
Trademark: Microsoft Windows logos are registered trademarks of Microsoft. Disclaimer: ErrorTools.com is not affiliated with Microsoft, nor claims direct affiliation.
The information on this page is provided for information purposes only.
Многие действия Windows 11 и 10 удобнее и быстрее выполнять с помощью сочетаний клавиш, многие из которых задействуют клавишу Win (Windows) — обычно находящуюся в нижнем ряду клавиатуры слева. Однако, некоторые пользователи могут столкнуться с тем, что нужная клавиша не работает.
В этой инструкции подробно о том, почему может не работать клавиша Win на клавиатуре компьютера или ноутбука и способах это исправить.
Функции включения и отключения клавиши Win на игровых клавиатурах и ноутбуках

Некоторые игровые клавиатуры и ноутбуки предлагают функцию отключения клавиши Win для исключения случайных нажатий во время игры. В зависимости от конкретной модели игрового устройства, реализовано это может быть по-разному, например:
- Для игровых устройств ASUS настройку включения и отключения клавиши Win можно найти в приложении Armoury Crate, для Corsair — в iCUE в настройках профиля клавиатуры, для других игровых компьютеров/клавиатур также можно поискать настройку в фирменном приложении.

- Некоторые игровые клавиатуры поддерживают блокировку клавиши Win сочетанием клавиш. Сами сочетания могут отличаться, например: Fn+Win, Fn+Win+L (отдельные клавиатуры Red Square), Fn+F1 (клавиатуры XPG), Fn+F8 (на некоторых клавиатурах Logitech), возможны и другие комбинации, например, Fn+f6
- Отдельные клавиатуры могут иметь переключатель игрового режима: при наличии такого, попробуйте отключить игровой режим.


Подводя итог по этой части: если у вас игровое устройство, изучите настройки фирменного ПО, функциональные клавиши и их назначение (открыв инструкцию к вашей клавиатуре) — вероятнее всего, отключение клавиши Win было выполнено с их помощью.
В дополнение к указанным пунктам можно попробовать отключить игровой режим в Параметрах Windows 11 или Windows 10 — по некоторым сообщениям, для части устройств он может также отключать и клавишу Win.
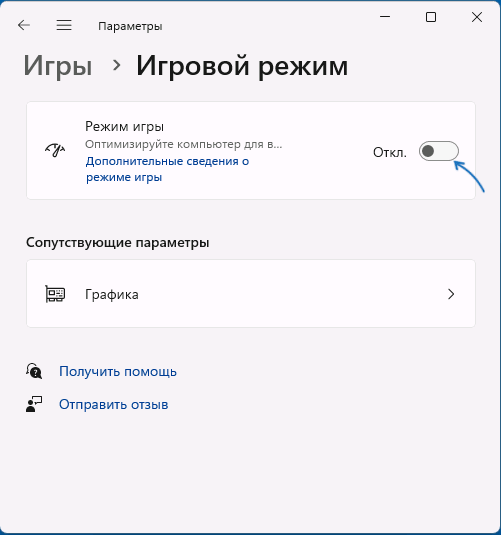
Найти настройки игрового режима можно в разделе Параметров «Игры».
Устранение неполадок клавиатуры
Если речь идёт о простой, не игровой клавиатуре, на которой перестала работать клавиша Win, вы можете попробовать следующие методы решения проблемы:
- Попробуйте удалить клавиатуру в диспетчере устройств (правый клик — удалить), а затем выбрать в меню диспетчера устройств «Действие» — «Обновить конфигурацию оборудования».
- Попробуйте подключить клавиатуру (или приёмник) к другому USB-разъему.
- Запустите средство устранения неполадок клавиатуры: нажмите правой кнопкой мыши по кнопке «Пуск», выберите пункт «Выполнить» и используйте команду
msdt.exe -id KeyboardDiagnostic
Внимание: классические инструменты устранения неполадок, возможно, прекратят работу в будущих версиях Windows.

- Попробуйте отключить фильтрацию ввода, для этого в Windows 11 и Windows 10 можно зайти в Параметры — Специальные возможности — Клавиатура и отключить опцию «Фильтрация ввода».

- Проверьте, нет ли других совместимых драйверов для вашей клавиатуры: в диспетчере устройств нажмите правой кнопкой мыши по клавиатуре, выберите «Обновить драйвер» — «Поиск драйверов на этом компьютере» — «Выбрать из списка установленных драйверов» и, при наличии другого совместимого драйвера, попробуйте выбрать его.


В заключение несколько дополнительных возможных причин не работающей клавиши Win на клавиатуре и подходов к решению проблемы:
- Если до появления проблемы вы устанавливали какие-либо твикеры или иные программы для настройки системы, некоторые из них могут содержать функции отключения или переназначения клавиш, которые, в том числе могли повлиять на работу клавиши Win: можно проверить наличие соответствующих настроек в таких программах.
- В Windows есть возможность настройки системной политики, отключающей комбинации клавиш с клавишей Win. Откройте редактор реестра и проверьте, нет ли параметра с именем NoWinKeys в разделе
HKEY_CURRENT_USER\Software\Microsoft\Windows\CurrentVersion\Policies\Explorer
и аналогичном подразделе в HKEY_LOCAL_MACHINE, при наличии — удалите его, а затем выйдите из системы и вновь зайдите, либо перезагрузите компьютер.
- Если проблема возникла недавно и предполагается, что причина — в системе, а не самой клавиатуре, можно попробовать использовать точки восстановления системы.
Учитывайте, что проблема может быть и аппаратной: неисправность клавиатуры вследствие износа или пролитых жидкостей: причем во втором случае проблемы часто проявляются не сразу, а через некоторое время после самого события.
Если вам необходима клавиша Win, при этом она не работает физически, а замена клавиатуры по какой-либо причине невозможна, вы можете использовать инструменты переназначения клавиш, такие как AutoHotkey, соответствующие настройки в Microsoft PowerToys и другие варианты.