
Quick Tips
- Make sure the automatic brightness feature is turned off on your laptop and update the display drivers.
- Switching to the Microsoft Basic Display Adapter can also resolve brightness-related issues in Windows 11.
- If the problem persists, consider running an SFC scan to repair system files.
Try Basic Fixes
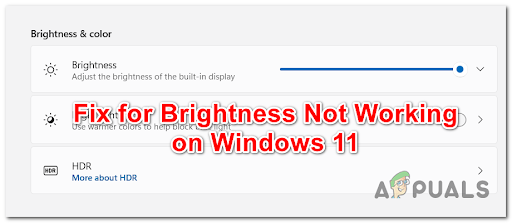
- Adjust brightness from the Quick Settings panel or Settings app: If you can’t seem to adjust the screen brightness using the function keys on your keyboard, press the Windows key + A to access the Quick Settings panel and use the slider next to the brightness icon to modify it. Alternatively, go to Settings > Display to change the screen brightness.
- Install Windows updates: It’s possible that the brightness controls not working issue is due to a bug within the Windows 11 build your laptop is running. If that’s the case, installing pending updates should help.
Fix 1: Disable Auto-Brightness
Next, you should check if the auto-brightness feature is enabled on your PC. If it is, you may have trouble changing the screen brightness manually.
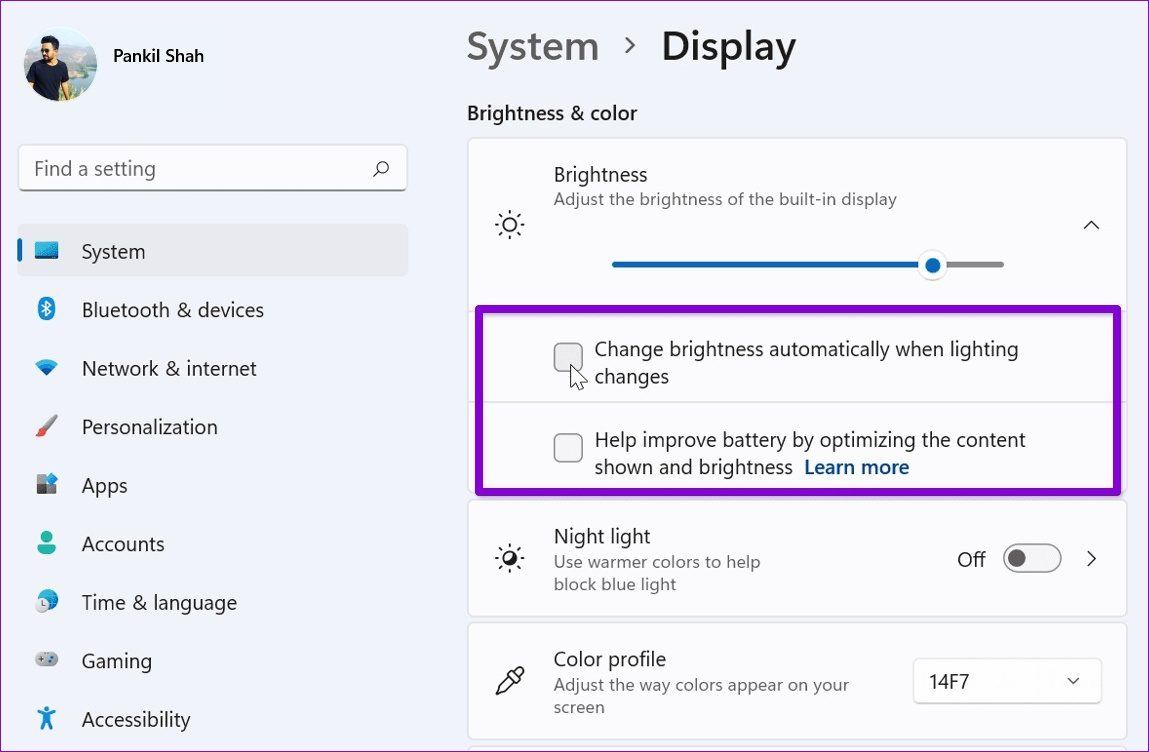
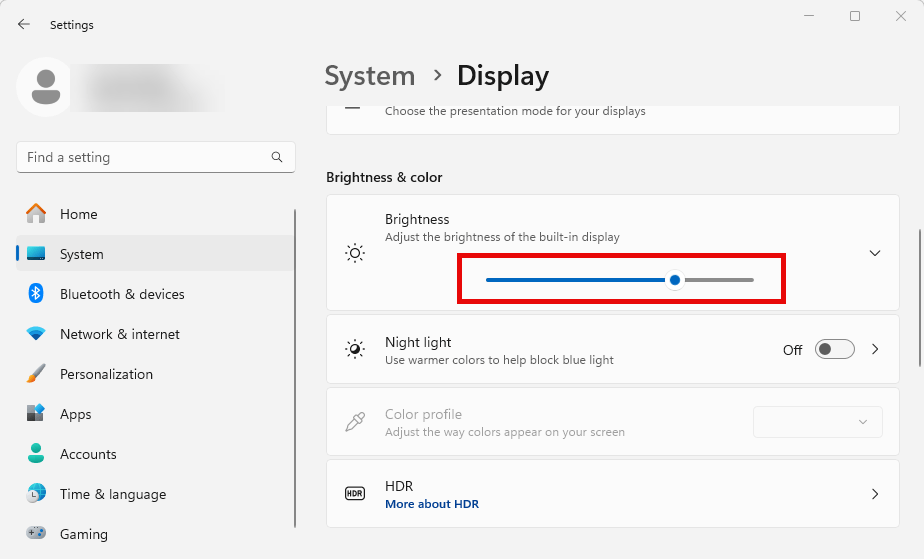
Step 1: Press the Windows key + I to open the Settings app and head to System > Display.
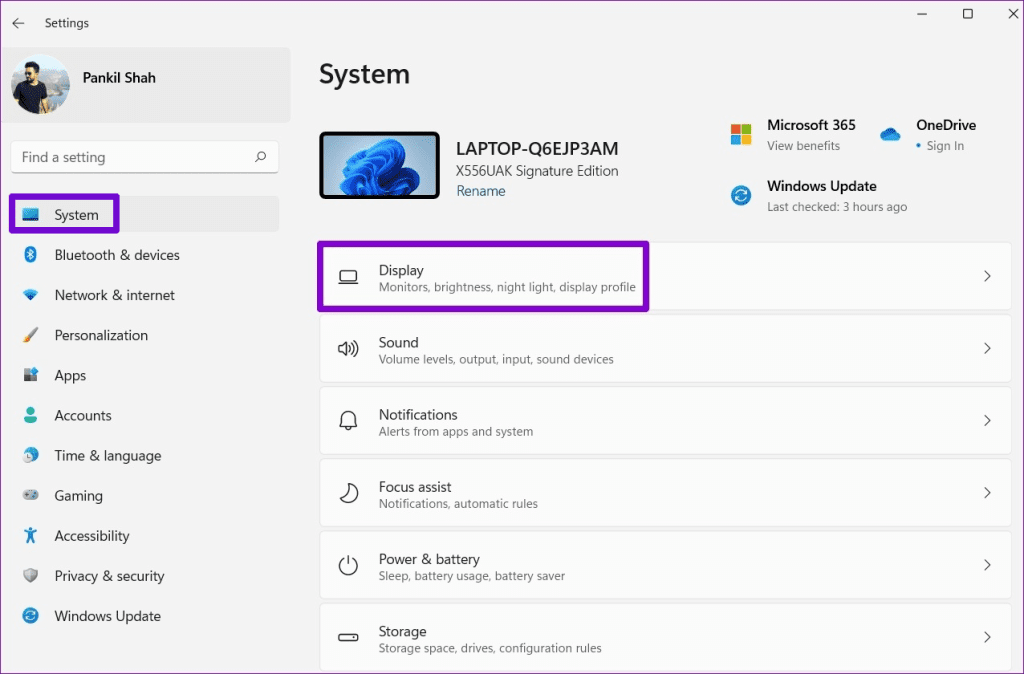
Step 2: Click on the arrow next to Brightness to expand it. Then, uncheck the boxes that read Change brightness automatically when lighting changes and Help improve battery by optimizing the content shown and brightness.
Fix 2: Update Display Driver
The display drivers on your PC can become outdated over time. When this happens, brightness controls may not work as expected in Windows 11. To fix this, you can update the display drivers by following the steps below.
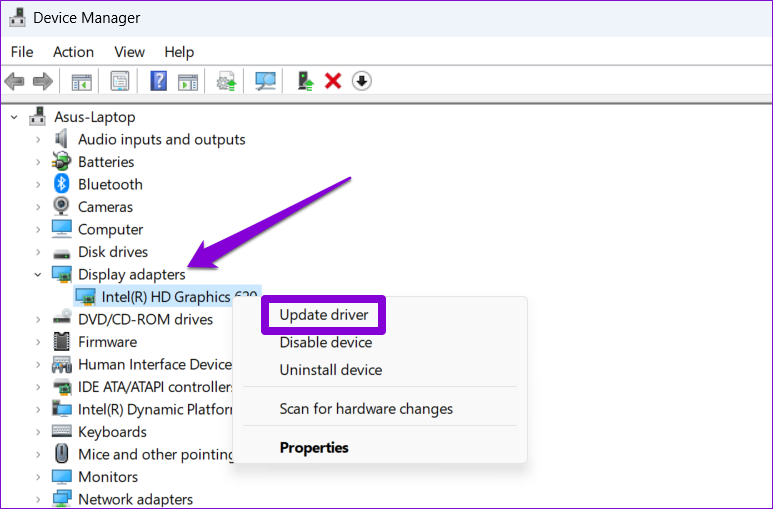
Step 1: Press the Windows key + S to access the search menu. Type in device manager and press Enter.

Step 2: Expand Display adapters, right-click on your display drivers, and select Update driver.

Follow the on-screen instructions to finish updating the display drivers.
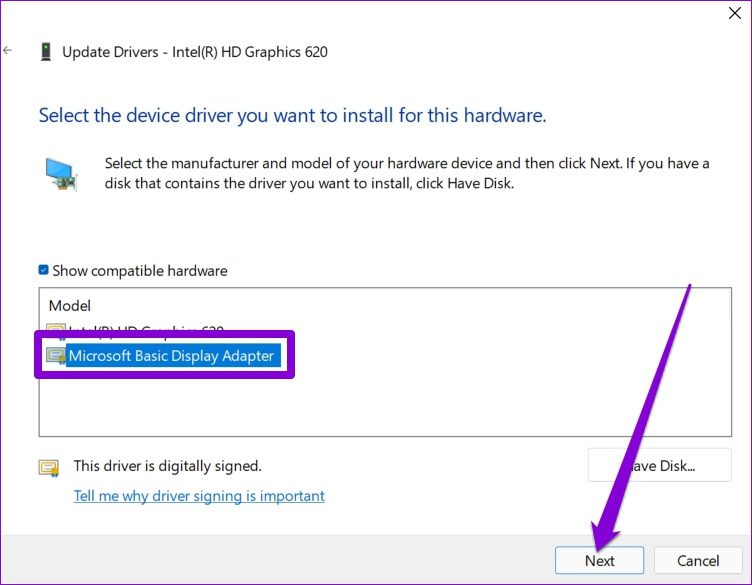
Fix 3: Use Microsoft Basic Display Adapter
If the brightness keys or slider do not work even after you update the display driver, you can try switching to Microsoft’s basic display adapter driver.
Step 1: Open Device Manager using the search menu.
Step 2: Expand Display adapters, right-click on your driver, and select Update driver from the list.
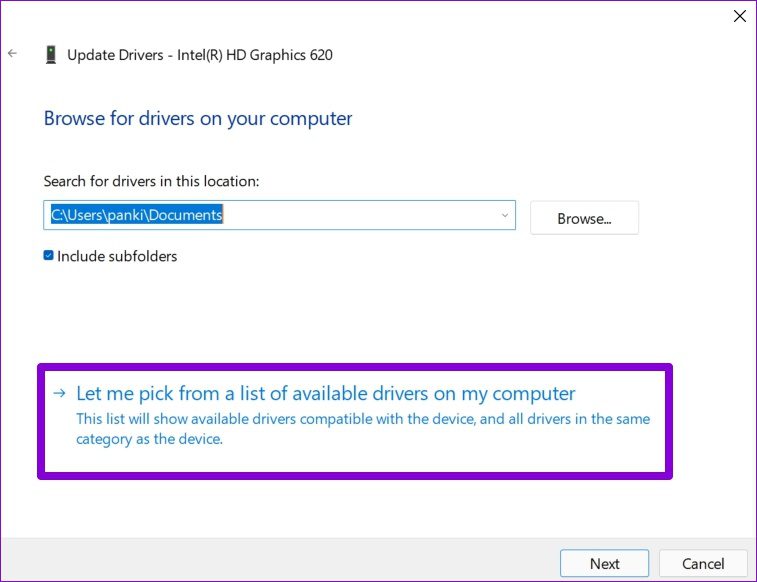
Step 3: Select Browse my computer for drivers.

Step 4: Click the Let me pick from a list of available drivers on my computer option.
Step 5: Select Microsoft Basic Display Adapter and click Next to install them.
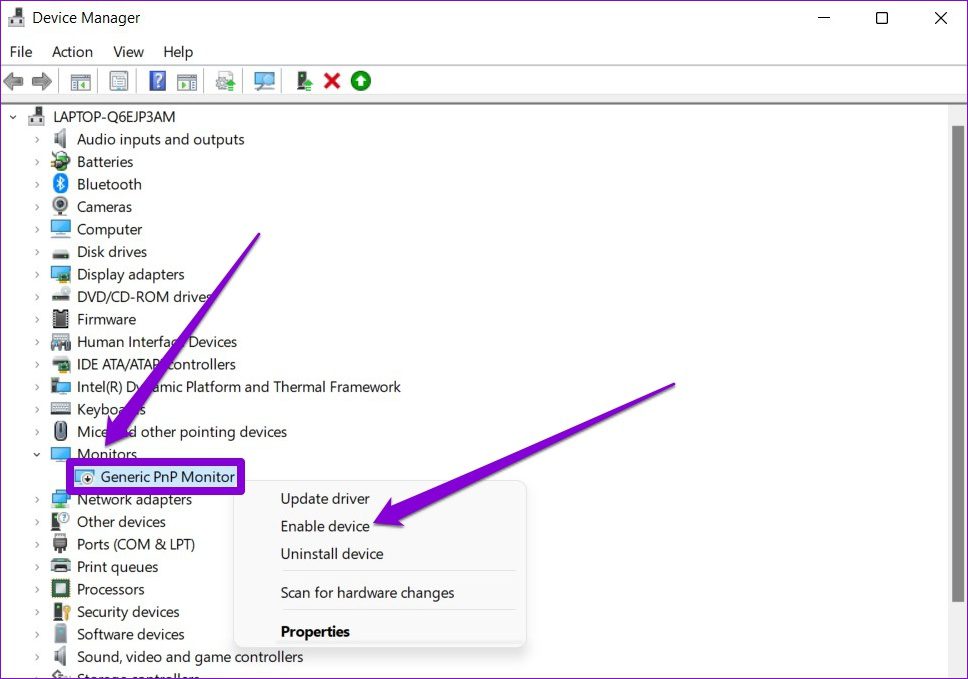
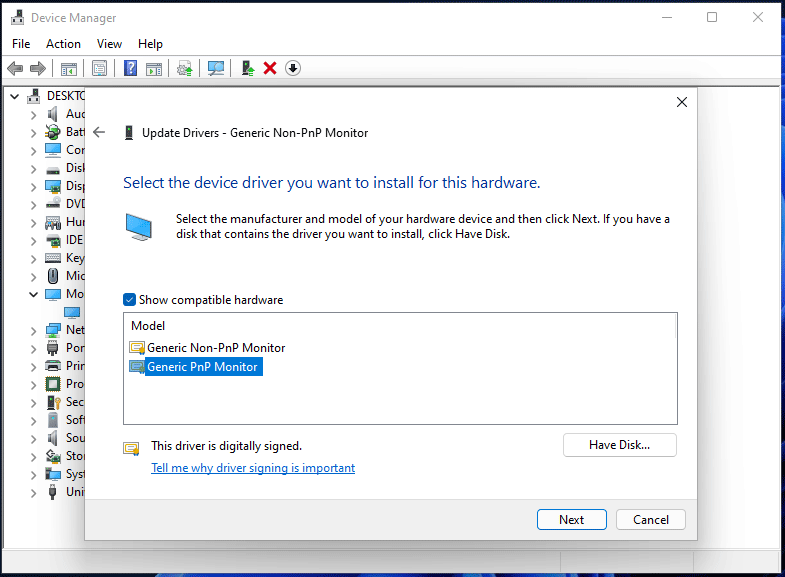
Fix 4: Re-Enable Generic Monitor Drivers
Generic PnP (Plug and Play) monitor drivers on Windows help you connect external displays without requiring any additional setup. However, if you’re having trouble changing the brightness on your external monitor, you can try disabling the Generic PnP monitor driver and enabling it again.
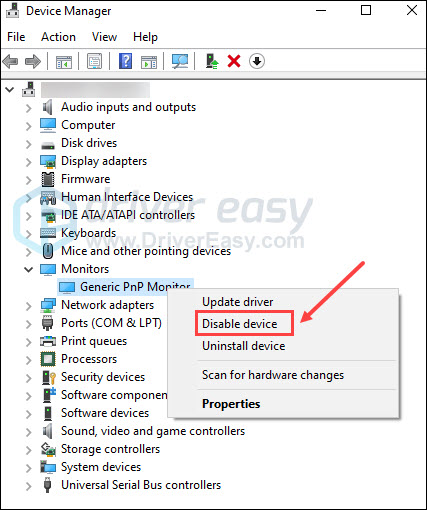
Step 1: Open Device Manager using the search menu.
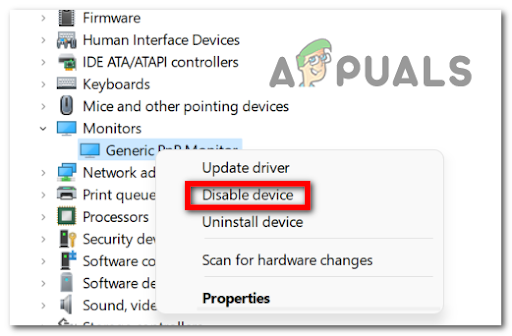
Step 2: Expand Monitors, right-click on Generic PnP Monitor, and select Disable device from the list.
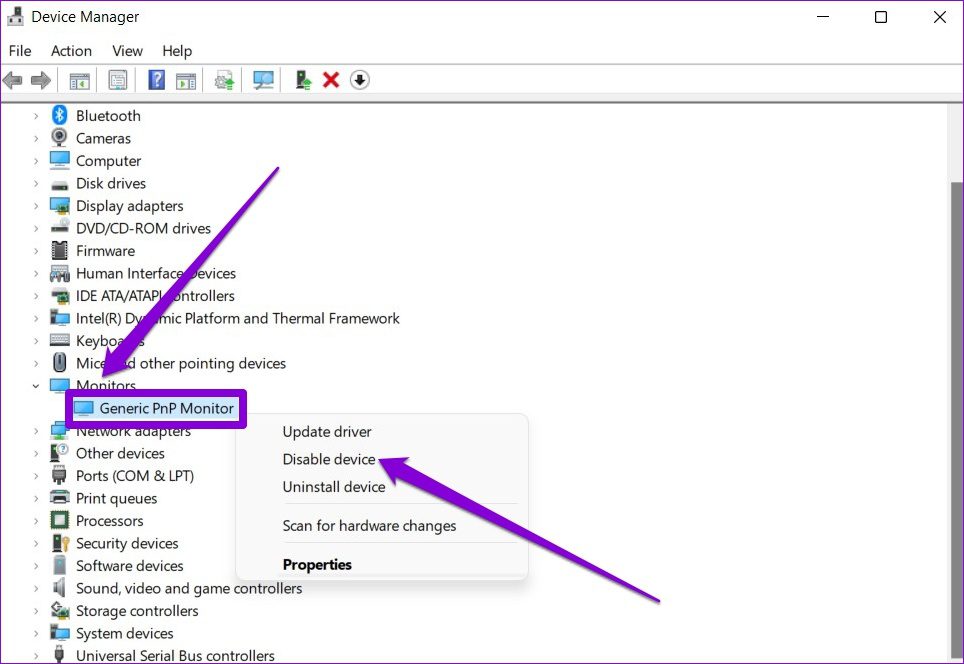
Step 3: Restart your PC and follow the steps above to enable the Generic PnP Monitor.
Fix 5: Repair System Files
Such issues can also arise if some of the system files on your PC are damaged or missing. If that’s the case, running the SFC (System File Checker) scan will help fix the brightness problem on your Windows 11 laptop.
Step 1: Right-click on the Start icon and select Terminal (Admin) from the resulting menu.

Step 2: Type the command mentioned below and press Enter.
SFC /scannow

Wait for the scan to complete and then restart your Windows laptop.
Was this helpful?
Thanks for your feedback!
The article above may contain affiliate links which help support Guiding Tech. The content remains unbiased and authentic and will never affect our editorial integrity.
Windows 11 brightness issue is a common problem. If you find brightness is not working, this is frustrating. Well then, how can you fix this issue on your Windows 11 PC? Take it easy and some useful solutions can be found in this post from MiniTool Solution.
Windows 11 Brightness Not Working
When using a computer, sometimes you need to change the screen brightness to avoid eye strain, improve visibility, and save energy. If you use the PC outdoor or near a window, you also need to adjust the brightness according to the brightness of your surroundings.
However, you may fail to change brightness in Windows 11 since there is no brightness slider in Settings. When going to adjust screen brightness from Quick Access, the option is greyed out.
Besides, there are some other situations on Windows 11 brightness not working. According to users, the brightness option is existing, but the brightness control is not working. In addition, sometimes Windows 11 brightness keeps going down.
If you run into one of the above situations, how can you fix the Windows 11 brightness issue? Move to the next part to look for some solutions.
Solutions to Windows 11 Brightness Not Working
Disable/Enable Generic PnP Monitor or Update Driver
PnP stands for the plug-and-play hardware device. According to users, this way is useful to fix the issue of brightness not working like Windows 11 brightness control not working, Windows 11 brightness slider missing, etc. So, you can also have a try by following the steps below.
Related article: Fix Generic PnP Monitor Issue in Windows 10
Step 1: Right-click the Start button and choose Device Manager.
Step 2: Expand Monitors, right-click on the Generic PnP Monitor and check if it is enabled. If it is, choose Disable device. If it is not enabled, disable it.
Step 3: Click Action at the top menu and choose Scan for hardware changes.
In addition to disabling and enabling the Generic PnP monitor driver, you can choose to update the driver to fix your Windows 11 brightness issue.
Right-click this monitor and choose Update driver. Click Browse my computer for drivers > Let me pick from a list of available drivers on my computer, choose Generic PnP Monitor, and click Next. Then, Windows will install the driver successfully.
Update Graphics Card Drivers
Outdated graphics card drivers can lead to Windows 11 brightness not working or Windows 11 brightness slider missing. To help you out, go to update the GPU drivers.
Step 1: Go to Device Manager via the Win + X menu.
Step 2: Expand Display adapters, right-click on the graphics card driver and choose Update driver.
Step 3: Choose the first option to let Windows automatically search for drivers to update.
In addition, you can update graphics card drivers by downloading the driver from the official website and installing it on your PC. To know more information, refer to this post – How to Update Graphics Card Drivers (NVIDIA/AMD/Intel).
Use Microsoft Basic Display Adapter
If your brightness is not working in Windows 11, you can use Microsoft Basic Display Adapter.
Step 1: In Device Manager, right-click the display adapter and choose Update driver.
Step 2: Go to Browse my computer for drivers > Let me pick from a list of available drivers on my computer, select Microsoft Basic Display Adapter and click Next. Windows will install the driver for your Windows 11 PC.

Enable Adaptive Brightness
If you run into Windows 11 brightness control not working, you can enable Adaptive Brightness to fix this issue. This feature can use light sensors to change the brightness of your screen depending on your environment. On most modern laptops, you can do this task.
Step 1: Go to Control Panel > Power Options.
Step 2: Click Change plan settings > Change advanced power settings.
Step 3: Expand Display and turn on settings for Enable adaptive brightness.
Step 4: Save the change by clicking Apply and OK.
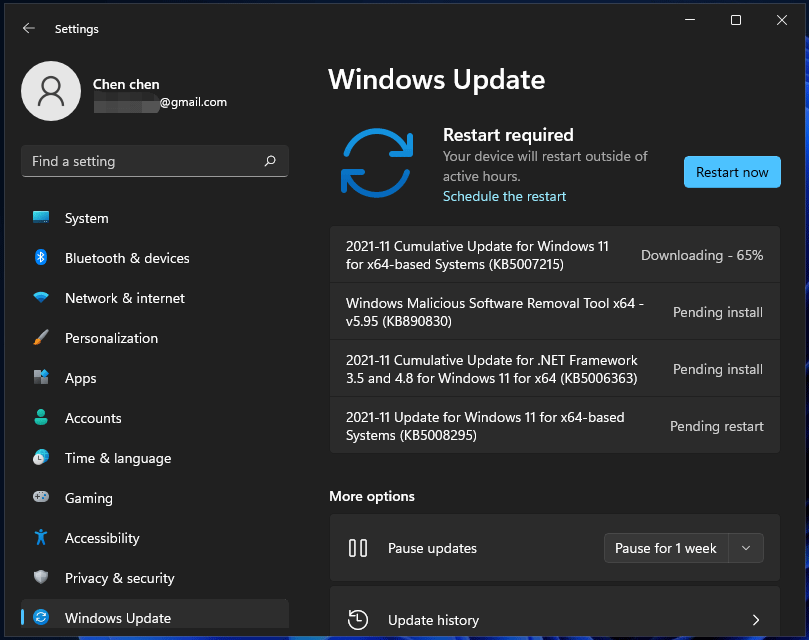
Update Windows 11
Windows update is a useful common to fix some issues including Windows 11 brightness bug. If you cannot adjust brightness, keep your Windows updated. Go to Settings > Windows Update and check for updates. Once some available updates are detected, download and install them on your PC.
Related articles:
- Top 5 Solutions to Windows 10 Brightness Not Working
- Top 6 Solutions to Windows 10 Brightness Slider Missing
These are methods to fix Windows 11 brightness not working. If you have any other useful methods, you can leave a comment below to let us know. Thanks.

The missing brightness slider is one of the annoying issues faced by Windows 11 and 10 users. Luckily, the problem can be solved using the ways mentioned in the following post.
The correct brightness is crucial for proper viewing when working on a PC. Without it, you face problems while watching a movie, playing a game, working on a PC, etc. Below we will explain how to fix the brightness slider missing on Windows 10 and 11.
Reasons for Missing Brightness Slider on Windows 10
- Outdated graphics driver
- Brightness setting removed from Notification Center
- Disabled monitor driver in Device Manager
Common Error Reports By Users When Facing Brightness Issue
- The brightness option is either greyed out or unavailable
- Brightness is not working on the laptop.
- Missing screen brightness option.
- The disappearance of the brightness slider.
How To Fix the Windows Brightness Slider Not Showing?
The mysterious disappearance of the brightness slider surprises many users. For some, it is greyed out, or perhaps the icon is missing. So, why does this happen? A possible explanation is that the option is disabled. To fix it, follow these steps:
Method 1 – Add Brightness Slider to Quick Action Center
If you cannot see the brightness slider in the Quick Action Center, it seems it is not added. To do so, add it follow these steps:
- Press Windows + I to open Windows Settings.
- Double click System option > click Notifications & actions > Edit your quick actions.

- You will now see the notification area > click Add Brightness. When added, click Done.
- You will now see the Brightness slider in the Windows 11 and 10 action center.
If the brightness slider is still not visible, you can follow the other fixes below.
Method 2 – Enable Adaptive Brightness
- Press Windows + I to open Settings.
- Click System.

- Power & sleep > Additional power settings.

- Click Change plan settings.

- Click Change advanced power settings.

- Click the + button to unhide the Display option and Enable the adaptive brightness option.

This will help activate the brightness slider in the Action Center.
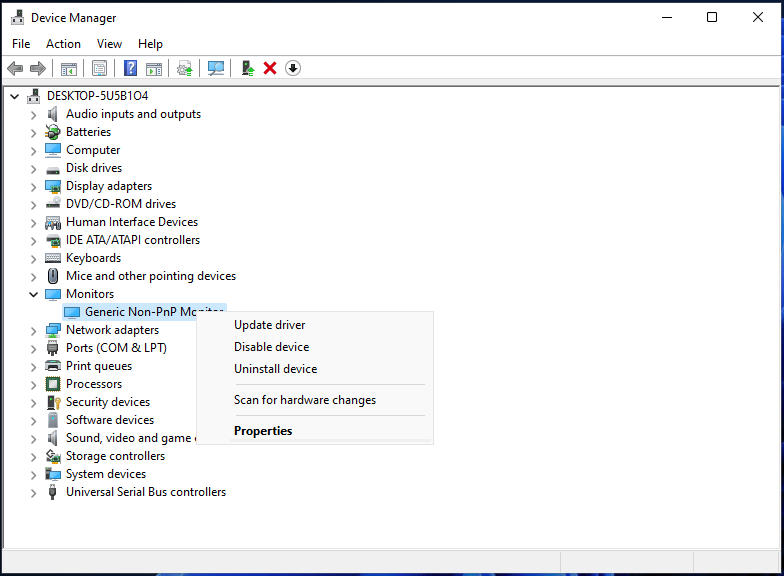
Method 3 – Uninstall and Reinstall Default Monitor Driver
If the brightness option is unavailable, the issue can be driver related. To fix this problem, uninstall and reinstall the driver. To do so, follow these steps:
- Right-click the Windows start icon > select Device Manager.
- Double click the Monitors section > right-click the monitor driver > Uninstall device.

- Check the box next to Delete the driver software for this device and click Uninstall.
- Let the operating finish.
- Click the Action tab > select Scan for hardware changes.
- This will reinstall the default driver. Now check if you can use the brightness settings.
If this doesn’t help, check if the monitor driver is enabled or disabled. If disabled, enable it using the instructions given below:
- Press Windows + X > select Device Manager.
- Expand Monitors category > right-click your Monitor driver and see choose Enable option. Instead of Enable, if you see Disable, the driver is enabled.
Check if the problem is solved or not. If not, we suggest updating the graphics driver. The easiest way is to use a third-party driver updating tool.
To use Advanced Driver Updater, the best tool for Windows to update drivers, follow these steps:
- Download and install Advanced Driver Updater.
- Open the tool and click Start Scan Now to start the scanning process and identify the outdated drivers.

- You’ll get a list of outdated drivers. To update the driver click the Update driver link. If you click Update All & are re-directed to the purchase page, you are a trial user. Free users can update only one driver at a time. While only paid users can use the Update All button. To update all drivers, you must purchase the product with a 60-day money-back guarantee.

- Wait for the driver update to install. Restart the PC the apply changes.
Now try to adjust the brightness. You should not face any problems.
Method 4 – Install Generic PnP Monitor Driver
If the Generic PnP monitor driver is not installed on your PC, then also you can face the brightness slider missing issues. To fix it, install the driver and get the brightness problem resolved.
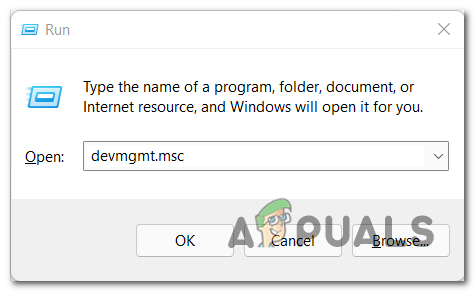
- Press Windows + R to open the Run window.
- Type devmgmt.msc and press Enter key.
- Expand Monitors category. Select the monitor driver > right-click > Update driver.
- Select the second option, Browse my computer for driver software.
- Click Let me pick from the list of available drivers on my computer.

- Select Generic PnP Monitor from the list > click Next.

- Restart PC to apply changes. The brightness problem should now be fixed.
Method 5 – Update Windows
You might face a brightness issue when you don’t have the latest Windows update installed. To update Windows, follow these steps:
- Press Windows + I to open Settings.
- Click Update & Security > Windows Update > Check for updates.

- Wait for the updates to install. Alternatively, you can click Download and install and wait for the updates to install.

- Restart the PC to apply updates and then check if the problem is fixed or not.
Final Words
This concludes our troubleshooting guide on how to fix brightness unavailable on Windows 11 and 10. Suppose the above fixes did not help; you try uninstalling problematic software. Some users have reported that after uninstalling TeamViewer, the issue is fixed. If you don’t know how to uninstall it, you can use the Uninstall module of Advanced System Optimizer.
After using the above methods, we hope you can resolve the missing brightness slider problem.
Most Related :
How To Fix Windows 10/11 LAN Drivers Problem?
How To Fix Windows 11 Bluetooth Not Working Problem
Fix – No Sound Steam Games Windows 11/10
How To Fix Video_Dxgkrnl_Fatal_Error on Windows (2022)
The brightness slider is a little built-in tool in Windows systems 10 and 11. However, if your brightness slider is missing, you may find it inconvenient to adjust your PC brightness to fit your various daily needs. This article will introduce 7 fixes for this problem. And hopefully, you’ll find them helpful.
Update Display Driver
3 steps to update ALL drivers
1. Download; 2. Scan; 3. Update.
Download Now
How to fix the brightness slider missing problem?
- Add brightness slider to action center
- Adjust brightness in the Settings
- Disable and enable your Generic PnP Monitor
- Update related drivers
- Check your graphics card software
- Update Windows
- Restart the Display Enhancement Service
You don’t have to try them all. Just walk your way down the list until you find the one that works for you.
Fix 1 Add brightness slider to action center
If your brightness slider is missing, the first thing you should check is the action center. It allows you to quickly adjust system settings without opening any windows or apps. (The brightness slider is no longer visible in Action center, so if you’re on Windows 11, please move on to Fix 2.)
Here is how:
- Press the Windows logo key and I on the keyboard to launch Settings. Click System.

- Choose Notifications & actions. Then click Edit your quick actions.

- Click Add and then Brightness. Once you have added, click Done.

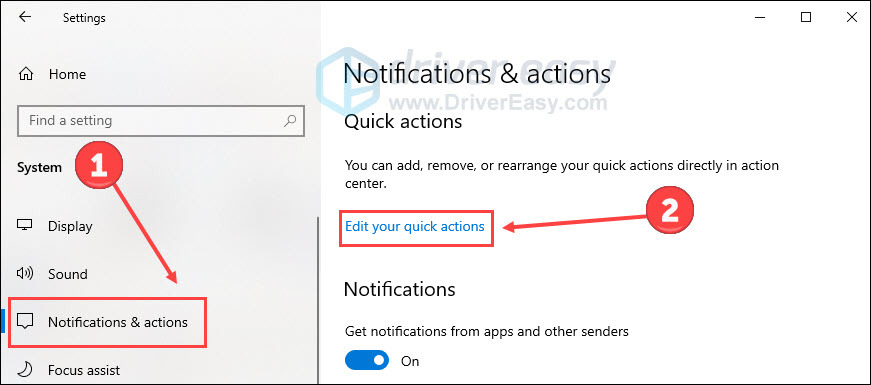
It’s supposed to add a brightness slider to your quick action center. However, if you still cannot find your missing brightness slider back, try the next move below.
Fix 2 Adjust brightness in the Settings
Even if your brightness slider is missing, you can modify your PC’s brightness in the Settings. Just follow these steps:
On Windows 11:
- Press the Windows logo key and I on the keyboard to launch Settings. Click System, then Display.

- Toggle the slider for Brightness to see if it works.


On Windows 10:
- Press the Windows logo key and I on the keyboard to launch Settings. Click System.
- In the Display tab, you’ll find a brightness slider under Brightness and Color. Then you can change the brightness based on your need.


But, if you still have problems with the brightness slider, you may need to check your computer’s monitor.
Fix 3 Disable and enable your Generic PnP Monitor
Sometimes your third-party apps might install a different driver for your monitor, or your monitor driver may get disabled for unknown reasons. If the monitor fails to work well, the brightness adjustment may be affected. Therefore, we recommend refreshing your monitor by disabling and enabling it.
- Press the Windows logo key and X on the keyboard. Then click Device Manager.
- Expand the Monitor list and right-click Generic PnP Monitor.
- If you see the Enable device option, click it to enable the driver. However, if you can’t see that option, you can click Disable device and then Enable device to make it works again.

Check your brightness settings to see if the problem persists. If you have no luck with this fix, check your computer drivers following the next move.
Fix 4 Update related drivers
When it comes to the brightness slider missing, checking your devices’ drivers is a must. For one thing, the brightness slider disappears may have something to do with the monitor, display, and graphics card. For another, missing, outdated, or faulty drivers are very likely to make your devices malfunction. So you may not want to neglect the driver update on your PC.
In this case, you need to update the monitor driver, display driver, and graphics drivers. All of them may have an impact on the brightness slider.
Generally, there are 2 methods to update device drivers:
Option 1 – Download and install the driver manually
To update your device drivers, you need to go to the manufacturers’ website, find the drivers corresponding with your specific flavor of Windows version (eg. Windows 32 bit) and download the driver manually.
For example, you may visit Nvidia, AMD, Intel, or other official websites to update your graphics driver. Normally you can find download links on the support, driver, or download sections. Search for your device model and find the driver matching your operating system.
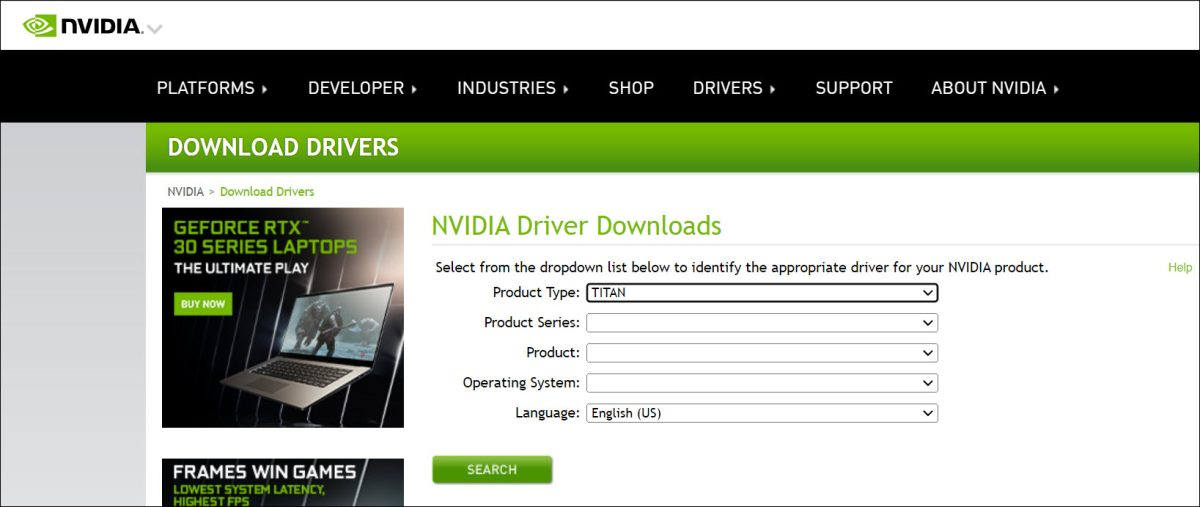
Once you’ve downloaded the correct drivers for your system, double-click on the downloaded file and follow the on-screen instructions to install the driver.
Option 2 – Automatically update all drivers
If you don’t have the time, patience, or computer skills to update all drivers manually, you can do it automatically with Driver Easy.
Driver Easy will automatically recognize your system and find the correct drivers for it. You don’t need to know exactly what system your computer is running, you don’t need to risk downloading and installing the wrong driver, and you don’t need to worry about making a mistake when installing.
- Download and install Driver Easy.
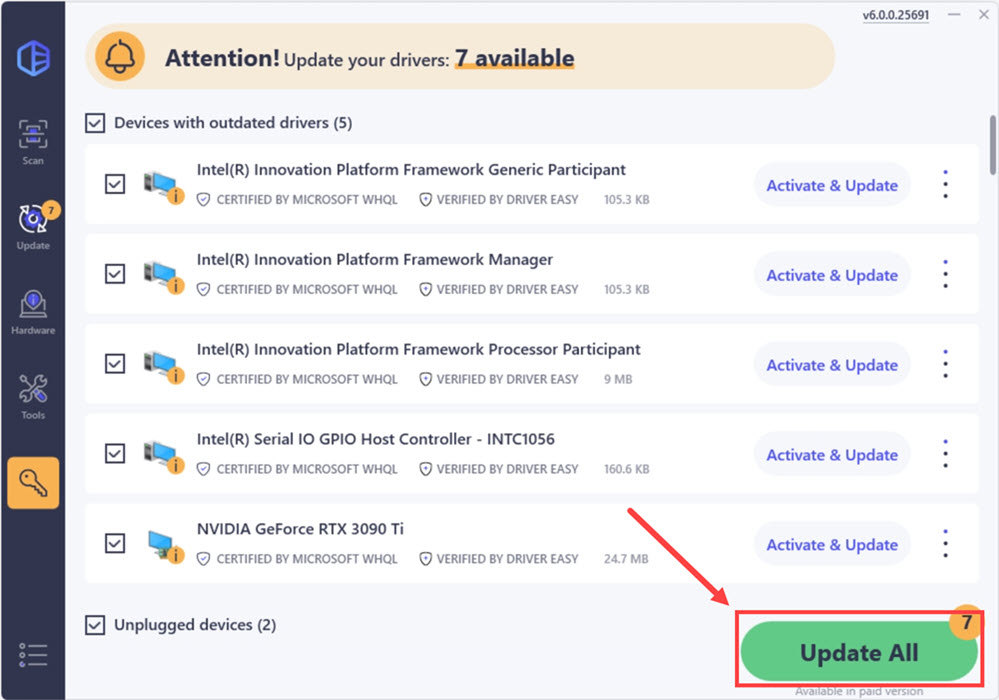
- Run Driver Easy and click the Scan Now button. Driver Easy will then scan your computer and detect any problem drivers.

- Click Update All to automatically download and install the correct version of all the drivers that are missing or out of date on your system.
(This requires the Pro version which comes with full support and a 30-day money-back guarantee. You’ll be prompted to upgrade when you click Update All. If you’re not ready to buy the Pro version, Driver Easy offers a 7-day free trial which includes access to all the Pro features such as high-speed download and one-click install. You won’t be charged anything until your 7-day trial has ended.)

- Restart your computer for the changes to take effect.

The Pro version of Driver Easy comes with full technical support. If you need assistance, please contact Driver Easy’s support team at support@drivereasy.com.
When you complete the updating, restart the computer to make changes apply. Then check the brightness slider to see if there is any improvement.
Fix 5 Check your graphics card software
If you are using a graphics card from Nvidia or AMD, you can try to adjust brightness using their control panel.
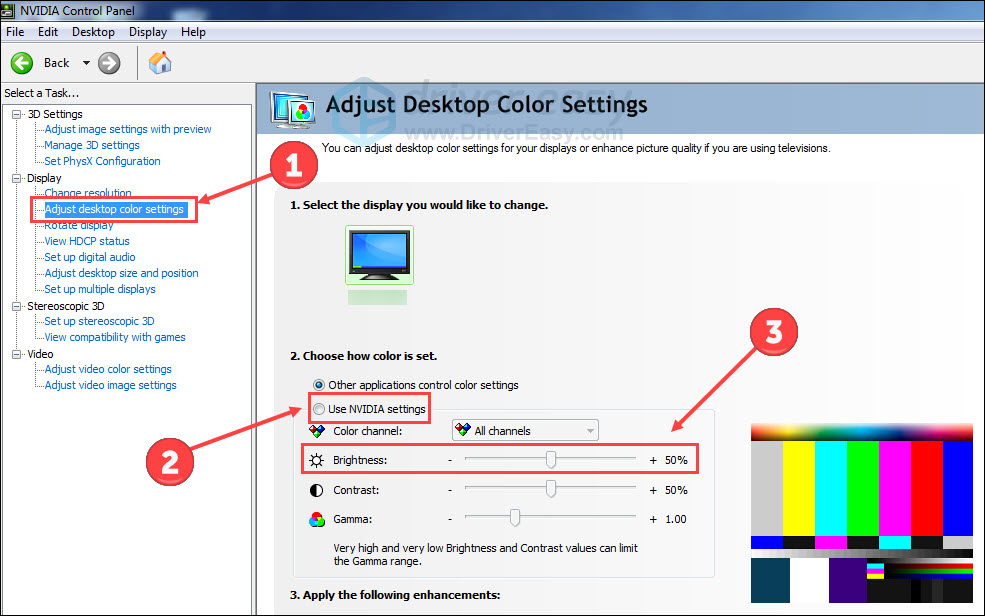
For instance, if you’re an Nvidia user, here is a step-by-step guide:
- Right-click the desktop and select NVIDIA Control Panel.
- Click Adjust Desktop Color Settings under Display on the left pane. Then click the Use NVIDIA Settings radio button. Now you can move the Brightness slider to increase or decrease the brightness of your desktop.

Other graphics card producers may have similar applications and guidelines. Search them online to adjust your computer brightness.
Fix 6 Update Windows
The brightness slider missing may happen when your Windows system is not up-to-date. You can check for any new Windows updates to fix this bug.
On Windows 10:
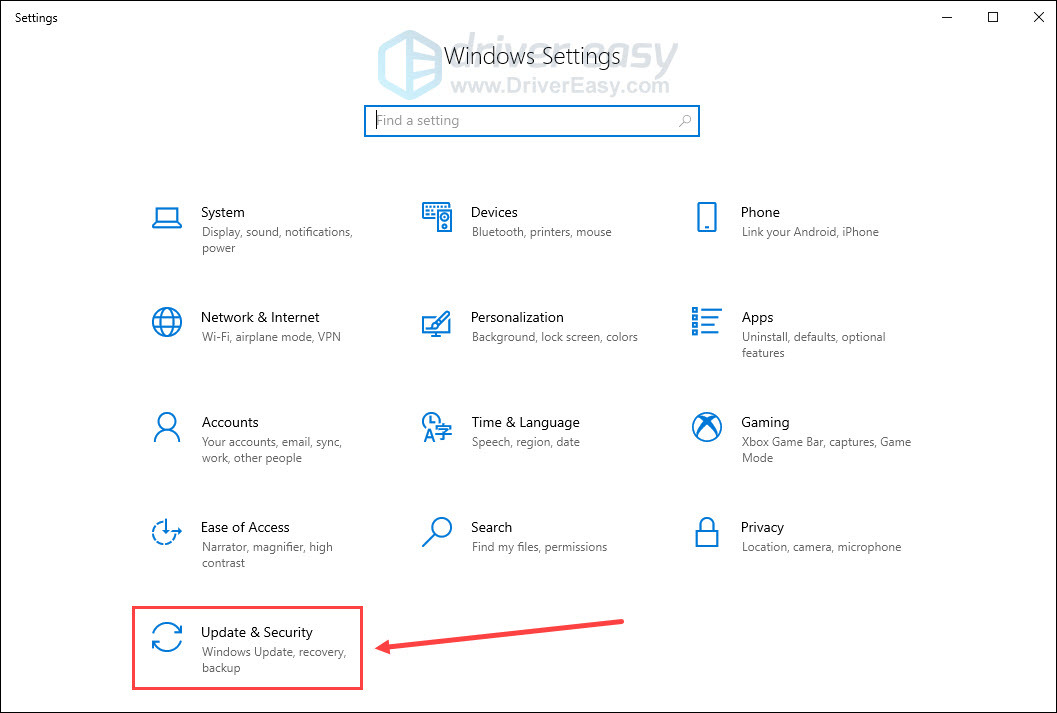
- Press the Windows logo key and I to open Settings. Click Update & Security.

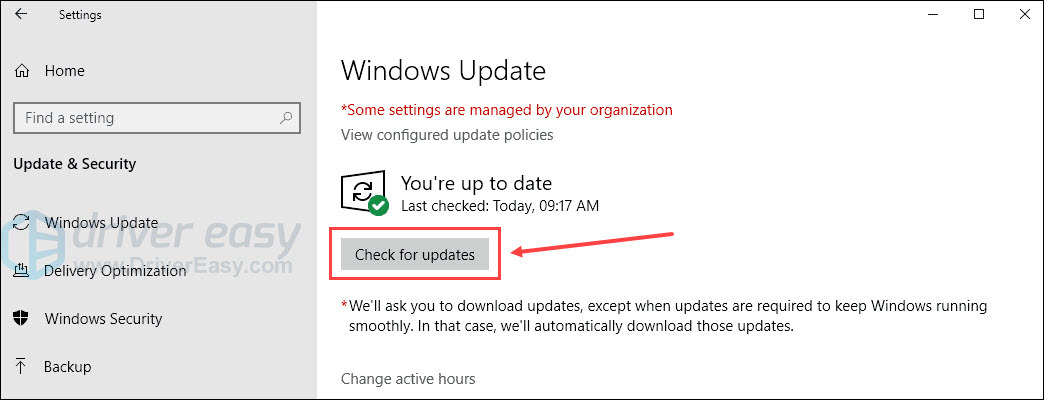
- Click Check for updates. If there are any updates available after scanning, download and install them.

On Windows 11:
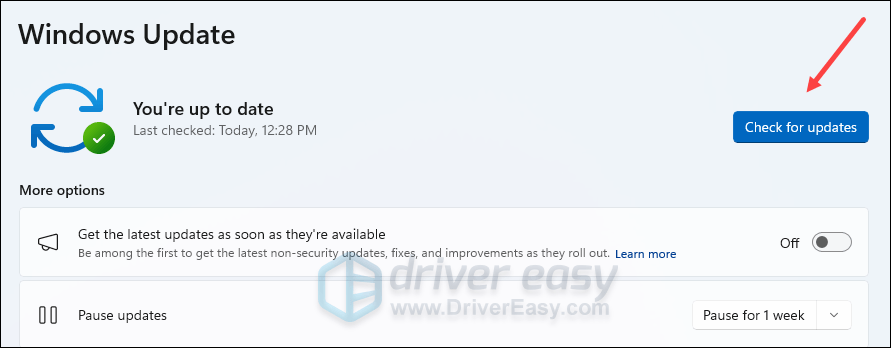
- On your keyboard, hit the Windows key, then type check for updates, then click Check for updates.

- Click Check for updates, and Windows will scan for any available updates.

- If there are available updates, Windows will automatically download them for you. Restart your computer for the update to take effect if needed.

- If there are no available updates, you’ll see You’re up to date like this.


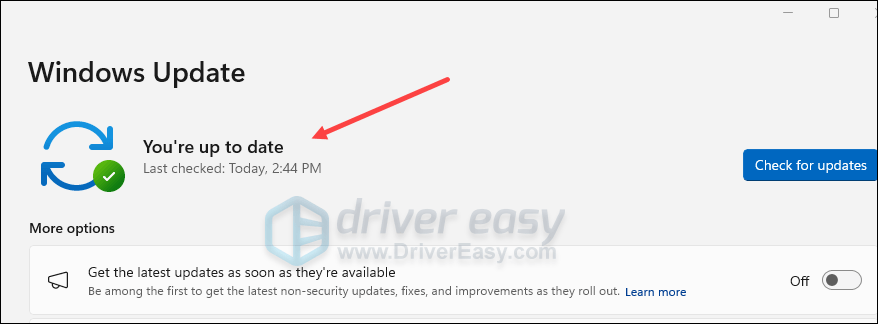
Reboot your computer to make updates work. Then try to adjust your brightness.
Fix 7 Restart the Display Enhancement Service
A non-working display service may also be the reason for the brightness slider missing. Restarting this service is expected to help tackle this problem.
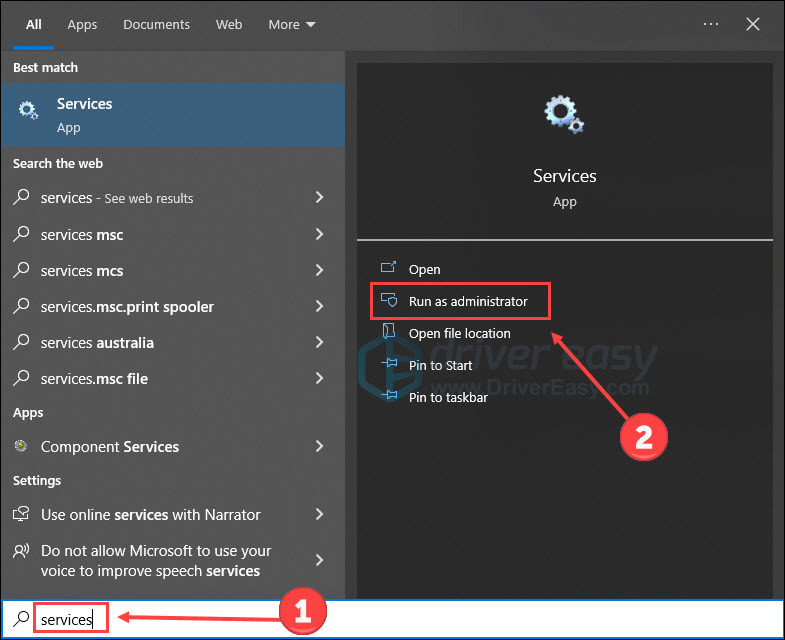
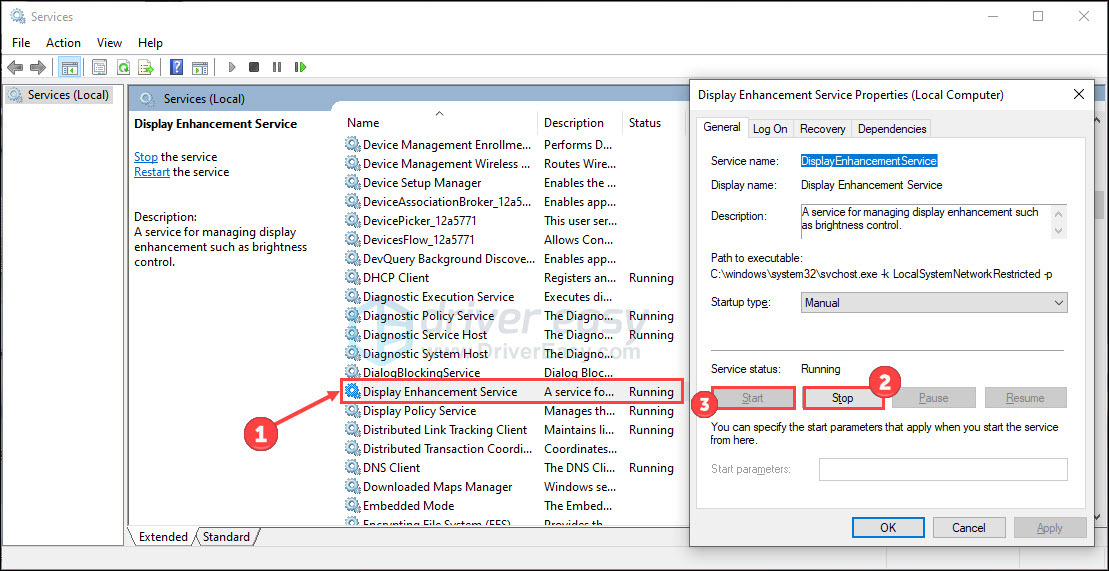
- Type Services on the search bar and click Run as administrator.

- Check if Display Enhancement Service is running. If it is, double-click it, and click Stop and Start to restart it. If not, double-click it and click Start.

That’s all for solving the brightness slider missing on Windows 11 and 10. If you have any questions or solutions, please feel free to leave a word below.
37
37 people found this helpful
Windows 11 is still in development, so early adopters are kind of expected to face certain bugs and inconsistencies until a stable public build is finally out. But you can’t really condone the frustration of some Windows 11 users that are tucked with a dimmed screen with no real possibility to change the brightness.
Most affected users report that the brightness slider is there, but a lot of users are saying that nothing happens when they use it. This error prevents people from changing the brightness of their screen, despite using a computer, laptop, or notebook.
If you do a quick search online, you’ll find that there are a lot of users affected by this problem and they’re all scrambling to find a solution to fix this extremely frustrating issue on Windows 11.
There are many methods to change the brightness of Windows 11 – using the Settings, using keyboard shortcuts, or using dedicated graphics card apps, but unfortunately, if you’re affected by this glitch, none of them will work.
However, after digging around, we finally discovered a fix that a lot of users have deemed to be victorious in allowing them to finally adjust the screen brightness again.
It’s actually a combination of different troubleshooting methods that will virtually take care of every known situation that will essentially prevent you from modifying the screen’s brightness on Windows 11.
So there are 2 main causes for this particular brightness issue on Windows 11:
- Improper Monitor driver – This typically occurs when the monitor driver is migrated over from an older Windows version. If this scenario is applicable, you can probably fix it by using Device Manager to forcibly update the generic monitor driver to a dedicated equivalent.
- Corrupted ieframe.dll element – This dynamic link library file (ieframe.dll) is responsible for breaking a lot of things on Windows 11 including the ability to adjust the brightness. If ieframe.dll is to blame for this issue, the good news is you can fix it by opening up an elevated CMD prompt and running a couple of SFC commands meant at repairing this file.
After investigating this issue, it’s clear that the two culprits go hand in hand. So when troubleshooting this issue, you will need to take measures against both of these scenarios.
Follow the instructions below for step by step instructions on fixing the Windows 11 issue where you can’t adjust the brightness of your screen:
- Press the Windows key + R to open a Run dialog box, then inside it you need to type ‘devmgmt.msc’ and press Enter. When you’re prompted by the User Account Control, click Yes to grant admin access.

Opening Device Manager - After the Device Manager appears on your screen, expand the drop-down menu where it says Monitors. Next, right-click on the monitor, then click on Disable device.

Disable the device Note: Once you do this, the generic driver will stop being used as Windows migrates to a different display driver.
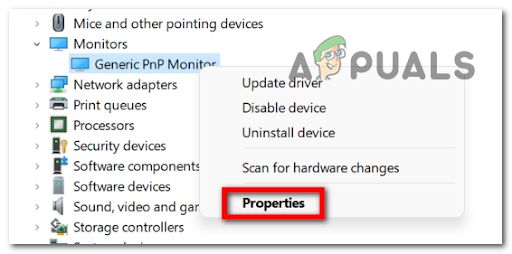
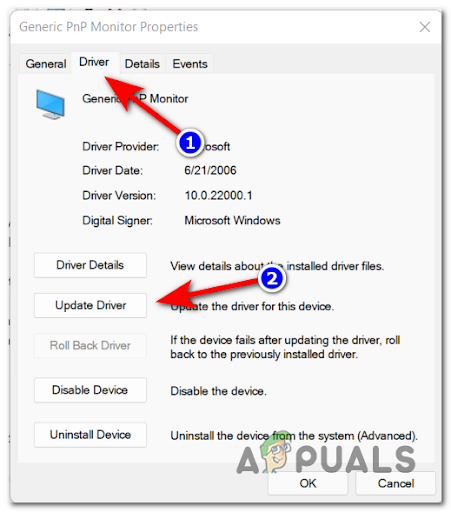
- Then, once the generic driver has been disabled, right-click on the monitor and click on Properties from the context menu that just appeared.

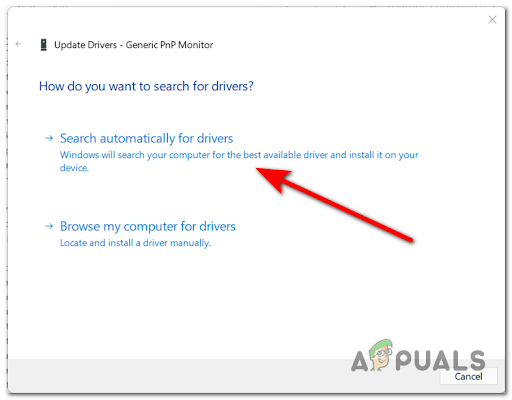
Accessing the Properties screen - Inside the properties menu, click on Driver tab located at the top of the screen, then click on Update Driver.

Update the driver after it’s disabled - You will have two options to choose from, so choose Search automatically for drivers. After the search is complete, you can close the menu.

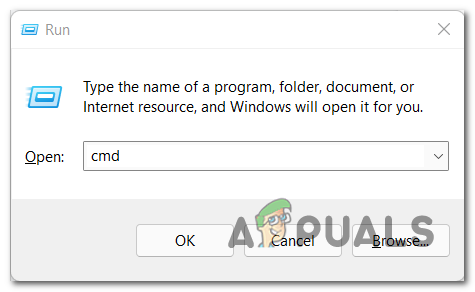
Search automatically for drivers - After that, open another Run dialog box by pressing the Windows key + R, and type cmd, then press Ctrl + Shift + Enter to open the CMD prompt with administrator privileges. When you’re prompted by the User Account Control window, click Yes to confirm the admin access.
Open up an elevated CMD prompt - Once you’re finally inside the elevated CMD prompt, type the following commands and press Enter after each one to effectively repair the ieframe.dll file and every associated dependency:
chkdsk
prompt
sfc /scanfile=c:\windows\system32\ieframe.dll
sfc /verifyfile=c:\windows\system32\ieframe.dll
assoc
sfc /scannow
- After the process is complete, type exit to close the Command Prompt, then the only thing left to do is to reboot your PC. Afterward, you can check to see if you still encounter the brightness not working problem.
At this point, you should be able to modify the screen brightness on Windows 11.
Kamil Anwar
Kamil is a certified MCITP, CCNA (W), CCNA (S) and a former British Computer Society Member with over 9 years of experience Configuring, Deploying and Managing Switches, Firewalls and Domain Controllers also an old-school still active on FreeNode.