
Applies ToWindows 11 Windows 10 Windows 10 Mobile
Если у вас возникли проблемы с подключением к беспроводному дисплею, попробуйте выполнить следующие действия, чтобы устранить неполадки.
-
Убедитесь, что устройство Windows 11 поддерживает Miracast. Чтобы проверка на компьютере, нажмите клавишу с логотипом Windows + K. Если устройство не поддерживает Miracast, может появиться сообщение о необходимости подключения внешнего дисплея с помощью кабеля.
-
Убедитесь, что Wi-Fi включен. Для этого на компьютере щелкните значок Сеть в правой части панели задач, а затем проверка быстрый параметр Wi-Fi.
-
Убедитесь, что дисплей поддерживает Miracast и убедитесь, что он включен. Если ваш беспроводной дисплей не поддерживает Miracast, вам потребуется адаптер Miracast (иногда называемый аппаратным ключом), который подключается к порту HDMI.
-
Убедитесь, что на целевом компьютере установлено приложение Беспроводной дисплей. Если устройство, к которому вы подключаетесь, является другим компьютером с Windows, необходимо установить приложение беспроводного отображения (необязательное средство в Windows).
-
Если целевой компьютер недоступен для обнаружения, попробуйте ввести беспроводной дисплей в поле поиска на панели задач и выбрать его в списке результатов. Теперь проверка для этого устройства на устройстве, с которого вы хотите проецировать. Дополнительные сведения см. в разделе Использование зеркального отображения и проецирования экрана.
-
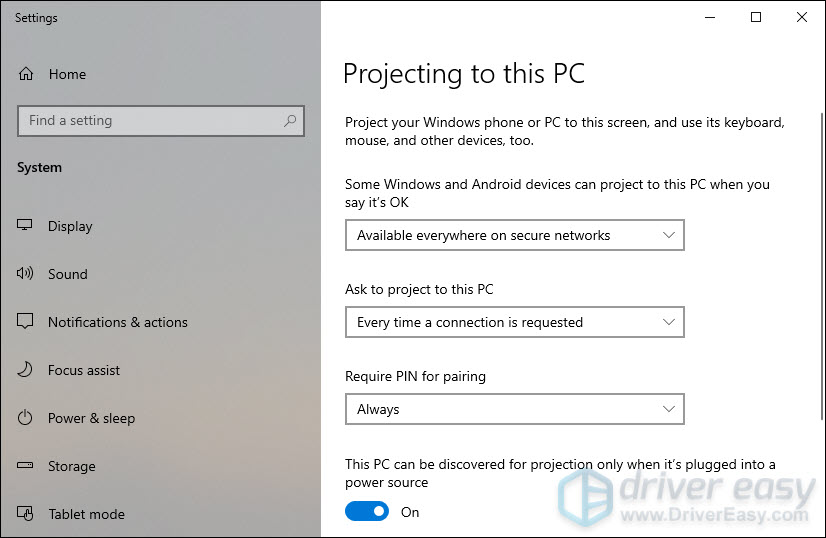
На целевом компьютере перейдите в раздел Параметры > системный > Проецирование на этот компьютер и убедитесь, что он настроен для обнаружения.
-
-
Убедитесь, что драйверы устройств обновлены и установлена последняя версия встроенного ПО для беспроводного дисплея или адаптера. Ознакомьтесь с информацией о поддержке на веб-сайте производителя для получения дальнейших инструкций или зайдите в Microsoft Store для поиска приложения производителя, которое поможет вам.
-
Перезагрузите компьютер и беспроводной дисплей.
-
Удалите беспроводной дисплей и снова подключите его. Чтобы удалить устройство, откройте раздел Параметры и выберите Bluetooth & устройства > устройства. В разделе Беспроводные дисплеи & док-станции выберите беспроводной дисплей или адаптер, который требуется удалить, а затем выберите Удалить устройство. После этого попробуйте повторно подключить устройство.
Нужна дополнительная помощь?
Нужны дополнительные параметры?
Изучите преимущества подписки, просмотрите учебные курсы, узнайте, как защитить свое устройство и т. д.
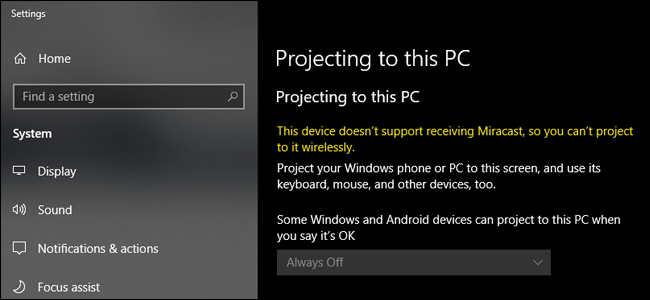
Windows 10 Projecting to this PC is a feature that allows you to wirelessly project your other devices to the screen of your computer. But when you try to use this feature, you might get an error message saying “This device doesn’t support receiving Miracast, so you can’t project to it wirelessly.”. To fix it, we’ll walk you through the steps in this article.

Try these fixes
You may not need to try them all; simply work your way down the list until you find the one that works for you.
- Check if your PC supports Miracast
- Check if WiFi is enabled on both devices
- Reinstall your wireless network adapter driver
- Verify your network driver if it’s compatible
- Update your network driver
- Set Auto for Wireless Mode Selection
- Disable third-party VPN
Fix 1: Check if your PC supports Miracast
Miracast is a wireless technology that makes it possible for users to mirror one’s device’s display to another device. Before using it, the first thing you need to do is check if your device supports it.
1) On your keyboard, press the Windows logo key and R at the same time to invoke the Run box.
2) Type dxdiag, then press Enter on your keyboard.
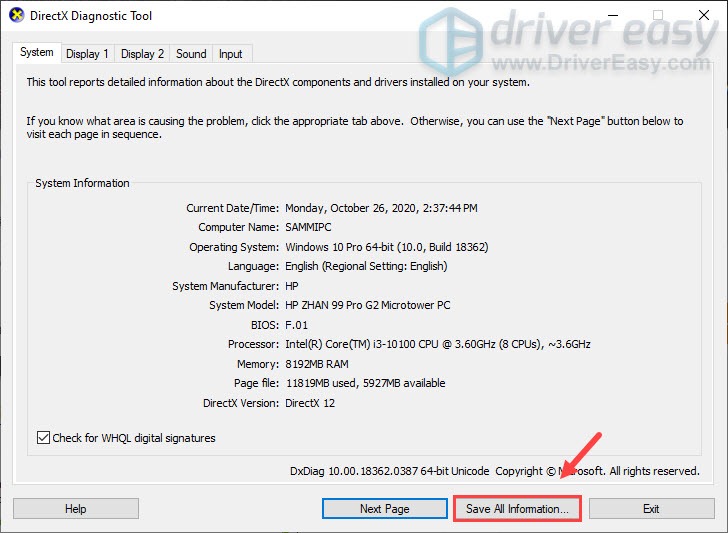
3) In the DirectX Diagnostic Tool window, click Save All Information… at the bottom.
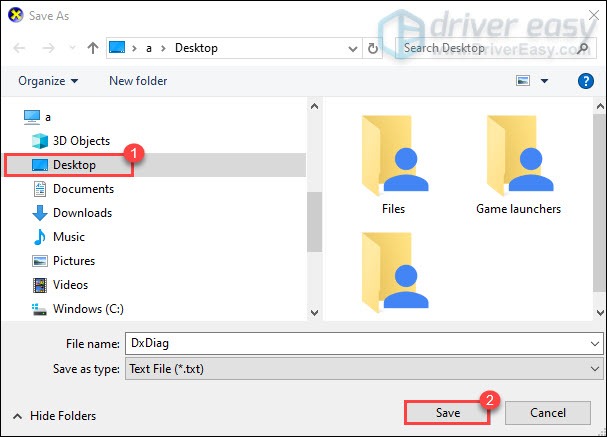
4) When the Save As window appears, select Desktop so that it’s easy to find. Then click Save.
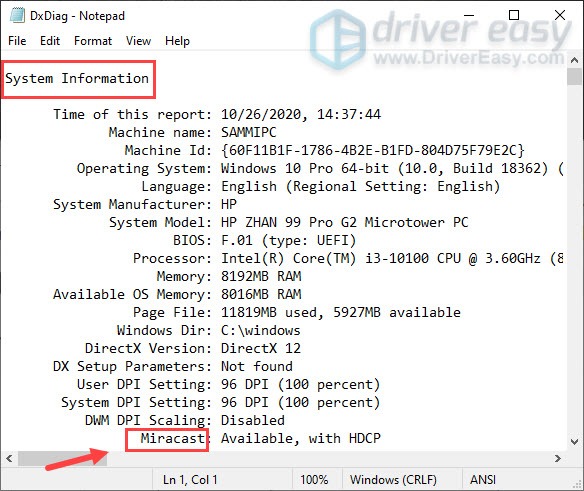
5) From your desktop, double-click on the DxDiag text file to open it.
6) Under the System Information section, look for Miracast. Now you can know whether it’s available or not. If it’s unavailable, then your PC doesn’t support Miracast.
If your computer doesn’t support Miracast, then you would need to buy a wireless adapter such as Microsoft Wireless Display Adapter.
Fix 2: Check if WiFi is enabled on both devices
Miracast is a WiFi standard. So to connect your computer to another device, you must use WiFi. Many users report that the reason they can’t use Miracast is that they were using Ethernet. After they switched to WiFi, they can connect their computer to other devices. Here’s how you can check if WiFi is enabled on your computer:
1) On your keyboard, press the Windows logo key and R at the same time to invoke the Run box.
2) Type ms-settings:network-wifi, then press Enter on your keyboard.
3) Click on the toggle to activate WiFi if it’s deactivated.
4)Also, you need to check if WiFi is enabled on other devices. For iOS and Android users, you can usually activate WiFi from the Settings app.
Once enabling WiFi on both your PC and display device, connect them to the same network.
Now you can check if it works:
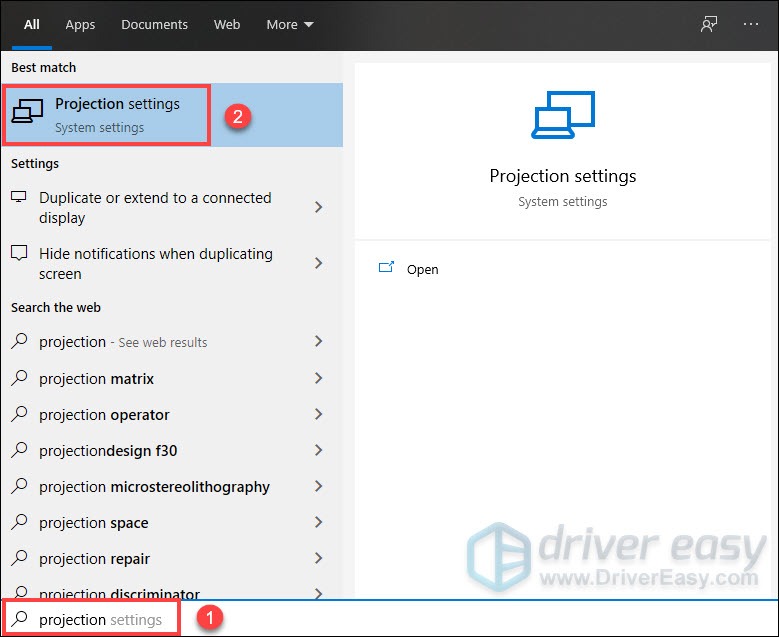
1) In the Search box, type projection. Select Projection settings from the result.
2) The error message should be gone.
If you still have the error message, don’t panic. There are a few other working fixes for you.
Fix 3: Reinstall your wireless network adapter driver
If you have WiFi enabled but can’t really connect to WiFi and still see the error message, you should reinstall the wireless network adapter driver. There is a possibility that your wireless network adapter driver is out of date or corrupted, which would prevent you from connecting your PC to the Internet. If the wireless driver is the culprit, reinstalling it will get you back online in minutes. Here’s how you can do this:
1) On your keyboard, press the Windows logo key and R at the same time to invoke the Run box.
2) Type devmgmt.msc, then press Enter on your keyboard.
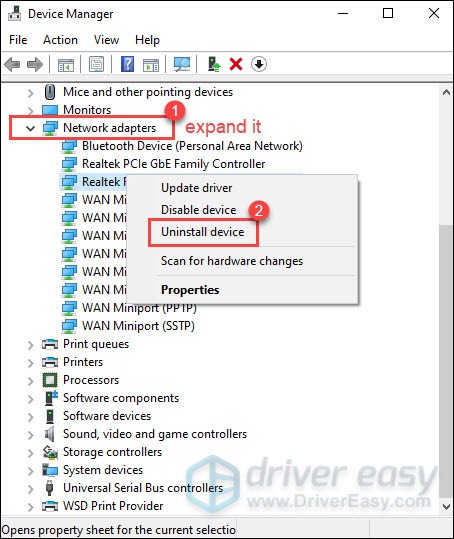
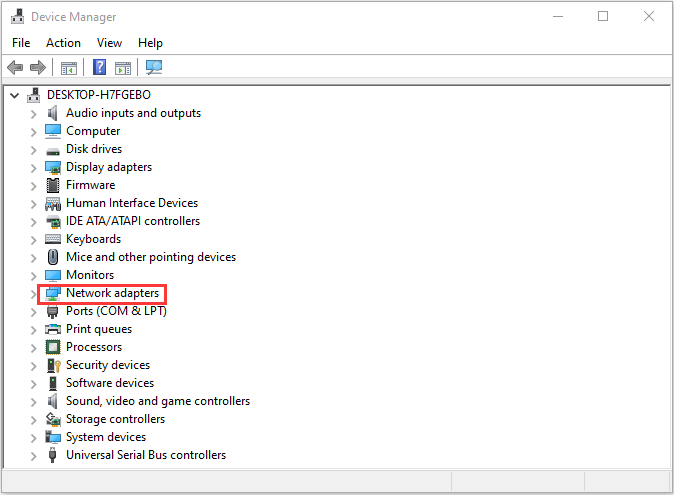
3) Expand Network adapters. Select your wireless network adapter driver, right-click on it and select Uninstall device.
4) Restart your computer and Windows will reinstall the driver automatically. (Note: you need to connect to the network.)
If reinstalling the wireless network adapter driver didn’t resolve your issue, you should verify your network driver to check if it’s compatible.
Fix 4: Verify your network driver if it’s compatible
To check if your network driver is compatible, you can follow the steps below:
1) Right-click on the Start menu.Then select Windows PowerShell (Admin).
2) Click Yes when a prompt appears asking for the right.
3) Copy the command and past in the window. Then hit Enter.
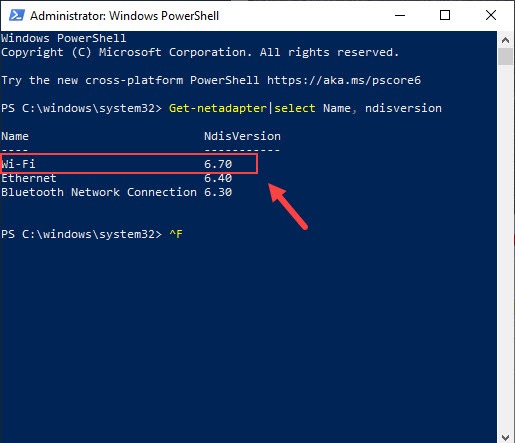
Get-netadapter|select Name, ndisversion
Now you can check your NdisVersion. It should be above 6.30 for your wireless card to support Miracast. If it’s below 6.30, you need to update your wireless network driver.
Fix 5: Update your network drivers
If your network drivers are outdated or faulty, you will encounter connectivity issues. So to fix it, you need to check for updates.
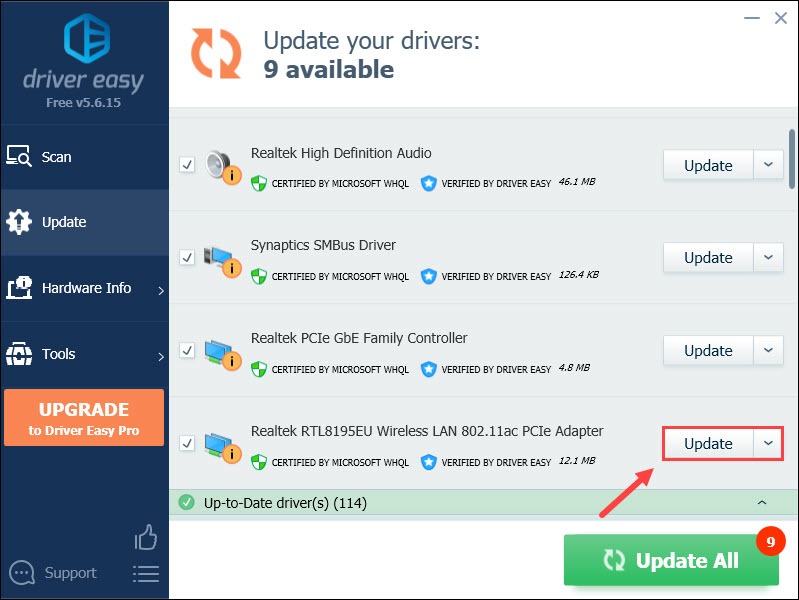
You can manually update your network drivers by going to manufacturers’ official websites to download and install the correct network drivers for your system. This can be time-consuming and you might risk downloading the wrong drivers for your system. So if you’re not comfortable doing it on your own, we recommend using Driver Easy to automatically update your network drivers.
1) Download and install Driver Easy.
2) Run Driver Easy and click the Scan Now button. Driver Easy will then scan your computer and detect any problem drivers. (Any problem drivers can cause issues. So we recommend checking for drivers updates on a regular basis.)

3) Click the Update button next to your wireless network adapter driver to automatically download the correct version of that driver, then you can manually install it (you can do this with the FREE version).
Or click Update All to automatically download and install the correct version of all the drivers that are missing or out of date on your system. (This requires the Pro version which comes with full support and a 30-day money-back guarantee. You’ll be prompted to upgrade when you click Update All.)
The Pro version of Driver Easy comes with full technical support. If you need assistance, please contact Driver Easy’s support team at support@drivereasy.com.
After updating your drivers, restart your computer for them to take effect.
Fix 6: Set Auto for Wireless Mode Selection
There is a possibility that your wireless adapter is on 5GHz or 802.11blg instead of Auto. To set it to Auto, follow these steps:
1) On your keyboard, press the Windows logo key and R at the same time to invoke the Run box.
2) Type devmgmt.msc, then press Enter on your keyboard.
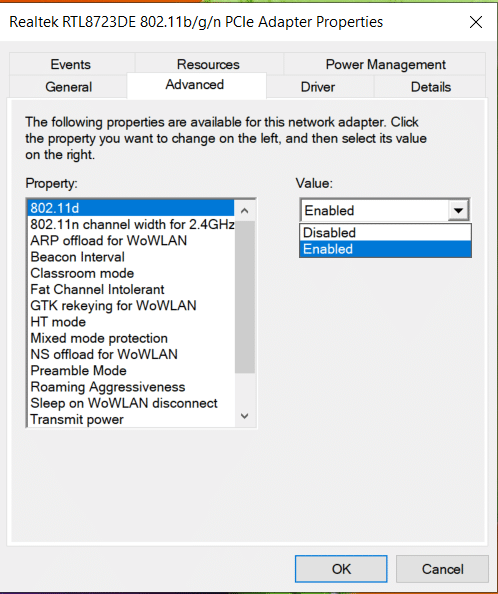
3) Expand Network adapters. Select your wireless network adapter driver, right-click on it, and select Properties.

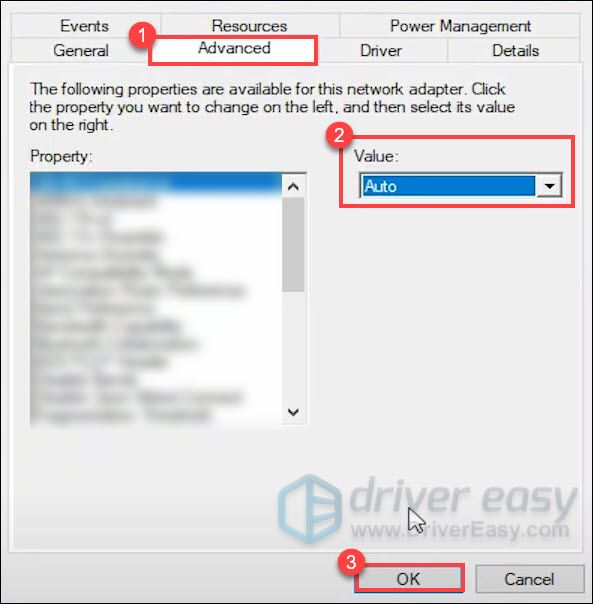
4) Select the tab Advanced. Set the Value to Auto. Then click OK.
After applying the changes, try using the feature Projecting to this PC and the error message should be gone.
Fix 7: Disable third-party VPN
If you have any third-party VPN software such as Cisco AnyConnect running on your PC, they might be in conflict with you utilizing Miracast mirroring. So to fix it, you should disable them.
To conclude, the error “This device doesn’t support receiving Miracast, so you can’t project to it wirelessly.” can occur due to a variety of reasons which are mainly related to compatibility and network driver issues. So I hope with the fixes in this article, you can resolve your issue. If you have any ideas or questions, please leave us a comment below.
Miracast — одна из технологий для беспроводной передачи изображения и звука на телевизор или монитор, простая в использовании и поддерживаемая многими устройствами, в том числе, компьютерами и ноутбуками с Windows 10, при наличии соответствующего Wi-Fi адаптера (см. Как подключить телевизор к компьютеру или ноутбуку по Wi-Fi).
В этой инструкции — о том, как включить Miracast в Windows 10 для подключения телевизора в качестве беспроводного монитора, а также о причинах того, что такое подключение не удается и способах их исправления. Обратите внимание, что и ваш компьютер или ноутбук с Windows 10 может быть использован в качестве беспроводного монитора.
Подключение к телевизору или беспроводному монитору по Miracast
Для того, чтобы включить Miracast и передавать изображение на телевизор по Wi-Fi, в Windows 10 достаточно нажать клавиши Win+P (где Win — клавиша с эмблемой Windows, а P — латинская).
Внизу списка вариантов проецирования дисплея выберите «Подключение к беспроводному дисплею» (о том, что делать, если такого пункта нет — см. далее).
Начнется поиск беспроводных дисплеев (мониторов, телевизоров и подобных). После того, как нужный экран будет найден (обратите внимание, что для большинства телевизоров, требуется их предварительно включить), выберите его в списке.
После выбора начнется подключение для передачи по Miracast (может занять некоторое время), а затем, если всё прошло гладко, вы увидите изображение монитора на вашем телевизоре или другом беспроводном дисплее.
Если Miracast не работает в Windows 10
Несмотря на всю простоту необходимых действий для включения Miracast, часто не все работает так как ожидается. Далее — возможные проблемы при подключении беспроводных мониторов и способы устранить их.
Устройство не поддерживает Miracast
Если пункт «Подключение к беспроводному дисплею» не отображается, то обычно это говорит об одной из двух вещей:
- Имеющийся Wi-Fi адаптер не поддерживает Miracast
- Отсутствуют необходимые драйвера Wi-Fi адаптера
Второй признак того, что дело в одном из этих двух пунктов — отображение сообщения «ПК или мобильное устройство не поддерживает Miracast, поэтому беспроводное проецирование с него невозможно».
Если ваш ноутбук, моноблок или компьютер с Wi-Fi адаптером были выпущены до 2012-2013 года, можно предположить, что дело именно в отсутствии поддержки Miracast (но не обязательно). Если они более новые, то с большей вероятностью дело в драйверах адаптера беспроводной сети.
В этом случае основная и единственная рекомендация — зайти на официальный сайт производителя вашего ноутбука, моноблока или, возможно, отдельного Wi-Fi адаптера (если вы приобретали его для ПК), загрузить официальные драйверы WLAN (Wi-Fi) оттуда и установить их. Кстати, если вы не устанавливали вручную драйверы чипсета (а положились на те, что Windows 10 установила сама), их лучше так же установить с официального сайта.
При этом, даже если официальные драйверы для Windows 10 отсутствуют, следует попробовать те, что представлены для версий 8.1, 8 или 7 — на них Miracast так же может заработать.
Не удается подключиться к телевизору (беспроводному дисплею)
Вторая распространенная ситуация — поиск беспроводных дисплеев в Windows 10 работает, но после выбора долгое время происходит подключение по Miracast к телевизору, после чего вы видите сообщение о том, что подключиться не удалось.
В этой ситуации может помочь установка последних официальных драйверов на Wi-Fi адаптер (как описывалось выше, обязательно попробуйте), но, к сожалению, не всегда.
Причем для этого случая четких решений у меня нет, есть только наблюдения: такая проблема чаще всего возникает на ноутбуках и моноблоках с процессорами Intel 2-го и 3-го поколения, то есть не на самом новом оборудовании (соответственно, используемые в этих устройствах Wi-Fi адаптеры тоже не новейшие). Также случается, что на данных устройствах подключение Miracast работает для одних телевизоров и не работает для других.
Отсюда могу вынести лишь предположение, что проблема с подключением к беспроводным дисплеям в данном случае может быть вызвана не полной поддержкой более используемого в Windows 10 или со стороны телевизора варианта технологии Miracast (или каких-то нюансов этой технологии) со стороны более старого оборудования. Еще один вариант — неправильная работа этого оборудования именно в Windows 10 (если, например, в 8 и 8.1 Miracast включался без проблем). Если ваша задача — просматривать фильмы с компьютера на телевизоре, то вы можете настроить DLNA в Windows 10, это должно сработать.
На этом все, что я могу предложить на текущий момент времени. Если у вас есть или были проблемы с работой Miracast для подключения к телевизору — делитесь в комментариях как проблемами, так и возможными решениями. См. также: Как подключить ноутбук к телевизору (проводное подключение).
-
Home
-
News
- 4 Solutions to Fix the “Your PC Doesn’t Support Miracast” Issue
By Daisy | Follow |
Last Updated
Some users have been encountering the “Your PC or mobile device doesn’t support Miracast, so it can’t project wirelessly” error. This issue is mostly encountered on Windows 10 and Windows 8. Read this post from MiniTool to fix the “Your PC doesn’t support Miracast” issue.
Your PC Doesn’t Support Miracast
Miracast is an industry standard that allows devices to discover each other without the need for HDMI cables. It can be used to mirror the contents of your devices’ screens wirelessly. You can regard Micracast as a wireless HDMI cable.
Here are some main reasons for the “This device doesn’t support receiving Miracast” error.
1. Intel Graphics Hardware is disabled
2. One of the devices is not Miracast capable
3. Wi-Fi is turned off
4. Cisco AnyConnect or similar software stopping the Miracast connection
5. The wireless adapter is forced to 5Ghz
If your PC or mobile device doesn’t support Miracast, you can move down to the next part. Next, I will introduce the solutions to fix it.
How to Fix the “Your PC Doesn’t Support Miracast” Issue
- Verify If Your PC Is MiraCast Compatible
- Make Sure that Wi-Fi Is Enabled on Both Devices
- Change Wireless Adapter to Auto
- Uninstall the Wireless Network Adapter Driver
How to Fix the “Your PC Doesn’t Support Miracast” Issue
Solution 1: Verify If Your PC Is MiraCast Compatible
You should make sure that your device is equipped to support a MiraCast connection before you explore any other troubleshooting avenues. Here’s a quick guide with what you have to do:
Step 1: Press the Windows key + R key to open the Run dialog box. Then, type powershell and click OK to open a new Powershell window.
Step 2: Type the following command and press Enter:
Get-netadapter|select Name, ndisversion
Tip: If the returned NdisVersion is above 6.30, your PC is equipped to support Miracast from a network point of view.
Step 4: Then open the Run dialog box again. Type dxdiag and click OK to open DirectX Diagnostic Tool.
Step 5: Navigate to the Display tab and find the Driver Model.
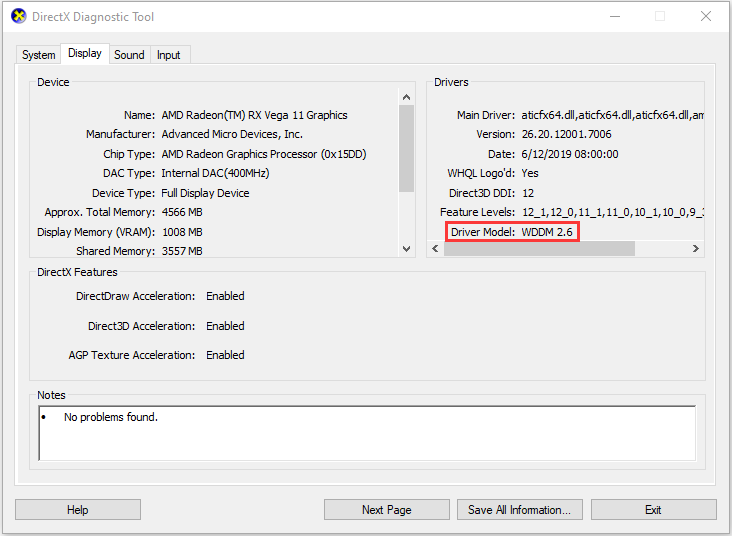
Tip: If the driver model does not state WDDM 1.3 or above, your system is not equipped to accommodate a Miracast connection.
If your computer is ready to support a Miracast connection, you can move to the next methods.
Solution 2: Make Sure that Wi-Fi Is Enabled on Both Devices
You should make sure that Wi-Fi is enabled on your computer, here is how to do it.
Step 1: Press the Windows key + R key to open the Run dialog box. Then, type ms-settings:network-wifi and click OK.
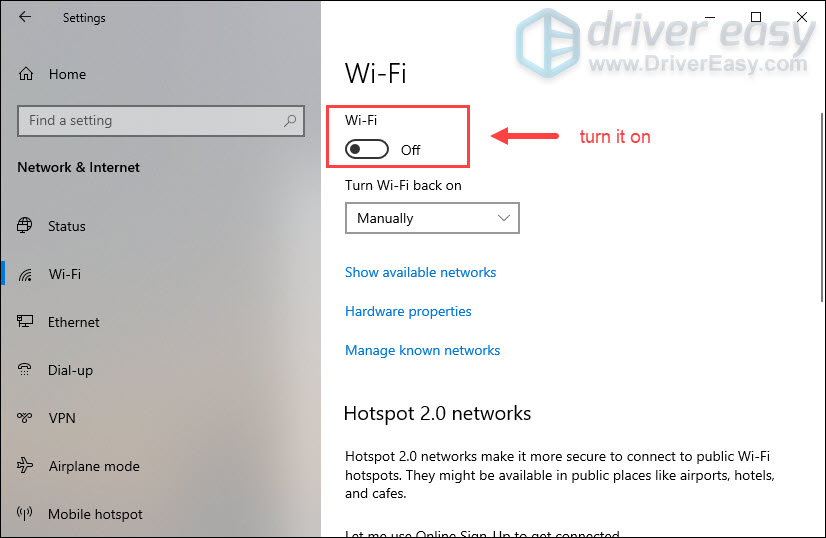
Step 2: In the Wi-Fi tab, ensure that the toggle associated with Wi-Fi is turned On.
If this method doesn’t work, you can move down to the next method.
Solution 3: Change Wireless Adapter to Auto
You can fix the “Your PC doesn’t support Miracast” issue by setting the Wireless Mode Selection back to Auto. Here’s a quick guide on how to do this:
Step 1: Press the Windows + R keys to open the Run dialog box. Then, type devmgmt.msc and click OK to open Device Manager.
Step 2: Expand the Network adapters drop-down menu, right-click your wireless network adapter and click Properties.
Step 3: Navigate to the Advanced tab, select the Wireless Mode Selection property and set it’s Value to Auto.
Step 4: Click OK and wait until the network connection is restored.
Then restart your computer and check if you are able to use the Miracast feature. If still not, move down to the next method below.
Solution 4: Uninstall the Wireless Network Adapter Driver
The last solution is to reinstall the Wireless Network Adapter driver. Here are the steps:
Step 1: Press the Windows key + R key to open the Run dialog box. Then, type devmgmt.msc and click OK to open Device Manager.
Step 2: Expand the Network adapters menu, then right-click your wireless network adapter and click Uninstall device.
Step 3: Then you need to click Uninstall.
Restart your computer and check if the issue is fixed.
Final Words
If you’re struggling to fix this particular issue, this post has provided you with a list of verified troubleshooting steps. You can try them one by one to fix the “Your PC doesn’t support Miracast” issue.
About The Author
Position: Columnist
Having been an editor at MiniTool since graduating college as an English major, Daisy specializes in writing about data backups, disk cloning, and file syncing as well as general computer knowledge and issues. In her free time, Daisy enjoys running and going with friends to the amusement park.
Suppose you found a great movie or a show on your laptop, and you want to cast it to your TV, or maybe to another PC using Miracast. Miracast is an application that allows a device to discover other devices and share its screen with others. With Miracast, users can easily cast their device screen onto another device without needing HDMI cables to do so. The only drawback is that the screen of the casting device will have to be turned on the whole time for screen sharing to take place. Or perhaps, you want to cast your phone screen to your TV or your PC. But, every time you try to do so, you get the error: Your PC doesn’t support Miracast. In this guide, we will learn to resolve Miracast not working on Windows 10 systems.
You can get Miracast from the Microsoft Store.
Many users complained that Miracast for Windows 8 and Miracast for Windows 10 don’t work. Fortunately, there are various methods by which you can fix your PC doesn’t support Miracast issue and continue enjoying your favorite shows and movies.

Table of Contents
Here are some general reasons for Miracast not working on Windows systems:
- Intel Graphics not enabled: Miracast will only work on your PC if Intel Graphics are enabled. You also need to ensure that the graphics card drivers are updated or else, it will result in Miracast not supported by Graphics driver error.
- No Wi-fi connection: The devices sharing the screen and receiving the screen need to be connected to a Wi-Fi network, preferably the same network. Make sure that the said internet connection is stable.
- Incompatibility with Miracast: The error message you receive may mean that your device is not compatible with Miracast. You can check this out by running diagnostics, as explained later on in the article.
- Wireless Adapter Settings: If the wireless adapter settings of your PC are set to 5GHz, it might be causing the error message.
- Third-party software interference: Your PC may not be able to connect with Miracast because of third-party software interference. Other software like AnyConnect may conflict with Miracast.
Now that you have a better idea about why your PC doesn’t support Miracast error, let us discuss the possible solutions for this issue.
Method 1: Verify Miracast Compatibility
The first logical thing to do is to verify if your PC is capable of supporting Miracast. The network adapter and graphics drivers of your PC are the two essential components for a successful connection of Miracast with the computer. Therefore, to check Miracast not supported by Graphics driver, you need to run diagnostics for the network adapter and graphics drivers as explained below:
1. Type Powershell in the Windows search bar. Select Run as Administrator from the search results, as highlighted.

2. Type Get-netadapter|select Name, ndisversion in the Powershell window.
3. Then, press Enter to get information about the network adapter driver version.
4. Now, check the number under NdisVersion.

If the numbers for LAN, Bluetooth and Wi-Fi adapters is 6.30 or above, then the PC network adapter can support Miracast.
If the numbers are under 6.30, update your network adapter driver by following the next method.
Method 2: Update Wireless Network Adapter Drivers & Graphics Drivers
Part I: Running Diagnostics & then updating Network Driver
1. Type Device Manager in the Windows search bar and launch it as shown.

2. In the Device Manager window, click on the downward arrow next to Network adapters to expand it.
3. Right-click on the wireless network adapter driver and select Update Driver, as shown below.

Note: If the above steps did not work for you, then it means that your PC is not compatible with Miracast. You do not need to follow the rest of the methods.
Part II: Running Diagnostics & then, updating Graphics Driver
Now, run the next set of diagnostics for the equally significant component i.e., Graphics Drivers. For this, you need to run DirectX Diagnostics.
1. Type Run in the Windows search bar and launch the Run dialogue box from here.

2. Next, type dxdiag in the Run dialogue box and then click on OK as shown below.

3. Now, the DirectX Diagnostic Tool will open. Click on the Display tab.
4. Go to the Drivers pane on the right-hand side and check the Driver Model, as highlighted.

5. If the Driver Model is below WDDM 1.3, your PC is not compatible with Miracast.
If the Driver Model is WDDM 1.3 or above, then your PC is compatible with Miracast.
Also Read: How to Set up & Use Miracast on Windows 10
Method 3: Enable Wi-Fi on Both Devices
Miracast does not need both devices to be connected to the same Wi-Fi network, but both devices should have Wi-Fi enabled on them. Here’s how to fix Miracast not working Windows 10 issue:
1. Type Wi-Fi in the Windows search bar. Launch Wi-Fi settings from the search results as shown.

2. On the right-pane of the settings window, ensure to toggle on Wi-Fi.

3. Similarly, enable Wi-Fi on your smartphone, as illustrated.
Method 4: Enable Integrated Graphics
For a Miracast connection to work, you need to ensure that the Intel Integrated Graphics are enabled on your PC. Here’s how to fix Miracast not supported by Graphics driver issue by modifying Graphics settings in the BIOS settings of your Windows 10 computer.
1. Follow our guide on How to access BIOS in Windows 10 to do the same on your computer.
Note: BIOS menu will look different for different motherboards. For information regarding the BIOS of a particular model or brand, visit the manufacturer website or check the user manual.
2. Once you enter the BIOS screen, go to Advanced settings or Expert settings.
3. Next, locate and click on Advanced Chipset Features from the left panel.

4. Here, go to Primary Graphics Adapter or Graphics Configuration.
5. Then select IGP > PCI > PCI-E or iGPU Multi-Monitor to enable Integrated Graphics on your device.
Also Read: Fix Graphics Card Not Detected on Windows 10
Method 5: Change Wireless Adapter Settings
There is a high chance that the wireless adapter is set to Auto instead of 5GHz or 802.11blg and thus, causing Miracast not working on Windows 10 issue. Follow the steps given below to change the wireless adapter settings:
1. Launch Device Manager and expand Network adapters as explained in Method 2.
2. Then, right-click on the wireless network adapter and select Properties, as depicted.

3. In the Properties window, switch to the Advanced tab.
4. Under Property, click on Wireless Mode Selection.
5. From the Value drop-down, select Enabled and click on OK.
Restart the computer and then check if Your PC doesn’t support Miracast error is rectified.
Method 6: Disable VPN (If applicable)
If a third-party VPN is enabled on your computer, it will interfere with Miracast connection. Therefore, disable it as follows:
1. Go to the bottom right side of the Taskbar and right-click on the third-party VPN software.
2. Then, click on Exit or a similar option, as shown.
Also Read: What is VPN? How it Works?
Method 7: Reinstall Wireless Network Adapter Drivers
If updating Wireless Network Adapter Driver and disabling conflicting programs didn’t work, there is a good chance that doing so will fix the Miracast not working on Windows 10 issue. Just follow the steps below to uninstall and then, install drivers for wireless network adapter.
1. Launch Device Manager as explained previously.
2. Now, expand Network adapters in this window.
3. Right-click on the wireless network adapter and then select Uninstall device as highlighted.

4. Select Uninstall in the pop-up box to confirm the uninstallation.
5. Finally, restart your PC. Windows will automatically reinstall the missing wireless network adapter drivers when the computer restarts.
Recommended:
- Connect to a Wireless Display with Miracast in Windows 10
- How to Mirror Your Android or iPhone Screen to Chromecast
- How to Fix Error Code 0x80004005
- Fix Command Prompt Appears then Disappears on Windows 10
We hope that this guide was helpful and you could fix Miracast not working or your PC doesn’t support Miracast issue on your Windows 10 desktop/laptop. Let us know which method worked for you. Also, if you have any questions or suggestions, feel free to drop them in the comments section below.