Все способы:
- Способ 1: Проверка текущей громкости
- Способ 2: Изменение формата ввода
- Способ 3: Проверка усиления микрофона и дополнительного регулятора громкости
- Способ 4: Проверка настроек программ
- Способ 5: Использование сторонней программы
- Способ 6: Переустановка драйвера звуковой карты
- Вопросы и ответы: 0
Способ 1: Проверка текущей громкости
Всегда следует начинать с самого простого и банального решения, даже в случае с очень тихим микрофоном в Windows 11. В данном случае подразумевается проверка громкости, установленной для устройства ввода в операционной системе. Понадобится открыть меню с настройками и отыскать соответствующий ползунок, чтобы проверить, не является ли возникшая проблема решаемой при помощи усиления громкости.
- Откройте меню «Пуск» и перейдите в «Проводник», щелкнув по значку с изображением шестеренки.
- В первом разделе с названием «Система» выберите категорию «Звук».
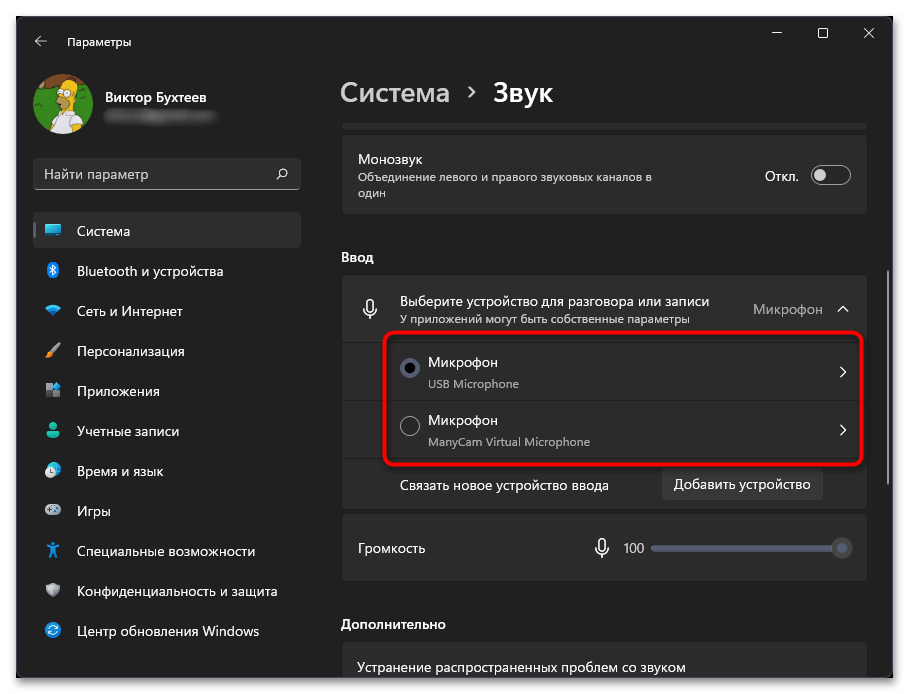
- Отыщите в блоке «Ввод» список микрофонов и убедитесь в том, что маркер установлен возле используемого вами.
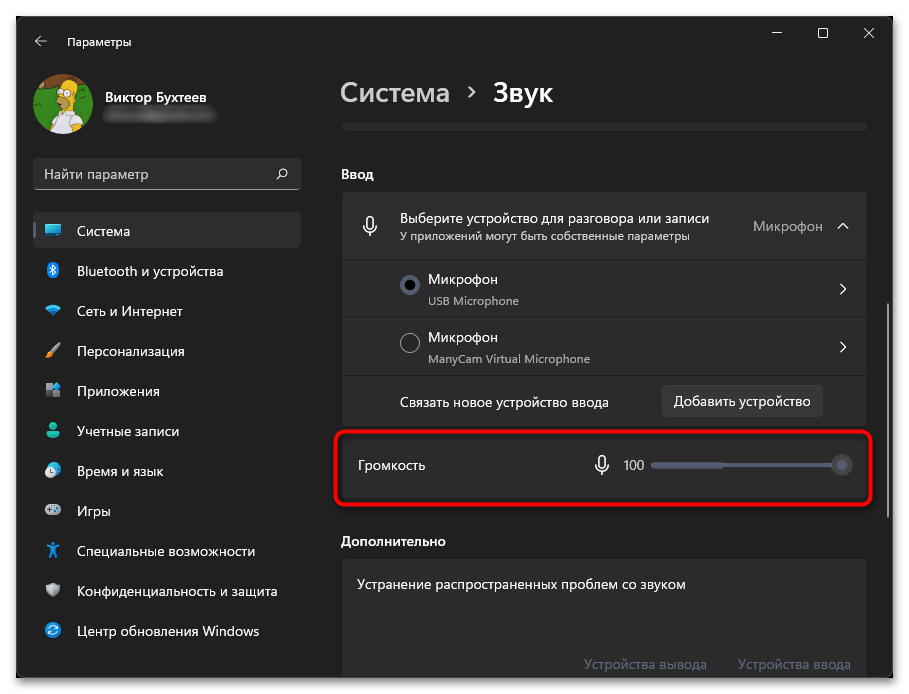
- Ниже вы видите ползунок «Громкость», максимально значение которого равняется 100. Если это не так, перетащите его до конца вправо, а затем переходите к проверке микрофона удобным для вас методом.


Отдельно стоит отметить, что на многих профессиональных микрофонах есть физический регулятор громкости. Если вы приобрели именно такой, внимательно посмотрите на сам корпус и отыщите там колесико. Регулируйте его и проверяйте работу оборудования в операционной системе, сравнивая вносимые изменения в режиме реального времени.
Способ 2: Изменение формата ввода
Устройствам ввода и вывода в Windows 11 по умолчанию присваивается определенное значение частоты дискретизации. Иногда как раз это значение становится проблемой при работе оборудования в конкретных программах. Мы рекомендуем изменить формат ввода для вашего микрофона, чтобы узнать, является ли он причиной тихого звука.
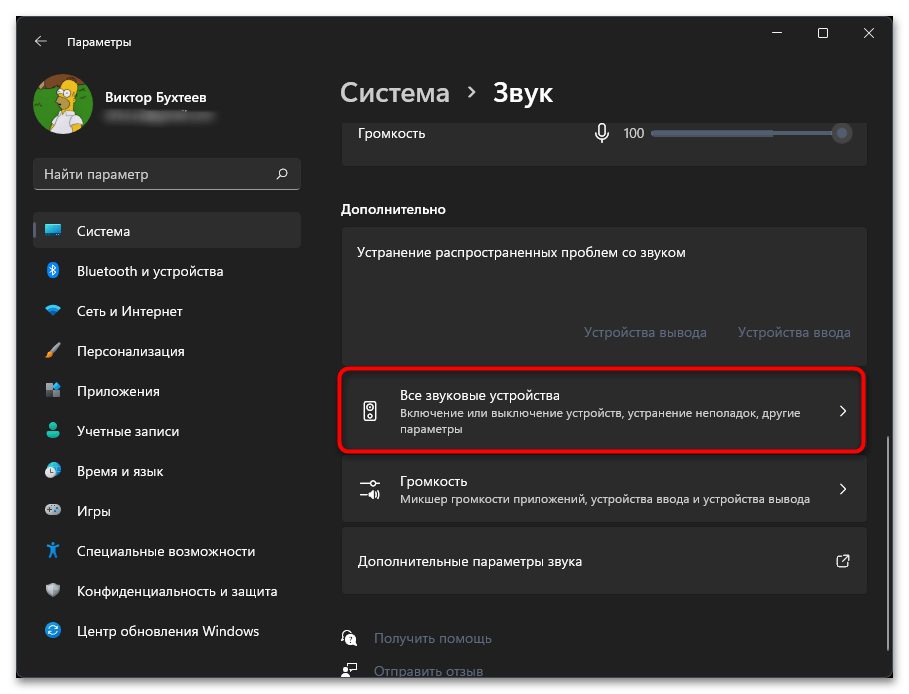
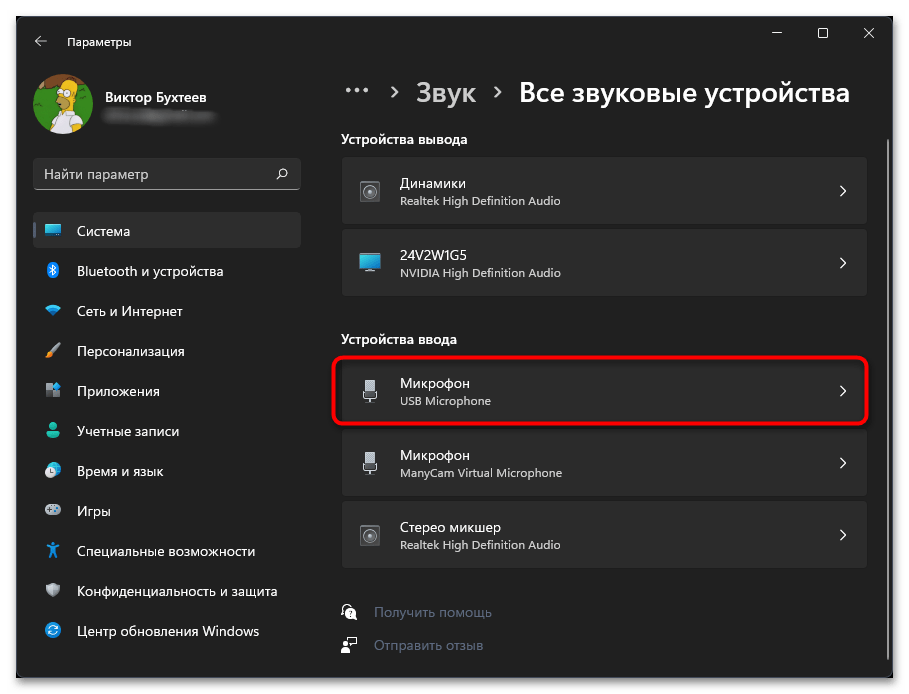
- В том же разделе с параметрами перейдите к «Все звуковые устройства».
- Найдите в списке ваш микрофон и щелкните по нему левой кнопкой мыши.
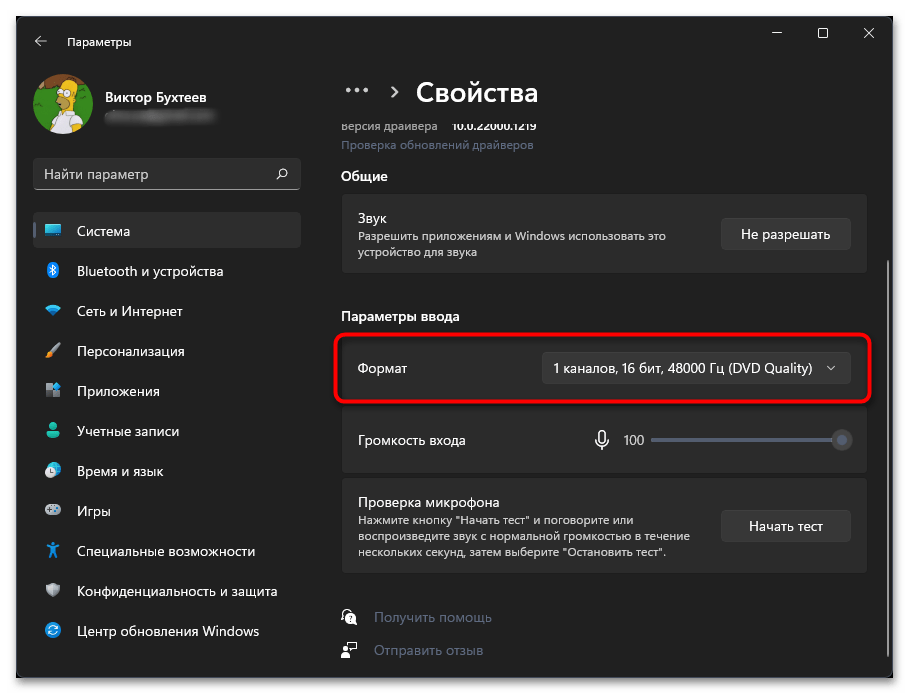
- Разверните список «Формат» и выберите один из вариантов. После этого переходите к проверке звука. Делайте так несколько раз, проверяя все доступные форматы, чтобы узнать, влияет ли как-то данная настройка на громкость микрофона конкретно в вашем случае.
Способ 3: Проверка усиления микрофона и дополнительного регулятора громкости
Для всех звуковых устройств в Виндовс 11 есть дополнительные параметры, отображаемые отдельным окном. В списке можно отыскать оборудование, проверить его настроить и получить доступ к дополнительным функциям. В случае с тихим микрофоном мы советуем обратиться к данному окну для проверки второго ползунка с громкостью, а также обнаружения настройки усиления, которая тоже может помочь в возникшей ситуации.
- Для начала откройте «Параметры» — «Система» — «Звук», как это было показано еще в предыдущих инструкциях. Прокрутите колесико вниз и нажмите по ссылке «Дополнительные параметры звука».
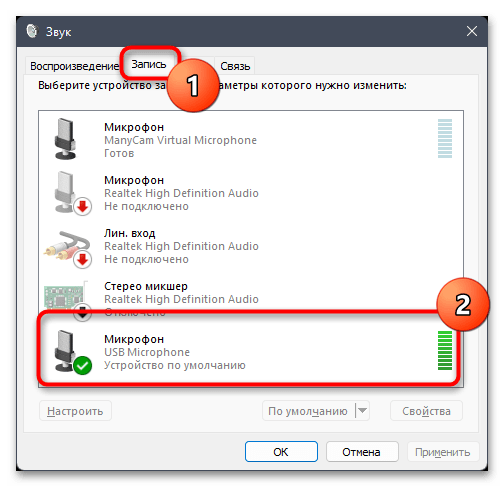
- В новом окне переключитесь на вкладку «Запись» и дважды щелкните левой кнопкой мыши по используемому вами микрофону (он должен быть отмечен зеленой галочкой).
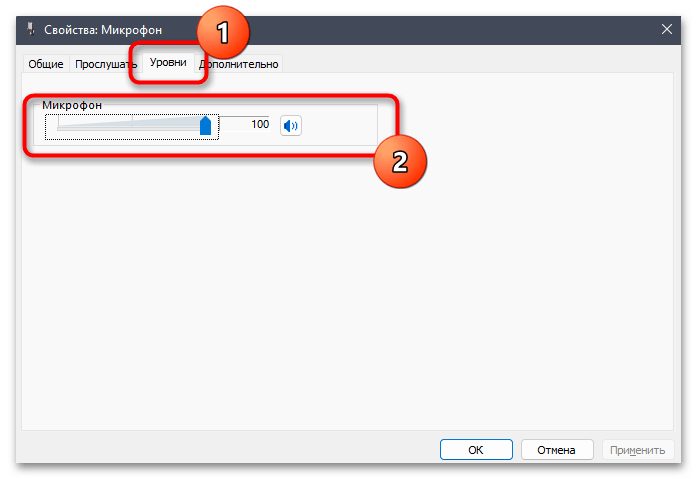
- Откройте вкладку «Уровни» и проверьте ползунок громкости, выкрутив его вправо, если еще не установлено максимальное значение. Иногда здесь есть и второй ползунок, который называется «Усиление». Его тоже можно немного переместить вправо (желательно не выкручивать это значение на максимум). После изменений приступайте к тестированию громкости вашего устройства ввода.

Способ 4: Проверка настроек программ
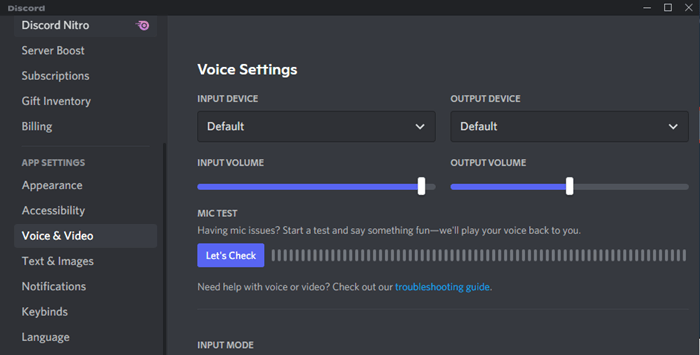
Иногда проблема с тихим звуком при использовании микрофона связана с тем, что в самой программе, где задействовано оборудование, в настройках установлено не максимальное значение. Если вы заметили, что действительно тише микрофон становится только в конкретной программе для общения, понадобится проверить ее параметры.
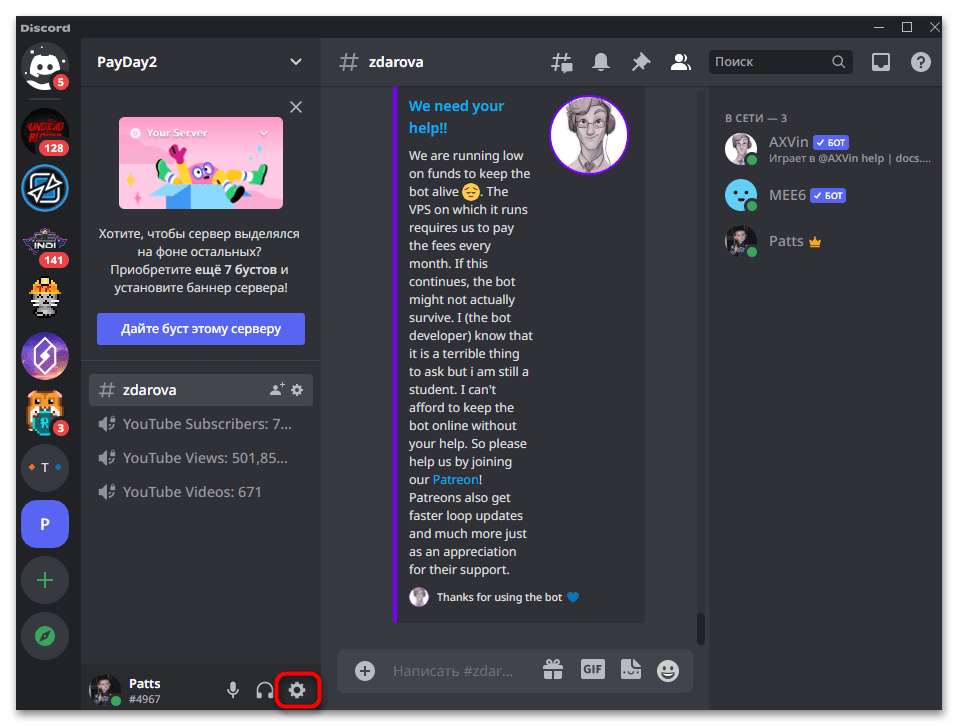
- Откройте используемый вами софт и перейдите в настройки, отыскав соответствующую кнопку в главном окне.
- Выберите раздел «Голос и видео» или «Микрофон». Названия пунктов меню зависят исключительно от выбранного вами софта.
- Найдите параметр, отвечающий за громкость микрофона, если такой есть, и передвиньте ползунок вправо.
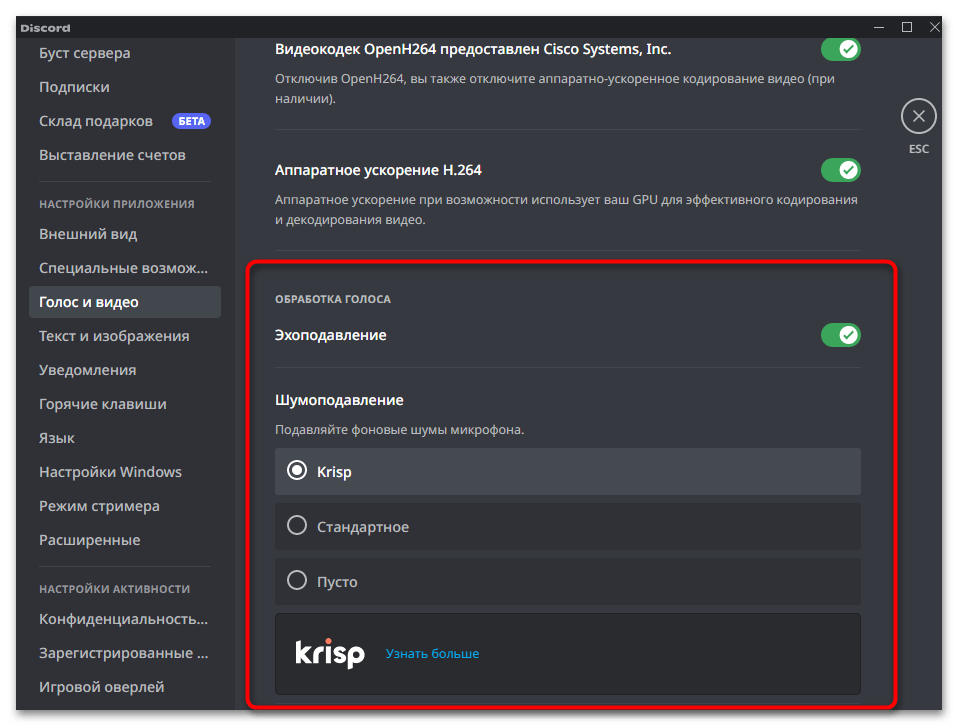
- Дополнительно в меню с настройками голоса посмотрите, присутствуют ли дополнительные параметры шумо- и эхоподавления. Если такие активны, попробуйте отключить их и после проверить работу микрофона, позвонив любому другу.


Способ 5: Использование сторонней программы
Equalizer APO — сторонняя программа, являющаяся продвинутым эквалайзером для Windows и работающая на системном уровне. Это значит, что ее можно настроить для микрофона, усилив громкость, а затем использовать оборудование ввода в любой программе операционной системы. Софт является бесплатным и довольно прост в настройке, если говорить о конкретном случае с усилением микрофона.
Скачать Equalizer APO с официального сайта
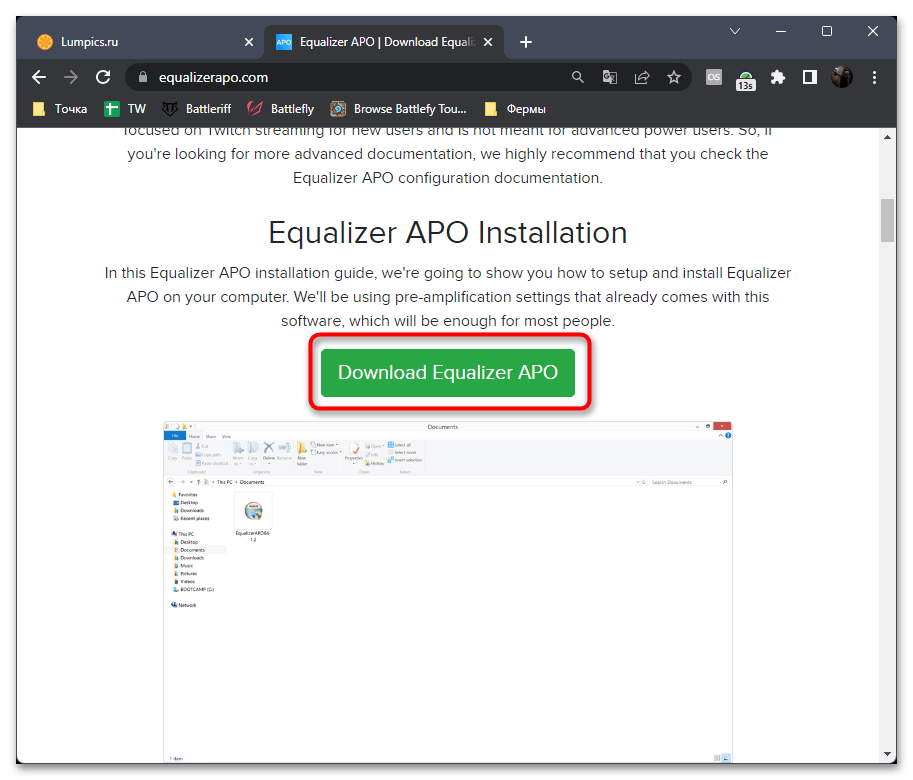
- Перейдите по ссылке выше и нажмите кнопку для скачивания программы на свой ПК.
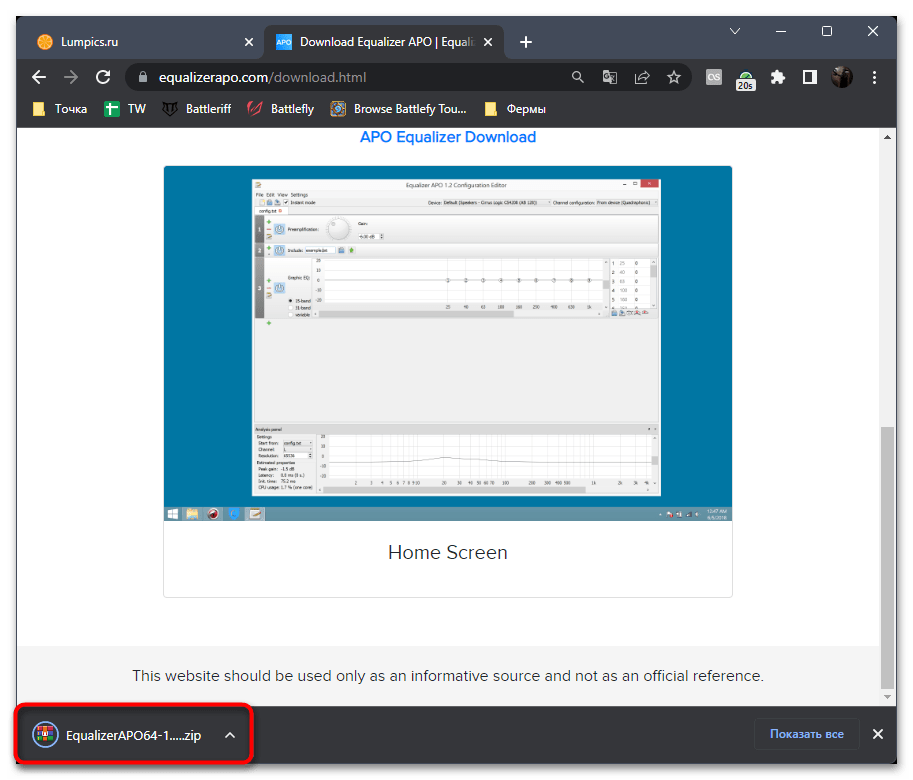
- Она будет загружена в виде архива, поэтому понадобится открыть его через любой архиватор и запустить находящийся там EXE-файл для запуска инсталляции.
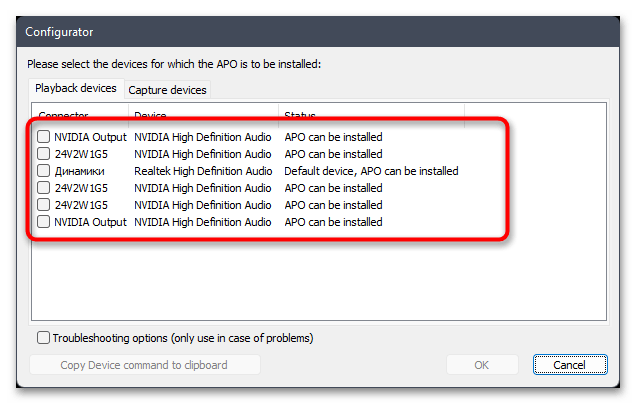
- Перед выходом из окна установки отметьте галочками все устройства ввода и вывода, которые хотите добавить в программу для получения настроек. Обратите внимание на то, что есть как вкладка «Playback devices», так и «Capture devices». Ваш микрофон находится во второй вкладке.
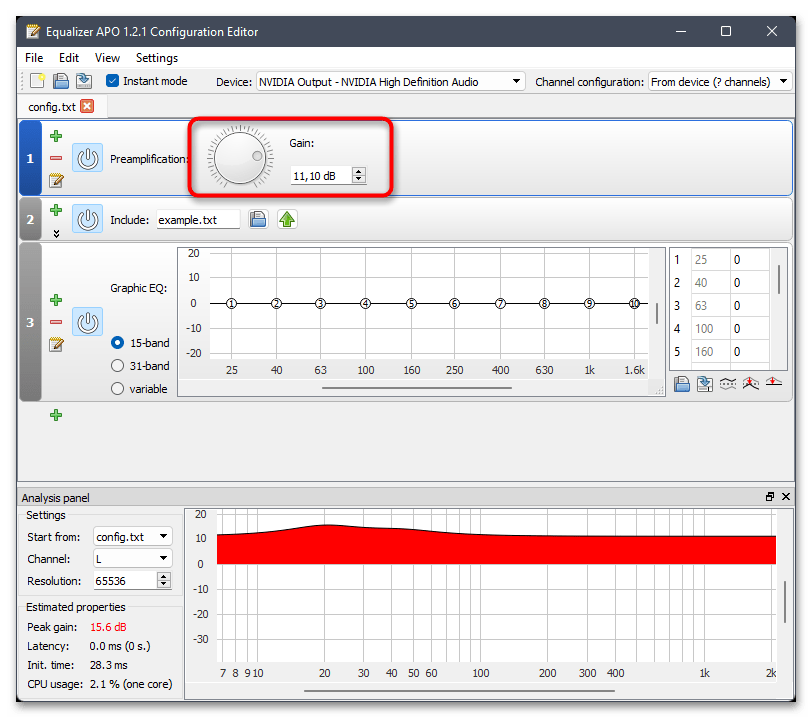
- После запуска Equalizer APO разверните список «Device» и выберите там свой микрофон, который добавили ранее.
- Теперь вам остается только выкрутить регулятор «Gain» немного вправо, чтобы повысить усиление. Рекомендуем проверить микрофон в любой программе или при помощи встроенного в ОС средства, чтобы определить, как усиление влияет на громкость. Важно держать Equalizer APO всегда включенным при использовании микрофона, иначе настройки применены не будут.

Способ 6: Переустановка драйвера звуковой карты
Последний метод, который может помочь разобраться в ситуации с тихим микрофоном, если ничего из перечисленного выше не помогло, — переустановка драйвера звуковой карты. Вам понадобится вручную удалить текущие файлы, а затем установить при помощи автоматического средства Виндовс или самостоятельно скачать последнюю версию драйвера. Это актуально в тех ситуациях, когда проблемы с громкостью вызваны программными неполадками в работе файлов настроек. Детальные инструкции по теме ищите в другой статье на нашем сайте по следующей ссылке.
Подробнее: Обновление драйвера звуковой карты в Windows 11

Наша группа в TelegramПолезные советы и помощь
Если у вас возникли проблемы с функциями микрофона или с микрофоном на гарнитуре или веб-камере, следующие сведения помогут вам устранить неполадки.
Убедитесь, что у приложений есть доступ к микрофону
Если после обновления Windows 11 микрофон не обнаружен, может потребоваться предоставить приложениям разрешение на его использование. Вот как это сделать.
-
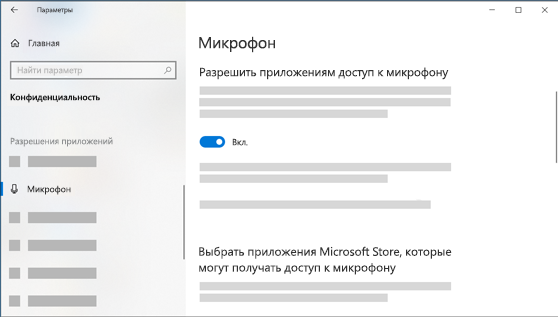
Выберите Пуск > Параметры > Конфиденциальность & безопасность > Микрофон и убедитесь, что доступ к микрофону включен.
-
Убедитесь, что включен параметр Разрешить приложениям доступ к микрофону , а затем выберите, какие приложения имеют доступ. Классические приложения не отображаются в этом списке.
Если вы хотите предоставить доступ к классическим приложениям, убедитесь, что включен параметр Разрешить классическим приложениям доступ к микрофону. Вы не можете отключить доступ к микрофону для отдельных приложений.
Если камера содержит микрофон, также может потребоваться предоставить приложениям разрешение на использование камеры. В этом случае выберите Пуск > Параметры > конфиденциальность & безопасность > камера и убедитесь, что камера включена.
Другие пользователи не слышат меня
Попробуйте следующие решения:
-
Если ваша гарнитура оснащена кнопкой выключения звука, убедитесь, что она не нажата.
-
Убедитесь, что микрофон или гарнитура правильно подключены к компьютеру. Если гарнитура является беспроводным устройством Bluetooth, убедитесь, что устройство Bluetooth связано и подключено, выполнив действия, описанные в разделе Связывание устройства Bluetooth в Windows.
-
Убедитесь, что в качестве системного устройства для записи звука по умолчанию используется микрофон или гарнитура. Вот как это сделать в Windows 11.
-
Выберите Пуск > Параметры > система > звук.
-
В разделе Входные данные выберите Выберите устройство для речи или записи и выберите нужное устройство.
-
Чтобы протестировать микрофон, проговорите в него. В разделе Громкость убедитесь, что синяя полоса перемещается, чтобы убедиться, что Windows вас услышит.
-
-
Запустите средство устранения неполадок со звуком записи. Выберите Параметры > Системный > Устранение неполадок > Другие средства устранения неполадок. Выберите средство устранения неполадок со звуком записи.
Windows не обнаруживает гарнитуру, камеру или микрофон
Если предыдущие действия по устранению неполадок не помогли устранить проблему, а Windows даже не обнаруживает микрофон, попробуйте переустановить аудиодрайверы:
-
Щелкните правой кнопкой мыши кнопку Пуск и выберите диспетчер устройств.
-
Разверните раздел Звуковые, видео- и игровые контроллеры .
-
Найдите любые звуковые устройства или драйверы. Щелкните правой кнопкой мыши звуковое устройство и выберите Удалить устройство. Убедитесь, что проверка поле Удалить программное обеспечение драйвера для этого устройства, а затем выберите Удалить. Повторите этот процесс для любых других звуковых устройств.
-
Перезагрузите компьютер. Windows попытается переустановить аудиоустройства и драйверы автоматически. Если это не так, щелкните правой кнопкой мыши кнопку Пуск и выберите диспетчер устройств. Щелкните правой кнопкой мыши раздел Звуковые, видео- и игровые контроллеры и выберите Пункт Проверить наличие изменений оборудования.
-
Обновите драйверы. После перезагрузки компьютера вернитесь к диспетчер устройств. Разверните раздел Звуковые, видео- и игровые контроллеры . Щелкните правой кнопкой мыши звуковой драйвер и выберите Обновить драйвер.
Громкость микрофона слишком низкая или, как представляется, вообще не работает
Попробуйте следующие решения:
-
Убедитесь, что микрофон или гарнитура правильно подключены к компьютеру.
-
Убедитесь, что микрофон правильно размещен.
-
Увеличьте громкость микрофона Вот как это сделать в Windows 11.
-
Выберите Пуск > Параметры > система > звук.
-
На вкладке Вход выберите микрофон, чтобы просмотреть его свойства.
-
В поле Громкость ввода убедитесь, что синяя полоса настраивается при разговоре с микрофоном.
-
Если это не так, перейдите к разделу Тестирование микрофона и Запуск теста. Это поможет устранить любые проблемы с микрофоном.
-
Microphone Quiet in Windows 11 is quite a real problem and this could happen all of a sudden. This problem may arise due to some simple issues like Mic are not attached, being weakly plugged in, or complex ones like corrupted audio drivers. Whatever the scenario in your case, you may solve it by applying the workarounds discussed below.
What causes “Microphone Quiet” in Windows 11?
The microphone in your Windows 11 might turn off or become silent due to different reasons. A list of probable reasons is outlined below –
- The mic is either not attached or weakly attached.
- You have accidentally or intentionally turned off the Microphone.
- Windows is selecting the wrong microphone.
- The headphone or microphone’s audio input is disabled.
- Due to the presence of faulty or buggy audio drivers.
- Hardware failure in Mic: If that’s the case, we suggest changing the Mic itself.

Ways to Fix Microphone Quite in Windows 11
Here are some tried and tested fixes to the Windows 11 microphone quiet issue. Try out each solution and see which one works best for you.
1] Check Input Volume
Prior to applying any fix, make sure to check the current status of the Input Volume in your Windows 11. If you find it mute, simply increase or adjust the microphone volume. Let’s see how to inspect the Input volume and change it –
- Press Win + I to launch Settings.
- Click System on the left navigation and then Sound on the right pane.
- Scroll down to the Input section, and click Microphone.

- On the subsequent, check what’s there besides Input Volume.
- If you find this low, increase it. Else, click “Start test” under Test your Microphone.

Now, wait while the system troubleshoots the Microphone Quiet issue.
2] Troubleshoot Playing Audio
If the input volume is all okay yet you are facing the Microphone Quiet issue in Windows 11, the best thing to do is to troubleshoot Playing Audio. This tool, upon running, will check what exactly is causing the audio loss and provide a way to resolve this. Here’s how to perform this task –
- Press Win + I and select System > Troubleshoot.
- On the right panel, click to expand Other troubleshooters.
- Under “Most frequent”, click the Run button available beside Playing Audio.
- Wait while the system is looking into this problem.
- After this is resolved, scroll down to the Recording Audio option, and hit the Run button again.
- Select your Microphone and hit Next.

- Wait again for the troubleshooter to complete addressing the Microphone Quiet issue on your PC.
- Once this is over, restart your PC.
Sign back into your device again and check if the Microphone Quiet issue resolves.
3] Disable “Enhance Audio”
There’s a feature in Windows 11 termed “Enhance Audio”. The sole function of this tool is to improve audio clarity coming from microphones. In case of facing microphone issues, you should try turning this feature off. Here’s how to do this –
- Press Win + X and choose Settings from the Power Menu.
- Go to System and then Sound.
- Under the Input Section, click Microphone.
- Scroll down to the Enhance Audio, and turn its toggle switch Off.

- Restart Windows and check if the Microphone Quiet issue resolves now.
4] Check App permissions for the Microphone
If you have intentionally or accidentally disabled the required app permissions for the Microphone, you won’t listen to any word coming out of your Microphone. Check the app permissions and allow them (if you find them disabled). Here’s how to do this –
- Press Win + S and type “Settings“.
- Click the top result over the Search window.
- Select Privacy & Security on the left navigation.
- Head over to the right panel, scroll down to App permissions, and click Microphone.

- Turn On the toggle switches of both –
- Microphone access
- Lets apps access your Microphone.

Close Settings and restart your PC. Sign back into your device and check if the Microphone is working all right.
5] Upgrade your driver
The presence of outdated or obsolete device drivers (mainly Microphones) may also invoke this issue. In order to fix this issue then, you must locate the buggy driver and reinstall it. Here’s how to update outdated drivers in Windows 11 –
- Press Win + R.
- In the Run dialog box, type “
devmgmt.msc“, and hit OK. - Expand the first section i.e. Audio inputs and outputs by clicking on its “>” icon.
- Right-click on the available Microphone and choose the option – Update driver.
- A pop-up window will appear next, click “Search automatically for drivers“.
Note: Since Device Manager is not relevant in Windows 11, this will redirect you to the Optional updates inside Settings. If you do find any pending updates here, download/install that on your PC.
- After updating the device drivers, make sure to reboot your PC.
I hope this post presents some useful insights on how to resolve Microphone Quiet issue in Windows 11.
Read Also:
- How to Change the Sound Output Device on Windows 11
Given the pandemic situation around the globe, online meetings are becoming a usual thing. Whether it is work from home or online classes, online meetings are almost a daily occurrence these days. Have you ever faced a low microphone volume issue during these meetings? Some users reported that they are experiencing trouble with microphone volume after they upgraded to Windows 11. While it is common to find a bug in these early stages of Windows 11, you do not have to sit around and let this affect your productivity. Although it is still too early to determine the exact reason behind the issue, we came up with some solutions to increase and fix low Microphone Volume in Windows 11.

Table of Contents
You can read Microsoft guide on How to set up and test microphones in Windows PCs. Following are the tried and tested methods to fix low Microphone Volume on Windows 11.
Method 1: Increase Microphone Volume
Follow these steps to adjust microphone volume as you may have inadvertently lowered it down:
1. Press Windows + I keys together to open Settings.
2. Click on the Sound option in System menu, as shown.

3. Make sure that the volume slider under Input is set to 100.

4. Click on Microphone. Then, click on Start test under Input settings.

5. After the test is over you can see its results.
If the result shows above 90% of the total volume, then the microphone is working fine. If not, continue with the troubleshooting methods listed below.
Method 2: Run Recording Audio Troubleshooter
Here are the steps to fix low Microphone Volume in Windows 11 by running in-built Microphone troubleshooter:
1. Open Windows Settings.
2. Under System menu, scroll down and select Troubleshoot, as depicted below.

3. Click on Other troubleshooters, as shown.

4. Click on the Run button for Recording Audio.

5. Select the Audio input device (e.g. Microphone Array – Realtek(R) Audio (Current Default Device)) you are experiencing trouble with and click on Next.

6. Follow on-screen instructions if any to fix issues with the microphone.
Also Read: How to Fix Windows 11 Webcam Not Working
Method 3: Turn On Microphone Access
Follow the steps mentioned below to fix low Microphone Volume in Windows 11 by giving Microphone Access to the apps that need the same to function properly:
1. Launch Windows Settings and click on Privacy & security menu option in the left pane.
2. Then, click on the Microphone option under App permissions, as shown.

3. Switch On the toggle for Microphone access, if it is disabled.
4. Scroll down the list of apps and switch On the individual toggles to make sure all desired apps have microphone access.

Now, you can increase Microphone Volume in Windows 11 apps as needed.
Method 4: Turn Off Audio Enhancements
Another method you can try to fix low Microphone Volume in Windows 11 is by turning Off the Audio Enhancements feature, as follows:
1. Open Windows Settings by pressing Windows + I keys simultaneously.
2. Click on Sound in the System Settings menu.

3. Select the audio input device (e.g. Microphone Array) you are facing trouble with under Choose a device for speaking or recording option.

4. Switch Off the toggle to turn off Enhance audio feature under Input settings section, shown highlighted below.

Also Read: How to Turn Off Windows 11 Camera and Microphone Using Keyboard Shortcut
Method 5: Adjust Microphone Boost
Follow given steps to fix low Microphone Volume on Windows 11 by adjusting Microphone Boost:
1. Right-click on the speaker icon in the Taskbar overflow section and select Sound settings, as illustrated below.
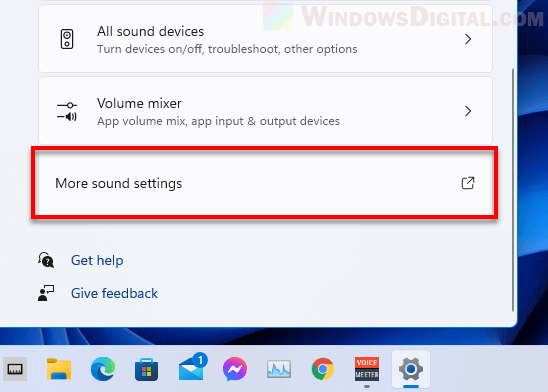
2. Click on More sound settings under Advanced section.

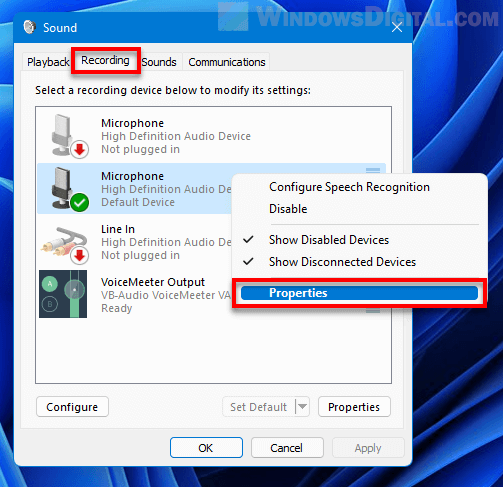
3. In the Sound dialog box, go to the Recording tab.
4. Here, right-click on the audio input device (e.g. Microphone Array) which is troubling you and select the Properties option, as depicted below.

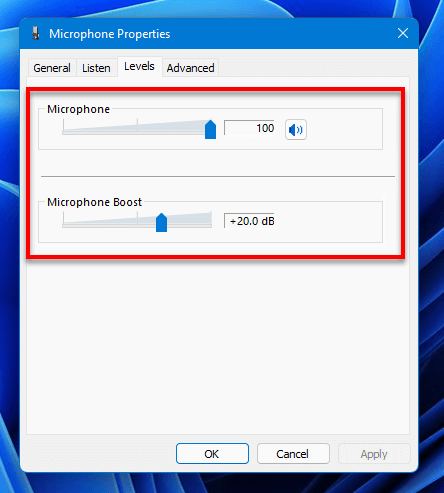
5. In the Properties window, navigate to the Levels tab.
6. Set the slider for Microphone Boost to the maximum value and click on Apply > OK buttons to save changes.

Also Read: How to Fix Windows 11 Taskbar Not Working
Method 6: Update Microphone drivers
If the above methods do not work, then system drivers may be outdated. Here’s how to fix low Microphone Volume in Windows 11 by updating your Microphone driver:
1. Click on the Search icon and type Device Manager, then click on Open.

2. In the Device Manager window, double-click on Audio inputs and outputs section to expand it.
3. Right-click on your microphone driver (e.g. Microphone Array (Realtek(R) Audio)) and select the Update driver option, as depicted below.

4A. Now, click on Search automatically for drivers to allow windows to download and install the latest compatible update automatically.

4B. Alternatively, click on Browse my computer for drivers to install the driver update if you have already downloaded the driver from the official website (e.g. Realtek).

5. The wizard will install the latest drivers it could find. Restart your PC after the installation is complete.
Recommended:
- How to Create PDF File in Windows 11
- How to Disable Lock Screen in Windows 11
- Fix Apps Can’t Open in Windows 11
- Fix VCRUNTIME140.dll Missing on Windows 11
We hope you found this article interesting and helpful to fix low Microphone Volume in Windows 11. You can send your suggestions and queries in the comment section below. We would love to know which topic you want us to explore next.
If you have ever used a voice-over-IP service such as Discord or Skype, you will certainly have encountered issues such as mic being too low in volume, causing your friends to have difficulty hearing your voice. The mic volume settings in the app itself is not the only settings you can increase the mic volume. There are various other sound settings you can tweak to boost the microphone volume level in Windows 11.
This guide will show you several methods on how to potentially boost the volume of your microphone in Windows 11 even when the mic is already at its max volume level.
Relevant guide: How to test microphone in Windows 11 to see if it’s working
How to boost mic volume in Windows 11
Method 1: Windows sound settings
To increase or boost the microphone volume in Windows 11, follow the steps below.
1. Right-click the speaker icon on the taskbar and select Sound settings.
2. In the Sound settings page, scroll down and then select More sound settings.
3. In the Sound window, click Recording tab, then right-click your microphone you want to configure and select Properties.
4. Next, in the Microphone properties window, select the Levels tab. From there you can adjust the microphone volume and microphone boost level. Drag the slider to the right to increase the volume or the boost level (dB or decibel is a relative unit for the quantification of the audio level).
5. Click Apply, then OK to save the changes.
No boost option? Try switching to a different mic port
It’s been a common case where users may sometimes not see the boost option in the Microphone properties window. This may be due to the microphone using the incorrect or bad port. Try to plug the microphone to a different mic port and see if it works.
In some other cases, you may not see the microphone boost option if your microphone connects using a USB port instead of a 3.5mm audio port. This is because when a mic connects via USB, it does not communicate with the on-board sound card (which only works when you connect your audio device via 3.5mm ports). If this is the case, try to find the mic boost option in the driver software that comes with your mic or headphone.
Try disabling exclusive mode
If the microphone volume and boost level set via Windows sound settings have no effect on your mic, you can try to disable the exclusive mode (Microphone properties > Advanced > Allow applications to take exclusive control of this device) to disallow app to take control of your mic.
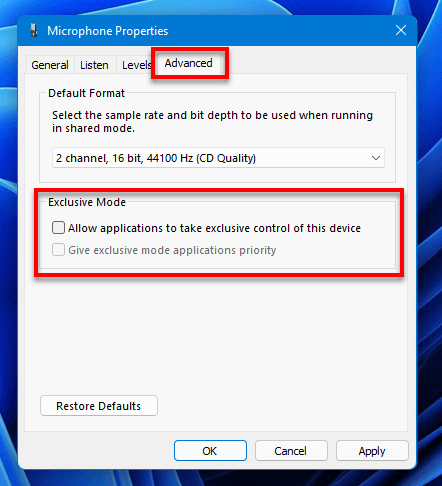
When the exclusive mode option is checked, Windows will give exclusive control of your mic to apps that use it. In some rare cases, when this option is enabled, the microphone volume and boost settings set via Windows microphone properties may not have effect on the mic if an app decides to take control of the mic. Try to uncheck the option and see if that helps in resolving your microphone volume issue.
This option is enabled by default so that apps can work better with your mic. If there is any unexpected outcome after unchecking this option, you can undo the change by simply re-enabling the option again.
Method 2: Use a third party audio mixer app
While the microphone boost settings in Windows 11 may help to boost your mic volume, there is a limit to it. Another way you can boost your mic further is to use an audio mixer app such as VoiceMeeter.
VoiceMeeter is a simple and free app to manage any audio sources from or to any audio devices in Windows. To further boost your mic using VoiceMeeter, follow the steps below.
1. Download VoiceMeeter from https://vb-audio.com/Voicemeeter/ and install it.
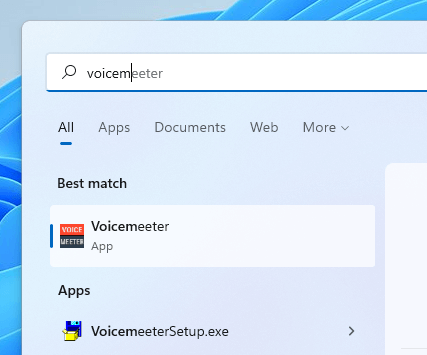
2. Once installed, search for and open VoiceMeeter via Start.
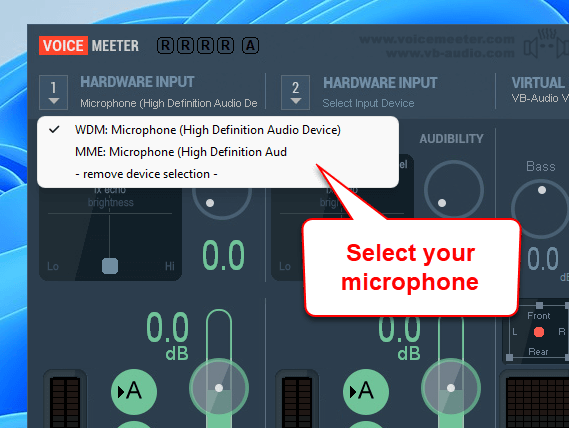
3. Next, click the one of the hardware input and select your microphone.
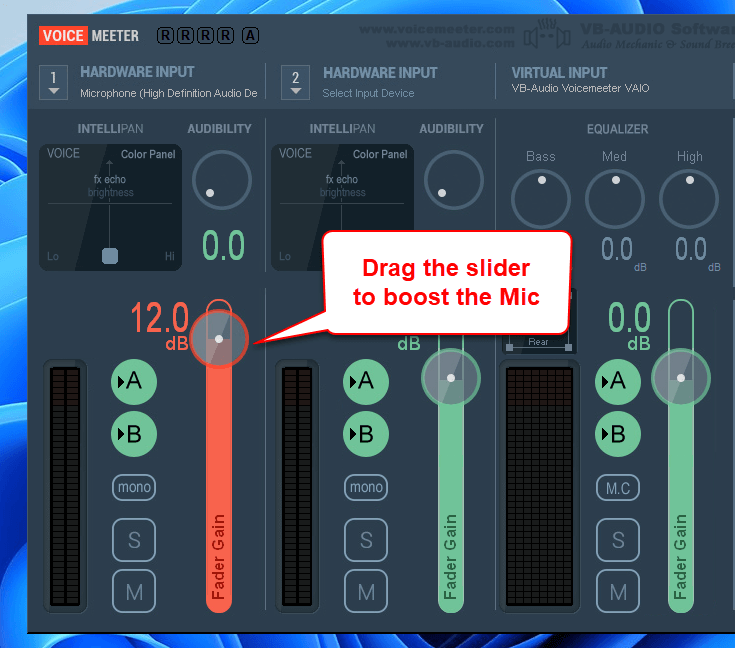
4. Once you’ve selected your mic, drag the slider underneath it to increase the microphone boost level.
VoiceMeeter needs to run in the background or minimized (as long as the app is running) for any changes to have effect on your audio devices. To save the changes so that the same settings will be loaded whenever you open VoiceMeeter, click Menu and select Save Settings. After that, click Menu again and select Load Settings on Startup. Then, select the settings you have saved earlier.

Check the mic settings in the app itself
It’s worth noting that most apps that require a mic will allow you to change the mic volume in the app itself. For example, in Discord, there are microphone settings of its own where you can control the volume of your mic. You should at least make sure the microphone volume level in the app is set to maximum before trying to boost your mic.