
Updated on Apr 28, 2025
| Workable Solutions | Step-by-step Troubleshooting |
|---|---|
| How Long Does Windows 10 Update Take 2019/2020/2021/2022/2023 | It may take between 10 and 20 minutes to update Windows 10 on a modern PC with solid-state storage…Full steps |
| Why Does Windows 10 Update Take So Long |
A low-speed internet connection or simultaneous downloads; Microsoft is constantly adding…Full steps |
| 6 Useful Fixes for Windows 10 Update Taking Forever Issue | Optimize network, free up space, run Windows Update troubleshooter, disable startup programs…Full steps |
Windows 11/10 Update Taking Forever Overview
Windows 10 pushes a lot of regular updates, with some improvement in stability and performance, and critical updates as well, mainly about bug fixes and shiny new features. Windows 10 update is quite normal and frequent, like twice each month. That’s the point! You seem to reach the frustrating moment again, where Windows 10 updates are taking hours and hours downloading and installing itself correctly on your PC. How long does windows update take? How are you going to skip such long waiting?
How Long Does Windows 11/10 Update Take
Between 10 and 20 minutes
It may take between 10 and 20 minutes to update Windows 10 on a modern PC with solid-state storage. The installation process may take longer on a conventional hard drive. Besides, the size of the update also affects the time it takes. Some updates are small, and you might not even notice them installing, others are massive and take a good chunk of time to install.
Read Also:
Why Does Windows 11/10 Update Take So Long
The amount of time Windows updates can be affected by multiple factors.
- A low-speed internet connection or simultaneous downloads
- An old hard disk drive on your computer bursting with data
- Too many fragments cause Windows 10 update slow
- Microsoft’s servers are getting slammed with many people all trying to download at the same time
- Windows update components might be broken
- The software might be conflicting with Windows update
5 Effective Fixes for Windows 11/10 Update Taking Forever Issue
Do you see Windows 10 taking forever in every 2018 update? Like one of the most seen blue screen loop, saying «getting Windows ready, don’t turn off your computer». Be prepared. Your computer is now slowing down, plodding, frozen and stuck! Let’s try the following methods to fix Windows 10 update slow issue.
Method 1. Optimize Your Network
A faster internet connection may solve your problem and decrease the update speed. You can change to another faster connection by upgrading to a fiber-optic connection or purchasing more bandwidth from your internet service provider. You can also try a brandwidth management tool to ensure sufficient network resources are reserved for Windows 10 updates.
Method 2. Free Up Hard Drive Space by Cleaning Large and Junk Files
Windows 10 updates often take up a lot of hard drive space, so you need to make sure there is enough room for them to speed up the installation. This means deleting junk files and unnecessary large files. If there are a lot of files waiting for removing, manual deletion can be cumbersome and time-consuming. In this case, you can use cleanup software to help delete large amounts of files at once automatically.
Now, download this powerful disk management tool to fix the slow Windows 10 update issue.
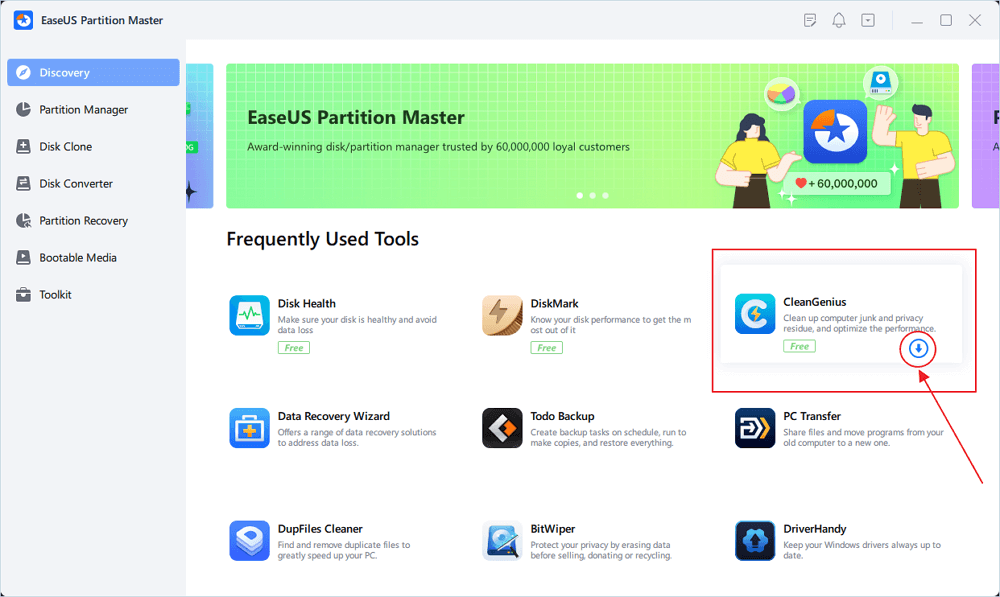
Step 1. DOWNLOAD and install EaseUS Partition Master for free and launch it on your Windows PC.
On the suite, hover your mouse on «PC Cleaner», click the Download icon to install and launch EaseUS CleanGenius.
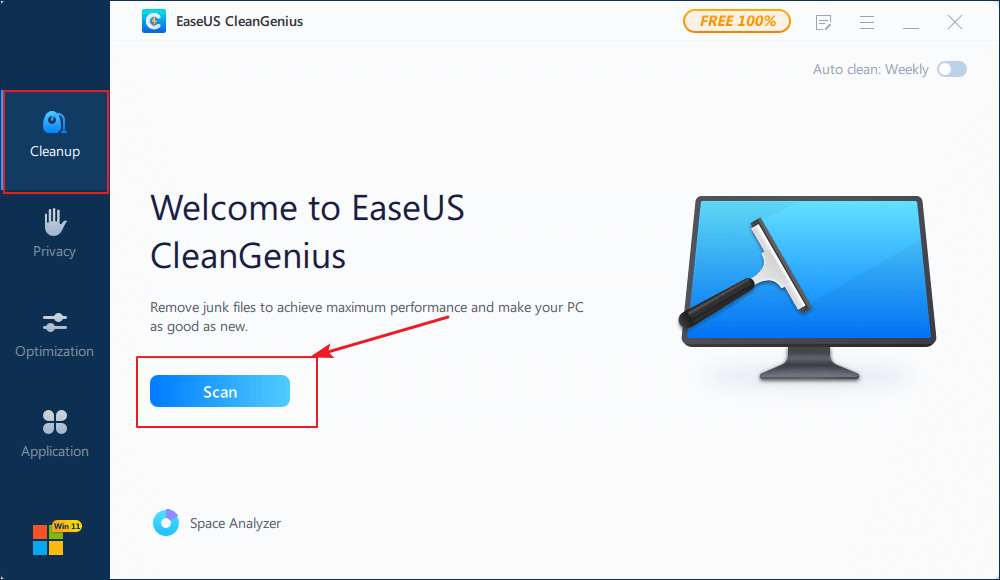
Step 2. On EaseUS CleanGenius, select «Cleanup» on the main screen, and click «Scan» to start scanning.
Step 3. When the scanning process completes, select useless large files and click «Clean» to clean large files.
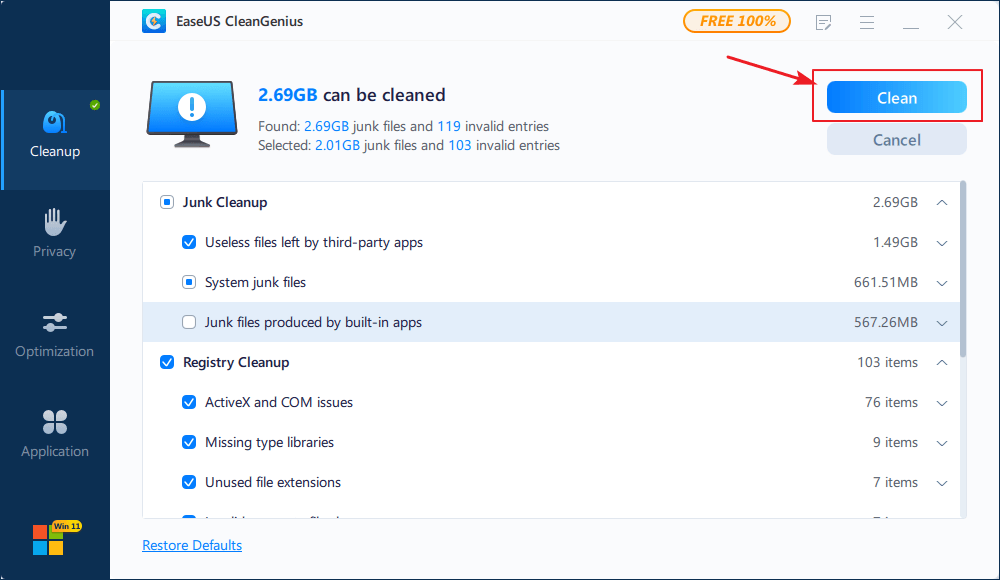
Step 4. When EaseUS CleanGenius completes cleaning the files you choose, click «Done» to finish the process.

If you think these solutions are not working, continue reading, and we will offer more solutions. If it helps you, you can share it with other people in need.
Method 3. Use Windows Update Troubleshooter
Excluding the internal hardware factors, it’s probably just the system bugs that throw your computer onto a blue screen where Windows 10 works on an infinite update.
The Windows own little program called Windows Update Troubleshooter can fix the broken components that might break the update progress.
Method 4. Disable Startup Programs That Conflict with the Update
You never know that third-party applications always conflict with the update because they happen to start at the same time. Along with applications, services and drivers are making the same effect. So, if you feel certain that the problem does not come from a poor internet connection or hard drive bad performance, consider this factor, and you may try performing a clean boot of Windows 10 before attempting to get the new update.
Step 1. Press Windows + R keys to open Run.
Step 2. Type msconfig in the Run box and click OK.
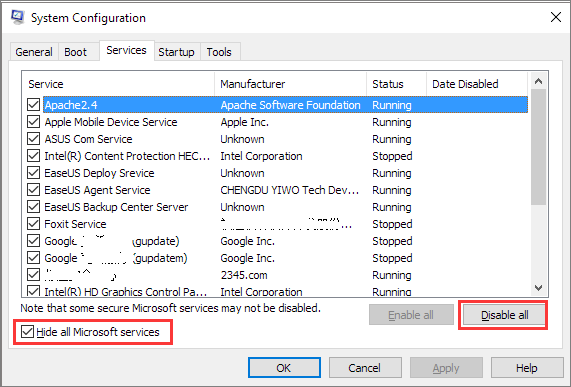
Step 3. In the System Configuration, click the «Services» tab.
Step 4. Check the box Hide all Microsoft services.
Step 5. Click «Disable all».
Step 6. Next, return and go on with the Startup tab.
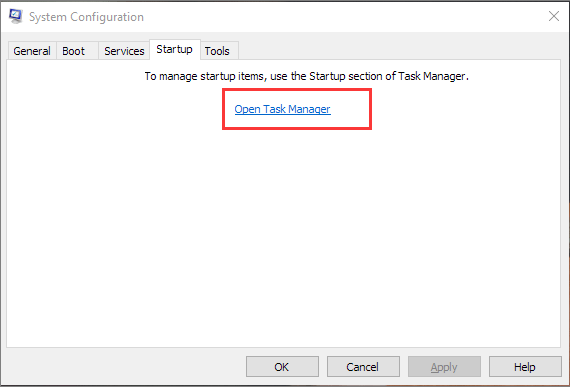
Step 7. Click Open Task Manager.
Step 8. Click any startup program that is suspicious in conflicting with the update and click «Disable».
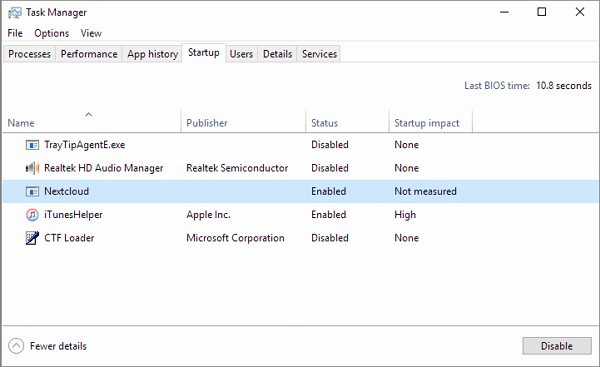
Repeat the previous step until all the startup programs in question were disabled.
Step 9. Close the Task Manager and click «OK» in the System Configuration window.
Step 10. Restart your PC and get the new update for the second time.
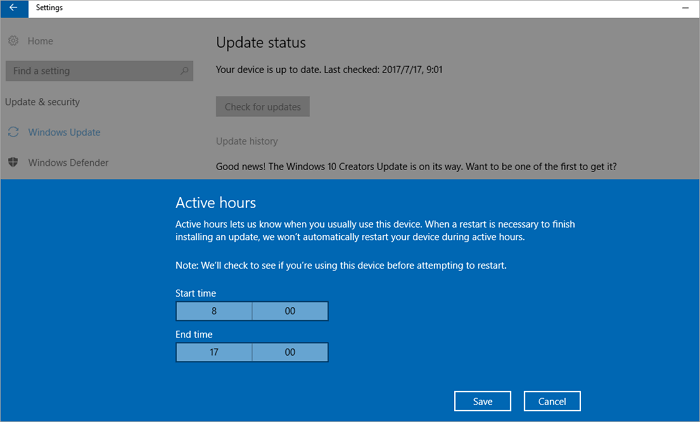
Method 5. Schedule Updates for Low-Traffic Periods
Massive Windows 10 updates with long installation can happen at any time. But your Internet connection may not be fast all day long. You can disable auto-updates and schedule it for after-hours when your computers and office network aren’t in use. Open the Windows Update window and specify when you prefer updates to be installed.
Most of the time, people receive a Windows 10 unwillingly because Microsoft turns on an automatic update on our computers by default. To avoid receiving any problematic update in the future, you can always try to disable Windows 10 update for permanent.
By the way, whenever you suffer from a slow boot or startup issue after Windows 10 update, find solutions on this page. For those seeking additional resources or clarification, our customer care department is available to offer professional support.
EaseUS experts are available to provide you with 1-on-1 manual services (24*7) and help fix different Windows configuration issues. Our experts will offer you FREE evaluation services and efficiently diagnose and resolve Windows update errors, Windows installation, or daily OS issues using their decades of experience.
- 1. Fix Windows update errors, such as update failure, unable to upgrade Windows, etc.
- 2. Serve to download and install the latest Windows operating system on PC with success.
- 3. Provide fixes for daily Windows system errors with drivers, permission, account settings, etc., issues.
To Sum Up
This tutorial demonstrates how long does Windows 10 update take and why is Windows 10 update taking so long. The most six useful solutions here can help you fix Windows 10 update taking forever problems. Among them, freeing up storage space and defragmenting your hard drive is very useful. You can complete the job with the assistance of EaseUS Partition Master Free.
This free disk management program makes complex hard drive organization easier than ever, such as convert MBR to GPT, convert FAT to NTFS, convert a logical partition to primary or primary partition to logical, etc..
1. How long does Windows 10 update take 2019?
Major updates to the Windows OS come about every six months, with the most recent being the November 2019 update. Major updates may take a little longer. The regular version only takes 7 to 17 minutes to install.
2. Why do Windows 10 updates take so long?
Why does Windows 10 update take so long? Windows 10 updates take so long to complete because Microsoft is constantly adding larger files and features to them. The biggest updates, released in the spring and fall of every year, usually take upwards of four hours to install. Besides, it’s also relevant to the small available space, hard drive fragments, software conflicts, and other factors.
3. Can I stop a Windows 10 update in progress?
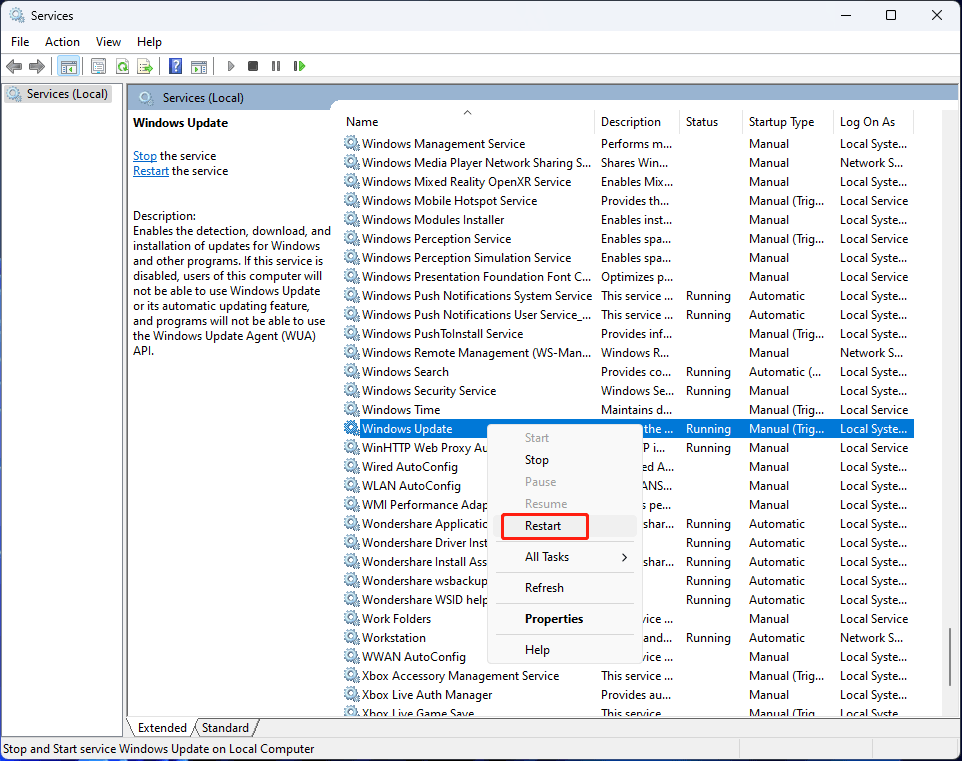
You can stop Windows 10 updates in progress in the services.
Step 1. Open the Search windows box and type Services in Windows 10. Right-click Services and select «Run as Administrator».
Step 2. In the Services window, you will find out the list of all the services running in the background. You need to find the Windows Update service.
Step 3. Right-click «Windows Update», and from the context menu, select «Stop». Alternatively, you can click on the «Stop» link available under the Windows update option on the top left side of the window.
4. How long does it take to update Windows 10 1903?
It depends. On different devices, in different network situations, the time spent is different. The installing of Windows 10 1903 takes about 30 minutes. Configuring, and restarting may take a few times. In short, you’ll probably upgrade to Windows 10 1903 in an hour.
Все способы:
- Способ 1: Ожидание
- Способ 2: Отключение устройств
- Способ 3: Перезапись флешки
- Дополнительные действия
- Вопросы и ответы: 1
Способ 1: Ожидание
В зависимости от используемой сборки, процесс подготовки Windows при установке занимает от 20 минут до часа, но в некоторых случаях он может затянуться. Иногда кажется, что экран с сообщением «Getting ready» или «Подготовка к настройке Windows» завис, в то время как система продолжает выполнять действия по настройке. О проблемах с установкой можно будет говорить, если ничего не изменится через два часа или более. Поэтому наберитесь терпения и просто немного подождите.
Способ 2: Отключение устройств
Теоретически проблемы с завершением установки могут быть вызваны ошибками идентификации подключенных к компьютеру устройств. Если сообщение «Getting ready» не исчезнет через продолжительное время (более часа), выключите компьютер кнопкой питания, отключите все второстепенные устройства и включите компьютер. Процедура настройки продолжится и, возможно, завершится успешно.
Способ 3: Перезапись флешки
Нельзя исключать, что причиной неполадки являются ошибки записи установочного образа Windows 10 на флешку. Также ошибки может содержать сам дистрибутив. Пересоздайте установочную флешку, также рекомендуется сравнить контрольные суммы ISO-образа с указанными хешами на сайте (если таковые имеются), с которого был скачан установочный образ. Избегайте по возможности использования пользовательских кастомизированных сборок Windows, так как они могут содержать ошибки.
Читайте также: Как создать загрузочную флешку с Windows 10
Дополнительные действия
В случае зависания на экране «Подготовка к настройке Windows» («Getting ready») не будет лишним проверить работу сети и диска. Во-первых, убедитесь в исправности и стабильности интернет-соединения. Возможно, компьютер отключился от сети и не может скачать нужное обновление. Если ПК подключен к роутеру по беспроводной сети, попробуйте подключиться с помощью кабеля Ethernet. Во-вторых, проверьте жесткий диск на предмет ошибок файловой системы и поврежденных секторов.
- Загрузите компьютер в среду восстановление любым подходящим способом, лучше всего с помощью установочного образа.
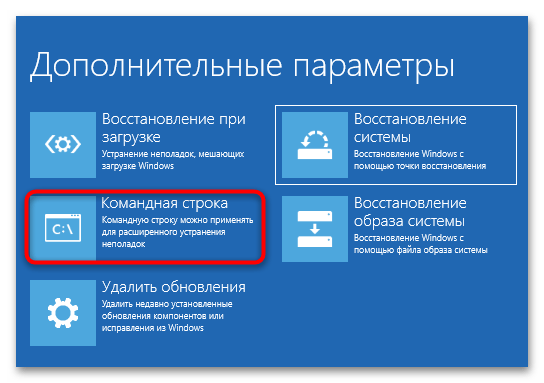
Подробнее: Как попасть в среду восстановления в Windows 10 - На экране выбора действия выберите «Поиск и исправление неисправностей» → «Дополнительные параметры» → «Командная строка».
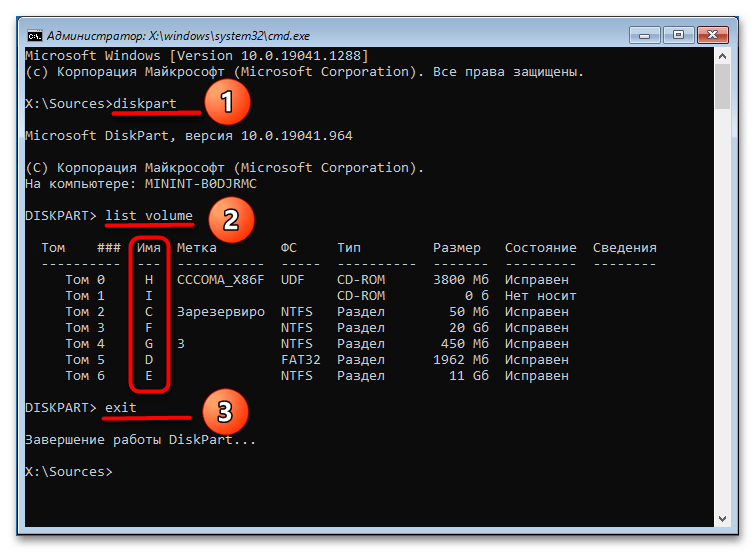
- В открывшейся консоли последовательно выполните команды
diskpartиlist volume, чтобы определить буквы разделов в загрузочной среде. Ориентируйтесь на строку «Размер», чтобы найти там системный диск. - Завершите работу «Diskpart» командой
exit. - Проверьте системный раздел, выполнив команду
chkdsk D: /f /r, где D – буква раздела с операционной системой.

Если ошибки будут найдены, утилита их исправит. После этого можно пробовать загружаться в обычном режиме. Для проверки диска на наличие поврежденных секторов лучше использовать специальное программное обеспечение, например программу Victoria. Так как компьютер не загружается, жесткий диск с него придется снять и проводить проверку уже с другого рабочего компьютера. Если такая возможность отсутствует, можно будет воспользоваться одним из спасательных LiveCD, на борту которого имеется программа Victoria.
Скачать Victoria
Читайте также: Восстанавливаем жесткий диск программой Victoria
Наша группа в TelegramПолезные советы и помощь
|
В России и большинстве других стран мира Windows 10 и 11 устанавливаются медленнее, чем в США. К тому же после установки они переполнены базовым ПО. Решить обе проблемы можно за пару секунд еще до инсталляции.
Раньше было лучше
В России операционные системы Windows 10 и Windows 11, как выяснилось, устанавливаются медленнее, чем, например, в США. Помимо этого, после якобы чистой установки системы российские пользователи все равно получат ОС, переполненную дополнительными программами, часть из которых нельзя удалить стандартными методами.
Столь необычную проблему выявил американский пользователь заблокированной в России социальной сети Twitter под псевдонимом ThioJoe (@thiojoe). В своем блоге он написал, что подобное характерно в принципе для всех стран, кроме тех, что используют американскую систему написания дат и времени, когда вместо привычной схемы «день/месяц/год» пишут «месяц/день/год».
Жители этих государств, получается, вынуждены «из коробки» работать в захламленной системе и дольше ждать ее установки – и все это именно из-за дополнительных программ, которым тоже требуется инсталляция. После этого все они занимают место на системном носителе, а некоторые, если не проверить меню «Автозагрузка» в «Диспетчере задач» – еще и оперативную память.
Количество стартовых программ зависит от региона и версии Windows 11
Подобная проблема наблюдается лишь в современных операционных системах Windows 10 и Windows 11 – ранее выпущенные ОС Microsoft после переустановки не грузили ни «железо», ни пользователями ненужным предустановленным ПО. Эта проблема приплюсовывается к другой, еще менее приятной – обе системы передают Microsoft огромное количество информации о пользователе (телеметрию), в десятки раз больше, чем незабвенная Windows XP, вышедшая в конце 2001 г.
Как решить проблему
В своей публикации ThioJoe написал, что смог решить проблему захламленности свежеустановленной Windows. Сделать это, по его словам, можно за пару кликов, но исключительно до того, как система будет полностью развернута на ПК и готова к работе.
Проблема решается на самом начальном этапе процесса установки Windows – когда на экране появится выбор языка, раскладки клавиатуры и параметров отображения времени и денежных единиц. В этом окне, по словам ThioJoe, необходимо выбрать английскую систему отображения времени, после чего продолжить установку.

Способ решения проблемы и итоговый результат
Итогом, утверждает автор совета, станет по-настоящему чистая Windows. Он продемонстрировал это на примере Windows 11 – новейшей ОС Microsoft, которую она всячески продвигает, и которая предустанавливается на новые ноутбуки и настольные компьютеры.
Результатом нехитрых манипуляций стало почти пустое меню «Пуск», по умолчанию заполненное дополнительными программами. Раздел «Рекомендуется» (Recommended) и вовсе чист, хотя по умолчанию он заполнен ссылками на утилиты, которые, по мнению Microsoft, обязательно должны пригодиться пользователю.
Подходит ли для России
Выложив в Сеть инструкцию, ThioJoe не уточнил лишь, стоит ли менять язык Windows и раскладку клавиатуры. В его случае Windows устанавливалась с интерфейсом на английском и поддержкой английской же раскладки.
Смена языка Windows после ее установки и настройки – часто не самая простая в своем выполнении задача, особенно в версиях с одним языком и в любимых миллионами россиян пиратских сборках.
Почти все языковые настройки Windows 11 легко меняются
Вследствие этого, если действительно нужно выбирать английский язык интерфейса, в российских широтах предложенный ThioJoe способ борьбы с бесполезным предустановленным ПО теряет свою эффективность. Что касается настроек раскладки клавиатуры и отображения дат, то сменить их, наоборот, не составляет труда. Сделать это можно в приложении «Параметры», во вкладке «Время и язык – Регион», и здесь же можно попытаться поменять язык интерфейса. Но перед сменой языка все же лучше сделать резервную копию системы, чтобы не пришлось устанавливать и настраивать ее заново.
- Какой дисплей для смартфона лучше: AMOLED или IPS?
When your Windows 10 Update Assistant is stuck at 99% or the Windows 11 Installation Assistant is stuck at 99% forever, do you know how to fix the issue? In this article, MiniTool Software will show you some easy solutions that have proven effective.
What Is Windows 10/11 Update Assistant?
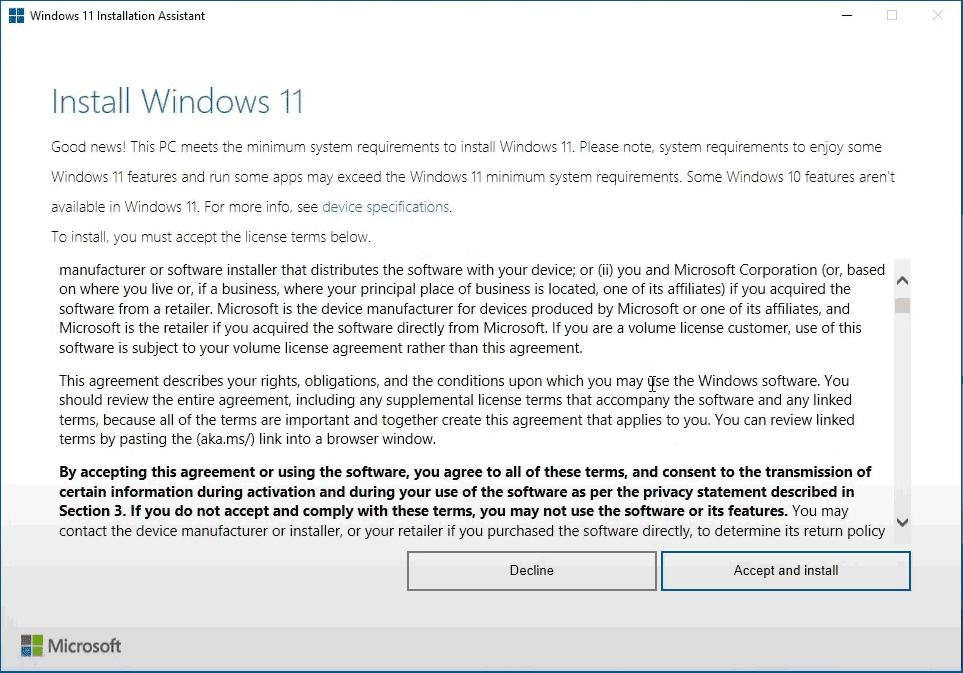
Windows 10/11 Update Assistant is a Windows update tool that can help you directly update/upgrade your system to the latest version of Windows 10/11. Specifically, the update assistant for Windows 10 is Windows 10 Update Assistant, and the update assistant for Windows 11 is called Windows 11 Installation Assistant.
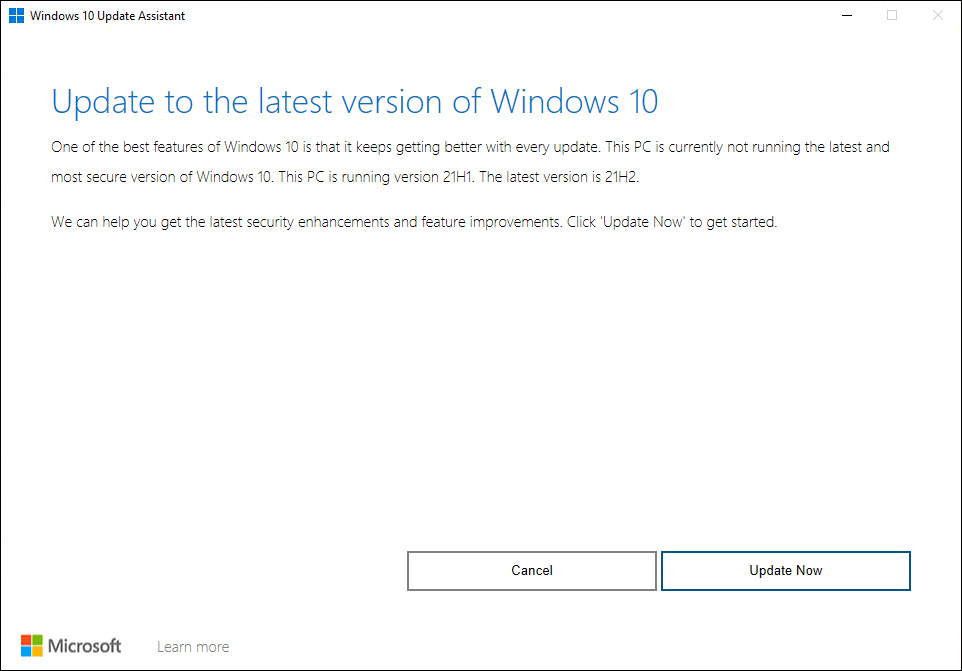
Using Windows Update Assistant to update your system to the latest version is one of the Windows update methods. If you can’t get the Windows updates via Windows Update in the Settings app, you can use Windows Update Assistant instead.
Windows 10/11 Update Assistant Is Stuck at 99%! How to Fix It?
It is not difficult to use Windows 10 Update Assistant or Windows 11 Installation Assistant to update your system. You can download it from the Windows 10 software download page (https://www.microsoft.com/software-download/windows10) or the Windows 11 software download page (https://www.microsoft.com/software-download/windows11) of Microsoft. After downloading, you can open the tool and follow the onscreen instructions to perform a Windows update. It will take a while to finish the entire update process. You should wait patiently.
However, some users report that they only waited for such a result of Windows Update Assistant stuck at 99% or Windows 10 Update Assistant stuck at 0/92/93 after a long wait. Some users even wait for more than 7 hours without any progress. For example, the following screenshot shows that Windows 10 21H2 Update Assistant is stuck at 99% forever.
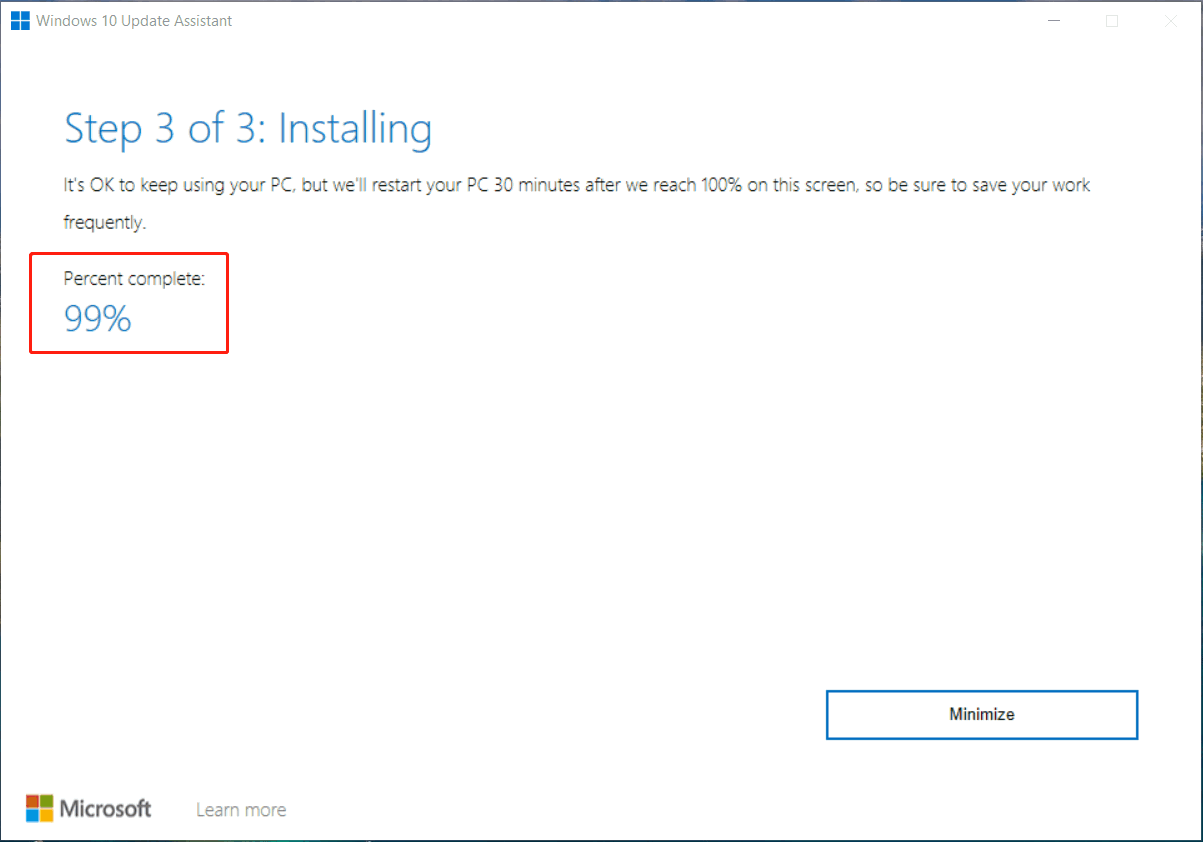
A Windows update needs a long time to download and install the components and files for the update on your device. It is normal if the Windows Upgrade Assistant is stuck at 99% or 0% within 4 hours. However, if the period is longer than that, you have to consider that there is a problem with this update process. You need to take some measures to solve the issue.
We collect and summarize some easy and useful solutions to fix this problem. Now, we will introduce them in this post. You may not know which method is right for your situation, so try them one by one.
Tip: Back up Your Computer before Performing a Windows Update
In theory, updating your system using Windows 10 Update Assistant or Windows 11 Installation Assistant will not delete files on your device. But to prevent some unexpected problems, you’d better back up your PC using MiniTool ShadowMaker to safeguard your files and system.
MiniTool ShadowMaker is a professional Windows backup software that can run on all versions of Windows, including the latest Windows 11. You can use it to back up your files, folders, partitions, disks, and systems with some simple clicks.
- How to back up Windows 10?
- How to back up Windows 11?
This software has a trial edition. You can use it for free within 30 days.
MiniTool ShadowMaker TrialClick to Download100%Clean & Safe
Some users report that their Windows Upgrade Assistant is stuck at 99% for more than 7 hours or even forever. If you are also bothered by this issue, you can run setup from the Media folder to solve the issue. You should not restart your computer before doing this. Otherwise, the Media folder might be unavailable on your device.
Step 1: Press Windows + E to open File Explorer.
Step 2: Type C:\$GetCurrent into the address bar in File Explorer and press Enter. C:\$GetCurrent folder is a hidden folder. If you can’t see it, you need to unhide it first. You can click View from the top ribbon bar and make sure the Hidden items option is selected on Windows 10, or go to View > Show to select Hidden items on Windows 11.
Step 3: Copy and paste the Media folder to the desktop.
Step 4: Restart your computer.
Step 5: Use the same method mentioned above to open the $GetCurrent folder. Then, copy and paste the Media folder from the desktop to the $GetCurrent folder in the C drive.
Step 6: Open the Media folder and then double-click the Setup file.
Step 7: Follow the on-screen instructions to start the update/upgrade progress. When you see the Get important updates screen, you need to select Not right now and then select Next to continue.
Step 8: When the update/upgrade progress ends, you should go to Windows Update to check for updates and install the available updates on your device.
Solution 2: Temporarily Turn off Any Third-Party Antivirus Software
Windows has a built-in tool to supply anti-virus services for your computer. This tool is called Windows Defender or Windows Security. It is enough to have this tool on your computer. But some users still install third-party anti-virus software to get multiple protections.\
It is good to do this to protect your computer from viruses and malware. However, the software might block your Windows update if it makes a wrong judgment. To rule out this possibility, you can temporarily disable the third-party anti-virus software and check if the issue is solved.
Besides, you’d better choose a popular third-party anti-virus tool to offer reliable and stable protections for your device.
Solution 3: Disconnect the Peripheral Devices
The peripheral devices that are connected to your computer can also be the cause of Windows Update Assistant stuck. The outdated peripheral devices’ drivers can disturb the update process on your device.
It is easy to rule out this possibility. You can remove all the peripheral devices like Bluetooth devices, printers, USB flash drives, external hard drives, and more. Then, you can run the Windows 10/11 update to see if the issue is solved.
If the issue persists, you can try the next solution.
Solution 4: Temporarily Disable the Internet Connection
Some users said they solve the issue by disabling the internet connection temporarily. If the above solutions can’t help you solve the issue, you can also do this to have a try.
So, you can disconnect the Ethernet cable, or disable your Wi-Fi connection, and then check if there are any changes with the updating process. If the internet connection is the cause, there should be visible changes after you disable the internet connection.
Solution 5: Restart the Windows Update Service
Restarting the Windows Update service is an effective method to solve Windows Update issues like Windows 10 Update Assistant taking forever.
Step 1: Click the search icon in the taskbar and search for Services.
Step 2: Select Services from the search result to open the Services app.
Step 3: Scroll down to find Windows Update. Then right-click it and select Restart.
Solution 6: Run the Windows Update Troubleshooter
Windows has different kinds of built-in troubleshooters to fix issues on your device. The Windows Update troubleshooter is a kind of tool that can help you fix the issues you encounter when updating your system.
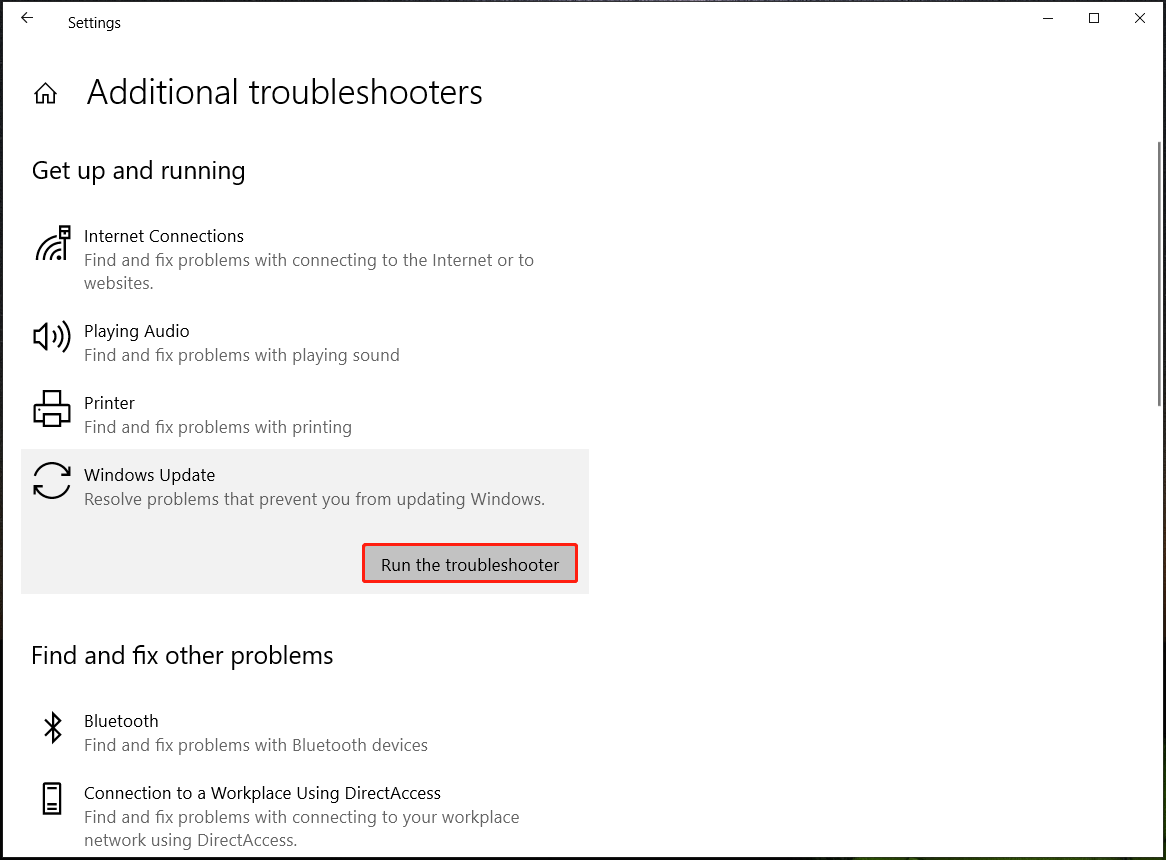
Run the Windows Update troubleshooter on Windows 10
Step 1: Press Windows + I to open the Settings app.
Step 2: Click Troubleshoot from the left menu.
Step 3: Click the Additional troubleshooters link from the right panel.
Step 4: On the next page, click Windows Update under Get up and running, then click the Run the troubleshooter button to run this tool to find and fix updates issues on your device.
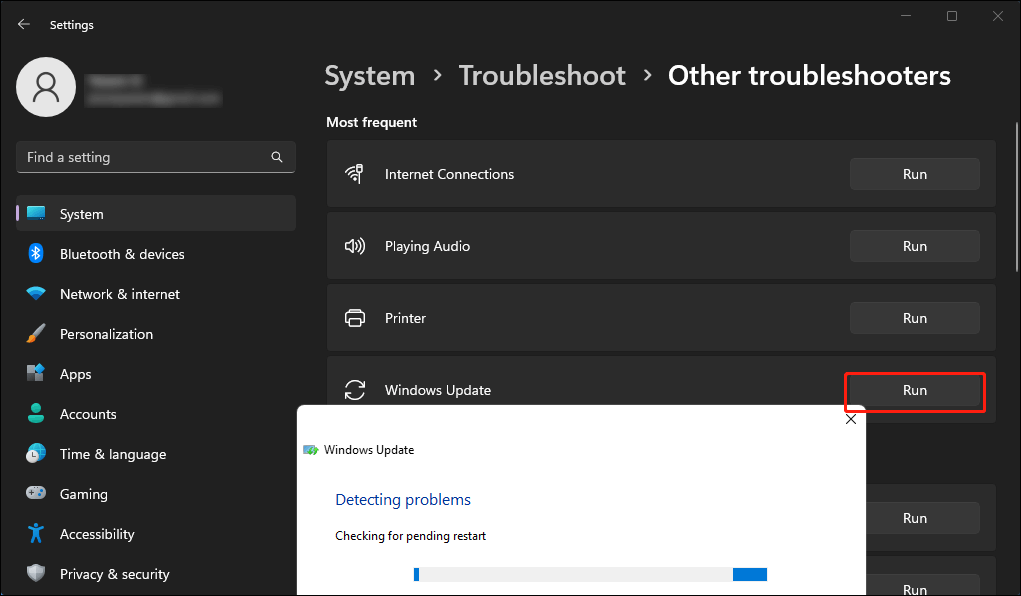
Run the Windows Update troubleshooter on Windows 11
Step 1: Press Windows + I to open the Settings app.
Step 2: Go to System > Troubleshoot > Other troubleshooters.
Step 3: Click the Run button next to the Windows Update option. This tool will begin to detect problems and fix them automatically.
Solution 7: Perform a System Restore
If you have performed a system restore point on which the Windows Update Assistant can still work normally, you can perform a system restore via the system restore point. Then, you can run the Windows Update Assistant and check if run fully.
- How to perform a system restore on Windows 10?
- How to perform a system restore on Windows 11?
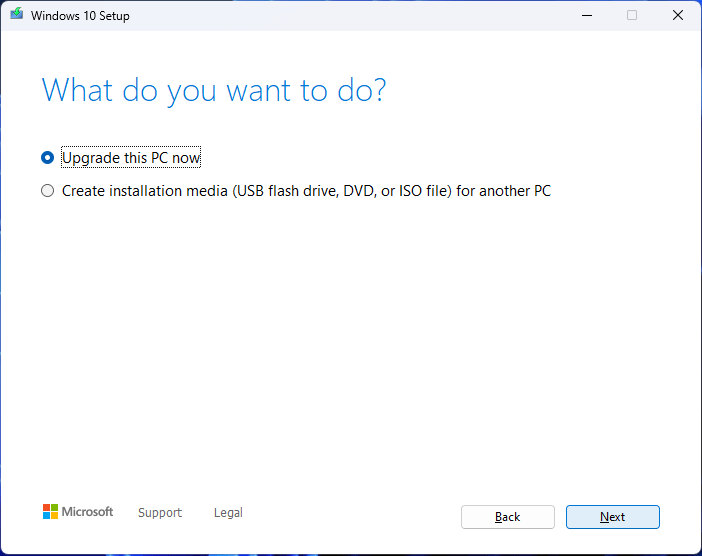
If you still can’t use Windows 10 Update assistant or Windows 11 Installation Assistant to update your system, you can use another tool to do the same job. For example, you can use Windows 10/11 media creation tool to update your system.
- Download Windows 10 media creation tool
- Download Windows 11 media creation tool
By using this tool, you can directly upgrade your PC. You can also use it to create an installation media, and then install Windows 10/11 from the USB drive.
Recover Your Lost Files on Windows 10/11
If your files get lost due to a Windows update or some other reason, do you know how to get them back? You can use professional data recovery software to rescue your files. You can try MiniTool Power Data Recovery, a free file recovery tool.
This software is specially designed to recover all kinds of files from different types of data storage devices as long as the files are not overwritten. For example, it can retrieve files from your computer hard drives, external hard drives, USB flash drives, memory cards, and more. This tool can work on all versions of Windows including Windows 11, Windows 10, Windows 8.1/8, and Windows 7.
Likewise, this software has a trial edition. You can run it to see if it can find your files. Then, you can use a full edition to recover your needed files without limits.
MiniTool Power Data Recovery TrialClick to Download100%Clean & Safe
This software is user-friendly. With only some simple clicks, you can find your needed files and recover them.
Step 1: Download and install this software on your computer.
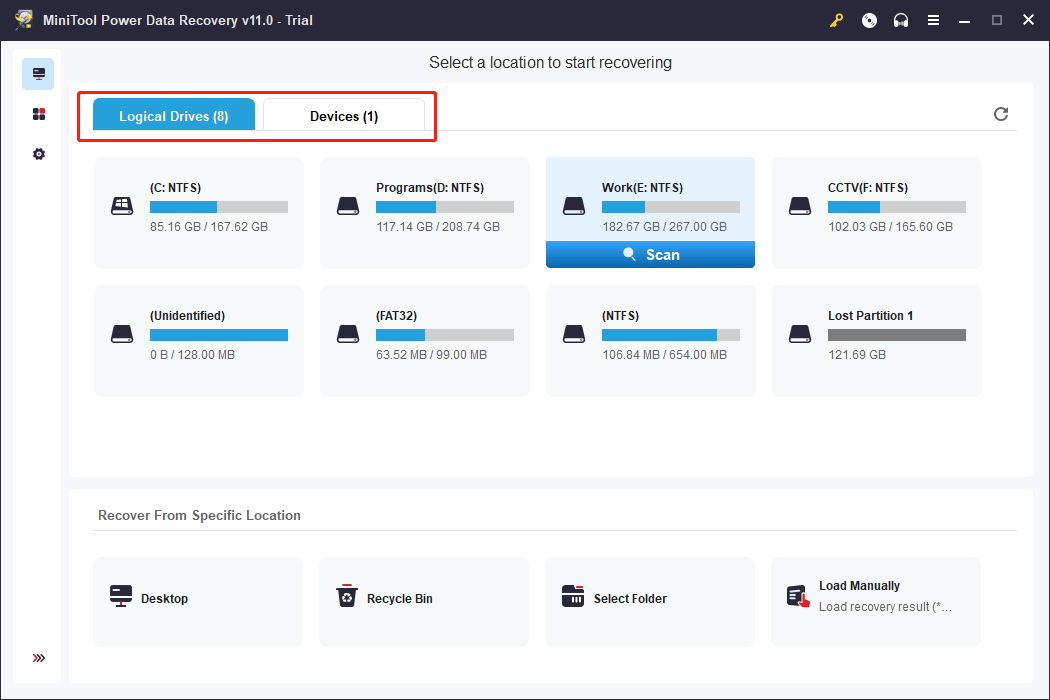
Step 2: Open the software. Then, it shows up all the drives it can detect on your device. Find the drive that previously saved the lost files. Then hover over that drive and click the Scan button to start scanning it. If you are not sure, you can switch to the Devices section and select the entire drive to scan.
Step 3: When the scanning ends, you can see the scan result. You can open each folder to find the files you want to recover.
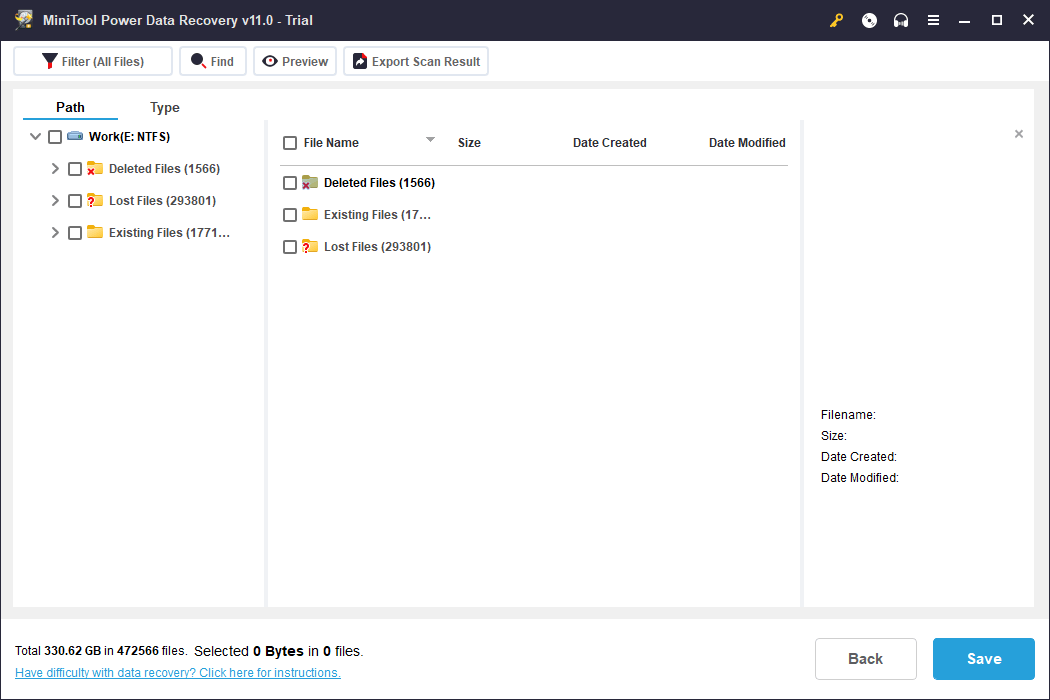
Step 4: Upgrade to a full edition and select all your needed files. Then, click the Save button and select a suitable location to save these files. The destination storage drive should not be the original location of the lost files. Otherwise, the lost files might be overwritten and become unrecoverable.
The End
Windows 10 Update Assistant is stuck at 99% or Windows 11 Installation Assistant is stuck at 99% on your PC? You should not worry about this issue. The solutions introduced in this article can help you solve the issue. You can just try out them and find a suitable one for you.
Should you have other useful solutions or suggestions, you can let us know in the comment. You can also contact us via [email protected].
Если вы видите это сообщение, значит, произошла проблема с загрузкой файлов в стилей (CSS) нашего сайта. Попробуйте сбросить кэш браузера (Ctrl+F5).
Если это не поможет, а вы находитесь в регионе, где возможны ограничения интернет-трафика с российских серверов — воспользуйтесь VPN.
|
Зависание системы при обновлении возможно по многим причинам. Это может быть вызвано разрывом интернет-соединения, сбоем на сервере, сбоем в самом компьютере, недостаточным объемом свободного места на жестком диске. Не исключено и наличие вируса, не разрешающего определенные действия. Вероятно, придется отменить обновление, перезагрузив компьютер с помощью кнопки «резет» или просто отключив питание. Перед повторной попыткой обновления тщательно изучить инструкцию, удостовериться, что никаких проблем нет. Произвести очистку диска, и после этого повторить попытку обновления. Если это опять не удастся, то обратиться в службу поддержки. Разумеется, это возможно при наличии лицензионной версии ОС. система выбрала этот ответ лучшим KONGL 7 лет назад Ждать двое суток в таком случае вовсе не обязательно. Очевидно, что произошел сбой и ваш компьютер завис. Теперь необходимо привести его в порядок. Для этого попробуйте перезагрузить компьютер используя стандартное сочетание клавиш: Ctrl-Alt-Del. (Зажимаете все три клавиши одновременно). Если это не помогает и компьютер не реагирует, то при наличии кнопки «Reset» жмём её. Если такой кнопки нет, щёлкаем выключатель на блоке питания, либо снимаем аккумулятор, если у вас ноутбук. Если после указанных процедур ваш компьютер загрузится корректно, то можно повторить операцию обновления. Если же и в дальнейшем ваш компьютер будет зависать, то вам придется обратиться в службу поддержки. дольф 7 лет назад было у меня дело, зависла система на обновлении, ни одна кнопка не реагировала. Уже давно мне говорили, в подобных случаях, нужно отключить питание ноутбука, нажала на выключение, ноутбук не реагирует. Нашла совет, нужно держать кнопку выключения 10 секунд, и да, ноутбук вырубился. Ждать, что Виндоус сама справится с обновлением не стоит, система затупила и загрузку обновления можно прервать механическим путем. А потом посмотреть загрузки и если это важное обновление, загрузить его с сайта разработчика. Если оно не указано в важных обновлениях, тогда не обязательно, но потом Виндоус может затупить в в воспроизведении видео и тут уж точно надо разбираться с загруженными обновлениями. Если обновление Windows не завершается долгое время, необходимо перезагрузить компьютер. Если компьютер «висит на заставке», надо принудительно выключить его кнопкой питания. Кнопку надо удерживать несколько секунд, пока не погаснет индикатор питания. В случае с ноутбуком иногда приходится снимать аккумуляторную батарею. После этого надо включить компьютер. Если через 30 минут работы картинка на экране не меняется, обновление не завершается, выключайте компьютер еще раз и включайте, удерживая кнопки клавиатуры SHIFT и F8. Появившееся меню подскажет дальнейшие действия. Если все манипуляции ни к чему не привели, вызывайте компьютерного специалиста. [поль 7 лет назад У меня в прошлом году такое же было. Перезагружала раз пять, нажимая на Ctrl+Alt+Del. После этого комп запустился. Я сразу же просканировала его на вирусы двумя антивирусниками и опять перезагрузила. Стараюсь больше не соглашаться на обновления. Peres 7 лет назад Эта проблема очень актуальная у многих пользователей и поэтому вообще нежелательно обновлять комп или другой гаджет через центр обновления. Многие жалуются, что происходит зависание, и он может обновляться не одни сутки. Попробуйте принудительно перезагрузить комп и потом восстановить его до состояния накануне. Это делается через опцию восстановление системы через оставленные точки. И еще так может реагировать антивирусная программа, ее сразу нужно отключать. Есть папка обновлений и ее нужно сразу удалить после того, как вы перезагрузите комп. Далее почистить все куки и потом проверить на вирусы. Иначе можно потерять все данные и потребуется переустановление ОС. snuch 7 лет назад Скорее всего при установке обновления возникла одна из ошибок,каких именно-вам никто скорее всего не скажет(если нет так называемого синего экрана смерти).Выключите компьютер,это сбросит процесс обновления и откатит его.Если при последующих попытках возникнет то же самое-отключите автообновления виндовс.На 10-й они абсолютно бесполезны и весят десятки гигов. Ёжик в туман 7 лет назад Лучше всего не использовать обновление, которое производится через Центр обновления Windows, так как оно бывает не доводит обновления до конца. Помню, ко мне звонит друг и говорит, что компьютер не может закончить обновление системы уже как два дня. После этого случая, я ему посоветовал просто взять и перезагрузить компьютер. Обновление может зависнуть из-за загрузки Центрального Процессора. Такое частенько бывает, потому что при обновлении системы, данная служба потребляет много ресурсов компьютера, из-за чего может зависнуть обновление системы и не отвечать на ваши клики. Время плати 5 лет назад Такое зависание бывает, когда обновления начинают устанавливаться некорректно, то есть возможно пропал интернет и система просто зависла. Тут нужно просто выключить или перезагрузить компьютер с помощью кнопок на Системном блоке. Если после перезагрузки операционная система вернется в прежнее состояние это хорошо, но бывает что после перезагрузки появляется черный экран. Здесь понадобится откат системы. Windows 10 не совсем совершенная операционная система и очень часто обновления приводят к сбоям. Поэтому лучше при возможности пользоваться Windows 7 или Windows 8.1. Вы сами же на свой вопрос и ответили. Здесь ключевое слово «висит». Ну раз компьютер висит, значит его надо перезагружать. Если удастся, то правильными способами, но скорей всего, придется просто грубо отключать компьютер от питания, если ноутбук, то и изъятием батарей. Но а потом как получится, или попытаться продолжить обновление или восстановить систему, до предыдущего состояния. Или крайний вариант — придется переустанавливать систему с потерей всех данных. Хотя при желании большинство данных все же можно будет спасти, если уж очень надо, но это другая тема. storu 7 лет назад Если обновление зависло, то компьютер нужно перезагрузить. Далее служба поддержки Майкрософт рекомендует сделать следующее: 1) Отключите от компьютера все устройства, которые подключены к нему через USB-порты. 2) Удалите антивирус, часто проблемы возникают из-за конфликтов с ним. 3)Удалите содержимое следующей папки «$Windows.~BT». 4) Удалите все программы, которые связаны с изменением интерфейса, тем. 5) Осуществите «чистую загрузку системы» и попытайтесь повторно обновить Windows. Для чистой загрузки винды нужно выполнить следующие действия: А причин зависания может быть несколько. Например, недостаток места, мало памяти. Другая причина — проблема с антивирусом или драйверами. Первое что можно и нужно сделать — перезапустить компьютер, потом можно почистить диск, проверить на вирусы и заново запустить обновление. Знаете ответ? |