
Рекомендуем: Как отключить иконку Защитника Windows, в Windows 10?
Windows 10, как и Windows 8 устанавливаются с определенным набором универсальных или современных (UWP) приложений. Погода, OneNote, Люди, Деньги, Windows Store, Ваш телефон, Groove Музыка, Камера, Office, Skype, Календарь и Почта, Калькулятор, Будильник, Кино и ТВ, Диктофон. Это неполный список приложений, установленных в ОС Windows 10.
При первом входе в систему, Windows 10 устанавливает эти приложения для вашей учетной записи пользователя.
Некоторые из предустановленных приложений, таких как Калькулятор, Погода, Почта необходимы для большинства пользователей, в то время как другие не представляют никакой ценности. Такие приложения, как Люди, Спорт, Фотографии и Paint 3D абсолютно бесполезны для большинства пользователей ПК, поскольку есть доступные и лучшие альтернативы. Например, классический Photo Viewer (Просмотр фотографий Windows) для многих лучше, чем новое приложение «Фотографии».
Вы, возможно, заметили, что есть приложения, которые не могут быть удалены с помощью панели управления или настроек в Windows 10. Для удаления этих приложений нужно использовать PowerShell или сторонние утилиты. Если приложения UWP вам не нужны или вы пользуетесь своим набором программ, вот как удалить их.
Как удалить приложения в Windows 10.
Чтобы удалить приложения установленные по умолчанию в Windows 10, вам необходимо открыть PowerShell от имени Администратора.
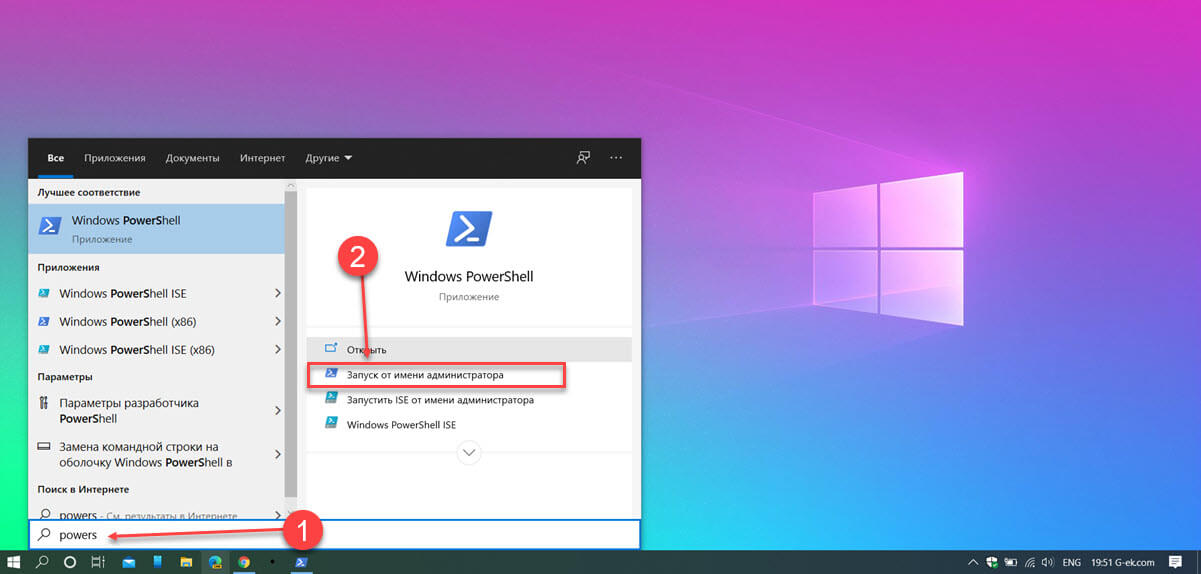
Шаг 1: Откройте меню «Пуск» (нажмите Win клавишу на клавиатуре) и введите Powershell. В результатах поиска, выберите «Запуск от имени администратора». Или вы можете нажать Ctrl+Shift+Enter чтобы открыть его в качестве администратора. Открытие PowerShell от имени администратора важно, в противном случае выполнение команды будет терпеть неудачу.
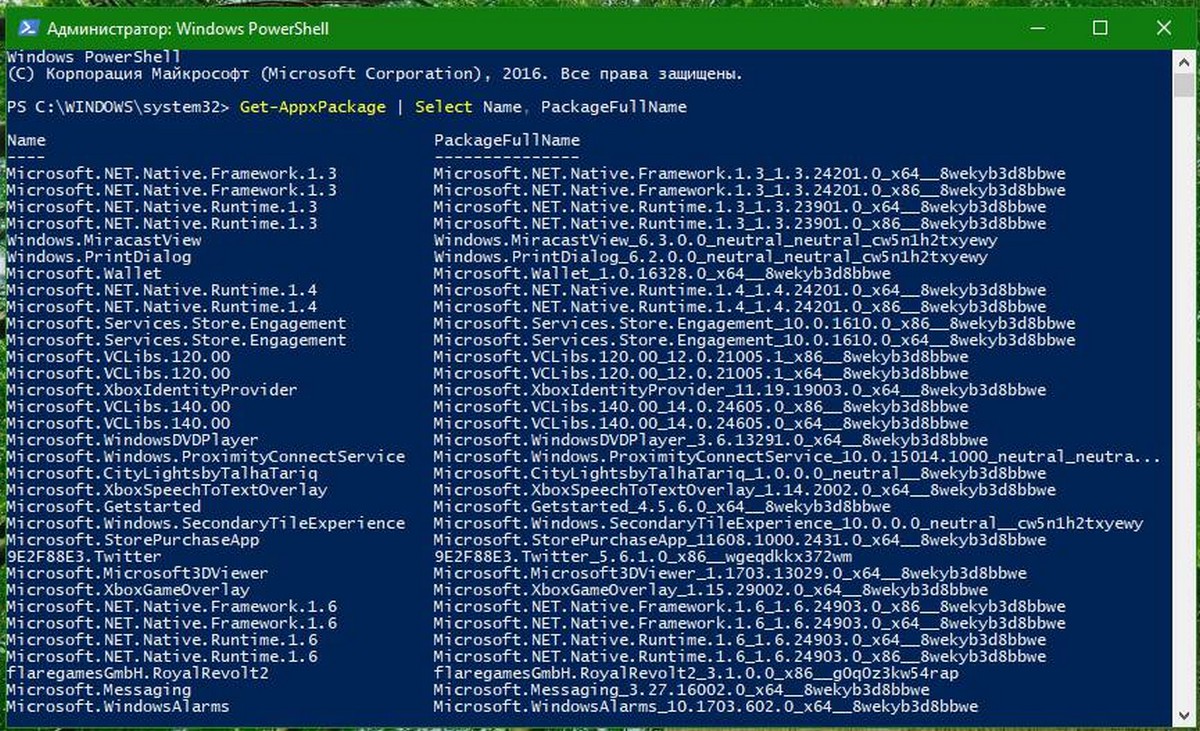
Шаг 2: Давайте посмотрим список всех установленных универсальных приложений для текущей учетной записи пользователя. Введите или скопируйте вставьте следующую команду:
Get-AppxPackage | Select Name, PackageFullName
Вы получите Список установленных пакетов приложений
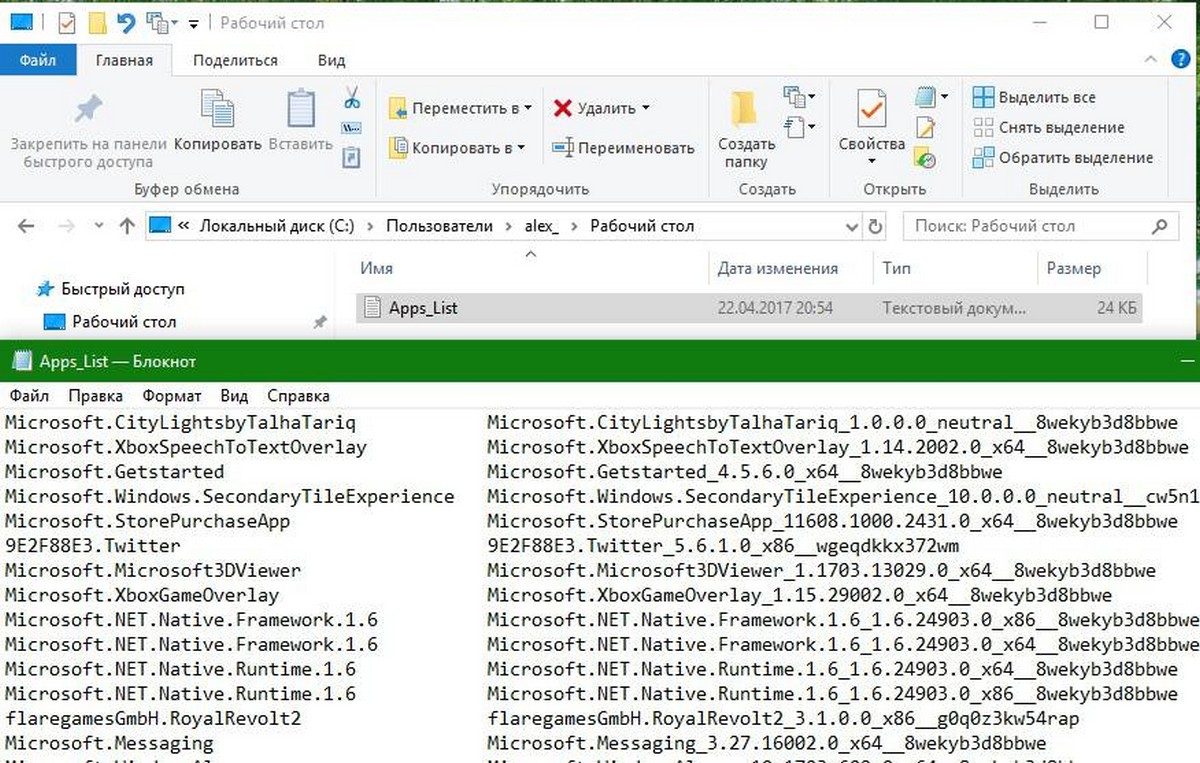
Шаг 3: Для удобства, вы можете сохранить его в файл, вывод команды выглядит следующим образом:
Get-AppxPackage | Select Name, PackageFullName >"$env:userprofile\Desktop\Apps_List.txt"
Список приложений, будет сохранен в файле — Apps_List.txt, на рабочем столе.
Шаг 4: Теперь вы можете использовать этот список для удаления отдельных приложений с помощью следующей команды:
Remove-AppxPackage «PackageFullName»
Например, я удалю Minecraft с помощью команды:
Remove-AppxPackage Microsoft.MinecraftUWP_1.0.700.0_x64__8wekyb3d8bbwe

Вы так-же, можете использовать комбинацию командлетов Get-AppxPackage и Remove-AppxPackage в одной команде, чтобы удалить приложение, не указав его полное имя пакета. Вместо этого, вы можете использовать шаблоны. Следующая команда делает то же самое, как и команда выше но выглядит намного проще:
Get-AppxPackage *Minecraft* | Remove-AppxPackage
Краткий список команд, которые вы можете использовать, чтобы удалить определенные приложения в Windows 10.
Удалить приложение 3D Builder
Get-AppxPackage *3dbuilder* | Remove-AppxPackage
Удалить приложение Будильники и часы
Get-AppxPackage *WindowsAlarms* | Remove-AppxPackage
Удалить приложение App Connector
Get-AppxPackage *Appconnector* | Remove-AppxPackage
Удалить Asphalt 8: Airborne
Get-AppxPackage *Asphalt8Airborne* | Remove-AppxPackage
Удалить приложение Калькулятор
Get-AppxPackage *WindowsCalculator* | Remove-AppxPackage
Удалить приложение Почта и Календарь
Get-AppxPackage *windowscommunicationsapps* | Remove-AppxPackage
Удалить приложение камеры
Get-AppxPackage *WindowsCamera* | Remove-AppxPackage
Удалить приложение Candy Crush Soda Saga
Get-AppxPackage *CandyCrushSodaSaga* | Remove-AppxPackage
Удалить приложение Facebook
Get-AppxPackage *Facebook* | Remove-AppxPackage
Удалить приложение Обращение за помощью
Get-AppxPackage *WindowsFeedbackHub* | Remove-AppxPackage
Удалить приложение Улучшите свой Office,
Get-AppxPackage *officehub* | Remove-AppxPackage
Удалить приложение Получить Skype
Get-AppxPackage *Microsoft.SkypeApp* | Remove-AppxPackage
Удалить приложение Советы
Get-AppxPackage *Getstarted* | Remove-AppxPackage
Удалить приложение Groove Музыка
Get-AppxPackage *ZuneMusic* | Remove-AppxPackage
Удалить приложение Карты
Get-AppxPackage *WindowsMaps* | Remove-AppxPackage
Удалить приложение Skype
Get-AppxPackage *Messaging* | Remove-AppxPackage
Удалить приложение Microsoft Solitaire Collection
Get-AppxPackage *MicrosoftSolitaireCollection* | Remove-AppxPackage
Удалить приложение Бумажник Microsoft
Get-AppxPackage *Wallet* | Remove-AppxPackage
Удалить приложение Платные данные Wi-Fi и сотовой связи
Get-AppxPackage *OneConnect* | Remove-AppxPackage
Удалить приложение Кино и ТВ
Get-AppxPackage *ZuneVideo* | Remove-AppxPackage
Удалить приложение Netflix
Get-AppxPackage *Netflix* | Remove-AppxPackage
Удалить приложение Новости
Get-AppxPackage *BingNews* | Remove-AppxPackage
Удалить приложение OneNote
Get-AppxPackage *OneNote* | Remove-AppxPackage
Удалить Paint 3D приложение
Get-AppxPackage *MSPaint* | Remove-AppxPackage
Удалить приложение Pandora
Get-AppxPackage *PandoraMediaInc* | Remove-AppxPackage
Удалить приложение Люди
Get-AppxPackage *People* | Remove-AppxPackage
Удалить приложение Телефон
Get-AppxPackage *CommsPhone* | Remove-AppxPackage
Удалить приложение Фото
Get-AppxPackage *Photos* | Remove-AppxPackage
Удалить приложение Skype Preview
Get-AppxPackage *SkypeApp* | Remove-AppxPackage
Удалить приложение Спорт
Get-AppxPackage *bingsports* | Remove-AppxPackage
Удалить приложение Sticky Notes
Get-AppxPackage *MicrosoftStickyNotes* | Remove-AppxPackage
Удалить Магазин с текущей учетной записи -(НЕ РЕКОМЕНДУЕТСЯ)
Get-AppxPackage *WindowsStore* | Remove-AppxPackage
Удалить приложение Sway
Get-AppxPackage *Office.Sway* | Remove-AppxPackage
Удалить приложение Twitter
Get-AppxPackage *Twitter* | Remove-AppxPackage
Удалить приложение 3D-Просмотр
Get-AppxPackage *Microsoft3DViewer* | Remove-AppxPackage
Удалить приложение Запись голоса
Get-AppxPackage *soundrecorder* | Remove-AppxPackage
Удалить приложение Погода
Get-AppxPackage *bingweather* | Remove-AppxPackage
Удалить приложение Xbox
Get-AppxPackage *XboxApp* | Remove-AppxPackage
Удалить приложение Xbox One SmartGlass
Get-AppxPackage *XboxOneSmartGlass* | Remove-AppxPackage
Как удалить приложение для всех учетных записей пользователей?
Чтобы удалить приложение из всех учетных записей пользователей, измените нужную команду следующим образом:
Get-AppxPackage -allusers *PackageName* | Remove-AppxPackage
Как удалить приложение для новых учетных записей пользователей?
Каждый раз, когда вы создаете нового пользователя, приложения по умолчанию будут установлены заново для этого пользователя. Для того, чтобы удалить приложения для новых учетных записей, которые будут созданы в будущем, выполните следующую команду в Powershell.
Get-AppxProvisionedPackage –online | where-object {$_.packagename –like "*PackageName*"} | Remove-AppxProvisionedPackage –online
Замените участок PackageName на нужное имя приложения.
Совет: Посмотрите наше руководство, Короткая команда для удаления всех приложений в Windows 10, за исключением Магазина.
Удалить приложение с помощью «Параметров» и меню «Пуск».
Некоторые Универсальные приложения могут быть удалены с помощью Приложения «Параметры». Кроме того, вы можете использовать этот способ для удаления не только приложений, но и классических программ.
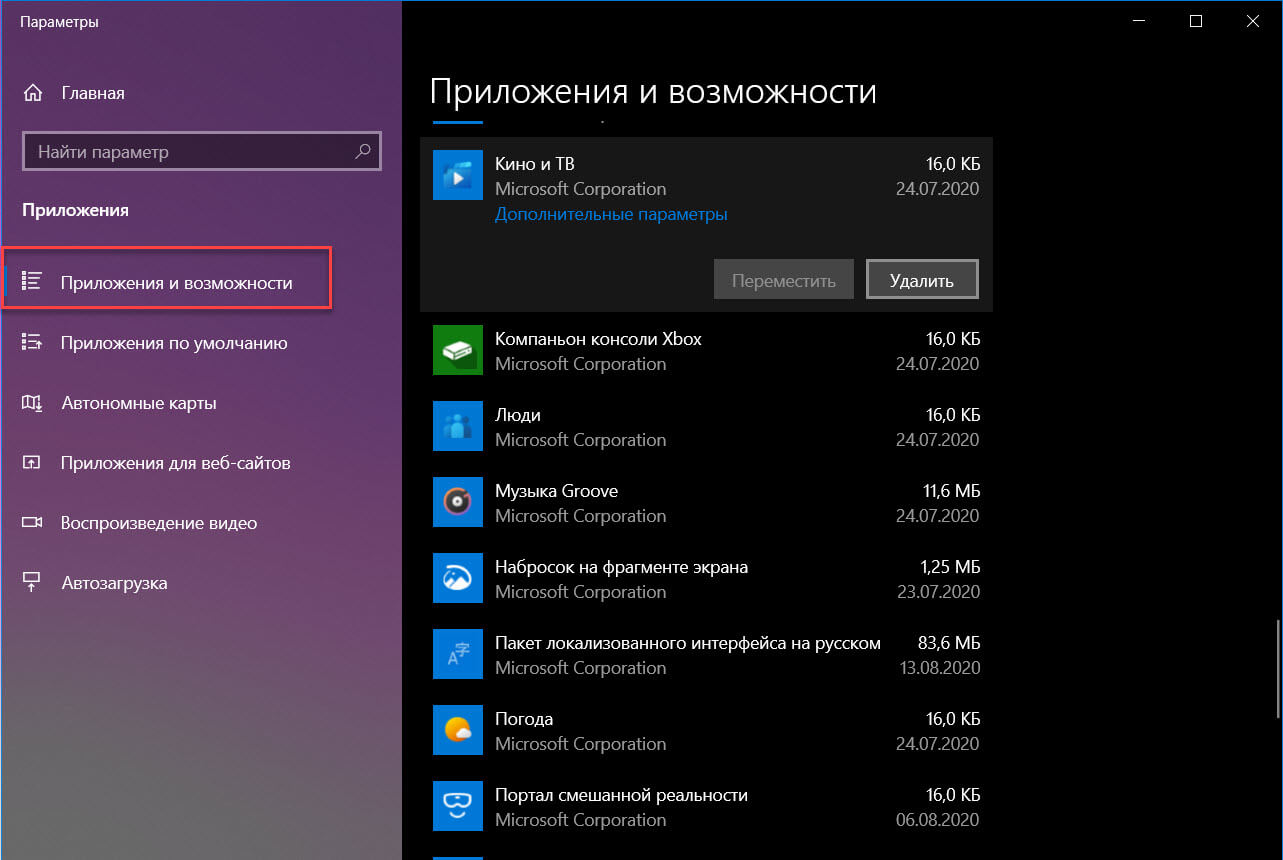
- Откройте «Параметры» нажав сочетание клавиш Win + I
- Перейдите в раздел «Приложения» → «Приложения и возможности».
- Найдите приложение, которое вы хотите удалить в списке и выберите его.
- Кнопка «Удалить» появится под именем приложения. Нажмите на нее, чтобы удалить приложение.
И напоследок, Windows 10 позволяет удалять некоторые приложения прямо из меню «Пуск».
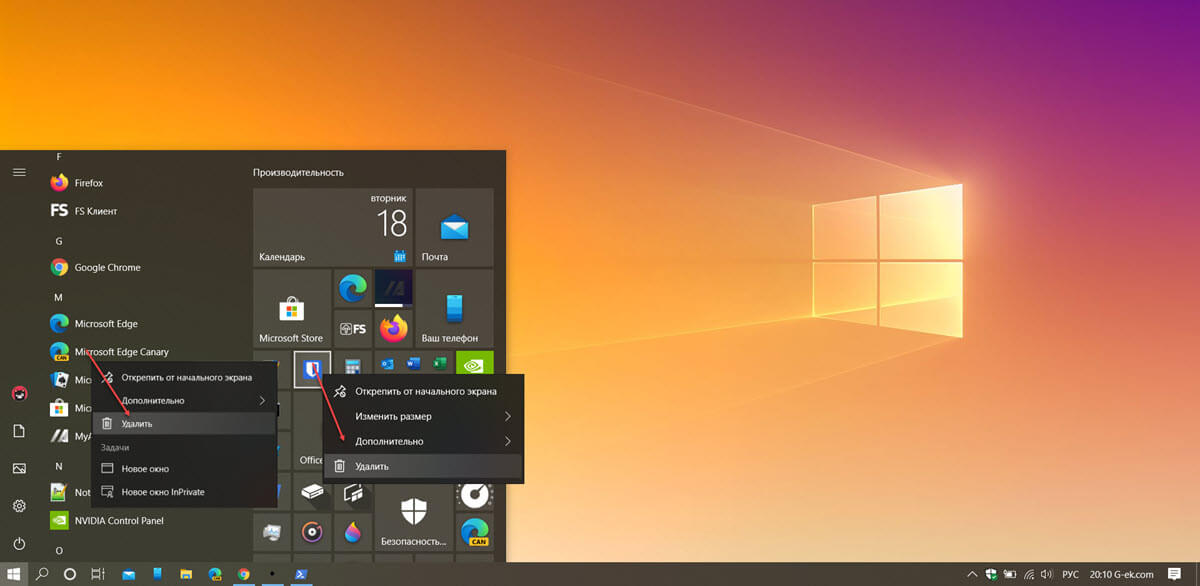
Найдите нужное приложение в списке приложений слева или если приложение имеет плитку, кликните правой кнопкой мыши на плитку или на приложение в списке. И удалите его с помощью команды контекстного меню «Удалить». Это работает как для UWP (приложений из Магазина) так и классических настольных приложений.
Все!
Работа комплектующих компьютера обеспечивается специализированным ПО. Например, для видеокарты это драйвер оборудования и библиотека DirectX. Они помогают правильно перекодировать текстуры в игре, и оптимизируют воспроизведение видео. Но бывает такое, что при очередном обновлении произошел сбой и установка не завершилась, а произвести восстановление не получилось, так как исполняемые файлы стираются.
И единственный выход – переустановка ПО. Далее в статье мы расскажем, как удалить DirectX для Windows 7/XP и предотвратить возникновение проблемы в будущем.
Почему возникают проблемы?
Как и говорилось выше, первая причина – ошибки в работе в компьютера. В итоге обновления не установились и DirectX не оптимизирует, а тормозит работу видеосистемы.
Обновляясь со сторонних ресурсов,например, с “битых” серверов, вы подвергаете свой компьютер опасности. Помимо вирусов, в архиве с DirectX находятся взломанные библиотеки файлов, которые блокирует система, определяя их как “трояны”. В итоге – антивирус отправляет служебные файлы на карантин, запрещает доступ, и вам вылетает сообщение «Ошибка при запуске DirectX».
DirectX – системный компонент, вшитый в ОС (касается Windows 7 и выше), для его удаления понадобятся сторонние утилиты. Мы будем использовать ПО от Microsoft DirectX Eradicator и Happy Uninstall, если у вас XP – достаточно встроенных в систему средств. Вначале определите какая у вас версия , для этого есть 2 способа:
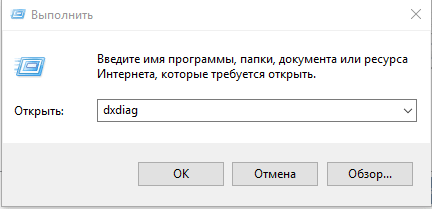
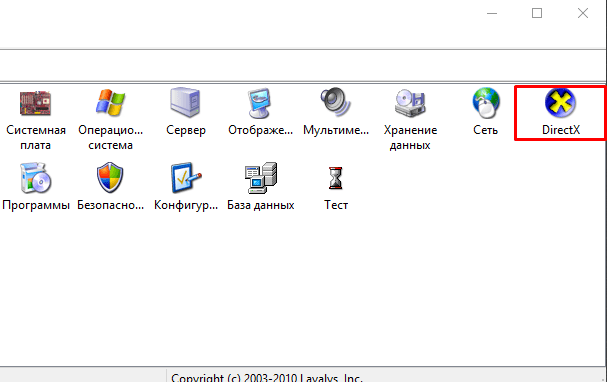
Чтобы удалить DirectX строенным средствами:
- Воспользуйтесь командой выполнить.
- Нажмите комбинацию клавиш WIN+R.
- Пропишите
dxdiagи нажмите “ОК”.
- Откроется окно с загрузкой информации об ОС, где вы увидите точные характеристики. Посмотрите на последнюю строчку «Версия».


Программными
Everest/AIDA
Разработка продукта Everest была прекращена, так как в 2010 году права на программу выкупила компания FinalWire Ltd и провела ребрендинг. Сейчас проект известен под названием AIDA 64 . Это инженерная утилита, показывающая расширенные свойства как Windows, так и ПК.
- Запустите EVEREST.
- В списке функций кликните на значок X.

- Далее перейдите во вкладку «Видео».

- Скрольте вниз до поля «Аппаратная поддержка» и посмотрите версию.

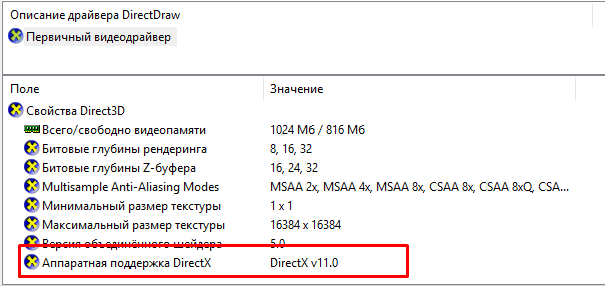
Everest покажет вам список установленных файлов библиотеки. Благодаря этому, вместо полной перезаписи DirectX можно загрузить отдельные составляющие библиотеки.
Проверка версии нужна для выбора способа удаления и обновления DirectX. С этим закончили, переходим к удалению. Один нюанс – не во всех Windows есть возможность удалить DirectX штатными средствами. Например, в 10-ке это сделать не получится. Поэтому, воспользуемся утилитами.
На Windows 10
Библиотека 12 версии установлена по умолчанию, а значит откатить либо переустановить не выйдет. В этом случае воспользуемся утилитами. Приступим:
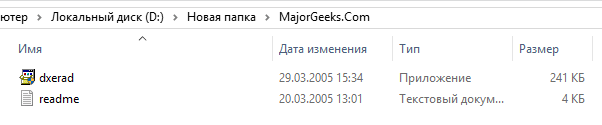
- Скачайте DirectX Eradicator, программа весит около 240 Кбайт.
- Устанавливать ее не нужно, распакуйте архив в удобное для вас место.
- Откройте файлик dxread.

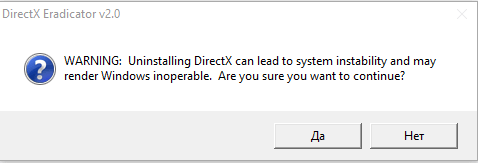
- Высветится окно с предупреждением о возможной дестабилизации системы – нарушении работы ОС. Бояться не стоит, – проблема исчезнет после перезагрузки. Подтвердив свое решение, вы полностью удалите DirectX с компьютера.

Важно! Не всегда получается исправить ошибку DirectX удалением самой библиотеки, в 67% проблема возникает после обновления и решается восстановлением системы.
Восстановление системы
Если неисправность возникла после попытки загрузить актуальную версию, бэкап ОС поможет решить ее и сохранит стабильность системы. Начнем:
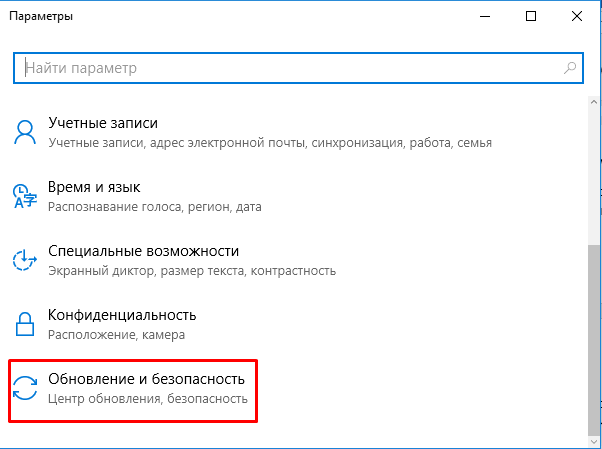
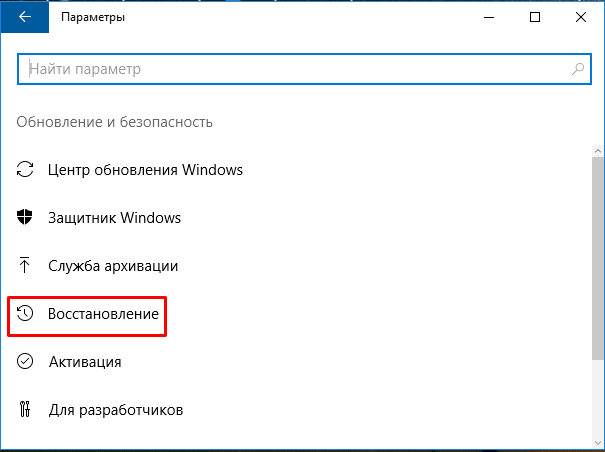
- Через кнопку «Пуск» зайдите в «Параметры».
- Выберите «Обновление и безопасность».

- Проскрольте до «Восстановление».

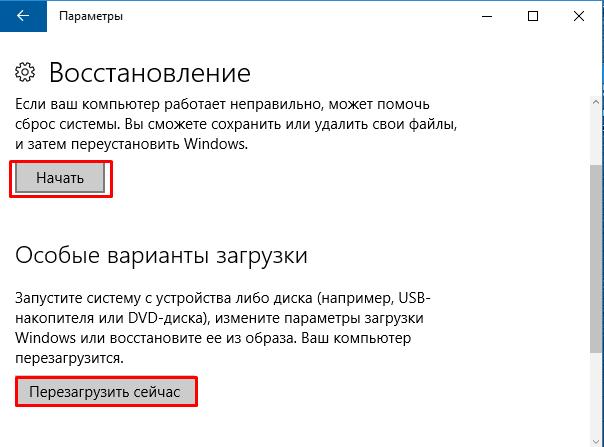
- В этом пункте есть два блока: «Вернуть в исходное состояние», «Перезагрузиться с другого носителя». Первый – откатывает систему до последней точки восстановления (обычно создается ОС) автоматически, второй – вернуть прежнее состояние ОС с помощью образа Windows.

- Если нет установочного диска, выбирайте “Вернуть в исходное состояние”.
На Windows 7
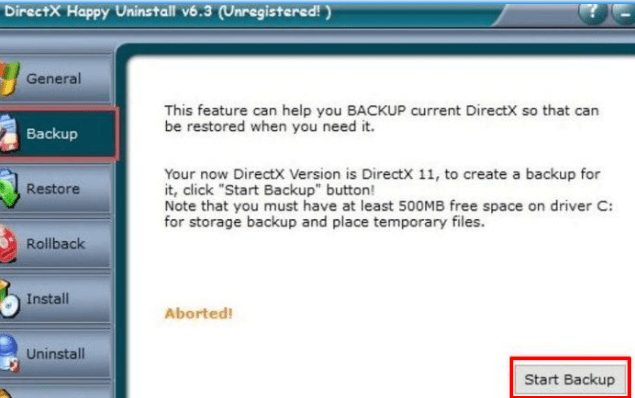
Вышеупомянутые средства подходят и для 7-ки. Но еще есть утилита Happy Uninstall, сертифицированная Microsoft. Она платная, воспользуемся триал-периодом. Скачайте и установите утилиту.
Сначала создайте резервную копию системы, чтобы в случае неудачи ее восстановить:
- Запустите программу.
- Перейдите в пункт «Backup» и нажмите кнопку “Старт”.

- Кликните на «Uninstal» и полностью удалите DirectX.

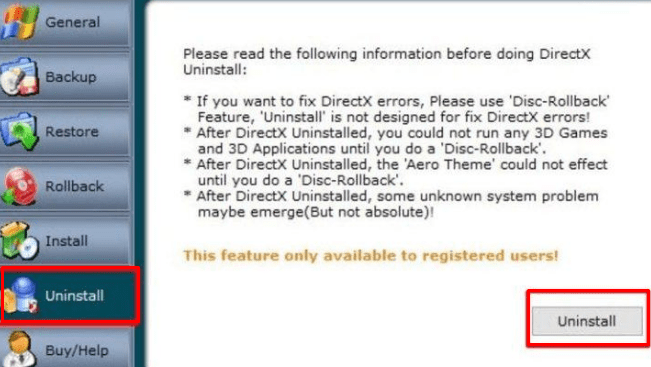
Программой можно пользоваться в целях диагностики и обновления ПО. Утилита показывает актуальную версию библиотек.
На Windows 8.1
Удалить DirectX полностью и без последствий возможно, если библиотека установлена без помощи системы обновления Windows. В противном случае система дестабилизируется. Если вы все же воспользовались утилитами для удаления и ОС перестала нормально функционировать, проведите восстановление системы, как указано выше, либо полностью переустановите ОС.
DirectX is an Application Programming Interface (API) for creating and managing graphic images and multimedia effects in applications such as games or active web pages that run on the Microsoft Windows operating system. Earlier DirectX was limited to certain fields like DirectSound, DirectPlay but with the upgraded Windows 10, DirectX has also been upgraded to DirectX 13, 12 and 10 as a result of which, it has become an essential part of Microsoft Windows operating system. However, if you’re unable to install DirectX on Windows 10 then don’t worry as today we are going to discuss how to fix this issue.

Table of Contents
DirectX has its Software Development Kit (SDK), which consists of runtime libraries in binary form, documentation, and headers used in coding. These SDK are free to download and use. But sometimes, when you try to install these SDKs or DirectX on your Windows 10, you face errors. The most common cause of the issue seems to be .NET Framework might be interfering with the installation of DirectX. This guide lists several methods using which you may be able to Install DirectX on Windows 10 without any errors.
1.Make Sure All the System requirements are Met
DirectX is an advanced feature, and all the computers may not be able to install it correctly. To install the DirectX properly on your computer, your computer needs to meet some mandatory requirements.
Given below are the requirements to install DirectX on your computer:
- Your Windows system must be at least 32-bit operating system
- The graphics card must be compatible with your DirectX version you are installing
- RAM and CPU must have enough space to install DirectX
- NET Framework 4 must be installed in your PC
If any of the above requirements are not fulfilled, you will not be able to install DirectX on your computer. To check these properties of your computer, follow the steps mentioned below:
1.Right click on the This PC icon. A menu will pop-up.
2.Click on the Properties option from the right-click context menu.

3.The system properties window will show up.
After completing the steps mentioned above, you will get to know if all the basic requirements to install DirectX on your computer are met or not. If all the requirements are not met, then fulfill all the basic requirements first. If all the basic requirements are met, then try other methods to fix Unable To Install DirectX on Windows 10 issue.
2.Check DirectX Version on Windows 10 is Latest
Sometimes, when you try to install DirectX on Windows 10, you are unable to do so as DirectX12 comes pre-installed on most of Windows 10 PC.
To check if DirectX is pre-installed on your Windows 10 and if installed then which version of DirectX is there, you need to follow the below steps:
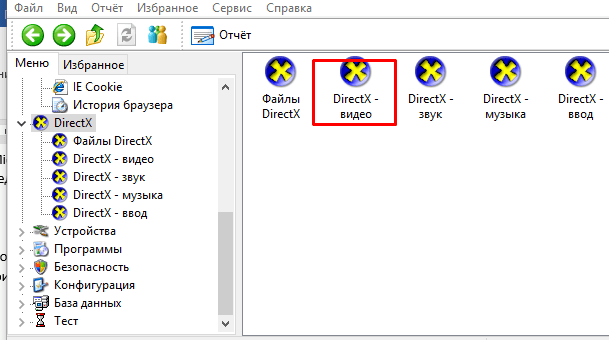
1.Open dxdiag on your computer by searching for it using search bar.
2.If you find the search result, it means DirectX is installed on your computer. To check its version, hit the enter button at the top result of your search. DirectX diagnostic tool will open up.

3.Visit System by clicking on the System tab available at the top menu.

4.Look for the DirectX version where you will find the DirectX version installed on your computer. In the above image DirectX 12 is installed.
3.Update Graphics Card Driver
It is possible that unable to install DirectX on your Windows 10 problem is arising because of outdated or corrupt Graphics card drivers, as you know DirectX is related to multimedia and any problem in Graphics card will lead to installation error.
So, by updating the Graphics card driver, your DirectX installation error may be resolved. To update the Graphics card driver follow the below steps:
1.Open Device Manager by searching for it using the search bar.
2.Hit the enter button at the top result of your search. Device Manager will open up.

3.Under Device Manager, locate and click on Display Adapters.
4.Under Display adapters, right-click on your Graphics card and click on Update driver.

5.Choose Search automatically for updated driver software option so that your windows can search for updates available automatically for the selected driver.

6.Your Windows will start searching for the updates.

7.If the Windows finds any update, it will start updating it automatically.

8.After the Windows has successfully updated your driver, the dialog box shown below will appear displaying the message that Windows has successfully updated your drivers.

9.If no update is available for the driver, then the dialog box shown below will appear displaying the message that the best drivers for your device are already installed.

10.Once the graphic card driver will update successfully, restart your computer.
4.Reinstall Graphics Card Driver
After completing the above-mentioned steps, when your computer restarts try to install DirectX on your Windows 10 again. If it doesn’t work, try unsintalling and then installing drivers.
5. Reinstall Previous Windows Updates
Sometimes, previous updates cause a problem while installing DirectX on your Windows 10. If this is the case, then you need to uninstall the previous updates and then re-install it again.
To uninstall the previous updates follow the steps mentioned below:
1.Press Windows Key + I to open Settings and click on Update & Security option.
2.From the left hand menu click on Windows update option.
3.Then under the Update status click on View installed update history.

4.Under View update history, click on Uninstall updates.
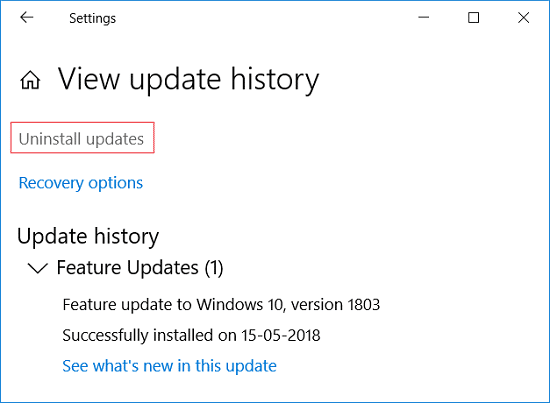
5.A page will open up that has all the updates. You have to search for the DirectX update, and then you can uninstall it by right-clicking on that update and choosing the uninstall option.

6.Once the update is uninstalled, restart your computer.
After completing the above steps, once the computer restarts, your previous update will be uninstalled. Now try to install DirectX on Windows 10 and you might be able to do so.
6. Download Visual C++ Redistributable
Visual C++ redistributable is a vital component of DirectX Windows 10. So, if you are facing any error while installing DirectX on your Windows 10, it may be connected to Visual C++ redistributable. By downloading & reinstalling Visual C++ redistributable for Windows 10, you may be able to fix unable to install the DirectX issue.
To download and reinstall visual C++ redistributable, follow the steps mentioned below:
1.Go to the Microsoft site to download the Visual C++ redistributable package.
2.The screen shown below will open up.

3.Click on the Download button.

4.The page shown below will open up.

5.Choose the download according to your operating system that is if you have a 64-bit operating system then check the checkbox next to x64.exe and if you have a 32-bit operating system then check the checkbox next to vc_redist.x86.exe and click Next button available at the bottom of the page.
6.Your selected version of visual C++ redistributable will start downloading.

7.Once the download is completed, double-click on the downloaded file.

8.After completing the above steps, try to reinstall DirectX on your Windows 10 and it might be installed without creating any error.
7. Install .Net Framework using Command Prompt
.Net Framework is also one of the important parts of DirectX, and you may be facing an error in installing DirectX because of .Net Framework. So, try to resolve your issue by installing the .Net Framework. You can install the .Net Framework easily using the Command prompt.
To install the .Net Framework using the command prompt, follow the steps mentioned below:
1.Search for command prompt using the Start Menu search.
2.Right-click on Command Prompt from the search result & select Run as administrator option.
3.Click on Yes when asked for confirmation and the Administrator command prompt will open up.
4.Enter the command mentioned below in the command prompt and press Enter button.
DISM /Online /Enable-Feature /FeatureName:NetFx3 /All /LimitAccess /Source:D:sourcessxs

6.The .Net Framework will start downloading. The installation will start automatically.
8.Once the installation is completed, restart your computer.
After completing the above steps, the .Net Framework will be installed, and the DirectX error may also disappear.
Recommended: How to Re-Install DirectX in Windows 10
Hopefully, using any one of the mentioned methods, you may be able to fix Unable to Install DirectX on Windows 10 issue, but if you still have any questions regarding this tutorial then feel free to ask them in the comment section.
Many multimedia and video applications that run on Windows PCs require the DirectX application programming interface to function properly. This technology allows these applications to function smoothly by allocating RAM, video storage, and processor resources. However, recent reports indicate that some individuals are having problems installing DirectX on their computers. In case you’re also dealing with an identical problem, this guide is for you.

What is DirectX in Windows?
DirectX is basically a collection of application programming interfaces (APIs) that Microsoft uses to handle multimedia-related tasks such as gaming, video playback, and graphics rendering. By default, DirectX comes pre-installed on your Windows PC. However, if it corrupts somehow, you should reinstall it on your computer.
What causes DirectX Not Installing issues in Windows?
If you are not able to use DirectX on Windows 11/10, this could be because of different reasons. Some possible reasons include –
- DirectX is already installed: As stated earlier, DirectX may come pre-installed on your computer. That’s the reason why you are encountering issues when installing DirectX manually on your PC.
- Compatibility issues: There are many versions of DirectX, each one compatible with a specific Windows version. If you try to install an incompatible version, the installation will fail on some odd error codes. There’s a possibility that you have recently upgraded your Windows OS and as a result of this, your device is now not compatible with the existing DirectX version.
- You have downloaded a corrupt DirectX setup file: At times, when you download the DirectX setup file, this may download incorrectly. This happens only when you are connected to an unstable internet connection.
- Drivers must have corrupted somehow: Apart from the above reasons, DirectX might also fail to install when some of your device drivers have corrupted somehow, especially Graphics cards or any other hardware components.
If DirectX is failing to install on your computer, you may try out the following solutions one after another.
1] Install the previous version of DirectX if required
The latest version of DirectX is not supported by many applications. It’s sometimes necessary to download older versions like DirectX8. To determine what version of DirectX you have, do the following:
- Right-click on Start and select Run to open the dialog box.
- Type
dxdiagin the text box and press Enter to launch the DirectX Diagnostic Tool. - On the next page, you will find the DirectX version in the System tab.

- If you want to install an older version, you can download it here. However, if you would like your device to run without lags and freezes, you should always use the latest version.
2] Update your graphics card drivers
In many cases, you will find that your DirectX version is incompatible with the graphics card driver. The reason may be that the auto-update feature has been disabled. To solve this problem, make sure that regular system updates are being applied.
- Press the Windows + R keys to open the Run dialog box.
- Type
devmgmt.mscon it and press Enter. This will open the Device Manager window. - Now click on Display Adapter, and it will show you the available display drivers.
- Right-click the Intel HD adapter and select Update.

- Click on Search automatically for updated driver software. You’ll need an internet connection for this step.
- It will let you know if the latest drivers are already installed, but if not, it keeps downloading and installing the updates.
3] Install .NET Framework using Command Prompt
If none of the above solutions work, you might have to download and install the .NET Framework using the Command Prompt. This will be accomplished using the Windows deployment image service:
- Open Command Prompt as an administrator.
- Type the following command and hit enter:
DISM /Online /Enable-Feature /FeatureName:NetFx3 /All /LimitAccess /Source:D:sourcessxs
- Once the process is complete, wait for it to finish. When it is done, restart your computer.
Read Next:
- Fix: This Driver Can’t be released to Failure Error on Windows 11/10
- How to Fix Xbox One error 0x87e00064 on Windows 11/10