
Если сбои системы, синие экраны BSoD или иные проблемы при работе Windows 10, 8.1 или Windows 7 наводят вас на мысли о том, что имеются какие-либо проблемы с оперативной памятью компьютера, может иметь смысл выполнить её проверку, а начать можно со встроенного средства диагностики проверки памяти Windows.
В этой инструкции подробно о способах запустить средство проверки памяти средствами Windows, причём даже в тех случаях, когда вход в систему невозможен, а также о возможных вариантах действий в случае, если в результате теста средство диагностики памяти сообщает о том, что были обнаружены проблемы оборудования. На схожую тему: Устранение неполадок Windows 10.
- Способы запуска средства проверки памяти
- Использование средства и просмотр результатов
- Обнаружены проблемы оборудования в средстве диагностики памяти
- Видео инструкция
Как запустить средство проверки памяти в Windows 10 и предыдущих версиях системы
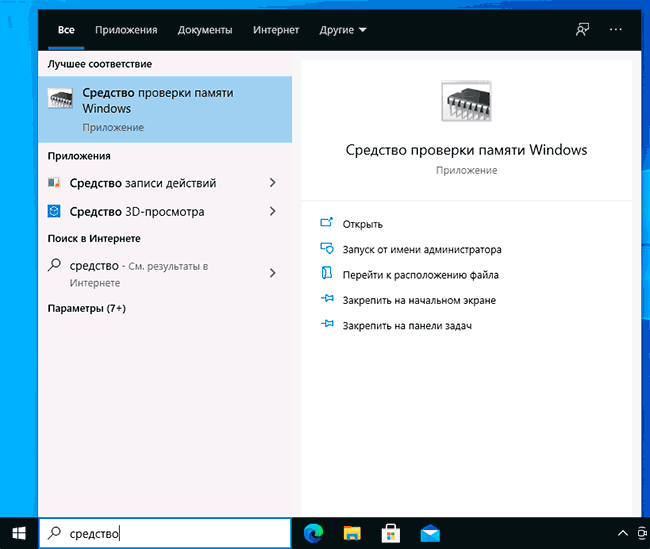
В случае, если операционная система запускается, вход в неё и работа возможны, вы можете использовать один из следующих вариантов запуска средства проверки памяти:
- Найти нужный пункт в разделе «Средства администрирования Windows» меню «Пуск».
- Нажать клавиши Win+R на клавиатуре, ввести mdsched.exe и нажать Enter.

- Открыть панель управления, выбрать пункт «Администрирование» и запустить «Средство проверки памяти Windows».
- Использовать поиск в панели задач Windows 10, начав вводить «Средство проверки памяти». Или встроенные средства поиска в предыдущих версиях ОС.

- Вручную запустить файл C:\Windows\System32\MdSched.exe

Если же ситуация осложняется тем, что Windows не запускается, вход в неё невозможен, либо сразу после него происходят сбои, можно использовать следующие способы запуска средства диагностики оперативной памяти:
- Загрузить компьютер или ноутбук с загрузочной флешки с Windows 10 или другой версией Windows, можно и с загрузочного диска. На экране программы установки нажать клавиши Shift+F10 (Shift+Fn+F10 на некоторых ноутбуках), ввести mdsexe в открывшейся командной строке и нажать Enter. После выбора в утилите проверки пункта «Выполнить перезагрузку и проверку», загружайте компьютер не с флешки, а с обычного загрузочного HDD или SSD.

- Средство проверки памяти можно запустить из среды восстановления Windows 10 — нажав кнопку «Дополнительные параметры» на синем экране с ошибкой или, находясь на экране блокировки Windows 10 (с выбором имени пользователя) нажать по изображенной справа внизу кнопке «Питания», а затем, удерживая Shift, нажать «Перезагрузка». В среде восстановления выбираем «Поиск и устранение неисправностей» — «Дополнительные параметры» — «Командная строка». А в ней, как и в предыдущем случае используем команду mdsched.exe.

- Если у вас есть подготовленный диск восстановления Windows, запуск можно осуществить, загрузившись с него.


Использование средства проверки памяти Windows и просмотр результатов

После запуска средства проверки памяти вам будет предложено перезагрузить компьютер, после согласия, процесс будет выглядеть следующим образом:
- Начнётся проверка оперативной памяти, которая может занять продолжительное время. Может показаться, что средство диагностики зависло: на всякий случай подождите в такой ситуации 5-10 минут. Если же действительно произошло зависание, не исключено что есть проблемы с оборудованием, вероятно — с оперативной памятью, но не обязательно.

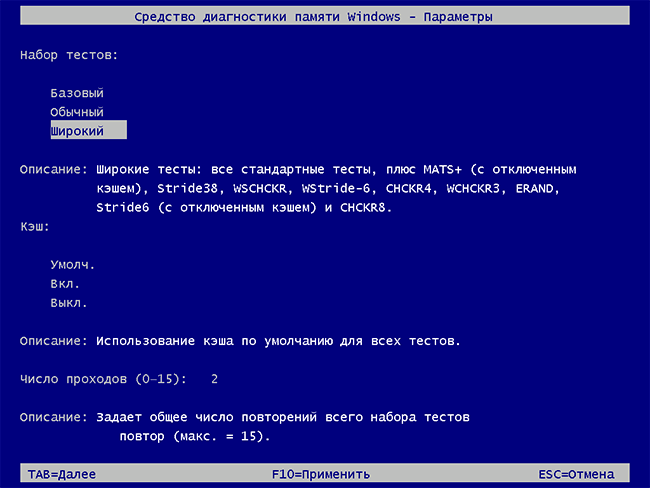
- Если в ходе проверки нажать клавишу F1 (или Fn+F1, если F1 не срабатывает), вы попадёте в настройки средства диагностики памяти Windows. Здесь можно выбрать набор тестов (по умолчанию — обычный), использование кэша, и число проходов. Переключение между разделами настроек выполняется клавишей Tab, изменение параметров — стрелками и вводом цифр (для числа проходов), применение параметров — клавишей F10. После изменения настроек тест перезапускается.
- В ходе проверки вы будете видеть информацию вида «Неполадки пока не обнаружены» или «Были обнаружены проблемы оборудования».
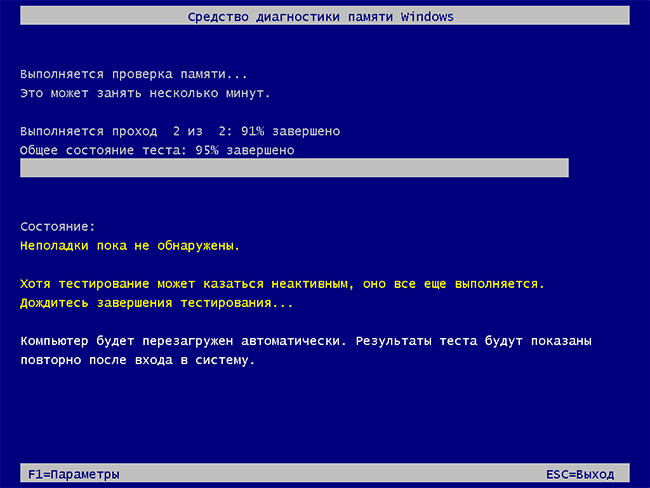
После завершения проверки компьютер будет автоматически перезагружен. Дальнейшие шаги — просмотр результатов.
- После перезагрузки в случае Windows 10 вы можете увидеть уведомление в области уведомлений, сообщающее о результате проверки памяти. Но оно отображается не всегда.
- Можно зайти в просмотр событий, для этого нажимаем Win+R, вводим eventvwr.msc и нажимаем Enter. Там открываем раздел «Журналы Windows» — «Система», находим пункты, где в столбце «Источник» указано MemoryDiagnostics-Results и просматриваем результаты.


Учитывайте, что ошибки, «вылеты», синие экраны и зависания не всегда связаны с проблемами оперативной памяти: если средство диагностики показывает, что всё в порядке, есть и иные возможные причины: отключенный файл подкачки, проблемы с HDD или SSD (или с их подключением, например — неисправный кабель), сторонние антивирусы или, наоборот, вредоносные программы, неправильная работа драйверов оборудования.
Что делать, если были обнаружены проблемы оборудования в средстве диагностики памяти
К сожалению, средство диагностики не сообщает о том, какие именно проблемы были обнаружены в ходе проверки, а лишь рекомендует обратиться к производителю оборудования. Что можно сделать:
- Отключить любые опции ускорения памяти (изменение частоты, таймингов и другие) при наличии соответствующих опций в БИОС или ПО производителя материнской платы или ноутбука.
- Попробовать проверить планки памяти по одной, в других слотах на материнской плате для того, чтобы выяснить, появляются ли проблемы только с одним конкретным модулем памяти или в одном конкретном разъеме.
- Использовать другие утилиты для проверки оперативной памяти при необходимости.
- Прочитать документацию к материнской плате ПК — возможно, это какая-то несовместимость с памятью с конкретными характеристиками (если вы недавно добавили новые модули памяти или только что самостоятельно собрали компьютер).
- Иногда может помочь обновление БИОС.
Видео инструкция
Если вы разобрались, чем была вызвана именно ваша проблема, буду благодарен комментарию к статье: возможно, для кого-то он окажется полезным.
Your Windows 11-equipped PC optimized for maximum performance right from the box. After time, you may encounter performance issues such as system slowdowns, application crashes, or unexpected errors. In these cases, the culprit might be your device’s random-access memory (RAM), a key component of your PC’s operations. Here’s why you might need to use Windows Memory Diagnostic tools and how you can access them so your device won’t miss a beat. device won’t miss a beat.
What is random-access memory?
Random-access memory (RAM) is a type of computer memory that stores data temporarily and allows fast access to it. When you open programs or files, the data that they use are loaded into the RAM for quick access by the central processing unit (CPU). An essential part of your device’s performance, RAM is like a workspace that your computer uses to work with more information at the same time, such as running multiple programs or tabs. When you close a program or operation, RAM no longer holds that data and resets, allowing you to use that space for something else.
Credit: Image created with AI
Issues with RAM and memory
When your PC’s RAM isn’t performing well on memory-intensive applications, you’ll notice because webpages and apps will load slowly. Here are examples that indicate when RAM issues might affect your Windows 11 device:
- Sluggish performance: If your device is taking longer to respond or open applications, it could be due to insufficient RAM.
- Frequent freezing or crashing: When running multiple applications simultaneously, your system might freeze or crash due to inadequate RAM capacity.
- Error messages: Messages indicating memory-related issues like «low memory» or «out of memory» can alert you to potential RAM problems.
Using the Windows Memory Diagnostic Tool
The Windows Memory Diagnostic tool is a built-in feature available in the latest Windows 11 operating systems. It can conduct a RAM test to detect possible problems with your PC’s memory.
Because chances are that you won’t need to use this tool frequently, it can be tricky to find. Here are multiple ways that you can access this tool on your PC:
- In the Start menu’s search box, enter windows memory. The Windows Memory Diagnostic app will appear as the first result.
- On your keyboard, select the Windows logo key + R to open the Run application function. Enter mdsched to open the Windows Memory Diagnostic app.
- In the Settings menu, enter memory in the search box in the left panel. Select Diagnose your computer’s memory problems to access the Windows Memory Diagnostic app.
Running the Windows Memory Diagnostic app
Before you run Windows Memory Diagnostic app, be sure to save all the content you’re working on and exit out of any currently running programs. Once that’s set, begin by selecting Restart now and check for problems (recommended).
Your PC’s system will reboot and start the Windows Memory Diagnostic tool, performing a thorough analysis of the computer’s RAM for issues. Once the test is complete, the system will restart, displaying the test results in the notification area.
More ways to enhance RAM performance
Windows uses this diagnostic tool to optimize memory usage and enhance performance, but users can further leverage Windows tools to help get the very best performance out of their devices. Users can:
- Optimize RAM usage: Windows comes with built-in features to manage RAM efficiently. Explore the settings to tweak the RAM usage as per your requirements.
- Monitor resource consumption: Use Task Manager to keep an eye on memory usage. Identify memory-hungry apps and manage them accordingly for smoother performance.
If you find that your PC isn’t performing to as-new standards, these RAM tools can help. Regularly check your device’s RAM health using Windows Memory Diagnostic and leverage the RAM tools available. And if you’re looking for your next favorite Windows 11 device, see which Surface device could be right for you.
Содержание статьи:
- Проверка ОЗУ (RAM) на ошибки
- Средство диагностики памяти Windows
- Тестирование оперативной памяти в Memtest 86+
- Что делать, если были найдены ошибки
- Вопросы и ответы: 15
Доброго времени суток.
Довольно часто при нестабильном поведении компьютера/ноутбука (например, стали появляться ошибки, зависания, вылетает синий экран, есть искажения изображения и пр.), требуется провести проверку оперативной памяти ОЗУ (RAM).
В ходе этого тестирования можно выяснить, все ли в порядке с памятью, нет ли ошибок, не требуется ли замена плашки (кстати, протестировать ОЗУ может быть не лишним и при покупке новой планки).
Вообще, привести диагностику памяти можно разными путями:
- использовать встроенное средство диагностики в Windows (если у вас ОС Windows 7, 8.1, 10, 11);
- либо использовать сторонний софт (на мой взгляд одна из лучших утилит для такого теста — Memtest 86+).
В этой статье рассмотрю оба эти варианта (хотя, конечно, второй вариант более предпочтителен!).
Итак…
*
Проверка ОЗУ (RAM) на ошибки
Средство диагностики памяти Windows
Вообще, лично на мой взгляд, встроенный софт в Windows, как правило, уступает софту стороннего разработчика. Поэтому, все же, если у вас есть свободная флешка (CD/DVD диск), я рекомендую воспользоваться тестом в программе Memtest 86+ (см. во второй части статьи).
И тем не менее, как запустить проверку планок ОЗУ в Windows (актуально для Windows 7, 8, 10, 11):
- нажать сочетание кнопок Win+R;
- в появившемся окне «Выполнить» ввести команду mdsched и нажать Enter (как на скрине ниже).
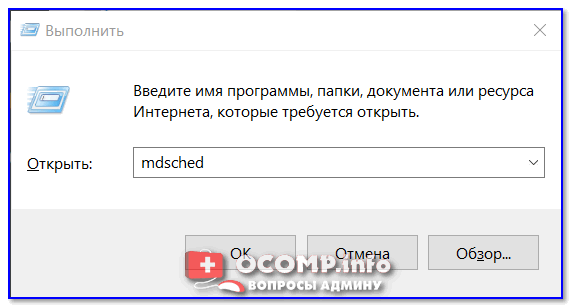
mdsched — команда для проверки ОЗУ (Win+R)
Далее должно появиться окно, в котором вам предложат на выбор два варианта проверки:
- выполнить перезагрузку и проверку прямо сейчас (т.е. приступить к проверке незамедлительно);
- выполнить проверку при следующем включении ПК (именно это и рекомендую выбрать, чтобы без спешки сохранить все документы, закрыть программы и спокойно отправить ПК на перезагрузку).
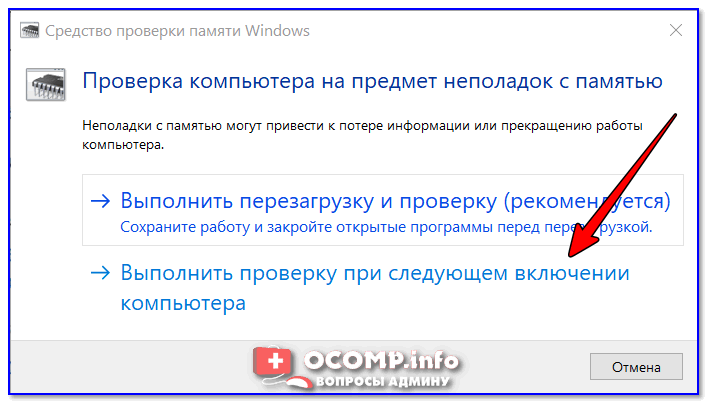
Средство проверки памяти Windows
Если с диагностикой все «OK» — увидите сообщение, что тест памяти был успешно запланирован.
Тест памяти запланирован
После перезагрузки компьютера/ноутбука увидите окно, как на фото ниже. Будет выполнено 2 прохода, в нижней части окна показывается состояние операции. Если с вашей памятью все хорошо — то состояние будет в статусе «Неполадки пока не обнаружены».
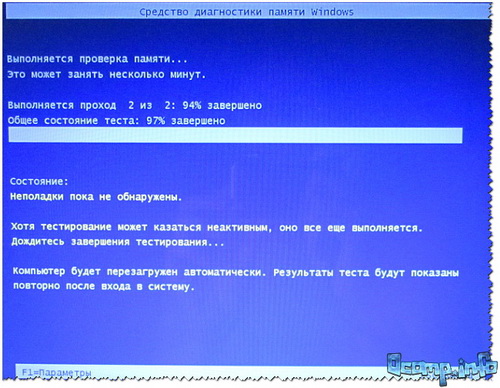
Средство диагностики памяти Windows
📌 Если будут найдены неполадки
Рекомендую прогнать еще раз утилитой Memtest 86+. Если ошибки подтвердятся и в этой утилите — то см. конец этой статьи, там привел несколько советов…
*
Тестирование оперативной памяти в Memtest 86+
📌 Важно!
Кстати, Memtest 86+ и другие полезные утилиты для проверки и диагностики ОЗУ, диска, и пр. железа есть на спец. LiveCD*
(* LiveCD — образ ISO со встроенной Windows и утилитами, который можно записать на флешку — и получится аварийный накопитель, с которого всегда можно будет загрузиться и провести диагностику ПК).
*
Memtest 86+
Сайт: http://www.memtest.org/#downiso
Memtest 86+ — одна из лучших утилит, предназначенных для тестирования оперативной памяти. Утилита может запускаться с помощью собственного загрузчика, поэтому для нее операционная система, в принципе, не нужна.
Программа поддерживает современные многоядерные процессоры, большинство чипсетов материнских плат. Memtest 86+ доступна для скачивания на официальном сайте (ссылка выше), в виде нескольких версий. О них пару слов ниже…
*
Про версии программы Memtest 86+ (V5.01, V6):
- Download — Pre-Compiled Bootable ISO (.gz) — программа распространяется в образе ISO. Такой образ можно записать хоть на флешку, хоть на обычный CD/DVD диск (правда, могут понадобиться доп. утилиты — например, UltraISO). В общем, универсальный вариант;
- Download — Pre-Compiled Bootable ISO (.zip) — тоже самое, только формат архива другой;
- Download — Pre-Compiled Bootable Binary (.gz) — файл в формате bin (это тоже образ диска, похож на ISO);
- Download — Pre-Compiled Bootable Binary (.zip) — тоже самое;
- 📌 Download — Auto-installer for USB Key (Win 9x/2k/xp/7) *NEW!* — самый востребованный вариант (на мой взгляд). Позволяет автоматически создать загрузочную флешку с Memtest 86+ за несколько шагов. Программа работает во всех версиях Windows: XP, 7, 8, 10, 11;
- Download — Pre-Compiled package for Floppy (DOS — Win) — создание загрузочной дискеты (на мой взгляд, сегодня практически не актуально).
Я выбрал 5-й вариант (Download — Auto-installer for USB Key (Win 9x/2k/xp/7) *NEW!*), именно при помощи нее и покажу как создать флешку.
Примечание: если вы загружаете 6-ю версию программы — выбирайте вариант «Windows USB Installer (32/64 bits)».
*
Создание загрузочной флешки с Memtest86+
Скачиваете архив, разархивируете его и запускаете файл программы (выбор версии — приведен выше). Далее нужно вставить флешку в USB-порт и:
- в первом окне программа попросит указать букву диска флешки (важно! Все данные на ней, перед записью Memtest 86+, будут удалены);
- далее нужно поставить галочку напротив «We will format G:\as Fat32» и нажать кнопку «Create»;
- дождаться сообщения «Installation Done, Your Drive should be ready to boot» (значит что носитель записан);
- кстати, если зайти в «Этот компьютер» — вы увидите, что название вашей флешки стало «MULTIBOOT».
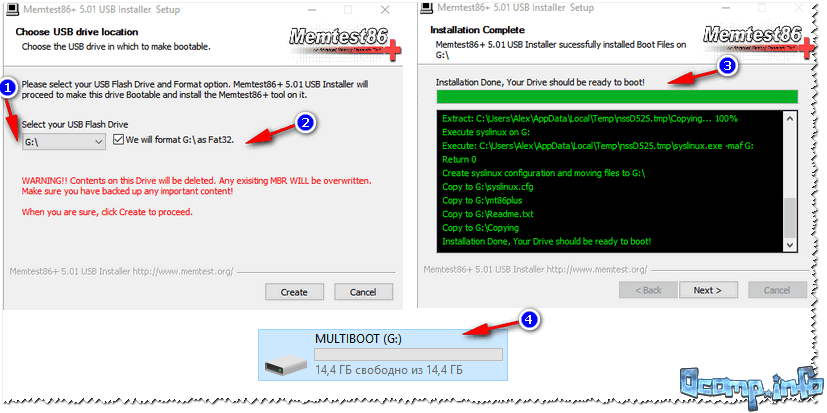
Создание загрузочной флешки в Memtest 86+
*
Загрузка с флешки и запуск теста в Memtest 86+
Чтобы загрузиться с созданной шагом ранее флешки, необходимо соответствующим образом настроить BIOS (либо воспользоваться кнопкой для вызова Boot Menu). Тема эта достаточно обширна, поэтому чуть ниже приведу ссылки на свои статьи.
📌 Как настроить BIOS для загрузки с флешки или CD/DVD диска — https://ocomp.info/kak-nastroit-bios-dlya-zagruzki-s-diska-ili-fleshki.html
📌 Горячие клавиши для вызова Boot Menu — https://ocomp.info/goryachie-klavishi-dlya-vh-bios-boot-menu.html
*
Я воспользовался вызовом Boot Menu, указал с чего загружаться (USB-флешки) и нажал Enter (скрин ниже).
Загрузка с USB-флешки
Далее, если ваша флешка правильно записана, утилита Memtest 86+ автоматически запуститься и начнет тестировать оперативную память. От вас ничего не требуется нажимать. Красной стрелкой на фото ниже показан ход тестирования (сколько процентов проверено).
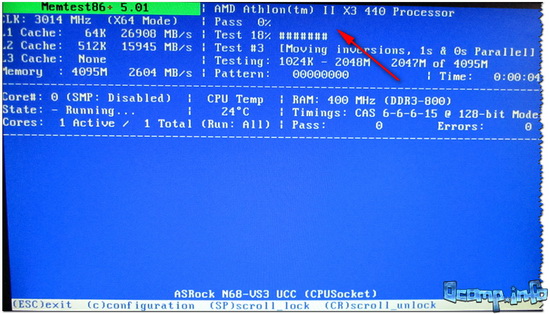
Тестирование в Memtest 86+ // запускается автоматически
📌 Примечание! На всякий случай приведу клавиши управления (хотя они в большинстве случаев не нужны).
Esc – закрыть программу и перезагрузить ПК;
C – задание параметров в ручном режиме (для опытных пользователей);
F1 — Enhanced Fail Safe Mode (расширенная Fail Safe Mode).
F2 — Experimental SMT support up to 32 cores (экспериментальная SMT поддержка до 32 ядер).
При запуске производится анализ компонентов компьютера, затем начинается тестирование оперативной памяти.
Если тест не запускается в авто-режиме — запустите его при помои кнопок F1, либо F2.
Вообще, рекомендую оставить вот так тестировать ПК на несколько часов, чтобы утилита прогнала память несколько раз. Если с памятью все в порядке — вы должны увидеть внизу окна сообщение «Pass complete, no errors, press Esc to exit» (как на фото ниже). 👇
Примечание!
Memtest 86+ записывает в каждый блок памяти информацию, а затем считывает её и проверяет на ошибки. Программа тестирует оперативную память циклически, т.е. у неё по умолчанию есть 11 тестов (включая нулевой), которые она гоняет по кругу неограниченное число раз (пока вы не остановите ее, нажав клавишу Esc).
Все хорошо с памятью // прошла тест
Если же в процессе тестирования будут найдены ошибки — вы увидите красные строки (это в любом случае не хорошо (как минимум)).
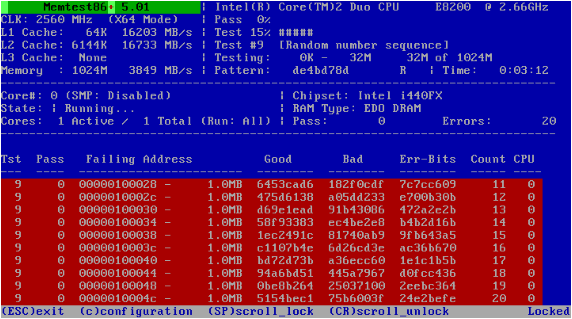
С памятью есть проблемы…
*
Что делать, если были найдены ошибки
Довольно популярный вопрос, наряду с вопросами по тестированию памяти…
Для начала необходимо открыть системный блок и почистить его от пыли. Вынуть планки памяти из слотов и продуть сами слоты (удобно это делать с помощью пылесоса с реверсным режимом, либо баллончика сжатого воздуха — такие продаются в компьютерных магазинах).
📌 Статья о чистке компьютера от пыли — https://ocomp.info/kak-pochistit-kompyuter-ot-pyili.html
Далее проверьте сами планки: нет ли на них сколов, царапин, чистые ли они. Если есть признаки механического повреждения, то наверняка потребуется замена памяти на новую.
Также обратите внимание на контакты. Дело в том, что через некоторое время они могут окислиться, и при вставке в слот не полностью (не всегда) давать контакт. В результате, как только контакт «потерялся» — у вас завис компьютер. Рекомендую их почистить в любом случае, для этого подойдет обычная резинка/стёрка (школьная). Оставшиеся катышки — можно либо сдуть, либо смахнуть мягкой кисточкой.

Чистка контактов памяти резинкой и кисточкой
Примечание. Процедуру нужно проводить крайне аккуратно, на чистой, сухой, ровной поверхности. Резинка лучше та, у которой две стороны: одна синяя, другая розовая. Тереть рекомендуется синей. В некоторых случаях, желтые контакты меняют цвет на более светлый.
После чистки памяти, вставьте ее вновь в слот и включите ПК (кстати, попробуйте вставить память в другие слоты, или поменять планки местами, если у вас все слоты заняты).
Далее проведите тестирование еще раз. В некоторых случаях, такая простая процедура, позволяет избавиться от ошибок, связанных с памятью, компьютер перестает зависать, перезагружаться и выдавать синий экран (тем самым, экономя ваши средства).
Если будут вновь найдены ошибки — можно попробовать сдать память в ремонт (но лично я не рекомендую). Если нет гарантийного обслуживания — лучше замените на новую (дело в том, что цена ремонта ОЗУ во многих случаях, стоит практически столько же, сколько новая планка).
*
На этом у меня пока всё. Дополнения приветствуются…
Удачи и хороших тестов!
👋
Первая публикация: 03.02.2017
Корректировка заметки: 7.08.2022
If your computer has been experiencing random crashes, general instability, or the dreaded blue screen of death, faulty RAM might be the cause. Windows 10 includes a built-in diagnostic tool specifically designed to detect memory problems so you can find out relatively quickly!
In this step-by-step guide to checking RAM for errors in Windows 10, we’ll walk you through the process of how to run Windows Memory Diagnostics Tool, interpret its results, and take appropriate action if problems are detected. Whether you’re experiencing issues or just want to perform preventative maintenance, this article will help you ensure your system’s memory is functioning properly.
What is the Windows Memory Diagnostics Tool?
The Windows Memory Diagnostics Tool is how to check for faulty RAM in Windows 10 without third-party software. Its primary purpose is to identify hardware issues within your system’s memory modules that could lead to system instability, data corruption, or application crashes. By methodically testing memory cells and their ability to store and retrieve data correctly, this tool helps pinpoint whether your RAM is the source of system problems you may be experiencing.
How it works and what it checks for
The Windows Memory Diagnostics Tool works by writing various test patterns to every memory location and then reading those patterns back to verify they match what was written. This process checks for several types of memory issues:
- Stuck bits (memory cells that are stuck in either a 0 or 1 state)
- Adjacent bit interference (where writing to one memory location affects nearby locations)
- Pattern sensitivity (where specific patterns of data cause errors)
- Timing issues (problems with memory refresh rates)
- Memory addressing errors (failures in properly accessing specific memory locations)
The tool runs through multiple test passes, with each pass becoming progressively more thorough. Basic tests can be completed in minutes, while comprehensive scans may take several hours depending on the amount of RAM installed in your system.
When to use the Memory Diagnostics Tool in Windows
You should consider running the Windows Memory Diagnostics Tool in the following situations:
- After experiencing blue screen of death (BSOD) errors, especially those with error codes like MEMORY_MANAGEMENT, PAGE_FAULT_IN_NONPAGED_AREA, or IRQL_NOT_LESS_OR_EQUAL
- When your system crashes or freezes randomly with no clear pattern
- If applications terminate unexpectedly without warning
- When you notice data corruption in files that were previously working correctly
- After installing new RAM modules to verify they’re functioning properly
- As part of regular system maintenance, particularly for systems that run critical applications
- If you’re experiencing unusual behavior like system slowdowns, graphical glitches, or frequent application errors
Running this diagnostic tool as a first troubleshooting step can save considerable time, as memory issues can manifest in ways that mimic software problems or other hardware failures.
How to run the Memory Diagnostics Tool in Windows 10
Method 1: Using the Start Menu
The most straightforward way to access the Windows Memory Diagnostics Tool is through the Start menu. Here’s how to do it:
Launch the tool via the Start menu
- Click on the Windows Start button in the lower-left corner of your screen.
- Type “Memory Diagnostics” in the search box.
- From the search results, click on “Windows Memory Diagnostic” to open the tool.
- A dialog box will appear with two options for running the diagnostic test.
Restarting immediately or running the test later
When you launch the Windows Memory Diagnostics Tool, you’ll be presented with two options:
- Restart now and check for problems (recommended): Select this option if you’re ready to run the test immediately. Save and close all open applications before selecting this option, as your computer will restart without further warning.
- Check for problems the next time I start my computer: Choose this option if you want to continue working and have the memory test run automatically the next time you restart your computer.
After selecting either option, Windows will restart, and the Memory Diagnostics Tool will run before Windows loads, displaying a blue screen with white text that shows the progress of the test.
Method 2: Using Command Prompt
For users who prefer command-line interfaces or need to run the tool from a script, the Command Prompt method offers additional flexibility.
Using mdsched.exe
- Press Windows key + R to open the Run dialog.
- Type cmd and press Enter (or press Ctrl+Shift+Enter for administrative privileges).
- At the Command Prompt, type mdsched.exe and press Enter.
- The same Windows Memory Diagnostics Tool dialog box will appear with the two restart options as described in Method 1.
Alternatively, you can use the following commands for specific actions:
- To run the diagnostic immediately: mdsched.exe /r
- To schedule the diagnostic for the next reboot: mdsched.exe /s
Options available after restart
Once your computer restarts and the Windows Memory Diagnostics Tool begins running, you’ll see a blue screen interface with the following information and options:
- Status information: Displays the current test pass, the test being performed, and the overall completion status.
- F1 key: Press this to access additional options for the test.
- F10 key: Press this to exit the diagnostic tool and continue booting normally.
When you press F1, you can customize your test with these options:
- Test Mix: Choose between Basic, Standard, or Extended test sequences.
- Cache: Toggle the cache on or off during testing.
- Pass Count: Set how many times the test sequence should repeat.
The Standard test mix is selected by default and is sufficient for most troubleshooting scenarios. The Extended mix performs additional tests but takes significantly longer to complete.
Understanding Memory Diagnostics test results
After the Windows Memory Diagnostics Tool completes its analysis, you’ll need to know where to find the results and how to interpret them. The tool doesn’t prominently display a detailed report upon completion, but Windows does record the outcome where you can access it.
How to access the diagnostic report after the test completes
When the memory diagnostic test finishes, your computer will automatically restart and boot into Windows normally. Unlike many troubleshooting tools, the Memory Diagnostics Tool doesn’t automatically display a results window. Instead, a brief notification may appear in the system tray (notification area) shortly after you log in, indicating whether any problems were found.
If you miss this notification or want to see more detailed information, you’ll need to check the Windows Event Viewer.
Using Event Viewer to find test results
- Right-click on the Start button and select “Event Viewer” from the menu. Alternatively, press Windows key + R, type eventvwr.msc, and press Enter.
- In Event Viewer, navigate to the following location in the left sidebar:
- Windows Logs > System
- In the right panel, click on “Filter Current Log” (or use the “Find” feature).
- In the filter dialog, enter “MemoryDiagnostics-Results” in the “Event sources” field and click OK.
The Event Viewer will now display only the memory diagnostic test results. Double-click on the most recent event to view detailed information.
Interpreting results (no errors vs. detected issues)
The Event Viewer entry will contain one of two general outcomes:
No errors detected
If your memory is functioning properly, you’ll see a message similar to:
The Windows Memory Diagnostic tested the computer’s memory and detected no errors.
This indicates that your RAM passed all the tests successfully, and memory issues are likely not the cause of any system problems you might be experiencing. If you’re still having system stability issues, you may need to investigate other potential causes such as storage device problems, overheating, driver conflicts, or software issues.
Detected issues
If problems are found, the message will indicate that hardware errors were detected:
The Windows Memory Diagnostic tested the computer’s memory and detected hardware errors.
In this case, the report may include additional details such as:
- The specific memory module with the issue (if your system has multiple RAM sticks)
- The type of error detected (e.g., stuck bits, addressing errors)
- The memory address range where errors occurred
- Recommendations for further action
If errors are detected, this strongly suggests that one or more of your RAM modules are faulty and should be replaced. In systems with multiple RAM sticks, you may need to test each module individually to identify which one is problematic.
It’s important to note that even a single memory error is cause for concern. Unlike some hardware issues that might cause intermittent problems, memory errors typically worsen over time and can lead to data corruption, so you should always address them quickly.
What to do if memory errors are found
If the Windows Memory Diagnostics Tool detects errors in your RAM, don’t panic. While faulty memory can cause significant system instability, the issue is often fixable with some straightforward steps. Here are common steps to take if your test results indicate memory problems:
Reseating RAM modules
Sometimes, memory errors occur not because the RAM is defective, but because it’s not properly seated in its slot. Dust or oxidation on the contacts can also cause connection issues that appear as memory errors.
- Power down your computer completely and unplug all cables.
- Ground yourself by touching a metal surface or using an anti-static wrist strap to prevent static electricity damage.
- Open your computer case following the manufacturer’s instructions.
- Locate the RAM modules on the motherboard (they’re typically long, thin components held by clips on both ends).
- Release the retention clips at each end of the RAM module.
- Carefully remove each memory module by pulling it straight up out of its slot.
- Inspect the gold contacts at the bottom of each module for dust or corrosion. If present, gently clean them with a soft, lint-free cloth. For stubborn oxidation, use isopropyl alcohol (90% or higher) and allow it to dry completely.
- Inspect the RAM slots on the motherboard for dust or debris, and if necessary, use compressed air to clean them.
- Firmly reinsert each module into its slot, applying even pressure until the retention clips snap into place.
- Close the computer case, reconnect all cables, and power on the system.
- Run the Windows Memory Diagnostics Tool again to see if reseating resolved the issue.
Running additional memory tests (e.g., MemTest86)
While the Windows Memory Diagnostics Tool is useful, it may not detect all types of memory issues. For more thorough testing, consider using MemTest86, which is widely regarded as the gold standard for memory testing:
- Download MemTest86 from the official website (it’s available as a free download).
- Create a bootable USB drive using the tool provided in the download.
- Boot your computer from the USB drive by changing the boot order in your BIOS/UEFI settings.
- Let MemTest86 run for several complete passes (at least 4 passes are recommended, which may take several hours).
- Monitor for errors during the test. Even a single error indicates a problem with your RAM.
MemTest86 provides more detailed information about errors, including the specific memory addresses where failures occur, which can help identify whether particular RAM modules are at fault.
Replacing faulty RAM
If reseating doesn’t solve the problem and additional testing confirms memory errors, it’s time to replace the faulty RAM:
- Identify which RAM module(s) are faulty if you have multiple sticks:
- If possible, test each module individually by installing one at a time and running the diagnostics.
- Pay attention to which memory addresses show errors, as this can help identify the problematic module.
- Purchase compatible replacement RAM:
- Determine your computer’s RAM specifications (speed, type, and form factor).
- For desktop computers, you can usually mix RAM from different manufacturers as long as the specifications match.
- For laptops, it’s often best to check the manufacturer’s recommendations for compatible memory.
- Install the new RAM following the same procedure used when reseating:
- Ensure proper orientation (the notch in the module should align with the slot).
- Insert the module firmly until the retention clips engage.
- Test the new RAM thoroughly:
- Run both the Windows Memory Diagnostics Tool and MemTest86 to verify the replacement has resolved the issue.
- Stress test your system with demanding applications to ensure stability under load.
- Monitor system performance over the next few days for any signs of instability that might indicate remaining issues.
Alternative memory testing tools
While the Windows Memory Diagnostics Tool provides a convenient built-in solution for troubleshooting memory issues in Windows 10, several third-party alternatives offer more comprehensive testing capabilities. These tools can be valuable when you need more detailed diagnostics or when the Windows tool doesn’t identify issues despite persistent symptoms.
MemTest86
MemTest86 is widely considered the industry standard for memory testing and offers several advantages over the Windows Memory Diagnostics Tool:
- Test coverage: Includes 13 different test algorithms compared to Windows’ more limited test suite
- Detection capability: Can identify subtle and intermittent errors that Windows might miss
- Detailed reporting: Provides precise information about error locations, types, and patterns
- Operating system independence: Runs before any OS loads, eliminating potential interference
- Hardware information: Displays detailed technical specifications of installed memory
- Configuration options: Offers extensive customization of test parameters and sequences
However, MemTest86 requires creating bootable media and has a more technical interface that may intimidate less experienced users.
Other notable alternatives
MemTest86+: An open-source fork of the original MemTest86 with some enhanced features
HCI MemTest: Runs within Windows and can test memory while the operating system is running
TestMem5 (TM5): Popular in overclocking communities for its ability to detect errors in highly-tuned systems
Karhu RAM Test: A paid tool known for quickly finding memory errors, popular among enthusiasts
AIDA64: A comprehensive system diagnostic tool that includes memory testing capabilities
When should I use a third-party tool instead of the built-in Windows option?
Consider using third-party memory testing tools in the following scenarios:
- Persistent issues despite clean Windows test: If the Windows Memory Diagnostics Tool reports no errors but you continue experiencing symptoms consistent with memory problems (system crashes, blue screens, random application failures)
- Overclocked systems: If you’ve overclocked your RAM or adjusted memory timings, third-party tools offer more sensitivity to subtle timing errors
- New system builds: When assembling a new computer, more thorough testing ensures components are functioning correctly before you begin using the system
- Intermittent problems: For issues that occur infrequently, longer and more comprehensive tests have a better chance of detecting errors
- Hardware enthusiast needs: If you need detailed information about error patterns to diagnose specific issues with memory controllers or motherboard components
- Multiple passes required: When you need to run extended testing over many hours or days to verify stability under prolonged use
- Professional environments: In business or enterprise settings where system reliability is mission-critical
For most users, a good approach is to start with the Windows tool for convenience, and if problems persist or more information is needed, progress to a more comprehensive solution like MemTest86.
Frequently Asked Questions (FAQs)
Q: How long does the Windows Memory Diagnostics Tool take to complete?
A: The time required for the Windows Memory Diagnostics Tool to troubleshoot memory issues in Windows 10 varies depending on several factors:
- Amount of RAM: The more memory installed in your system, the longer the test will take. A system with 32GB of RAM will take significantly longer to test than one with 8GB.
- Test settings: Using the Standard setting (default) typically takes 30-45 minutes for a system with 16GB of RAM. The Basic setting completes faster, while the Extended setting can take several hours.
- Pass count: Each additional pass multiplies the testing time. By default, the tool runs one pass, but you can configure it to run multiple passes for more thorough testing.
- System hardware: The speed of your processor and memory can affect testing time, with newer hardware generally completing tests more quickly.
As a general guideline, expect the default test to take approximately 20-30 minutes for systems with 8GB of RAM, 30-45 minutes for 16GB, and 45-90 minutes for 32GB or more.
Q: Can I use my PC while the test is running?
A: No, you cannot use your PC while the Windows Memory Diagnostics Tool is running. The tool operates at a pre-boot level, meaning it runs before Windows loads. This approach is necessary because:
- Testing memory requires exclusive access to read and write to all memory locations
- The operating system itself uses RAM, which would interfere with testing
- For accurate results, the test needs to control all aspects of memory allocation
When you initiate the test, your computer will restart, and the test will run in a specialized environment. Only after the test completes will your computer boot back into Windows. Plan accordingly and save all your work before starting the diagnostic.
Q: What should I do if the tool freezes during the test?
A: If the Windows Memory Diagnostics Tool appears to freeze or stop responding during testing, follow these steps:
- Be patient first: Some tests take longer than others, and what appears to be a freeze might be a particularly intensive test. Wait at least 15-20 minutes before assuming the tool has truly frozen.
- Force a restart: If you’re confident the tool has frozen, press and hold the power button on your computer until it shuts down, then power it back on.
- Consider the freeze a diagnostic clue: A freeze during memory testing often indicates a serious memory problem. The test may have encountered critically faulty memory that prevented it from continuing.
- Try a different testing approach:
- Run the Windows Memory Diagnostics Tool again, but select the Basic test mix instead of Standard or Extended
- Try testing with only one RAM module installed at a time to identify if a specific module is causing the freeze
- Use a third-party tool like MemTest86 that might handle severe memory errors differently
- Check for hardware issues beyond memory: If the diagnostic repeatedly freezes at the same point, consider potential motherboard issues, particularly with the memory controller or BIOS settings.
Q: Is this tool available in Windows 11 and older versions?
A: Yes, the Windows Memory Diagnostics Tool is available across multiple Windows versions:
- Windows 11: The tool is included and functions identically to the Windows 10 version.
- Windows 10: Fully supported in all editions and builds.
- Windows 8/8.1: Available with the same functionality.
- Windows 7: Included and fully functional.
- Windows Vista: First version to include the tool as a standard component.
- Windows XP: Available as part of the Windows Memory Diagnostic, which was a separate download from Microsoft.
In summary
The Windows Memory Diagnostics Tool provides Windows 10 users with a powerful yet accessible way to identify potential RAM issues before they lead to serious system problems. By understanding how to run this built-in utility, interpret its results, and take appropriate action when issues are detected, you can maintain system stability and extend the lifespan of your computer.
While memory problems can be frustrating, they’re often straightforward to resolve once identified — whether through reseating RAM modules or replacing faulty hardware.
Remember that proactive memory testing is a valuable part of routine system maintenance, not just a troubleshooting step when problems arise. By incorporating occasional memory diagnostics into your maintenance routine, you can catch potential issues early and ensure your system continues to run reliably for years to come.