Если вы установили Windows 11 с учётной записью Майкрософт, но хотели бы использовать её с локальной (автономной учётной записью), это сравнительно легко сделать, используя Параметры системы и некоторые дополнительные способы.
В этой инструкции пошагово описаны несколько методов удалить учётную запись Майкрософт и использовать вместо этого локальную учётную запись в Windows 11. На близкую тему: Как установить Windows 11 с локальной учётной записью (Home и Pro версии).
Удаление учётной записи Майкрософт в Параметрах
Основной способ удалить учётную запись Майкрософт, а точнее изменить её на локальный аккаунт — использовать соответствующие Параметры Windows 11. Потребуется выполнить следующие шаги:
- Откройте «Параметры» (можно нажать клавиши Win+I), перейдите в раздел «Учётные записи» и откройте пункт «Ваши данные».
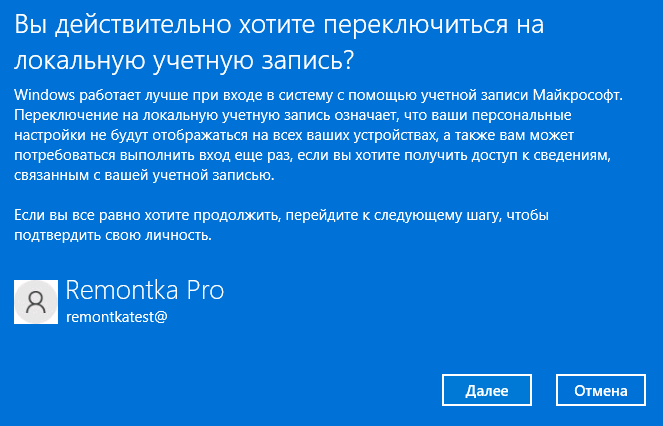
- В разделе «Параметры учетной записи» нажмите «Войти вместо этого с локальной учетной записью».
- Подтвердите переключение на локальную учетную запись, нажав «Далее».
- Введите ПИН-код или пароль для подтверждения.
- Введите имя пользователя и пароль (не обязательно) — они могут совпадать с теми, что у вас были при использовании учётной записи Майкрософт. Необходимость ввода обусловлена тем, что теперь эти данные будут храниться локально. Нажмите «Далее».
- Нажмите «Выйти из системы и закончить».
После выполнения последнего шага будет осуществлено переключение учетной записи в локальную и выход из Windows 11.
Сразу после этого вы сможете снова зайти, уже под тем именем пользователя и паролем, которые задали на 5-м шаге, при этом все ваши данные, которые были в учётной записи Майкрософт, будут сохранены в этом локальном аккаунте, можно пользоваться.
Обратите внимание: использование учётной записи Майкрософт может продолжиться в таких программах как OneDrive, Microsoft Store или других. При необходимости выйдите из них. Также зайдите в Параметры — Учетные записи — Электронная почта и учетные записи и посмотрите раздел «Учетные записи, используемые другими приложениями», где вероятнее всего будет отображаться ваша учетная запись Майкрософт, которую можно будет удалить.
Создание локальной учётной записи, перенос данных и удаление учётной записи Майкрософт
Ещё один метод — создать новую локальную учётную запись, дать ей права Администратора, зайти в эту учетную запись, перенести все необходимые данные и удалить ранее использовавшуюся учётную запись Майкрософт.
Чтобы выполнить необходимые действия потребуется:
- Запустить командную строку от имени администратора и по порядку ввести две команды (заменив имя пользователя и пароль на нужные данные для нового пользователя, если имя пользователя содержит пробелы, возьмите имя в кавычки):
net user имя_пользователя пароль /add
net localgroup Администраторы имя_пользователя /add
Это создаст нового пользователя с правами Администратора. Сделать это можно и в «Параметрах», но способ с командной строкой будет быстрее для данного случая.
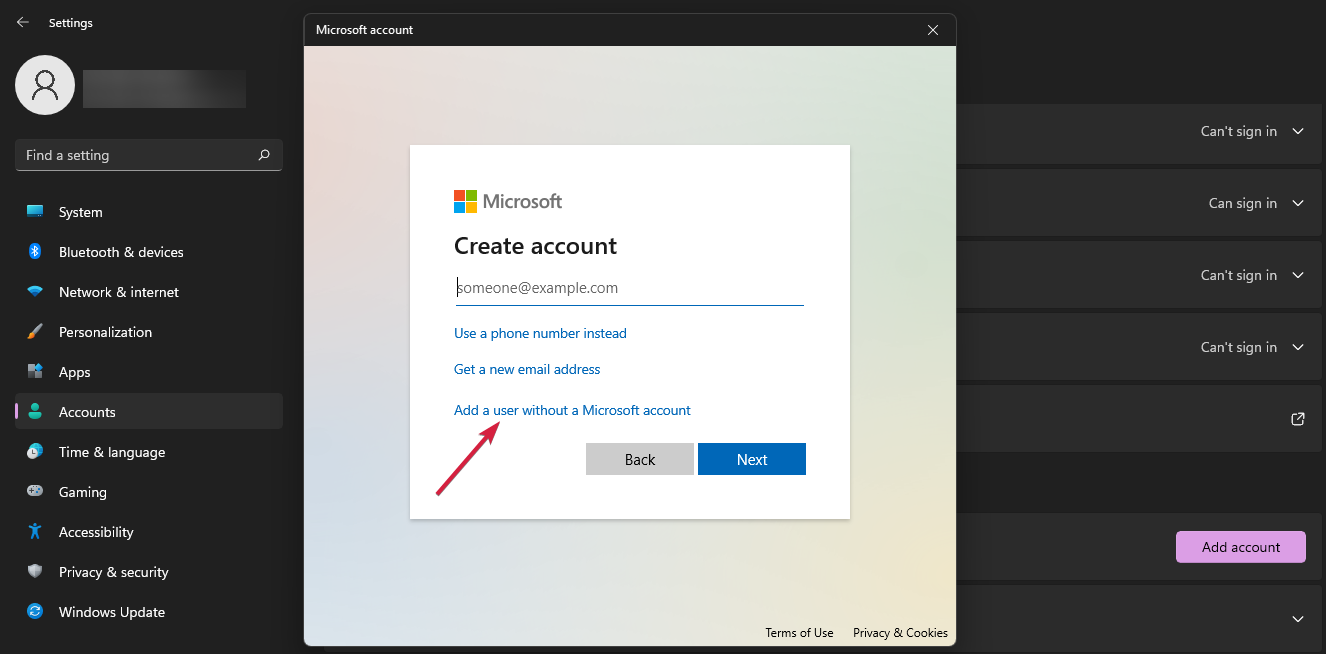
- Если способ с командной строкой из 1-го шага вам не подходит, зайдите в Параметры — Учетные записи — Семья и другие пользователи, нажмите «Добавить учетную запись», затем — «У меня нет данных для входа этого человека» — «Добавить пользователя без учетной записи Майкрософт». Создайте нового пользователя, затем снова зайдите в «Семья и другие пользователи», выберите созданную учетную запись, нажмите «Изменить тип учётной записи» и сделайте её Администратором.
- Выйдите из текущего аккаунта, зайдите во вновь созданный. Обязательно выполнить именно выход, а не простое переключение на новую учетную запись. Для этого можно нажать по имени пользователя в меню Пуск и выбрать пункт «Выйти».
- Проверьте работу программ, перенесите необходимые данные из папок пользователя с учетной записью Майкрософт (их можно найти в C:\Пользователи\Имя).
- Зайдите в Параметры — Учетные данные — Семья и другие пользователи.
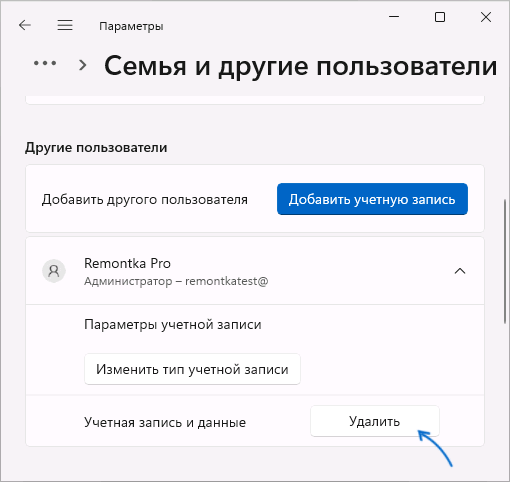
- Нажмите по учетной записи Майкрософт, которую нужно удалить, нажмите кнопку «Удалить».
- Если вы уверены, что все важные данные из папок учетной записи Майкрософт были сохранены, подтвердите удаление, нажав «Удалить учетную запись и данные».
С использованием Live CD
Многие Live CD на базе Win PE для восстановления работоспособности Windows и других задач содержат утилиты для сброса паролей. Одна из самых популярных — Windows Login Unlocker, присутствующая на WinPE 10-8 Sergei Strelec.

Если сбрасывать пароль учётной записи Майкрософт с помощью этой утилиты, то: пароль будет удален, а учётная запись «превращена» в локальную, что и требовалось. Более подробно в соответствующем разделе статьи Как сбросить пароль Windows 11.
Если у вас остаются вопросы на тему, задавайте их в комментариях, не исключено, что подходящее решение будет предложено.
Порядок закрытия учетной записи Майкрософт
Applies ToMicrosoft account
Закрытие учетной записи Майкрософт означает, что вы не сможете использовать ее для входа в какие-либо продукты или службы Майкрософт, включая Outlook.com или Hotmail, OneDrive, Xbox, Skype, Office или Microsoft 365, Rewards и Microsoft Certification. Вы также потеряете доступ к сохраненным ключам восстановления BitLocker.
При закрытии учетной записи Майкрософт по какой-либо причине корпорация Майкрософт хочет убедиться в двух вещах:
-
Что это действительно вы, а не кто-то другой пытается закрыть вашу учетную запись.
-
Что вы не оставляете ничего важного позади, что вам понадобится позже.
Если вы уверены, выполните следующие действия, чтобы закрыть учетную запись:
-
Войдите, чтобы начать закрытие личная учетная запись Майкрософт.Закрытие учетной записи
Примечания:
-
Чтобы закрыть учетную запись, необходимо иметь возможность входа. Если вам не удается войти в учетную запись Майкрософт, используйте вспомогательное средство входа.
-
Если вы забыли сведения об учетной записи и пришлось сбросить данные безопасности, необходимо подождать 60 дней, прежде чем закрыть учетную запись.
-
-
Если отображается запрос на вход в учетную запись или ее подтверждение, следуйте этим инструкциям.
-
Убедитесь, что учетная запись Майкрософт выбрана правильно, а затем нажмите кнопку Далее.
-
Прочтите список и установите флажки, чтобы подтвердить, что вы прочитали каждый элемент.
-
Выберите для повторного открытия окна значение 30 или 60 дней.
-
В раскрывающемся списке Выберите причину выберите объяснение того, почему вы закрываете учетную запись.
-
Нажмите Пометить для закрытия.
Удаление учетных записей и удаление данных
Как указано в Соглашении об использовании служб Майкрософт, после закрытия вашей учетной записи и повторного открытия окна мы удалим ваши данные и содержимое. Дополнительные сведения о данных.
Статьи по теме
Повторное открытие учетной записи Майкрософт
Дополнительные сведения
Чтобы закрыть учетную запись, необходимо иметь возможность входа. Если вам не удается войти в учетную запись Майкрософт, используйте вспомогательное средство входа.
Обратитесь в службу поддержки
Чтобы получить техническую поддержку, перейдите в раздел Обращение в службу поддержки Майкрософт, опишите проблему и выберите Техническая поддержка. Если вам по-прежнему нужна помощь, выберитеОбратитесь в службу поддержки, чтобы получить наилучший вариант поддержки.
Нужна дополнительная помощь?
Нужны дополнительные параметры?
Изучите преимущества подписки, просмотрите учебные курсы, узнайте, как защитить свое устройство и т. д.
Для создания единой платформы Microsoft используется учетная запись. С помощью учетной записи Майкрософт можно синхронизировать данные между компьютерами, иметь быстрый доступ к приложениям Microsoft, пользоваться облаком, найти потерянное устройство и т.д. Если все эти прелести не для вас, то скорее всего вы думали уже об удалении учётки с вашего ПК. Из плюсов этого действия можно выделить приватность и запуск системы без пароля. Сейчас рассмотрим несколько вариантов того, как это осуществить.
Как удалить учётную запись Майкрософт в Windows 11
Вариант первый.
При таком методе полностью удалится запись со всей информацией.
Мы рекомендуем заранее подумать о РК.
1. Жмём «Win+I».
2. Давим «Учетные записи», «Семья и другие пользователи».
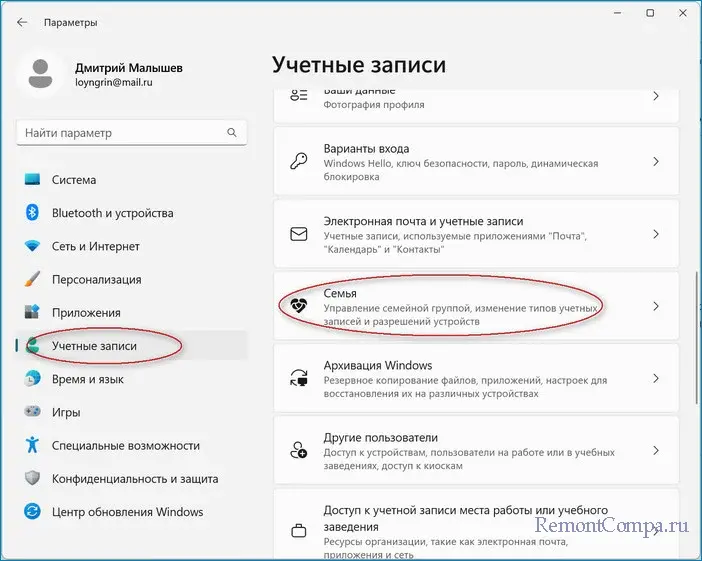
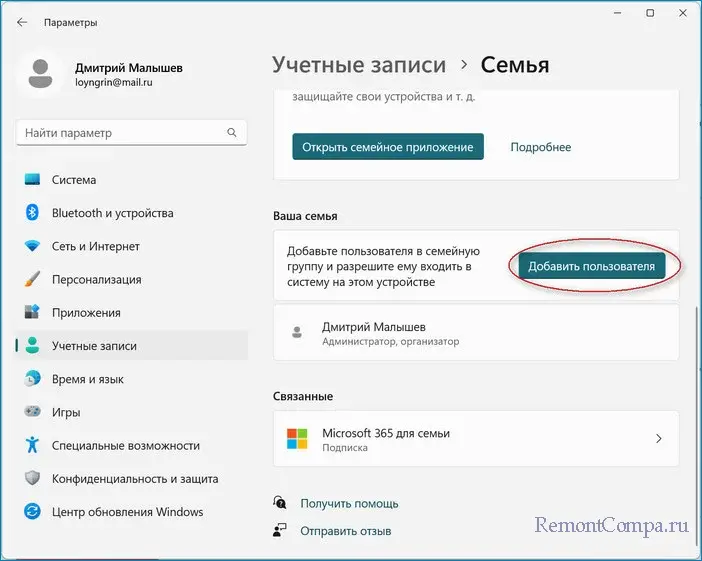
3. У многих юзеров дополнительной учётки не заведено. То есть удалить основную не представляется возможным. Поэтому ее нужно создать. Щелкаем «Добавить учетную запись». Желательно отключить интернет, но когда этого не сделаешь, надо будет пройти еще два следующих шага.
4. «У меня нет данных для входа этого человека».
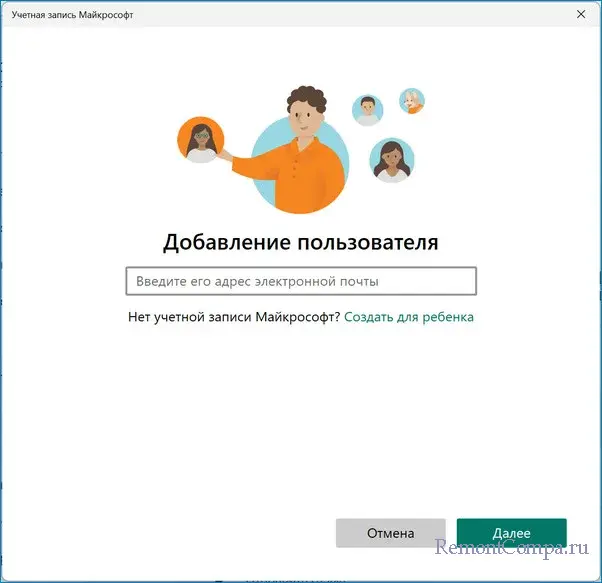
5. «Добавить пользователя без учетной записи Microsoft».
6. Заполняем строки всем необходимым. «Далее».
7. Возвращаемся к «Семья и другие пользователи».
8. Жмем по учётке, которую только сделали и «Изменить тип учетной записи».
9. Выбор делаем в пользу «Администратора».
10. Заходим из под новой учётки. Повторяем действия пунктов 1,2,3.
11. Выбираем нашу основную учётку. «Удалить».
12. Подтверждаем щелкая «Удалить учетную запись и данные».
Вариант второй.
В варианте номер два данные юзера не удалятся.
1. Жмем «Win+I». Теперь «Учетные записи» и «Ваши данные».
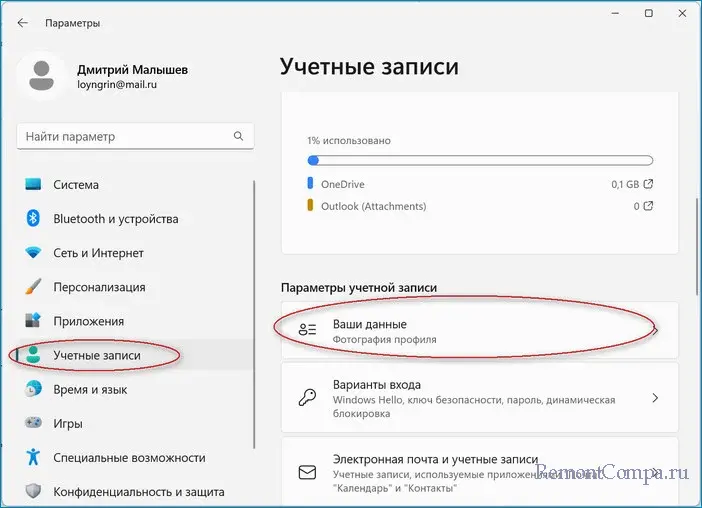
2. Появится надпись «Войти с локальной учетной записью». Щелкаем.
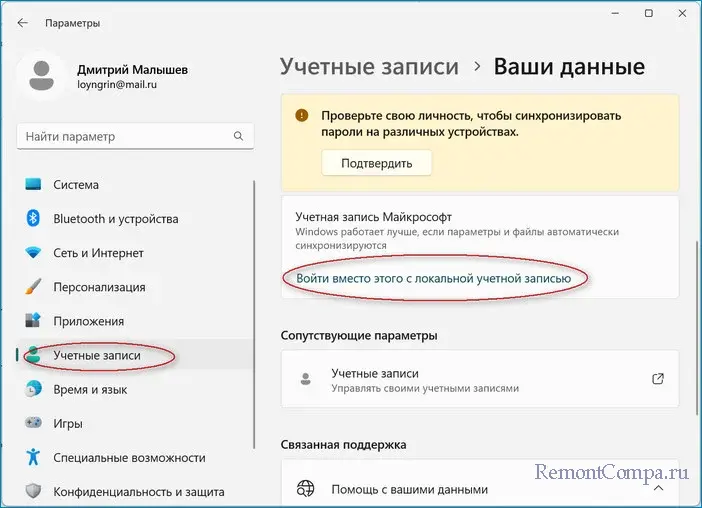
3. Всплывет сообщение, мы жмем «Далее». Пишем код от записи Microsoft. Подтверждаем действие.
4. Придумываем конфиденциальные данные. Щелкаем «Далее».
Здесь кроме названия учётки можно ничего не вводить, если, конечно, вам не нужен пароль.
5. Жмем «Выйти и закончить».
Заходим с новыми данными.
Проверить все ли у вас вышло вероятно сделать зайдя в параметры и посмотрев в угол. Сейчас тут виден идентификатор local account.
Метод третий.
1. Проникаем в «Панель управления». Ставим режим «Маленькие значки».
2. «Учетные записи пользователей» — «Управление другой учетной записью».
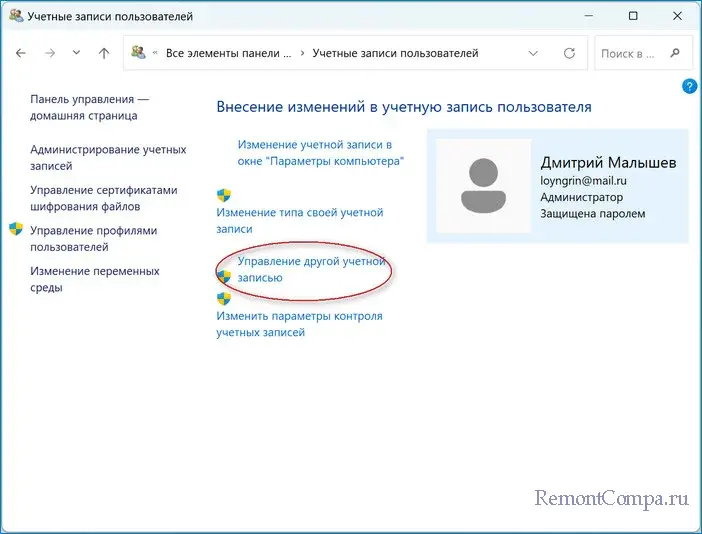
3. Клацаем на уничтожаемую учётку.
4. Щелкаем «Удалить учетную запись».
5. Решаем убирать с файлами, либо без. В любом варианте учётка удалится.
Вариант четвертый.
1. Жмем «Win+R». Пишем «netplwiz» и нажимаем «Ok».
2. Выбираем удаляемую учётку.
3. Щелкаем по кнопке «Удалить».
4. Подтверждаем действие.
-
Home
- Computing
- Guides
While many people love porting their Microsoft account to their new Windows 11 PC, just as many hate the experience. One of the nicest things about having a new computer is how little tabs it has over you, and letting Microsoft in from the beginning — especially in a way that feels required — is a bit letdown for privacy-minded people.
To make matters worse, getting rid of your account feels tricky. It not only feels like it, Microsoft is your direct antagonist in getting the privacy you want. Luckily, you can make a local account that is disconnected from the rest of your life to gain back the personal feel of your computer.
Removing a Microsoft account from Windows 11

If you have Windows 11, you’ll need some sort of an account on the computer. But, that account doesn’t need to be cloud connected. You can use a local account, with no ties to your other doings, instead. With this method, you don’t lose any files or your personal information.
Step 1: Go to Windows 11 settings with Windows Key and I keyboard shortcut.
Step 2: Click the Accounts section in the sidebar.
Step 3: Click Your Info and choose Sign in with a local account instead.
Step 4: Click next and enter your password to confirm.
Step 5: Follow the steps on the screen and enter your information.
See our guide on using Windows 11 without setting up a Microsoft account for more information.
Removing a work or school account from Windows 11
Fortunately, your Windows 11 work or school account can be removed completely and it is quite easy:
Step 1: Go to Windows 11 settings with Windows Key and I on the keyboard.
Step 2: Click the Accounts section in the sidebar.
Step 3: Click Access work or school and click the Disconnect button.
Are you making the most from your computer? Check these Windows 11 tips and tricks to make life easier.
Arif Bacchus is a native New Yorker and a fan of all things technology. Arif works as a freelance writer at Digital Trends…
-
Computing
The latest Windows 11 build has a surprising bug — it gets rid of Copilot

Microsoft has updated the support page for the Windows 11 build it released last week to reveal a rather amusing bug — it seems to have caused some devices to automatically uninstall the Copilot app and unpin it from the taskbar.
At the time of writing, Microsoft is still working on a resolution to the issue spotted by Windows Latest, recommending affected users reinstall the app and pin it back to the taskbar manually. It looks like the bug can occur on any device if it updates to build KB5053598 from Windows 11 24H2, 23H2, or 22H2, along with Windows 10 22H2 or 21H2.
Read more
-
Computing
Latest Windows 11 update slows Intel’s newest desktop processors

Microsoft’s latest Windows 11 24H2 (KB5050094 and KB5051987) updates are causing some serious performance issues, especially for Intel Core Ultra 9 285K users, as Neowin reports. The updates interfere with CPU speeds when a user minimizes a program or the app is out of focus. However, older Intel processors remain unaffected.
It’s reported that apps are «massively throttled,» causing the CPU’s clock rate to drop significantly and deteriorating overall performance. Some users have resorted to using beta BIOS or changing power settings to preserve CPU performance during background processes. The Intel Core Ultra 9 285K slowdown is causing some major headaches as the issues occur across various apps, including Prime95 and 7Zip. This suggests that the 24H2 performance issues are not limited to one app but are linked to KB 5050094 and KB5051987 updates.
Read more
-
Computing
The EU is cracking down on labels in Windows 11’s Start menu

To align with the EU’s Digital Markets Act (DMA), Microsoft is updating Windows 11’s Start Menu Search, but only for users in the European Economic Area, as Tech Radar reports. The software giant is introducing more transparent labels to distinguish between web search results and local ones. This move is part of broader changes that let users uninstall Edge and turn off Bing integration, reinforcing transparency and user choice.
The changes are in a new Windows 11 Insider Preview Build, build 27764. Notably, X user @alex290292 shared a screenshot that shows the new Start menu user interface with the «Windows» and «Web search from Bing» sections. These changes are great news since they give users more control over Windows 11. Specifically, the modifications include adding custom web search providers to Windows Search, letting users remove the Edge browser, and turning off Bing web search.
Read more
Readers help support Windows Report. We may get a commission if you buy through our links.
Read our disclosure page to find out how can you help Windows Report sustain the editorial team. Read more
One of the good things about PCs is that you can create different user accounts for different purposes. However, some users are enquiring how to remove a user account on Windows 11 instead.
This guide will show you different ways to do this, irrespective of the type of account you want to delete.
What is a local user account, and why do you need it?
A local user account is another instance of the operating system with its own settings, software, and, most of all, different management rights.
In other words, as an administrator of the system, you can create different local accounts for multiple users and, at the same time, limit their rights to manage some resources. For instance, you can block their right to install apps or set some rules.
This is particularly important when you set up a local account for your children or family. So, if you’re using the same computer as your family, it’s best to have an account for each one. This way, you will avoid clutter, and everyone will have their own privacy.
But if you are removing accounts due to privacy or performance-related issues, it’s wise to simply sign out other users in Windows 11. Or you may also consider removing accounts used by other apps to avoid unnecessary notifications.
How can I remove an account from Windows 11?
1. Create a local account
First, you need to know that you cannot remove a Microsoft account from the PC if you don’t have another available Microsoft or local account with administrative privileges in place.
So, if the account you’re trying to remove is the only one on your computer, you will need to create a local account.
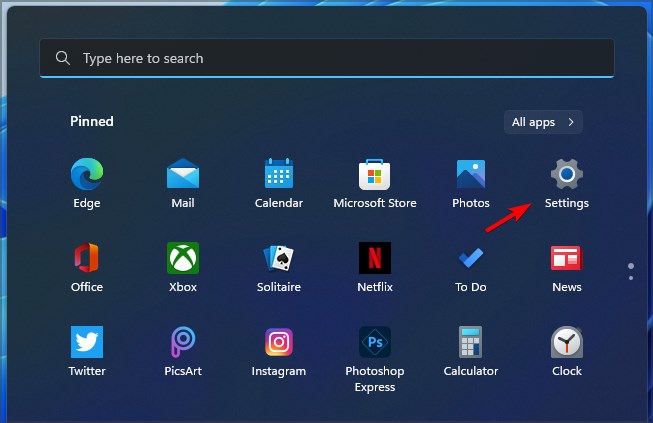
- Click on the Windows button and select Settings.
- Now choose Accounts from the left pane and click on Family & other users from the right.
- Look down at the Other users section and hit the Add account button.
- Click on I don’t have this person’s sign-in information.
- Select Add a user without a Microsoft account.
- Now you need to complete the username. You can also add a password but it’s not imperative. If you leave the password fields blank, the user will just log in by pressing the Enter key.
- As you can see in our screenshot, the account was created, but it’s a standard one, so we need to change it into an Administrator account.
- Click on the Change account type option.
- In the next windows, click on the Standard User field and select Administrator instead, then hit OK.
NOTE
Now that you have created a local account, you can, at last, remove any Microsoft account from the PC but remember that deleting it will also remove the user data.
2. Remove a Microsoft account using Settings
-
1. Make sure you are logged in as an administrator in Windows 11. If you are not, do so.
-
2. Click on the Windows button and then choose Settings.
-
3. Choose the Accounts option from the left, then select Family and other users from the menu on the right.
-
4. Navigate to the Other users section.
-
5. Select the user you want to delete. In our case, we want to remove the account called WindowsReport.
-
6. Click the Remove button to delete it.
-
7. Next, press the Delete account and data button.
Now that you have deleted the user’s account, you need to also manually remove the user’s profile folder.
-
8. Press the Windows key + E to open File Manager.
-
9. Navigate to This PC and double-click on the C: drive.
-
10. Now, double-click on the Users folder.
-
11. Right-click on the user account folder that you want to delete, in our case, WindowsReport, and select the Delete icon.
Now, you can manually remove a local user’s account on your Windows 11 device via Settings. From there, you can configure all the accounts on your computer. Moreover, you can delete all the associated data with that account.
It’s important to know that it’s not enough to delete a user’s account from the Computer Management console. You also need to delete the user’s profile folder.
By doing so, you will free up a lot of space in the process. The procedure is pretty easy to follow, so just apply the steps above to get it done quickly.
3. Remove a Microsoft account using User Accounts
- Press the Windows key + R to start Run.
- Type netplwiz and click OK or press Enter.
- Now, click on the account you want to delete and hit the Remove button.
- You will be prompted again to accept the deletion of the account and the user data.
- Recent Windows 11 update lets you disable profanity filter in voice typing
- Microsoft wants Windows 10 users to upgrade to Windows 11 or Copilot + PCs
- Windows 11 KB5055627 update makes File Explorer more fluid
4. Remove a Microsoft account using Control Panel
NOTE
As a safety measure, we strongly advise you to perform a backup before deleting any Microsoft account.
- Click the Search icon on the Taskbar, then type control panel and select the Control Panel app from the results.
- Select User Accounts.
- Click on the Remove user accounts option.
- Next, choose the account that you want to remove.
- Click on Delete the account.
- In the next window, you can choose whether to keep or delete the files from the account. If you choose to keep them, they will be stored online in the user’s account.
The last option of deleting the Microsoft account is better because it offers a way of backing up the data in the user’s account.
How do I delete an administrator account in Windows 11?
The methods of removing an administrator account on Windows 11 are the same as the ones shown above. However, you need to have another administrator account to do this. You can temporarily enable the hidden admin account and once you have created a new admin account, you can disable it.
We have reached the end of this guide on how to remove an account on Windows 11. You can always try any of our methods, as they all work effectively.
Similarly, if you want to know how to change the password and username in Windows 11, check our detailed guide to do it quickly.
Did you succeed in deleting the user account? If you need more information, please leave us a note in the comments section below.
Vladimir Popescu
Being an artist his entire life while also playing handball at a professional level, Vladimir has also developed a passion for all things computer-related.
With an innate fascination for research and analysis, and realizing many other people share his passion for this subject, he delved into writing Windows-related articles, so other people can also benefit from the acquired information.
When not writing kick-ass articles, Vladimir likes to spend his time doing Crossfit and creating art.


