

Браузер Chrome оснащен универсальными функциями, которые повышают удобство просмотра для конечного пользователя. Учитывая самую большую долю рынка в мире просмотра веб-страниц, нет никаких сомнений в удобном интерфейсе браузера Chrome. Для принадлежащих компании устройств, развернутых в качестве киосков, необходимо предлагать Chrome в качестве основного браузера из-за его популярности среди пользователей. Также необходимо эффективно управлять киоск-устройством и возможностями просмотра в Chrome, не мешая работе пользователя и ключевым функциям, предлагаемым браузером Chrome.
Чтобы успешно преодолеть утомительный путь удаленного управления киоск-браузерами Windows 10 на базе Chrome, Scalefusion расширяет режим одного приложения Windows 10 браузером Chrome. Запустив режим киоска Chrome в Windows 10, компании могут использовать удобство использования браузера Chrome для получения желаемого трафика в киоске, сохраняя при этом оптимальную безопасность устройства и данных.
Что такое режим киоска Chrome в Windows 10?
Режим киоска браузера Chrome в Windows 10 превращает ваш компьютер в специальный веб-браузер, отображающий в полноэкранном режиме только определенный веб-сайт или веб-приложение. Это ограничивает доступ пользователей к другим веб-сайтам, меню, закладкам и даже панели задач.
Использование браузера Chrome в режиме киоска в Windows 10 обеспечивает мощное решение для создания безопасного и целенаправленного веб-опыта в контролируемых средах. С небольшой настройкой вы можете превратить Chrome в удобный киоск, улучшив опыт как для вас, так и для ваших посетителей.
Режим киоска Chrome OS против режима киоска Chrome в Windows
Режим киоска Google Chrome блокирует устройство для запуска только браузера Chrome с его расширениями, создавая безопасную среду без отвлекающих факторов. И ChromeOS, и Windows предлагают эту функцию, что делает их идеальными для таких задач, как публичные киоски или выделенные рабочие станции. Хотя обе системы предоставляют схожую основную функциональность, способы их настройки и управления существенно различаются.
Настройка режима киоска Chrome проста, для легкой настройки предусмотрена специальная вкладка «Параметры киоска» в консоли администратора. Напротив, настройка режима киоска в Windows сложнее, требует создания ярлыков и ручной настройки командных строк и папок. Кроме того, ChromeOS предлагает более простое управление, поскольку все интегрировано в консоли администратора, тогда как Windows требует большего вмешательства администраторов для поддержания системных настроек.
Хотя обе системы предлагают гибкость, Windows может быть лучшим выбором для предприятий, которым требуется больше настроек и контроля. Несмотря на более сложный процесс настройки, Windows обеспечивает большую гибкость в конфигурации, что делает ее идеальной для организаций, которым требуется индивидуальное решение. ChromeOS, хотя и проще в настройке и управлении, может не предлагать тот же уровень настроек, который Windows предоставляет для расширенных потребностей.
Настройка режима киоска Chrome с ограниченным доступом в Windows 10
Назначенный доступ — это мощная функция Windows, которая позволяет компаниям преобразовывать устройство в выделенный киоск или создавать ограниченный пользовательский интерфейс. Ограничение доступа к одному приложению обеспечивает безопасную и свободную от отвлекающих факторов среду, что делает ее идеальной для общедоступных устройств или общих рабочих пространств.
Эта функция помогает компаниям сохранять концентрацию и безопасность, обеспечивая при этом бесперебойную работу пользователей.
Настройка режима киоска Chrome:
Чтобы настроить режим киоска Chrome с помощью ограниченного доступа в Windows 10, выполните следующие действия:
- Создайте новую учетную запись пользователя:
- Перейдите в Настройки > Учетные записи > Семья и другие пользователи.
- Выберите Добавить пользователя для этого компьютера и создайте новую локальную учетную запись пользователя, предназначенную для работы в киоске.
- Настроить назначенный доступ:
- Перейдите на Настройки > Учетные записи > Назначенный доступ.
- Нажмите на Установить киоск и выберите учетную запись пользователя, которую вы только что создали.
- Выберите Google Chrome из списка доступных приложений или выберите его, если необходимо.
- Настройте Chrome как приложение киоска по умолчанию:
- После выбора Chrome браузер откроет Chrome в режиме киоска через учетную запись, в которую он вошел. Это гарантирует, что пользователи смогут взаимодействовать только с Chrome, создавая безопасную среду без отвлекающих факторов.
- При желании можно настроить Chrome на открытие URL-адреса или отображение определенной веб-страницы при запуске.
- Перезагрузите устройство: После завершения настройки перезагрузите устройство. После перезагрузки устройство автоматически войдет в назначенную учетную запись киоска и откроет Chrome в режиме киоска, ограничивая пользователей браузером.
Преимущества использования назначенного доступа в режиме киоска Chrome
Режим назначенного доступа обеспечивает оптимизированный, закрытый опыт, который приносит пользу предприятиям в различных условиях. Режим киоска Chrome идеально подходит для:
- Публичный просмотр: устройства в общественных местах могут запускать Chrome в полноэкранном режиме для просмотра веб-страниц.
- Интерактивные цифровые вывески: установите киоски для отображения контента или рекламы в общественных местах.
- Общие устройства: ограничьте доступ к общим устройствам, предоставив пользователям доступ к определенной группе приложений, что позволит им сосредоточиться на задаче и сократит количество отвлекающих факторов.
- Устройства для сотрудников первой линии: ограничьте доступ сотрудников к устройствам определенными инструментами или приложениями.
Эта функция легко настраивается и идеально подходит для создания безопасной, продуктивной и свободной от отвлекающих факторов среды на устройствах с Windows 10, будь то для общественного использования, цифровых вывесок или внутренних рабочих станций.
Как запустить режим киоска браузера Chrome в Windows 10?
Давайте изучим пошаговые методы запуска Chrome в режиме киоска на устройствах с Windows 10:
1. Зарегистрируйтесь на Scalefusion. Windows МДМ. Вы можете использовать свой корпоративный адрес электронной почты или войти в систему, используя учетную запись Office 365 AD на панели управления Scalefusion.

2. Зарегистрируйте свои устройства Windows с помощью браузера IE/Edge.

Теперь вы можете начать управлять зарегистрированными устройствами, настроив профили устройств.
Learn More:

How To Setup Kiosk Mode for Windows 10
What is Windows Kiosk Mode? – A Fundamental Elaboration
3. Теперь вы можете приступить к настройке политик, которые будут применяться к устройствам с Windows 10. Перейдите в раздел «Управление устройствами» на панели управления Scalefusion и щелкните раздел «Профили устройств».

4. Вы можете начать настройку профиля для устройств Windows 10, нажав кнопку «Создать новый профиль». Выберите Windows 10 в качестве ОС и введите желаемое имя профиля. Нажмите «Отправить», чтобы продолжить.

5. На следующем шаге вы можете настроить приложения, которые будут доступны на киоск-устройстве. Вы можете занести в черный список (заблокировать) выбранные приложения или пропустить политику приложений, чтобы позволить пользователю выбирать приложения для использования на устройстве.
6. Перейдите к следующему разделу и выберите веб-сайты из белого списка, которые нужно разрешить на устройстве. Вы можете создать основной список разрешенных веб-сайтов в разделе белых списков веб-сайтов на панели управления Scalefusion.

Прочитайте больше: Внесение веб-сайтов в белый список на ваших устройствах с Windows 10
7. Настройте параметры браузера Chrome. Вы можете настроить параметры взаимодействия с пользователем, поиска контента, сети, печати и безопасности браузера Chrome.

8. Теперь перейдем к раздел настроек, где можно настроить режим одного приложения для устройств Windows 10. Чтобы запустить устройство как браузер Windows Kiosk, выберите приложение браузера в качестве киоск-приложение и выберите Chrome в качестве киоск-браузера.

9. Вы можете прокрутить вниз, чтобы настроить параметры браузера Chrome при работе в режиме одного приложения на устройствах с Windows 10. Вы можете выбрать URL-адрес по умолчанию для браузера Chrome и выбрать путь установки.

Если вы не хотите, чтобы конечные пользователи имели доступ к более чем одному веб-сайту в браузере Windows Chrome, вы можете отключить перемотку вперед, назад и адресную строку.
10. Вы можете выбрать учетную запись пользователя, в которой браузер Chrome должен быть переведен в режим одного приложения. Вы можете ввести основное имя пользователя или выбрать опцию «Автосоздать учетную запись пользователя киоска».

11. Вы можете нажать «Создать профиль», чтобы сохранить изменения. Этот профиль устройства теперь будет доступен в разделе «Профили устройств» на информационной панели. Теперь вы можете применить профиль устройства к зарегистрированным устройствам или группам устройств.

Ваше зарегистрированное устройство с Windows 10 теперь будет переведено в режим одного приложения с браузером Chrome. Конечные пользователи теперь могут получить доступ только к браузеру Chrome на выбранном устройстве с Windows 10, что по сути делает его браузером Windows Chrome. Благодаря функциям белого списка веб-сайтов и конфигурации Chrome, предлагаемым Scalefusion, вы можете полностью контролировать браузер Chrome на устройствах с Windows 10.
Варианты использования браузера Chrome в режиме киоска Windows
1. Розничные торговцы
Розничные продавцы и центры поддержки клиентов используют киоски Windows Chrome для предоставления клиентам интерактивных информационных терминалов, позволяющих им легко проверять подробную информацию о продуктах, описания, цены и наличие. Кроме того, эти устройства функционируют как киоски самообслуживания для размещения заказов и проведения транзакций, что помогает сократить время ожидания и повысить производительность.
2. образование
Многие образовательные учреждения используют режим киоска браузера Chrome в библиотеках и компьютерных классах, чтобы ограничить доступ к образовательным веб-сайтам, обеспечивая продуктивное обучение и предотвращая ненужные отвлекающие факторы. Кроме того, Chrome в режиме киоска используется в качестве информационных киосков, помогая студентам предоставлять обычные объявления, информацию о поступлении и карты кампуса.
3. радушие
Режим киоска Windows 10 Chrome в сфере гостеприимства может упростить регистрацию гостей, предоставить интерактивные карты, информацию о местных достопримечательностях и включить самообслуживание при бронировании и заказах. Он повышает качество обслуживания гостей, предоставляя удобный интерфейс для доступа к гостиничным услугам и информации, сокращая время ожидания и повышая эффективность работы.
4. Здравоохранение
Режим киоска Chrome помогает предотвратить утечку или потерю данных, защищая конфиденциальную информацию на устройствах. Он используется для оптимизации регистрации пациентов, планирования посещений и информационных киосков для информирования посетителей о последних проблемах со здоровьем. Установив режим киоска с веб-сайтами и приложениями здравоохранения, врачи и медицинский персонал могут получать новую информацию и оставаться сосредоточенными на своей работе.
5. Банковское дело и Финансы
В финансовой отрасли режим киоска браузера Chrome в Windows 10 может облегчить безопасное банковское самообслуживание, оптимизировать управление счетами, разрешить подачу заявок на получение кредита, предоставить инструменты финансового планирования и отображать обновления фондового рынка в режиме реального времени. Он улучшает качество обслуживания клиентов, предлагая эффективные, безопасные и доступные финансовые услуги, сокращая время ожидания в отделениях и оптимизируя распределение ресурсов для финансовых учреждений.
6. Транспорт
Настройка устройств Windows с режимом киоска браузера Chrome позволяет администраторам мгновенно предоставлять легкодоступную информацию о рейсах, позволяя путешественникам проверять свое расписание без участия человека.
Эти киоски отображают обновления и информацию о чрезвычайных ситуациях в режиме реального времени, позволяя путешественникам немедленно реагировать. Кроме того, некоторые киоски помогают бронировать билеты и производить оплату на месте, что существенно помогает предотвратить пропущенные рейсы.
Хотите оптимизировать свое устройство с Windows 10 для использования в бизнесе с помощью Scalefusion? Начните свой 14-день бесплатно tриал Cегодня!
Часто задаваемые вопросы
1. Что такое режим киоска браузера Chrome в Windows 10?
Режим киоска браузера Chrome в Windows 10 — это функция, которая позволяет ограничить браузер Chrome одним приложением, что делает его идеальным для публичного использования или выполнения определенных задач, таких как цифровые вывески или информационные киоски. Он блокирует браузер, не позволяя пользователям получать доступ к другим приложениям или настройкам, создавая контролируемую среду для упрощения использования.
2. Как включить режим Chrome Kiosk в Windows 10?
Включение режима киоска Chrome в Windows 10 включает настройку параметров командной строки Chrome для запуска в режиме киоска. Этот процесс обычно требует создания ярлыка с определенными командами или использования параметров групповой политики для принудительного применения режима на нескольких устройствах.
3. Могу ли я настроить параметры режима киоска Chrome?
Да, настройки режима киоска Chrome можно настроить в соответствии с вашими конкретными потребностями. Вы можете настроить такие параметры, как отображаемый URL-адрес, разрешенные функции браузера, ориентацию экрана и многое другое, чтобы создать персонализированную и безопасную среду для пользователей.
4. Каковы преимущества использования режима Chrome Kiosk в Windows 10?
Преимущества использования режима Chrome Kiosk в Windows 10 многочисленны. Он упрощает взаимодействие с пользователем, обеспечивая целенаправленный просмотр без отвлекающих факторов, повышает производительность, ограничивая доступ только к необходимым приложениям или веб-сайтам, а также обеспечивает единообразный пользовательский опыт на нескольких устройствах или в разных местах.
5. Как режим Chrome Kiosk повышает безопасность в Windows 10?
Режим Chrome Kiosk повышает безопасность Windows 10, ограничивая доступ к неавторизованным приложениям или системным настройкам, сводя к минимуму риск взлома или неправильного использования. Он не позволяет пользователям уходить с указанного контента или веб-сайтов, снижая вероятность воздействия на вредоносные сайты или загрузки и тем самым защищая как устройство, так и пользовательские данные.
Chrome Kiosk mode, known for its security and stability, can be deployed in many market sectors:
- Retail Self-Service Terminals: Clients can access a platform from which they can browse through the products or services, require a specific service, and check out.
- Meeting Room Sign-In: Serve as self-registration device when an event requires guests to sign in.
- School Computer Labs: As students can’t access non-educational applications, this will improve their focus and enhance the systerm security.
- Visitor Registration Desks: Instead of having visitors fill up a paper form, they can access a digital one.Their data wll be automatically uploaded and labeled to be subsequently elaborated.
Here we will explore some effective setup methods, you can choose the one suits you the best.
| Methods | Benifits | Scenarios |
|---|---|---|
| 1. Google Admin |
|
Equipped with Chrome Enterprise or Education licenses |
| 2. Third-party MDM solution |
|
High security requirements |
| 3. Lock down Chrome Browser | For personal use, or locking down on a single device | Developer Mode enabled in Chrome Browser |
| 4. Add Chrome As Shortcut Tab |
|
Used in conjunction with commands |
1 Use Google Admin to Set Up Chrome Kiosk Mode
Using the Google Admin console, administrators can remotely and centrally manage multiple devices, configure/deploy/update, and monitor device status in bulk. This method is especially suitable for Managed ChromeOS devices.
- Use your credentials to log in to the Google Admin console, and navigate to the menu: Devices > Chrome > Apps & Extensions > Kiosk.

Step 1: Log in to Google Admin console
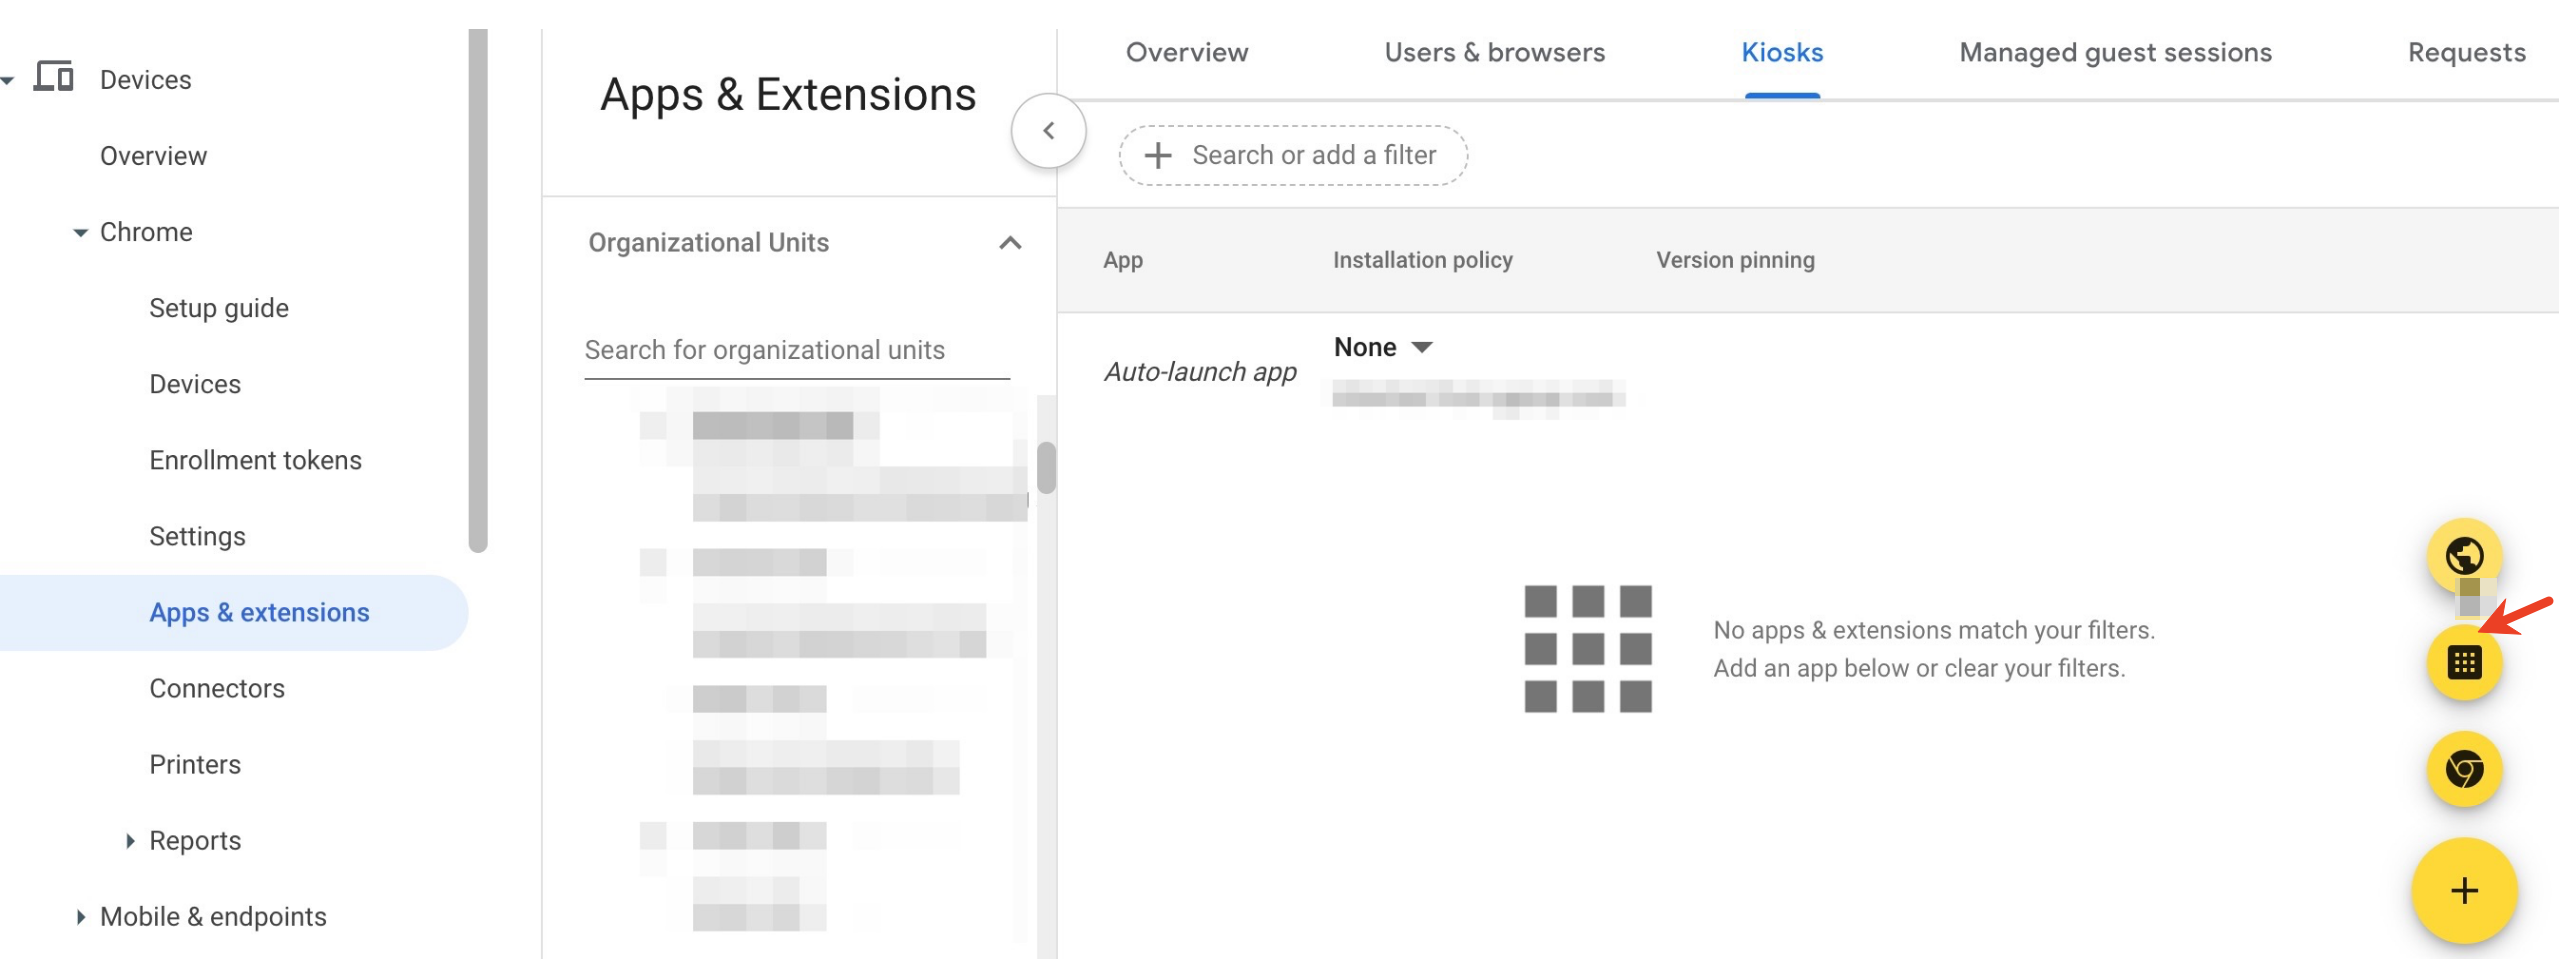
- Select the Chrome app for lockdown, and configure deployment and launch settings. You can choose Public Session Kiosk or Auto-Launch Kiosk App.
Step 2: Chrome Kiosk Mode Setup
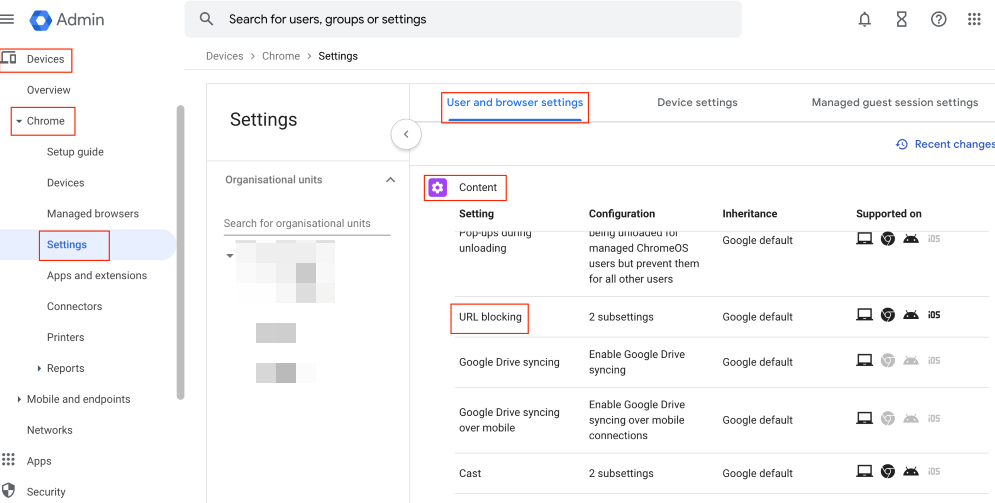
- In Chrome > Settings tab, you can set URL blocking, which supports up to 1000 URLs.

Step 3: URL List
- You can also specify the required_platform_version in the manifest and then block automatic app updates in Google Admin to avoid compatibility issues caused by updates.
Step 4: Chrome Version Conrol
- After completing the setup, verify the settings on the managed device: restart the Chrome device and check the lockdown status.
Step 5: Verification
Google Admin supports two types of Kiosk modes—Auto-launch Kiosk and Public Session Kiosk—which are designed for different use cases.
- Auto-launch Kiosk: Intended for single-purpose devices, such as ordering kiosks (e.g., in restaurants) or hotel check-in terminals. When the device starts up, it automatically launches a specific application and enters full-screen mode. The browser typically operates in single-tab mode, locking users into a specific webpage and preventing them from exiting or accessing other functions.
- Public Session Kiosk: Designed for devices that require temporary access, such as library computers. It allows multiple users to access the device without logging in and without retaining any user data after the session. Users can open multiple tabs on the Chrome browser and navigate freely across multiple websites.
2 Apply a Third-party MDM solution
Users who need batch settings and high security requirements may consider methods that strictly limit access and support remote configuration. For that, the most appropriate method is by using an MDM solution.
- Step 1.Sign up and log into AirDroid Business admin console
- Click the free trial button below to sign up for an AirDroid Business account and use it to log into the admin console.
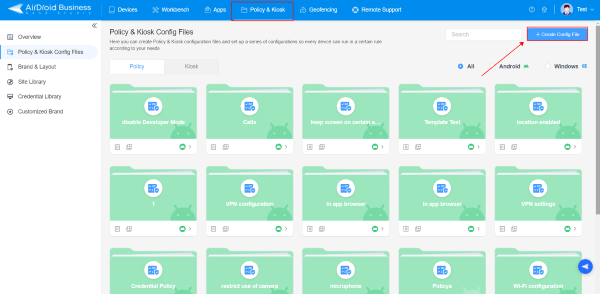
- Step 2.Create a profile for Chrome kiosk mode
- First, follow the AirDroid Business enrollment guide to bind your Windows devices to the admin console. Then, navigate to ‘Policy & Kiosk’, create a new Policy Config File for Windows, click ‘Browser’, select ‘Open’ on Browser Configuration, and complete the configuration of website allowlists.
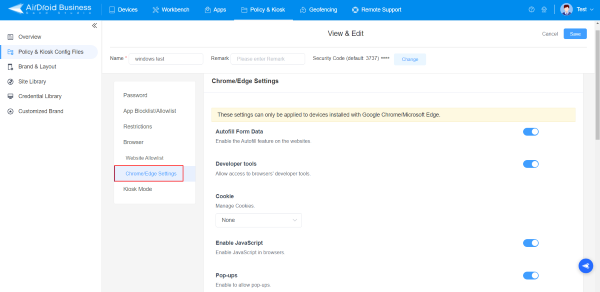
- Step 3.Build a custom Chrome browser
- Navigate to Chrome/Edge Settings to view a list of browser functions. Modify the settings according to your business needs.
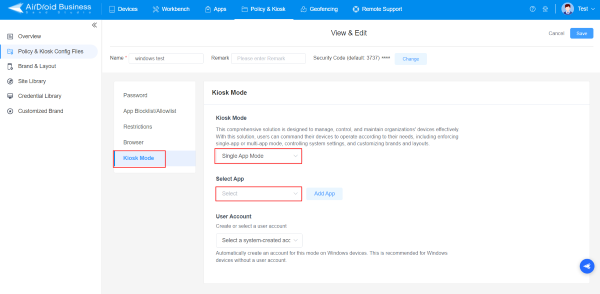
- Step 4.Kiosk Mode
- Move to ‘Kiosk mode’, select ‘single-app mode’, choose Google Chrome from the app list to ENABLE Chrome kiosk mode, complete the ‘user account’ setting and click save.
- Step 5.Apply settings to target Windows devices
- Apply this Policy Config File to your target Windows devices to finish kiosk mode configurations.
3 Lock down Chrome Browser
- Open Chrome browser and go to chrome://extensions, enable Developer Mode at the top right of this page.

Step 1: Enable Developer Mode

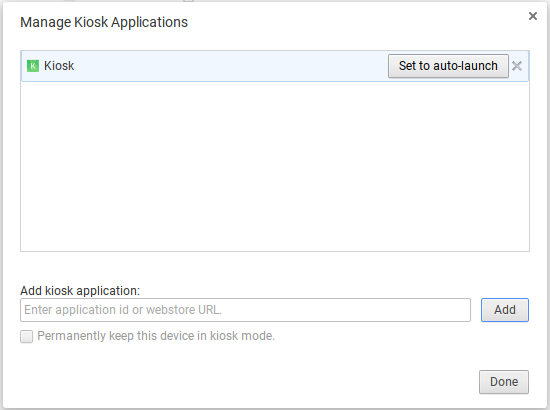
- Click on Manage kiosk applications and enter the Chrome app ID. Click done.
Step 2: Chrome Lockdown
Note : If the «Manage kiosk application» button is not available on your Chrome device, please refer to this solution.
- After restarting or logging into the device, Chrome kiosk mode will automatically launch.
Step 3: Restart the Device
Tips : Developers can leverage ChromeOS Dev documentation and PWA technology to deliver advanced features like offline functionality and hardware API access in Chrome kiosk mode.
No matter which method you use to configure Chrome Kiosk mode, Chrome will run in single-tab mode by default. This means the browser will be locked to a specific webpage or web app, and users will not be able to manually open new tabs or access other pages.
If you require multi-tab functionality, additional configuration is usually needed: you can use MDM policy settings or the —kiosk parameter combined with other settings to control the browser’s behavior.
4 Add Chrome As Shortcut Tab
Follow these steps to quickly set up a Windows device running into Chrome kiosk mode. And users cannot exit without a keyboard.
- Open the Google Chrome browser on your Windows 10/11 OS device and look for the profile icon at the top-right corner of the screen.
Step 1: Open Chrome
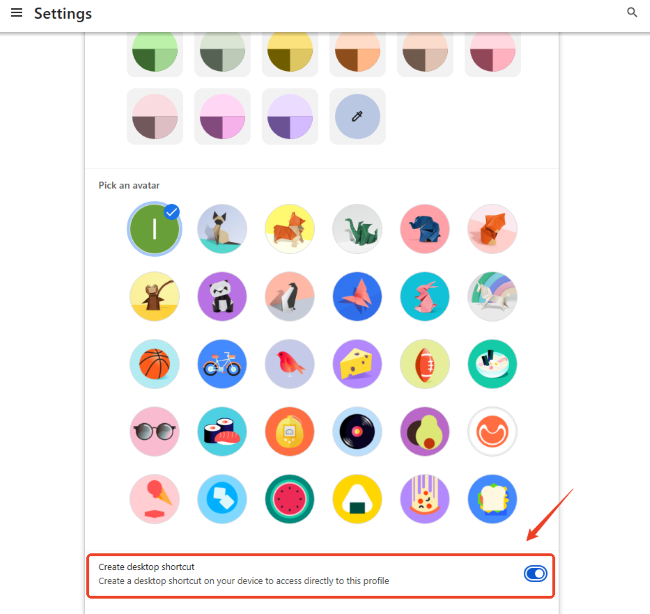
- Select the profile you want to create a shortcut for. Click the pencil icon labeled «Customize Profile.» Enter a name for your Chrome profile, choose a theme color, and select an avatar. Toggle the «Create desktop shortcut» switch to blue. A Chrome shortcut for this profile will then appear on your desktop.

Step 2: Create A Shortcut
- Now close all the Chrome tabs and move to the desktop. You will find your Chrome shortcut there.
Step 3: Move to Desktop
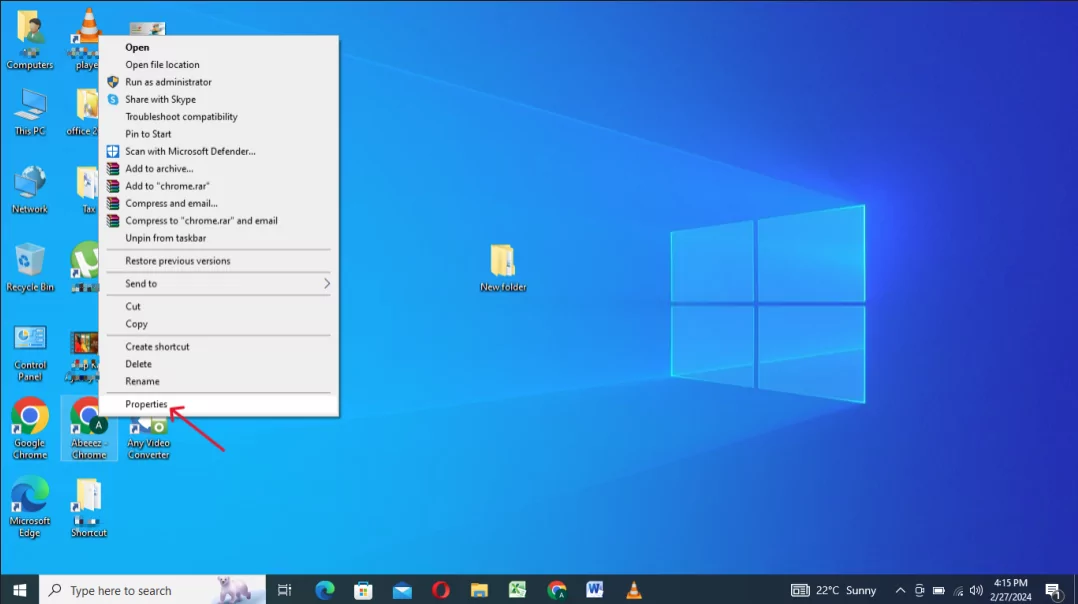
- Right-click on the tab and choose the ‘Properties’ option.
Step 4:Manage Properties
- Click on the Shortcut option, and add ‘- -kiosk https://www.airdroid.com/business/’(any other domain in the target box you want to run on the browser). Press ‘OK’ to initiate the settings.
Step 5: Select the ‘Shortcut’ option

- After applying the above settings, the Chrome full screen kiosk mode will auto launch with a specific URL mentioned in the properties. If automatic full screen doesn’t work on your Windows device, ensure Chrome is set as the default browser and fully closed before starting the setup process.
- Attention: To exit the kiosk mode, you need to press ALT+F4 or Ctrl+Alt+Del.
Step 6: Chrome Full Screen Kiosk Mode
Tips: Use a combination of shortcut keys and commands to set the Chrome Kiosk mode, it’s fast, but requires technical expertise for advanced configurations, such as blocking unnecessary browser functions, and lacks the ability to manage multiple devices from a single workstation. For broader device control, the MDM solution is more effective.
Common Issues of Chrome Kiosk Mode Created by Shortcut
Set up Chrome Kiosk Mode by Shortcut is simple and fast, but it is not suitable for businesses. Because it lacks of stability and there various problems.
Issue 1.Kiosk Mode Fails to Launch After Setup
When setting up Google Chrome Kiosk Mode in Windows, one of the most common issues you can encounter is that Chrome fails to launch after setup. This can happen for (usually) a couple of reasons:
- Incorrect Parameters: The kiosk mode doesn’t start if there is an error in the syntax of the command used to launch Chrome. Check your commands and make sure that there aren’t any misplaced spaces, quotation marks, and typos.
- User Permissions: Make sure that you have the necessary administrative privileges when setting up Chrome Kiosk Mode, or the kiosk mode will fail to launch.
- Conflicts with other Applications: Other applications might interfere with the kiosk mode. Before launching it, make sure to shut down any other application. In particular, make sure you shut down every service running in the background.
Issue 2. Unable to Limit Chrome Browser to a Single Tab
Chrome Browser Kiosk Mode is intended to open a single tab. A common issue that can occur is that, once launched the kiosk mode, Chrome allows multiple tabs, defeating the purpose of the kiosk mode. This can happen for several reasons and this is how you can troubleshoot it:
- Make sure you shut down the Chrome Browser completely before launching the kiosk mode.
- When creating the shortcut, in the Target field, add a starting page by typing: —kiosk http://www.xxx.com
Issue 3. Full Screen Shortcuts Doesn’t Work
Sometimes, the Chrome Kiosk Mode can face issues with the full-screen shortcuts (like F11 or Ctrl+Shift+F) that don’t work.
This mainly happens because, when launched, correctly, Chrome is displayed full screen without the need to use shortcuts.
In particular, the command —kiosk launches Chrome, in kiosk mode, full screen. So, make sure you’ve used the right command, and there are no syntax errors, and Chrome will automatically launch full-screen, without any need for shortcuts.
Issue 4. Unable to Run HTML File in Chrome Kiosk Mode
Chrome Kiosk Mode is designed to display web-based content. So, by default, it may not allow to run HTML files for security restrictions. Therefore, to run HTML files, you need to provide the necessary permissions.
- Use this additional command —allow-file-access-from-files to enable Chrome to open local HTML files. The full command should look like this: —kiosk —allow-file-access-from-files
Issue 5. Task Manager Still Accessible in Chrome Kiosk Mode
When in Kiosk Mode, users might still be able to access the Task Manager. This should be fixed because, being able to access the Task Manager, users can exit the Chrome Kiosk Mode or interfere with it.
If you’re experiencing this issue, you can use Registry Editor to disable the task manager. This is how you do it:
- Open the Registry Editor by pressing Win+R and typing regedit
- Navigate to the following:
HKEY_CURRENT_USER\Software\Microsoft\Windows\CurrentVersion\Policies\System - In the System key, right-click in the right pane and select Nex, then DWORD (32-bit) Value
- Name the value DisableTaskMgr
- Double-click on DisableTaskMgr
- Set the value to 1
Issue 6. Difficult to Exit Kiosk Mode
Because the entire Windows system is locked into the Chrome Browser application, it can be tricky for admins to exit the kiosk mode.
When both shortcuts and task manager are disabled, the most effective way of exiting the Chrome kiosk mode on Windows is to restart the system and reset the session.
But make sure to avoid setting up the system to automatically boot the kiosk mode when restarting.
Issue 7. Chrome Settings or Session Data May Not Persist After Restart
When you want Chrome to persist after restart, you need to set the kiosk mode to be automatically launched upon restart.
To do so, after creating the Chrome Kiosk shortcut, you just need to place the shortcut folder in the Windows Startup folder. This will cause Chrome to start automatically whenever the system is restarted.
If you also want Chrome to restore the last data session upon restart, you need to add the command –restore-last-session when creating your shortcut. So, instead of only using –kiosk, you need to type —kiosk —restore-last-session
Issue 8. Chrome Extension Isn’t Working
When Chrome extensions don’t work when the system in kiosk mode, you need to manually enable them by modifying the Kiosk Mode shortcut you’ve previously created. In particular, after locating the shortcut folder:
- Right-click on it and select Properties
- In the Target field, add the following command: —load-extension=”C:\path-to-extension-folder”
Conclusion
Setting up Chrome Kiosk mode on computers is one of the most effective and secure ways to lock them into a specific website or web application.
In scenarios like large education systems, that require advanced security features and access specific Google Chrome extensions, it would be essential to consult the Chrome Developer Dashboard or Admin Console. These would provide detailed configurations to tailor the security features strictly around the specific use environment needs.
Lastly, you should always make sure to have the last Chrome version running on the kiosk mode devices, especially if you need the browser to support multi-tab kiosk mode or specific extensions. It’s a simple but effective way to avoid unnecessary functional conflicts when the Chrome Kiosk mode is running.
Kiosk Mode feature allows the user to convert the Chromedevice into one usable app machine. It locks away all the other apps and features that Chrome has to offer. Chrome devices can include from a wide variety of Chromebooks, which are specialized and low budget laptops, Chrome CPUs, which are small boxes that only need a monitor to run and finally Chromebase devices, which can be used commercially for business.
Where Can Chrome With Kiosk Mode Be Used?
Chrome has become very popular over the users and is used for both personal and work purpose. The Chrome for Work, also known as Google Chrome Enterprise is a business-focused solution for Chrome devices. It is Google’s initiative to encourage institutions, schools and other workplaces to use Chrome devices. The Chrome Kiosk Mode is an essential requirement for institutions such as libraries and other business that prefer Kiosk systems so the user can use the intended app.

That is the reason why Google inculcated the Single App Kiosk Mode, which locks the user on to a single full-screen Chrome app that cannot be changed or exited. This mode is different from the normal kiosk mode, which allows a few controls to the user. The normal Chrome Kiosk Mode can be activated on the Chrome Browser running in Windows 10 computer. But,this Single App Kiosk Mode is available only on Chrome devices, which locks the user on one particular website or Chrome app.
Also Read: How to Enable Kiosk Mode on Windows 10?
How To Enable Chrome Kiosk Mode In Your Computer?
Chrome Kiosk Mode On A Managed Chrome Device
If your Network administrator has modified the system policies that are controlling the Chrome OS or browser settings, then this Chrome device comes under the category of Managed devices. To set the Chrome Kiosk Mode, follow these steps:
Step 1. Open the Chrome Device’s admin panel.
Step 2. Locate the Kiosk settings section.
Step 3. You can choose from a variety of selections like Public Session Kiosk, Auto-Launch Public Session and Auto-Launch Kiosk App.
Note: Public Session Kiosk means the normal Chrome Kiosk Mode, and Auto-Launch Kiosk App is a different name for initiating Single App Kiosk Mode.
Also Read: How to Activate Kiosk Mode on Firefox Browser?
Chrome Kiosk Mode On A Non-managed Chrome Device
Step 1. Sign into the Chromebook and open Chrome Browser.
Step 2. On the address bar, type the following command
Chrome://extensions
Step 3. Turn on the Developer Mode by toggling the switch towards the right.

Step 4. Click on Manage Kiosk Applications.
Step 5. Enter the ID of the Kiosk App you want to use in the “Add kiosk application” box.
Step 6. Select Add and then done.
How To Turn Off The Chrome Kiosk Mode?
Step 1. Restart your Chromebook.
Step 2. While the device is turn on, Press Ctrl + Alt + S
Step 3. The Kiosk Mode will Turn Off, and the normal Sign-in screen will appear.
Chrome Kiosk Mode On Chrome For Windows
To set up the Chrome in Kiosk Mode on Windows 10 computer follow these steps:
Step 1. Create a Shortcut of the Chrome browser on your Desktop.
Step 2. Make a right-click on the Chrome shortcut and from the contextual menu, click on Properties.
Step 3. In the Properties window. Click on the Shortcut tab and locate the Target Field.
Step 4. Do not erase anything in the target field. Add “ –Kiosk” at the end of whatever is already mentioned in the target field.
Step 5. Double Click on this shortcut icon and the Chrome browser will always open in Kiosk Mode. However, this will be the normal kiosk mode, which is different from the Single-App Kiosk Mode.
Your Thoughts On How To Enable Chrome Kiosk Mode In Your Computer?
Chrome’s Kiosk Mode is not only useful for businesses, Malls, Libraries but can also be used in your home. If you are left without any option but to hand over your laptop or tablet to your kids, then you could probably enable the kiosk mode so that they wouldn’t be able to make a mess of your system.

Follow us on social media – Facebook and YouTube. For any queries or suggestions, please let us know in the comments section below. We would love to get back to you with a solution. We post regularly on the tips and tricks along with solutions to common issues related to technology. Subscribe to our newsletter to get regular updates on the tech world.
Setting up Kiosk mode in Chrome on a Windows PC can be a useful way to restrict access to specific websites or applications, making it ideal for public use computers or shared workstations. Kiosk mode allows you to lock down the browser so that users can only access a specific set of websites or applications, preventing them from browsing freely or making any changes to the system settings. In this article, we will guide you through the process of setting up Kiosk mode in Chrome on a Windows PC, step by step.
Step 1: Download and Install Chrome
The first step in setting up Kiosk mode in Chrome on a Windows PC is to download and install the Chrome browser if you don’t already have it installed. You can download Chrome from the official Google website by visiting https://www.google.com/chrome/ and clicking on the «Download Chrome» button. Follow the on-screen instructions to install the browser on your PC.
Step 2: Create a new Chrome shortcut
To set up Kiosk mode in Chrome, you will need to create a new shortcut for the browser with the necessary command line arguments. To do this, right-click on the desktop or the Start menu and select «New» and then «Shortcut». In the «Create Shortcut» window, enter the following command in the «Type the location of the item» field:
«C:Program Files (x86)GoogleChromeApplicationchrome.exe» –kiosk https://www.example.com
Replace «https://www.example.com» with the URL of the website you want to display in Kiosk mode. Click «Next» and then enter a name for the shortcut, such as «Chrome Kiosk Mode», and click «Finish» to create the shortcut.
Step 3: Adjust Kiosk mode settings
Now that you have created a new shortcut for Chrome in Kiosk mode, you can adjust the settings to customize the browsing experience. Right-click on the new shortcut you created and select «Properties». In the «Target» field, you can add additional command line arguments to customize the behavior of Chrome in Kiosk mode. Some common command line arguments include:
–kiosk-printing : Allows users to print from Chrome in Kiosk mode.
–disable-pinch : Disables pinch zooming on touchscreens.
–disable-gesture-requirement-for-media-playback : Allows users to play media without using gestures.
–disable-new-avatar-menu : Disables the new avatar menu in Chrome.
You can add these command line arguments to the end of the «Target» field, separated by a space. Once you have made the necessary adjustments, click «Apply» and then «OK» to save the changes.
Step 4: Test Kiosk mode
To test Kiosk mode in Chrome, double-click on the new shortcut you created on the desktop. Chrome should open in full-screen mode, displaying the website you specified in the shortcut. Users will only be able to interact with the website and will not have access to the browser’s address bar or settings. You can test different websites and applications to ensure that everything is working as expected.
Step 5: Exit Kiosk mode
To exit Kiosk mode in Chrome, you can press the «Alt» and «F4» keys simultaneously on your keyboard, or you can press the Windows key to access the Start menu and close the browser from there. Alternatively, you can press the «Ctrl» and «Shift» keys simultaneously and then click on the «Exit Kiosk mode» button in the top-right corner of the browser window.
Conclusion
Setting up Kiosk mode in Chrome on a Windows PC can be a straightforward process with the right guidance. By following the steps outlined in this article, you can easily lock down the browser to restrict access to specific websites or applications, making it ideal for public use computers or shared workstations. Whether you are setting up a kiosk for a trade show, an information booth, or a shared office computer, Kiosk mode in Chrome can help you create a secure and controlled browsing environment for users.
Set up Chrome Browser Kiosk Mode on Windows 10. – If someone else uses your computer. Kiosk mode assists in creating a second user profile on Google Chrome. The second user guest will have full-screen Chrome browser without any of your personal data. Read a related article on How to Change Proxy Settings in Chrome Web Browser.
Kiosk Mode is a characteristic notion in Chrome that lets the computer to be used in a single window. It works on a simple technique of blocking the access to the other parts of the device. Kiosk Mode is not exclusive only for Google Chrome. The kiosk also has the ability to modify in order to use a Guest account or a particular URL. Also, follow How to Sync Google Chrome Tabs on Multiple Computers. It is useful if in case any person uses the PC wherein you’d rather favor they work on with a single web browser. With this kiosk mode, you can administer that. Stick on to our guide to know the steps for setting up this mode.
How to Set up Chrome Browser Kiosk Mode in Windows 10
Step 1 – Open Google Chrome and head towards the three dot (hamburger) icon for handling the Chrome Settings.
Step 2 – Here reach out to the Settings from the list of options and click the same. This will lead you to a page related to Chrome Settings.
Follow our related guide to Use chrome://settings/content to Directly Open Content Settings.
Step 3 – Then move towards the heading People and select the Add Person button.
Step 4 – Now write the name of the New person (Account User) and pick an icon for the account. Make sure to click the Add button to complete the whole process.
Note – See that the check mark is there on the box reading Create a desktop shortcut for this user. This will add a new account of Google Chrome to your desktop. Now the desktop will contain two accounts of Chrome – the first one and the new one.
You may also like to know How to Add Chrome With Icon to Desktop Context Menu in Windows 10.
Step 5 – Then close all the accounts of Google Chrome available on the desktop.
Step 6 – Now perform a right click on the new Google Chrome icon that you have created in the above step. A list of options will come into view, click Properties.
Step 7 – Click on the Shortcut tab and go to the box adjacent to the option Target. Paste –kiosk just at the end of the given target and click Apply after then Ok.
In case, this does not work then copy and paste the below command here replacing the original target and test one after another.
–chrome-frame –kiosk “http://www.google.com”–kiosk
If this command does not work then try either of these commands
–chrome-frame –kiosk “http://www.google.com”
OR
–kiosk “http://www.google.com”
Step 8 – Now click the Apply and then the OK button to completely Set up Chrome Browser Kiosk Mode.
This will open the Google Chrome in kiosk mode.
Well, you may find another related guide to be helpful – How to Export Import Edge Favorites As HTML File with Chrome, Firefox, IE.
Concluding Words
You all know that Chrome is the most widely used browser people tend to use it time and again. In this case, for the sake of your privacy and to save your personal folder from the intrusion of others, kiosk is the best option. Hence, Set up Chrome Browser Kiosk Mode in Windows 10 and if you have more tips on settings up this, kindly write them to us.