
Если браузер Google Chrome работает с паузами и сбоями или не запускается совсем, могут появляться сообщения, описанные ниже.
- Ошибка прокси-сервера в Google Chrome:
-
err_connection_reset_chrome
-
- Веб-страница недоступна:
err_connection_closederr_connection_failed
Примечание. Если страница загружается слишком медленно или не открывается, воспользуйтесь советами по устранению неполадок.
Общие рекомендации
Закройте другие вкладки, расширения и приложения
Возможно, приложения, расширения и программы, запущенные на компьютере, используют слишком много оперативной памяти, поэтому сайт не загружается.
Чтобы освободить память:
- Закройте все вкладки кроме той, в которой вы получили сообщение об ошибке.
- Выйдите из запущенных программ и приложений.
- Остановите скачивание контента.
- Удалите ненужные расширения. Подробнее об удалении расширений…
Совет. Попробуйте обновить вкладку, на которой появилось сообщение об ошибке.
Перезапустите компьютер
Иногда веб-страницы не загружаются из-за других программ или приложений.
- Перезагрузите компьютер.
- Попробуйте загрузить страницу ещё раз.
Устранение неполадок
Откройте страницу в другом браузере
Чтобы выяснить, где возникла проблема – на веб-странице или в Chrome, попробуйте другой браузер, например Firefox или Safari.
Если все работает, попробуйте эти способы:
Если страница также не открывается в другом браузере, проблема может быть связана с сетевым подключением или самим сайтом. Об этом можно прочитать ниже.
Что делать, если Chrome не запускается
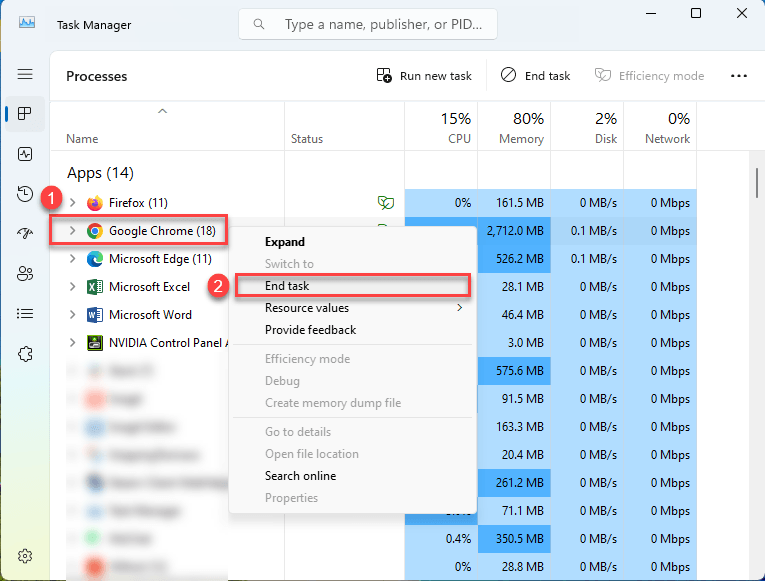
Убедитесь, что Chrome не запущен в фоновом режиме
Чтобы узнать, какие программы запущены в фоновом режиме и как принудительно закрыть Chrome, следуйте инструкциям ниже.
Windows
- Нажмите Ctrl + Alt + Delete.
- Выберите Диспетчер задач.
- На вкладке «Процессы» выберите Google Chrome или chrome.exe.
- Нажмите Завершить задачу.
macOS
- Нажмите + Option + Esc.
- Выберите Google Chrome Завершить.
Перезапустите компьютер
Ошибки в Chrome могут возникать из-за других работающих программ или процессов. Попробуйте перезапустить компьютер, чтобы решить проблему.
Переустановите Chrome
Если эти советы не помогли, удалите и снова установите Chrome. Переустановка может решить проблемы с поисковой системой, всплывающими окнами и обновлениями, а также устранить неполадки, из-за которых Chrome не открывается.
Ничего не помогло? Включите отправку отчетов о сбоях, чтобы мы могли изучить проблему. Также рекомендуем посетить справочный форум Chrome.
Эта информация оказалась полезной?
Как можно улучшить эту статью?
Google Chrome is undoubtedly the most popular web browser. However, people from all over the world face various errors related to it. If Google Chrome is set as your default browser then you would be familiar with the following errors. “Class not Registered,” “Chrome not Opening,” “chrome not Working,” or “Google Chrome isn’t responding after Windows 10 Fall Creators Update” is some of the frequently occurring Chrome related errors. After the Windows 10 update or the Windows 10 Creators Update, it is possible that your Google Chrome crashes and doesn’t work.
These are the top 5 ways by which you can get Google Chrome to run like before so that you can begin browsing your favorite websites.
Sometimes when you upgrade your Operating System to the higher version, the other programs and apps on your PC ail to work due to compatibility issues. The Windows system thus doesn’t support the old apps, programs, and software. So the first thing that you can always try is to upgrade the error causing program, Google Chrome in this case.
Method 1- Reboot your System in Safe Mode and Clear Cache and Cookies
You can solve the Google Chrome error by entering into the Safe Mode.
Step 1: Click on start. Then click on the Power icon.
Step 2: Now press the Shift key and simultaneously click on the Restart option.
Step 3: Follow the given route- Troubleshoot> Advanced Options> Startup settings.

Step 4: Now click on the Restart link and then press the F5 key. This will enable the Safe Mode with Networking.

Now you will be able to option your PC or laptop in Safe Mode. After completing these steps, hop n to clearing the cookies and cache of the concerned program.
Step 5: Next launch Google Chrome on your system.
Step 6: Firstly back up all your important bookmarks and accounts. Then press the Shift+ Ctrl+ Del key together.
Step 7: From the new window that opens, clear the cache and cookies and the browsing history of your Chrome.

If this method doesn’t work, then move on to the next one.
Method 2- Troubleshoot the Error by Adding Reliable Multicast Protocol
If the above method doesn’t help you to access the Google Chrome browser, check the network configurations of your system.
Step 1: Launch the run command prompt by pressing the Windows icon key +R. Then type ncpa.cpl in the box and hit the Enter tab.
Step 2: Click on the Network Connections. Right click on the currently running network adapter and select Properties option.
Step 3: In the Networking tab, scroll down to locate Microsoft Network Adapter Multiplexor Protocol. And then click on the Install option.
Step 4: In the next window highlight the Protocol button and then Add it by clicking on the Add option present below.
Step 5: Now highlight- Reliable Multicast Protocol and press Ok.

That’s it. Apply the final changes by pressing the Ok option and restart your system. Try launching the browser to check if the issue persists.
Method 3- Modify the Google Chrome Browser Properties
If the above two methods were of no use to resolve the Google Chrome not working on your system, then try to modify some of its settings. This method is appropriate for those who have to open Chrome with Windows Security Shield mark. So follow the steps given below to open the .exe or shortcut file of the browser to run it as an Administrator.
Step 1: Right-click on the Google Chrome icon and click on Properties.
Step 2: Now select the compatibility tab and click on Change Settings for all users option.
Step 3: Next in the compatibility mode, uncheck the box against the Run this program in Compatibility mode.
Step 4: Also under the Settings, make sure to check the Run this program as an Administrator option.
Step 5: Apply all the changes made by clicking on Apply. Then click OK.

Step 5: Lastly close the Google Chrome Properties window by click on the Ok tab.
Open the browser to check on the problem. Still stuck on the issue, we have one more method that you can try.
Also Read: Fix Steam Games Not Launching on Windows 10
Method 4- Turn Off/ Disable Hardware Acceleration
Hardware Acceleration can also stop Google Chrome from working, so turn it off and check for the error.
Step 1: Open Google Chrome and type in the Address bar- chrome://settings. Press Enter and the settings of the browser will open.
Step 2: Locate Show Advanced Settings and click on it. Now click on Settings.

Step 3: Uncheck the box for the Use hardware acceleration when an available option.

Step 4: Besides the option, you will observe the Restart link. Click on it.

After restarting your system, boot it in normal mode.
We hope that with the help of these methods you can now fix the issue. If you have any query, feel free to share with us in the comments section.
If you’re a Windows 10 user, chances are that you’re familiar with Google Chrome – one of the most popular web browsers around. However, there may come a time when you experience issues that leave you frustrated and unsure of what to do next. Whether Chrome won’t open, crashes unexpectedly, or fails to load pages, these problems can hinder your productivity and online experience. In this comprehensive guide, we will explore the common reasons why Chrome may not be working in Windows 10 and provide effective solutions to help restore its functionality.
Understanding Chrome Issues in Windows 10
Before diving into troubleshooting steps, it’s important to understand some common scenarios where Chrome might fail to operate effectively on Windows 10. These scenarios can range from connectivity issues to corrupted files. Recognizing the root cause of your problem can streamline the fixing process.
Common Symptoms of Chrome Malfunctions
You might find that Chrome exhibits one or more of the following symptoms:
- Chrome won’t open: The browser does not launch when you click on its icon.
- Crash upon launch: Chrome opens briefly and then crashes.
- Pages won’t load: You receive error messages like “Aw, Snap!” or “This site can’t be reached.”
- Slow performance: Chrome takes a long time to load pages or responds sluggishly to user commands.
- Frequent freezing: The browser freezes while browsing or performing tasks.
Understanding what specific issue you are facing can help in identifying appropriate solutions.
Common Causes of Chrome Not Working on Windows 10
Identifying the cause behind Chrome’s malfunction is essential. Some prevalent causes include:
1. Software Conflicts
Different software applications can conflict with Chrome. If you’ve recently installed new software or updates, this might cause the browser to behave unexpectedly.
2. Corrupted User Profile
Sometimes, user profiles can become corrupted, affecting the browser’s performance. This can lead to issues like crashing or failure to load web pages.
3. Outdated or Corrupted Installation
An outdated or corrupted version of Chrome can lead to numerous problems. If your version is not updated or if the installation files are corrupted, it is likely to face interruptions.
4. Hardware Acceleration Issues
While hardware acceleration improves performance by offloading processing tasks to your machine’s GPU, it can also cause problems if your hardware or drivers aren’t up to date or compatible.
5. Malware or Virus Infections
Malware can seriously affect your browser’s performance. If your system is compromised, Chrome may exhibit unpredictable behavior, including slowdowns or shutdowns.
6. Network Connectivity Problems
Sometimes, network issues are the reason behind Chrome’s failure to load pages. Strong signals may not guarantee stable connectivity; lots of variables come into play.
Troubleshooting Steps to Get Chrome Working Again
Once you understand the possible causes of your Chrome issues, you can follow these troubleshooting steps to resolve them effectively:
1. Restart Your Computer
This step may sound simple, but restarting your system can clear temporary files and reset your operating environment.
2. Update Google Chrome
An outdated version of Chrome can lead to various issues.
- Open Chrome.
- Click on the three dots in the upper-right corner.
- Select “Help” > “About Google Chrome.”
- Chrome will automatically check for updates and install them if available.
3. Disable Hardware Acceleration
If you suspect hardware acceleration is causing problems, you can disable it:
- Open Chrome and go to “Settings.”
- Scroll down and click on “Advanced.”
- Under “System,” toggle off “Use hardware acceleration when available.”
- Restart Chrome.
4. Clear Browsing Data
Excess data can slow Chrome down or cause it to crash. Clearing browsing data can solve several issues.
- Open Chrome.
- Click on the three dots > “More tools” > “Clear browsing data.”
- Select a time range and the types of data you want to clear, then click “Clear data.”
5. Create a New User Profile
If your user profile is corrupted, creating a new profile may resolve your issues:
- Open the Start menu and type “Run.”
- Enter: %LOCALAPPDATA%\Google\Chrome\User Data\
- Locate the “Default” folder and rename it to “Backup Default.”
- Restart Chrome, and a new profile will be created automatically.
6. Check for Malware or Viruses
Run a scan with your antivirus software to check for malware. You may also consider using tools like the Malwarebytes Anti-Malware scanner to check for potential threats.
7. Reinstall Chrome
If all else fails, reinstalling Chrome might be necessary. This process is simple:
- Press the Windows key and type “Apps & features.”
- Find Google Chrome in the list and click “Uninstall.”
- After uninstalling, download the latest version from the official Chrome website and install it.
Advanced Troubleshooting Techniques
If the basic troubleshooting steps haven’t resolved your Chrome issues, consider trying a few advanced techniques.
1. Reset Chrome to Default Settings
Resetting Chrome can help eliminate issues originating from configuration changes:
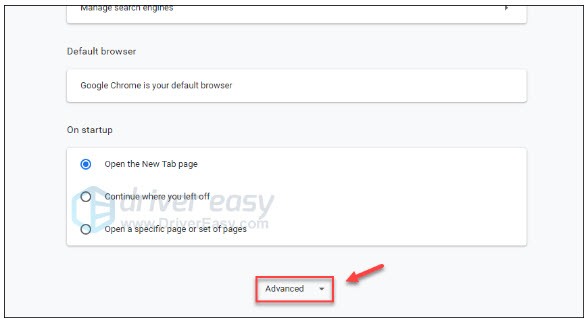
- Open Chrome > “Settings.”
- Scroll to the bottom and click “Advanced.”
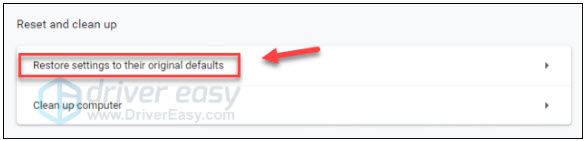
- In the “Reset and clean up” section, select “Restore settings to their original defaults.”
2. Disable Extensions and Add-ons
Extensions can sometimes interfere with browser performance. Disable all extensions to see if the issue persists:
- Go to “More Tools” > “Extensions.”
- Toggle off all extensions and restart Chrome.
3. Change DNS Settings
Flushing the DNS cache and changing your DNS settings to use Google’s public DNS might help:
- Open Command Prompt as an administrator.
- Type
ipconfig /flushdnsand press Enter. - Right-click on the network icon in the system tray, select “Open Network & Internet settings,” and then “Change adapter options.”
- Right-click on your network connection and select “Properties.”
- Double-click “Internet Protocol Version 4 (TCP/IPv4)” and enter the following DNS servers:
- Preferred: 8.8.8.8
- Alternate: 8.8.4.4
4. Monitor Chrome’s Resource Usage
Sometimes, background processes can consume unnecessary resources. Use the Task Manager for this:
- Press Ctrl + Shift + Esc to open Task Manager.
- Click on the “Processes” tab and check if Google Chrome is using excessive resources, then close any problematic processes.
When to Seek Professional Help
If you’ve tried all the aforementioned tips and your Chrome is still not functioning correctly, it might be time to seek help. Sometimes, underlying system issues may require a professional’s assistance.
In extreme cases, paying attention to any additional signs or system errors connected to Chrome can provide more insights. Reporting issues to Google support can also prompt fixes in future updates.
Conclusion
Encountering issues with Google Chrome on your Windows 10 system can be irritating, but you don’t have to let it negatively impact your browsing experience. By understanding common issues and taking appropriate troubleshooting measures, most problems can be resolved quickly and efficiently. From updating the application to checking for malware, follow this guide as your roadmap to restore functionality. Should issues persist, don’t hesitate to seek further assistance. With persistence, you can enjoy smooth and uninterrupted browsing on Google Chrome once again.
What are the common reasons Chrome won’t open on Windows 10?
There are several common reasons why Chrome may not open on Windows 10. One frequent issue is a corrupted user profile, which can prevent the browser from launching correctly. Software conflicts, such as security software or other browser extensions, can also interfere with Chrome’s functionality. Additionally, outdated software, either Windows or the Chrome browser itself, can lead to compatibility issues that prevent the application from starting.
Another reason could be insufficient system resources, particularly if too many applications are running simultaneously. Furthermore, issues with the Chrome installation, such as missing files or improper installation, can stop it from functioning. It’s essential to troubleshoot these possibilities systematically to identify the root cause of the problem.
How can I fix Chrome not opening on Windows 10?
To fix Chrome not opening on Windows 10, start by checking your task manager for any active Chrome processes. Sometimes, previous instances of Chrome may still be running, preventing a new window from opening. If you find any active Chrome processes, end those tasks and then attempt to relaunch the browser. This simple action can often resolve the issue.
If the problem persists, you can try resetting Chrome settings to its default. This step involves going to Chrome’s settings, scrolling down to the “Advanced” section, and selecting “Restore settings to their original defaults.” This can help eliminate issues caused by misconfigured settings or unwanted extensions, allowing Chrome to function correctly again.
What should I do if Chrome is crashing frequently on Windows 10?
If Chrome is crashing frequently on Windows 10, there are several steps you can take to troubleshoot the issue. First, try updating Chrome to the latest version. Open the browser, go to the menu, and select “Help” followed by “About Google Chrome.” If an update is available, it will be automatically downloaded and installed. An outdated version of Chrome may contain bugs that could lead to crashes.
Additionally, you can check for conflicting software. Some third-party applications, particularly security software, may interfere with Chrome’s operation. Temporarily disabling these applications can help you determine if they are the culprits. If this resolves the situation, consider adjusting the settings of your security software or finding alternatives that play well with Chrome.
How can I clear the cache and cookies in Chrome?
Clearing the cache and cookies in Chrome can resolve many browsing issues. To do this, open Chrome and click on the three-dot menu in the upper right corner. From there, navigate to “More tools” and select “Clear browsing data.” You’ll have options to select the time range and the types of data you want to clear. Selecting “Cookies and other site data” and “Cached images and files” is recommended, with the “All time” option selected for the most thorough cleaning.
After you’ve made these selections, click on the “Clear data” button. This action will log you out of most websites, so be sure to know your passwords beforehand. Regularly clearing your cache can help improve Chrome’s performance and resolve issues related to loading and formatting of web pages.
Why is Chrome running slow on Windows 10?
If Chrome is running slowly on Windows 10, the first thing to check is your extensions. Some extensions may consume a lot of resources or conflict with one another, leading to sluggish performance. To identify if this is the case, you can disable your extensions one by one by going to “More tools” and then “Extensions.” After disabling each extension, test Chrome’s speed to see if performance improves.
Another factor might be the system itself. If your computer is low on memory or processing power, this can significantly affect Chrome’s speed. Closing unused tabs, limiting background applications, or even upgrading your RAM could help. Additionally, regularly updating Windows can ensure that your operating system remains compatible with Chrome’s latest features, which can contribute to overall performance.
How do I reset Chrome to its default settings?
Resetting Chrome to its default settings can be a useful troubleshooting step if you are facing persistent issues. To do this, open Chrome and go to the settings menu. Scroll down to the bottom and click on “Advanced,” then find the “Reset and clean up” section. Click on “Restore settings to their original defaults.” A prompt will appear to confirm the action, and upon selecting “Reset settings,” Chrome will revert to its original state while keeping your bookmarks and saved passwords intact.
It is important to note that a reset will disable any extensions you have installed and clear temporary data, which might help eliminate faults that are causing problems. Taking this step can often resolve issues stemming from misconfigurations or conflicting settings, allowing for a smoother browsing experience once again.
Can antivirus software prevent Chrome from working?
Yes, antivirus software can potentially prevent Chrome from working correctly on Windows 10. Some antivirus programs may mistakenly identify Chrome’s legitimate processes as threats, leading to blocked access. This interference can manifest as issues with launching the browser, slow performance, or even complete disallowance from accessing certain websites. It’s crucial to configure your antivirus settings to ensure that they don’t inadvertently disrupt Chrome’s functionality.
If you suspect that your antivirus might be causing problems, try temporarily disabling it and see if Chrome behaves normally. You can also add Chrome to the exceptions list of your antivirus software, thus allowing it full functionality without compromising your protection. Always remember to re-enable your antivirus program after testing to maintain your system’s security.
What should I do if Chrome is unresponsive or freezes frequently?
If Chrome is unresponsive or often freezes, start by checking for available updates. Open Chrome and go to the menu, then click “Help,” followed by “About Google Chrome.” If there’s an update ready, Chrome will automatically download it. Keeping Chrome updated is crucial for optimal performance and stability, as newer versions typically include fixes for common bugs and issues.
Another step is to clear your browsing data, including cache and cookies, which can often become overloaded and cause the browser to hang. You can accomplish this by going to the three-dot menu, selecting “More tools,” and then “Clear browsing data.” This can free up resources and help improve Chrome’s responsiveness on Windows 10, making for a smoother browsing experience overall.
Chrome, like many others apps on Windows 10, makes some changes to the Windows registry when you install it. These changes are essential for Chrome to run. The browser has a neat reset feature that can reset everything back to their default value should anything break. That said, the reset doesn’t appear to fix everything. For some Windows 10 users Chrome not working has to do with a registry problem.
If you’re constantly getting ERR_TIMED_OUT errors in Chrome even though other browsers work fine, here’s what you need to do.
Before you apply this particular fix, you need to check if it will work for you. Open Task manager and go to the Services tab. Sort the service by name i.e., alphabetical order and look for the CryptSvc service. Right-click it and select ‘Restart’ from the context menu. After that, check if Chrome is working or not. If it is, then this fix is going to fix Chrome long term.
Open the Windows registry editor by tapping the Win+R keyboard shortcut. It will open the run box. Type regedit and tap Enter. You’re going to need admin rights to edit the registry.
Go to the following location;
HKEY_CURRENT_USER\Software\Microsoft\SystemCertificates\Root
Before you do anything, back up the Root key. Next, right-click the ProtectedRoots key, and select Permissions from the context menu. In the window that opens, select your user, and enable ‘Full Control’ for it. Take another back up of the Root key.
Open Task Manager again and stop the CryptSvc service. Next, delete the Root key from this location.
HKEY_CURRENT_USER\Software\Microsoft\SystemCertificates
Restart Windows 10, and your problem ought to be fixed. If you still have problems with Chrome, you should reset it. Backup your Chrome profile folder first. To reset Chrome, open it and click the more options button at the top right. From the menu, select Settings. Scroll to the bottom of the Settings page and click Advanced. Again, scroll all the way to the bottom. You will see an option called ‘Restore settings to their original defaults’.
Confirm that you want to reset Chrome. The reset will not delete you history, bookmarks, or passwords however, since you’re dealing with a buggy Chrome to begin with, make sure you take a backup of your profile folder.
This is an old bug that plagued users on Windows 10 build 10.0.17134.376 and it has been acknowledged on Google’s own help forums.
If you’re getting the ERR_NAME_NOT_RESOLVED error in Chrome, there’s a fix for that too.

Fatima Wahab
Fatima has been writing for AddictiveTips for six years. She began as a junior writer and has been working as the Editor in Chief since 2014.
Fatima gets an adrenaline rush from figuring out how technology works, and how to manipulate it. A well-designed app, something that solves a common everyday problem and looks
Google Chrome is great. It’s easy to use, fast, and stable. But, occasionally, you might run into issues like Google Chrome not opening.
If you’re experiencing this frustrating issue now, take a deep breath and try the fixes below.
Try these fixes:
You may not have to try them all. Just work your way down the list until you find the one that works.
- Restart your PC
- Check if Chrome is already running
- Free up system memory
- Disable your antivirus temporarily
- Hard reset Chrome
- Reset Chrome in safe mode
- Reinstall Chrome
Quick Check: Before trying the fixes below, open Microsoft Edge or Firefox. Can you browse the internet?
- If other browsers work: Follow this guide to fix Chrome.
- If no browsers work: This is likely an internet issue – you may want to explore our Knowledge Base Network Issues page to troubleshoot.
If you’re experiencing Chrome issues, take a deep breath and try the fixes below.
Fix 1: Restart your PC
Sometimes, certain applications running on your computer may conflict with Google Chrome, causing it to fail.
To see if there’re any programs preventing your browser from working correctly, try restarting your PC. A simple reboot wipes away the current state of the software and fixes issues associated with it.
If your browser still won’t open after the reboot, read on and try the next fix.
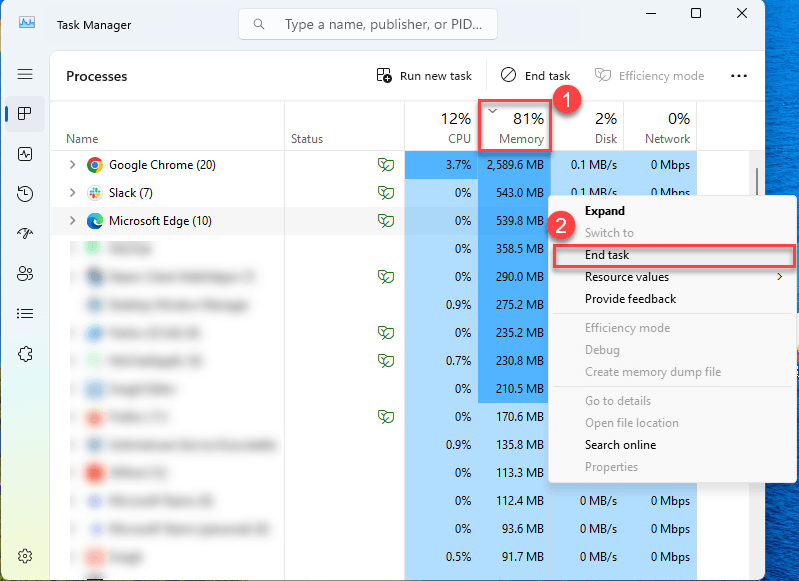
Fix 2: Check if Chrome is already running
Sometimes Chrome might be running in the background without you knowing it. Here’s how to check and force close it:
- On your keyboard, press the Ctrl, Shift, and Esc keys to bring up Task Manager.
- Locate the Google Chrome or chrome.exe processes.
- Right-click each one and click End task.

- Try opening Chrome again and see if Chrome works properly.
Fix 3: Free up system memory
Chrome can be quite demanding on your system resources. If your computer is running low on memory, Chrome might fail to start.
Here’s how to free up some resources:
- Press Ctrl + Shift + Esc to open Task Manager.
- Click on the Memory column to sort by memory usage, then look for programs using lots of memory and close any you don’t need.

Additional steps to optimize memory:
- Close unnecessary programs running in the background
- Pause any active downloads
- If you can open Chrome, remove unused extensions (you can do this later if Chrome won’t open now)
Fix 4: Disable your antivirus temporarily
Your problem is sometimes caused by interference from antivirus software. To see if that’s the problem for you, temporarily disable your antivirus program and firewall and check if the problem persists. (Consult your antivirus documentation for instructions on disabling it.)
If Chrome works properly after you disable the antivirus software, contact the vendor of your antivirus software and ask them for advice, or install a different antivirus solution.
Be extra careful about what sites you visit, what emails you open, and what files you download when your antivirus is disabled.
Fix 4: Hard reset Chrome
In some cases, Chrome not opening issue happens when certain files are damaged or corrupted. To fix it, try clearing your Chrome profile to hard reset the browser. Here is how to do it:
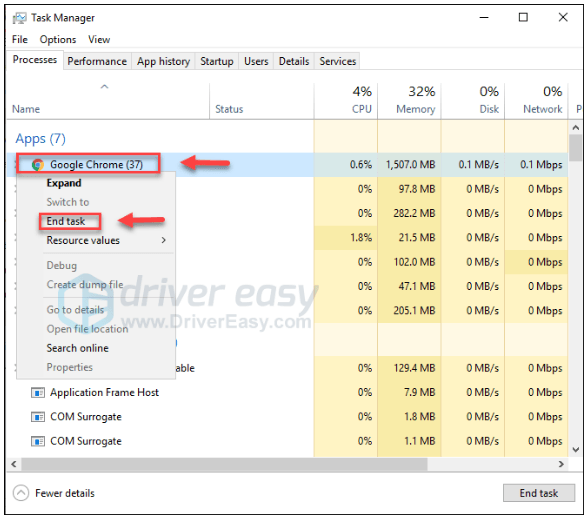
1) On your keyboard, press the Ctrl, Shift, and Esc keys at the same time to open Task Manager.
Verify there is no Chrome-related process running in the background. If there is, right-click the process and select End task.
3) On your keyboard, press the Windows logo key and R at the same time to invoke the Run dialog.
4) Type %USERPROFILE%\AppData\Local\Google\Chrome\User Data in the box and click OK.
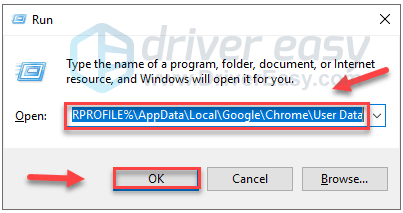
5) Copy the Default folder and place the copy in another location to back it up. Then, delete the original Default folder.
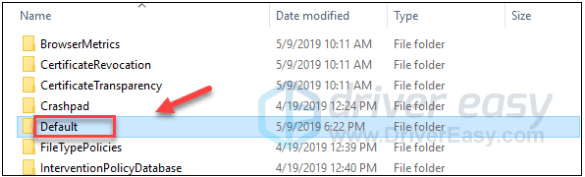
Try opening Chrome to test your issue. If you still can’t launch Chrome properly, don’t worry. Move on to fix 4, below.
Fix 5: Reset Chrome in safe mode
Your issue is also probably caused by improper Chrome settings. If that’s the problem for you, resetting Chrome can help fix it. Follow the instructions below:
Reset Chrome in safe mode
- Boot your PC into safe mode.
Boot your PC into safe mode. (Click to see how to enter safe mode in Windows 10, 7, 8, 8.1, XP, or Vista.)
- Open Chrome, then click the menu button and select Settings.
Open Chrome, then click the menu button and select Settings.
- Click Advanced at the bottom.
Click Advanced at the bottom.

- Select Restore settings to their original defaults.
Select Restore settings to their original defaults.
- Click Reset settings.
Click Reset settings.
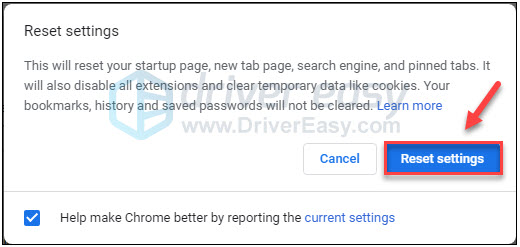
This should fix your issue. If your issue persists, then go ahead with the next fix.
Fix 6: Reinstall Chrome
Flash, updates, or other problems can also prevent Chrome from running correctly. In this case, reinstalling Chrome is very likely the solution to your issue.
If you want to keep your bookmarks, settings, passwords, etc., you would want to make sure you’ve logged into your Google account, and you turn on sync. To do so, go to Settings > Sync and Google service > Manage what you sync. Then, select what information you want to sync with checkboxes, or select Sync everything.
1) On your keyboard, press the Windows logo key. Then, type control and click Control Panel.

2) Under View by, click Category, and then select Uninstall a program.
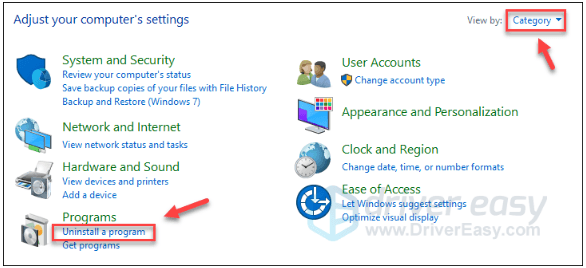
3) Right-click Google Chrome and click Uninstall.
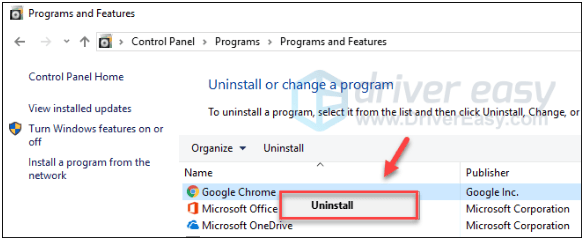
4) Download and install Chrome.
Hopefully, this article helped in resolving your problem. Feel free to leave a comment below if you have any questions and suggestions.
127
127 people found this helpful