
Applies ToWindows 11 Windows 10
Windows 11 позволяет выбрать время и способ получения последних обновлений, чтобы обеспечить бесперебойную и безопасную работу устройства. Если вы не готовы получить рекомендованные обновления, можно временно приостановить загрузку и установку обновлений.
-
Выберите Пуск > Параметры > Центр обновления Windows .
-
Выберите время, на которое вы хотите приостановить работу.
Примечание: По достижении предела приостановки, вам потребуется установить последние обновления, перед тем как вы сможете опять приостановить их скачивание и установку.
Чтобы завершить установку обновлений, необходимо перезагрузить устройство. Если отображается запрос на перезагрузку устройства, но вы не хотите прерывать работу, запланируйте перезагрузку на более удобное время.
-
Выберите Пуск > Параметры > Центр обновления Windows .
-
Выберите Запланировать перезагрузку и укажите удобное для вас время.
Открыть клиентский компонент Центра обновления Windows
Нужна дополнительная помощь?
Нужны дополнительные параметры?
Изучите преимущества подписки, просмотрите учебные курсы, узнайте, как защитить свое устройство и т. д.
What to Know
- Windows 11: Go to Settings > Windows Update > Advanced options.
- Windows 10: Go to Settings > Update & Security > Windows Update > Advanced options.
- We recommend turning on updates for other Microsoft products, and enabling metered connection downloads.
The directions in this article explain how to edit how Windows receives and installs updates. Depending on your version of Windows, this could mean downloading but not installing the updates, notifying you but not downloading them, or even disabling Windows Update completely.
Time Required: Changing how Windows updates are downloaded and installed should only take you a few minutes at most.
Microsoft made changes to the location and wording of Windows Update and its settings almost every time a new version of Windows was released. Below are three sets of instructions for changing/disabling Windows Update: one for Windows 11; one for Windows 10; one for Windows 8, Windows 7, or Windows Vista; and one for Windows XP.
Not sure what version of Windows you’re running? Use the Lifewire System Info Tool to find out:
How to Change Windows Update Settings in Windows 11
The Windows Update settings in Windows 11 didn’t change much from Windows 10, aside from small things like different names for the options and the method you take to get to the settings.
-
Right-click the Start button, and choose Settings. You can also left-click the Start button and search for Settings.
-
Choose Windows Update from the menu on the left.
-
Select Advanced options from the right side.
-
The options here control how Windows 11 will download and install updates for the operating system and, if selected, other software from Microsoft.
I highly recommend that you do the following: turn on Receive updates for other Microsoft products and turn on Download updates over metered connections. All things considered, this is the safest way to go.
-
Changes you make to Windows 11’s Windows Update settings are saved automatically. You can close the Settings window when you’re finished customizing the settings.
Here are more details on all these settings that are available to you in Windows Update for Windows 11:
Receive updates for other Microsoft products: Just as it sounds, you can have Windows Update deliver updates for other Microsoft programs that you have installed, such as Microsoft Office.
Get me up to date: Your PC will restart ASAP so that updates will finish installing as quickly as possible. You’ll get a restart prompt 15 minutes before it happens so that you can save your work.
Download updates over metered connections: You’ll receive automatic updates even if you’re connected to a data-limited network. Most people, especially home users, are on unlimited data plans, so this is only relevant for people on a limited network, like through a mobile data plan.
Notify me when a restart is required to finish updating: A restart prompt will appear when Windows Update is ready to reboot your computer.
Active hours: Change this if Windows is rebooting your computer while you’re using it. Telling Windows that your active hours are, say 9 AM to 5 PM, will force it to not reboot for updates during that time frame. The automatic option will choose the active hours based on your activity.
Delivery Optimization: Set download and upload speed limits to ensure that not all of your network bandwidth is used for updates. You can also allow or deny letting your PC send already-downloaded Windows updates to other devices on your local network.
On the main Windows Update screen are some other options:
Get the latest updates as soon as they’re available: Turn this on to get the latest non-security and feature updates as soon as they become available for your device.
Pause updates: If updates are getting in the way of your computer usage, you can pause them for anywhere from 1 week to 5 weeks. Windows will resume updates after the pause period is up.
Windows Insider Program: This lets you receive early versions of major updates to Windows 11. This is the fastest way to get the newest features as they become available, before everyone else. However, depending on the option you choose after enabling this, you might end up using an unstable version that isn’t fit for public use just yet. This is accessible from the main Windows Update screen.
How to Change Windows Update Settings in Windows 10
Beginning in Windows 10, Microsoft simplified the options available to you regarding the Windows Update process, but also removed some of the finer control you may have enjoyed in earlier versions.
-
Select Start and then choose the settings icon.
-
Choose Update & Security.
-
Choose Windows Update from the menu on the left, assuming it’s not already selected.
-
Select Advanced options.
-
The various settings on this page control how Windows 10 will download and install updates for the operating system, and perhaps other software, from Microsoft.
We highly recommend that you do the following: turn on Receive updates for other Microsoft products when you update Windows, turn on Download updates over metered connections (extra charges may apply), and don’t enable any deferred/pause updates options (if you see them).
-
Changes to Windows Update settings in Windows 10 are saved automatically once you make them. Once you’re done selecting or deselecting things, you can close the Advanced options window that’s open.
Here are more details on all the «advanced» Windows Update settings that are available to you in Windows 10:
Update notifications: Choose this option to automatically download updates of all kind—security and non-security. You’ll be told when Windows needs to restart to apply them, so that you can prepare by saving work, etc.
There is no official way to turn off automatic updating in Windows 10, nor is there a straightforward way to disable Windows Update altogether.
Here’s what some of that other stuff on the Advanced options screen is for:
Receive updates for other Microsoft products when you update Windows: This is pretty self-explanatory. I recommend checking this option so other Microsoft programs you have installed will get automatic updates, too. (Updates for your Windows Store apps are handled in the Store. Open Settings from the Store and then toggle on or off the Update apps automatically option.)
Pause Updates: Choosing one of these options will stop Windows from updating your computer for several days, up to 35. When that time period is over, Windows Update will be forced to install the newest updates before you can pause them again.
Defer upgrades: There are two deferred update options in Windows 10, letting you delay feature updates and/or quality updates. Doing so lets you wait several days or months before these updates will automatically install. Deferring upgrades isn’t supported in Windows 10 Home.
On the primary Windows Update screen is another option:
Change active hours: If Windows is restarting for updates when you’re using your computer, you can adjust this setting to tell Windows when you’re on your computer, to make sure that updates don’t force-restart during that time. Pick the automatic option and Windows will choose the active hours based on your activity.
Depending on the version of Windows 10 you’re running, you might also see the options listed below.
Choose the branch readiness level: Windows Update lets you choose when to install updates. You can pick Semi-Annual Channel (Targeted) which means the update is ready for most people, or Semi-Annual Channel which refers to updates that are ready for widespread use in organizations.
Choose how updates are delivered: These options, if you see them, allow you to enable or disable the downloading, as well as the uploading, of Windows Update related files around your local network or even the entire internet. Participating in the Updates from more than one place program helps speed up the Windows Update process in Windows 10.
Get insider builds: If you see it, it allows you to sign up to get early versions of major updates to Windows 10. When enabled, you’ll have Fast or Slow options, indicating how soon after these Windows 10 test versions are made available that you’ll get them.
How to Change Windows Update Settings in Windows 8, 7, & Vista
Microsoft no longer supports Windows 8.1, Windows 8, Windows 7, or Windows Vista. If you’re still running one of those versions of Windows, you have nothing to worry about because there won’t be any updates.
These versions of Windows have very similar Windows Update settings, but I’ll call out any differences as we walk through the process.
-
Open Control Panel. In Windows 8, the WIN+X Menu is the quickest way, and in Windows 7 & Vista, check the Start menu for the link.
-
Select System and Security, or just Security in Windows Vista.
If you’re viewing the Classic View, Large icons, or Small icons view of Control Panel, choose Windows Update instead and then skip to Step 4.
-
Choose Windows Update from the System and Security window.
-
Select Change settings on the left.
-
The settings you see on the screen right now control how Windows Update will look for, receive, and install updates from Microsoft.
You can customize the time that downloaded updates are installed. In Windows 8, this is behind the Updates will be automatically installed during the maintenance window link, and in Windows 7 & Vista, it’s right there on the Windows Update screen.
-
Choose OK to save the changes. Feel free to close any open windows related to Windows Update.
Here’s a bit more on all of those options you have:
Install updates automatically (recommended): Choose this option to have Windows Update automatically check for, download, and install important security patches.
Download updates but let me choose whether to install them: Choose this to have Windows Update automatically check for and download important updates but not install them. You’ll have to explicitly choose to install the updates either from Windows Update or during the next shutdown process.
Check for updates but let me choose whether to download and install them: With this option, Windows Update will check for and notify you of available updates but you’ll need to manually approve the download and installation of them.
Never check for updates (not recommended): This option disables Windows Update completely in Windows 8, 7, or Vista. When you choose this, Windows Update won’t even check with Microsoft to see if important security patches are available.
Here are what some of those other checkboxes mean, not all of which you’ll see, depending on your version of Windows and how your computer is configured:
Give me recommended updates the same way I receive important updates: This option gives Windows Update permission to treat patches that Microsoft «recommends» the same way as patches thought to be «critical» or «important,» and download and install them as you’ve selected in the drop-down box.
Allow all users to install updates on this computer: Check this if you have other, non-administrator accounts on your computer that actually get used. This will let those users install updates, too. However, even when unchecked, updates installed by an administrator will still get applied to those user accounts, they just won’t be able to install them.
Give me updates for other Microsoft products when I update Windows: Check this option, which is a bit wordier in Windows 7 & Vista, if you own other Microsoft software and you want Windows Update to handle updating those as well.
Show me detailed notifications when new Microsoft software is available: This is pretty self-explanatory—check it if you want to get notifications, via Windows Update, when Microsoft software you don’t have installed is available for your computer.
How to Change Windows Update Settings in Windows XP
Microsoft ended support for Windows XP many years ago. There will be no more updates. For your archives, here’s how it worked back when they did still send updates.
Windows Update is more an online service than an integrated part of Windows XP, but the update settings can be set from within the operating system.
-
Open Control Panel, usually via Start, and then its link on the right.
-
Click Security Center.
If you’re viewing Control Panel in the Classic View, you won’t see this link. Instead, double-click Automatic Updates and then skip to Step 4.
-
Click the Automatic Updates link near the bottom of the window.
-
These four options you see in the Automatic Updates window control how Windows XP gets updated.
I highly recommend that you choose the Automatic (recommended) option and the everyday choice from the drop-down that appears underneath, along with a time you’re not using your computer.
-
Click OK to save your changes.
Here are more details on what those four choices actually mean for your Windows Update experience in Windows XP:
Automatic (recommended): Windows Update will automatically check for, download, and install updates, with no input from you needed.
Download updates for me, but let me choose when to install them: Updates will be checked for, and downloaded, from Microsoft’s servers, but they won’t be installed until you manually approve them.
Notify me but don’t automatically download or install them: Windows Update will check for new updates from Microsoft, and let you know about them, but they won’t be downloaded and installed until you say so.
Turn off Automatic Updates: This option completely disables Windows Update in Windows XP. You won’t even be told that updates are available. You can, of course, still visit the Windows Update website yourself and check for any new patches.
When to Change Windows Update Settings
Windows Update exists to help make it easy to keep Windows up to date with the latest patches, service packs, and other updates. How easy depends on how Windows Update is configured to download and apply updates.
When you first turned on your new computer or were finishing your Windows operating system install, you told Windows Update how you wanted it to act—a little more automatic or a little more manual.
If your original decision isn’t working out, or you need to change how it works to avoid repeating an auto-update issue, like what happens on some Patch Tuesdays, you can simply adjust how Windows receives and installs updates.
Disabling Windows Update & Turning off Automatic Updates
While it is possible, at least prior to Windows 10, I do not recommend completely disabling Windows Update. At the very least, choose an option where you’re notified of new updates, even if you choose not to have them automatically download or install.
And on that thought…we also do not recommend turning off automatic updating. Letting Windows Update check, download, and automatically install updates is a very good way to make sure you’re protected from being exploited by security issues after they’re discovered. Yes, at least in Windows 8, 7, and Vista, you could compromise by making that critical «install» part up to you, but that’s just one more thing you have to remember to do.
Bottom line: keep it simple by keeping it automatic.
How to Fix Problems Caused by Windows Updates
Imagine a situation when your system administrator or a 3rd party software or a malware disabled/restricted Windows Update settings page. In such situations, you won’t be able to change Windows Update download and installation related settings because all available options would be grayed out or completely removed.
Same thing happened with Windows 10 operating system. Microsoft has disabled customization of Windows Update settings in Windows 10 by removing all options related to Windows Update downloading and installation. They did this because they wanted Windows 10 to automatically download and install all updates and hotfixes. Microsoft didn’t want Windows 10 users to modify Windows Update settings, the company wanted to prevent them from disabling Automatic Updates in Windows 10.
In Windows 10, you can’t change settings of automatically download and install Windows updates in its settings page. Now Windows 10 will automatically download and install new updates without your knowledge and you’ll have no idea when and which updates Windows were installed. If you open Windows Update settings page in Windows 10, you get following screen:

You can see in above screenshot, Windows 10 is showing that available updates will be downloaded and installed automatically.
If you are on a limited bandwidth or slow Internet connection, you may want to change the settings to notify you before downloading and installing the updates so that you can select which updates do you want to install and when.
If you are using Windows 10 and want to be able to change Windows Update settings, this guide will help you.
Today in this article, we are going to tell you methods to remove this restriction and to become able to modify Windows Update download and install related settings. After following these methods you’ll be able to force Windows 10 to notify and ask you before downloading new updates as shown in following screenshot:

You can see in the above screenshot, Windows Update is showing that you’ll be asked to download available updates which means it’ll not download new updates automatically. You’ll be notified about available updates first. Once you click on Download button, Windows will start downloading available updates otherwise not.
Proof: Forcing Windows 10 to Always Notify Before Downloading Updates
Good news is that we can remove this restriction from Windows Update settings using following 2 methods:
- METHOD 1: Using Group Policy Editor (gpedit.msc)
- METHOD 2: Using Registry Editor (regedit.exe)
So without wasting time lets start the tutorial:
METHOD 1: Using Group Policy Editor (gpedit.msc)
1. Press WIN+R keys together to launch RUN dialog box. Now type gpedit.msc and press Enter. It’ll open Group Policy Editor.
2. Now go to:
Computer Configuration -> Administrative Templates -> Windows Components -> Windows Update
3. In right-side pane, look for “Configure Automatic Updates” option.

4. The option would be set to Not Configured. Double-click on it and set it to Enabled.
Now select any of the given options according to your requirements:
- 2 – Notify for download and notify for install
- 3 – Auto download and notify for install
- 4 – Auto download and schedule the install
- 5 – Allow local admin to choose setting

PS: Select the last option “5 – Allow local admin to choose setting” to be able to choose options in drop-down box on Windows Update settings page.
That’s it. Apply changes and open Windows Update settings page. Now you’ll be able to change desired settings.
IMPORTANT NOTE:
After applying changes in Group Policy Editor, open Windows Update page in Settings app. Now click on “Check for updates” button to force Windows 10 to apply your changes. After that the new settings will be applied successfully.
METHOD 2: Using Registry Editor (regedit.exe)
If you are using Windows 10 Home edition, you’ll not be able to run gpedit.msc command because this edition doesn’t come with Group Policy Editor.
If you can’t use or don’t want to use Group Policy Editor, you can take help of Registry Editor for the same task. Just follow these simple steps:
1. Press WIN+R keys together to launch RUN dialog box. Now type regedit and press Enter. It’ll open Registry Editor.
2. Now go to following key:
HKEY_LOCAL_MACHINE\SOFTWARE\Policies\Microsoft\Windows
3. Create a new key under Windows key and set its name as WindowsUpdate
4. Create another new key under WindowsUpdate key and set its name as AU
So the final key path would be:
HKEY_LOCAL_MACHINE\SOFTWARE\Policies\Microsoft\Windows\WindowsUpdate\AU
5. Now select AU key and in right-side pane create a new DWORD AUOptions and set its value to any of following according to your requirements:
- 2 (To notify for download and notify for install)
- 3 (To auto download and notify for install)
- 4 (To auto download and schedule the install)
- 5 (To allow local admin to choose setting)

PS: Set the value of AUOptions to 5 to be able to choose options in drop-down box on Windows Update settings page.
NOTE: If you are using 64-bit edition of Windows, you’ll also need to follow steps 3-5 for following Registry key:
HKEY_LOCAL_MACHINE\SOFTWARE\Wow6432Node\Policies\Microsoft\Windows
6. Close Registry Editor and open Windows Update settings page. Now you’ll be able to change desired settings.
PS: If you are not familiar with Registry editing tasks, we are also providing ready-made Registry script to do the task automatically. Download following ZIP file, extract it and run .REG file. It’ll ask for confirmation, accept it. Restart your computer and Windows will always notify you before downloading new updates:
IMPORTANT NOTE:
After applying changes in Registry Editor, restart your computer. After reboot, open Windows Update page in Settings app. Now click on “Check for updates” button to force Windows 10 to apply your changes. After that the new settings will be applied successfully.
Further Read:
Fixing Windows 10 Automatic Updates Install Problem
[Windows 10 Tip] Disable Automatic Driver Updates Installation via Windows Update
You are here: Home » Troubleshooting Guides » [Windows 10 Tip] Change Windows Update Download and Installation Related Settings
Readers help support Windows Report. We may get a commission if you buy through our links.
Read our disclosure page to find out how can you help Windows Report sustain the editorial team. Read more
Windows 10 has changed many things, and one of those things is the Windows Update section and the dedicated settings. But honestly, they are more streamlined and optimally placed than before, making things all the easier.
So, while updating Windows remains the same, managing or changing the settings is now relatively easier. But for those still unsure about things, here is all you need to know about the Windows 10 update settings.
What are the changes to Windows 10 update settings?
1. Updates are not accessible from the Control Panel anymore
Maybe one of the biggest changes is that now you cannot access Windows Update from Control Panel. Instead, the only way to access Windows Update settings on Windows 10 is to use the Settings app and navigate to Update & Security section.
With Windows 10, all updates are installed automatically, and when you visit the Windows Update section, you’ll only find the Check for updates button that locates updates, and if any are available, it downloads them automatically.
2. Windows now download updates automatically
In addition, Windows 10 will also check for updates in the background and download them automatically.
This means that you won’t be able to select individual updates. Instead, you’ll automatically download all of the updates from security updates, optional updates to driver updates.
We should also mention that Windows Update won’t download updates on metered connections, so it won’t use your mobile data. Instead, it will download updates once you connect to a stable Wi-Fi network.
However, in order to prevent Windows Update from downloading updates, you have to set your current connection as metered.

We also have to mention that Windows 10 Professional users will have the option to defer upgrades under the Advanced options section.
They will still get all the updates like Home users, but their updates might be delayed until they have been tested for some time by Home users.
Under the Advanced options, you can choose how updates are installed. You can choose Automatic, and Windows will download updates automatically, install them, and schedule a reboot when you’re not using your PC. You can also schedule a restart that will allow you to set a reboot at a specific time.
- Windows 11 24H2 is now broadly available, but there’s a catch
- Windows 11 will soon add ‘Advanced’ settings page with lots of useful options
3. Peer-to-peer downloads
One new feature that Microsoft has introduced with Windows 10 is peer-to-peer download for updates.
For example, if you have multiple PCs in your network, you can choose to download updates directly from them and speed up the download process.
In addition, your PC will both send and receive updates from other Windows 10 computers over the Internet, but if you don’t want to send and receive updates from other computers on the Internet, you can turn this option off.
4. View history and uninstall updates
If, for some reason, you have issues with your PC after installing an update, you have the option to view your update history under the Advanced options.

You’ll see the list of updates there, but you can also uninstall an update if it’s causing any problems.
5. Updates remain unchanged after a reset
Probably one of the most useful features of Windows Update is the ability to keep your updates after you reset your PC.
Windows 10 comes with a PC Reset feature that will perform a clean install of Windows 10, but now you can keep your updates and won’t have to download all updates again.
That’s it! There are all the Windows 10 update settings and features you should know about! And by now, managing or changing these should be much easier.
Before you leave, find out how to fix Windows update errors and effortlessly install the latest version.
For any other queries or to share your feedback, drop a comment below.
Ivan Jenic
Windows Hardware Expert
Passionate about all elements related to Windows and combined with his innate curiosity, Ivan has delved deep into understanding this operating system, with a specialization in drivers and driver troubleshooting.
When he’s not tackling diverse driver-related problems, Ivan enjoys watching good movies and spending time hiking with his family and friends.
Microsoft выпускает новые обновления безопасности для своих продуктов как минимум один раз в месяц. В большинстве случаев служба Windows Update прекрасно справляется с автоматическим получением и установкой обновлений Windows. Также вы можете вручную найти, скачать и установить актуальное кумулятивное обновление безопасности для вашей редакции и версии Windows. Например, на компьютерах с отключенной службой wususerv, в изолированных от интернета сетях (если у вас не используется WSUS сервер, где можно вручную управлять тестированием и одобрением обновлений Windows), в локальной сети с лимитным подключением (metered connection) и т.д.
Содержание:
- Узнать дату установки последних обновлений Windows
- Как найти и скачать последние обновления безопасности для вашей версии Windows?
- Ручная установка кумулятивных обновлений в Windows
- Ручное обновление билда Windows 10 (Feature Update)
Каждый второй вторник месяца Microsoft выпускает новые обновления для всех поддерживаемых редакций Windows (исправления для особо критичных уязвимостей могут выпускаться быстрее, не дожидаясь этой даты. Также имейте в виду, что в Windows используется кумулятивная модель обновлений. Это означает, что для обновления Windows достаточно установить только один, последний, кумулятивный пакет безопасности.
Узнать дату установки последних обновлений Windows
Проверьте дату установки последних обновлений на вашем компьютере с помощью PowerShell команды:
gwmi win32_quickfixengineering |sort installedon -desc
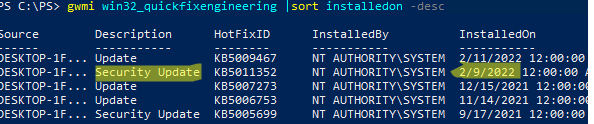
Source Description HotFixID InstalledBy InstalledOn
PCname1 Security Update KB5011352 NT AUTHORITY\SYSTEM 2/9/2022 12:00:00 AMН
В данном случае видно, что последний раз на этом компьютере обновление безопасности устанавливалось 9 февраля 2022 года.
Так же вы можете вывести историю установки обновлений с помощью командлета
Get-WUHistory
из модуля PSWindowsUpdate:
Get-WUHistory|Where-Object {$_.Title -match "KB*"} |Sort-Object date -desc
Затем вам нужно узнать версию и номер билда вашей Windows. Воспользуйтесь командой:
Get-ComputerInfo | select WindowsProductName, WindowsVersion, OsHardwareAbstractionLayer, OsArchitecture
WindowsProductName WindowsVersion OsHardwareAbstractionLayer, OsArchitecture
Windows 10 Pro 2009 10.0.19041.1566 64-bit

В моем случае мне нужно скачать последние обновления безопасности для Windows 10 20H2 x64.
Как найти и скачать последние обновления безопасности для вашей версии Windows?
Вы можете вручную скачать последние обновления для продуктов Microsoft из каталога обновлений Microsoft Update Catalog — https://www.catalog.update.microsoft.com/Home.aspx. В каталоге вы можете найти обновления для всех поддерживаемых версий Windows (также поддерживается прямой импорт обновлений через консоль WSUS). Главная проблема, что в каталоге отсутствует удобная система поиска. Если вы не знаете номер KB, который вам нужно установить, найти и скачать пакет с обновлением довольно трудно.
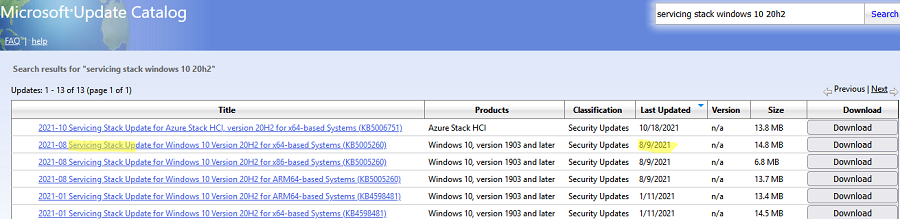
Рассмотрим, как сформировать правильный запрос для поиска обновлений для вашей редакции Windows в каталоге обновлений Microsoft. Статья пишется 9 марта 2022 года, соответственно последние обновления безопасности были выпушены вчера, 8 марта (второй вторник месяца). Для поиска обновлений безопасности для Windows 10 20H2 x64 за март 2022 года, воспользуйтесь таким поисковым запросом, который нужно вставить в поисковую строку в верхнем правом углу:
windows 10 20h2 x64 3/%/2022

Каталог Microsoft Update вернул список из 3 обновлений.
Как решить какие из этих обновлений нужно скачать и установить? Конечно, можно скачать и установить вручную все эти обновления, но можно сэкономить время. Т.к. Microsoft перешла на кумулятивные обновления, вам достаточно скачать и установить последнее Cumulative Update для вашей системы.
В моем случае доступно одно большое кумулятивное обновление для Windows 10:
- 2022-03 Cumulative Update for Windows 10 Version 20H2 for x64-based Systems (KB5011487), Windows 10 version 1903 and later, Security Updates, 3/7/2022 — 655.6 MB
Щелкните по названию обновления безопасности KB5011487. В открывшемся окне с информацией об обновлении перейдите на вкладку Package Details. На этой вкладке видно какие обновления заменяет данное обновление (This update replaces the following updates:), и каким обновлением заменяется в свою очередь оно (This update has been replaced by the following updates).
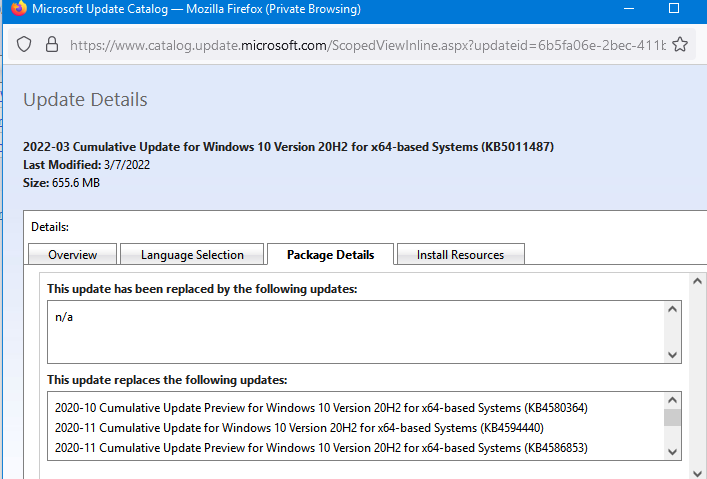
Как вы это обновление ничем не заменяется: This update has been replaced by the following updates: n/a. Значит это самое последнее и актуальное кумулятивное обновление безопасности для вашей версии Windows 10.
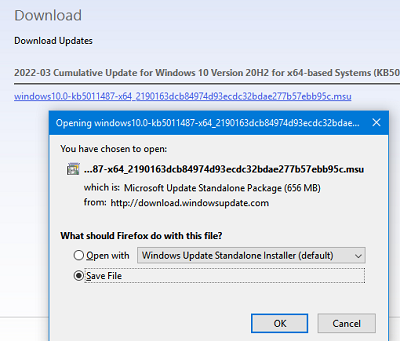
Нажмите на кнопку Download, в открывшемся окне появится прямая ссылка на загрузку MSU файла обновлений. Скачайте файл и сохраните его на диск.
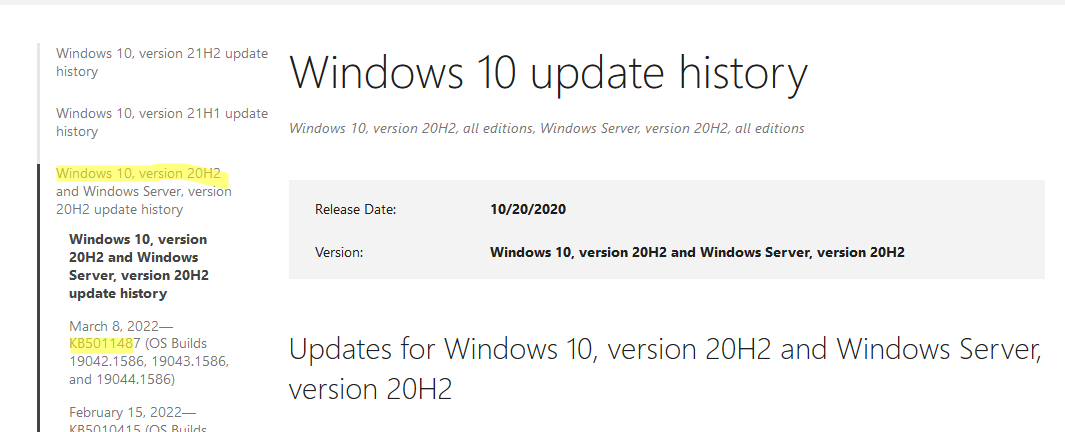
Также вы можете найти номер KB актуального кумулятивного обновления для вашей версии Windows 10 с помощью страницы https://support.microsoft.com/en-us/topic/windows-10-update-history-7dd3071a-3906-fa2c-c342-f7f86728a6e3.
В списке слева выберите вашу версию Windows 10 (в моем примере это Windows 10 20H2), затем обратите внимание на список In this release. Самая первая запись ссылается на статью базы знаний для последнего кумулятивного обновления Windows этой редакции. В нашем примере это March 8, 2022—KB5011487 (OS Builds 19042.1586, 19043.1586, and 19044.1586). Именно это обновление мы и скачали согласно методике выше.
Затем скачайте последнее доступное обновление служебного стека Windows 10 (SSU — Servicing Stack Updates). Это обновление также можно найти в Windows Update Catalog по ключевой фразе:
servicing stack windows 10 20h2
Обязательно установите Servicing Stack Update до установки накопительного обнолвения безопасности Windows.
C марта 2021 года, Microsoft перестала выпускать отдельные обновления SSU для билдов Windows 10 2004 и старше. Теперь они интегрируются в последнее кумулятивное обновление LCU (Latest Cumulative Update).
Скачать файлы обновлений Windows с помощью PowerShell
Для скачивания файлов MSU обновлений из Microsoft Update Catalog можно использовать командлет Save-KBFile из модуля KBUpdate (KB Viewer, Saver, Installer and Uninstaller) — https://github.com/potatoqualitee/kbupdate
Установите модуль из PowerShell Gallery:
Install-Module kbupdate -Scope CurrentUser
Для загрузки определенных файлов обновлений выполните команду PowerShell:
Save-KBFile -Name KB5011487, 5005260 -Architecture x64 -Path C:\Updates
Ручная установка кумулятивных обновлений в Windows
После того, как вы скачали MSU файл с актуальным кумулятивным обновлением для вашей редакции Windows 10, вы можете его установить.
Щелкните дважды по скачанному msu файлу и следуйте шагам мастера автономного установщика обновлений Windwows.
После окончания установки пакета обновлений нужно перезагрузить компьютер (если после установки обновления вы наблюдаете проблемы с работой ОС или приложений, вы можете удалить его).
Также вы можете установить обновление Windows из командной строки в тихом режиме с помощью утилиты wusa.exe (Windows Update Standalone Installer). Следующая команда установит указанное обновление в тихом режиме и отложит автоматическую перезагрузку системы после завершения установки:
wusa C:\updates\windows10.0-kb5011487-x64_2190163dcb84974d93ecdc32bdae277b57ebb95c.msu /quiet /norestart
Ручное обновление сигнатур Windows Defender
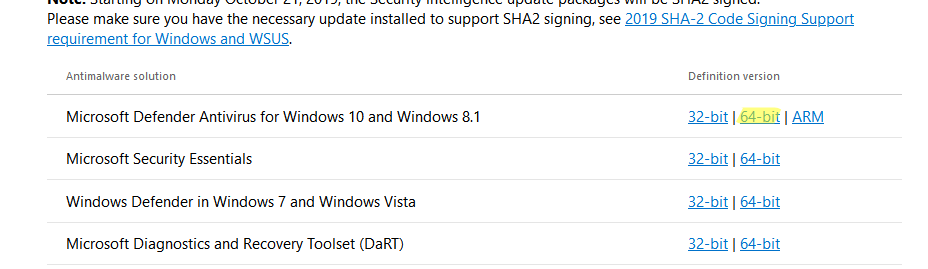
Если на вашем устройстве Windows включен встроенный Windows Defender Antivirus, вы можете вручную обновить его сигнатуры. Обновление с новым набором сигнатур можно скачать с Microsoft Update Catalog, либо (проще) со страницы https://www.microsoft.com/en-us/wdsi/defenderupdates#manual.
Скачайте файл офлайн установки для вашей версии Window. Например, Microsoft Defender Antivirus for Windows 10 and Windows 8.1 64-bit.
Запустите и установите файл
fpam-fe.exe
для обновления антивирусных баз.
Ручное обновление билда Windows 10 (Feature Update)
Также вы можете вручную обновить билд Windows 10 (Feature Update). Например, вы хотите вручную обновить билд Windows 10 на своем компьютере с 20H2 (окончание поддержки 10 мая 2022) на 21H2.
Для этого перейдите на страницу https://www.microsoft.com/en-us/software-download/windows10 и нажмите кнопку Update Now.
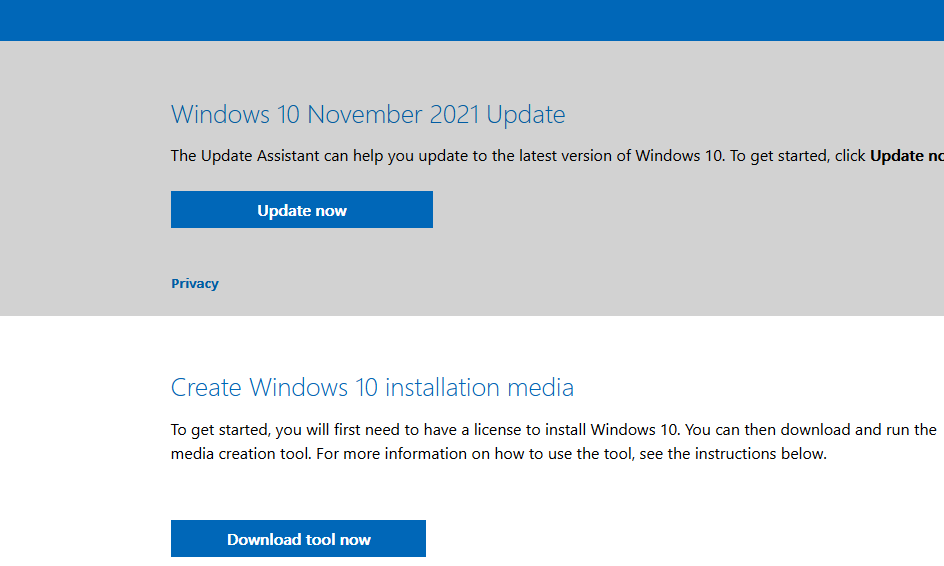
Скачайте и запустите файл Windows 10 Update Assistant (
Windows10Upgrade9252.exe)
.
Мастер предложит вам обновится до последней версии Windows 10 (Windows 10 November 2021 Update). Для такого обновления требуется подключение к интернету.
Чтобы выполнить оффлайн обновление билда Windows 10, сформируйте установочный ISO образ с новый билдом Windows 10 с помощью Media Citation Tool (позволяет создать iso образ или загрузочную флешку с Windows 10).
Затем смонтируйте ISO образ в виртуальный привод и запустите файл setup.exe. Следуйте шагам мастера обновления Windows. Подробнее это описано в статье про обновление билда Windows 10 из командной строки.