
Starting Windows is usually as easy as pressing a button and waiting for the operating system and startup programs to load. Sometimes you hit a snag and need a little more help to get things running correctly. That’s where troubleshooting options available through the Advanced Startup options menu come in. Each offers a different way to manage your startup or repair your computer.
What Are the Benefits of Advanced Startup?
The Advanced Startup menu gives you troubleshooting options to help you fix anything that’s gone wrong with your Windows installation. Once you get to it, you’re presented with a few options to help you solve problems.
- System Restore option: It lets you roll back Windows to an earlier time. To use it, you must have created restore points. These points are basically a snapshot of your computer and how it works at any given time. When you choose one, you’re restarting your computer as if it’s starting from that snapshot, albeit with the current date and time. It’s a great way to roll back unwanted system changes.
- System Recovery Image: It does something similar but with another kind of file. A system image file is something you have to manually create that preserves the files and settings of your computer. If your entire hard disk fails, you can use one of these files to restore everything on your computer to what it was when you saved the system image file.
- Startup Repair: It helps locate and fix issues that prevent the computer from completing the startup process and give you access to Windows. If you’re repeatedly seeing it shut down or freeze before it loads in, this is a great place to start trying to fix the problem.
- Command Prompt: This option lets you input commands as you would with a command prompt window on your desktop.
- Startup Settings: It acts as an advanced boot menu option. If you need to switch boot devices or behavior, try this. Restart the computer in Safe Mode before accessing the Advanced Startup menu if you don’t see it and need to access it.
These tools can be beneficial to anyone needing to troubleshoot their startup options in Windows. Because of their utility, there are multiple ways to gain access to them – even if you can’t sign into Windows itself.
What if I’m Entering Advanced Startup, but All the Options Aren’t Available?
You may have a problem in your system preventing it from showing the standard options. Try using the access method that involves bootable media or performing the steps in Safe Mode. Either of these might help you regain access to all the options you require.
Getting Into Advanced Startup
The way you reach advanced startup will vary depending on what computer issues you’re facing. It’s effortless to get to the menu if your computer works correctly. If it isn’t, you may have to work a little harder to get to those options.
From the Log-In Screen
You can restart the computer so that you can access the Advanced Startup when you turn it back on, even from the log-in screen. It’s the easiest way to reach the Advanced Startup menu.
- Press the Windows Key + X.
- Hover over Shut Down or Sign Out.
- Choose Sign Out to return to the Log In screen.

- Click the Power icon and hold down the Shift key.
- Click Restart.
- Wait for the computer to restart.
- Choose Troubleshoot.

- Choose Advanced Options.


You can now use any of those options to tweak, repair, or assess Windows as needed. If you aren’t able to sign into your account, this should still work.
From Windows Settings
If you’re in your account and Windows, you can also set it up so that the computer automatically goes into the Advanced Startup menu on its next restart.
- Press the Windows key + X.
- Choose Settings.
- Click Update and Security.
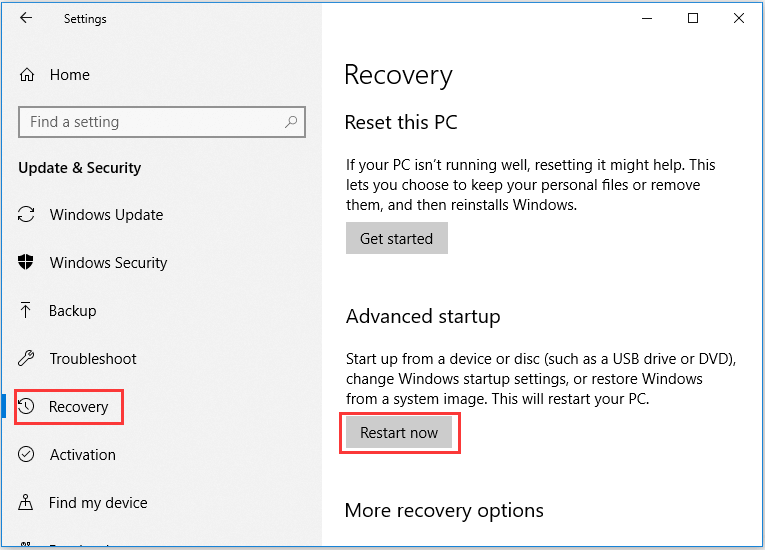
- Choose Recovery from the left pane.
- Click Restart Now under the Advanced Startup heading. Your computer will restart.
- Choose Troubleshoot.
- Choose Advanced Options.


It should only do this kind of restart once. You’ll have to repeat these steps every time you want to boot into Advanced Options in this way.
Using PowerShell
You can use an elevated PowerShell command window to shut down the computer and access the Advanced Startup menu.
- Press the Windows key + X.
- Choose the PowerShell (Admin) option.
- Click to confirm that you want to run it as an administrator.
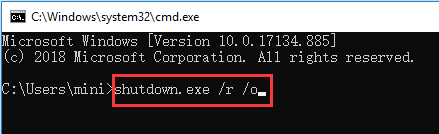
- Type “
shutdown.exe /r /o” without quotes.
- Press Enter.

Your computer will shut down and should restart in the desired menu.
Sign-On With Bootable Media
This method requires you to have bootable media for Windows. In this case, the bootable media is a copy of Windows on a drive or DVD that can install it on a new system or offer access to troubleshooting tools on one already running.
If you don’t already have a Windows start-up disc, here’s how you can make bootable media. Use a blank USB with at least 8 GB of space available.
- Put the blank drive you’re using into the computer where you’re making the media.
- Visit the Download Windows page for the OS you’re working on. Choose Download Tool Now.
- Select Run.
- Choose to Accept the license agreement.
- Choose Create Installation Media for Another PC.
- Click Next.
- Choose your options for Windows. You want the selections you choose to match your system.
- Choose the USB option.
- Follow the steps to create the drive. You’ll use this to access Windows Advanced Startup.


Once you have the USB drive with Windows on it, you can use it to get to the Advanced Startup options menu.
- Turn off the computer and put the USB into a free port.
- Turn the computer on and enter BIOS. You will have to press a key to enter it during the startup screen, which will vary depending on what kind of motherboard you’re using.
- Choose the USB as the boot device, and then save your changes and exit. The computer should restart and use the USB as the boot device.|
- Click Next.
- Choose Repair Your Computer.
- Click Troubleshoot, and then choose Advanced Options to access the menu.


From here, you can use any of the options available to you. Remember to go back into your BIOS and change the boot device to the drive with your typical Windows operating system next time you sign out.
Windows Automatic Access
Sometimes you might be presented with this menu and wonder how it happened. Windows will sometimes pull up the Advanced Startup menu to help users with repeated startup errors. You can also force this to happen by forcing your computer to hard shut down a few times with the power button on the case, but it’s not recommended except as a last resort.

If you see the screen after your computer has struggled with getting started, consider trying a few troubleshooting options to get the startup working right again.
-
Home
-
News
- 9 Ways to Access Advanced Startup/Boot Options Windows 10
By Alisa |
Last Updated
This post lists 9 ways to allow you access Advanced Startup/Boot Options in Windows 10. Open Windows 10 Advanced Options menu to use Startup Repair, System Restore, Reset this PC, System Image Recovery, Command Prompt tools or boot Windows 10 PC into Safe Mode to troubleshoot PC problems. MiniTool software helps you boot computer and recover lost data with ease.
Windows 10 offers the Advanced Startup Options (also known as Advance Boot Options Windows 10) feature to help users to troubleshoot many Windows 10 problems.
After you access Advanced Options Windows 10 menu, you can repair Windows 10 problems with the diagnostic and repair tools it offer. You can use the tools like Reset this PC, Startup Repair, System Restore, System Image Recovery, Command Prompt to diagnose and fix Windows 10 errors. You can also access Startup Settings from Windows 10 Advanced options to start Windows 10 in Safe Mode if your computer has problems to start.
There are many ways to access Advanced Options Windows 10. This post introduces 9 ways to you. Some ways lets you directly get into Windows 10 boot options menu when PC can start, while some others enable you to access Advanced Startup Options Windows 10 when PC/laptop won’t turn on.
Quick Video Guide:
Way 1. Access Advanced Startup Options Windows 10 from Settings
If your Windows 10 PC can boot, you can click Start -> Settings -> Update & Security -> Recovery, and click Restart now button under Advanced startup to access Advanced Startup Options window.
Way 2. Access Advanced Boot Options Windows 10 with Shift + Restart
Another easy way to access Advanced Options window is through Shift + Restart. You can click Start -> Power, press and hold Shift key on the keyboard and click Restart button. This will take you into the Advanced Startup Options menu in Windows 10.
Way 3. Access Advanced Options Windows 10 from Sign-in Screen
If you are in the sign-in screen, you can click Power button at the lower-right. Press and hold Shift and click Restart. This will also open Advanced Options dialog.
You can press Ctrl + Alt + Delete keys on the keyboard at the same time to open the Task Manager menu. Then click Power button, press and hold Shift key on the keyboard and click Restart button.
Way 5. Hit F11 to Access Advanced Startup Options Windows 10
For some computers, you can hit F11 key on the keyboard as soon as the computer powers on, and this can help you access Advanced Options menu in Windows 10.
Way 6. Access Windows 10 Boot Options with Command Prompt
You can also use Command Prompt to access the Advanced Startup Options in Windows 10.
- Press Windows + R keys on the keyboard, and type cmd in Windows Run. Press Ctrl + Shift + Enter key to run Command Prompt as administrator.
- You can then type this command line: shutdown. exe /r /o, and hit Enter.
- Click Close when you see You’re about to be signed out. And after a while, your Windows 10 computer will restart into Windows 10 recovery mode and enter Advanced Options window.
Way 7. Turn Off and On Windows 10 PC 3 Times to Access Advanced Options
This way and the following two ways below helps you access Advanced Startup Options Windows 10 when your PC can’t boot.
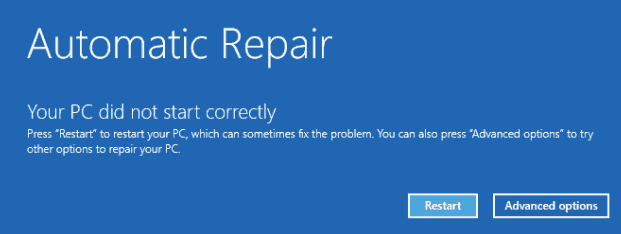
Press the Power button on your computer to start your computer. When you see the Windows logo during booting, immediately press the Power button again to shut down the computer. Repeat the power-on and power-off operation 3 times. In the third restart, your computer should enter into Windows Recovery Environment (WinRE).
After you select your account and input the account password, you can see the Automatic Repair Window, you can click Advanced options button to get to Windows 10 Advanced boot options Window.
Way 8. Access Windows 10 Advanced Options with Recovery Drive/Disk
- If the above ways fail to get you into Advanced Options window, you can create a Windows 10 repair/recovery disk or USB drive to boot your Windows 10 PC and enter into Windows 10 recovery mode.
- Insert the Windows 10 recovery USB drive or DVD disc to your computer USB port, and boot Windows 10 computer from the Windows 10 recovery drive/disk.
- Then choose a keyboard layout and Windows 10 Advanced Boot Options window will auto open up.
Way 9. Get to Advanced Options Windows 10 with Installation Disc/Drive
If you have a Windows 10 installation disc or USB drive, you can access Windows 10 Advanced Options menu thought installation media.
- Plug in the Windows 10 installation CD/DVD disc or USB flash drive to your computer, and boot the computer from the inserted DVD disc or USB drive in BIOS.
- After you enter into Windows Setup screen, choose computer language and other preferences and click Next.
- Next click Repair your computer. Advanced Startup Options window will open.
Use Advanced Options on Windows 10 to Repair Windows 10 Issues
By using the 9 ways above, you can easily enter into Advanced Options screen in Windows 10. You can then use the tools in it to troubleshoot and fix your Windows 10 computer problems. You can reset your Windows 10 PC to factory status, perform a system restore to go back to a previous healthy point, boot your computer to Safe Mode, use startup repair to fix Windows 10 startup problems, boot to Command Prompt in Windows 10, etc.
About The Author
Position: Columnist
Alisa is a professional English editor with 4-year experience. She loves writing and focuses on sharing detailed solutions and thoughts for computer problems, data recovery & backup, digital gadgets, tech news, etc. Through her articles, users can always easily get related problems solved and find what they want. In spare time, she likes basketball, badminton, tennis, cycling, running, and singing. She is very funny and energetic in life, and always brings friends lots of laughs.
Procedures and Steps – Go to Advanced Startup Options In Windows 10. – Are you trying to enter Advanced Startup so that you could repair your latest Windows operating system? When you need to either of Reset, Refresh, Run a diagnostic tool, Startup repair, accessibility of Advanced Startup screen is essential. The options are found under WinRE.
Windows 10 includes entire menus regarding repairing on a single platform named Advanced Startup option. The options allow you to handle the operations as entering UEFI Firmware Settings, Automatic repair, Go to previous Build. A few more are Troubleshoot, Use a USB or DVD device for booting or repairing, and Turn off PC. But the question is to go to Advanced Startup Options In Windows 10 so that could get the help of these menus.
Go to Advanced Startup Options In Windows 10
You will find 10 Different methods out of these few are useful for beginners and remaining are for experienced Windows 10 users. If you are a beginner then you can use the way 1, 5, 8, and 10 but tech proficient users can follow 2, 3, 4, and 9.
Way 1 – Instantly Go to Advanced Startup Options
When you don’t want to enter into the technicalities of the Setting and tools of Windows 10, this way is useful for you. Simply reboot of Windows 10 PC and implementation of shift key will fulfill your need.
Step 1 – Click on Start button on the utmost left of the taskbar to open the Start menu.
Step 2 – Click on the Power icon and select Restart at the Start menu. As the computer initiate restarting, constantly Press the Shift key on your keyboard. When the PC restarts you notice you are into the Advanced Options screen.
Step 2 – Select Troubleshoot and let the next screen Come.
You will experience the Advanced Startup Options automatically before you.
Way 2 – Advanced Startup Options Windows 10 From Update & Security Settings
This is a conventional way to enter Advanced Startup Options In Windows 10, most of the users follow. You need to open Settings program and pass through the Update & Security section to reach the screen.
Step 1 – Click Win+I and select the last section Update & Security.
Step 2 – Select Recovery in the left pane and allow the right pane to load. You will find 3 sections in the right pane.
Step 3 – Locate Advanced Startup in the lowest part and select Restart now.
Step 4 – Once the Options screen turns out, choose Troubleshoot.
Way 3 – Advanced Startup Options Win 10 Using Command Prompt
If you want to go to advanced boot options from command prompt this is a pretty easy method. When you execute Advanced boot options command you directly reach the screen you are looking for.
Step 1 – Press Start button and type cmd. Right click on the Command prompt at the top and select Run as administrator.
Step 2 – When UAC pop up turns up on the screen select Yes.
Step 3 – Copy shutdown.exe /r /o, paste into the command prompt and press Enter.
Way 4 – Advanced Startup with With PowerShell
If you use PowerShell then you can enable advanced startup options quite simply. The command you execute in the Command prompt works perfectly for the PowerShell when you open Advanced boot options.
Step 1 – Press Start, type powershell, right click on the Windows PowerShell under Best match, and choose Run as administrator.
Step 2 – Type shutdown.exe /r /o, in Windows PowerShell and press Enter key.
Way 5 – Via Power User Menu
You have the privilege to get into Advanced startup options screen using Power user menu in straightway in only 2 clicks.
Step 1 – Right click on Start button and hover on Shut down and sign out. Select Restart and press and hold Shift button simultaneously. Keep hold on the Shift until your Computer restarts
Way 6 – Go to Advanced Startup Options in Windows 10
Using Recovery Drive
If you are encountering a severe malfunction and can’t boot your desktop then you need to put Installation Media or recovery Drive into action. You will bring about Advanced Startup Options In Windows 10 directly exclusively in only 2 steps only with this procedure.
Step 1 – Insert the Recovery Drive into the CD Drive or USB port and boot.
Step 2 – Once you see Keyboard layout language, select the proper one.
Way 7 – Advanced Startup Options with Repair your Computer In Windows 10
When you boot a machine powered Windows 10 with the assistance of the DVD or USB rendered by Microsoft you have a chance to bring Advanced Startup Options. Repair your computer Setup dialog helps you to do the same.
Step 1 – Put your Installation media into either CD-ROM or USB Port and start your PC. Start your PC after you have inserted the system media files.
Step 2 – Select correct language preference and click Next.
Step 3 – When the Setup dialog comes to view, select Repair your computer.
Way 8 – Hard Reboot
You can open the recovery environment without entering your operating system. Hard Reboot ts the technique that allows starting your Windows 10 into Advanced options by rebooting repeatedly
Step 1 – Long press the Power button of your Windows 10 PC and force shut down.
Step 2 – Again press and hold down the Power button of the PC and let it reboot. Repeat the same action. frequently and wait till you see Windows logo (Usually, it appears after3rd attempt).
Way 9 – From Ctrl+Alt+Del Screen
Soft reboot is the procedure that you can employ for entering Advanced Startup Options In Windows 10.
Step 1 – Press Alt, Ctrl, and Delete by and large on your keyboard.
Step 2 – Click on the Power icon, Select Restart on the screen, and long Press Shift continuously until the bootup.
Way 10 – From Sign in Screen
In addition, Sign in screen includes power tools that allow you to get into the recovery environment.
Step 1 – In the lowest right corner of the screen click the Power shaped icon and Select Restart. Finally, keep a hold on the Shift key on your keyboard and wait for the computer to reboot.
Conclusion
So above are the procedures and steps to go to Advanced Startup Options In Windows 10. Here you should note that the manufacturers provided BIOS never works in this concern. Using these ways, you will effectively enter the Advanced Startup, whether your own HP, Dell, Toshiba, Sony, Acer, HCL, and others.
Содержание
- [Личный опыт]: Починяем потерявшуюся загрузку по F8 в Windows 7
- Восстановление загрузчика windows 7 своими руками
- 1 Восстановление загрузчика windows 7
- Choose advanced options for windows setup что делать
- Advanced startup options (including safe mode)
- Repair Your Computer
- Safe Mode
- Восстановление Windows 7 после системных ошибок
- Восстановление Windows 7
- Использование инструментов восстановления Windows 7
[Личный опыт]: Починяем потерявшуюся загрузку по F8 в Windows 7
Disclaimer: не ждите откровений. У меня возникла проблема, решение не смог ни нагуглить, ни нахабрить — пришлось решать самому. Кому-то из гуру может показаться очевидным, кому-то может пригодиться.
Недавно возникла задача перегрузить компьютер с Win7 в Safe Mode. Все как обычно: Restart, список вариантов загрузки, F8… и ничего! Нажатие F8 вместо отображения меню с вариантами Safe Mode и прочими твиками просто загружает Windows обычным способом. Непорядок!
Коллективный разум через Google Search подсказал, что можно загрузиться в Safe Mode через MSConfig.exe: запускаем, переходим во вкладку Boot, выбираем нужный вариант загрузки и ставим галку напротив Safe Mode. Пробуем — работает! Заканчиваем дела в Safe Mode (вычищаем недопроапгрейдившийся Outpost), запускаем MSConfig снова, снимаем галку Safe Mode и возвращаемся к нормальной жизни.
А почему это advancedoptions = No? Правим: bcdedit.exe /set advancedoptions 1, перегружаемся — попадаем в Advanced Boot Options! Ура? Перегружаемся еще раз — снова попадаем в Advanced Boot Options!
Получается, или они всегда недоступны, или всегда показываются при загрузке — совсем не то, что нужно. Чтение справки bcdedit выявило еще один вариант: bcdedit.exe /deletevalue advancedoptions убирает форсированное включение/отключение Advanced Boot Options и позволяет пользователю выбирать — это оно!
Возможно, кому-то еще пригодится, если вдруг заметите, что F8 не срабатывает. Или, как защита от шаловливых ручек юзеров (в XP таки приходилось патчить ntldr). Должно точно так же работать в Vista, но не проверял. Интересно, какие еще фокусы можно творить с виндовым бутлоадером?
Источник
Здравствуйте дорогие читатели. Как известно в операционной системе Windows 7 существует полезная функция восстановления системы. Запустить её вы можете после загрузки с диска установочным Windows 7.
Восстановление системы хотя и не справится со всеми всевозможными проблемами, но основную часть из них решает автоматически.

1 Восстановление загрузчика windows 7
Но как быть, когда точка восстановления не помогает а загрузка невозможна даже из под безопасного режима? Как выполнить восстановление загрузчика Windows 7? Вариантов несколько, начнем с восстановление системы Windows 7 — стандартными средствами.
В этом случае нам понадобится установочный диск (дистрибутив) Windows 7. Вставляем его в привод и загружаемся из под него. надеюсь вы помните, что для того чтобы загрузится с диска, необходимо выставить загрузку с диска через BIOS. На всякий случаю дам вам ссылку с описанием данной процедуры .
Далее. После того как загрузились с диска, появится окошко менеджера загрузки — выбираем [Windows Setup EMS Enabled].

Выбираем раскладку клавиатуры и ожидаем загрузки System Recovery Options.

Выбираем Startup Repair. После чего начнется анализ и устранение найденных ошибок Windows.

По идеи все автоматически будет исправлено. Если восстановление загрузчика Windows 7 не произойдет, то появится сообщение — Startup Repair could not detect a problem. Которое означает, что проблемы не были найдены.

В этом случае пойдем более проверенным способом — восстановление загрузчика Windows 7 через командную строку.
Снова загружаемся с диска, доходим до выбора операционной системы, выбираем её установив значение — Use recovery tools that can help fix problems starting Windows нажимаем next. Затем когда дойдет до окошка System Recovery Options выбираем командную строку — Command Prompt.

вводим в командной строке
bootsect /nt60 All
Если ввели правильно, то появится что-то вроде:

Нажимаем exit –> Enter
Вас должно перекинуть на System Recovery Options где мы выбираем Restart
Все. Система восстановлена.
После выполнения процедуры восстановление загрузчика Windows 7. Войдите в Windows и сделайте точку восстановления через Acronis, которую необходимо будет записать на жесткий диск. Таким образом вы сможете восстановить Windows 7 при возникновении любой непредвиденной проблемы. Читать подробней о восстановлении данных Acronis . Напоследок публикую 6-й тур по разгадыванию кроссвордов.
НАЧАТЬ РАЗГАДЫВАТЬ
Так к примеру Dimson который совсем недавно подключился к участию в турнире в прошлый раз показал отличный результат. Обогнал всех и получил 10 баллов — что тут скажешь, парень молоток. Желаю ему успехов в дальнейшем.
Источник
Опишу всё по порядку.
*** STOP: 0x0000007B (0xF78D2524, 0xC0000034, 0x00000000, 0x00000000)
(тут идёт сплошной текст, что-то про ошибки, их повтор и обращение к производителю)
Info: An unexpected I/O error has occurred.
Теперь картина такая:
Enable Boot Logging
Enable low-resolution video (640×480)
Last Know Good Configuration (advanced)
Directory Services Restore Mofe
Debugging Mode
Disable automatic restart on system failure
Disable Driver Signature Enforcement
Start Windows Normaly
Выбираю Safe Mode, он начинает загружать драйвера, но останавливается на строке «Loaded: windowssystem32DRIVERSdisk.sys», а снизу в наглую написано: «Please wait. «. Лампочка обращения к винчестеру горит, изредка помигивая (мне порой кажется, она издевается). Комп выключается опять через удержание кнопки включения.
Choose an operating system to start, or press TAB to select a tool:
(Use the arrow keys to hightlight your choice, then press ENTER.)
Windows Setup [EMS Enable]
To specify an advanced option for this choice, press F8.
Windows Memory Diagnostic
ENTER= Choose TAB=Menu ESC=Cancel
Ну выбираю Windows Setup [EMS Enable]. Снова идёт Windows is loading files. с заполнением белой горизонтальной шкалой, Starting Windows (ну же!), и. чёрный экран даже без мигающего тире. Диод снова горит, изредка циклично помигивая (я начинаю понимать, что он точно издевается), и комп вырубается только через удержание кнопки включения.
Всё как обычно: синий экран, сверху слева написано «Установка Windows», снизу идёт загрузка файлов. Я спокоен. Но напрасно. Снова синий экран, про который я описывал вначале (*** STOP: 0x0000007B (0xF78D2524, 0xC0000034, 0x00000000, 0x00000000)). Плюс ко всему кулер начинает сильно напрягаться. Компьютер выключается теперь с одного нажатия кнопки включения.
. помогите
Источник
Advanced startup options (including safe mode)
The Advanced Boot Options screen lets you start Windows in advanced troubleshooting modes. You can access the menu by turning on your computer and pressing the F8 key before Windows starts.
Some options, such as safe mode, start Windows in a limited state, where only the bare essentials are started. If a problem doesn’t reappear when you start in safe mode, you can eliminate the default settings and basic device drivers and services as possible causes. Other options start Windows with advanced features intended for use by system administrators and IT professionals. For more information, go to the Microsoft website for IT professionals.
Repair Your Computer
Shows a list of system recovery tools you can use to repair startup problems, run diagnostics, or restore your system. This option is available only if the tools are installed on your computer’s hard disk. If you have a Windows installation disc, the system recovery tools are located on that disc.
Safe Mode
Starts Windows with a minimal set of drivers and services.
To start in safe mode:
Do one of the following:
If your computer has a single operating system installed, press and hold the F8 key as your computer restarts. You need to press F8 before the Windows logo appears. If the Windows logo appears, you’ll need to try again by waiting until the Windows logon prompt appears, and then shutting down and restarting your computer.
If your computer has more than one operating system, use the arrow keys to highlight the operating system you want to start in safe mode, and then press F8.
On the Advanced Boot Options screen, use the arrow keys to highlight the safe mode option you want, and then press Enter.
Log on to your computer with a user account that has administrator rights.
Safe Mode with Networking. Starts Windows in safe mode and includes the network drivers and services needed to access the Internet or other computers on your network.
Safe Mode with Command Prompt. Starts Windows in safe mode with a command prompt window instead of the usual Windows interface. This option is intended for IT professionals and administrators.
Enable Boot Logging. Creates a file, ntbtlog.txt, that lists all the drivers that are installed during startup and that might be useful for advanced troubleshooting.
Enable low-resolution video (640×480). Starts Windows using your current video driver and using low resolution and refresh rate settings. You can use this mode to reset your display settings. For more information, see Change your screen resolution.
Last Known Good Configuration (advanced). Starts Windows with the last registry and driver configuration that worked successfully.
Directory Services Restore Mode. Starts Windows domain controller running Active Directory so that the directory service can be restored. This option is intended for IT professionals and administrators.
Debugging Mode. Starts Windows in an advanced troubleshooting mode intended for IT professionals and system administrators.
Disable automatic restart on system failure. Prevents Windows from automatically restarting if an error causes Windows to fail. Choose this option only if Windows is stuck in a loop where Windows fails, attempts to restart, and fails again repeatedly.
Disable Driver Signature Enforcement. Allows drivers containing improper signatures to be installed.
Start Windows Normally. Starts Windows in its normal mode.
Источник
Восстановление Windows 7 после системных ошибок
Если Windows 7 не может нормально загрузиться, она попробует провести восстановление системы и отобразит диалоговое окно Windows Error Recovery. В системе, на которой не установлены файлы Startup Repair, диалоговое окно Windows Error Recovery выглядит так, как показано на рисунке ниже. Для восстановления своего компьютера, вы можете использовать установочный диск Windows или диск восстановления Windows. В системе с установленными файлами Startup Repair, если ваша система не может загрузиться, в диалоговом окне «Windows Error Recovery» отображаются параметры, показанные на следующем рисунке.
Восстановление Windows 7
Если работа системы не была завершена должным образом (например, для выключения вы использовали кнопку питания), Windows Error Recovery предлагает параметры Safe Mode, Last Known Good Configuration (advanced) или Start Windows Normally.
Предложение, для восстановления ОС Windows, использовать установочный диск или диск восстановления.
Если файлы восстановления при загрузке в системе недоступны и она не может загрузиться, Windows 7 отображает этот тип сообщения. Для выделения нужного параметра, используйте клавиши стрелка вверх и стрелка вниз.
Если файлы Startup Repair доступны в не запускающейся системе, Windows 7 отображает этот тип сообщения. Предложение нажать клавишу Enter для использования выбранной опции запуска. Для выделения нужного параметра, используйте клавиши стрелка вверх и стрелка вниз.
Если вы подозреваете, что Windows работает не так хорошо, как это возможно, но Windows 7 не запускает Windows Error Recovery, вы все равно можете выбрать один из этих и других параметров, нажав при запуске, пока не появится меню расширенных параметров загрузки клавишу F8.
Меню дополнительных вариантов загрузки Windows 7. Предложение нажать клавишу Enter для использования выбранной опции запуска. Для выделения нужного параметра, используйте клавиши стрелка вверх и стрелка вниз.
Использование инструментов восстановления Windows 7
Доступ к инструментам восстановления Windows 7 возможен разными способами. В таблице ниже приведена краткая ссылка на эти инструменты и способы доступа к ним.
Средства восстановления системы для Windows 7
Источник
Как зайти в BIOS или UEFI, изменить приоритет загрузочных устройств, режимы работы SATA контроллера (AHCI и IDE), загрузка с помощью Boot Menu для установки Windows.
В прошлой статье мы говорили о том как сделать загрузочный диск или флешку. А сейчас я расскажу вам как настроить BIOS компьютера для установки Windows с диска или флешки.
Содержание
Содержание
- 1. Что такое BIOS и UEFI
- 2. Как войти в BIOS Setup
- 3. Основы работы в Setup
- 3.1. Клавиши управления
- 3.2. Сохранение настроек
- 3.3. Отмена настроек
- 3.4. Восстановление настроек
- 4. Варианты загрузки
- 5. Настройка BIOS
- 5.1. Изменение приоритета загрузки
- 5.2. Режим работы SATA контроллера
- 6. Загрузка с помощью «Boot Menu»
- 7. Проблемы с загрузкой
- 8. Ссылки
1. Что такое BIOS и UEFI
Каждая материнская плата имеет специальную программу для загрузки компьютера и настройки параметров различных устройств. Эта программа прошита (запрограммирована) в специальную микросхему на материнской плате и поэтому называется прошивкой.
Раньше все материнские платы имели прошивку, называемую BIOS, которая имела простой графический интерфейс с белыми буквами на синем фоне и была ограничена в функционале. Например, в BIOS нельзя было использовать мышку, выбирать язык и отсутствовали какие либо графические элементы (картинки) в виду ограниченного объема микросхемы памяти BIOS. Также материнские платы с BIOS не поддерживали диски объемом более 2 Тб ввиду ограничений старой системы разметки дисков (MBR).
Сейчас многие материнские платы имеют новый тип прошивки, называемый UEFI, которая отличается улучшенным графическим интерфейсом с использованием красивого фона, рисованных кнопок, возможностью выбора языка (включая русский) и некоторыми улучшениями. Например, поддержкой нового типа разделов дисков (GPT), позволяющей использовать жесткие диски объемом более 2 Тб.
Какой тип прошивки имеет ваша материнская плата можно узнать в руководстве к ней, на сайте производителя материнской платы или ноутбука, а также визуально при входе в программу настройки Setup. Программа Setup также прошита в материнскую плату и используется для изменения настроек BIOS или UEFI.
2. Как войти в BIOS Setup
Для входа в программу Setup нужно сразу после включения компьютера зажать кнопку «Delete» на клавиатуре. На некоторых материнских платах и ноутбуках для этого используются клавиши «F2», «F10» или «Esc». Какую именно кнопку нажимать можно прочитать в сообщениях, появляющихся сразу после включения компьютера.
В текстовом виде
")
В графическом виде
")
Если вы не успеваете прочитать, то нажмите кнопку «Pause» на клавиатуре для приостановки загрузки. Продолжить загрузку можно нажатием любой клавиши. Если вы нажмете клавишу, предназначенную для входа в Setup, то сразу же попадете в программу настройки материнской платы.
Классический BIOS

Интерфейс UEFI

3. Основы работы в Setup
3.1. Клавиши управления
Программа Setup представляет из себя набор различных параметров, сгруппированных на отдельных вкладках, в зависимости от назначения. Справа или внизу будет описание клавиш, с помощью которых производятся все действия.

Для перехода между вкладками обычно используются стрелочки «вправо», «влево» на клавиатуре. Для перехода между строками внутри одной вкладки используются стрелочки «вниз», «вверх».

Для смены значений необходимо перейти с помощью стрелочек на требуемое поле, нажать клавишу «Enter», а затем с помощью стрелочек выбрать новое значение из выпадающего меню. Для этого также могут используются клавиши «+», «-» или «Page Up», «Page Down».
Для возврата на уровень вверх или к предыдущей странице нажимайте клавишу «Esc». Клавиша «Esc» на одной из главных вкладок будет означать выход из BIOS без сохранения настроек, который нужно будет подтвердить или отказаться от выхода.
В программе Setup с интерфейсом UEFI можно выполнять все действия с помощью мышки.
3.2. Сохранение настроек
Это очень важный момент. После совершения всех необходимых настроек перейдите на вкладку «Exit», выберете стрелочками пункт «Exit and Save Changes» («Выйти и Сохранить Изменения», порядок слов может быть разным), нажмите «Enter» и подтвердите сохранение настроек выбрав стрелочками «OK» или «Yes» и снова «Enter».
Сохранить настройки можно гораздо проще и быстрее нажав клавишу «F10» на клавиатуре и подтвердив свое решение. Эта клавиша работает во многих версиях BIOS, UEFI и часто указывается в подсказках (внизу или справа).
3.3. Отмена настроек
Если вы случайно что-то изменили или не уверены в правильности сделанных настроек, то прейдите на вкладку «Exit» и выберите «Exit and Discard Changes» («Выйти и Отменить Изменения») или нажимайте клавишу «Esc» до появления сообщения о выходе без изменения настроек и подтвердите действие («OK» или «Yes»).
3.4. Восстановление настроек
Для восстановления всех настроек в оптимальные значения по умолчанию прейдите на вкладку «Exit» и выберите «Load Setup Default» («Загрузить Настройки По умолчанию»). После этого можно сразу изменить другие настройки или просто выйти из BIOS с сохранением параметров («Exit and Save Changes» или «F10»).
4. Варианты загрузки
Вставьте загрузочный диск или флешку в компьютер, на который вы планируете устанавливать Windows. Теперь для того, чтобы начать установку Windows, нужно настроить BIOS (или UEFI) с помощью программы Setup на загрузку с диска или флешки. Также для этого можно использовать специальное загрузочное меню материнской платы (Boot Menu). Последний вариант проще и удобнее, но мы рассмотрим оба способа.
5. Настройка BIOS
5.1. Изменение приоритета загрузки
Перейдите на вкладку «Boot» или «Загрузка».

Установите ваш DVD-привод или флешку первым в порядке загрузочных устройств.

Если вы будете устанавливать Windows с диска, то первым пунктом выбирайте устройство типа «ATAPI CD-ROM», название с указанием производителя или модели привода. Например, «CDROM:PM-HL-DT-STDVD-RAM GH22NP» (это DVD-привод «LG»).
Если планируете устанавливать Windows с флешки, то первым выбирайте что-то типа «Removable Dev.» или название флешки с указанием производителя. Например, «USB: Patriot Memory» (это флешка «PATRIOT»).
Вторым должен стоять жесткий диск, который обозначается как «Hard Drive», «HDD» или интерфейс к которому он подключен, производитель и модель диска. Например, «SATA:3M-SAMSUNG HD502HJ» (это жесткий диск «Samsung» на 500 Гб с интерфейсом SATA).
Обратите внимание на то, что в разделе «Boot» могут быть и другие пункты, отвечающие за приоритет загрузки, типа «Hard Disk Drives» или «Removable Device Priority».

В них также нужно проверить, чтобы DVD-привод или флешка стояли на первом месте.

Если у вас два жестких диска, то выше должен стоять тот, на который вы устанавливаете систему. Но в таком случае я рекомендую один из дисков отключить, чтобы избежать путаницы и возможных ошибок в установке системы. Его можно будет подключить после установки.
В программе Setup с интерфейсом UEFI все делается аналогично. Ищите раздел «Boot» или «Загрузка», находите там ваш DVD-привод или флешку и поднимаете их в самый верх приоритета загрузки. Плюс для этого можно использовать мышку, что проще и удобнее.

Не забудьте сохранить настройки на вкладке «Exit», выбрав пункт «Exit and Save Changes» или нажав «F10».
5.2. Режим работы SATA контроллера
Это в принципе не так важно, но многих интересует этот вопрос, поэтому я решил его немного прояснить. SATA диски могут работать в режиме совместимости с более старыми IDE дисками и в более современном режиме AHCI. AHCI дает небольшой прирост производительности жесткого диска при множественном одновременном обращении к нему. Такой режим работы диска возникает в основном на серверах и для обычного домашнего компьютера практически бесполезен.
При настройке BIOS есть возможность выбрать режим работы SATA контроллера.

Эти настройки могут находиться в разных местах и несколько отличаться в названиях, но принцип везде один. Вам предлагается режим совместимости с IDE или новый режим AHCI.
")
В целом, режим совместимости с IDE рекомендуется использовать для Windows XP, так как изначально она не имеет SATA-драйверов и просто не увидит жесткий диск, что не позволит установить Windows. Драйвера можно встроить в установочный дистрибутив Windows, но смысла это не имеет, так как на скорость работы не повлияет, а проблем может добавить.
Для Windows 7 и старше рекомендуется использовать режим AHCI, так как в современных операционных системах есть необходимые драйвера. Также многие специалисты настоятельно рекомендуют включать AHCI для быстрых SSD-дисков.
6. Загрузка с помощью «Boot Menu»
Есть более простой и удобный способ загрузки с DVD-диска или флешки как для BIOS, так и для UEFI – загрузка с помощью «Boot Menu» («Меню Загрузки»).
Для вызова меню загрузки могут использоваться клавиши «F8», «F10», «F11», «F12» или «Esc». Их часто можно увидеть в подсказках на начальном экране загрузки компьютера. Еще эту информацию можно узнать из инструкции, на сайте производителя материнской платы или ноутбука, поиском в интернете или методом тыка.

Сразу после включения компьютера зажмите и удерживайте клавишу вызова «Boot Menu» до появления меню выбора загрузочного устройства.

С помощью стрелочек «вниз» и «вверх» перейдите на DVD-привод или флешку и нажмите «Enter».
Плюсы такого способа очевидны – не нужно копаться в BIOS, не нужно потом возвращать настройки BIOS обратно (хотя это не всегда обязательно) и достаточно вызвать это меню всего один раз, так как после начала установки Windows это уже не потребуется. Кроме того, использование «Boot Menu» не изменяет настройки BIOS или UEFI.
7. Проблемы с загрузкой
Друзья, в связи с тем, что у многих возникали проблемы с загрузкой при установке Windows и некоторые писали об этом в комментариях, я решил сделать отдельный раздел, где собрал известные мне способы решения этих проблем.
Выполняйте рекомендации по очереди, а не все сразу, чтобы определить в чем именно была проблема.
- Если загрузка компьютера останавливается в самом начале и просит нажать F1, после чего входит в BIOS, то у вас скорее всего либо села батарейка на материнке (может сбиваться время), проблемы с процессорным кулером (вышел из строя, ни туда подключили) или жестким диском (ошибки в SMART).
- Если при включение ПК появляется сообщение «Reboot and Select proper Boot device or Insert Boot Media in selected Boot device and press a key» это значит, что загрузочная область на диске или флешке не найдена или повреждена. Попробуйте загрузиться с установочного диска или флешки с помощью Boot Menu (раздел 6 статьи), если не поможет сделайте загрузочный носитель заново с помощью утилиты «Windows USB/DVD Download Tool».
- Если после перезагрузки компьютера установка Windows начитается сначала, то выньте загрузочный диск или флешку и перезагрузите компьютер, установка должна будет продолжиться с жесткого диска.
- Отключите от компьютера все лишние USB-устройства (флешку, 3G-модем, смартфон, принтер). Оставить нужно только мышку, клавиатуру, DVD-диск или флешку, с которых вы производите установку Windows.
- Если у вас несколько жестких дисков, то отключите от материнской платы все диски, кроме того на который будет производиться установка Windows.
- Сбросьте настройки BIOS по умолчанию (описано в этой статье).
- Если установщик не видит диск или в конце появляется ошибка 0x0000007B измените в BIOS режим SATA контроллера с AHCI на IDE или обратно.
- Если при каждой загрузке компьютер или ноутбук сам входит в BIOS или открывает меню загрузки, то установите в BIOS опцию Boot Pop Menu в состояние Disable/Выключено (если есть).
- Отключите Fast Boot в разделе Advanced в BIOS, а в разделе Boot установите опцию Launch CSM в состояние Enable/Включено (если есть).
- В разделе Boot в BIOS измените режим загрузки с EFI (UEFI) на Legacy (если есть).
- Установите в BIOS опцию Secure Boot в состояние Disable/Выключено (если есть).
- Выберите в BIOS версию устанавливаемой Windows (если есть).
- Если у вас ноутбук, одна версия Windows устанавливается, а другая нет и вам не помогли советы по настройке BIOS, то обратитесь в поддержку или на форум производителя. Также может помочь обновление BIOS, после которого в нем могут появиться дополнительные опции (п.8-12).
- При возможности устанавливайте Windows с DVD-диска, так как с флешками бывает множество различных проблем.
- Делайте загрузочный диск или флешку из оригинального образа.
- Вставляйте флешку в разъем USB 2.0 на задней панели компьютера (материнской платы) или разъем USB 2.0 ноутбука. Загрузка с разъема USB 3.0 работает не всегда.
- Попробуйте воспользоваться Boot Menu, как описано в п.6 этой статьи. Этот способ проще, надежней чем настройка приоритета загрузки в BIOS и вы сможете определить видит ли компьютер вашу флешку.
- Нижнее подчеркивание на черном экране говорит о том, что компьютер зависает в момент обращения к флешке или к жесткому диску. Если без флешки загрузка идет дальше, то дело точно в ней.
- Если компьютер не видит флешку или не хочет с нее загружаться, используйте для установки DVD-диск или другую флешку.
- Если такой возможности нет, то измените тип флешки со «съемный носитель» на «жесткий диск» с помощью утилиты «BootIt Next Generation», отформатируйте ее утилитой «HP USB Disk Storage Format Tool» и сделайте заново загрузочной с помощью «Windows USB/DVD Download Tool». Все эти утилиты вы можете скачать ниже в разделе «Ссылки».
- Если проблема возникает уже после выбора раздела установки Windows, то воспользуйтесь советами по настройке BIOS (п.7-12). Удалите при установке старые разделы с диска или сделайте это с помощью загрузочного диска Acronis Disk Director.
- Если установщик сообщает, что не может установить Windows на диск, то попробуйте выполнить конвертацию MBR в GPT или обратно.
Напоминаю, что для выхода из BIOS с сохранением настроек используется клавиша F10.
8. Ссылки
По ссылкам ниже вы можете скачать все необходимые утилиты, для решения проблем с флешкой.
В следующих статьях мы рассмотрим как установить Windows 7, Windows 8.1 и Windows 10.
6 Methods for accessing the ASO Boot Menu in Windows 11, 10, or 8
Updated on March 13, 2023
What to Know
- Hold down SHIFT while restarting, or go to Settings > Update & Security > Recovery > Restart now.
- If Windows does not start, boot from your Windows installation media or a recovery drive.
- To boot directly into ASO, choose the boot option for System Recovery, Advanced Startup, Recovery, etc.
This article explains how to access the Advanced Startup Options in Windows 11, 10, or 8.
What Are Advanced Startup Options in Windows?
The Advanced Startup Options (ASO) menu, available in Windows 11, Windows 10, and Windows 8, is the central fix-it location for the entire operating system.
From here you can access Windows diagnostic and repair tools like Reset This PC, System Restore, Command Prompt, Startup Repair, and much more.
It’s also where you access Startup Settings, the menu that includes Safe Mode, among other startup methods that could help you access Windows if it’s having problems starting. In other words, Advanced Startup Options functions as the Windows 11/10/8 boot menu.
How Do I Access Windows Advanced Startup Options?
This menu should appear automatically after two consecutive startup errors. However, if you need to open it manually, there are six different ways to do so.
The best way to decide which method to use is to base your decision on what level of access you have to Windows right now:
- If Windows starts normally: Use any method, but 1, 2, or 3 will be easiest.
- If Windows does not start: Use methods 4, 5, or 6. Method 1 will also work if you can at least get to the Windows logon screen.
Time Required: Accessing ASO is easy and can take anywhere from a few seconds to a few minutes, depending on which method you use.
All of these means of getting to the Advanced Startup Options menu work equally well in any edition of Windows 11, Windows 10, Windows 8, or Windows 8.1 unless noted otherwise.
Method 1: SHIFT + Restart
This is by far the easiest way to get this done. Just hold down either SHIFT key while selecting Restart, available from any power icon.
Power icons are available throughout Windows, as well as from the sign-in/lock screen.
All you do now is wait while the Advanced Startup Options menu opens!
This method doesn’t seem to work with the on-screen keyboard. You’ll need to have a physical keyboard connected to your computer or device to open it this way.
Method 2: Settings Menu
-
In Windows 11, right-click the Start button and choose Settings.
In Windows 10, select the Start button, and then choose the settings button followed by Update & Security.
In Windows 8, swipe from the right to open the charms bar. Select Change PC settings. Choose Update and recovery from the list on the left (or General prior to Windows 8.1).
-
Choose Recovery from the list of options.
-
In the Advanced startup section, select Restart now.
-
Wait through the Please wait message until Advanced Startup Options opens.
Method 3: Shutdown Command
-
Open Command Prompt.
Another option is to open Run (use the WIN+R keyboard shortcut) if you can’t get Command Prompt started for some reason, probably related to the issue you’re having that has you here in the first place!
-
Save any open files before continuing or you’ll lose any changes you’ve made since your last save.
-
Execute the shutdown command in the following way:
shutdown /r /oTo cancel the shutdown command once executed (like if you forgot to save your work!) execute shutdown /a in the same Command Prompt window.
-
Select Close to the signoff warning message that appears a few seconds later.
-
After several seconds, during which nothing seems to be happening, Windows will then close and you’ll see a Please wait message.
-
Wait just a few seconds more until the Advanced Startup Options menu opens.
Method 4: Boot From Your Windows Installation Media
-
Insert into your computer a Windows 11, Windows 10, or Windows 8 DVD or a flash drive with the Windows installation files on it.
You can borrow someone else’s disc (or other media) if you need to. You’re not installing or reinstalling Windows, you’re just accessing Advanced Startup Options—no product key or license breaking required.
-
Boot from the disc or boot from the USB device, whatever your situation calls for.
-
Select Next from the Windows Setup screen.
-
Choose Repair your computer at the bottom of the window.
-
Advanced Startup Options will start, almost immediately.
Method 5: Boot From a Windows 11/10/8 Recovery Drive
-
Insert your Windows 11, Windows 10, or Windows 8 Recovery Drive into a free USB port.
Don’t worry if you weren’t proactive and never got around to creating a Recovery Drive. If you or a friend has a computer with the same version of Windows, see How to Create a Windows Recovery Drive for instructions.
-
Boot your computer from the flash drive.
-
On the Choose your keyboard layout screen, select U.S. or whatever keyboard layout you’d like to use.
-
Advanced Startup Options will begin instantly.
Method 6: Boot Directly to Advanced Startup Options
-
Start or restart your computer or device.
-
Choose the boot option for System Recovery, Advanced Startup, Recovery, etc.
On some Windows 11/10/8 computers, for example, pressing F11 starts System Recovery.
What this option is called is configurable by your hardware maker, so the options mentioned here are just some that we’ve seen or heard. Whatever the name, it should be clear that what you’re about to do is a boot to the advanced recovery features included in Windows.
The ability to boot directly to Advanced Startup Options isn’t one that’s available with a traditional BIOS. Your computer will need to support UEFI and then also be configured properly to boot directly to the ASO menu. Fortunately, this is very common these days.
-
Wait for Advanced Startup Options to begin.
What About F8 and SHIFT+F8?
Neither F8 nor SHIFT+F8 is a reliable option for booting to the Advanced Startup Options menu. See our guide on how to start Windows in Safe Mode for more on this.
If you need to access Advanced Startup Options, you can do so with any of the several methods listed above.
How to Exit Advanced Startup Options
Whenever you’re finished using the ASO menu, you can choose Continue to restart your computer. Assuming it’s working properly now, this will boot you back into Windows.
Your other option is Turn off your PC, which will do just that.
FAQ
-
Press the Windows key + X and then select Run to open the Run window, or press the Windows key + R to open the Run window immediately. Type in «msconfig» and select OK to run MSConfig. Select the Boot tab, then choose the OS type you want to set as the new default and select Set as default > Apply > OK.
-
Press the Windows key + R to open the Run window, then type in «msconfig» and press Enter. Select the Boot tab, choose the item you want to remove, then select Delete.
-
You’ll need to access your computer’s BIOS, which you can do by pressing the correct key on your keyboard multiple times as Windows is starting up. Depending on the manufacturer this could be F12, F2, Esc, or Delete. Then select your desired boot device from the list.
Thanks for letting us know!
Get the Latest Tech News Delivered Every Day
Subscribe